Tag Archives: Azure AD

Using the Azure Run As Account in Azure Automation to Connect to Azure AD with a Service Principal

If you are using Azure Automation and working with Runbooks for automating against your Azure subscription, you can create an Azure Run As Account for authenticating and logging in to your subscription. The Azure Run As Account is configured in your Automation Account, and will do the following:

  • Creates an Azure AD application with a self-signed certificate, creates a service principal account for the application in Azure AD, and assigns the Contributor role for the account in your current subscription.
  • Creates an Automation certificate asset named AzureRunAsCertificate in the specified Automation account. The certificate asset holds the certificate private key that’s used by the Azure AD application.
  • Creates an Automation connection asset named AzureRunAsConnection in the specified Automation account. The connection asset holds the applicationId, tenantId, subscriptionId, and certificate thumbprint.

You can read more about setting up Azure Run As Accounts here, including how to do a more customized setup with PowerShell: https://docs.microsoft.com/en-us/azure/automation/automation-create-runas-account.

Something worth noting is that this Azure Run As Account will by default have the Contributor role to your entire subscription, so it would make sense to look into changing RBAC settings for the subcription or resource groups if you want to limit that. Also, all users that have access to the Automation Account will also have the opprotunity to use this Azure Run As Account.

Having said that, the Azure Run As Account is a great way to authenticate securely with certificates and a service principal name without needing to store a username and password in a credential object.

So I thought, wouldn’t it be great if we could use this same Azure Run As Account to log in to your Azure AD tenant for the possibility to run Azure AD PowerShell commands? The reason I thought of this is because of this article showing how to authenticate with Azure AD v2 PowerShell and Service Principal: https://docs.microsoft.com/en-us/powershell/azure/active-directory/signing-in-service-principal?view=azureadps-2.0. In this short blog post will show you how to do this.

Getting the Azure Run As Account details

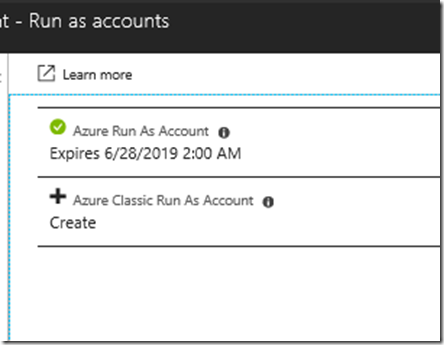
First, look into your Automation Account and Account Settings to find any Run as accounts:

image

Click on the Azure Run As Account to see the details (or to create one if you haven’t before). Take a note of the Service Principal Object Id, we will use that later:

image

Creating a Runbook that Authenticates with Service Principal to Azure AD

Now, let’s create a PowerShell runbook using the Azure Run As Account for connecting to Azure AD.

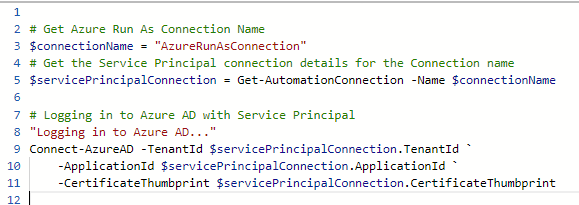
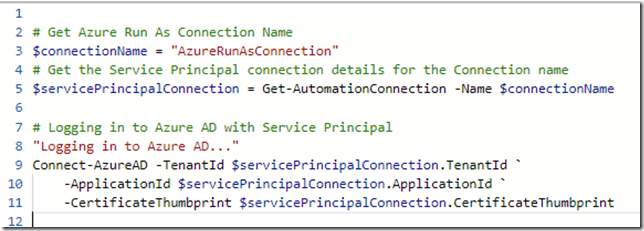
First, I set the connection name  “AzureRunAsConnection”, and then save that as a variable for holding my service principal details using the Get-AutomationConnection cmdlet.

Then, logging in to Azure AD is done with specifiying TenantId, ApplicationId and CertificateThumbprint parameters, as shown below:

image

This will log in my service principal to Azure AD and I’m ready to run some commands, for example getting some organization details for the tenant, or counting different types of user objects:

image

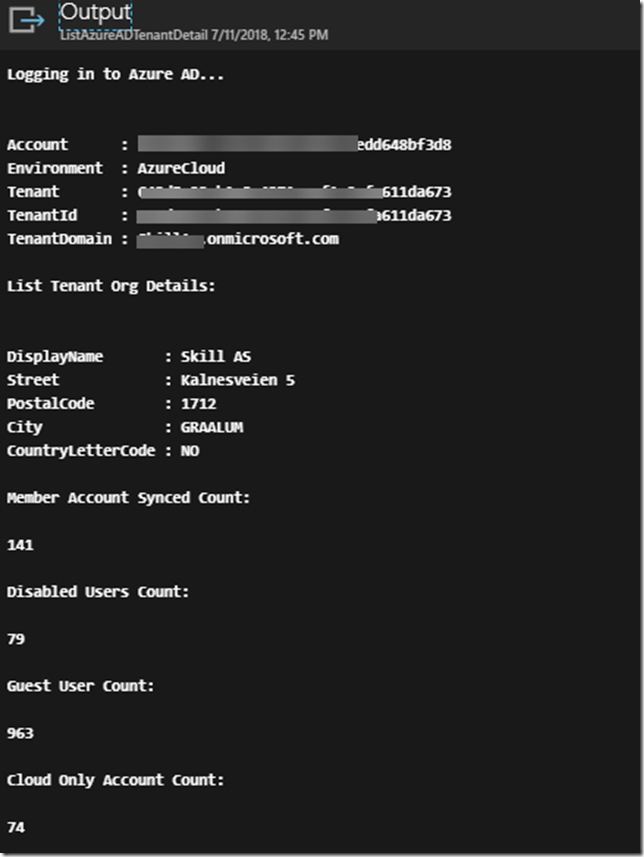
Running this runbook will for example show me this output for my tenant. This shows that I successfully authenticated with the Azure Run As Account service principal:

image

Here is a link to a Gist where I have included the above PowerShell runbook script:


<#
.SYNOPSIS
This Azure Automation runbook connects to Azure AD with a Service Principal and Connect-AzureAD.
.DESCRIPTION
This Azure Automation runbook connects to Azure AD with a Service Principal and Connect-AzureAD.
It uses an Azure Run As Account connection that must be created before.
You have to import the AzureAD module from the Automation module gallery, if it's not already there.
AUTHOR: Jan Vidar Elven [MVP]
LASTEDIT: July 11th, 2018
#>
# Get Azure Run As Connection Name
$connectionName = "AzureRunAsConnection"
# Get the Service Principal connection details for the Connection name
$servicePrincipalConnection = Get-AutomationConnection -Name $connectionName
# Logging in to Azure AD with Service Principal
"Logging in to Azure AD…"
Connect-AzureAD -TenantId $servicePrincipalConnection.TenantId `
-ApplicationId $servicePrincipalConnection.ApplicationId `
-CertificateThumbprint $servicePrincipalConnection.CertificateThumbprint
"List Tenant Org Details:"
Get-AzureADTenantDetail | Select DisplayName, Street, PostalCode, City, CountryLetterCode
"Member Account Synced Count:"
(Get-AzureADUser -All $true -Filter "userType eq 'Member' and accountEnabled eq true" | Where-Object {$_.DirSyncEnabled -eq $true}).Count
"Disabled Users Count:"
(Get-AzureADUser -All $true -Filter 'accountEnabled eq false').Count
"Guest User Count:"
(Get-AzureADUser -All $true -Filter "userType eq 'Guest'").Count
"Cloud Only Account Count:"
(Get-AzureADUser -All $true -Filter "userType eq 'Member'" | Where-Object {$_.userPrincipalName -like "*onmicrosoft.com"}).Count

Role Permissions for the Service Principal

Depending on what kind of automation you want to do against Azure AD, especially if you want to write data, you will have to add the Service Principal to an Azure AD Role. Here is a couple of examples, using the object id for the service principal I told you to note earlier from the Azure Run As Account:

# Get the associated Service Principal for the Azure Run As Account
$runAsServicePrincipal = Get-AzureADServicePrincipal -ObjectId ""

# Add the Service Principal to the Directory Readers Role
Add-AzureADDirectoryRoleMember -ObjectId (Get-AzureADDirectoryRole | where-object {$_.DisplayName -eq "Directory Readers"}).Objectid -RefObjectId $runAsServicePrincipal.ObjectId

# Add the Service Principal to the User Administrator Role
Add-AzureADDirectoryRoleMember -ObjectId (Get-AzureADDirectoryRole | where-object {$_.DisplayName -eq "User Account Administrator"}).Objectid -RefObjectId $aaAadUser.ObjectId

# Add the Service Principal to the Global Administrator Role
Add-AzureADDirectoryRoleMember -ObjectId (Get-AzureADDirectoryRole | where-object {$_.DisplayName -eq "Company Administrator"}).Objectid -RefObjectId $runAsServicePrincipal.ObjectId

That concludes this short blog post, hope it has been helpful! Thanks for reading and remember to share if it was useful Smile

Azure MFA Report Dashboard in Azure Portal–The Good, The Bad and The Ugly

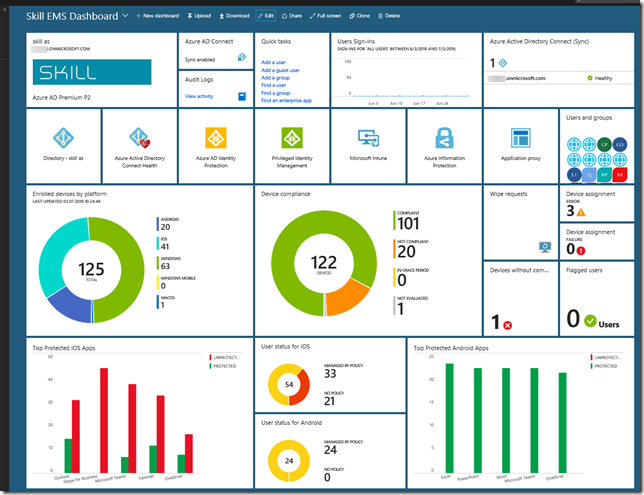
If you are working with EMS and implementing Azure AD, Intune, MDM, MAM, Information Protection and more, you can build yourself some great dashboards in the Azure Portal using tiles and pin blades to your customized dashboard. This is an example from my own workplace:

image

Often when I work with projects implementing Identity & Access, Conditional Access and Azure MFA, I wish I could have a dashboard to report on MFA registration, and be able to pin that to my EMS dashboard as shown above.

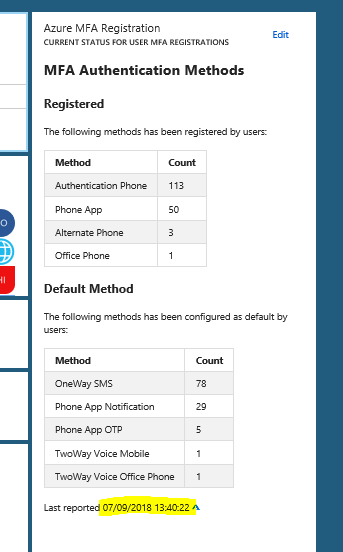
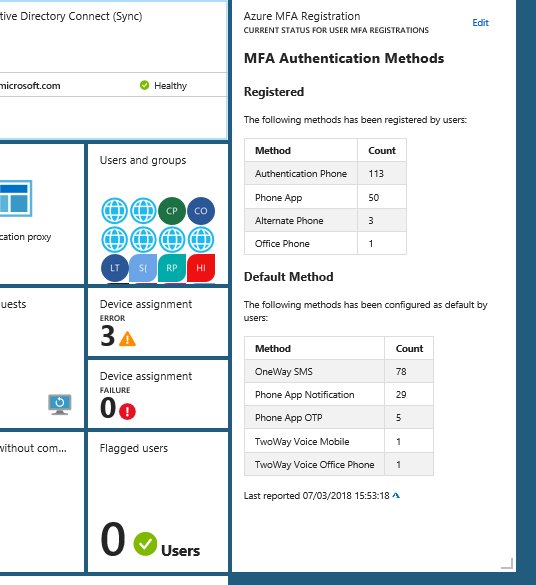
It might be in the future that Azure MFA registrations and methods will be native in the portal, but for now this information have to be retreived in another way. In this blog post I will show you how you can set up a solution for showing this information. I will use the Markdown Tile from the gallery for displaying this information, and in the end it will look like this:

I referred in the title of this blog post to the good, the bad and the ugly, and by that I mean the process of setting this up, because it starts easy enough in the beginning but it will get more “ugly” in the end 😉

The Good – Setting up the Markdown Tile

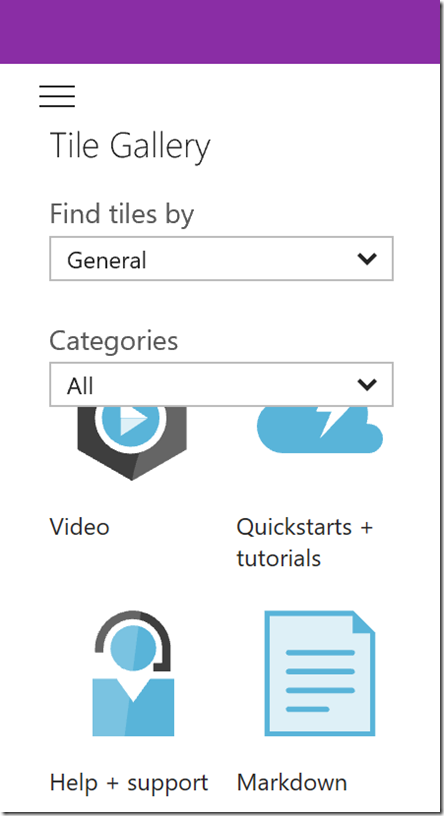
I will use the Markdown Tile for the content in my customized dashboard in my Azure Portal. The first part is easy to set up, just click Edit and find the Markdown tile from the gallery, as shown below:

image

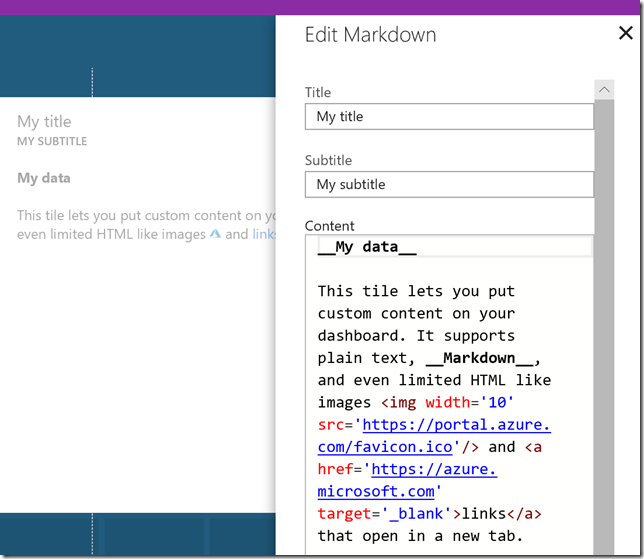
Drag the tile to a place you want it on your dashboard, and the Edit the title, subtitle and content as prompted:

image

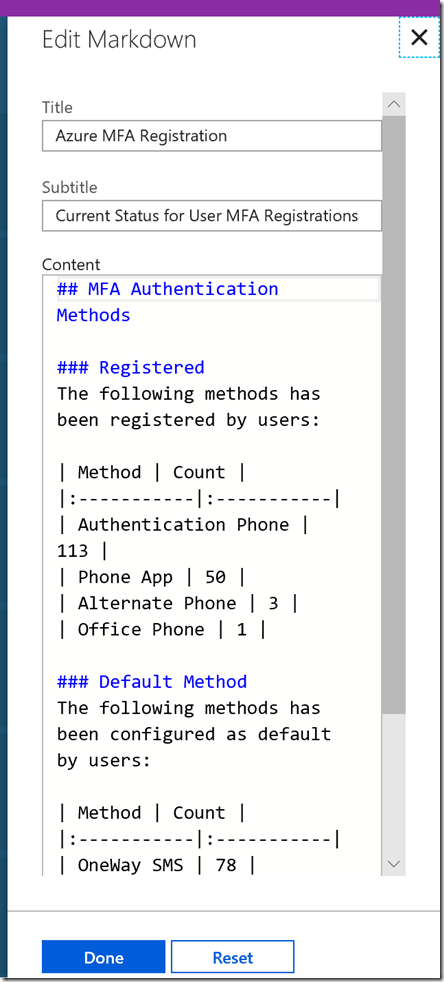
There is a sample content provided, other than that you can write your own markdown. I will not get into details on markdown format here, there is a lot of good guides for learning the format, for example this: https://guides.github.com/features/mastering-markdown/. I will however provide you with a sample for reporting MFA registrations and default methods. This is how I set up my markdown tile:

image

And here is a link to my github repository where you can get the complete MFAReport.md file sample:

https://github.com/skillriver/AzureMFADashboard/blob/master/MFAReport.md

Now we need to fill that markdown tile with some real Azure AD MFA report data to report on.

The Bad – PowerShell Script for getting MFA registration and methods to Markdown

So the “bad” news is that we are reliant on running some Azure AD PowerShell commands for getting user details for MFA registration and methods. For now we are also reliant on the Azure AD v1 PowerShell (MSOnline) Module, as the new v2 AzureAD Module does not yet have any methods to get MFA authentication data. We cannot use the Microsoft Graph API either to get MFA user data, but I expect that to change in the future.

So lets look at the script I use, and after authenticating and connecting to Azure AD in my tenant with Connect-MSOLService, I will run the following commands to get details from each user where there has been configured one or more StrongAuthenticationMethods, and Group on those methods and save the results to a hash table. The results are stored in the $authMethodsRegistered object variable. Similarly I run the command once more, filtering on only showing the methods that are set to default for each user, and save to the $authMethodsDefault variable.

# Connect to MSOnline PowerShell (Azure AD v1)
Connect-MsolService

# Get MFA Methods Registered as Hash Table
$authMethodsRegistered = Get-MsolUser -All | Where-Object {$_.StrongAuthenticationMethods -ne $null} | Select-Object -Property UserPrincipalName -ExpandProperty StrongAuthenticationMethods `
| Group-Object MethodType -AsHashTable -AsString

# Get Default MFA Methods as Hash Table
$authMethodsDefault = Get-MsolUser -All | Where-Object {$_.StrongAuthenticationMethods -ne $null} | Select-Object -Property UserPrincipalName -ExpandProperty StrongAuthenticationMethods `
| Where-Object {$_.IsDefault -eq $true} | Group-Object MethodType -AsHashTable -AsString

# Create a Custom Object for MFA Data
$authMethodsData = New-Object PSObject
$authMethodsData | Add-Member -MemberType NoteProperty -Name AuthPhoneRegistered -Value $authMethodsRegistered.TwoWayVoiceMobile.Count
$authMethodsData | Add-Member -MemberType NoteProperty -Name AuthPhoneAppRegistered -Value $authMethodsRegistered.PhoneAppOTP.Count
$authMethodsData | Add-Member -MemberType NoteProperty -Name OfficePhoneRegistered -Value $authMethodsRegistered.TwoWayVoiceOffice.Count
$authMethodsData | Add-Member -MemberType NoteProperty -Name AlternatePhoneRegistered -Value $authMethodsRegistered.TwoWayVoiceAlternateMobile.Count
$authMethodsData | Add-Member -MemberType NoteProperty -Name OneWaySMSDefault –Value $authMethodsDefault.OneWaySMS.Count
$authMethodsData | Add-Member -MemberType NoteProperty -Name PhoneAppNotificationDefault –Value $authMethodsDefault.PhoneAppNotification.Count
$authMethodsData | Add-Member -MemberType NoteProperty -Name PhoneAppOTPDefault –Value $authMethodsDefault.PhoneAppOTP.Count
$authMethodsData | Add-Member -MemberType NoteProperty -Name TwoWayVoiceMobileDefault –Value $authMethodsDefault.TwoWayVoiceMobile.Count
$authMethodsData | Add-Member -MemberType NoteProperty -Name TwoWayVoiceOfficeDefault –Value $authMethodsDefault.TwoWayVoiceOffice.Count

# Write to Markdown file
"## MFA Authentication Methods`n" | Set-Content .\MFAReport.md -Force -Encoding UTF8
"### Registered`n" | Add-Content .\MFAReport.md -Encoding UTF8
"The following methods has been registered by users:`n" | Add-Content .\MFAReport.md -Encoding UTF8
"| Method | Count |" | Add-Content .\MFAReport.md -Encoding UTF8
"|:-----------|:-----------|" | Add-Content .\MFAReport.md -Encoding UTF8
"| Authentication Phone | " + [string]$authMethodsData.AuthPhoneRegistered + " |" | Add-Content .\MFAReport.md -Encoding UTF8
"| Phone App | " + [string]$authMethodsData.AuthPhoneAppRegistered + " |" | Add-Content .\MFAReport.md -Encoding UTF8
"| Alternate Phone | " + [string]$authMethodsData.AlternatePhoneRegistered + " |" | Add-Content .\MFAReport.md -Encoding UTF8
"| Office Phone | " + [string]$authMethodsData.OfficePhoneRegistered + " |" | Add-Content .\MFAReport.md -Encoding UTF8
"" | Add-Content .\MFAReport.md -Encoding UTF8
"### Default Method" | Add-Content .\MFAReport.md -Encoding UTF8
"The following methods has been configured as default by users:" | Add-Content .\MFAReport.md -Encoding UTF8
"" | Add-Content .\MFAReport.md -Encoding UTF8
"| Method | Count |" | Add-Content .\MFAReport.md -Encoding UTF8
"|:-----------|:-----------|" | Add-Content .\MFAReport.md -Encoding UTF8
"| OneWay SMS | " + [string]$authMethodsData.OneWaySMSDefault + " |" | Add-Content .\MFAReport.md -Encoding UTF8
"| Phone App Notification | " + [string]$authMethodsData.PhoneAppNotificationDefault + " |" | Add-Content .\MFAReport.md -Encoding UTF8
"| Phone App OTP | " + [string]$authMethodsData.PhoneAppOTPDefault + " |" | Add-Content .\MFAReport.md -Encoding UTF8
"| TwoWay Voice Mobile | " + [string]$authMethodsData.TwoWayVoiceMobileDefault + " |" | Add-Content .\MFAReport.md -Encoding UTF8
"| TwoWay Voice Office Phone | " + [string]$authMethodsData.TwoWayVoiceOfficeDefault + " |`n" | Add-Content .\MFAReport.md -Encoding UTF8
"Last reported " + [string](Get-Date) | Add-Content .\MFAReport.md -Encoding UTF8

"" | Add-Content .\MFAReport.md

The complete PowerShell script can be found at my GitHub repository here:

https://github.com/skillriver/AzureMFADashboard/blob/master/MFAStrongAuthenticationUserReport.ps1

So now we have a script where we can get MFA authentication details for each user and create a markdown file that we can use in the tile in the Azure Portal custom dashboard. But it is all a manual process now, and it works fine for an ad hoc update. If we want to automate however, we have to get into the “ugly” stuff 😉

The Ugly – Automating Markdown creation and update Dashboard

This part requires multiple steps. First we need to schedule and run the PowerShell commands from above. Then we need to find a way to update the customized dashboard tile with the updated markdown file. To summary, this is what we need now:

  • Schedule the PowerShell script to run automatically. We can use Azure Automation for that.
  • Programmatically change the markdown tile in the customized dashboard. We can use Azure Resource Manager Rest API for that.

Lets get into the Azure Automation solution first. To run a PowerShell script I will need to create a Runbook, and in that Runbook I need to authenticate to Azure AD. I can define a Credential Asset with a username and password for a global admin user, but I like to use the least privilege possible, and besides that all my global admins are either protected by Azure AD PIM and/or MFA, so that won’t work. I prefer to use a service principal whereever possible, but after testing extensively with Connect-MSOLService that is not supported either.

So I tested with a dedicated Azure AD credential account, first by only adding the user to the Directory Readers role. I was able to list all users with Get-MSOLUser, but not any StrongAuthentication info. Neither did it work with Security Readers. In the end I added the user account to User Administrator role in Azure AD, and I was successful getting StrongAuthentication methods.

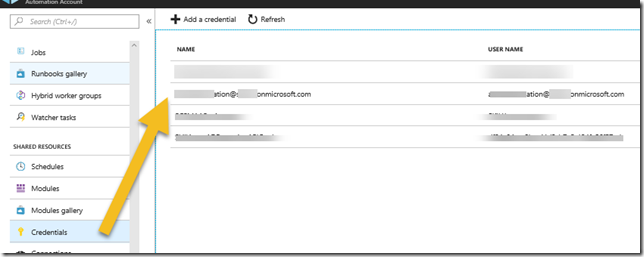
So, in my automation accont I will add or reuse my credentials:

image

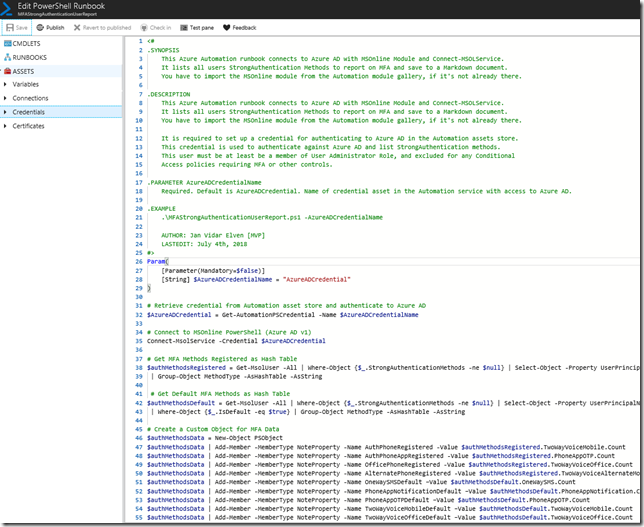
Next, I will create a new PowerShell script based Runbook, basically I will use the PowerShell script from earlier in the blog, but with a couple of added parameter and getting the credential using the Get-PSAutomationCredential method. This is how it looks, you will get link to the complete script later:

image

And after testing, I can see that I successfully will get the MFAReport.md content (added a Get-Content .\MFAReport.md at the end to display the output):

image

Now that we have a solution for running the PowerShell script and generating the markdown file, the next part is how to update that data in the custom dashboard. And for that we need to look into programatically changing Azure Portal dashboards. There is a good resource and starting point for that in this article: https://docs.microsoft.com/en-us/azure/azure-portal/azure-portal-dashboards-create-programmatically.

First you need to share the custom dashboard, remember to include the markdown tile we set up in the first part of this blog post. At the top in the portal dashboard, select the Share button:

image

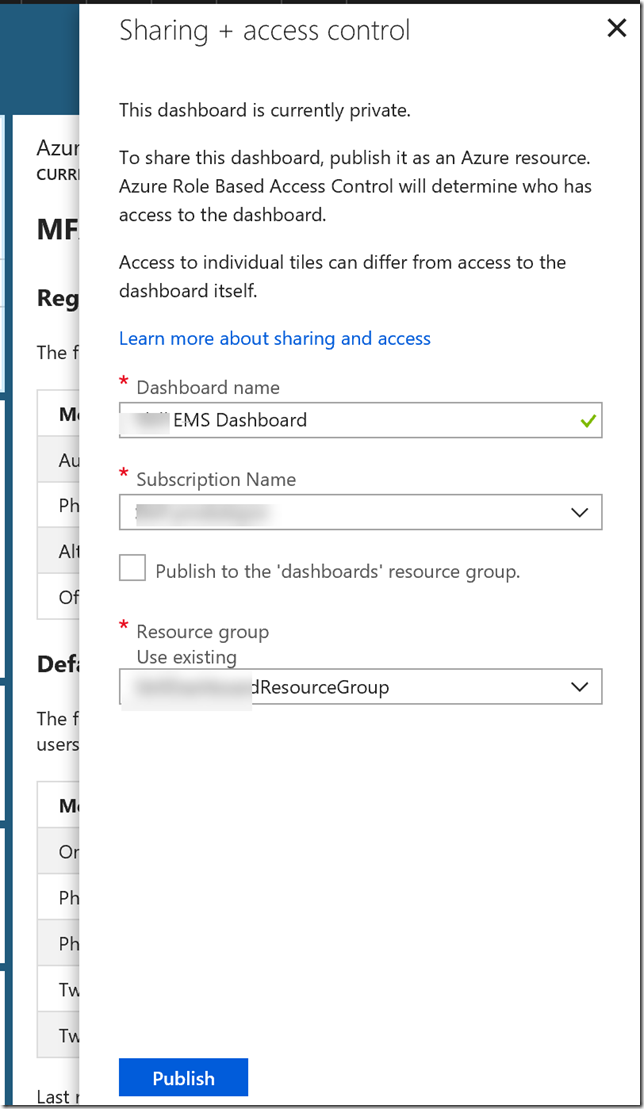
By sharing the dashboard will published as an Azure resource. Specify a name, select the subscription and either use the default dashboard resource group or select an existing one:

image

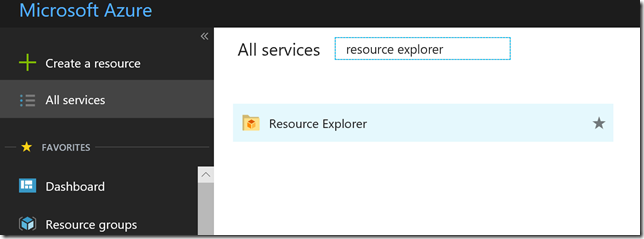
Go to Resource Explorer in the Portal:

image

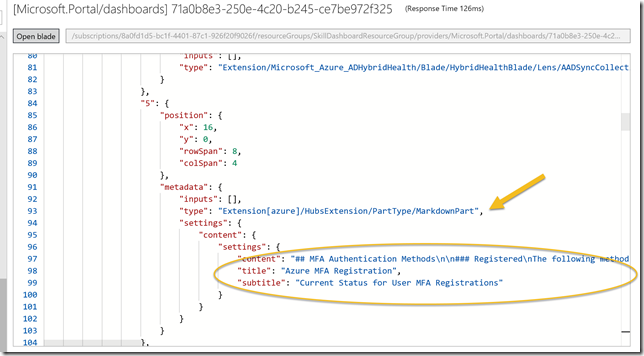
Navigate to Subscriptions, Resource Groups, and find the resource group and resource containing the custom dashboard. From there you will be able to see the JSON definition of the dashboard and specifically the markdown tile containing the content we want to update:

image

So for next process now we need to copy this complete JSON definition containing all your tiles including the markdown tile. Locally on your computer, create a .json file in your favorite JSON editor, I use Visual Studio Code for this, and paste in the content. I have named my file DeploymentTemplateMFAReport.json.

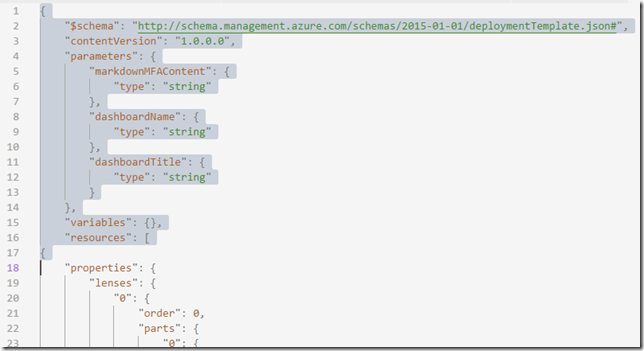
Now we need to change this template to be ready for deployment, and for that we need to add or change a couple of things. First, in the start of the JSON file, add schema and versioning, and parameters, variables and resources section like I have shown below in line 1-17:

image

I have chosen to use 3 parameters, the markdown content itself, and name of the dashboard and the title of the dashboard.

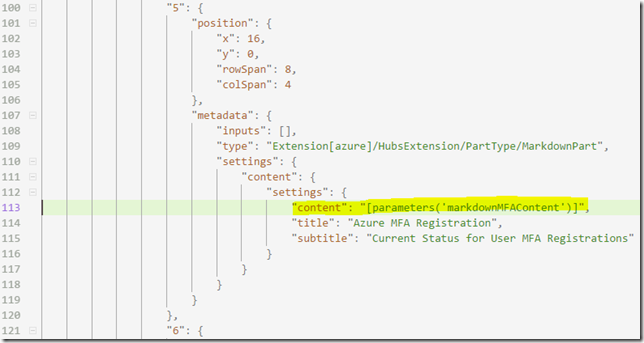
Next, find the tile for the markdown content, and change the content value to the value of the parameter, like I have done at line 113 here:

image

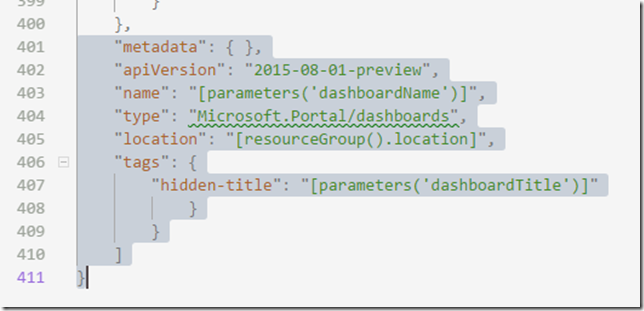
And last, at the end of the json template, add and change the following settings, I have used my parameters for the dashboard name and the dashboard title here in the lines 401-411:

image

My deployment template for the customized dashboard is now completely general and can be used in every environment. In fact you are welcome to borrow and use my template from above her, I have included it in my github repository:

https://github.com/skillriver/AzureMFADashboard/blob/master/DeploymentTemplateMFAReport.json

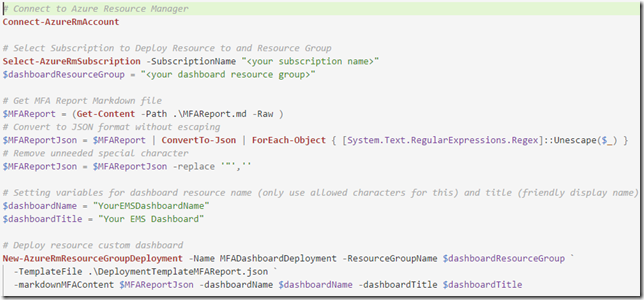
Working locally in my Visual Studio Code editor, I can now test the deployment using Azure PowerShell, as shown below and described with these simple steps:

  1. Connect to Azure Resource Manager and select the Subscription
  2. Specify a variable for the Resource Group you want to deploy to
  3. The MFAreport.md file (which we created earlier) need some converting to JSON format, I’m removing all espace characters and any uneeded special characters
  4. Specify variable names your environment for name and title for the dashboard
  5. Deploy the custom dashboard to the resource group

image

However, now that we can test the deployment, I want to schedule a deployment using Azure Automation, and I will continue on my previous runbook from before. But first we need to set up some connections for authenticating to Azure and some variables.

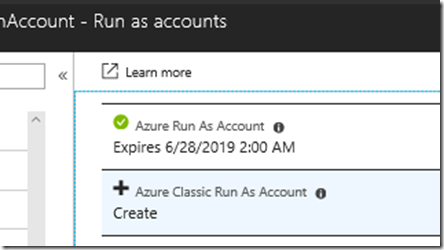
I Azure Automation we can create an Azure Run As Account, this will also create a service principal. If you navigate to your Automation Account in the Azure Portal, and go to the section called Run as accounts, you can create an Azure Run As Account automatically, as I have done here:

image

If I look more closely at this generated Run As Account, I can see details for Azure AD App Registration, Service Principal, Certificate and more. This account will also automatically be assigned Contributor role for my Azure Subscription. If you want more control over Azure Run As Accounts, you can create your own as described in the following article: https://docs.microsoft.com/en-us/azure/automation/automation-create-runas-account

image

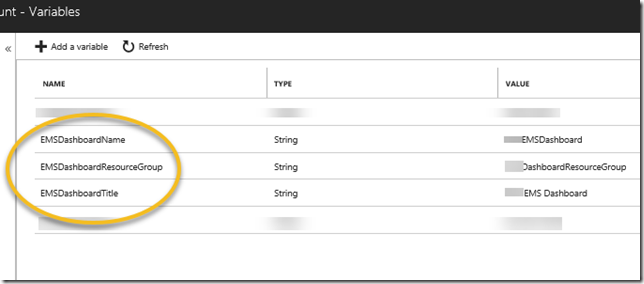
I will use this Azure Run As account in my environment to deploy the dashboard resource, I’ll just need to make sure the account has contributor access to the resource group. Next I will set ut a few variables under the Variables section for my Automation Account, I will use these variables when I deploy the resource:

image

Now we are ready to finally put together the complete Runbook and test it. You will have the complete link later in the blog post, but I will share some screenshots first:

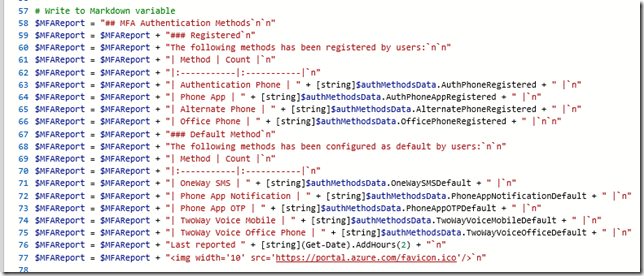
After I’ve connected with Connect-MSOLService I’m creating a variable for the markdown content, so I’ve changed from earlier when I saved a .md file temporarily, now I just adding lines using the newline special character (`n):

image

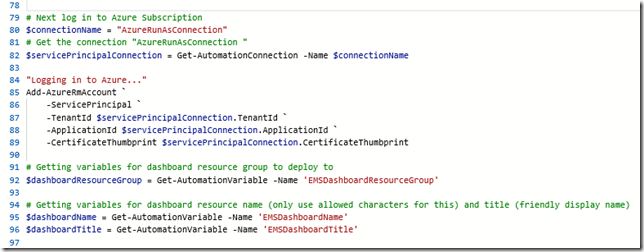
The next part is for logging in to Azure (using the Azure Run As Account mentioned above), and then getting my variables ready for deployment:

image

Then I convert the markdown content to Json format, and removing any escape characters that I don’t need:

image

And then deploy the dashboard resource with parameters for markdown content and dashboard name & title. Note that I’m using my deployment template as a source from my github repository via the TemplateUri property:

image

You can use any TemplateUri you want, for example from a more private source like a storage account blob etc.

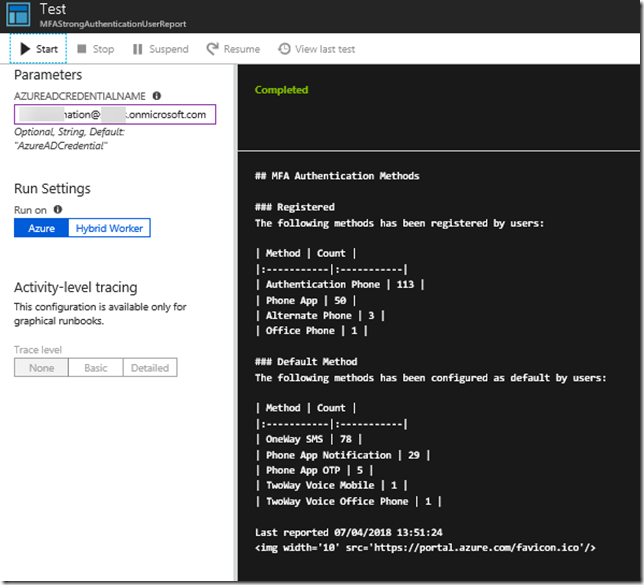
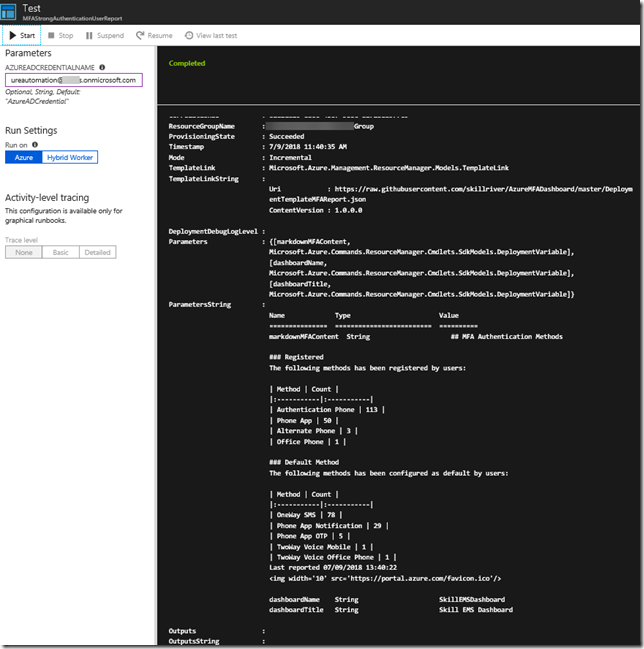
Testing the Runbook gives the following output, which shows it was successful:

image

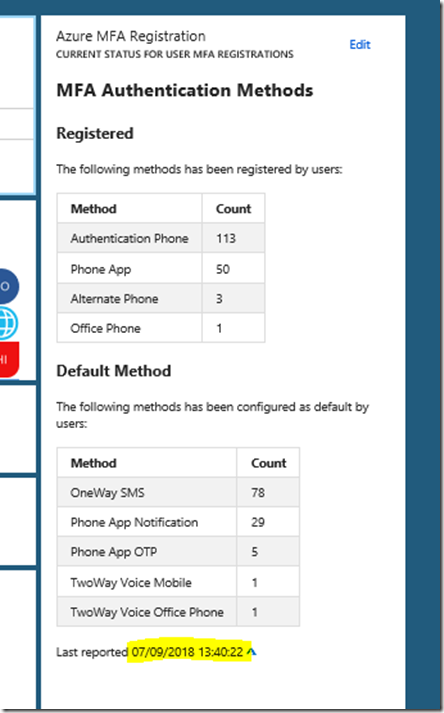
When I now go and refresh the dasboard in the portal, I can see that the markdown tile has been updated:

image

That leaves me with just publishing and scheduling the runbook:

image

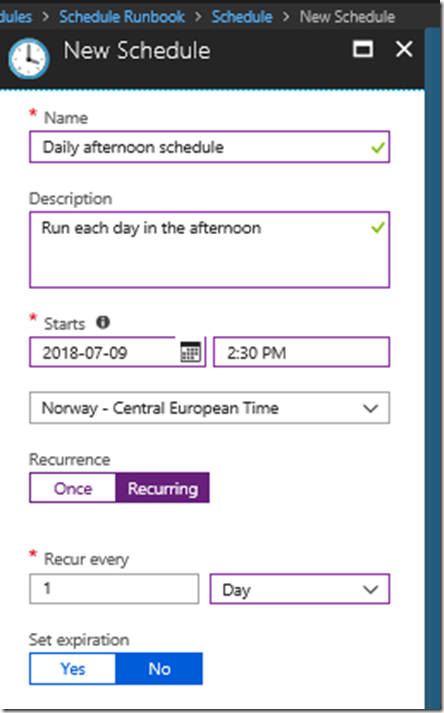
When creating a new schedule specify a name and recurrence:

image

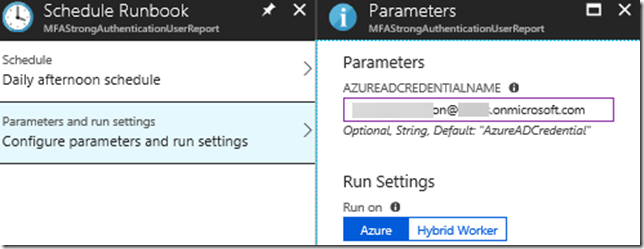
Link the schedule to the runbook and any needed parameters, I have to specify my credential that are allowed to Connect-MSOLService:

image

That concludes this lengthy blog post. The script will now run regularly and update my custom markdown tile with MFA report data.

Here is the link to the PowerShell script used in my Azure Automation runbook, enjoy your MFA Reporting!

https://github.com/skillriver/AzureMFADashboard/blob/master/MFAStrongAuthenticationUserReportAutomation.ps1


Getting started with Azure AD PIM PowerShell Module

This is a short blog post showing how you can get started and some examples of using the PIM PowerShell Module for Azure AD Privileged Identity Management.

You can read more about Azure AD Privileged Identity Management here: https://docs.microsoft.com/en-us/azure/active-directory/active-directory-privileged-identity-management-configure, or by just using the following short URL: https://aka.ms/AzureADPIM!

Installing the Azure AD PIM PowerShell Module

Since there are no PIM related commands in the AzureAD or AzureADPreview PowerShell Modules, we will have to install a separate module for PIM. You can find this module at the PowerShell Gallery here: https://www.powershellgallery.com/packages/Microsoft.Azure.ActiveDirectory.PIM.PSModule

To install the module just run the following command in an elevated PowerShell session:

Install-Module Microsoft.Azure.ActiveDirectory.PIM.PSModule
image

After installing you can list the available commands in the PIM module:

Get-Command -Module Microsoft.Azure.ActiveDirectory.PIM.PSModule
image

Here is a short explanation of the available commands:

  • Connect-PimService. Prompts you to log on with an Azure AD Account that might have any PIM roles assigned. You can optionally specify a username, tenantname or credential object as parameters. Especially tenantname would be useful if you are a guest user with roles assigned in another tenant.
  • Show-PimServiceConnection. This will show the active PimService session details you have, after connecting with Connect-PimService.
  • Get-PrivilegedRoleAssignment. This would list any permanent or eligible role assignments the user you connected with using Connect-PimService has.
  • Enable-PrivilegedRoleAssignment. This command will enable a specified role assignments. It is required to specify which role either by RoleId or by a RoleAssignment variable. It is also required to specify a Duration for activation. Optional parameters includes Reason, TicketNumber, TicketSystem and StartTimeUtc.
  • Disable-PrivilegedRoleAssignment. If you previously have activated one or more roles with Enable-PrivilegedRoleAssignement, you can preemptively deactivate these roles again before the duration expires. You must specify a RoleId or RoleAssignment variable.
  • Disconnect-PimService. Disconnects any previous sessions to PimService.

Examples of Azure AD PIM Commands

In the following I will show some examples of using the Azure AD PIM Module.

Connect-PimService

In the following I’m connecting with a specified username, if it is required to use Azure MFA for this user I will be prompted for that as well:

Connect-PimService –UserName <username>
image
image

After authenticating, PIM service connection details are returned, here slightly masked:

image

The above returned is exactly the same as would be returned by running the command:

Show-PimServiceConnection

Get-PrivilegedRoleAssignment

This command will list any role assignments, permanent or eligible your user might have. Here is a couple of examples for outputs for two different admin users. The first user is eligible for Security Administrator and Privileged Role Administrator, and permanent for Global Administrator:

image

The second admin user is eligible for Exchange Administrator and Global Administrator:

image

If I want to assign a variable to a role assignment, I can do it like the following command:

$roleAssignment = Get-PrivilegedRoleAssignment | Where {$_.RoleName -eq "Privileged Role Administrator"}

I now have a role assignment variable I can use in the following commands.

Enable-PrivilegedRoleAssignment

To enable one of my roles, I need to specify a duration (PS! keep inside the allowed role settings for max duration!), and specify which role either by RoleId or RoleAssignment variable. Optional parameters like Reason etc can also be specified.

Here is a working example:

Enable-PrivilegedRoleAssignment –Duration 1 –RoleAssignment $roleAssignment –Reason “Add crmadmin to CRM Administrators”

After running the command, if successful it will return as a submitted request for activating role membership.

image

By running Get-PrivilegedRoleAssignment again, we can now see that the role of “Privileged Role Administrator” is indeed activated (elevated), and with a ExpirationTime (UTC time):

image

PS! If you have required MFA on activation for the role, one of two things will happen:

  1. If the user already has verified the identity with Azure MFA when authenticating with Connect-PimService, the user will not be asked again. This is the same experience as by using the Azure Portal for activating roles.
  2. If the user hasn’t verified with Azure MFA, the user will be prompted when activating the role, similar to this example:
    image

Disable-PrivilegedRoleAssignment

Any roles you have activated will automatically deactivate after the duration specified has passed. However, if you are finished doing administrative tasks with your role, you can deactivate the role manually.

To deactivate an active assignment, run the following command specifying a RoleId or RoleAssignment variable:

Disable-PrivilegedRoleAssignment –RoleAssignment $roleAssignment
image

Disconnect-PimService

To end your connection to Azure AD PIM Service, run the following command:

Disconnect-PimService

After running that command you can also see that there are no role assignments to list anymore.

image

Hope these commands and examples have been helpful, enjoy working with Azure AD PIM!

Configure Azure AD Authentication for Project Honolulu version 1803

Just a few days ago a new version of Project Honolulu, technical preview 1830, was released for Windows Server Insiders, https://blogs.windows.com/windowsexperience/2018/03/13/announcing-project-honolulu-technical-preview-1803-and-rsat-insider-preview-for-windows-10/.

One of the major updates to that version was the support for changing access control from local group/Active Directory to Azure AD Authentication. Configuring Azure AD Authentication will provide the ability to pre-authenticate users with their Azure AD credentials, as well as restrict access to selected users or even integrate with Azure AD Conditional Access.

In this blog post I will provide some steps, examples and screenshots for how I did that configuration in my own environment.

This scenario builds on the previous installation I have made with Windows Server 1709 (Server Core) and Project Honolulu, see blog article for how my setup is: https://gotoguy.blog/2018/02/13/installing-windows-server-version-1709-on-intel-nuc-skull-canyon-and-configure-hyper-v-for-remote-management/

Update existing version of Project Honolulu to version 1803

Since I had an existing installation of Project Honolulu on this server ELVEN-NUC-HV1.nuc.group, I downloaded the 1803 installation file, connected to the server and ran the following command to silently install and update the existing installation:

msiexec /i HonoluluTechnicalPreview1803.msi /qn /L*v log1803.txt SME_PORT=443 SSL_CERTIFICATE_OPTION=generate

After that I navigated to the https://elven-nuc-hv1.nuc.group url from my client machine, and verified that I could sign in and see that the Project Honolulu website was updated.

image

I also note the certificate warning I receive because my client doesn’t trust the self generated certificate the gateway server installation provided. This will be a problem when using Azure AD Authentication, so in the next step I will make sure the client trusts that.

Export and trust self signed certificate

First, start a PowerShell session on the Honolulu Gateway Server, and then run the command:

Get-ChildItem –Path cert:\LocalMachine\My | FL

This will return any certificates in the machine store. As I have previously installed and generated a self signed certificate for Project Honolulu gateway server, I see 2 certificates now, and can note the thumbprint for the most recent one:

image

Next I will run the following commands for getting the certificate and exporting it to a .cer file:

$cert = (Get-ChildItem –Path cert:\LocalMachine\my\<THUMBPRINT>)
Export-Certificate –Cert $cert –FilePath <path>\<filename>.cer.

In my enviroment I ran the following:

imageAfter that, transfer the .cer file to the client computer(s) you want to be able to connect to the Project Honolulu website, and run the following commands to get and import the .cer certificate into trusted root store:

$cert = (Get-ChildItem –Path <path>\<filename>.cer)
$cert | Import-Certificate –CertStoreLocation cert:\LocalMachine\Root

In my enviroment this looked like this (from an elevated PowerShell window):

image

I took the extra step of verifying that the self signed certificate indeed was imported into trusted root store:

image

Change Access Control to Azure AD

Now I am ready to change access control in Project Honolulu. Click on the Settings cogwheel, and under Settings click Access.

My current settings are set to Active Directory or Local groups, so I click on Change access control:

image

I then change to Azure Active Directory (AAD), and see the prerequisites for connecting the gateway to Azure:

image

I downloaded the New-AadApp.ps1 script, note that this script requires the modules AzureRM.Resources and AzureAD to be installed at the machine where you run the script. If you don’t have them installed, you can install these using Install-Module, as shown in this example:

image

I chose to run this script on my client computer (not on my server core gateway computer), and with the following command:

.\New-AadApp1803.1.ps1 –GatewayEndpoint https://elven-nuc-hv1.nuc.group

(PS! I didn’t have the AzureAD module installed, but the AzureADPreview module instead. A simple change in the Requires section of the script fixed that;)

Running the script prompted me to specify a Global Administrator account for the tenant I wanted to register the Azure AD App in, and after sucessfully authenticating I got confirmation. Note the AAD Application name and other Id’s:

image

Back at the Access Control settings, refresh the browser, note the changed instructions show in the dialog below, and then Save. This will restart the gateway service.

image

After refreshing the browser again, you will be prompted by the following consent for permissions (provided that you already had an active logged on session, or else you will prompted to log in to the tenant you registered the app in):

image

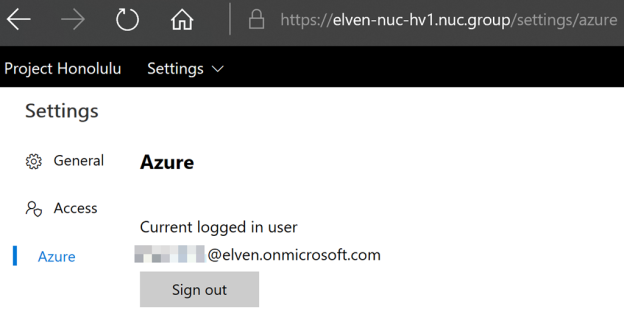
After successfully authenticating and accepting, I’m logged into the Project Honolulu website. Under Settings and Azure, I can verify that I’m logged in and sign out again if needed.

image

Logging on with other users from the tenant

Remember by default all members of the Azure AD tenant will have user access to the Honolulu gateway service. That includes any B2B Guest Users!

Each user logging in need to first time consent to permissions, in the following screenshots I have logged on with a normal user account and then a B2B guest account:

imageimage

Only local administrators on the gateway machine will have administrator access to the Honolulu gateway.

Under Access Settings you can click on a link to go directly to the Azure AD App that got registered when you ran the script earlier:

image

Clicking on that link and logging in with a Global Administrator, you will get to your SME-<name> app. From there you can go to users and groups, and all users that have logged in until now will be listed. By default they will not have any role assigned, but you can change role between Gateway Administrator or Gateway User as I have done below:

image

If you want to restrict which users or groups that are allowed to log into the Project Honolulu site with their Azure AD Credentials, you can go to Properties and then enable the setting for require user assignment:

image

After enabling this setting users that aren’t added to the list of users or groups either directly or via group membership will not be allowed to log on to Project Honolulu.

Summary and next steps

In this blog post I have shown a first look for enabling Azure AD Authentication for Project Honolulu version 1803 technical preview.

The next step is to look into configuring Azure AD Conditional Access for this application, that will come in a later update to this blog article, stay tuned!

A couple of issues is also on my list:

  • I’m prompted to log on with local admin credentials in addition to the Azure AD credentials
  • When I follow the link from Access Control settings I’m able to find the Azure AD App, but I cannot see it by just browsing the Enterprise Applications list. Based on the documentation I this should have work. This means for now I cannot add that App to any Conditional Access policies as it is not browseable.
  • The .\New-AadApp1803.1.ps1 script cannot be run on the Windows Server 1709 core version, as there is no GUI and I get iframe errors, it could be that this is related to the issue above, as I ran the script on my client instead.

I will also look into these issues in an update to this blog post. Please comment below if you are seeing similar issues or have any other experiences. Thanks for reading 🙂

Install & Register Azure AD Application Proxy Connector on Windows Server 1709

I recently installed the new release of Windows Server, version 1709 on my Intel NUC, you can read about that here.

I have installed Project Honolulu for remote server management on that server, but as this Intel NUC is usually located on my home lab network, I want to be able to publish and access the Honolulu website using Azure AD Application Proxy.

As the Windows Server 1709 is Server Core, I need to install and configure the Azure AD Application Proxy Connector silently, and these are the steps I did to do that.

First, you need to download the Application Proxy connector install file, and transfer it to the server. You can access the connector download from Application Proxy section in your Azure AD portal:

image

After that, run the following command to do a quiet install of the connector, skipping registration interactively:

AADApplicationProxyConnectorInstaller.exe REGISTERCONNECTOR=”false” /q

image

Next we need to register the Application Proxy connector to Azure AD, and for that we need to run some PowerShell commands. There are two ways this can be done, with a Credential Object, or using an Offline Token. Using Credential is simplest, but has the drawback that you cannot use that method if your Global Administrator account is protected with Azure MFA. Lets look at both methods below.

Using Credential Object:

On the Server you want to register the Azure AD App Proxy Connector, start a PowerShell session and run the following commands for setting the Global Administrator user name and password, and then create a Credential Object.

image

After that, run the following commands to run the RegisterConnector.ps1 script for register the connector using Credential object as authentication:

image

You can copy the PowerShell commands used above using the Gist linked at the end of this blog post.

Using Offline Token:

If you can’t or don’t want to use a credential object, you have to use a offline token. The following commands will get an access token for the authorization context needed for Application Proxy Connector Registration.

Getting the Token can be run from any client, and then transferred to the server, but you will need to have the Azure Active Directory Authentication Library (ADAL) installed at the machine you are running the PowerShell commands. The easiest way to get the needed libraries installed is to Install the AzureAD PowerShell Module.

The following commands locates the AzureAD (or AzureADPreview) Module, and then finds the ADAL Helper Library: Microsoft.IdentityModel.Clients.ActiveDirectory.dll, and adds that as a Type to the PowerShell session:

image

Next, run these commands to define some constants, these values are the same for all tenants:

image

Now we can run these commands for setting the authentication context and then prompt user for AuthN:

image

Running the above commands will result in an authentication prompt, this is where you would specify your Global Administrator account, and if MFA enabled this will also work:

image

After authenticating we can check the result and save the token and tenantId in variables as shown below:

image

Next, copy the contents of the $token and $tenantId to the Windows Server 1709, and run the following command to create a secure string from the token:

image

And then run the RegisterConnector.ps1 script with AuthenticationMode as Token and using the secure token and tenant id as parameter values as shown below:

image

PS! According to the official documentation, there are no description or examples for the mandatory parameter “Feature”, but I found that it accepts the value “ApplicationProxy” as used above.

You can copy the above PowerShell commands from the Gist linked at the end of this blog post.


# Register Azure AD App Proxy Connector
# PS! Using Credential Object cannot be used with MFA enabled administrator accounts, use offline token
$User = "<username of global administrator>"
$PlainPassword = '<password>'
$SecurePassword = $PlainPassword | ConvertTo-SecureString -AsPlainText -Force
$cred = New-Object –TypeName System.Management.Automation.PSCredential –ArgumentList $User, $SecurePassword
Set-Location "C:\Program Files\Microsoft AAD App Proxy Connector"
.\RegisterConnector.ps1 -modulePath "C:\Program Files\Microsoft AAD App Proxy Connector\Modules\" `
-moduleName "AppProxyPSModule" -Authenticationmode Credentials -Usercredentials $cred


# Get Offline Token for Azure AD App Proxy Register Connector
# Then Register Connector with that Token
# Locate AzureAD/AzureADPreview PowerShell Module
# Change Name of Module to AzureAD or AzureADPreview after what you have installed
$AADPoshPath = (Get-InstalledModule -Name AzureADPreview).InstalledLocation
# Set Location for ADAL Helper Library
$ADALPath = $(Get-ChildItem -Path $($AADPoshPath) -Filter Microsoft.IdentityModel.Clients.ActiveDirectory.dll -Recurse ).FullName | `
Select-Object -Last 1
# Add ADAL Helper Library
Add-Type -Path $ADALPath
#region constants
# The AAD authentication endpoint uri
[uri]$AadAuthenticationEndpoint = "https://login.microsoftonline.com/common/oauth2/token?api-version=1.0/&quot;
# The application ID of the connector in AAD
[string]$ConnectorAppId = "55747057-9b5d-4bd4-b387-abf52a8bd489"
# The reply address of the connector application in AAD
[uri]$ConnectorRedirectAddress = "urn:ietf:wg:oauth:2.0:oob"
# The AppIdUri of the registration service in AAD
[uri]$RegistrationServiceAppIdUri = "https://proxy.cloudwebappproxy.net/registerapp&quot;
#endregion
#region GetAuthenticationToken
# Set AuthN context
$authContext = New-Object "Microsoft.IdentityModel.Clients.ActiveDirectory.AuthenticationContext" `
-ArgumentList $AadAuthenticationEndpoint
# Build platform parameters
$promptBehavior = [Microsoft.IdentityModel.Clients.ActiveDirectory.PromptBehavior]::Always
$platformParam = New-Object "Microsoft.IdentityModel.Clients.ActiveDirectory.PlatformParameters" -ArgumentList $promptBehavior
# Do AuthN and get token
$authResult = $authContext.AcquireTokenAsync($RegistrationServiceAppIdUri.AbsoluteUri, `
$ConnectorAppId, `
$ConnectorRedirectAddress, `
$platformParam).Result
# Check AuthN result
If (($authResult) -and ($authResult.AccessToken) -and ($authResult.TenantId) ) {
$token = $authResult.AccessToken
$tenantId = $authResult.TenantId
}
Else {
Write-Output "Authentication result, token or tenant id returned are null"
}
#endregion
# Create a secure string from token
$secureToken = $token | ConvertTo-SecureString -AsPlainText -Force
# Register connector with secure token and tenant guid
Set-Location "C:\Program Files\Microsoft AAD App Proxy Connector"
.\RegisterConnector.ps1 -modulePath "C:\Program Files\Microsoft AAD App Proxy Connector\Modules\" `
-moduleName "AppProxyPSModule" -Authenticationmode Token -Token $SecureToken -TenantId $tenantId `
-Feature ApplicationProxy

So to recap, after installing the Application Proxy Connector silently on the Windows Server 1709, and then registering the connector, I can now verify in the Azure AD Portal that the connector is available for use. I can see it has a status of Active, from my home IP address, and I have already placed it in a Connector Group.

image

I’m now ready to publish Azure AD Proxy Apps using this connector, and in my next blogpost I will publish the Project Honolulu management website using this!

Here is the Gist source for the above linked PowerShell commands:


# Register Azure AD App Proxy Connector
# PS! Using Credential Object cannot be used with MFA enabled administrator accounts, use offline token
$User = "<username of global administrator>"
$PlainPassword = '<password>'
$SecurePassword = $PlainPassword | ConvertTo-SecureString -AsPlainText -Force
$cred = New-Object –TypeName System.Management.Automation.PSCredential –ArgumentList $User, $SecurePassword
Set-Location "C:\Program Files\Microsoft AAD App Proxy Connector"
.\RegisterConnector.ps1 -modulePath "C:\Program Files\Microsoft AAD App Proxy Connector\Modules\" `
-moduleName "AppProxyPSModule" -Authenticationmode Credentials -Usercredentials $cred


# Get Offline Token for Azure AD App Proxy Register Connector
# Then Register Connector with that Token
# Locate AzureAD/AzureADPreview PowerShell Module
# Change Name of Module to AzureAD or AzureADPreview after what you have installed
$AADPoshPath = (Get-InstalledModule -Name AzureADPreview).InstalledLocation
# Set Location for ADAL Helper Library
$ADALPath = $(Get-ChildItem -Path $($AADPoshPath) -Filter Microsoft.IdentityModel.Clients.ActiveDirectory.dll -Recurse ).FullName | `
Select-Object -Last 1
# Add ADAL Helper Library
Add-Type -Path $ADALPath
#region constants
# The AAD authentication endpoint uri
[uri]$AadAuthenticationEndpoint = "https://login.microsoftonline.com/common/oauth2/token?api-version=1.0/&quot;
# The application ID of the connector in AAD
[string]$ConnectorAppId = "55747057-9b5d-4bd4-b387-abf52a8bd489"
# The reply address of the connector application in AAD
[uri]$ConnectorRedirectAddress = "urn:ietf:wg:oauth:2.0:oob"
# The AppIdUri of the registration service in AAD
[uri]$RegistrationServiceAppIdUri = "https://proxy.cloudwebappproxy.net/registerapp&quot;
#endregion
#region GetAuthenticationToken
# Set AuthN context
$authContext = New-Object "Microsoft.IdentityModel.Clients.ActiveDirectory.AuthenticationContext" `
-ArgumentList $AadAuthenticationEndpoint
# Build platform parameters
$promptBehavior = [Microsoft.IdentityModel.Clients.ActiveDirectory.PromptBehavior]::Always
$platformParam = New-Object "Microsoft.IdentityModel.Clients.ActiveDirectory.PlatformParameters" -ArgumentList $promptBehavior
# Do AuthN and get token
$authResult = $authContext.AcquireTokenAsync($RegistrationServiceAppIdUri.AbsoluteUri, `
$ConnectorAppId, `
$ConnectorRedirectAddress, `
$platformParam).Result
# Check AuthN result
If (($authResult) -and ($authResult.AccessToken) -and ($authResult.TenantId) ) {
$token = $authResult.AccessToken
$tenantId = $authResult.TenantId
}
Else {
Write-Output "Authentication result, token or tenant id returned are null"
}
#endregion
# Create a secure string from token
$secureToken = $token | ConvertTo-SecureString -AsPlainText -Force
# Register connector with secure token and tenant guid
Set-Location "C:\Program Files\Microsoft AAD App Proxy Connector"
.\RegisterConnector.ps1 -modulePath "C:\Program Files\Microsoft AAD App Proxy Connector\Modules\" `
-moduleName "AppProxyPSModule" -Authenticationmode Token -Token $SecureToken -TenantId $tenantId `
-Feature ApplicationProxy

Access Microsoft Graph API using Custom Connector in PowerApps and Flows

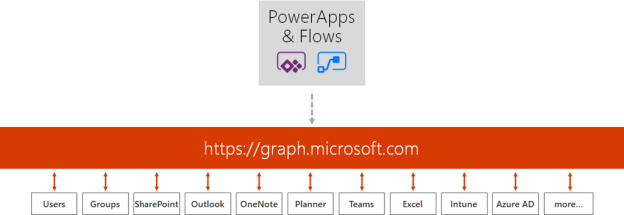
Microsoft PowerApps and Flows are great and simple to get started and use solutions for creating Apps and for how to “Code with No Code”. And the Microsoft Graph API is a great source of information for your Organizational data, including Users, Devices, Apps and Data. The Microsoft Graph has one common endpoint for which you can access and use all the information you want.

The purpose of this blog post is to show how to set up the requirements for accessing Microsoft Graph from PowerApps and Microsoft Flow.

image

I will show how you create an App Registration in your Azure AD tenant with the required settings and permissions for Microsoft Graph, and how you set up a custom connector in PowerApps and how to connect to that using PowerApps and Flows. We will create a simple App and see how you can share that App in your Organization. Let’s get started!

App Registration

If you want to access the Microsoft Graph you will need an App Registration, for which you can authenticate against the Graph API. There are two options available, depending on whether you want to authenticate only with Azure AD Work or School accounts, or if you also want to authenticate with Microsoft Accounts. The first option is to use the Azure AD portal (https://aad.portal.azure.com), the second option is to use the Application Registration Portal (https://apps.dev.microsoft.com). I will use the Azure AD Portal.

First, login as a Global Administrator to your Azure AD Portal, or have your IT admin perform the following steps for you. Under Azure Active Directory, create a new App Registration:

image

Provide a name like below, select Web app / API type, and then type any URL you want. It doesn’t have to be an accessible URL, as long as it is a valid format:

image

After the App Registration is created, you can open it and note the application id, which we will require later:

image

Next, under Settings, click Required Permissions. Here we will add the permissions we need for accessing the Microsoft Graph.

image

Click Add and then select Microsoft Graph from the list over available APIs:

image

Next, you will need to specify the permissions this App will have to access the Microsoft Graph. Note that there are two types of permissions:

  • Application Permissions. These permissions are for Apps that run without a user logged in, like a service or deamon.
  • Delegated Permissions. These permissions are for running apps in the context of the logged on user. The users effective permission will be a least privilege of these permissions you give the App, and the users actual permission in your organization.

image

In my scenario with using PowerApps and Flows, I will only use Delegated Permissions. Lets start with the most basic permission, and add that to the Microsoft Graph API:

image

Note that there is a column for Require Admin which either contains a Yes or No. If you select a permission that require Admin grant, the Global Administrator must click on the Grant Permissions. In our example now I don’t have to do this, but remember that any time you update the permissions for your app registration that require Admin, you must click on this Grant Permissions button.

image

Next, under Settings for the App Registration, go to Keys. We will now create a secret key to be used together with the application id when authenticating. Type in a description and select a period of expiry, and then click save. Your key will be displayed only once, so make sure you copy it and note it down for later use:

image

We are now ready to head over to PowerApps and create our Custom Connector that will use this App Registration.

Create a Custom Connector in PowerApps

Go to https://web.powerapps.com and log on as your normal user account, you don’t have to be an admin to do this.

Under Custom connectors, select Create Custom Connector, specify a name and continue:

image

On the General page, type a description and optionally change the icon or background color:

image

Under scheme select HTTPS, and under host, specify graph.microsoft.com. The base URL is “/”.

image

Click Continue. Under Security select OAuth 2.0 as authentication type, and then for Identity Provider select Azure Active Directory. For Client id, copy the Application id from the Application Registration we did in the previous section in the Azure AD portal:

image

Scroll down and for Client secret, paste in the secret key you generated from the app registration. Let login URL and tenant ID be as suggested and the type https://graph.microsoft.com as Resource URL:

image

Scroll further down. Scope is optional, and take a note of that Redirect URL will be generated after we save the connector.

image

Click continue to the Definition section. We will get back to this later, so for now just click Create connector:

image

The custom connector will be created, and we can go back and get the redirect URL:

image

Now you need to get back to the application registration in Azure AD and add that Redirect URL to the list of Reply URLs like this:

image

Save that and we are ready for the next step. To summarize, we have now created an App Registration in Azure AD with these 4 steps, as well as prepared a Custom Connector i PowerApps.

image

Now we need to prepare some queries we are going to run in Microsoft Graph.

Prepare queries in Graph Explorer

When working with Microsoft Graph, Graph Explorer is your best friend and resource. You can access the Graph Explorer via the https://graph.microsoft.com website, or even with this simple url:

http://aka.ms/ge

At the Graph Explorer page you can run from a  great collection of samples, and you can either run with a sample account, or log in using your own Work/School or Microsoft account.

image

I will log in as my normal user, and if this is the first time you log in to Graph Explorer you are prompted to consent to permissions needed by the Graph Explorer. From the picture below I have just Run Query for getting my profile:

image

With Microsoft Graph, you can also select just the attributes you want to see, so if I run the following query: https://graph.microsoft.com/v1.0/me/?$select=displayName,givenName,surname,userPrincipalName,aboutMe

I will get this response for my user:

image

From the response I see that my “aboutMe” attribute is empty. Let’s try to put a value into that. This is where the Microsoft Graph documentation is useful. If I look at the API reference for update user, https://developer.microsoft.com/en-us/graph/docs/api-reference/v1.0/api/user_update, I see that I will have to use a PATCH method and specify a Request Body which contains the attributes and values I want to update. So for example I will specify my request like this, and then Run Query:

image

I see that the status is success with a status code of 204, and if I check my profile again with the GET query from earlier, I will se that the aboutMe value now has been set: (It’s true by the way, I love working with Microsoft Graph!)

image

Now that we have seen how we can run queries for reading and writing to Microsoft Graph, lets try to implement that in a PowerApp, but first we need to create some Operations for our Custom Connector.

Create Custom Connector Operations

Back in PowerApps and under Custom connectors, I select edit for my connector:

image

I then go to Definition, and since there are no Actions created previously, I will add that now by clicking New Action. This will present me with the following form. I will specify a name, description and an operation id:

image

Scroll down to Request, this is where we will provide the details for our query. The best way to do this is to select to Import from sample. I specify the Method to be GET, and then the query like this, which is the same query I ran in the Graph Explorer earlier:

image

I don’t need to specify any Header or Body for this query, so I just press Import. Now my action looks like this:

image

Scroll down to the Response section, and then click on the default response. Click on Import from sample, and this time you paste in the response body from the previous Graph Explorer query:

image

This response will help the custom connector operation so that we can get the right output values mapped in our PowerApp later. Select Import.

The response now looks like this:

image

We can also validate that the response looks ok:

image

Click on Update connector to save this operation.

Next I want to create another action for updating the aboutMe attribute in my profile. I’ll create a new Action:

image

Under Request I will select Import from sample again, this time specifying PATCH as operation verb, the request URL is https://graph.microsoft.com/v1.0/me, and also add the Headers and Body as shown below. These samples are exactly the same as what I tested in Graph Explorer:

image

As this operation does not return a specific response object, I will let the default response be as it is, and will save my settings by Updating the connector.

Testing the custom connector

In my custom connector I can now move to the Test section:

image

The first thing I need to do is to create a New connection:

image

By logging in with my user I will be presented to consent to the permissions of the App, these are the delegated permissions we configured when registering the App in Azure AD (the reason for the double consent is that in addition to the Microsoft Graph delegated permission, there was also an Active Directory Graph permission for sign in and read profile) :

image

After creating the connection, go back to the custom connector and to the test section again. This time we have a valid connection to choose, and can test the action we want. I will test the GetMyProfile action first:

image

By using the $select parameter I can specify any attribute I want to get, and when clicking Test operation I get a successful response like this:

image

Now, let’s test the second action:

image

I specify the Content-Type to be application/json, and then an updated value for the aboutMe in the profile, and then Test operation:

image

The response is also successful.

Now that the operations are tested and verified, we know that the Custom connector can successfully access the Microsoft Graph, and we are finally ready for creating a PowerApp and testing it all out!

Set up the PowerApp and use the Connector

I will create a PowerApp that will get my profile details, and also be able to update the about me attribute. I will not get into great detail on the general instructions to set up the PowerApp, but the high level steps are:

  • Create a new PowerApp using the blank template and phone layout
  • Add some custom colors and an image (optional)
  • Add some labels and text boxes for getting some chosen profile attributes
  • One of the text boxes is for the “about me” value
  • Create a couple of buttons for getting profile data and to update the “about me” value

So after playing around a little bit I have this PowerApp ready:

image

So lets bring some action into the PowerApp. First, go to the View menu, and then Data Sources. From the list of data sources you should be able to see a connection with your username and the PowerApps Microsoft Graph connector (as I am using PowerApps for other data sources as well, I have a few more):

image

After I add the connection I now have a data source for this Connector:

image

Now I can refer to this data source in my PowerApp, for example in my buttons. I will for the first button add an action for getting my profile data, and for the second button add an action for writing back to “about me” in my profile.

For reading data from my profile, I will add the following action to the OnSelect event:

image

First a little explanation of this action:

  • UpdateContext is a function that would hold data into a variable i specify.
  • Calling the PowerAppsMicrosoftGraph.GetMyProfile operation would return a response I want to save to that variable.
  • Using arguments for $select I can specify which attributes I want to return as a response.
  • So by using UpdateContext and specifying that I save the response back to the MyProfile variable I can use that variable in other controls.

The complete operation is: UpdateContext({MyProfile: PowerAppsMicrosoftGraph.GetMyProfile({‘$select’:”DisplayName,givenName,surname,aboutMe”})})

Then for each textbox control I can get the value from the MyProfile variable, like this:

image

And l would do the same for the other text boxes, using MyProfile.givenName, MyProfile.surname and MyProfile.aboutMe.

Next, for updating the attribute “about me”, I will add the following action to the OnSelect event:

image

In this case I call the PowerAppsMicrosoftGraph.UpdateAboutMeProfile operation, specifying the arguments for content-type and using the text specified in the txtAboutMe.Text property:

PowerAppsMicrosoftGraph.UpdateAbouteMeProfile({‘Content-Type’:”application/json”,aboutMe:txtAboutMe.Text})

Now you can Save, give the PowerApp a Name and a chosen Icon, and then Publish the PowerApp. You are now ready to run the PowerApp!

Running the PowerApp

The PowerApp can be started in different ways, via the mobile app, desktop app or via the https://web.powerapps.com website. When I run this PowerApp I see this after starting up:

image

When I click Read Profile, it will call the Custom connector and get my profile information from Microsoft Graph:

image

Lets update some text in the About me textbox:

image

And then click on the butting Update About me, this will run the PATCH query against Microsoft Graph and update the “about me” attribute.

PS! The operation will run successfully, but it will return the following error when the custom connector to Graph API does not return a response object:

image

This is a flaw in PowerApps using Custom API connector, as it expext a JSON response object, but some operations against API’s are designed to return a 204 No Content response. We will fix that later by using a Flow.

To verify my profile has been updated, I can check in Dvelve and the about me section:

image

At this point we have seen that we can access the Microsoft Graph using a Custom connector from a PowerApp. There are a couple of more scenarios I will show before I wrap up this blog post, using Flows and Sharing the PowerApp with other users in my organization.

Using Microsoft Flow

Using Microsoft Flow with your PowerApps will make it possible to add workflows with actions and condtions to your apps. When creating a custom connector like we did to Microsoft Graph earlier, the same connector is available for your Flows.

I will go to the Flows section and create a new Flow. The first step for getting input from PowerApps is already there, so add a new step and select Action. From there you can search a lot of actions available, and you will find our PowerApps Microsoft Graph connector as well, with it’s 2 defined operations. Select the Update About Me Profile:

image

Next, the operation require 2 inputs, the first one I specify “application/json” which Microsoft Graph expects, and for the next aboutMe input, I select “Ask in PowerApps”:

image

This will create an input I later can use from PowerApps. This is all I need to do now, but I could have added more actions for example for sending an e-mail after updating the profile etc.

Now I specify a Flow name and Create or Update the Flow:

image

Back in my PowerApp, select the Update About me button, and then in the Action menu, select Flows:

image

Then find the Flow I created and add that:

image

You will see that the Run action for the Flow will prompt me for the Input I created with the “Ask in PowerApps” when I edited the Flow. This is where I would supply the the content from the txtAboutMe.Text control:

image

The OnSelect action for this button now looks like this, which will run the Flow:

image

Let’s Save and Publish the PowerApp again, and then launch it. First i Read the profile, and then I update some text in the About me:

image

When running Update About me now, the action successfully completes, with no error warning, and if I go to the Flow I can see the run history shows that it successfully completed. In the details I see that the Flow has triggered with the input I specified in the PowerApp:

image

Note that the Flow handles 204 No Content well, so now we have solved our problem in the PowerApps from earlier 🙂

Using a Flow will not only handle some types of inputs and outputs better for custom connectors than directly from PowerApps, but also make it possible to create more logic to your apps using workflows with actions, conditions and a lot of other data sources.

Sharing the PowerApp with other users

In the last part of this blog post I will show how you can share the PowerApp with other users. When you create a PowerApp it is only you that can access it:

image

Sharing an app that uses a custom connector, like we use for the Microsoft Graph, it will be automatically shared, but users must create their own connections to it.

And when sharing an app that includes a Flow, users who run the app will be prompted to confirm or update any connections on which the flow relies. In addition, only the person who created the flow can customize its parameters.

You can share the PowerApp to specific individuals, to groups or to the whole organization.

image

When sharing to the organization the users can find the PowerApp in the Dynamics 365 app store, under in-house apps:

image

Now, let’s test with another user, in this case I have a test user called [email protected]. When he launches the PowerApp for the first time he will need to create a connection to the custom connector:

image

After signing in he would need to  consent to the App permissions:

image

And after consenting click to Allow:

image

Now he can use the PowerApp, and when clicking Read Profile his details are filled in as expected. This is a test user I have based on the Seinfeild Show, so I will add to the “About me” with some text:

image

When I click Update About me, this users profile is updated. My test user does not have access to see the details of the Flow, but back with my original user that owns the Flow I can see that it indeed ran with the input from this user:

image

Summary

In this blog post we have seen how we can access the Microsoft Graph via a Custom connector in PowerApps and Flows. The sample shown in this post is simple with working with the profile of the logged on user, but with the power of the Microsoft Graph this opens up a lot of possibilities!

In later blog posts I will show some more exciting scenarios for using the Microsoft Graph, and I will link back to this blog post as a reference for how to get it all set up!

Thanks for reading, let me know in the omments if you have any questions or maybe some ideas for usage scenarios!

Azure AD B2B Users and Access to Azure AD Application Proxy Apps

The purpose of this blog post is to show a practical approach and some guidelines for publishing Azure AD App Proxy applications to guest users using Azure AD B2B.

To keep this blog post short and to the point, I will make the following assumptions:

Demo scenario

I will first give a quick overview over the demo scenario for this blog post:

  • I will use my tenant elven.onmicrosoft.com, where I have configured a custom domain elven.no.
  • I have invited an external user: [email protected] to the elven.onmicrosoft.com tenant. This user has accepted the invitation and can access resources that will be shared.
  • I have published some App Proxy applications, and in this scenario I will use Cireson Portal, which is a Self Service Portal for SCSM.

In this blog post I will use both single sign-on disabled with forms based authentication, and single sign-on with windows integrated authentication for this guest user, but lets first verify that the guest user can log on to my application panel.

Using Azure AD Access Panel as Guest User

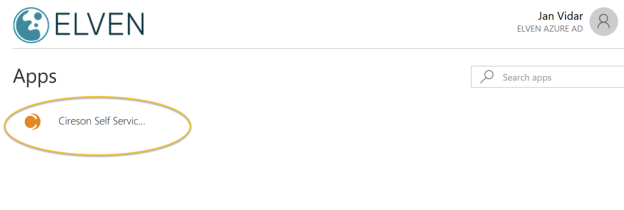
When I log on to the Azure AD Access Panel at https://myapps.microsoft.com as external account I will se all my published applications at my company Skill AS, and since I have been added as a Azure AD B2B guest to the Elven Azure AD tenant, I can switch to that tenant like this:

image

I will then be redirected to the Elven Azure AD tenant and all my published applications will show (but for now this is none):

image

So lets start by adding this external guest to a published application without single sign-on and Windows Integrated Authentication enabled.

Without Single Sign-On

First, this is the guest user I will add to the application:

image

Then I go to the App Proxy Application, and in the properties I have required that any user must be assigned to access the application:

image

Under Application Proxy I will require pre authentication with Azure AD, so that users can not access the URL without being logged on to the tenant (in this case as a guest):

image

In this first scenario single sign-on with Azure AD and Windows Integrated Authentication is disabled:

image

Then I add my guest user as an assigned user to the application:

image

In the meantime I have configured the Cireson Portal to use Forms Based Authentication, and now we can test the guest user:

In the Access Panel my guest user can now see and launch the Cireson Portal published application:

image

And my guest user can successfully get to the web application which now presents a user login form, which will require a on-premises AD user with access rights to the Cireson Portal.

image

In my on-premises AD I have created just that, a user with the account name jan.vidar.guest:

image

And I can successfully log on with the guest user:

image

So far we have seen that an Azure AD B2B user can successfully launch an Azure AD App Proxy application, and in the next step log on with a local AD user with access to the application.

I the next section we will see how we can provide single sign-on with Azure AD and Windows Integrated Authentication.

PS! I will also change the Cireson Portal to use Windows Authentication before this next step!

Azure AD Single Sign-On and Windows Integrated Authentication

First I will need to change the settings for the Azure AD App Proxy application.

Under Single sign-on I will change to Integrated Windows Authentication, specify a SPN for Kerberos Constrained Delegation, and specify to use User principal name for delegated login identity:

image

By now you might have realized that for single sign-on to work with windows integrated authentication in a Azure AD B2B guest user scenario, you will need to have a “shadow” AD user for this external scenario. In my first test above, I had created a “jan.vidar.guest” user. Remember that I chose to use User principal name as a delegated login identity. So I will need a UPN that will be a link between my Azure AD guest user account ([email protected]) and the local AD user. If that link is missing, you will see the following in the Application Proxy Connector Log:

image

So this error message tells us exactly what user principal name is expected from the guest user. The error message below provide more details from this error:

Web Application Proxy encountered an unexpected error while processing the request.
Error: The user name or password is incorrect.
(0x8007052e)

Details:
Transaction ID: {00000000-0000-0000-0000-000000000000}
Session ID: {00000000-0000-0000-0000-000000000000}
Published Application Name:
Published Application ID:
Published Application External URL:
https://selfservice-elven.msappproxy.net/
Published Backend URL:
http://azscsmms3/
User: jan.vidar.elven_skill.no#EXT#@elven.onmicrosoft.com
User-Agent: Mozilla/5.0 (Windows NT 10.0; Win64; x64) AppleWebKit/537.36 (KHTML, like Gecko) Chrome/58.0.3029.110 Safari/537.36 Edge/16.16299
Device ID: <Not Applicable>
Token State: NotFound
Cookie State: NotFound
Client Request URL:
https://selfservice-elven.msappproxy.net/Home/NavigationNodes
Backend Request URL: <Not Applicable>
Preauthentication Flow: PassThrough
Backend Server Authentication Mode: WIA
State Machine State: OuOfOrderFEHeadersWriting
Response Code to Client: 500
Response Message to Client: Internal Server Error
Client Certificate Issuer: <Not Found>
Response Code from Backend: <Not Applicable>
Frontend Response Location Header: <Not Applicable>
Backend Response Location Header: <Not Applicable>
Backend Request Http Verb: <Not Applicable>
Client Request Http Verb: POST

So, lets change the UPN of my local shadow user to that. You can either add the UPN suffix to your Active Directory Forest, or change the user principal name with AD PowerShell like:

Set-ADUser jan.vidar.guest -UserPrincipalName jan.vidar.elven_skill.no#EXT#@elven.onmicrosoft.com

image

Generally you will need to add Azure AD B2B users with user principal name in the form of:

<emailalias>_guestdomain#EXT#tenantdomain

So, lets try to launch the Cireson Portal again now, this time with Azure AD Single Sign-On and Windows Integrated Authentication:

image

And now the user will be logged directly into the Cireson Portal with SSO:

image

So now we have seen that we can successfully use Azure AD B2B Guests in an Azure AD Application Proxy published application scenario, with or without Single Sign-On, and that we require a link with the delegated identiy with a “shadow” user in the on-premises AD.

NB! Before you think that you should create that user as a disabled account, this is what happens:

image

This means, you have to enable the AD user account, but the password can be anything and don’t have to be shared with the external user.

Update: Require MFA from Guest Users

I have had some questions on how requiring MFA would affect guest users when accessing published applications, and decided to update the blog post on this.

First of all you would need to create an Azure AD Conditional Access Policy where you:

  • Target the policy to your guest users, for example by creating a group (assigned or dynamic) with all guest users in your tenant.
  • Target the policy to your selected published Azure AD App Proxy Apps.
  • Setting the policy to require MFA.

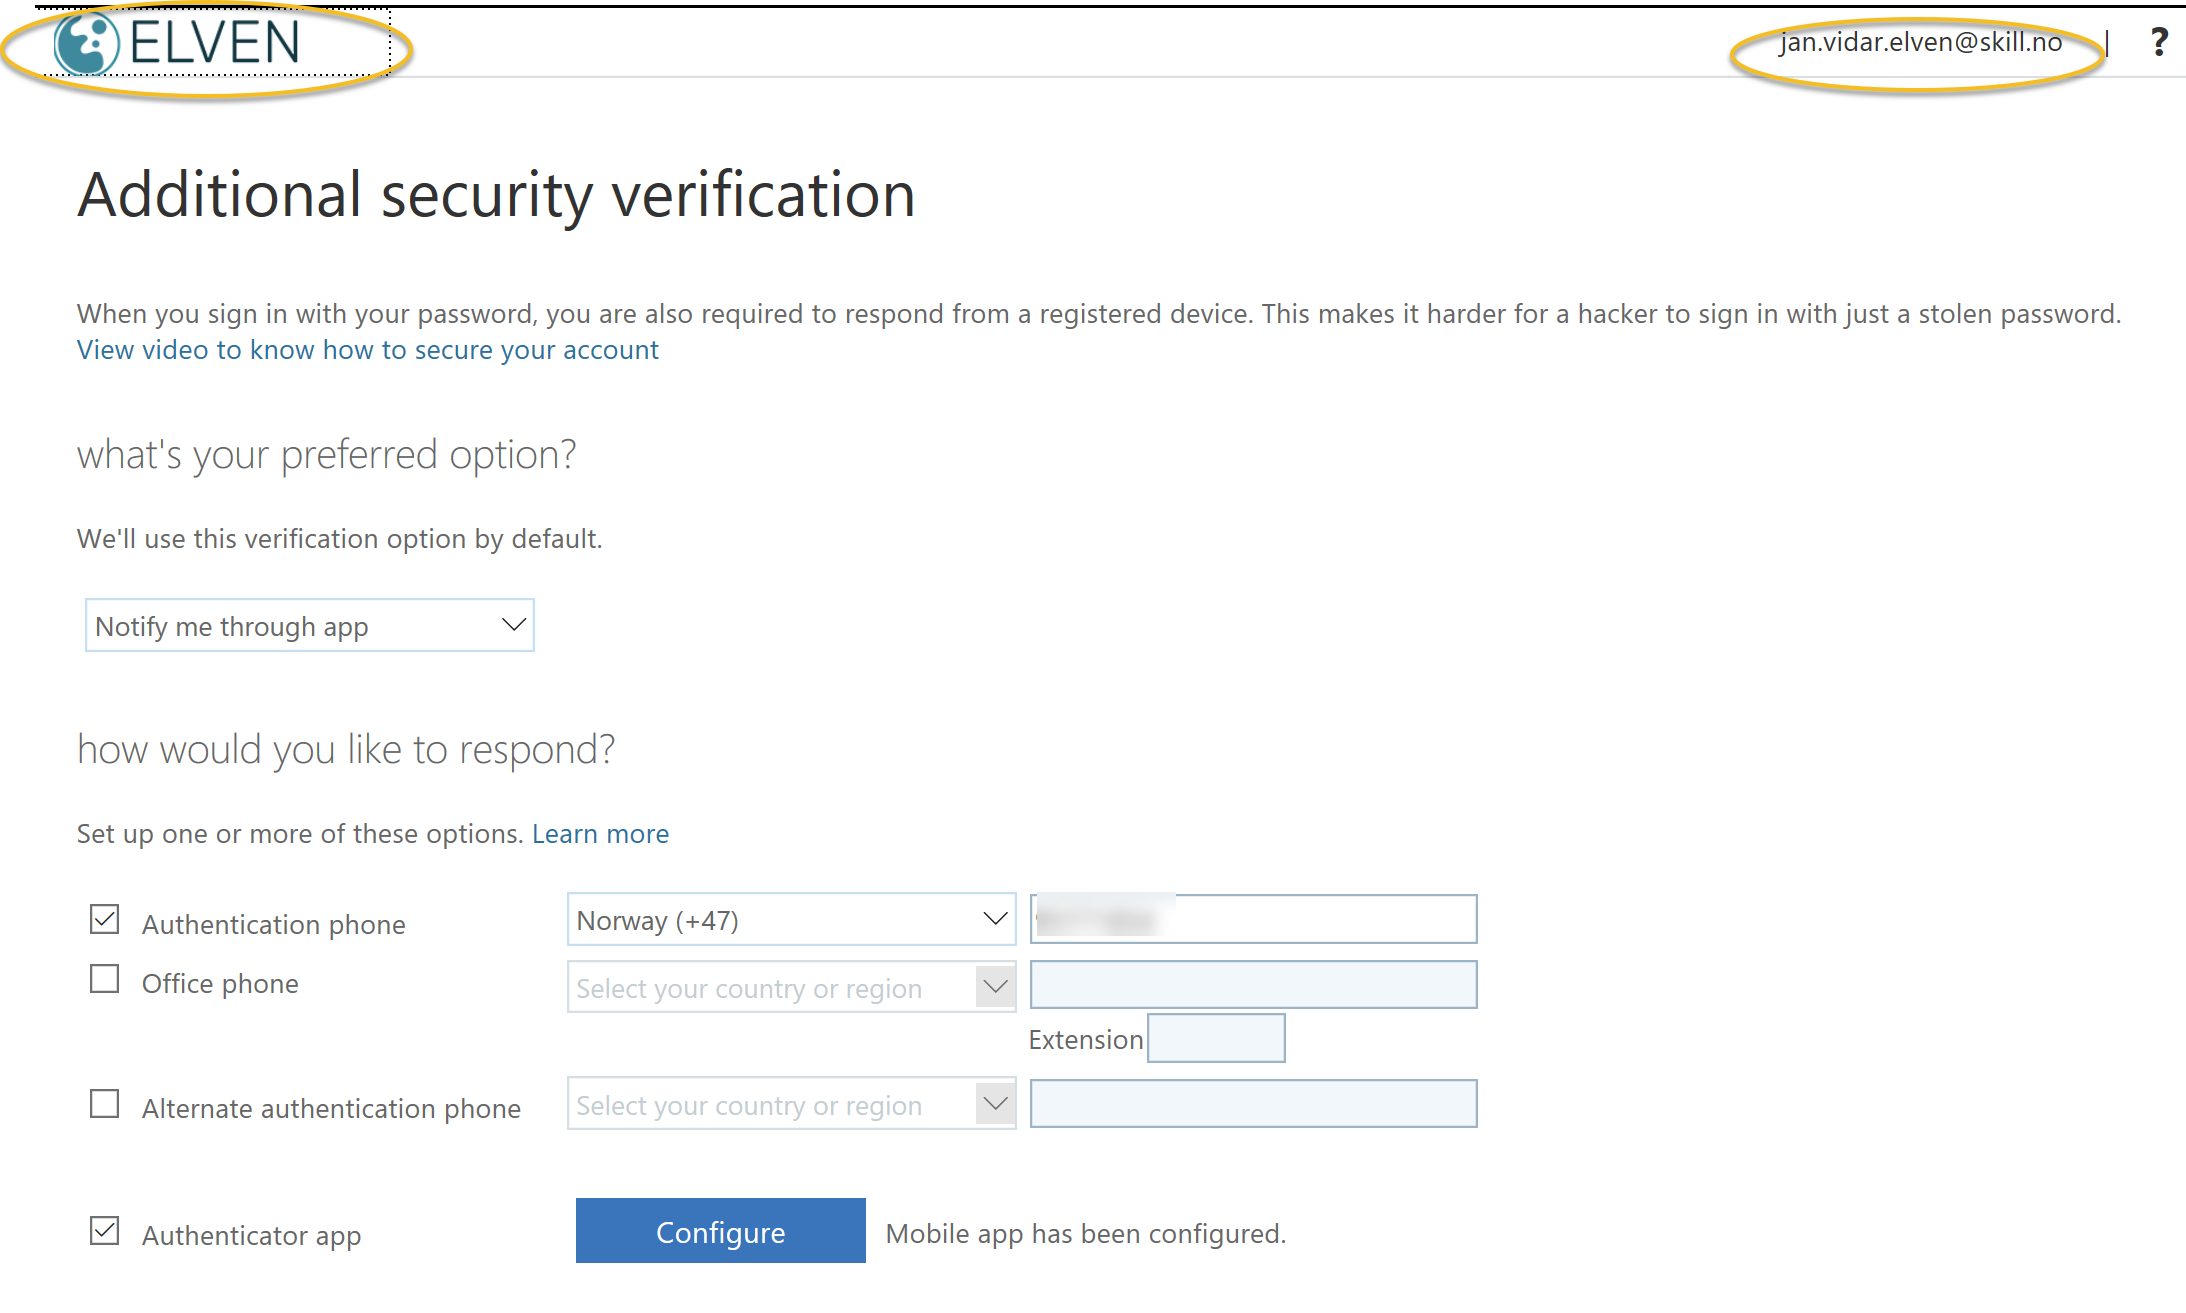
Your guest users will have to set up their security verification methods in your tenant before they can authenticate with MFA as guests to your published application. They will be prompted to do that if they haven’t done it before at first time, but they can also do that by accessing their profile in your tenants myapps.microsoft.com. See below picture where my guest user can set up preferred methods for MFA in the elven tenant:

MFAGuest4

In this example I have set up Microsoft Authenticator on my mobile phone, and note the #EXT# identity which is the guest user for Elven tenant:

MFAGuest2

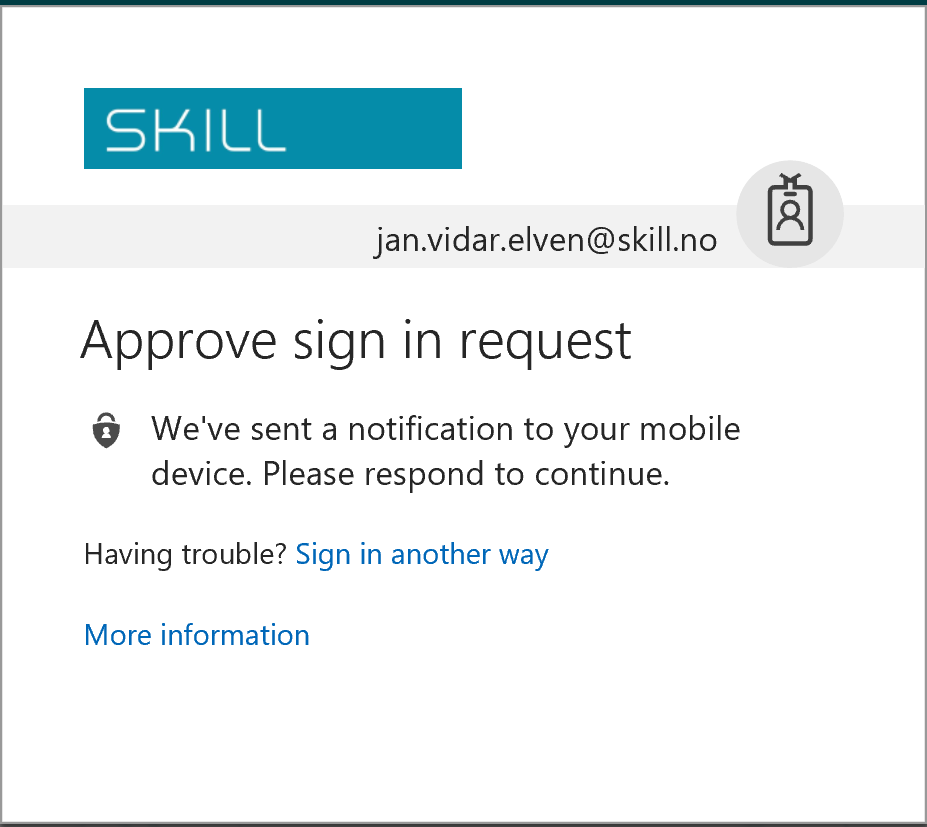
I can the select to launch the application as a guest user, and will be prompted authenticate with my selected method for MFA:

MFAGuest3

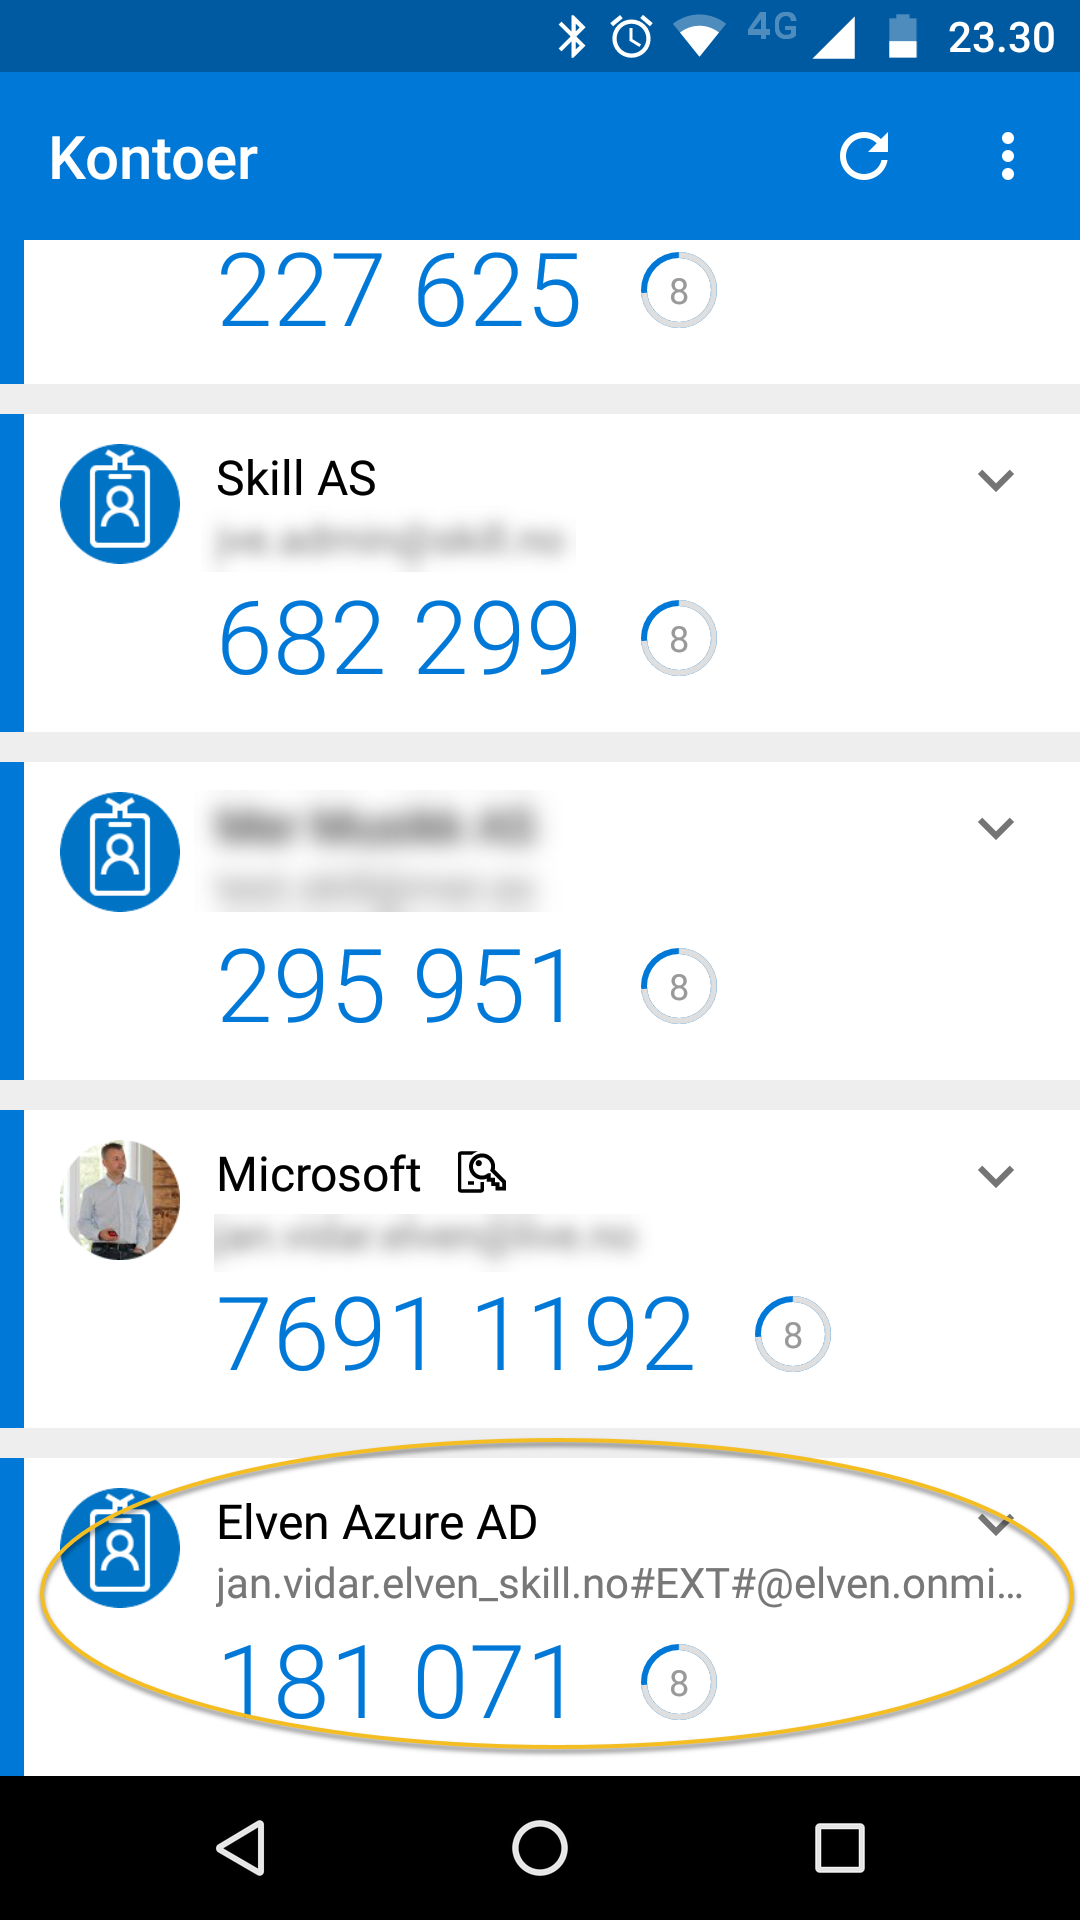
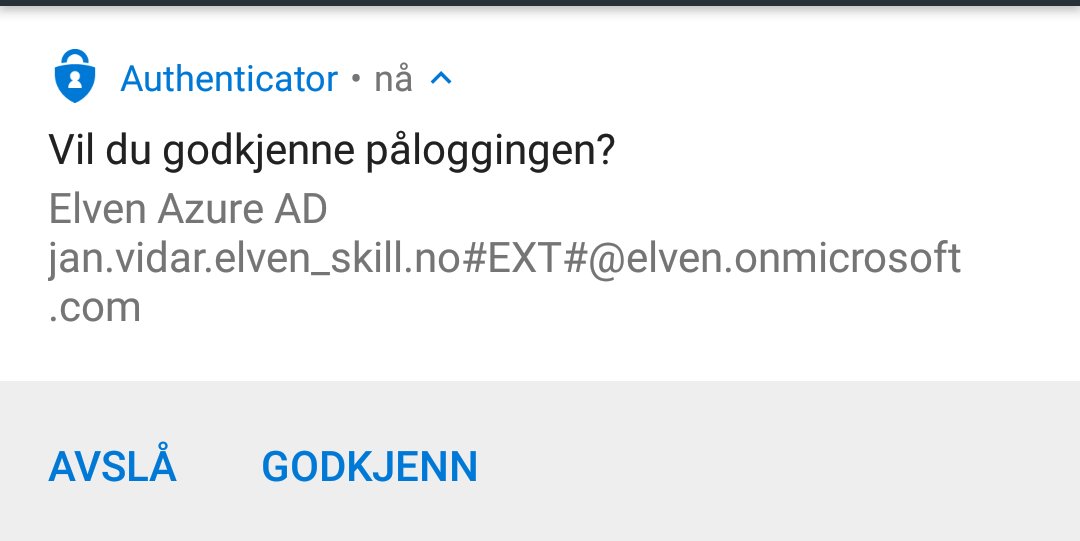
In my mobile phone I can approve, again I can see that I authenticate with my #EXT# guest account (most text in Norwegian, but you get the idea;)

MFAGuest1

See notes under for license requirements for MFA and guest users.

Notes and tips

Although Azure AD B2B is a free feature, creating local users in Active Directory and accessing resources like web servers, database servers and any third party applications you publish are not free and you will have to check your licensing requirements.

You shouldn’t synchronize your shadow guest users to Azure AD with Azure AD Connect.

Using Azure AD Conditional Access for require MFA is an Azure AD Premium feature, so you need EMS E3 or Azure AD Premium P1 licenses. You can then use up to 5 Azure AD B2B guests per EMS E3/AADP1 license you own, in a 1:5 ratio. So for example if you internally have 100 EMS licenses, you can require MFA for up to 500 Azure AD B2B guests.

And finally, Microsoft has noted that there will be guidance and documentation coming for best practice and governance for these Azure AD and on-premises AD guest users, as there can be a lot more complex enviroments than my example here, see this link: https://techcommunity.microsoft.com/t5/Azure-Active-Directory-B2B/AAD-Application-Proxy-and-B2B-Users/td-p/85249

Using Azure AD Managed Service Identity to Access Microsoft Graph with Azure Functions and PowerShell

Recently Microsoft released an exciting new preview in Azure AD: Managed Service Identity! You can go and read the details at the Enterprise Mobility + Security blog, and some examples of usage scenarios: https://azure.microsoft.com/en-us/blog/keep-credentials-out-of-code-introducing-azure-ad-managed-service-identity/

Managed Service Identity makes it possible to keep credentials out of code, and that is a very inviting prospect. As I have been exploring Microsoft Graph in different scenarios using PowerShell, I thought I should have a go at using Managed Service Identity in an Azure Function and run some PowerShell commands to get data from the Microsoft Graph. Lets get started!

Configuring the Azure Function

First, if you haven’t already created an existing Azure Function App, go ahead and do that. Here is my Function App I will use in this demo:

image

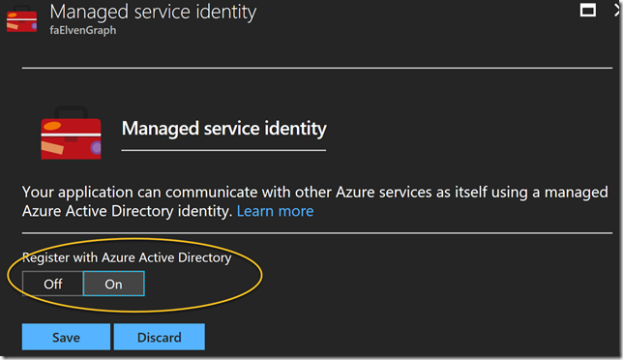
Next, open the Function App and go to Platform features, and then click on Managed service identity:

image

Under Managed service identity, select to Register with Azure Active Directory:

image

After saving you should get a successful notification that the managed service identity has been registered.

image

Let’s check what has happened in Azure AD, to that I will use the AzureAD PowerShell CmdLets. After connecting to my Azure AD tenant, I will try to get the Service Principal:

image

And get some properties of that object:

image

We can see that the Service Principal object is connected to the Azure Function App and of type ServiceAccount.

image

Now, we are ready for the next step, which is to create a function that will get data from Microsoft Graph. But first we will need to give this Service Principal some permissions.

Permissions and Roles for the Managed Service Identity

Depending of what you want to do with your Function App, the managed service identity, represented by the service principal, will need some permissions to access resources. You could give the service principal rights to Azure resources like Virtual Machines, or to access Key Vault secrets (a nice blog post on that here: https://blog.kloud.com.au/2017/09/19/enabling-and-using-managed-service-identity-to-access-an-azure-key-vault-with-azure-powershell-functions/).

In my scenario I want to access the Microsoft Graph, and specifically get some Directory data like user information from my Azure AD. When accessing Microsoft Graph you would normally register an Azure AD Application and set up Application or Delegated Permissions, and follow the authentication flow for that. But in this case I want the Service Principal to be able to directly access Directory Data, so I will have to give my Service Principal permission to do that.

The following Azure AD commands adds my service principal to the AD Directory Role “Directory Readers”:

image When listing membership in that role I can see my Service Principal has been added:

image

Creating a PowerShell Function for the Managed Service Identity

In your Function App, you can now create a new Function, selecting language PowerShell, and in this case I will create it as a HttpTrigger Function:

image

If you have been following the flow of the blog post until now, we can now check if the Function App is ready for using the Managed Service Identity (MSI). Two environment variables will be created, and you can check if they exist by going to Platform features, and then selecting Advanced tools (Kudo). Under environment you would se something like this if everything is ready (it could take a little time, so re-check until its there):

image

These two environment variables will be needed in the Azure Function, so we will start by getting that:

image

If I run the Function I can see from the output that I was able to retrieve the environment variables:

image

Next I will specify some URI and parameters for my authentication request using the managed service identity. I will need to specify the version (currently 2017-09-01 as specified in the documentation), and since I want to get data from the Microsoft Graph, I will need to specify that as the resource URI. I then build the URI for getting the authentication token:

image

With that, I can now do an authentication request, which if successful will return an access token I can use as a Bearer token in later queries agains the Microsoft Graph:

image

Let’s do another test run and verify that I can get an Access Token:

image

Querying the Microsoft Graph

With a valid Access Token, and with the correct permissions for the resources I will want to access, I can now run some Microsoft Graph API queries.

In my example I have some test users in my tenant named after the popular Seinfeld show. In fact I have set a “Seinfeld” department attribute value on those. So my query for getting those users would be:

https://graph.microsoft.com/v1.0/users?$filter=Department eq ‘Seinfeld’

A great way to test Microsoft Graph Commands is to use the Graph Explorer, https://developer.microsoft.com/en-us/graph/graph-explorer, and if you sign in to your own tenant you can query your own data. As an example, I have showed that here:

image

In my Azure Function I can define the same query like this (PS! note the escape character before the $filter for it to work):

image

And with that I can request the user list using Microsoft Graph and a Authorization Header consisting of the Access Token as a Bearer:

image

Let’s output some data from that response:

SNAGHTMLfb020e

And there it is! I’m able to successfully query the Microsoft Graph using Managed Service Identity in an Azure Function, without handling any credentials.

For reference, I have attached both the Azure AD PowerShell  commands, and the Function PowerShell commands below from my Gist. Enjoy!

Azure AD PowerShell SPN commands:


# Log in to Azure AD with Global Admin
Connect-AzureAD
# Get the Service Principal for the Function App
$faSpn = Get-AzureADServicePrincipal -SearchString "faElvenGraph"
# Get some properties for the Service Principal
$faSpn | Select-Object ObjectId, ObjectType, AlternativeNames,
AppId, DisplayName, ServicePrincipalType
# Get a Directory Role
$role = Get-AzureADDirectoryRole | Where-Object {$_.DisplayName -eq "Directory Readers" }
# Add the Service Principal to the Directory Role
Add-AzureADDirectoryRoleMember -ObjectId $role.ObjectId -RefObjectId $faSpn.ObjectId
# List Members in the Role
Get-AzureADDirectoryRoleMember -ObjectId $role.ObjectId
# If you want to remove from the Role, uncomment and use the following
#Remove-AzureADDirectoryRoleMember -ObjectId $role.ObjectId -MemberId $faSpn.ObjectId

view raw

AzureADSPN.ps1

hosted with ❤ by GitHub

Azure Function PowerShell Trigger:


# Get Managed Service Identity info from Azure Functions Application Settings
$msiEndpoint = $env:MSI_ENDPOINT
$msiSecret = $env:MSI_SECRET
Write-Output $msiEndpoint
Write-Output $msiSecret
# Specify URI and Token AuthN Request Parameters
$apiVersion = "2017-09-01"
$resourceURI = "https://graph.microsoft.com&quot;
$tokenAuthURI = $msiEndpoint + "?resource=$resourceURI&api-version=$apiVersion"
# Authenticate with MSI and get Token
$tokenResponse = Invoke-RestMethod -Method Get -Headers @{"Secret"="$msiSecret"} -Uri $tokenAuthURI
# This response should give us a Bearer Token for later use in Graph API calls
$accessToken = $tokenResponse.access_token
Write-Output "Access Token"
Write-Output $accessToken
# $tokenResponse | Get-member
# All Users from a Department
$userlisttURI = "https://graph.microsoft.com/v1.0/users?`$filter=Department eq 'Seinfeld'"
# Get the User objects via an authenticated request to Graph API with the help of Bearer Token in authorization header
$graphResponseUsers = Invoke-RestMethod -Method Get -Uri $userlisttURI -Headers @{"Authorization"="Bearer $accessToken"}
# Loop through PowerShell object returned from Graph query
foreach ($user in $graphResponseUsers.value)
{
Write-Output $user.DisplayName
}

Looking in to the Changes to Token Lifetime Defaults in Azure AD

In a recent announcement at the Enterprise Mobility Blog, https://blogs.technet.microsoft.com/enterprisemobility/2017/08/31/changes-to-the-token-lifetime-defaults-in-azure-ad/, there will be a change for default settings to the Token Lifetime Defaults in Azure Active Directory for New Tenants only. This change will not affect existing old Tenants.

I have summarized the changes in this table:

image

This is great news for many customers to remove user frustration over authentication prompts when refresh tokens expired after a period of inactivity. For example, if I havent used an App on my mobile phone for 14 days, I have to reauthenticate with my work/school account again to get a new Access Token and Refresh Token. Some Apps I use quite often, like Outlook and OneDrive, and by keeping active the Refresh Token will be continously renewed as well together with the Access Token (which by default is valid for 1 hour). For my existing tenant this would mean that keeping active, and at least using the Refresh Token inside the 14 Days, I will get new Access and Refresh Tokens, but after 90 Days the Single and/or Multi factor Refresh Token Max Age will be reached, and I have to reauthenticate again in my Apps.

Some Apps I will naturally use more rarely, for example Power BI, Flow, PowerApps etc. (this will be different for each user type), but I risk having to reauthenticate every time if I only access these Apps every other week.

So for New Tenants this has now changed, as Refresh Tokens will be valid for 90 Days, and if you use the Refresh Token inside that period, you will get 90 more days. And furthermore, the Max Age for Single/Multi factor Refresh Token will have a new default of Until-revoked, so basically it will never expire.

Keep in mind though, that Azure AD Administrators can revoke any Refresh Token at any time. Refresh Tokens will also be invalid if the authenticated users password changes or expire. It is also nice to be aware of that every time a Refresh Token is used to get a new Access Token, Conditional Access and Identity Protection from Azure AD will be used to check if the User or Device is in a Compliant State with any policies defined.

A few words on the Confidential Clients also. Confidential Clients are typically Web Apps that are able to securely store Tokens and identity itself to Azure AD, so after the User has Authenticated and actively Consented to access specific Resources, the resulting Access and Refresh Tokens can be used until revoked, as long as the Refresh Token are used at least once inside 90 Days (New Tenants) or 14 Days (Old Tenants).

If you want to read more deep dive on configurable Token Lifetimes, you can follow this link: https://docs.microsoft.com/en-us/azure/active-directory/active-directory-configurable-token-lifetimes.

Azure AD PowerShell examples for changing Token Lifetime Defaults

I have created some Azure AD PowerShell V2 examples for how you can change the Token Lifetime Policy defaults in your organization.

First connect to your Tenant and see if there already are defined any policies (normally there would be nothing):

image

Then lets make a definition that reflects the new defaults for New Tenants:

image

So if you already have an existing old tenant, and you want to change the default policy so that it reflects the new Token Lifetime settings, you can run this command:

image

A different scenario, lets say I have a New Tenant, and want to use the old default values instead. I will make a definition that reflects that:

image

And create a policy using these definitions:

image

Last, I will leave you with commands for changing any existing Azure AD policies:

image

The complete list of Azure AD PowerShell CmdLets used and examples can be found here at my Gist repository.


# Azure AD v2 PowerShell Token Lifetime Policy
# Connect with Modern Authentication
Connect-AzureAD
# See if there are any existing Azure AD Policies defined
Get-AzureADPolicy
# Defaults for NEW tenants:
# Refresh Token Inactivity: 90 Days
# Single/Multi factor Refresh Token Max Age: until-revoked
# Refresh token Max Age for Confidential Clients: until-revoked
$newDefaultTokenLifetimePolicy = @('{
"TokenLifetimePolicy":
{
"Version":1,
"MaxInactiveTime":"90.00:00:00",
"MaxAgeSingleFactor":"until-revoked",
"MaxAgeMultiFactor":"until-revoked",
"MaxAgeSessionSingleFactor":"until-revoked",
"MaxAgeSessionMultiFactor":"until-revoked"
}
}')
# If you have an OLD tenant, run this command to create a default
# organization policy that reflects the settings for new tenants
New-AzureADPolicy -Definition $newDefaultTokenLifetimePolicy `
-DisplayName "OrganizationDefaultPolicyScenario" `
-IsOrganizationDefault $true -Type "TokenLifetimePolicy"
# Defaults for OLD existing tenants:
# Refresh Token Inactivity: 14 Days
# Single/Multi factor Refresh Token Max Age: 90 days
# Refresh token Max Age for Confidential Clients: until-revoked
$oldDefaultTokenLifetimePolicy = @('{
"TokenLifetimePolicy":
{
"Version":1,
"MaxInactiveTime":"14.00:00:00",
"MaxAgeSingleFactor":"90.00:00:00",
"MaxAgeMultiFactor":"90.00:00:00",
"MaxAgeSessionSingleFactor":"until-revoked",
"MaxAgeSessionMultiFactor":"until-revoked"
}
}')
# If you have a NEW tenant, and want to use the old default values,
# run this command to create a revert the default organization policy
New-AzureADPolicy -Definition $oldDefaultTokenLifetimePolicy `
-DisplayName "OrganizationDefaultPolicyScenario" `
-IsOrganizationDefault $true -Type "TokenLifetimePolicy"
# If you want to update any existing organization default token lifetime policy, use these commands
$orgDefaultPolicy = Get-AzureADPolicy | Where-Object `
{$_.Type -eq "TokenLifetimePolicy" -and $_.IsOrganizationDefault -eq $true}
Set-AzureADPolicy -Id $orgDefaultPolicy.Id -DisplayName "OrganizationDefaultPolicyUpdatedScenario" `
-Definition $newDefaultTokenLifetimePolicy
# Look at existing token lifetime polices and settings
$aadTokenLifetimePolicies = Get-AzureADPolicy | Where-Object {$_.Type -eq "TokenLifetimePolicy"} | `
Select-Object DisplayName, Type, IsOrganizationDefault, Definition
# List existing settings
$aadTokenLifetimePolicies.Definition | ConvertFrom-Json | Select-Object -ExpandProperty TokenLifetimePolicy | `
Select-Object $aadTokenLifetimePolicies.DisplayName, `
MaxInactiveTime, `
MaxAgeSingleFactor, `
MaxAgeMultiFactor, `
MaxAgeSessionSingleFactor, `
MaxAgeSessionMultiFactor

Hopefully this has been informative and helpful for Azure AD Administrators and others Smile!

Experts and Community unite again at Experts Live Europe in Berlin

Last week I was back at this great Community conference, previously known as System Center Universe Europe (SCU Europe), and this year for the first time under the name Experts Live Europe, part of the Experts Live network (http://www.expertslive.org). This conference is well known for its great content, top speakers, sponsors and great community, where you meet friends old and new, and generally have a great time the 3 days the conference lasts.

This year the conference was held in the BCC by Alexanderplatz in Berlin, the same venue as last year. With almost 400 people from 28(!) different countries, I was very proud again to be among the great set of Experts and MVPs presenting sessions on topics from Cloud, Datacenter, Management, PowerShell, IoT, Azure, EMS, and more.

DH5UPI_XcAA861qDH5XO43XoAEjxx-

I presented two breakout sessions, the first one was about how to “Take your Azure AD and Intune Management Skills to the Next Level with Microsoft Graph API and PowerShell”, a practical and demo-heavy session.  The PowerShell script I used in the demos can be found in my GitHub repository: https://github.com/skillriver/ELEU2017-Public

20170824-093253_experts_live_day2_775620170824-093036_experts_live_day2_630920170824-093236-experts-live-day2-7753_origDH-sq1pWAAAlSJ1

The second session I presented was on “Mastering Azure Active Directory v2”, where I discussed features in the new Azure AD Portal for Azure AD Administrators that have previously used the classic portal or Office 365 admin portal for managing users, licenses, and admin roles and more. We also looked at the Azure AD v2 PowerShell, that will replace the v1 (MSOL) cmdlets. Look to my Gist repository for several examples on using Azure AD v2 cmdlets, https://gist.github.com/skillriver.

20170825_141449_experts_live_day3_7709520170825_141532_experts_live_day3_8861020170825_141644_experts_live_day3_7710020170825_141508_experts_live_day3_77097

I also had the pleasure to be in a discussion panel with Microsoft Intune Principal Program Manager Simon May, CDM MVP Tudor Damian and my fellow Norwegian EMS MVP Jan Ketil Skanke, where we had good questions and discussions from the attendance on the topic Identity, Security and Compliance.

20170824-154354_experts_live_day2_6506DIAB2iEXYAAGwWE

The days went by really fast, and soon it was time for the closing note and the traditional trivia with funny stories and facts from the past conferences. One of the questions was how many have attended all 5 conferences (speakers, sponsors and attendees), the correct answer was not known, but the audience who had done this was invited onto the stage, and 10 people (in addition to Marcel) had their loyalty appriciated with claps and cheers from the room. And, I’m one of those that has been to all conferences 🙂

5yearSCU20170825-154856-experts-live-day3-77201_orig

So with that ended the 5th annual conference that used to be SCU Europe and is now Experts Live. I have made some great friends there, and the conference has a family feeling going back there every year. There has been some early mornings, and some late nights, as it should be.

DH96GxHXgAAx9CP20170825_201542_experts_live_day3_77685

Thanks for me, Berlin and Experts Live, next year it will another place, it will be exiting to see where it will be. I know I will be back, hope you will to!

DIFSBUhXUAERPjz