Tag Archives: Azure Multi-Factor Authentication

Secure Access to Project Honolulu with Azure AD App Proxy and Conditional Access

Last week Microsoft announced Project “Honolulu”, the new Windows Server remote management experience, and now you can download a technical preview to install in your own data center, read here for more details: https://blogs.technet.microsoft.com/windowsserver/2017/09/22/project-honolulu-technical-preview-is-now-available-for-download/.

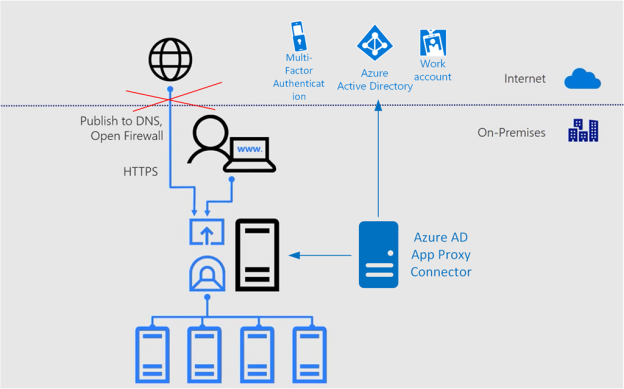
As the management is browser based, I thought this was a perfect fit for using Azure AD and publishing the management portal using Azure AD Application Proxy, and even better to secure the access using Azure AD Conditional Access. Consider the following diagram, where you instead of just publishing DNS and open Firewall to access the management server directly, I would instead use Azure AD App Proxy for secure access.

ProjectHonolulu

So lets get started setting this up!

Install and configure Project “Honolulu” technical preview

I will not get into great detail on installing Project “Honolulu” here, you can just follow the technical deployment documentation, but in my environment I have installed some servers running as Azure Virtual Machines joined to a single-forest, single-domain Active Directory. I have “on-premises” AD users and groups, and I’m running Azure AD Connect with Password Hash Synchronization.

On one of these Azure VM’s, I’ve downloaded and installed the Project “Honolulu” technical preview, with the following configuration:

  • Management Port: 6516
  • Self-signed Certificate

I’m now able to access the web based management internally, using https://azhon1.elven.local:6516. I can now proceed with publishing this externally with Azure AD App Proxy.

Configure Azure AD Application Proxy

Before you can publish applications using Azure AD Application Proxy, you have enable the feature in your Azure AD tenant, and install and configure one or more servers running Azure AD App Proxy Connector, and configure those in a connector group to use for the application. If you already have this configured, you can proceed to the next section. If you want more details, see this previous blog post, and the first sections on enabling App Proxy and innstalling connectors: https://gotoguy.blog/2017/02/21/publish-the-cireson-configuration-manager-portal-with-azure-ad-application-proxy/

Publish the Project Honolulu as an Azure AD App Proxy App

In the Azure AD management blade in the Azure Portal, select Enterprise Applications and click to add a new application. Select On-premises application:

image Specify a Name for your application, and the Internal Url where you installed the Project Honolulu technical preview, including port number as shown below. If you want you can change parts of the External Url, even using your own domain and SSL certificate. I will just use the default here. I will use Azure Active Directory as Pre Authentication, meaning that no-one can access this website without beeing authenticated with Azure AD first. And last, I select my Connector Group of Azure AD App Proxy Connector Servers. PS! Remember that these servers need to be able to access the Internal Url directly, in case you have any Firewalls, NSGs or other components that might block traffic.

image

After adding the application, I have to do some more configurations. First, optionally, you can select a custom logo:

image

User assignment is required in this configuration, so next I need to assign some users to the application. Here I have added a normal domain user and a domain admin user. Both these users are synchronized from my local AD.

image

Next I wan’t to configure Single Sign-On, so that users that authenticate with Azure AD automatically will be signed in to the Project Honolulu management site. I select Integrated Windows Authentication for sign-on mode, and then I specify the internal application SPN for which is needed for Kerberos Constrained Delegation.

image

After that I have one more important step, and that is to configure delegation at my Application Proxy Connector servers. In my local Active Directory, open the Computer object for every server that acts as Azure AD App Proxy Connectors, and on the Delegation tab, add the server that you installed the Project Honolulu on, selecting http as the service. In my environment, I have added this now. I have some previous delegations for others servers as well.

image

We are now ready to test the application publishing via Azure AD!

Access Application using Azure AD

You now have basically two options for accessing the application:

When using the Azure AD Access Panel, if your users has been assigned access, you will see the application published:

image

When launching that, I will be automatically logged in to the Project Honolulu web site, configured via SSO and Windows Integrated Authentication:

image

And I can start managing my configured servers:

image

So, now we have successfully configured an Azure AD App Proxy Application, and can connect securely from external url using SSO with Windows Integrated Authentication and Azure AD Pre Authentication. The application also requires that only assigned users can access the application.

In the next section I will configure Conditional Access for the application.

Configuring Conditional Access

When publishing this server management tool for external access, I wan’t to secure access as much as possible. For example, if one of my admins credentials have been leaked, I want that extra layer of security that users have to use Azure Multi-Factor Authentication when accessing the Project Honolulu application. I will configure that using Azure AD Conditional Access. On the application, I select Conditional Access as shown below:

image

I select to create a new policy, giving it a name:

image

I then select this to apply for all users:

image

Confirm that this policy applies to the Project Honolulu application:

SNAGHTML7d43e5d

On Conditions I can optionally configure conditions for sign-in risk, device platforms, locations and client apps, but I will just let this policy apply for all conditions for now, so I’m leaving Conditions as it is.

image

Under Access Control I select to Require Multi-Factor Authentication, and the set to Enable the policy. Note that I can select additional controls for even more secure access, but for now I just want to require MFA:

SNAGHTML7d8d124

So, save the policy, and lets test how accessing the application works now.

If I either go directly to the external url, og via the Access Panel, I will now be prompted for MFA:

image

That concludes this blog post. I’m very excited for this new preview for Project “Honolulu”, and using the great Azure AD Application Proxy feature I can securely publish and access the management site from external locations and clients. And even better with Azure AD Conditional Access, I can create a policy that sets access control for multi-factor autentication requirements, and if I want I can even control which device clients and what apps they use to access.

Hopefully this has been helpful for you, if you have any questions reach out to me on Twitter or use the comments below this blog post 🙂

Speaking at #ExpertsLive 2016 Netherlands

Next week at Tuesday 22nd of November I will be back speaking at ExpertsLive 2016, at CineMed Ede, Netherlands. After my first visit and speaking there last year, I always wanted to go back to this great community event, and I’m very happy and honored to be invited to speak again.

ExpertsLive NL 2016 will feature over 50 sessions, plus Keynote and Closing note, in as much as 9 different tracks ranging from Azure and Azure Stack, to Managebility, Automation, Windows Server 2016, Office 365, Security and Windows 10! In addition there will be great sponsors and networking. What more can you ask of a conference. There will be over 1000 attendees mostly from Netherlands, but also from visiting nearby countries.

My session will be on Azure Active Directory and how you can perform Premium Management and Protection of Identity and Access with Azure AD, covering solutions like Privileged Identity Management, Identity Protection, Multi-Factor Authentication and Azure AD Connect Health. It is very important to protect your identity now, let me show you how, and I will show some nice demos as well, hope to see you there!

Read more about ExpertsLive here: http://www.expertslive.nl

EXPERTSLIVE.5011_email-signature_spreker_ENG_630x180

Speaking at UC Day UK 2016

I’m excited to be speaking at UC Day UK at the National Conference Centre, in Birmingham, 24th October 2016. If you are interested in attending or reading more, visit this link http://www.ucday.uk.

My session will be on Azure Active Directory and how you can perform Premium Management and Protection of Identity and Access with Azure AD, covering solutions like Privileged Identity Management, Identity Protection, Multi-Factor Authentication and Azure AD Connect Health. I will show some nice demos as well, hope to see you there!

JoinSkillriverPremiumIdentityManagementAzureAD

In addition to my session I will during the day be interviewed on The Skype Show (www.theskypeshow.com) about Azure AD and Identity and Access, some of these sessions will go live on Microsoft Channel 9 if logistics permit, or via Skype for Broadcast Meetings or Skype Meetings, and in anyway be recorded and released on Channel 9, Youtube and The Skype Shows website.

image

UC Day will cover technologies like Skype for Business, Exchange, Office 365, Azure and Cloud, and with 25 breakout sessions over 5 tracks, together with expo and sponsors, keynote and closing note. I very much look forward to come there!

How to enable Azure MFA for Online PowerShell Modules that don’t support MFA?

In this blog post I will look into how you can accomplish Azure Multi-Factor Authentication for Admins even though the Online PowerShell Module don’t support it. The key to do this is to implement and use Azure AD Privileged Identity Management, which is an Azure AD Premium P2 / EMS E5 feature.

The Problem

Administration of Online Services with PowerShell can be done with different PowerShell modules or for some scenarios setting up a remote session to the Online Service.  But not all scenarios support Azure MFA natively.

A quick overview of the main modules that DO support Azure MFA today:

All of these above supports Azure MFA as long as you are not passing in a Credential object. There are also more advanced scenarios for programmatic access with Access Token and Certificates that I will not cover here for some of these modules. The main thing is that when you create a Credential object with Get-Credential, and pass that in as a Parameter to the above modules, Azure MFA will not work if the Admin user has been configured to use that. We’ll see some examples later in the blog. Note also that if you have an older version of MSOnline or Aadrm which required the Online Sign-In assistant, these will not work with Azure MFA and you must upgrade to the latest versions.

So what about the modules and scenarios that don’t support Azure MFA. These are mainly Office 365 and Remote PowerShell:

  • Exchange Online Remote PowerShell (Update, a new Exchange Online Remote PowerShell module has now been released, but for a normal PowerShell remoting session this would still not support Azure MFA)
  • Skype for Business Online Remote PowerShell
  • Office 365 Security & Compliance Center Remote PowerShell

In these scenarios you must create a Credential object, and pass that in as a parameter when connecting to the service, thus blocking the use of Azure MFA.

A Security Best Practice for Admins

Today I just don’t find it acceptable for Admin accounts for any Online Service like Azure or Office 365, to not use Multi-Factor Authentication or some other protection mechanism, and just depend on username and password!

In addition to that, as an Organization you have to have control of your identities, employees and admins come and go, I have seen many times that Organizations still have Admin accounts for users that have left the company for a long time ago.

Most Organizations have Directory Synchronization from local Active Directory to Azure AD, making it possible to synchronize your local admin accounts. You then have a choice: Should I use synchronized admin accounts for the Admin Roles in Azure/Office 365? Or should I only create Cloud only admin accounts for this purpose?

My security best practice is to use a combination of both, so that:

  • Synchronized On-Premise Admin Accounts for the most important, permanent and sensitive admin accounts, like Global Admins, Security Admins, Azure Subscription Admins and more. These accounts will be set up to require Azure MFA, as these accounts possibly can connect to On-Premise resources.
  • Cloud Only Admins accounts for Role Based Administration, additional temporary Global Admins or other scenarios for intermittent Azure and Office 365 administration. These accounts will not be set up for Azure MFA, but I use Azure AD Privileged Identity Management to require Azure MFA when activating the role. Some of these accounts also includes service accounts for Directory Synchronization, Intune Connector etc.

The Solution

I have found that the best way to protect both type of Admin accounts is to use the Azure AD Privileged Identity Management and Azure MFA in combination so that:

  • In general all of the permanent Admin Accounts with a few exceptions are required to use Azure MFA. These Admin accounts can use all PowerShell modules that support MFA when connecting.
  • Role-based admins (for example Exchange Admins, Skype for Business Admins,..) are set up to be Temporary/Eligible Admins in Azure AD Privileged Identity Management, which require Azure MFA at activation time. After the admin role is activated, he or she can use the PowerShell modules/remote sessions that don’t support Azure MFA natively.

The downside of this solution is that Azure AD Privileged Identity Management require an Azure AD Premium P2 license or Enterprise Mobility E5 license, which will be Generally Available Sept 15th. Azure MFA are free to use for Admin accounts for Online Services.

How to set it up

In the following steps I will show how to set this up and how it will work. For the purpose for this demo I will work with my demo environment with the tenant name elven.onmicrosoft.com. I have also configured directory synchronization from my on-premise Active Directory, these users will have a UPN suffix of elven.no.

In my environment I have a fictional character called Ola Nordmann. Ola is an Exchange Admin in our Hybrid Exchange environment, and needs permissions to administer Exchange Online in Office 365 both via the management portal and via Exchange Online PowerShell.

Ola has these two accounts now in Azure AD:

image

As per the solution described, I will configure and require Azure MFA for the on-premise admin account, and for the cloud admin account I will use Privileged Identity Management and MFA for role activation.

Configure Multi-Factor Authentication

The easiest way to enable MFA for a user is via the Office 365 Admin portal at https://portal.azure.com. In the user list I find and select the admin user I want to enable MFA for:

image

The Manage multi-factor authentication will take me to the Azure AD multi-factor authentication administration page, where I find and select the admin user:

image

On the right-hand side I select to Enable for the selected user(s):

image

After that I confirm that I want to enable MFA for the user:

image

And get confirmation:

image

Now I see that the status is Enabled, this means that the user needs to log on and configure the authentication method for MFA first:

image

Configure Admin Role

Next, I will give Ola Nordmann the Exchange Administrator role, so that he can administer Exchange Online.

Back in the Office Admin portal I see that the user now has no roles:

image

I select Edit, and choose the Customized administrator and Exchange administrator role, and add the e-mail address of the user:

image

Next, I add the same Exchange administrator role to the Ola Nordmann (Cloud Admin) user:

image

So, at this time, both admin users are Exchange administrators, but only the [email protected] on-premise admin account has been configured for multi-factor authentication.

Log on and activate multi-factor authentication method for admin user

Now I will log on the [email protected] account to https://portal.office.com.

Since this admin account has been configured for MFA, I must set that up now:

image

I need to select an authentication method. In this demo I will use the Microsoft Authenticator App:

image

I select to set up and configure the mobile app:

image

I open up the Microsoft Authenticator app on my phone, and follow the instructions from above. After that I get confirmation that the mobile app has been configured.

image

Now I need to select Contact me to test the authentication:

image

At my phone I get the notification in the App and select verify, and I should be successful. Since I only have set up the mobile app, I also need to add phone number verification in case I lose access to the app. I type my mobile phone number and press next.

image

And in the last step I get an app password to use on some apps, I will not be needing this now for this demo, and click Done:

image

Back in the portal login, I will now be prompted to authenticate with my app:

image

After successfully authenticating I’m logged in to the portal:

image

And since this user has an Exchange administrator role, I can see limited information in the Office 365 admin portal and launch the link to the Exchange admin portal:

image

Try to access Exchange Online PowerShell with MFA enabled admin

First, a quick look back at the multi-factor authentication administration page, where the admin user status has now been updated to Enforced. This happens after the users have been enabled for MFA, and after they have successfully configured their authentication methods. Enforced means that they will now be required to do MFA when authenticating against online services:

image

Let’s try to access Exchange Online PowerShell with this admin user. Instructions for connecting with PowerShell for Office 365 services are detailed here: https://support.office.com/en-us/article/Managing-Office-365-and-Exchange-Online-with-Windows-PowerShell-06a743bb-ceb6-49a9-a61d-db4ffdf54fa6?ui=en-US&rs=en-US&ad=US

I launch a PowerShell window and get a Credential object:

image

After that I try to create a remote session with that credential:

image

As expected this will fail, as multi-factor auhtentication is required for the [email protected] account.

In the next part we will look at the other cloud admin user and configure the workaround using Azure AD Privileged Identity Management.

Configure Azure AD Privileged Identity Management for Exchange administrators

At this next step I log in as a Global Administrator, and if I haven’t already added the Privileged Identity Management solution, I can add it from the Azure Marketplace:

image

The first Global Administrator that set up Privileged Identity Management will added to the Security Administrator and Privileged Role Administrator Roles. After that we can manage the privileged roles. If you have previously added the solution, you will have to activate your Privileged Role administrator first.

image

When I select the Exchange Administrator role, I can see both admin accounts for my Ola admin user. These roles are assigned on a permanent basis:

image

Azure AD Privileged Identity Management will let me assign and change admin roles from permanent to eligible for temporary activation. I will do this for the [email protected] cloud admin account:

image

After I click Make eligible, the admin account are removed from permanent role and are now listed as Eligible:

image

Lets click on the Settings button for the Exchange Administrator role. At settings I can set the activation duration, email notifications, ticketing and fore some roles I can select whether to require multi-factor authentication for activation:

image

These settings can also be set as default for all roles:

image

At this point my cloud admin [email protected] has been removed as a permanent Exchange Administrator, and will require activation before he will be temporarily activated as an Exchange Administrator for one hour duration.

Log on as admin user without activation

When I log in to the Office 365 portal with the [email protected], I will see that this user is just a normal user with no admin links, This is expected as the user hasn’t activated the Exchange Administrator role.

image

Activate the Exchange Administrator Role

Next I go to the Azure portal at https://portal.azure.com still logged on as [email protected]. First I need to add the Privileged Identity Management solution:

image

After adding the solution, I can request activation for the roles I’m eligible for, in this case Exchange Administrator:

image

When requesting activation I need to verify my identity first:

image

If my account hasn’t already been set up for multi-factor authentication, it will be guided to do that now:

image

After configuring and verifying multi-factor authentication, I can now activate my Exchange Administrator role and provide a reason:

image

After successful activation I can verify the duration I will be activated for:

image

Log on to the Office 365 Portal and Exchange Admin Center after activation

After activation, I should log off and back on with my activated admin role account, and this time I will see the Exchange Admin portal:

image

Log on to Exchange Online PowerShell after activation

And finally, I can start an Exchange Online PowerShell Session with my activated account. First I get my credential:

image

Then I can create the remote Exchange Online session and import it to PowerShell:

image

And finally just try out some Exchange Online administration successfully:

image

Summary

At the end of this long blog post, we can summarize that we have accomplished the solution of adding Azure Multi-Factor Authentication for scenarios where the PowerShell Module or Remoting Session does not natively support it. This is made possible by using Azure AD Privileged Identity Management, and by making some role administrators eligible and require MFA when activating. This way they have verified their identity before they connect with the Credential object.

This is just one scenario where both Azure AD MFA and Privileged Identity Management can be used together for increased security and reduce the attack surface of having vulnerable permanent administrator accounts and roles.

I hope this blog post have been informative and helpful, please reach out or comment if you want to know more or have any questions.