I have for a while been working on my System Center Service Manager environment to run on Azure Virtual Machines, and to increase availability for this environment I have created a SQL Server AlwaysOn Cluster also in Azure. While my environment is mostly for demo and development, and availability is not that critical, I find it important to look into high availability scenarios for knowledge and guidance for our customers.
There are some great tutorials and support on how to create SQL Server AlwaysOn in Azure, and how Service Manager supports AlwaysOn in these links:
- High Availability and Disaster Recovery for SQL Server in Azure Virtual Machines: http://msdn.microsoft.com/en-us/library/jj870962.aspx
- SQL Server Requirements for System Center 2012 – Service Manager: http://technet.microsoft.com/en-us/library/hh495585.aspx
I have also placed my Cireson Portal server on an Azure Virtual Machine, configured to use the Service Manager environment above.
The SQL Server AlwaysOn cluster use an Availability Listener, which until recently had to use a Public IP endpoint for the Cloud Service. Therefore, my Availability Listener is using a custom endpoint port, which I have set to 51433 but could be anything you want. Since this is a Public IP address, it is also important to set ACLs on that endpoint. Some weeks ago, there was finally support for running AlwaysOn listener on Internal Load Balancer, http://azure.microsoft.com/blog/2014/10/01/sql-server-alwayson-and-ilb/, so I will change my configuration to that next.
Now for Cireson Portal v1 and v2, where the connection string had to be configured manually in the .config files, it was quite straightforward to configure the SQL Server connections. In v2 Cireson also introduced the HTML KB and ServiceManagement database, which also required a connection. To get this to work I configured the following files:
- In the Web.Config file at C:\Inetpub\CiresonPortal, specify database connection string with Server=ListenerName,Port:<connectionStrings>
<add name=”ManagementServer” connectionString=”az-scsm-ms01″ />
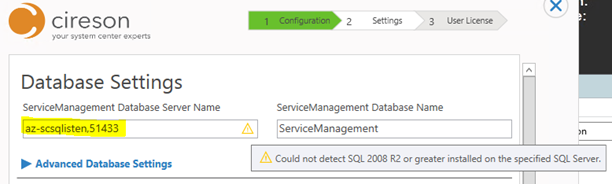
<add name=”ServiceManagementDatabase” connectionString=”Server= AZ-SCSQLListen,51433;Database=ServiceManagement;Trusted_Connection=True;” />
</connectionStrings> - In the Cireson.CacheBuilder.WindowsService.exe.Config file at C:\Inetpub\CiresonPortal\CacheBuilder\WindowsService, and Cireson.CacheBuilder.Service.exe.Config file at C:\Inetpub\CiresonPortal\CacheBuilder\ConsoleApplication, specify the database connection strings to both ServiceManager database and ServiceManagement database with Server=ListenerName,Port:<connectionStrings>
<add name=”ServiceManagementDatabase” connectionString=”Server=AZ-SCSQLListen,51433;Database=ServiceManagement;Trusted_Connection=True;” />
<add name=”ServiceManagerDatabase” connectionString=”Server=AZ-SCSQLListen,51433;Database=ServiceManager;Trusted_Connection=True;” />
<add name=”ManagementServer” connectionString=”az-scsm-ms01″ />
</connectionStrings>
In Cireson Portal v1 and v2, this worked perfectly. I was able to use both ServiceManager database, and the new ServiceManagement database via the AlwaysOn Availability Listener.
Now, for Cireson Portal v3 and the Release Candidate I have been testing, there is a new Setup program. This setup program does not recognize using Availability Listener name and custom SQL Server port, as shown below:
The same warning message applied to the Cache Builder settings of the Setup program.
Now, I have two choices:
- Go ahead and use the listener, port configuration and finish the setup.
- Or just specify the name of the primary SQL Server, and later reconfigure the same Config files that I did in the previous version.
For the first alternative, at the end of running Setup, I got this error message:
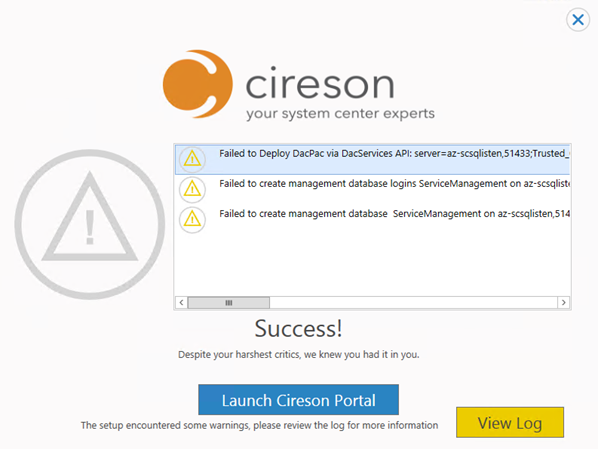
The setup log gave the same information, and when looking into the Web.Config file at C:\Inetpub\CiresonPortal the availability listener and port was configured in the server setting. The same applied to the Console and Windows Service cache builder config files, which in v3 are located in the folder C:\inetpub\CiresonPortal\bin.
So I tried the second alternative, just use the name of the primary SQL Server node, and finish Setup that way. This time I get a little further, but get an ALTER DATABSE error from Setup:
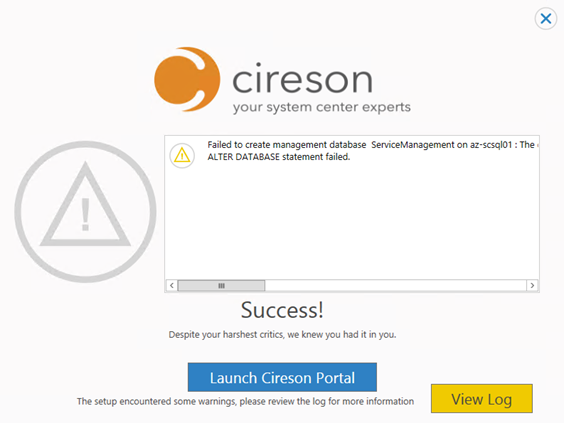
Looking at the log for details, I see the reason for the failure:
10/26/2014 7:53:57 PM Attempting to create ServiceManagement Database
10/26/2014 7:53:57 PM Failed to create management database ServiceManagement on az-scsql01 : The operation cannot be performed on database “ServiceManagement” because it is involved in a database mirroring session or an availability group. Some operations are not allowed on a database that is participating in a database mirroring session or in an availability group.
ALTER DATABASE statement failed.
So, in other words, to successfully complete Setup I would need to temporary remove the ServiceManagement database from the Availability Group, so that only the primary SQL Server node has the database.
When I did that, everything went as planned and the Setup completed without any errors!
I now wanted to see how I could after Setup still configure the Cireson Portal v3 to use the Availability Group and Listener for ServiceManagement database. So I did the following:
- Added the ServiceManagement database back to the Availability Group
- Configured the Web.Config file to use <availability listener name>,<port> for Server connection for ServiceManagement database.
- Configured the Cireson.CacheBuilder.WindowsService.exe.Config and Cireson.CacheBuilder.Service.exe.Config files in C:\inetpub\CiresonPortal\bin, with the same <availability listener name>,<port> for Server connection for ServiceManagement database.
This worked fine, and when accessing the Cireson Portal I was able to log in and use HTML KB and more.
But, after a while, I suspected a problem with the cache builder, which in v3 use the ServiceManagement database. And when running the Console application for Cache Builder I see the following error:
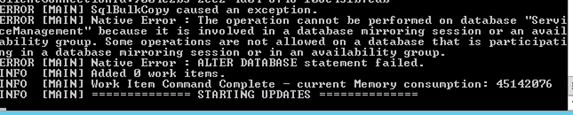
From the CacheBuilder.log file at C:\Inetpub\CiresonPortal\bin\logs folder I see several of these errors:
ERROR [MAIN] 26 Oct 2014 20:12:00,068: Error executing delegate: System.Data.SqlClient.SqlException (0x80131904): The operation cannot be performed on database “ServiceManagement” because it is involved in a database mirroring session or an availability group. Some operations are not allowed on a database that is participating in a database mirroring session or in an availability group.
ALTER DATABASE statement failed.
at System.Data.SqlClient.SqlConnection.OnError(SqlException exception, Boolean breakConnection, Action`1 wrapCloseInAction)
at System.Data.SqlClient.SqlInternalConnection.OnError(SqlException exception, Boolean breakConnection, Action`1 wrapCloseInAction)
at System.Data.SqlClient.TdsParser.ThrowExceptionAndWarning(TdsParserStateObject stateObj, Boolean callerHasConnectionLock, Boolean asyncClose)
at System.Data.SqlClient.TdsParser.TryRun(RunBehavior runBehavior, SqlCommand cmdHandler, SqlDataReader dataStream, BulkCopySimpleResultSet bulkCopyHandler, TdsParserStateObject stateObj, Boolean& dataReady)
at System.Data.SqlClient.SqlCommand.FinishExecuteReader(SqlDataReader ds, RunBehavior runBehavior, String resetOptionsString)
at System.Data.SqlClient.SqlCommand.RunExecuteReaderTds(CommandBehavior cmdBehavior, RunBehavior runBehavior, Boolean returnStream, Boolean async, Int32 timeout, Task& task, Boolean asyncWrite, SqlDataReader ds)
at System.Data.SqlClient.SqlCommand.RunExecuteReader(CommandBehavior cmdBehavior, RunBehavior runBehavior, Boolean returnStream, String method, TaskCompletionSource`1 completion, Int32 timeout, Task& task, Boolean asyncWrite)
at System.Data.SqlClient.SqlCommand.InternalExecuteNonQuery(TaskCompletionSource`1 completion, String methodName, Boolean sendToPipe, Int32 timeout, Boolean asyncWrite)
at System.Data.SqlClient.SqlCommand.ExecuteNonQuery()
at Cireson.ServiceManager.DAL.Database.SwitchToBulkLoggedRecoveryMode(ISqlConnectionWrapper connection)
at Cireson.ServiceManager.DAL.Database.<>c__DisplayClass7`1.b__6(ISqlConnectionWrapper connection)
at Cireson.ServiceManager.DAL.Database.OpenConnection(Action`1 action, String context)
ClientConnectionId:9004c2b3-2cc2-4d04-8748-106e431b7cab
ERROR [MAIN] 26 Oct 2014 20:12:00,068: SqlBulkCopy caused an exception.
ERROR [MAIN] 26 Oct 2014 20:12:00,068: Native Error : The operation cannot be performed on database “ServiceManagement” because it is involved in a database mirroring session or an availability group. Some operations are not allowed on a database that is participating in a database mirroring session or in an availability group.
ERROR [MAIN] 26 Oct 2014 20:12:00,068: Native Error : ALTER DATABASE statement failed.
INFO [MAIN] 26 Oct 2014 20:12:00,068: Added 0 work items.
So, a quick recap:
So far on testing the Cireson Portal v3 with SQL AlwaysOn availability databases I have discovered:
- The new Setup program cannot use availability listener and custom SQL Server port. Setup finishes but any DAC packages and changes to the ServiceManagement database are not deployed.
- The Setup program cannot deploy ServiceManagement database if the database is in an Availability Group even if I only specify the primary SQL Server node directly.
- After Setup I can change the Config files to use AlwaysOn availability group, but Cache Builder fails if the ServiceManagement database is in an Availability Group.
- Cireson Portal v3 can successfully connect to and use the ServiceManager database in an Availability Group.
These experiences are submitted to Cireson as bug/feature requests, so I will update this post if changes are made to any of this.
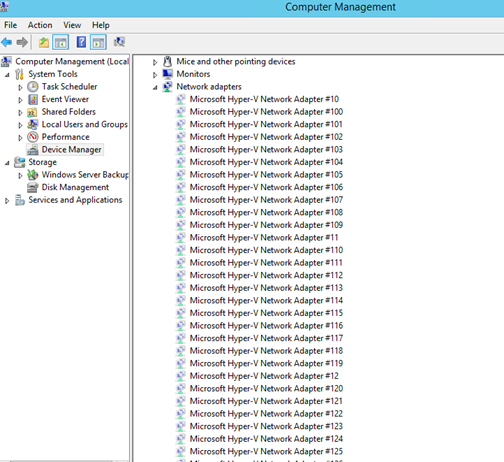 I found in some forums that the cause of the network browse problem I had with the server could be related to this for Azure VM’s. I don’t know the actual limit, or if it’s a fixed value, but the solution would be to uninstall these hidden network adapters. Although it is easy to right click and uninstall each network adapter, I wanted to create a PowerShell Script to be more efficient. There are no native PowerShell cmdlets or Commands that could help me with this, so after some research I ended with a combination of these two solutions:
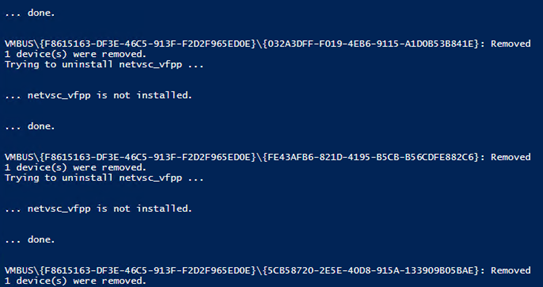 In the end I booted the VM and after that everything was working on the network again!