Monthly Archives: September 2017

Secure Access to Project Honolulu with Azure AD App Proxy and Conditional Access

Last week Microsoft announced Project “Honolulu”, the new Windows Server remote management experience, and now you can download a technical preview to install in your own data center, read here for more details: https://blogs.technet.microsoft.com/windowsserver/2017/09/22/project-honolulu-technical-preview-is-now-available-for-download/.

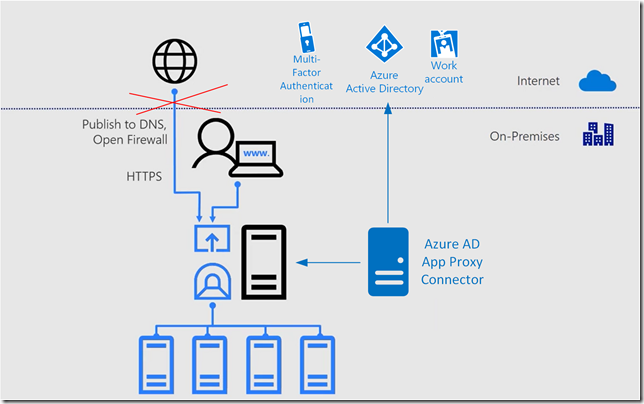
As the management is browser based, I thought this was a perfect fit for using Azure AD and publishing the management portal using Azure AD Application Proxy, and even better to secure the access using Azure AD Conditional Access. Consider the following diagram, where you instead of just publishing DNS and open Firewall to access the management server directly, I would instead use Azure AD App Proxy for secure access.

ProjectHonolulu

So lets get started setting this up!

Install and configure Project “Honolulu” technical preview

I will not get into great detail on installing Project “Honolulu” here, you can just follow the technical deployment documentation, but in my environment I have installed some servers running as Azure Virtual Machines joined to a single-forest, single-domain Active Directory. I have “on-premises” AD users and groups, and I’m running Azure AD Connect with Password Hash Synchronization.

On one of these Azure VM’s, I’ve downloaded and installed the Project “Honolulu” technical preview, with the following configuration:

  • Management Port: 6516
  • Self-signed Certificate

I’m now able to access the web based management internally, using https://azhon1.elven.local:6516. I can now proceed with publishing this externally with Azure AD App Proxy.

Configure Azure AD Application Proxy

Before you can publish applications using Azure AD Application Proxy, you have enable the feature in your Azure AD tenant, and install and configure one or more servers running Azure AD App Proxy Connector, and configure those in a connector group to use for the application. If you already have this configured, you can proceed to the next section. If you want more details, see this previous blog post, and the first sections on enabling App Proxy and innstalling connectors: https://gotoguy.blog/2017/02/21/publish-the-cireson-configuration-manager-portal-with-azure-ad-application-proxy/

Publish the Project Honolulu as an Azure AD App Proxy App

In the Azure AD management blade in the Azure Portal, select Enterprise Applications and click to add a new application. Select On-premises application:

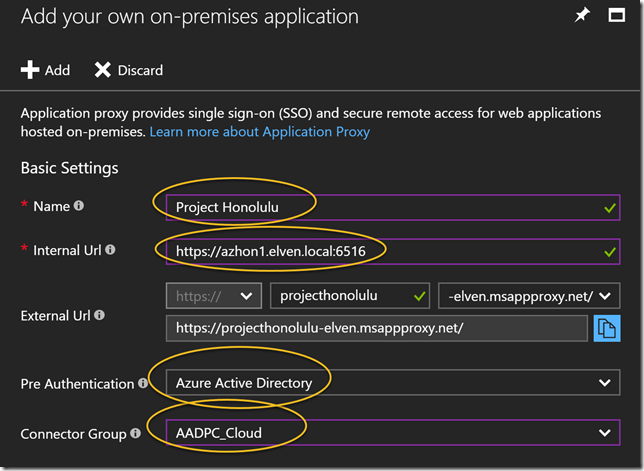
image Specify a Name for your application, and the Internal Url where you installed the Project Honolulu technical preview, including port number as shown below. If you want you can change parts of the External Url, even using your own domain and SSL certificate. I will just use the default here. I will use Azure Active Directory as Pre Authentication, meaning that no-one can access this website without beeing authenticated with Azure AD first. And last, I select my Connector Group of Azure AD App Proxy Connector Servers. PS! Remember that these servers need to be able to access the Internal Url directly, in case you have any Firewalls, NSGs or other components that might block traffic.

image

After adding the application, I have to do some more configurations. First, optionally, you can select a custom logo:

image

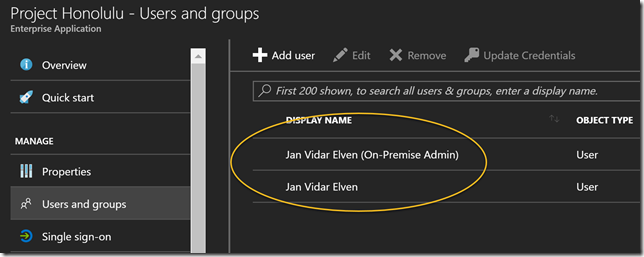
User assignment is required in this configuration, so next I need to assign some users to the application. Here I have added a normal domain user and a domain admin user. Both these users are synchronized from my local AD.

image

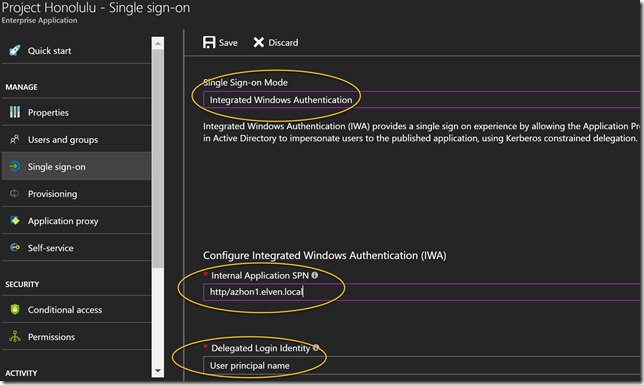
Next I wan’t to configure Single Sign-On, so that users that authenticate with Azure AD automatically will be signed in to the Project Honolulu management site. I select Integrated Windows Authentication for sign-on mode, and then I specify the internal application SPN for which is needed for Kerberos Constrained Delegation.

image

After that I have one more important step, and that is to configure delegation at my Application Proxy Connector servers. In my local Active Directory, open the Computer object for every server that acts as Azure AD App Proxy Connectors, and on the Delegation tab, add the server that you installed the Project Honolulu on, selecting http as the service. In my environment, I have added this now. I have some previous delegations for others servers as well.

image

We are now ready to test the application publishing via Azure AD!

Access Application using Azure AD

You now have basically two options for accessing the application:

When using the Azure AD Access Panel, if your users has been assigned access, you will see the application published:

image

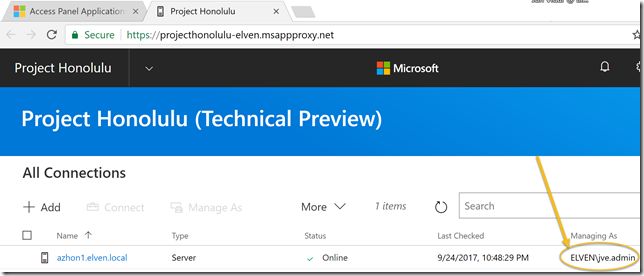
When launching that, I will be automatically logged in to the Project Honolulu web site, configured via SSO and Windows Integrated Authentication:

image

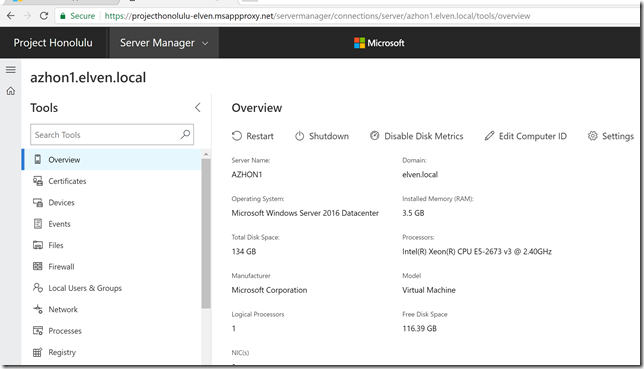
And I can start managing my configured servers:

image

So, now we have successfully configured an Azure AD App Proxy Application, and can connect securely from external url using SSO with Windows Integrated Authentication and Azure AD Pre Authentication. The application also requires that only assigned users can access the application.

In the next section I will configure Conditional Access for the application.

Configuring Conditional Access

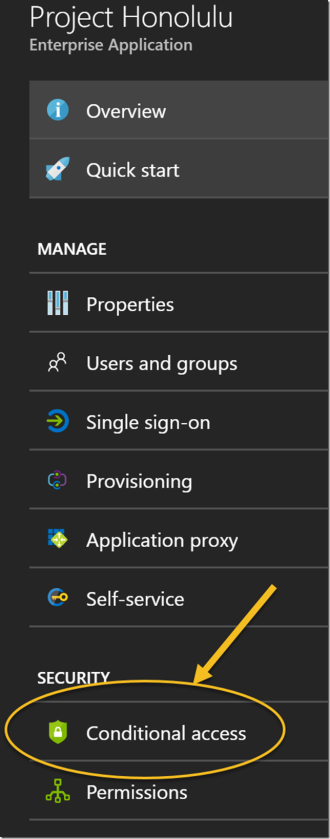
When publishing this server management tool for external access, I wan’t to secure access as much as possible. For example, if one of my admins credentials have been leaked, I want that extra layer of security that users have to use Azure Multi-Factor Authentication when accessing the Project Honolulu application. I will configure that using Azure AD Conditional Access. On the application, I select Conditional Access as shown below:

image

I select to create a new policy, giving it a name:

image

I then select this to apply for all users:

image

Confirm that this policy applies to the Project Honolulu application:

SNAGHTML7d43e5d

On Conditions I can optionally configure conditions for sign-in risk, device platforms, locations and client apps, but I will just let this policy apply for all conditions for now, so I’m leaving Conditions as it is.

image

Under Access Control I select to Require Multi-Factor Authentication, and the set to Enable the policy. Note that I can select additional controls for even more secure access, but for now I just want to require MFA:

SNAGHTML7d8d124

So, save the policy, and lets test how accessing the application works now.

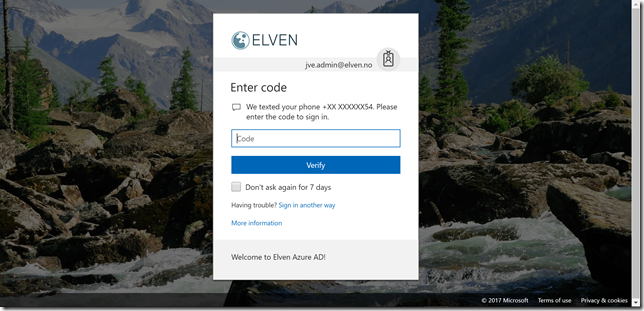
If I either go directly to the external url, og via the Access Panel, I will now be prompted for MFA:

image

That concludes this blog post. I’m very excited for this new preview for Project “Honolulu”, and using the great Azure AD Application Proxy feature I can securely publish and access the management site from external locations and clients. And even better with Azure AD Conditional Access, I can create a policy that sets access control for multi-factor autentication requirements, and if I want I can even control which device clients and what apps they use to access.

Hopefully this has been helpful for you, if you have any questions reach out to me on Twitter or use the comments below this blog post 🙂

Using Azure AD Managed Service Identity to Access Microsoft Graph with Azure Functions and PowerShell

Recently Microsoft released an exciting new preview in Azure AD: Managed Service Identity! You can go and read the details at the Enterprise Mobility + Security blog, and some examples of usage scenarios: https://azure.microsoft.com/en-us/blog/keep-credentials-out-of-code-introducing-azure-ad-managed-service-identity/

Managed Service Identity makes it possible to keep credentials out of code, and that is a very inviting prospect. As I have been exploring Microsoft Graph in different scenarios using PowerShell, I thought I should have a go at using Managed Service Identity in an Azure Function and run some PowerShell commands to get data from the Microsoft Graph. Lets get started!

Configuring the Azure Function

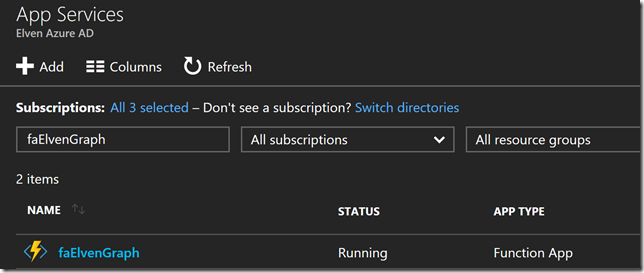
First, if you haven’t already created an existing Azure Function App, go ahead and do that. Here is my Function App I will use in this demo:

image

Next, open the Function App and go to Platform features, and then click on Managed service identity:

image

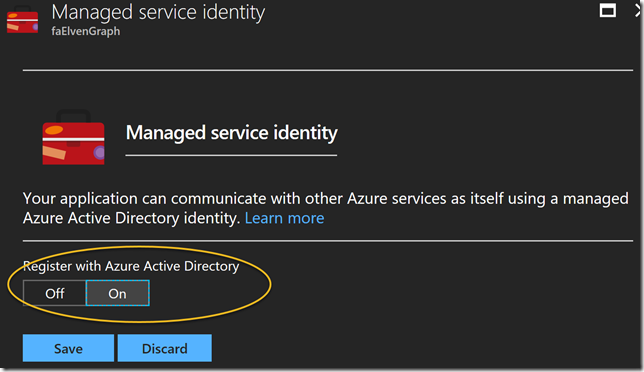
Under Managed service identity, select to Register with Azure Active Directory:

image

After saving you should get a successful notification that the managed service identity has been registered.

image

Let’s check what has happened in Azure AD, to that I will use the AzureAD PowerShell CmdLets. After connecting to my Azure AD tenant, I will try to get the Service Principal:

image

And get some properties of that object:

image

We can see that the Service Principal object is connected to the Azure Function App and of type ServiceAccount.

image

Now, we are ready for the next step, which is to create a function that will get data from Microsoft Graph. But first we will need to give this Service Principal some permissions.

Permissions and Roles for the Managed Service Identity

Depending of what you want to do with your Function App, the managed service identity, represented by the service principal, will need some permissions to access resources. You could give the service principal rights to Azure resources like Virtual Machines, or to access Key Vault secrets (a nice blog post on that here: https://blog.kloud.com.au/2017/09/19/enabling-and-using-managed-service-identity-to-access-an-azure-key-vault-with-azure-powershell-functions/).

In my scenario I want to access the Microsoft Graph, and specifically get some Directory data like user information from my Azure AD. When accessing Microsoft Graph you would normally register an Azure AD Application and set up Application or Delegated Permissions, and follow the authentication flow for that. But in this case I want the Service Principal to be able to directly access Directory Data, so I will have to give my Service Principal permission to do that.

The following Azure AD commands adds my service principal to the AD Directory Role “Directory Readers”:

image When listing membership in that role I can see my Service Principal has been added:

image

Creating a PowerShell Function for the Managed Service Identity

In your Function App, you can now create a new Function, selecting language PowerShell, and in this case I will create it as a HttpTrigger Function:

image

If you have been following the flow of the blog post until now, we can now check if the Function App is ready for using the Managed Service Identity (MSI). Two environment variables will be created, and you can check if they exist by going to Platform features, and then selecting Advanced tools (Kudo). Under environment you would se something like this if everything is ready (it could take a little time, so re-check until its there):

image

These two environment variables will be needed in the Azure Function, so we will start by getting that:

image

If I run the Function I can see from the output that I was able to retrieve the environment variables:

image

Next I will specify some URI and parameters for my authentication request using the managed service identity. I will need to specify the version (currently 2017-09-01 as specified in the documentation), and since I want to get data from the Microsoft Graph, I will need to specify that as the resource URI. I then build the URI for getting the authentication token:

image

With that, I can now do an authentication request, which if successful will return an access token I can use as a Bearer token in later queries agains the Microsoft Graph:

image

Let’s do another test run and verify that I can get an Access Token:

image

Querying the Microsoft Graph

With a valid Access Token, and with the correct permissions for the resources I will want to access, I can now run some Microsoft Graph API queries.

In my example I have some test users in my tenant named after the popular Seinfeld show. In fact I have set a “Seinfeld” department attribute value on those. So my query for getting those users would be:

https://graph.microsoft.com/v1.0/users?$filter=Department eq ‘Seinfeld’

A great way to test Microsoft Graph Commands is to use the Graph Explorer, https://developer.microsoft.com/en-us/graph/graph-explorer, and if you sign in to your own tenant you can query your own data. As an example, I have showed that here:

image

In my Azure Function I can define the same query like this (PS! note the escape character before the $filter for it to work):

image

And with that I can request the user list using Microsoft Graph and a Authorization Header consisting of the Access Token as a Bearer:

image

Let’s output some data from that response:

SNAGHTMLfb020e

And there it is! I’m able to successfully query the Microsoft Graph using Managed Service Identity in an Azure Function, without handling any credentials.

For reference, I have attached both the Azure AD PowerShell  commands, and the Function PowerShell commands below from my Gist. Enjoy!

Azure AD PowerShell SPN commands:


# Log in to Azure AD with Global Admin
Connect-AzureAD
# Get the Service Principal for the Function App
$faSpn = Get-AzureADServicePrincipal -SearchString "faElvenGraph"
# Get some properties for the Service Principal
$faSpn | Select-Object ObjectId, ObjectType, AlternativeNames,
AppId, DisplayName, ServicePrincipalType
# Get a Directory Role
$role = Get-AzureADDirectoryRole | Where-Object {$_.DisplayName -eq "Directory Readers" }
# Add the Service Principal to the Directory Role
Add-AzureADDirectoryRoleMember -ObjectId $role.ObjectId -RefObjectId $faSpn.ObjectId
# List Members in the Role
Get-AzureADDirectoryRoleMember -ObjectId $role.ObjectId
# If you want to remove from the Role, uncomment and use the following
#Remove-AzureADDirectoryRoleMember -ObjectId $role.ObjectId -MemberId $faSpn.ObjectId

view raw

AzureADSPN.ps1

hosted with ❤ by GitHub

Azure Function PowerShell Trigger:


# Get Managed Service Identity info from Azure Functions Application Settings
$msiEndpoint = $env:MSI_ENDPOINT
$msiSecret = $env:MSI_SECRET
Write-Output $msiEndpoint
Write-Output $msiSecret
# Specify URI and Token AuthN Request Parameters
$apiVersion = "2017-09-01"
$resourceURI = "https://graph.microsoft.com"
$tokenAuthURI = $msiEndpoint + "?resource=$resourceURI&api-version=$apiVersion"
# Authenticate with MSI and get Token
$tokenResponse = Invoke-RestMethod -Method Get -Headers @{"Secret"="$msiSecret"} -Uri $tokenAuthURI
# This response should give us a Bearer Token for later use in Graph API calls
$accessToken = $tokenResponse.access_token
Write-Output "Access Token"
Write-Output $accessToken
# $tokenResponse | Get-member
# All Users from a Department
$userlisttURI = "https://graph.microsoft.com/v1.0/users?`$filter=Department eq 'Seinfeld'"
# Get the User objects via an authenticated request to Graph API with the help of Bearer Token in authorization header
$graphResponseUsers = Invoke-RestMethod -Method Get -Uri $userlisttURI -Headers @{"Authorization"="Bearer $accessToken"}
# Loop through PowerShell object returned from Graph query
foreach ($user in $graphResponseUsers.value)
{
Write-Output $user.DisplayName
}

Looking in to the Changes to Token Lifetime Defaults in Azure AD

In a recent announcement at the Enterprise Mobility Blog, https://blogs.technet.microsoft.com/enterprisemobility/2017/08/31/changes-to-the-token-lifetime-defaults-in-azure-ad/, there will be a change for default settings to the Token Lifetime Defaults in Azure Active Directory for New Tenants only. This change will not affect existing old Tenants.

I have summarized the changes in this table:

image

This is great news for many customers to remove user frustration over authentication prompts when refresh tokens expired after a period of inactivity. For example, if I havent used an App on my mobile phone for 14 days, I have to reauthenticate with my work/school account again to get a new Access Token and Refresh Token. Some Apps I use quite often, like Outlook and OneDrive, and by keeping active the Refresh Token will be continously renewed as well together with the Access Token (which by default is valid for 1 hour). For my existing tenant this would mean that keeping active, and at least using the Refresh Token inside the 14 Days, I will get new Access and Refresh Tokens, but after 90 Days the Single and/or Multi factor Refresh Token Max Age will be reached, and I have to reauthenticate again in my Apps.

Some Apps I will naturally use more rarely, for example Power BI, Flow, PowerApps etc. (this will be different for each user type), but I risk having to reauthenticate every time if I only access these Apps every other week.

So for New Tenants this has now changed, as Refresh Tokens will be valid for 90 Days, and if you use the Refresh Token inside that period, you will get 90 more days. And furthermore, the Max Age for Single/Multi factor Refresh Token will have a new default of Until-revoked, so basically it will never expire.

Keep in mind though, that Azure AD Administrators can revoke any Refresh Token at any time. Refresh Tokens will also be invalid if the authenticated users password changes or expire. It is also nice to be aware of that every time a Refresh Token is used to get a new Access Token, Conditional Access and Identity Protection from Azure AD will be used to check if the User or Device is in a Compliant State with any policies defined.

A few words on the Confidential Clients also. Confidential Clients are typically Web Apps that are able to securely store Tokens and identity itself to Azure AD, so after the User has Authenticated and actively Consented to access specific Resources, the resulting Access and Refresh Tokens can be used until revoked, as long as the Refresh Token are used at least once inside 90 Days (New Tenants) or 14 Days (Old Tenants).

If you want to read more deep dive on configurable Token Lifetimes, you can follow this link: https://docs.microsoft.com/en-us/azure/active-directory/active-directory-configurable-token-lifetimes.

Azure AD PowerShell examples for changing Token Lifetime Defaults

I have created some Azure AD PowerShell V2 examples for how you can change the Token Lifetime Policy defaults in your organization.

First connect to your Tenant and see if there already are defined any policies (normally there would be nothing):

image

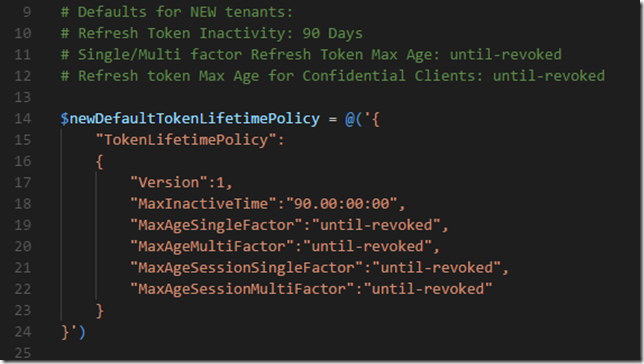
Then lets make a definition that reflects the new defaults for New Tenants:

image

So if you already have an existing old tenant, and you want to change the default policy so that it reflects the new Token Lifetime settings, you can run this command:

image

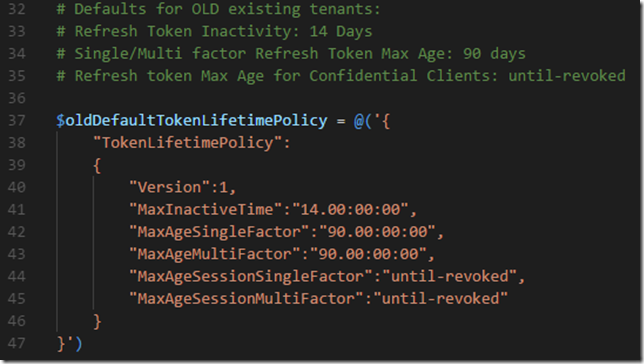
A different scenario, lets say I have a New Tenant, and want to use the old default values instead. I will make a definition that reflects that:

image

And create a policy using these definitions:

image

Last, I will leave you with commands for changing any existing Azure AD policies:

image

The complete list of Azure AD PowerShell CmdLets used and examples can be found here at my Gist repository.


# Azure AD v2 PowerShell Token Lifetime Policy
# Connect with Modern Authentication
Connect-AzureAD
# See if there are any existing Azure AD Policies defined
Get-AzureADPolicy
# Defaults for NEW tenants:
# Refresh Token Inactivity: 90 Days
# Single/Multi factor Refresh Token Max Age: until-revoked
# Refresh token Max Age for Confidential Clients: until-revoked
$newDefaultTokenLifetimePolicy = @('{
"TokenLifetimePolicy":
{
"Version":1,
"MaxInactiveTime":"90.00:00:00",
"MaxAgeSingleFactor":"until-revoked",
"MaxAgeMultiFactor":"until-revoked",
"MaxAgeSessionSingleFactor":"until-revoked",
"MaxAgeSessionMultiFactor":"until-revoked"
}
}')
# If you have an OLD tenant, run this command to create a default
# organization policy that reflects the settings for new tenants
New-AzureADPolicy -Definition $newDefaultTokenLifetimePolicy `
-DisplayName "OrganizationDefaultPolicyScenario" `
-IsOrganizationDefault $true -Type "TokenLifetimePolicy"
# Defaults for OLD existing tenants:
# Refresh Token Inactivity: 14 Days
# Single/Multi factor Refresh Token Max Age: 90 days
# Refresh token Max Age for Confidential Clients: until-revoked
$oldDefaultTokenLifetimePolicy = @('{
"TokenLifetimePolicy":
{
"Version":1,
"MaxInactiveTime":"14.00:00:00",
"MaxAgeSingleFactor":"90.00:00:00",
"MaxAgeMultiFactor":"90.00:00:00",
"MaxAgeSessionSingleFactor":"until-revoked",
"MaxAgeSessionMultiFactor":"until-revoked"
}
}')
# If you have a NEW tenant, and want to use the old default values,
# run this command to create a revert the default organization policy
New-AzureADPolicy -Definition $oldDefaultTokenLifetimePolicy `
-DisplayName "OrganizationDefaultPolicyScenario" `
-IsOrganizationDefault $true -Type "TokenLifetimePolicy"
# If you want to update any existing organization default token lifetime policy, use these commands
$orgDefaultPolicy = Get-AzureADPolicy | Where-Object `
{$_.Type -eq "TokenLifetimePolicy" -and $_.IsOrganizationDefault -eq $true}
Set-AzureADPolicy -Id $orgDefaultPolicy.Id -DisplayName "OrganizationDefaultPolicyUpdatedScenario" `
-Definition $newDefaultTokenLifetimePolicy
# Look at existing token lifetime polices and settings
$aadTokenLifetimePolicies = Get-AzureADPolicy | Where-Object {$_.Type -eq "TokenLifetimePolicy"} | `
Select-Object DisplayName, Type, IsOrganizationDefault, Definition
# List existing settings
$aadTokenLifetimePolicies.Definition | ConvertFrom-Json | Select-Object -ExpandProperty TokenLifetimePolicy | `
Select-Object $aadTokenLifetimePolicies.DisplayName, `
MaxInactiveTime, `
MaxAgeSingleFactor, `
MaxAgeMultiFactor, `
MaxAgeSessionSingleFactor, `
MaxAgeSessionMultiFactor

Hopefully this has been informative and helpful for Azure AD Administrators and others Smile!