Category Archives: Philips Hue

Blog Series – Power’ing up your Home Office Lights: Part 10 – Subscribe to Graph and Teams Presence to automatically set Hue Lights based on my Teams Presence!

This blog post is part of the Blog Series: Power’ing up your Home Office Lights with Power Platform. See introduction post for links to the other articles in the series:
https://gotoguy.blog/2020/12/02/blog-series—powering-up-your-home-office-lights-using-power-platform—introduction/

In this last part of the blog series, we will build on the previous blog post where we could get the presence status from Teams to the Hue Power App. Now we will use Microsoft Graph and subscribe to change notifications for presence, so that both the Power App and my Hue Lights will automatically change status based on the presence.

In this blog post I will reuse the Custom Connector I created for managing Microsoft Graph Subscriptions in this previous blog post: Managing Microsoft Graph Change Notifications Subscriptions with Power Platform | GoToGuy Blog

To follow along, you will need at least to create the App Registration and the Custom Connector referred to in that blog post. You can also import the Custom Connector OpenAPI Swagger from this link: <MY GITHUB URL TO HERE>

Adding the Custom Connector to the PowerApp

In the Hue Power App, go to the View menu, and under Data click to “+ Add data source”. Add the MSGraph Subscription Connector as shown below. This way we can refer to this in the Hue Power App.

We are going to add the logic to creating the subscription based on this toggle button and the selected light source:

But before that we have somethings to prepare first. When creating a Graph Subscription, we will need to prepare a Webhook Url for where Graph will send its notifcations when the Teams presence changes. This will be handled in a Power Automate Flow, so lets create that first.

Creating the Flow for Graph Notifications and Hue Lights changes

Since I have built this all before, ref. https://gotoguy.blog/2020/10/24/managing-microsoft-graph-change-notifications-subscriptions-with-power-platform/, I will make a copy of the “Graph Notification – Presence Change” flow for this use case.

If you want to follow along, you will need to follow the instructions in that blog post first. After saving a copy, or if you created a new flow from blank using HTTP request webhook, you will need to copy the HTTP POST URL shown below, as that will be the “notification url” we will refer to later:

Next set some value that only you know for the secret client state:

The next part of the Flow are used to do a first-time validation of adding the change subscription, with Content-Type text/plain and request query containing a validation token. Microsoft Graph expects a response of status code 200 with the validation token back. If that is returned, Microsoft Graph will successfully create the subscription.

For subsequent requests, we must return a 202 Accepted response, and in the next step I parse the notification request body, so that we can look into what change we have been notified for:

Following the change notification, we can start looking into the change value. Firstly, I have added a verification of the secret client state I specified earlier, this is prevent misuse of the notification Url if that become known by others or used in the wrong context. After doing a simple test of the client state, where I do nothing if the client state don’t match, I can start building the logic behind the changes in presence status:

Inside the Switch Presence Status action, I will based on the availability status change, do a different case for each of the possible Teams Presence status values (see blog series post part 9 for explaining the different presence availability values):

Inside each of these cases I will define the light settings and colors, and after that call the Remote Hue API for setting the light. As you saw in part 8 of this blog series, in order to access the Hue API remotely I will need the following:

  • An Access Token to be included as a Bearer token in the Authorization Header
  • A username/whitelist identifier
  • The actual lightnumber to set the state for
  • A request body containing the light state, for example colors, brightness, on/off etc.

Remember, this Flow will be triggered from Microsoft Graph whenever there is a presence state change in Teams. So I need to be able to access/retreive the access token, username and for which lightnumber I created the subscription. This is how I will get it:

  • Access Token will be retreived via the Logic App I created in part 4 of the blog series.
  • Username/whitelist identifier will be retrieved via the SharePoint List i created in part 6, see below image.
  • However, I do need to store the lightnumber I will create the change notification for, and for this I will add a couple more columns in this list:

Customize the Configuration List for storing Subscription Details

I add the following two single-line-of-text columns to my List:

  • Subscribe Presence LightNumber. This will be the chosen Hue light I want to change when change notifications occur for Teams presence status.
  • Change Notification Subscription Id. This will be the Id I can refer back to when adding and removing the subscription when needed.

Customize the Flow for getting User Configuration and preparing Light States

Back to the Flow again, we need to add some actions. First, add a initialize variable action after the initialize SecretClientState action like here:

I set the type to Object and using the json function to create an empty json object. This variable will later be used for changing the light state.

Next, in the Flow after the “Parse Notification Body” action, add a “Get Items” action from SharePoint connector, and configure it to your site, list name and the following Filter Query:

My filter query:
first(body('Parse_Notification_Body')?['value'])?['subscriptionId']
will be used to find what username and light that have been set up for presence changes.

Next, lets set the variable for LigthState. Inside each of the Switch Cases, add the action Set Variable, and then set the variable to the chosen xy color code, as a json object like the following. This is for the color green:

Do the same for all of the other case, these are the values I have been using:

STATECOLORJSON VARIABLE
AwayYellowjson(‘{
“on”: true,
“bri”: 254,
“xy”: [ 0.517102, 0.474840 ],
“transitiontime”: 0
}’)
AvailableGreenjson(‘{
“on”: true,
“bri”: 254,
“xy”: [ 0.358189, 0.556853 ],
“transitiontime”: 0
}’)
AvailableIdleGreen (10% bright)json(‘{
“on”: true,
“bri”: 25,
“xy”: [ 0.358189, 0.556853 ],
“transitiontime”: 0
}’)
BusyRedjson(‘{
“on”: true,
“bri”: 254,
“xy”: [ 0.626564, 0.256591 ],
“transitiontime”: 0
}’)
BusyIdleRed (10% bright)json(‘{
“on”: true,
“bri”: 25,
“xy”: [ 0.626564, 0.256591 ],
“transitiontime”: 0
}’)
BeRightBackYellowjson(‘{
“on”: true,
“bri”: 254,
“xy”: [ 0.517102, 0.474840 ],
“transitiontime”: 0
}’)
DoNotDisturbRedjson(‘{
“on”: true,
“bri”: 254,
“xy”: [ 0.626564, 0.256591 ],
“transitiontime”: 0
}’)
OfflineGrey (10% bright)json(‘{
“on”: true,
“bri”: 25,
“xy”: [ 0.3146, 0.3303 ],
“transitiontime”: 0
}’)
PresenceUnknownWhitejson(‘{
“on”: true,
“bri”: 254,
“xy”: [ 0.3146, 0.3303 ],
“transitiontime”: 0
}’)

PS! The transitiontime is to get as close to realtime updates as possible. Add the colors similarly for rest of the states:

Get the Access Token and call Hue Remote API

Now we are ready to get the Access Token, and call the Hue Remote API with the selected light state.

First, add a HTTP action below the Switch Presence Status action, calling the Logic App previously created in part 4 of the blog series:
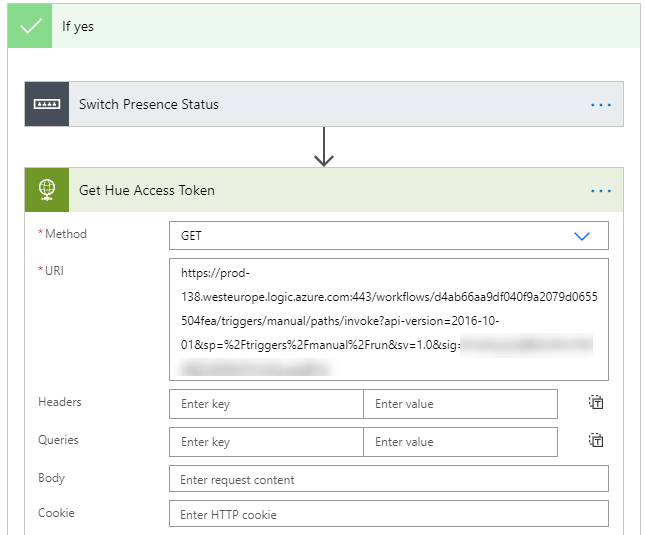
Next, add another HTTP request after, and this will call the Hue Remote API to set the lights:

When constructing Hue API URI above, I retreive the whitelist identifier for username with the following expression:

first(body('Get_My_Hue_User_Subscription')?['Value'])?['WhitelistIdentifier']

And then which light number with this expression:

first(body('Get_My_Hue_User_Subscription')?['Value'])?['SubscribePresenceLightNumber']

That should be the completion of this Flow. Remember to turn it on if needed. We are now ready for the last step.

Adding the Flow for Creating the Graph Subscription

In the beginning of this blog post I referred to the toggle “Sync Hue Lights with Teams” in the Power App. Now that we have prepared the Flow handling the notification Url, we need to add a new Flow that would handle the creating, or deletion, of Graph Subscriptions. As this is a toggle control, setting it to “On” should create a Graph subscription for the selected lights, and setting it to “Off” should remove that subscription again.

Create a new instant Flow with PowerApps as trigger:

Next, add an action for initialize variable for getting the UserDisplayName:
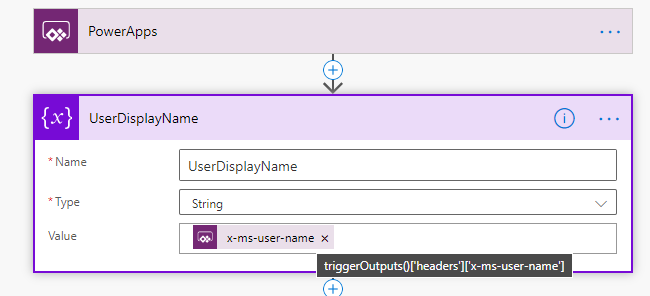
Use the following expression for getting the user display name:

triggerOutputs()['headers']['x-ms-user-name']

Next, add another initialize variable for getting the light number. After renaming the action, click on “Ask in PowerApps”:

Add another initialize variable, this time a boolean value, and for getting the value of the toggle sync control:

Next, we will retrieve our user config source from the SharePoint list again, this time filtered by the UserDisplayName variable:

We now need some logic to the next steps for the flow, lets start by the toogle button which will be either true or false:

If yes, that should mean that we either should create a new graph subscription, or update any exisiting ones.

Under Yes, add a new action. This action will call the Custom Connector I created in another blog post (https://gotoguy.blog/2020/10/24/managing-microsoft-graph-change-notifications-subscriptions-with-power-platform/). This Custom Connector should have the following actions:

Click on the Get Subscription action to add that. For the subscriptionId parameter I will refer to the first returned instance of any exisiting Graph Subscriptions I have in the SharePoint list returned earlier.

Here is the expression for your reference:

first(body('Get_My_Hue_User')?['Value'])?['ChangeNotificationSubscriptionId']

When running the Flow this action will either:

  • Return a 200 OK if the subscription is found, or if the SharePoint List has a blank value for ChangeNotificationSubscriptionId.
  • Return a 404 ResourceNotFound if the subscription is not found, this will happen if the subscription is expired. This is an error that will halt the Flow, so we need to handle it.

So lets start by getting the Status Code. I’ll do that by adding a compose action with the following expression:

outputs('Get_Graph_Subscription')['statusCode']
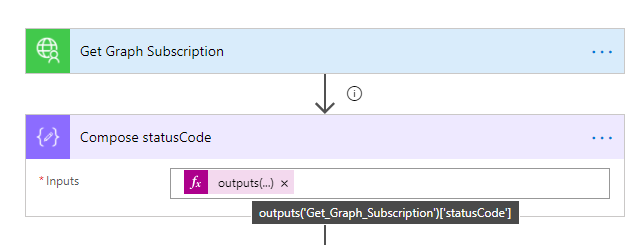
It’s also important to set that this action should run even if the Get Graph Subscription action fails:

Lets add another condition, where the outputs of the status code should be 200 (OK):

A status code of 200 will either indicate that either we found an existing Graph Subscription matching the configured subscription id from the SharePoint List, or that the list is blank and the Get Graph Subscription will return an empty array or any other Graph Subscriptions you might have. In the first case, we will just update the existing subscription, in the latter case we will create a new subscription. Lets start by adding another compose action:

Adding the Flow to the Hue Power App

Back in the Hue Power App, we can now link this Flow to the toggle control. With the sync toggle control selected, go to the Action menu, and then click on Power Automate. From there you should see the “Hue – Create Update Remove Graph Subscription” Flow, click to add it. On the OnChange event, add the Run parameters where the lightnumber value is read from the dropdown list and selected items lightnumber, and the toggle button value like this:

Blog Series – Power’ing up your Home Office Lights: Part 9 – Using Microsoft Graph to get Teams Presence and show state in PowerApp.

This blog post is part of the Blog Series: Power’ing up your Home Office Lights with Power Platform. See introduction post for links to the other articles in the series:
https://gotoguy.blog/2020/12/02/blog-series—powering-up-your-home-office-lights-using-power-platform—introduction/

In this part 9 we will use Microsoft Graph to get the logged in user Teams Presence, and show that state in the PowerApp.

I have previously written another post on Teams Presence, Microsoft Graph and requirements here: Subscribing to Teams Presence with Graph API using Power Platform | GoToGuy Blog. If you want to dig deeper into that I would recommend that you read that post, but for now in this article I will show how you can get your Teams Presence into the Hue Power App.

Teams Presence is currently available in the beta endpoint of Microsoft Graph here: https://graph.microsoft.com/beta/me/presence

If you quickly want to check your own Teams Presence via the Microsoft Graph you can try the following. Just click this link that will launch in Graph Explorer: https://developer.microsoft.com/en-us/graph/graph-explorer?request=me%2Fpresence&method=GET&version=beta&GraphUrl=https://graph.microsoft.com

Just remember to consent to the Presence.Read permission as shown below:

As always when calling Microsoft Graph, we need to authenticate to Azure AD and authorize to Graph API to get an access token for quierying resources. And if we want to do that from Power Platform we need to create an app registration for that in Azure AD.

App Registration in Azure AD

This step might be dependent on if your tenant administrator has restricted the users’ right to create app registrations. If so, you will need to log into your tenant as a Global Administrator or Application Administrator, or get help from your IT admin to create the following App Registration in Azure AD.

If not, the following operations don’t require admin consent or permissions, so you can go ahead and create the App Registration. At the Azure AD Portal, go to https://aad.portal.azure.com, App Registrations and add a new like below:

Just leave the Redirect URI blank for now and click register.

Next, click on API Permissions, and click add a permission and select Microsoft Graph at the top, click on Delegated permissions, and add the Presence.Read permission as shown below:

You should now have the following permissions:

Next, go to Certificates & secrets, add a new client secret with a description, and select your chosen expiry:

Click Add and copy the secret value which will showed only this once. Save this secret for now, we will need it later. Also, go back to overview and copy the Application (Client) Id for later. We will need that as well.

There is just one thing left in this app registration, but for now we need to switch over to Power Platform for creating the Custom Connector.

Custom Connector in Power Platform for Microsoft Graph

We will now create a custom connector in Power Platform to reference this App Registration and get the Presence. Log either into make.powerapps.com, or flow.microsoft.com, for this next step.

Under the Data menu, select Custom Connectors. Select to add new connector from blank, and give it a name:

Select Continue, and on the General page, type graph.microsoft.com as host. You can also upload an icon and a description:

On the Security page, select OAuth 2.0 as type, and Azure Active Directory for Identity Provider. Client Id and Secret is the App Id and Secret from the App Registration earlier. Resource Url is https://graph.microsoft.com, and specify the scope to be Presence.Read:

After that, click on “Create Connector”, and the the “Redirect URL” will be populated:

Copy this URL and add it as a Web platform Redirect URI back in the Azure AD App Registration:

Back in the Custom Connector, go to Step 3. Definition, and click New Action. Type in a Summary “Get Presence” and Operation ID “GetPresence”, and under Request click Import from sample. Specify Get as verb, and URL to https://graph.microsoft.com/beta/me/presence, like below, and click Import:

Go to the Response section, and click on the Default response. Click on Import from sample and specify Content-Type application/json for Header response, and for Body, paste in the response you got when you tried the presence query in Graph Explorer in the beginning of this blog post:

The action should now look like this:

We can now proceed to Test. Click on Update Connector and under 4. Test click on “New connection”, and then Create:

Sign in and then accept the application to read your presence information and profile as shown below:

I can now test the GetPresence action with the signed in connection, and verify a successful response. In my case my availability just now is “Away”:

With the Custom Connector now ready, I can proceed to add this status to my PowerApp.

Customizing the Hue Power App to get Presence

Back in my Power App i created in earlier parts of this blog series, I want this icon to reflect my Teams Presence status. I will start simple by adding an OnSelect event to this icon, that will get my Presence status using the Custom Connector.

Under View menu, and Data, select to add the custom connector as a new connection to the PowerApp:

On the OnSelect event for the presence icon, I will use Set function and a variable called MyPresence, where I run the Custom connector and GetPresence operation like below:

Set(MyPresence,MSGraphPresenceConnector.GetPresence())

This is how it looks:

Holding down ALT button, I can now click on the Icon to run the OnSelect event, and after that I can go to the View menu again, then under variables I will find the MyPresence variable. When looking into that record, I can verify that I indeed have received my presence status:

The next part would be to update the color of the Icon to reflect the status. I also, for now at least want an extra label that specifies the status as a text value. Lets start by that. I add a label next to the Icon and then set the Text property to “MyPresence.availability”, as shown under:

You should now be able to change the Teams Presence and then click on the Icon in the Hue Power App to update presence status text:

From the Graph Documentation, presence resource type – Microsoft Graph beta | Microsoft Docs, the following values are possible for presence availability, and I have added the suggested colors for these statuses:

  • Away (Yellow)
  • Available (Green)
  • AvailableIdle (Green)
  • Busy (Red)
  • BusyIdle (Red)
  • BeRightBack (Yellow)
  • DoNotDisturb (Red)
  • Offline (Light Grey)
  • PresenceUnknown (White)

So what remaining is that I want to update the color of the Teams Presence Icon also to reflect the status. And for this I chose to use the Switch function, where I evaluate the MyPresence.availability variable, and have different results:

Switch( MyPresence.availability, "Away", "Result1", "Available", "Result2", "AvailableIdle", "Result3", "Busy", "Result4", "BusyIdle", "Result5", "BeRightBack", "Result6", "DoNotDisturb", "Result7", "Offline", "Result8", "PresenceUnknown", "Result9", "DefaultResult" )

I will use that Switch formula to set the Fill property of the Icon, which now is manually set to Red like this:

So after picking the colors, I end up with this formula:

Switch( MyPresence.availability, "Away", RGBA(253, 185, 19, 1), "Available", RGBA(146, 195, 83, 1), "AvailableIdle", RGBA(146, 195, 83, 1), "Busy", RGBA(196, 49, 75, 1), "BusyIdle", RGBA(196, 49, 75, 1), "BeRightBack", RGBA(253, 185, 19, 1), "DoNotDisturb", RGBA(196, 49, 75, 1), "Offline", RGBA(128, 130, 133, 1), "PresenceUnknown", RGBA(255, 255, 255, 1), RGBA(0, 0, 0, 0) )

Adding this to the Fill property of the Icon:

After this you should be able to change your Teams Presence status, and then click on the Icon to update the status in the PowerApp:

One last ting remains before I conclude this blog post, and that is that I want to update the presence status everytime I navigate to this screen in my PowerApp. I’ll just add the following line to the OnSelect event for the Control Lights button on the main screen:

Summary & Next Steps

In this blog post I have shown how you can get the Teams Presence status into the Hue Power App, and for now the status is manually updated either by clicking on the status Icon, or when navigating to the lights screen.

In the next, and last part, of this blog series, I will show how you can subscribe to Microsoft Graph changes, so that you can automatically get status updates.

Thanks for reading so far, see you in the last part 10 of this blog series!

Blog Series – Power’ing up your Home Office Lights: Part 8 – Using Power Automate Flows to Get and Set Lights State

This blog post is part of the Blog Series: Power’ing up your Home Office Lights with Power Platform. See introduction post for links to the other articles in the series:
https://gotoguy.blog/2020/12/02/blog-series—powering-up-your-home-office-lights-using-power-platform—introduction/

In Part 7 we built the main screen of the PowerApp, the topic for today is to build Flows and the PowerApp screen for controlling the Hue Lights:

If you want a quick summary of how this screen works, take a look at this video:

<YOUTUBE VIDEO PROCESSING, AVAILABLE SOON>

Building the Lights Control Screen

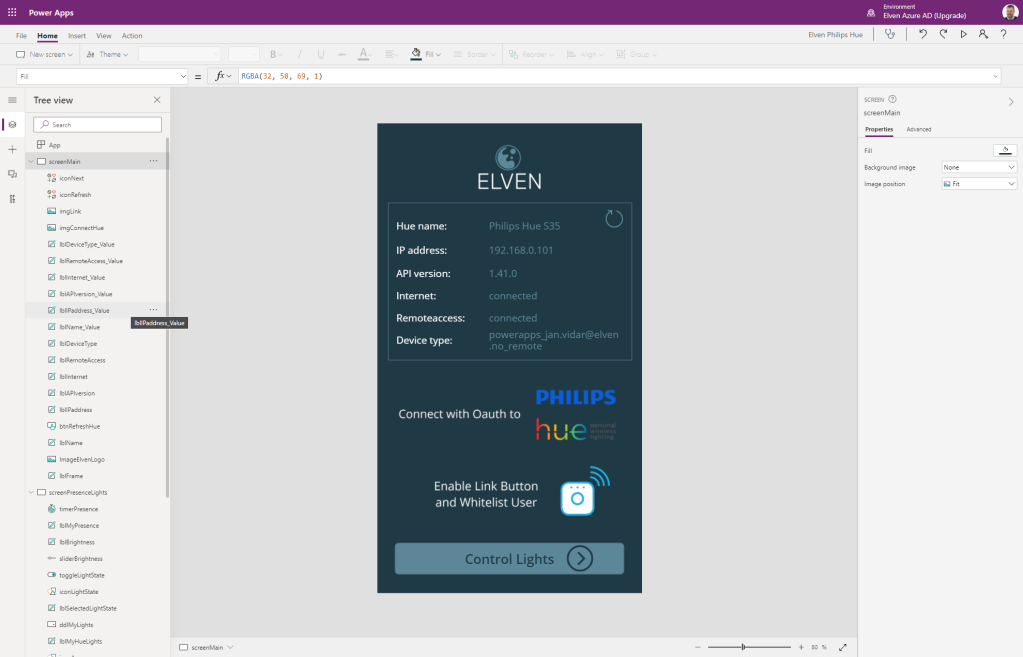
Start by adding another screen to the Hue PowerApp. If you have used a custom background color, logo and other graphical elements like I have you can do the same for this screen also. In addition to the label controls I’ve added for texts, I’ve added the following controls to my Hue PowerApp:

  • Small circle icons/shapes to reflect color states.
  • Toggle controls to set Light state On/Off and sync with Teams Presence On/Off.
  • Dropdown list for listing the Hue Lights.
  • Slider control for setting Brightness.
  • I’ve also added a Timer control and set it to not visible.

After adding and customizing the controls and named your controls after your chosen naming convention, your Hue PowerApp might look like the following:

Now we need to create a couple of Flows (as of today these are names Cloud Flows) for getting and setting Light State.

Creating Flow for Getting Lights and State

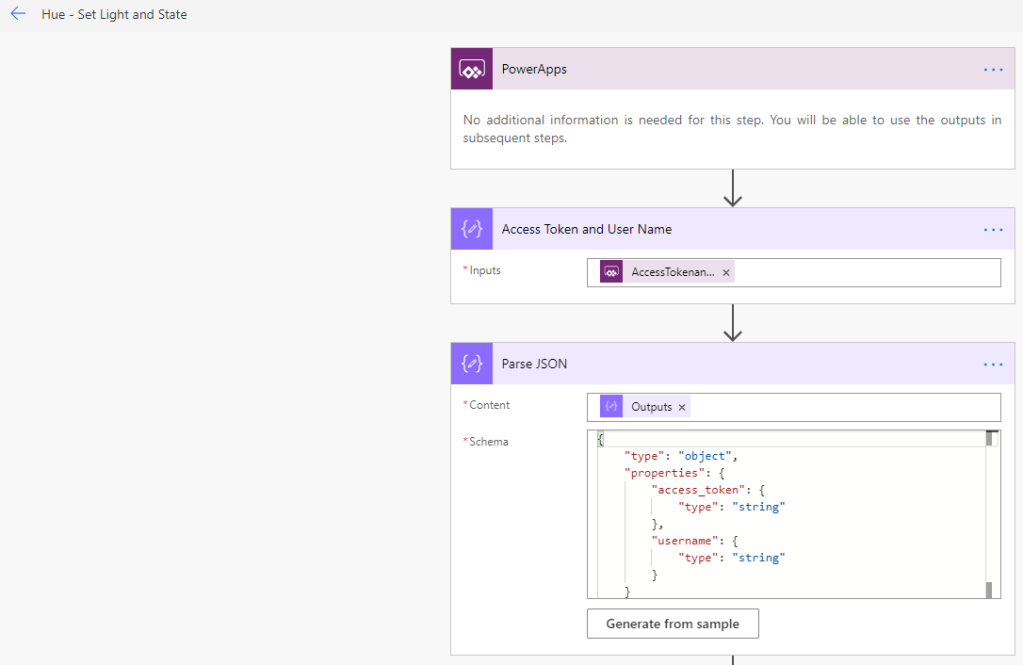
Create a new Instant Flow with PowerApps as Trigger. Name the Flow “Hue – Get Lights and State”. First add a Compose action, name the action “Access Token and User Name”, and select Ask in PowerApps under Dynamic Content:

Next, add a Parse JSON action below:

You can use the following schema:

{
    "type": "object",
    "properties": {
        "access_token": {
            "type": "string"
        },
        "username": {
            "type": "string"
        }
    }
}

We are now ready to query for the Lights for my Hue Remote API. But first it is helpful to understand a little about how the Hue Remote API returns lights. Earlier this year I published this blog post about exploring the Hue Remote API using Postman: Remote Authentication and Controlling Philips Hue API using Postman | GoToGuy Blog. For example when I query for all lights, https://api.meethue.com/bridge/{{username}}/lights/, I get a response similar to this:

The special thing to note here is that Hue returns every light as a named object identified by a light number. This is not an Array, so you cannot loop through that as you would expect. So I needed to think a little different in my solution.

I decided to create my own Array, and get the Lights one-by-one. For this I needed to start at light number “1”, and then do until some maximum value. I have currently 13 lights, so I created a variable for “13”. It makes it a little static, but at least it works with as little hassle as possible.

First add an Initialize variable action, of type Array and name arrayLights, and using the expression json('[]') as an empty json array as value:

Next, add two more Initialize variables actions, both of type Integer and named LightNumber with value 1, and NumberOfLights with value 13 (or whatever number of lights you have!).

Now, add a “Do until” action, setting LightNumber is greater than NumberOfLights as loop control:

Inside the Do until-loop, add a HTTP action, where we will run a GET query against the https://api.meethue.com/bridge/<whitelist identifer>/lights/<lightnumber>, using the access_token as a Bearer token in the Authorization Header:

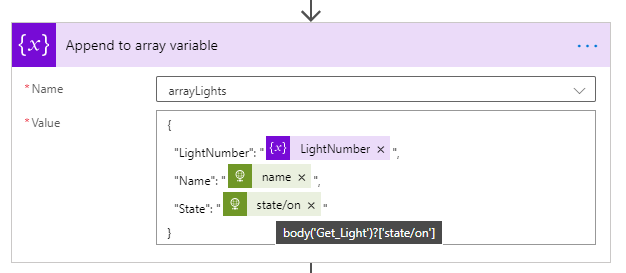
This will return the first light state. Add a Append to array variable action, selecting the “arrayLights”, and adding the value like following:

This will add the Light number, the name of the Light source (body('Get_Light')?['name']) and if state on is true or false (body('Get_Light')?['state/on']).

Next action is to add an Increment variable action to increase the LightNumber by 1:

And last, outside the Do until, add a Response action so that we can return the data to the PowerApp. The important part here is to specify status code 200 and content-type application/json, and return the arrayLights variable as shown below:

Getting the Lights and State to the PowerApp

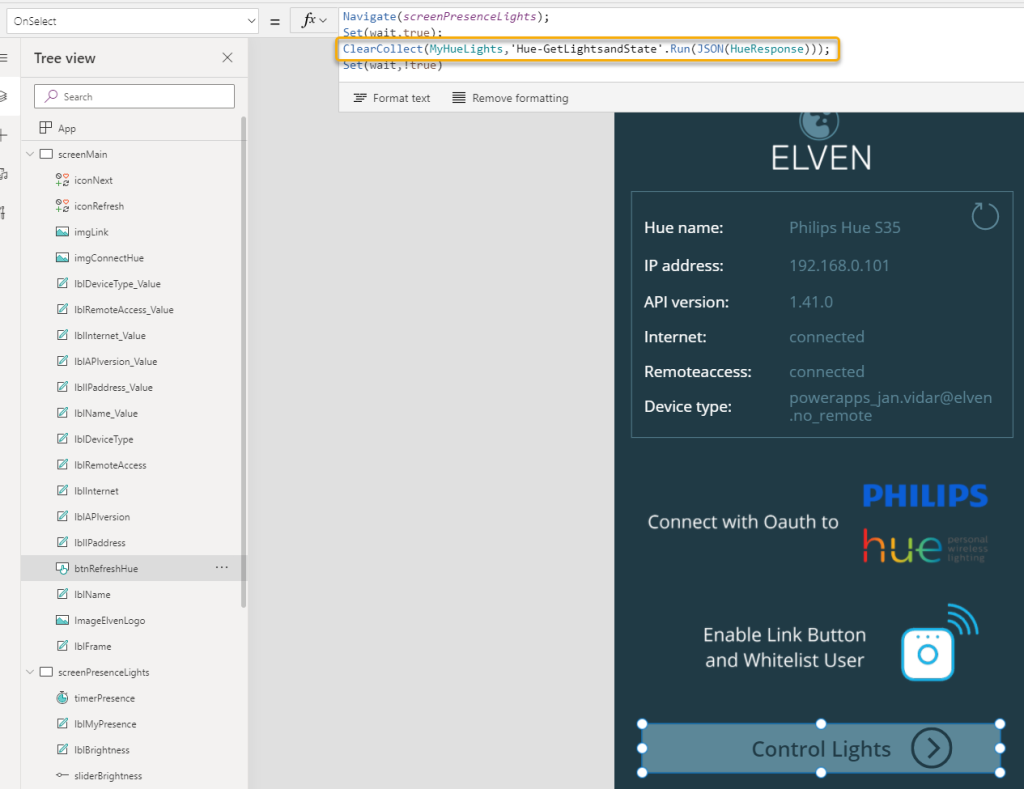
Now that we have to Flow for getting Lights and State, we can get that data into the PowerApp. Back in the PowerApp, select the Button control in the Main Screen with the name Control Lights. Click on the Action menu, and Power Automate to link the “Hue – Get Lights” and State Flow, and add the following lines to the OnSelect event:

Navigate(screenPresenceLights);
Set(wait,true);
ClearCollect(MyHueLights,'Hue-GetLightsandState'.Run(JSON(HueResponse)));
Set(wait,!true)

To explain, the Navigate(<screen>), is for changing to the other screen of course. I also use the Set(wait,true) and Set(wait,!true) on either side of the Flow run to make the PowerApp appear busy. And then, I save all the Lights and State back from the response from the Flow to a Collection, using ClearCollect and the Collection name “MyHueLights”. The Flow run expects that I supply the access_token and username, which I already has as a record variable in the shape of “HueResponse”. So, I’ll just add a JSON(..) function around that.

We can test. Hold down the “ALT” on your keyboard, and click on the “Control Lights” button. After this, go to the View menu and select Collections. You should see the “MyHueLights” collection, and a preview of the first 5 items:

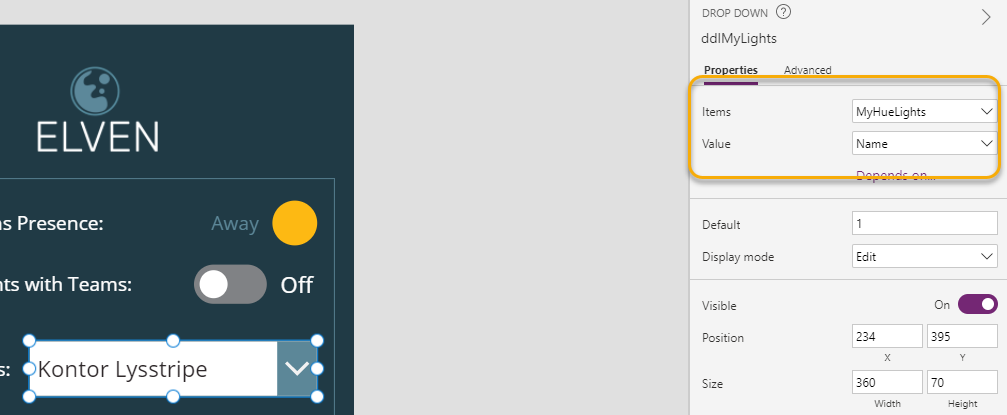
Now we can get that data in to the PowerApp controls. Select the Drop Down list control, and set the Items property to “MyHueLights” and the Value to “Name”:

This should fill the Drop Down with Light names. Next, for the Drop Down list OnChange event, add the following:

Set(SelectedLight,(ddlMyLights.SelectedText));
Set(CheckStatus,false);
If(SelectedLight.State="True",Set(CheckStatus,true);Set(LightState,true),
Set(CheckStatus,true);Set(LightState,false)
)

So in the above expression for the OnChange event, I set a variable “SelectedLight” to the selected text from the Drop Down, and then I’m manipulating another variable with set “CheckStatus” and set “LightState”, depending on if the state on is true or false.

Proceeed to select the toggleLightState control, and set the Default property to the variable “LightState” and Reset property to “CheckStatus”:

We now have what we need for getting the Lights and State into the PowerApp. The next thing we need to build is to actually set Light states and colors back to the Hue Remote API.

Creating Flow for Setting Lights and State

Create a new Instant Flow with PowerApps as trigger, and name it “Hue – Set Light and State”. Start by adding the same two Compose actions as the “Hue – Get Light and State” Flow:

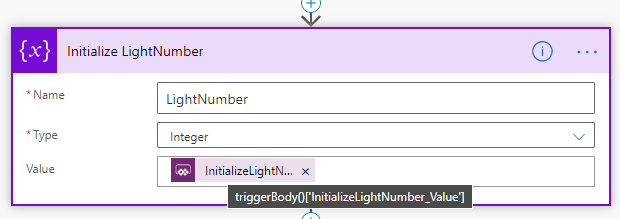
Next, add an Initialize variable action, with the name “Initialize LightNumber”, and select “Ask in PowerApps” under Dynamic content so that this input will be submitted from the PowerApp:

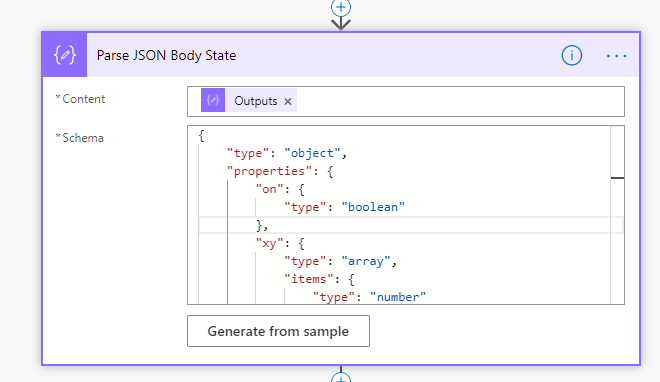
After that, add a Compose action. Name it “Body State”, and select “Ask in PowerApps” for input:

This input parameter is where we will supply the light state, colors etc.

Next add a Parse JSON action, using the outputs of the previous Body State input:

You can use the following schema:

{
    "type": "object",
    "properties": {
        "on": {
            "type": "boolean"
        },
        "xy": {
            "type": "array",
            "items": {
                "type": "number"
            }
        },
        "bri": {
            "type": "integer"
        }
    }
}

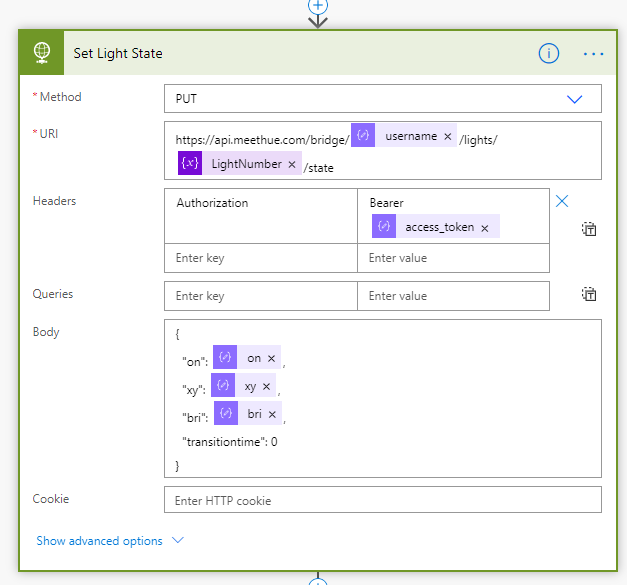
After this, add an HTTP action, using method PUT, and the address https://api.meethue.com/bridge/<whitelist identifier>/lights/<lightnumber>/state, and including the access_token as a Bearer token in the Authorization Header. For Body, construct the following JSON body:

And last, add a Response action to return status code and body to the PowerApp:

We now have a Flow in which we can call to set the light states in the PowerApp.

Control Light States from PowerApp

Lets start by turning selected Lights on and off. Select the Toggle control for Light State, and for the “OnCheck” event add the Power Automate Flow “Hue – Set Light and State” under the Action menu. For the OnCheck event add the following expression:

Set(MyLightState, "{'on':true }");
'Hue-SetLightandState'.Run(JSON(HueResponse), SelectedLight.LightNumber , MyLightState)

And for the UnCheck event:

Set(MyLightState, "{'on':false }");
'Hue-SetLightandState'.Run(JSON(HueResponse), SelectedLight.LightNumber , MyLightState)

So as you can see above, I’m using a variable named “MyLightState”, for dynamically storing the different light states I want to set and submit to the Flow. The ‘Hue-SetLightandState.Run’ takes three inputs in the form of access_token and username (via HueResponse variable), then selected LightNumber, and the MyLightState variable.

Next, lets go to the Slider control for setting Brightness. On the OnChange event, add the following expression:

Set(MyLightState, "{'bri': " & sliderBrightness.Value & " }");
'Hue-SetLightandState'.Run(JSON(HueResponse), SelectedLight.LightNumber , MyLightState)

Here I’m changing the state via the ‘bri’ value, and the sliderBrightness.Value. Btw, the Slider is set to minimum 2 and max 254, to support the values expected by the Hue API for ‘bri’.

And then finally we can set the color states for the three icons I have prepared. I have created pre-defined colors reflecting my presence status, green for available, red for busy and yellow for away.

For each of these, change the “OnSelect” event to the following:

Green (Available):

Set(MyLightState, "{'on':true, 'xy': [ 0.358189, 0.556853 ], 'bri':" & sliderBrightness.Value & " }");
 'Hue-SetLightandState'.Run(JSON(HueResponse), SelectedLight.LightNumber , MyLightState)

Red (Busy):

Set(MyLightState, "{'on':true, 'xy': [ 0.626564, 0.256591 ], 'bri':" & sliderBrightness.Value & " }");
 'Hue-SetLightandState'.Run(JSON(HueResponse), SelectedLight.LightNumber , MyLightState)

Yellow (Away):

Set(MyLightState, "{'on':true, 'xy': [ 0.517102, 0.474840 ], 'bri':" & sliderBrightness.Value & " }");
 'Hue-SetLightandState'.Run(JSON(HueResponse), SelectedLight.LightNumber , MyLightState)

A few words about the colors, this is something that could be a little difficult to get a grasp on. Hue has an explanation on the CIE color space and the “xy” resource here: Core Concepts – Philips Hue Developer Program (meethue.com).

You can also see some conversion functions here: Color Conversion Formulas RGB to XY and back – Philips Hue Developer Program (meethue.com)

Basically I’ve tested and learned. A good tip is to set the color you like using the official Hue Mobile App, and then read the state for the light.

Summary and Next Steps

The Hue PowerApp has now a working solution for getting Lights and State, as well as manually controlling colors, toggle on and off, and setting brightness.

In the next part of this blog post series, we will look into getting the presence status from Teams and show that in the Power App.

Thanks for reading!

Blog Series – Power’ing up your Home Office Lights: Part 7 – Building the PowerApp for Hue to Get Config and Link user

This blog post is part of the Blog Series: Power’ing up your Home Office Lights with Power Platform. See introduction post for links to the other articles in the series:
https://gotoguy.blog/2020/12/02/blog-series—powering-up-your-home-office-lights-using-power-platform—introduction/

With the Power Automate Flows we’ve built in the previous parts, we should now be able to get the Link and Whitelist the user and get the Hue Bridge Configuration details. It is time to build the main screen of the “Hue PowerApp”!

Here is a short video where I talk about the basics of the main screen of the PowerApp we are going to build:

Building the PowerApp and Main Screen

In my solution I wanted to build a canvas app with a phone layout, to be able to use it when on my mobile as well. Start by logging in to make.powerapps.com, and creating a new app from Blank, and either phone or tablet layout by your preference:

This next step is up to your preference and personal choice, but what I did was the following:

  • Added a custom background color from your palette (if you have a branding profile) or you could choose one of the built-in themes:
  • Add a Header logo
  • Add elements like frames and icons. I often use a Label control and set the border for it to create a frame like figure.
  • Add label controls for your text and placeholders for where you will update values later. Set font colors for labels and labels where you will have values.
  • Add some Images for where you want to add an action to the OnSelect event.
  • Add Button controls or Icons for navigating between screens.
  • Use a naming convenvtion for your controls.

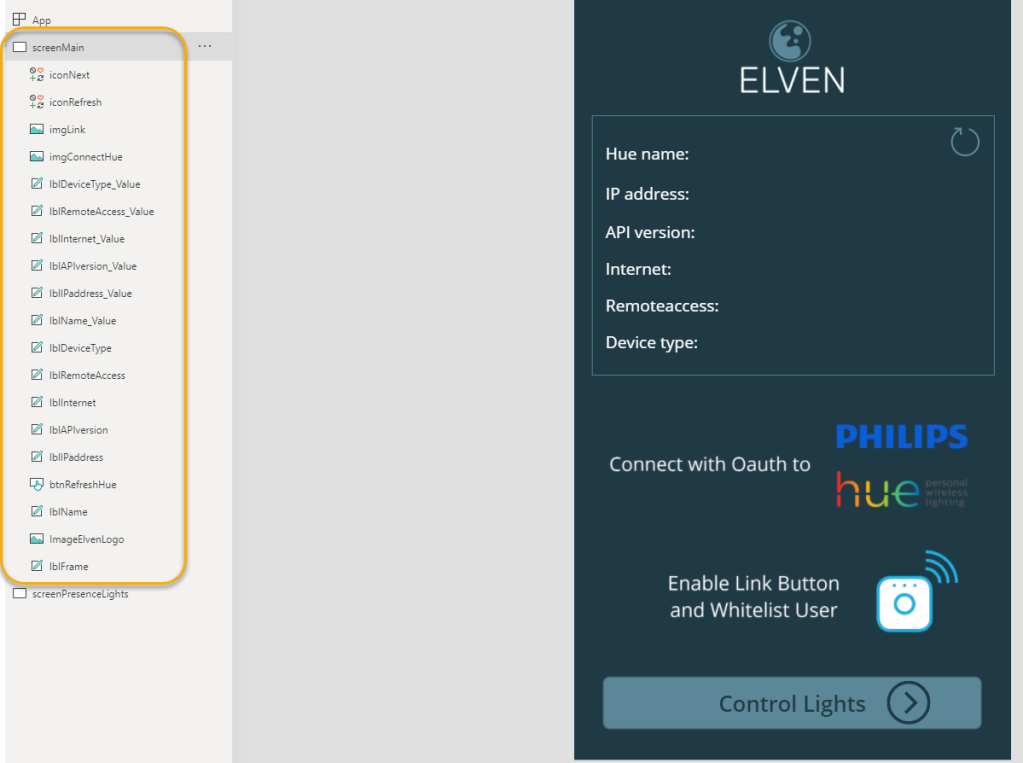
In the end, adding and formatting all controls, and before I add any data to the PowerApp, my Hue PowerApp ends up like this:

I’ve uploaded Images for the Authorization and Linking, for your convenience I’ve attached those here:

After finishing the PowerApp main screen design, we can proceed to adding actions and getting data.

Connecting the PowerApp to Power Automate Flows

Start by selecting the Refresh Icon, on the Action menu, click the On Select button to change to the OnSelect event, and click the Power Automate button:

Under Data, select to associate the “Hue – Get Access Token and Config” Flow:

This will start populating the OnSelect event field, which you would edit so that you use the “Se”t function and save the response from calling the Flow in the variable HueResponse like this: Set(HueResponse,'Hue-GetAccessTokenandConfig'.Run())

Lets test this action. Before this I have removed my user from the Microsoft List “Elven Hue Users”, this list is empty now:

Hold down the “ALT” button on your keyboard, and click on the Refresh icon. The Flow will now run, you will see the small dots flying over the screen, but you won’t see any data yet. But you can check the contents of the “HueResponse” variable. Do this by going to the View menu, and click on the “Variables” button. From there you should see the HueResponse variable, it is of type “Record” and you can click on that Record icon:

You should now see something like the following values, if I hadn’t deleted the username from my List earlier I would see values for all these fields:

If I compare this with the response output from the Flow I triggered with the refresh icon above, I can see that the output really reflects the contents of the “HueResponse” variable:

Lets add these values to the labels I prepared in the PowerApp.

For the label containing the Hue name value, add the following to the Text property: If(HueResponse.access_token="","Hue not Connected!",If(HueResponse.username="","Connection to Hue OK, but User not linked!",HueResponse.name))

This should return something like this:

Proceed to add the following to the Text property for each of the remaining configuration value labels:

HueResponse.ipaddress
HueResponse.apiversion
HueResponse.internet
HueResponse.remoteaccess
HueResponse.devicetype

They won’t show any value in the PowerApp yet though. First we need to get the user registered at the Hue Remote API, which is the next step. Select the following image:

On the Action menu, for the OnSelect event, add the Power Automate Flow for Link and Whitelist User. Change the OnSelect event so that also this is using “Set” function and taking the response from the Flow to the same HueResponse variable, but you also need to supply an input to this flow. For this we will use the HueResponse.access_token, so your OnSelect event should look like this:

Set(HueResponse, 'Hue-LinkandWhitelistUser'.Run(HueResponse.access_token))

Lets test this button. Hold down “ALT” on your keyboard, and click on the image. The Flow should now run, register a user at Hue Remote API, create a new List item and return the configuration to the PowerApp:

Checking the HueResponse record variable now:

A couple of more things remain on the main screen. First, on the App’s OnStart event, add the same event as the refresh icon, this would get the config automatically at start:

Next, select this Image:

On the OnSelect event, add the following:

Launch("https://api.meethue.com/oauth2/auth?clientid=<your_client_id>&response_type=code&state=<youranystring>&appid=<your_app_id>&deviceid=<your_device_id>&devicename=<your device name>")

Replace the <your_…> values with the client id and app id from the Hue Remote API app registration, and your values for device id and name.

Clicking this image will now launch the Hue Developers portal, asking you to Grant permission to the App, and return to the Logic App that retrieves the Bearer Token and store that in the Key Vault as we have seen in previous parts of this blog series.

Summary and Next Steps

We’ve now built the foundation and first part of the PowerApp to retreive the configuration, create and link username, and if needed authorizing and getting a new Bearer Token via Hue Remote API if needed.

In the next part we will build the screen for getting lights and setting lights state and color.

Thanks for reading, see you in the next part!

Blog Series – Power’ing up your Home Office Lights: Part 6 – Using Power Automate Flow to Link Button and Whitelist user

This blog post is part of the Blog Series: Power’ing up your Home Office Lights with Power Platform. See introduction post for links to the other articles in the series:
https://gotoguy.blog/2020/12/02/blog-series—powering-up-your-home-office-lights-using-power-platform—introduction/

In the previous part 5 we created the first Power Automate Flow of the solution, for retreiving the Access Token and getting the configuration of the Hue Bridge via Remote API. To get all the configuration details of the Bridge, we were dependent on that the user had a Whitelist Identifier in the Microsoft List, and this is the Flow we will be working on in this blog post.

Lets do a quick video where I talk about this Flow and what it does:

Create the Flow for Linking and Whitelisting User

Create a new instant Flow, with PowerApps as Trigger. In my case I have named this Flow “Hue – Link and Whitelist User”.

As the first action in the Flow after the PowerApps trigger, add a Compose action:

Tips: Make sure that you set a name for the action, in my case I’ve named it “Access Token”, before you under Dynamic content selects “Ask in PowerApps”. This way the Input parameter will get a more descriptive name like “AccessToken_Inputs”, when we later call the Flow from the PowerApp.

Next, add two Initialize variable actions, called UserDisplayName and UserEmail and type String. For values use the following custom expressions (see comment for expression):

Next, add a Get Items action from SharePoint, and specify your Site and List. For Filter Query, add Title eq ‘<UserDisplayName variable>’:

Add a Condition action, where we will check if the Get Items returns an empty result to be false:

If false, meaning that the user already have a configuration in the List, under “If yes”, add a Get Item action. Specify the Site and List Name, and for Id add the following expression to return the first instance of results first(body('Check_if_User_Already_Linked')?['Value'])?['Id'] :

Next, add a HTTP action where we will query the Hue Remote API for the Bridge configuration details. Specify the URI to be https://api.meethue.com/bridge/<whitelist identifier>/config, and add an Authorization Header with Bearer <Token Outputs>:

This action should return all the details we want from the Hue Bridge, and we can add a Response action to return that back to the PowerApp:

In the other case, when a User Linked was not found in the SharePoint List, we need to add that user and get the Whitelist Identifier. Under “If no”, add a HTTP action. In this action we will “remotely” push the Hue Bridge button via a PUT method. This is basically the same procedure as when you add new lights or equipments, where you need to run and press the button down. But here we do it via the API like below:

PS! Note that above I’ve used “Raw” Authentication and for Value selected Bearer “AccessToken Outputs”. This is just another option to show, I could have have used an Authorization Header instead.

After the Link Button is enabled, we can add another HTTP action, this will register the username via a POST method and a request body containing the “devicetype” value. Device type is so that you can identify the registered usernames on your bridge:

After this action, add a Parse JSON action so that we can more easliy reuse the outputs from adding the username:

For Schema, select “Generate from sample”, and paste the sample output provided by the Hue API documentation here, https://developers.meethue.com/develop/hue-api/7-configuration-api/#create-user, under 7.1.5. Sample Response.

Next, add a “Create Item” action. Specify the Site and List Name, and add the following values for List columns:

Note that for Whitelist Identifier, use the expression body('Parse_JSON')?[0]?['success/username'], this is because the output from Hue API returns an array, so the [0] is to specify the first instance.

Now, using that newly created username, we can query for the Bridge config using the “Whitelist Identifier” from above:

And lastly, add a Response action that returns this back to the PowerApp:

Verify and Test the Flow

That should complete the Flow. We will link that into a PowerApp later, but if you want to you can test the Flow by performing the Trigger action yourself. Then you need to specify a valid Access Token, and the Flow should run successfully, creating a Linked User if you haven’t already:

If you check the List a new item should now represent your user:

Summary and Next Steps

We are now ready to start working on the PowerApp, linking the Flows we have created in this and the previous blog posts. That will come in the next part!

Thanks for reading so far 🙂

Blog Series – Power’ing up your Home Office Lights: Part 5 – Using Power Automate Flow to Get Access Token and Config

This blog post is part of the Blog Series: Power’ing up your Home Office Lights with Power Platform. See introduction post for links to the other articles in the series:
https://gotoguy.blog/2020/12/02/blog-series—powering-up-your-home-office-lights-using-power-platform—introduction/

In previous parts we have built the logic for authorizing and getting Bearer Token for Hue Remote API, and storing that as a Secret in Azure Key Vault, now it’s time to move over to the user side of things. In this part we will build a Power Automate Flow that retreives the Access Token and checks if the user has been set up for configuration. Here is a short video where I walk through that Flow:

Setting up a User State & Config Source

As the PowerApp and Flows we will build are stateless, in the sense it will get data from configured variables and data connections, we need to store some user state and configuration somewhere. The Hue Remote API require that we need to register a so called “whitelist identifer”, a username to be used when sending request to the Hue Remote API, for example: https://api.meethue.com/bridge/<whitelist_identifier>/lights&nbsp;

The way I have built the solution is that the Authorization part, getting, retreiving and if needed refreshing the Bearer Token, are done in the Logic Apps layer, and common for every user that uses the Power Platform solution. On the user side of things, I want every user that share the solution to have their own whitelist identifier.

This means that first time a user use the solution, the user must register their device and retreive the username to be used as the whitelist identifier. Subsequently users will use their own identifer when calling the Hue Remote API.

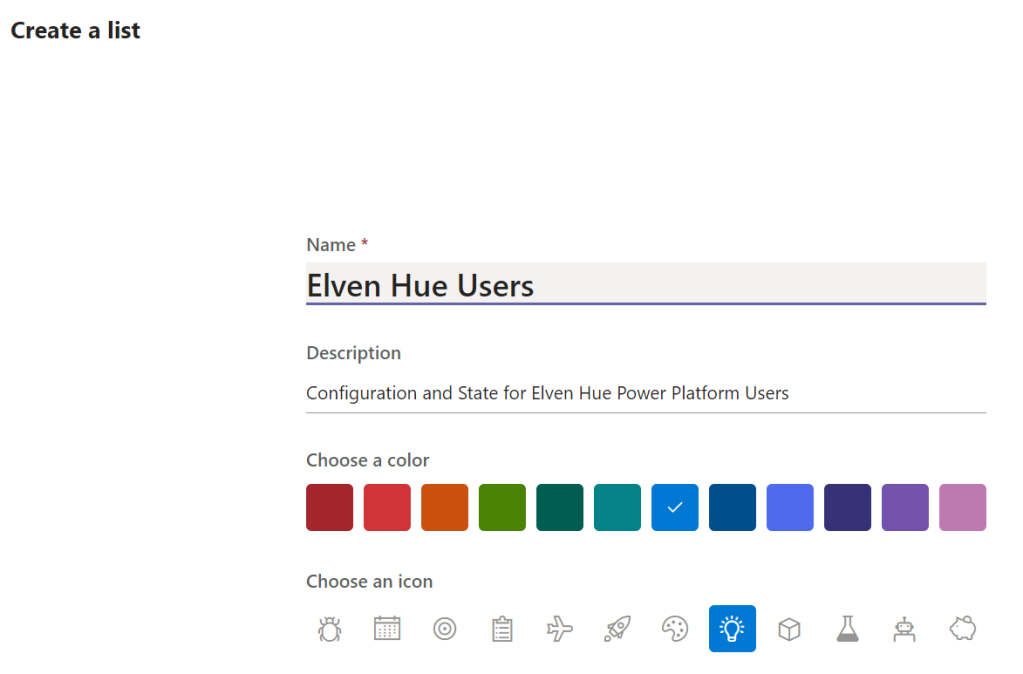
So we need something set up to store this information about users’ states and configuration, and I have chosen to use a SharePoint List/Microsoft List to do this. This List has been created in a Team where the users of the solution are members.

These are the steps I have done to set it up:

  1. Created a new Team in Microsoft Teams. I’ve named my Team “Elven Hue Lights”
  2. Created a new SharePoint List/Microsoft List in that Team. You can either to this directly in the Team by adding Microsofts Lists to a Tab, and select to create a new List from Blank, or open Lists from the Office 365 launcher. I created a List like this:
  1. Then, in addition to the Title column, add the following columns, single line of text, for storing “Whitelist Identifier” and “Device Type”:

This list will be used by the following Power Automate Flow, so that is the next step to set up.

Create the Flow for Hue Access Token and Config

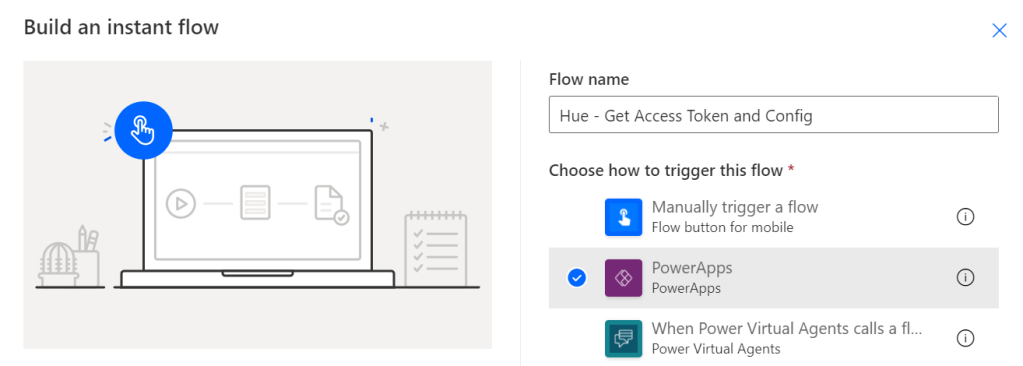
Create the following Power Automate Flow, of type Instant and using PowerApps as trigger, and using the name “Hue – Get Access Token and Config”:

After the Trigger action for PowerApps, add a HTTP action. This action will send a GET request to the Logic App we created in the previous part “logicapp-hue-get-accesstoken”. So paste the Request Url for that Logic App in the URI field below:

After getting the Access Token from the Logic App, add an Initialize variable to get the calling users Displayname via the triggerOutputs header and x-ms-user-name value:

Next, add a Get Item action from SharePoint, this will retreive any items matching the User Display Name from the List we created for Hue Users. Specify the correct Site Address and List Name, and add a Filter query where Title equals the variable of the User Display Name we got in the previous step:

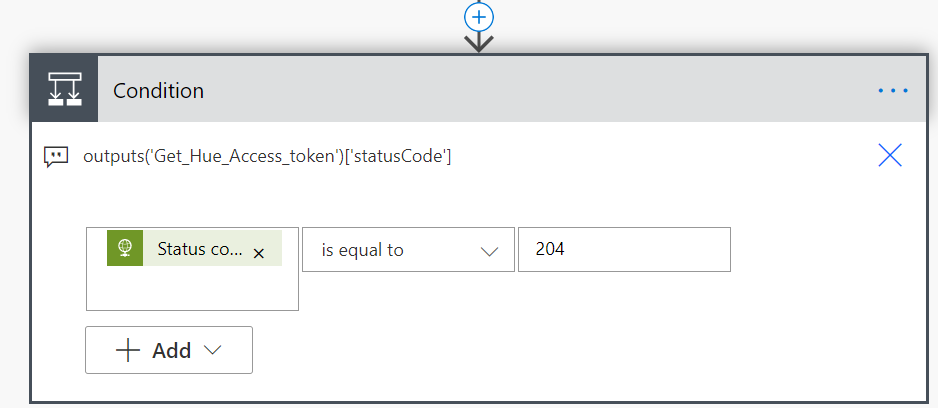
Next, add a Condition action, where we will evaluate the returned statusCode from the Logic App. This will be either 204 (No Content) or 200 (OK), as we configured back in the Logic App:

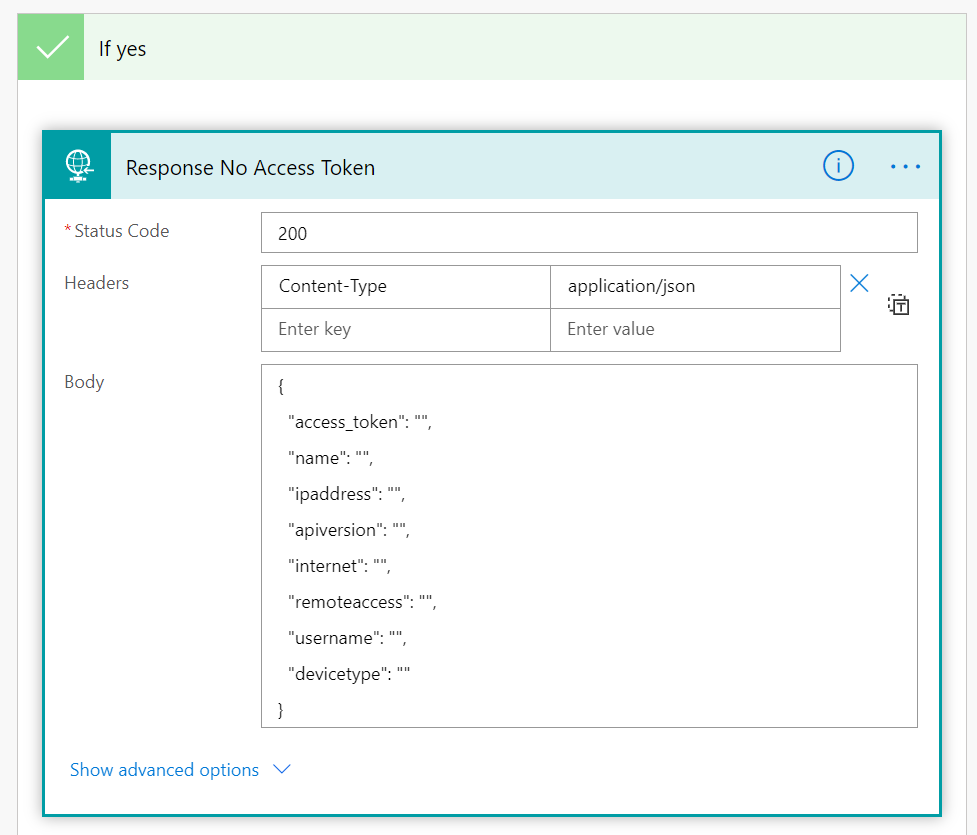
If Yes, add a Response action, this will return a JSON response object back to the PowerApp, but in this case it will be empty:

A quick comment on the above Response body, which will be clearer later in the Flow. I’ve prepared a structured response that will possibly return not only the access_token, but also the name (Hue Bridge), and the Bridge IP address, API version etc. But for now, this is empty data.

Let’s move over to the No side of the Condition. Inside “If no”, add another Condition, and name it “If Username is Empty”. This condition should apply if the Get Item action from the List returns no matching user for the display name:

I’m using an expression empty(body('Get_My_Hue_User')?['value']) and if that is equal to the expression true.

Under “If yes”, meaning that the Get Item returns empty results, add another Response action like the following:

In the above case, as we don’t have a matching user configuration stored, we can return the JSON object with only the access_token.

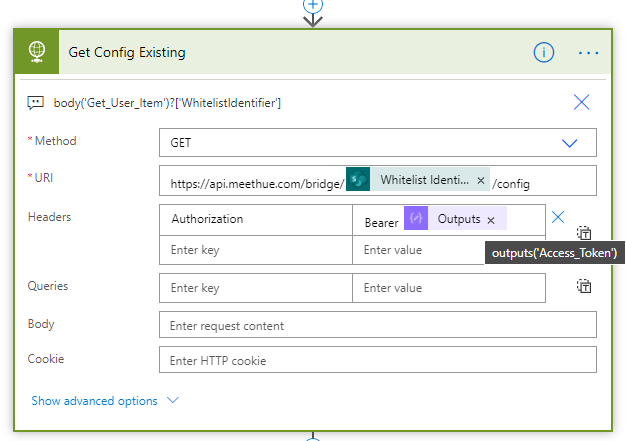
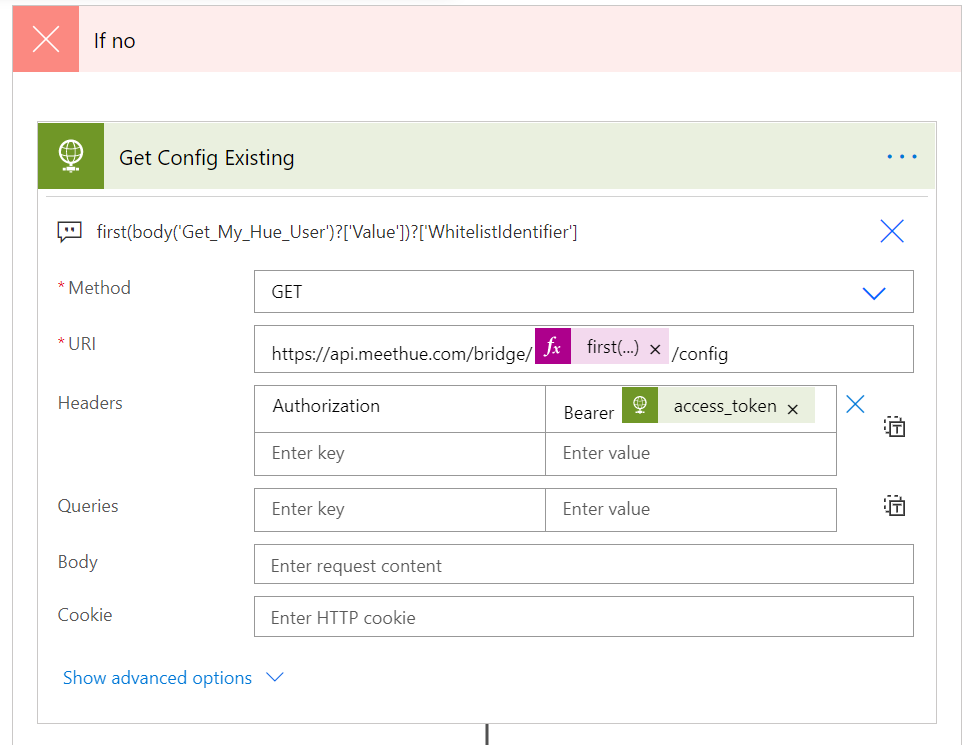
Next, under “If no”, meaning that a matching user was found in the List, add a HTTP action. This action will call the https://api.meethue.com/bridge/<whitelistidentifier>/config, getting the configuration of the Hue Bridge, and using the access_token as Bearer Token in the Authorization Header:

Note! Even though the Get Item action that is filtered for the user display name, in reality will return only one item (or empty), it is still returned as an array of results. So I’m using the expression and function “first” to return only the first item as a single item. So to get the Whitelist Identifier the expression to be used is:

first(body('Get_My_Hue_User')?['Value'])?['WhitelistIdentifier']

After this action, add another Response action, this time returning values for all config values in my custom JSON object:

Ok, quite a few custom expressions used above, so for your convenience I’ll list them here:

body('Get_Hue_Access_Token')?['access_token']
body('Get_Config_Existing')?['name']
body('Get_Config_Existing')?['ipaddress']
body('Get_Config_Existing')?['apiversion']
body('Get_Config_Existing')?['internetservices/internet']
body('Get_Config_Existing')?['internetservices/remoteaccess']
first(body('Get_My_Hue_User')?['Value'])?['WhitelistIdentifier']
first(body('Get_My_Hue_User')?['Value'])?['DeviceType']

That should be this Flow complete.

Test and Validate Flow

We can now validate the Flow using a simple test run. Save the Flow and click on the Test button and “I’ll perform the trigger action”. This should now complete successfully:

As expected the username should be returned as empty as we haven’t yet configured the user for Hue Remote API. So the Flow will return access_token only:

Summary and Next Steps

This Flow will be central later and used on every PowerApp launch to retrieve the access_token and configuration from the Hue Bridge. But first we need to build the Flow for linking User configuration and Whitelist Identifier. That will be in the next part!

Thanks for reading this far, see you in the next part of this blog series.

Blog Series – Power’ing up your Home Office Lights: Part 4 – Using Logic Apps to Get Access Token and Renew Access Token if needed
This blog post is part of the Blog Series: Power’ing up your Home Office Lights with Power Platform. See introduction post for links to the other articles in the series:
https://gotoguy.blog/2020/12/02/blog-series—powering-up-your-home-office-lights-using-power-platform—introduction/

After building the Logic App in part 3 that will authorize and get access token via Oauth2, we will now create another Logic App that will retrieve the Bearer Token from the Key Vault secret, and renew the Token using Refresh Token whenever it is expired.

Here is a short video where I walk through that Logic App scenario:

Create the Logic App and HTTP Trigger

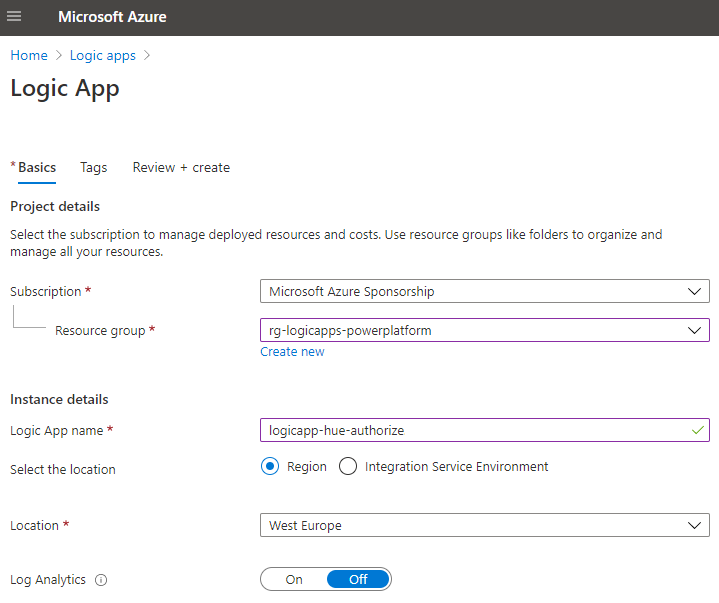
The first thing you need to do, is to create a new Logic App in your Azure subscription. Select the Resource Group you have contributor access to, and give the Logic App a suitable name, as per your naming guidelines. This is the Logic App I created in my environment:

Add a HTTP request trigger for this Logic App as well:

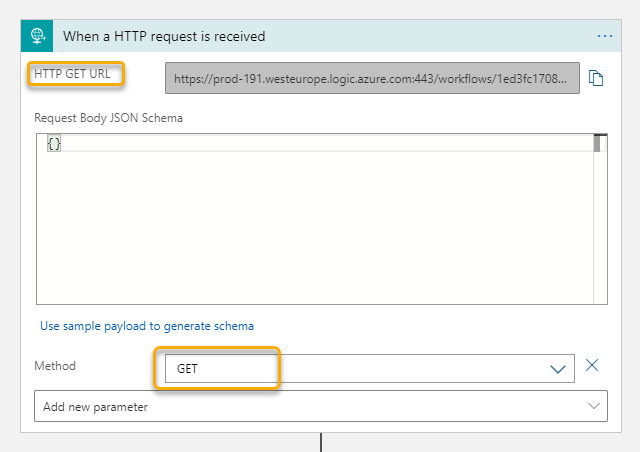
In the Logic App Designer, make sure you hit Save on the Logic App before the next step. You will now be shown the URL, but first go down to the “Add new parameter” and select Method and GET for method. This way your Logic App will trigger on HTTP GET requests.

Adding Logic App Identity and Key Vault Access

As this Logic App also will request secrets from Key Vault, we will need to add a Managed Service Identity and add that to the Key Vault access policy.

Go to Identity settings, and set the System assigned Identity to On:

Next, go to your Key Vault and under Access policies, add the the newly created Logic App with the following Secret permissions (Get, Set, List):

Add Actions for Getting or Renewing Bearer Token

The actions in this Logic App will retrieve the Bearer Token from the Key Vault and return the Access Token as a Response. If Token is expired, it will be renewed using the Refresh token.

Start by adding a HTTP request, and get the Secret for the Bearer Token like the following:

Next, add a Compose action, getting the outputs from the Get KV Secret Bearer Token action. This secret was stored as a Json Object, but will be returned as a String, so I have used the following custom expression to convert to Json:

json(outputs('Get_KV_Secret_Bearer_Token')?['body/value'])

Next, add the following Compose actions for getting the timestamps in Ticks, and converting to Epoch. See the previous blog post for explanation of why this is necessary, but we need to do this to be able to calculate wether the secret is expired or not:

For your convenience, I’ve added the custom expressions as comments to the actions above, or you can copy it from below:

ticks(utcNow())

ticks('1970-01-01T00:00:00Z')

div(sub(outputs('GetNowTimeStampInTicks'), outputs('Get1970TimestampInTicks')), 10000000)

Next, add a Condition action. Here we will check if the expiry date time of the secret is greater than the current calculated timestamp in Epoch:

Use the following custom expression for getting the “exp” attribute from Key Vault Secret:

outputs('Get_KV_Secret_Bearer_Token')?['body/attributes/exp']

If the secret hasn’t expired, we will return the access token as a Response action as shown below. Note that I will only return the access_token, not the complete Bearer Token stored in the Key Vault secret, as this also contains the refresh_token. The reasoning behind this is that the calling clients (users from PowerApps/Automate) only need the access_token.

As you see from above, I’ve built a Json body and schema for the response, and the custom expression returing the value of access_token is outputs('Compose_Bearer_Token')?['access_token'].

On the False side of the Condition, meaning that the Secret is expired, we will have the logic that renews the Bearer Token. First add two HTTP actions, for getting the Client Id and Client Secret from Key Vault:

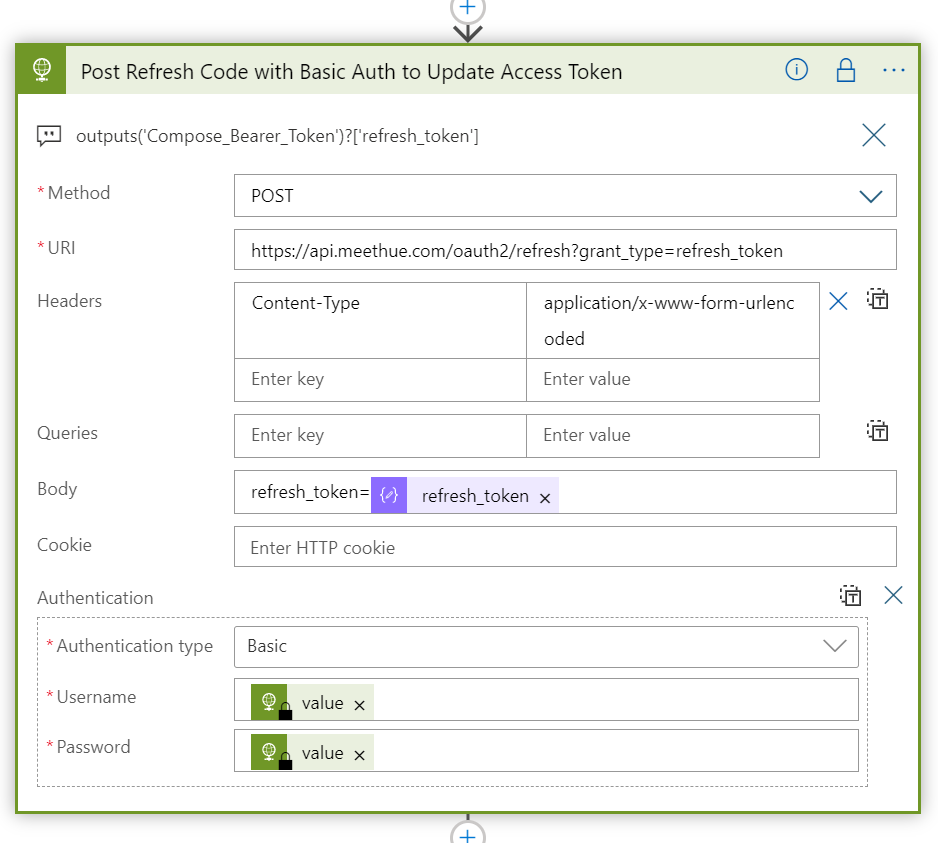
Next, add another HTTP action, using Method POST we will send a request to the oauth2/refresh endpoint at Hue Remote API:

The refresh_token need to be sent in a Request Body, using the expression: outputs('Compose_Bearer_Token')?['refresh_token']

Remember to set Content-Type: application/x-www-form-urlencoded. And Authentication Type should be set to Basic, using the retrieved Client Id and Secret from Key Vault as username and password.

Refreshing the Token correctly will return a new Bearer Token. We now need to get and convert the time stamps to Epoch integer, to calulate when the Access Token expires. This is the same process as we used in the Logic App “logicapp-hue-authorize” in part 3 of this blog series. Add 3 new Compose actions like below:

For your convenience, here are the custom expressions used for the above actions:

addSeconds(utcNow(), int(body('Post_Refresh_Code_with_Basic_Auth_to_Update_Access_Token')?['access_token_expires_in']))

ticks(outputs('AccessToken_Expires_Utc'))

div(sub(outputs('GetTimestampInTicks'), outputs('Get1970TimestampInTicks')), 10000000)

Next step is to update the Bearer Token Secret in Key Vault with the new Token we received now and the new expiry date. Add a HTTP action like below:

We can now return the access_token using the HTTP action like below:

The last action we need to add is a default response if any accest_token could not be returned. This is important as we are going to call this Logic App using Power Automate Flows, and we need to have a response for any scenario. Add this after the condition action like below:

For the Null Response action, change the Configure run after setting like the following:

That should be it. Remember to secure outputs for any actions that return credential information:

Verify Logic App

We can now test the Logic App. You can use Postman, Invoke-RestMethod in PowerShell, or just run in the Browser your Logic App Http Trigger Url:

This should return your Access Token:

Looking at the Run History for the Logic App, we should see a sucessful run:

Summary and Next Steps

That should conclude this blog post. In this post, and the previous, we have built the logic behind authorizing and getting the Bearer Token for Philips Hue Remote API, as well as providing and refresh the Token when needed.

In the next part we are going to start building the solution in Power Automate. Thanks for reading, see you in the next part!

Blog Series – Power’ing up your Home Office Lights: Part 3 – Using Logic Apps to Authorize and Get Access Token using Oauth and Hue Remote API

This blog post is part of the Blog Series: Power’ing up your Home Office Lights with Power Platform. See introduction post for links to the other articles in the series:
https://gotoguy.blog/2020/12/02/blog-series—powering-up-your-home-office-lights-using-power-platform—introduction/

Now that we have registered the application for Hue Remote API, and stored the client Id and Secret in Azure Key Vault, we can start build the Logic App that will authorize and get access token via Oauth2.

Here is a short video where I introduce the concept:

Create the Logic App and HTTP Trigger

The first thing you need to do, is to create a new Logic App in your Azure subscription. Select the Resource Group you have contributor access to, and give the Logic App a suitable name, as per your naming guidelines:

Next, select HTTP request to be the trigger for the Logic App:

After that you will see the following in the Logic App designer:

Make sure you hit Save on the Logic App before the next step. You will now be shown the URL, but first go down to the “Add new parameter” and select Method and GET for method. This way your Logic App will trigger on HTTP GET requests, which is required for the Authorization Code flow with Hue:

Now copy this URL, and make sure that no one but you can access this URL, as this is a SAS (Shared Access Signature) URL that anyone in the world can send requests to if they know the URL. Save the Logic App.

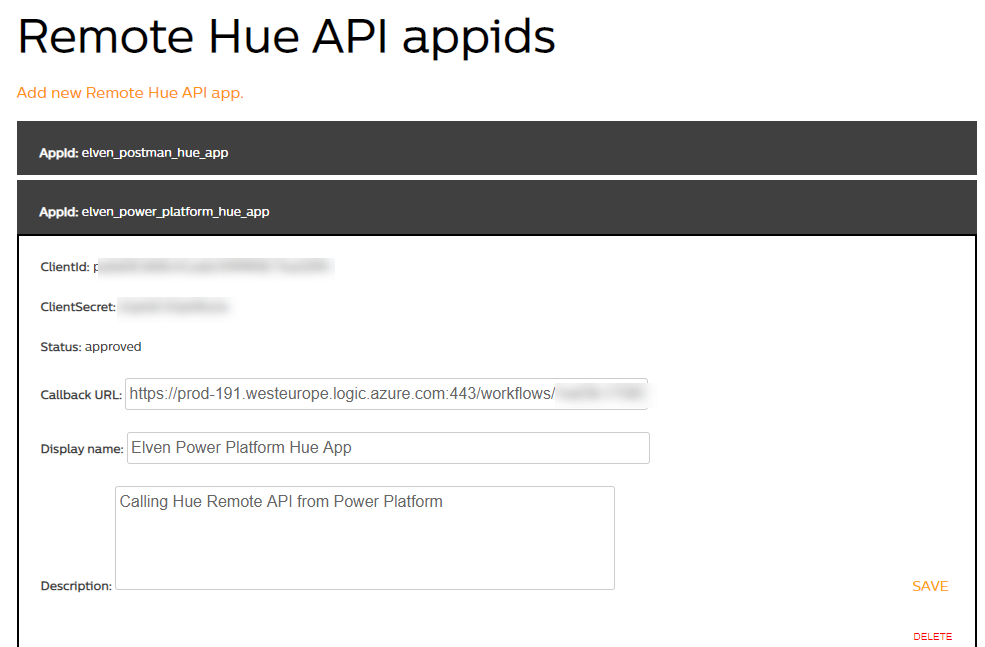
Go back to your App Registration in the Hue Developers Portal, and change your temporary http://localhost/logicapp Callback URL to your Logic App URL:

This means that from now on, the Logic App will handle the authorization code for the Hue App. But first we will need to let the Logic App access the Key Vault.

Adding Logic App Identity and Key Vault Access

For the Logic App, under Settings and Identity, set system assigned managed identity to On:

After this setting is saved, you can later see the status and the object id of the service principal.

Next, under your Key Vault, click on Access Policies and Add Access Policy, from there selec the Get, Set and List Secret Management operations, and for principal search for and add the Logic App. This should look like this after adding:

With permissions in place, we are now ready to add actions to the Logic App.

Add Actions for getting Access Token

The first ting we need to do is to get the authorization code after the Hue App registration redirects back to the callback URL. This is returned as a querystring appended to the URL. Add a “Compose” action and use the following expression for getting the request queries:

(I’ve added the custom expression to comments for better visibility).

Then we need to get the Client Id and Secret from the Kay Vault. Add a HTTP action next, where we will use the Azure Rest API for getting the secret, and authenticate with the Managed Service Identity:

The URI above points to my Azure Key Vault URI, and the specified secret. The documentation for getting secrets can be seen here: Get Secret – Get Secret (Azure Key Vault) | Microsoft Docs.

The same applies to getting the Client Secret, add another HTTP action:

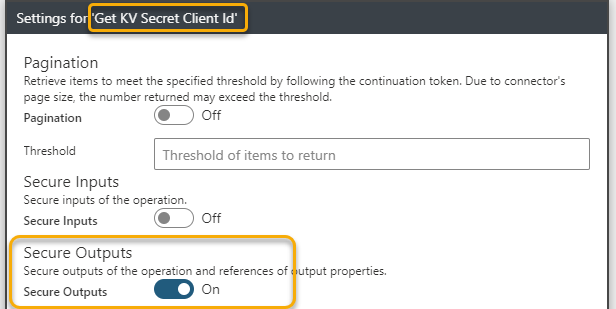
The get an access token from Hue Remote API we must either use Basic Authentication or Digest Authentication. Since I’m running this as a Logic App in a controlled environment and trusting the SSL encryption I will use Basic Authentication. In addition, I will secure the outputs from getting Client Id and Secret from Key Vault, so that other users cannot see those values from the run history:

This setting has been enabled for both the actions getting KV Secret Client Id and Client Secret:

For obtaining an Access Token with Basic Authentication the following header is required: Authorization: Basic <base64(clientid:clientsecret)>

This means that we need to base64 encode the clientid + “:” + clientsecret. This can be done using this lengthy expression, here in a “initialize variable” action:

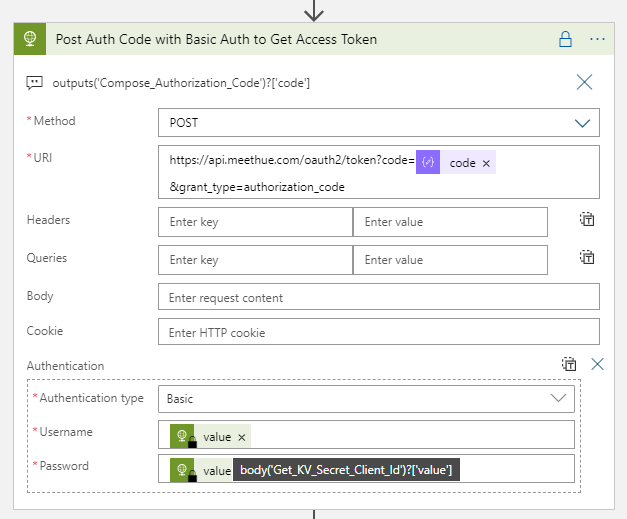
This above action is just for reference though, as the HTTP action supports base64 encoding out of the box. So when posting to the token endpoint, the best way is to use the following:

(PS! Another way to do Basic Authentication in a HTTP action would be to add the Authorization header manually in the Action above with: “Basic <your calculated base64>” as value, and leaving the Authentication type to None.)

From the above settings, in the URI add the authorization code we got from the request queries earlier, using the expression:

outputs('Compose_Authorization_Code')?['code']

When selecting Authentication type to Basic, the username (client id) and password (secret) will automatically be base64 encoded. The values for username and password are the valies from the Get KV Secret Client actions earlier, in the following format:

body('Get_KV_Secret_Client_Id')?['value']

And this action will return the Bearer Token from Hue Remote API if everything is correctly inputted.

I also make sure that the output of this action is secured from viewing:

With the Bearer Token now retrieved, the next actions is to calculate the expiry time and write the Token back to the Key Vault secret.

Add Actions for getting expiry time and write Token to Key Vault

The Bearer Token returned by Hue Remote API will be in the format of the following masked response:

The _expires_in values are in seconds, so that means that the Access Token is valid for 7 days, and the Refresh Token about 112 days. It would then make sense to only refresh the token when needed.

Lets start by calculating when the access_token expires, with the following expression in a Compose action:

addSeconds(utcNow(), int(body('Post_Auth_Code_with_Basic_Auth_to_Get_Access_Token')?['access_token_expires_in']))

The above expression takes the current time and add the number of seconds for when the access token expires.

This will return a new datetime 7 days ahead. This value will be used to set the expiry time on the Key Vault secret for Bearer Token. By setting an expiry time I can later calculate if I need to refresh the Access Token or not.

But it’s not that easy.. The calculated time above will need to be converted to Epoch (32-bit “Unix”) integer format to be able to set the Key Vault secret “exp” attribute. This isn’t so clear when seeing the API docs, Set Secret – Set Secret (Azure Key Vault) | Microsoft Docs, so took me a little trial and error. And I found great help in this blog article: https://devkimchi.com/2018/11/04/converting-tick-or-epoch-to-timestamp-in-logic-app/.

Based on this I need to convert the timestamp to Ticks (64-bit). Ticks is a built in function in Logic Apps, but to be able to convert to Epoch I will need to calculate the difference in ticks between when the Access Token expire, and the first value of Epoch which is 1970-01-01T00:00:00Z. This is well explained in the above reference blog, but here are my resulting actions.

After calculating the Access Token expiry, I add a compose action which converts this to Ticks:

Using the following expression: ticks(outputs('AccessToken_Expires_Utc'))

Then I need to find the 1970-01-01T00:00:00Z value in Ticks:

Using this expression: ticks('1970-01-01T00:00:00Z')

Then we can convert this to Epoch by subtracting the two Ticks values calculated above, and divide by 1 million:

This is the expression used above: div(sub(outputs('GetTimestampInTicks'), outputs('Get1970TimestampInTicks')), 10000000)

We now have the correct format for the “exp” attribute to update the Key Vault secret. Add a new HTTP action and configure like below:

Remember to secure the Output for this action also:

Finally we can finish this Logic App by adding a Response action and do a quick test to verify that everything works as expected.

Adding Response action and verify Logic App

Add a Response action with status code 200 and a body like below:

Tips: It can be difficult to troubleshoot the Logic App when securing outputs, so you might hold back in that when testing. It will show your secrets in the run history though, so it might be best to do this in a test enviroment depending on your needs.

Now we can test. Construct the URL for authorizing the App again, like we did in Part 1:

https://api.meethue.com/oauth2/auth?clientid=&response_type=code&state=elvenanystring&appid=elven_demo_hue_app&deviceid=elven_demo&devicename=Elven Demo

Paste it in the Browser, and after granting access to the App in Hue Developer portal:

You should be redirected to the Logic App:

.. and with a respons success!

Looking at the Run history, we can verify the steps were successful:

You can also look into the inputs and outputs of the actions, except the actions where we secured the output:

We can also verify that the Key Vault secret storing the Bearer Token has been updated and have an Expiration Date one week forward:

Summary and next steps

That concludes this blog post. Thanks for reading this far, in the next part we will build the Logic App that will respond back the Access Token and renew using Refresh Token if needed.

Blog Series – Power’ing up your Home Office Lights: Part 2 – Prepare Azure Key Vault for storing your API secrets

This blog post is part of the Blog Series: Power’ing up your Home Office Lights with Power Platform. See introduction post for links to the other articles in the series:
https://gotoguy.blog/2020/12/02/blog-series—powering-up-your-home-office-lights-using-power-platform—introduction/

Continuing on Part 1, where we created an App Registration for Hue Remote API, I will need a secure place to store the App credentials like Client ID and Secret. I will also need to store the Access Token and Refresh Token, so that I can retrieve it when I need to call the Hue Remote API, and use the Refresh Token to renew the Access Token when it expires.

To start with, here is a short video where I explain the concept:

Choosing Azure Key Vault as Secret Storage

Client ID and Secret from the App registration are credentials that needs to be protected from unauthorized access. Likewise, if unauthorized users get hold of your Access Token, they can access your Hue Bridge remotely and create user access for themselves to your Hue Lights.

If you are planning to build this solution only for yourself, and no other users will share your Hue Power Apps and Flows, then you can store the credentials and tokens in a personal storage, for example in a SharePoint Online List. Just make sure that this resource never will be shared with other users internally, or externally. This would also be a logical choice if you don’t have access to an Azure subscription for yourself.

In my case, I wanted to be able to share the user part of the solution with other users, while making sure that my credentials and tokens were as protected as possible. So I decided to create some logic around that in Azure, and to store my secrets in Azure Key Vault.

Setting up Azure Resources for Key Vault

You will need access to an Azure Subscription to do this part. Your organization might provide you with access to a subscription, or there are several pathways to starting with Azure for free, amongst others Visual Studio subscription, Azure for Free, Azure for Students to name a few.

At a minimum you will need Contributor access to a Resource Group, where you can deploy the following:

  • Azure Key Vault resource for storing secrets for Power Platform and Hue Remote API.
  • Adding the secrets necessary for the solution.
  • Access policy that allows you, and later the Logic Apps access to get, set and list secrets from the Key Vault.

In your resource group, create a new Key Vault. The name needs to be globally unique, so it makes sense to use any naming convention:

For the purpose of the Hue Remote API, you will need to create the following 3 secrets:

The “secret-hue-client-id” and “secret-hue-client-secret” are created manually with the client id and secret from the Hue App registration.

The “secret-hue-bearer-token” will be populated via the Logic App we will look into in a later part in this blog series. Note that this secret has an expiration date, which is when the token expires. I will get into that later as well.

Managing Access to the Key Vault

You need to configure the Key Vault access policy so that you, and any services that interact with the Key Vault have the right access to get, set or list secrets.

In this case, I have configured my Hue Logic Apps with access via Managed Service Identity (MSI), at this point you might not have these in place yet, but we will get there also in a later part:

With that we can conclude this part, in the next part of the blog series we will start looking into the Logic Apps for Hue authorization and managing access token.

Thanks for reading, see you in the next part 🙂

Blog Series – Power’ing up your Home Office Lights: Part 1 – Get to know your Hue Remote API and prepare for building your solution

This blog post is part of the Blog Series: Power’ing up your Home Office Lights with Power Platform. See introduction post for links to the other articles in the series:
https://gotoguy.blog/2020/12/02/blog-series—powering-up-your-home-office-lights-using-power-platform—introduction/

In this first part I wanted to introduce the requirements and preparations for automating with your Home Lights API. In my case I’m using Philips Hue, as Hue has a well developed API that also can be accessed from remote. And since I’m on the topic of automating with Power Platform, I need to be able to access the API from remote.

In principle, you could use this guide against any light system that has an API, but of course I will show all the examples and config based on Philips Hue in this blog series.

In this blog post I will show you how to set up and be ready for the next parts of this blog series. If you want to dive deeper into understanding the API and testing from remote, I would recommend you read this blog post I published earlier this year about authentication, exploring and controlling using Postman:

Remote Authentication and Controlling Philips Hue API using Postman | GoToGuy Blog

Here’s a quick video introduction to this articles topic, and below we will cover the necessary overview of how you should prepare for the next parts of the blog series:

Create a New Remote Hue API app

The first thing you need to do after you have created a Hue Developer account, is to create a new Remote Hue API app here: https://developers.meethue.com/my-apps/.

You need to specify the following required fields:

  • App name: A display name for your remote app
  • Callback URL: This is needed for the Oauth2 consent and returning an authorization code. It is here where we will specify the HTTP request URL for the Logic App we will create in Part 3 of this blog series. For now, you can just enter some dummy URL like http://localhost/mylogicapp.
  • Application description: A short description for your remote app.
  • Optionally you can specify contact details.

After submitting your new app is ready, and also an AppId, ClientId and ClientSecret will be provided, for example:

As you can see from above image, I’ve already configured the correct URL for my Logic App, meaning the Callback URL from above will trigger the Logic App below.

But as previously mentioned, you can now just specify something like http://localhost/mylogicapp.

Test if we can successfully get Authorization Code

As explained at Remote Authentication – Philips Hue Developer Program (meethue.com), the initial step in the authorization flow is granting permissions for the login user to the resources. This will be done using the following sample request:

GET https://api.meethue.com/oauth2/auth?clientid=<clientid>&appid=<appid>&deviceid=<deviceid>&devicename=<devicename>&state=<state>&response_type=code

Using a Demo App Registration,

ClientId: J9NckRHRPGAoYppWGtjnNJtriTOo5R4Q

AppId: elven_power_platform_demo_app

lets construct that URL, I’ve highlighted the parts you need to replace for your environment:

https://api.meethue.com/oauth2/auth?clientid=J9NckRHRPGAoYppWGtjnNJtriTOo5R4Q&appid=elven_power_platform_demo_app&deviceid=elvendemo&devicename=ElvenDemoLocal&state=anydemostring&response_type=code

Now, copy that URL, and paste it into your Browser, and hit Enter.

If you aren’t logged in with your Hue Developers account already, you must do so, and after that you will need to accept the following permission grant:

Now, if you are using localhost as the callback URL, the following response is perfectly normal:

Note the above authorization code, which is returned to the application together with the state string I supplied for verification. This Code, will together with the ClientId and Secret be used for accessing the Token endpoint and getting an Access Token. But that will come later in this series.

Summary and next steps

We have now prepared the necessary App Registration at Hue Developers portal, and laid the necessary foundations for the next steps in building the logic behind remote authentication.

If you want to explore more about authentication and access tokens, you can do that with the link in the beginning of the blog post using Postman.

Thanks for reading, hope to see you in the next part.