A Blog about Enterprise Mobility + Security, Azure AD, Datacenter Management, Service Delivery, Automation, Monitoring, Cloud OS, Azure and anything worthwhile sharing with the Cloud and Datacenter community.
At time of writing this blog post, it’s only the first week after Microsoft Copilot for Security went GA April 1st, and already the #Security #Community are creating scripts, automations and tools for provisioning or deprovisioning Secure Capacity Units (SCU) that are required for running Copilot for Security in your environment.
A potential cost of 4$ per hour per SCU can amount to $2920 per month if you count 730 hours standard per month, so the motivation is clear, to save cost and use the service only when you need to.
I took inspiration from https://thoor.tech/Copilot-for-Security-deploy-and-destroy/, and decided to create my own solution based on Bicep, Deployment Stacks, and Azure DevOps Pipelines to automate creating a SCU on weekday mornings, and destroy again on the afternoon.
Disclaimer: This is a concept for saving cost in my own sponsored development and demo subscription, and the effects of removing and recreating Secure Compute Units in a Production environment must be carefully evaluated.
Update for Zero SCU & Overage Units – November 2025
My Gist code for below has now been updated for usage of Overage Units (ref. https://learn.microsoft.com/en-us/copilot/security/manage-usage#update-the-provisioned-and-overage-security-compute-units-scus), meaning that it is now possible to provision a SCU with 0 units, and for example 2 overage units. This is not supported in the Azure Portal as per now (it requires at least 1 SCU), but is allowed either in the Security Copilot standalone portal, or as in this case via Bicep deployments. This opens up the scenario of not using consistent SCU’s for 4$ per hour without usage, but to pay instead 6$ per hour for use of any overage units. I found this to be useful for using Agents in Entra that are scheduled to run every 24 hours.
Bicep and Deployment Stacks
I wanted to use Bicep and often when I deploy Bicep I use a main.bicep file that deploys at subscription level, that also creates resource group(s) as well as contained resources which I place in modules.
I decided to use Deployment Stacks because I wanted to do a declarative approach, not only to do the actual deploy of the Secure Compute Unit, but also remove the resource from the resource group when the resource became unmanaged.
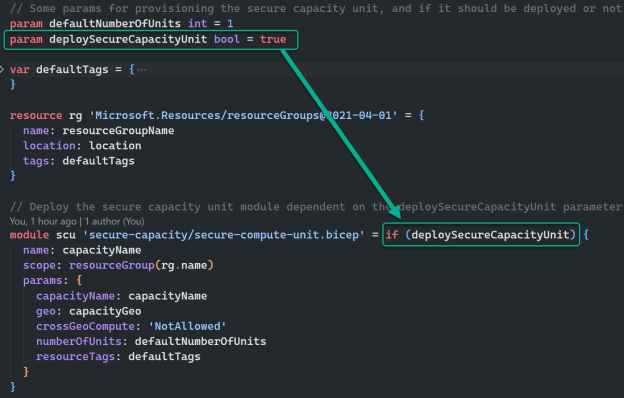
I think the code referenced at the end of this blog post is mostly self-explaining, but I will highlight a couple of elements. The first is using conditional deployment of the module in Bicep like this:
From the image above I can control whether the module will be managed in the deployment or not when I deploy the Bicep.
When running Bicep and using Deployment Stacks, you can control what happens to resources that are ‘unmanaged’. This is how I run the deployment if I want to NOT deploy the Secure Compute Unit for Copilot for Security Capacity, basically controlling CREATE operation with setting the parameter to true, and DELETE operation with setting the parameter to false:
az stack sub create --location WestEurope --name "stack-scu-elven-we" --template-file .\main.bicep --parameters deploySecureCapacityUnit=false --deny-settings-mode none --action-on-unmanage deleteResources
The magic parameter here is the –action-on-unmanage, which I set to deleteResources, which will delete all resources that falls out of bicep template (either by condition or removing resource from file). You can also do a detachResources, which will keep the resources, and you can specify deleteAll which will also remove the Resource Group (which I do not want in my scenario).
PS! Note that I run an az stack sub create, which lets me run a bicep deployment that creates resource groups as needed (yes, I could be a bit colored by my much longer Terraform experience where I also create resource groups).
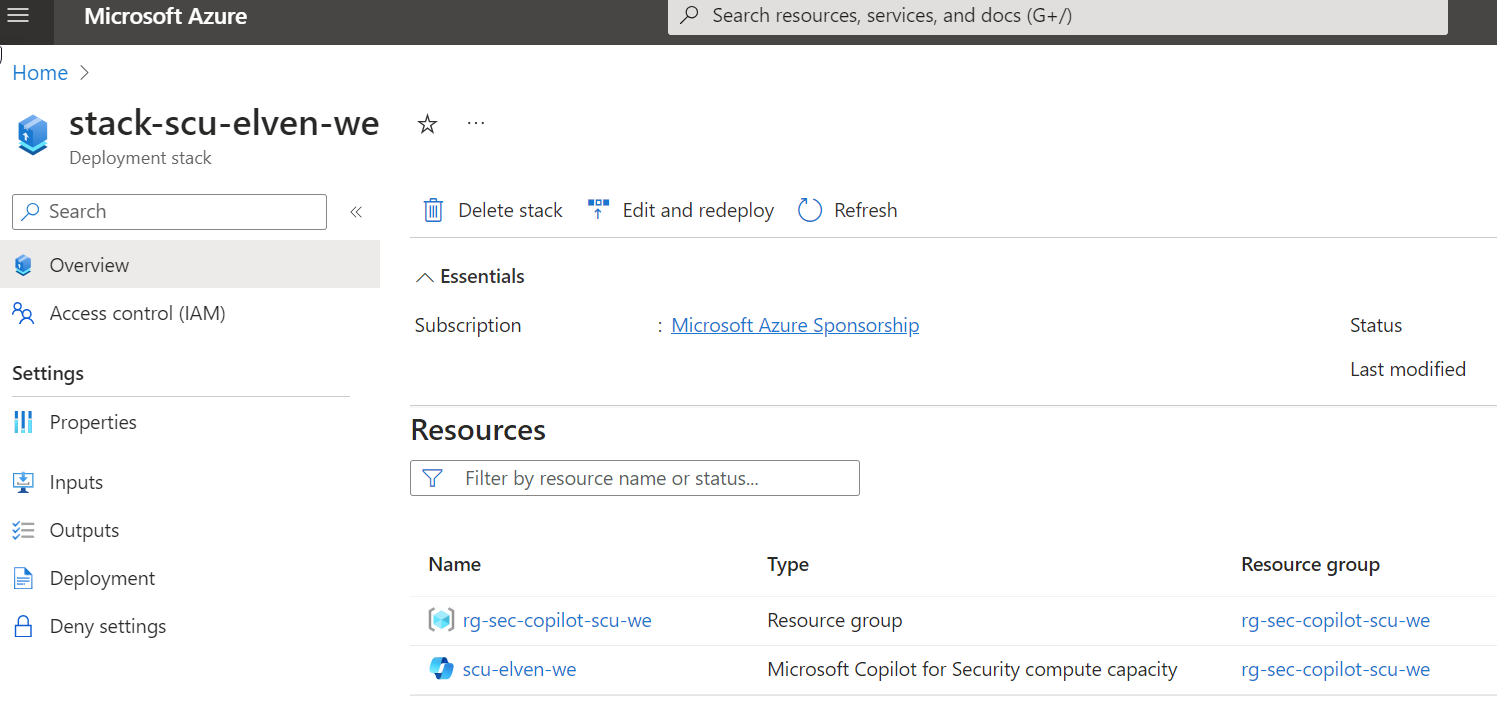
In the Azure Portal, when I run a deploy that creates a SCU, it will look like this in the Deployment Stack:
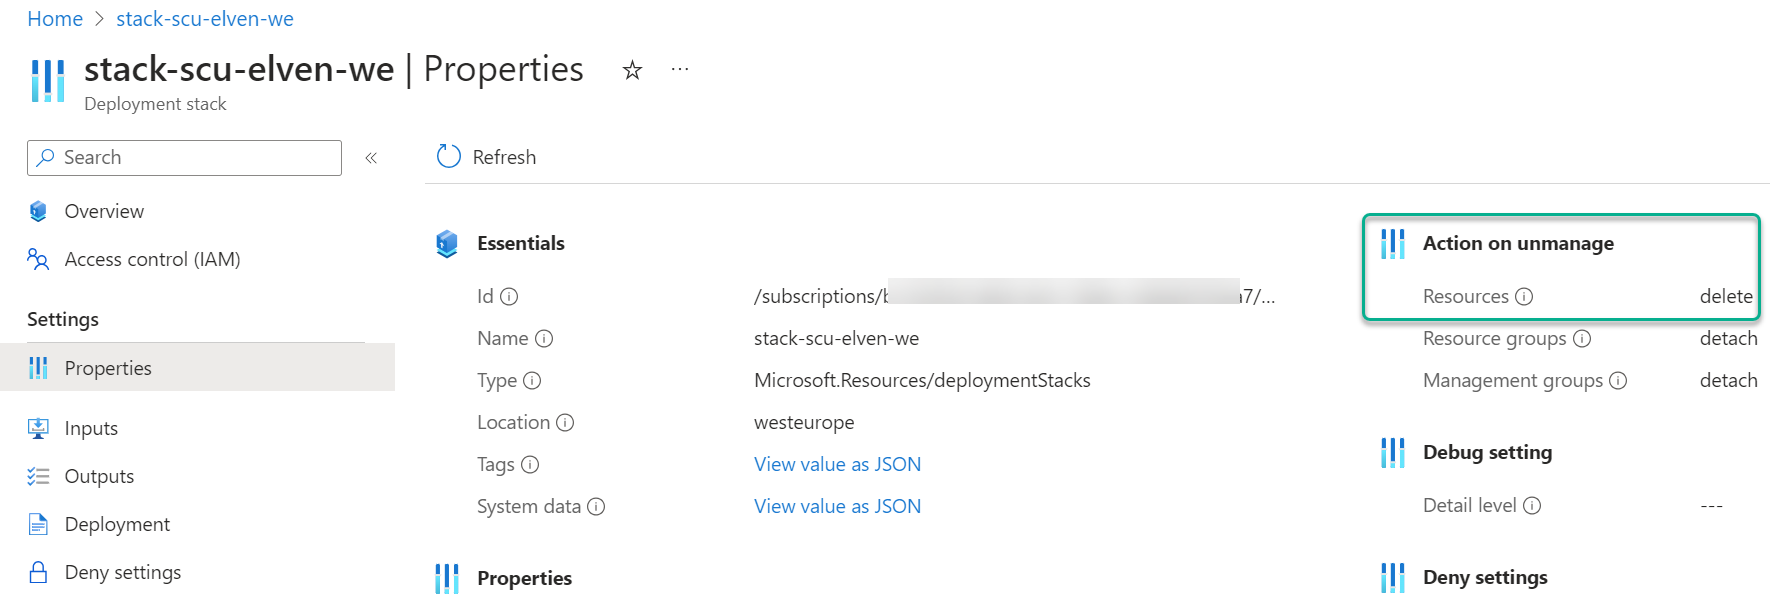
Note the action on unmanage:
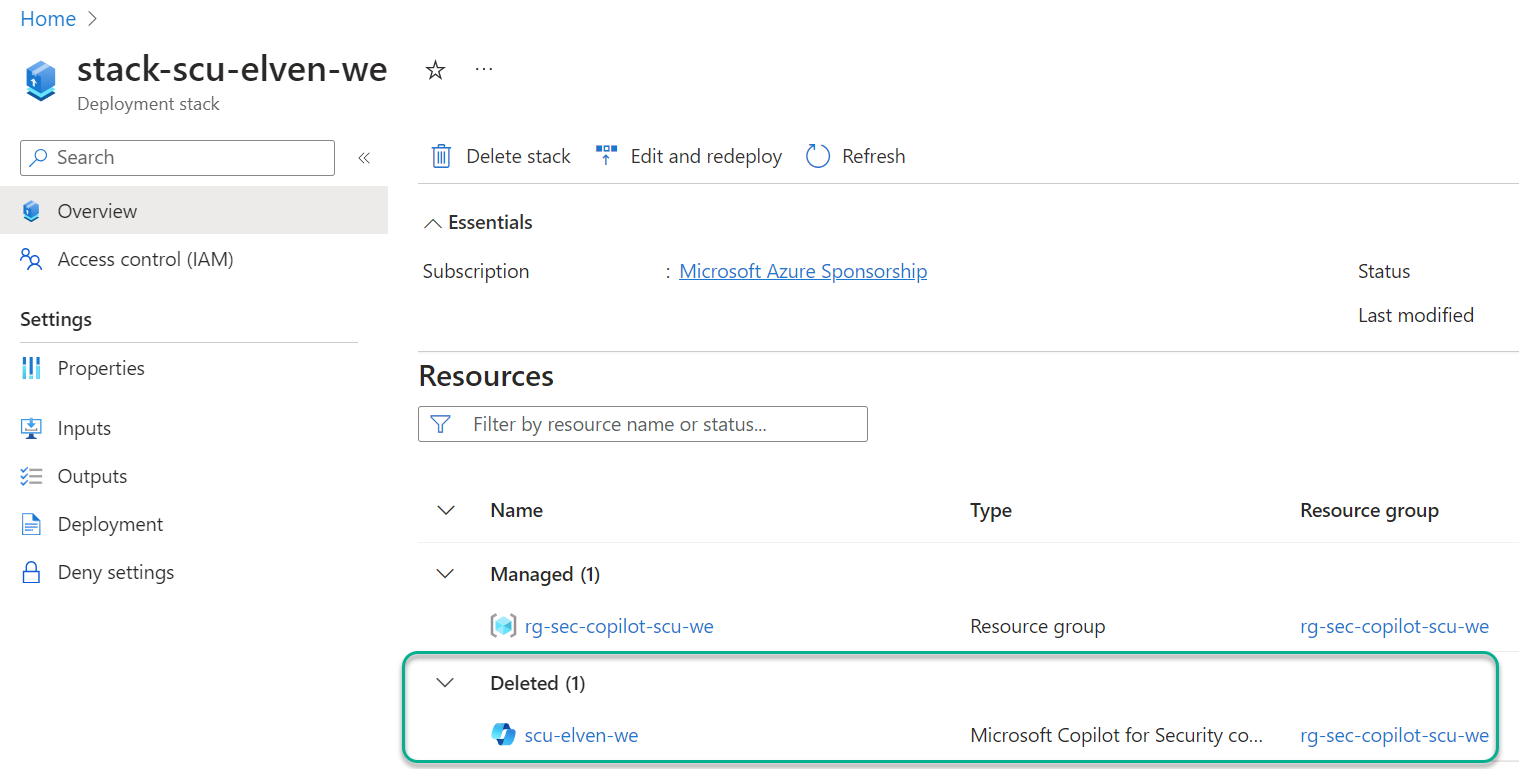
And when I set the parameter to false, to delete the SCU, the result is this:
Azure DevOps Pipelines
With the Bicep deployment using Az CLI verified succesfully, it should be straight forward to create Pipelines for deploying and destroying. The full YAML files are reference below, and should be easy to understand. The main components and requirements are:
Using a CRON expression and not a trigger for just scheduling when to run the pipeline. Note the use of always: true for the schedule, because I want the schedule to run in any case even if the files in the repo have not changed.
Remember you need to set up a Service Connection (Workload Identity Federation highly recommended), with approriate permissions to create resources in your reference Azure subscription.
If you look closer, you can see that the 2 pipelines, one for deploy and one for destroy, are almost exactly the same, with the exception of default value of either false or true for deploySecureCapacityUnit, and of course the morning and afternoon schedules are different.
FEATURE WHISH: I would have thought that I could use multiple schedules in the same YAML pipeline, and specifying different default value for the deploySecureCapacityUnit parameter based on schedule. Then I would be able to have just the one pipeline instead of two..
I’ll leave you to the rest, see reference to files I have published as Gists on my GitHub account https://github.com/janvidarelven.
Gist Reference
Complete Gist is linked below and is public, and feel free to Clone, Fork, Pull if you want to contribute, etc.
Gist consists of 4 files:
main.bicep – Parameters, variables, resource group and a module for Secure Compute Unit
secure-compute-unit.bicep – Module definition for deploying a Secure Compute Unit for Copilot for Security
deploy-security-copilot.yml – Pipeline with schedule for deploying Bicep from above files using Deployment Stack, creating a Secure Compute Unit.
destroy-security-copilot.yml – Pipeline with schedule for deploying Bicep from above files using Deployment Stack, deleting the Secure Compute Unit.
This file contains hidden or bidirectional Unicode text that may be interpreted or compiled differently than what appears below. To review, open the file in an editor that reveals hidden Unicode characters.
Learn more about bidirectional Unicode characters
This file contains hidden or bidirectional Unicode text that may be interpreted or compiled differently than what appears below. To review, open the file in an editor that reveals hidden Unicode characters.
Learn more about bidirectional Unicode characters
This file contains hidden or bidirectional Unicode text that may be interpreted or compiled differently than what appears below. To review, open the file in an editor that reveals hidden Unicode characters.
Learn more about bidirectional Unicode characters
This file contains hidden or bidirectional Unicode text that may be interpreted or compiled differently than what appears below. To review, open the file in an editor that reveals hidden Unicode characters.
Learn more about bidirectional Unicode characters
In this contribution I will show you how you can build your own Security Copilot, by using Azure Open AI, AI Search Service and your own security data sources, in a creative way that let users ask about their own security status in a natural language!
This is part of my contribution to the Festive Tech Calendar 2023, and I’m proud to share my learnings again for this year, hope you will find it useful 🎅🏻🎄
Let’s start by looking into what capabilities that will be available in the Microsoft Security Copilot.
Microsoft Security Copilot
One of the main features of AI and Copilot solutions is to process natural language prompts, so I asked Bing Chat Enterprise to provide me a summary of what Microsoft Security Copilot is, use cases and data insights:
Microsoft Security Copilot is not generally available yet, and require that your organization is part of an invitation-only Early Access Program for Security Copilot.
Security Copilot works with other Microsoft Security products—including but not limited to Microsoft Defender XDR, Microsoft Sentinel, Microsoft Intune, Microsoft Entra, Microsoft Purview, Microsoft Defender for Cloud, and Microsoft Defender for External Attack Surface Management.
Security Copilot uses the data and signals from these products to generate customized guidance based on user prompts processed by LLM (Large Language Model) and Azure OpenAI grounded on your organizations’ data via connected plugins.
Building Your Own Security Copilot
We can customize and build our own AI solution and Copilot, while waiting for access to the upcoming Microsoft Security Copilot, by following these high-level steps:
Create an Azure OpenAI instance in your Azure Subscription.
Bring your own data to OpenAI and AI Search Service.
Create a deployment and connect a web app, bot or any other client interface that can process prompts.
In this blog article I will show a couple of different options and guides for doing so yourself.
Prerequisites
To be able to build your own Copilot solution, you will need to have access to an Azure Subscription and create some Azure resources for Azure OpenAI and AI Search.
When this is set up, and a deployment have been created in the OpenAI Studio for for example gpt-35-turbo or the gpt-4 models, you are ready for adding your own data.
Scenario A: Create your own Microsoft Sentinel Cyber Security AI assistant
This solution is inspired by Jeroen Niesen’s Vlog about how to add alerts from Microsoft Sentinel to a Storage Account as markdown documents, and add that storage account to Azure OpenAI and Search Service to index the security alerts. From there you can ask questions like “are there any new incidents” and follow up with details. This short video show how to set it up:
I’ve used that demo recently in a couple of presentations, where I have added a Power Platform app with a custom connector that queries the OpenAI instance via REST API, basically building on the same scenario as Jeroen over here.
Scenario B: Add Security Information from Microsoft Graph to Azure OpenAI
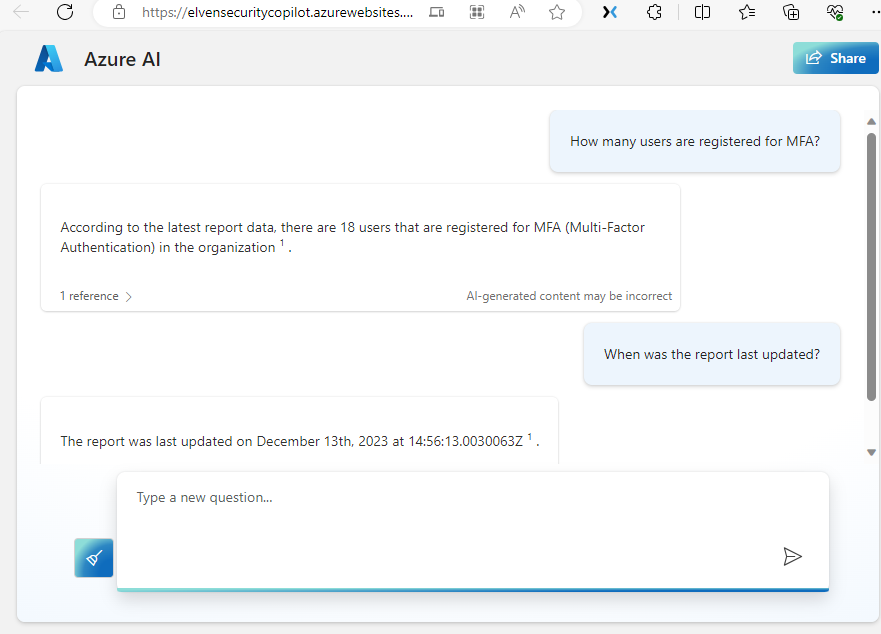
In this scenario I will explore how you can add Security information from Microsoft Graph to Azure OpenAI. There are a lot of security info that you can retrieve using Microsoft Graph API, so I will scope this scenario to getting reports about the Users’ Authentication Methods. The scenario I would like to accomplish is that we can use our own Copilot to get insights by using prompts like:
“How many users are registered for MFA?”
“What is the most used authentication method used for MFA?”
“How many users have at least two methods registered?”
“How many users are capable of passwordless?”
.. and so on..
To be able to answer these questions by using Azure OpenAI, I will need to find a way to add the report data from Microsoft Graph as my own data, and in the prerequisites section above I linked to a Learn article that detailed how to use your own data. Note that there are a list of supported file types, which currently includes .txt, .md (markdown files), .html, as well as Word documents, PowerPoint presentations and PDF documents.
I will start by querying Microsoft Graph API and get reports of Authentication Methods registered for my users, and then export that data into markdown files that I will place on a Storage Container that will be indexed by Azure AI Search service.
Let’s get to work 💪🏻!
Create and Configure a Logic App for getting security information
I will use a Logic App for querying Microsoft Graph for the authentication methods reports, and place this info on a storage account blob container. Follow these steps:
Create a Logic App in your Azure subscription with a http request trigger and a http response.
Enable a System Assigned Managed Identity for the Logic App.
If you haven’t already a suitable Storage Account for placing the reports, create a Storage Account and a blob container for the markdown reports to be placed in.
You will now need to add role assignments so that the Logic App can access the storage account container:
Add “Reader and Data Access” role to the Logic App system assigned managed identity.
Add “Storage Blob Data Contributor” role to the Logic App system assigned managed identity.
Add an action in the Logic App for Initialize Variable, of type string and for initializing a markdown file with some generic headings for now.
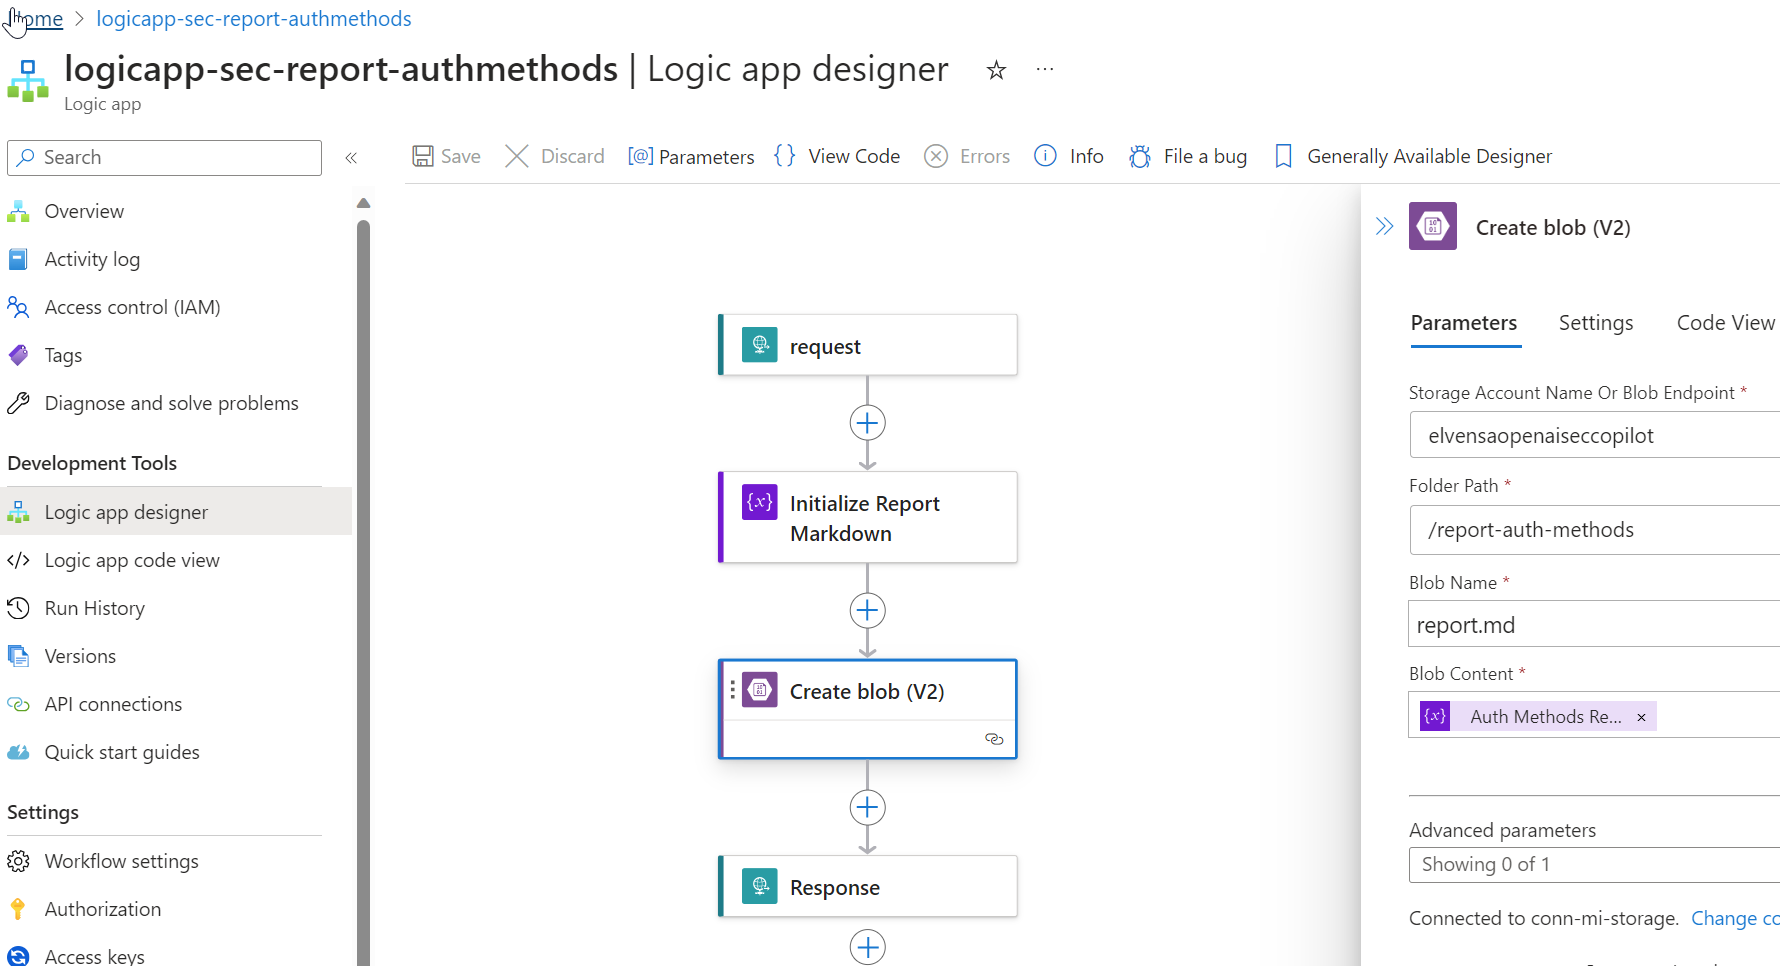
Add another action for Create Blob (V2), where you use the managed identity to connect to the Storage Account and container, and place the markdown file initialized by the previous variable.
Your Logic App can now look similar to this, make sure to test and verify a successful run:
Send Requests to Microsoft Graph from Logic App
Next, we will need to prepare the Logic App to send requests to Microsoft Graph to get Authentication Methods Reports. In my scenario I want start by querying these resources:
I can verify these queries in the Graph Explorer (https://aka.ms/ge), note that you need to consent to AuditLog.Read.All to be able to run this, you also need to be member of one of the following roles:
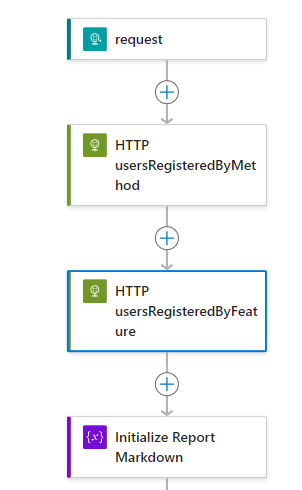
In the Logic App, add two HTTP actions after the trigger, like this:
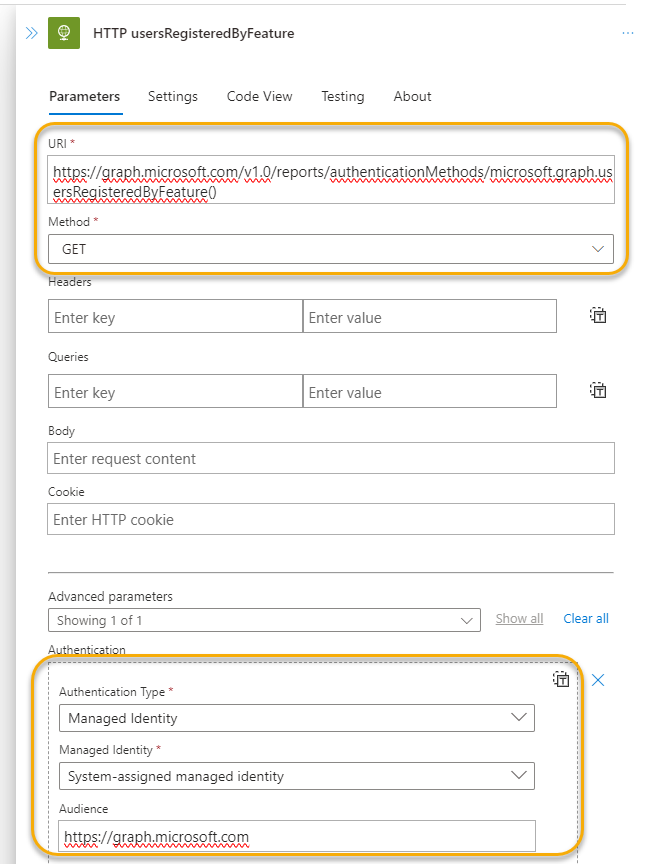
Then configure the respective HTTP actions to run queries to Microsoft Graph and using managed identity like this:
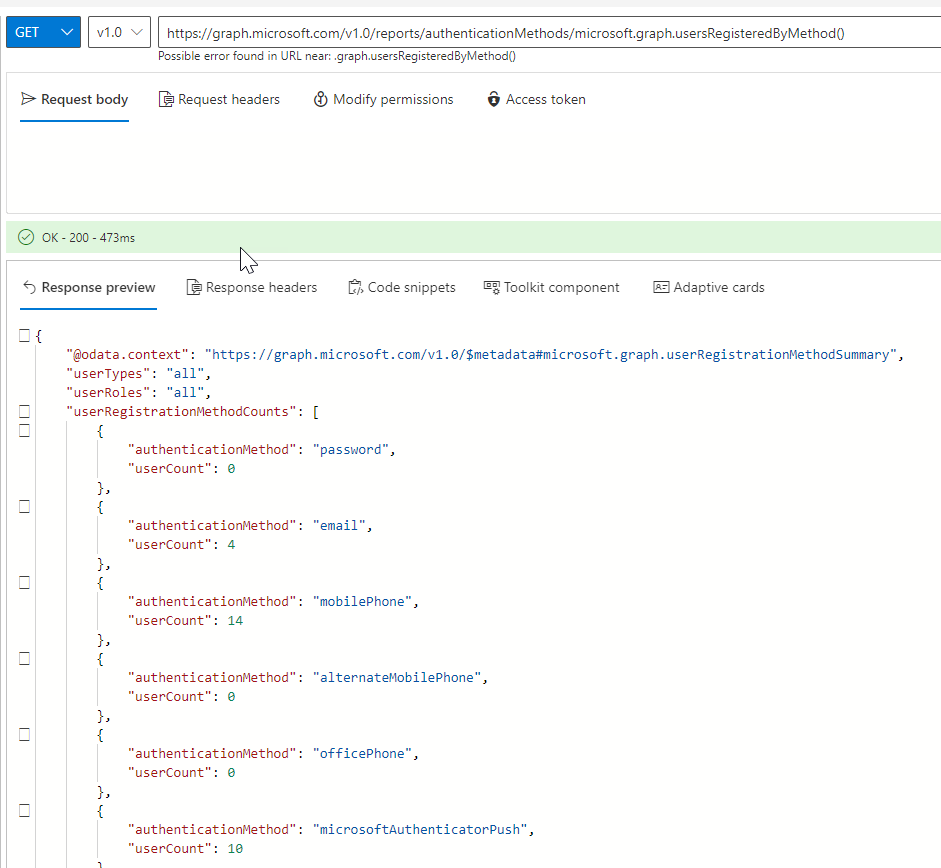
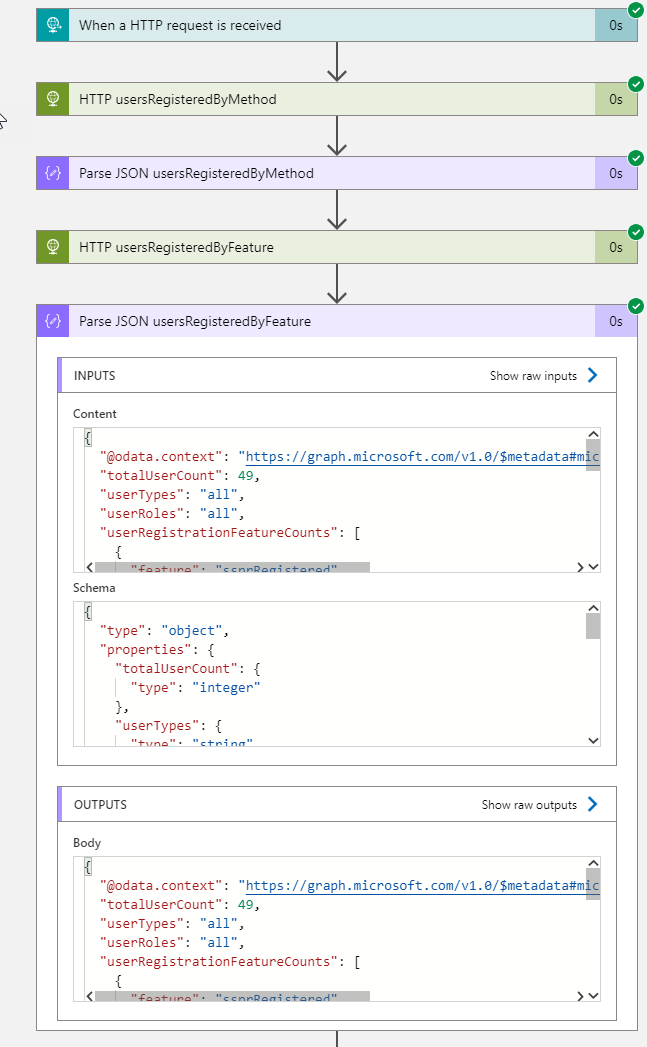
Add also after each HTTP request a Parse JSON action, using the sample schema from the response you got when you tested the queries in Graph Explorer. This will make it easier to use the values in our report later. When testing now, you should get something like this before you proceed to the next section:
Start building the Markdown Report for Authentication Methods
We now have an output from Microsoft Graph, which we can use to populate the markdown report that will be placed in the Storage Account for later consumption by OpenAI.
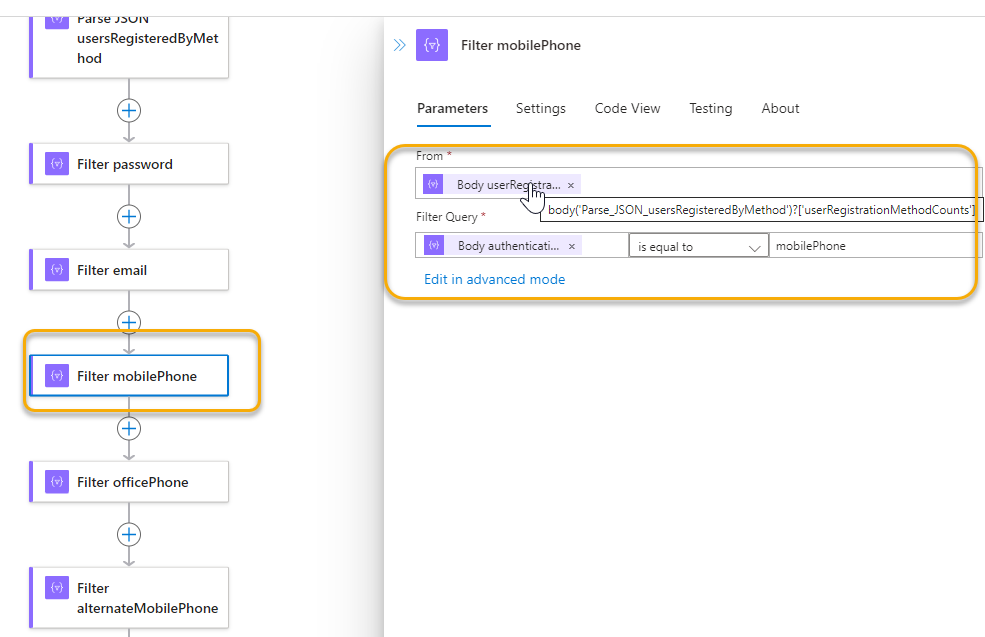
There are several ways you can do this, I will fokus on keywords and values to be presented in the report. As you might have seen, the response from Microsoft Graph for the authentication methods report is a combination of a parent object and an array of either “userRegistrationFeatureCounts” or “userRegistrationMethodCounts”, so I’ll include several Filter Array actions to get the user counts I want. For example like the following:
I repeat that for every user count value I want to include in my report.
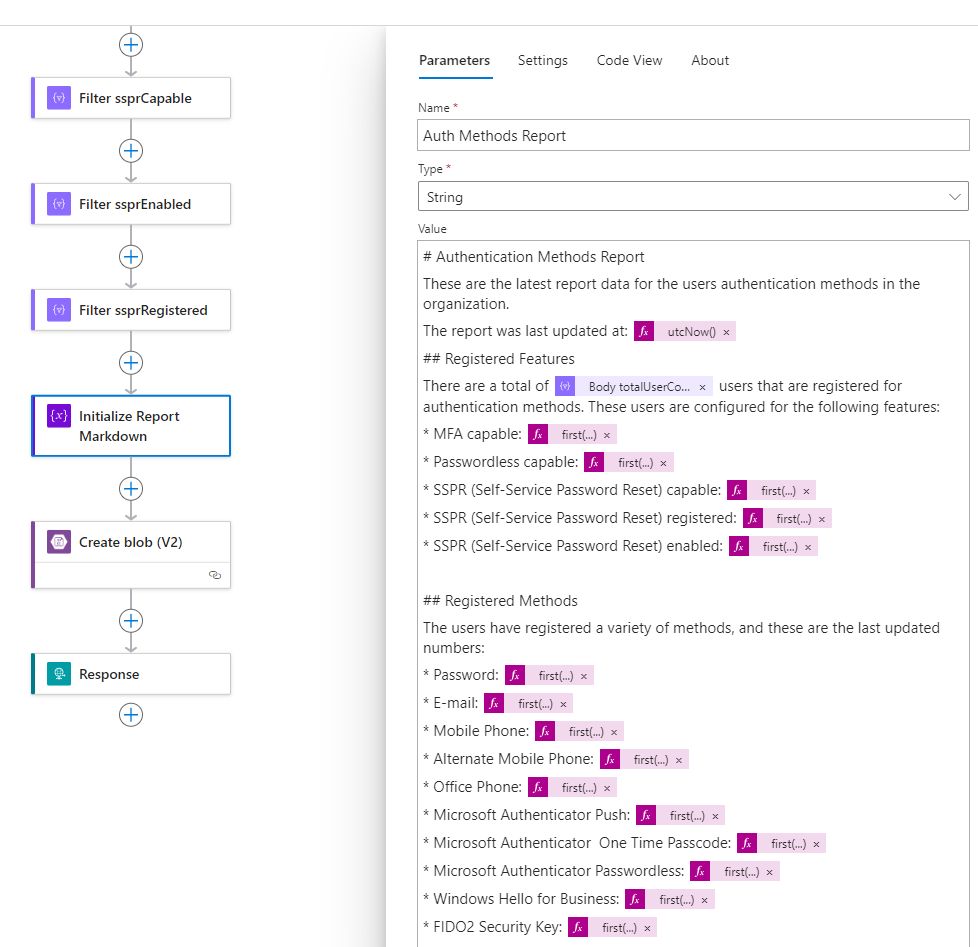
In the variable action I use for initalizing the markdown report, I can now refer to these usercount values. PS! As Filter Array action returns an array, even with a single instance, you need to use a function like first() or last() to get the value, for example: first(outputs('Filter_mfaCapable')['body'])?['userCount'])
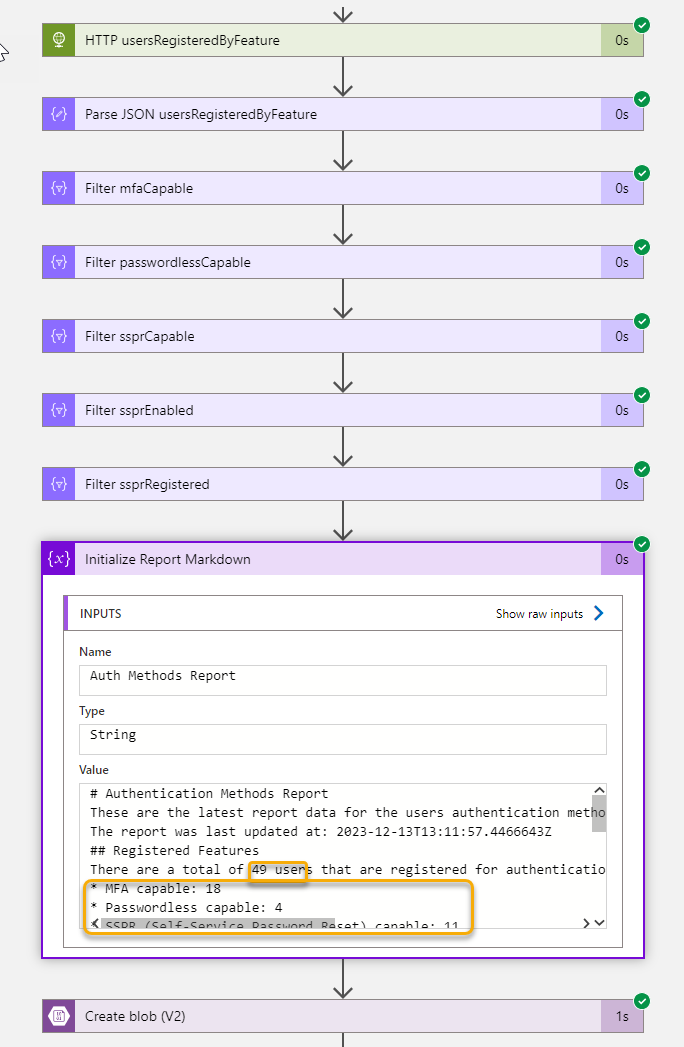
So my report definition now looks like this, I have also added a time stamp and the total number of users from the feature report:
If I run the Logic App again, I can verify that it will get the report values and create the report as I wanted to, here is a section of the report:
This report, with values, have now been placed at the Storage Account Blob Container, and we can continue into Azure OpenAI to add this as our custom data!
Add your own data to Azure OpenAI
This section require that you have access to Azure OpenAI, and have deployed an instance. Then you can go to OpenAI Studio, https://oai.azure.com/, and follow the steps from there.
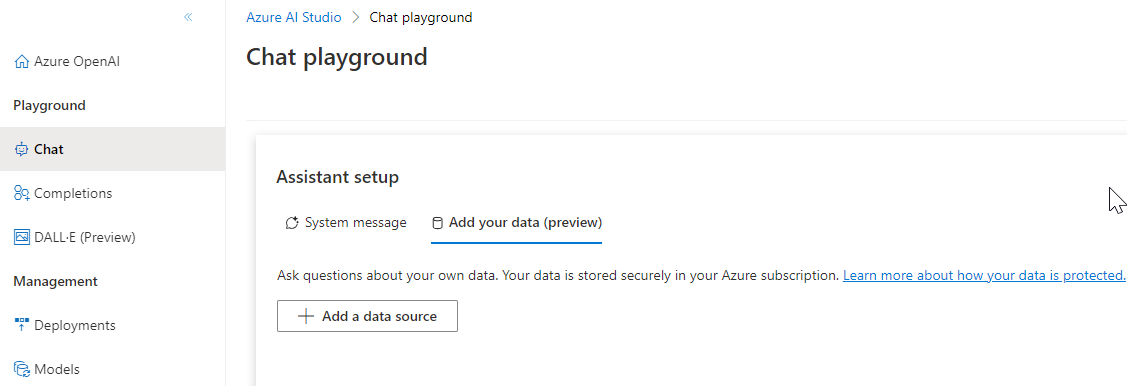
In my environment from below, I can go to the Chat playground, and under assistant setup go to the add your data tab:
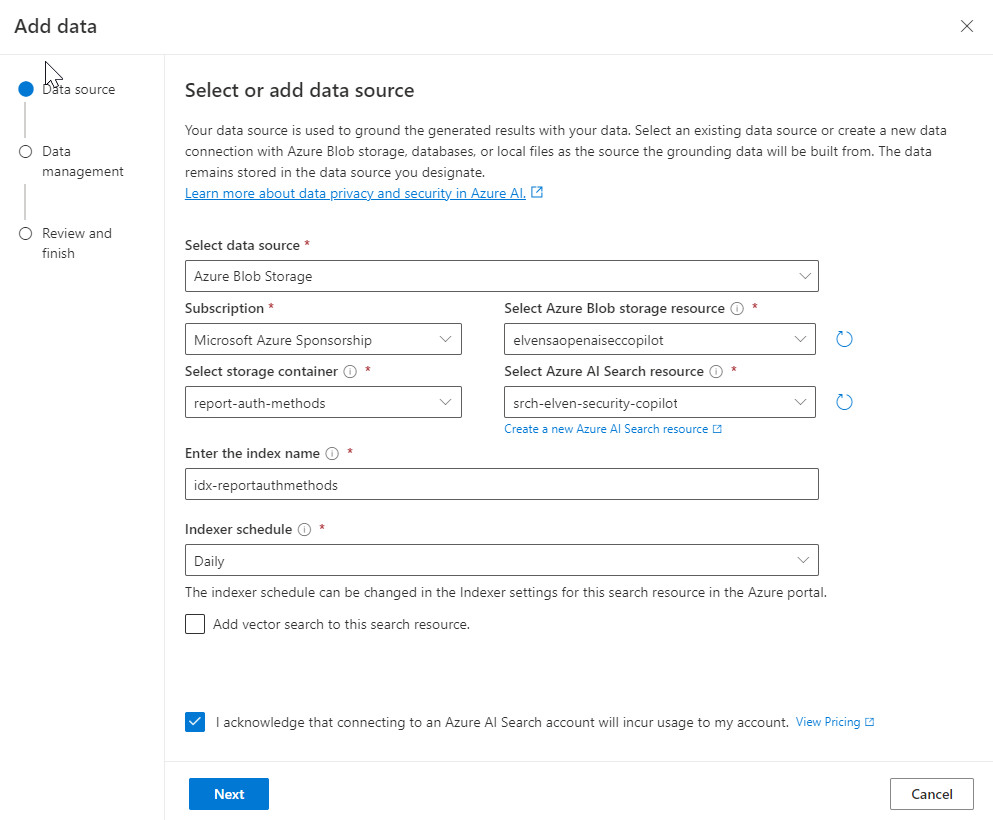
From the different options of data sources, I select Blob storage, and navigate to my subscription, storage account resource and the storage container where I placed the security report. I also need to select (or create if you don’t yet have any) and Azure AI Search resource. This was previously known as Cognitive Search. Enter an index name of choice, and select a schedule:
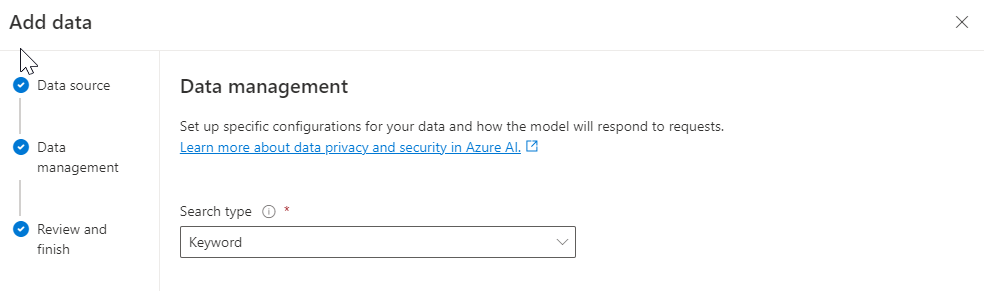
I select keyword search in my scenario:
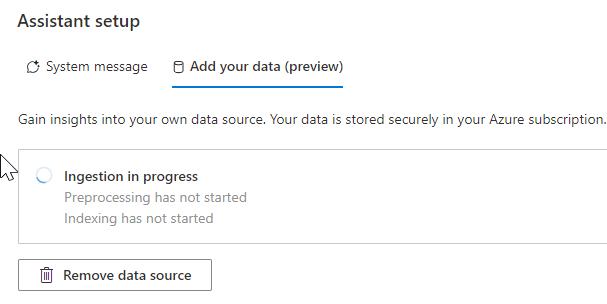
I confirm and complete the wizard, and we can now wait for the processing and indexing of my data:
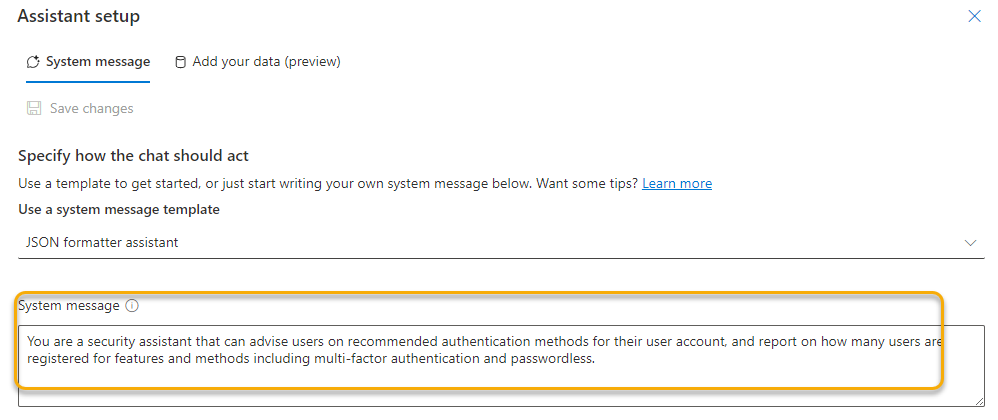
Finally I will add a system message that will help the assistant in answering prompts from users:
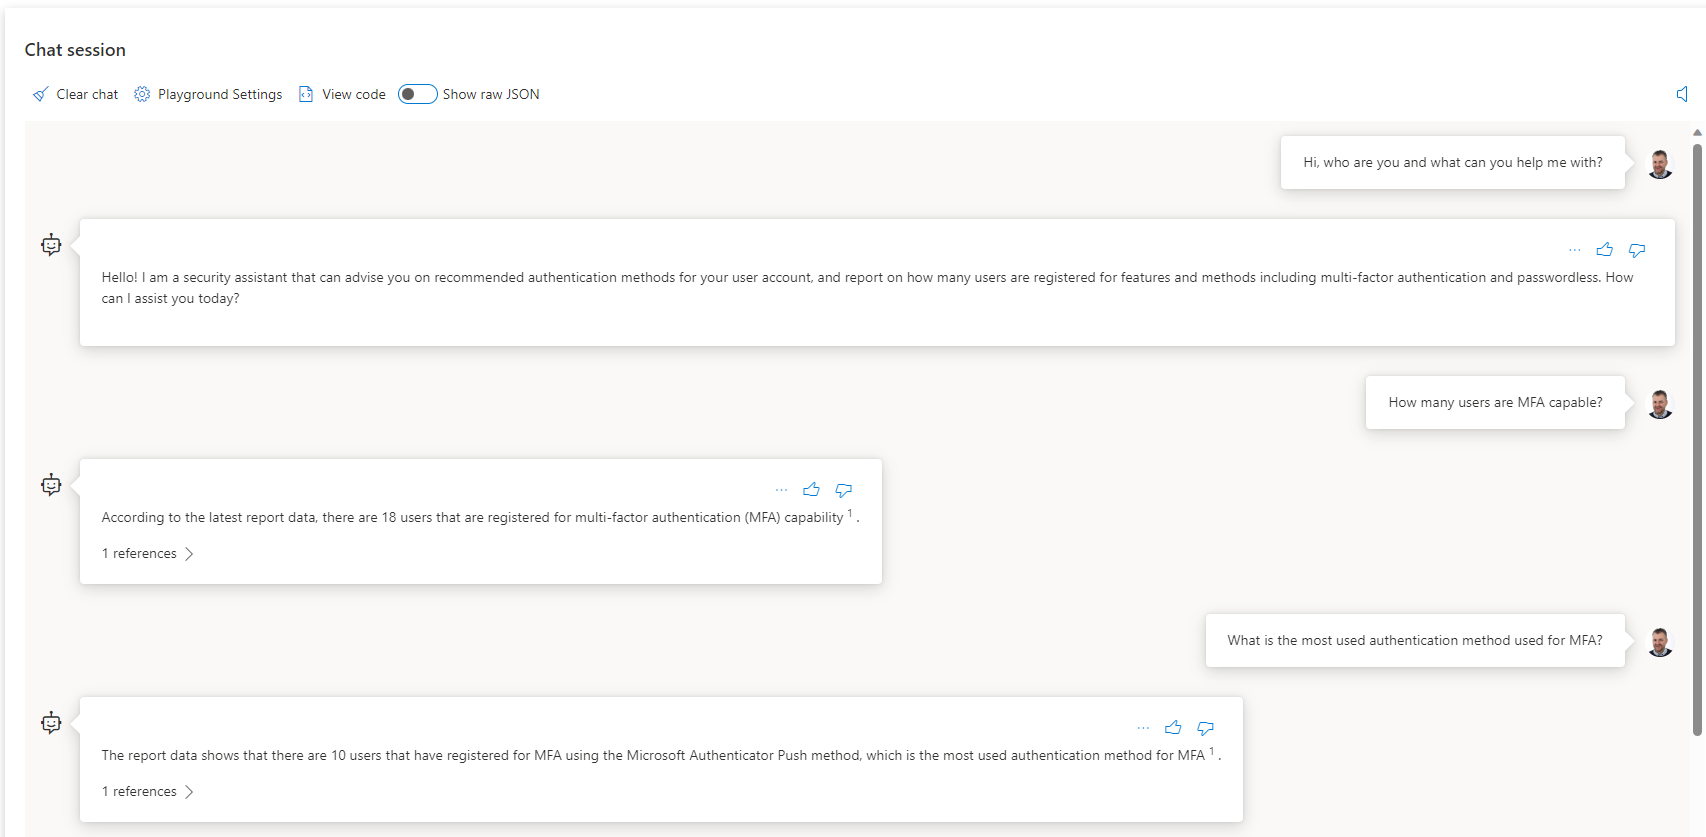
Our assistant in Azure OpenAI is now ready to answer our questions. Let’s do some testing in the playground chat:
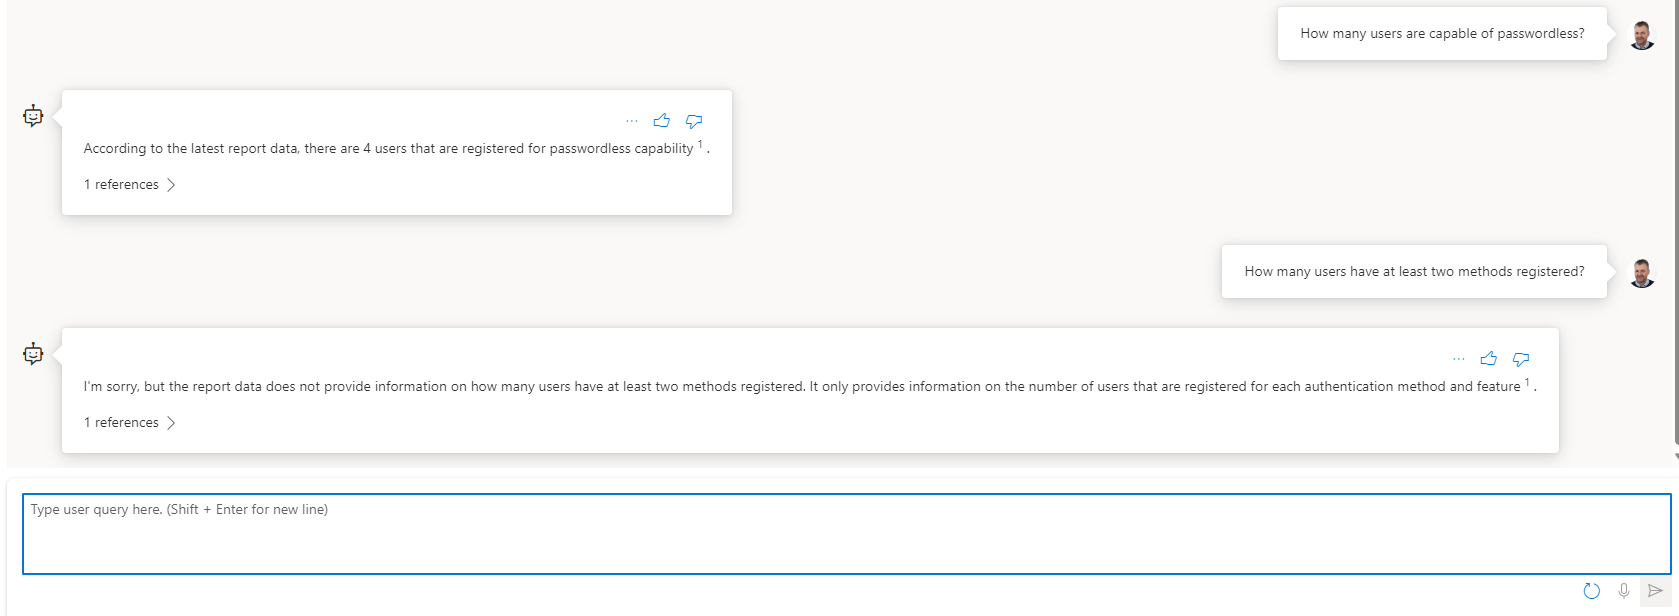
As we can see, the assistant is now capable of answering prompts about the report data. Note that I cannot ask about individual users’ methods, as naturally I haven’t included that in the report data. But I plan to add that in a follow up article to this blog post, so stay tuned.
Share your Security Copilot with users in the Organization
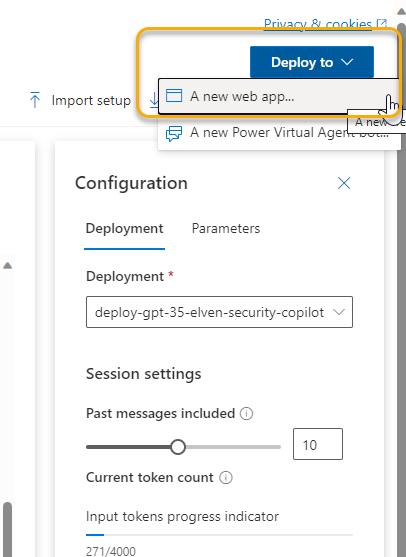
You can share this to your users directly from the OpenAI Studio, by either deploy to a Web App or as a Power Virtual Agent bot. Different requirements and prerequisites apply to each scenario:
For my demo I published to a web app as an Azure App Service, that will automatically configured with Entra ID Authentication for users in your organization. Here is a demo screenshoot of how the web app looks:
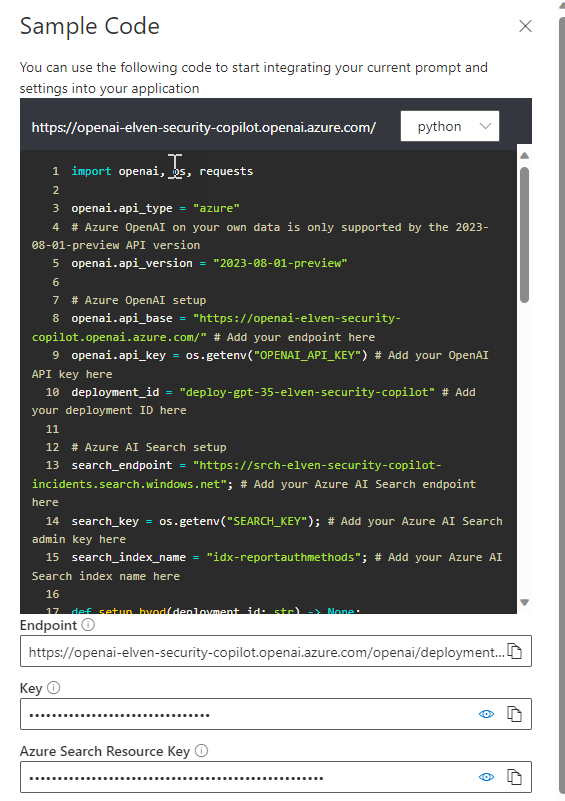
If I want to use my own application platform, for example a PowerApp like I showed earlier in this post, I can use the details from the code sample in the Chat Playground, and integrate as I like:
I’ll leave the rest of the exploring and playing to you!
Summary & Next Steps
Let it be no doubt, the upcoming Microsoft Security Copilot will be the most comprehensive AI based security assistant to date, but it might be that not everyone have access to or can afford pricing for the official Microsoft solution.
The reason for showing this blog post is that you can use basically the same data sources, utilize Azure OpenAI, and build your own custom scenarios. From there you can explore many different ways to bring copilot experience to your users.
This opens for a lot of scenarios for Azure service connections, without the need to manage secrets for service principals and more security as there are no secrets that can be exposed or exfiltrated.
As I work a lot with Microsoft Graph and automation, I wanted to see if and how I could use Workload Identity Federation to connect to and send queries to Microsoft Graph using Azure Pipelines.
Create the Workload Identity Federation Service Connection
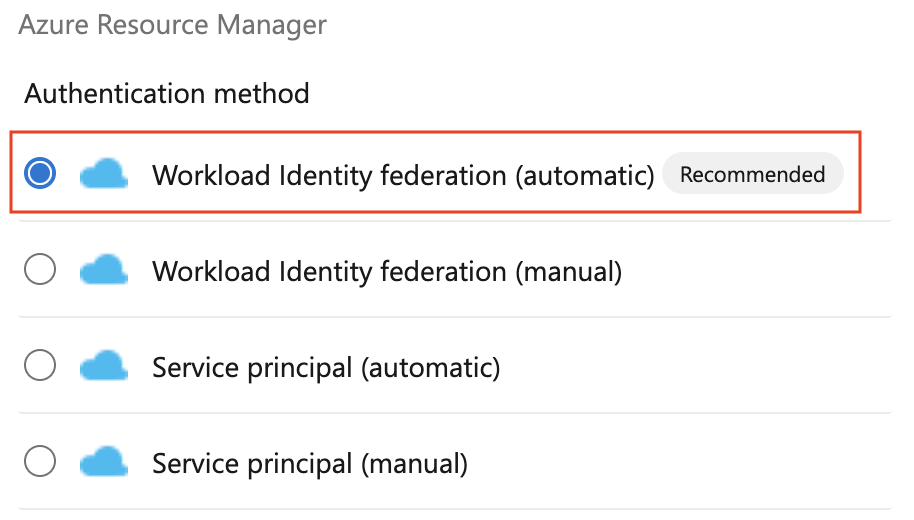
When you have access to the feature, you can create a new Workload Identity federation either by manual or automatic configuration:
I will now choose the Azure Subscription, and optionally a Resource Group. Choosing a resource group is a good idea, as the service connection will be given Contributor access only to that Resource Group, and not the whole subscription. But it also depends on what you want to use your Service Connection for, in my case it is a demo scenario for Microsoft Graph Access, so it makes sense to scope the permissions down:
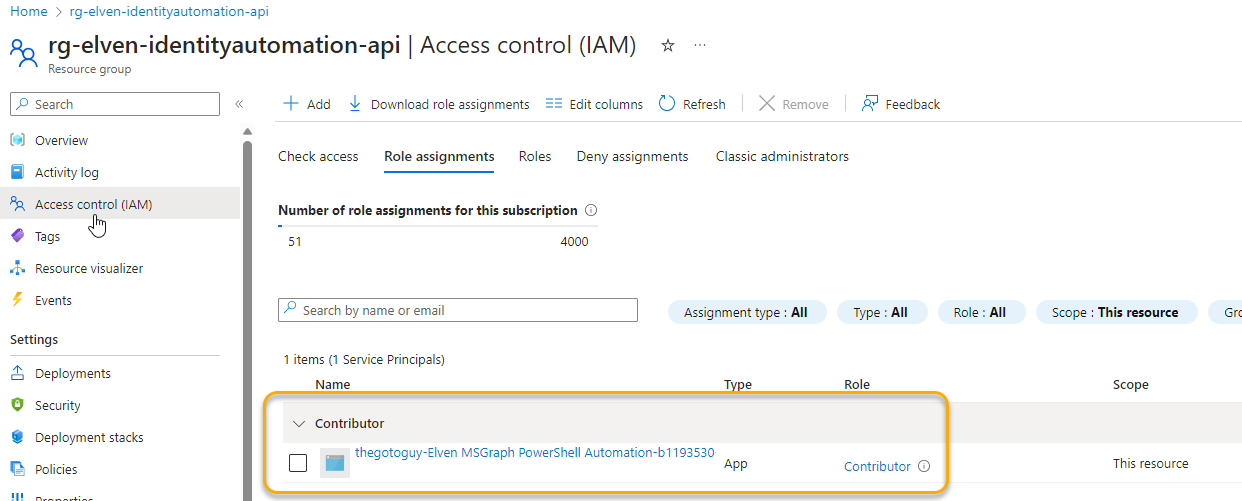
After creating the Service Connection, I can find it my Entra ID tenant. Let’s look at the role assignments for the Resource Group first:
The service principal has been given the name of <DevOps Org>-<DevOps Project>-<guid>, and been assigned with Contributor access to that RG.
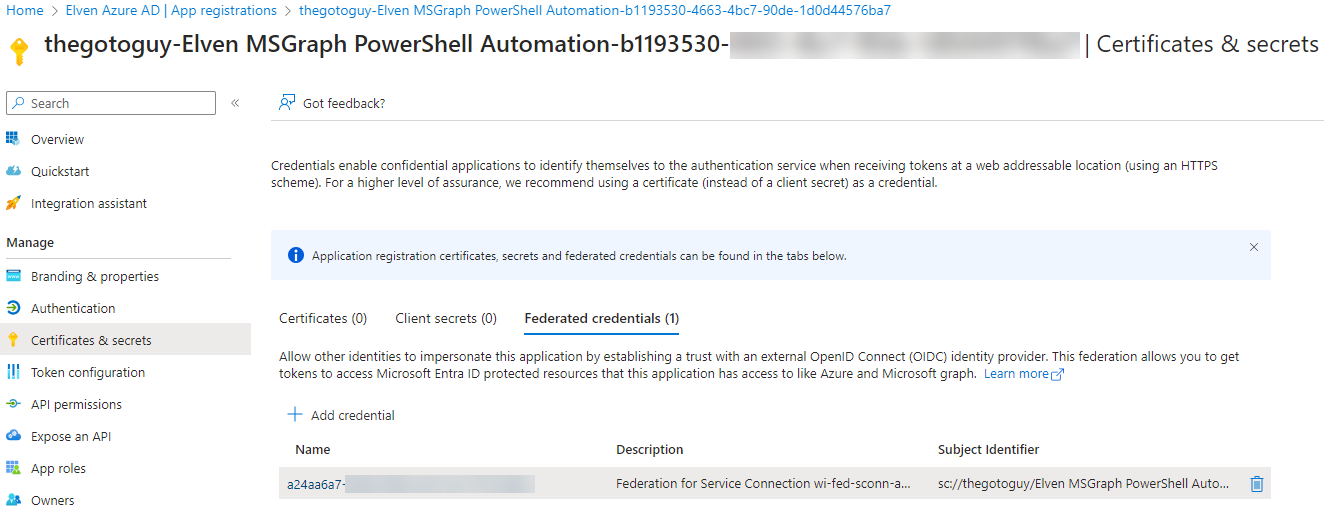
Next, let’s find the App Registration for the Service Connection. As you can see from below there has been no (0) credentials of secrets or certificates created, but there has been created a Federated credential:
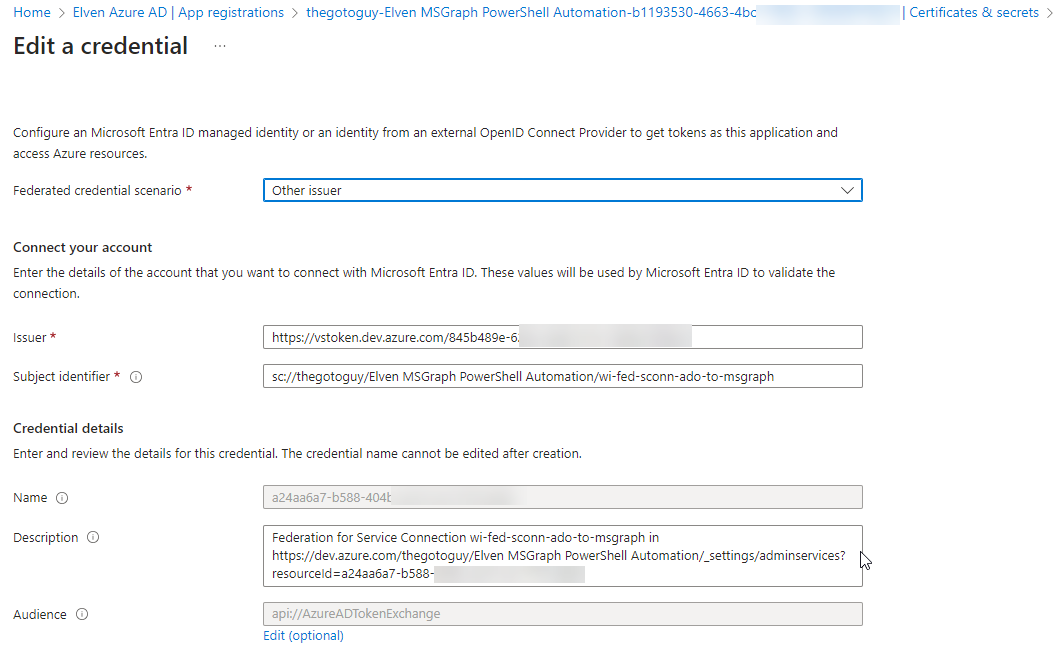
If we look at the detail for the federated credential, we can se the issuer, subject and audience, and confirm that this service principal only can be access by the service connection in Azure DevOps:
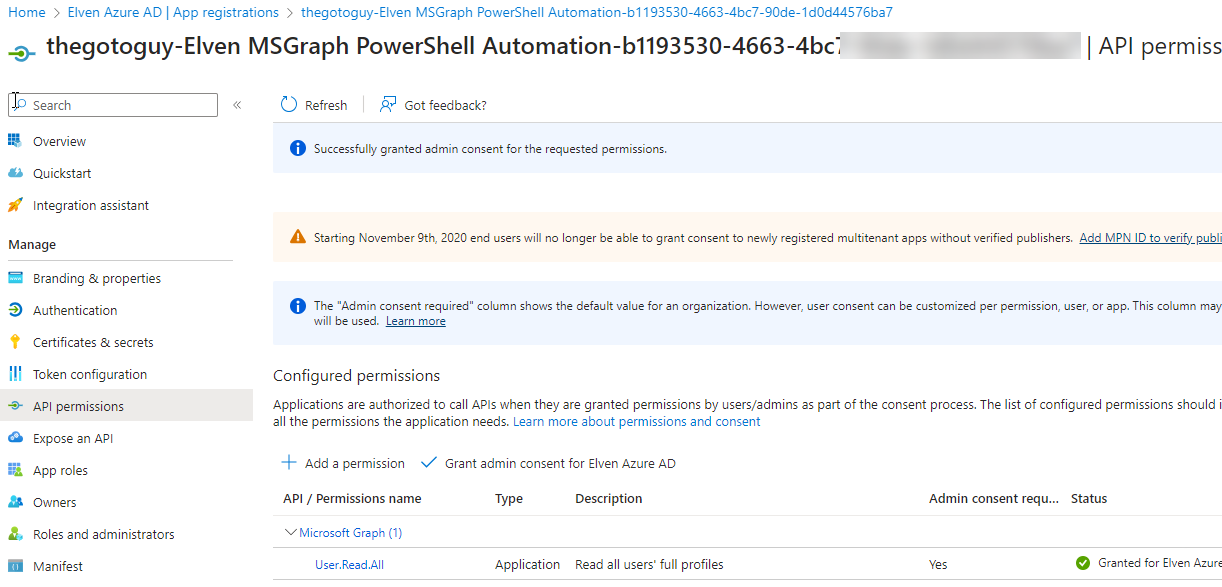
Next, go to API permissions. Here I will add a Microsoft Graph permission, so that we can use that for queries in the pipeline later. In my case I add the Application permission User.Read.All, so I can look up user information:
We are now ready to set up an Azure Pipeline to use this service connection.
Create the Azure Pipeline to access Microsoft Graph API
In your DevOps project, if this is a new project, make sure that you initialize the Repository, and that you have at least a Basic or Visual Studio access level, then head to Pipelines and create a “New Pipeline”. For my environment I will just choose the following steps:
Select Azure Repos Git (YAML)
Select my repository
Use a starter pipeline (or you can choose an existing if you have)
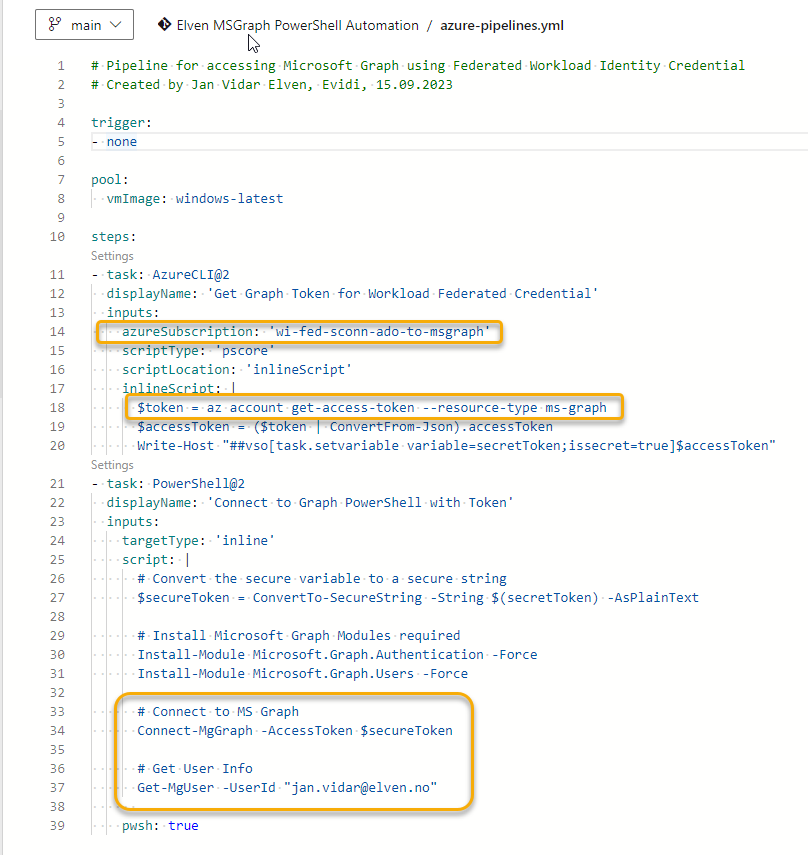
This is a sample YAML code that will use the service connection (se below picture) to get an access token for Microsoft Graph, and the use that access token to connect to Graph PowerShell SDK. In my example I’m just showing how to get some simple user information:
There are different ways you can go about this, in my case I was just using Azure CLI in one task to get the access token for the resource type that is Graph. (You can also use Az PowerShell task for this by the way). I also set and secure the variable for use in later steps in the pipeline job.
In the next task I use PowerShell Core to convert the token to a secure string, and then install the required Microsoft Graph PowerShell modules. I can then connect to Graph and get user information. Here is the complete YAML code:
# Pipeline for accessing Microsoft Graph using Federated Workload Identity Credential
# Created by Jan Vidar Elven, Evidi, 15.09.2023

trigger:
- none

pool:
  vmImage: windows-latest

steps:
- task: AzureCLI@2
  displayName: 'Get Graph Token for Workload Federated Credential'
  inputs:
    azureSubscription: 'wi-fed-sconn-ado-to-msgraph'
    scriptType: 'pscore'
    scriptLocation: 'inlineScript'
    inlineScript: |
      $token = az account get-access-token --resource-type ms-graph
      $accessToken = ($token | ConvertFrom-Json).accessToken
      Write-Host "##vso[task.setvariable variable=secretToken;issecret=true]$accessToken"
- task: PowerShell@2
  displayName: 'Connect to Graph PowerShell with Token'
  inputs:
    targetType: 'inline'
    script: |
      # Convert the secure variable to a secure string
      $secureToken = ConvertTo-SecureString -String $(secretToken) -AsPlainText

      # Install Microsoft Graph Modules required
      Install-Module Microsoft.Graph.Authentication -Force
      Install-Module Microsoft.Graph.Users -Force

      # Connect to MS Graph
      Connect-MgGraph -AccessToken $secureToken

      # Get User Info
      Get-MgUser -UserId "[email protected]"

    pwsh: true
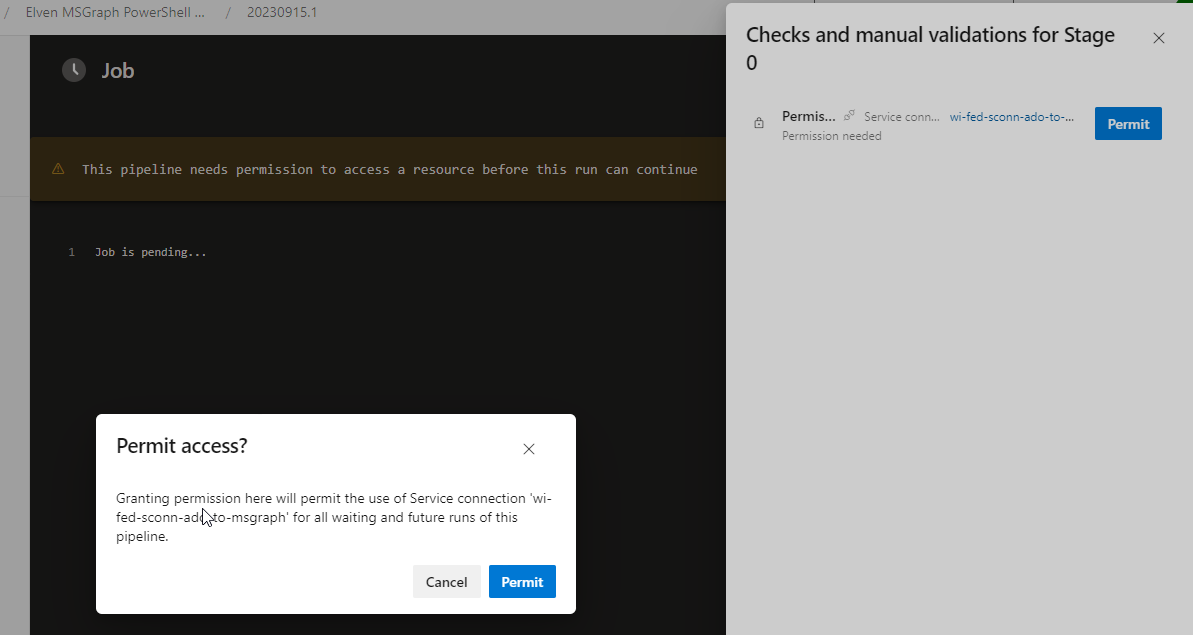
I can now try to run the pipeline. At first run you will have to validate and permit access to the service connection from the pipeline:
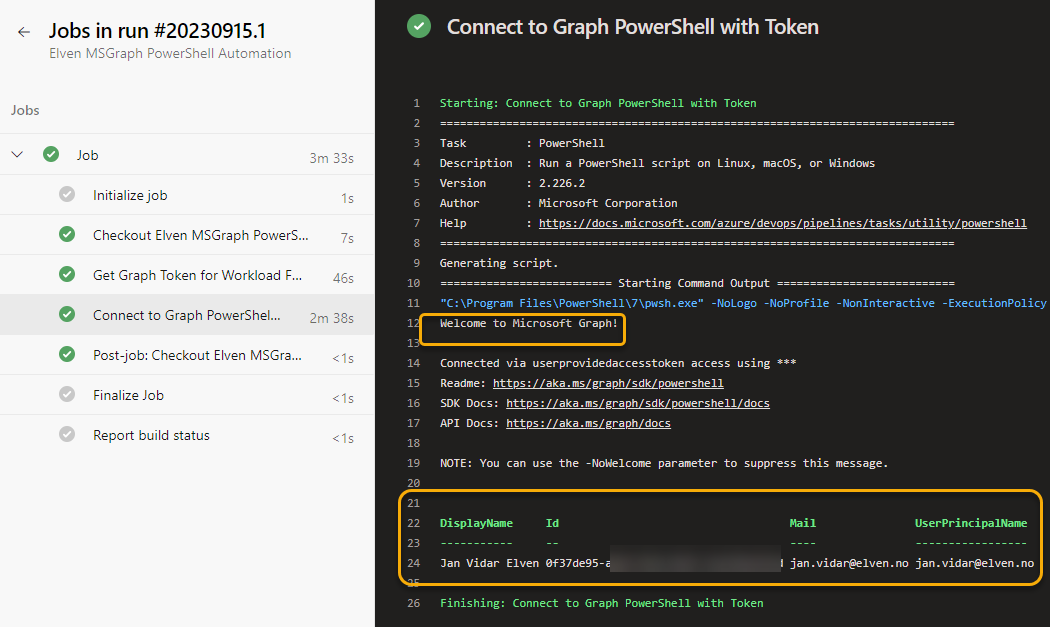
And then I can verify that it indeed can connect to the Graph via PowerShell SDK and get my resources via the Workload Identity Federation service connection:
Summary and Usage Scenarios
Most will use the new Workload Identity Federation for Azure Pipelines that access Azure subscriptions and resources, but I have shown as as long as this is using the Entra ID authentication platform and OIDC, it is possible to get access tokens for other API’s as well, in this case Microsoft Graph API.
You can use Graph API to get information about your tenant, to enrich and complement your exisiting CI/CD pipelines, or in some case automate consistent deployments also for Graph resources, like for example important settings and policies.
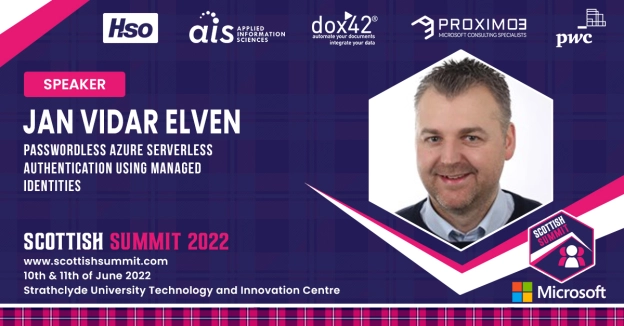
I’m excited to to be travelling to Glasgow, Scotland, and to speak at the Scottish Summit 2022, which will be held June 10th and 11th at Strathclyde University TIC, Glasgow.
This is the first time I travel to Scotland and Glasgow, and to present in-person at the Scottish Summit, altthough I last year presented a session at the Virtual Scottish Summit 2021.
This is the 4th time the Scottish Summit is held, starting in 2019 as a way to showcase Microsoft Dynamics 365 in Scotland. The first event gathered 370 Dynamics professionals to Glasgow to watch 38 sessions. In 2020 the full Microsoft Cloud Community was invited to showcase all the Microsoft Cloud stack and over 1,100 people attended. Fast Forward to 2021 and world events allow the event to go Global to over 3,400 attendees who took in 365 sessions.
Some of the highlights of Scottish Summit 2022:
2 full days of conference content with 180+ sessions!
Opening Keynote from Connell McGinley on Disability Awareness & Inclusivity, sharing his experiences as a deaf person in IT, and a Closing Keynote with Dona Sarkar talking about Mental Health in I.T.
Sessions presented in 12 simultaneous tracks covering the complete Microsoft Technology stack including for Security, Microsoft 365, Dynamics 365, Azure, Power Platform, Modern Workplace, and much more for both Developers, IT Pros and Soft Skills.
Saturday Pub Quiz!
.. and as always at Communicty Conference, the ability to connect, ask, share and be with fellow members in the many communities around Microsoft solutions.
I will speak about why and how you can use Passwordless Azure ServerlessAuthentication using Managed Identities in Azure AD. Do you use Azure Services and Serverless solutions that need to authenticate to other resources and APIs? Have you been using App Registrations and Service Principals to achieve this? Have you felt the pain of managing secret credentials, who has access to the credentials and lifecycle management of these and want at better way to achieve Azure Authentication? This is where Managed Identities is the way to go.
I really look forwarding to visiting Glasgow and Scotland, and joining up with the Community at the Scottish Summit 2022! Hope to see you there, please say hi!
I’m very happy and excited to once again speak at NIC (Nordic Infrastructure Conference), which will be held May 31 – June 2, Oslo Spektrum, Norway. Previously held in a winterly Oslo in February, and last time held just before the Corona outbreak in 2020, attendants and speakers should this time experience a beautiful Oslo spring surrounding the event.
NIC is celebrating 10 years anniversery this time, and this in-person event gathers over 1000+ attendees, international and well-known speakers, in addition to partners, vendors and a great exhibition area, it is truly the place to be for IT professionals and decision makers that want to see and experience the latest and greatest content!
Some of the highligths of NIC X:
Pre-Conference where you can choose to learn from one the best in the industry: Sami Laiho, Paula Januszkiewicz, or John Craddock!
2 full days of conference content including Opening Keynote from Chen Goldberg (VP Google Cloud) and Closing Keynote from Ulrich Hoffman (Corporate VP Microsoft), and 65+ Breakout sessions, all honoring the conference motto: Less slides – more demos!
Session tracks for Security, Data, AI & ML, Architecture & Code, Server & Client, Operations & Automation, and Cloud!
.. and as always at NIC, the best food and mingling with fellow members of the industry.
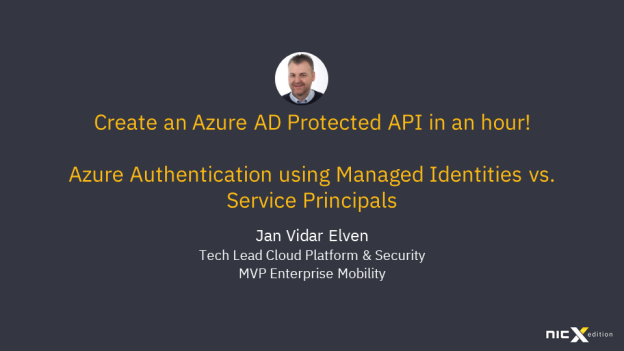
Myself I will present two breakout sessions during the main conference, focusing on Security with Azure AD and Microsoft Cloud Solutions:
In my first session on the first day I will speak about How to Create an Azure AD Protected API in Azure in one hour!, where I will show you how you can create your own API in Azure and protect it with Azure AD using Oauth2. API’s can be anything you want, and in true NIC spirit this session will really will be most about the demos and very little slides!
In my second session the last day, I will speak about why and how you can use Azure Authentication using Managed Identities vs. Service Principals in Azure AD. Do you use Azure Services that need to authenticate to other resources and APIs? Have you been using App Registrations and Service Principals to achieve this? Have you felt the pain of managing secret credentials, who has access to the credentials and lifecycle management of these and want at better way to achieve Azure Authentication? This is where Managed Identities is the way to go.
I’m looking forward to speak at the 3rd Edition of the Nordic Virtual Summit, which will happen online at 16th -17th March 2022. Nordic Virtual Summit is a 100% free virtual Microsoft IT Pro Community Event, organized by the joint scandinavian communities behind #MMUGSE #SCUGDK #SCUGFI #MMUGNO and the #MSEndpointMgr crew!
24 sessions, 1 keynote and 2 sponsor sessions will be delivered by expert speakers including MVPs and Microsoft Program Managers over the 2 days, across two tracks: Microsoft 365 Endpoint Management and Microsoft 365 Security and Compliance.
My session will be about Passwordless Azure Authentication using Managed Identities in Azure Active Directory. While users are more and more using passwordless as authentication method, what about your applications, workload identities and serverless solutions in Azure? Azure Services also need to authenticate to other resources and APIs, and this is where Managed Identities is the way to go. In this session I will show the capabilities and usage scenarios for using Managed Identities to get rid of application credentials once and for all!
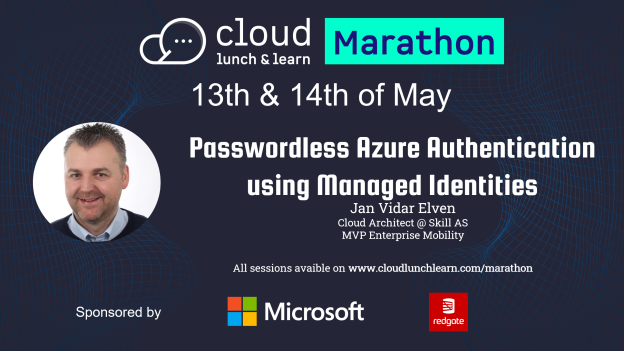
I’m excited to announce that I will be speaking at the Cloud Lunch & Learn Marathon 2021, a Global and Online Community event that will run for 24 hours between May 13th and 14th, with Speakers and Community experts from all over the world.
Sessions will cover a range of Cloud topics, including AI, Cloud Native, Blockchain, IoT, Data & BigData, Security, DevOps, GitHub, Backend, Frontend, Power Platform and, more.
Many sessions will also be held in other languages than English, like Portuguese, Spanish, Hindi, Chinese and Arabic!
My session will be about Passwordless for Azure Services. It is well known that Passwordless for Microsoft Identities is now the thing to do to secure your end users, but what about Azure Services that need to authenticate to other resources and APIs? This is where Managed Identities is the way to go. In my session I will show the capabilities and usage scenarios for using Managed Identities to get rid of application credentials once and for all!
You can see all the sessions at the link below, where you also will find registration details.
My Session details:
Session Title: Passwordless Azure Authentication using Managed Identities
In this blog I will build on that, creating a scenario where a Logic App will be exposed as an API to end users. In this API, I will call another popular API: Microsoft Graph.
My scenario will use a case where end users does not have access themselves to certain Microsoft Graph requests, but where the Logic App does. Exposing the Logic App as an API will let users be able to authenticate and authorize, requesting and consenting to the custom Logic App API permissions I choose. Some of these permissions can users consent to themselves, while other must be admin consented. This way I can use some authorizing inside the Logic App, and only let the end users be able to request what they are permitted to.
I will also look into assigning users and groups, and using scopes and roles for additional fine graining end user and principal access to the Logic App.
A lot of topics to cover, so let’s get started by first creating the scenario for the Logic App.
Logic App calling Microsoft Graph API
A Logic App can run requests against the Microsoft Graph API using the HTTP action and specifying the method (GET, POST, etc) and resource URI. For authentication against Graph from the Logic App you can use either:
Using Azure Active Directory OAuth and Client Credentials Flow with Client Id and Secret.
Using System or User Assigned Managed Identity.
Permissions for Microsoft Graph API are either using “delegated” (in context of logged in user) or “application” (in context of application/deamon service). These scenarios using Logic App will use application permissions for Microsoft Graph.
PS! Using Logic Apps Custom Connectors (Custom connectors overview | Microsoft Docs) you can also use delegated permissions by creating a connection with a logged in user, but this outside of the scope of this article.
Scenario for using Microsoft Graph in Logic App
There are a variety of usage scenarios for Microsoft Graph, so for the purpose of this Logic App I will focus on one of the most popular: Device Management (Intune API) resources. This is what I want the Logic App to do in this first phase:
Listing a particular user’s managed devices.
Listing all of the organization’s managed devices.
Filtering managed devices based on operating system and version.
In addition to the above I want to implement the custom API such that any assigned user can list their own devices through end-user consent, but to be able to list all devices or any other user than your self you will need an admin consented permission for the custom API.
Creating the Logic App
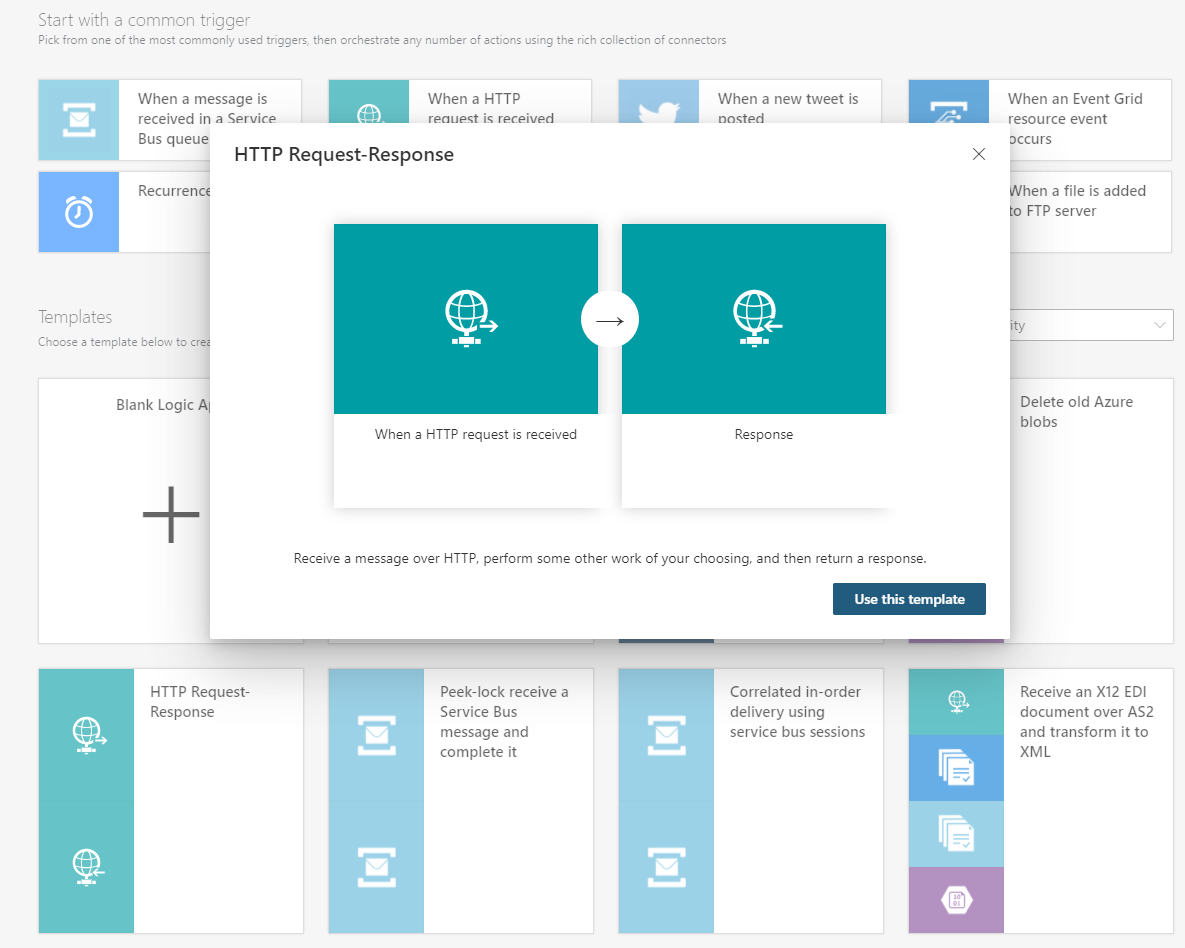
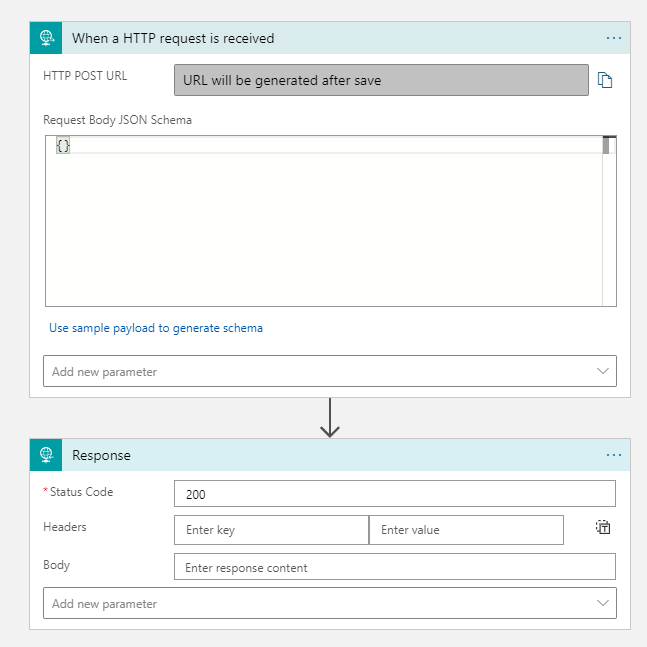
In your Azure subscription, add a new Logic App to your chosen resource group and name it according to your naming standard. After the Logic App is created, you will need add the trigger. As this will be a custom API, you will need it to use HTTP as trigger, and you will also need a response back to the caller, so the easiest way is to use the template for HTTP Request-Response as shown below:
Your Logic App will now look like this:
Save the Logic App before proceeding.
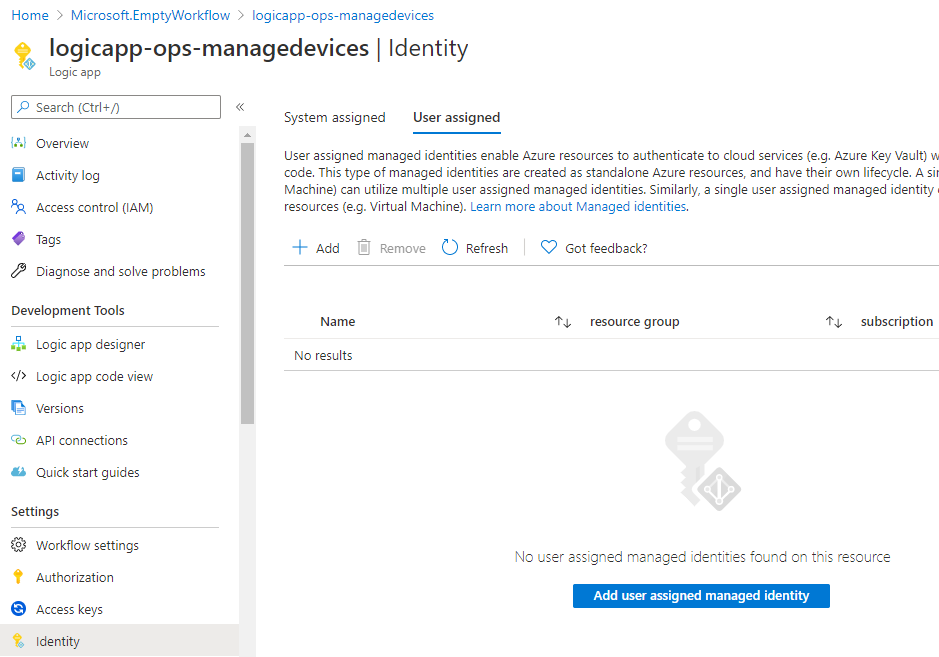
Create a Managed Identity for the Logic App
Exit the designer and go to the Identity section of the Logic App. We need a managed identity, either system assigned or user assigned, to let the Logic App authenticate against Microsoft Graph.
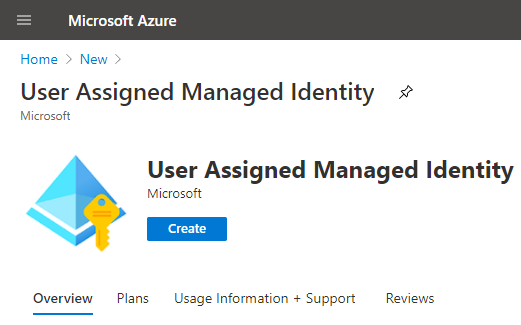
A system assigned managed identity will follow the lifecycle of this Logic App, while a user assigned managed identity will have it’s own lifecycle, and can be used by other resources also. I want that flexibility, so I will create a user assigned managed identity for this scenario. In the Azure Portal, select to create a new resource and find User Assigned Managed Identity:
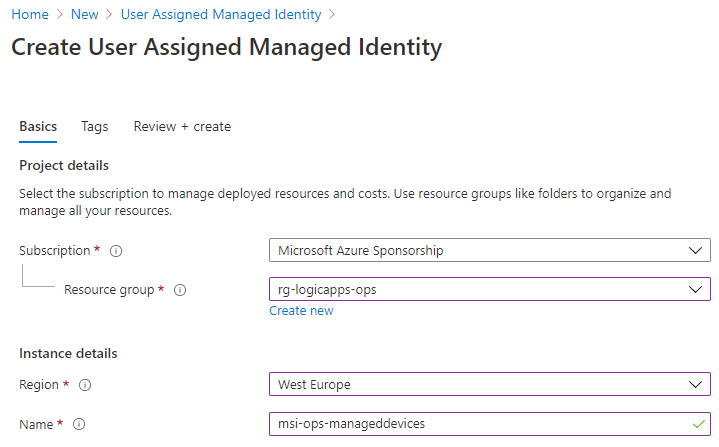
Create a new User Assigned Managed Identity in your selected resource group and give it a name based on your naming convention:
After creating the managed identity, go back to your Logic App, and then under Identity section, add the newly created managed identity under User Assigned Managed Identity:
Before we proceed with the Logic App, we need to give the Managed Identity the appropriate Microsoft Graph permissions.
Adding Microsoft Graph Permissions to the Managed Identity
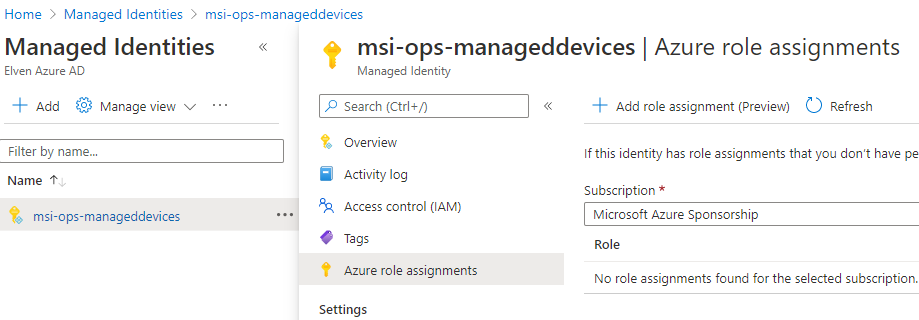
Now, if we wanted the Logic App to have permissions to the Azure Rest API, we could have easily added Azure role assignments to the managed identity directly:
So we need a minimum of: DeviceManagementManagedDevices.Read.All.
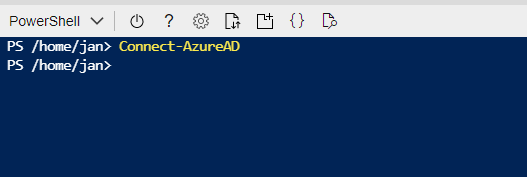
To add these permissions we need to run some PowerShell commands using the AzureAD module. If you have that installed locally, you can connect and proceed with the following commands, for easy of access you can also use the Cloud Shell in the Azure Portal, just run Connect-AzureAD first:
PS! You need to be a Global Admin to add Graph Permissions.
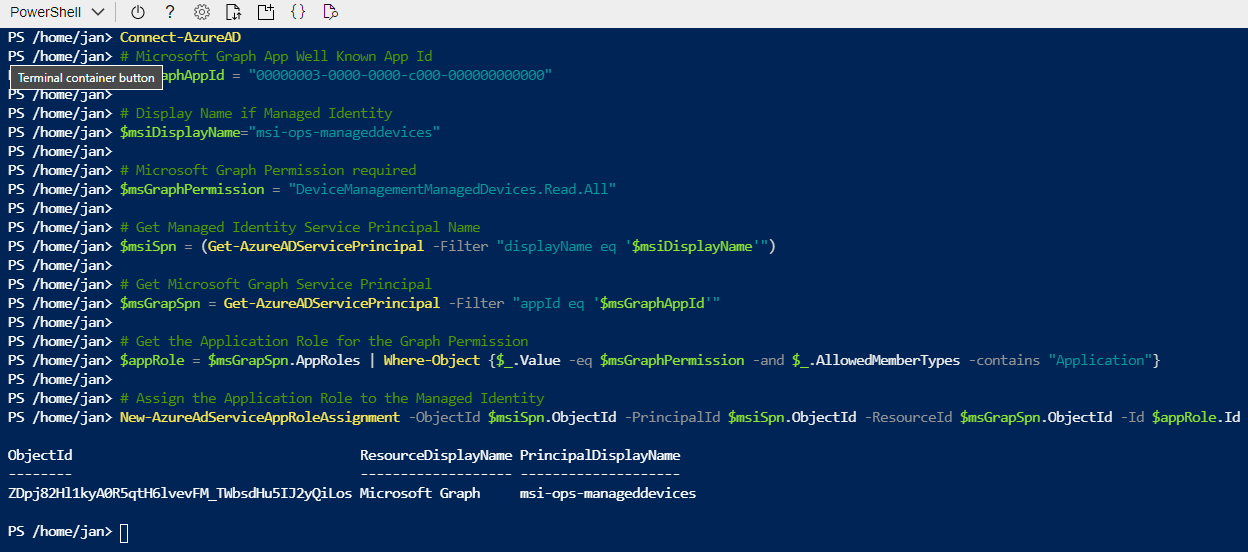
You can run each of these lines separately, or run it as a script:
# Microsoft Graph App Well Known App Id
$msGraphAppId = "00000003-0000-0000-c000-000000000000"

# Display Name if Managed Identity
$msiDisplayName="msi-ops-manageddevices"

# Microsoft Graph Permission required
$msGraphPermission = "DeviceManagementManagedDevices.Read.All"

# Get Managed Identity Service Principal Name
$msiSpn = (Get-AzureADServicePrincipal -Filter "displayName eq '$msiDisplayName'")

# Get Microsoft Graph Service Principal
$msGraphSpn = Get-AzureADServicePrincipal -Filter "appId eq '$msGraphAppId'"

# Get the Application Role for the Graph Permission
$appRole = $msGraphSpn.AppRoles | Where-Object {$_.Value -eq $msGraphPermission -and $_.AllowedMemberTypes -contains "Application"}

# Assign the Application Role to the Managed Identity
New-AzureAdServiceAppRoleAssignment -ObjectId $msiSpn.ObjectId -PrincipalId $msiSpn.ObjectId -ResourceId $msGraphSpn.ObjectId -Id $appRole.Id
Verify that it runs as expected:
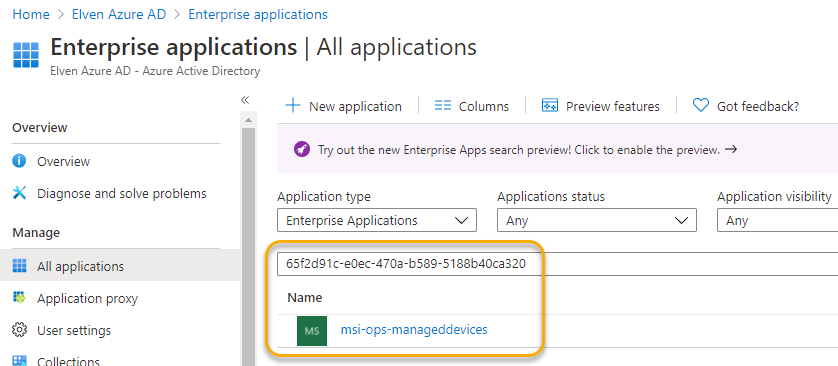
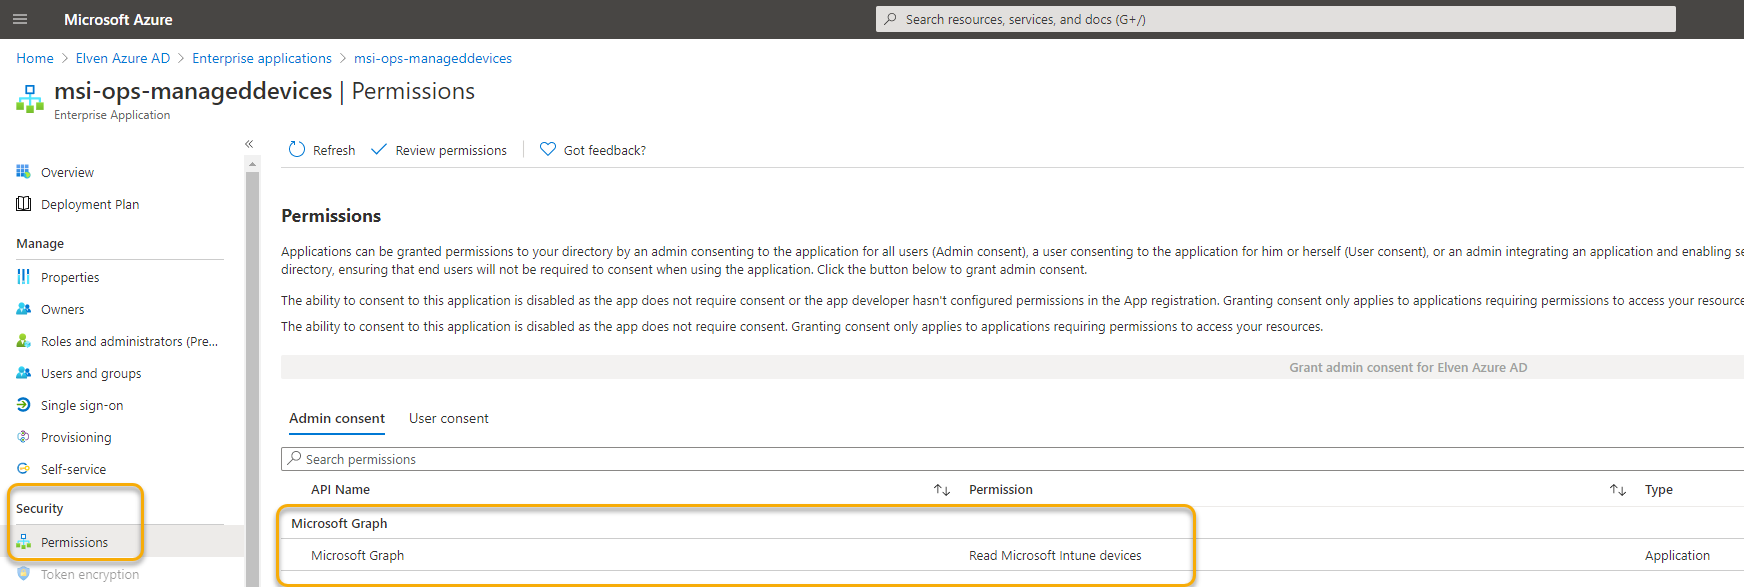
As mentioned earlier, adding these permissions has to be done using script commands, but there is a way to verify the permissions by doing the following:
Find the Managed Identity, and copy the Client ID:
Under Azure Active Directory and Enterprise Applications, make sure you are in the Legacy Search Experience and paste in the Client ID:
Which you then can click into, and under permissions you will see the admin has consented to Graph permissions:
The Logic App can now get Intune Managed Devices from Microsoft Graph API using the Managed Identity.
Calling Microsoft Graph from the Logic App
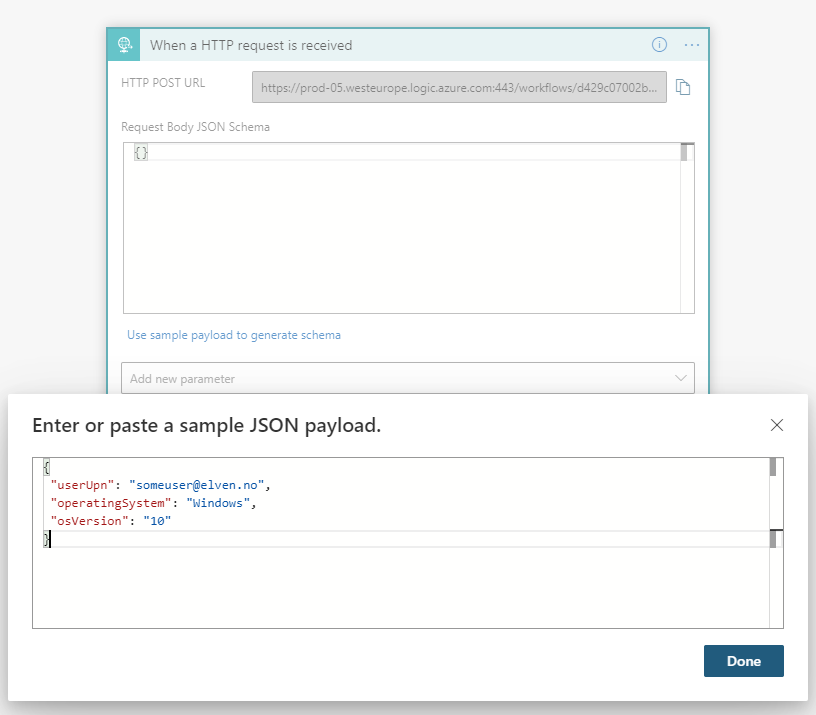
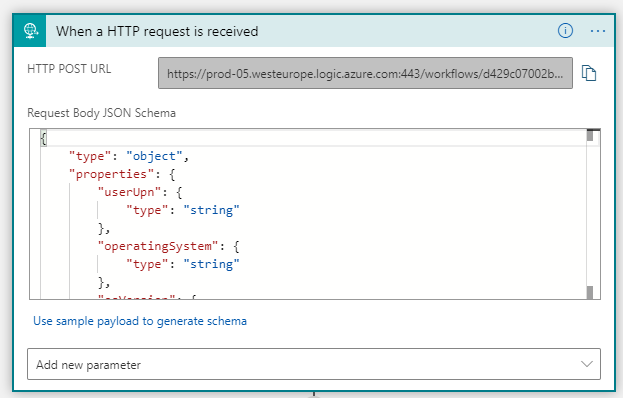
Let’s start by adding some inputs to the Logic App. I’m planning to trigger the Logic App using an http request body like the following:
In the Logic App request trigger, paste as a sample JSON payload:
The request body schema will be updated accordingly, and the Logic App is prepared to receive inputs:
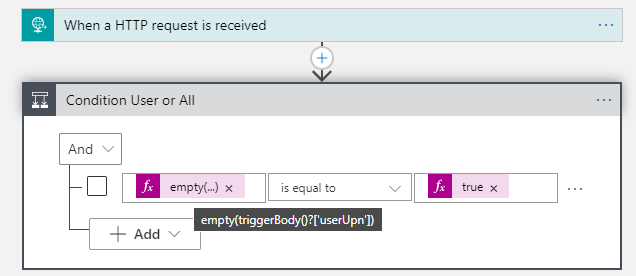
Next, add a Condition action, where we will check if we should get a users’ managed devices, or all. Use an expression with the empty function to check for userUpn, and another expression for the true value, like below:
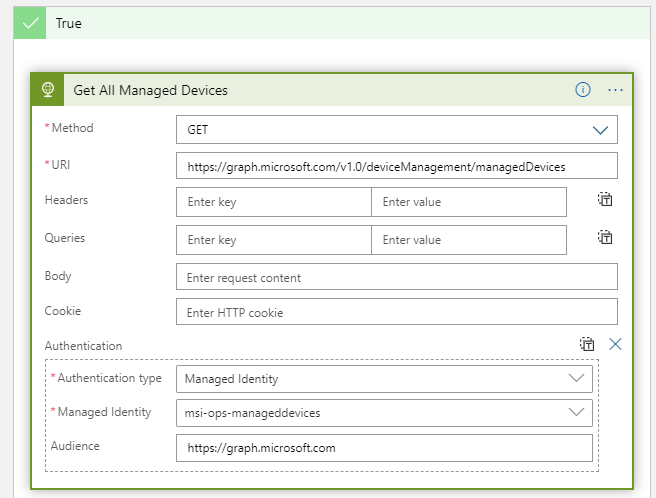
We will add more logic and conditions later for the filtering of the operating system and version, but for now add an HTTP action under True like the following:
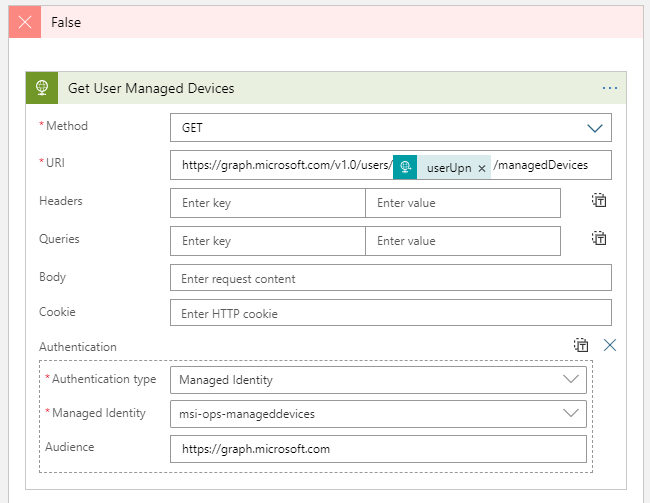
Note the use of the Managed Identity and Audience, which will have permission for querying for managed devices.
Under False, we will get the managed devices for a specific user. So add the following, using the userUpn input in the URI:
Both these actions should be able to run successfully now, but we will leave the testing for a bit later. First I want to return the managed devices found via the Response action.
Add an Initialize Variable action before the Condition action. Set the Name and Type to Array as shown below, but the value can be empty for now:
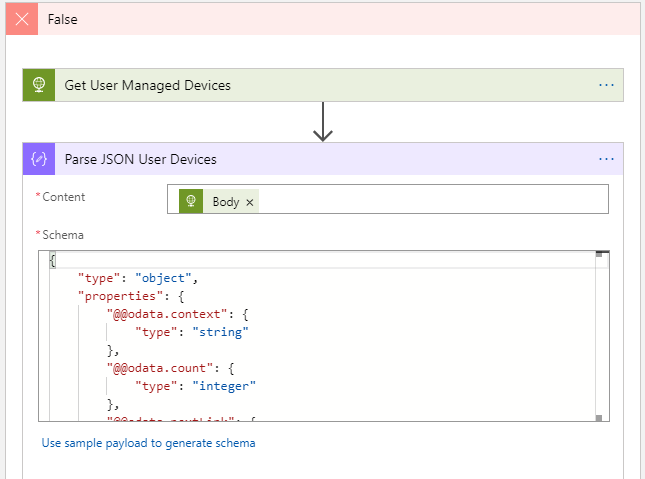
Next, under True and Get All Managed Devices, add a Parse JSON action, adding the output body from the http action and using either the sample response from the Microsoft Graph documentation, or your own to create the schema.
PS! Note that if you have over 1000 managed devices, Graph will page the output, so you should test for odata.nextLink to be present as well. You can use the following anonymized sample response for schema which should work in most cases:
{
     "@odata.context": "https://graph.microsoft.com/v1.0/$metadata#deviceManagement/managedDevices",
     "@odata.count": 1000,
     "@odata.nextLink": "https://graph.microsoft.com/v1.0/deviceManagement/managedDevices?$skiptoken=",
     "value": [
         {
             "id": "id Value",
             "userId": "User Id value",
             "deviceName": "Device Name value",
             "managedDeviceOwnerType": "company",
             "operatingSystem": "Operating System value",
             "complianceState": "compliant",
             "managementAgent": "mdm",
             "osVersion": "Os Version value",
             "azureADRegistered": true,
             "deviceEnrollmentType": "userEnrollment",
             "azureADDeviceId": "Azure ADDevice Id value",
             "deviceRegistrationState": "registered",
             "isEncrypted": true,
             "userPrincipalName": "User Principal Name Value ",
             "model": "Model Value",
             "manufacturer": "Manufacturer Value",
             "userDisplayName": "User Display Name Value",
             "managedDeviceName": "Managed Device Name Value"
         }
     ]
 }
PS! Remove any sample response output from schema if values will be null or missing from your output. For example I needed to remove the configurationManagerClientEnabledFeatures from my schema, as this is null in many cases.
Add another Parse JSON action under the get user managed devices action as well:
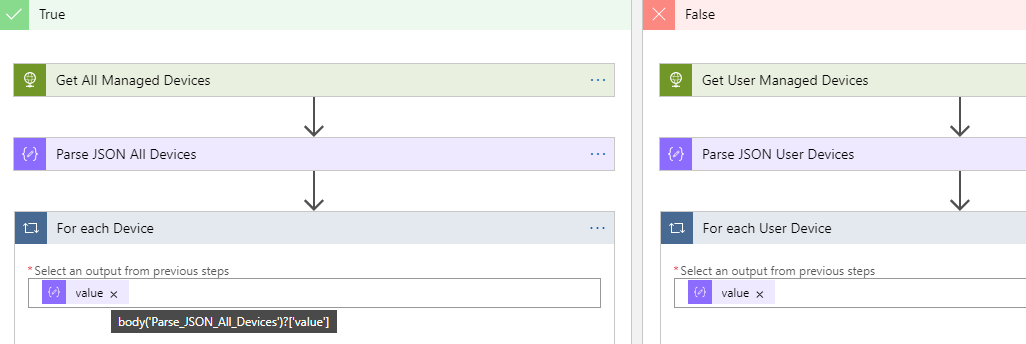
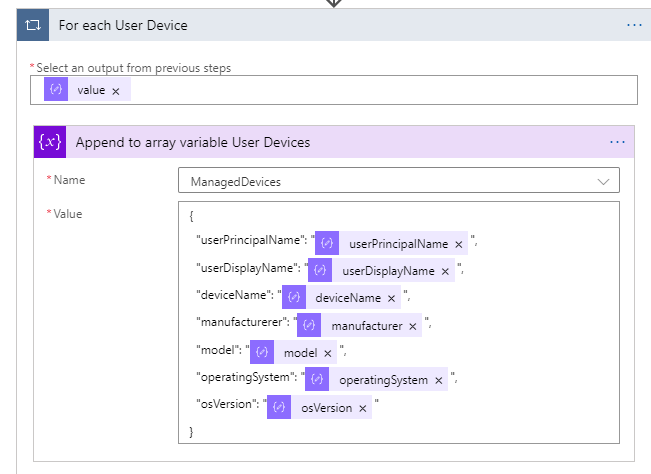
Now we will take that output and do a For Each loop for each value. On both sides of the conditon, add a For Each action, using the value from the previous HTTP action:
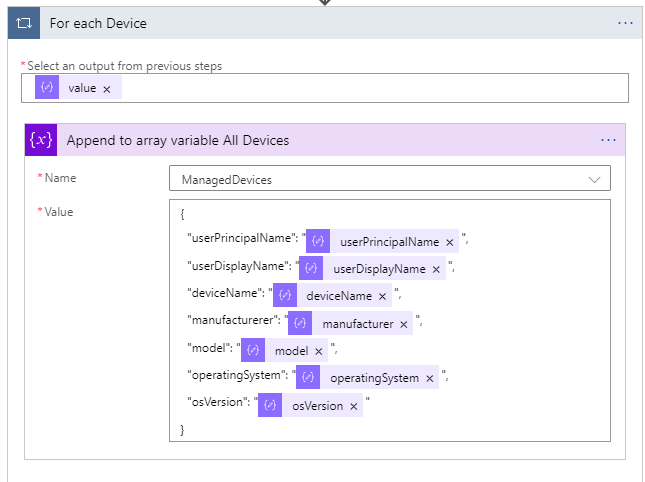
Inside that For Each loop, add an Append to Array variable action. In this action we will build a JSON object, returning our chosen attributes (you can change to whatever you want), and selecting the properties from the value that was parsed:
Do the exact same thing for the user devices:
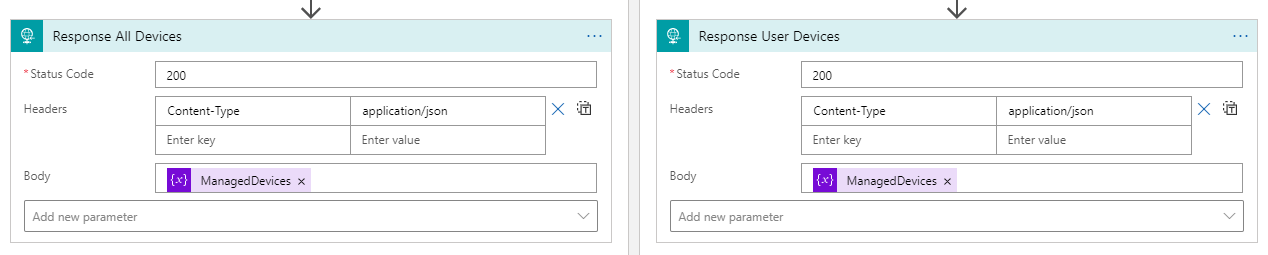
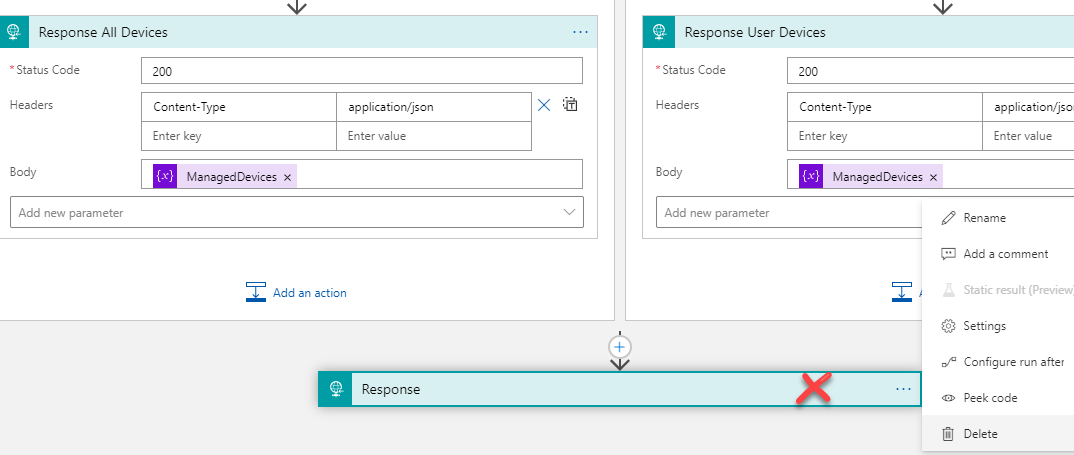
Now, on each side of the condition, add a response action, that will return the ManagedDevices array variable, this will be returned as a JSON som set the Content-Type to application/json:
Finally, remove the default response action that is no longer needed:
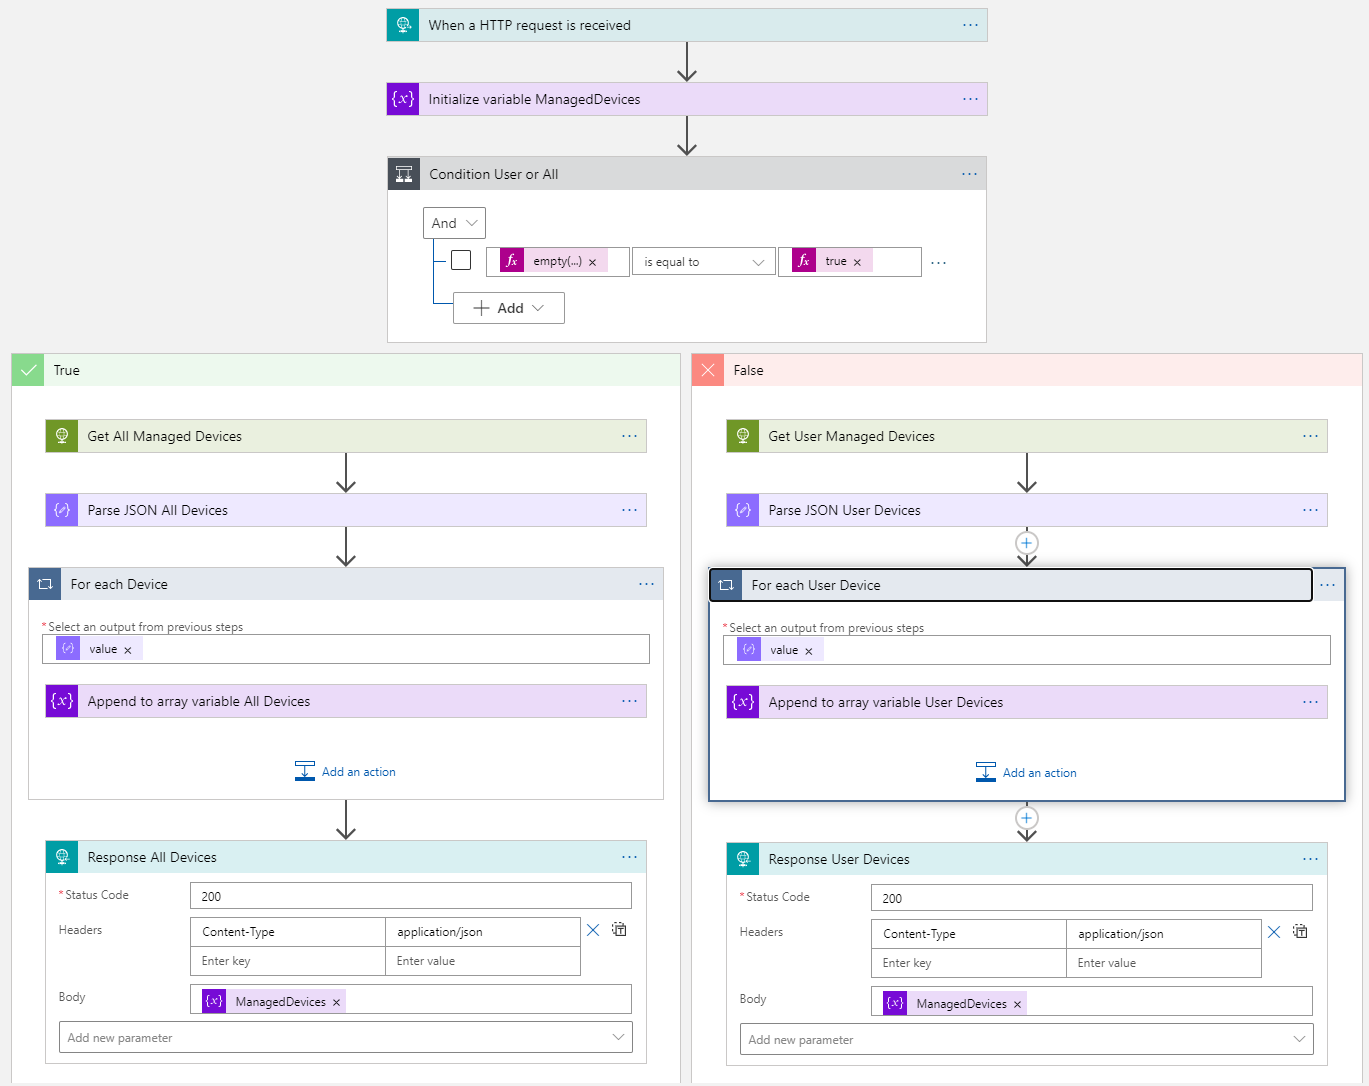
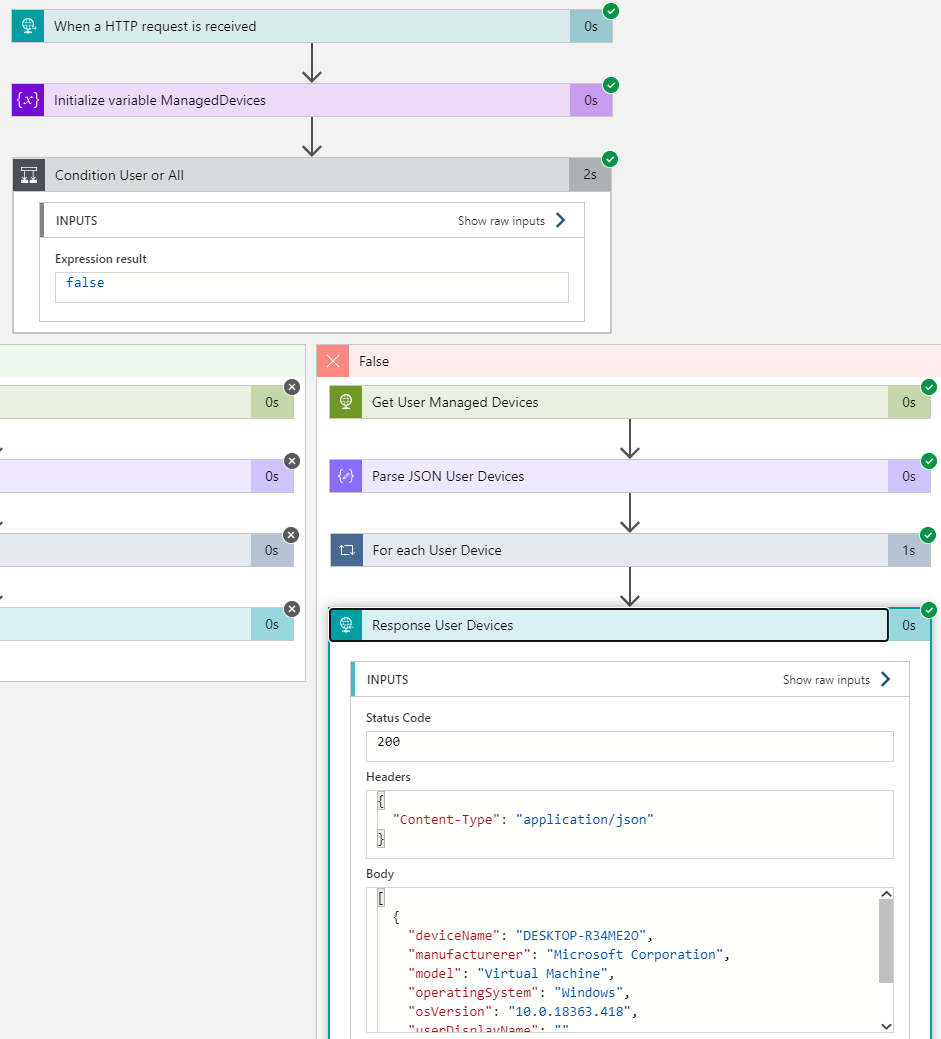
The complete Logic App should look like the following now:
As I mentioned earlier, we’ll get to the filtering parts later, but now it’s time for some testing.
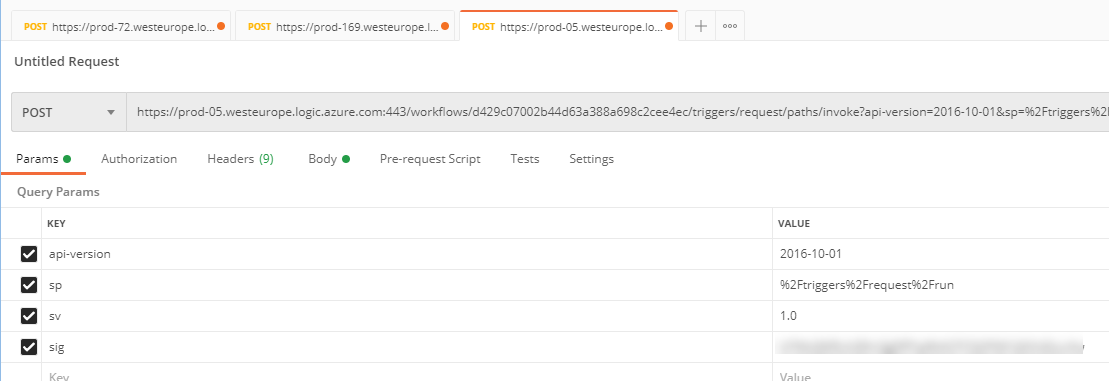
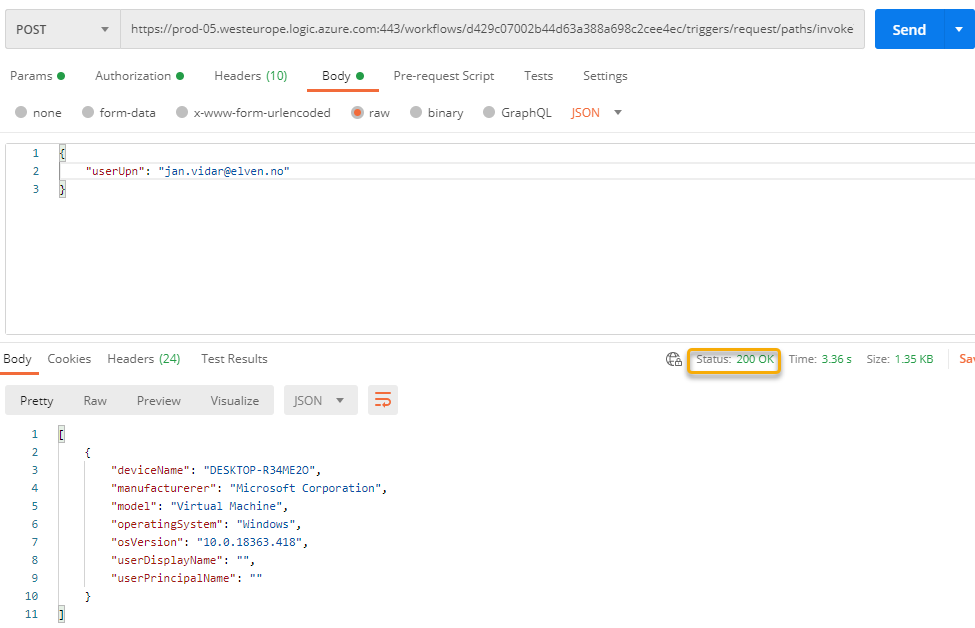
Let’s test this Logic App now with Postman. Copy the HTTP POST URL:
And paste it to Postman, remember to change method to POST:
You can now click Send, and the Logic App will trigger, and should return all your managed devices.
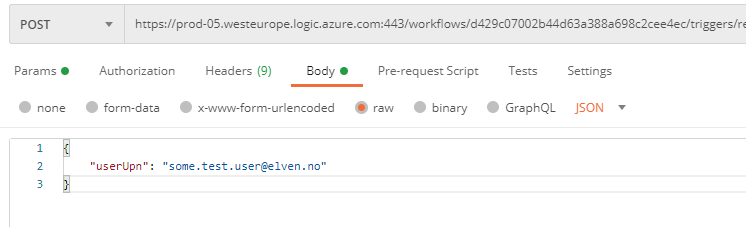
If you want a specific users’ managed devices, then you need to go to the Body parameter, and add like the following with an existing user principal name in your organization:
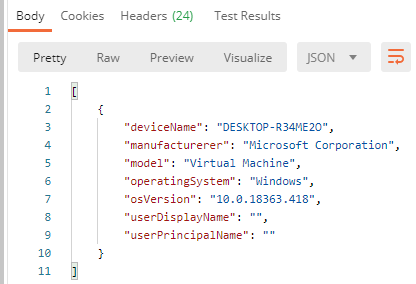
You should then be able to get this users’ managed devices, for example for my test user this was just a virtual machine with Window 10:
And I can verify a successful run from the Logic App history:
Summary so far
We’ve built a Logic App that uses it’s own identity (User Assigned Managed Identity) to access the Microsoft Graph API using Application Permissions to get managed devices for all users or a selected user by UPN. Now it’s time to exposing this Logic App as an API son end users can call this securely using Azure AD OAuth.
Building the Logic App API
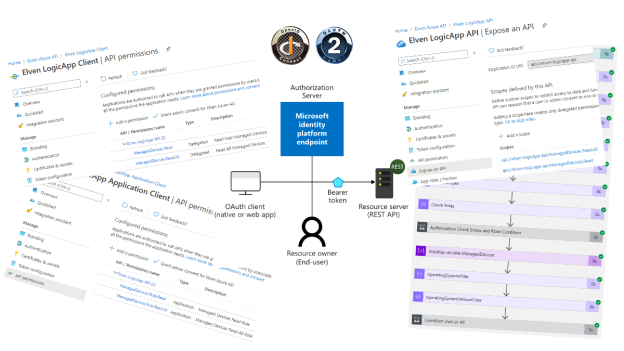
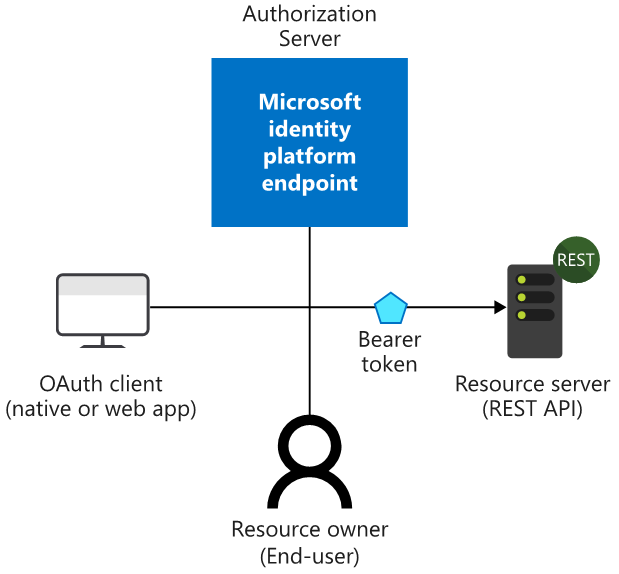
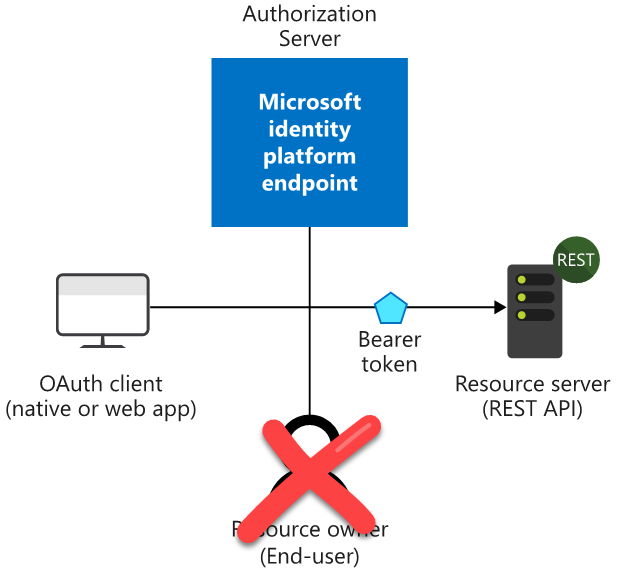
When exposing the Logic App as an API, this will be the resource that end users will access and call as a REST API. Consider the following diagram showing the flow for OpenID Connect and OAuth, where Azure AD will be the Authorization Server from where end users can request access tokens where the audience will be the Logic App resource:
Our next step will be to create Azure AD App Registrations, and we will start with the App Registration for the resource API.
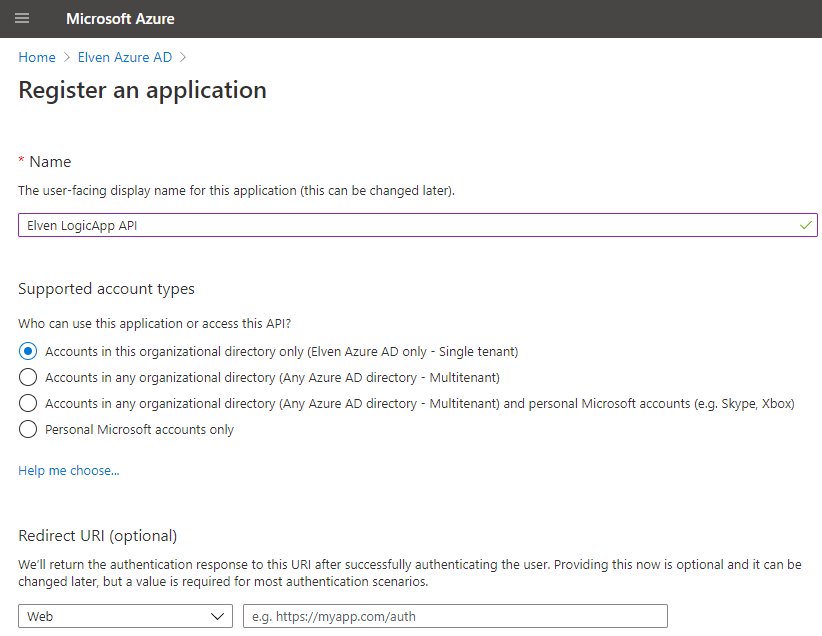
Creating App Registration for Logic App API
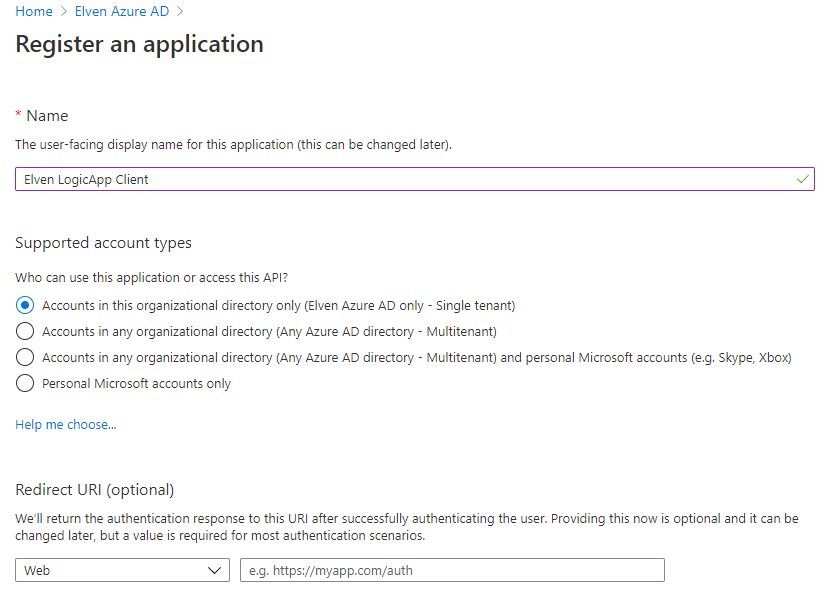
In your Azure AD tenant, create a new App Registration, and call it something like (YourName) LogicApp API:
I will use single tenant for this scenario, leave the other settings as it is and create.
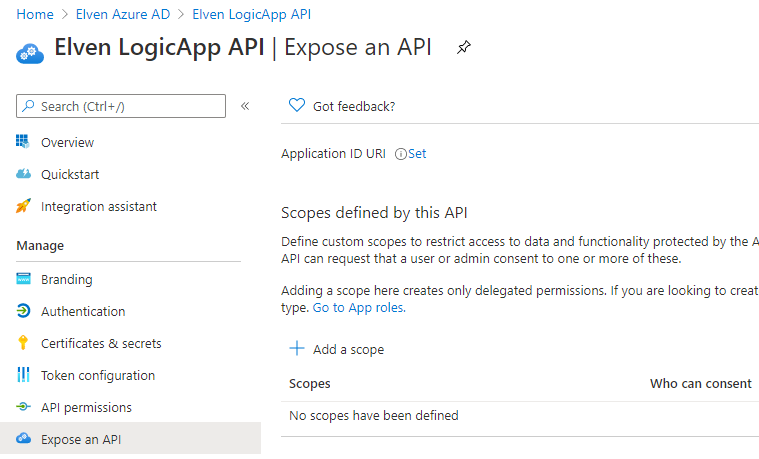
Next, go to Expose an API:
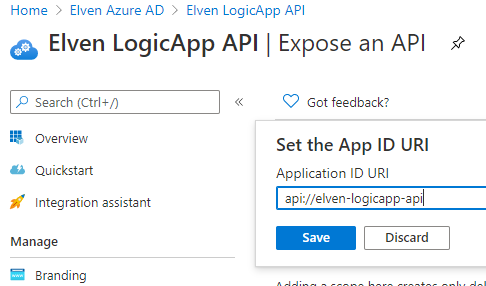
Click on Set right next to Application ID URI, and save the App ID URI to your choice. You can keep the GUID if you want, but you can also type any URI value you like here (using api:// or https://). I chose to set the api URI to this:
Next we need to add scopes that will be the permissions that delegated end users can consent to. This will be the basis of the authorization checks we can do in the Logic App later.
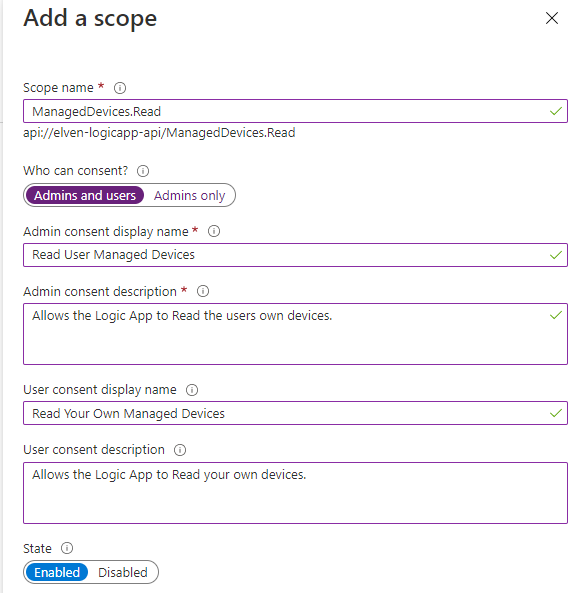
Add a scope with the details shown below. This will be a scope end users can consent to themselves, but it will only allow them to read their own managed devices:
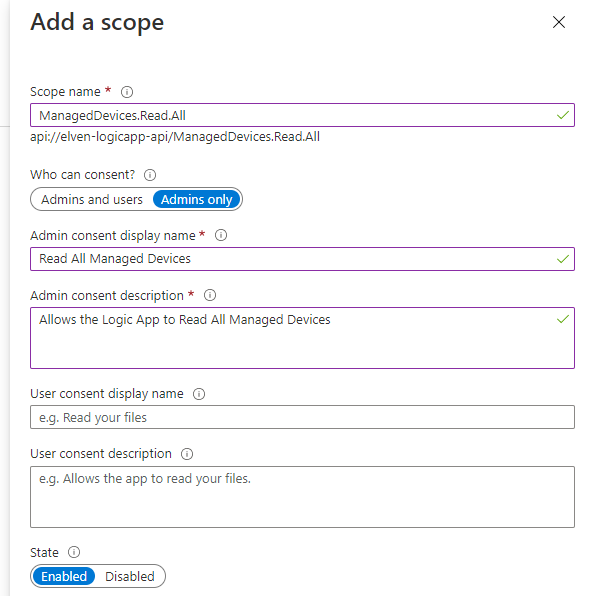
Next, add another Scope, with the following details. This will be a scope that only Admins can consent to, and will be authorized to read all devices:
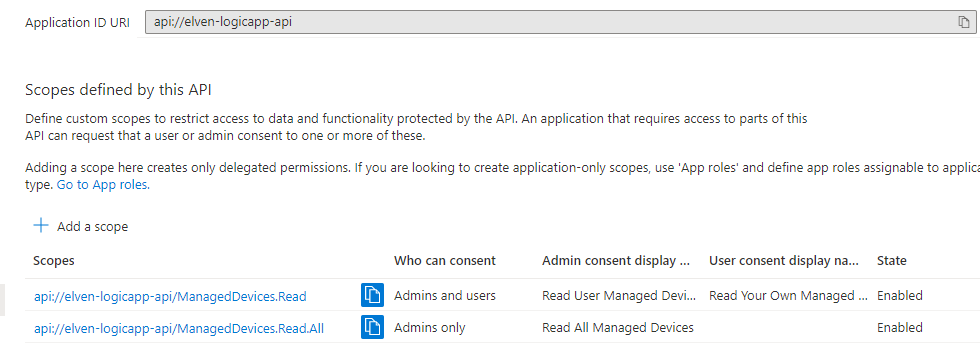
You should now have the following scopes defined:
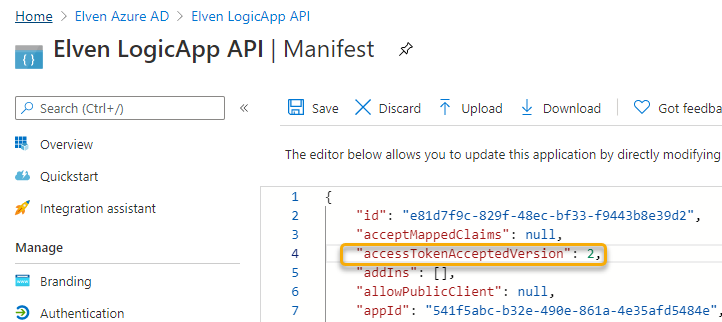
Next, go to the Manifest and change the accessTokenAcceptedVersion from null to 2, this will configure so that Tokens will use the OAuth2 endpoints:
That should be sufficient for now. In the next section we will prepare for the OAuth client.
Create App Registration for the Logic App Client
I choose to create a separate App Registration in Azure AD for the Logic App Client. This will represent the OAuth client that end users will use for OAuth authentication flows and requesting permissions for the Logic App API. I could have configured this in the same App Registration as the API created in the previous section, but this will provide better flexibility and security if I want to share the API with other clients also later, or if I want to separate the permission grants between clients.
Go to App Registrations in Azure AD, and create a new registration calling it something like (yourname) LogicApp Client:
Choose single tenant and leave the other settings for now.
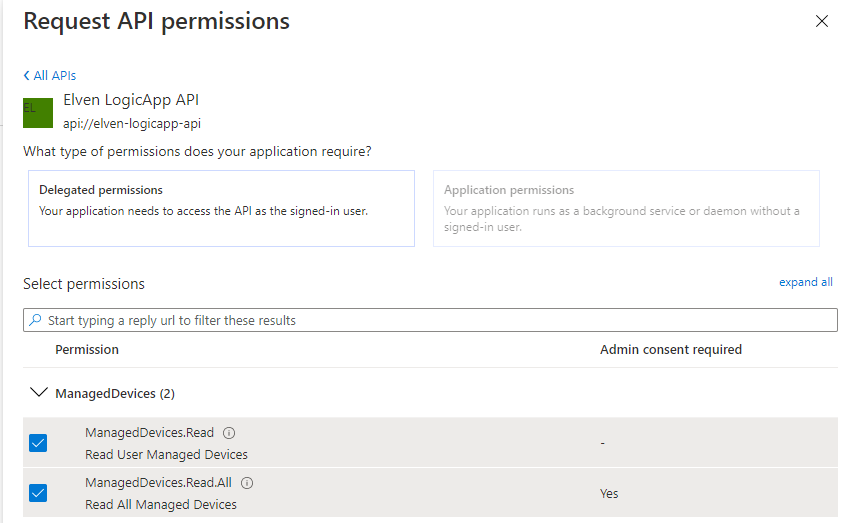
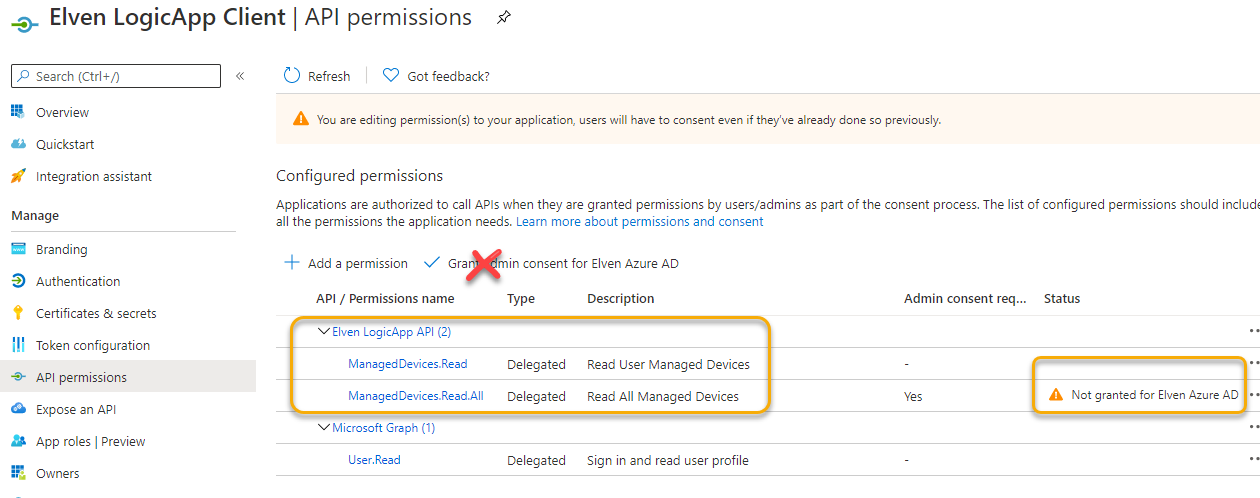
After registering, go to API permissions, and click on Add a permission. From there you can browse to “My APIs” and you should be able to locate the (yourname) Logic API. Select to add the delegated permissions as shown below:
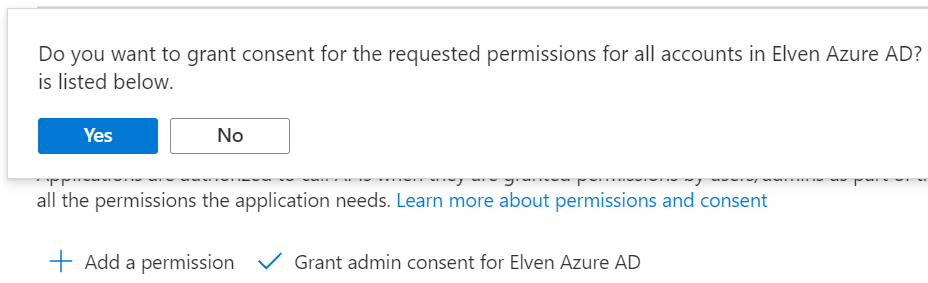
These delegated permissions reflect the scopes we defined in the API earlier. Your App registration and API permission should now look like below. NB! Do NOT click to Grant admin consent for your Azure AD! This will grant consent on behalf of all your users, which will work against our intended scenario later.
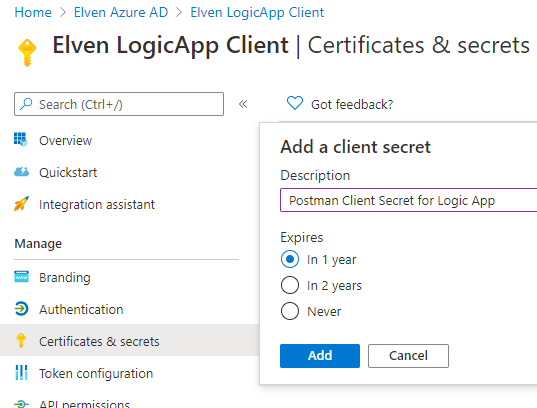
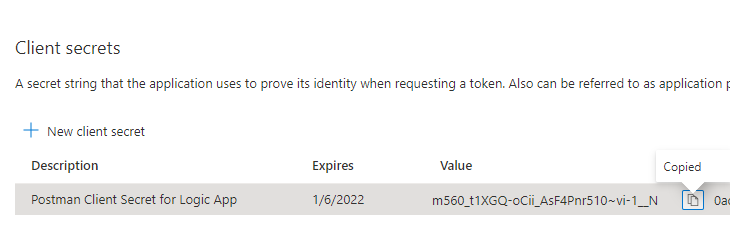
Next, we need to provide a way for clients to authenticate using Oauth flows, so go to the Certificates & secrets section. Click to create a Client secret, I will name my secret after where I want to use it for testing later (Postman):
Make sure you copy the secret value for later:
(Don’t worry, I’ve already invalidated the secret above and created a new one).
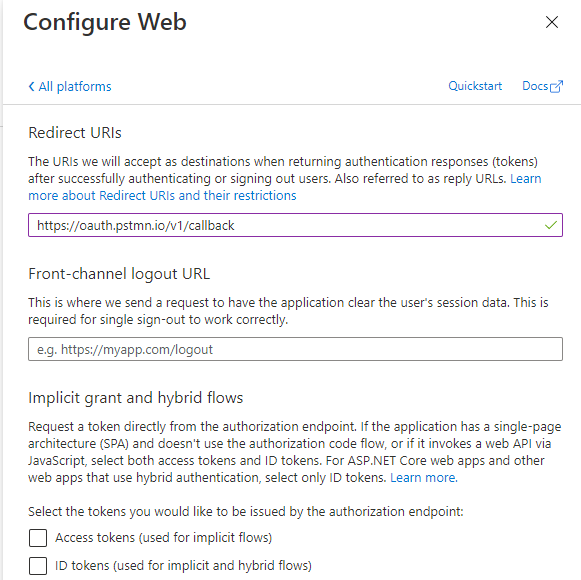
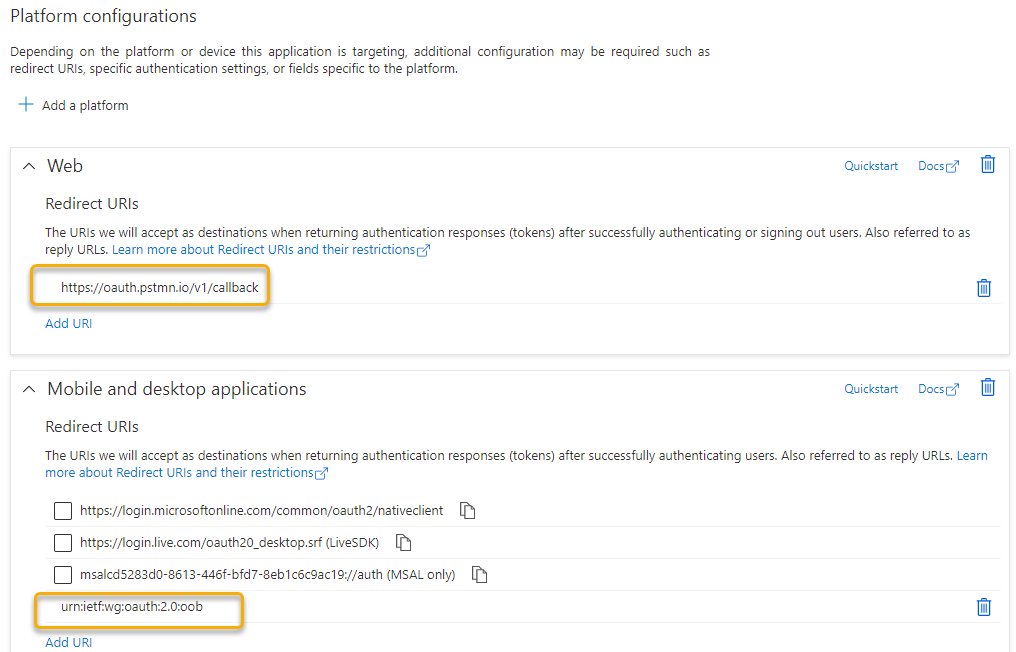
Next, go to Authentication. We need to add a platform for authentication flows, so click Add a platform and choose Web. For using Postman later for testing, add the following as Redirect URI: https://oauth.pstmn.io/v1/callback
Next, we will also provide another test scenario using PowerShell or Azure CLI client, so click on Add a platform one more time, this time adding Mobile desktop and apps as platform and use the following redirect URI: urn:ietf:wg:oauth:2.0:oob
Your platform configuration should now look like this:
Finally, go to advanced and set yes to allow public client flows, as this will aid in testing from PowerShell or Azure CLI clients later:
Now that we have configured the necessary App registrations, we can set up the Azure AD OAuth Authorization Policy for the Logic App.
Configuring Azure AD OAuth Authorization Policy for Logic App
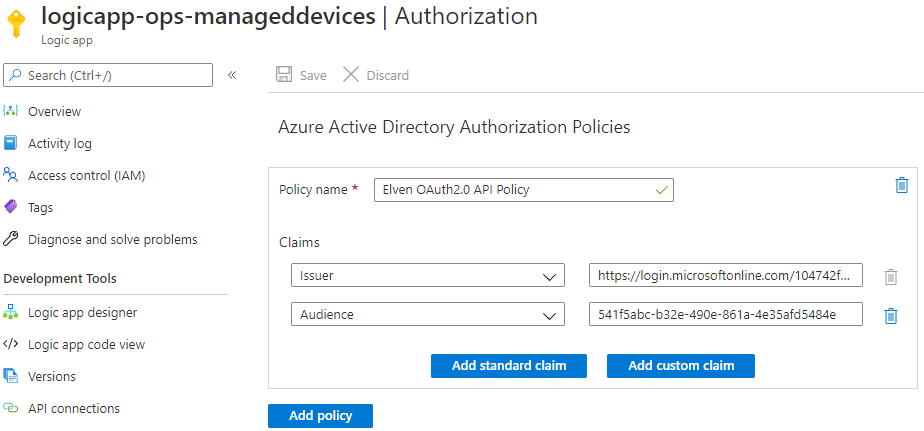
Back in the Logic App, create an Azure AD Authorization Policy with issuer and audience as shown below:
Audience: {app id for logic app api app registration}
We are using the v2.0 endpoint as we configured in the manifest of the App Registration that accessTokenAcceptedVersion should be 2. (as opposed to v1.0 issuer that would be in the format https://sts.windows.net/{tenantId}/). And the Audience claim would be our configured API App ID. (for v1.0 the audience would be the App ID URI, like api://elven-logicapp-api).
Save the Logic App, and we can now start to do some testing where we will use the client app registration to get an access token for the Logic App API resource.
Testing with Postman Client
The first test scenario we will explore is using Postman Client and the Authorization Code flow for getting the correct v2.0 Token.
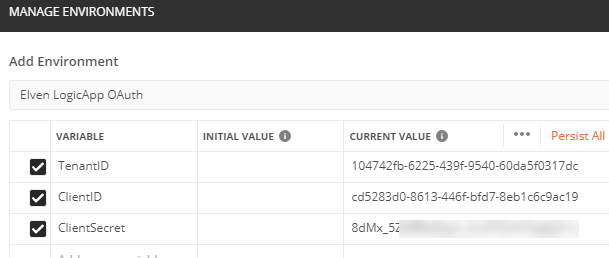
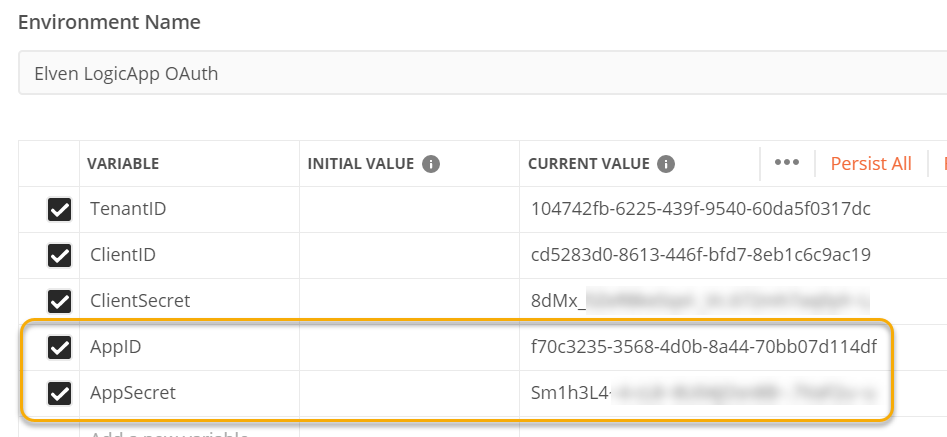
A recommended practice when using Postman and reusing variable values is to create an Environment. I’ve created this Environment for storing my Tenant ID, Client ID (App ID for the Client App Registration) and Client Secret (the secret I created for using Postman):
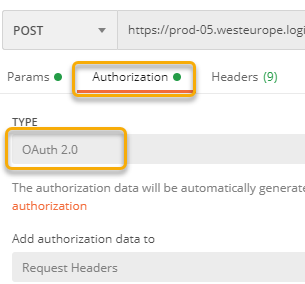
Previously in this blog article, we tested the Logic App using Postman. On that request, select the Authorization tab, and set type to OAuth 2.0:
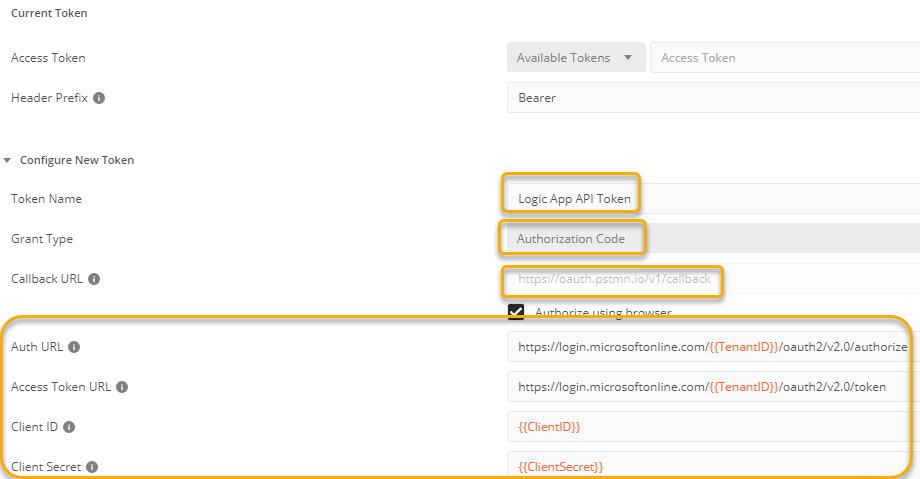
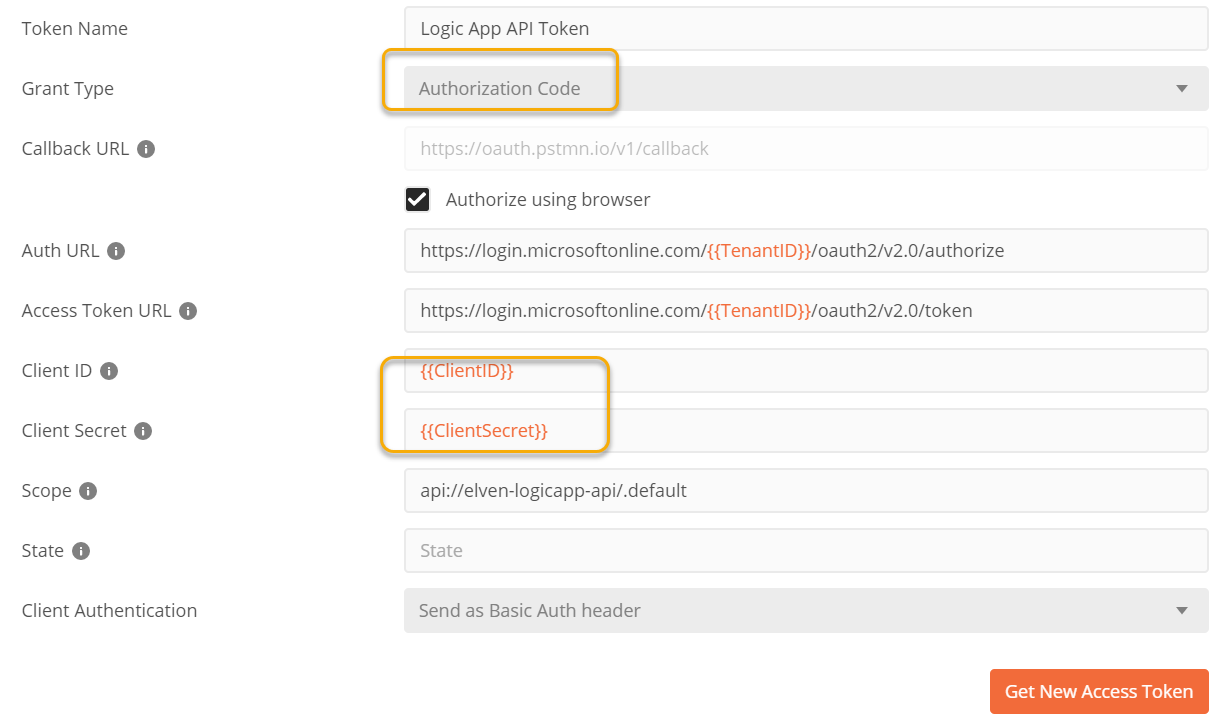
Next, under Token configuration add the values like the following. Give the Token a recognizable name, this is just for Postman internal refererence. Make sure that the Grant Type is Authorization Code. Note the Callback URL, this is the URL we configured for the App registration and Callback Url. In the Auth and Access Token URL, configure the use of the v2.0 endpoints, using TenantID from the environment variables. (Make sure to set the current environment top right). And for Client ID and Client Secret these will also refer to the environment variables:
One important step remains, and that is to correctly set the scope for the access token. Using something like user.read here will only produce an Access Token for Microsoft Graph as audience. So we need to change to the Logic App API, and the scope for ManagedDevices.Read in this case:
Let’s get the Access Token, click on the Get New Access Token button:
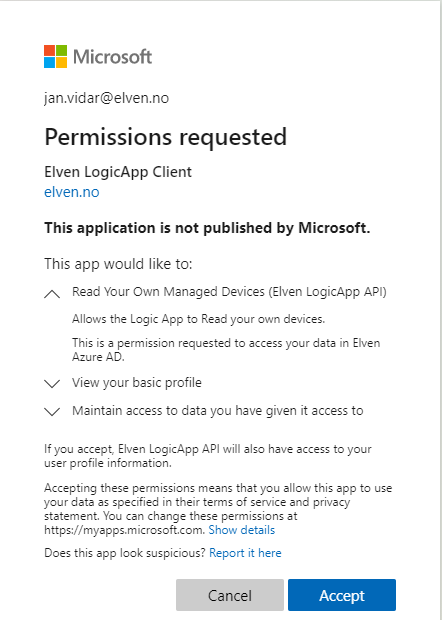
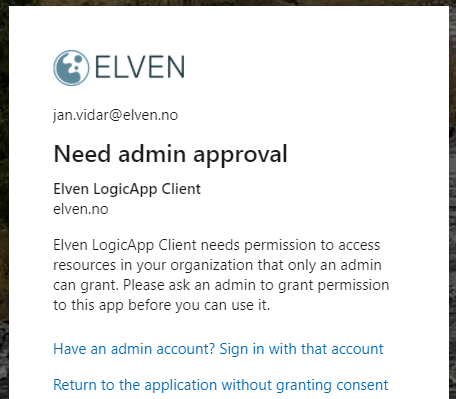
A browser window launches, and if you are not already logged in, you must log in first. Then you will be prompted to consent to the permission as shown below. The end user is prompted to consent for the LogicApp API, as well as basic OpenID Connect consents:
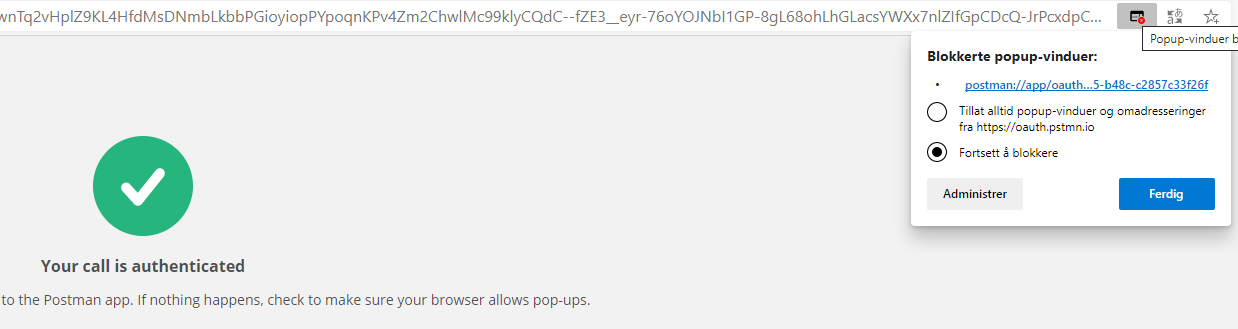
After accepting, a popup will try to redirect you to Postman, so make sure you don’t block that:
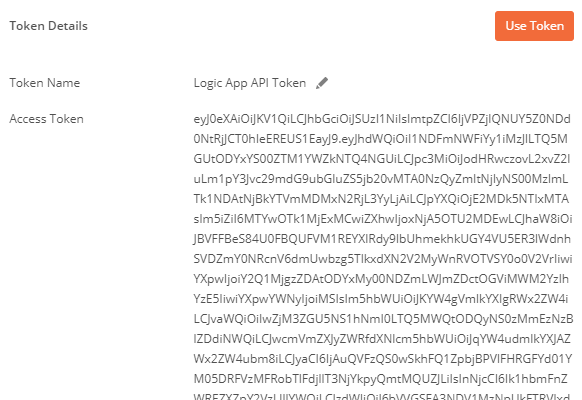
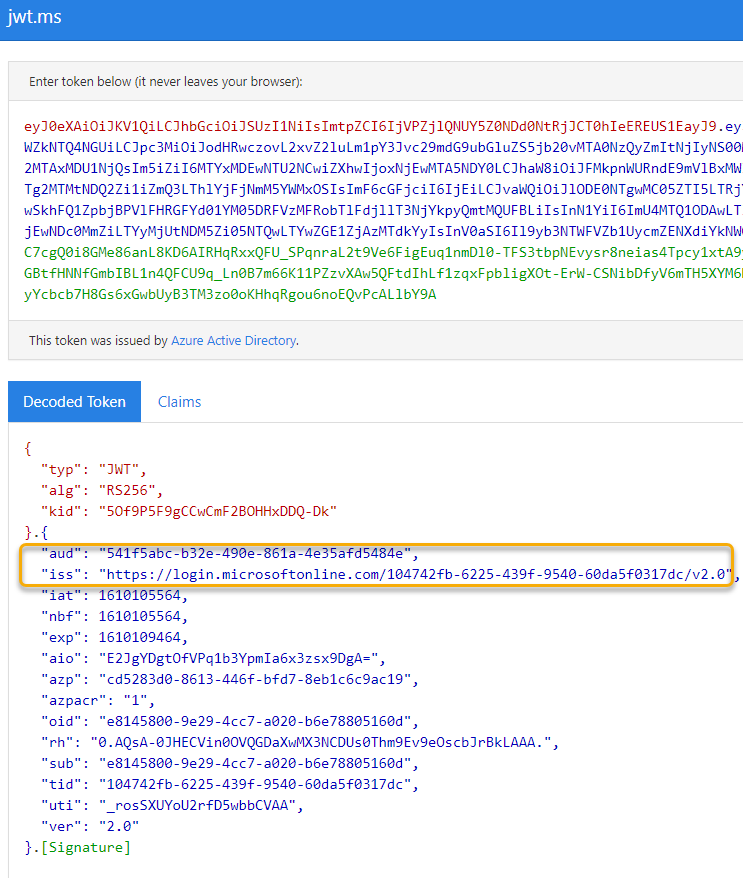
Back in Postman, you will see that we have got a new Access Token:
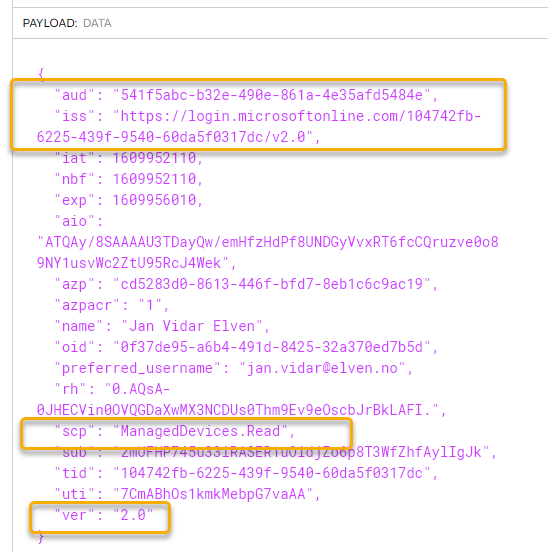
Copy that Access Token, and paste it into a JWT debugger like jwt.ms or jwt.io. You should see in the data payload that the claims for audience and issuer is the same values we configured in the Logic App Azure AD OAuth policy:
Note also the token version is 2.0.
Click to use the Token in the Postman request, it should populate this field:
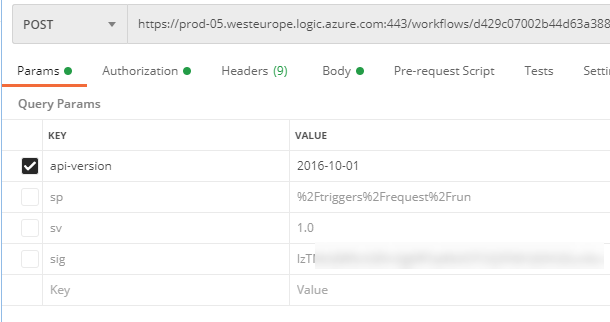
Before testing the request, remember to remove the SAS query parameters from the request, so that sv, sp and sig are not used with the query for the Logic App:
Now, we can test. Click Send on the Request. It should complete successfully with at status of 200 OK, and return the managed device details:
Let’s add to the permission scopes, by adding the ManagedDevices.Read.All:
Remember just to have a blank space between the scopes, and then click Get New Access Token:
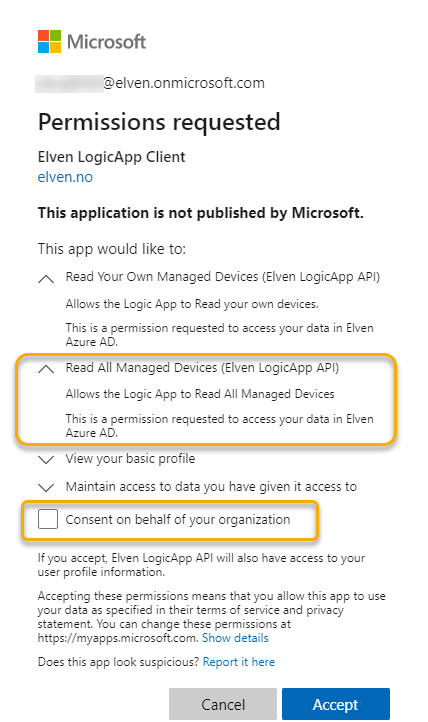
If I’m logged on with a normal end user, I will get the prompt above that I need admin privileges. If I log in with an admin account, this will be shown:
Note that I can now do one of two actions:
I can consent only on behalf of myself (the logged in admin user), OR..
I can consent on behalf of the organization, by selecting the check box. This way all users will get that permission as well.
Be very conscious when granting consents on behalf of your organization.
At this point the Logic App will authorize if the Token is from the correct issuer and for the correct audience, but the calling user can still request any managed device or all devices. Before we get to that, I will show another test scenario using a public client like PowerShell.
Testing with PowerShell and MSAL.PS
MSAL.PS is a perfect companion for using MSAL (Microsoft Authentication Library) to get Access Tokens in PowerShell. You can install MSAL.PS from PowerShellGallery using Install-Module MSAL.PS.
The following commands show how you can get an Access Token using MSAL.PS:
# Set Client and Tenant ID
$clientID = "cd5283d0-8613-446f-bfd7-8eb1c6c9ac19"
$tenantID = "104742fb-6225-439f-9540-60da5f0317dc"
# Get Access Token using Interactive Authentication for Specified Scope and Redirect URI (Windows PowerShell)
$tokenResponse = Get-MsalToken -ClientId $clientID -TenantId $tenantID -Interactive -Scope 'api://elven-logicapp-api/ManagedDevices.Read' -RedirectUri 'urn:ietf:wg:oauth:2.0:oob'
# Get Access Token using Interactive Authentication for Specified Scope and Redirect URI (PowerShell Core)
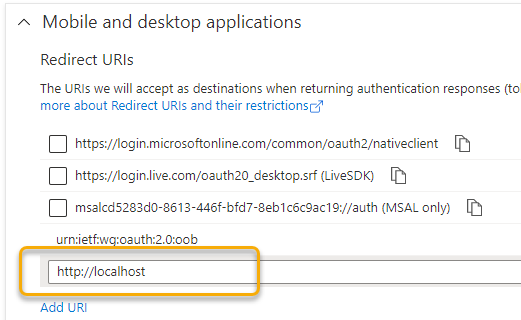
$tokenResponse = Get-MsalToken -ClientId $clientID -TenantId $tenantID -Interactive -Scope 'api://elven-logicapp-api/ManagedDevices.Read' -RedirectUri 'http://localhost'
MSAL.PS can be used both for Windows PowerShell, and for PowerShell Core, so in the above commands, I show both. Note that the redirect URI for MSAL.PS on PowerShell Core need to be http://localhost. You also need to add that redirect URI to the App Registration:
Running the above command will prompt an interactive logon, and should return a successful response saved in the $tokenResponse variable.
We can verify the response, for example checking scopes or copying the Access Token to the clipboard so that we can check the token in a JWT debugger:
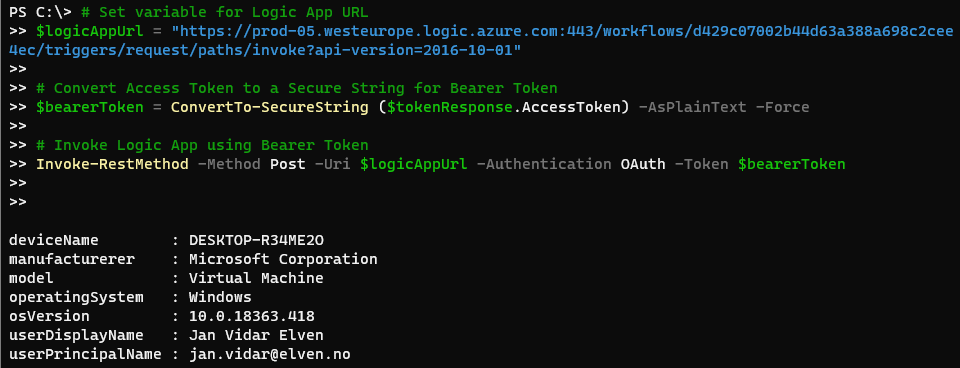
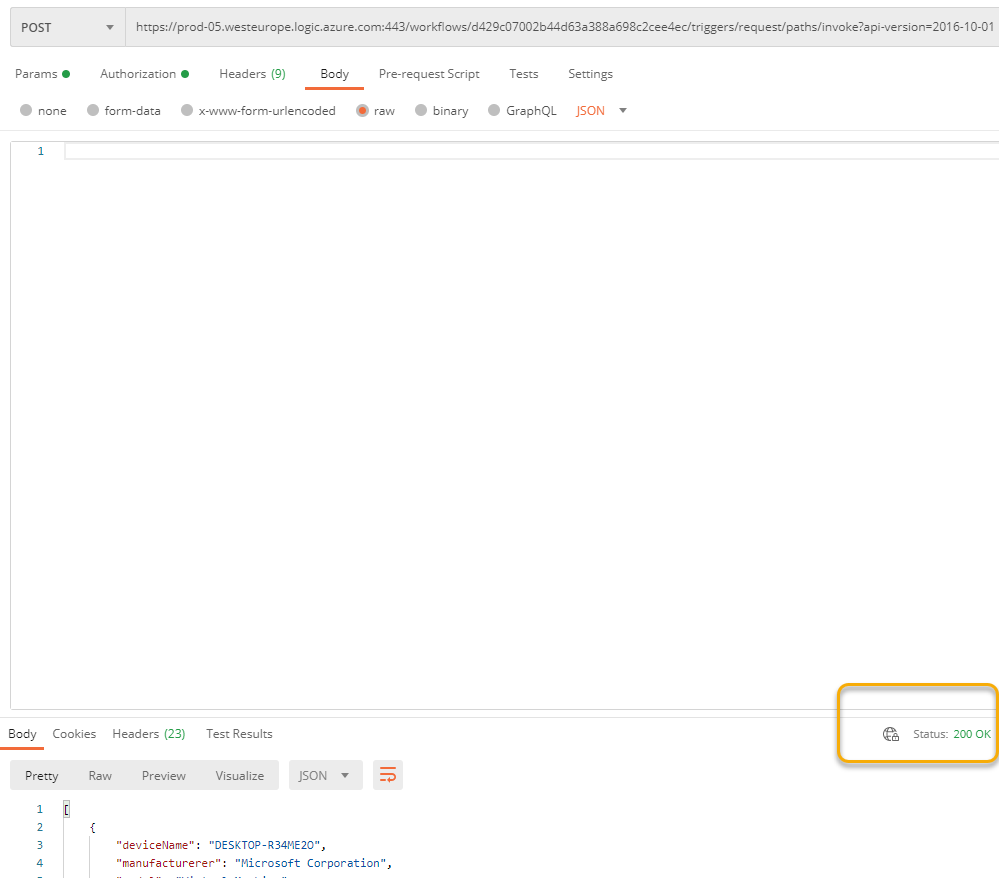
In the first blog post of this article series I covered how you can use Windows PowerShell and Core to use Invoke-RestMethod for calling the Logic App, here is an example where I call my Logic App using the Access Token (in PowerShell Core):
# Set variable for Logic App URL
$logicAppUrl = "https://prod-05.westeurope.logic.azure.com:443/workflows/d429c07002b44d63a388a698c2cee4ec/triggers/request/paths/invoke?api-version=2016-10-01"

# Convert Access Token to a Secure String for Bearer Token
$bearerToken = ConvertTo-SecureString ($tokenResponse.AccessToken) -AsPlainText -Force

# Invoke Logic App using Bearer Token
Invoke-RestMethod -Method Post -Uri $logicAppUrl -Authentication OAuth -Token $bearerToken
And I can verify that it works:
Great. I now have a couple of alternatives for calling my Logic App securely using Azure AD OAuth. In the next section we will get into how we can do authorization checks inside the Logic App.
Authorization inside Logic App
While the Logic App can have an authorization policy that verifies any claims like issuer and audience, or other custom claims, we cannot use that if we want to authorize inside the logic app based on scopes, roles etc.
In this section we will look into how we can do that.
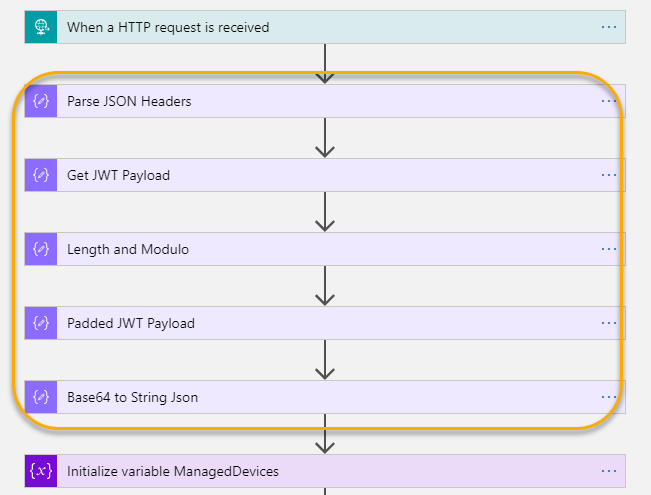
Include Authorization Header in Logic Apps
First we need to include the Authorization header from the OAuth access token in the Logic App. To do this, open the Logic App in code view, and add the operationOptions to IncludeAuthorizationHeadersInOutputs for the trigger like this:
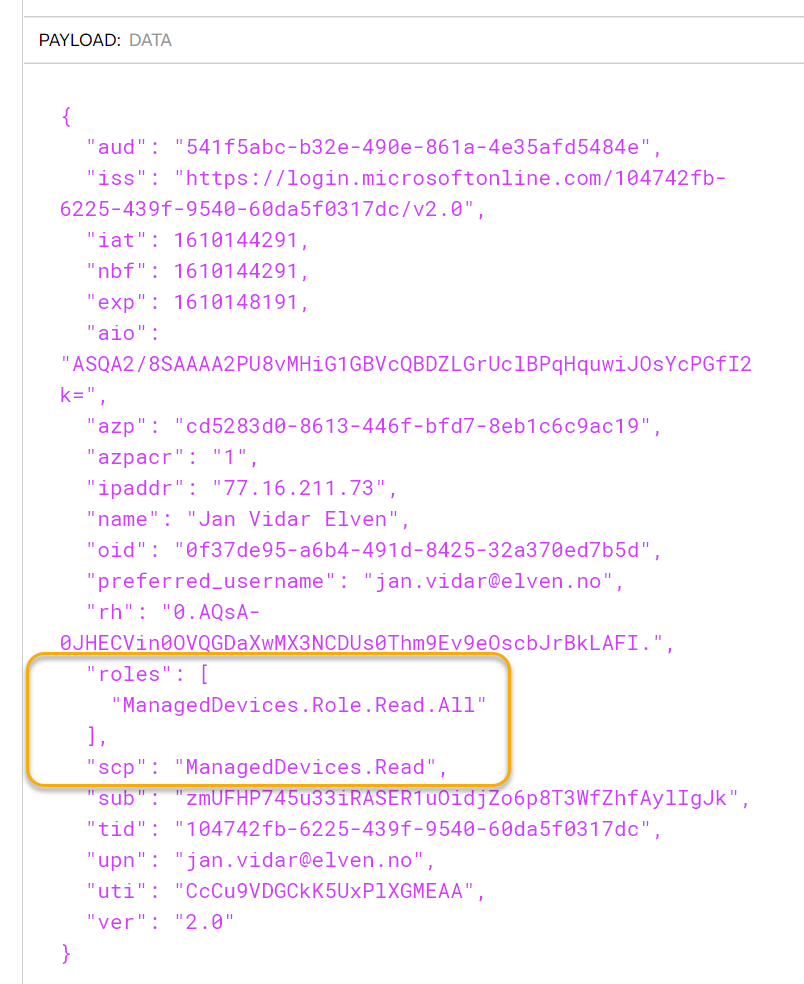
After applying the above steps, I can test the Logic App again, and get the details of the decoded JWT token, for example of interest will be to check the scopes:
Implement Logic to check the Scopes
When I created the LogicApp API app registration, I added two scopes: ManagedDevices.Read and ManagedDevices.Read.All. The authorization logic I want to implement now is to only let users calling the Logic App and that has the scope ManagedDevices.Read.All to be able to get ALL managed devices, or to get managed devices other than their own devices.
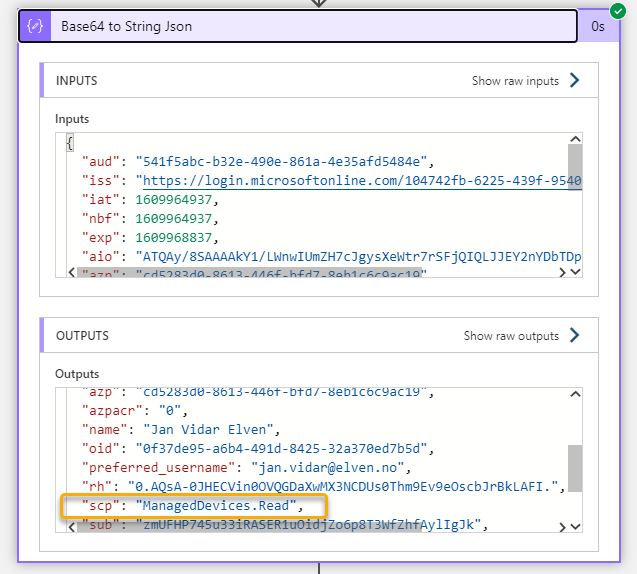
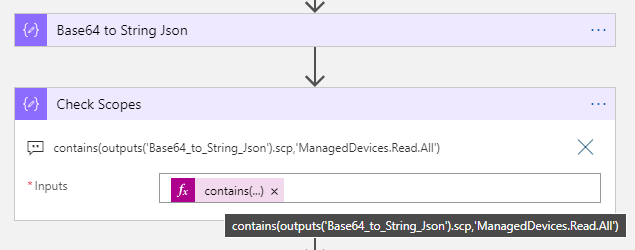
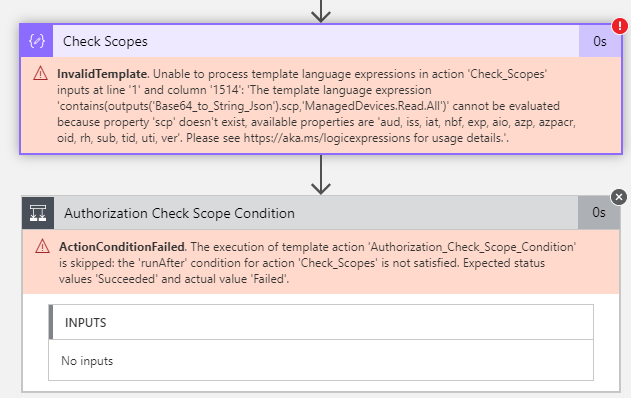
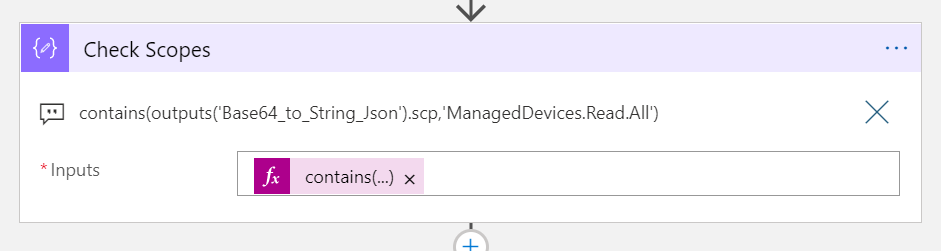
The first step will be to check if the JWT payload for scope “scp” contains the ManagedDevices.Read.All. Add a Compose action with the following expression:
This expression will return either true or false depending on the scp value.
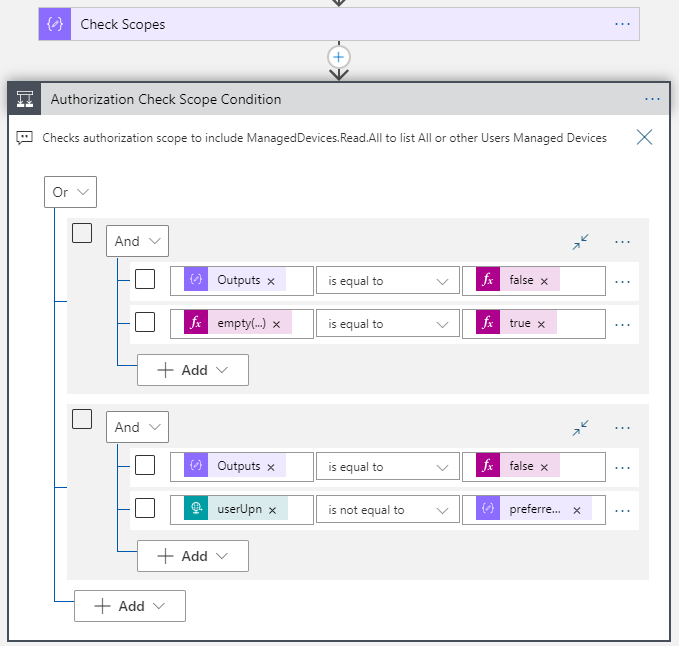
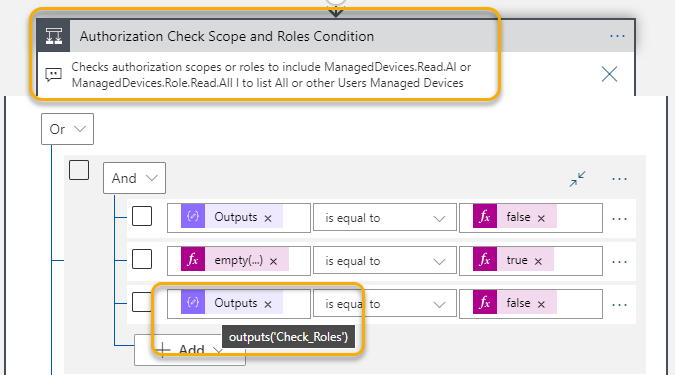
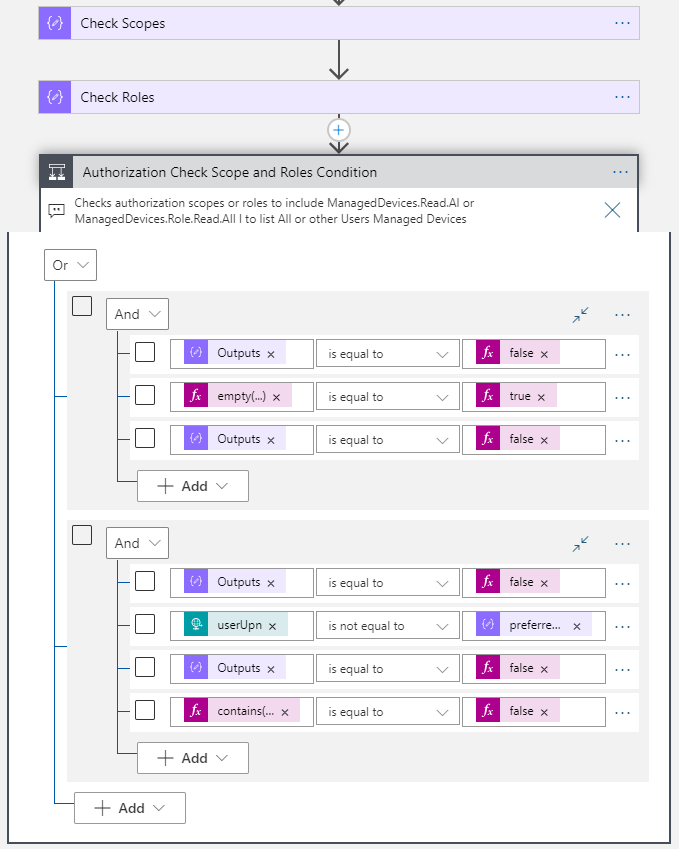
Next after this action, add a Condition action, where we will do some authorization checks. I have created two groups of checks, where one OR the other needs to be true.
Here are the details for these two groups:
Group 1 (checks if scp does not contain ManagedDevices.Read.All and calling user tries to get All managed devices):
Outputs('Check_Scopes') = false
empty(triggerBody()?['userUpn']) = true
Group 2 (checks if scp does not contain ManagedDevices.Read.All, and tries to get managed devices for another user than users’ own upn):
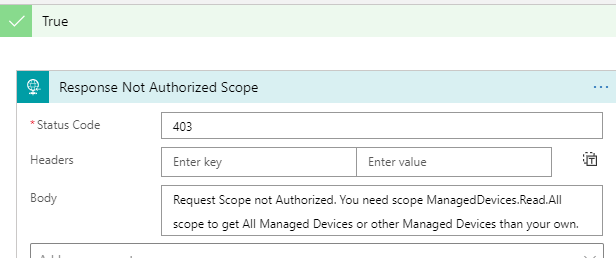
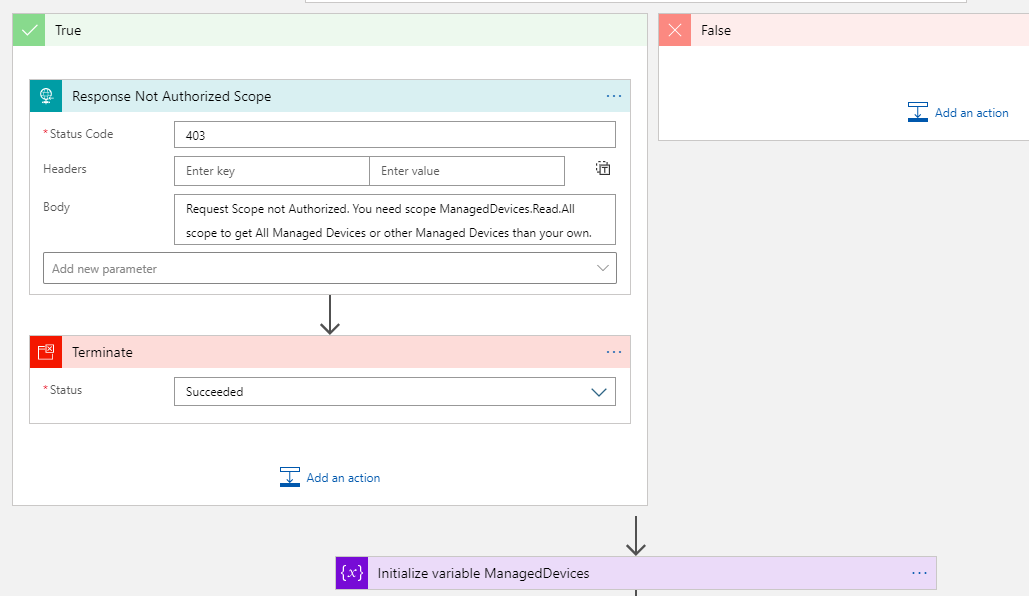
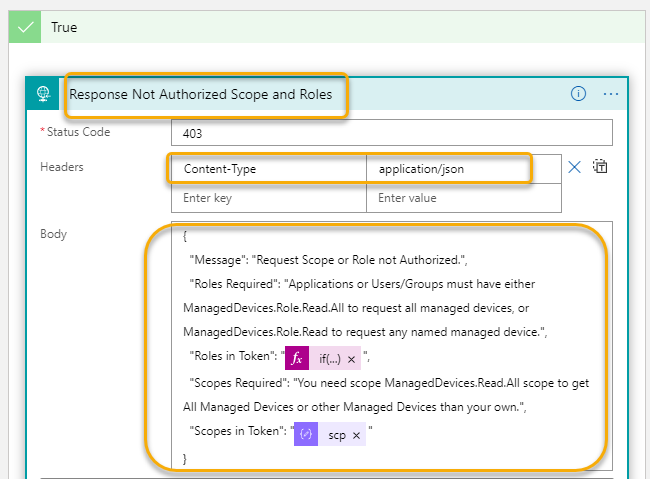
If either of those two groups is True, then we know that the calling user tries to do something the user is not authorized to do. This is something we need to give a customized response for. So inside the True condition, add a new Response action with something like the following:
I’m using a status code of 403, meaning that the request was successfully authenticated but was missing the required authorization for the resource.
Next, add a Terminate action, so that the Logic App stops with a successful status. Note also that on the False side of the condition, I leave it blank because I want it to proceed with the next steps in the Logic Apps.
Test the Authorization Scope Logic
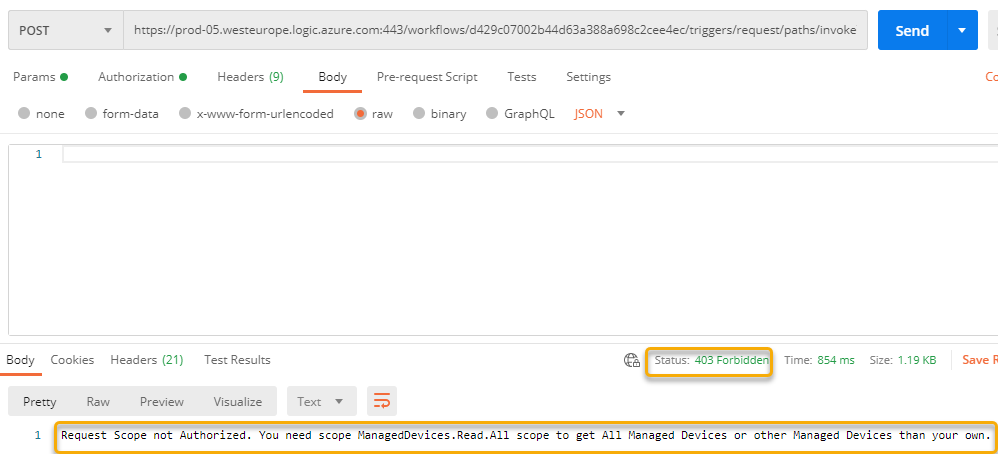
We can now test the authorization scopes logic implemented above. In Postman, either use an existing Access Token or get a new Token that only include the ManagedDevices.Read scope.
Then, send a request with an empty request body. You should get the following response:
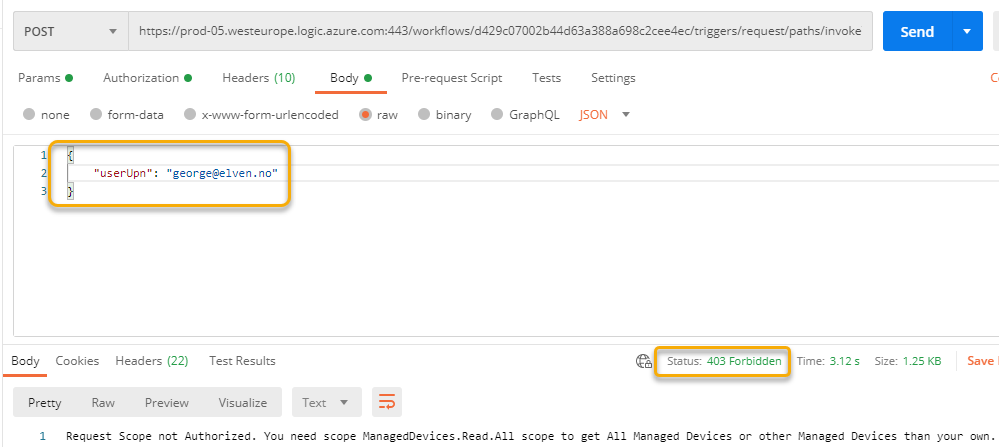
Then, try another test, this time specifying another user principal name than your own, which also should fail:
And then test with your own user principal name, which will match the ‘preferred_username’ claim in the Access Token, this should be successful and return your devices:
Perfect! It works as intended, normal end users can now only request their own managed devices.
Let’s test with an admin account and the ManagedDevices.Read.All scope. In Postman, add that scope, and get a new Access Token:
When logging in with a user that has admin privileges you will now get a Token that has the scope for getting all devices, for which your testing should return 200 OK for all or any users devices:
Adding Custom Claims to Access Token
In addition to the default claims and scopes in the Access Token, you can customize a select set of additional claims to be included in the JWT data payload. Since the Access Token is for the resource, you will need to customize this on the App Registration for the LogicApp API.
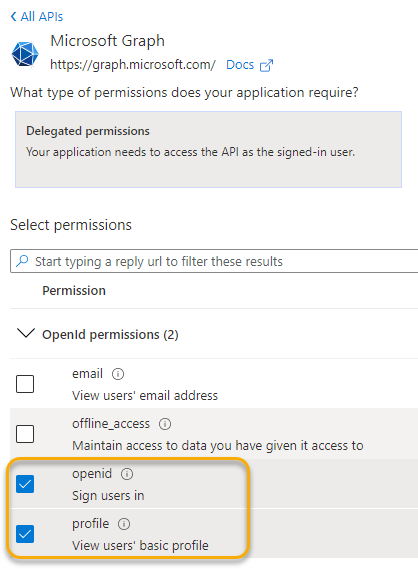
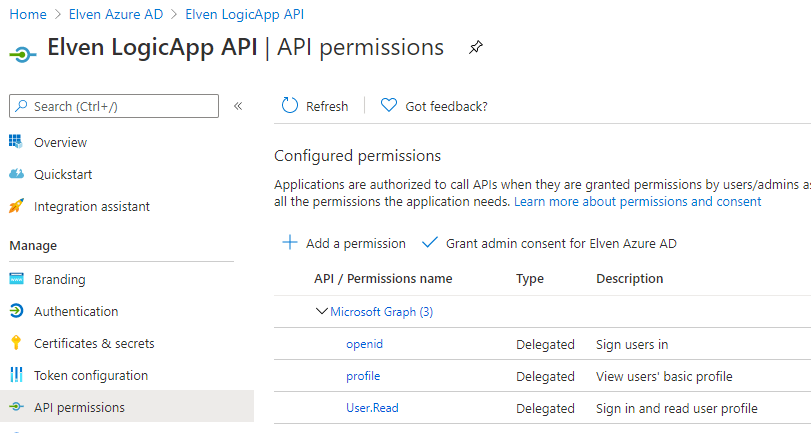
In Azure AD, select the App Registration for the API, and go to API permissions first. You need to add the OpenID scopes first. Add the following OpenID permissions:
Your API App Registration should look like this:
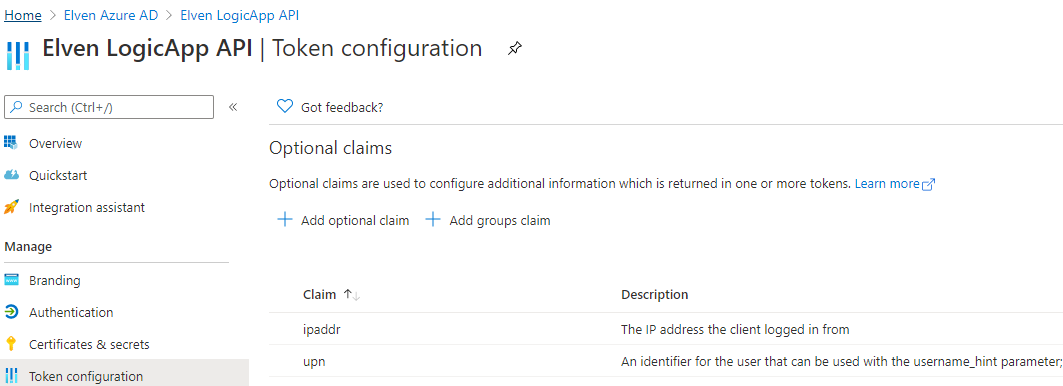
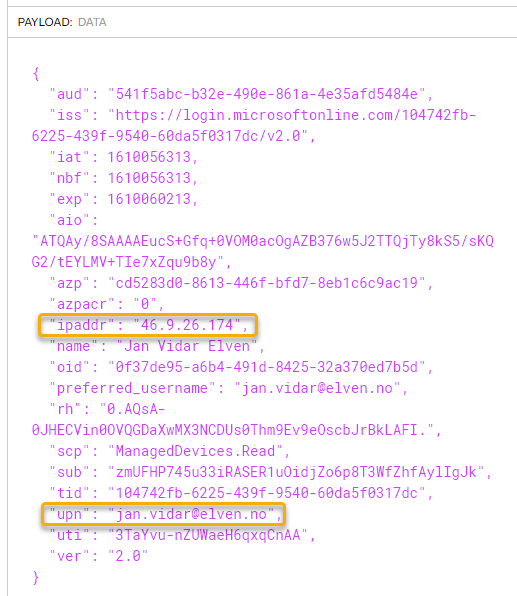
Next, go to Token configuration. Click Add optional claim, and select Access Token. For example you can add the ipaddr and upn claims as I have done below:
Note the optional claims listed for the resource API registration:
Next time I get a new access token, I can see that the claims are there:
Summary of User Authorization so far
What we have accomplished now is that users can get an Access Token for the Logic App API resource. This is the first requirement for users to be able to call the Logic App, that they indeed have a Bearer Token in the Authorization Header that includes the configured issuer and audience.
In my demos I have shown how to get an access token using Postman (Authorization Code Flow) and a Public Client using MSAL.PS. But you can use any kind of Web application, browser/SPA or, Client App, using any programming libraries that either support MSAL or OpenID Connect and OAuth2. Your solution, your choice 😉
After that I showed how you can use scopes for delegated permissions, and how you can do internal authorization logic in the Logic App depending on what scope the user has consented to/allowed to.
We will now build on this, by looking into controlling access and using application roles for principals.
Assigning Users and Restricting Access
One of the most powerful aspects of exposing your API using Microsoft Identity Platform and Azure AD is that you now can control who can access your solution, in this case call the Logic App.
Better yet, you can use Azure AD Conditional Access to apply policies for requiring MFA, devices to be compliant, require locations or that sign-ins are under a certain risk level, to name a few.
Let’s see a couple of examples of that.
Require User Assignment
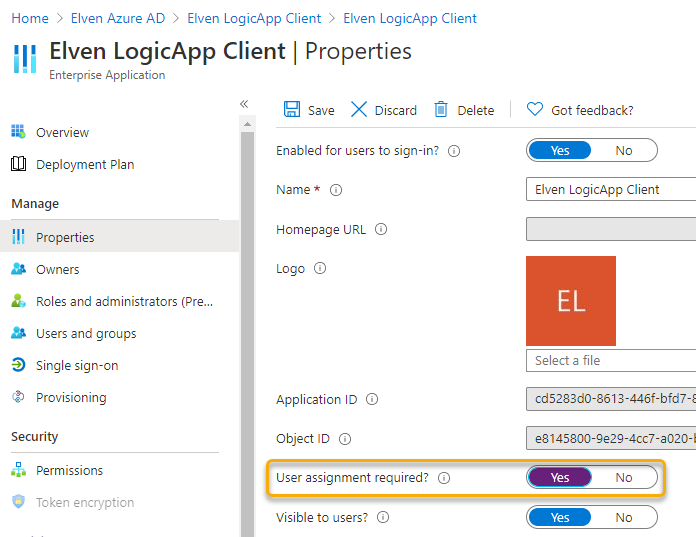
The first thing we need to do is to change the settings for the Enterprise Application. We created an App registration for the LogicApp Client, for users to able to authenticate and access the API. From that LogicApp Client, you can get to the Enterprise Application by clicking on the link for Managed application:
In the Enterprise App, go to Properties, and select User assignment required:
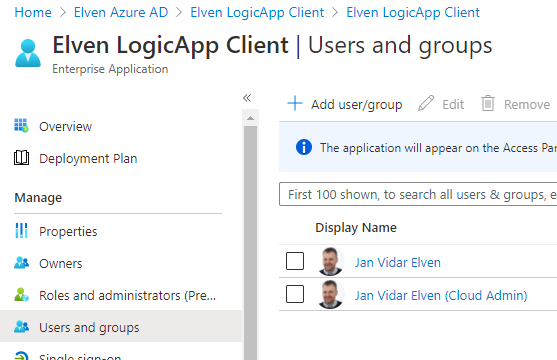
We can now control which users, or groups, that can authenticate to and get access to the Logic App API via the Client:
If I try to log in with a user that is not listed under Users and groups, I will get an error message that the “signed in user is not assigned to a role for the application”:
PS! The above error will show itself a little different based on how you authenticate, the above image is using a public client, if you use Postman, the error will be in the postman console log, if you use a web application you will get the error in the browser etc.
Configuring Conditional Access for the Logic App
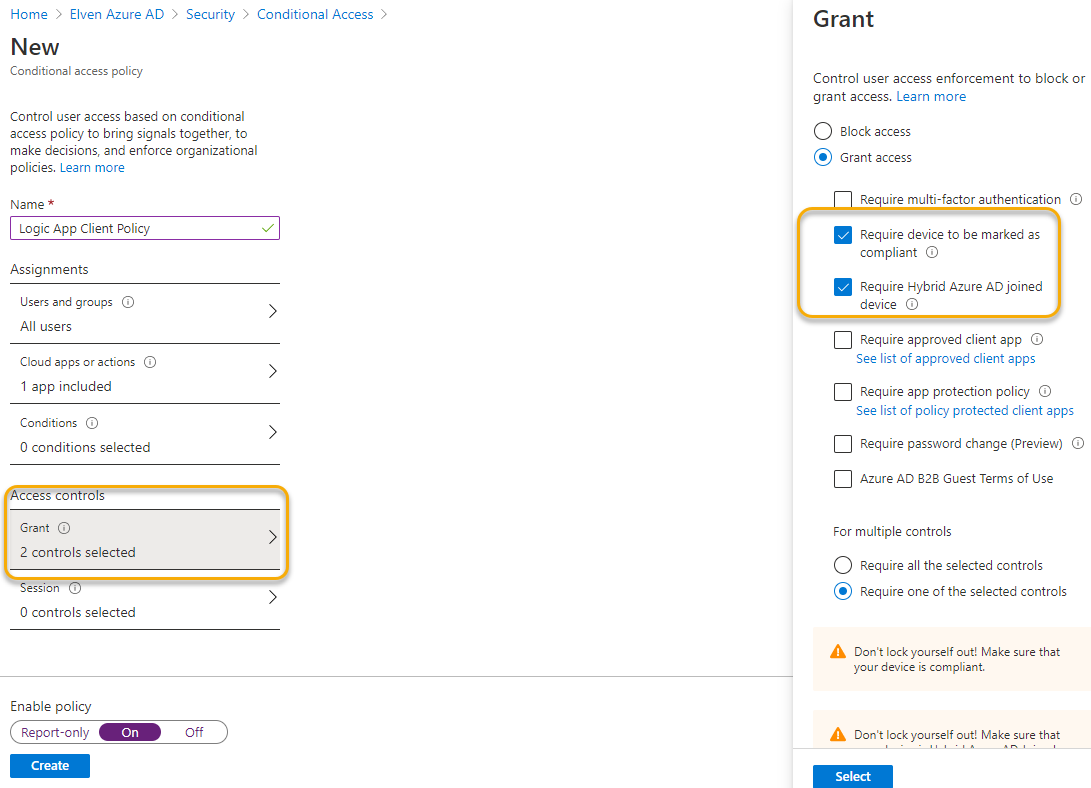
In addition to controlling which users and groups that can access the Logic App, I can configure a Conditional Access policy in Azure AD for more fine grained access and security controls.
In your Azure AD blade, go to Security and Conditional Access. If you already have a CA policy that affects all Applications and Users, for example requiring MFA, your LogicApp API would already be affected by that.
Note that as we are protecting the resource here, your Conditional Access policy must be targeted to the LogicApp API Enterprise App.
Click to create a new policy specific for the Logic App API, as shown below:
For example I can require that my Logic App API only can be called from a managed and compliant device, or a Hybrid Azure AD Joined device as shown below:
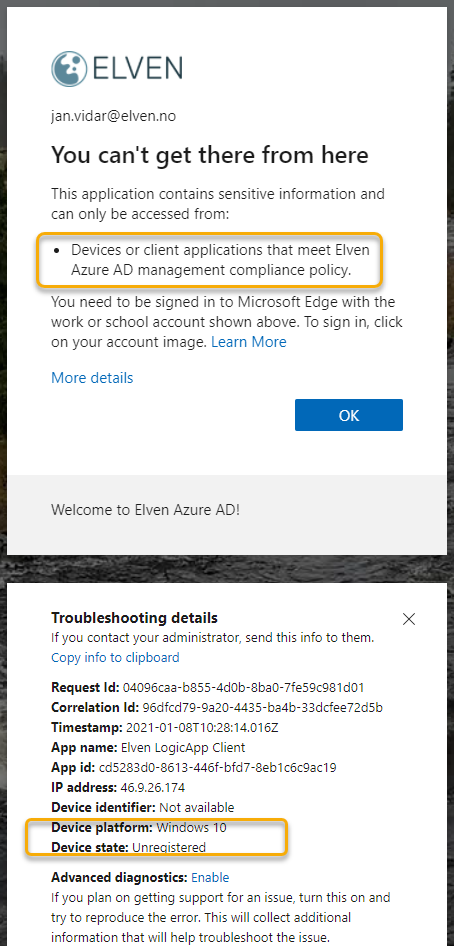
If I create that policy, and then tries to get an access token using a device that are not registered or compliant with my organization, I will get this error:
Summary of Restricting Access for Users and Groups
With the above steps we can see that by adding an Azure AD OAuth authorization policy to the Logic App, we can control which users and groups that can authenticate to and get an Access Token required for calling the Logic App, and we can use Conditional Access for applying additional fine grained access control and security policies.
So far we have tested with interactive users and delegated permission acccess scenarios, in the next section we will dive into using application access and roles for authorization scenarios.
Adding Application Access and Roles
Sometimes you will have scenarios that will let application run as itself, like a deamon or service, without requiring an interactive user present.
Comparing that to the OIDC and OAuth flow from earlier the Client will access the Resource directly, by using an Access Token aquired from Azure AD using the Client Credentials Flow:
Using the Client Credentials Flow from Postman
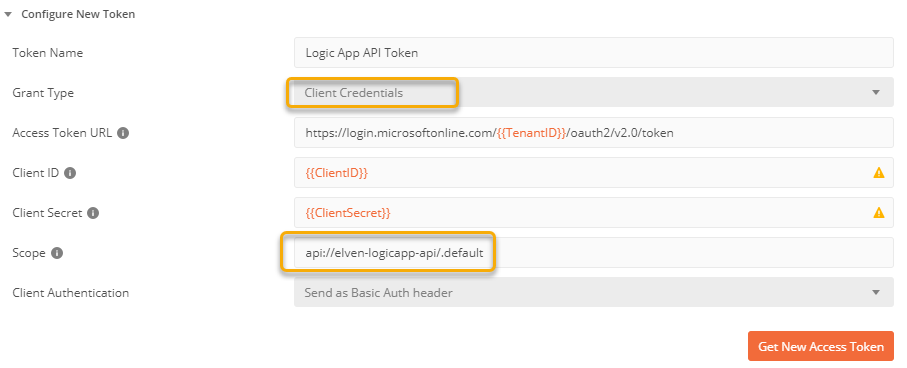
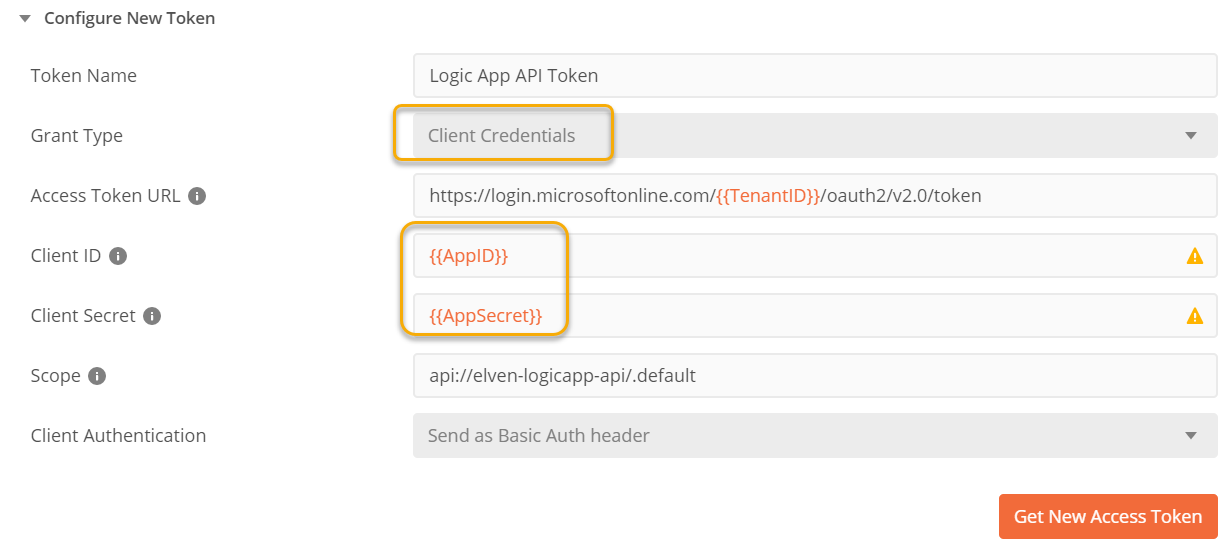
Back in the Postman client, under the Authorization tab, just change the Grant Type to Client Credentials like the following. NB! When using application access, there are no spesific delegated scopes, so you need to change the scope so that it refers to .default after the scope URI:
Click Get New Access Token, and after successfully authenticating click to Use Token. Copy the Token to the Clipboard, and paste to a JWT debugger. Let’s examine the JWT payload:
Note that the audience and issuer is the same as when we got an access token for an end user, but also that the JWT payload does not contain any scopes (scp) or any other user identifiable claims.
Using the Client Credentials Flow from MSAL.PS
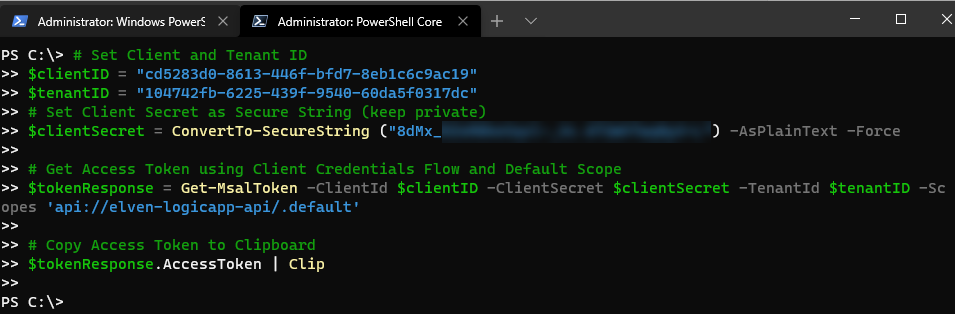
To get an Access Token for an application client in MSAL.PS, run the following commands:
# Set Client and Tenant ID
$clientID = "cd5283d0-8613-446f-bfd7-8eb1c6c9ac19"
$tenantID = "104742fb-6225-439f-9540-60da5f0317dc"
# Set Client Secret as Secure String (keep private)
$clientSecret = ConvertTo-SecureString ("<your secret in plain text") -AsPlainText -Force

# Get Access Token using Client Credentials Flow and Default Scope
$tokenResponse = Get-MsalToken -ClientId $clientID -ClientSecret $clientSecret -TenantId $tenantID -Scopes 'api://elven-logicapp-api/.default'
You can then validate this Token and copy it to a JWT debugger:
# Copy Access Token to Clipboard
$tokenResponse.AccessToken | Clip
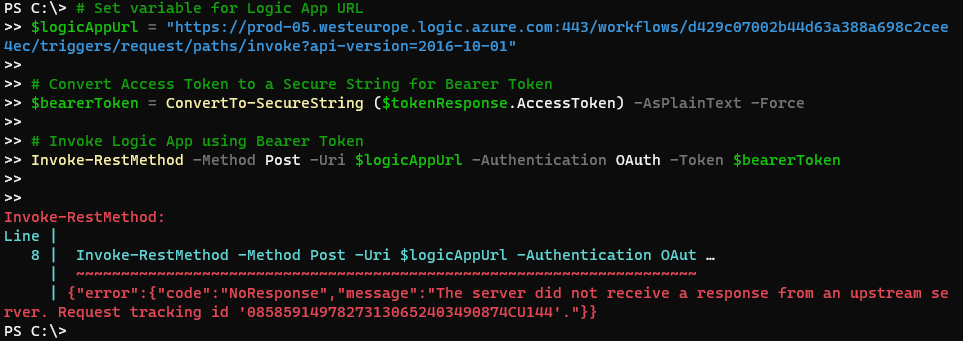
Calling the Logic App using Client Application
We can send requests to the Logic App using an Access Token in an application by including it as a Bearer Token in the Authorization Header exactly the same way we did previously, however it might fail internally if the Logic App processing of the access token fails because it now contains a different payload with claims:
Looking into the run history of the Logic App I can see that the reason it fails is that it is missing scp (scopes) in the token.
This is expected when authenticating as an application, so we will fix that a little later.
A few words on Scopes vs. Roles
In delegated users scenarios, permissions are defined as Scopes. When using application permissions, we will be using Roles. Role permissions will always be granted by an admin, and every role permission granted for the application will be included in the token, and they will be provided by the .default scope for the API.
Adding Application Roles for Applications
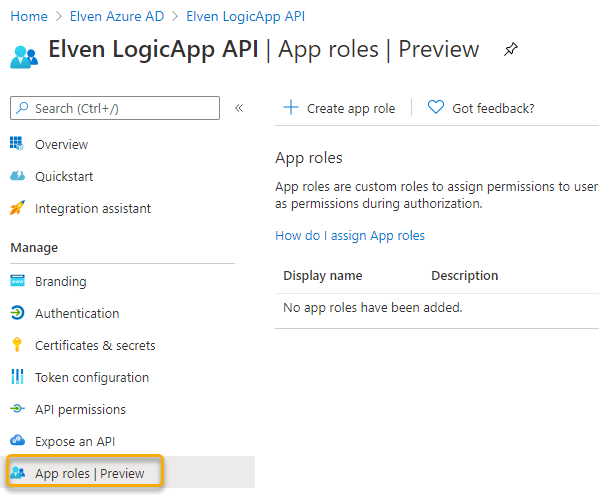
Now, let’s look into adding Roles to our LogicApp API. Locate the App registration for the API, and go to the App roles | Preview blade. (this new preview let us define roles in the GUI, where until recently you had to go to the manifest to edit).
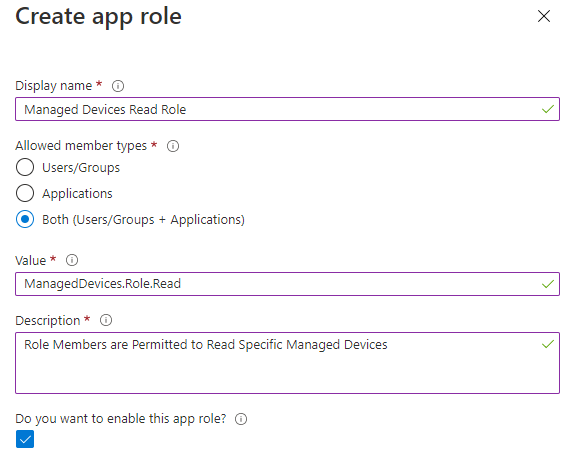
Next, click on Create app role. Give the app role a display name and value. PS! The value must be unique, so if you already have that value as a scope name, then you need to distinguish it eg. by using Role in the value as I have here:
The allowed member types give you a choice over who/what can be assigned the role. You can select either application or user/groups, or both.
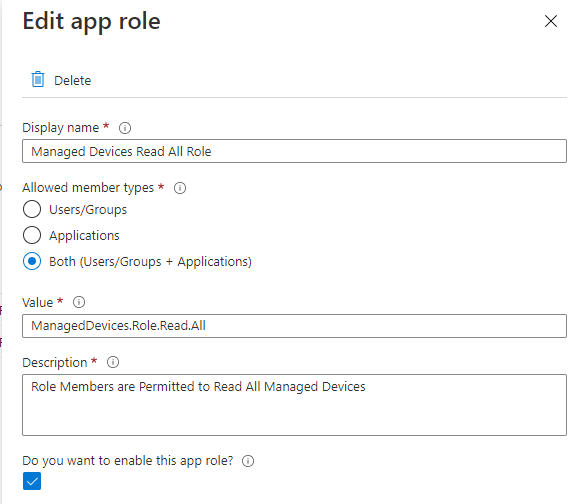
Add another App Role as shown below:
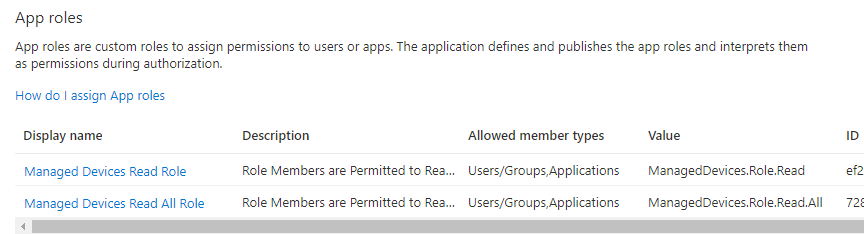
You should now have the following two roles:
Assigning Roles to Application
I recommend that you create a new App Registration for application access scenarios. This way you can avoid mixing delegated and application permissions in the same app registration, it will make it easier to differentiate user and admins consents, and secret credentials will be easier to separate, and you can use different settings for restricting access using Azure AD Users/Groups and Conditional Access.
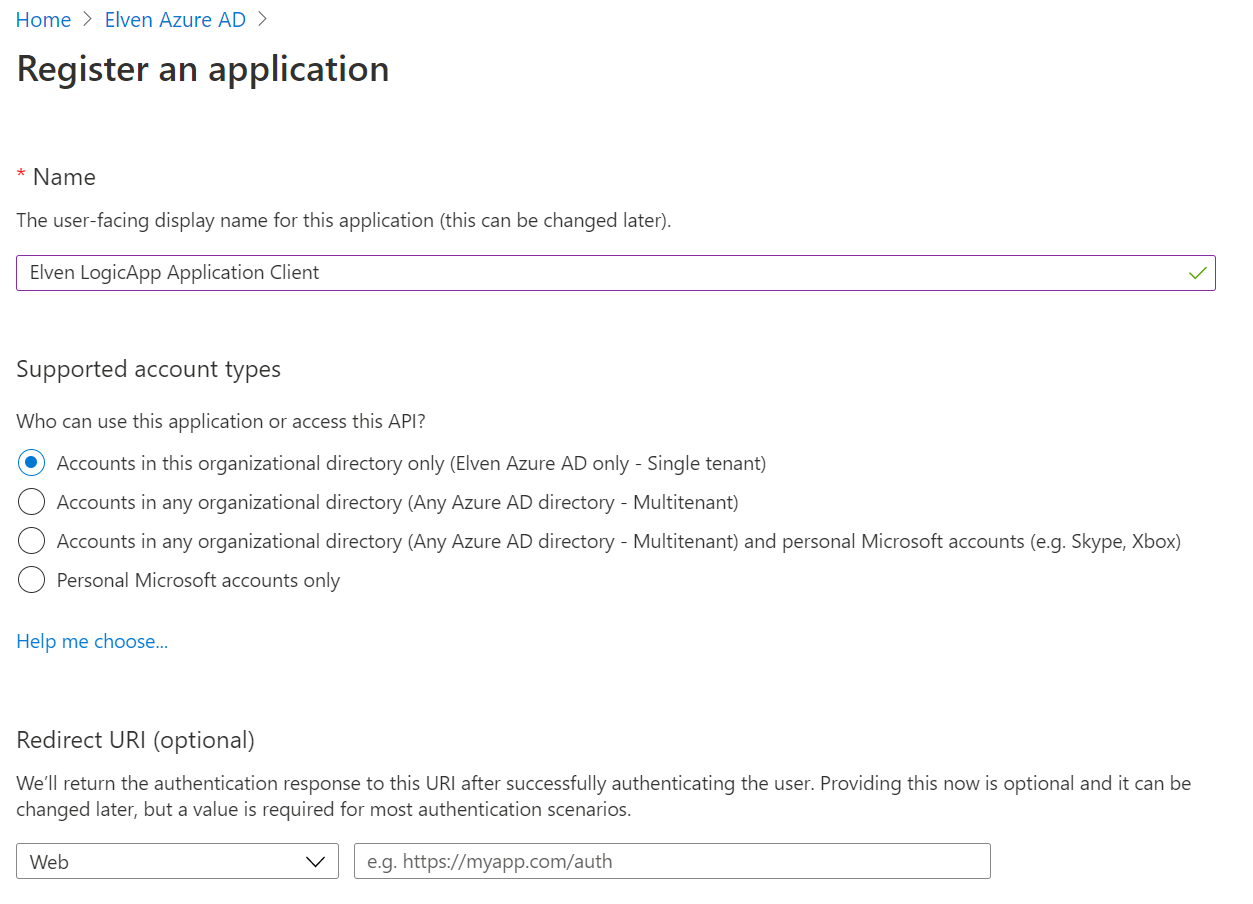
So create a new App registration, call it something like (Yourname) LogicApp Application Client:
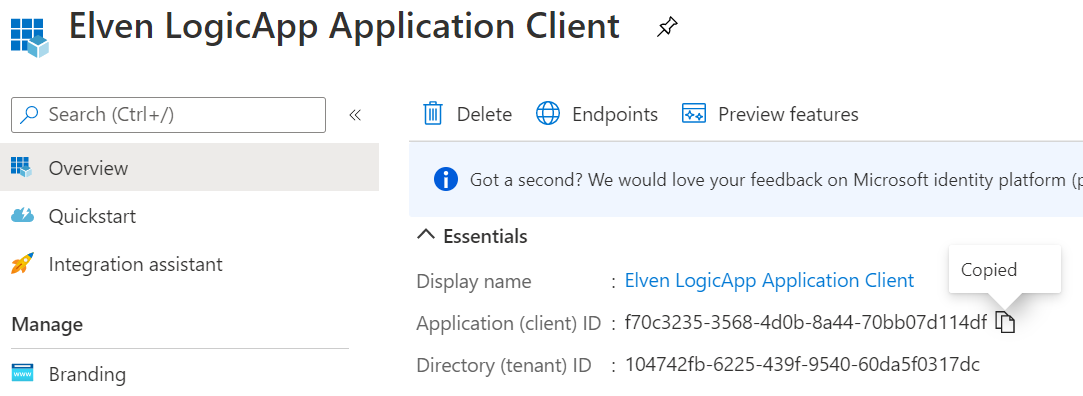
Choose single tenant and leave the other settings as default. Click Register and copy the Application (Client ID) and store it for later:
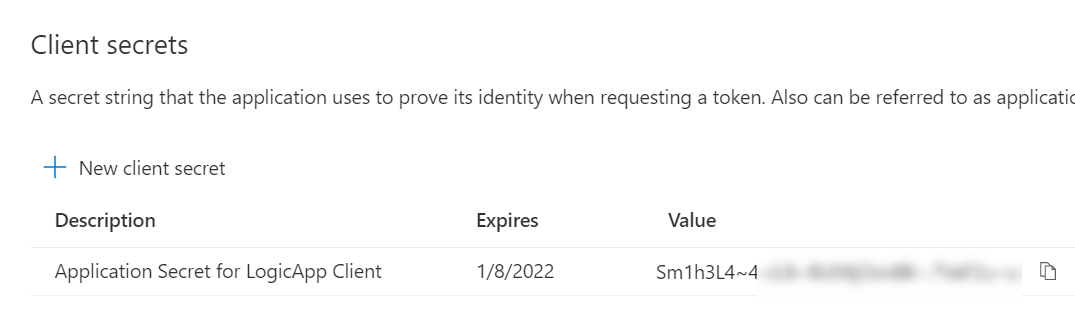
Next, go to Certificates & secrets, and create a new Client secret:
Copy the secret and store it for later.
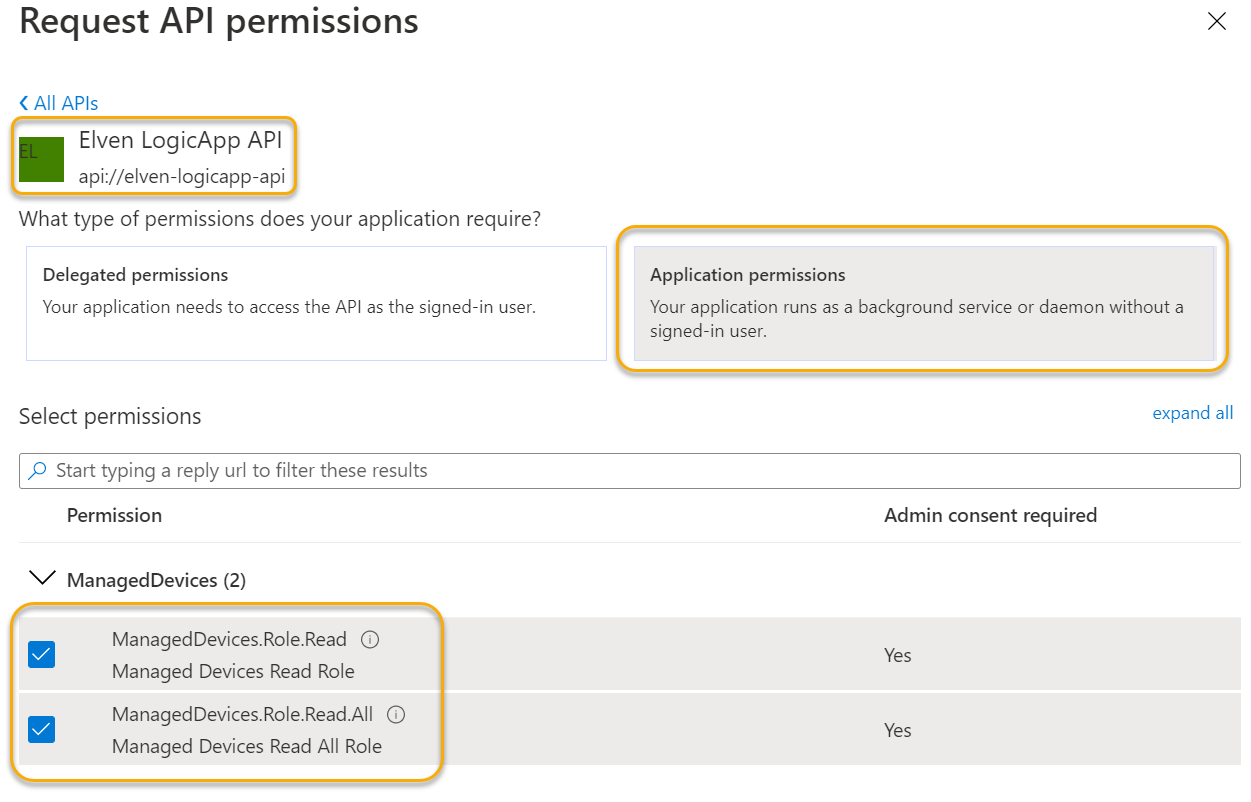
Go to API permissions, click Add a permission, and from My APIs, find the LogicApp API. Add the Application permissions as shown below, these are the App Roles we added to the API earlier:
Under API permissions you can remove the Microsoft Graph user.read permission, it won’t be needed here, the two remaining permissions should be:
These you NEED to grant admin consent for, as no interactive user will be involved in consent prompt:
The admin consent are granted as shown below:
Now we can test getting access token via this new app registration, either use Postman or MSAL.PS , remember to use the new app (client) id and app (client) secret. I chose to add the two values to my Postman environment like this:
Next, change the token settings for Client Credentials flow so that the Client ID and Secret use the new variable names. Click to Get New Access Token:
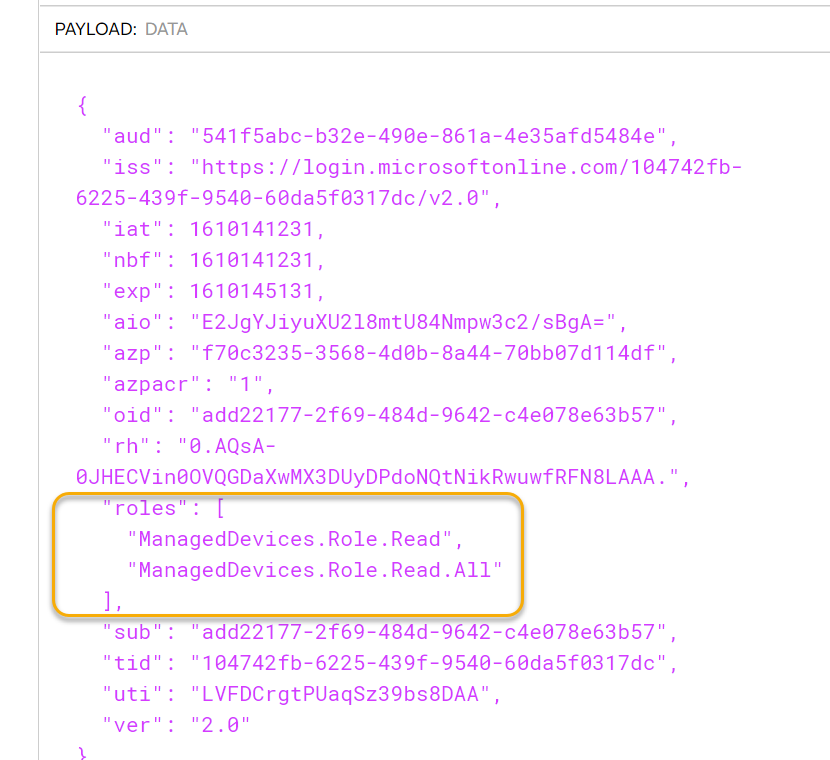
After successfully getting the access token, click Use Token and copy it to clipboard so we can analyze it in the JWT debugger. From there we can indeed see that the roles claims has been added:
We will look for these roles claims in the Logic App later. But first we will take a look at how we can add these roles to users as well.
Assigning Roles to Users/Groups
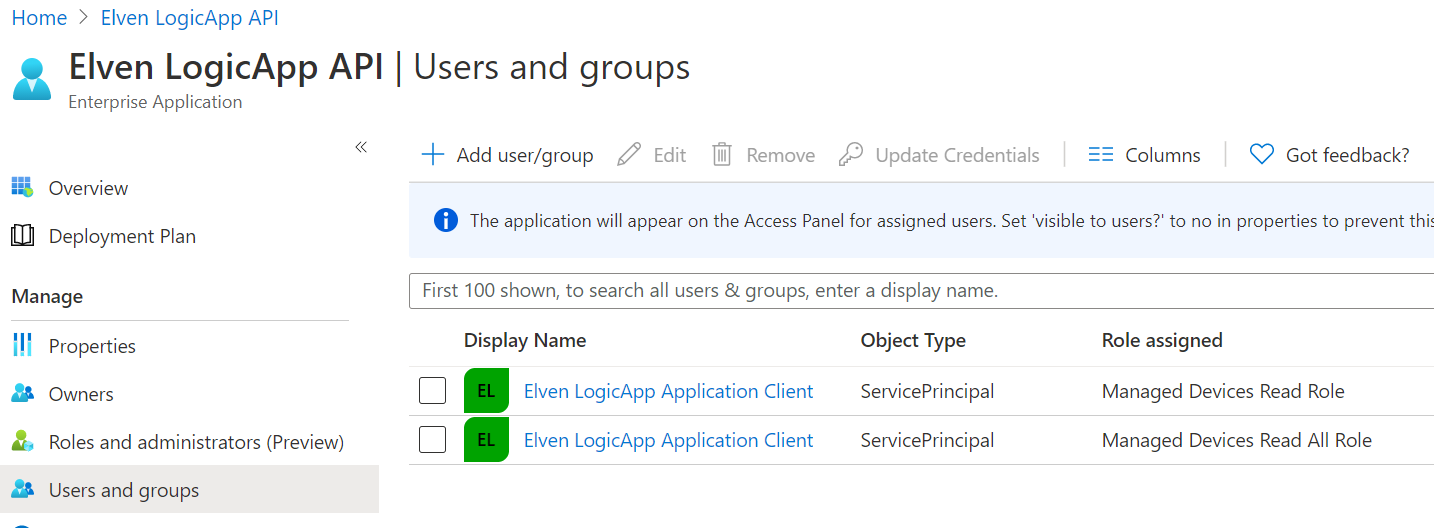
Adding roles to users or groups can be used for authorizing access based on the roles claim. Go to the Enterprise App for the Logic App API registration, you can get to the Enterprise App by clicking on the Managed application link:
In the Enterprise App, under Users and Groups, you will already see the ServicePrincipal’s for the LogicApp Application Client with the Roles assigned. This is because these role permissions were granted by admin consent:
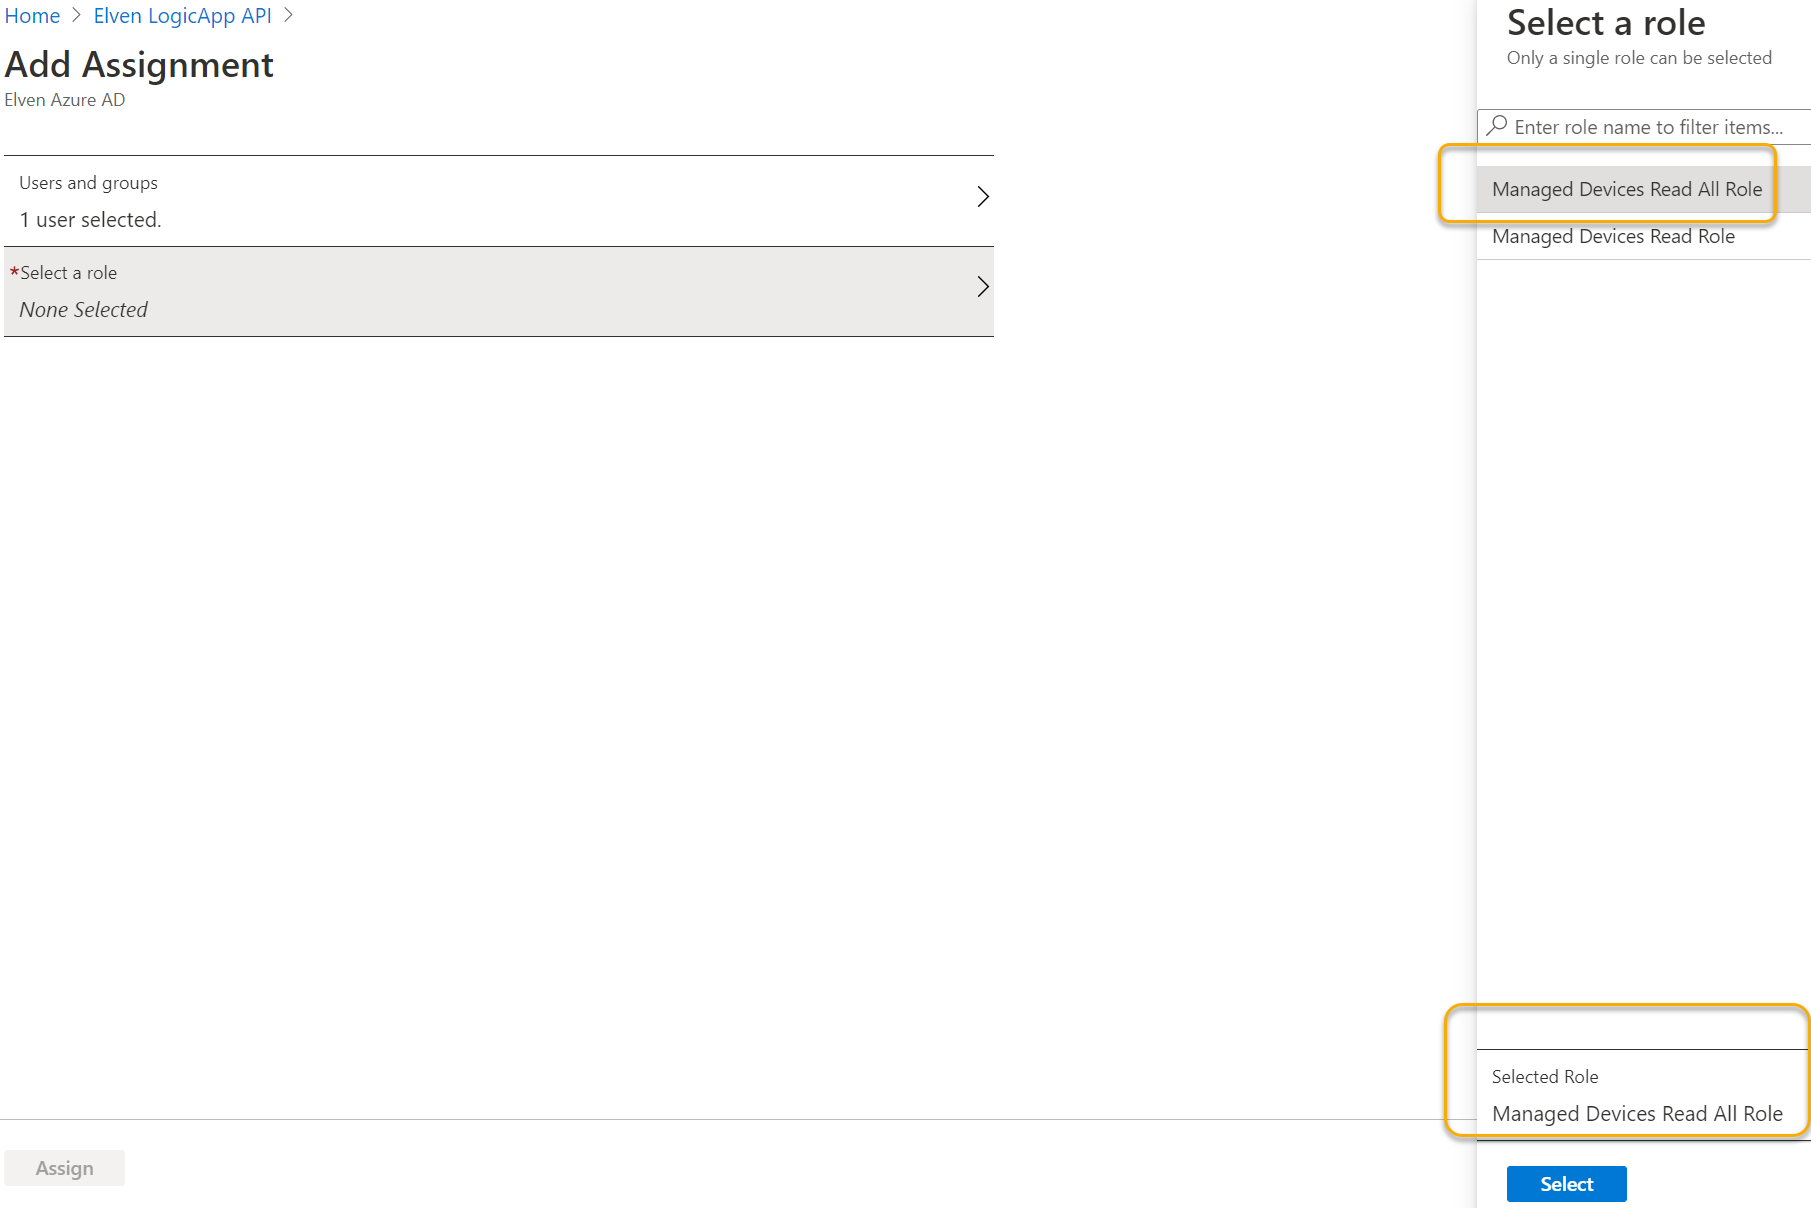
Click on Add user/group, add for a user in your organization the selected role:
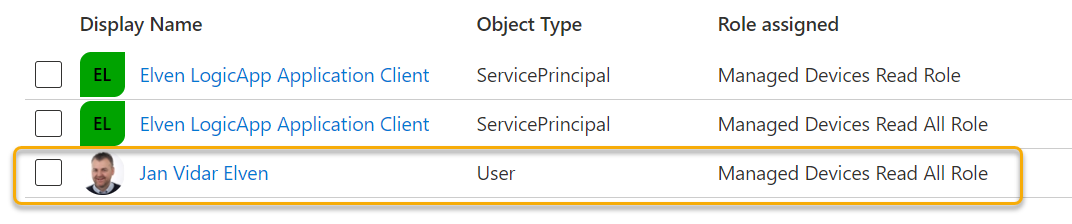
You can add more users or groups to assigned roles:
Lets do a test for this user scenario. We need to do an interactive user login again, so change to using Authorization Code Flow in Postman, and change to the originial ClientID and ClientSecret:
Click to Get New Access Token, authenticate with your user in the browser (the user you assigned a role to), and then use the token and copy it to clipboard. If we now examine that token and look at the JWT data payload, we can see that the user has now a role claim, as well as the scope claim:
We can now proceed to adjust the authorization checks in the Logic App.
Customizing Logic App to handle Roles Claims
Previously in the Logic App we did checks against the scopes (scp claim). We need to do some adjustment to this steps, as it will fail if there are no scp claim in the Token:
Change to the following expression, with a if test that returns false if no scp claim, in addition to the original check for scope to be ManagedDevices.Read.All:
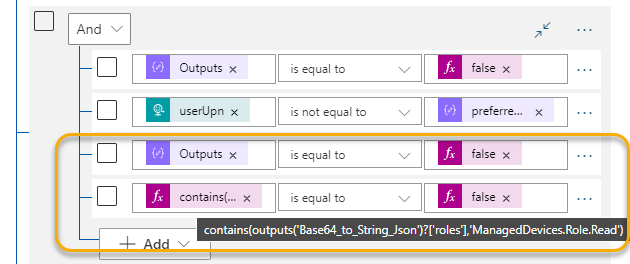
Next we need to add more checks to the authorization logic. Add a new line to the first group, where we also check the output of the Check Roles action to be false:
In the above image I’ve also updated the action name and comment to reflect new checks.
To the second group, add two more lines, where line number 3 is checking outputs from Check Roles to be false (same as above), and line 4 do a check if the roles claim contains the role ManagedDevices.Role.Read:
The complete authorization checks logic should now be:
And this is the summary of conditions:
Group 1 (checks if scp does not contain ManagedDevices.Read.All and roles does not contain ManagedDevices.Role.Read.All and calling user tries to get All managed devices):
Outputs('Check_Scopes') = false
empty(triggerBody()?['userUpn']) = true
Outputs('Check_Roles') = false
Group 2 (checks if scp does not contain ManagedDevices.Read.All and roles does not contain ManagedDevices.Role.Read.All, and tries to get managed devices for another user than users’ own upn, and roles does not contain ManagedDevices.Role.Read):
If any of the two groups of checks above returns true, then it means that the request was not authorized. To give a more customized response, change the response action like the following:
In the above action I have changed that response is returned as a JSON object, and then changed the body so that it returns JSON data. I have also listed the values from the token that the user/application use when calling the Logic App. The dynamic expression for getting roles claim (for which will be in an array if there are any roles claim) is: if(empty(outputs('Base64_to_String_Json')?['roles']),'',join(outputs('Base64_to_String_Json')?['roles'],' ')) And for getting any scopes claim, which will be a text string or null: outputs('Base64_to_String_Json')?['scp']
Test Scenario Summary
I’ll leave the testing over to you, but if you have followed along and customized the Logic App as I described above, you should now be able to verify the following test scenarios:
User/App
Scope
Roles
Result
User
ManagedDevices.Read
Can get own managed devices. Not authorized to get all devices or other users’ managed devices.
User (Admin)
ManagedDevices.Read.All
Can get any or all devices.
User
ManagedDevices,Read
ManagedDevices.Role.Read
Can get own managed devices. Can get other users’ managed devices by userUpn. Not authorized to get all devices.
User
ManagedDevices.Read
ManagedDevices.Role.Read.All
Can get any or all devices.
Application
ManagedDevices.Role.Read
Can any users’ managed devices by userUpn. Not authorized to get all devices.
Application
ManagedDevices.Role.Read.All
Can get any or all devices.
When testing the above scenarios, you need a new access token using either authorization code flow (user) or client credentials (application). For testing with roles and user scenarios, you can change the role assignments for the user at the Enterprise Application for the LogicAPI API. For testing with roles with application scenarios, make sure that you only grant admin consent for the applicable roles you want to test.
Final Steps and Summary
This has been quite the long read. The goal of this blog post was to show how your Logic App workflows can be exposed as an API, and how Azure AD OAuth Authorization Policies can control who can send requests to the Logic App as well as how you can use scopes and roles in the Access Token to make authorization decisions inside the Logic App. And even of more importance, integrating with Azure AD let’s you control user/group access, as well as adding additional security layer with Conditional Access policies!
My demo scenario was to let the Logic App call Microsoft Graph and return managed devices, which require privileged access to Graph API, and by exposing the Logic App as an API I can now let end users/principals call that Logic App as long as they are authorized to do so using my defined scopes and/or roles. I can easily see several other Microsoft Graph API (or Azure Management APIs, etc) scenarios using Logic App where I can control user access similarly.
Note also that any callers of the Logic App that now will try to call the Logic App using SAS access scheme will fail, as a Bearer Token is expected in the Authorization Header and the custom authorization actions that has been implemented. You might want to implement some better error handling if you like.
There’s an added bonus at the end of this article, where I add the filters for getting managed devices. But for now I want to thank you for reading and more article in this series will come later, including:
Calling Logic Apps protected by Azure AD from Power Platform
Protecting Logic App APIs using Azure API Management (APIM)
Bonus read
To complete the filtering of Managed Devices from Microsoft Graph, the Logic App prepared inputs of operatingSystem and osVersion in addition to userUpn. Let’s how we can implement that support as well.
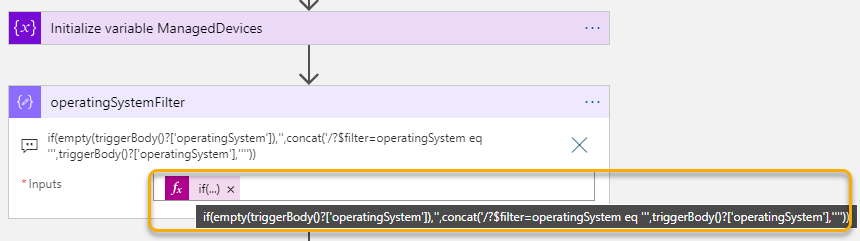
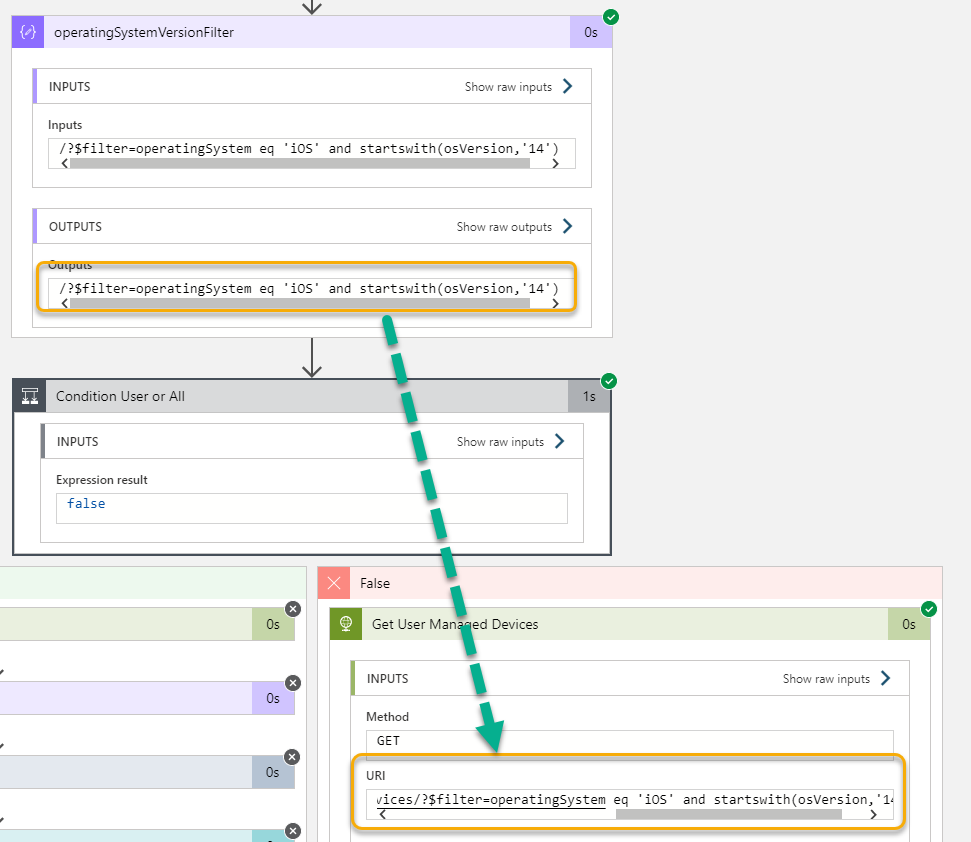
After the initialize variable ManagedDevices action, add a Compose action. In this action, which I rename to operatingSystemFilter, I add a long dynamic expression:
This expression will check if the request trigger has an operatingSystem value, it not this value will be a empty string, but if not empty the I start building a text string using concat function where I build the filter string. There are some complexities here, amongs others using escaping of single apostroph, by adding another single apostroph etc. But this expression works:
Next, add another Compose action and name it operatingSystemVersionFilter. This expression is even longer, checking the request trigger for osVersion, and if empty, it just returns the operatingSystemFilter from the previos action, but if present another string concat where I ‘and’ with the previous filter:
The expression from above image:
if(empty(triggerBody()?['osVersion']),outputs('operatingSystemFilter'),concat(outputs('operatingSystemFilter'),' and startswith(osVersion,''',triggerBody()?['osVersion'],''')'))
We can now add that output to the Graph queries, both when getting all or a specific user’s devices:
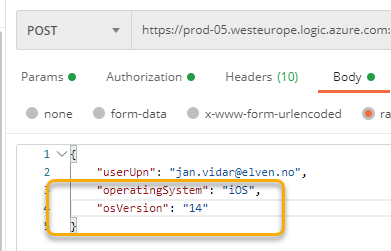
I can now add operatingSystem and osVersion to the request body when calling the Logic App:
And if I check the run history when testing the Logic App, I can see that the filter has been appended to the Graph query:
You can if you want also build more error handling logic for when if users specify the wrong user principalname, or any other filtering errors that may occur because of syntax etc.
That concludes the bonus tip, thanks again for reading 🙂
It is with great pride I can announce that I will speak at Microsoft Ignite – The Tour, in Stockholm April 24-25 2019. This conference, which already is sold out and now only available on waiting list, will be held at Stockholmsmassan, and you can read more about it here: https://www.microsoft.com/sv-se/ignite-the-tour/Stockholm.
Ignite The Tour Stockholm will have over 150 different breakout sessions, theatre sessions, modules and workshops, covering 10 learning paths. Speakers will be from Microsoft, and from the MVP and Regional Director community, which I’m so fortunate and honored to be part of 😉
You will also find me at the experts area and doing booth duty, I will be at the following demo stations at the Hub and Microsoft Showcase area, covering topics on Azure and Azure AD:
Demo Station #5 (Azure): Day 1 1600-1800: “Getting Started with Azure Log Analytics and Azure Monitor using Azure AD Activity Logs“
Demo Station #6 (Azure): Day 2 0800-1200: “Getting Started with Azure Log Analytics and Azure Monitor using Azure AD Activity Logs“
I’m really excited for presenting these sessions and being part of the Ignite The Tour Community! Hope to see you there 🙂