Tag Archives: Azure MFA

Exploring Azure MFA sign-in failures using Log Analytics

Most IT admins, pros and end users from organizations that use Office 365 and Azure AD will by now have heard about the big Azure MFA outage on Monday November 19. When something like this happens, it is important to get insights on which users that were affected, and in what type of scenarios they most experienced the problem. Microsoft MVP Tony Redmond wrote a useful blog post (https://office365itpros.com/2018/11/21/reporting-mfa-enabled-accounts/) on how to report on possible/potentially affected and MFA enabled users, and how to disable and re-enable those users. But many organizations are now using Conditional Access policies using Azure AD Premium, so this will be of limited help for those.

If I could wish one thing from Microsoft for Christmas this year, it would be to be able to manage MFA and Conditional Access policies with Azure AD PowerShell and Microsoft Graph! Admins could then run “break-the-glass” administrative users (or even “break-the-glass service principals”) to disable/re-enable policies when big MFA outages happens. A good CA policy design, trusting compliant devices and secure locations could also go a long way in mitigating such big outage problems.

Tony’s blog post made me think about the feature I recently activated, on integrating Azure AD Activity Logs to Azure Log Analytics, you can read more about this here: https://gotoguy.blog/2018/11/06/get-started-with-integration-of-azure-ad-activity-logs-to-azure-log-analytics/

By exploring the Sign-in logs in Log Analytics I could get some more insights into how my organization was affected by the MFA outage on November 19. Please see the above blog post on how to get started setting up this integration, the rest of this blog post will show some sample queries for the SigninLogs.

Querying the SigninLogs for failed and interrupted sign-ins

All the queries seen below are shown in screenshot images, but I have listed all them for you to copy at the end of the blog post.

First I can take a look at the SigninLogs for the specific day of 19th November, and the grouping on the result type and description of the sign-in events. For example I can see that there is a high number of event 50074: User did not pass the MFA challenge. Interestingly there is also a relatively high number of invalid username or password, that could be a separate issue but could also be that users that fails MFA sign-ins tries to log in again thinking they had wrong password first time.

image

Changing that query a little, I can exclude the successful sign-ins (ResultType 0), and sort on the most count of failures. Two of the events of most interest here is 50074 and 50076:

image

In this next query I focus on the “50074: User did not pass the MFA challenge” error. By increasing the time range to last 31 days, and adding a bin(TimeGenerated, 1d) to the summarize group, I’ll be able to see the count of this error on each day in the last month. This will give me a baseline, and we can see that on the 19th this number spikes. I have added a render to timechart for graphical display. There are also some other days where this number increases, I can look into more insights for that if I want as well, but for now I will focus on the 19th.

image

Back to the time range of the 19th of November, I can modify the summarize to group by each hour, by using bin(TimeGenerated, 1h). This will show me how the problems evolved during the day. Must errors occurred about 10 am in the morning:

image

Lets look at some queries for how this error affected my environment. First I can group on the Users and how many errors they experience. Some users were really persistent in trying to get through the MFA error. I have masked the real names. We also see some admin accounts but admins quickly recognized that something was wrong, and actively sought information on the outage. By midday most users were notified on the on-going outage and the number of errors slowly decrease during the day.

image

In this next query, I group on the Apps the users tried to reach:

image

And in this following query, what kind of Client App they used. It would be normal that Browser is quite high, as mobile apps and desktop clients are more likely to have valid refresh tokens.

image

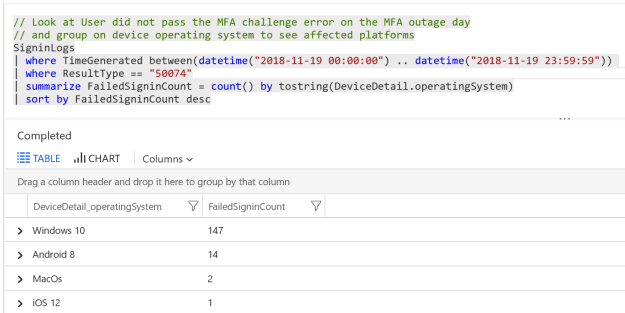
In this query I can look into the device operating system the users tried to sign in from:

2018-11-21_22-05-27

In the following query I can look at which network the users tried to log in from, by identifying IP address:

image

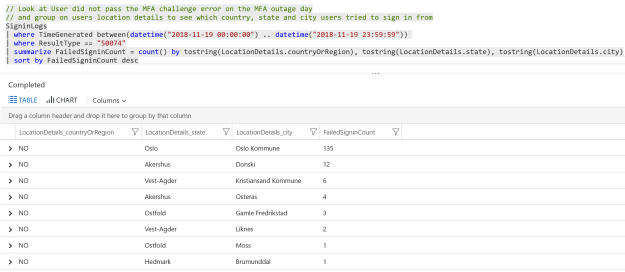
And in this query we can get more location details from where users tried to sign in:

2018-11-21_22-07-17

Summary

Querying Log Analytics for Sign-in events as shown above can provide valuable insights into how such an outage can affect users. This can also give me some input on how to design Conditional Access policies. Querying this data over time can also provide a baseline for normal operations in your environment, and make it easier to set alert thresholds if you want to get alerts when number of failures inside a time interval gets higher than usual. Using Azure Monitor and action groups you can be pro-active and be notified if something similar should occur again.

Here are all the queries shown above:

// Look at SigninLogs for a custom date time interval and group by sign in results
SigninLogs
| where TimeGenerated between(datetime("2018-11-19 00:00:00") .. datetime("2018-11-19 23:59:59")) 
| summarize count() by ResultType, ResultDescription

// Exclude successful signins and format results with sorting
SigninLogs
| where TimeGenerated between(datetime("2018-11-19 00:00:00") .. datetime("2018-11-19 23:59:59")) 
| where ResultType != "0" 
| summarize FailedSigninCount = count() by ResultDescription, ResultType 
| sort by FailedSigninCount desc

// Look at User did not pass the MFA challenge error last month to see trend
// and present to line chart group by each 1 day
SigninLogs
| where TimeGenerated >= ago(31d)
| where ResultType == "50074"
| summarize FailedSigninCount = count() by ResultDescription, bin(TimeGenerated, 1d)
| render timechart

// Look at User did not pass the MFA challenge error on the MFA outage day
// and present to line chart group by each 1 hour to see impact during day
SigninLogs
| where TimeGenerated between(datetime("2018-11-19 00:00:00") .. datetime("2018-11-19 23:59:59")) 
| where ResultType == "50074" 
| summarize FailedSigninCount = count() by ResultDescription, bin(TimeGenerated, 1h)
| render timechart

// Look at User did not pass the MFA challenge error on the MFA outage day
// and group on users to see affected users
SigninLogs
| where TimeGenerated between(datetime("2018-11-19 00:00:00") .. datetime("2018-11-19 23:59:59")) 
| where ResultType == "50074"
| summarize FailedSigninCount = count() by UserDisplayName
| sort by FailedSigninCount desc

// Look at User did not pass the MFA challenge error on the MFA outage day
// and group on Apps to see affected applications the users tried to sign in to
SigninLogs
| where TimeGenerated  between(datetime("2018-11-19 00:00:00") .. datetime("2018-11-19 23:59:59")) 
| where ResultType == "50074"
| summarize FailedSigninCount = count() by AppDisplayName
| sort by FailedSigninCount desc

// Look at User did not pass the MFA challenge error on the MFA outage day
// and group on client apps to see affected apps the users tried to sign in from
SigninLogs
| where TimeGenerated between(datetime("2018-11-19 00:00:00") .. datetime("2018-11-19 23:59:59")) 
| where ResultType == "50074"
| summarize FailedSigninCount = count() by ClientAppUsed
| sort by FailedSigninCount desc

// Look at User did not pass the MFA challenge error on the MFA outage day
// and group on device operating system to see affected platforms
SigninLogs
| where TimeGenerated between(datetime("2018-11-19 00:00:00") .. datetime("2018-11-19 23:59:59")) 
| where ResultType == "50074"
| summarize FailedSigninCount = count() by tostring(DeviceDetail.operatingSystem)
| sort by FailedSigninCount desc

// Look at User did not pass the MFA challenge error on the MFA outage day
// and group on IP address to see from which network users tried to sign in from
SigninLogs
| where TimeGenerated between(datetime("2018-11-19 00:00:00") .. datetime("2018-11-19 23:59:59")) 
| where ResultType == "50074"
| summarize FailedSigninCount = count() by IPAddress
| sort by FailedSigninCount desc

// Look at User did not pass the MFA challenge error on the MFA outage day
// and group on users location details to see which country, state and city users tried to sign in from
SigninLogs
| where TimeGenerated between(datetime("2018-11-19 00:00:00") .. datetime("2018-11-19 23:59:59")) 
| where ResultType == "50074"
| summarize FailedSigninCount = count() by tostring(LocationDetails.countryOrRegion), tostring(LocationDetails.state), tostring(LocationDetails.city)
| sort by FailedSigninCount desc

Azure MFA Report Dashboard in Azure Portal–The Good, The Bad and The Ugly

If you are working with EMS and implementing Azure AD, Intune, MDM, MAM, Information Protection and more, you can build yourself some great dashboards in the Azure Portal using tiles and pin blades to your customized dashboard. This is an example from my own workplace:

image

Often when I work with projects implementing Identity & Access, Conditional Access and Azure MFA, I wish I could have a dashboard to report on MFA registration, and be able to pin that to my EMS dashboard as shown above.

It might be in the future that Azure MFA registrations and methods will be native in the portal, but for now this information have to be retreived in another way. In this blog post I will show you how you can set up a solution for showing this information. I will use the Markdown Tile from the gallery for displaying this information, and in the end it will look like this:

I referred in the title of this blog post to the good, the bad and the ugly, and by that I mean the process of setting this up, because it starts easy enough in the beginning but it will get more “ugly” in the end 😉

The Good – Setting up the Markdown Tile

I will use the Markdown Tile for the content in my customized dashboard in my Azure Portal. The first part is easy to set up, just click Edit and find the Markdown tile from the gallery, as shown below:

image

Drag the tile to a place you want it on your dashboard, and the Edit the title, subtitle and content as prompted:

image

There is a sample content provided, other than that you can write your own markdown. I will not get into details on markdown format here, there is a lot of good guides for learning the format, for example this: https://guides.github.com/features/mastering-markdown/. I will however provide you with a sample for reporting MFA registrations and default methods. This is how I set up my markdown tile:

image

And here is a link to my github repository where you can get the complete MFAReport.md file sample:

https://github.com/skillriver/AzureMFADashboard/blob/master/MFAReport.md

Now we need to fill that markdown tile with some real Azure AD MFA report data to report on.

The Bad – PowerShell Script for getting MFA registration and methods to Markdown

So the “bad” news is that we are reliant on running some Azure AD PowerShell commands for getting user details for MFA registration and methods. For now we are also reliant on the Azure AD v1 PowerShell (MSOnline) Module, as the new v2 AzureAD Module does not yet have any methods to get MFA authentication data. We cannot use the Microsoft Graph API either to get MFA user data, but I expect that to change in the future.

So lets look at the script I use, and after authenticating and connecting to Azure AD in my tenant with Connect-MSOLService, I will run the following commands to get details from each user where there has been configured one or more StrongAuthenticationMethods, and Group on those methods and save the results to a hash table. The results are stored in the $authMethodsRegistered object variable. Similarly I run the command once more, filtering on only showing the methods that are set to default for each user, and save to the $authMethodsDefault variable.

# Connect to MSOnline PowerShell (Azure AD v1)
Connect-MsolService

# Get MFA Methods Registered as Hash Table
$authMethodsRegistered = Get-MsolUser -All | Where-Object {$_.StrongAuthenticationMethods -ne $null} | Select-Object -Property UserPrincipalName -ExpandProperty StrongAuthenticationMethods `
| Group-Object MethodType -AsHashTable -AsString

# Get Default MFA Methods as Hash Table
$authMethodsDefault = Get-MsolUser -All | Where-Object {$_.StrongAuthenticationMethods -ne $null} | Select-Object -Property UserPrincipalName -ExpandProperty StrongAuthenticationMethods `
| Where-Object {$_.IsDefault -eq $true} | Group-Object MethodType -AsHashTable -AsString

# Create a Custom Object for MFA Data
$authMethodsData = New-Object PSObject
$authMethodsData | Add-Member -MemberType NoteProperty -Name AuthPhoneRegistered -Value $authMethodsRegistered.TwoWayVoiceMobile.Count
$authMethodsData | Add-Member -MemberType NoteProperty -Name AuthPhoneAppRegistered -Value $authMethodsRegistered.PhoneAppOTP.Count
$authMethodsData | Add-Member -MemberType NoteProperty -Name OfficePhoneRegistered -Value $authMethodsRegistered.TwoWayVoiceOffice.Count
$authMethodsData | Add-Member -MemberType NoteProperty -Name AlternatePhoneRegistered -Value $authMethodsRegistered.TwoWayVoiceAlternateMobile.Count
$authMethodsData | Add-Member -MemberType NoteProperty -Name OneWaySMSDefault –Value $authMethodsDefault.OneWaySMS.Count
$authMethodsData | Add-Member -MemberType NoteProperty -Name PhoneAppNotificationDefault –Value $authMethodsDefault.PhoneAppNotification.Count
$authMethodsData | Add-Member -MemberType NoteProperty -Name PhoneAppOTPDefault –Value $authMethodsDefault.PhoneAppOTP.Count
$authMethodsData | Add-Member -MemberType NoteProperty -Name TwoWayVoiceMobileDefault –Value $authMethodsDefault.TwoWayVoiceMobile.Count
$authMethodsData | Add-Member -MemberType NoteProperty -Name TwoWayVoiceOfficeDefault –Value $authMethodsDefault.TwoWayVoiceOffice.Count

# Write to Markdown file
"## MFA Authentication Methods`n" | Set-Content .\MFAReport.md -Force -Encoding UTF8
"### Registered`n" | Add-Content .\MFAReport.md -Encoding UTF8
"The following methods has been registered by users:`n" | Add-Content .\MFAReport.md -Encoding UTF8
"| Method | Count |" | Add-Content .\MFAReport.md -Encoding UTF8
"|:-----------|:-----------|" | Add-Content .\MFAReport.md -Encoding UTF8
"| Authentication Phone | " + [string]$authMethodsData.AuthPhoneRegistered + " |" | Add-Content .\MFAReport.md -Encoding UTF8
"| Phone App | " + [string]$authMethodsData.AuthPhoneAppRegistered + " |" | Add-Content .\MFAReport.md -Encoding UTF8
"| Alternate Phone | " + [string]$authMethodsData.AlternatePhoneRegistered + " |" | Add-Content .\MFAReport.md -Encoding UTF8
"| Office Phone | " + [string]$authMethodsData.OfficePhoneRegistered + " |" | Add-Content .\MFAReport.md -Encoding UTF8
"" | Add-Content .\MFAReport.md -Encoding UTF8
"### Default Method" | Add-Content .\MFAReport.md -Encoding UTF8
"The following methods has been configured as default by users:" | Add-Content .\MFAReport.md -Encoding UTF8
"" | Add-Content .\MFAReport.md -Encoding UTF8
"| Method | Count |" | Add-Content .\MFAReport.md -Encoding UTF8
"|:-----------|:-----------|" | Add-Content .\MFAReport.md -Encoding UTF8
"| OneWay SMS | " + [string]$authMethodsData.OneWaySMSDefault + " |" | Add-Content .\MFAReport.md -Encoding UTF8
"| Phone App Notification | " + [string]$authMethodsData.PhoneAppNotificationDefault + " |" | Add-Content .\MFAReport.md -Encoding UTF8
"| Phone App OTP | " + [string]$authMethodsData.PhoneAppOTPDefault + " |" | Add-Content .\MFAReport.md -Encoding UTF8
"| TwoWay Voice Mobile | " + [string]$authMethodsData.TwoWayVoiceMobileDefault + " |" | Add-Content .\MFAReport.md -Encoding UTF8
"| TwoWay Voice Office Phone | " + [string]$authMethodsData.TwoWayVoiceOfficeDefault + " |`n" | Add-Content .\MFAReport.md -Encoding UTF8
"Last reported " + [string](Get-Date) | Add-Content .\MFAReport.md -Encoding UTF8

"" | Add-Content .\MFAReport.md

The complete PowerShell script can be found at my GitHub repository here:

https://github.com/skillriver/AzureMFADashboard/blob/master/MFAStrongAuthenticationUserReport.ps1

So now we have a script where we can get MFA authentication details for each user and create a markdown file that we can use in the tile in the Azure Portal custom dashboard. But it is all a manual process now, and it works fine for an ad hoc update. If we want to automate however, we have to get into the “ugly” stuff 😉

The Ugly – Automating Markdown creation and update Dashboard

This part requires multiple steps. First we need to schedule and run the PowerShell commands from above. Then we need to find a way to update the customized dashboard tile with the updated markdown file. To summary, this is what we need now:

  • Schedule the PowerShell script to run automatically. We can use Azure Automation for that.
  • Programmatically change the markdown tile in the customized dashboard. We can use Azure Resource Manager Rest API for that.

Lets get into the Azure Automation solution first. To run a PowerShell script I will need to create a Runbook, and in that Runbook I need to authenticate to Azure AD. I can define a Credential Asset with a username and password for a global admin user, but I like to use the least privilege possible, and besides that all my global admins are either protected by Azure AD PIM and/or MFA, so that won’t work. I prefer to use a service principal whereever possible, but after testing extensively with Connect-MSOLService that is not supported either.

So I tested with a dedicated Azure AD credential account, first by only adding the user to the Directory Readers role. I was able to list all users with Get-MSOLUser, but not any StrongAuthentication info. Neither did it work with Security Readers. In the end I added the user account to User Administrator role in Azure AD, and I was successful getting StrongAuthentication methods.

So, in my automation accont I will add or reuse my credentials:

image

Next, I will create a new PowerShell script based Runbook, basically I will use the PowerShell script from earlier in the blog, but with a couple of added parameter and getting the credential using the Get-PSAutomationCredential method. This is how it looks, you will get link to the complete script later:

image

And after testing, I can see that I successfully will get the MFAReport.md content (added a Get-Content .\MFAReport.md at the end to display the output):

image

Now that we have a solution for running the PowerShell script and generating the markdown file, the next part is how to update that data in the custom dashboard. And for that we need to look into programatically changing Azure Portal dashboards. There is a good resource and starting point for that in this article: https://docs.microsoft.com/en-us/azure/azure-portal/azure-portal-dashboards-create-programmatically.

First you need to share the custom dashboard, remember to include the markdown tile we set up in the first part of this blog post. At the top in the portal dashboard, select the Share button:

image

By sharing the dashboard will published as an Azure resource. Specify a name, select the subscription and either use the default dashboard resource group or select an existing one:

image

Go to Resource Explorer in the Portal:

image

Navigate to Subscriptions, Resource Groups, and find the resource group and resource containing the custom dashboard. From there you will be able to see the JSON definition of the dashboard and specifically the markdown tile containing the content we want to update:

image

So for next process now we need to copy this complete JSON definition containing all your tiles including the markdown tile. Locally on your computer, create a .json file in your favorite JSON editor, I use Visual Studio Code for this, and paste in the content. I have named my file DeploymentTemplateMFAReport.json.

Now we need to change this template to be ready for deployment, and for that we need to add or change a couple of things. First, in the start of the JSON file, add schema and versioning, and parameters, variables and resources section like I have shown below in line 1-17:

image

I have chosen to use 3 parameters, the markdown content itself, and name of the dashboard and the title of the dashboard.

Next, find the tile for the markdown content, and change the content value to the value of the parameter, like I have done at line 113 here:

image

And last, at the end of the json template, add and change the following settings, I have used my parameters for the dashboard name and the dashboard title here in the lines 401-411:

image

My deployment template for the customized dashboard is now completely general and can be used in every environment. In fact you are welcome to borrow and use my template from above her, I have included it in my github repository:

https://github.com/skillriver/AzureMFADashboard/blob/master/DeploymentTemplateMFAReport.json

Working locally in my Visual Studio Code editor, I can now test the deployment using Azure PowerShell, as shown below and described with these simple steps:

  1. Connect to Azure Resource Manager and select the Subscription
  2. Specify a variable for the Resource Group you want to deploy to
  3. The MFAreport.md file (which we created earlier) need some converting to JSON format, I’m removing all espace characters and any uneeded special characters
  4. Specify variable names your environment for name and title for the dashboard
  5. Deploy the custom dashboard to the resource group

image

However, now that we can test the deployment, I want to schedule a deployment using Azure Automation, and I will continue on my previous runbook from before. But first we need to set up some connections for authenticating to Azure and some variables.

I Azure Automation we can create an Azure Run As Account, this will also create a service principal. If you navigate to your Automation Account in the Azure Portal, and go to the section called Run as accounts, you can create an Azure Run As Account automatically, as I have done here:

image

If I look more closely at this generated Run As Account, I can see details for Azure AD App Registration, Service Principal, Certificate and more. This account will also automatically be assigned Contributor role for my Azure Subscription. If you want more control over Azure Run As Accounts, you can create your own as described in the following article: https://docs.microsoft.com/en-us/azure/automation/automation-create-runas-account

image

I will use this Azure Run As account in my environment to deploy the dashboard resource, I’ll just need to make sure the account has contributor access to the resource group. Next I will set ut a few variables under the Variables section for my Automation Account, I will use these variables when I deploy the resource:

image

Now we are ready to finally put together the complete Runbook and test it. You will have the complete link later in the blog post, but I will share some screenshots first:

After I’ve connected with Connect-MSOLService I’m creating a variable for the markdown content, so I’ve changed from earlier when I saved a .md file temporarily, now I just adding lines using the newline special character (`n):

image

The next part is for logging in to Azure (using the Azure Run As Account mentioned above), and then getting my variables ready for deployment:

image

Then I convert the markdown content to Json format, and removing any escape characters that I don’t need:

image

And then deploy the dashboard resource with parameters for markdown content and dashboard name & title. Note that I’m using my deployment template as a source from my github repository via the TemplateUri property:

image

You can use any TemplateUri you want, for example from a more private source like a storage account blob etc.

Testing the Runbook gives the following output, which shows it was successful:

image

When I now go and refresh the dasboard in the portal, I can see that the markdown tile has been updated:

image

That leaves me with just publishing and scheduling the runbook:

image

When creating a new schedule specify a name and recurrence:

image

Link the schedule to the runbook and any needed parameters, I have to specify my credential that are allowed to Connect-MSOLService:

image

That concludes this lengthy blog post. The script will now run regularly and update my custom markdown tile with MFA report data.

Here is the link to the PowerShell script used in my Azure Automation runbook, enjoy your MFA Reporting!

https://github.com/skillriver/AzureMFADashboard/blob/master/MFAStrongAuthenticationUserReportAutomation.ps1


How to configure Conditional Access for Azure AD PIM

Azure AD Privileged Identity Management is a really great security feature for controlling those Azure AD and Azure Subscription administrator roles. By implementing Azure AD PIM you can let users with admin roles elevate themselves when they need to, using just in time (JIT) and eligible roles instead of permanent admin roles. You can even implement approval workflows and audit trails, so if you haven’t looked into it you should really take a look!

With Azure AD PIM you can require Azure MFA when activating admin roles, but outside that you cannot set conditions and access control scenarios like you can do with Azure AD Conditional Access.

But now recently there is a new option in public preview for assignments to users and groups for Conditional Access policies, you can assign the CA policy to directory roles!

image

So I was wondering how this would work together with Azure AD Privileged Identity Management, for example in the following scenario:

I have an Exchange Administrator that from time to time performs Exchange Online admin tasks, and have configured this admin user with Azure AD PIM and eligible for Exchange Administrator Role among others:

image

Lets say that I only want this user to perfom Exchange Administrator tasks from a Compliant Device. Even though the Azure AD PIM role is protected by MFA at activation, making the user secure and trusted, I really want the device he is using to be secure and compliant with any management profiles I have defined using Intune MDM. Especially when he is doing admin stuff in our Exchange Online tenant or even running some Exchange Online PowerShell commands.

Lets set up this scenario.

Creating Azure AD Conditional Access Policy for Directory Role

The first thing I set up is the CA policy for my specific Directory Role in this scenario. I specify a name and then select the Directory role of Exchange administrator as shown below:

image

Next for Cloud apps I select Exchange Online:

image

For Access controls I select to require the device to marked as compliant:

image

After that I enable the policy and save. We are now ready to test the user experience.

Testing Azure AD PIM Role Activation and Conditional Access

So now we can test the scenario. Remember that the idea is that the CA policy only will kick in when the user has activated his Azure AD PIM role assignment as Exchange Administrator.

PS! If this user also has a Exchange Online license and mailbox, the same CA policy will apply and require the device to be compliant as long as the Exchange Administrator role is active. That could pose some not intended side effects, requiring the devices that access Exchange Online for normal mailbox access to be compliant as well, but as long as the Exchange Online Admin isn’t available as a Cloud app in Conditional Access we have to do it this way.

With my admin user, I first go to http://aka.ms/myroles, which will redirect me to my roles defined in Azure AD PIM. Lets sign in first:

image

And here is my eligible roles:

image

I select the action link to activate my Exchange Administrator role, and then to verify my identity with Azure MFA:

image

After verifying I can specify a reason or adjust the activation duration:

image

After that I’m activated and has an access valid for the set period of time:

image

Now, let’s go to to the Exchange Online Admin portal: https://outlook.office365.com/ecp. After signing in, if I’m not already signed in, I will get this message:

image

The details will tell me that the access rules require a compliant device:

image

We could also check using Exchange Online PowerShell module, and I get the same message:

image

Note that this message only works with the Connect-EXOPSSession that use Modern Authentication. The “old” way of using remote PowerShell and credential object to Exchange Online use basic (legacy) authentication so we cannot control that information flow, but the admin user will be denied there as well:

ExoPS

To conclude this blog post, I have shown that by combining the new preview feature of Directory Roles assningments for Azure AD Conditional Access, and Azure AD Privileged Identity Management, we can implement more complex scenarios for conditions and access rules for using those directory roles. In my example I used compliant device, but you could also use any other of the conditions and access controls available.