Monthly Archives: February 2016

Displaying Service Manager Service Requests Stats in OMS via Performance Collection and Operations Manager

Following up on my previous blog article on how to collect Service Manager and Incident statistics via Operations Manager to OMS, https://systemcenterpoint.wordpress.com/2016/02/19/collecting-service-manager-incident-stats-in-oms-via-powershell-script-performance-collection-in-operations-manager/, this blog article will show how to get statistics for Service Requests and display that as Performance Data in OMS.

Getting Ready

Please see the link above for the first article on getting SCSM data to OMS, and instructions for configuring your Operations Manager environment and SMLets PowerShell module. I will use that same setup as basis for this article.

Creating the PowerShell Command Script for getting SCSM Service Request data

First I needed to think about what kind of Service Request data I wanted to get from SCSM. I decided to get the following values:

  • Submitted Service Requests
  • In Progress Service Requests
  • Completed Service Requests
  • Failed Service Requests
  • Cancelled Service Requests
  • Closed Service Requests
  • Service Requests Opened Last Day
  • Service Requests Opened Last Hour
  • Service Requests Completed Last Day
  • New Service Requests

Now, first some thoughts on why I chose these data to get for Service Requests (SR). When New Service Requests are created, they are quickly changed to a status of either Submitted (no activities in the template the Service Request was created from) or In Progress (where there are one or more activities). SR’s with no activities are manually set to Completed by the analyst when finished, or Cancelled if the SR will not be delivered. SR’s with activities gets the status Completed when all activities are completed as well, but might also get the status of Failed if any activities fails as well, for example runbook automation activities that might fail. Finally, when SR’s are completed, they will eventually be Closed.

So it makes sense to track all these statuses as performance data. You might ask why look at New status for SR’s, when this is only an intermittent status quickly changing to either Submitted or In Progress? Well, if there is a problem with the Workflow service at the Service Manager Management Server, SR’s can be stuck in New status. This is something I would want to be able to see in OMS, and even create an Alert for.

In addition to tracking the individual status values, I also want to see data on how many SR’s are created the last day, last hour, and also how many SR’s are Completed the last day. These will be nice performance indicators.

These Service Request values will be retrieved by the Get-SCSMObject cmdlet in SMLets, using different criteria. Unlike Get-SCSMIncident which query directly for Incident Records, I have to create the PowerShell command a little bit different, by specifying the Class Object (via Get-SCSMClass) and also filter Status Enumeration Id for Service Requests via Get-SCSMEnumeration. For example to get all SR’s with a status of In Progress, I use the following command:

The complete script is shown below for how to get those SR data via SCOM to OMS:

# Debug file
$debuglog = $env:TEMP+\powershell_perf_collect_SR_stats_debug.log

Date | Out-File $debuglog

Who Am I: | Out-File $debuglog -Append
whoami |
Out-File $debuglog -Append

$ErrorActionPreference = Stop

Try {

Import-Module C:\Program Files\WindowsPowerShell\Modules\SMLets

$API = new-object -comObject MOM.ScriptAPI

$scsmserver = az-scsm-ms01

$beforetime = $(Get-Date).AddHours(1)
$beforedate = $(Get-Date).AddDays(1)

$PropertyBags=@()

$inprogressrequests = 0
$inprogressrequests = @(Get-SCSMObject -Computername $scsmserver –Class (Get-SCSMClass -ComputerName $scsmserver -Name System.WorkItem.ServiceRequest$) -Filter (Status -eq ‘ + (Get-SCSMEnumeration -ComputerName $scsmserver ServiceRequestStatusEnum.InProgress$).Id +)).Count
$PropertyBag = $API.CreatePropertyBag()
$PropertyBag.AddValue(Instance, In Progress Service Requests)
$PropertyBag.AddValue(Value, [UInt32]$inprogressrequests)
$PropertyBags += $PropertyBag

In Progress Service Requests: | Out-File $debuglog -Append
$inprogressrequests | Out-File $debuglog -Append

$completedrequests = 0
$completedrequests = @(Get-SCSMObject -Computername $scsmserver –Class (Get-SCSMClass -ComputerName $scsmserver -Name System.WorkItem.ServiceRequest$) -Filter (Status -eq ‘ + (Get-SCSMEnumeration -ComputerName $scsmserver ServiceRequestStatusEnum.Completed$).Id +)).Count
$PropertyBag = $API.CreatePropertyBag()
$PropertyBag.AddValue(Instance, Completed Service Requests)
$PropertyBag.AddValue(Value, [UInt32]$completedrequests)
$PropertyBags += $PropertyBag

Completed Service Requests: | Out-File $debuglog -Append
$completedrequests | Out-File $debuglog -Append

$submittedrequests = 0
$submittedrequests = @(Get-SCSMObject -Computername $scsmserver –Class (Get-SCSMClass -ComputerName $scsmserver -Name System.WorkItem.ServiceRequest$) -Filter (Status -eq ‘ + (Get-SCSMEnumeration -ComputerName $scsmserver ServiceRequestStatusEnum.Submitted$).Id +)).Count
$PropertyBag = $API.CreatePropertyBag()
$PropertyBag.AddValue(Instance, Submitted Service Requests)
$PropertyBag.AddValue(Value, [UInt32]$submittedrequests)
$PropertyBags += $PropertyBag

Submitted Service Requests: | Out-File $debuglog -Append
$submittedrequests | Out-File $debuglog -Append

$cancelledrequests = 0
$cancelledrequests = @(Get-SCSMObject -Computername $scsmserver –Class (Get-SCSMClass -ComputerName $scsmserver -Name System.WorkItem.ServiceRequest$) -Filter (Status -eq ‘ + (Get-SCSMEnumeration -ComputerName $scsmserver ServiceRequestStatusEnum.Canceled$).Id +)).Count
$PropertyBag = $API.CreatePropertyBag()
$PropertyBag.AddValue(Instance, Cancelled Service Requests)
$PropertyBag.AddValue(Value, [UInt32]$cancelledrequests)
$PropertyBags += $PropertyBag

Cancelled Service Requests: | Out-File $debuglog -Append
$cancelledrequests | Out-File $debuglog -Append

$failedrequests = 0
$failedrequests = @(Get-SCSMObject -Computername $scsmserver –Class (Get-SCSMClass -ComputerName $scsmserver -Name System.WorkItem.ServiceRequest$) -Filter (Status -eq ‘ + (Get-SCSMEnumeration -ComputerName $scsmserver ServiceRequestStatusEnum.Failed$).Id +)).Count
$PropertyBag = $API.CreatePropertyBag()
$PropertyBag.AddValue(Instance, Failed Service Requests)
$PropertyBag.AddValue(Value, [UInt32]$failedrequests)
$PropertyBags += $PropertyBag

Failed Service Requests: | Out-File $debuglog -Append
$failedrequests | Out-File $debuglog -Append

$closedrequests = 0
$closedrequests = @(Get-SCSMObject -Computername $scsmserver –Class (Get-SCSMClass -ComputerName $scsmserver -Name System.WorkItem.ServiceRequest$) -Filter (Status -eq ‘ + (Get-SCSMEnumeration -ComputerName $scsmserver ServiceRequestStatusEnum.Closed$).Id +)).Count
$PropertyBag = $API.CreatePropertyBag()
$PropertyBag.AddValue(Instance, Closed Service Requests)
$PropertyBag.AddValue(Value, [UInt32]$closedrequests)
$PropertyBags += $PropertyBag

Closed Service Requests: | Out-File $debuglog -Append
$closedrequests | Out-File $debuglog -Append

$newrequests = 0
$newrequests = @(Get-SCSMObject -Computername $scsmserver –Class (Get-SCSMClass -ComputerName $scsmserver -Name System.WorkItem.ServiceRequest$) -Filter (Status -eq ‘ + (Get-SCSMEnumeration -ComputerName $scsmserver ServiceRequestStatusEnum.New$).Id +)).Count
$PropertyBag = $API.CreatePropertyBag()
$PropertyBag.AddValue(Instance, New Service Requests)
$PropertyBag.AddValue(Value, [UInt32]$newrequests)
$PropertyBags += $PropertyBag

New Service Requests: | Out-File $debuglog -Append
$newrequests | Out-File $debuglog -Append

$requestsopenedlasthour = 0
$requestsopenedlasthour = @(Get-SCSMObject -Computername $scsmserver –Class (Get-SCSMClass -ComputerName $scsmserver -Name System.WorkItem.ServiceRequest$) -Filter (CreatedDate -gt ‘ + $beforetime +)).Count
$PropertyBag = $API.CreatePropertyBag()
$PropertyBag.AddValue(Instance, Service Requests Opened Last Hour)
$PropertyBag.AddValue(Value, [UInt32]$requestsopenedlasthour)
$PropertyBags += $PropertyBag

Service Requests Opened Last Hour: | Out-File $debuglog -Append
$requestsopenedlasthour | Out-File $debuglog -Append

$requestsopenedlastday = 0
$requestsopenedlastday = @(Get-SCSMObject -Computername $scsmserver –Class (Get-SCSMClass -ComputerName $scsmserver -Name System.WorkItem.ServiceRequest$) -Filter (CreatedDate -gt ‘ + $beforedate +)).Count
$PropertyBag = $API.CreatePropertyBag()
$PropertyBag.AddValue(Instance, Service Requests Opened Last Day)
$PropertyBag.AddValue(Value, [UInt32]$requestsopenedlastday)
$PropertyBags += $PropertyBag

Service Requests Opened Last Day: | Out-File $debuglog -Append
$requestsopenedlastday | Out-File $debuglog -Append

$requestscompletedlastday = 0
$requestscompletedlastday = @(Get-SCSMObject -Computername $scsmserver –Class (Get-SCSMClass -ComputerName $scsmserver -Name System.WorkItem.ServiceRequest$) -Filter (CompletedDate -gt ‘ + $beforedate +)).Count
$PropertyBag = $API.CreatePropertyBag()
$PropertyBag.AddValue(Instance, Service Requests Completed Last Day)
$PropertyBag.AddValue(Value, [UInt32]$requestscompletedlastday)
$PropertyBags += $PropertyBag

Service Requests Completed Last Day: | Out-File $debuglog -Append
$requestscompletedlastday | Out-File $debuglog -Append

$PropertyBags

} Catch {

Error Catched: | Out-File $debuglog -Append
$(
$_.Exception.GetType().FullName) | Out-File $debuglog -Append
$(
$_.Exception.Message) | Out-File $debuglog -Append

}


PS! I have included debugging and logging in the script, be aware though that doing $ErrorActionPreference=Stop will end the script if any errors, for example with logging, so it might be an idea to remove the debug logging when confirmed that everything works.

In the next part I’m ready to create the PowerShell Script Rule.

Creating the PowerShell Script Rule

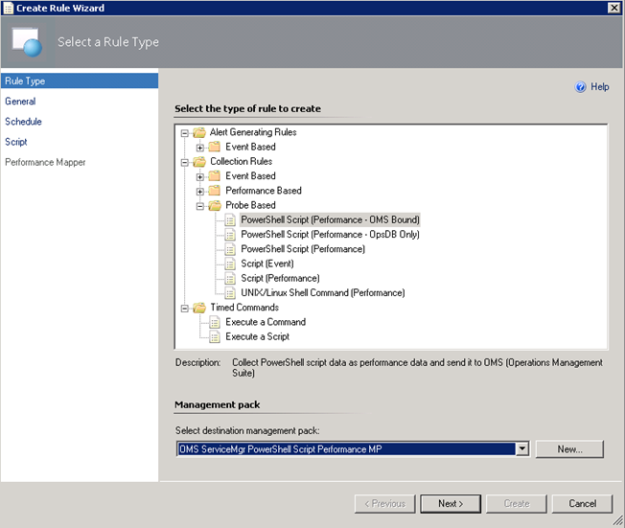
In the Operations Console, under Authoring, create a new PowerShell Script Rule as shown below:

    1. Select the PowerShell Script (Performance – OMS Bound) Rule:I have created a custom destination management pack for this script.
    2. Specifying a Rule name and Rule Category: Performance Collection. As mentioned earlier in this article the Rule target will be the Root Management Server Emulator:
    3. Selecting to run the script every 30 minutes, and at which time the interval will start from:
    4. Selecting a name for the script file and timeout, and entering the complete script as shown earlier:
    5. For the Performance Mapping information, the Object name must be in the \\FQDN\YourObjectName format. For FQDN I used the Target variable for PrincipalName, and for the Object Name ServiceManagerServiceRequestStats, and adding the “\\” at the start and “\” between: \\$Target/Host/Property[Type=”MicrosoftWindowsLibrary7585010!Microsoft.Windows.Computer”]/PrincipalName$\ServiceMgrServiceRequestStatsI specified the Counter name as “Service Manager Service Request Stats”, and the Instance and Value are specified as $Data/Property(@Name=’Instance’)$ and $Data/Property(@Name=Value)$. These reflect the PropertyBag instance and value created in the PowerShell script:
    6. After finishing the Create Rule Wizard, two new rules are created, which you can find by scoping to the Root Management Server Emulator I chose as target. Both Rules must be enabled, as they are not enabled by default:


At this point we are finished configuring the SCOM side, and can wait for some hours to see that data are actually coming into my OMS workspace.

Looking at Service Manager Service Request Performance Data in OMS

After a while I will start seeing Performance Data coming into OMS with the specified Object and Counter Name, and for the different instances and values.

In Log Search, I can specify Type=Perf ObjectName=ServiceMgrServiceRequestStats, and I will find the Results and Metrics for the specified time frame.

I can now look at Service Manager stats as performance data, showing different scenarios like how many active, pending, resolved and closed incidents there are over a time period. I can also look at how many incidents are created by each hour or by each day.

I can also create saved searches and alerts for my search criteria.

Creating OMS Alerts for Service Request Counters

A couple of scenarios are interesting for Alerts when some of the Service Request counters pass a threshold.

Failed Service Requests is a status that will be set when an Activity in the SR fails, for example a Runbook Automation Activity. Normally you would expect that analysts would follow up on requests that fails directly in Service Manager, but it could make sense to generate an alert if the number of failed requests increases over a predefined threshold.

The search query for Failed Service Requests in OMS is:

Type=Perf ObjectName=ServiceMgrServiceRequestStats InstanceName=”Failed Service Requests”

This would give me all results for the defined time period, but to generate an alert I would want to look at the most recent results, for example for the last hour. In addition, I want to filter the results for my alert when the number of failed requests are over the threshold of 10. My query for this would be:

Type=Perf ObjectName=ServiceMgrServiceRequestStats InstanceName=”Failed Service Requests” AND TimeGenerated>NOW-1HOUR AND CounterValue > 10

In my test environment, this gives me the following result, showing that I have a total of 29 failed requests:

Ok, 29 failed requests are a lot, but as this is a test environment and a lot of these are old requests, I would need to do some cleaning up. I want to create an alert for this, so I press the Alert button:

For the alert I give it a name and base it on the search query. I want to check every 60 minutes, and generate alert when the number of results is greater than 1 so that I make sure the passing of the threshold is consistent and not just temporary.

For actions I want an email notification, so I type in a Subject and my recipients.

I Save the alert rule, and verify that it was successfully created.

Soon I get my first alert on email:

There is also a second scenario for an alert, and that is when Service Requests get stuck in a New status. Normally this would be when Service Manager workflows are not running, so it will be important to get notified on that.

The following search query, using countervalue > 1 will provide the results for my alert as I want to get notified as soon there is more than one value in the results:

Type=Perf ObjectName=ServiceMgrServiceRequestStats InstanceName=”New Service Requests” AND TimeGenerated>NOW-1HOUR AND CounterValue > 1

And I can create my alert as the following image:

With that, this blog post is concluded. Thanks for reading, I hope the posts on OMS and getting SCSM data via NRT Perfomance Collection has been useful 😉

Collecting Service Manager Incident Stats in OMS via PowerShell Script Performance Collection in Operations Manager

I have been thinking about bringing in some key Service Manager statistics to Microsoft Operations Management Suite. The best way to do that now is to use the NRT Performance Data Collection in OMS and PowerShell Script rule in my Operations Manager Management Group that I have connected to OMS. The key solution to make this happen are the “Sample Management Pack – Wizard to Create PowerShell script Collection Rules” described in this blog article http://blogs.msdn.com/b/wei_out_there_with_system_center/archive/2015/09/29/oms-collecting-nrt-performance-data-from-an-opsmgr-powershell-script-collection-rule-created-from-a-wizard.aspx.

With this solution I can practically get any data I want into OMS via SCOM and PowerShell Script, so I will start my solution for bringing in Service Manager Stats by defining some PowerShell commands to get the values I want. For that I will use the SMLets PowerShell Module for Service Manager.

For this blog article, I will focus on Incident Stats from SCSM. In a later article I will get in some more SCSM data to OMS.

Getting Ready

I have to do some preparations first. This includes:

  1. Importing the “Sample Management Pack – Wizard to Create PowerShell script Collection Rules”
    1. This can be downloaded from Technet Gallery at https://gallery.technet.microsoft.com/Sample-Management-Pack-e48040f7
  2. Install the SMLets for SCSM PowerShell Module (at the chosen Target server for the PowerShell Script Rule).
    1. I chose to install it from the PowerShell Gallery at https://www.powershellgallery.com/packages/SMLets
    2. If you are running Windows Server 2012 R2, which I am, follow the instructions here to support the PowerShellGet module, https://www.powershellgallery.com/GettingStarted?section=Get%20Started.
  3. Choose Target for where to run the SCSM commands from
    1. Regarding the SMLets and where to install, I decided to use the SCOM Root Management Server Emulator. This server will then run the SCSM commands against the Service Manager Management Server.
  4. Choose account for Run As Profile
    1. I also needed to think about the run as account the SCSM commands will run under. As we will see later the PowerShell Script Rules will be set up with a Default Run As Profile.
    2. The Default Run As Profile for the RMS Emulator will be the Management Server Action Account, if I had chosen another Rule Target the Default Run As Profile would be the Local System Account.
    3. Alternatively, I could have created a custom Run As Profile with a SCSM user account that have permissions to read the required data from SCSM, and configured the PowerShell Script rules to use that.
    4. I decided to go with the Management Server Action Account, and make sure that this account is mapped to a Role in SCSM with access to the work items I want to query against, any Operator Role will do but you could chose to scope and restrict more if needed:

At this point I’m ready for the next step, which is to create some PowerShell commands for the Script Rule in SCOM.

Creating the PowerShell Command Script for getting SCSM data

First I needed to think about what kind of Incident data I wanted to get from SCSM. I decided to get the following values:

  • Active Incidents
  • Pending Incidents
  • Resolved Incidents
  • Closed Incidents
  • Incidents Opened Last Day
  • Incidents Opened Last Hour

These values will be retrieved by the Get-SCSMIncident cmdlet in SMLets, using different criteria. The complete script is shown below:

# Debug file
$debuglog = $env:TEMP+\powershell_perf_collect_debug.log

Date | Out-File $debuglog

Who Am I: | Out-File $debuglog -Append
whoami |
Out-File $debuglog -Append

$ErrorActionPreference = Stop

Try {

Import-Module C:\Program Files\WindowsPowerShell\Modules\SMLets

$API = new-object -comObject MOM.ScriptAPI

$scsmserver = MY-SCSM-MANAGEMENTSERVER-HERE

$beforetime = $(Get-Date).AddHours(1)
$beforedate = $(Get-Date).AddDays(1)

$PropertyBags=@()

$activeincidents = 0
$activeincidents = @(Get-SCSMIncident -ComputerName $scsmserver -Status Active).Count
$PropertyBag = $API.CreatePropertyBag()
$PropertyBag.AddValue(Instance, Active Incidents)
$PropertyBag.AddValue(Value, [UInt32]$activeincidents)
$PropertyBags += $PropertyBag

Active Incidents: | Out-File $debuglog -Append
$activeincidents | Out-File $debuglog -Append

$pendingincidents = 0
$pendingincidents = @(Get-SCSMIncident -ComputerName $scsmserver -Status Pending).Count
$PropertyBag = $API.CreatePropertyBag()
$PropertyBag.AddValue(Instance, Pending Incidents)
$PropertyBag.AddValue(Value, [UInt32]$pendingincidents)
$PropertyBags += $PropertyBag

Pending Incidents: | Out-File $debuglog -Append
$pendingincidents | Out-File $debuglog -Append

$resolvedincidents = 0
$resolvedincidents = @(Get-SCSMIncident -ComputerName $scsmserver -Status Resolved).Count
$PropertyBag = $API.CreatePropertyBag()
$PropertyBag.AddValue(Instance, Resolved Incidents)
$PropertyBag.AddValue(Value, [UInt32]$resolvedincidents)
$PropertyBags += $PropertyBag

Resolved Incidents: | Out-File $debuglog -Append
$resolvedincidents | Out-File $debuglog -Append

$closedincidents = 0
$closedincidents = @(Get-SCSMIncident -ComputerName $scsmserver -Status Closed).Count
$PropertyBag = $API.CreatePropertyBag()
$PropertyBag.AddValue(Instance, Closed Incidents)
$PropertyBag.AddValue(Value, [UInt32]$closedincidents)
$PropertyBags += $PropertyBag

Closed Incidents: | Out-File $debuglog -Append
$closedincidents | Out-File $debuglog -Append

$incidentsopenedlasthour = 0
$incidentsopenedlasthour = @(Get-SCSMIncident -CreatedAfter $beforetime -ComputerName $scsmserver).Count
$PropertyBag = $API.CreatePropertyBag()
$PropertyBag.AddValue(Instance, Incidents Opened Last Hour)
$PropertyBag.AddValue(Value, [UInt32]$incidentsopenedlasthour)
$PropertyBags += $PropertyBag

Incidents Opened Last Hour: | Out-File $debuglog -Append
$incidentsopenedlasthour | Out-File $debuglog -Append

$incidentsopenedlastday = 0
$incidentsopenedlastday = @(Get-SCSMIncident -CreatedAfter $beforedate -ComputerName $scsmserver).Count
$PropertyBag = $API.CreatePropertyBag()
$PropertyBag.AddValue(Instance, Incidents Opened Last Day)
$PropertyBag.AddValue(Value, [UInt32]$incidentsopenedlastday)
$PropertyBags += $PropertyBag

Incidents Opened Last Day: | Out-File $debuglog -Append
$incidentsopenedlastday | Out-File $debuglog -Append

$PropertyBags

} Catch {

Error Catched: | Out-File $debuglog -Append
$(
$_.Exception.GetType().FullName) | Out-File $debuglog -Append
$(
$_.Exception.Message) | Out-File $debuglog -Append

}

Some comments about the script. I usually like to include some debug logging in the script when I develop the solution. This way I can keep track of what happens underway in the script or get some exceptions if the script command fails. Be aware though that doing $ErrorActionPreference=Stop will end the script if any errors, so it might be an idea to remove the debug logging when confirmed that everything works.

In the next part I’m ready to create the PowerShell Script Rule.

Creating the PowerShell Script Rule

In the Operations Console, under Authoring, create a new PowerShell Script Rule as shown below:

  1. Select the PowerShell Script (Performance – OMS Bound) Rule:I have created a custom destination management pack for this script.
  2. Specifying a Rule name and Rule Category: Performance Collection. As mentioned earlier in this article the Rule target will be the Root Management Server Emulator:
  3. Selecting to run the script every 30 minutes, and at which time the interval will start from:
  4. Selecting a name for the script file and timeout, and entering the complete script as shown earlier:
  5. For the Performance Mapping information, the Object name must be in the \\FQDN\YourObjectName format. For FQDN I used the Target variable for PrincipalName, and for the Object Name ServiceManagerIncidentStats, and adding the “\\” at the start and “\” between: \\$Target/Host/Property[Type=”MicrosoftWindowsLibrary7585010!Microsoft.Windows.Computer”]/PrincipalName$\ServiceMgrIncidentStats I specified the Counter name as “Service Manager Incident Stats”, and the Instance and Value are specified as $Data/Property(@Name=’Instance’)$ and $Data/Property(@Name=Value)$. These reflect the PropertyBag instance and value created in the PowerShell script:
  6. After finishing the Create Rule Wizard, two new rules are created, which you can find by scoping to the Root Management Server Emulator I chose as target. Both Rules must be enabled, as they are not enabled by default:
  7. Looking into the Properties of the rules, we can make edits to the PowerShell script, and verify that the Run as profile is the Default. This is where I would change the profile if I wanted to create my own custom profile and run as account for it.

At this point we are finished configuring the SCOM side, and can wait for some hours to see that data are actually coming into my OMS workspace.

Looking at Service Manager Performance Data in OMS

After a while I will start seeing Performance Data coming into OMS with the specified Object and Counter Name, and for the different instances and values.

In Log Search, I can specify Type=Perf ObjectName=ServiceMgrIncidentStats, and I will find the Results and Metrics for the specified time frame.

I can now look at Service Manager stats as performance data, showing different scenarios like how many active, pending, resolved and closed incidents there are over a time period. I can also look at how many incidents are created by each hour or by each day.

Finally, I can also create saved searches and alerts that creates for example alerts when the number of incidents for any counters are over a set value.

Thanks for reading, and look for more blog posts on OMS and getting SCSM data via NRT Perfomance Collection in the future 😉

Session Recap – Nordic Infrastructure Conference (NIC) 2016 – Publishing Azure AD Applications

This week I had the pleasure of not only revisiting Nordic Infrastructure Conference (www.nicconf.com), but also presenting a session myself: Deep Dive – Publishing Applications with Azure AD. My session was about how you with Azure AD can publish applications from a SaaS Gallery, your organization’s own applications, or internal applications that will be accessible outside with Azure AD Application Proxy.

This was the 5th anniversary of NIC, held in Oslo, Norway and the venue of Oslo Spektrum. NIC has been established as a premium event for IT-professionals, attracting internationally renowned speakers and MVPs, SMEs and Partners.

In this blog post I will do a recap of my session, for both attendees that was there and others that couldn’t be. I will also expand on some of the things we went through in the session as there were some limits to the time we could use on several demos.

Proud Speaker

The presentation and session recording will later be available at the www.nicconf.com webpage. At the end of this blog post, there is also a link to where you can download the presentation and other code samples and files that where used in the session.

Session Menu

The theme for the presentation was to present a menu for publishing Azure AD Applications with Azure AD. The menu would consist of required ingredients, recipes for publishing scenarios, consumption of the published applications from the users’ perspective, and some extras and tip for self-servicing and troubleshooting.

I started with pointing to the key features of Azure AD as an Identity and Access Management Solution, for both Cloud and On-Premise Solutions, an enabler for true Enterprise Mobility and Business Everywhere, with one common, hybrid identity. There are some important Business Value for Organizations such as controlling access to applications, single sign-on, conditional access, hybrid identity and self-servicing.

Ingredients

It is no surprise that you need Azure AD as a key ingredient 😉 But what edition of Azure AD should you use? Free, Basic or Premium? In the session I covered the most important differences relevant for Publishing Applications, where you would need at least Basic to be able to publish internal applications with Azure AD App Proxy, and Premium Edition if you want to cover all the self-servicing scenarios and advanced reporting. For all details, refer to https://azure.microsoft.com/en-us/documentation/articles/active-directory-editions/.

In addition to the application you want to publish, you will need an Azure AD identity, either a cloud based identity or a hybrid identity synchronized with Azure AD Connect.

In the first demo of the session we looked into configuring and verifying that your Azure AD tenant is ready for publishing applications.

Recipes

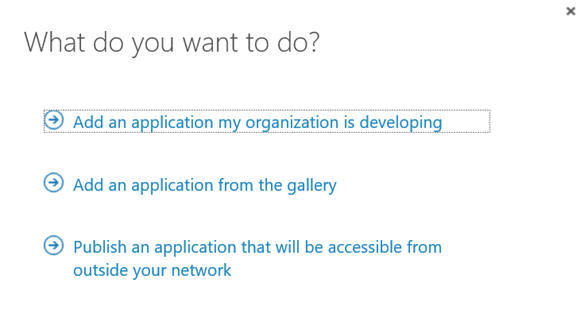
The publishing scenarios we looked at in the session was from the following menu of three alternatives in Azure AD:

Add an application from the gallery

The first publishing scenario we looked at in the session was publishing applications from the SaaS gallery of applications. The gallery contains over 2500 different SaaS applications, many offering both true Single Sign-On (SSO) with Azure AD and provisioning/de-provisioning of users and groups. Other applications provide password-based same sign-on.

The demos in the session used two different SaaS apps as example; Twitter and Google Apps.

Twitter is a good example of a SaaS application using password same sign on.

When configuring single sign-on for Twitter, we don’t have the option of using Azure AD Single Sign-On. Some applications can maybe support one of the federation protocols implemented in a local ADFS or a third-party provider, but that is dependent on the application. So for Twitter we will typically use Password Single Sign-On.

After configuring Password Single Sign-On, the next step is to assign account to the application. When assigning accounts, you can select that the users enter passwords themselves in the Access Panel. Or you can enter the credentials on behalf of the user.

This opens up a very interesting scenario: Consider you have a company based social media account on Twitter, Facebook, Instagram or other. All the users in the marketing department should have access to that/those application/applications, so you start handing out the username and password to the shared account. This is a risk, as users can lose the password and it can get on wrong hands, or maybe previous employees that are no longer in the company still have the username and password to the application.

With Azure AD, by entering the Twitter credentials on behalf of the user, they are never given the logon details directly. And when they leave the organization after removing the user from Azure AD, they will no longer have access. You can even apply conditional access policies for the application.

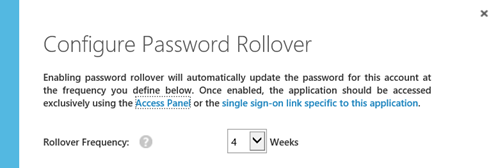
You can even configure automatic password rollover to update the password at a defined frequency:

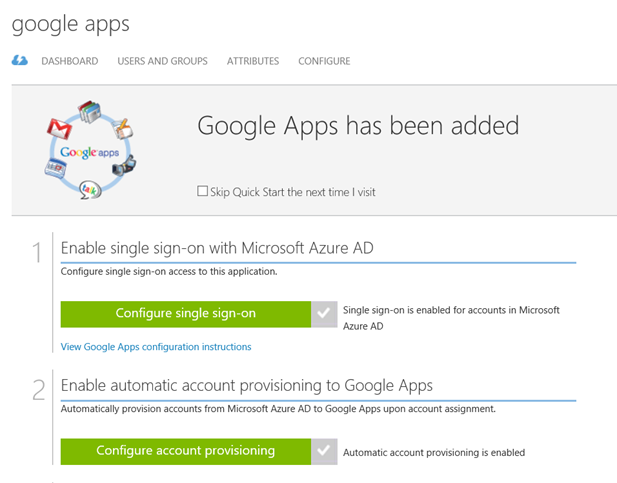
The other part of the demo focused on Google Apps. I had an existing subscription for Google Apps, which I configured to use Azure AD Single Sign-On and account provisioning for.

There is a complete tutorial for configuring SSO and provisioning for Google Apps at https://azure.microsoft.com/en-us/documentation/articles/active-directory-saas-google-apps-tutorial/.

In the demo I created a test user named [email protected], and assigned that user to the Google Apps application.

I showed that the user didn’t exist in the Google Apps user directory for my organization, and after a while (new user accounts are provisioned ca every 10 minutes), the user appeared in the Google Apps directory via Azure AD.

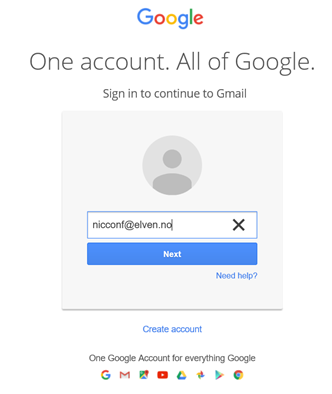
The new user can now use Azure AD SSO when logging into Google:

I’m redirected to my Azure AD tenant for signin in:

And then the user is logged in to Google:

Add an application my organization is developing

The next part of the publishing scenarios was adding applications that my organization is developing. Most times these applications will be Web Applications or Web API, but it’s possible to publish native client applications also.

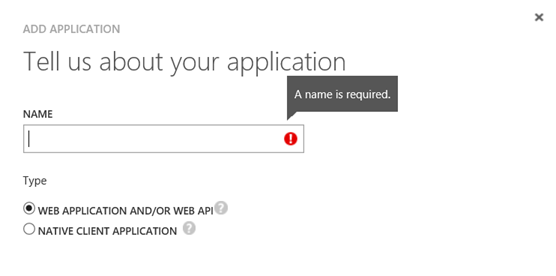
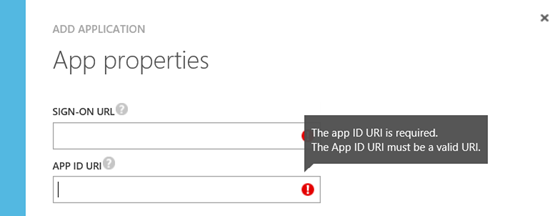
When creating a web application you give it a name, and a sign-on url and unique app id uri:

Keep in mind that creating a web application here only does the publishing part of it, you still would need to create the actual application somewhere, for example as an App Service in an Azure Subcstiption.

You can have the web applications do their own authentication, for example integrating with on-premise Active Directory Federation Services, or you can have the application use Azure Active Directory as SSO provider.

In the session demo we looked at how we could quickly create a Web Application, integrate it with Azure AD for authentication and publish it. These are the main steps:

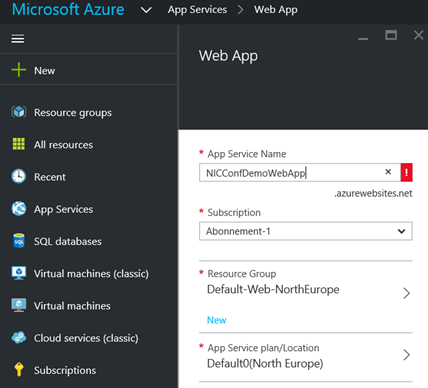
  1. Create a new Web App in you Azure Subscription. In the new Azure Portal for your subscription, under App Services create a new Web App. The Service Name must be unique, and you select either an existing resource group or create a new, and specify an App Service plan.
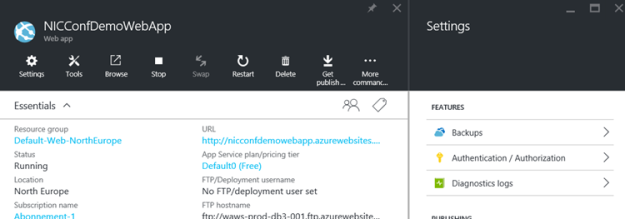
  2. After the Web App is created, open the application properties and under Settings find Features and Authentication / Authorization:
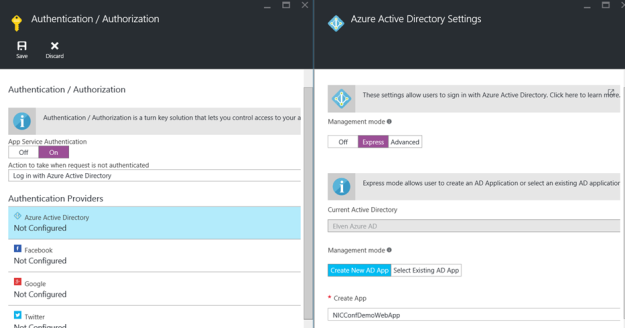
  3. Enable App Service Authentication and log in action. Enable Azure Active Directory as authentication provider and configure Express settings. PS! Here we can create and publish a new AD App (or select an existing one) also. We created a new one for our demo:
  4. Remember to save the Web App and the first part of the demo is done. A this point you can go to http://nicconfdemowebapp.azurewebsites.net, and be prompted to sign in with a Azure AD account from the directory the application was configured for. There is no content in the application, and every user in the Azure AD directory can access the application as long as they authenticate:
  5. The next part of this demo was to change some configuration settings for the published web application which is now published to Azure AD:
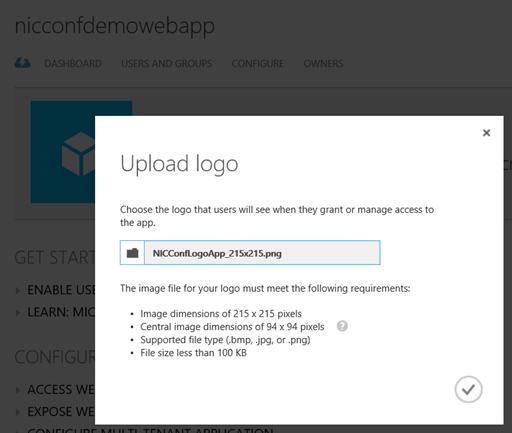
  6. I want to upload a custom logo, and configure the application so that only assigned users/groups can access it. First upload a logo:
  7. Then at the Configure page, I select that user assignment is required to access the App:
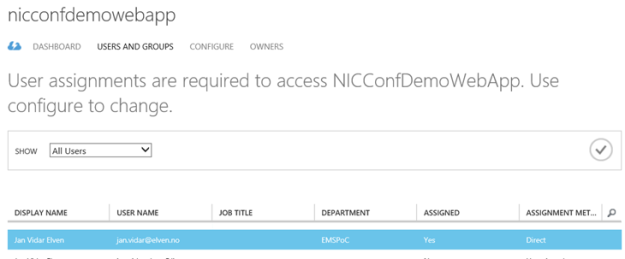
  8. Then after saving, I go to the Users and Groups page, and select to assign the users I want:

    If you assign individual users the assignment method will be Direct, if you assign Groups the members will assigned by inheritance.

  9. Now, if I start a new session to the Web App and log in with a user that has not been assigned, I will get this message:
  10. The final steps of this demo showed how you can create some content in that Web App via Visual Studio. There are several development tools you can use, I have been using Visual Studio 2015, and you can download a Community Edition that is free if you don’t have a license. In my example I created a VB.NET Web App Project, and by using a Publish Profile file and some custom code I was able to show the logged in users claim properties.You can even create App Services directly from Visual Studio, and create and publish Azure AD Web Apps from there. But if you download this file from the Web App:


    And import it to the Visual Studio project, you can publish your changes directly.

  11. This is the result for the demo web application, the code is included at the end of this blog post:

Publish an application that will be accessible from outside your network

The third scenario for publishing applications with Azure AD is the applications you want to be available from outside your network. These applications are internal web applications like SharePoint, Exchange Outlook Web Access or other internal web sites, you can even publish Remote Desktops and Network Device Enrollment Services (NDES) with Azure AD Application Proxy.

Azure AD App Proxy uses Connector Servers and Connector Groups inside the on premise infrastructure that must be able to connect to the internal URLs. These Connector Servers also can perform Kerberos Constrained Delegation for Windows Authentication, so that you can use Azure AD Single Sign-On to those internal applications.

A sample diagram showing the communication flow is shown below:

In the demo we looked at how you could install and configure a Connector installation, and organize Connector Servers in Groups for the applications to use. Here are some of the steps required:

  1. First the setting for enabling Application Proxy Services for the Azure AD Directory must be enabled, and Connectors downloaded for installation.
  2. You create and manage connector groups:
  3. And organize the installed connectors in those groups:
  4. When these requirements are in place you can start publishing your internal web applications.

For each internal published web application, you can configure authentication method, custom domain names, conditional access and self-servicing options. For details on how to do these different configurations, see previous blog posts I have published on this subject:

Consumption, Self Service and Troubleshooting

The last part of the session focused on the user experience for accessing the different published Azure AD applications.

User can access Azure AD published applications via:

  • Access Panel, https://myapps.microsoft.com
  • My Apps (iOS, Google Play)
  • App Launcher in Office 365
  • Managed Browser App with My Apps
  • Directly to URL

The Access Panel is a web-based portal that allows an end user with an organizational account in Azure AD to view and launch applications to which they have been assigned access. The Edge browser in Windows 10 is not fully supported yet, so you need to use either Internet Explorer, Chrome or Firefox for all supported scenarios. In addition, an Access Panel Extension needs to be installed for accessing Password SSO Applications.

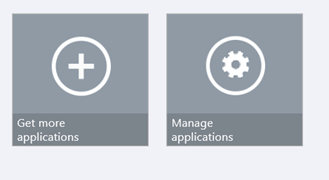
The Access Panel is also where users can view account details, change or reset password, edit multi-factor authentication settings and preferences, and if you are using Azure AD Premium self-manage Groups.

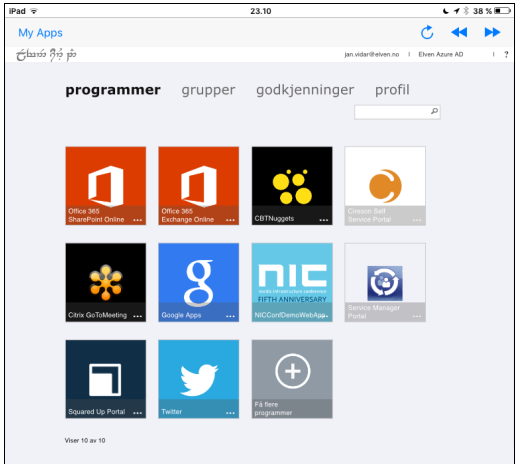
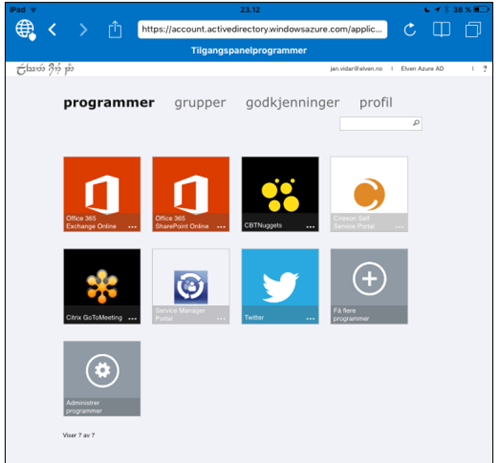
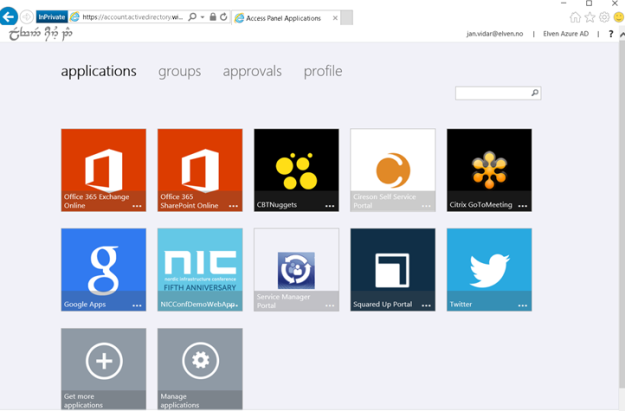
The Access Panel via Internet Explorer:

The Access Panel via My Apps and Managed Browser Apps:

If the user is licensed for Office 365, the published applications are available via the App Launcher and URL https://portal.office.com/myapps:

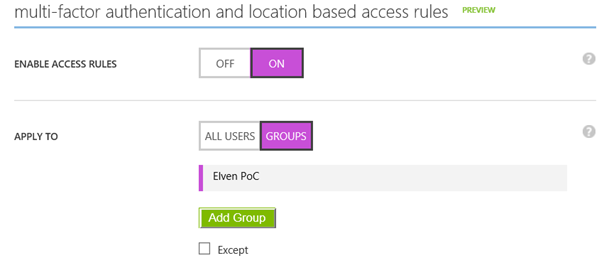
Conditional Access, which is an Azure AD Premium licensed feature, can be configured for each published Azure AD Application. These settings consist of enabling Access Rules for All Users or selected Groups, and optionally with exceptions to those users/groups. The access rules settings are requiring multi-factor authentication, require MFA when not at work, or block access when not at work. For the location based rules to work there must be configured IP addresses/subnets for the company’s known IP address ranges.

Instead of Assigning Users and Groups you could also let users manage self-service access to the published applications. When configured a group will be automatically created that application, and optionally you could configure 1 or more Approvers:

The end user will access this self-servicing via the Access Panel:

The session was wrapped up with some links to troubleshooting and more resources:

Presentation and files downloads

The presentation and files used in the demos can be downloaded from this link: http://1drv.ms/1Q429rh

Thank you for attending my session and/or reading this recap!

How to enable Conditional Access for Azure RemoteApp Programs

Last week I published a blog article on how to publish the System Center Service Manager and Operations Manager Consoles as Azure RemoteApp Programs. (See https://systemcenterpoint.wordpress.com/2016/02/02/publish-operations-and-service-manager-consoles-as-azure-remoteapp-programs/)

One great feature if you are using Azure AD Premium is that you can enable Conditional Access for your Azure RemoteApp Programs. Conditional Access will enable your organization to require Multi-Factor Authentication or required that the programs only can be accessed when at work. In this blog post I will show how this can be configured.

Requirements for Conditional Access for Azure RemoteApp Programs

The following requirements must be met to enable Conditional Access for Azure RemoteApp Programs:

  • Conditional Access are an Azure AD Premium feature, so your organization must be licensed for that
  • You must have created at least one Azure RemoteApp Collection
  • At least one user/group must be assigned to a Program in the Azure RemoteApp Collection

If all these requirements are met, you will see this “Microsoft Azure RemoteApp” Application in your Azure AD:

Configuring Conditional Access for Microsoft Azure RemoteApp

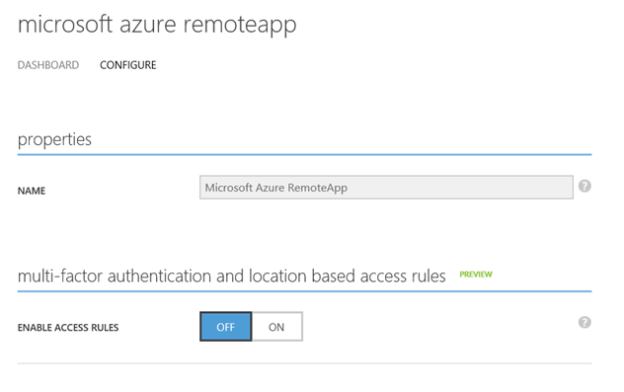
Select the Microsoft Azure RemoteApp Application and go to the Configure tab:

When enabling Access Rules, you can select to enable it for All Users, or for selected Groups. Both options can have exceptions for groups that you don’t want to have Access Rules:

For the Rules you have 3 options for Conditional Access:

You can require Multi-Factor Authentication for the groups/users you selected above, every time they launch a RemoteApp Program Session. I

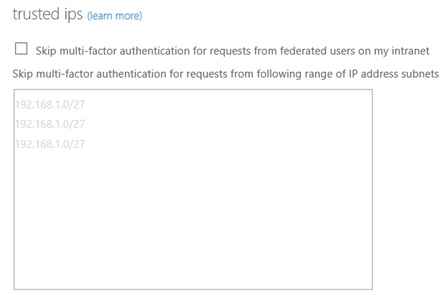
Another scenario, if you define your work network locations, you can require MFA when not at work, or block the application completely.

To configure trusted IPs, click on the link to get to the MFA Service Settings:

User Experience for Azure RemoteApp Conditional Access

So, how does this look for the user when accessing Azure RemoteApp Programs?

Require Multi-Factor Authentication

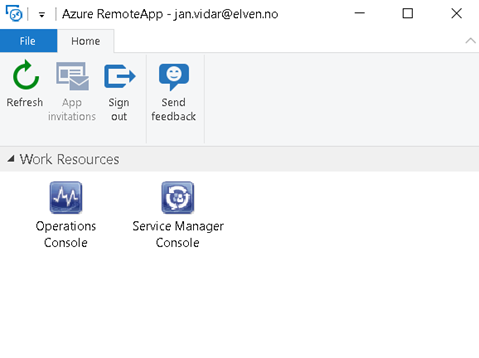
I launch my selected Azure RemoteApp Client, and clicking on a RemoteApp Program:

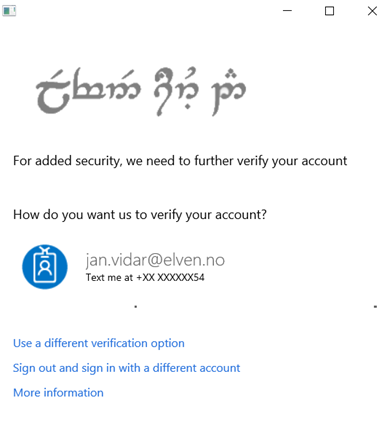
When launching the program, I’m prompted for MFA as expected:

If I sign in with the Azure RemoteApp HTML5 Preview client, https://www.remoteapp.windowsazure.com/web, the Multi-Factor Authentication will be performed before you see your Work Resources.

Block access when not at work

If I selected the Access Rule for Blocking Access when not at work, I will get this message if I’m not on a trusted network:

Conclusion

Meeting the requirements, we can verify that Conditional Access can be enabled for selected groups of users, and it will apply to all the Azure RemoteApp Programs you have published. Note that you cannot enable this specifically for selected Azure RemoteApp Programs, it will be for all the RemoteApp Programs or none.

Publish Operations and Service Manager Consoles as Azure RemoteApp Programs

This blog post will show how you can publish System Center 2012 R2 Management Consoles like the Operations Console and Service Console as Azure Remote Apps.

I already have an environment in Azure that runs Service Manager and Operations Manager 2012 R2. Now I want remote clients and platforms to be able to run these consoles as remote apps.

When planning, I decided to use a Hybrid Collection, and the overall steps was (as documented in https://azure.microsoft.com/en-us/documentation/articles/remoteapp-create-hybrid-deployment/):

  1. Decide what image to use for your collection. You can create a custom image or use one of the Microsoft images included with your subscription.
  2. Set up your virtual network.
  3. Create a collection.
  4. Join your collection to your local domain.
  5. Add a template image to your collection.
  6. Configure directory synchronization. Azure RemoteApp requires that you integrate with Azure Active Directory by either 1) configuring Azure Active Directory Sync with the Password Sync option, or 2) configuring Azure Active Directory Sync without the Password Sync option but using a domain that is federated to AD FS. Check out the configuration info for Active Directory with RemoteApp.
  7. Publish RemoteApp apps.
  8. Configure user access.

Azure Remote App can only be configured in the classic Azure Management Portal (manage.windowsazure.com), it’s on the roadmap for support in the new portal.azure.com and with Azure Resource Manager.

Step 1 – Create Custom Image for Installing Service Manager and Operations Consoles

There are several options available for creating a custom image. As my System Center environment already was set up in Azure, it made sense to create and use an image on an Azure VM, https://azure.microsoft.com/en-us/documentation/articles/remoteapp-image-on-azurevm/.

Create Azure VM for Image

First I created a VM based on template for Remote Desktop Session Host:

The VM template must be configured to run on a VNet that can contact the Domain Controller for the Domain that the System Center Servers are joined to.

After the VM was provisioned, I joined it to my AD Domain and rebooted.

After that I was ready to install and configure the Service Manager and Operations Consoles with all requirements on the image. I also added the most recent Update Rollups for System Center 2012 R2 Consoles (that already are updated on the System Center Servers of course).

A this point I tested the Service Manager and Operations Consoles, and was successful in connecting the Management Servers.

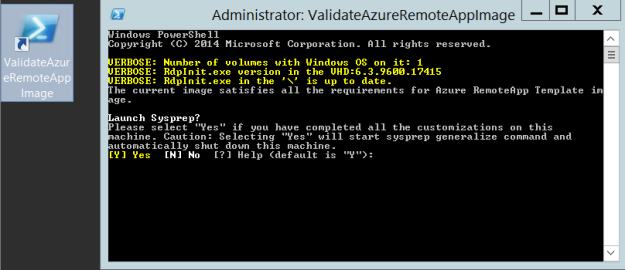
Finally, the Azure VM needed to be Sysprepped. The desktop contains a validation script, it will validate the image for Azure RemoteApp requirements, and ask to launch Sysprep:

Then:

After running Sysprep the VM shuts down and we are ready for capturing the virtual machine.

Capture the virtual machine

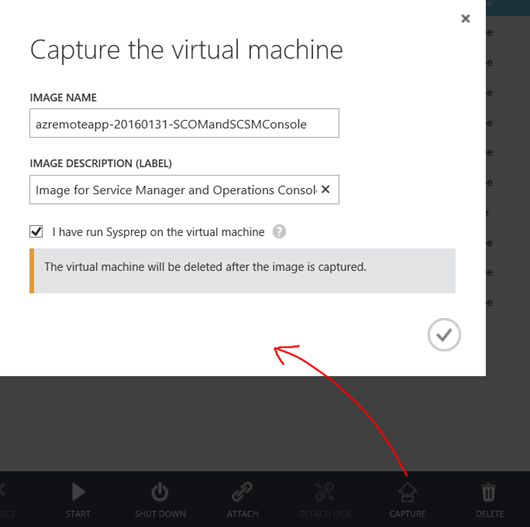
To capture the image follow the instructions as specified here https://azure.microsoft.com/en-us/documentation/articles/virtual-machines-capture-image-windows-server/.

I give the virtual machine an image name and description, and confirm that I have run Sysprep. Note that the VM will be deleted after the image is captured:

When finished, the captured image is deleted from the virtual machines instances, and available under images:

At this point I have a ready image to use. I can create new VM’s based on this image if I want, or I can use it as a RemoteApp image, which I will return to later. Now I’m ready for the next step.

Step 2 – Set up virtual network

Most will already have this in place if you have an existing Azure Subscription with Azure VMs. The requirement is that the Azure RemoteApp collection and image must be able to connect to the existing infrastructure. In this scenario where I want to use Service Manager and Operations Manager Consoles as Azure RemoteApp, I would need to be able to reach the Management Servers. Basically there are 3 scenarios:

  1. The Management Servers and the RemoteApp programs are on the same Azure Virtual Network.
  2. The Management Servers are on on-premise infrastructure, and the Virtual Network must be configured with a VPN to the on-premise infrastructure.
  3. The Management Servers are on another Virtual Network, and these two Virtual Networks must be connected to each other via Azure Site-to-Site VPN.
    1. A variant on the third scenario, where the Management Servers are created in a Resouce Group in ARM (Azure Resource Manager).

And of course, my scenario was the last one, as I have created my System Center 2012 R2 environment in a Resource Group using Azure Resource Manager J.

Since I cannot configure and deploy Azure RemoteApp in ARM, I needed to create a Site-to-Site VPN between my Azure Service Management environment (ASM) and ARM environment.

There are some good guidance on how to do that in this article: https://azure.microsoft.com/en-us/documentation/articles/virtual-networks-arm-asm-s2s/.

Since I already had VNets and VM’s in place I had to tweak a little in the guide, but I was able to make it work successfully. I will not get into details on that here, as I will focus on Azure RemoteApp, but that might be stuff for another blog post later :).

PS! Make sure that the Virtual Network has at least one DNS server to provide name resolution!

Step 3 – Create a collection

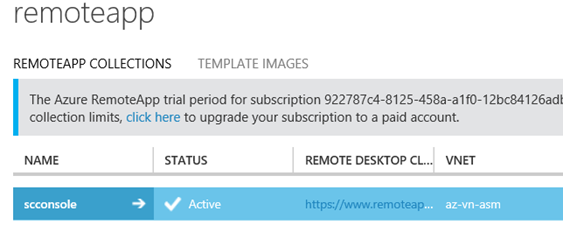
At this stage I was ready to create a RemoteApp Collection. I have signed up for a trial as notified in the image below, and selected to create a RemoteApp Collection with a Basic Plan. I specified my Virtual Network and Subnet that has connection to the ARM environment, and select to Join Local Domain.

After creating the RemoteApp Collection, I get a status of Input Required:

At the Quick Start menu, the steps to follow are highlighted:

Step 4 – Join collection to local domain

The next step is to join the local domain.

I specify my Active Directory Domain information, optionally specifying a OU for the RDS hosts that will provide the service. I also need a service account that has permissions to add computers to the domain.

After successfully joining the domain, the first step is acknowledged and I’m ready for the next step:

Step 5 – Add template image to collection

I now need to add the previously created Azure VM image I captured to the RemoteApp Collection.

Import the image into the Azure RemoteApp image library

First I add the image to the RemoteApp library:

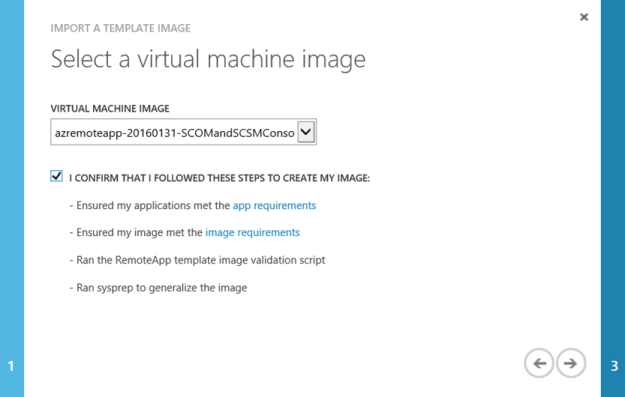
I select to import from the Virtual Machines library:

Find my image:

Give it a name for the RemoteApp template and specify a location consistent with my Azure infrastructure:

After that the Upload Pending status will be there for a while, about 15-20 minutes in my case:

And then the RemoteApp image is ready:

Link collection to existing template image

Now I can link the uploaded image to the collection:

Selecting my image template:

And after that provisioning of the collection with the image starts. This will take a while longer:

While its being provisioned, I can see that the status is pending, and that the operation can take up to 1 hour:

Provisioning status:

Finally, after provisioning:

Then we are ready for the last final steps before we can start testing!

Step 6 – Configure directory synchronization

Azure RemoteApp requires that you integrate with Azure Active Directory by either 1) configuring Azure Active Directory Sync with the Password Sync option, or 2) configuring Azure Active Directory Sync without the Password Sync option but using a domain that is federated to AD FS.

This is already in place in this environment, so the users I want to configure access for are already in Azure AD.

Step 7 – Publish RemoteApp apps

I can now publish the Remote App Programs from the provisioned image:

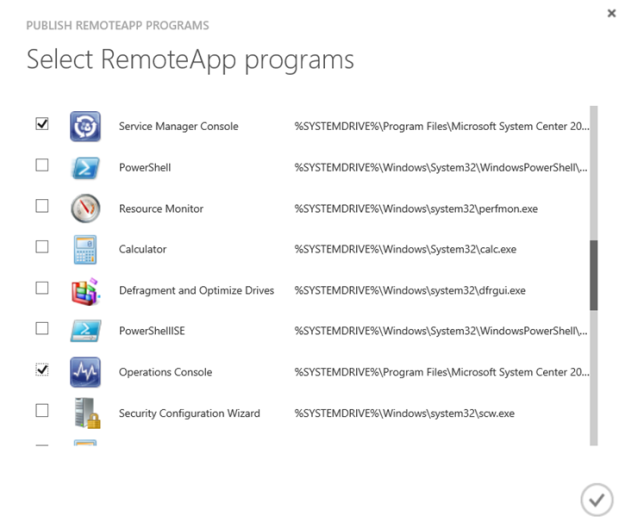
I select the Service Manager Console and Operations Console:

Verify that the RemoteApp programs are published:

Step 8 – Configure user access

Next I need to configure the users that should have access to the RemoteApp Programs:

After that I’m ready for testing!

Testing the RemoteApp Programs

Now I can test the RemoteApp Programs.

HTML5 Remote App Web

First I test with the new HTML5 Remote App Web Client, this is now in Public Preview, and available at the following URL: https://www.remoteapp.windowsazure.com/web.

When logging in I’m presented with the following Work Resources:

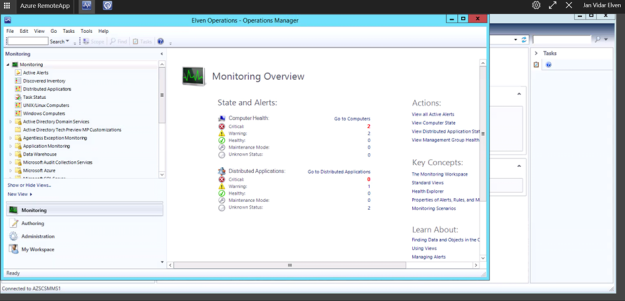
I can successfully launch the Service Manager and Operations Consoles. I can also easily switch between them in the top menu bar:

Azure Remote App Desktop App

Next I test with the downloadable Azure RemoteApp Desktop Application. After signing in I can see my work resources and launch them:

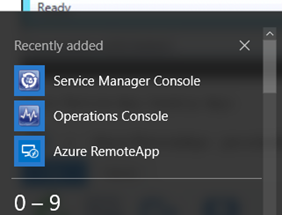
The Azure RemoteApp client also seamlessly integrate the RemoteApp Programs at the Start and All Apps Menu in Windows 10:

Windows 10 Mobile Remote Desktop App

There are Remote Desktop Apps for all mobile platforms (Windows Mobile, iPhone, iOS, Android). Here I have tested the Windows 10 Mobile App:

And I can launch the RemoteApp Program on my phone:

Windows 10 Continuum Support

There is a new Remote Desktop Preview App out for Windows 10 Mobile that support Continuum, but this Preview App does not currently support Azure RemoteApp. That will come later down the line though, and when that comes I will update this blog post or create a related post with my experiences on that!

Conclusion

This was quite fun to work with, and the whole process with the 8 steps above worked like a charm. The most challenging thing was to create the Site-to-Site VPN between my ASM and ARM environment in fact. Outside that I never had any errors or problems.

I’m eagerly awaiting Azure RemoteApp support for Azure Resource Manager though!