A Blog about Enterprise Mobility + Security, Azure AD, Datacenter Management, Service Delivery, Automation, Monitoring, Cloud OS, Azure and anything worthwhile sharing with the Cloud and Datacenter community.
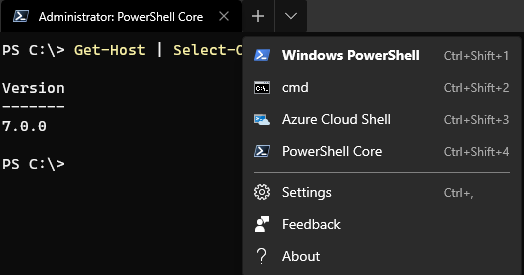
I’ve been using Windows PowerShell mostly previously, as I’m running Windows 10 and use a lot of PowerShell modules that variously depend on SDKs or other Windows Components, but I’m increasingly using PowerShell Core in scenarios for example with Azure Functions PowerShell ( https://docs.microsoft.com/en-us/azure/azure-functions/functions-reference-powershell). My computer now runs Visual Studio Code and Windows Terminal with different Profiles, so that I can easily change between environments and run side-by-side:
Let’s compare the “old” way and the “new” way, but first lets get an Access Token for Microsoft Graph.
Get Access Token using Graph Explorer
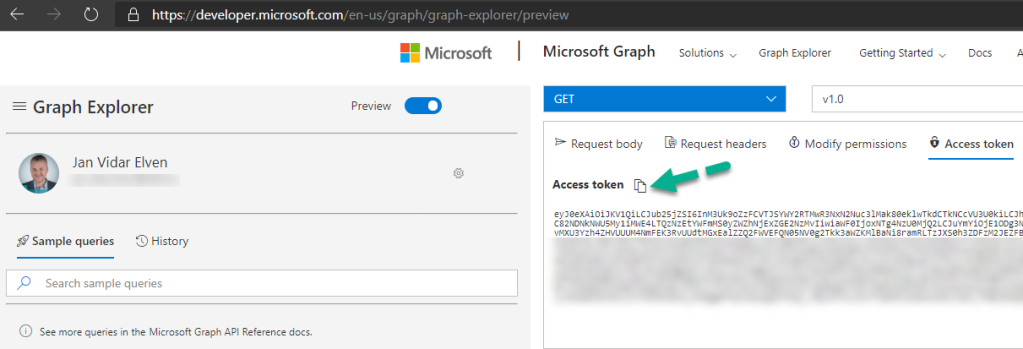
If you want to learn Microsoft Graph and start with some sample queries, Graph Explorer should be your main starting point: https://developer.microsoft.com/en-us/graph/graph-explorer/preview. The new preview version of the Graph Explorer lets you get a copy of your Access Token if you sign in with your account as shown below, you can copy it to your clipboard:
This Access Token will run queries as the logged on user (yourself) using the consented permissions in Graph Explorer, so you should only use this token for your own sample queries and not share it with anyone else.
Preferably you would get an Access Token by registering your own App Registration in Azure AD and authenticate using one of the following authentication flows:
Authorization Code Flow (Delegated User – Web Apps and APIs)
Device Code Flow (Delegated User – Native Clients, recommended for PowerShell)
Client Credentials Flow (Application Permissions – Scripts and Background Processes that don’t require user interactivity)
But for now I would use use the Access Token from Graph Explorer for the following samples.
The “old” way, using Authorization Header with Bearer Token
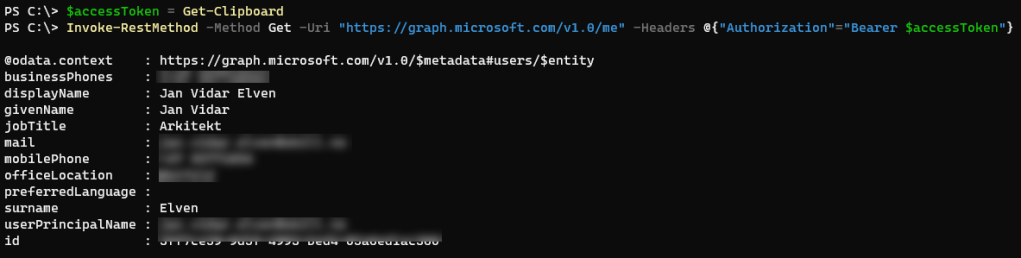
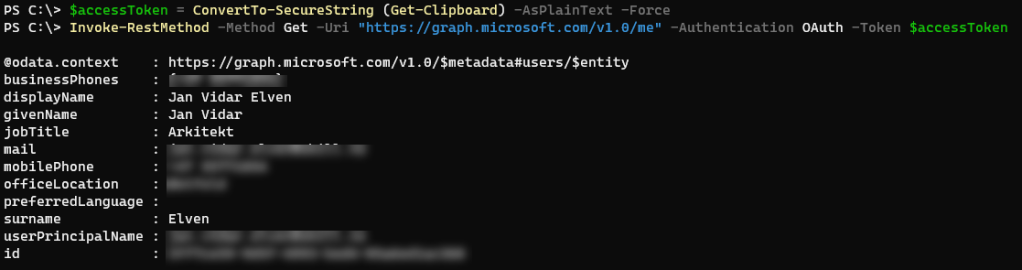
This method works with both Windows PowerShell and PowerShell Core. After aquiring an Access Token you would need to specify an Authorization Header with a Bearer Token for every request. In this example I get the Access Token from the Clipboard, as I copied that from the Graph Explorer.
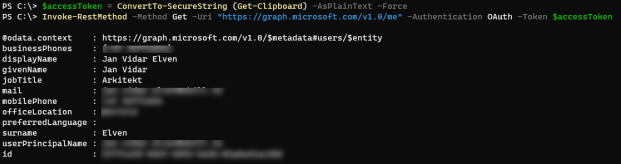
And then you would run the request specifying the Authentication parameter to be Oauth, and the Token parameter to be the secure string:
Invoke-RestMethod -Method Get -Uri "https://graph.microsoft.com/v1.0/me" -Authentication OAuth -Token $accessToken
This should return a response like below:
Summary
So in summary you can start using the Authentication and Token parameters in PowerShell Core, it would add / override the Authorization Header and Bearer Token for you. There can also be some added security gains as the Token is submitted as a securestring, which means you can try to keep it out of code as clear text.
A while back I wrote a blog post on how you could download, install and use a separate Azure AD PIM PowerShell Module for managing Privileged Roles, https://gotoguy.blog/2018/05/22/getting-started-with-azure-ad-pim-powershell-module/. With the recent update of the AzureADPreview Module, the cmdlets for managing Privileged Roles are now included in the module, so there is no longer required to install a separate module for this!
In this blog post I will explain and show how these commands can be used. These PowerShell CmdLets are also at parity with the Graph API, so I will also show equivalent methods for this.
Install or Update AzureADPreview Module
First you need to either install or update the AzureADPreview Module, so that you are running on version 2.0.2.27 or newer.
Update November 23 2020: Latest version of AzureADPreview Module is 2.0.2.129.
The AzureADPreview Module can be installed from PowerShellGallery using Install-Module or Update-Module, and you can verify which version you have installed using Get-Module <modulename> –ListAvailable like this:
With that requirement out of the way we can proceed to look at the commands.
Privileged Role Management Commands
Currently in the AzureADPreview Module, there are 13 commands related to Privileged Roles:
Note that some of the above commands are not in that documentation, all the new commands have a *MS* which means it is mapped to equivalent Microsoft Graph API’s.
In the interest of this blog post, here is a quick explanation of each of the available commands:
Add-AzureADMSPrivilegedResource. Use this API to add a new azure AD MS privileged resource.
Close-AzureADMSPrivilegedRoleAssignmentRequest. Cancel a AzureADMSPrivilegedRoleAssignmentRequest.
Get-AzureADMSPrivilegedResource. Get azure AD MS privileged resource.
Get-AzureADMSPrivilegedRoleAssignment. Get role assignments for a specific provider and resource.
Get-AzureADMSPrivilegedRoleAssignmentRequest. Get role assignment request for a specific resource.
Get-AzureADMSPrivilegedRoleDefinition. Get role definitions.
Get-AzureADMSPrivilegedRoleSetting. Get role settings.
Open-AzureADMSPrivilegedRoleAssignmentRequest. Create a role assignment request.
Set-AzureADMSPrivilegedRoleAssignmentRequest. Update a role assignment request.
Set-AzureADMSPrivilegedRoleSetting. Update role setting.
The other 3 Privileged Role commands that are still available to use, but currently are not documented on the above link to docs are:
Get-AzureADPrivilegedRole. List all Directory Roles available for Privileged Roles assignments.
Get-AzureADPrivilegedRoleAssignment. List active and eligible privileged role assignments.
New-AzureADPrivilegedRoleAssignment. Creates a new privileged role assignment for specified role and user.
(*) As soon as your tenant is upgraded to using the updated Privileged Identity Management experience for Azure AD roles (see below) these three commands will be outdated and should not be used anymore.
Further on in this blog post I will provide some more examples and usage scenarios for the new Azure AD Privileged Role Management commands, and their equivalent Microsoft Graph API methods, but first something on the difference between Azure Resources and Azure AD, changes in management experience and current limitations in the PowerShell commands.
Azure Resources vs. Azure AD
As you might know, Azure AD PIM can be used for managing privileged role assignments to both Azure AD roles and Azure Resources:
The new PowerShell commands that follows the syntax verb-AzureADMSPrivilegedRole…. all require a parameter called ProviderId, which as per today only support “AzureResources”. This means that currently you can only use the new Azure AD PowerShell commands for managing PIM for Azure resources, not for Azure AD roles yet! I had this confirmed with the Microsoft Program Manager for Azure AD PIM, as you can see from the conversation https://twitter.com/stevemsft/status/1143977432690466816?s=20 and shown in the below image:
This is related to the following notice from the Azure AD PIM Microsoft Graph documentation, stating that Azure AD roles will move to the Azure resource API in the coming months:
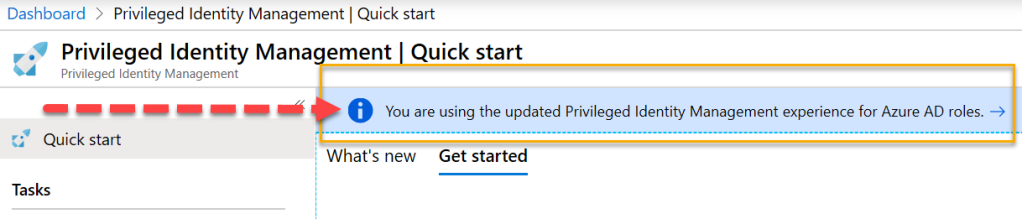
Update March 19 2020: Tenants are now starting to get migrated to the new Azure AD PIM provider similar to Azure Resources! If you log in to your tenant and see the following info in the Privileged Identity Management blade, then you can also use the new Azure AD provider, as I will show in the examples below:
As the new PowerShell commands are built on Microsoft Graph, this also means that they will work for Azure AD roles depending o the move to the Azure resources API.
Explore Privileged Resources
There are two commands for exploring and adding Privileged Azure Resources:
The equivalent Graph API methods for Azure AD roles are (Beta endpoint only as per march 2020):
List: GET /privilegedAccess/aadRoles/resources
Get: GET /privilegedAccess/aadRoles/resources/{tenantid}
Register: POST /privilegedAccess/aadRoles/resources/register (Note per march 2020: There are currently no way to programmatically onboard tenants to PIM for Azure AD roles)
This will return a list (capped at max 200 results), with the Id, ExternalId, Type, DisplayName and more for each resource that have been registered to Azure AD PIM:
As mentioned above the list is capped at max 200 results, which is a Microsoft Graph limitation for this privileged resource API. You can use the –Top parameter to specify a lower number of returned results, like –Top 50, but it will just ignore and cap at 200 if you for example type –Top 300.
So to return fewer results we can use the –Filter parameter which support Odata query. I have tried some different combinations, and not all will work as expected. Some examples of working filters:
..or any other specific resource type like Microsoft.Network/loadBalancers, Microsoft.Network/networkSecurityGroups, etc., which I find is a bit strange as I would like to filter on those as well.
If you know the specific resource id you can also get that privileged resource object directly:
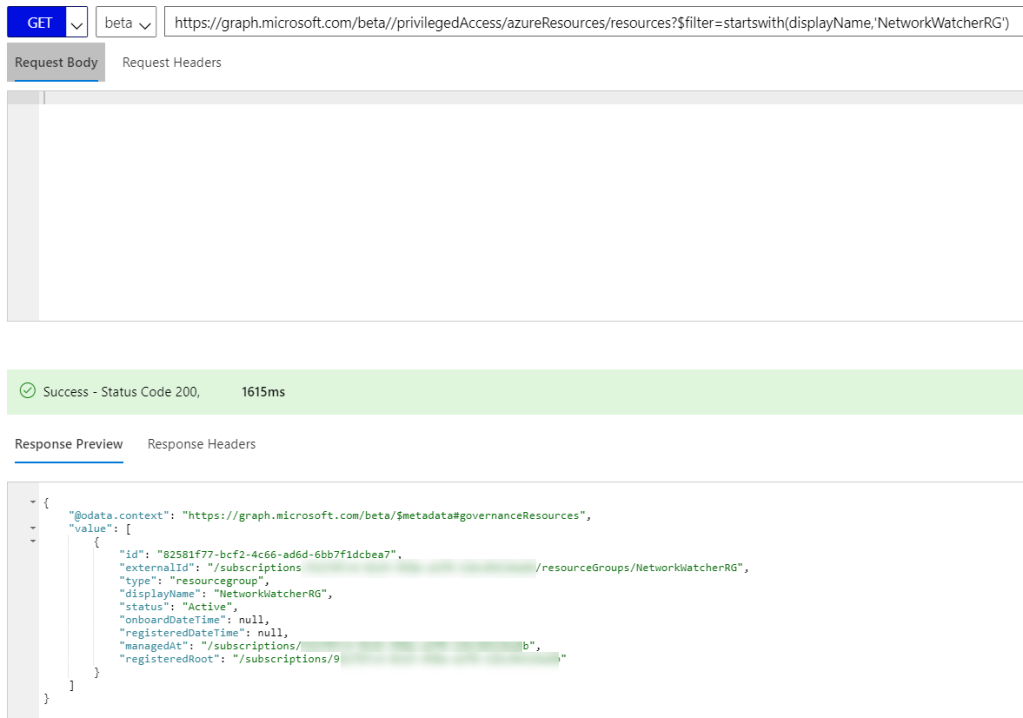
Lets compare this to the Microsoft Graph API methods, using Graph Explorer. To list all managed Azure Resources I run the GET /privilegedAccess/azureResources/resources like this:
Which pretty much returns the same list of resources and attributes as I did when running the PowerShell command. There is one important change though, and I mentioned earlier that the PowerShell command would only return max 200 results. In the Graph response I will receive a skip token from where if I run that I will get the next set of potentially 200 more results, and so on.
Graph can also handle filters of course, so lets try that. Here are some variations you can try out:
GET /privilegedAccess/azureResources/resources?$filter=type eq ‘resourcegroup’&$top=5
GET /privilegedAccess/azureResources/resources?$filter=displayName eq ‘rg-auth-dc’
GET /privilegedAccess/azureResources/resources?$filter=startswith(displayName,’rg-‘)
And if you want to get a specific resource with Graph, just specify the id like this:
GET /privilegedAccess/azureResources/resources/ad7327ba-50f4-4f03-a4ee-029f310b6775
Which will return the specific resource in the response:
Last, to add a resource as a managed resource to Azure AD PIM, using PowerShell can be done like this:
These commands are just to get a list of and adding managed Azure resources for Azure AD PIM, i the next parts we will look into actually managing assignments and settings.
Examples of Exploring Privileged Azure AD role resource
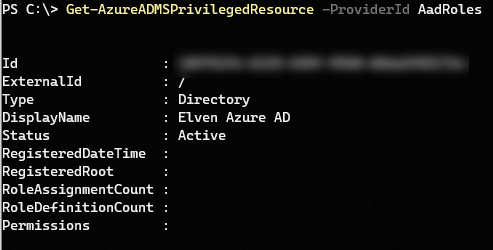
To get a list over all tenants registered for privileged Azure AD roles, just run:
This will return a list of directories that have been onboarded for PIM for Azure AD Roles, with the Id referring to tenant id, Type, DisplayName and more:
If you know the specific tenant id you can also get that privileged resource object directly:
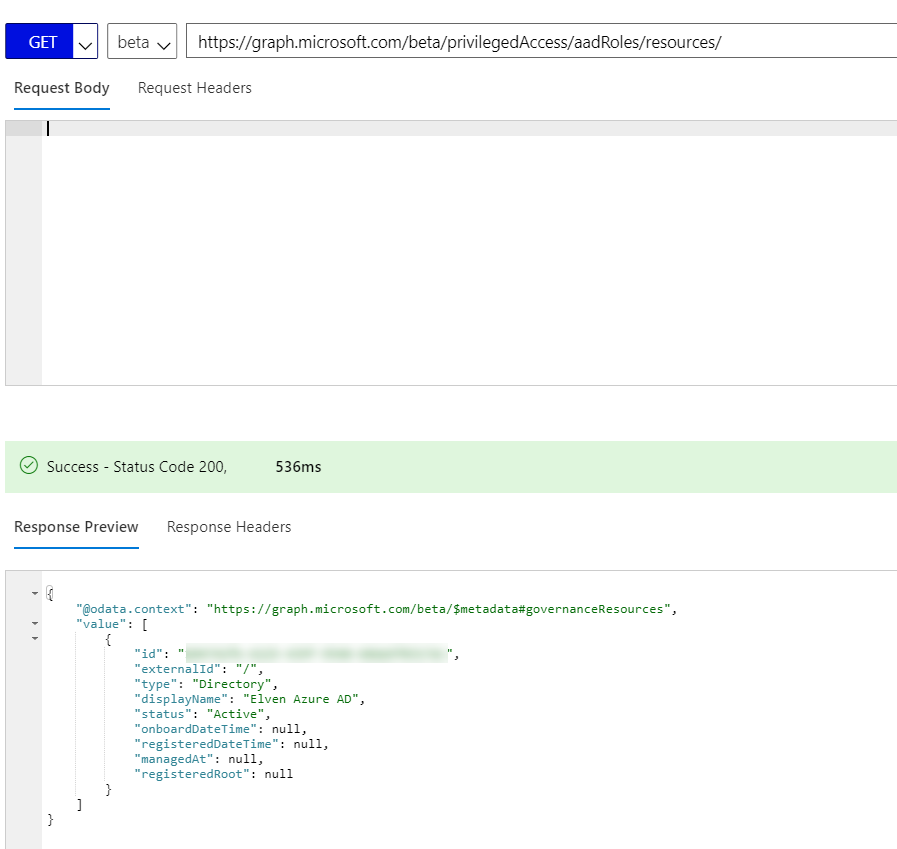
Lets compare this to the Microsoft Graph API methods, using Graph Explorer. To list all managed Azure AD roles directories I run the GET /privilegedAccess/aadRoles/resources like this:
Note that you also can specify the resource for Azure AD roles directly, by specifying the tenant id like this:
GET /privilegedAccess/aadRoles/resources/{tenant-id}
These commands are just to get a list and settings for tenant onboarded to Azure AD roles management with Azure AD PIM, i the next parts we will look into actually managing assignments and settings.
Explore Role Assignments
The following command can be used for listing or getting specific role assignments for Azure resources:
The equivalent Microsoft Graph API methods for Azure Resources:
List: GET /privilegedAccess/azureResources/resources/{resourceId}/roleAssignments
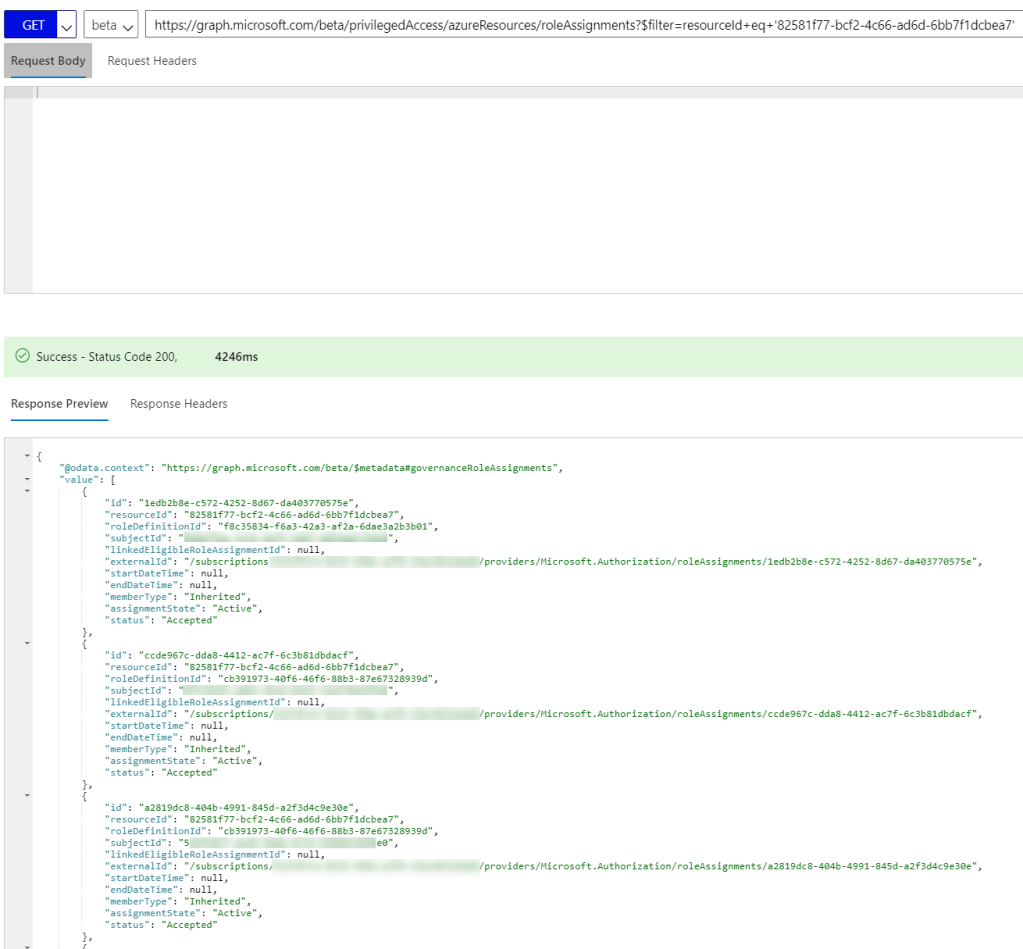
List: GET /privilegedAccess/azureResources/roleAssignments?$filter=resourceId+eq+'{resourceId}’
List (Mine): GET /privilegedAccess/azureResources/roleAssignments?$filter=subjectId+eq+'{myId}’
Get: GET /privilegedAccess/azureResources/resources/{resourceId}/roleAssignments/{id}
Get: GET /privilegedAccess/azureResources/roleAssignments/{id}?$filter=resourceId+eq+'{resourceId}’
Get (Mine): GET /privilegedAccess/azureResources/roleAssignments/{id}?$filter=subjectId+eq+'{myId}’
And these are the main Graph API methods for Azure AD roles:
List: GET /privilegedAccess/aadRoles/resources/{tenantId}/roleAssignments
List (Mine): GET /privilegedAccess/aadRoles/resources/{tenantId}/roleAssignments?$filter=subjectId+eq+'{myId}’
List (Role): GET privilegedAccess/aadRoles/resources/{tenantId}/roleAssignments?filter=roleDefinitionId eq ‘{myRoleDefinitionId}’
Now that seems a lot of different variations for Graph calls for the one PowerShell command, but as you will see later Graph can be a little more flexible in querying in different ways.
Examples of Exploring Role Assignments for Azure Resources
Lets see some samples for PowerShell first. Now we need to supply a resource id, that can be subscription object, a resource group object, any type of resource objects like virtual machines, virtual networks and so on, and even management group objects. So based on the commands previously shown in the blog post, we should be able to get out the resource id’s first, for example like this:
So this returns a list of role assignments for the specified resource, each assignment has its own id, as well as the ResourceId, the RoleDefinitionId (which role that has been assigned, like reader, contributor, owner, etc), SubjectId (which user, service principal, group, etc has been assigned the role). In addition we can get info on any linked eligible assignements, start and end time for assignements, assignment state and if the assignment is active or not, or if the type is inherited or assigned directly to the resource.
The same results can be retrieved by first querying for the resource id:
And then querying for the role assignments belonging to this resource:
Basically the above command returns the same as this blade in the Azure Portal:
Examples of Exploring Role Assignments for Azure AD roles
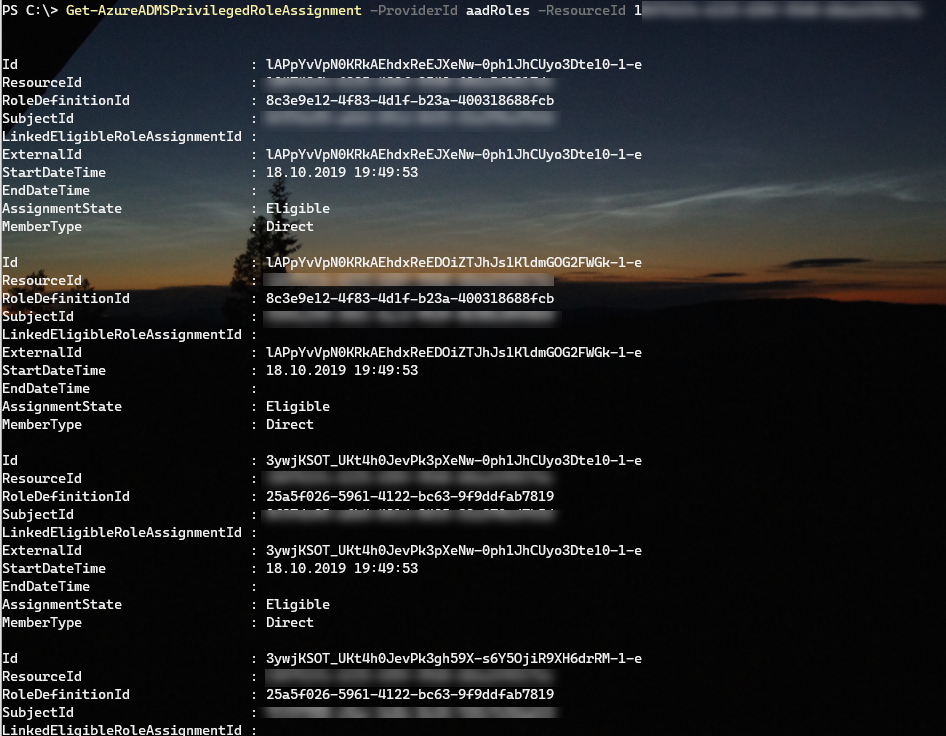
If i want to look at Role Assignments for Azure AD roles via PowerShell you would specify ProviderId as aadRoles and the ResourceId to be the tenant id:
This will return all Azure AD role assignments in your tenant:
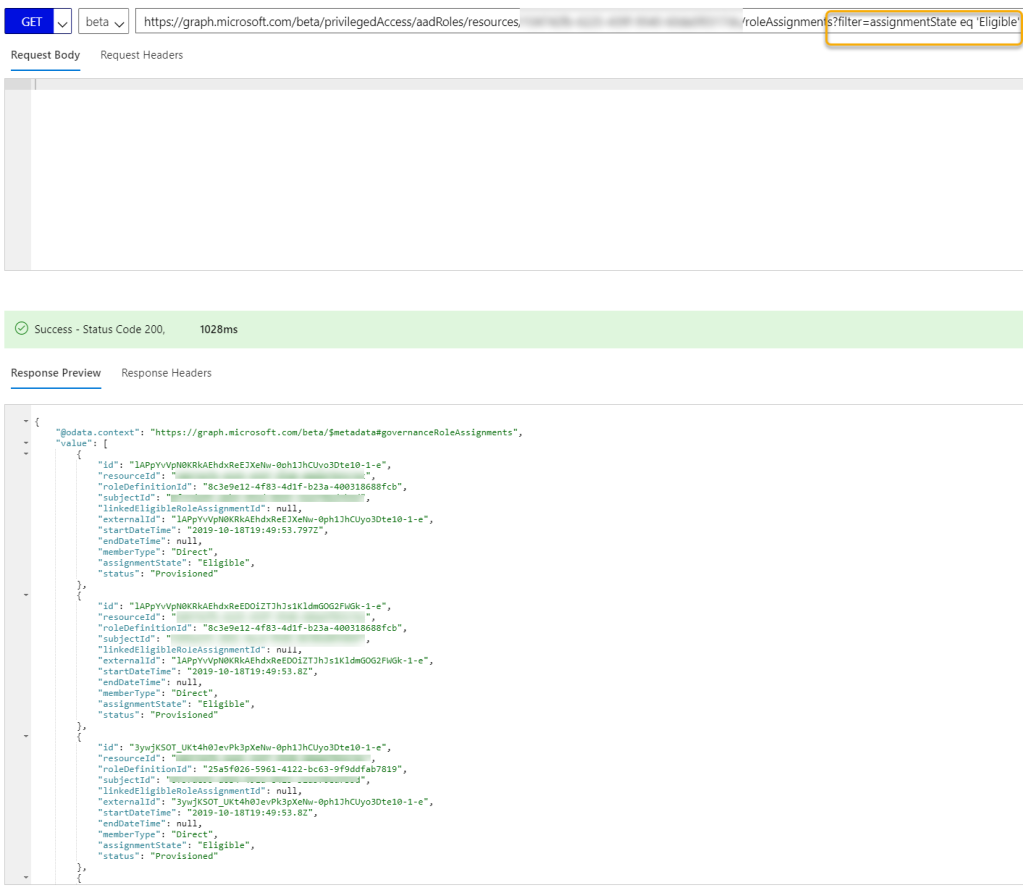
To return fewer results we can use the –Filter parameter which support Odata query. I have tried some different combinations, here are some examples of working filters:
If you are using Azure Automation and working with Runbooks for automating against your Azure subscription, you can create an Azure Run As Account for authenticating and logging in to your subscription. The Azure Run As Account is configured in your Automation Account, and will do the following:
Creates an Azure AD application with a self-signed certificate, creates a service principal account for the application in Azure AD, and assigns the Contributor role for the account in your current subscription.
Creates an Automation certificate asset named AzureRunAsCertificate in the specified Automation account. The certificate asset holds the certificate private key that’s used by the Azure AD application.
Creates an Automation connection asset named AzureRunAsConnection in the specified Automation account. The connection asset holds the applicationId, tenantId, subscriptionId, and certificate thumbprint.
Something worth noting is that this Azure Run As Account will by default have the Contributor role to your entire subscription, so it would make sense to look into changing RBAC settings for the subcription or resource groups if you want to limit that. Also, all users that have access to the Automation Account will also have the opprotunity to use this Azure Run As Account.
Having said that, the Azure Run As Account is a great way to authenticate securely with certificates and a service principal name without needing to store a username and password in a credential object.
So I thought, wouldn’t it be great if we could use this same Azure Run As Account to log in to your Azure AD tenant for the possibility to run Azure AD PowerShell commands? The reason I thought of this is because of this article showing how to authenticate with Azure AD v2 PowerShell and Service Principal: https://docs.microsoft.com/en-us/powershell/azure/active-directory/signing-in-service-principal?view=azureadps-2.0. In this short blog post will show you how to do this.
Getting the Azure Run As Account details
First, look into your Automation Account and Account Settings to find any Run as accounts:
Click on the Azure Run As Account to see the details (or to create one if you haven’t before). Take a note of the Service Principal Object Id, we will use that later:
Creating a Runbook that Authenticates with Service Principal to Azure AD
Now, let’s create a PowerShell runbook using the Azure Run As Account for connecting to Azure AD.
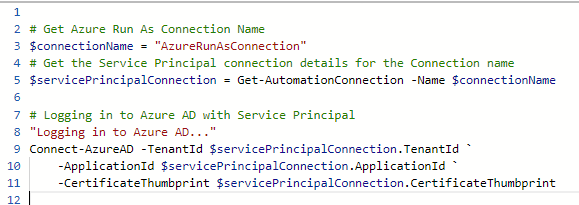
First, I set the connection name “AzureRunAsConnection”, and then save that as a variable for holding my service principal details using the Get-AutomationConnection cmdlet.
Then, logging in to Azure AD is done with specifiying TenantId, ApplicationId and CertificateThumbprint parameters, as shown below:
This will log in my service principal to Azure AD and I’m ready to run some commands, for example getting some organization details for the tenant, or counting different types of user objects:
Running this runbook will for example show me this output for my tenant. This shows that I successfully authenticated with the Azure Run As Account service principal:
Here is a link to a Gist where I have included the above PowerShell runbook script:
This file contains hidden or bidirectional Unicode text that may be interpreted or compiled differently than what appears below. To review, open the file in an editor that reveals hidden Unicode characters. Learn more about bidirectional Unicode characters
Depending on what kind of automation you want to do against Azure AD, especially if you want to write data, you will have to add the Service Principal to an Azure AD Role. Here is a couple of examples, using the object id for the service principal I told you to note earlier from the Azure Run As Account:
# Get the associated Service Principal for the Azure Run As Account
$runAsServicePrincipal = Get-AzureADServicePrincipal -ObjectId ""

# Add the Service Principal to the Directory Readers Role
Add-AzureADDirectoryRoleMember -ObjectId (Get-AzureADDirectoryRole | where-object {$_.DisplayName -eq "Directory Readers"}).Objectid -RefObjectId $runAsServicePrincipal.ObjectId

# Add the Service Principal to the User Administrator Role
Add-AzureADDirectoryRoleMember -ObjectId (Get-AzureADDirectoryRole | where-object {$_.DisplayName -eq "User Account Administrator"}).Objectid -RefObjectId $aaAadUser.ObjectId

# Add the Service Principal to the Global Administrator Role
Add-AzureADDirectoryRoleMember -ObjectId (Get-AzureADDirectoryRole | where-object {$_.DisplayName -eq "Company Administrator"}).Objectid -RefObjectId $runAsServicePrincipal.ObjectId
That concludes this short blog post, hope it has been helpful! Thanks for reading and remember to share if it was useful
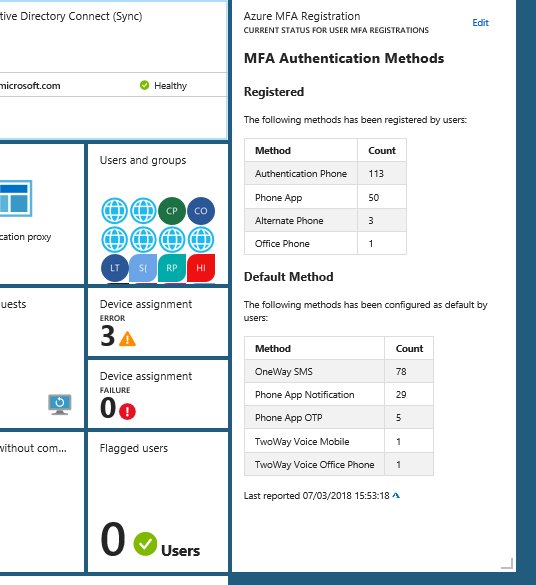
If you are working with EMS and implementing Azure AD, Intune, MDM, MAM, Information Protection and more, you can build yourself some great dashboards in the Azure Portal using tiles and pin blades to your customized dashboard. This is an example from my own workplace:
Often when I work with projects implementing Identity & Access, Conditional Access and Azure MFA, I wish I could have a dashboard to report on MFA registration, and be able to pin that to my EMS dashboard as shown above.
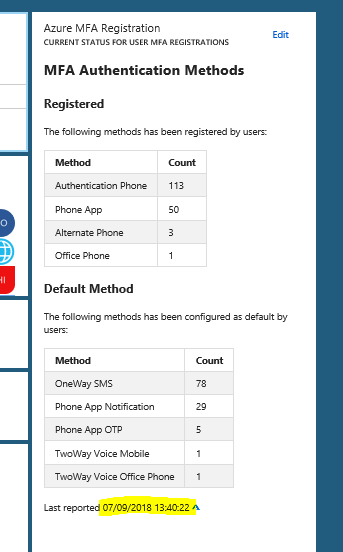
It might be in the future that Azure MFA registrations and methods will be native in the portal, but for now this information have to be retreived in another way. In this blog post I will show you how you can set up a solution for showing this information. I will use the Markdown Tile from the gallery for displaying this information, and in the end it will look like this:
I referred in the title of this blog post to the good, the bad and the ugly, and by that I mean the process of setting this up, because it starts easy enough in the beginning but it will get more “ugly” in the end 😉
The Good – Setting up the Markdown Tile
I will use the Markdown Tile for the content in my customized dashboard in my Azure Portal. The first part is easy to set up, just click Edit and find the Markdown tile from the gallery, as shown below:
Drag the tile to a place you want it on your dashboard, and the Edit the title, subtitle and content as prompted:
There is a sample content provided, other than that you can write your own markdown. I will not get into details on markdown format here, there is a lot of good guides for learning the format, for example this: https://guides.github.com/features/mastering-markdown/. I will however provide you with a sample for reporting MFA registrations and default methods. This is how I set up my markdown tile:
And here is a link to my github repository where you can get the complete MFAReport.md file sample:
Now we need to fill that markdown tile with some real Azure AD MFA report data to report on.
The Bad – PowerShell Script for getting MFA registration and methods to Markdown
So the “bad” news is that we are reliant on running some Azure AD PowerShell commands for getting user details for MFA registration and methods. For now we are also reliant on the Azure AD v1 PowerShell (MSOnline) Module, as the new v2 AzureAD Module does not yet have any methods to get MFA authentication data. We cannot use the Microsoft Graph API either to get MFA user data, but I expect that to change in the future.
So lets look at the script I use, and after authenticating and connecting to Azure AD in my tenant with Connect-MSOLService, I will run the following commands to get details from each user where there has been configured one or more StrongAuthenticationMethods, and Group on those methods and save the results to a hash table. The results are stored in the $authMethodsRegistered object variable. Similarly I run the command once more, filtering on only showing the methods that are set to default for each user, and save to the $authMethodsDefault variable.
So now we have a script where we can get MFA authentication details for each user and create a markdown file that we can use in the tile in the Azure Portal custom dashboard. But it is all a manual process now, and it works fine for an ad hoc update. If we want to automate however, we have to get into the “ugly” stuff 😉
The Ugly – Automating Markdown creation and update Dashboard
This part requires multiple steps. First we need to schedule and run the PowerShell commands from above. Then we need to find a way to update the customized dashboard tile with the updated markdown file. To summary, this is what we need now:
Schedule the PowerShell script to run automatically. We can use Azure Automation for that.
Programmatically change the markdown tile in the customized dashboard. We can use Azure Resource Manager Rest API for that.
Lets get into the Azure Automation solution first. To run a PowerShell script I will need to create a Runbook, and in that Runbook I need to authenticate to Azure AD. I can define a Credential Asset with a username and password for a global admin user, but I like to use the least privilege possible, and besides that all my global admins are either protected by Azure AD PIM and/or MFA, so that won’t work. I prefer to use a service principal whereever possible, but after testing extensively with Connect-MSOLService that is not supported either.
So I tested with a dedicated Azure AD credential account, first by only adding the user to the Directory Readers role. I was able to list all users with Get-MSOLUser, but not any StrongAuthentication info. Neither did it work with Security Readers. In the end I added the user account to User Administrator role in Azure AD, and I was successful getting StrongAuthentication methods.
So, in my automation accont I will add or reuse my credentials:
Next, I will create a new PowerShell script based Runbook, basically I will use the PowerShell script from earlier in the blog, but with a couple of added parameter and getting the credential using the Get-PSAutomationCredential method. This is how it looks, you will get link to the complete script later:
And after testing, I can see that I successfully will get the MFAReport.md content (added a Get-Content .\MFAReport.md at the end to display the output):
Now that we have a solution for running the PowerShell script and generating the markdown file, the next part is how to update that data in the custom dashboard. And for that we need to look into programatically changing Azure Portal dashboards. There is a good resource and starting point for that in this article: https://docs.microsoft.com/en-us/azure/azure-portal/azure-portal-dashboards-create-programmatically.
First you need to share the custom dashboard, remember to include the markdown tile we set up in the first part of this blog post. At the top in the portal dashboard, select the Share button:
By sharing the dashboard will published as an Azure resource. Specify a name, select the subscription and either use the default dashboard resource group or select an existing one:
Go to Resource Explorer in the Portal:
Navigate to Subscriptions, Resource Groups, and find the resource group and resource containing the custom dashboard. From there you will be able to see the JSON definition of the dashboard and specifically the markdown tile containing the content we want to update:
So for next process now we need to copy this complete JSON definition containing all your tiles including the markdown tile. Locally on your computer, create a .json file in your favorite JSON editor, I use Visual Studio Code for this, and paste in the content. I have named my file DeploymentTemplateMFAReport.json.
Now we need to change this template to be ready for deployment, and for that we need to add or change a couple of things. First, in the start of the JSON file, add schema and versioning, and parameters, variables and resources section like I have shown below in line 1-17:
I have chosen to use 3 parameters, the markdown content itself, and name of the dashboard and the title of the dashboard.
Next, find the tile for the markdown content, and change the content value to the value of the parameter, like I have done at line 113 here:
And last, at the end of the json template, add and change the following settings, I have used my parameters for the dashboard name and the dashboard title here in the lines 401-411:
My deployment template for the customized dashboard is now completely general and can be used in every environment. In fact you are welcome to borrow and use my template from above her, I have included it in my github repository:
Working locally in my Visual Studio Code editor, I can now test the deployment using Azure PowerShell, as shown below and described with these simple steps:
Connect to Azure Resource Manager and select the Subscription
Specify a variable for the Resource Group you want to deploy to
The MFAreport.md file (which we created earlier) need some converting to JSON format, I’m removing all espace characters and any uneeded special characters
Specify variable names your environment for name and title for the dashboard
Deploy the custom dashboard to the resource group
However, now that we can test the deployment, I want to schedule a deployment using Azure Automation, and I will continue on my previous runbook from before. But first we need to set up some connections for authenticating to Azure and some variables.
I Azure Automation we can create an Azure Run As Account, this will also create a service principal. If you navigate to your Automation Account in the Azure Portal, and go to the section called Run as accounts, you can create an Azure Run As Account automatically, as I have done here:
If I look more closely at this generated Run As Account, I can see details for Azure AD App Registration, Service Principal, Certificate and more. This account will also automatically be assigned Contributor role for my Azure Subscription. If you want more control over Azure Run As Accounts, you can create your own as described in the following article: https://docs.microsoft.com/en-us/azure/automation/automation-create-runas-account
I will use this Azure Run As account in my environment to deploy the dashboard resource, I’ll just need to make sure the account has contributor access to the resource group. Next I will set ut a few variables under the Variables section for my Automation Account, I will use these variables when I deploy the resource:
Now we are ready to finally put together the complete Runbook and test it. You will have the complete link later in the blog post, but I will share some screenshots first:
After I’ve connected with Connect-MSOLService I’m creating a variable for the markdown content, so I’ve changed from earlier when I saved a .md file temporarily, now I just adding lines using the newline special character (`n):
The next part is for logging in to Azure (using the Azure Run As Account mentioned above), and then getting my variables ready for deployment:
Then I convert the markdown content to Json format, and removing any escape characters that I don’t need:
And then deploy the dashboard resource with parameters for markdown content and dashboard name & title. Note that I’m using my deployment template as a source from my github repository via the TemplateUri property:
You can use any TemplateUri you want, for example from a more private source like a storage account blob etc.
Testing the Runbook gives the following output, which shows it was successful:
When I now go and refresh the dasboard in the portal, I can see that the markdown tile has been updated:
That leaves me with just publishing and scheduling the runbook:
When creating a new schedule specify a name and recurrence:
Link the schedule to the runbook and any needed parameters, I have to specify my credential that are allowed to Connect-MSOLService:
That concludes this lengthy blog post. The script will now run regularly and update my custom markdown tile with MFA report data.
Here is the link to the PowerShell script used in my Azure Automation runbook, enjoy your MFA Reporting!
This is a short blog post showing how you can get started and some examples of using the PIM PowerShell Module for Azure AD Privileged Identity Management.
Here is a short explanation of the available commands:
Connect-PimService. Prompts you to log on with an Azure AD Account that might have any PIM roles assigned. You can optionally specify a username, tenantname or credential object as parameters. Especially tenantname would be useful if you are a guest user with roles assigned in another tenant.
Show-PimServiceConnection. This will show the active PimService session details you have, after connecting with Connect-PimService.
Get-PrivilegedRoleAssignment. This would list any permanent or eligible role assignments the user you connected with using Connect-PimService has.
Enable-PrivilegedRoleAssignment. This command will enable a specified role assignments. It is required to specify which role either by RoleId or by a RoleAssignment variable. It is also required to specify a Duration for activation. Optional parameters includes Reason, TicketNumber, TicketSystem and StartTimeUtc.
Disable-PrivilegedRoleAssignment. If you previously have activated one or more roles with Enable-PrivilegedRoleAssignement, you can preemptively deactivate these roles again before the duration expires. You must specify a RoleId or RoleAssignment variable.
Disconnect-PimService. Disconnects any previous sessions to PimService.
Examples of Azure AD PIM Commands
In the following I will show some examples of using the Azure AD PIM Module.
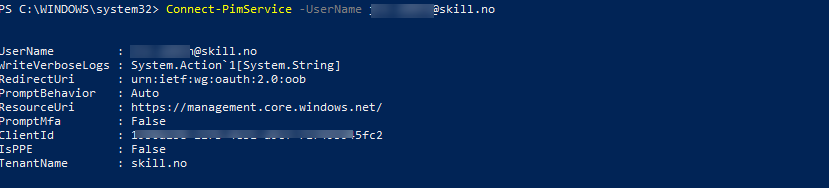
Connect-PimService
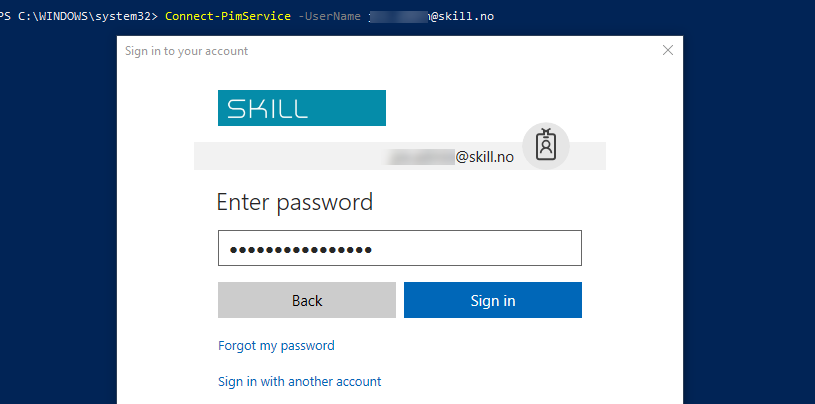
In the following I’m connecting with a specified username, if it is required to use Azure MFA for this user I will be prompted for that as well:
Connect-PimService –UserName <username>
After authenticating, PIM service connection details are returned, here slightly masked:
The above returned is exactly the same as would be returned by running the command:
Show-PimServiceConnection
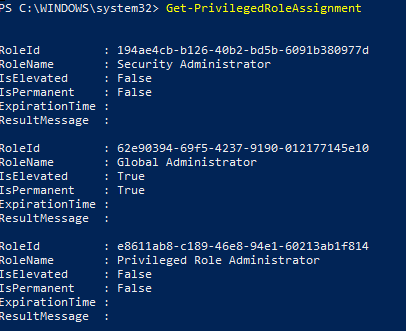
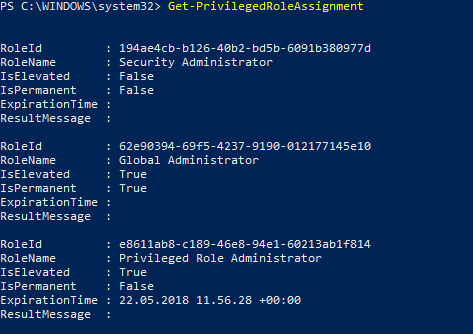
Get-PrivilegedRoleAssignment
This command will list any role assignments, permanent or eligible your user might have. Here is a couple of examples for outputs for two different admin users. The first user is eligible for Security Administrator and Privileged Role Administrator, and permanent for Global Administrator:
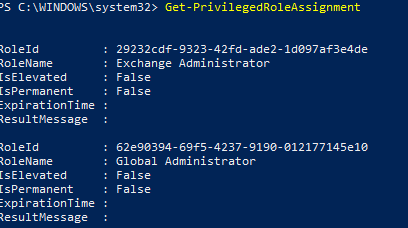
The second admin user is eligible for Exchange Administrator and Global Administrator:
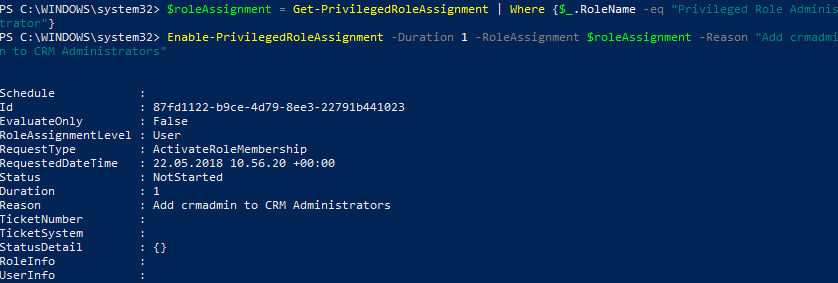
If I want to assign a variable to a role assignment, I can do it like the following command:
$roleAssignment = Get-PrivilegedRoleAssignment | Where {$_.RoleName -eq "Privileged Role Administrator"}
I now have a role assignment variable I can use in the following commands.
Enable-PrivilegedRoleAssignment
To enable one of my roles, I need to specify a duration (PS! keep inside the allowed role settings for max duration!), and specify which role either by RoleId or RoleAssignment variable. Optional parameters like Reason etc can also be specified.
After running the command, if successful it will return as a submitted request for activating role membership.
By running Get-PrivilegedRoleAssignment again, we can now see that the role of “Privileged Role Administrator” is indeed activated (elevated), and with a ExpirationTime (UTC time):
PS! If you have required MFA on activation for the role, one of two things will happen:
If the user already has verified the identity with Azure MFA when authenticating with Connect-PimService, the user will not be asked again. This is the same experience as by using the Azure Portal for activating roles.
If the user hasn’t verified with Azure MFA, the user will be prompted when activating the role, similar to this example:
Disable-PrivilegedRoleAssignment
Any roles you have activated will automatically deactivate after the duration specified has passed. However, if you are finished doing administrative tasks with your role, you can deactivate the role manually.
To deactivate an active assignment, run the following command specifying a RoleId or RoleAssignment variable:
I recently installed the new release of Windows Server, version 1709 on my Intel NUC, you can read about that here.
I have installed Project Honolulu for remote server management on that server, but as this Intel NUC is usually located on my home lab network, I want to be able to publish and access the Honolulu website using Azure AD Application Proxy.
As the Windows Server 1709 is Server Core, I need to install and configure the Azure AD Application Proxy Connector silently, and these are the steps I did to do that.
First, you need to download the Application Proxy connector install file, and transfer it to the server. You can access the connector download from Application Proxy section in your Azure AD portal:
After that, run the following command to do a quiet install of the connector, skipping registration interactively:
Next we need to register the Application Proxy connector to Azure AD, and for that we need to run some PowerShell commands. There are two ways this can be done, with a Credential Object, or using an Offline Token. Using Credential is simplest, but has the drawback that you cannot use that method if your Global Administrator account is protected with Azure MFA. Lets look at both methods below.
Using Credential Object:
On the Server you want to register the Azure AD App Proxy Connector, start a PowerShell session and run the following commands for setting the Global Administrator user name and password, and then create a Credential Object.
After that, run the following commands to run the RegisterConnector.ps1 script for register the connector using Credential object as authentication:
You can copy the PowerShell commands used above using the Gist linked at the end of this blog post.
Using Offline Token:
If you can’t or don’t want to use a credential object, you have to use a offline token. The following commands will get an access token for the authorization context needed for Application Proxy Connector Registration.
Getting the Token can be run from any client, and then transferred to the server, but you will need to have the Azure Active Directory Authentication Library (ADAL) installed at the machine you are running the PowerShell commands. The easiest way to get the needed libraries installed is to Install the AzureAD PowerShell Module.
The following commands locates the AzureAD (or AzureADPreview) Module, and then finds the ADAL Helper Library: Microsoft.IdentityModel.Clients.ActiveDirectory.dll, and adds that as a Type to the PowerShell session:
Next, run these commands to define some constants, these values are the same for all tenants:
Now we can run these commands for setting the authentication context and then prompt user for AuthN:
Running the above commands will result in an authentication prompt, this is where you would specify your Global Administrator account, and if MFA enabled this will also work:
After authenticating we can check the result and save the token and tenantId in variables as shown below:
Next, copy the contents of the $token and $tenantId to the Windows Server 1709, and run the following command to create a secure string from the token:
And then run the RegisterConnector.ps1 script with AuthenticationMode as Token and using the secure token and tenant id as parameter values as shown below:
PS! According to the official documentation, there are no description or examples for the mandatory parameter “Feature”, but I found that it accepts the value “ApplicationProxy” as used above.
You can copy the above PowerShell commands from the Gist linked at the end of this blog post.
This file contains hidden or bidirectional Unicode text that may be interpreted or compiled differently than what appears below. To review, open the file in an editor that reveals hidden Unicode characters. Learn more about bidirectional Unicode characters
This file contains hidden or bidirectional Unicode text that may be interpreted or compiled differently than what appears below. To review, open the file in an editor that reveals hidden Unicode characters. Learn more about bidirectional Unicode characters
So to recap, after installing the Application Proxy Connector silently on the Windows Server 1709, and then registering the connector, I can now verify in the Azure AD Portal that the connector is available for use. I can see it has a status of Active, from my home IP address, and I have already placed it in a Connector Group.
I’m now ready to publish Azure AD Proxy Apps using this connector, and in my next blogpost I will publish the Project Honolulu management website using this!
Here is the Gist source for the above linked PowerShell commands:
This file contains hidden or bidirectional Unicode text that may be interpreted or compiled differently than what appears below. To review, open the file in an editor that reveals hidden Unicode characters. Learn more about bidirectional Unicode characters
This file contains hidden or bidirectional Unicode text that may be interpreted or compiled differently than what appears below. To review, open the file in an editor that reveals hidden Unicode characters. Learn more about bidirectional Unicode characters
The purpose of this blog post is to show how you can run a PowerShell script on an Azure VM that will shutdown and deallocate the actual VM the script is run on.
Marcels blog learnt me of something I havent used before, Azure Instance Metadata Service, where I can get information on my current VM instance. I wanted to combine this with using Managed Service Identity (MSI), and actually let the VM authenticate to itself for running the shut down command. The shut down command will be using the Azure REST API.
First, let us set up the requirements and permissions to get this to work.
First, we need to set up the Managed Service Identiy the VMs in question. This is done under the VM configuration, by enabling Managed service identity as shown below:
After saving the configuration, wait for the Managed service identity to be successfully created. This will create a service principal in Azure AD, and for VMs this will have the same name as the virtual machine name.
Now we need to give that service principal access to its own VM. Under the VMs Access Control (IAM) node, select to add a permission for the service principal as shown under. I have given the role of Virtual Machine Contributor, which means that the MSI will be able to write to and perform operations on the VM like shutdown, restart and more:
So for each VM we want to use this PowerShell script, we will need to do the same 2 operations, enable MSI and add service principal permission to the VM:
PowerShell script for Shutdown and Deallocate using MSI
The following script will when run on the Azure VM do the following steps: (full script follows below as the images are small)
Read instance metadata and save subscription, resource group and vm name info:
When this script is run on a VM the following output will display that the REST operation was successful, and shortly after the server goes down and deallocates as excpected.
To summarize, this blog post showed how we can use Managed Service Identity together with Azure Instance Metadata Service, to let the VM manage itself. This example showed how to shut down and deallocate, but you can use the REST API for other operations like restart, get info, update the VM and so on. Best of all with using MSI, is that we don’t have to take care of application id’s, secret keys and more, and having those exposed in the script which can be a security issue.
The complete PowerShell script is shown below:
This file contains hidden or bidirectional Unicode text that may be interpreted or compiled differently than what appears below. To review, open the file in an editor that reveals hidden Unicode characters. Learn more about bidirectional Unicode characters
Managed Service Identity makes it possible to keep credentials out of code, and that is a very inviting prospect. As I have been exploring Microsoft Graph in different scenarios using PowerShell, I thought I should have a go at using Managed Service Identity in an Azure Function and run some PowerShell commands to get data from the Microsoft Graph. Lets get started!
Configuring the Azure Function
First, if you haven’t already created an existing Azure Function App, go ahead and do that. Here is my Function App I will use in this demo:
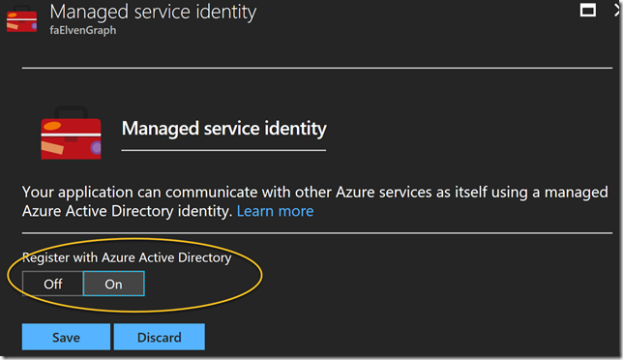
Next, open the Function App and go to Platform features, and then click on Managed service identity:
Under Managed service identity, select to Register with Azure Active Directory:
After saving you should get a successful notification that the managed service identity has been registered.
Let’s check what has happened in Azure AD, to that I will use the AzureAD PowerShell CmdLets. After connecting to my Azure AD tenant, I will try to get the Service Principal:
And get some properties of that object:
We can see that the Service Principal object is connected to the Azure Function App and of type ServiceAccount.
Now, we are ready for the next step, which is to create a function that will get data from Microsoft Graph. But first we will need to give this Service Principal some permissions.
Permissions and Roles for the Managed Service Identity
In my scenario I want to access the Microsoft Graph, and specifically get some Directory data like user information from my Azure AD. When accessing Microsoft Graph you would normally register an Azure AD Application and set up Application or Delegated Permissions, and follow the authentication flow for that. But in this case I want the Service Principal to be able to directly access Directory Data, so I will have to give my Service Principal permission to do that.
The following Azure AD commands adds my service principal to the AD Directory Role “Directory Readers”:
When listing membership in that role I can see my Service Principal has been added:
Creating a PowerShell Function for the Managed Service Identity
In your Function App, you can now create a new Function, selecting language PowerShell, and in this case I will create it as a HttpTrigger Function:
If you have been following the flow of the blog post until now, we can now check if the Function App is ready for using the Managed Service Identity (MSI). Two environment variables will be created, and you can check if they exist by going to Platform features, and then selecting Advanced tools (Kudo). Under environment you would se something like this if everything is ready (it could take a little time, so re-check until its there):
These two environment variables will be needed in the Azure Function, so we will start by getting that:
If I run the Function I can see from the output that I was able to retrieve the environment variables:
Next I will specify some URI and parameters for my authentication request using the managed service identity. I will need to specify the version (currently 2017-09-01 as specified in the documentation), and since I want to get data from the Microsoft Graph, I will need to specify that as the resource URI. I then build the URI for getting the authentication token:
With that, I can now do an authentication request, which if successful will return an access token I can use as a Bearer token in later queries agains the Microsoft Graph:
Let’s do another test run and verify that I can get an Access Token:
Querying the Microsoft Graph
With a valid Access Token, and with the correct permissions for the resources I will want to access, I can now run some Microsoft Graph API queries.
In my example I have some test users in my tenant named after the popular Seinfeld show. In fact I have set a “Seinfeld” department attribute value on those. So my query for getting those users would be:
A great way to test Microsoft Graph Commands is to use the Graph Explorer, https://developer.microsoft.com/en-us/graph/graph-explorer, and if you sign in to your own tenant you can query your own data. As an example, I have showed that here:
In my Azure Function I can define the same query like this (PS! note the escape character before the $filter for it to work):
And with that I can request the user list using Microsoft Graph and a Authorization Header consisting of the Access Token as a Bearer:
Let’s output some data from that response:
And there it is! I’m able to successfully query the Microsoft Graph using Managed Service Identity in an Azure Function, without handling any credentials.
For reference, I have attached both the Azure AD PowerShell commands, and the Function PowerShell commands below from my Gist. Enjoy!
Azure AD PowerShell SPN commands:
This file contains hidden or bidirectional Unicode text that may be interpreted or compiled differently than what appears below. To review, open the file in an editor that reveals hidden Unicode characters. Learn more about bidirectional Unicode characters
This file contains hidden or bidirectional Unicode text that may be interpreted or compiled differently than what appears below. To review, open the file in an editor that reveals hidden Unicode characters. Learn more about bidirectional Unicode characters
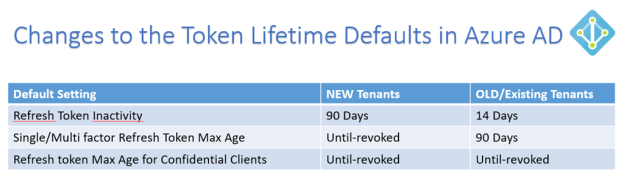
This is great news for many customers to remove user frustration over authentication prompts when refresh tokens expired after a period of inactivity. For example, if I havent used an App on my mobile phone for 14 days, I have to reauthenticate with my work/school account again to get a new Access Token and Refresh Token. Some Apps I use quite often, like Outlook and OneDrive, and by keeping active the Refresh Token will be continously renewed as well together with the Access Token (which by default is valid for 1 hour). For my existing tenant this would mean that keeping active, and at least using the Refresh Token inside the 14 Days, I will get new Access and Refresh Tokens, but after 90 Days the Single and/or Multi factor Refresh Token Max Age will be reached, and I have to reauthenticate again in my Apps.
Some Apps I will naturally use more rarely, for example Power BI, Flow, PowerApps etc. (this will be different for each user type), but I risk having to reauthenticate every time if I only access these Apps every other week.
So for New Tenants this has now changed, as Refresh Tokens will be valid for 90 Days, and if you use the Refresh Token inside that period, you will get 90 more days. And furthermore, the Max Age for Single/Multi factor Refresh Token will have a new default of Until-revoked, so basically it will never expire.
Keep in mind though, that Azure AD Administrators can revoke any Refresh Token at any time. Refresh Tokens will also be invalid if the authenticated users password changes or expire. It is also nice to be aware of that every time a Refresh Token is used to get a new Access Token, Conditional Access and Identity Protection from Azure AD will be used to check if the User or Device is in a Compliant State with any policies defined.
A few words on the Confidential Clients also. Confidential Clients are typically Web Apps that are able to securely store Tokens and identity itself to Azure AD, so after the User has Authenticated and actively Consented to access specific Resources, the resulting Access and Refresh Tokens can be used until revoked, as long as the Refresh Token are used at least once inside 90 Days (New Tenants) or 14 Days (Old Tenants).
Azure AD PowerShell examples for changing Token Lifetime Defaults
I have created some Azure AD PowerShell V2 examples for how you can change the Token Lifetime Policy defaults in your organization.
First connect to your Tenant and see if there already are defined any policies (normally there would be nothing):
Then lets make a definition that reflects the new defaults for New Tenants:
So if you already have an existing old tenant, and you want to change the default policy so that it reflects the new Token Lifetime settings, you can run this command:
A different scenario, lets say I have a New Tenant, and want to use the old default values instead. I will make a definition that reflects that:
And create a policy using these definitions:
Last, I will leave you with commands for changing any existing Azure AD policies:
The complete list of Azure AD PowerShell CmdLets used and examples can be found here at my Gist repository.
This file contains hidden or bidirectional Unicode text that may be interpreted or compiled differently than what appears below. To review, open the file in an editor that reveals hidden Unicode characters. Learn more about bidirectional Unicode characters
Last week I was back at this great Community conference, previously known as System Center Universe Europe (SCU Europe), and this year for the first time under the name Experts Live Europe, part of the Experts Live network (http://www.expertslive.org). This conference is well known for its great content, top speakers, sponsors and great community, where you meet friends old and new, and generally have a great time the 3 days the conference lasts.
This year the conference was held in the BCC by Alexanderplatz in Berlin, the same venue as last year. With almost 400 people from 28(!) different countries, I was very proud again to be among the great set of Experts and MVPs presenting sessions on topics from Cloud, Datacenter, Management, PowerShell, IoT, Azure, EMS, and more.
I presented two breakout sessions, the first one was about how to “Take your Azure AD and Intune Management Skills to the Next Level with Microsoft Graph API and PowerShell”, a practical and demo-heavy session. The PowerShell script I used in the demos can be found in my GitHub repository: https://github.com/skillriver/ELEU2017-Public
The second session I presented was on “Mastering Azure Active Directory v2”, where I discussed features in the new Azure AD Portal for Azure AD Administrators that have previously used the classic portal or Office 365 admin portal for managing users, licenses, and admin roles and more. We also looked at the Azure AD v2 PowerShell, that will replace the v1 (MSOL) cmdlets. Look to my Gist repository for several examples on using Azure AD v2 cmdlets, https://gist.github.com/skillriver.
I also had the pleasure to be in a discussion panel with Microsoft Intune Principal Program Manager Simon May, CDM MVP Tudor Damian and my fellow Norwegian EMS MVP Jan Ketil Skanke, where we had good questions and discussions from the attendance on the topic Identity, Security and Compliance.
The days went by really fast, and soon it was time for the closing note and the traditional trivia with funny stories and facts from the past conferences. One of the questions was how many have attended all 5 conferences (speakers, sponsors and attendees), the correct answer was not known, but the audience who had done this was invited onto the stage, and 10 people (in addition to Marcel) had their loyalty appriciated with claps and cheers from the room. And, I’m one of those that has been to all conferences 🙂
So with that ended the 5th annual conference that used to be SCU Europe and is now Experts Live. I have made some great friends there, and the conference has a family feeling going back there every year. There has been some early mornings, and some late nights, as it should be.
Thanks for me, Berlin and Experts Live, next year it will another place, it will be exiting to see where it will be. I know I will be back, hope you will to!