In this blog post I will look into how you can accomplish Azure Multi-Factor Authentication for Admins even though the Online PowerShell Module don’t support it. The key to do this is to implement and use Azure AD Privileged Identity Management, which is an Azure AD Premium P2 / EMS E5 feature.
The Problem
Administration of Online Services with PowerShell can be done with different PowerShell modules or for some scenarios setting up a remote session to the Online Service. But not all scenarios support Azure MFA natively.
A quick overview of the main modules that DO support Azure MFA today:
All of these above supports Azure MFA as long as you are not passing in a Credential object. There are also more advanced scenarios for programmatic access with Access Token and Certificates that I will not cover here for some of these modules. The main thing is that when you create a Credential object with Get-Credential, and pass that in as a Parameter to the above modules, Azure MFA will not work if the Admin user has been configured to use that. We’ll see some examples later in the blog. Note also that if you have an older version of MSOnline or Aadrm which required the Online Sign-In assistant, these will not work with Azure MFA and you must upgrade to the latest versions.
So what about the modules and scenarios that don’t support Azure MFA. These are mainly Office 365 and Remote PowerShell:
- Exchange Online Remote PowerShell (Update, a new Exchange Online Remote PowerShell module has now been released, but for a normal PowerShell remoting session this would still not support Azure MFA)
- Skype for Business Online Remote PowerShell
- Office 365 Security & Compliance Center Remote PowerShell
In these scenarios you must create a Credential object, and pass that in as a parameter when connecting to the service, thus blocking the use of Azure MFA.
A Security Best Practice for Admins
Today I just don’t find it acceptable for Admin accounts for any Online Service like Azure or Office 365, to not use Multi-Factor Authentication or some other protection mechanism, and just depend on username and password!
In addition to that, as an Organization you have to have control of your identities, employees and admins come and go, I have seen many times that Organizations still have Admin accounts for users that have left the company for a long time ago.
Most Organizations have Directory Synchronization from local Active Directory to Azure AD, making it possible to synchronize your local admin accounts. You then have a choice: Should I use synchronized admin accounts for the Admin Roles in Azure/Office 365? Or should I only create Cloud only admin accounts for this purpose?
My security best practice is to use a combination of both, so that:
- Synchronized On-Premise Admin Accounts for the most important, permanent and sensitive admin accounts, like Global Admins, Security Admins, Azure Subscription Admins and more. These accounts will be set up to require Azure MFA, as these accounts possibly can connect to On-Premise resources.
- Cloud Only Admins accounts for Role Based Administration, additional temporary Global Admins or other scenarios for intermittent Azure and Office 365 administration. These accounts will not be set up for Azure MFA, but I use Azure AD Privileged Identity Management to require Azure MFA when activating the role. Some of these accounts also includes service accounts for Directory Synchronization, Intune Connector etc.
The Solution
I have found that the best way to protect both type of Admin accounts is to use the Azure AD Privileged Identity Management and Azure MFA in combination so that:
- In general all of the permanent Admin Accounts with a few exceptions are required to use Azure MFA. These Admin accounts can use all PowerShell modules that support MFA when connecting.
- Role-based admins (for example Exchange Admins, Skype for Business Admins,..) are set up to be Temporary/Eligible Admins in Azure AD Privileged Identity Management, which require Azure MFA at activation time. After the admin role is activated, he or she can use the PowerShell modules/remote sessions that don’t support Azure MFA natively.
The downside of this solution is that Azure AD Privileged Identity Management require an Azure AD Premium P2 license or Enterprise Mobility E5 license, which will be Generally Available Sept 15th. Azure MFA are free to use for Admin accounts for Online Services.
How to set it up
In the following steps I will show how to set this up and how it will work. For the purpose for this demo I will work with my demo environment with the tenant name elven.onmicrosoft.com. I have also configured directory synchronization from my on-premise Active Directory, these users will have a UPN suffix of elven.no.
In my environment I have a fictional character called Ola Nordmann. Ola is an Exchange Admin in our Hybrid Exchange environment, and needs permissions to administer Exchange Online in Office 365 both via the management portal and via Exchange Online PowerShell.
Ola has these two accounts now in Azure AD:

As per the solution described, I will configure and require Azure MFA for the on-premise admin account, and for the cloud admin account I will use Privileged Identity Management and MFA for role activation.
Configure Multi-Factor Authentication
The easiest way to enable MFA for a user is via the Office 365 Admin portal at https://portal.azure.com. In the user list I find and select the admin user I want to enable MFA for:

The Manage multi-factor authentication will take me to the Azure AD multi-factor authentication administration page, where I find and select the admin user:

On the right-hand side I select to Enable for the selected user(s):

After that I confirm that I want to enable MFA for the user:

And get confirmation:

Now I see that the status is Enabled, this means that the user needs to log on and configure the authentication method for MFA first:

Configure Admin Role
Next, I will give Ola Nordmann the Exchange Administrator role, so that he can administer Exchange Online.
Back in the Office Admin portal I see that the user now has no roles:

I select Edit, and choose the Customized administrator and Exchange administrator role, and add the e-mail address of the user:

Next, I add the same Exchange administrator role to the Ola Nordmann (Cloud Admin) user:

So, at this time, both admin users are Exchange administrators, but only the [email protected] on-premise admin account has been configured for multi-factor authentication.
Log on and activate multi-factor authentication method for admin user
Now I will log on the [email protected] account to https://portal.office.com.
Since this admin account has been configured for MFA, I must set that up now:

I need to select an authentication method. In this demo I will use the Microsoft Authenticator App:

I select to set up and configure the mobile app:

I open up the Microsoft Authenticator app on my phone, and follow the instructions from above. After that I get confirmation that the mobile app has been configured.

Now I need to select Contact me to test the authentication:

At my phone I get the notification in the App and select verify, and I should be successful. Since I only have set up the mobile app, I also need to add phone number verification in case I lose access to the app. I type my mobile phone number and press next.

And in the last step I get an app password to use on some apps, I will not be needing this now for this demo, and click Done:

Back in the portal login, I will now be prompted to authenticate with my app:

After successfully authenticating I’m logged in to the portal:

And since this user has an Exchange administrator role, I can see limited information in the Office 365 admin portal and launch the link to the Exchange admin portal:

Try to access Exchange Online PowerShell with MFA enabled admin
First, a quick look back at the multi-factor authentication administration page, where the admin user status has now been updated to Enforced. This happens after the users have been enabled for MFA, and after they have successfully configured their authentication methods. Enforced means that they will now be required to do MFA when authenticating against online services:

Let’s try to access Exchange Online PowerShell with this admin user. Instructions for connecting with PowerShell for Office 365 services are detailed here: https://support.office.com/en-us/article/Managing-Office-365-and-Exchange-Online-with-Windows-PowerShell-06a743bb-ceb6-49a9-a61d-db4ffdf54fa6?ui=en-US&rs=en-US&ad=US
I launch a PowerShell window and get a Credential object:

After that I try to create a remote session with that credential:

As expected this will fail, as multi-factor auhtentication is required for the [email protected] account.
In the next part we will look at the other cloud admin user and configure the workaround using Azure AD Privileged Identity Management.
Configure Azure AD Privileged Identity Management for Exchange administrators
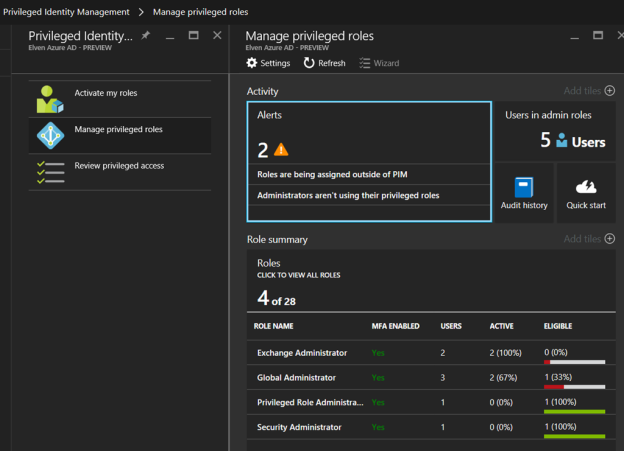
At this next step I log in as a Global Administrator, and if I haven’t already added the Privileged Identity Management solution, I can add it from the Azure Marketplace:

The first Global Administrator that set up Privileged Identity Management will added to the Security Administrator and Privileged Role Administrator Roles. After that we can manage the privileged roles. If you have previously added the solution, you will have to activate your Privileged Role administrator first.

When I select the Exchange Administrator role, I can see both admin accounts for my Ola admin user. These roles are assigned on a permanent basis:

Azure AD Privileged Identity Management will let me assign and change admin roles from permanent to eligible for temporary activation. I will do this for the [email protected] cloud admin account:

After I click Make eligible, the admin account are removed from permanent role and are now listed as Eligible:

Lets click on the Settings button for the Exchange Administrator role. At settings I can set the activation duration, email notifications, ticketing and fore some roles I can select whether to require multi-factor authentication for activation:

These settings can also be set as default for all roles:

At this point my cloud admin [email protected] has been removed as a permanent Exchange Administrator, and will require activation before he will be temporarily activated as an Exchange Administrator for one hour duration.
Log on as admin user without activation
When I log in to the Office 365 portal with the [email protected], I will see that this user is just a normal user with no admin links, This is expected as the user hasn’t activated the Exchange Administrator role.

Activate the Exchange Administrator Role
Next I go to the Azure portal at https://portal.azure.com still logged on as [email protected]. First I need to add the Privileged Identity Management solution:

After adding the solution, I can request activation for the roles I’m eligible for, in this case Exchange Administrator:

When requesting activation I need to verify my identity first:

If my account hasn’t already been set up for multi-factor authentication, it will be guided to do that now:

After configuring and verifying multi-factor authentication, I can now activate my Exchange Administrator role and provide a reason:

After successful activation I can verify the duration I will be activated for:

Log on to the Office 365 Portal and Exchange Admin Center after activation
After activation, I should log off and back on with my activated admin role account, and this time I will see the Exchange Admin portal:

Log on to Exchange Online PowerShell after activation
And finally, I can start an Exchange Online PowerShell Session with my activated account. First I get my credential:

Then I can create the remote Exchange Online session and import it to PowerShell:

And finally just try out some Exchange Online administration successfully:

Summary
At the end of this long blog post, we can summarize that we have accomplished the solution of adding Azure Multi-Factor Authentication for scenarios where the PowerShell Module or Remoting Session does not natively support it. This is made possible by using Azure AD Privileged Identity Management, and by making some role administrators eligible and require MFA when activating. This way they have verified their identity before they connect with the Credential object.
This is just one scenario where both Azure AD MFA and Privileged Identity Management can be used together for increased security and reduce the attack surface of having vulnerable permanent administrator accounts and roles.
I hope this blog post have been informative and helpful, please reach out or comment if you want to know more or have any questions.