Tag Archives: Log Analytics

Exploring Azure MFA sign-in failures using Log Analytics

Most IT admins, pros and end users from organizations that use Office 365 and Azure AD will by now have heard about the big Azure MFA outage on Monday November 19. When something like this happens, it is important to get insights on which users that were affected, and in what type of scenarios they most experienced the problem. Microsoft MVP Tony Redmond wrote a useful blog post (https://office365itpros.com/2018/11/21/reporting-mfa-enabled-accounts/) on how to report on possible/potentially affected and MFA enabled users, and how to disable and re-enable those users. But many organizations are now using Conditional Access policies using Azure AD Premium, so this will be of limited help for those.

If I could wish one thing from Microsoft for Christmas this year, it would be to be able to manage MFA and Conditional Access policies with Azure AD PowerShell and Microsoft Graph! Admins could then run “break-the-glass” administrative users (or even “break-the-glass service principals”) to disable/re-enable policies when big MFA outages happens. A good CA policy design, trusting compliant devices and secure locations could also go a long way in mitigating such big outage problems.

Tony’s blog post made me think about the feature I recently activated, on integrating Azure AD Activity Logs to Azure Log Analytics, you can read more about this here: https://gotoguy.blog/2018/11/06/get-started-with-integration-of-azure-ad-activity-logs-to-azure-log-analytics/

By exploring the Sign-in logs in Log Analytics I could get some more insights into how my organization was affected by the MFA outage on November 19. Please see the above blog post on how to get started setting up this integration, the rest of this blog post will show some sample queries for the SigninLogs.

Querying the SigninLogs for failed and interrupted sign-ins

All the queries seen below are shown in screenshot images, but I have listed all them for you to copy at the end of the blog post.

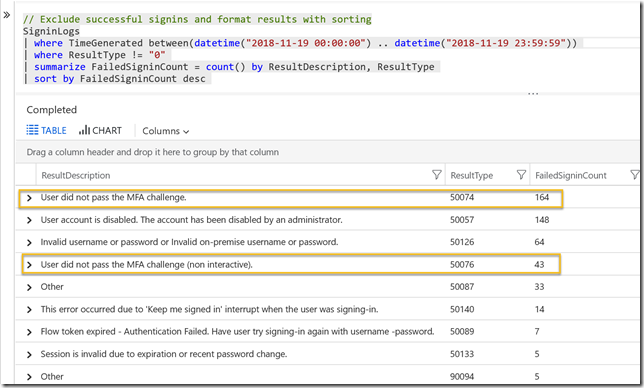
First I can take a look at the SigninLogs for the specific day of 19th November, and the grouping on the result type and description of the sign-in events. For example I can see that there is a high number of event 50074: User did not pass the MFA challenge. Interestingly there is also a relatively high number of invalid username or password, that could be a separate issue but could also be that users that fails MFA sign-ins tries to log in again thinking they had wrong password first time.

image

Changing that query a little, I can exclude the successful sign-ins (ResultType 0), and sort on the most count of failures. Two of the events of most interest here is 50074 and 50076:

image

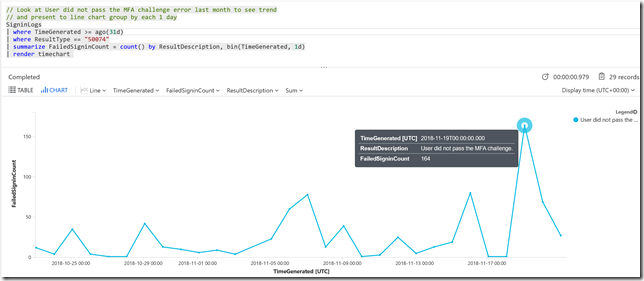
In this next query I focus on the “50074: User did not pass the MFA challenge” error. By increasing the time range to last 31 days, and adding a bin(TimeGenerated, 1d) to the summarize group, I’ll be able to see the count of this error on each day in the last month. This will give me a baseline, and we can see that on the 19th this number spikes. I have added a render to timechart for graphical display. There are also some other days where this number increases, I can look into more insights for that if I want as well, but for now I will focus on the 19th.

image

Back to the time range of the 19th of November, I can modify the summarize to group by each hour, by using bin(TimeGenerated, 1h). This will show me how the problems evolved during the day. Must errors occurred about 10 am in the morning:

image

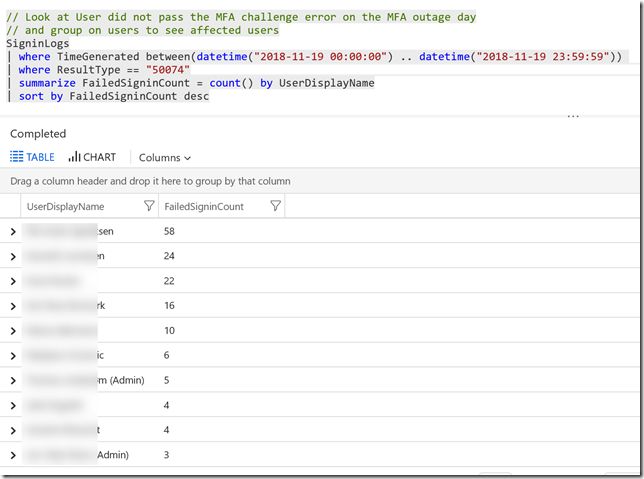
Lets look at some queries for how this error affected my environment. First I can group on the Users and how many errors they experience. Some users were really persistent in trying to get through the MFA error. I have masked the real names. We also see some admin accounts but admins quickly recognized that something was wrong, and actively sought information on the outage. By midday most users were notified on the on-going outage and the number of errors slowly decrease during the day.

image

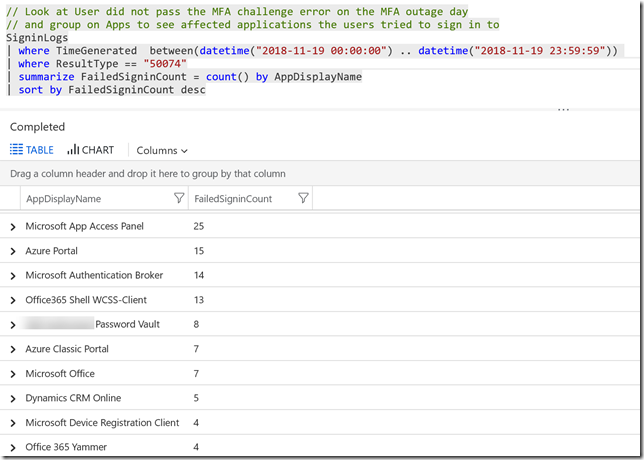
In this next query, I group on the Apps the users tried to reach:

image

And in this following query, what kind of Client App they used. It would be normal that Browser is quite high, as mobile apps and desktop clients are more likely to have valid refresh tokens.

image

In this query I can look into the device operating system the users tried to sign in from:

2018-11-21_22-05-27

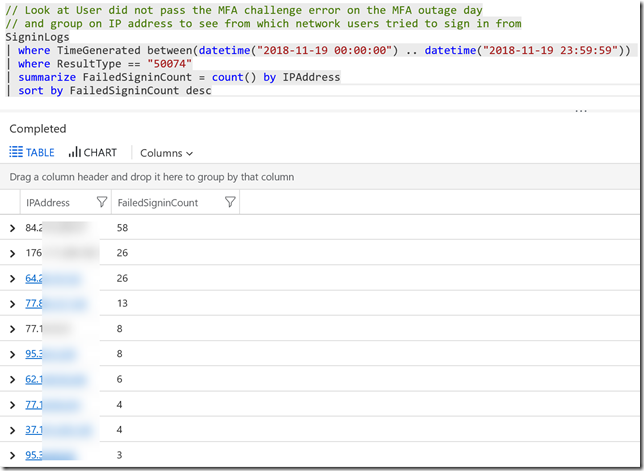
In the following query I can look at which network the users tried to log in from, by identifying IP address:

image

And in this query we can get more location details from where users tried to sign in:

2018-11-21_22-07-17

Summary

Querying Log Analytics for Sign-in events as shown above can provide valuable insights into how such an outage can affect users. This can also give me some input on how to design Conditional Access policies. Querying this data over time can also provide a baseline for normal operations in your environment, and make it easier to set alert thresholds if you want to get alerts when number of failures inside a time interval gets higher than usual. Using Azure Monitor and action groups you can be pro-active and be notified if something similar should occur again.

Here are all the queries shown above:

// Look at SigninLogs for a custom date time interval and group by sign in results
SigninLogs
| where TimeGenerated between(datetime("2018-11-19 00:00:00") .. datetime("2018-11-19 23:59:59")) 
| summarize count() by ResultType, ResultDescription

// Exclude successful signins and format results with sorting
SigninLogs
| where TimeGenerated between(datetime("2018-11-19 00:00:00") .. datetime("2018-11-19 23:59:59")) 
| where ResultType != "0" 
| summarize FailedSigninCount = count() by ResultDescription, ResultType 
| sort by FailedSigninCount desc

// Look at User did not pass the MFA challenge error last month to see trend
// and present to line chart group by each 1 day
SigninLogs
| where TimeGenerated >= ago(31d)
| where ResultType == "50074"
| summarize FailedSigninCount = count() by ResultDescription, bin(TimeGenerated, 1d)
| render timechart

// Look at User did not pass the MFA challenge error on the MFA outage day
// and present to line chart group by each 1 hour to see impact during day
SigninLogs
| where TimeGenerated between(datetime("2018-11-19 00:00:00") .. datetime("2018-11-19 23:59:59")) 
| where ResultType == "50074" 
| summarize FailedSigninCount = count() by ResultDescription, bin(TimeGenerated, 1h)
| render timechart

// Look at User did not pass the MFA challenge error on the MFA outage day
// and group on users to see affected users
SigninLogs
| where TimeGenerated between(datetime("2018-11-19 00:00:00") .. datetime("2018-11-19 23:59:59")) 
| where ResultType == "50074"
| summarize FailedSigninCount = count() by UserDisplayName
| sort by FailedSigninCount desc

// Look at User did not pass the MFA challenge error on the MFA outage day
// and group on Apps to see affected applications the users tried to sign in to
SigninLogs
| where TimeGenerated  between(datetime("2018-11-19 00:00:00") .. datetime("2018-11-19 23:59:59")) 
| where ResultType == "50074"
| summarize FailedSigninCount = count() by AppDisplayName
| sort by FailedSigninCount desc

// Look at User did not pass the MFA challenge error on the MFA outage day
// and group on client apps to see affected apps the users tried to sign in from
SigninLogs
| where TimeGenerated between(datetime("2018-11-19 00:00:00") .. datetime("2018-11-19 23:59:59")) 
| where ResultType == "50074"
| summarize FailedSigninCount = count() by ClientAppUsed
| sort by FailedSigninCount desc

// Look at User did not pass the MFA challenge error on the MFA outage day
// and group on device operating system to see affected platforms
SigninLogs
| where TimeGenerated between(datetime("2018-11-19 00:00:00") .. datetime("2018-11-19 23:59:59")) 
| where ResultType == "50074"
| summarize FailedSigninCount = count() by tostring(DeviceDetail.operatingSystem)
| sort by FailedSigninCount desc

// Look at User did not pass the MFA challenge error on the MFA outage day
// and group on IP address to see from which network users tried to sign in from
SigninLogs
| where TimeGenerated between(datetime("2018-11-19 00:00:00") .. datetime("2018-11-19 23:59:59")) 
| where ResultType == "50074"
| summarize FailedSigninCount = count() by IPAddress
| sort by FailedSigninCount desc

// Look at User did not pass the MFA challenge error on the MFA outage day
// and group on users location details to see which country, state and city users tried to sign in from
SigninLogs
| where TimeGenerated between(datetime("2018-11-19 00:00:00") .. datetime("2018-11-19 23:59:59")) 
| where ResultType == "50074"
| summarize FailedSigninCount = count() by tostring(LocationDetails.countryOrRegion), tostring(LocationDetails.state), tostring(LocationDetails.city)
| sort by FailedSigninCount desc

Alert on On-premises Connectivity for Self Service Password Reset using Azure Monitor and Azure AD Activity Logs in Log Analytics

Recently I wrote a blog post on how to get started with integration of Azure AD Activity Logs to Azure Log Analytics. Setting up this is a requirement for the solution in this blog post, so make sure you have set this up first: https://gotoguy.blog/2018/11/06/get-started-with-integration-of-azure-ad-activity-logs-to-azure-log-analytics/.

In this blog post I wanted to show a practical example on how to create an alert for when Azure AD Self Service Password fails in password writeback because of connectivity error to the On-premises environment.

Build the query

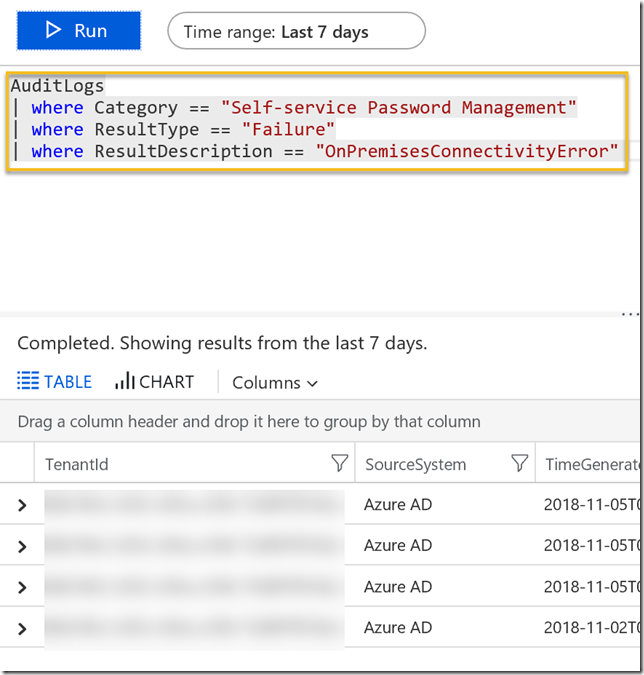
If you know the schema, you can write the query directly, but more often than not you will work out these scenarios by exploring your actual log data. In my example we had a concrete example where password resets failed because of On-premises connectivity error. Looking into the Azure Log Analytics logs, I started with this simple query against AuditLogs:

image

After that I looked into the filters, and found that I could filter on Failures:

image

This resultated in some failure results. Exploring the results in the bottom right windows, I found that the failures had a ResultDescription of “OnPremisesConnectivityError”:

image

By clicking on the plus sign above I add that to the query:

image

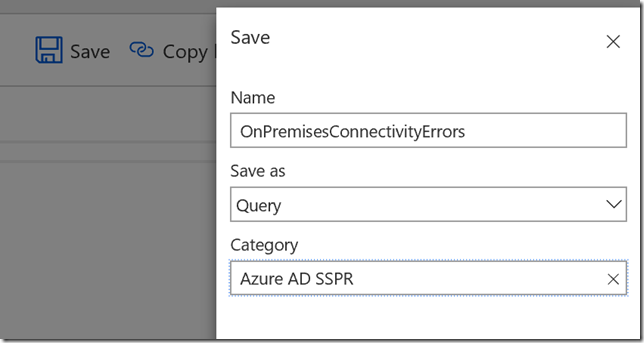
I want to save my query next, so that I have it available for later:

image

Now that I have the results I want I can proceed to create an Alert Rule. Btw, here is the full query (I have since amended it to include OnPremisesConnectivityFailure in addition):

AuditLogs
| where Category == "Self-service Password Management"
| where ResultType == "Failure"
| where ResultDescription == "OnPremisesConnectivityError" or ResultDescription == "OnPremisesConnectivtyFailure"

Create an Alert Rule

Next, I can create a new Alert Rule for this query, something you can do directly from the query:

image

This next step would bring me over to the Azure Monitor and Rules Management section. The alert target (OMS/Log Analytics Workspace) and target hierarchy (Azure Subscription and Resource Group) should already be specifed:

image

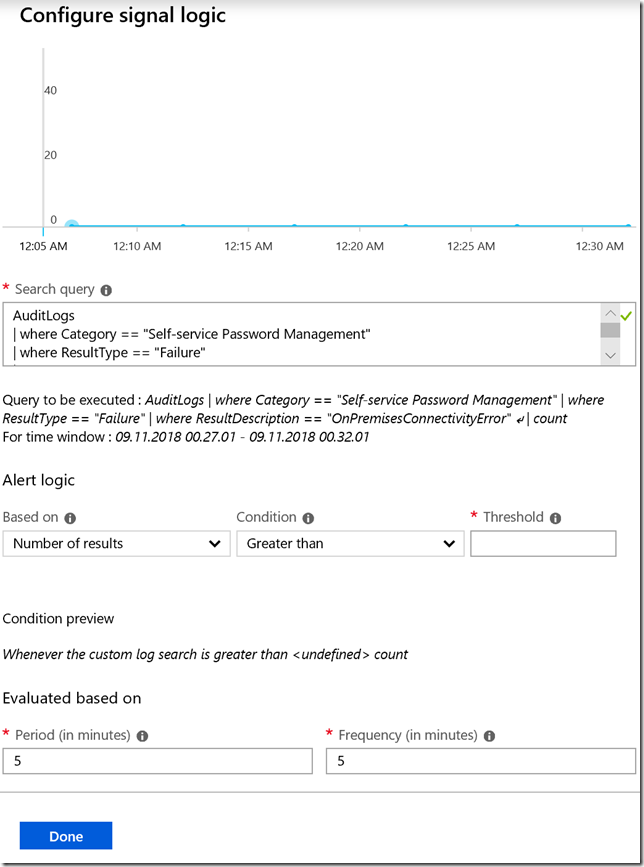
Now I need to configure the alert criteria. Note that currently monthly cost for this alert is $1.50. Click on the criteria to configure the signal logic:

image

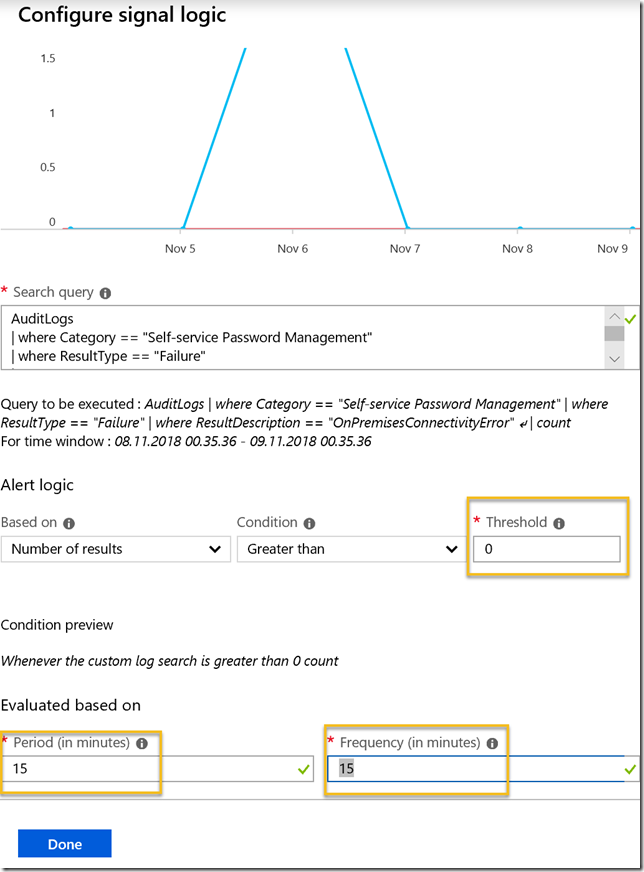
Here we see the query from before, as well as we need to set a threshold for number of results, and a period and frequency. Pricing details can be found at: https://azure.microsoft.com/en-us/pricing/details/monitor/. If you look at Alert signals and Log section, you’ll see that alerts with frequency of 5 minutes is $1.5, 10 minutes $1 and 15 minutes $0.5. This is per log monitored. I changed my period and frequency to 15 minutes:

image

After I click done I see that the alert criteria is correctly configured with a price of $0.50:

image

Next I need to specify the alert details, for example like below. You also have the option to supress multiple alerts inside a time window. I configured 60 minutes:

image

Next I need to either select an existing action group or create a new. An action group decides which action to take when an alert occures:

image

I’ll create a new action group for now. In this action group I will select to send an e-mail to a group in my company. As you see in the image below I have several options for action type, examples of use can be:

  • Trigger e-mail, SMS, push or other notifications.
  • Trigger Azure Functions for running some code logic.
  • Trigger Logic App for executing a business flow logic.
  • Trigger a webhook for posting a status, for example to a Microsoft Teams webhook.
  • Send the Alert via ITSM connector to create an incident in your connected ITSM system.
  • Trigger a Runbook in Azure Automation to run your own PowerShell runbooks, or you can use one of the built-in runbooks for restart, stop, remove or scale up/down VM.

image

When selecting Email I need to specify an e-mail address for the user/group I want to notify:

image

After that I’m ready to create the Alert rule:

SNAGHTML50ef585

After I created the rule, the group e-mail address I specified received this e-mail, confirming that it is now part of an action group:

image

If you want to locate and change this alert rule at a later stage, you will find it under Azure Monitor and Alert Rules:

image

Thats it, now we can just wait for future Self-Service Password Reset or Change connectivity errors, and we will get notified.

Testing the Alert rule Notification

For testing, I just wanted to force the error by logging into my Azure AD Connect Server and stop the service.

After that I tried to reset or change my password, resulting in this error message shown to the user:

image

Now in this situation, most users will either just wait and try again later, try one more time and then give up, and if you are lucky they will contact their IT admin and notify of the error. More often than not users just leave it there, and not notify anyone. This is where it is useful to get an alert as we have created here, because then you as an IT admin can proactively analyze and fix the error before it affects more users. This is the alert I received to my specified group:

image

We can directly click on the result to get into details for the error, for example which user was affected, from which IP address and more:

image

I don’t know about you, but I think this is just brilliant 🙂 With the integration of Azure AD Activity Logs in Log Analytics, I can really explore and analyze a lot of the operations going on in my tenant, and using Azure Monitor I can create alert rules that notifies or trigger other actions to handle those alerts.

Thanks for reading, more blog post will follow on this subject of Azure AD and Log Analytics, so stay tuned!

Get started with integration of Azure AD Activity Logs to Azure Log Analytics

Recently Microsoft announced the availability of forwarding the Azure AD Activity Logs to Azure Log Analyctis. You can read the announcement in full here: https://techcommunity.microsoft.com/t5/Azure-Active-Directory-Identity/Azure-Active-Directory-Activity-logs-in-Azure-Log-Analytics-now/ba-p/274843.

By bringing thousands (or even millions depending on your organization size and use of Azure AD), of sign-in and audit log events to Log Analytics you can finally use the power of Log Analytics for query, analyze, visualize and alert on your data.

In this blog post I will show how to get started and provide some useful tips. Most of this is already well documented in the following Microsoft Docs, but I will provide my own perspective and experience and as well let this blog post be an anchor for future detailed blog posts on the subject of analyzing Azure AD sign-in and audit logs in Log Analytics and Azure Monitor:

Set up Diagnostic Settings to Log Analytics

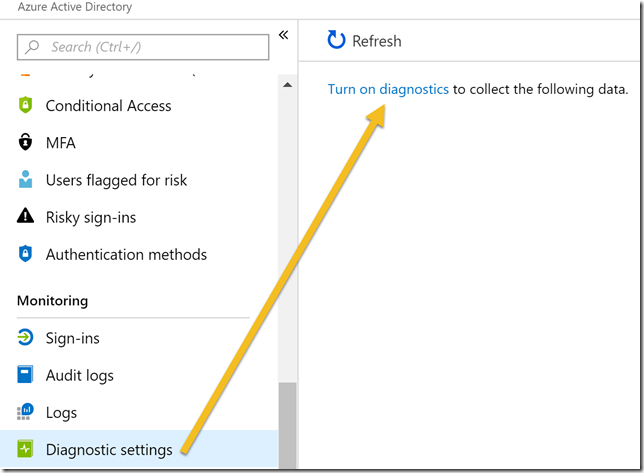
The first action we need to do is to Turn on diagnostics in the Azure AD Portal. You will need to be a Global Administrator or Security Administrator to do this:

image

PS! Another way to get to this setting to Turn on diagnostics is to either go to Sign-ins or Audit logs under Monotoring, and from there click on Export Data Settings:

SNAGHTML591fe33

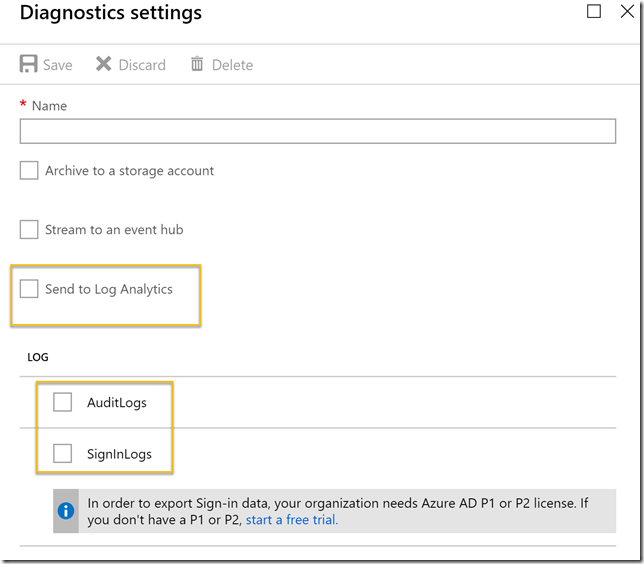
Next select to Send to Log Analytics, and then select either or both of the AuditLogs or SigninLogs.

image

Note that to be able to export Sign-in data, your organization needs Azure AD Premium P1 or P2 (or EMS E3/E5). This requirement only applies to sign-in logs, not audit logs.

After selecting Log Analytics, and which logs to export, you need to configure which Log Analytics (still named as OMS) workspace to export the data to:

image

Note that this requires access to an Azure Subscription. You can either select an existing OMS workspace or create a new:

image

Important info! Usually you will need to be a Global Administrator or Security Administrator to be able to access the details of Sign-in logs or Audit logs in Azure AD, but by exporting this data to either an existing or a new Log Analytics workspace, potentially a lot more users can access that data. You need to think about if this is something you want to do, and at least control and govern which users can access that Log Analytics workspace.

For this reason alone it would probably be a better idea to create a dedicated Log Analytics workspace for the Azure AD activity logs:

image

Regarding pricing, using a Log Analytics workspace for Azure AD Activity Logs alone should not incur a notable cost in most normal environments. In an environment of less than 100 users I found the following consumption per day, which is way below the amount of free data you get included:

image

If you want to save and use that same query yourself, here it is:

Usage| where TimeGenerated > startofday(ago(31d))| where IsBillable == true
| where (DataType == "SigninLogs" or DataType == "AuditLogs") and Solution == "LogManagement"
| summarize TotalVolumeGB = sum(Quantity) / 1024 by bin(TimeGenerated, 1d), Solution| render barchart

Choosing a pricing tier depends on whether the Subscription was created before April 2, 2018 or not, or whether you have elected to move to a new pricing model. The older pricing model had a choice of free tier, which had a daily cap of 500 MB and a data retention of 7 days. As the diagram above showed, most organizations will be way below the 500 MB daily cap, but a retention of only 7 days will be considered short for most analyzing needs. So under the older pricing model you would consider a standalone per GB model, giving a retention of 1 month by default, but a cost of $2.30 per GB.

The new pricing model after April 2, 2018 has a simplified pricing model. Here the first 5 GB are free and you have a default retention of 31 days. Additional GBs for ingestion are $2.99 per month, and extra retention after the first 31 days is $0.13 per GB per month. Note that this pricing model is on subscription level and affects all your Log Analytics workspaces, so you need to carefully consider any changes to the new pricing model in your subscription.

After you have selected/created a Log Analytics workspace, and provided a name for the Diagnostic settings, you are ready to Save:

image

After about 15 minutes you can start explore the Logs in the Log Analytics workspace.

Start to Analyze Azure AD Activity logs with Log Analytics

To begin analyze the exported Azure AD Activity Logs with Log Analytics, you can either go to the Log Analytics section in your Azure Portal. You can also access the logs directly from Azure Active Directory from under the Monitoring section, which will take you directly to the configured Log Analytics workspace:

image

By default this will open a search query showing sample data from all your Log Analytics workspace.

I find that a good way to start learning about the sign-in and audit logs is to look at the schema. The SigninLogs and AuditLogs schemas should appear right under LogManagement as shown below:

SNAGHTML5fc1b7b

To look at the SigninLogs just add that to the query window and select a time range and click Run:

image

Depending on your sample data you can start filter on the left side, for example to look at only certain app sign ins, or client apps used, location and more..

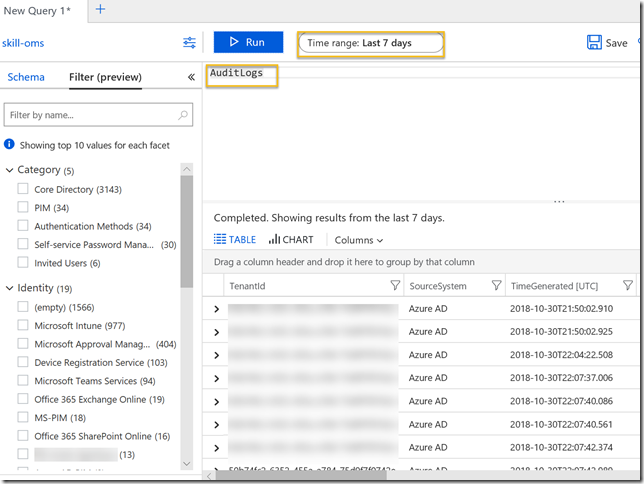
Similarly for AuditLogs, in the following example I have set a time range of last 7 days:

image

See the links in the beginning of this blog post for some more sample queries and you can also import some sample views.

So now that we have a working diagnostic setting that exports my Azure AD sign-in and audit logs to Azure Log Analytics, I’m ready to explore some interesting scenarios for analyzing this data. This will be a topic for upcoming blog posts, so stay tuned for that!

Thanks for reading so far, I’m really excited for this feature! Smile

Displaying Azure Automation Runbook Stats in OMS via Performance Collection and Operations Manager

Wouldn’t it be great to get some more information about your Azure Automation Runbooks in the Operations Management Suite Portal? That’s a rhetorical question, of course the answer will be yes!

While Azure Automation is a part of the suite of components in OMS, today you only get the following information from the Azure Automation blade:

The blade shows the number of runbooks and jobs from the one Automation Account you have configured. You can only configure one Automation Account at a time, and for getting more details you are directed to the Azure Portal.

I wanted to use my OMS-connected Operations Manager Management Group, and use a PowerShell script rule to get some more statistics for Azure Automation and display that in OMS Log Analytics as Performance Data. I will do this using the “Sample Management Pack – Wizard to Create PowerShell script Collection Rules” described in this blog article http://blogs.msdn.com/b/wei_out_there_with_system_center/archive/2015/09/29/oms-collecting-nrt-performance-data-from-an-opsmgr-powershell-script-collection-rule-created-from-a-wizard.aspx.

I will use the AzureRM PowerShell Module for the PowerShell commands that will connect to my Azure subscription and get the Azure Automation Runbooks data.

Getting Ready

Before I can create the PowerShell script rule for gettting the Azure Automation data, I have to do some preparations first. This includes:

  1. Importing the “Sample Management Pack – Wizard to Create PowerShell script Collection Rules” to my Operations Manager environment.
    1. This can be downloaded from Technet Gallery at https://gallery.technet.microsoft.com/Sample-Management-Pack-e48040f7.
  2. Install the AzureRM PowerShell Module (at the chosen Target server for the PowerShell Script Rule).
    1. I chose to install it from the PowerShell Gallery using the instructions here: https://azure.microsoft.com/en-us/documentation/articles/powershell-install-configure/
    2. If you are running Windows Server 2012 R2, which I am, follow the instructions here to support the PowerShellGet module, https://www.powershellgallery.com/GettingStarted?section=Get%20Started.
  3. Choose Target for where to run the AzureRM commands from
    1. Regarding the AzureRM and where to install, I decided to use the SCOM Root Management Server Emulator. This server will then run the AzureRM commands against my Azure Subscription.
  4. Choose account for Run As Profile
    1. I also needed to think about the run as account the AzureRM commands will run under. As we will see later the PowerShell Script Rules will be set up with a Default Run As Profile.
    2. The Default Run As Profile for the RMS Emulator will be the Management Server Action Account, if I had chosen another Rule Target the Default Run As Profile would be the Local System Account.
    3. Alternatively, I could have created a custom Run As Profile with a user account that have permissions to execute the AzureRM cmdlets and connect to and read the required data from the Azure subscription, and configure the PowerShell Script rules to use that.
    4. I decided to go with the Management Server Action Account, in my case SKILL\scom_msaa. This account will execute the AzureRM PowerShell cmdlets, so I need to make sure that I can login to my Azure subscription using that account.
  5. Next, I started PowerShell ISE with “Run as different user”, specifying my scom_msaa account. I run the commands below, as I wanted to save the password for the user I’m going to connect to the Azure subscription and get the Automation data. I also did a test import-module of the AzureRM modules I will need in the main script.

The commands above are here in full:


# Prepare to save encrypted password

# Verify that logged on as scom_msaa
whoami

# Get the password
$securepassword = Read-Host -AsSecureString -Prompt Enter Azure AD account password:

# Filepath for encrypted password file
$filepath = C:\users\scom_msaa\AppData\encryptedazureadpassword.txt

# Save password encrypted to file
ConvertFrom-SecureString -SecureString $securepassword | Out-File -FilePath $filepath

Import-Module C:\Program Files\WindowsPowerShell\Modules\AzureRM
Import-Module C:\Program Files\WindowsPowerShell\Modules\AzureRM.Profile
Import-Module C:\Program Files\WindowsPowerShell\Modules\AzureRM.Automation

At this point I’m ready for the next step, which is to create some PowerShell commands for the Script Rule in SCOM.

Creating the PowerShell Command Script for getting Azure Automation data

First I needed to think about what kind of Azure Automation and Runbook data I wanted to get from my Azure Subscription. I decided to get the following values:

  • Job Count Last Day
  • Job Count Last Month
  • Job Count This Month
  • Job Minutes This Month
  • Runbooks in New State
  • Runbooks in Published State
  • Runbooks in Edit State
  • PowerShell Workflow Runbooks
  • Graphical Runbooks
  • PowerShell Script Runbooks

I wanted to have the statistics for Runbooks Jobs to see the activity of the Runbooks. As I’m running the Free plan of Azure Automation, I’m restricted to 500 minutes a month, so it makes sense to count the accumulated job minutes for the month as well.

In addition to this I want some statistics for the number of Runbooks in the environment, separated on New, Published and Edit Runbooks, and the Runbook type separated on Workflow, Graphical and PowerShell Script.

The PowerShell Script Rule for getting these data will be using the AzureRM PowerShell Module, and specifically the cmdlets in AzureRM.Profile and AzureRM.Automation:

To log in and authenticate to Azure, I will use the encrypted password saved earlier, and create a Credential object for the login:

Initializing the script with date filters and setting default values for variables. I decided to create the script so that I can get data from all the Resource Groups I have Automation Accounts in. This way, If I have multiple Automation Accounts, I can get statistics combined for each of them:

Then, looping through each Resource Group, running the different commands to get the variable data. Since I potentially will loop through multiple Resource Groups and Automation Accounts, the variables will be using += to add to the previous loop value:

After setting each variable and exiting the loop, the $PropertyBag can be filled with the values for the different counters:

The complete script is shown below for how to get those Azure Automation data via SCOM and PowerShell Script Rule to to OMS:


# Debug file
$debuglog = $env:TEMP+\powershell_perf_collect_AA_stats_debug.log

Date | Out-File $debuglog

Who Am I: | Out-File $debuglog -Append
whoami |
Out-File $debuglog -Append

$ErrorActionPreference = Stop

Try {

If (!(Get-Module –Name AzureRM)) { Import-Module C:\Program Files\WindowsPowerShell\Modules\AzureRM }
If (!(Get-Module –Name AzureRM.Profile)) { Import-Module C:\Program Files\WindowsPowerShell\Modules\AzureRM.Profile }
If (!(Get-Module –Name AzureRM.Automation)) { Import-Module C:\Program Files\WindowsPowerShell\Modules\AzureRM.Automation }

# Get Cred for ARM
$filepath = C:\users\scom_msaa\AppData\encryptedazureadpassword.txt
$userName = myAzureADAdminAccount
$securePassword = ConvertTo-SecureString (Get-Content -Path $FilePath)
$cred = New-Object -TypeName System.Management.Automation.PSCredential ($username, $securePassword)

# Log in and sett active subscription
Login-AzureRmAccount -Credential $cred

$subscriptionid = mysubscriptionID

Set-AzureRmContext -SubscriptionId $subscriptionid

$API = new-object -comObject MOM.ScriptAPI

$aftertime = $(Get-Date).AddHours(1)
$afterdate_lastday = $(Get-Date).AddDays(1)
$afterdate_lastmonth = $(Get-Date).AddDays(30)
$afterdate_thismonth = $(Get-Date).AddDays(($(Get-Date).Day)+1)

$AutomationRGs = @(MyResourceGroupName1,MyResourceGroupName2)

$PropertyBags=@()

$newrunbooks = 0
$publishedrunbooks = 0
$editrunbooks = 0
$scriptrunbooks = 0
$graphrunbooks = 0
$powershellrunbooks = 0
$jobcountlastday = 0
$jobcountlastmonth = 0
$jobcountthismonth = 0
$jobminutesthismonth = 0

ForEach ($AutomationRG in $AutomationRGs) {

$rmautomationacct = Get-AzureRmAutomationAccount -ResourceGroupName $AutomationRG

$newrunbooks += (Get-AzureRmAutomationRunbook -AutomationAccountName $rmautomationacct.AutomationAccountName -ResourceGroupName $AutomationRG `
|
Where {$_.State -eq New}).Count

$publishedrunbooks += (Get-AzureRmAutomationRunbook -AutomationAccountName $rmautomationacct.AutomationAccountName -ResourceGroupName $AutomationRG `
|
Where {$_.State -eq Published}).Count

$editrunbooks += (Get-AzureRmAutomationRunbook -AutomationAccountName $rmautomationacct.AutomationAccountName -ResourceGroupName $AutomationRG `
|
Where {$_.State -eq Edit}).Count

$scriptrunbooks += (Get-AzureRmAutomationRunbook -AutomationAccountName $rmautomationacct.AutomationAccountName -ResourceGroupName $AutomationRG `
|
Where {$_.RunbookType -eq Script}).Count

$graphrunbooks += (Get-AzureRmAutomationRunbook -AutomationAccountName $rmautomationacct.AutomationAccountName -ResourceGroupName $AutomationRG `
|
Where {$_.RunbookType -eq Graph}).Count

$powershellrunbooks += (Get-AzureRmAutomationRunbook -AutomationAccountName $rmautomationacct.AutomationAccountName -ResourceGroupName $AutomationRG `
|
Where {$_.RunbookType -eq PowerShell}).Count

$jobcountlastday += (Get-AzureRmAutomationJob -AutomationAccountName $rmautomationacct.AutomationAccountName -ResourceGroupName $AutomationRG `
-StartTime
$afterdate_lastday).Count

$jobcountlastmonth += (Get-AzureRmAutomationJob -AutomationAccountName $rmautomationacct.AutomationAccountName -ResourceGroupName $AutomationRG `
-StartTime
$afterdate_lastmonth).Count

$jobcountthismonth += (Get-AzureRmAutomationJob -AutomationAccountName $rmautomationacct.AutomationAccountName -ResourceGroupName $AutomationRG `
-StartTime
$afterdate_thismonth.ToLongDateString()).Count

$jobsthismonth = Get-AzureRmAutomationJob -AutomationAccountName $rmautomationacct.AutomationAccountName -ResourceGroupName $AutomationRG `
-StartTime
$afterdate_thismonth.ToLongDateString() | Select-Object RunbookName, StartTime, EndTime, CreationTime, LastModifiedTime, @{Name=RunningTime;Expression={[TimeSpan]::Parse($_.EndTime $_.StartTime).TotalMinutes}}, @{Name=Month;Expression={($_.EndTime).Month}}

$jobminutesthismonth += [int][Math]::Ceiling(($jobsthismonth | Measure-Object -Property RunningTime -Sum).Sum)

}

$PropertyBag = $API.CreatePropertyBag()
$PropertyBag.AddValue(Instance, Job Count Last Day)
$PropertyBag.AddValue(Value, [UInt32]$jobcountlastday)
$PropertyBags += $PropertyBag

Job Count Last Day: | Out-File $debuglog -Append
$jobcountlastday | Out-File $debuglog -Append

$PropertyBag = $API.CreatePropertyBag()
$PropertyBag.AddValue(Instance, Job Count Last Month)
$PropertyBag.AddValue(Value, [UInt32]$jobcountlastmonth)
$PropertyBags += $PropertyBag

Job Count Last Month: | Out-File $debuglog -Append
$jobcountlastmonth | Out-File $debuglog -Append

$PropertyBag = $API.CreatePropertyBag()
$PropertyBag.AddValue(Instance, Job Count This Month)
$PropertyBag.AddValue(Value, [UInt32]$jobcountthismonth)
$PropertyBags += $PropertyBag

Job Count This Month: | Out-File $debuglog -Append
$jobcountthismonth | Out-File $debuglog -Append

$PropertyBag = $API.CreatePropertyBag()
$PropertyBag.AddValue(Instance, Job Minutes This Month)
$PropertyBag.AddValue(Value, [UInt32]$jobminutesthismonth)
$PropertyBags += $PropertyBag

Job Minutes This Month: | Out-File $debuglog -Append
$jobminutesthismonth | Out-File $debuglog -Append

$PropertyBag = $API.CreatePropertyBag()
$PropertyBag.AddValue(Instance, Runbooks in New State)
$PropertyBag.AddValue(Value, [UInt32]$newrunbooks)
$PropertyBags += $PropertyBag

Runbooks in New State: | Out-File $debuglog -Append
$newrunbooks | Out-File $debuglog -Append

$PropertyBag = $API.CreatePropertyBag()
$PropertyBag.AddValue(Instance, Runbooks in Published State)
$PropertyBag.AddValue(Value, [UInt32]$publishedrunbooks)
$PropertyBags += $PropertyBag

Runbooks in Published State: | Out-File $debuglog -Append
$publishedrunbooks | Out-File $debuglog -Append

$PropertyBag = $API.CreatePropertyBag()
$PropertyBag.AddValue(Instance, Runbooks in Edit State)
$PropertyBag.AddValue(Value, [UInt32]$editrunbooks)
$PropertyBags += $PropertyBag

Runbooks in Edit State: | Out-File $debuglog -Append
$editrunbooks | Out-File $debuglog -Append

$PropertyBag = $API.CreatePropertyBag()
$PropertyBag.AddValue(Instance, PowerShell Workflow Runbooks)
$PropertyBag.AddValue(Value, [UInt32]$scriptrunbooks)
$PropertyBags += $PropertyBag

PowerShell Workflow Runbooks: | Out-File $debuglog -Append
$scriptrunbooks | Out-File $debuglog -Append

$PropertyBag = $API.CreatePropertyBag()
$PropertyBag.AddValue(Instance, Graphical Runbooks)
$PropertyBag.AddValue(Value, [UInt32]$graphrunbooks)
$PropertyBags += $PropertyBag

Graphical Runbooks: | Out-File $debuglog -Append
$graphrunbooks | Out-File $debuglog -Append

$PropertyBag = $API.CreatePropertyBag()
$PropertyBag.AddValue(Instance, PowerShell Script Runbooks)
$PropertyBag.AddValue(Value, [UInt32]$powershellrunbooks)
$PropertyBags += $PropertyBag

PowerShell Script Runbooks: | Out-File $debuglog -Append
$powershellrunbooks | Out-File $debuglog -Append

$PropertyBags

} Catch {

Error Catched: | Out-File $debuglog -Append
$(
$_.Exception.GetType().FullName) | Out-File $debuglog -Append
$(
$_.Exception.Message) | Out-File $debuglog -Append

}

PS! I have included debugging and logging in the script, be aware though that doing $ErrorActionPreference=Stop will end the script if any errors, for example with logging, so it might be an idea to remove the debug logging when confirmed that everything works.

In the next part I’m ready to create the PowerShell Script Rule.

Creating the PowerShell Script Rule

In the Operations Console, under Authoring, create a new PowerShell Script Rule as shown below:

  1. Select the PowerShell Script (Performance – OMS Bound) Rule:I have created a custom destination management pack for this script.
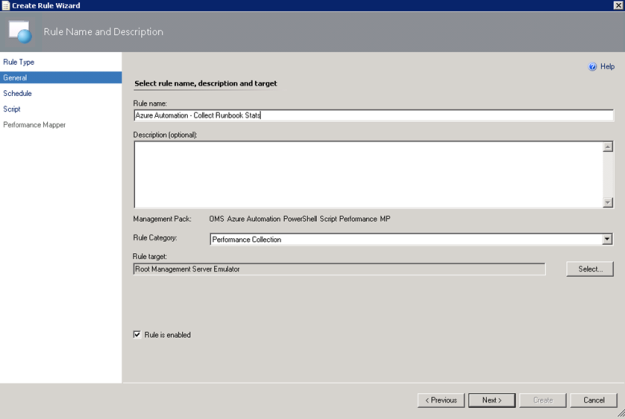
  2. Specifying a Rule name and Rule Category: Performance Collection. As mentioned earlier in this article the Rule target will be the Root Management Server Emulator:
  3. Selecting to run the script every 30 minutes, and at which time the interval will start from:
  4. Selecting a name for the script file and timeout, and entering the complete script as shown earlier:
  5. For the Performance Mapping information, the Object name must be in the \\FQDN\YourObjectName format. For FQDN I used the Target variable for PrincipalName, and for the Object Name AzureAutomationRunbookStats, and adding the “\\” at the start and “\” between: \\$Target/Host/Property[Type=”MicrosoftWindowsLibrary7585010!Microsoft.Windows.Computer”]/PrincipalName$\AzureAutomationRunbookStatsI specified the Counter name as “Azure Automation Runbook Stats”, and the Instance and Value are specified as $Data/Property(@Name=’Instance’)$ and $Data/Property(@Name=Value)$. These reflect the PropertyBag instance and value created in the PowerShell script:
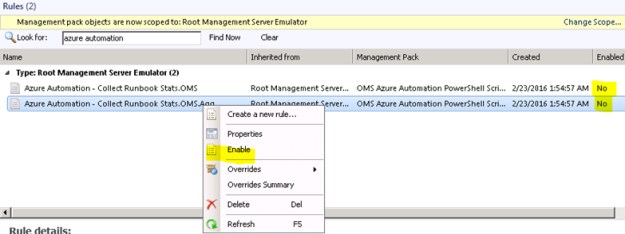
  6. After finishing the Create Rule Wizard, two new rules are created, which you can find by scoping to the Root Management Server Emulator I chose as target. Both Rules must be enabled, as they are not enabled by default:
At this point we are finished configuring the SCOM side, and can wait for some hours to see that data are actually coming into my OMS workspace.

Looking at Azure Automation Runbook Stats Performance Data in OMS

After a while I will start seeing Performance Data coming into OMS with the specified Object and Counter Name, and for the different instances and values.

In Log Search, I can specify Type=Perf ObjectName=AzureAutomationRunbookStats, and I will find the Results and Metrics for the specified time frame.

In the example above I’m highlighting the Job Minutes This Month counter, which will steadily increase for each month, and as we can see the highest value was 107 minutes, after when the month changed to March we were back at 0 minutes. After a while when the number of job minutes increases it will be interesting to follow whether this counter will go close to 500 minutes.

This way, I can now look at Azure Automation Runbook stats as performance data, showing different scenarios like how many jobs and runbook job minutes there are over a time period. I can also look at how what type of runbooks I have and what state they are in.

I can also create saved searches and alerts for my search criteria.

Creating OMS Alerts for Azure Automation Runbook Counters

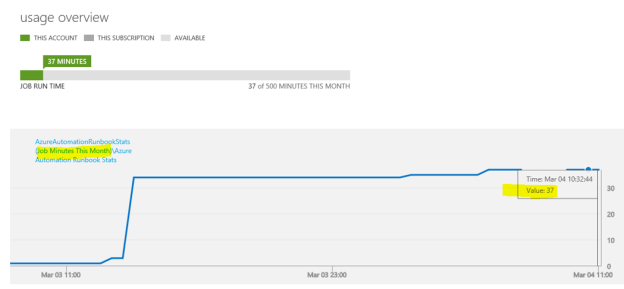
There is one specific scenario for Alerts I’m interested in, and that is when I’m approaching my monthly limit on 500 job minutes.

“Job Minutes This Month” is a counter that will get the sum of all job minutes for all runbook jobs across all automation accounts. In the classic Azure portal, you will have a usage overview like this:

With OMS I would get this information over a time period like this:

The search query for Job Minutes This Month as I have defined it via the PowerShell Script Rule in OMS is:

Type=Perf ObjectName=AzureAutomationRunbookStats InstanceName=”Job Minutes This Month”

This would give me all results for the defined time period, but to generate an alert I would want to look at the most recent results, for example for the last hour. In addition, I want to filter the results for my alert when the number of job minutes are over the threshold of 450 which means I’m getting close to the limit of 500 free minutes per month. My query for this would be:

Type=Perf ObjectName=AzureAutomationRunbookStats InstanceName=”Job Minutes This Month” AND TimeGenerated>NOW-1HOUR AND CounterValue > 450

Now, in my test environment, this will give med 0 results, because I’m currently at 37 minutes:

Let’s say, for sake of testing an Alert, I add criteria to include 37 minutes as well, like this:

This time I have 2 results. Let’s create an alert for this, press the ALERT button:

For the alert I give it a name and base it on the search query. I want to check every 60 minutes, and generate alert when the number of results is greater than 1 so that I make sure the passing of the threshold is consistent and not just temporary.

For actions I want an email notification, so I type in a Subject and my recipients.

I Save the alert rule, and verify that it was successfully created.

Soon I get my first alert on email:

Now, that it works, I can remove the Alert and create a new one without the OR CounterValue=37, this I leave to you 😉

With that, this blog post is concluded. Thanks for reading, I hope this post on how to get more insights on your Azure Automation Runbook Stats in OMS and getting data via NRT Perfomance Collection has been useful 😉

Displaying Service Manager Service Requests Stats in OMS via Performance Collection and Operations Manager

Following up on my previous blog article on how to collect Service Manager and Incident statistics via Operations Manager to OMS, https://systemcenterpoint.wordpress.com/2016/02/19/collecting-service-manager-incident-stats-in-oms-via-powershell-script-performance-collection-in-operations-manager/, this blog article will show how to get statistics for Service Requests and display that as Performance Data in OMS.

Getting Ready

Please see the link above for the first article on getting SCSM data to OMS, and instructions for configuring your Operations Manager environment and SMLets PowerShell module. I will use that same setup as basis for this article.

Creating the PowerShell Command Script for getting SCSM Service Request data

First I needed to think about what kind of Service Request data I wanted to get from SCSM. I decided to get the following values:

  • Submitted Service Requests
  • In Progress Service Requests
  • Completed Service Requests
  • Failed Service Requests
  • Cancelled Service Requests
  • Closed Service Requests
  • Service Requests Opened Last Day
  • Service Requests Opened Last Hour
  • Service Requests Completed Last Day
  • New Service Requests

Now, first some thoughts on why I chose these data to get for Service Requests (SR). When New Service Requests are created, they are quickly changed to a status of either Submitted (no activities in the template the Service Request was created from) or In Progress (where there are one or more activities). SR’s with no activities are manually set to Completed by the analyst when finished, or Cancelled if the SR will not be delivered. SR’s with activities gets the status Completed when all activities are completed as well, but might also get the status of Failed if any activities fails as well, for example runbook automation activities that might fail. Finally, when SR’s are completed, they will eventually be Closed.

So it makes sense to track all these statuses as performance data. You might ask why look at New status for SR’s, when this is only an intermittent status quickly changing to either Submitted or In Progress? Well, if there is a problem with the Workflow service at the Service Manager Management Server, SR’s can be stuck in New status. This is something I would want to be able to see in OMS, and even create an Alert for.

In addition to tracking the individual status values, I also want to see data on how many SR’s are created the last day, last hour, and also how many SR’s are Completed the last day. These will be nice performance indicators.

These Service Request values will be retrieved by the Get-SCSMObject cmdlet in SMLets, using different criteria. Unlike Get-SCSMIncident which query directly for Incident Records, I have to create the PowerShell command a little bit different, by specifying the Class Object (via Get-SCSMClass) and also filter Status Enumeration Id for Service Requests via Get-SCSMEnumeration. For example to get all SR’s with a status of In Progress, I use the following command:

The complete script is shown below for how to get those SR data via SCOM to OMS:

# Debug file
$debuglog = $env:TEMP+\powershell_perf_collect_SR_stats_debug.log

Date | Out-File $debuglog

Who Am I: | Out-File $debuglog -Append
whoami |
Out-File $debuglog -Append

$ErrorActionPreference = Stop

Try {

Import-Module C:\Program Files\WindowsPowerShell\Modules\SMLets

$API = new-object -comObject MOM.ScriptAPI

$scsmserver = az-scsm-ms01

$beforetime = $(Get-Date).AddHours(1)
$beforedate = $(Get-Date).AddDays(1)

$PropertyBags=@()

$inprogressrequests = 0
$inprogressrequests = @(Get-SCSMObject -Computername $scsmserver –Class (Get-SCSMClass -ComputerName $scsmserver -Name System.WorkItem.ServiceRequest$) -Filter (Status -eq ‘ + (Get-SCSMEnumeration -ComputerName $scsmserver ServiceRequestStatusEnum.InProgress$).Id +)).Count
$PropertyBag = $API.CreatePropertyBag()
$PropertyBag.AddValue(Instance, In Progress Service Requests)
$PropertyBag.AddValue(Value, [UInt32]$inprogressrequests)
$PropertyBags += $PropertyBag

In Progress Service Requests: | Out-File $debuglog -Append
$inprogressrequests | Out-File $debuglog -Append

$completedrequests = 0
$completedrequests = @(Get-SCSMObject -Computername $scsmserver –Class (Get-SCSMClass -ComputerName $scsmserver -Name System.WorkItem.ServiceRequest$) -Filter (Status -eq ‘ + (Get-SCSMEnumeration -ComputerName $scsmserver ServiceRequestStatusEnum.Completed$).Id +)).Count
$PropertyBag = $API.CreatePropertyBag()
$PropertyBag.AddValue(Instance, Completed Service Requests)
$PropertyBag.AddValue(Value, [UInt32]$completedrequests)
$PropertyBags += $PropertyBag

Completed Service Requests: | Out-File $debuglog -Append
$completedrequests | Out-File $debuglog -Append

$submittedrequests = 0
$submittedrequests = @(Get-SCSMObject -Computername $scsmserver –Class (Get-SCSMClass -ComputerName $scsmserver -Name System.WorkItem.ServiceRequest$) -Filter (Status -eq ‘ + (Get-SCSMEnumeration -ComputerName $scsmserver ServiceRequestStatusEnum.Submitted$).Id +)).Count
$PropertyBag = $API.CreatePropertyBag()
$PropertyBag.AddValue(Instance, Submitted Service Requests)
$PropertyBag.AddValue(Value, [UInt32]$submittedrequests)
$PropertyBags += $PropertyBag

Submitted Service Requests: | Out-File $debuglog -Append
$submittedrequests | Out-File $debuglog -Append

$cancelledrequests = 0
$cancelledrequests = @(Get-SCSMObject -Computername $scsmserver –Class (Get-SCSMClass -ComputerName $scsmserver -Name System.WorkItem.ServiceRequest$) -Filter (Status -eq ‘ + (Get-SCSMEnumeration -ComputerName $scsmserver ServiceRequestStatusEnum.Canceled$).Id +)).Count
$PropertyBag = $API.CreatePropertyBag()
$PropertyBag.AddValue(Instance, Cancelled Service Requests)
$PropertyBag.AddValue(Value, [UInt32]$cancelledrequests)
$PropertyBags += $PropertyBag

Cancelled Service Requests: | Out-File $debuglog -Append
$cancelledrequests | Out-File $debuglog -Append

$failedrequests = 0
$failedrequests = @(Get-SCSMObject -Computername $scsmserver –Class (Get-SCSMClass -ComputerName $scsmserver -Name System.WorkItem.ServiceRequest$) -Filter (Status -eq ‘ + (Get-SCSMEnumeration -ComputerName $scsmserver ServiceRequestStatusEnum.Failed$).Id +)).Count
$PropertyBag = $API.CreatePropertyBag()
$PropertyBag.AddValue(Instance, Failed Service Requests)
$PropertyBag.AddValue(Value, [UInt32]$failedrequests)
$PropertyBags += $PropertyBag

Failed Service Requests: | Out-File $debuglog -Append
$failedrequests | Out-File $debuglog -Append

$closedrequests = 0
$closedrequests = @(Get-SCSMObject -Computername $scsmserver –Class (Get-SCSMClass -ComputerName $scsmserver -Name System.WorkItem.ServiceRequest$) -Filter (Status -eq ‘ + (Get-SCSMEnumeration -ComputerName $scsmserver ServiceRequestStatusEnum.Closed$).Id +)).Count
$PropertyBag = $API.CreatePropertyBag()
$PropertyBag.AddValue(Instance, Closed Service Requests)
$PropertyBag.AddValue(Value, [UInt32]$closedrequests)
$PropertyBags += $PropertyBag

Closed Service Requests: | Out-File $debuglog -Append
$closedrequests | Out-File $debuglog -Append

$newrequests = 0
$newrequests = @(Get-SCSMObject -Computername $scsmserver –Class (Get-SCSMClass -ComputerName $scsmserver -Name System.WorkItem.ServiceRequest$) -Filter (Status -eq ‘ + (Get-SCSMEnumeration -ComputerName $scsmserver ServiceRequestStatusEnum.New$).Id +)).Count
$PropertyBag = $API.CreatePropertyBag()
$PropertyBag.AddValue(Instance, New Service Requests)
$PropertyBag.AddValue(Value, [UInt32]$newrequests)
$PropertyBags += $PropertyBag

New Service Requests: | Out-File $debuglog -Append
$newrequests | Out-File $debuglog -Append

$requestsopenedlasthour = 0
$requestsopenedlasthour = @(Get-SCSMObject -Computername $scsmserver –Class (Get-SCSMClass -ComputerName $scsmserver -Name System.WorkItem.ServiceRequest$) -Filter (CreatedDate -gt ‘ + $beforetime +)).Count
$PropertyBag = $API.CreatePropertyBag()
$PropertyBag.AddValue(Instance, Service Requests Opened Last Hour)
$PropertyBag.AddValue(Value, [UInt32]$requestsopenedlasthour)
$PropertyBags += $PropertyBag

Service Requests Opened Last Hour: | Out-File $debuglog -Append
$requestsopenedlasthour | Out-File $debuglog -Append

$requestsopenedlastday = 0
$requestsopenedlastday = @(Get-SCSMObject -Computername $scsmserver –Class (Get-SCSMClass -ComputerName $scsmserver -Name System.WorkItem.ServiceRequest$) -Filter (CreatedDate -gt ‘ + $beforedate +)).Count
$PropertyBag = $API.CreatePropertyBag()
$PropertyBag.AddValue(Instance, Service Requests Opened Last Day)
$PropertyBag.AddValue(Value, [UInt32]$requestsopenedlastday)
$PropertyBags += $PropertyBag

Service Requests Opened Last Day: | Out-File $debuglog -Append
$requestsopenedlastday | Out-File $debuglog -Append

$requestscompletedlastday = 0
$requestscompletedlastday = @(Get-SCSMObject -Computername $scsmserver –Class (Get-SCSMClass -ComputerName $scsmserver -Name System.WorkItem.ServiceRequest$) -Filter (CompletedDate -gt ‘ + $beforedate +)).Count
$PropertyBag = $API.CreatePropertyBag()
$PropertyBag.AddValue(Instance, Service Requests Completed Last Day)
$PropertyBag.AddValue(Value, [UInt32]$requestscompletedlastday)
$PropertyBags += $PropertyBag

Service Requests Completed Last Day: | Out-File $debuglog -Append
$requestscompletedlastday | Out-File $debuglog -Append

$PropertyBags

} Catch {

Error Catched: | Out-File $debuglog -Append
$(
$_.Exception.GetType().FullName) | Out-File $debuglog -Append
$(
$_.Exception.Message) | Out-File $debuglog -Append

}


PS! I have included debugging and logging in the script, be aware though that doing $ErrorActionPreference=Stop will end the script if any errors, for example with logging, so it might be an idea to remove the debug logging when confirmed that everything works.

In the next part I’m ready to create the PowerShell Script Rule.

Creating the PowerShell Script Rule

In the Operations Console, under Authoring, create a new PowerShell Script Rule as shown below:

    1. Select the PowerShell Script (Performance – OMS Bound) Rule:I have created a custom destination management pack for this script.
    2. Specifying a Rule name and Rule Category: Performance Collection. As mentioned earlier in this article the Rule target will be the Root Management Server Emulator:
    3. Selecting to run the script every 30 minutes, and at which time the interval will start from:
    4. Selecting a name for the script file and timeout, and entering the complete script as shown earlier:
    5. For the Performance Mapping information, the Object name must be in the \\FQDN\YourObjectName format. For FQDN I used the Target variable for PrincipalName, and for the Object Name ServiceManagerServiceRequestStats, and adding the “\\” at the start and “\” between: \\$Target/Host/Property[Type=”MicrosoftWindowsLibrary7585010!Microsoft.Windows.Computer”]/PrincipalName$\ServiceMgrServiceRequestStatsI specified the Counter name as “Service Manager Service Request Stats”, and the Instance and Value are specified as $Data/Property(@Name=’Instance’)$ and $Data/Property(@Name=Value)$. These reflect the PropertyBag instance and value created in the PowerShell script:
    6. After finishing the Create Rule Wizard, two new rules are created, which you can find by scoping to the Root Management Server Emulator I chose as target. Both Rules must be enabled, as they are not enabled by default:


At this point we are finished configuring the SCOM side, and can wait for some hours to see that data are actually coming into my OMS workspace.

Looking at Service Manager Service Request Performance Data in OMS

After a while I will start seeing Performance Data coming into OMS with the specified Object and Counter Name, and for the different instances and values.

In Log Search, I can specify Type=Perf ObjectName=ServiceMgrServiceRequestStats, and I will find the Results and Metrics for the specified time frame.

I can now look at Service Manager stats as performance data, showing different scenarios like how many active, pending, resolved and closed incidents there are over a time period. I can also look at how many incidents are created by each hour or by each day.

I can also create saved searches and alerts for my search criteria.

Creating OMS Alerts for Service Request Counters

A couple of scenarios are interesting for Alerts when some of the Service Request counters pass a threshold.

Failed Service Requests is a status that will be set when an Activity in the SR fails, for example a Runbook Automation Activity. Normally you would expect that analysts would follow up on requests that fails directly in Service Manager, but it could make sense to generate an alert if the number of failed requests increases over a predefined threshold.

The search query for Failed Service Requests in OMS is:

Type=Perf ObjectName=ServiceMgrServiceRequestStats InstanceName=”Failed Service Requests”

This would give me all results for the defined time period, but to generate an alert I would want to look at the most recent results, for example for the last hour. In addition, I want to filter the results for my alert when the number of failed requests are over the threshold of 10. My query for this would be:

Type=Perf ObjectName=ServiceMgrServiceRequestStats InstanceName=”Failed Service Requests” AND TimeGenerated>NOW-1HOUR AND CounterValue > 10

In my test environment, this gives me the following result, showing that I have a total of 29 failed requests:

Ok, 29 failed requests are a lot, but as this is a test environment and a lot of these are old requests, I would need to do some cleaning up. I want to create an alert for this, so I press the Alert button:

For the alert I give it a name and base it on the search query. I want to check every 60 minutes, and generate alert when the number of results is greater than 1 so that I make sure the passing of the threshold is consistent and not just temporary.

For actions I want an email notification, so I type in a Subject and my recipients.

I Save the alert rule, and verify that it was successfully created.

Soon I get my first alert on email:

There is also a second scenario for an alert, and that is when Service Requests get stuck in a New status. Normally this would be when Service Manager workflows are not running, so it will be important to get notified on that.

The following search query, using countervalue > 1 will provide the results for my alert as I want to get notified as soon there is more than one value in the results:

Type=Perf ObjectName=ServiceMgrServiceRequestStats InstanceName=”New Service Requests” AND TimeGenerated>NOW-1HOUR AND CounterValue > 1

And I can create my alert as the following image:

With that, this blog post is concluded. Thanks for reading, I hope the posts on OMS and getting SCSM data via NRT Perfomance Collection has been useful 😉