A while back I wrote a blog post on Installing Hyper-V Server 2016 on my Intel NUC Skull Canyon: https://gotoguy.blog/2016/10/17/installing-microsoft-hyper-v-server-2016-on-intel-nuc-skull-canyon/
You can read more on the hardware setup on that referred blog post, but in this blog post I will revisit the steps on how to repeat this setup on the new Semi-Annual Channel release of Windows Server, version 1709. You can read more on this new server version here: https://docs.microsoft.com/en-us/windows-server/get-started/get-started-with-1709
Setup Windows Server, version 1709
I needed to add a bootable volume for which I could install Windows Server, version 1709, and prepared an USB stick for which I would boot up the installation media for Windows Server 1709. The following steps should help you set up a bootable USB stick for Windows Server, version 1709:
- Download the .iso image for the Windows Server, version 1709, and mount it to a drive letter (in my example this will be f:)
- Make sure the USB stick is inserted and note the drive letter (in my case this is E:)
- Launch an elevated Command Prompt or PowerShell window (Run as Administrator)
- Run command: Diskpart (this will start DiskPart tool in interactive mode)
- Run command: list disk (from the list, note the disk number of the USB drive)
- Run command: select disk 1 (use the number from above, double check before next step which is to clean)
- Run command: clean (careful, this will wipe out the usb drive completely, so make sure you have selected the correct disk number)
- Run command: create partition primary
- Run command: select partition 1
- Run command: active (this will mark the selected partition as active)
- Run command: format fs=ntfs quick label=”1709″ (wait after for formatting to complete)
- Run command: exit
- You have now exited diskpart, change to the mounted iso drive (f:), and the run command: cd boot
- Run command (change drive letters if different in your environment): F:\boot>bootsect /nt60 e:
- You will now have updated NTFS filesystem bootcode on the USB drive, and the last step is to copy all Windows Server, version 1709 files:
xcopy f:\* e: /H /F /E - This could take a while, especially copying the large install.wim file. After copying is finished, you are ready to boot the USB stick on the Intel NUC Skull Canyon.
- At the Intel NUC boot screen, hit F10 to enter boot menu, and select the boot option for UEFI USB drive. After this the Windows Server, 1709 server install should begin.
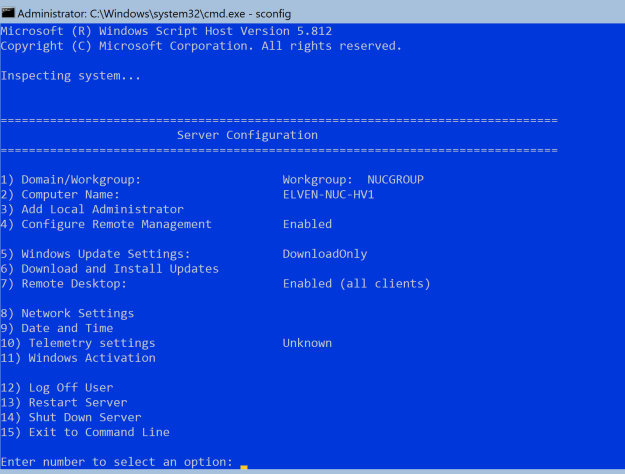
Install the Windows Server, 1709 following the installation process, and since 1709 is only available in Server Core, you will have to use Command Prompt and “SConfig” tool for initially configuring the server as shown in the next section.
Configuring the Windows Server, 1709 version for Remote Management and Hyper-V Server
After installation and changing the Administrator account password before first time logon, the Server Core configuration was ready for to start configure the server.
I first did these changes:
- Renamed the Computer Name, in this case I renamed the Computer to ELVEN-NUC-HV1
- Renamed the Workgroup name to NUCGROUP (optional)
- Enabled Remote Desktop (All clients, less secure). This setting can be reversed after I have configured all the Remote Management scenarios I need to.
- Under Configure Remote Management, I also Enabled the Server to Response to Ping, that could be useful when setting up the Server.
- I also downloaded and installed any pending updates.
My next step was to add the Hyper-V Server Role and configure for Remote Management via Hyper-V Manager.
Add and Configure the Hyper-V Host for Remote Management
In the Command Prompt of the server, type powershell.exe to start a PowerShell session.
Then run the following command to install the Hyper-V Role:
Add-WindowsFeature -Name Hyper-V,RSAT-Hyper-V-Tools

After a reboot we are ready to configure the server for remote management
I want to use my Windows 10 machine and Hyper-V Manager to remote manage this Hyper-V Host, as described in this link: https://msdn.microsoft.com/en-us/virtualization/hyperv_on_windows/user_guide/remote_host_management.
As this will be my home/portable lab, the Hyper-V Server will not be in a domain, so I need to use the instructions at the end of the above article for Manage a Hyper-V host outside your domain (or with no domain).
This is the steps I went through to set that up:
Configure FQDN for the Hyper-V Host
I want to set the FQDN for the Hyper-V Host so that:
Computername = ELVEN-NUC-HV1
Desired Primary DNS Suffix = nuc.group
In PowerShell, I first add the FQDN of the computer with the Netdom command:
netdom computername $env:computername /Add:ELVEN-NUC-HV1.nuc.group
Second, I add the FQDN of the computer to primary:
netdom computername $env:computername /MakePrimary:ELVEN-NUC-HV1.nuc.group
Restart the server before the next step.
Add the FQDN and IP address to the Hosts file
To be able to access the Hyper-V Server from my Windows 10 client, I add the IP address (I have created a DHCP reservation for it on my Router) and the FQDN in my Hosts file in C:\Windows\System32\Drivers\Etc directory.

Configure Remoting on the Hyper-V Server
On the Hyper-V host to be managed, start PowerShell.exe, and run the following as an administrator:
Enable-PSRemoting
Enable-PSRemoting will create the necessary firewall rules for private network zones.
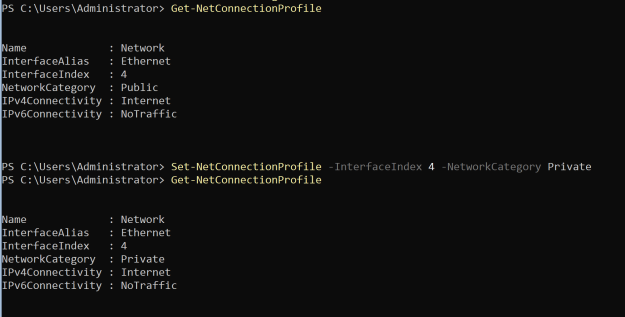
To make sure that the connection are in the private network zone, I check with the command:
Get-NetConnectionProfile
In my case, as this server is in a workgroup, I must specifically change the network zone from public to private:
Set-NetConnectionProfile -InterfaceIndex 4 -NetworkCategory Private
When checking after that, the connection is now Private:
After that I run the following command:
Enable-WSManCredSSP -Role server
Configure the Client
On my Windows 10 client machine, I run the following commands in a PowerShell (Run As Administrator) session:
# Start the WinRM Service
Start-Service WinRm
# Add the Hyper-V Server as Trusted Host
Set-Item WSMan:\localhost\Client\TrustedHosts -Value “elven-nuc-hv1.nuc.group”
# Add the Hyper-V Server to the list of servers to delegate credentials to
Enable-WSManCredSSP -Role client -DelegateComputer “elven-nuc-hv1.nuc.group”
If you later when adding the Server to Hyper-V Manager, get this error message, you need to follow these instructions on the client via GPedit.msc:
Configure the following group policy: * Computer Configuration | Administrative Templates | System | Credentials Delegation | Allow delegating fresh credentials with NTLM-only server authentication *
Click Enable and add wsman/elven-nuc-hv1.nuc.group

Add the Server to Hyper-V Manager
Finally, we should be ready to add the Server to Hyper-V Manager:
- Select Connect to Server, specify name and Connect as your Admin user:

- And now I can successfully configure the Hyper-V Server:
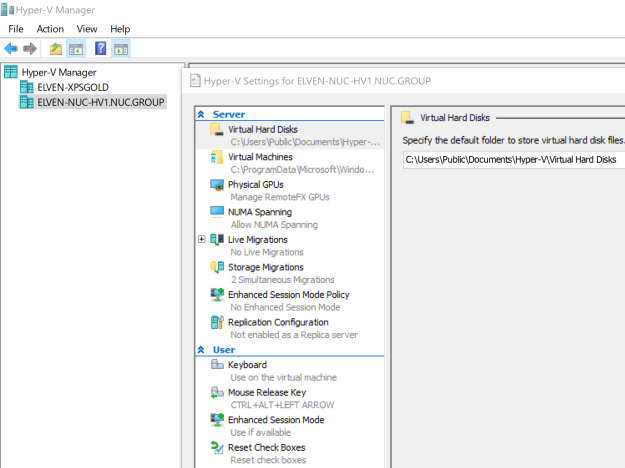

I can now configure Hyper-V Settings and add VMs to the Server via Hyper-V Manager from my Windows 10 client to the Windows Server, version 1709!
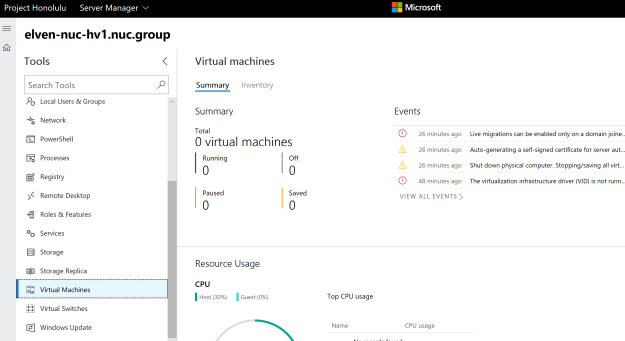
Manage the Windows Server 1709 with Project Honolulu
Another way to remote manage the Windows Server, version 1709 is to use the browser based server management tool “Project Honolulu”, https://docs.microsoft.com/en-us/windows-server/manage/honolulu/Honolulu.
Project Honololu is supported in Gateway Mode on the 1709 server version, and to install you first have to download the Honolulu installer, and then run a command like this:
msiexec /i <HonoluluInstallerName>.msi /qn /L*v log.txt SME_PORT=<port> SSL_CERTIFICATE_OPTION=generate
In my example I ran the command like this:
msiexec /i HonoluluTechnicalPreview1712-05002.msi /qn /L*v log.txt SME_PORT=443 SSL_CERTIFICATE_OPTION=generate
After installing Project Honolulu I can now also remote manage via browser from my client: