A Blog about Enterprise Mobility + Security, Azure AD, Datacenter Management, Service Delivery, Automation, Monitoring, Cloud OS, Azure and anything worthwhile sharing with the Cloud and Datacenter community.
Recently I came across a personal scenario where I use Hugo and GitHub Pages as a team site for a Soccer team I’m coaching and wanted to automate some updates to the web site. I’ve written a blog post previously on how I organized trainings at home using Power Platform: How I as a Soccer Coach…. | GoToGuy Blog, and I am now using Github Pages and Hugo for publishing some statistics and more for that scenario.
In this blog post I will show how I:
Created an OAuth Application for Github API.
Created a Custom Connector in Power Platform for connections to that OAuth Application.
Created Operations for getting content, updating content and triggering workflows for Github Actions.
Connected to Github API using my Azure AD account and user impersonation.
Created a Power Automate Cloud Flow for using the Custom Connector and the defined operations.
Lets get started!
Create OAuth Application for Github API
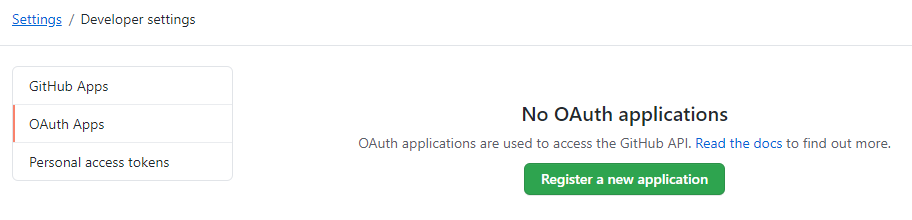
Start by logging in to your GitHub account and go to Settings. Under Settings you will find Developer Settings where you can access OAuth Apps. You can also go directly to the following URL https://github.com/settings/developers.
Click to Register a new application, and fill in something like the following:
As the above image shows, give the application a descriptive name for your scenario, you can type any homepage URL, this is not important in this scenario. The authorization callback URL is important though, as this will the callback to the Custom Connector we will create later. We can verify the URL later, but use https://global.consent.azure-apim.net/redirect.
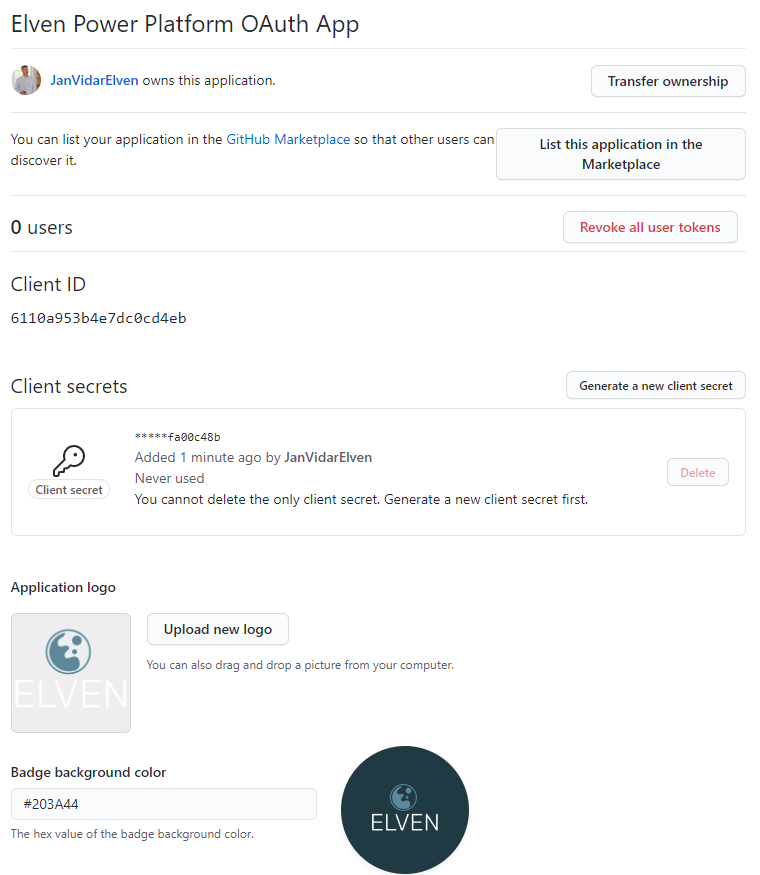
Register the application. Next you can change the settings for the registered app. You will have to copy the Client ID, we will need that later. You also need to create Client Secret, make sure to copy that as well, you will only be able to see this once. You can also change some settings like name, logo and branding if you like. This is how my Github App registration looks like now:
We can now proceed to Power Platform to create the Custom Connector.
Create Custom Connector to Github API in Power Platform
Log in to your Power Platform environment, and go to Custom Connectors under Data. Click to create a New custom connector. You can select to create from blank if you want to follow along the steps in my blog post here, or you can select to import an OpenAPI for URL, as I will provide the swagger file at the end of this blog post.
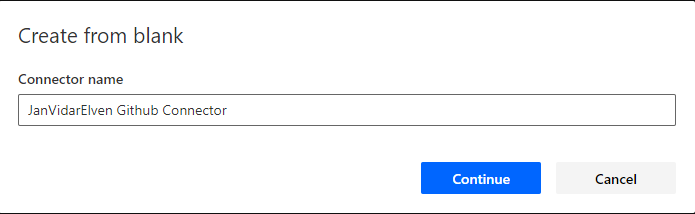
Give the connector a name of your choice and continue:
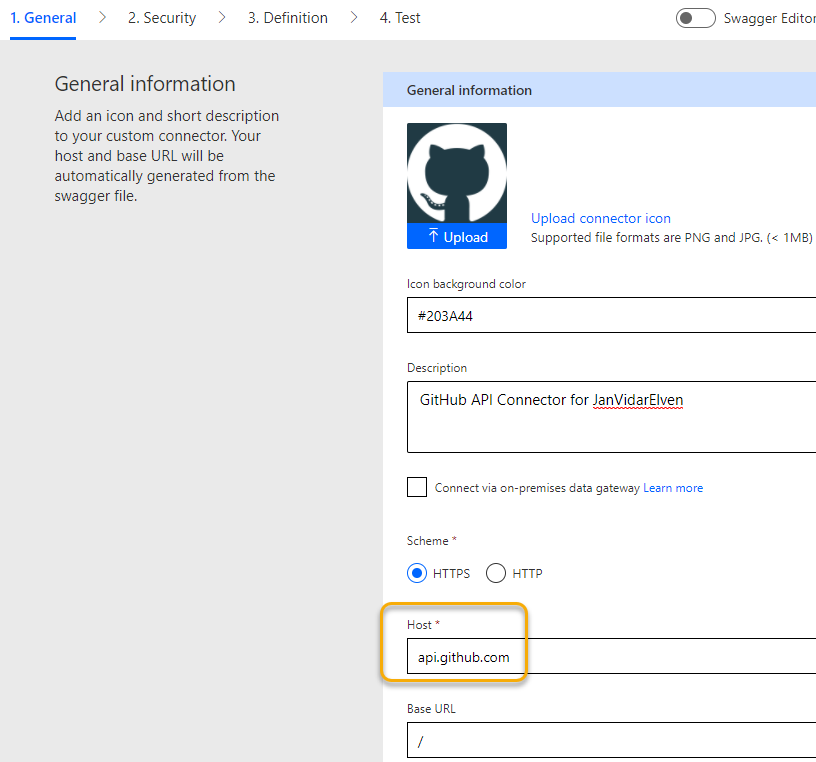
Next you need to specify “api.github.com” as host. You can also optionally upload a connector icon, as I have done here:
(You can grab the mark logo used above from here, GitHub Logos and Usage, note the usage requirements).
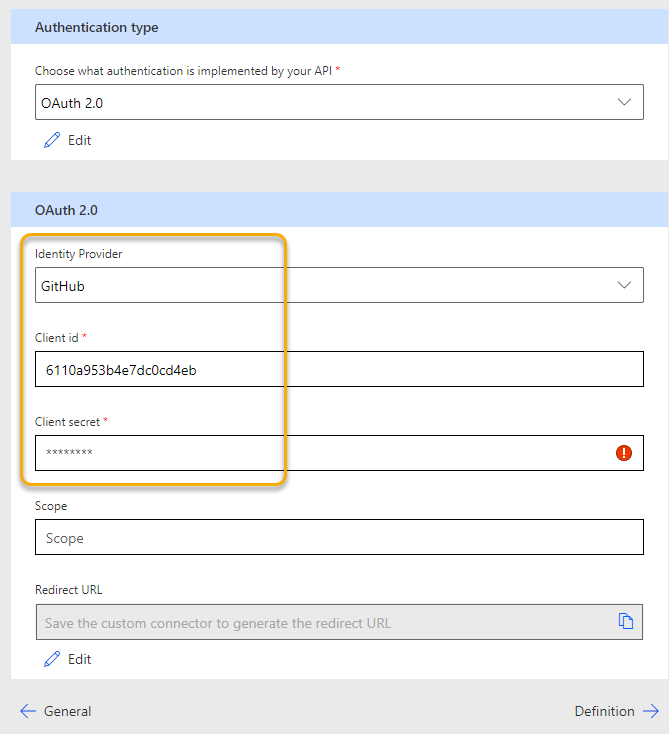
Next, go to Security. Select OAuth 2.0 as authentication type, and then selec GitHub as Identity Provider.
(PS! You can select Generic OAuth 2 also, but it will fall back to GitHub as Identity Provider eventually after all).
Add your Client ID and Secret from the Github OAuth application registration:
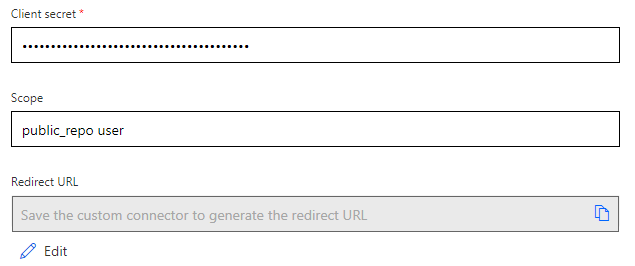
It is important to configure the correct scope (or scopes) as this will authorize the client for accessing the API. If you leave the scope blank, you will only get public read only access. You can read more on available scopes here: Scopes for OAuth Apps – GitHub Docs
In my case I want to have full read and write access to public repositories, as well as read write to user profile, so I set the scope to “public_repo user” (use space delimiter for multiple scopes):
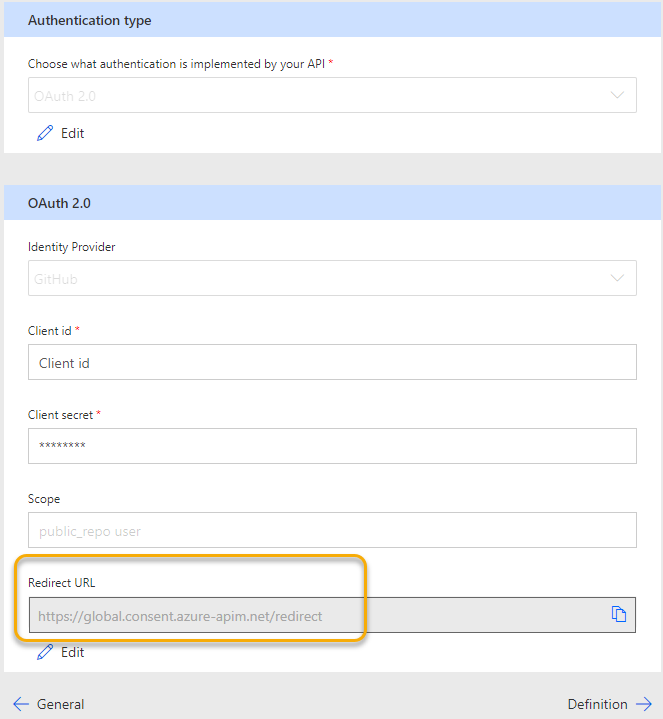
I can now click “Create connector”. After creating the security details are now hidden/disabled, and I can verify the Redirect URL to be the same as the Callback URL from the GitHub OAuth app registration:
We can now start defining the operations for the actions I want to do against the GitHub API.
Create Operations for sending requests to GitHub API
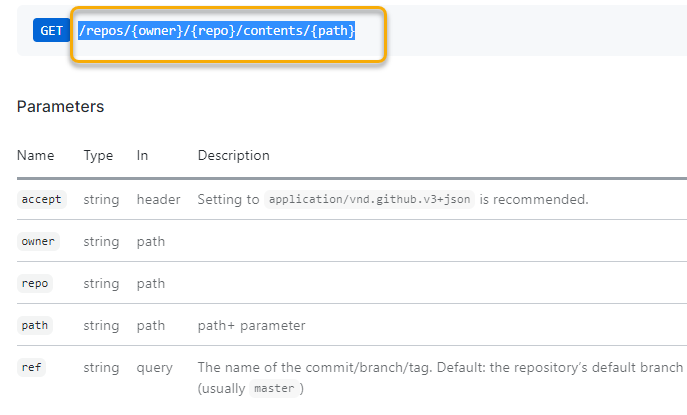
When querying and sending request to the GitHub API you need to know the API details and required parameters for what you want. The following link is for the official GitHub Rest API reference: Reference – GitHub Docs.
In my example I want to define the following 3 operations in my Custom Connector:
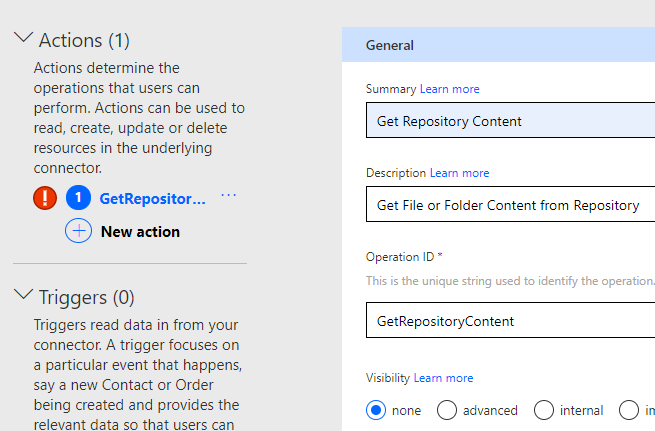
Under 3. Definition, select to create a New action, and call it something like “Get Repository Content” with the Operation ID set to “GetRepositoryContent”:
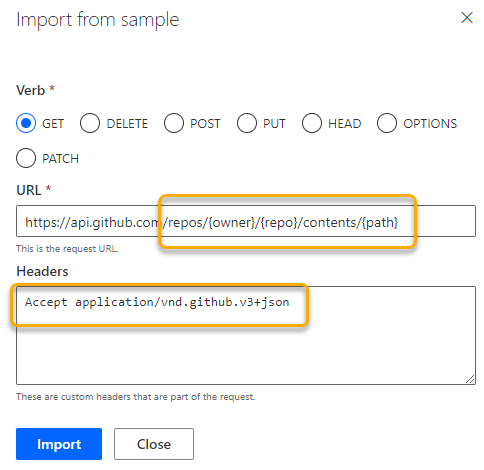
Then, under Request, click Import from sample. Select the Verb GET, and under URL type https://api.github.com. The rest of the query we will get from the GitHub API docs. Copy the following fra the REST API reference docs:
So that your sample request now looks like this, remember to add the recommended Accept header:
Click Import. The request will now ask for owner, repo and path as parameters:
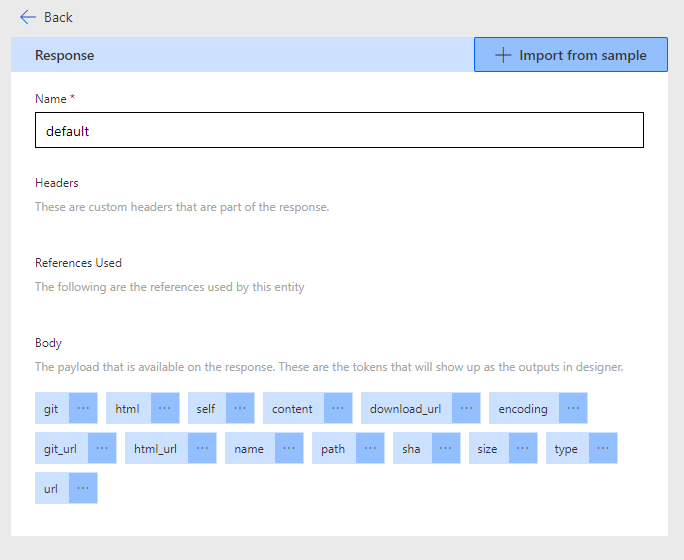
Next, click the default response. Here you can copy the sample response from the REST API docs, I’ve copied the sample response for getting file contents:
After that click “Update connector” and we have the first action operation defined.
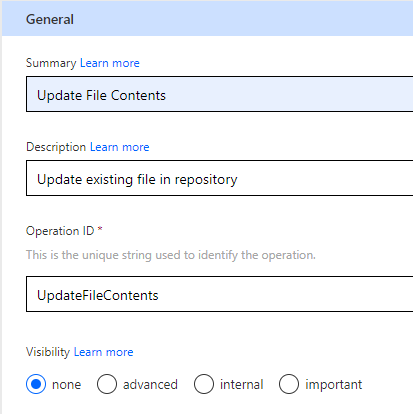
Click New action again, this time for updating file contents:
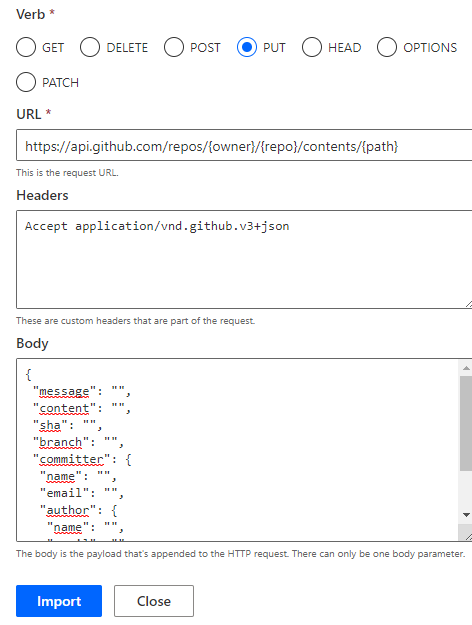
For the sample request the Verb is PUT, the URL is the same as when getting file content, but now we need to specify a request body as well:
I’ve created the sample request body based on the docs reference, with just empty placeholder values for the parameters needed. Some of these can be omitted, but message, contents, sha and branch is required for updating an existing file:
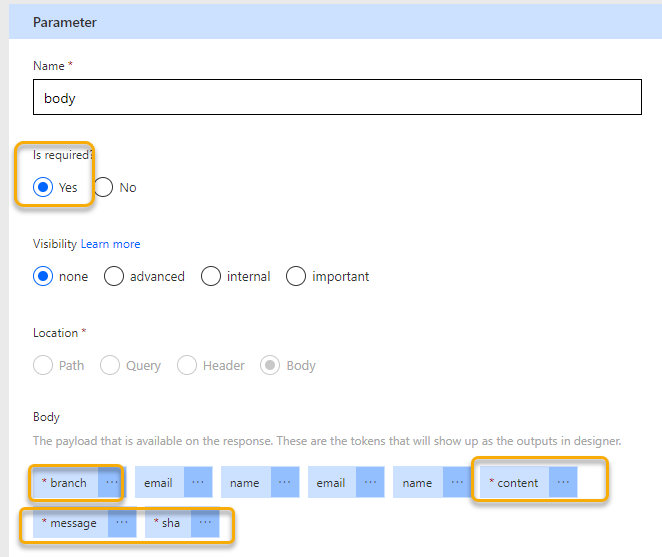
After importing the sample request, you can click into the body parameter and change to required for the body itself, as well as the payload parameters that you always want to include from below:
Add a sample default response as well, I’ve copied the example response for updating a file from the docs.
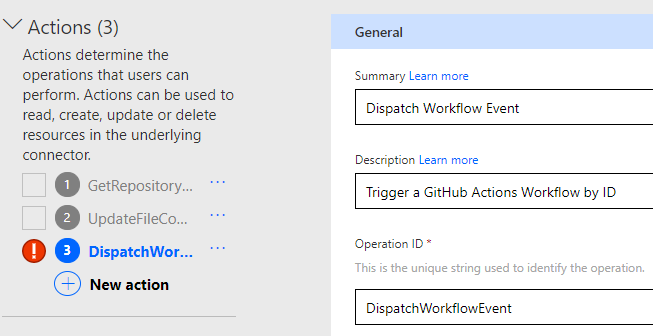
Click “Update connector” again and we are ready to add the third action:
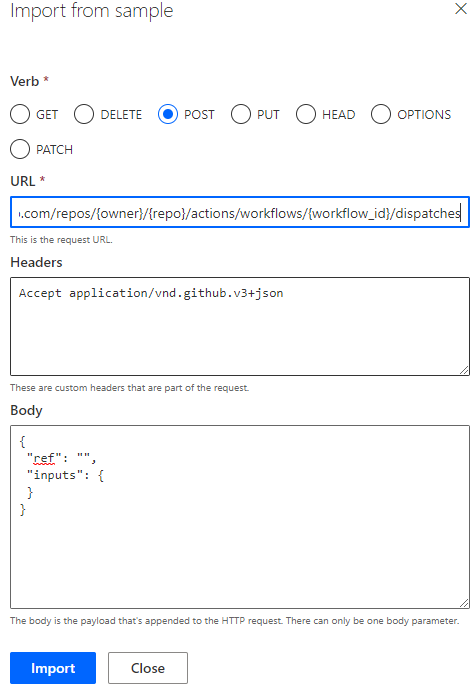
This will be a POST request, with the following URL and request body:
Note from above that “ref” needs to be referencing a branch or tag name as is a required parameter. “Inputs” is an object, depending on your GitHub Actions workflow if incoming parameters is defned, so in many cases this can be empty.
You can leave the default response as it is, as API will return 204 No Content if request is successful.
Click on “Update connector” again, and you should now have 3 actions successfully configured.
We can now proceed to create a connection and authenticate to GitHub API using this custom connector.
Connect to Github API using my Azure AD account and user impersonation
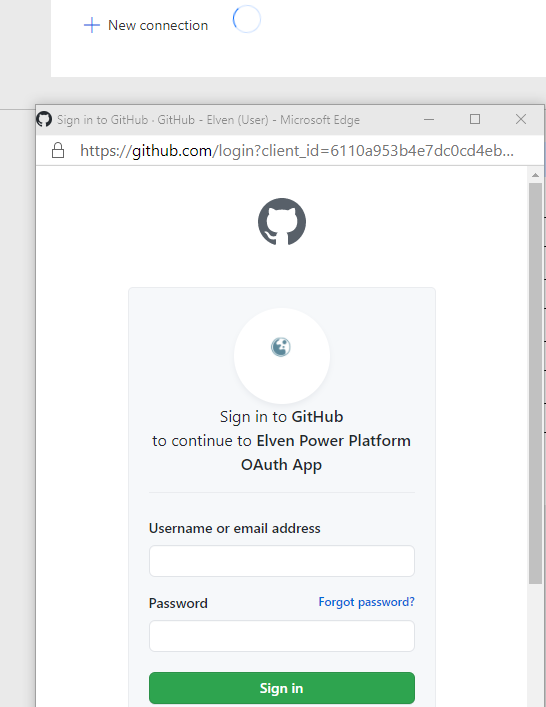
Go to “4. Test”, and click to create a “New connection”. This will create a new authentication popup, and if you’re not already logged in to GitHub you must log in first. Note the correct reference and branding to the “Elven Power Platform OAuth App”:
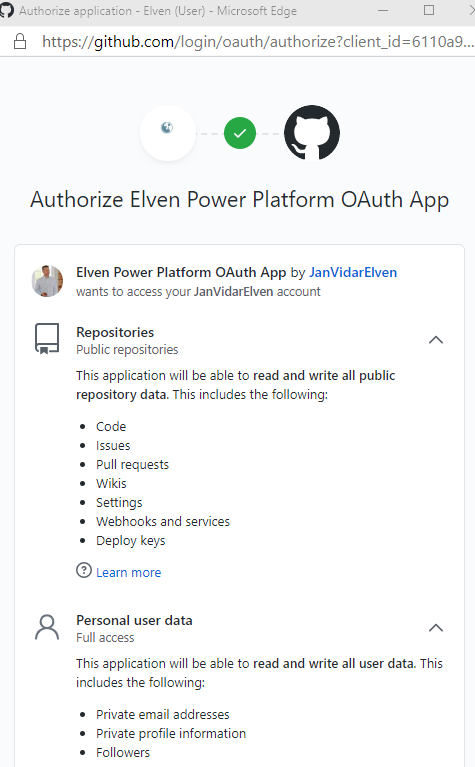
After logging in I’m prompted to authorize the OAuth app to access data in my account. Note that the scopes “public_repo” and “user” is shown in the authorization request:
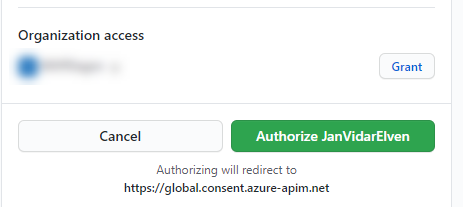
If you own other organizations you can grant access to that as well. Click Authorize “OwnerName”: as shown below:
After authorizing you will be redirected back to the Connections, and you should be able to successfully get a new connection object.
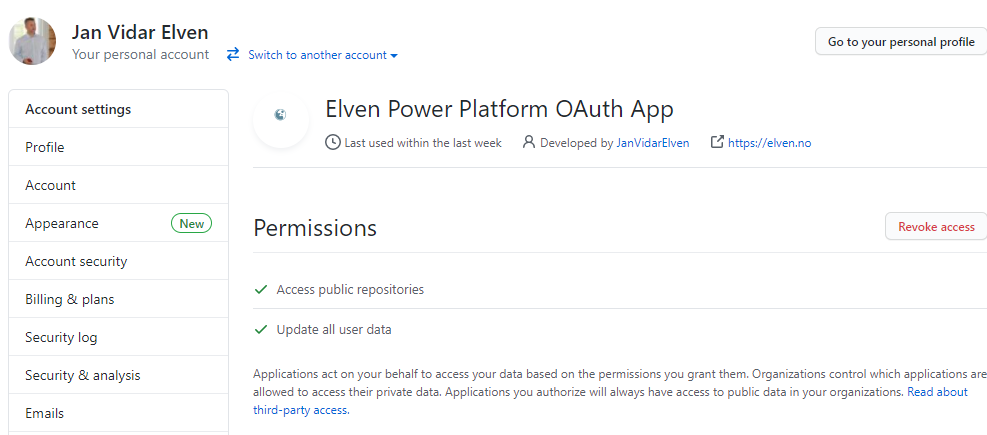
Let’s take a look at GitHub settings again, under https://github.com/settings/applications. You should see the OAuth App and the correct permissions configured if you click into details. You can also revoke the access if you need to remove it or reconfigure the scopes for example:
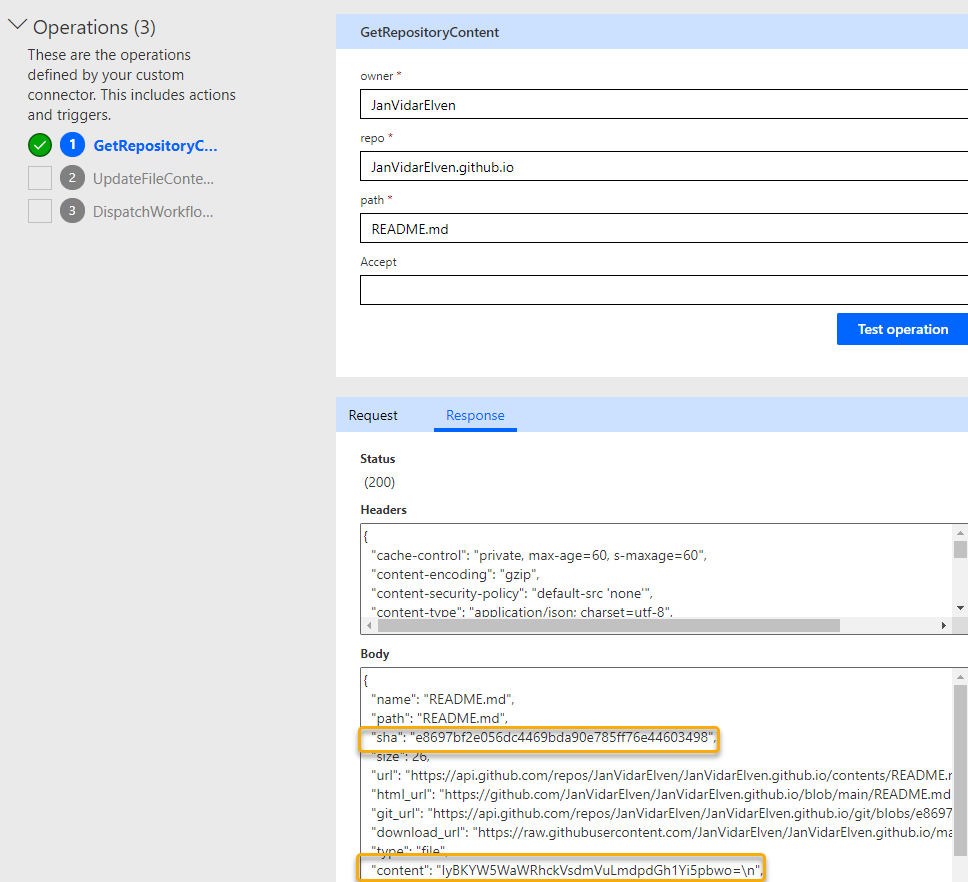
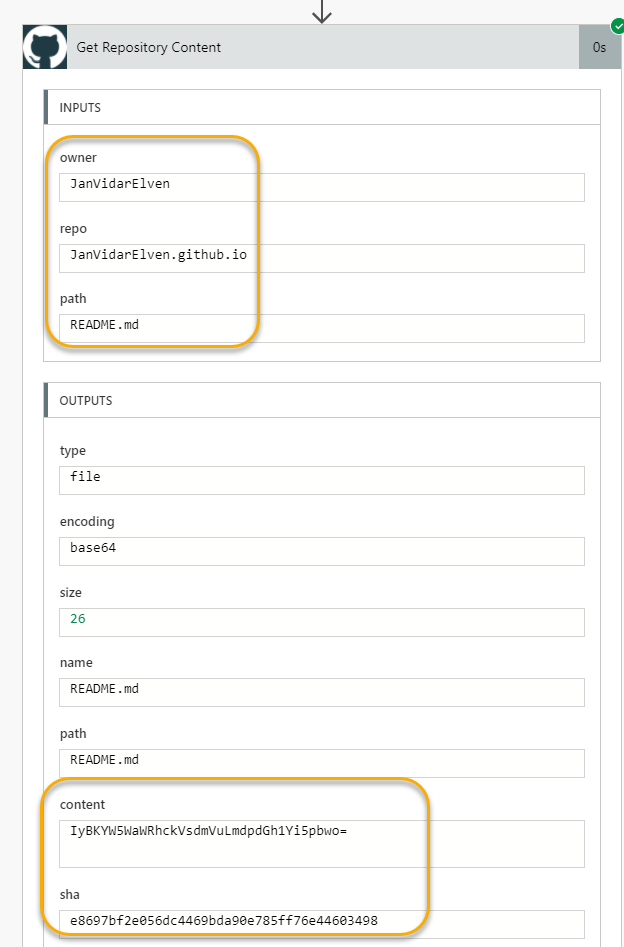
Let’s do a test from the Custom Connector and see what we get. Click on the GetRepositoryContent, and provide the paramaters for “owner” (your GitHub account name), “repo” (any repository, I’m using my GitHub Pages repo here), and a “path” to an existing file in that repo (I’m just testing against my README.md at root, but this can be any subfolder\file also). Click Test operation and see:
This should be successful, note that the response contains a couple of important values for later, the “sha” for the existing file, and the “content” which is a base64 representation of the current contents of the README.md file.
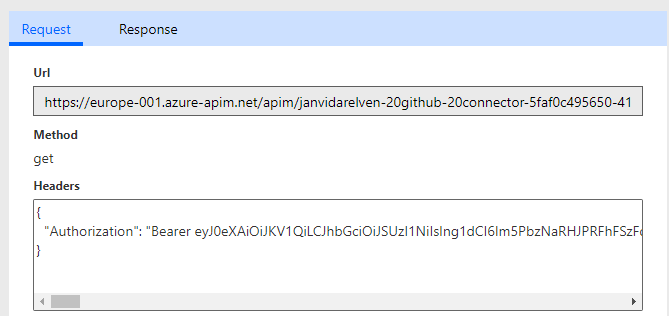
Click on the Request tab, and you will see a preview of how the request was constructed. You will also see the Authorization Header with the Bearer Token:
A couple of important things to note:
The request uses an API gateway in Azure APIM, not GitHub directly.
The Bearer Token in the Authorization Header is for the Azure API GW audience, so it cannot be used directly against GitHub API.
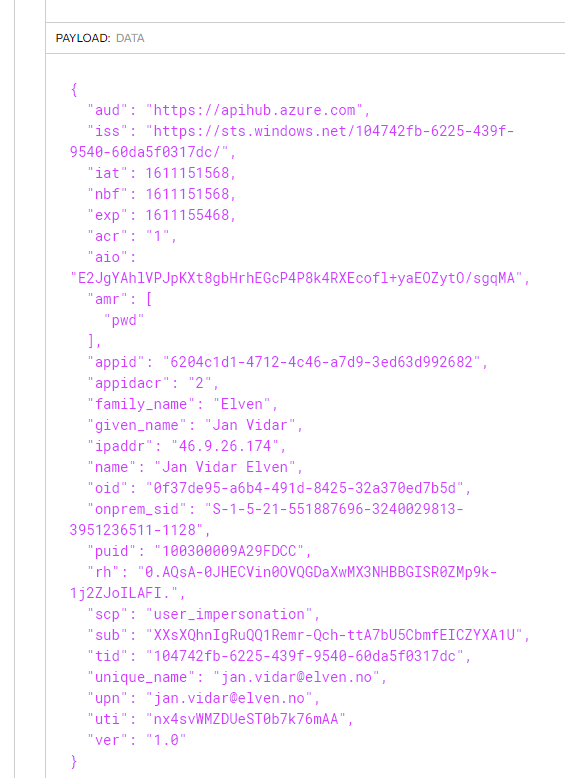
Copy the entire token value, from after “Bearer <token……>”, and paste it into a JWT debugger like jwt.io. From there we can look at the decoded payload:
From that payload it’s clear that the Token has been issued by my Azure AD tenant and for my logged on user in Power Platform. The scope is user_impersonation, so this will be used in a on-behalf-of flow scenario via the audience defined as apihub.azure.com, which in turn will request from GitHub API resources on my behalf via the APIM gateway used by Power Platform.
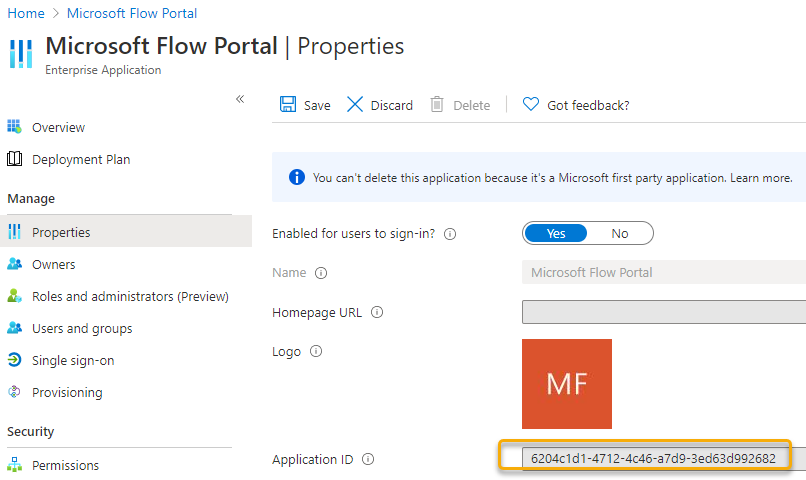
You can also lookup the appid from the Token in the Azure AD tenant, and you will find the following Enterprise Application, from where you can enable or disable it on an organization level, or you can examine the sign in logs:
We can test the other operations as well, but let’s create a Flow for that scenario.
Create a Power Automate Cloud Flow for using the Custom Connector to Get and Update File Content
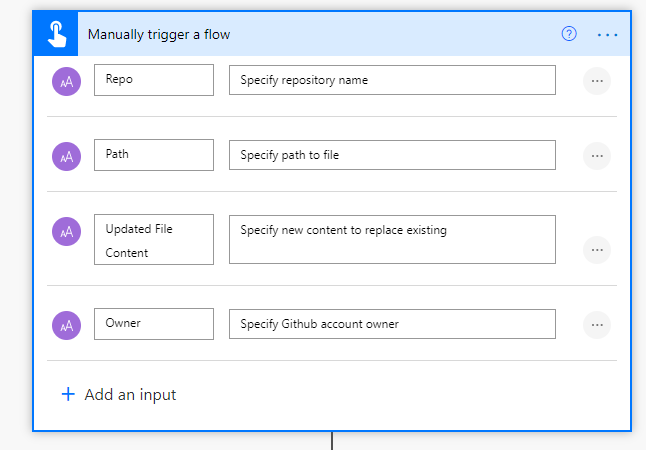
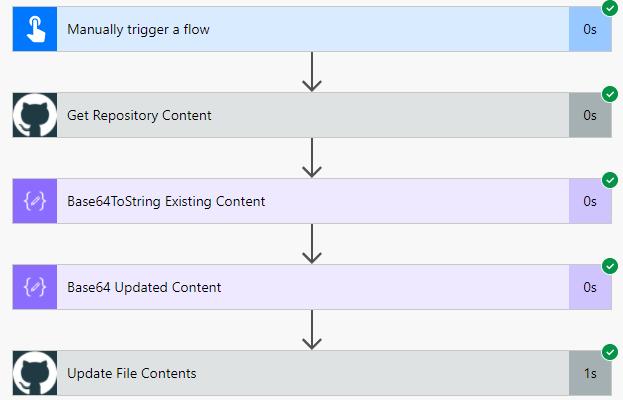
Create a new Cloud Flow, using an instant trigger for manually triggering a flow. Add some inputs like shown below:
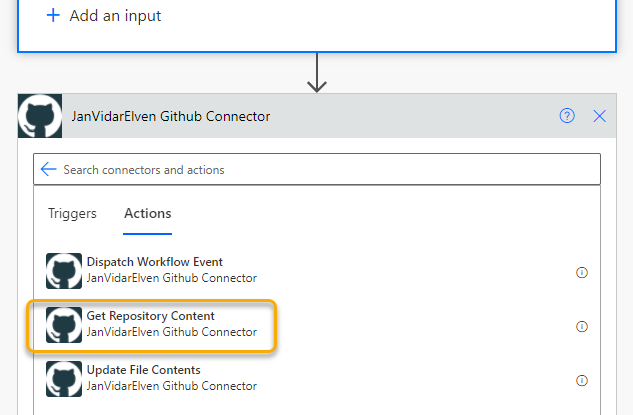
Next, add a new action and from under Custom find the GitHub Custom Connector:
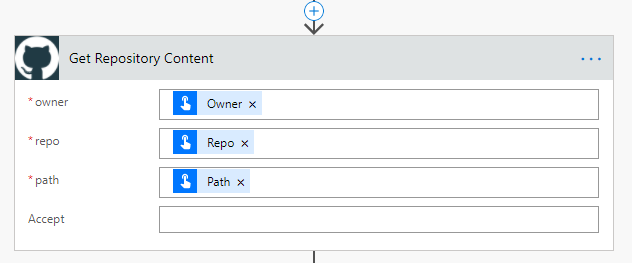
Add the “Get Repository Content” action and then fill in the inputs like below:
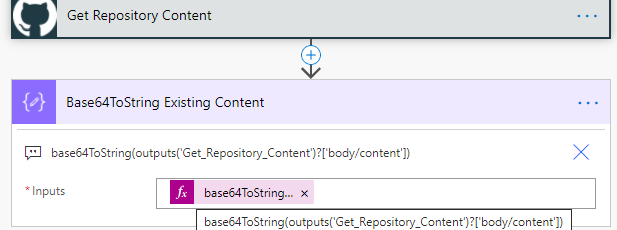
Next, add a Compose action, with the following dynamic expression:
This is just for checking what the existing file contents is:
We can do a quick Save and then Test Flow so far, from the Run history I should get the correct inputs, and when finding the existing file the outputs will include the sha value of the existing file, as well as the base64 encoded value of the content:
And when looking at the decoding of the content I can see that the readme.md file content is shown correctly:
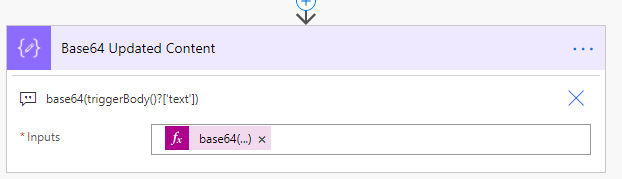
Go into Flow edit mode again, and add another Compose action, this time we need to base64 encode the new content I want to update the file with:
Note that the base64 function uses for parameter the input trigger of base64(triggerBody()?['text']), as this is the first text parameter of the trigger.
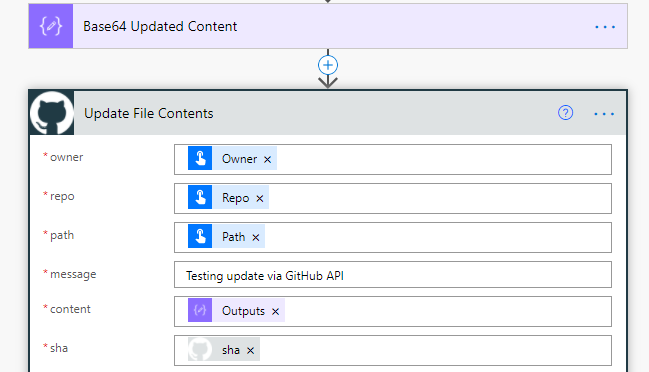
Add a new action, this time for the Custom Connector again, and the Update File Contents. Specify the owner, repo and path as previously input values, type a custom message for the message, and select the outputs from the “Base64 Updated Content” action, and use the sha value from the “Get Repository Content”. The rest of the values (committer, author objects) are optional:
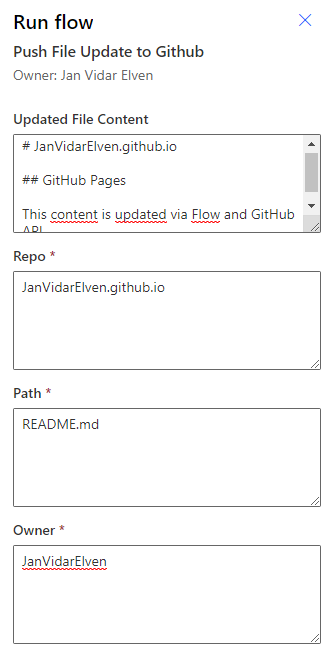
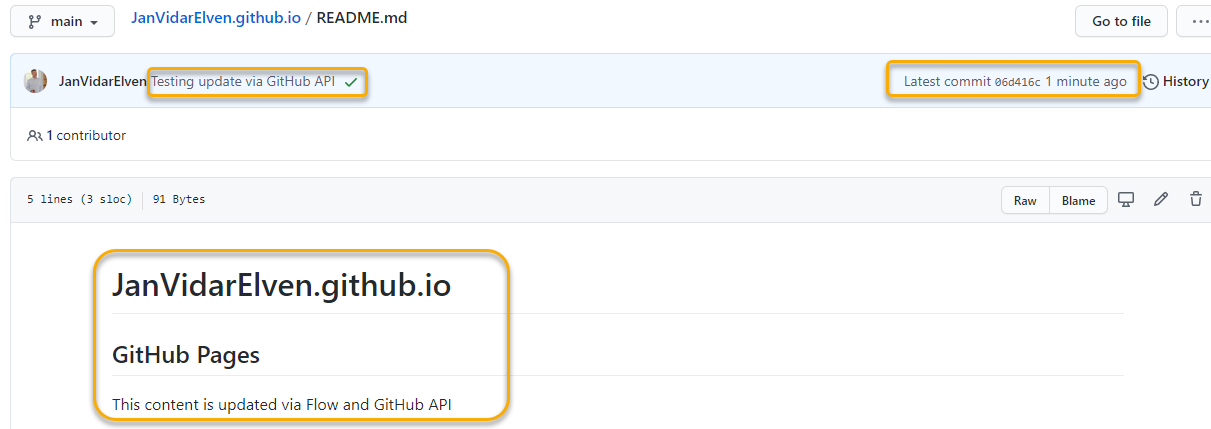
Save and then do another test, for example like the following to update the README.md file:
And the test should be successful:
I can also verify this at my repository and check the file has been updated. Note also the commit message:
Triggering a GitHub Actions Workflow
The last thing I wanted to go through in this blog post is using the Power Platform Custom Connector to trigger a GitHub Actions workflow. My use case for this is to start a Hugo build when I have dynamically updated files for my static website, but for now I will keep it simple.
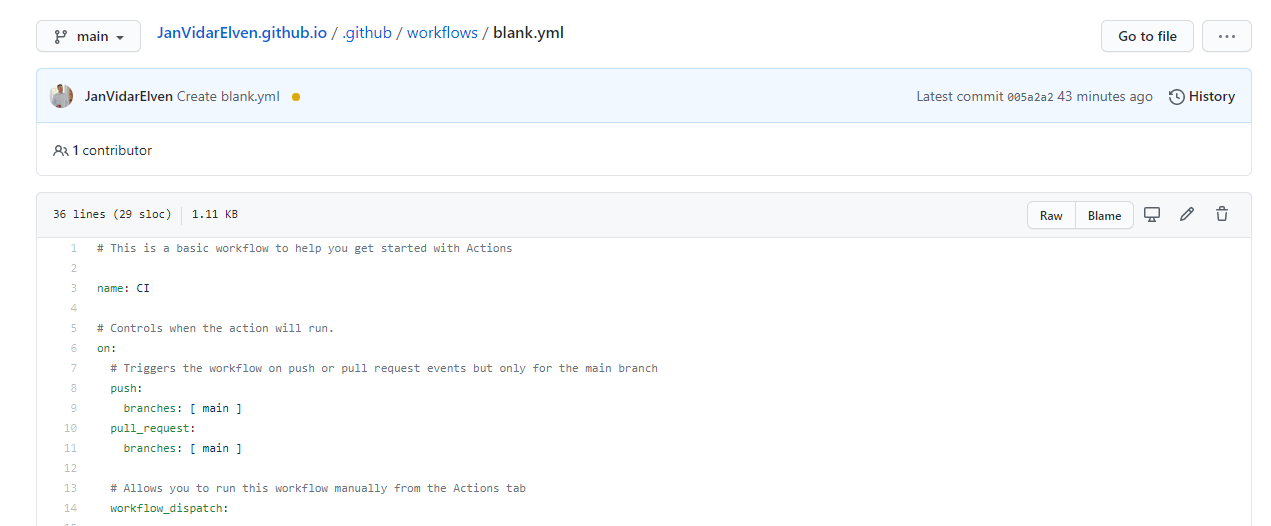
I have via a basic template created a simple workflow like this:
This workflow can also be triggered manually using workflow_dispatch, so let’s use that to verify that I can call it from Power Platform.
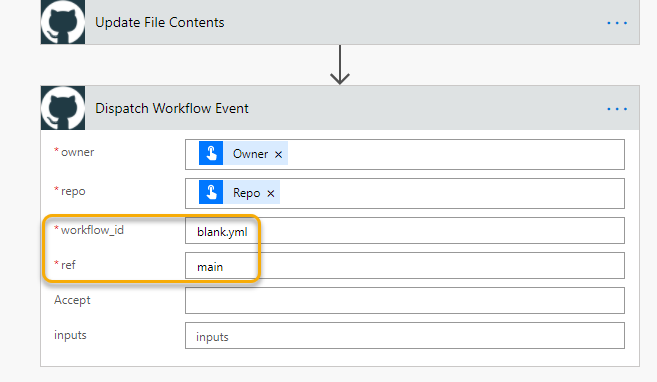
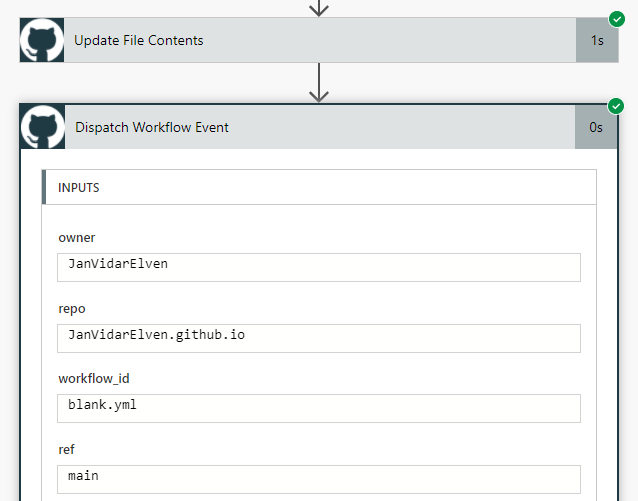
Add a new action at the end of the Flow, adding the Custom Connector action for Dispatching Workflow event:
Specify Owner and Repo from inputs, and for workflow id either specify ID or the name of the workflow file, in this case blank.yml. The ref parameter is either a branch or tag name, so in my case I use main branch. I leave the other parameters blank as I don’t have any inputs to supply, and use the default Accept header.
Save and Test the Flow again, supplying an updated file content, owner, repo and path similar to what we did previously. When the Flow runs it should complete successfully:
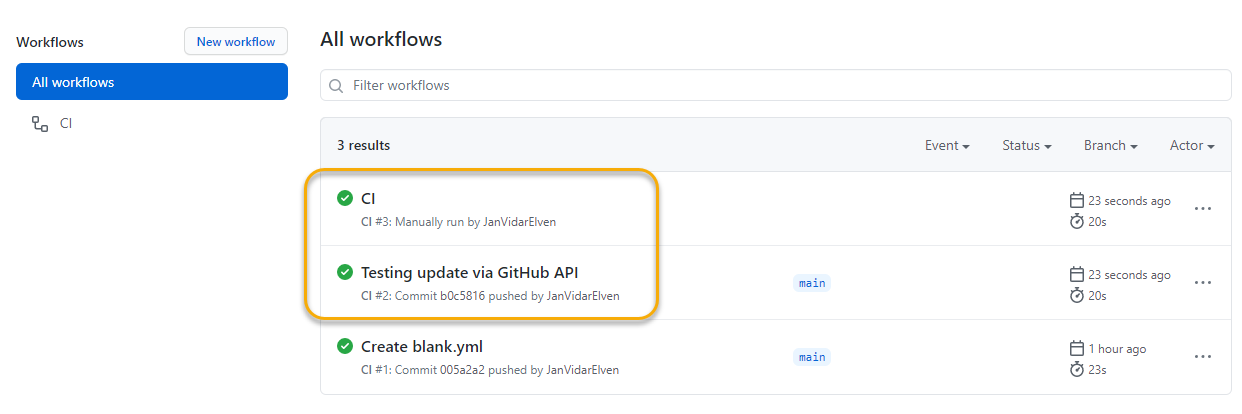
If I go to my GitHub repository, and under Actions, I can see that this workflow has been triggered:
Actually it has been triggered twice, as the first trigger is automatic for the push commit on the file update, and the other (named “CI” in results) is the actual workflow dispatch from the Flow.
Basically this means that I can select some different logic to when my workflows will trigger, either as a push or pull trigger, or as a trigger event based on my Flows. But of course I won’t normally run both triggers 😉
I now have what I need for working further with my personal Hugo and GitHub Pages project, my plan is to update data and assets files from my Power Platform environment, and then trigger a Hugo build for my website. I might blog more on that process later.
Summary and some last thoughts
In this blog post I wanted to show how you can work with the GitHub REST API via a Power Platform Custom Connector. This way you can basically achieve anything that the GitHub API has available, provided the correct scope/scopes has been authorized.
I do want to mention however that there is a GitHub Connector you can use directly in Power Automate, Logic Apps, or Power Apps also: GitHub – Connectors | Microsoft Docs, where you can create a direct connection to your GitHub account. You should take a look at that if that can server your needs.
In my case I needed the API to get or update file contents directly, as well as when using impersonation people in my organization can use their own Azure AD accounts if I share the Custom Connector with them, they don’t need their own GitHub accounts as long as the OAuth App has been authorized on my behalf.
If you want a quickstart on creating the Custom Connector your self, below is the Swagger definition. Thanks for reading, hope it has been useful!
This file contains hidden or bidirectional Unicode text that may be interpreted or compiled differently than what appears below. To review, open the file in an editor that reveals hidden Unicode characters.
Learn more about bidirectional Unicode characters
In this blog I will build on that, creating a scenario where a Logic App will be exposed as an API to end users. In this API, I will call another popular API: Microsoft Graph.
My scenario will use a case where end users does not have access themselves to certain Microsoft Graph requests, but where the Logic App does. Exposing the Logic App as an API will let users be able to authenticate and authorize, requesting and consenting to the custom Logic App API permissions I choose. Some of these permissions can users consent to themselves, while other must be admin consented. This way I can use some authorizing inside the Logic App, and only let the end users be able to request what they are permitted to.
I will also look into assigning users and groups, and using scopes and roles for additional fine graining end user and principal access to the Logic App.
A lot of topics to cover, so let’s get started by first creating the scenario for the Logic App.
Logic App calling Microsoft Graph API
A Logic App can run requests against the Microsoft Graph API using the HTTP action and specifying the method (GET, POST, etc) and resource URI. For authentication against Graph from the Logic App you can use either:
Using Azure Active Directory OAuth and Client Credentials Flow with Client Id and Secret.
Using System or User Assigned Managed Identity.
Permissions for Microsoft Graph API are either using “delegated” (in context of logged in user) or “application” (in context of application/deamon service). These scenarios using Logic App will use application permissions for Microsoft Graph.
PS! Using Logic Apps Custom Connectors (Custom connectors overview | Microsoft Docs) you can also use delegated permissions by creating a connection with a logged in user, but this outside of the scope of this article.
Scenario for using Microsoft Graph in Logic App
There are a variety of usage scenarios for Microsoft Graph, so for the purpose of this Logic App I will focus on one of the most popular: Device Management (Intune API) resources. This is what I want the Logic App to do in this first phase:
Listing a particular user’s managed devices.
Listing all of the organization’s managed devices.
Filtering managed devices based on operating system and version.
In addition to the above I want to implement the custom API such that any assigned user can list their own devices through end-user consent, but to be able to list all devices or any other user than your self you will need an admin consented permission for the custom API.
Creating the Logic App
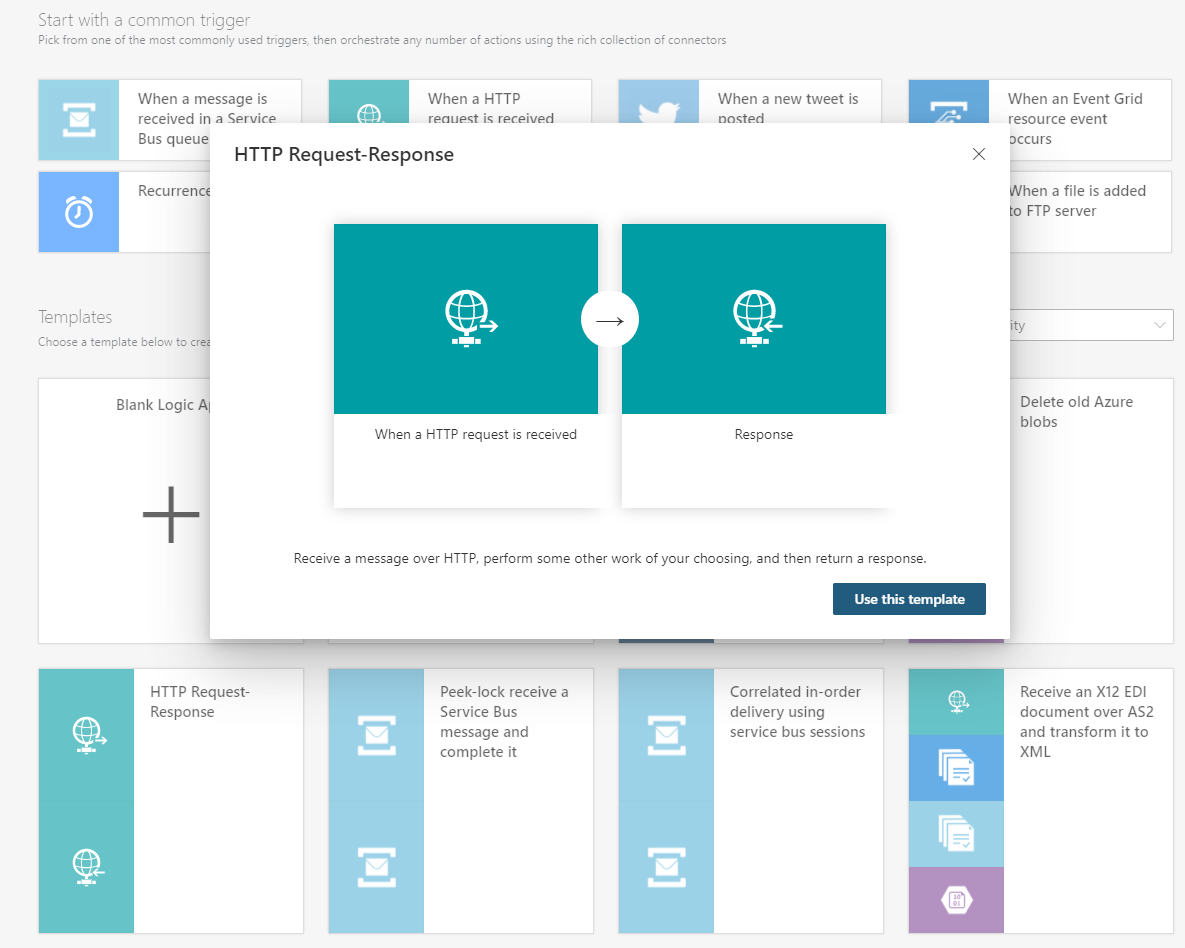
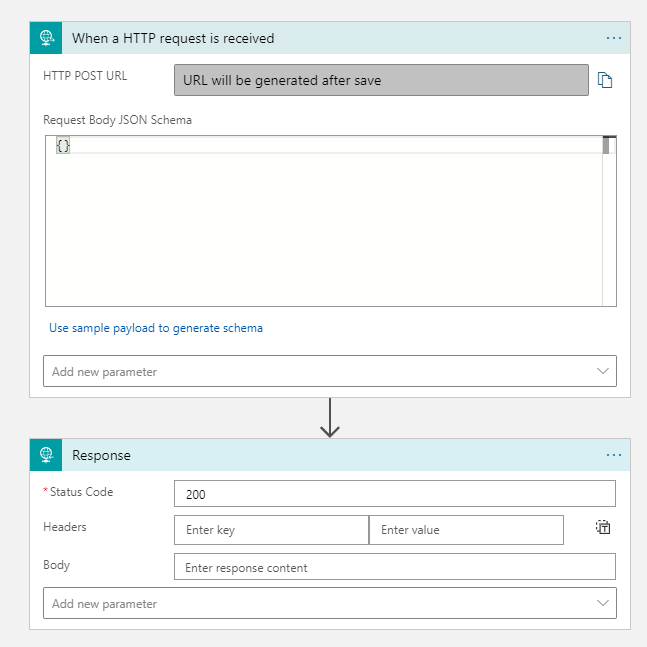
In your Azure subscription, add a new Logic App to your chosen resource group and name it according to your naming standard. After the Logic App is created, you will need add the trigger. As this will be a custom API, you will need it to use HTTP as trigger, and you will also need a response back to the caller, so the easiest way is to use the template for HTTP Request-Response as shown below:
Your Logic App will now look like this:
Save the Logic App before proceeding.
Create a Managed Identity for the Logic App
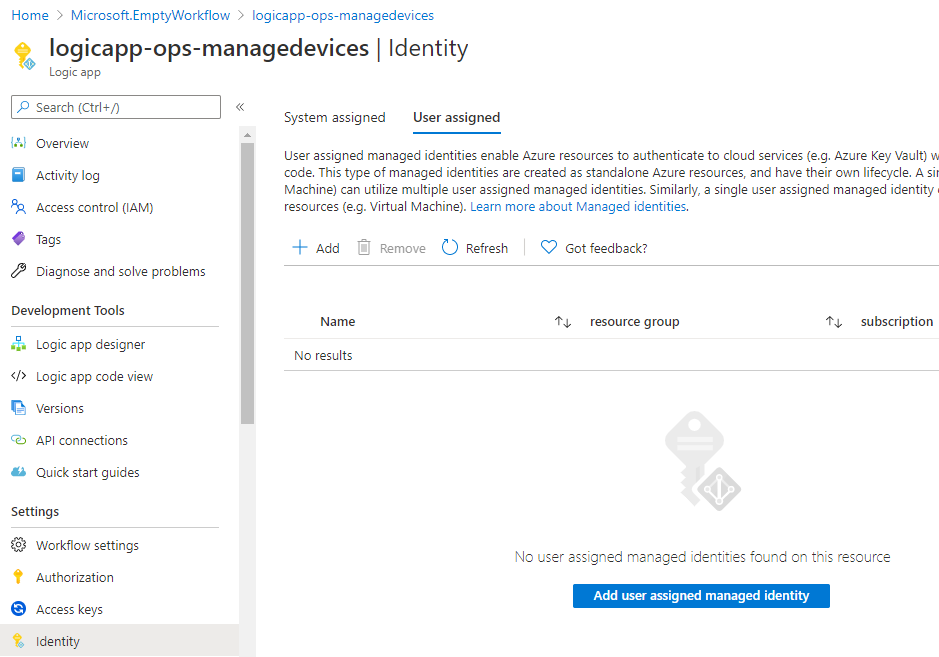
Exit the designer and go to the Identity section of the Logic App. We need a managed identity, either system assigned or user assigned, to let the Logic App authenticate against Microsoft Graph.
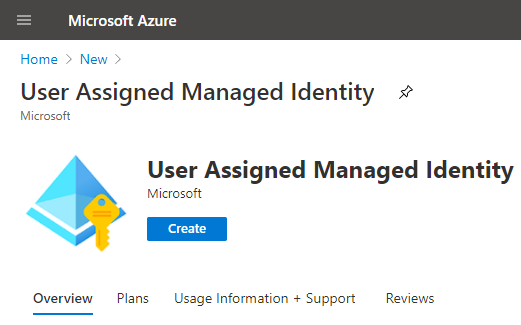
A system assigned managed identity will follow the lifecycle of this Logic App, while a user assigned managed identity will have it’s own lifecycle, and can be used by other resources also. I want that flexibility, so I will create a user assigned managed identity for this scenario. In the Azure Portal, select to create a new resource and find User Assigned Managed Identity:
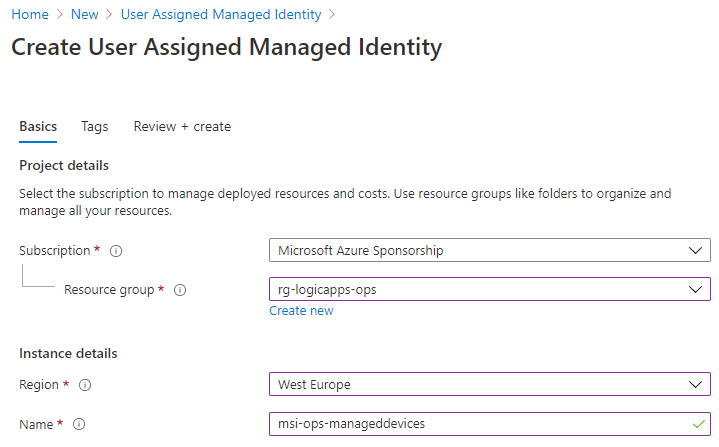
Create a new User Assigned Managed Identity in your selected resource group and give it a name based on your naming convention:
After creating the managed identity, go back to your Logic App, and then under Identity section, add the newly created managed identity under User Assigned Managed Identity:
Before we proceed with the Logic App, we need to give the Managed Identity the appropriate Microsoft Graph permissions.
Adding Microsoft Graph Permissions to the Managed Identity
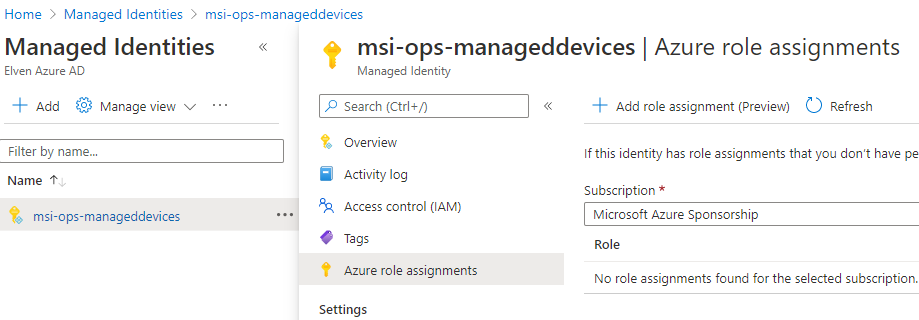
Now, if we wanted the Logic App to have permissions to the Azure Rest API, we could have easily added Azure role assignments to the managed identity directly:
So we need a minimum of: DeviceManagementManagedDevices.Read.All.
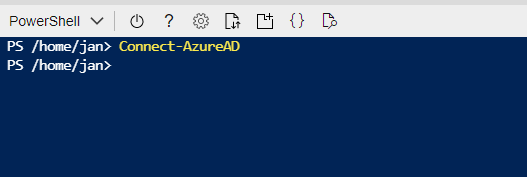
To add these permissions we need to run some PowerShell commands using the AzureAD module. If you have that installed locally, you can connect and proceed with the following commands, for easy of access you can also use the Cloud Shell in the Azure Portal, just run Connect-AzureAD first:
PS! You need to be a Global Admin to add Graph Permissions.
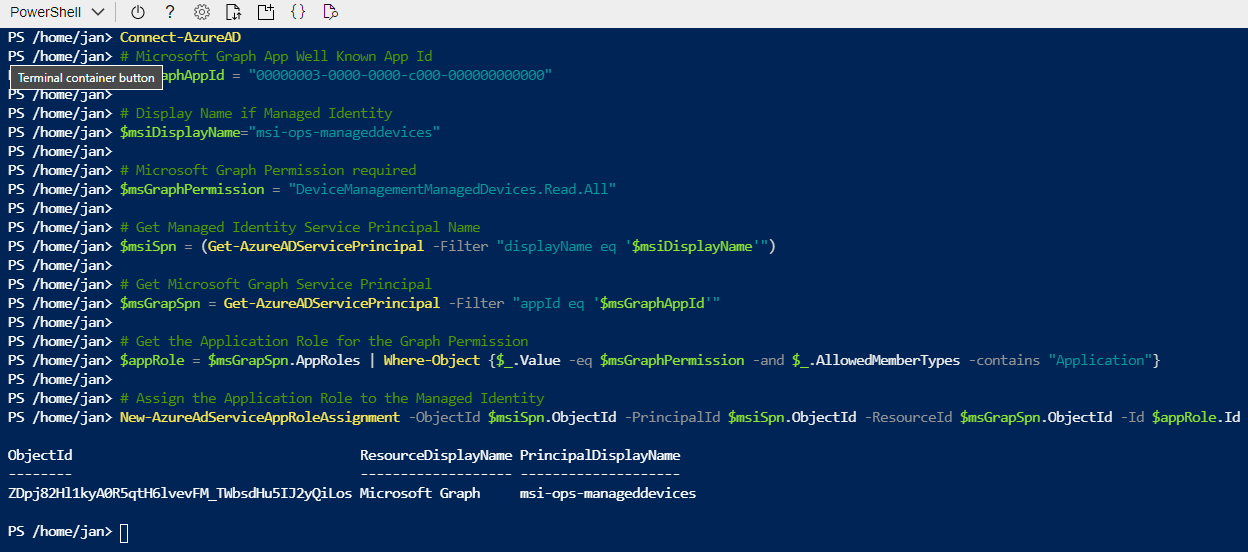
You can run each of these lines separately, or run it as a script:
# Microsoft Graph App Well Known App Id
$msGraphAppId = "00000003-0000-0000-c000-000000000000"

# Display Name if Managed Identity
$msiDisplayName="msi-ops-manageddevices"

# Microsoft Graph Permission required
$msGraphPermission = "DeviceManagementManagedDevices.Read.All"

# Get Managed Identity Service Principal Name
$msiSpn = (Get-AzureADServicePrincipal -Filter "displayName eq '$msiDisplayName'")

# Get Microsoft Graph Service Principal
$msGraphSpn = Get-AzureADServicePrincipal -Filter "appId eq '$msGraphAppId'"

# Get the Application Role for the Graph Permission
$appRole = $msGraphSpn.AppRoles | Where-Object {$_.Value -eq $msGraphPermission -and $_.AllowedMemberTypes -contains "Application"}

# Assign the Application Role to the Managed Identity
New-AzureAdServiceAppRoleAssignment -ObjectId $msiSpn.ObjectId -PrincipalId $msiSpn.ObjectId -ResourceId $msGraphSpn.ObjectId -Id $appRole.Id
Verify that it runs as expected:
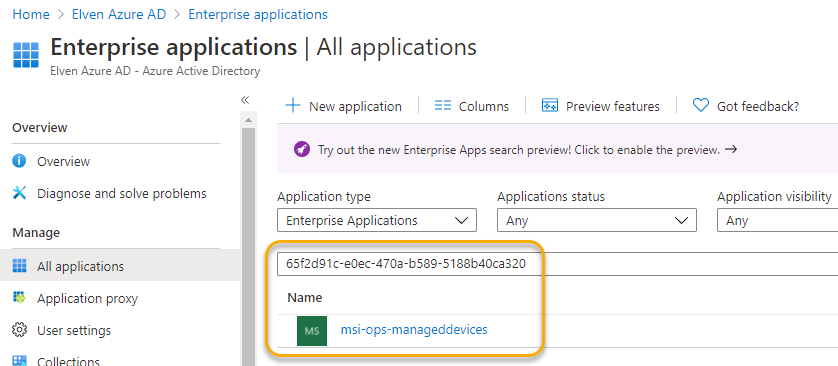
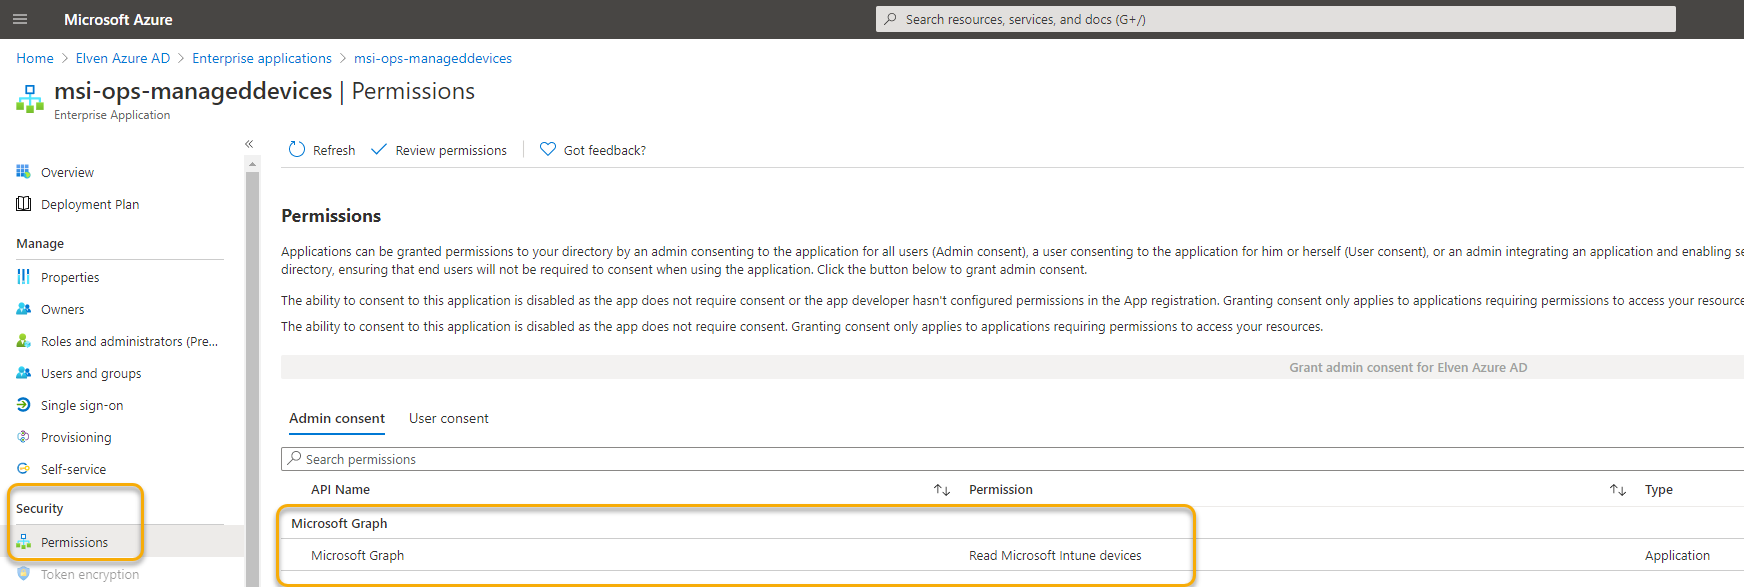
As mentioned earlier, adding these permissions has to be done using script commands, but there is a way to verify the permissions by doing the following:
Find the Managed Identity, and copy the Client ID:
Under Azure Active Directory and Enterprise Applications, make sure you are in the Legacy Search Experience and paste in the Client ID:
Which you then can click into, and under permissions you will see the admin has consented to Graph permissions:
The Logic App can now get Intune Managed Devices from Microsoft Graph API using the Managed Identity.
Calling Microsoft Graph from the Logic App
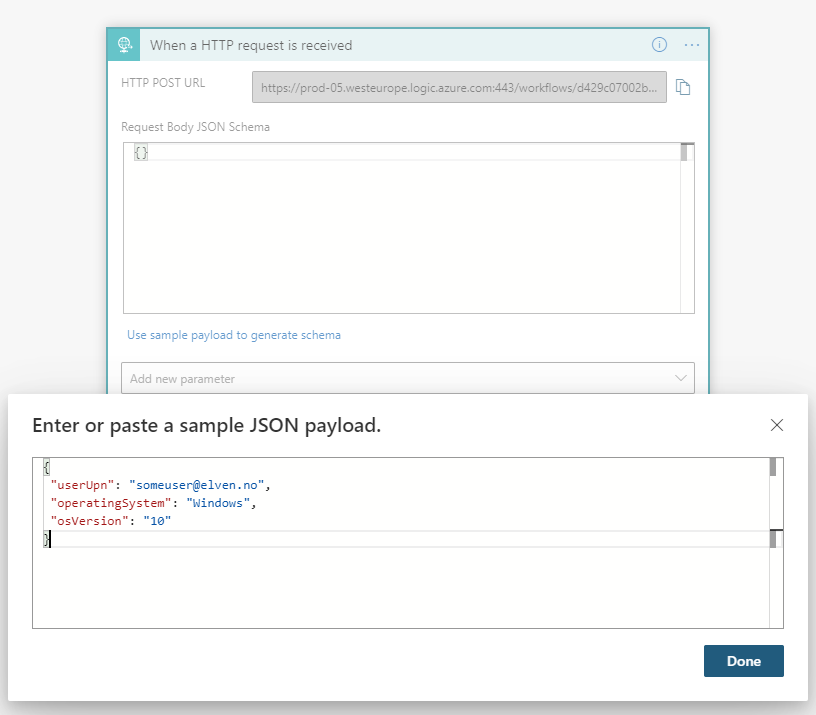
Let’s start by adding some inputs to the Logic App. I’m planning to trigger the Logic App using an http request body like the following:
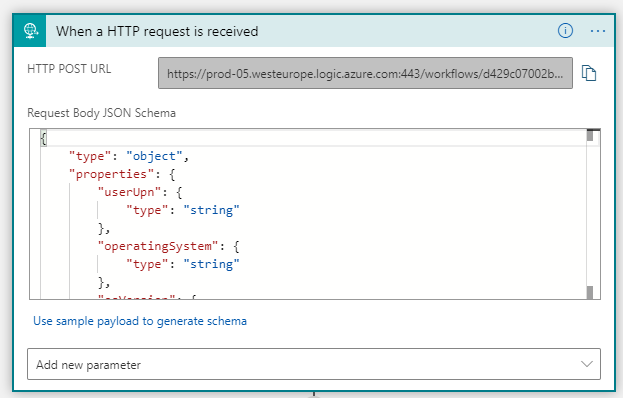
In the Logic App request trigger, paste as a sample JSON payload:
The request body schema will be updated accordingly, and the Logic App is prepared to receive inputs:
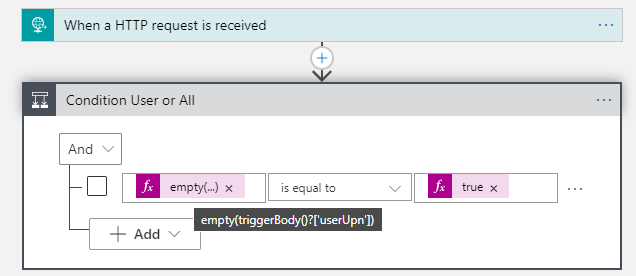
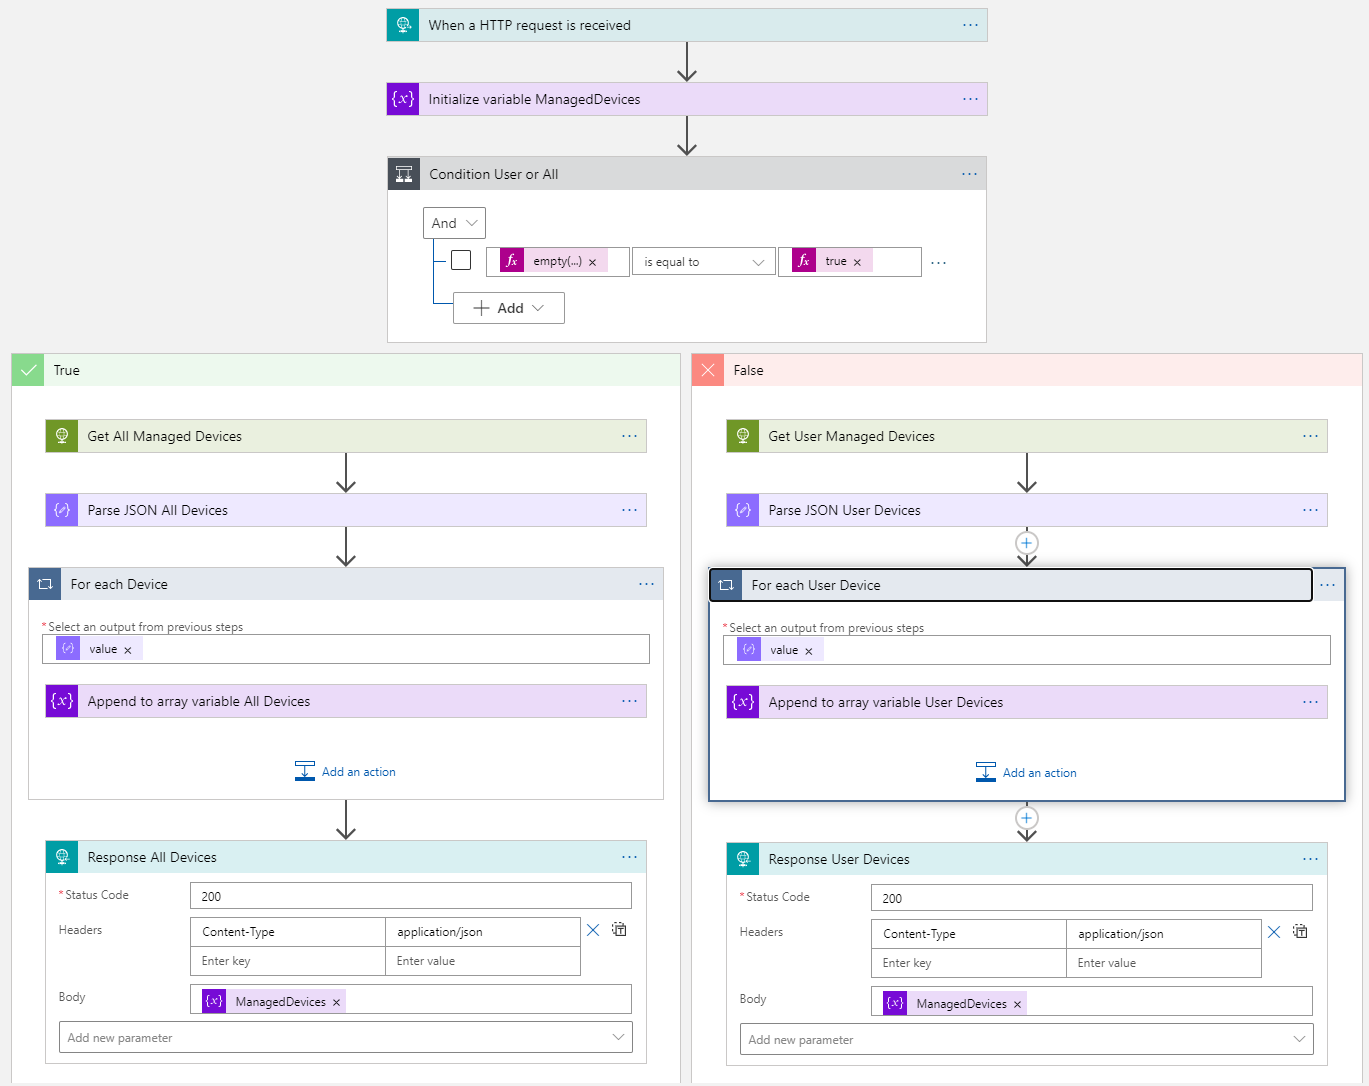
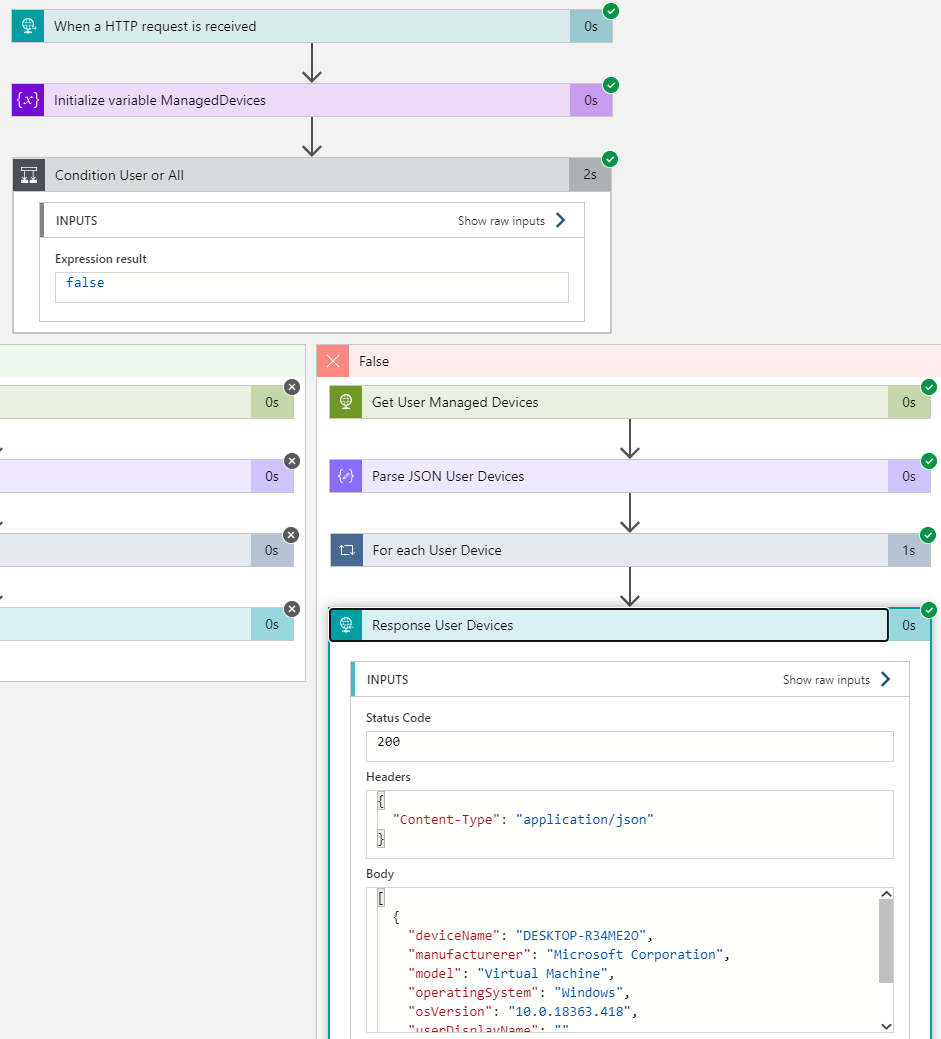
Next, add a Condition action, where we will check if we should get a users’ managed devices, or all. Use an expression with the empty function to check for userUpn, and another expression for the true value, like below:
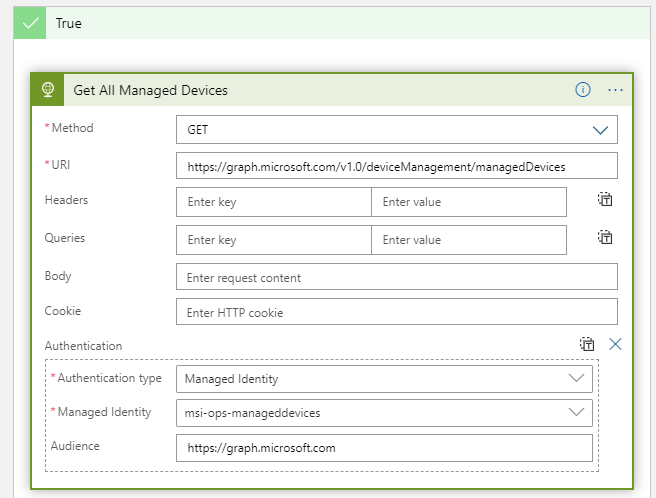
We will add more logic and conditions later for the filtering of the operating system and version, but for now add an HTTP action under True like the following:
Note the use of the Managed Identity and Audience, which will have permission for querying for managed devices.
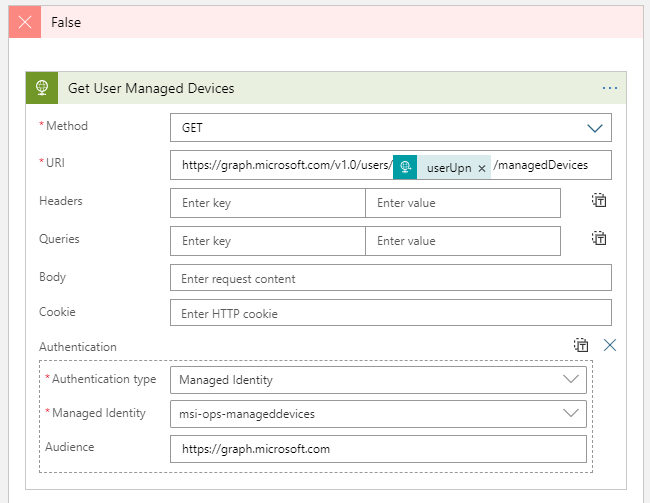
Under False, we will get the managed devices for a specific user. So add the following, using the userUpn input in the URI:
Both these actions should be able to run successfully now, but we will leave the testing for a bit later. First I want to return the managed devices found via the Response action.
Add an Initialize Variable action before the Condition action. Set the Name and Type to Array as shown below, but the value can be empty for now:
Next, under True and Get All Managed Devices, add a Parse JSON action, adding the output body from the http action and using either the sample response from the Microsoft Graph documentation, or your own to create the schema.
PS! Note that if you have over 1000 managed devices, Graph will page the output, so you should test for odata.nextLink to be present as well. You can use the following anonymized sample response for schema which should work in most cases:
{
     "@odata.context": "https://graph.microsoft.com/v1.0/$metadata#deviceManagement/managedDevices",
     "@odata.count": 1000,
     "@odata.nextLink": "https://graph.microsoft.com/v1.0/deviceManagement/managedDevices?$skiptoken=",
     "value": [
         {
             "id": "id Value",
             "userId": "User Id value",
             "deviceName": "Device Name value",
             "managedDeviceOwnerType": "company",
             "operatingSystem": "Operating System value",
             "complianceState": "compliant",
             "managementAgent": "mdm",
             "osVersion": "Os Version value",
             "azureADRegistered": true,
             "deviceEnrollmentType": "userEnrollment",
             "azureADDeviceId": "Azure ADDevice Id value",
             "deviceRegistrationState": "registered",
             "isEncrypted": true,
             "userPrincipalName": "User Principal Name Value ",
             "model": "Model Value",
             "manufacturer": "Manufacturer Value",
             "userDisplayName": "User Display Name Value",
             "managedDeviceName": "Managed Device Name Value"
         }
     ]
 }
PS! Remove any sample response output from schema if values will be null or missing from your output. For example I needed to remove the configurationManagerClientEnabledFeatures from my schema, as this is null in many cases.
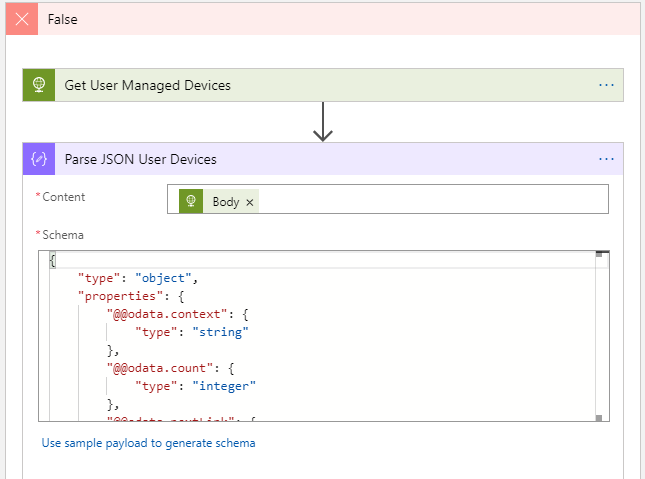
Add another Parse JSON action under the get user managed devices action as well:
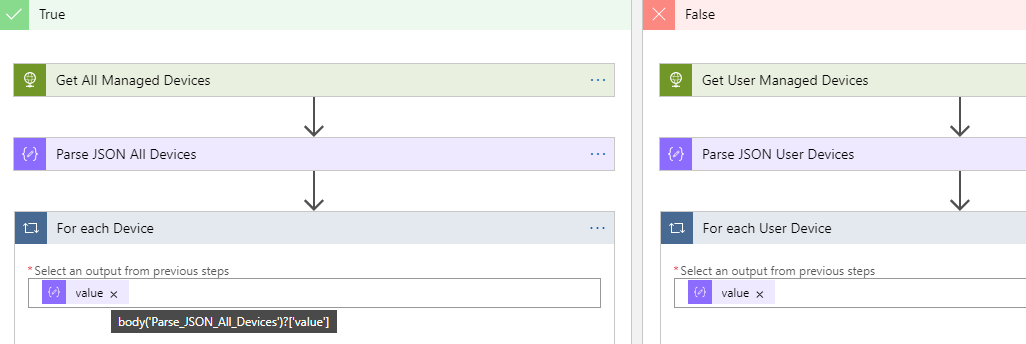
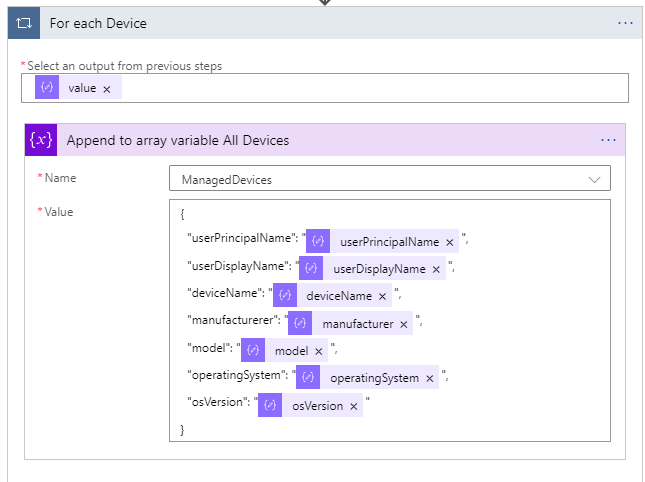
Now we will take that output and do a For Each loop for each value. On both sides of the conditon, add a For Each action, using the value from the previous HTTP action:
Inside that For Each loop, add an Append to Array variable action. In this action we will build a JSON object, returning our chosen attributes (you can change to whatever you want), and selecting the properties from the value that was parsed:
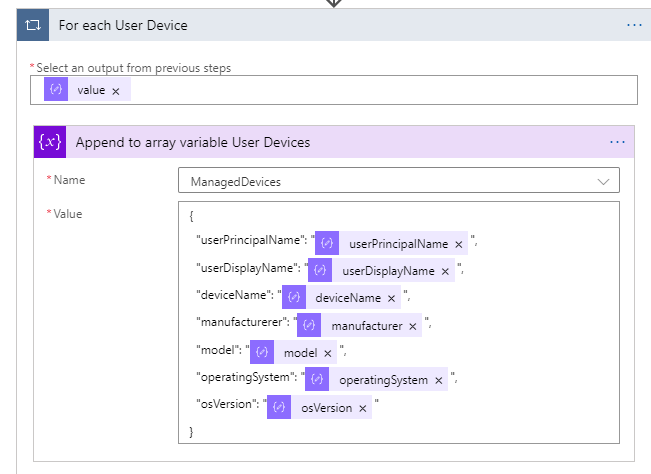
Do the exact same thing for the user devices:
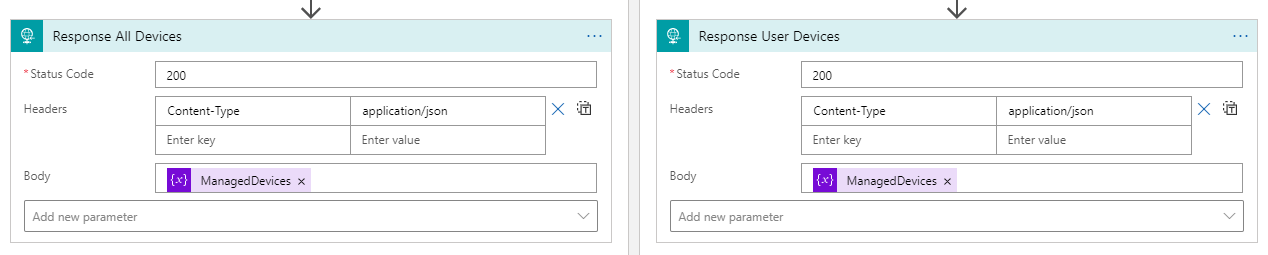
Now, on each side of the condition, add a response action, that will return the ManagedDevices array variable, this will be returned as a JSON som set the Content-Type to application/json:
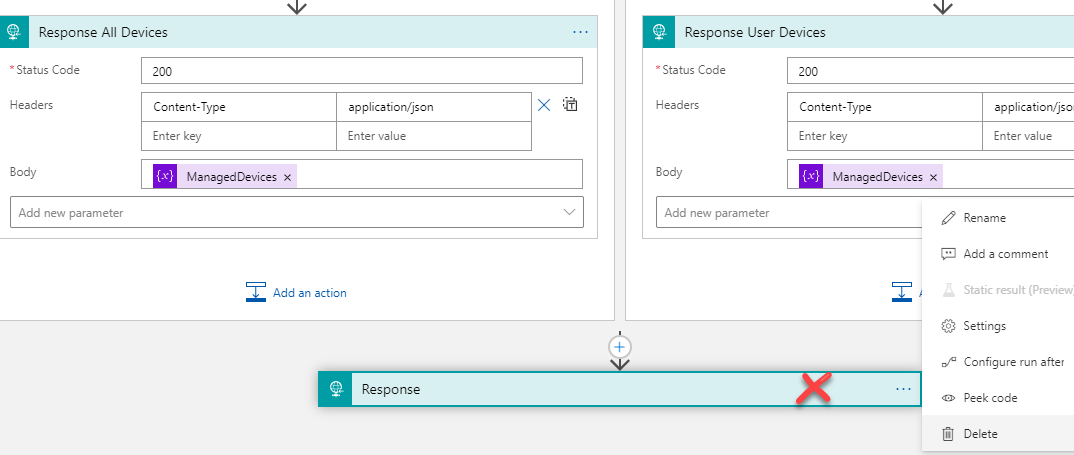
Finally, remove the default response action that is no longer needed:
The complete Logic App should look like the following now:
As I mentioned earlier, we’ll get to the filtering parts later, but now it’s time for some testing.
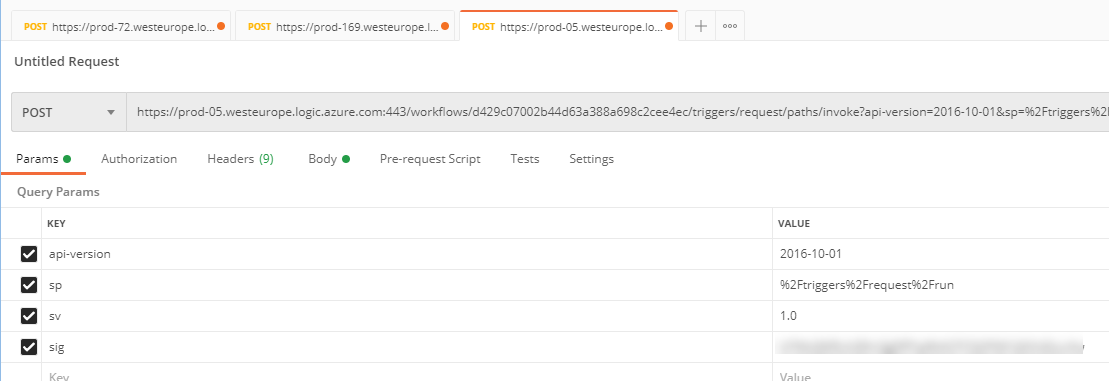
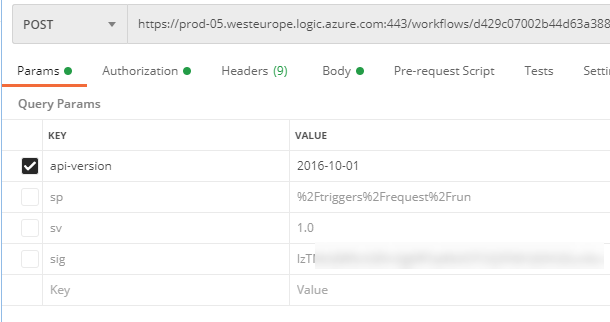
Let’s test this Logic App now with Postman. Copy the HTTP POST URL:
And paste it to Postman, remember to change method to POST:
You can now click Send, and the Logic App will trigger, and should return all your managed devices.
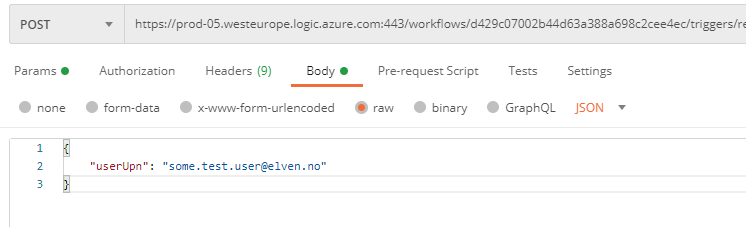
If you want a specific users’ managed devices, then you need to go to the Body parameter, and add like the following with an existing user principal name in your organization:
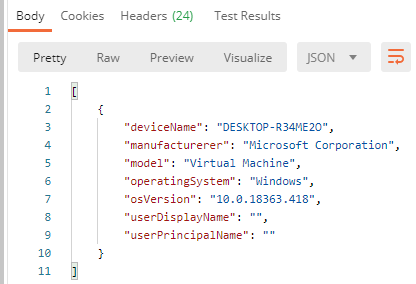
You should then be able to get this users’ managed devices, for example for my test user this was just a virtual machine with Window 10:
And I can verify a successful run from the Logic App history:
Summary so far
We’ve built a Logic App that uses it’s own identity (User Assigned Managed Identity) to access the Microsoft Graph API using Application Permissions to get managed devices for all users or a selected user by UPN. Now it’s time to exposing this Logic App as an API son end users can call this securely using Azure AD OAuth.
Building the Logic App API
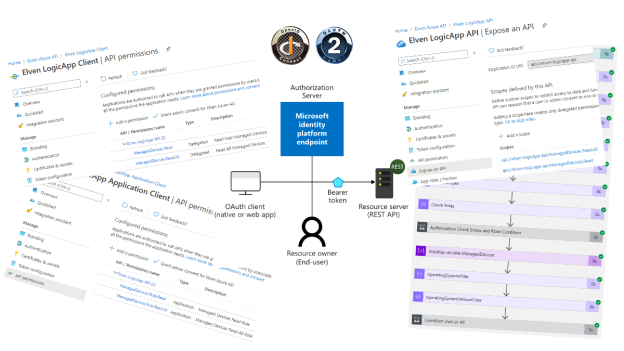
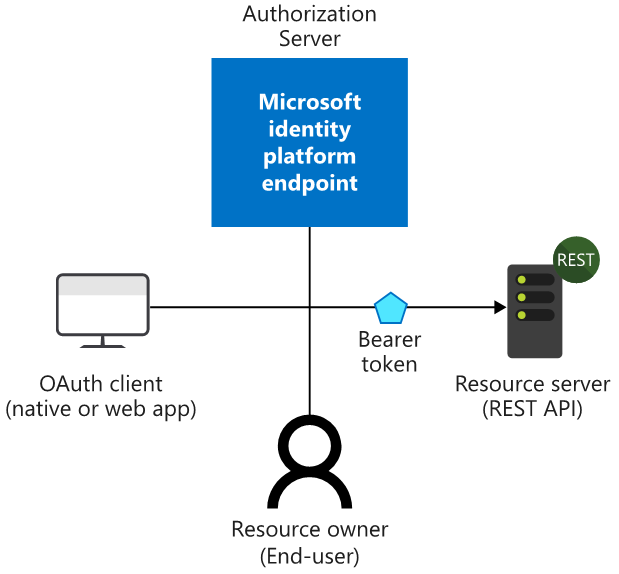
When exposing the Logic App as an API, this will be the resource that end users will access and call as a REST API. Consider the following diagram showing the flow for OpenID Connect and OAuth, where Azure AD will be the Authorization Server from where end users can request access tokens where the audience will be the Logic App resource:
Our next step will be to create Azure AD App Registrations, and we will start with the App Registration for the resource API.
Creating App Registration for Logic App API
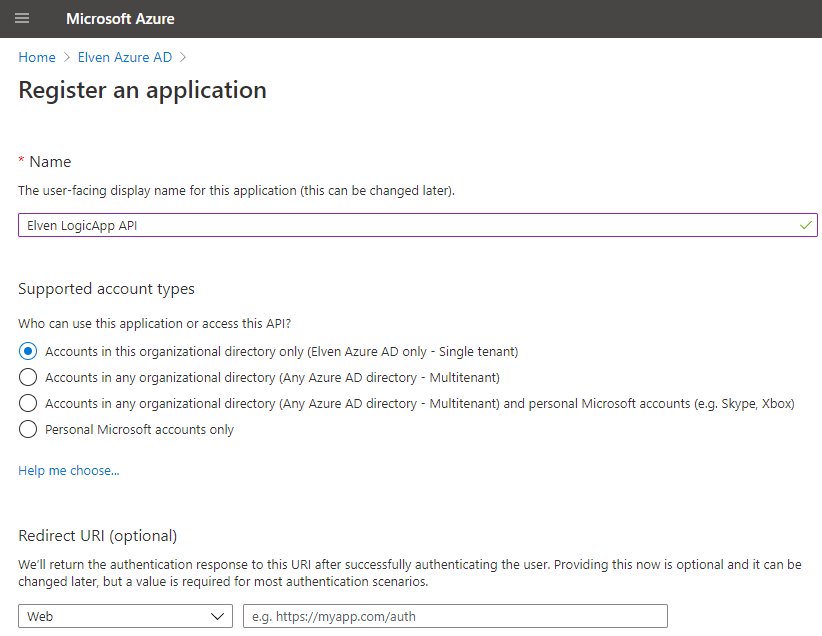
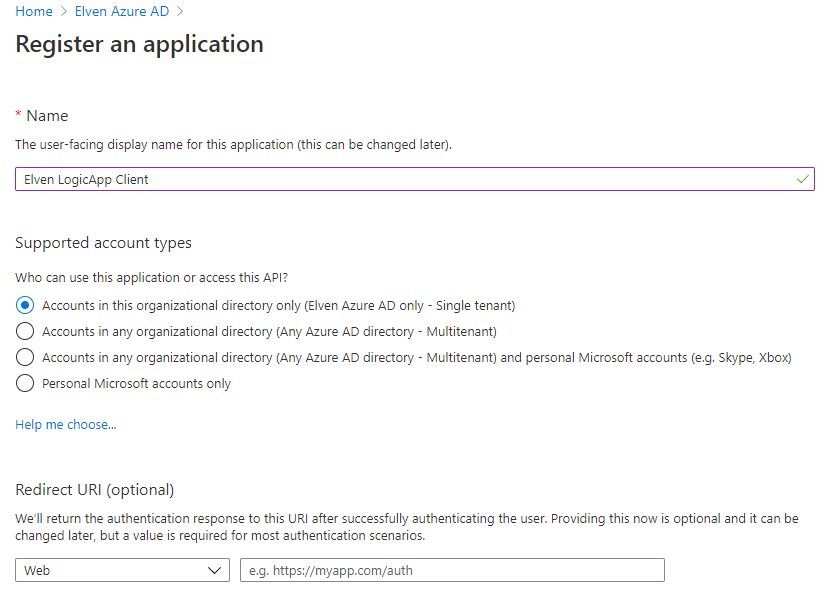
In your Azure AD tenant, create a new App Registration, and call it something like (YourName) LogicApp API:
I will use single tenant for this scenario, leave the other settings as it is and create.
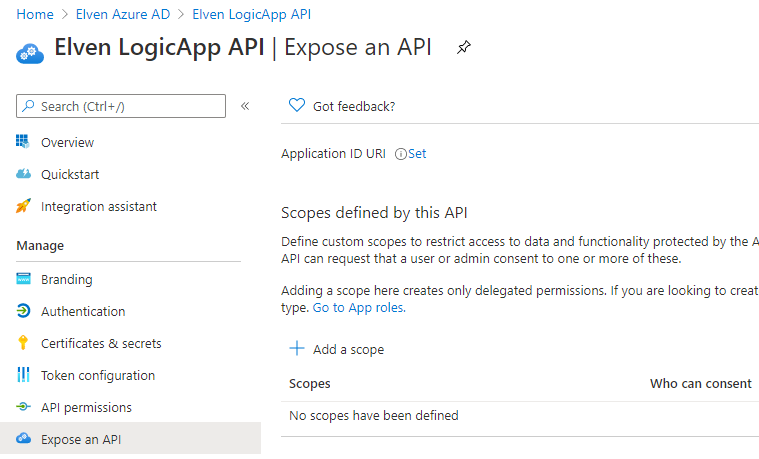
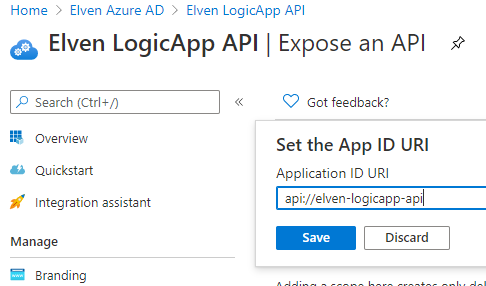
Next, go to Expose an API:
Click on Set right next to Application ID URI, and save the App ID URI to your choice. You can keep the GUID if you want, but you can also type any URI value you like here (using api:// or https://). I chose to set the api URI to this:
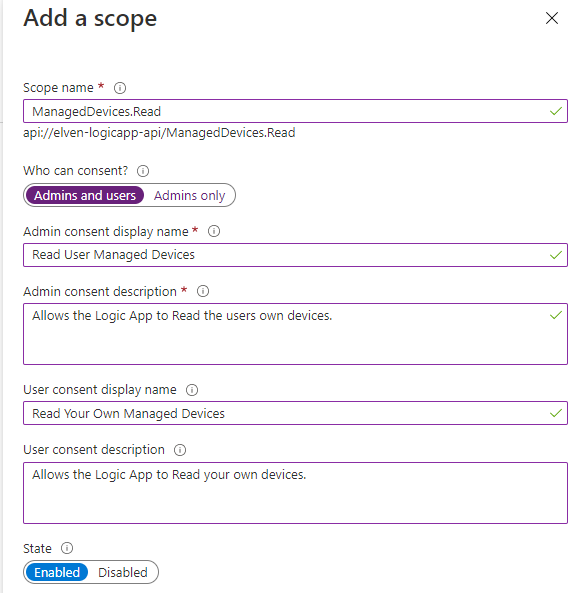
Next we need to add scopes that will be the permissions that delegated end users can consent to. This will be the basis of the authorization checks we can do in the Logic App later.
Add a scope with the details shown below. This will be a scope end users can consent to themselves, but it will only allow them to read their own managed devices:
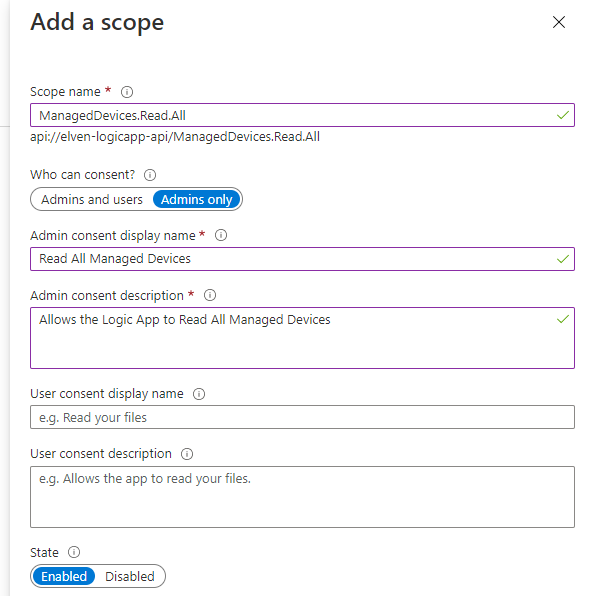
Next, add another Scope, with the following details. This will be a scope that only Admins can consent to, and will be authorized to read all devices:
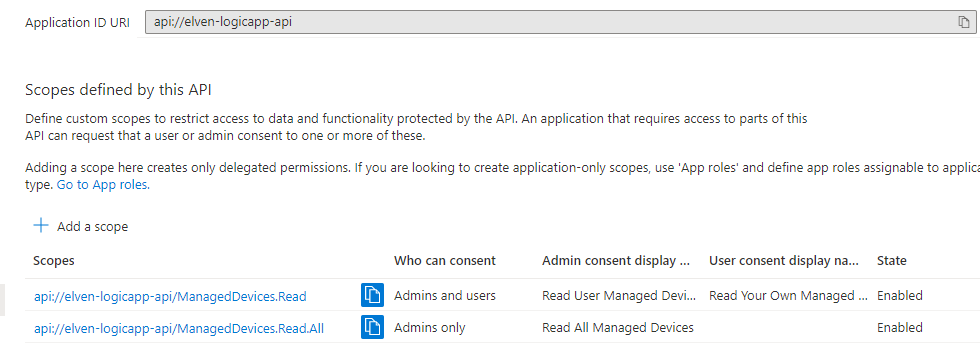
You should now have the following scopes defined:
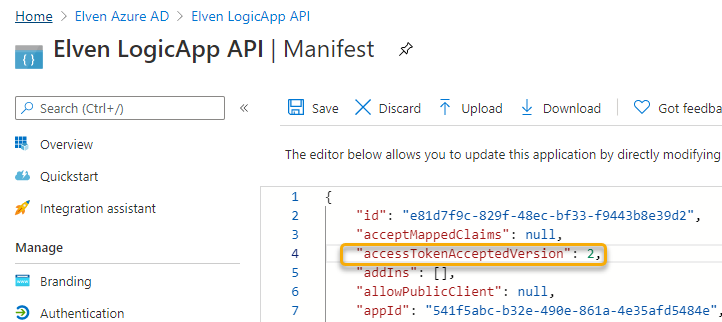
Next, go to the Manifest and change the accessTokenAcceptedVersion from null to 2, this will configure so that Tokens will use the OAuth2 endpoints:
That should be sufficient for now. In the next section we will prepare for the OAuth client.
Create App Registration for the Logic App Client
I choose to create a separate App Registration in Azure AD for the Logic App Client. This will represent the OAuth client that end users will use for OAuth authentication flows and requesting permissions for the Logic App API. I could have configured this in the same App Registration as the API created in the previous section, but this will provide better flexibility and security if I want to share the API with other clients also later, or if I want to separate the permission grants between clients.
Go to App Registrations in Azure AD, and create a new registration calling it something like (yourname) LogicApp Client:
Choose single tenant and leave the other settings for now.
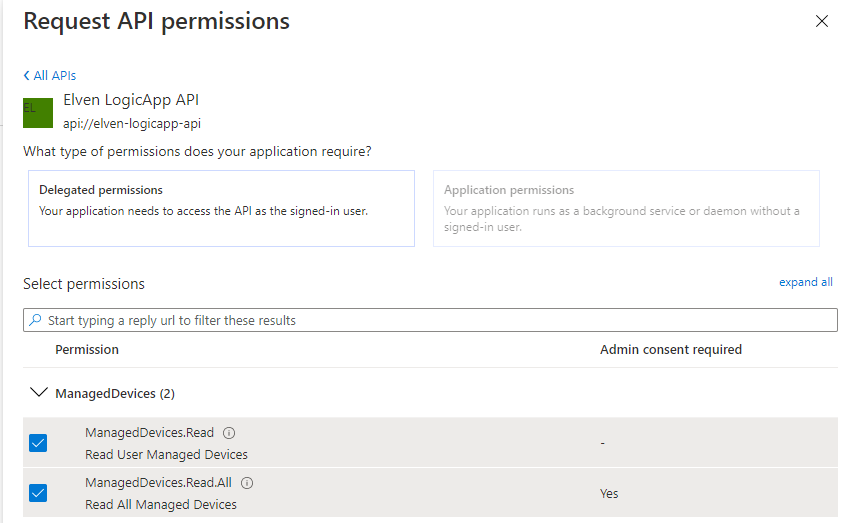
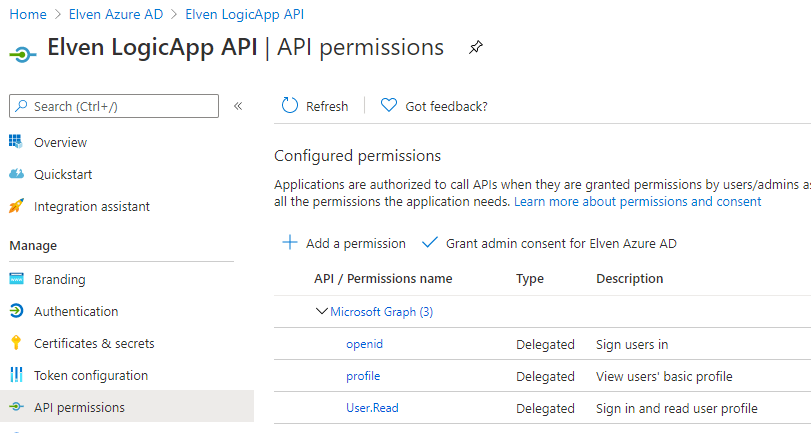
After registering, go to API permissions, and click on Add a permission. From there you can browse to “My APIs” and you should be able to locate the (yourname) Logic API. Select to add the delegated permissions as shown below:
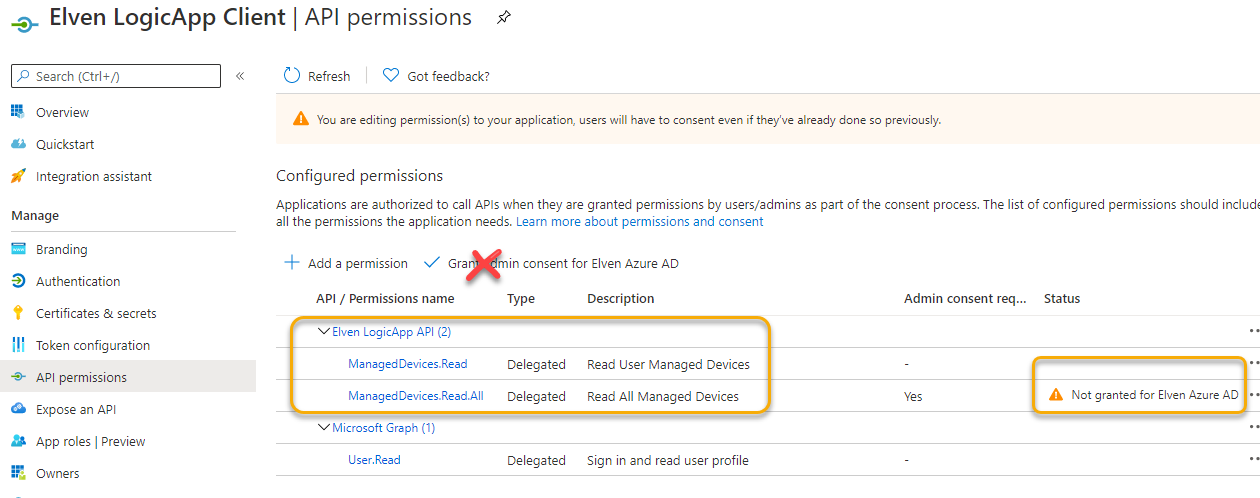
These delegated permissions reflect the scopes we defined in the API earlier. Your App registration and API permission should now look like below. NB! Do NOT click to Grant admin consent for your Azure AD! This will grant consent on behalf of all your users, which will work against our intended scenario later.
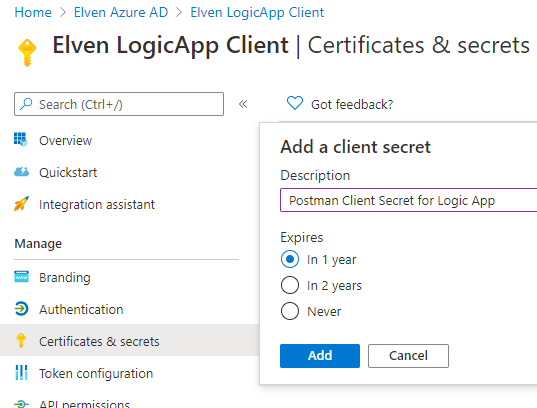
Next, we need to provide a way for clients to authenticate using Oauth flows, so go to the Certificates & secrets section. Click to create a Client secret, I will name my secret after where I want to use it for testing later (Postman):
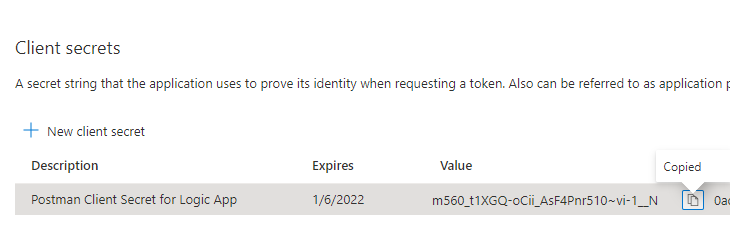
Make sure you copy the secret value for later:
(Don’t worry, I’ve already invalidated the secret above and created a new one).
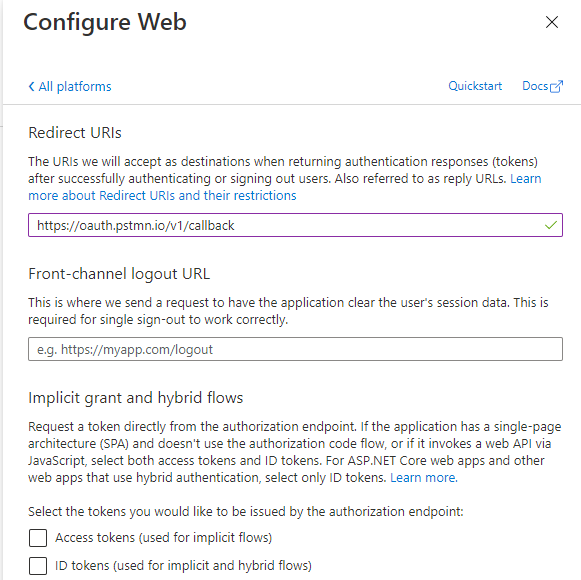
Next, go to Authentication. We need to add a platform for authentication flows, so click Add a platform and choose Web. For using Postman later for testing, add the following as Redirect URI: https://oauth.pstmn.io/v1/callback
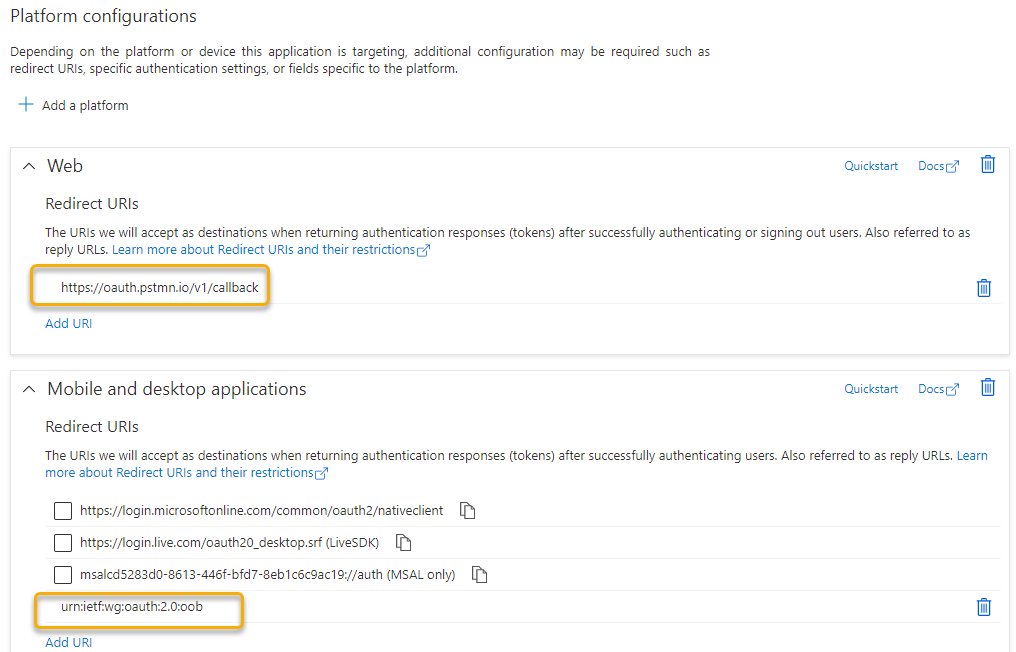
Next, we will also provide another test scenario using PowerShell or Azure CLI client, so click on Add a platform one more time, this time adding Mobile desktop and apps as platform and use the following redirect URI: urn:ietf:wg:oauth:2.0:oob
Your platform configuration should now look like this:
Finally, go to advanced and set yes to allow public client flows, as this will aid in testing from PowerShell or Azure CLI clients later:
Now that we have configured the necessary App registrations, we can set up the Azure AD OAuth Authorization Policy for the Logic App.
Configuring Azure AD OAuth Authorization Policy for Logic App
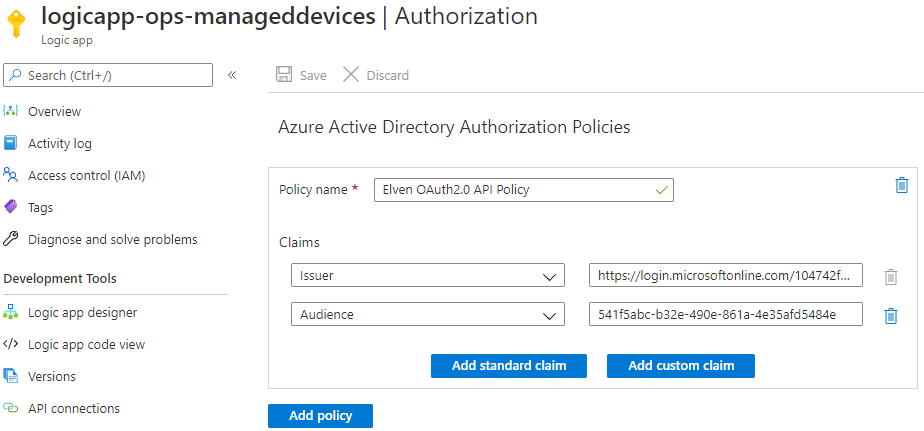
Back in the Logic App, create an Azure AD Authorization Policy with issuer and audience as shown below:
Audience: {app id for logic app api app registration}
We are using the v2.0 endpoint as we configured in the manifest of the App Registration that accessTokenAcceptedVersion should be 2. (as opposed to v1.0 issuer that would be in the format https://sts.windows.net/{tenantId}/). And the Audience claim would be our configured API App ID. (for v1.0 the audience would be the App ID URI, like api://elven-logicapp-api).
Save the Logic App, and we can now start to do some testing where we will use the client app registration to get an access token for the Logic App API resource.
Testing with Postman Client
The first test scenario we will explore is using Postman Client and the Authorization Code flow for getting the correct v2.0 Token.
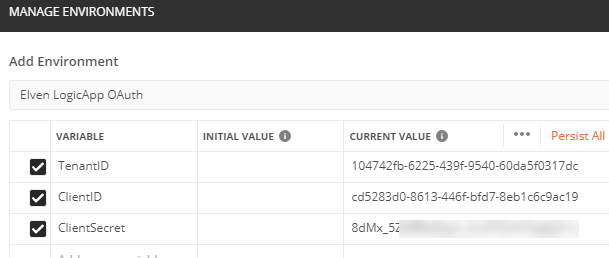
A recommended practice when using Postman and reusing variable values is to create an Environment. I’ve created this Environment for storing my Tenant ID, Client ID (App ID for the Client App Registration) and Client Secret (the secret I created for using Postman):
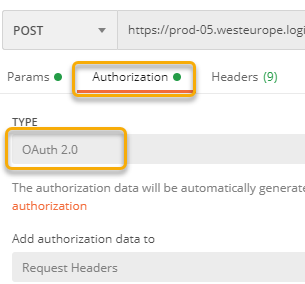
Previously in this blog article, we tested the Logic App using Postman. On that request, select the Authorization tab, and set type to OAuth 2.0:
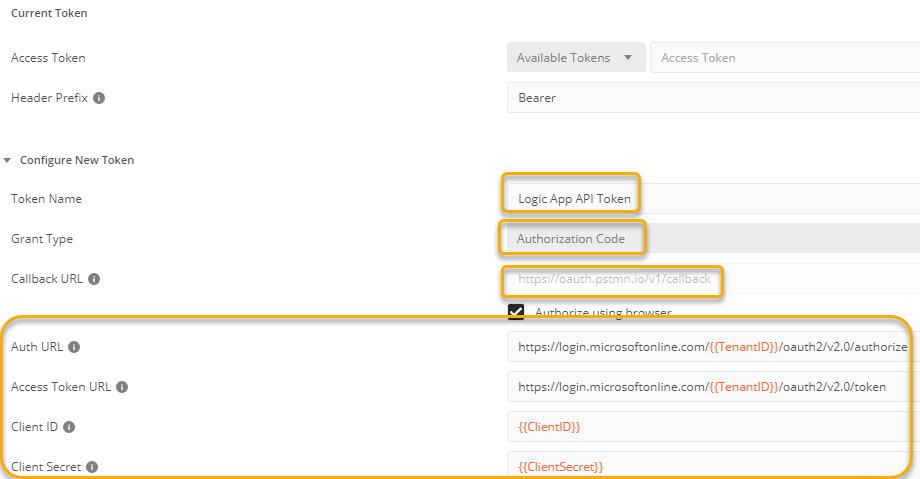
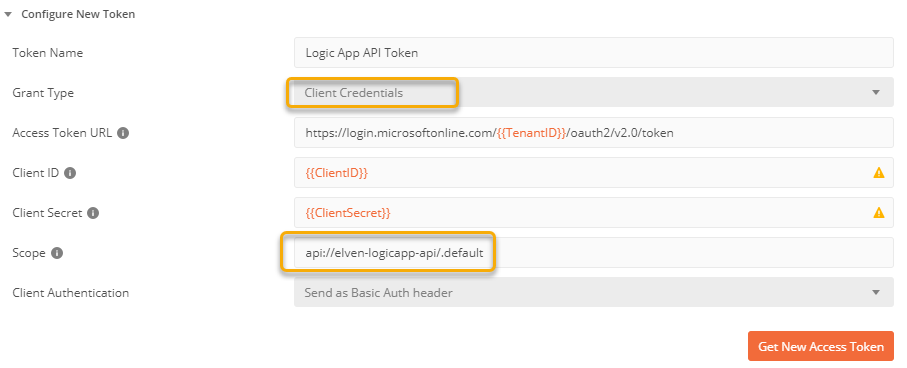
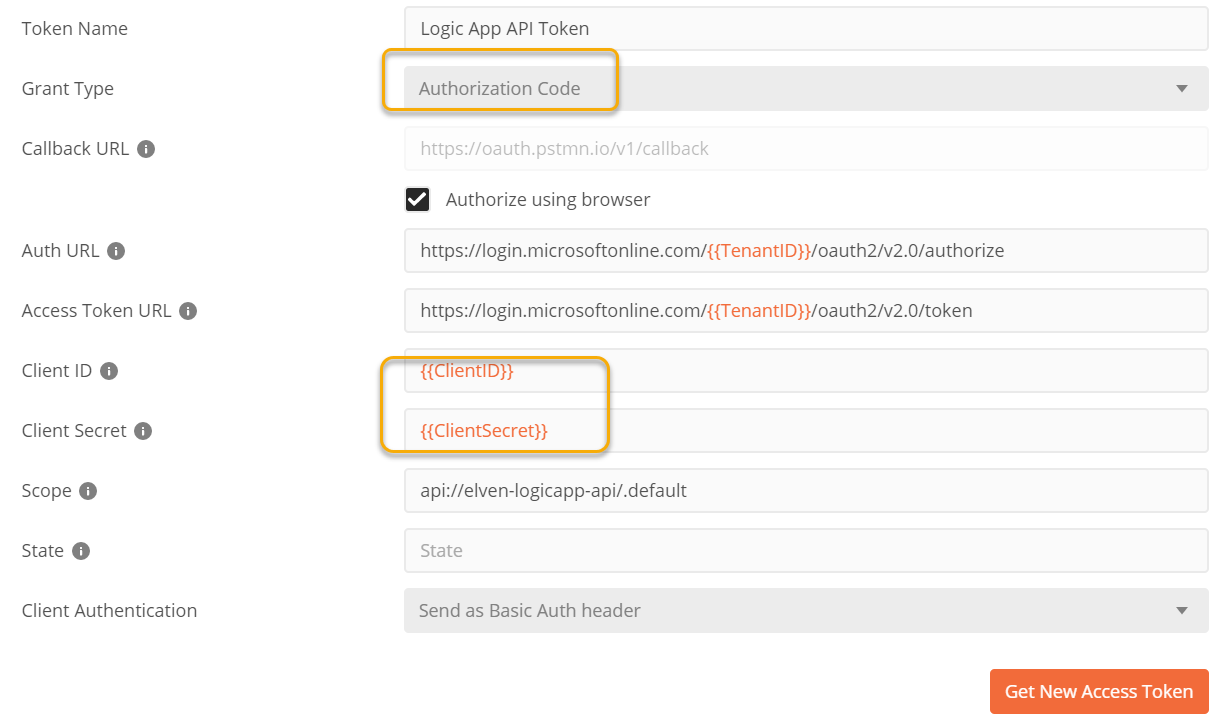
Next, under Token configuration add the values like the following. Give the Token a recognizable name, this is just for Postman internal refererence. Make sure that the Grant Type is Authorization Code. Note the Callback URL, this is the URL we configured for the App registration and Callback Url. In the Auth and Access Token URL, configure the use of the v2.0 endpoints, using TenantID from the environment variables. (Make sure to set the current environment top right). And for Client ID and Client Secret these will also refer to the environment variables:
One important step remains, and that is to correctly set the scope for the access token. Using something like user.read here will only produce an Access Token for Microsoft Graph as audience. So we need to change to the Logic App API, and the scope for ManagedDevices.Read in this case:
Let’s get the Access Token, click on the Get New Access Token button:
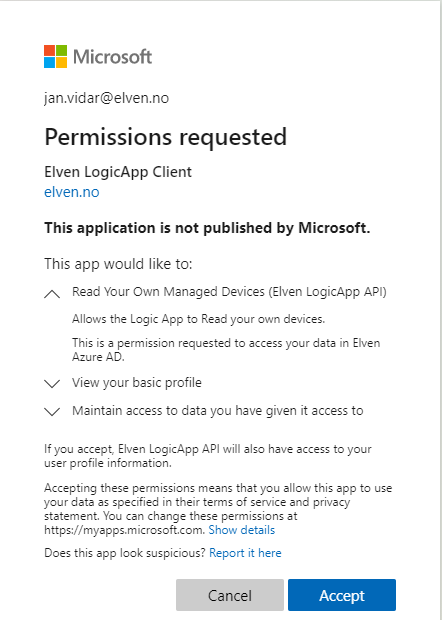
A browser window launches, and if you are not already logged in, you must log in first. Then you will be prompted to consent to the permission as shown below. The end user is prompted to consent for the LogicApp API, as well as basic OpenID Connect consents:
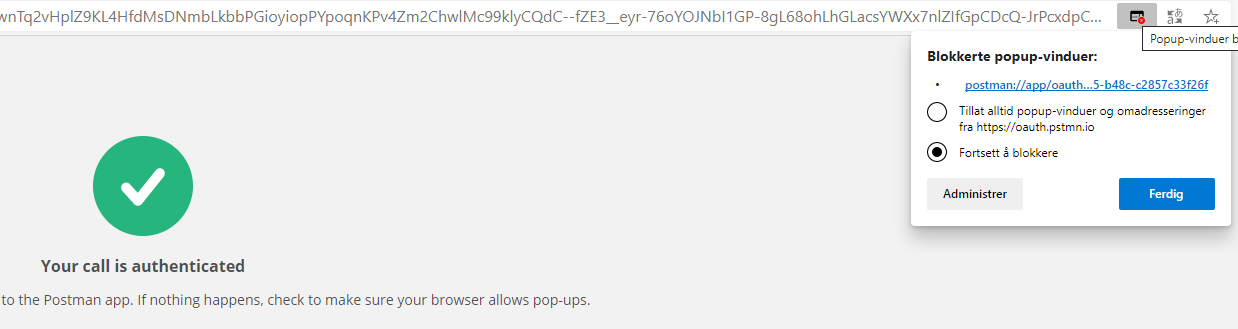
After accepting, a popup will try to redirect you to Postman, so make sure you don’t block that:
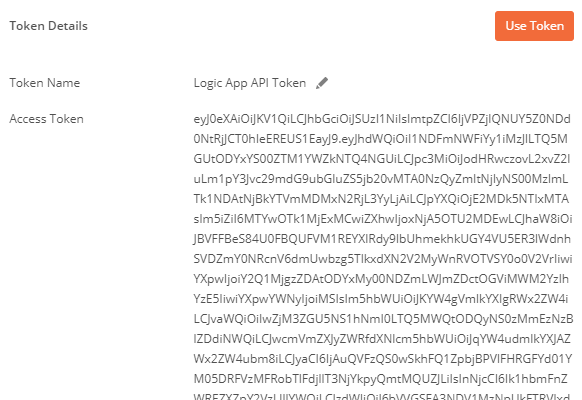
Back in Postman, you will see that we have got a new Access Token:
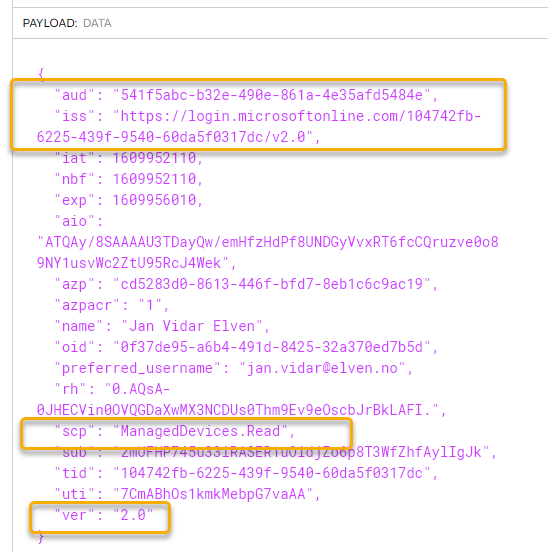
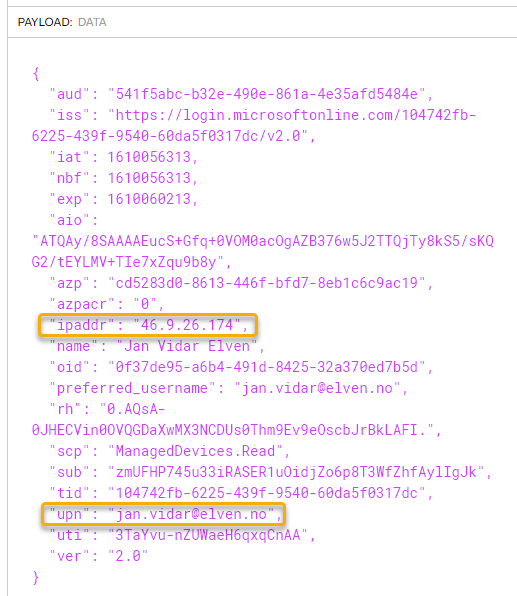
Copy that Access Token, and paste it into a JWT debugger like jwt.ms or jwt.io. You should see in the data payload that the claims for audience and issuer is the same values we configured in the Logic App Azure AD OAuth policy:
Note also the token version is 2.0.
Click to use the Token in the Postman request, it should populate this field:
Before testing the request, remember to remove the SAS query parameters from the request, so that sv, sp and sig are not used with the query for the Logic App:
Now, we can test. Click Send on the Request. It should complete successfully with at status of 200 OK, and return the managed device details:
Let’s add to the permission scopes, by adding the ManagedDevices.Read.All:
Remember just to have a blank space between the scopes, and then click Get New Access Token:
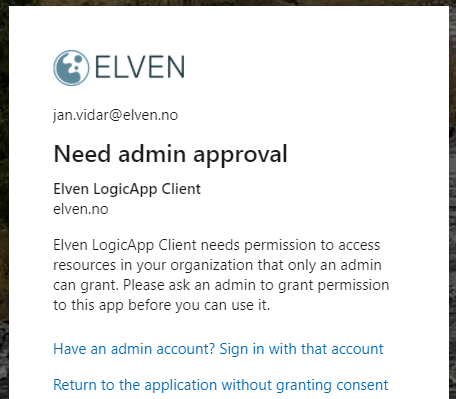
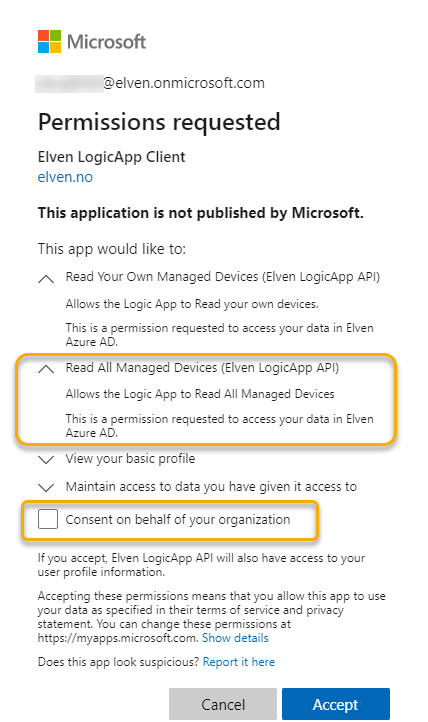
If I’m logged on with a normal end user, I will get the prompt above that I need admin privileges. If I log in with an admin account, this will be shown:
Note that I can now do one of two actions:
I can consent only on behalf of myself (the logged in admin user), OR..
I can consent on behalf of the organization, by selecting the check box. This way all users will get that permission as well.
Be very conscious when granting consents on behalf of your organization.
At this point the Logic App will authorize if the Token is from the correct issuer and for the correct audience, but the calling user can still request any managed device or all devices. Before we get to that, I will show another test scenario using a public client like PowerShell.
Testing with PowerShell and MSAL.PS
MSAL.PS is a perfect companion for using MSAL (Microsoft Authentication Library) to get Access Tokens in PowerShell. You can install MSAL.PS from PowerShellGallery using Install-Module MSAL.PS.
The following commands show how you can get an Access Token using MSAL.PS:
# Set Client and Tenant ID
$clientID = "cd5283d0-8613-446f-bfd7-8eb1c6c9ac19"
$tenantID = "104742fb-6225-439f-9540-60da5f0317dc"
# Get Access Token using Interactive Authentication for Specified Scope and Redirect URI (Windows PowerShell)
$tokenResponse = Get-MsalToken -ClientId $clientID -TenantId $tenantID -Interactive -Scope 'api://elven-logicapp-api/ManagedDevices.Read' -RedirectUri 'urn:ietf:wg:oauth:2.0:oob'
# Get Access Token using Interactive Authentication for Specified Scope and Redirect URI (PowerShell Core)
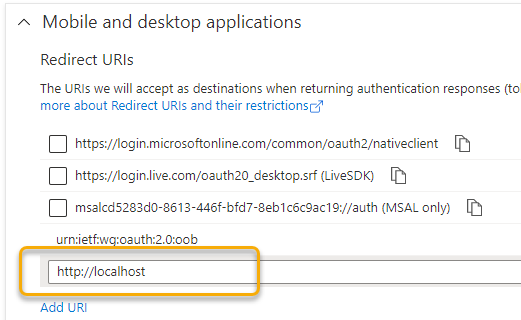
$tokenResponse = Get-MsalToken -ClientId $clientID -TenantId $tenantID -Interactive -Scope 'api://elven-logicapp-api/ManagedDevices.Read' -RedirectUri 'http://localhost'
MSAL.PS can be used both for Windows PowerShell, and for PowerShell Core, so in the above commands, I show both. Note that the redirect URI for MSAL.PS on PowerShell Core need to be http://localhost. You also need to add that redirect URI to the App Registration:
Running the above command will prompt an interactive logon, and should return a successful response saved in the $tokenResponse variable.
We can verify the response, for example checking scopes or copying the Access Token to the clipboard so that we can check the token in a JWT debugger:
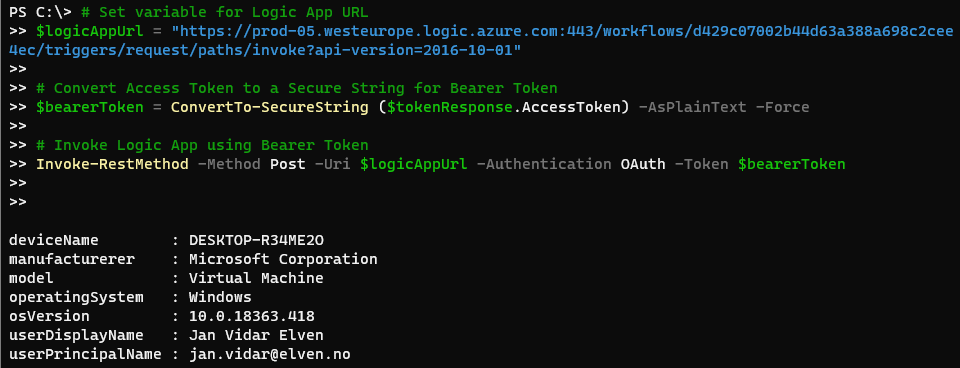
In the first blog post of this article series I covered how you can use Windows PowerShell and Core to use Invoke-RestMethod for calling the Logic App, here is an example where I call my Logic App using the Access Token (in PowerShell Core):
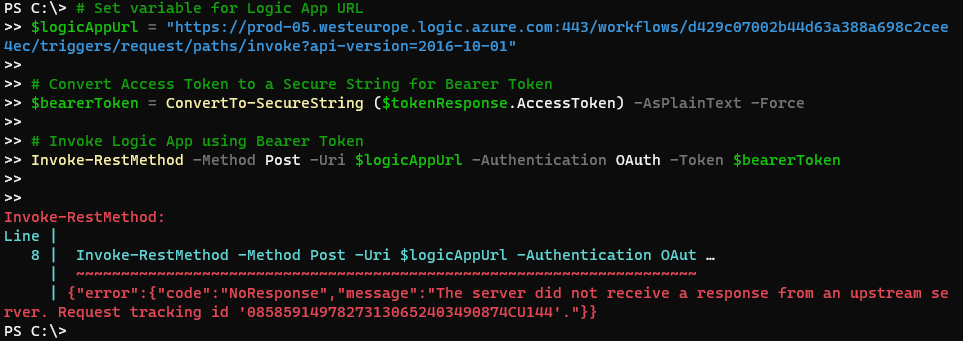
# Set variable for Logic App URL
$logicAppUrl = "https://prod-05.westeurope.logic.azure.com:443/workflows/d429c07002b44d63a388a698c2cee4ec/triggers/request/paths/invoke?api-version=2016-10-01"
# Convert Access Token to a Secure String for Bearer Token
$bearerToken = ConvertTo-SecureString ($tokenResponse.AccessToken) -AsPlainText -Force
# Invoke Logic App using Bearer Token
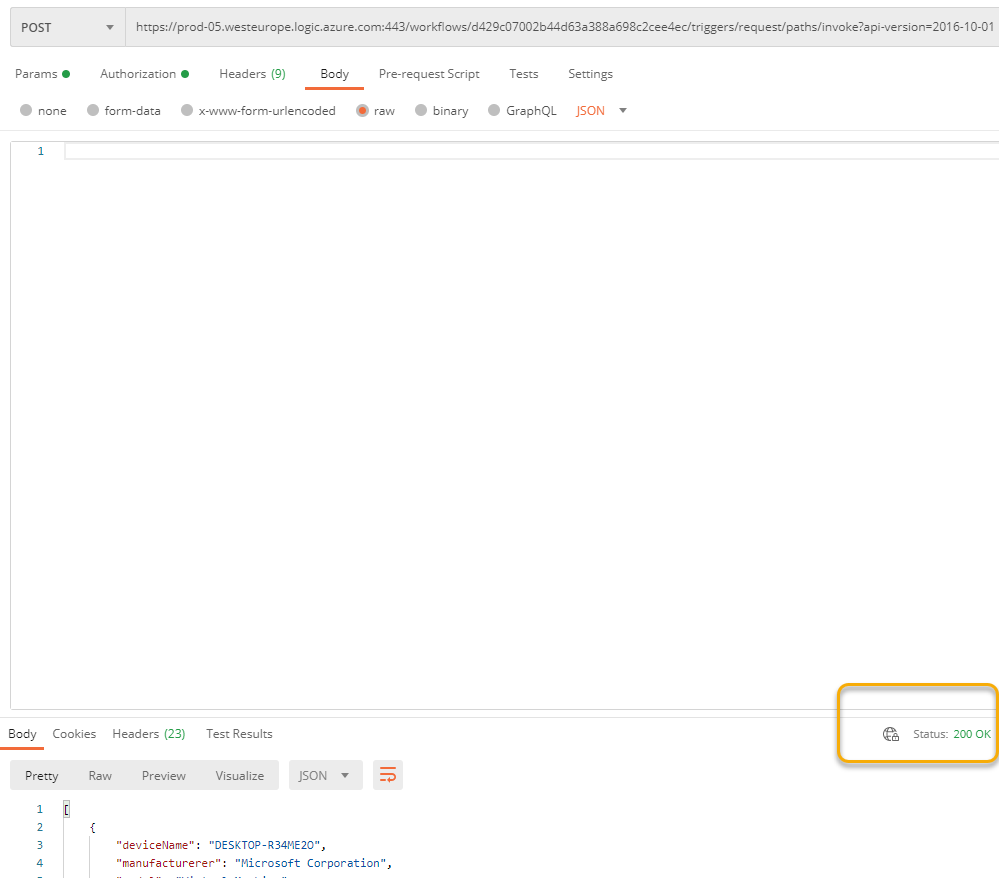
Invoke-RestMethod -Method Post -Uri $logicAppUrl -Authentication OAuth -Token $bearerToken
And I can verify that it works:
Great. I now have a couple of alternatives for calling my Logic App securely using Azure AD OAuth. In the next section we will get into how we can do authorization checks inside the Logic App.
Authorization inside Logic App
While the Logic App can have an authorization policy that verifies any claims like issuer and audience, or other custom claims, we cannot use that if we want to authorize inside the logic app based on scopes, roles etc.
In this section we will look into how we can do that.
Include Authorization Header in Logic Apps
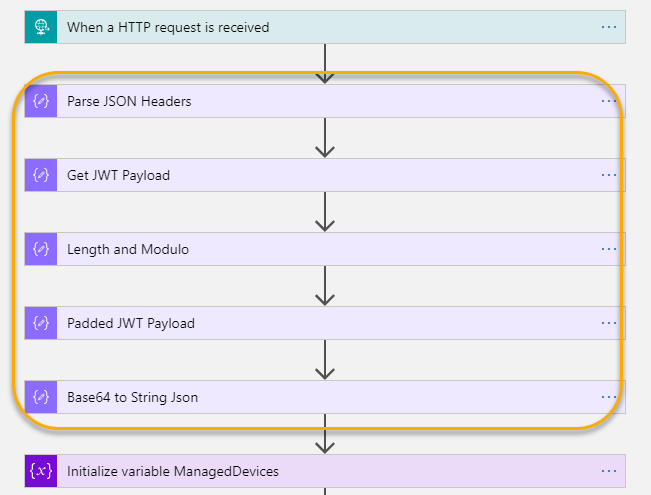
First we need to include the Authorization header from the OAuth access token in the Logic App. To do this, open the Logic App in code view, and add the operationOptions to IncludeAuthorizationHeadersInOutputs for the trigger like this:
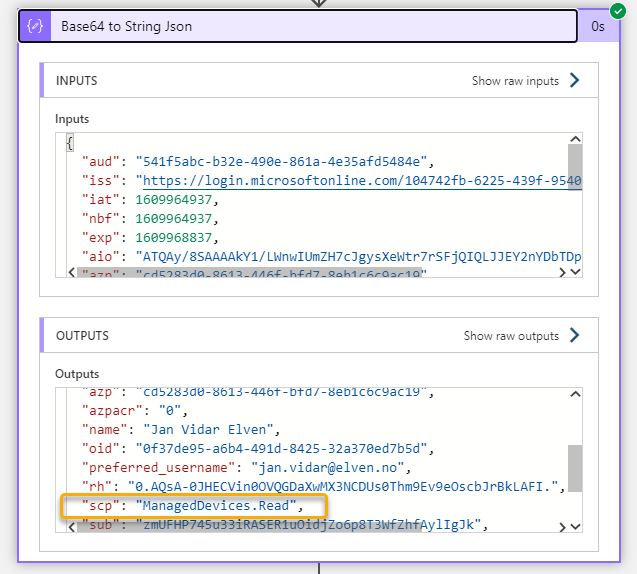
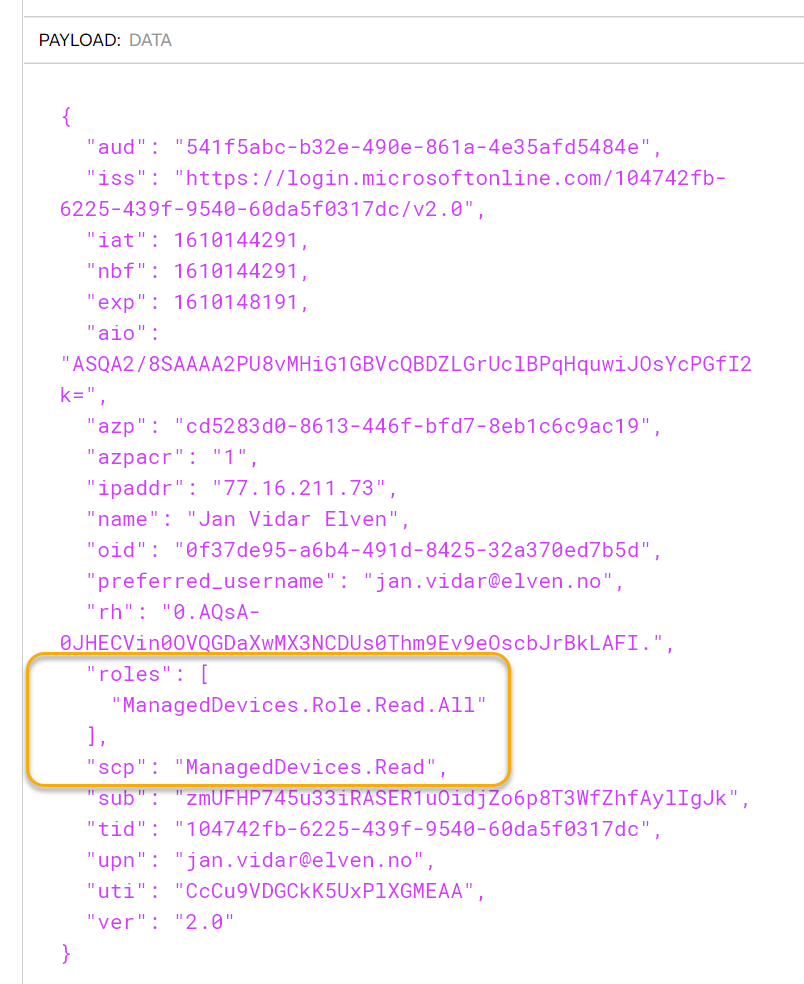
After applying the above steps, I can test the Logic App again, and get the details of the decoded JWT token, for example of interest will be to check the scopes:
Implement Logic to check the Scopes
When I created the LogicApp API app registration, I added two scopes: ManagedDevices.Read and ManagedDevices.Read.All. The authorization logic I want to implement now is to only let users calling the Logic App and that has the scope ManagedDevices.Read.All to be able to get ALL managed devices, or to get managed devices other than their own devices.
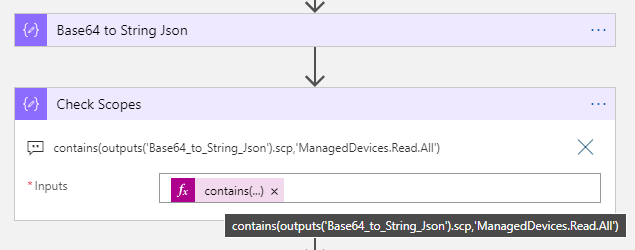
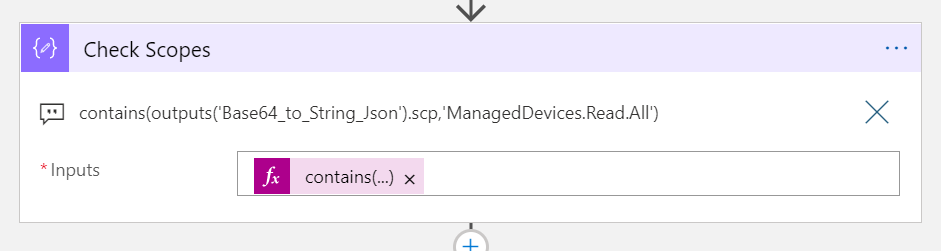
The first step will be to check if the JWT payload for scope “scp” contains the ManagedDevices.Read.All. Add a Compose action with the following expression:
This expression will return either true or false depending on the scp value.
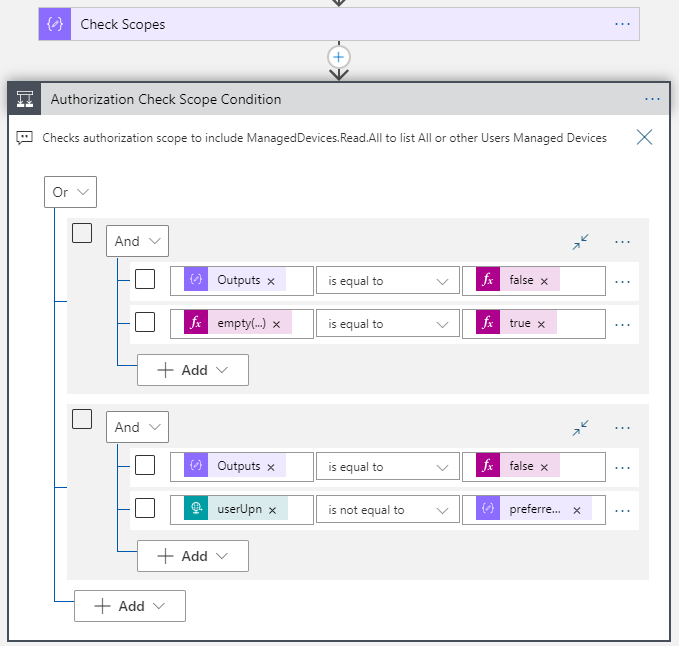
Next after this action, add a Condition action, where we will do some authorization checks. I have created two groups of checks, where one OR the other needs to be true.
Here are the details for these two groups:
Group 1 (checks if scp does not contain ManagedDevices.Read.All and calling user tries to get All managed devices):
Outputs('Check_Scopes') = false
empty(triggerBody()?['userUpn']) = true
Group 2 (checks if scp does not contain ManagedDevices.Read.All, and tries to get managed devices for another user than users’ own upn):
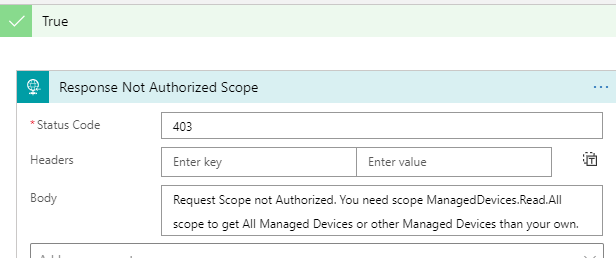
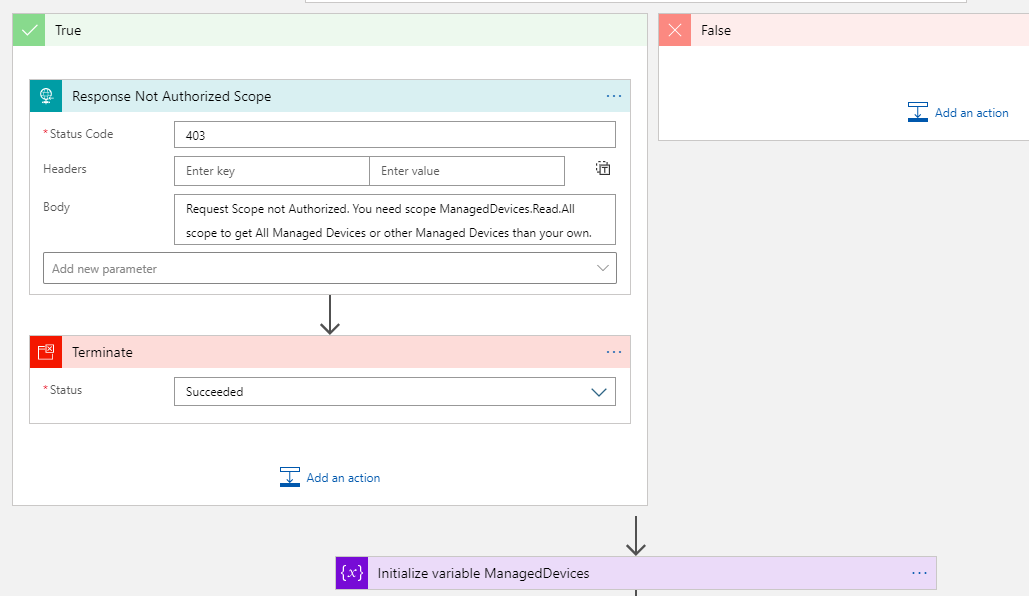
If either of those two groups is True, then we know that the calling user tries to do something the user is not authorized to do. This is something we need to give a customized response for. So inside the True condition, add a new Response action with something like the following:
I’m using a status code of 403, meaning that the request was successfully authenticated but was missing the required authorization for the resource.
Next, add a Terminate action, so that the Logic App stops with a successful status. Note also that on the False side of the condition, I leave it blank because I want it to proceed with the next steps in the Logic Apps.
Test the Authorization Scope Logic
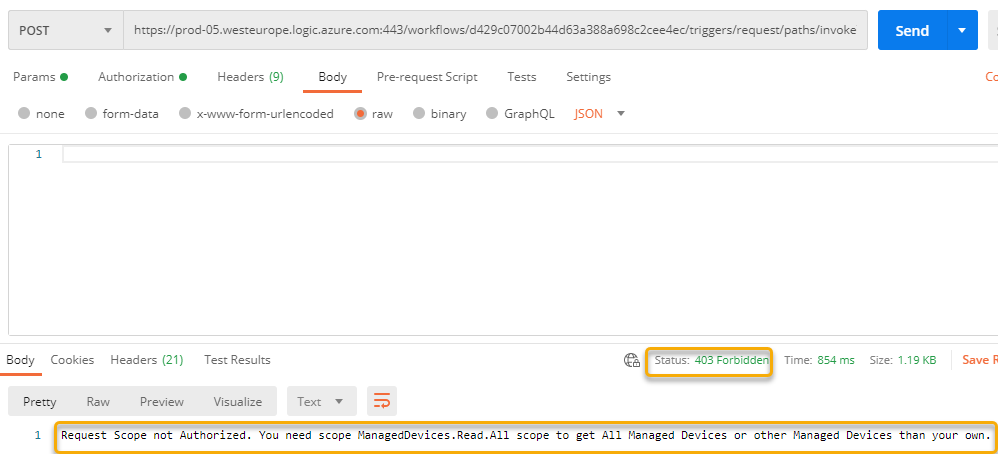
We can now test the authorization scopes logic implemented above. In Postman, either use an existing Access Token or get a new Token that only include the ManagedDevices.Read scope.
Then, send a request with an empty request body. You should get the following response:
Then, try another test, this time specifying another user principal name than your own, which also should fail:
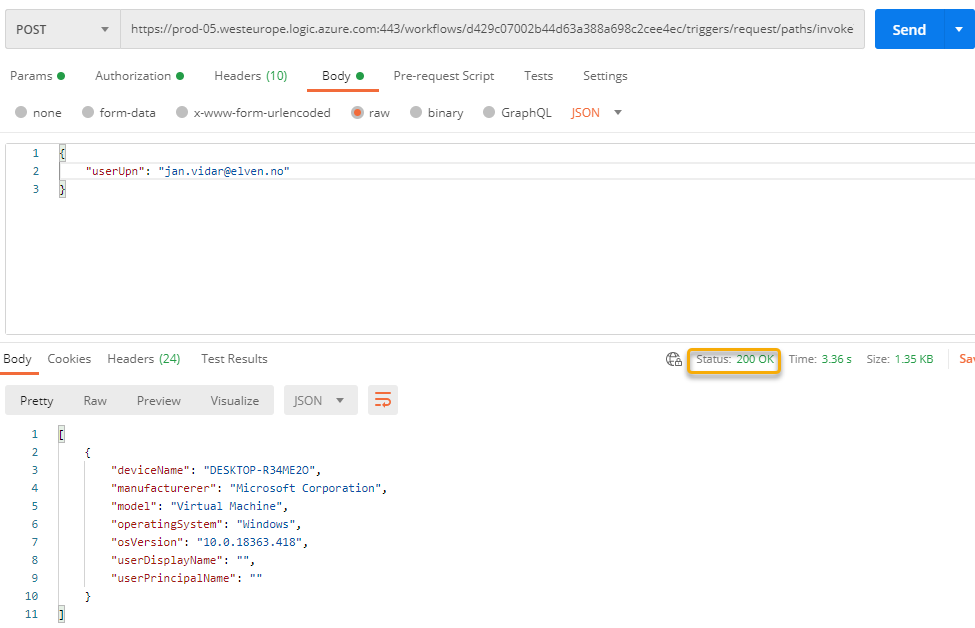
And then test with your own user principal name, which will match the ‘preferred_username’ claim in the Access Token, this should be successful and return your devices:
Perfect! It works as intended, normal end users can now only request their own managed devices.
Let’s test with an admin account and the ManagedDevices.Read.All scope. In Postman, add that scope, and get a new Access Token:
When logging in with a user that has admin privileges you will now get a Token that has the scope for getting all devices, for which your testing should return 200 OK for all or any users devices:
Adding Custom Claims to Access Token
In addition to the default claims and scopes in the Access Token, you can customize a select set of additional claims to be included in the JWT data payload. Since the Access Token is for the resource, you will need to customize this on the App Registration for the LogicApp API.
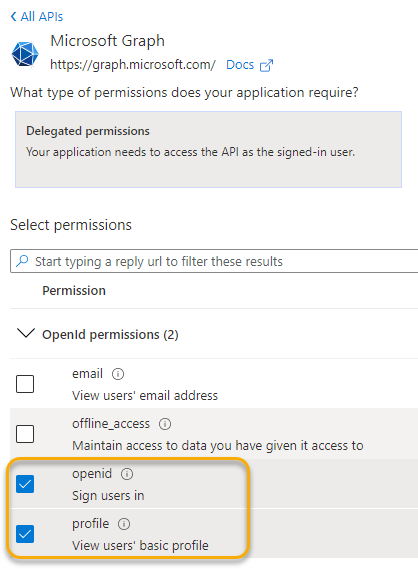
In Azure AD, select the App Registration for the API, and go to API permissions first. You need to add the OpenID scopes first. Add the following OpenID permissions:
Your API App Registration should look like this:
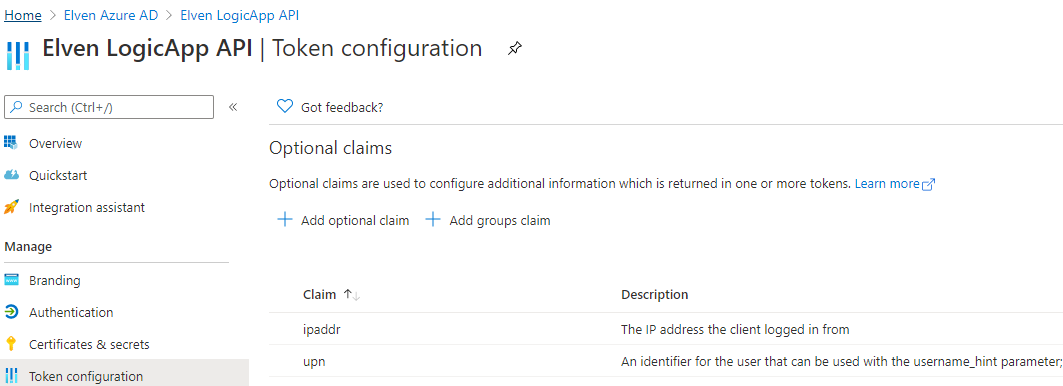
Next, go to Token configuration. Click Add optional claim, and select Access Token. For example you can add the ipaddr and upn claims as I have done below:
Note the optional claims listed for the resource API registration:
Next time I get a new access token, I can see that the claims are there:
Summary of User Authorization so far
What we have accomplished now is that users can get an Access Token for the Logic App API resource. This is the first requirement for users to be able to call the Logic App, that they indeed have a Bearer Token in the Authorization Header that includes the configured issuer and audience.
In my demos I have shown how to get an access token using Postman (Authorization Code Flow) and a Public Client using MSAL.PS. But you can use any kind of Web application, browser/SPA or, Client App, using any programming libraries that either support MSAL or OpenID Connect and OAuth2. Your solution, your choice 😉
After that I showed how you can use scopes for delegated permissions, and how you can do internal authorization logic in the Logic App depending on what scope the user has consented to/allowed to.
We will now build on this, by looking into controlling access and using application roles for principals.
Assigning Users and Restricting Access
One of the most powerful aspects of exposing your API using Microsoft Identity Platform and Azure AD is that you now can control who can access your solution, in this case call the Logic App.
Better yet, you can use Azure AD Conditional Access to apply policies for requiring MFA, devices to be compliant, require locations or that sign-ins are under a certain risk level, to name a few.
Let’s see a couple of examples of that.
Require User Assignment
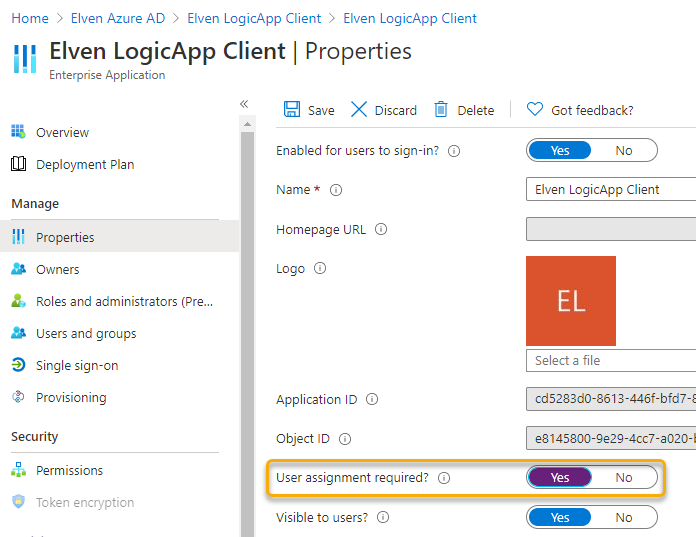
The first thing we need to do is to change the settings for the Enterprise Application. We created an App registration for the LogicApp Client, for users to able to authenticate and access the API. From that LogicApp Client, you can get to the Enterprise Application by clicking on the link for Managed application:
In the Enterprise App, go to Properties, and select User assignment required:
We can now control which users, or groups, that can authenticate to and get access to the Logic App API via the Client:
If I try to log in with a user that is not listed under Users and groups, I will get an error message that the “signed in user is not assigned to a role for the application”:
PS! The above error will show itself a little different based on how you authenticate, the above image is using a public client, if you use Postman, the error will be in the postman console log, if you use a web application you will get the error in the browser etc.
Configuring Conditional Access for the Logic App
In addition to controlling which users and groups that can access the Logic App, I can configure a Conditional Access policy in Azure AD for more fine grained access and security controls.
In your Azure AD blade, go to Security and Conditional Access. If you already have a CA policy that affects all Applications and Users, for example requiring MFA, your LogicApp API would already be affected by that.
Note that as we are protecting the resource here, your Conditional Access policy must be targeted to the LogicApp API Enterprise App.
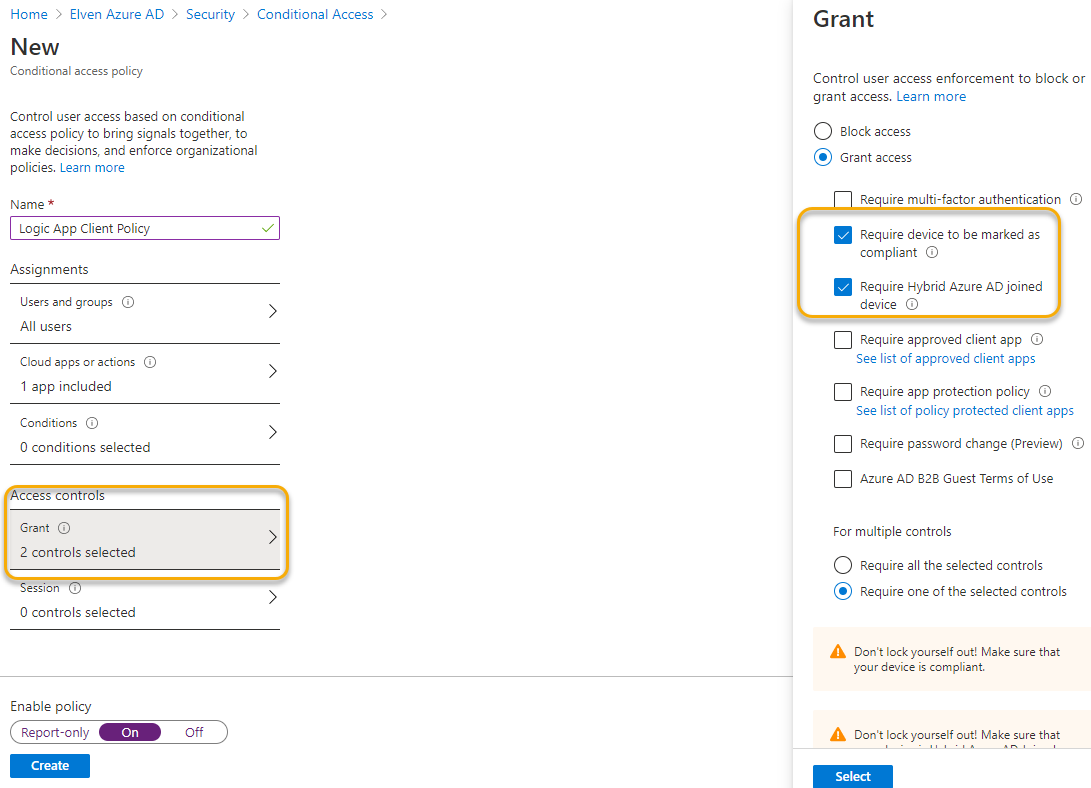
Click to create a new policy specific for the Logic App API, as shown below:
For example I can require that my Logic App API only can be called from a managed and compliant device, or a Hybrid Azure AD Joined device as shown below:
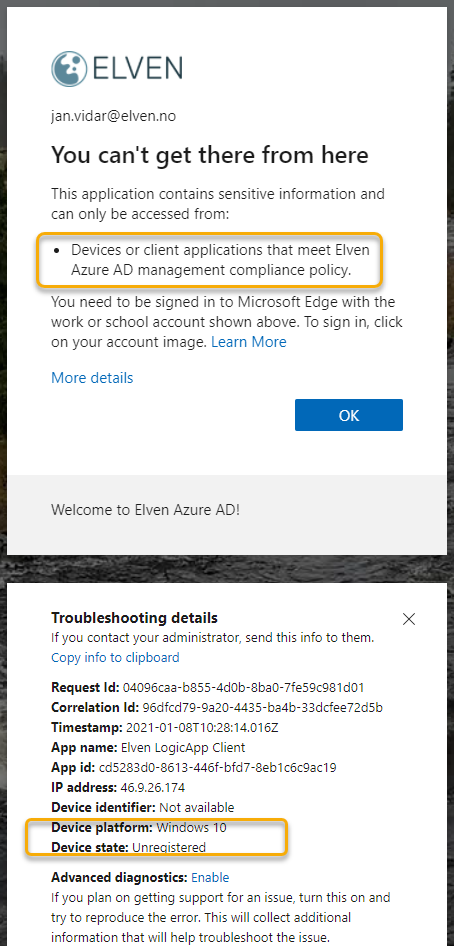
If I create that policy, and then tries to get an access token using a device that are not registered or compliant with my organization, I will get this error:
Summary of Restricting Access for Users and Groups
With the above steps we can see that by adding an Azure AD OAuth authorization policy to the Logic App, we can control which users and groups that can authenticate to and get an Access Token required for calling the Logic App, and we can use Conditional Access for applying additional fine grained access control and security policies.
So far we have tested with interactive users and delegated permission acccess scenarios, in the next section we will dive into using application access and roles for authorization scenarios.
Adding Application Access and Roles
Sometimes you will have scenarios that will let application run as itself, like a deamon or service, without requiring an interactive user present.
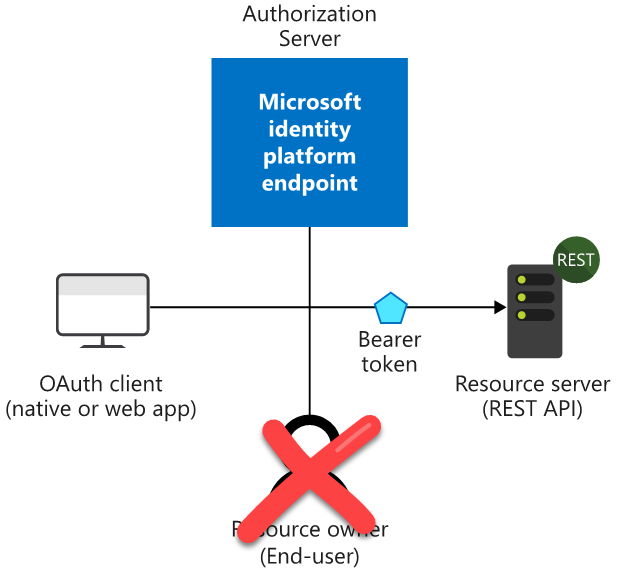
Comparing that to the OIDC and OAuth flow from earlier the Client will access the Resource directly, by using an Access Token aquired from Azure AD using the Client Credentials Flow:
Using the Client Credentials Flow from Postman
Back in the Postman client, under the Authorization tab, just change the Grant Type to Client Credentials like the following. NB! When using application access, there are no spesific delegated scopes, so you need to change the scope so that it refers to .default after the scope URI:
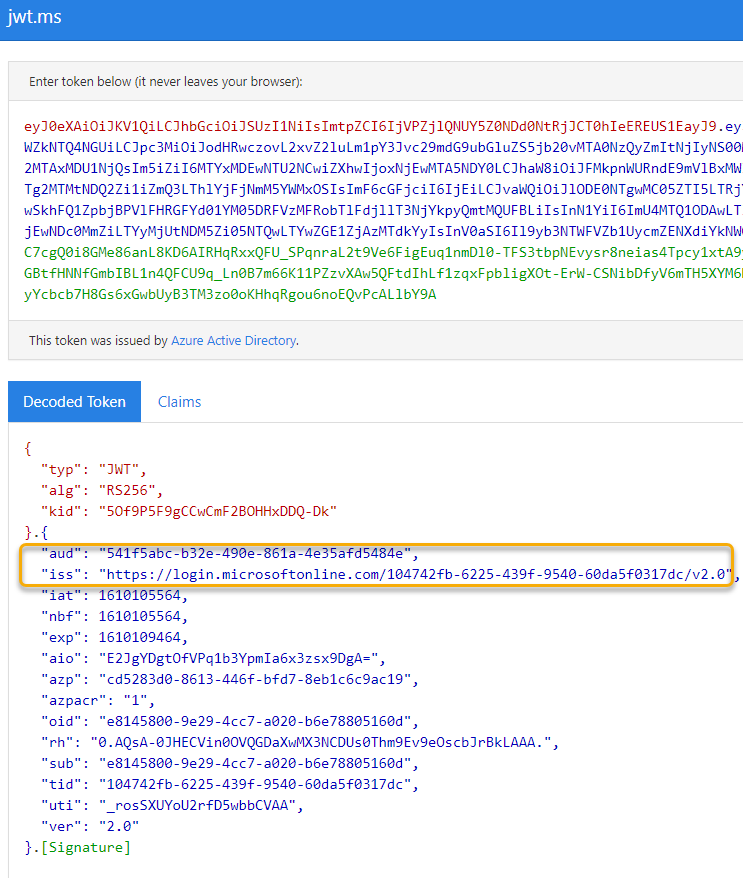
Click Get New Access Token, and after successfully authenticating click to Use Token. Copy the Token to the Clipboard, and paste to a JWT debugger. Let’s examine the JWT payload:
Note that the audience and issuer is the same as when we got an access token for an end user, but also that the JWT payload does not contain any scopes (scp) or any other user identifiable claims.
Using the Client Credentials Flow from MSAL.PS
To get an Access Token for an application client in MSAL.PS, run the following commands:
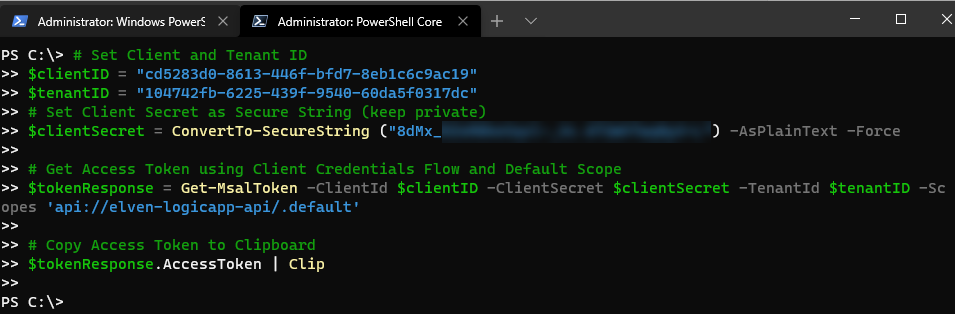
# Set Client and Tenant ID
$clientID = "cd5283d0-8613-446f-bfd7-8eb1c6c9ac19"
$tenantID = "104742fb-6225-439f-9540-60da5f0317dc"
# Set Client Secret as Secure String (keep private)
$clientSecret = ConvertTo-SecureString ("<your secret in plain text") -AsPlainText -Force

# Get Access Token using Client Credentials Flow and Default Scope
$tokenResponse = Get-MsalToken -ClientId $clientID -ClientSecret $clientSecret -TenantId $tenantID -Scopes 'api://elven-logicapp-api/.default'
You can then validate this Token and copy it to a JWT debugger:
# Copy Access Token to Clipboard
$tokenResponse.AccessToken | Clip
Calling the Logic App using Client Application
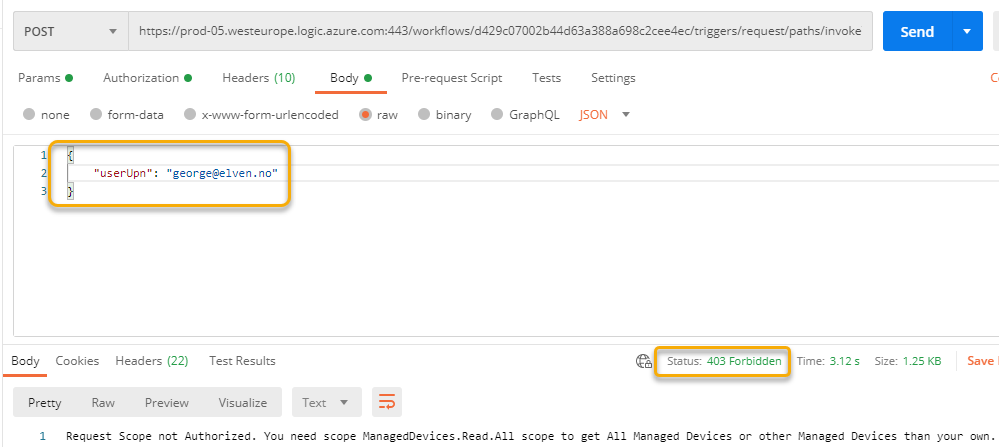
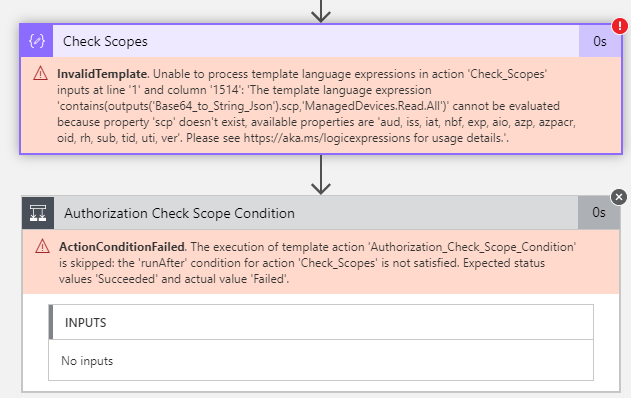
We can send requests to the Logic App using an Access Token in an application by including it as a Bearer Token in the Authorization Header exactly the same way we did previously, however it might fail internally if the Logic App processing of the access token fails because it now contains a different payload with claims:
Looking into the run history of the Logic App I can see that the reason it fails is that it is missing scp (scopes) in the token.
This is expected when authenticating as an application, so we will fix that a little later.
A few words on Scopes vs. Roles
In delegated users scenarios, permissions are defined as Scopes. When using application permissions, we will be using Roles. Role permissions will always be granted by an admin, and every role permission granted for the application will be included in the token, and they will be provided by the .default scope for the API.
Adding Application Roles for Applications
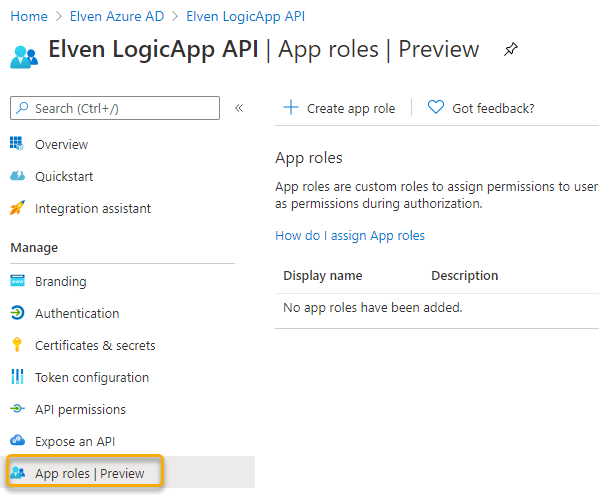
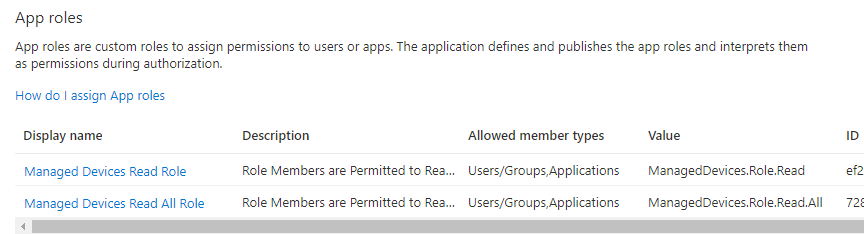
Now, let’s look into adding Roles to our LogicApp API. Locate the App registration for the API, and go to the App roles | Preview blade. (this new preview let us define roles in the GUI, where until recently you had to go to the manifest to edit).
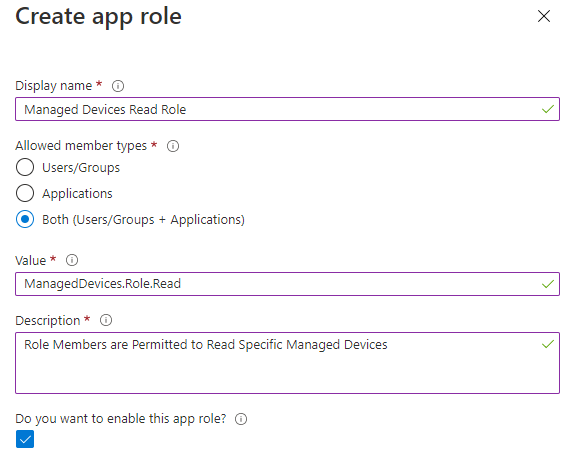
Next, click on Create app role. Give the app role a display name and value. PS! The value must be unique, so if you already have that value as a scope name, then you need to distinguish it eg. by using Role in the value as I have here:
The allowed member types give you a choice over who/what can be assigned the role. You can select either application or user/groups, or both.
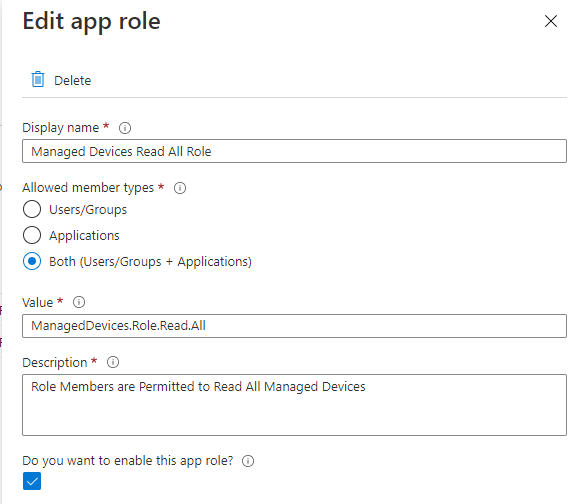
Add another App Role as shown below:
You should now have the following two roles:
Assigning Roles to Application
I recommend that you create a new App Registration for application access scenarios. This way you can avoid mixing delegated and application permissions in the same app registration, it will make it easier to differentiate user and admins consents, and secret credentials will be easier to separate, and you can use different settings for restricting access using Azure AD Users/Groups and Conditional Access.
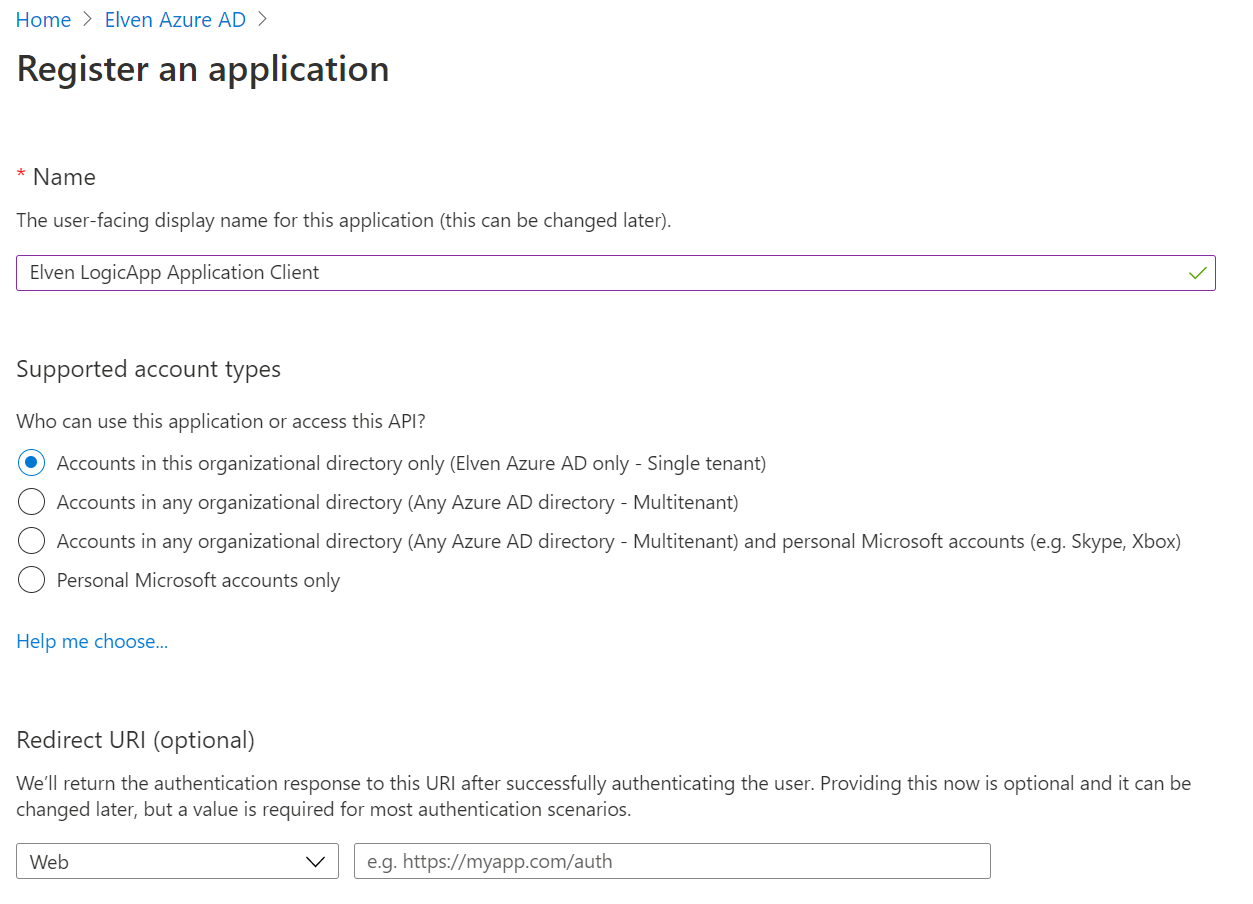
So create a new App registration, call it something like (Yourname) LogicApp Application Client:
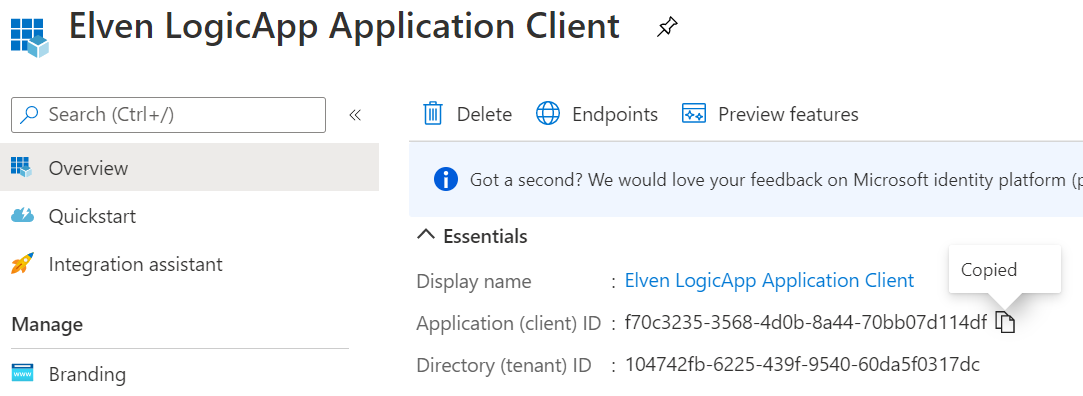
Choose single tenant and leave the other settings as default. Click Register and copy the Application (Client ID) and store it for later:
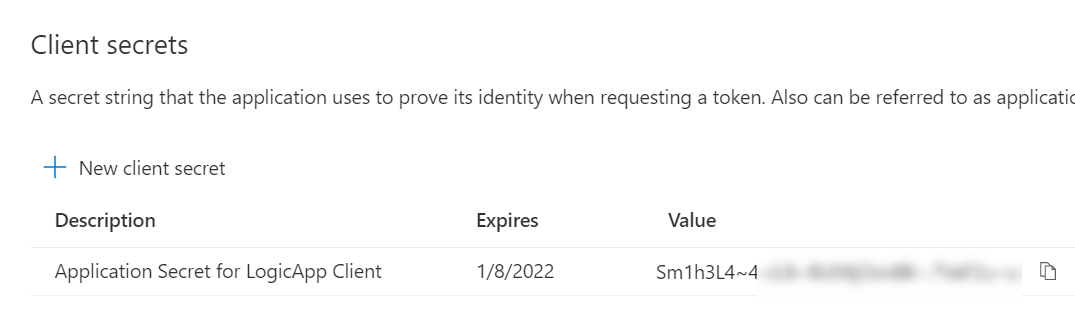
Next, go to Certificates & secrets, and create a new Client secret:
Copy the secret and store it for later.
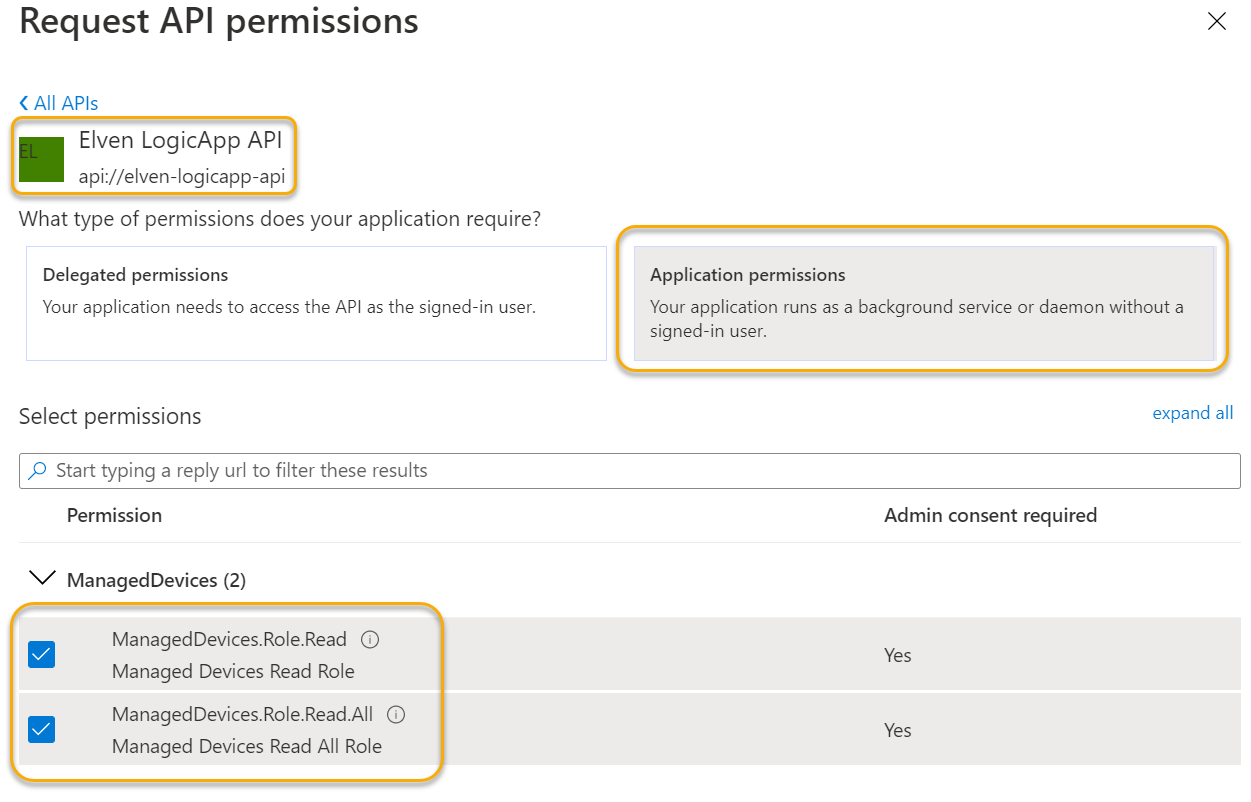
Go to API permissions, click Add a permission, and from My APIs, find the LogicApp API. Add the Application permissions as shown below, these are the App Roles we added to the API earlier:
Under API permissions you can remove the Microsoft Graph user.read permission, it won’t be needed here, the two remaining permissions should be:
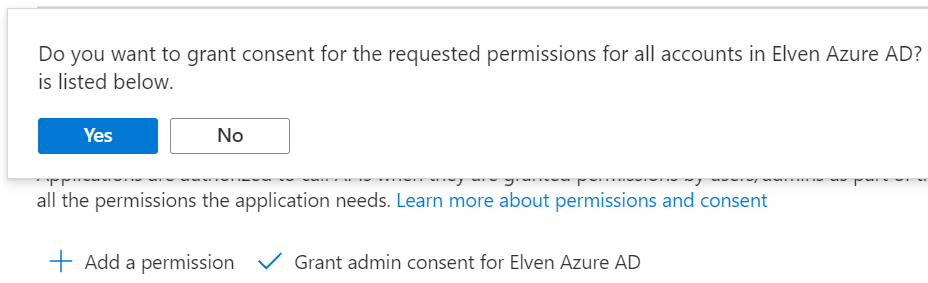
These you NEED to grant admin consent for, as no interactive user will be involved in consent prompt:
The admin consent are granted as shown below:
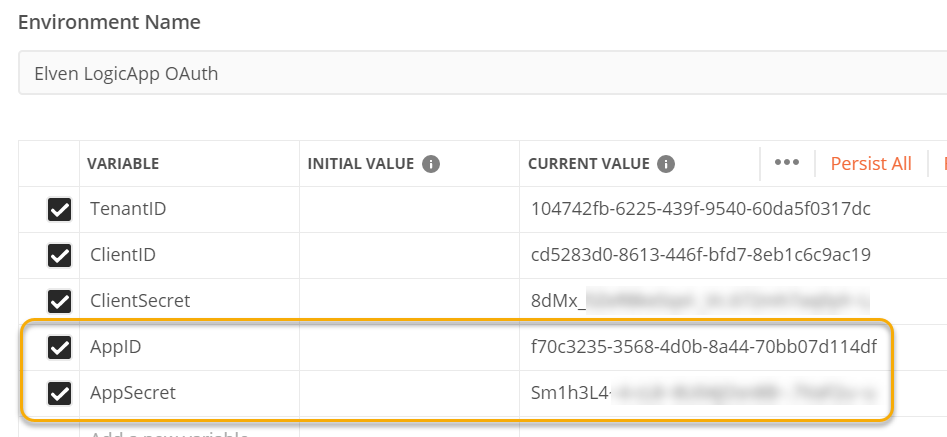
Now we can test getting access token via this new app registration, either use Postman or MSAL.PS , remember to use the new app (client) id and app (client) secret. I chose to add the two values to my Postman environment like this:
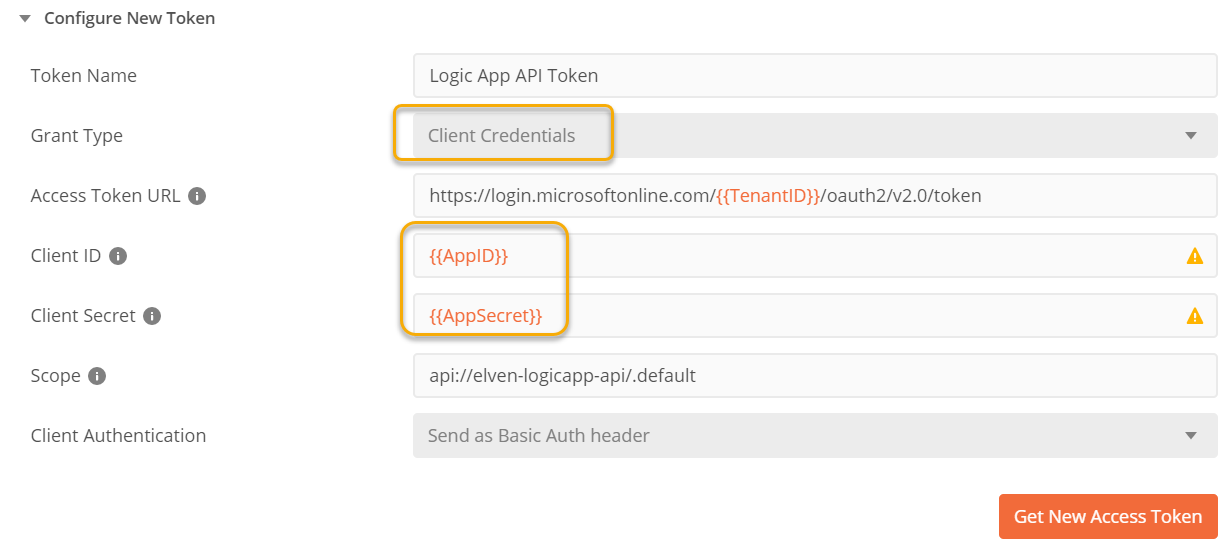
Next, change the token settings for Client Credentials flow so that the Client ID and Secret use the new variable names. Click to Get New Access Token:
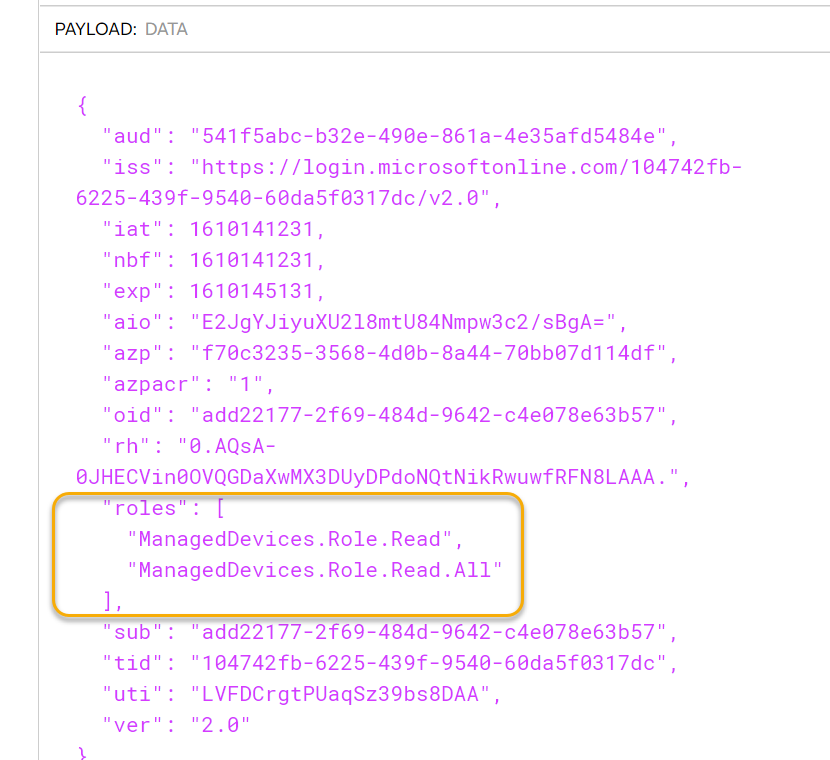
After successfully getting the access token, click Use Token and copy it to clipboard so we can analyze it in the JWT debugger. From there we can indeed see that the roles claims has been added:
We will look for these roles claims in the Logic App later. But first we will take a look at how we can add these roles to users as well.
Assigning Roles to Users/Groups
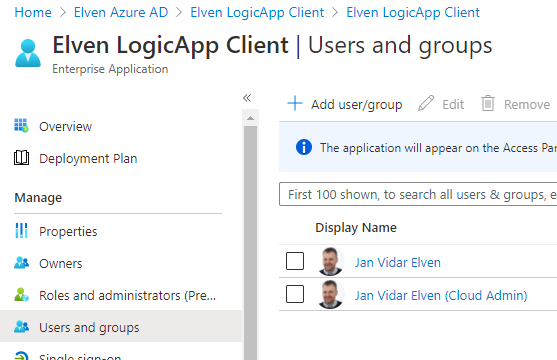
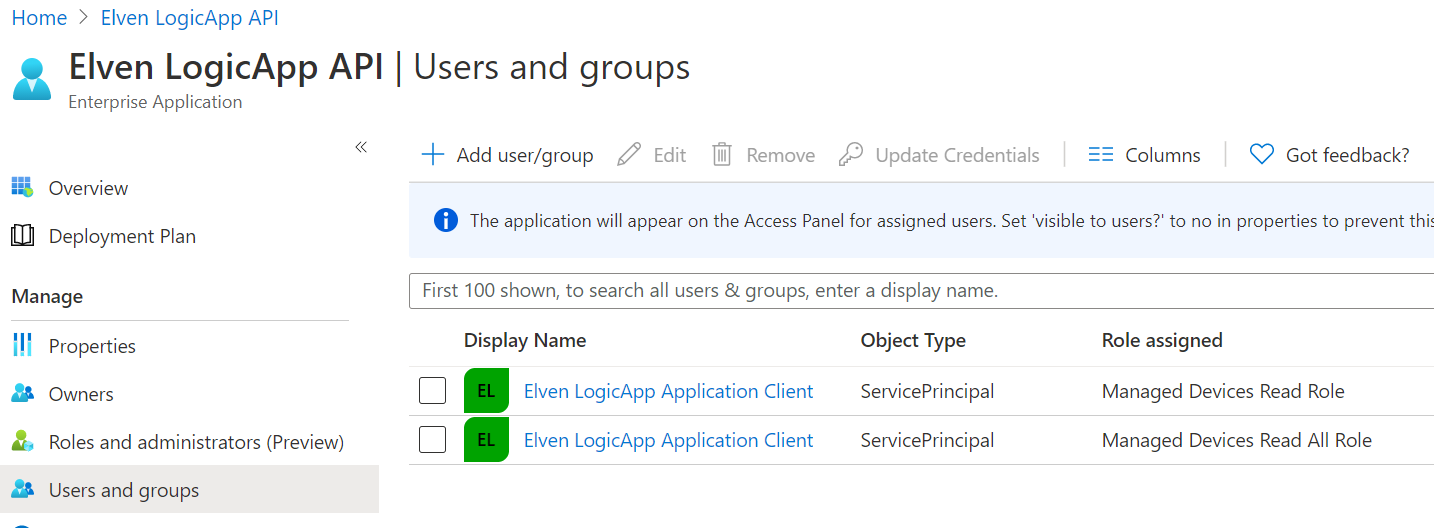
Adding roles to users or groups can be used for authorizing access based on the roles claim. Go to the Enterprise App for the Logic App API registration, you can get to the Enterprise App by clicking on the Managed application link:
In the Enterprise App, under Users and Groups, you will already see the ServicePrincipal’s for the LogicApp Application Client with the Roles assigned. This is because these role permissions were granted by admin consent:
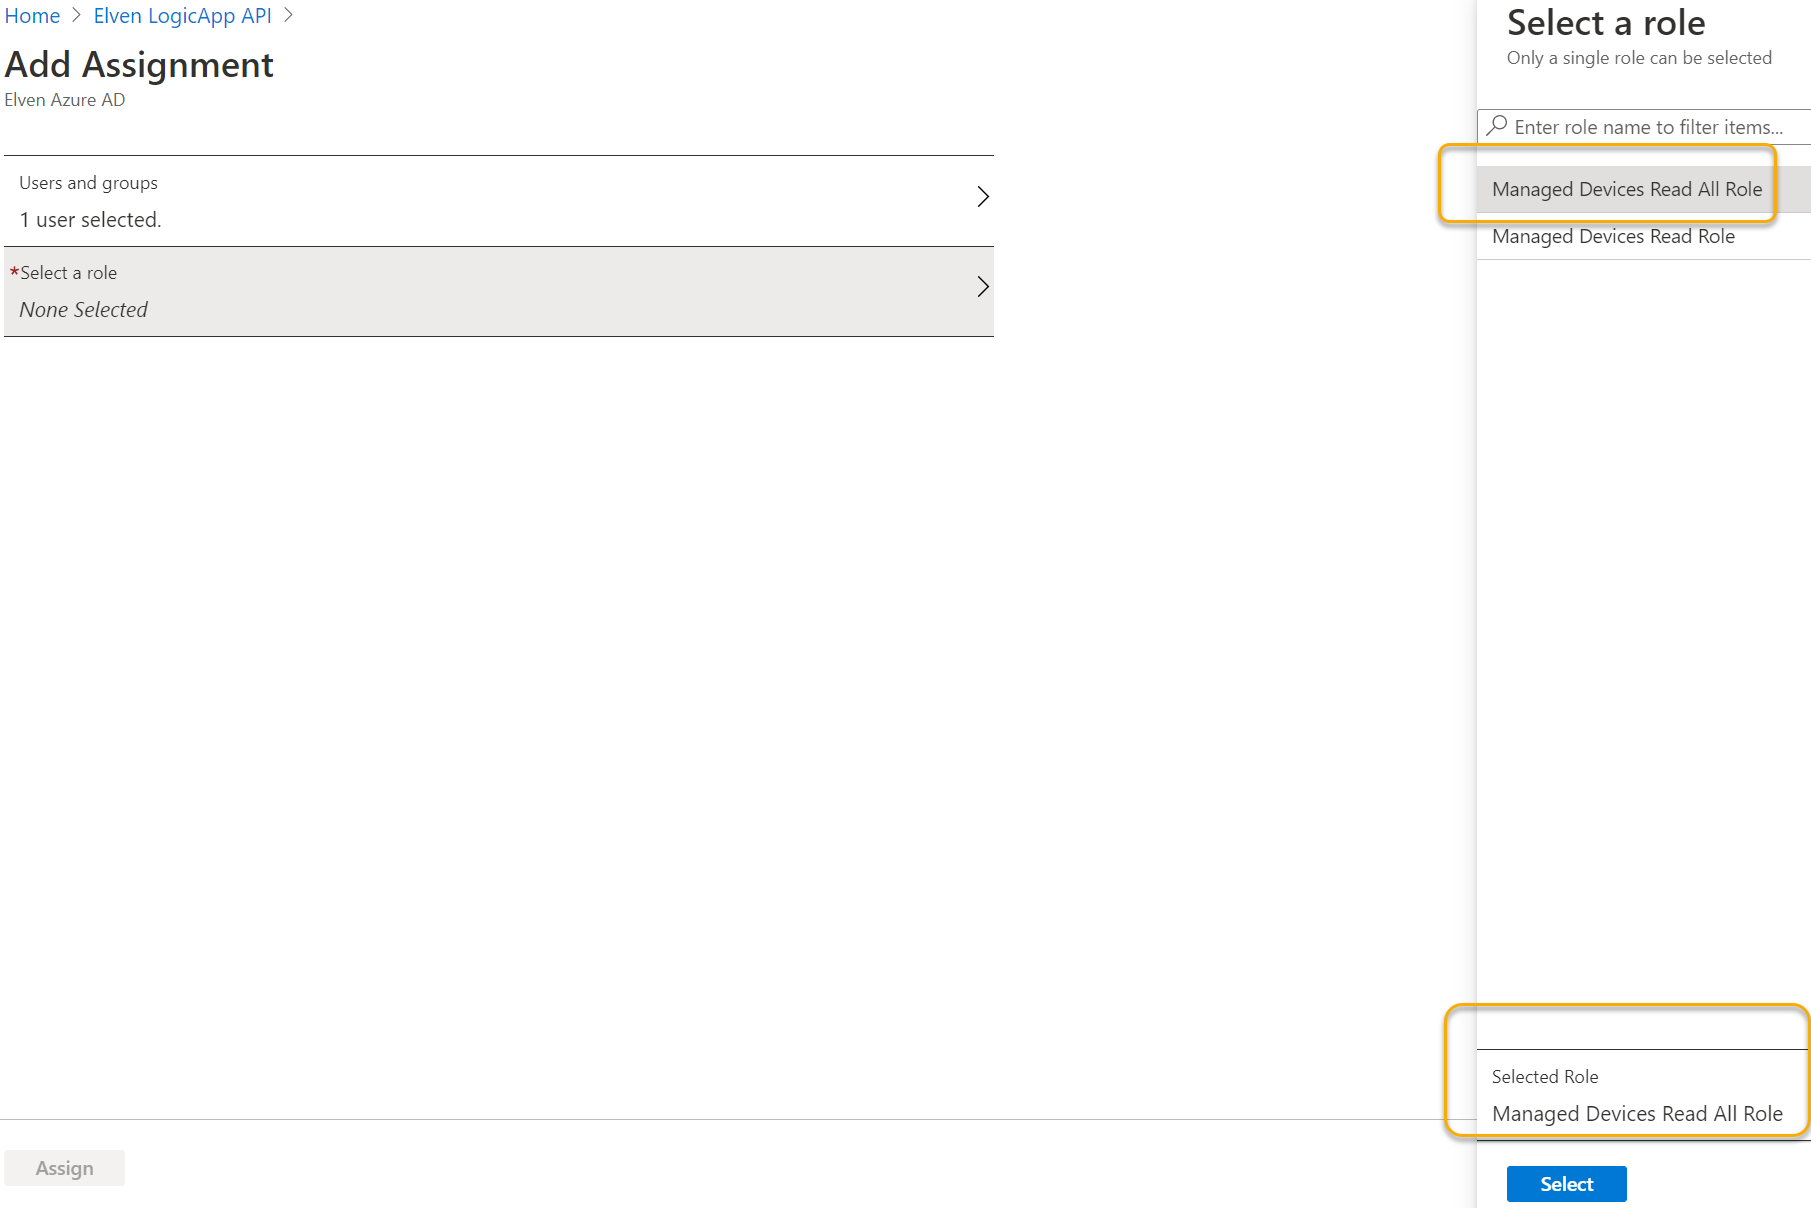
Click on Add user/group, add for a user in your organization the selected role:
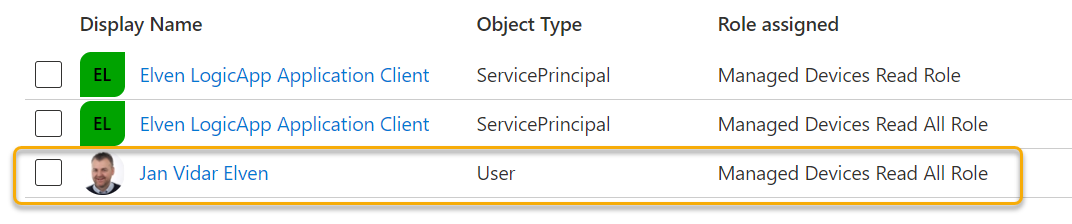
You can add more users or groups to assigned roles:
Lets do a test for this user scenario. We need to do an interactive user login again, so change to using Authorization Code Flow in Postman, and change to the originial ClientID and ClientSecret:
Click to Get New Access Token, authenticate with your user in the browser (the user you assigned a role to), and then use the token and copy it to clipboard. If we now examine that token and look at the JWT data payload, we can see that the user has now a role claim, as well as the scope claim:
We can now proceed to adjust the authorization checks in the Logic App.
Customizing Logic App to handle Roles Claims
Previously in the Logic App we did checks against the scopes (scp claim). We need to do some adjustment to this steps, as it will fail if there are no scp claim in the Token:
Change to the following expression, with a if test that returns false if no scp claim, in addition to the original check for scope to be ManagedDevices.Read.All:
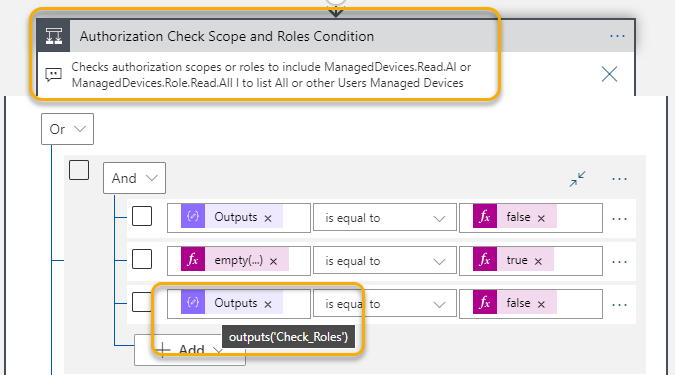
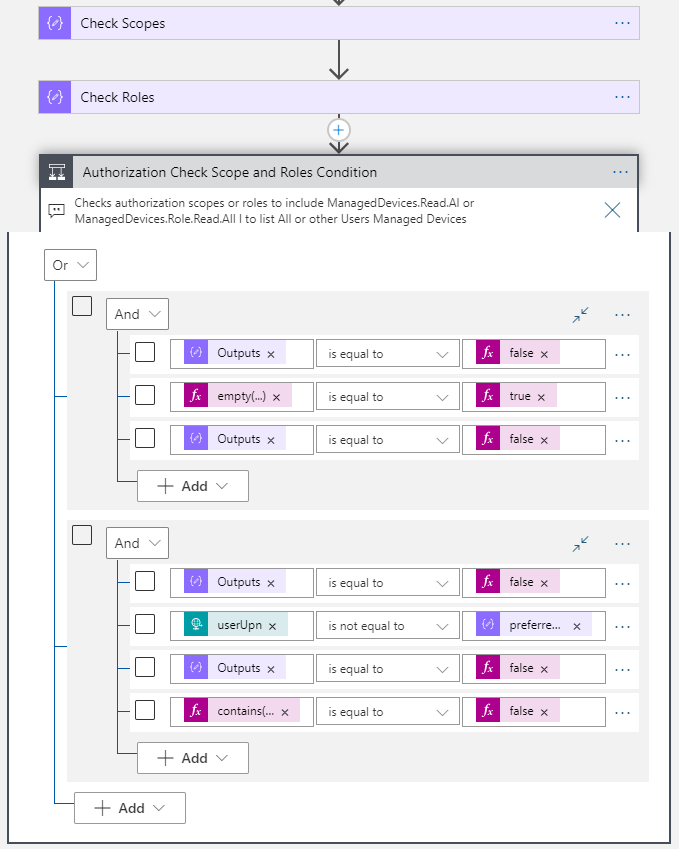
Next we need to add more checks to the authorization logic. Add a new line to the first group, where we also check the output of the Check Roles action to be false:
In the above image I’ve also updated the action name and comment to reflect new checks.
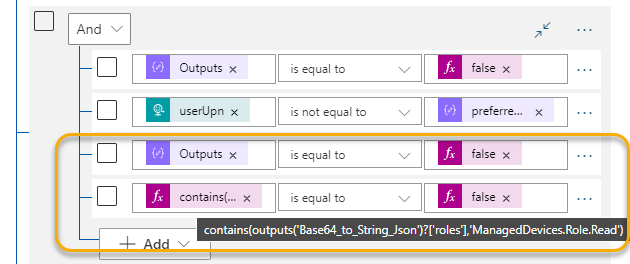
To the second group, add two more lines, where line number 3 is checking outputs from Check Roles to be false (same as above), and line 4 do a check if the roles claim contains the role ManagedDevices.Role.Read:
The complete authorization checks logic should now be:
And this is the summary of conditions:
Group 1 (checks if scp does not contain ManagedDevices.Read.All and roles does not contain ManagedDevices.Role.Read.All and calling user tries to get All managed devices):
Outputs('Check_Scopes') = false
empty(triggerBody()?['userUpn']) = true
Outputs('Check_Roles') = false
Group 2 (checks if scp does not contain ManagedDevices.Read.All and roles does not contain ManagedDevices.Role.Read.All, and tries to get managed devices for another user than users’ own upn, and roles does not contain ManagedDevices.Role.Read):
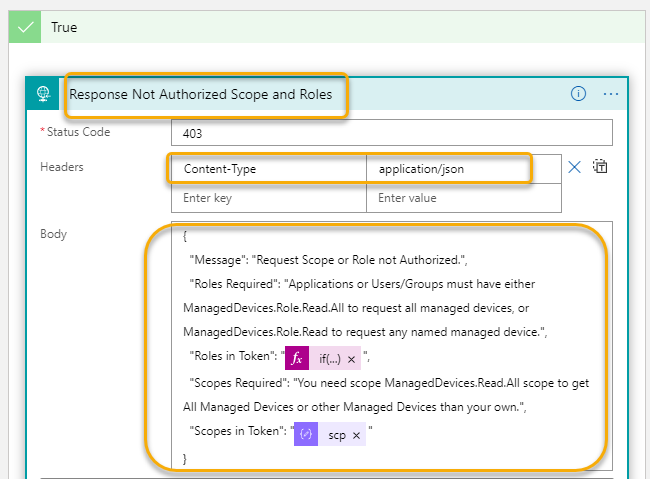
If any of the two groups of checks above returns true, then it means that the request was not authorized. To give a more customized response, change the response action like the following:
In the above action I have changed that response is returned as a JSON object, and then changed the body so that it returns JSON data. I have also listed the values from the token that the user/application use when calling the Logic App. The dynamic expression for getting roles claim (for which will be in an array if there are any roles claim) is: if(empty(outputs('Base64_to_String_Json')?['roles']),'',join(outputs('Base64_to_String_Json')?['roles'],' ')) And for getting any scopes claim, which will be a text string or null: outputs('Base64_to_String_Json')?['scp']
Test Scenario Summary
I’ll leave the testing over to you, but if you have followed along and customized the Logic App as I described above, you should now be able to verify the following test scenarios:
User/App
Scope
Roles
Result
User
ManagedDevices.Read
Can get own managed devices. Not authorized to get all devices or other users’ managed devices.
User (Admin)
ManagedDevices.Read.All
Can get any or all devices.
User
ManagedDevices,Read
ManagedDevices.Role.Read
Can get own managed devices. Can get other users’ managed devices by userUpn. Not authorized to get all devices.
User
ManagedDevices.Read
ManagedDevices.Role.Read.All
Can get any or all devices.
Application
ManagedDevices.Role.Read
Can any users’ managed devices by userUpn. Not authorized to get all devices.
Application
ManagedDevices.Role.Read.All
Can get any or all devices.
When testing the above scenarios, you need a new access token using either authorization code flow (user) or client credentials (application). For testing with roles and user scenarios, you can change the role assignments for the user at the Enterprise Application for the LogicAPI API. For testing with roles with application scenarios, make sure that you only grant admin consent for the applicable roles you want to test.
Final Steps and Summary
This has been quite the long read. The goal of this blog post was to show how your Logic App workflows can be exposed as an API, and how Azure AD OAuth Authorization Policies can control who can send requests to the Logic App as well as how you can use scopes and roles in the Access Token to make authorization decisions inside the Logic App. And even of more importance, integrating with Azure AD let’s you control user/group access, as well as adding additional security layer with Conditional Access policies!
My demo scenario was to let the Logic App call Microsoft Graph and return managed devices, which require privileged access to Graph API, and by exposing the Logic App as an API I can now let end users/principals call that Logic App as long as they are authorized to do so using my defined scopes and/or roles. I can easily see several other Microsoft Graph API (or Azure Management APIs, etc) scenarios using Logic App where I can control user access similarly.
Note also that any callers of the Logic App that now will try to call the Logic App using SAS access scheme will fail, as a Bearer Token is expected in the Authorization Header and the custom authorization actions that has been implemented. You might want to implement some better error handling if you like.
There’s an added bonus at the end of this article, where I add the filters for getting managed devices. But for now I want to thank you for reading and more article in this series will come later, including:
Calling Logic Apps protected by Azure AD from Power Platform
Protecting Logic App APIs using Azure API Management (APIM)
Bonus read
To complete the filtering of Managed Devices from Microsoft Graph, the Logic App prepared inputs of operatingSystem and osVersion in addition to userUpn. Let’s how we can implement that support as well.
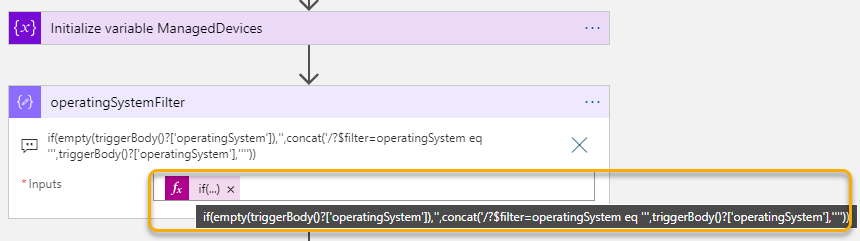
After the initialize variable ManagedDevices action, add a Compose action. In this action, which I rename to operatingSystemFilter, I add a long dynamic expression:
This expression will check if the request trigger has an operatingSystem value, it not this value will be a empty string, but if not empty the I start building a text string using concat function where I build the filter string. There are some complexities here, amongs others using escaping of single apostroph, by adding another single apostroph etc. But this expression works:
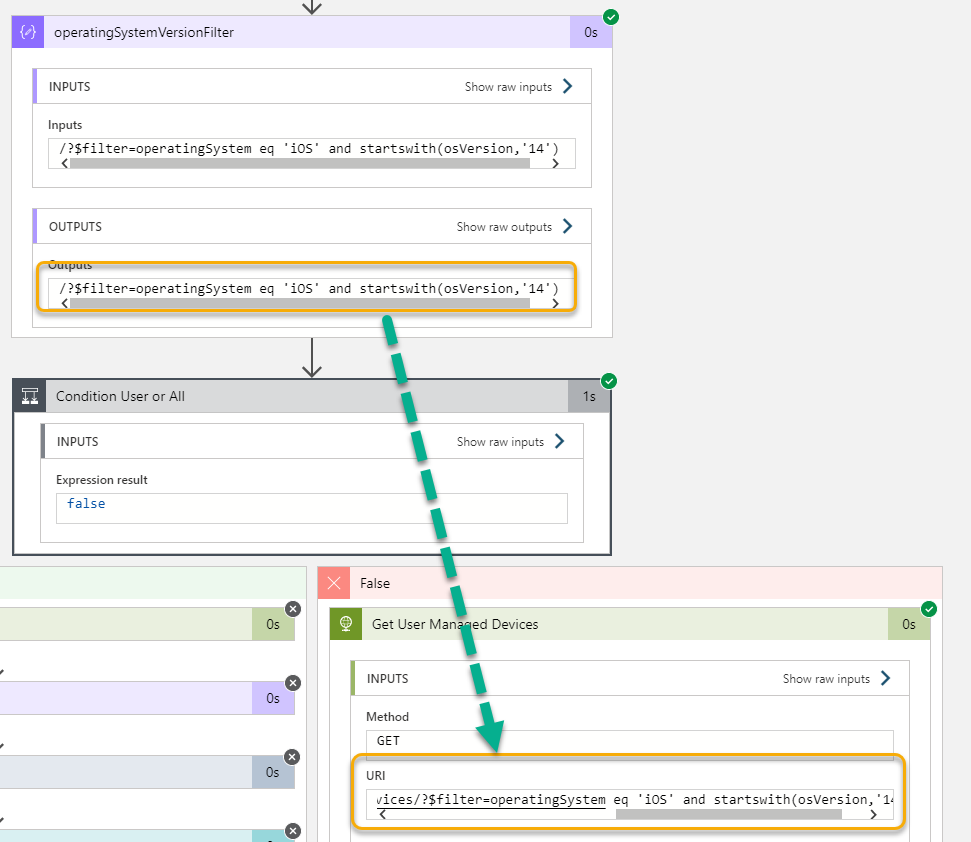
Next, add another Compose action and name it operatingSystemVersionFilter. This expression is even longer, checking the request trigger for osVersion, and if empty, it just returns the operatingSystemFilter from the previos action, but if present another string concat where I ‘and’ with the previous filter:
The expression from above image:
if(empty(triggerBody()?['osVersion']),outputs('operatingSystemFilter'),concat(outputs('operatingSystemFilter'),' and startswith(osVersion,''',triggerBody()?['osVersion'],''')'))
We can now add that output to the Graph queries, both when getting all or a specific user’s devices:
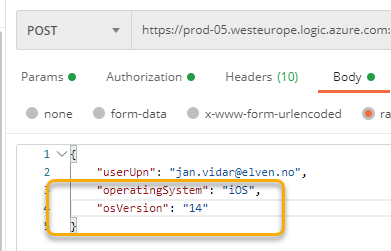
I can now add operatingSystem and osVersion to the request body when calling the Logic App:
And if I check the run history when testing the Logic App, I can see that the filter has been appended to the Graph query:
You can if you want also build more error handling logic for when if users specify the wrong user principalname, or any other filtering errors that may occur because of syntax etc.
That concludes the bonus tip, thanks again for reading 🙂