Tag Archives: Azure

Automatic Provisioning and Deprovisioning of Copilot for Security Capacity Unit

At time of writing this blog post, it’s only the first week after Microsoft Copilot for Security went GA April 1st, and already the #Security #Community are creating scripts, automations and tools for provisioning or deprovisioning Secure Capacity Units (SCU) that are required for running Copilot for Security in your environment.

A potential cost of 4$ per hour per SCU can amount to $2920 per month if you count 730 hours standard per month, so the motivation is clear, to save cost and use the service only when you need to.

I took inspiration from https://thoor.tech/Copilot-for-Security-deploy-and-destroy/, and decided to create my own solution based on Bicep, Deployment Stacks, and Azure DevOps Pipelines to automate creating a SCU on weekday mornings, and destroy again on the afternoon.

Disclaimer: This is a concept for saving cost in my own sponsored development and demo subscription, and the effects of removing and recreating Secure Compute Units in a Production environment must be carefully evaluated.

Bicep and Deployment Stacks

I wanted to use Bicep and often when I deploy Bicep I use a main.bicep file that deploys at subscription level, that also creates resource group(s) as well as contained resources which I place in modules.

Deployment Stacks, which is currently in Public Preview, let you deploy a set of resources grouped together, and I highly recommend reading this blog post by Freek Berson to understand more of the value: https://fberson.medium.com/deployment-stacks-for-bicep-are-awesome-a-full-walkthrough-sneak-peek-and-of-whats-coming-soon-4461078ec56a

I decided to use Deployment Stacks because I wanted to do a declarative approach, not only to do the actual deploy of the Secure Compute Unit, but also remove the resource from the resource group when the resource became unmanaged.

I think the code referenced at the end of this blog post is mostly self-explaining, but I will highlight a couple of elements. The first is using conditional deployment of the module in Bicep like this:

From the image above I can control whether the module will be managed in the deployment or not when I deploy the Bicep.

When running Bicep and using Deployment Stacks, you can control what happens to resources that are ‘unmanaged’. This is how I run the deployment if I want to NOT deploy the Secure Compute Unit for Copilot for Security Capacity, basically controlling CREATE operation with setting the parameter to true, and DELETE operation with setting the parameter to false:

az stack sub create --location WestEurope --name "stack-scu-elven-we" --template-file .\main.bicep --parameters deploySecureCapacityUnit=false --deny-settings-mode none --action-on-unmanage deleteResources

The magic parameter here is the –action-on-unmanage, which I set to deleteResources, which will delete all resources that falls out of bicep template (either by condition or removing resource from file). You can also do a detachResources, which will keep the resources, and you can specify deleteAll which will also remove the Resource Group (which I do not want in my scenario).

PS! Note that I run an az stack sub create, which lets me run a bicep deployment that creates resource groups as needed (yes, I could be a bit colored by my much longer Terraform experience where I also create resource groups).

In the Azure Portal, when I run a deploy that creates a SCU, it will look like this in the Deployment Stack:

Note the action on unmanage:

And when I set the parameter to false, to delete the SCU, the result is this:

Azure DevOps Pipelines

With the Bicep deployment using Az CLI verified succesfully, it should be straight forward to create Pipelines for deploying and destroying. The full YAML files are reference below, and should be easy to understand. The main components and requirements are:

  • Using a CRON expression and not a trigger for just scheduling when to run the pipeline. Note the use of always: true for the schedule, because I want the schedule to run in any case even if the files in the repo have not changed.
  • Remember you need to set up a Service Connection (Workload Identity Federation highly recommended), with approriate permissions to create resources in your reference Azure subscription.

If you look closer, you can see that the 2 pipelines, one for deploy and one for destroy, are almost exactly the same, with the exception of default value of either false or true for deploySecureCapacityUnit, and of course the morning and afternoon schedules are different.

FEATURE WHISH: I would have thought that I could use multiple schedules in the same YAML pipeline, and specifying different default value for the deploySecureCapacityUnit parameter based on schedule. Then I would be able to have just the one pipeline instead of two..

I’ll leave you to the rest, see reference to files I have published as Gists on my GitHub account https://github.com/janvidarelven.

Gist Reference

Complete Gist is linked below and is public, and feel free to Clone, Fork, Pull if you want to contribute, etc.

Gist consists of 4 files:

  • main.bicep – Parameters, variables, resource group and a module for Secure Compute Unit
  • secure-compute-unit.bicep – Module definition for deploying a Secure Compute Unit for Copilot for Security
  • deploy-security-copilot.yml – Pipeline with schedule for deploying Bicep from above files using Deployment Stack, creating a Secure Compute Unit.
  • destroy-security-copilot.yml – Pipeline with schedule for deploying Bicep from above files using Deployment Stack, deleting the Secure Compute Unit.
name: CD-$(rev:r)-Deploy-Security-Copilot-$(Date:dd.MM.yyyy) # build numbering format
trigger: none
schedules:
cron: "0 7 * * 1-5"
displayName: Morning weekdays
branches:
include:
main
always: true
parameters:
name: azureServiceConnection
default: serviceconn-<your-wif-connection>
name: azureSubscriptionTarget
default: '<your-sub-name-or-id'
name: deploySecureCapacityUnit
type: boolean
default: true
pool:
vmImage: windows-latest
variables:
name: deploymentDefaultLocation
value: westeurope
name: deploymentBicepTemplate
value: .\SecurityCopilot-Bicep\main.bicep
jobs:
job:
steps:
task: AzureCLI@2
displayName: 'Deploy Security Copilot Compute Unit'
inputs:
azureSubscription: '${{ parameters.azureServiceConnection }}'
scriptType: pscore
scriptLocation: inlineScript
inlineScript: |
az –version
az account set –subscription '${{ parameters.azureSubscriptionTarget }}'
az stack sub create `
–location $(deploymentDefaultLocation) `
–name "stack-scu-yourorg-we" `
–template-file $(deploymentBicepTemplate) `
–parameters deploySecureCapacityUnit=${{ parameters.deploySecureCapacityUnit }} `
–deny-settings-mode none `
–action-on-unmanage deleteResources
name: CD-$(rev:r)-Destroy-Security-Copilot-$(Date:dd.MM.yyyy) # build numbering format
trigger: none
schedules:
cron: "0 14 * * 1-5"
displayName: Afternoon weekdays
branches:
include:
main
always: true
parameters:
name: azureServiceConnection
default: serviceconn-<your-wif-connection>
name: azureSubscriptionTarget
default: '<your-sub-name-or-id'
name: deploySecureCapacityUnit
type: boolean
default: false
pool:
vmImage: windows-latest
variables:
name: deploymentDefaultLocation
value: westeurope
name: deploymentBicepTemplate
value: .\SecurityCopilot-Bicep\main.bicep
jobs:
job:
steps:
task: AzureCLI@2
displayName: 'Deploy Security Copilot Compute Unit'
inputs:
azureSubscription: '${{ parameters.azureServiceConnection }}'
scriptType: pscore
scriptLocation: inlineScript
inlineScript: |
az –version
az account set –subscription '${{ parameters.azureSubscriptionTarget }}'
az stack sub create `
–location $(deploymentDefaultLocation) `
–name "stack-scu-elven-we" `
–template-file $(deploymentBicepTemplate) `
–parameters deploySecureCapacityUnit=${{ parameters.deploySecureCapacityUnit }} `
–deny-settings-mode none `
–action-on-unmanage deleteResources
targetScope = 'subscription'
// If an environment is set up (dev, test, prod…), it is used in the application name
param environment string = 'dev'
param applicationName string = 'security-copilot'
param location string = 'westeurope'
param resourceGroupName string = 'rg-sec-copilot-scu-we'
param capacityName string = 'scu-<yourorg>-we'
param capacityGeo string = 'EU'
// Some params for provisioning the secure capacity unit, and if it should be deployed or not
param defaultNumberOfUnits int = 1
param deploySecureCapacityUnit bool = true
var defaultTags = {
Environment: environment
Application: '${applicationName}-${environment}'
Dataclassification: 'Confidential'
Costcenter: 'AI'
Criticality: 'Normal'
Service: 'Security Copilot'
Deploymenttype: 'Bicep'
Owner: 'Jan Vidar Elven'
Business: 'Elven'
}
resource rg 'Microsoft.Resources/resourceGroups@2021-04-01' = {
name: resourceGroupName
location: location
tags: defaultTags
}
// Deploy the secure capacity unit module dependent on the deploySecureCapacityUnit parameter
module scu 'secure-capacity/secure-compute-unit.bicep' = if (deploySecureCapacityUnit) {
name: capacityName
scope: resourceGroup(rg.name)
params: {
capacityName: capacityName
geo: capacityGeo
crossGeoCompute: 'NotAllowed'
numberOfUnits: defaultNumberOfUnits
resourceTags: defaultTags
}
}
view raw main.bicep hosted with ❤ by GitHub
// Secure Compute Unit – Bicep module
// Created by – Jan Vidar Elven
@description('The name of the Security Copilot Capacity. It has to be unique.')
param capacityName string
@description('A list of tags to apply to the resources')
param resourceTags object
@description('Number of Secure Compute Units.')
@allowed([
1
2
3
])
param numberOfUnits int
@description('If Prompts are are allowed to cross default region for performance reasons.')
@allowed([
'NotAllowed'
'Allowed'
])
param crossGeoCompute string
@description('Prompt evaluation region. Allowed values are EU, ANZ, US, UK.')
@allowed([
'EU'
'ANZ'
'US'
'UK'
])
param geo string
var locationMap = {
EU: 'westeurope'
ANZ: 'australiaeast'
US: 'eastus'
UK: 'uksouth'
}
var location = contains(locationMap, geo) ? locationMap[geo] : 'defaultlocation'
resource Copilot 'Microsoft.SecurityCopilot/capacities@2023-12-01-preview' = {
name: capacityName
location: location
properties: {
numberOfUnits: numberOfUnits
crossGeoCompute: crossGeoCompute
geo: geo
}
tags: resourceTags
}

Speaking at the Cloud Lunch & Learn Marathon 2021!

I’m excited to announce that I will be speaking at the Cloud Lunch & Learn Marathon 2021, a Global and Online Community event that will run for 24 hours between May 13th and 14th, with Speakers and Community experts from all over the world.

Sessions will cover a range of Cloud topics, including AI, Cloud Native, Blockchain, IoT, Data & BigData, Security, DevOps, GitHub, Backend, Frontend, Power Platform and, more.

Many sessions will also be held in other languages than English, like Portuguese, Spanish, Hindi, Chinese and Arabic!

My session will be about Passwordless for Azure Services. It is well known that Passwordless for Microsoft Identities is now the thing to do to secure your end users, but what about Azure Services that need to authenticate to other resources and APIs? This is where Managed Identities is the way to go. In my session I will show the capabilities and usage scenarios for using Managed Identities to get rid of application credentials once and for all!

You can see all the sessions at the link below, where you also will find registration details.

My Session details:

  • Session Title: Passwordless Azure Authentication using Managed Identities
  • Track/Day: Security, Dev, IT Ops – Thu 13th May
  • Time: 16:30 CET

You can register for free here: Cloud Lunch and Learn (cloudlunchlearn.com)

Hope to see you there!

Blog Series – Power’ing up your Home Office Lights: Part 2 – Prepare Azure Key Vault for storing your API secrets

This blog post is part of the Blog Series: Power’ing up your Home Office Lights with Power Platform. See introduction post for links to the other articles in the series:
https://gotoguy.blog/2020/12/02/blog-series—powering-up-your-home-office-lights-using-power-platform—introduction/

Continuing on Part 1, where we created an App Registration for Hue Remote API, I will need a secure place to store the App credentials like Client ID and Secret. I will also need to store the Access Token and Refresh Token, so that I can retrieve it when I need to call the Hue Remote API, and use the Refresh Token to renew the Access Token when it expires.

To start with, here is a short video where I explain the concept:

Choosing Azure Key Vault as Secret Storage

Client ID and Secret from the App registration are credentials that needs to be protected from unauthorized access. Likewise, if unauthorized users get hold of your Access Token, they can access your Hue Bridge remotely and create user access for themselves to your Hue Lights.

If you are planning to build this solution only for yourself, and no other users will share your Hue Power Apps and Flows, then you can store the credentials and tokens in a personal storage, for example in a SharePoint Online List. Just make sure that this resource never will be shared with other users internally, or externally. This would also be a logical choice if you don’t have access to an Azure subscription for yourself.

In my case, I wanted to be able to share the user part of the solution with other users, while making sure that my credentials and tokens were as protected as possible. So I decided to create some logic around that in Azure, and to store my secrets in Azure Key Vault.

Setting up Azure Resources for Key Vault

You will need access to an Azure Subscription to do this part. Your organization might provide you with access to a subscription, or there are several pathways to starting with Azure for free, amongst others Visual Studio subscription, Azure for Free, Azure for Students to name a few.

At a minimum you will need Contributor access to a Resource Group, where you can deploy the following:

  • Azure Key Vault resource for storing secrets for Power Platform and Hue Remote API.
  • Adding the secrets necessary for the solution.
  • Access policy that allows you, and later the Logic Apps access to get, set and list secrets from the Key Vault.

In your resource group, create a new Key Vault. The name needs to be globally unique, so it makes sense to use any naming convention:

For the purpose of the Hue Remote API, you will need to create the following 3 secrets:

The “secret-hue-client-id” and “secret-hue-client-secret” are created manually with the client id and secret from the Hue App registration.

The “secret-hue-bearer-token” will be populated via the Logic App we will look into in a later part in this blog series. Note that this secret has an expiration date, which is when the token expires. I will get into that later as well.

Managing Access to the Key Vault

You need to configure the Key Vault access policy so that you, and any services that interact with the Key Vault have the right access to get, set or list secrets.

In this case, I have configured my Hue Logic Apps with access via Managed Service Identity (MSI), at this point you might not have these in place yet, but we will get there also in a later part:

With that we can conclude this part, in the next part of the blog series we will start looking into the Logic Apps for Hue authorization and managing access token.

Thanks for reading, see you in the next part 🙂

Shutdown and Deallocate an Azure VM using Managed Service Identity and Instance Metadata Service

The purpose of this blog post is to show how you can run a PowerShell script on an Azure VM that will shutdown and deallocate the actual VM the script is run on.

First, kudos to Marcel Meurer (Azure MVP), that originated the idea of how to run a PowerShell script that will shut down and deallocate the VM from inside itself, this is a good read: https://www.sepago.de/blog/2018/01/16/deallocate-an-azure-vm-from-itself.

Marcels blog learnt me of something I havent used before, Azure Instance Metadata Service, where I can get information on my current VM instance. I wanted to combine this with using Managed Service Identity (MSI), and actually let the VM authenticate to itself for running the shut down command. The shut down command will be using the Azure REST API.

First, let us set up the requirements and permissions to get this to work.

Configure Managed Service Identity

Managed Service Identity is feature that as of January 2018 is in Public Preview, and by using MSI for Azure Virtual Machines I can authenticate to Azure Resource Manager API without handling credentials in the code. You can read more on the specifics here: https://docs.microsoft.com/en-us/azure/active-directory/msi-tutorial-windows-vm-access-arm.

First, we need to set up the Managed Service Identiy the VMs in question. This is done under the VM configuration, by enabling Managed service identity as shown below:

image

After saving the configuration, wait for the Managed service identity to be successfully created. This will create a service principal in Azure AD, and for VMs this will have the same name as the virtual machine name.

Now we need to give that service principal access to its own VM. Under the VMs Access Control (IAM) node, select to add a permission for the service principal as shown under. I have given the role of Virtual Machine Contributor, which means that the MSI will be able to write to and perform operations on the VM like shutdown, restart and more:

image

So for each VM we want to use this PowerShell script, we will need to do the same 2 operations, enable MSI and add service principal permission to the VM:

image

PowerShell script for Shutdown and Deallocate using MSI

The following script will when run on the Azure VM do the following steps: (full script follows below as the images are small)

  1. Read instance metadata and save subscription, resource group and vm name info:image
  2. Authorize itself to Managed Service Identity:image
  3. Send an Azure Resource Manager REST API POST command for shutdown and deallocate:imageThe REST API call for shutting down a VM uses method POST and the following URI format: https://management.azure.com/subscriptions/{subscriptionId}/resourceGroups/{resourceGroup}/providers/Microsoft.Compute/virtualMachines/{vm}/deallocate?api-version={apiVersion}(https://docs.microsoft.com/en-us/rest/api/compute/virtualmachines/virtualmachines-stop-deallocate)

When this script is run on a VM the following output will display that the REST operation was successful, and shortly after the server goes down and deallocates as excpected.

image

To summarize, this blog post showed how we can use Managed Service Identity together with Azure Instance Metadata Service, to let the VM manage itself. This example showed how to shut down and deallocate, but you can use the REST API for other operations like restart, get info, update the VM and so on. Best of all with using MSI, is that we don’t have to take care of application id’s, secret keys and more, and having those exposed in the script which can be a security issue.

The complete PowerShell script is shown below:


# This script will shutdown the Azure VM it's running on
# Requirements: Azure Managed Service Identity (MSI) configured on the VMs in question.
# Permissions: The MSI service principal for the VM needs to be added as Virtual Machine Contributor for it's own VM
# Kudos: This script is inspired from Marcel Meurer's script for shutting down VM from itself: https://www.sepago.de/blog/2018/01/16/deallocate-an-azure-vm-from-itself
# Read VM details from Azure VM Instance Metadata
$md = Invoke-RestMethod -Headers @{"Metadata"="true"} -URI http://169.254.169.254/metadata/instance?api-version=2017-08-01
# Save variables from metadata
$subscriptionId = $md.compute.subscriptionId
$resourceGroupName = $md.compute.resourceGroupName
$vmName = $md.compute.name
# Next, using the MSI we will get an access token for the service principal
$response = Invoke-WebRequest -Uri http://localhost:50342/oauth2/token -Method GET -Body @{resource="https://management.azure.com/&quot;} `
-Headers @{Metadata="true"}
# Save the response and access token
$content = $response.Content | ConvertFrom-Json
$ArmToken = $content.access_token
# Using Azure REST API to shutdown and deallocate VM, authenticating with access token from MSI
Invoke-WebRequest -Uri `
https://management.azure.com/subscriptions/$subscriptionId/resourceGroups/$resourceGroupName/providers/Microsoft.Compute/virtualMachines/$vmName/deallocate?api-version=2016-04-30-preview `
-Method POST -ContentType "application/json" `
-Headers @{ Authorization ="Bearer $ArmToken"}

Speaking at NIC 2017

I’m very happy that I have been selected as a speaker again for next years NIC 2017!

I will have at least one session to present, and hoping for a second session but the organizers have a lot of interesting session proposals to choose from so we’ll see.

My session will be about Enterprise Applications and Publishing in the new Azure AD Management Experience:

image

In this session we will look into the new management experience of Azure AD Applications in the new Azure Portal. The session will cover publishing and management of Application Proxy applications, Web App/API Applications and Enterprise Applications including SaaS Applications, and how and in which scenarios we can use the new Azure Portal, PowerShell or the Classic Portal for administration. Another important topic that will be covered is how you can configure Conditional Access for those applications for Users and Devices with the Enterprise Mobility & Security offering.

NIC 2017 is 2nd and 3rd of February, with a Pre-Conf day at the 1th. Read more at www.nicconf.com.

Hope to see you there!

Experts and Community unite at last ever #SCU_Europe 2016! #ExpertsLive next

This years SCU Europe 2016, for the first time outside Switzerland in the 4th year running, was held in Berlin at the BCC (Berlin Congress Center) close to the Alexander Platz in the eastern parts of “Berlin Mitte”.


The intro video introducing the Experts:

Let’s begin with the end: at the closing note SCUE general Marcel Zehner announced and with a little bit of emotion that this was the last ever SCU Europe to be held.. You and your organization should be proud of what you have achieved, Marcel, it is one of the best community conferences around, and I have been fortunate to be able to visit all 4 starting with Bern in 2013, Basel in 2014 and 2015, and now Berlin in 2016. It’s only cities with B’s is it? In fact, you never know what twists and turns your career takes, but looking back I’m not sure I would be where I am now in turn of being presenter, MVP and community influencer myself if I had not travelled alone to Bern 4 years ago, that’s where I really started working with and for the Community (with a capitol C)!

Luckily SCU Europe will continue as Experts Live Europe next year! Same place at BCC, same organization and format, and the same dates only next year it will be: 23rd – 25th of August 2017. A new web page was launched, www.expertslive.eu, and Twitter (@ExpertsLiveEU) and Facebook have been changed to reflect that. The hash tag #SCU_Europe will eventually be inactive and you should now use #ExpertsLive.

image

I think this is a very good decision, there has already been discussion on that the name “System Center Universe” is not really reflecting the content and focus of the conference, now embracing the Cloud, with content areas for Management, Productivity, Security, DevOps, Automation, Data Platform and more. ExpertsLive, originally a 1-day community conference in Netherland running each year back from 2009 and with up to 1200 participants, will now be a network of conferences, ranging from region based (ExpertsLive Europe, but also SCU APAC and SCU Australia will be ExpertsLive APAC and Australia next year), and local, country based ExpertsLive like the one in Netherlands, but more will come.

image

The closing note video announcing Experts Live Europe:

This year at SCU Europe I was one of the Experts and presented two sessions on “Premium Identity Management and Protection with Azure AD” and “Deep Dive: Publishing Applications with Azure AD”. I also took part in a “Ask-the-Experts” area together with Cameron Fuller and Kevin Greene where we took questions on the topic System Center 2016. I participated on a discussion panel on Friday morning with Markus Wilhelm from Microsoft Germany on the subject Defense Strategies and Security, and of course we had the Meet and greet with the Experts at the Networking party. It was a really great experience speaking at this conference, thanks for having me!


The content of the conference this year was great, and for the first time there was 5 tracks, with over 70 sessions presented! All presentations and session recordings will be at Channel 9 in a few weeks time, so make sure you look at anything you missed or want to see again if you where there, or if you weren’t at the conference this year you can look at your sessions of interest.

I was travelling with a group this year, both from my company and some of our customers, in total we were 7 in the group, and also had 3 cancellations the last week before the conference from some customers that could not make it after all. Moving the conference to Berlin is a big part of why it now was easier to attract more Nordic attendance I think. We stayed at the Park Inn by Radisson right by the Alexander Platz and BCC, so it was really central and nice.


In good tradition there are a lot of parties and social networking going on. On the first night there are the Sponsors and Speakers Party, which was held in Mio right by the TV Tower by Alexander Platz, on Thursday we had the attendee Networking Party at the conference center. Later that night our group and some more partners/customers of Squared Up went on to another party at Cosmic Kaspar. It was really hot, so basically the party was at the pavement! On the last day we had the Closing Drinks, sponsored by Cireson and itnetX at Club Carambar, also close to the Alexander Platz. In addition, there are a lot of unofficial gatherings going on, lots of laughs and new and old friends have a good time.


See you next year at Experts Live Europe in Berlin 23-25th August, 2017!

Speaking at System Center Universe Europe 2016 – Berlin

I’m really excited that I will have two sessions at this years SCU Europe in Berlin, August 24th – 26th. System Center Universe Europe is a really great community conference that focuses on Cloud, Datacenter and Modern Workplace Management, covering technologies like Microsoft System Center, Microsoft Azure, Office 365 and Microsoft Hyper-V. Read more about SCU Europe here: http://www.systemcenteruniverse.ch/about-scu-europe.html

I have been visiting all SCU Europe Conferences since the inaugural start in Bern 2013. I met some amazing MVPs, sponsors and community leaders already then, in fact it inspired me even more to share more of my own workings and knowledge by blogging, using social media and eventually speaking at technical  and community conferences myself.  The following two years SCU Europe were held in Basel, both the great conference venue at Swissotel and lest not forget Bar Rouge had its fair share of memorable moments 🙂

This years SCU Europe will be held in Berlin from the 24th to the 26th of August. Moving the conference to Berlin is a smart move I think, it will make the conference even more accessible to most European and overseas travelers, and attract the attendance it deserve.

A few months ago I received some great news, I had two sessions accepted for SCU Europe, and received my first Microsoft MVP Award for Enterprise Mobility. I’m really happy to not only go and learn and enjoy the conference sessions and community, but also to contribute myself along with over 40 top, top speakers from all over the world!

My first session will cover “Premium Management and Protection of Identity and Access with Azure AD”:

image

In the session I will focus on Azure AD Identity Protection, Azure AD Privileged Identity Management for controlling role and admin access, how to monitor it all will Azure AD Connect Health, and how Azure Multi-Factor Authentication works with these solutions. The session will cover the recent announcements regarding Enterprise Mobility + Security.

The second session will be a deep dive on “Publish Applications with Azure AD”:

image

In this demo-packed session I will go deep into what you need to get started on publishing the different types of applications, and how to configure and troubleshoot user access to these applications. The session will cover Azure AD Single Sign-On and Password Single Sign-On, integrating Azure AD SSO with your internally developed applications, and publishing applications with Azure AD App Proxy that either use pre-authentication or pass through.

Hope to see you at the conference, and if you haven’t registered yet there is still time: http://www.systemcenteruniverse.ch/registration.html

Trigger Azure AD Connect Sync Scheduler with Azure Automation

In this blog post I will show how you can trigger the Azure AD Connect Sync Scheduler with an Azure Automation Runbook PowerShell Script. Since the Azure AD Connect build 1.1.105.0 was released February 2016, a new scheduler is built-in that per default sync every 30 minutes (previously 3 hours). For more detail on Azure AD Connect Sync Scheduler, see https://azure.microsoft.com/en-us/documentation/articles/active-directory-aadconnectsync-feature-scheduler/.

Normally a sync schedule of 30 minutes is sufficient for most use, but sometimes you will need to do an immediate sync. So I thought it was a good idea to create a PowerShell script that creates a remote session to the Azure AD Connect Server, and then triggers a delta sync.

Now, this PowerShell script can of course be used with any of your favorite automation solutions, for example Orchestrator or SMA on-premises. But why not just use Azure Automation and a Hybrid Worker to run this script. This way you can trigger the script in a number of ways including in the Azure Portal, via Webhooks, remediating alerts in OMS and more.

Requirements

Lets first take a look at the requirements for this solution:

  • You will have to have an Azure Subscription, so that an Azure Automation Account can be created (or use your existing account), and that a runbook script with the related assets can be created.
  • You will need to have an OMS Workspace for the Azure Subscription, and have a Hybrid Worker set up that can communicate with the Azure AD Connect Server. The Hybrid Worker will use a credential asset and variable asset created in the first part.

In the following two parts I will look at these two requirements and how you can set it up to start triggering Azure AD Connect Scheduler with your Azure Automation Runbook.

Part 1 – Set up the Azure Automation Runbook and Assets

To set up the Azure Automation part of the solution, I have created a GitHub Repository  where you can deploy the solution directly from https://github.com/skillriver/Trigger-AzureADSyncScheduler. This repository contains the Azure Resource Manager deployment template and PowerShell script that you need to get started.

You can also click this deploy button directly:


Lets step through what you experience when you click to “Deploy to Azure”. Please make sure that you are logged in to your correct Azure Subscription first.

Deploying with the Template

I will not go through how I created the ARM based JSON templates, but I will quickly show the user experience when doing the deployment.

The custom deployment will ask you for some parameter values:

  • AUTOMATIONACCOUNTNAME. If you specify an existing Automation Account, this will be used, or else a new one will be created with the Free pricing tier.
  • AAHYBRIDWORKERCREDENTIALNAME. There is a default value there, this will be used as a Credential Asset in the PowerShell script. You can change the value, but then you must remember to change it in the script as well.
  • AAHYBRIDWORKERDOMAIN. The NETBIOS Domain Name for where the Azure AD Connect Server belongs to.
  • AAHYBRIDWORKERUSERNAME. This is this the user name for the service account or other user account that has permission to connect to the Azure AD Connect Server and trigger the sync schedule.
  • AAHYBRIDWORKERPASSWORD. The password for the user above.
  • AADSSERVERNAME. The server name of the Azure AD Connect Server.

You will have to select the correct subscription, and either create a new Resource Group, or an existing one (please note that Azure Automation is not available in every region).

image

After saving the parameters, and reviewing and accepting legal terms, you are ready to create the custom deployment.

If everything went OK, you should see a confirmation:

image

You will have an Automation Account:

image

You will have a PowerShell Script Runbook with the name Trigger-AzureADSync:

image

The script can be viewed as shown below. This script is short and simple, it will get the Asset Variable for Azure AD Connect Server name, and get the Credential Asset for the Hybrid Worker Account. It will the create a remote session, and run the delta sync cycle:

image

Lets take a look at the Assets created with the deployment as well, the Variable:

image

The Credential:

image

That’s the whole solution for this first part. If you for any reason could not or would not deploy the template directly, and would prefer to create this manually, you should be fine just following the images above. Just follow these steps:

  1. Create a Azure Automation Account (Free tier, and in your chosen supported Azure Region).
  2. Create a Variable Asset, with the name of the Azure AD Connect Server.
  3. Create a Credential Asset, with the DOMAIN\UserName of the account you will use to remote session to the Azure AD Connect Server.
  4. Create a new PowerShell Script Runbook, typing the CmdLets from above and using your variable assets.

By now you should be ready for the next step, because you cannot run this Automation Runbook just yet. You have to have in place OMS and a Hybrid Worker first, and that will be shown in the next part.

Part 2 –  Set up the Hybrid Worker and Remote session permission

To be able to run Azure Automation Runbooks in your own datacenter, you will need to have an OMS workspace and at least one Hybrid Worker configured that will be able to execute the Runbook locally and connect to the Azure AD Connect Server.

Hybrid Runbook Worker Components

I will not go through the details here on how to set up an OMS workspace and a Hybrid Worker if you don’t have this from before, you can just follow the documentation here https://azure.microsoft.com/en-us/documentation/articles/automation-hybrid-runbook-worker/.

After setting up and registering your Hybrid Worker, you will have a Hybrid Worker Group with at least one Hybrid Worker.

image

Now, running the Runbook with the right security is going to be essential here, after all the Runbook is going to connect to the Azure AD Connect Server and initiate the sync cycle. Lets first check the settings of the Hybrid Worker Group. We can either select a Default Run As account as I have here:

image

Or you can select a Custom Run As, specifying a credential Asset to use for all Runbooks running on this Hybrid Worker Group:

image

In my example here, I will use the Default Run As Account, because I specify my own credentials in the PowerShell Runbook, as shown earlier in Part 1 of this blog post:

image

Next, I will have to create a domain account in my local Active Directory. I have created a service account to be used for Azure Automation Hybrid Workers. This is the same account you specified when creating the credential asset in Part 1 in Azure Automation:

image

This account will need permission to remote PowerShell to the Azure AD Connect Server. In Computer Management and Local Users and Groups on the Azure AD Connect Server, add this service account to the Remote Management Users group:

image

And add the account to the ADSyncOperators group, so that the user has permission to Azure AD Connect operations:

image

That should be it, we are now ready to start the Runbook and verify that it works.

Starting the Runbook

From the Automation Account and the Trigger-AzureADSync Runbook, select Start and under Run Settings select Hybrid Worker and your Hybrid Worker Group:

image

You can verify that the job completed and with no errors:

image

Looking into the Synchronization Service on the Azure AD Connect Server, I can verify that the sync cycle has been running:

image

That concludes this blog article, hope it has been helpful!

Displaying Azure Automation Runbook Stats in OMS via Performance Collection and Operations Manager

Wouldn’t it be great to get some more information about your Azure Automation Runbooks in the Operations Management Suite Portal? That’s a rhetorical question, of course the answer will be yes!

While Azure Automation is a part of the suite of components in OMS, today you only get the following information from the Azure Automation blade:

The blade shows the number of runbooks and jobs from the one Automation Account you have configured. You can only configure one Automation Account at a time, and for getting more details you are directed to the Azure Portal.

I wanted to use my OMS-connected Operations Manager Management Group, and use a PowerShell script rule to get some more statistics for Azure Automation and display that in OMS Log Analytics as Performance Data. I will do this using the “Sample Management Pack – Wizard to Create PowerShell script Collection Rules” described in this blog article http://blogs.msdn.com/b/wei_out_there_with_system_center/archive/2015/09/29/oms-collecting-nrt-performance-data-from-an-opsmgr-powershell-script-collection-rule-created-from-a-wizard.aspx.

I will use the AzureRM PowerShell Module for the PowerShell commands that will connect to my Azure subscription and get the Azure Automation Runbooks data.

Getting Ready

Before I can create the PowerShell script rule for gettting the Azure Automation data, I have to do some preparations first. This includes:

  1. Importing the “Sample Management Pack – Wizard to Create PowerShell script Collection Rules” to my Operations Manager environment.
    1. This can be downloaded from Technet Gallery at https://gallery.technet.microsoft.com/Sample-Management-Pack-e48040f7.
  2. Install the AzureRM PowerShell Module (at the chosen Target server for the PowerShell Script Rule).
    1. I chose to install it from the PowerShell Gallery using the instructions here: https://azure.microsoft.com/en-us/documentation/articles/powershell-install-configure/
    2. If you are running Windows Server 2012 R2, which I am, follow the instructions here to support the PowerShellGet module, https://www.powershellgallery.com/GettingStarted?section=Get%20Started.
  3. Choose Target for where to run the AzureRM commands from
    1. Regarding the AzureRM and where to install, I decided to use the SCOM Root Management Server Emulator. This server will then run the AzureRM commands against my Azure Subscription.
  4. Choose account for Run As Profile
    1. I also needed to think about the run as account the AzureRM commands will run under. As we will see later the PowerShell Script Rules will be set up with a Default Run As Profile.
    2. The Default Run As Profile for the RMS Emulator will be the Management Server Action Account, if I had chosen another Rule Target the Default Run As Profile would be the Local System Account.
    3. Alternatively, I could have created a custom Run As Profile with a user account that have permissions to execute the AzureRM cmdlets and connect to and read the required data from the Azure subscription, and configure the PowerShell Script rules to use that.
    4. I decided to go with the Management Server Action Account, in my case SKILL\scom_msaa. This account will execute the AzureRM PowerShell cmdlets, so I need to make sure that I can login to my Azure subscription using that account.
  5. Next, I started PowerShell ISE with “Run as different user”, specifying my scom_msaa account. I run the commands below, as I wanted to save the password for the user I’m going to connect to the Azure subscription and get the Automation data. I also did a test import-module of the AzureRM modules I will need in the main script.

The commands above are here in full:


# Prepare to save encrypted password

# Verify that logged on as scom_msaa
whoami

# Get the password
$securepassword = Read-Host -AsSecureString -Prompt Enter Azure AD account password:

# Filepath for encrypted password file
$filepath = C:\users\scom_msaa\AppData\encryptedazureadpassword.txt

# Save password encrypted to file
ConvertFrom-SecureString -SecureString $securepassword | Out-File -FilePath $filepath

Import-Module C:\Program Files\WindowsPowerShell\Modules\AzureRM
Import-Module C:\Program Files\WindowsPowerShell\Modules\AzureRM.Profile
Import-Module C:\Program Files\WindowsPowerShell\Modules\AzureRM.Automation

At this point I’m ready for the next step, which is to create some PowerShell commands for the Script Rule in SCOM.

Creating the PowerShell Command Script for getting Azure Automation data

First I needed to think about what kind of Azure Automation and Runbook data I wanted to get from my Azure Subscription. I decided to get the following values:

  • Job Count Last Day
  • Job Count Last Month
  • Job Count This Month
  • Job Minutes This Month
  • Runbooks in New State
  • Runbooks in Published State
  • Runbooks in Edit State
  • PowerShell Workflow Runbooks
  • Graphical Runbooks
  • PowerShell Script Runbooks

I wanted to have the statistics for Runbooks Jobs to see the activity of the Runbooks. As I’m running the Free plan of Azure Automation, I’m restricted to 500 minutes a month, so it makes sense to count the accumulated job minutes for the month as well.

In addition to this I want some statistics for the number of Runbooks in the environment, separated on New, Published and Edit Runbooks, and the Runbook type separated on Workflow, Graphical and PowerShell Script.

The PowerShell Script Rule for getting these data will be using the AzureRM PowerShell Module, and specifically the cmdlets in AzureRM.Profile and AzureRM.Automation:

To log in and authenticate to Azure, I will use the encrypted password saved earlier, and create a Credential object for the login:

Initializing the script with date filters and setting default values for variables. I decided to create the script so that I can get data from all the Resource Groups I have Automation Accounts in. This way, If I have multiple Automation Accounts, I can get statistics combined for each of them:

Then, looping through each Resource Group, running the different commands to get the variable data. Since I potentially will loop through multiple Resource Groups and Automation Accounts, the variables will be using += to add to the previous loop value:

After setting each variable and exiting the loop, the $PropertyBag can be filled with the values for the different counters:

The complete script is shown below for how to get those Azure Automation data via SCOM and PowerShell Script Rule to to OMS:


# Debug file
$debuglog = $env:TEMP+\powershell_perf_collect_AA_stats_debug.log

Date | Out-File $debuglog

Who Am I: | Out-File $debuglog -Append
whoami |
Out-File $debuglog -Append

$ErrorActionPreference = Stop

Try {

If (!(Get-Module –Name AzureRM)) { Import-Module C:\Program Files\WindowsPowerShell\Modules\AzureRM }
If (!(Get-Module –Name AzureRM.Profile)) { Import-Module C:\Program Files\WindowsPowerShell\Modules\AzureRM.Profile }
If (!(Get-Module –Name AzureRM.Automation)) { Import-Module C:\Program Files\WindowsPowerShell\Modules\AzureRM.Automation }

# Get Cred for ARM
$filepath = C:\users\scom_msaa\AppData\encryptedazureadpassword.txt
$userName = myAzureADAdminAccount
$securePassword = ConvertTo-SecureString (Get-Content -Path $FilePath)
$cred = New-Object -TypeName System.Management.Automation.PSCredential ($username, $securePassword)

# Log in and sett active subscription
Login-AzureRmAccount -Credential $cred

$subscriptionid = mysubscriptionID

Set-AzureRmContext -SubscriptionId $subscriptionid

$API = new-object -comObject MOM.ScriptAPI

$aftertime = $(Get-Date).AddHours(1)
$afterdate_lastday = $(Get-Date).AddDays(1)
$afterdate_lastmonth = $(Get-Date).AddDays(30)
$afterdate_thismonth = $(Get-Date).AddDays(($(Get-Date).Day)+1)

$AutomationRGs = @(MyResourceGroupName1,MyResourceGroupName2)

$PropertyBags=@()

$newrunbooks = 0
$publishedrunbooks = 0
$editrunbooks = 0
$scriptrunbooks = 0
$graphrunbooks = 0
$powershellrunbooks = 0
$jobcountlastday = 0
$jobcountlastmonth = 0
$jobcountthismonth = 0
$jobminutesthismonth = 0

ForEach ($AutomationRG in $AutomationRGs) {

$rmautomationacct = Get-AzureRmAutomationAccount -ResourceGroupName $AutomationRG

$newrunbooks += (Get-AzureRmAutomationRunbook -AutomationAccountName $rmautomationacct.AutomationAccountName -ResourceGroupName $AutomationRG `
|
Where {$_.State -eq New}).Count

$publishedrunbooks += (Get-AzureRmAutomationRunbook -AutomationAccountName $rmautomationacct.AutomationAccountName -ResourceGroupName $AutomationRG `
|
Where {$_.State -eq Published}).Count

$editrunbooks += (Get-AzureRmAutomationRunbook -AutomationAccountName $rmautomationacct.AutomationAccountName -ResourceGroupName $AutomationRG `
|
Where {$_.State -eq Edit}).Count

$scriptrunbooks += (Get-AzureRmAutomationRunbook -AutomationAccountName $rmautomationacct.AutomationAccountName -ResourceGroupName $AutomationRG `
|
Where {$_.RunbookType -eq Script}).Count

$graphrunbooks += (Get-AzureRmAutomationRunbook -AutomationAccountName $rmautomationacct.AutomationAccountName -ResourceGroupName $AutomationRG `
|
Where {$_.RunbookType -eq Graph}).Count

$powershellrunbooks += (Get-AzureRmAutomationRunbook -AutomationAccountName $rmautomationacct.AutomationAccountName -ResourceGroupName $AutomationRG `
|
Where {$_.RunbookType -eq PowerShell}).Count

$jobcountlastday += (Get-AzureRmAutomationJob -AutomationAccountName $rmautomationacct.AutomationAccountName -ResourceGroupName $AutomationRG `
-StartTime
$afterdate_lastday).Count

$jobcountlastmonth += (Get-AzureRmAutomationJob -AutomationAccountName $rmautomationacct.AutomationAccountName -ResourceGroupName $AutomationRG `
-StartTime
$afterdate_lastmonth).Count

$jobcountthismonth += (Get-AzureRmAutomationJob -AutomationAccountName $rmautomationacct.AutomationAccountName -ResourceGroupName $AutomationRG `
-StartTime
$afterdate_thismonth.ToLongDateString()).Count

$jobsthismonth = Get-AzureRmAutomationJob -AutomationAccountName $rmautomationacct.AutomationAccountName -ResourceGroupName $AutomationRG `
-StartTime
$afterdate_thismonth.ToLongDateString() | Select-Object RunbookName, StartTime, EndTime, CreationTime, LastModifiedTime, @{Name=RunningTime;Expression={[TimeSpan]::Parse($_.EndTime $_.StartTime).TotalMinutes}}, @{Name=Month;Expression={($_.EndTime).Month}}

$jobminutesthismonth += [int][Math]::Ceiling(($jobsthismonth | Measure-Object -Property RunningTime -Sum).Sum)

}

$PropertyBag = $API.CreatePropertyBag()
$PropertyBag.AddValue(Instance, Job Count Last Day)
$PropertyBag.AddValue(Value, [UInt32]$jobcountlastday)
$PropertyBags += $PropertyBag

Job Count Last Day: | Out-File $debuglog -Append
$jobcountlastday | Out-File $debuglog -Append

$PropertyBag = $API.CreatePropertyBag()
$PropertyBag.AddValue(Instance, Job Count Last Month)
$PropertyBag.AddValue(Value, [UInt32]$jobcountlastmonth)
$PropertyBags += $PropertyBag

Job Count Last Month: | Out-File $debuglog -Append
$jobcountlastmonth | Out-File $debuglog -Append

$PropertyBag = $API.CreatePropertyBag()
$PropertyBag.AddValue(Instance, Job Count This Month)
$PropertyBag.AddValue(Value, [UInt32]$jobcountthismonth)
$PropertyBags += $PropertyBag

Job Count This Month: | Out-File $debuglog -Append
$jobcountthismonth | Out-File $debuglog -Append

$PropertyBag = $API.CreatePropertyBag()
$PropertyBag.AddValue(Instance, Job Minutes This Month)
$PropertyBag.AddValue(Value, [UInt32]$jobminutesthismonth)
$PropertyBags += $PropertyBag

Job Minutes This Month: | Out-File $debuglog -Append
$jobminutesthismonth | Out-File $debuglog -Append

$PropertyBag = $API.CreatePropertyBag()
$PropertyBag.AddValue(Instance, Runbooks in New State)
$PropertyBag.AddValue(Value, [UInt32]$newrunbooks)
$PropertyBags += $PropertyBag

Runbooks in New State: | Out-File $debuglog -Append
$newrunbooks | Out-File $debuglog -Append

$PropertyBag = $API.CreatePropertyBag()
$PropertyBag.AddValue(Instance, Runbooks in Published State)
$PropertyBag.AddValue(Value, [UInt32]$publishedrunbooks)
$PropertyBags += $PropertyBag

Runbooks in Published State: | Out-File $debuglog -Append
$publishedrunbooks | Out-File $debuglog -Append

$PropertyBag = $API.CreatePropertyBag()
$PropertyBag.AddValue(Instance, Runbooks in Edit State)
$PropertyBag.AddValue(Value, [UInt32]$editrunbooks)
$PropertyBags += $PropertyBag

Runbooks in Edit State: | Out-File $debuglog -Append
$editrunbooks | Out-File $debuglog -Append

$PropertyBag = $API.CreatePropertyBag()
$PropertyBag.AddValue(Instance, PowerShell Workflow Runbooks)
$PropertyBag.AddValue(Value, [UInt32]$scriptrunbooks)
$PropertyBags += $PropertyBag

PowerShell Workflow Runbooks: | Out-File $debuglog -Append
$scriptrunbooks | Out-File $debuglog -Append

$PropertyBag = $API.CreatePropertyBag()
$PropertyBag.AddValue(Instance, Graphical Runbooks)
$PropertyBag.AddValue(Value, [UInt32]$graphrunbooks)
$PropertyBags += $PropertyBag

Graphical Runbooks: | Out-File $debuglog -Append
$graphrunbooks | Out-File $debuglog -Append

$PropertyBag = $API.CreatePropertyBag()
$PropertyBag.AddValue(Instance, PowerShell Script Runbooks)
$PropertyBag.AddValue(Value, [UInt32]$powershellrunbooks)
$PropertyBags += $PropertyBag

PowerShell Script Runbooks: | Out-File $debuglog -Append
$powershellrunbooks | Out-File $debuglog -Append

$PropertyBags

} Catch {

Error Catched: | Out-File $debuglog -Append
$(
$_.Exception.GetType().FullName) | Out-File $debuglog -Append
$(
$_.Exception.Message) | Out-File $debuglog -Append

}

PS! I have included debugging and logging in the script, be aware though that doing $ErrorActionPreference=Stop will end the script if any errors, for example with logging, so it might be an idea to remove the debug logging when confirmed that everything works.

In the next part I’m ready to create the PowerShell Script Rule.

Creating the PowerShell Script Rule

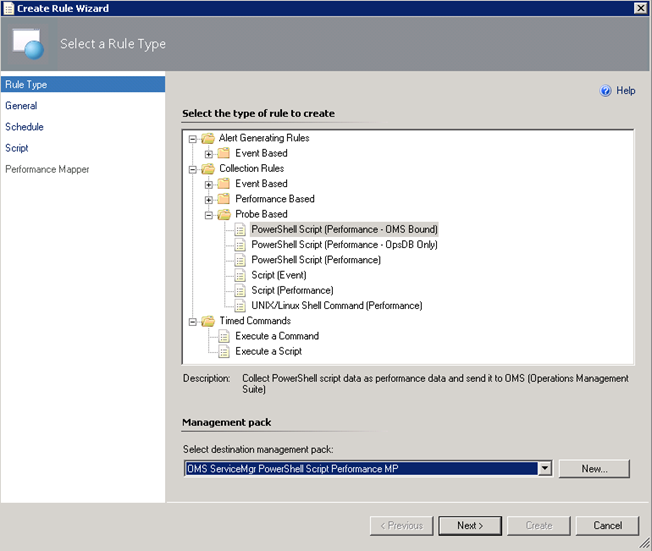
In the Operations Console, under Authoring, create a new PowerShell Script Rule as shown below:

  1. Select the PowerShell Script (Performance – OMS Bound) Rule:I have created a custom destination management pack for this script.
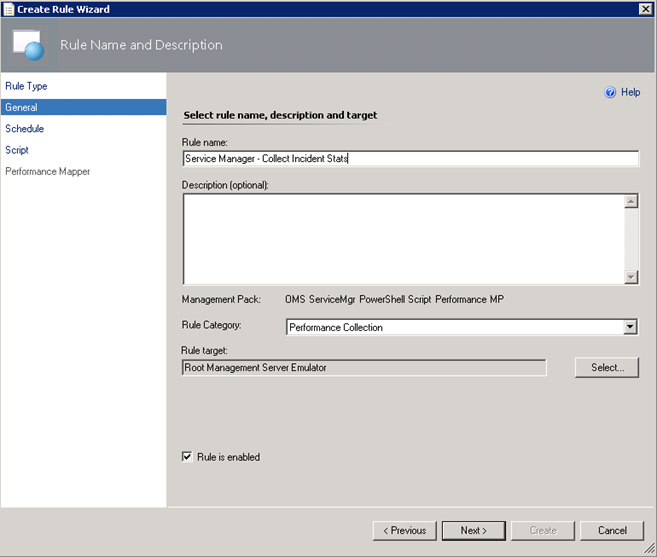
  2. Specifying a Rule name and Rule Category: Performance Collection. As mentioned earlier in this article the Rule target will be the Root Management Server Emulator:
  3. Selecting to run the script every 30 minutes, and at which time the interval will start from:
  4. Selecting a name for the script file and timeout, and entering the complete script as shown earlier:
  5. For the Performance Mapping information, the Object name must be in the \\FQDN\YourObjectName format. For FQDN I used the Target variable for PrincipalName, and for the Object Name AzureAutomationRunbookStats, and adding the “\\” at the start and “\” between: \\$Target/Host/Property[Type=”MicrosoftWindowsLibrary7585010!Microsoft.Windows.Computer”]/PrincipalName$\AzureAutomationRunbookStatsI specified the Counter name as “Azure Automation Runbook Stats”, and the Instance and Value are specified as $Data/Property(@Name=’Instance’)$ and $Data/Property(@Name=Value)$. These reflect the PropertyBag instance and value created in the PowerShell script:
  6. After finishing the Create Rule Wizard, two new rules are created, which you can find by scoping to the Root Management Server Emulator I chose as target. Both Rules must be enabled, as they are not enabled by default:

At this point we are finished configuring the SCOM side, and can wait for some hours to see that data are actually coming into my OMS workspace.

Looking at Azure Automation Runbook Stats Performance Data in OMS

After a while I will start seeing Performance Data coming into OMS with the specified Object and Counter Name, and for the different instances and values.

In Log Search, I can specify Type=Perf ObjectName=AzureAutomationRunbookStats, and I will find the Results and Metrics for the specified time frame.

In the example above I’m highlighting the Job Minutes This Month counter, which will steadily increase for each month, and as we can see the highest value was 107 minutes, after when the month changed to March we were back at 0 minutes. After a while when the number of job minutes increases it will be interesting to follow whether this counter will go close to 500 minutes.

This way, I can now look at Azure Automation Runbook stats as performance data, showing different scenarios like how many jobs and runbook job minutes there are over a time period. I can also look at how what type of runbooks I have and what state they are in.

I can also create saved searches and alerts for my search criteria.

Creating OMS Alerts for Azure Automation Runbook Counters

There is one specific scenario for Alerts I’m interested in, and that is when I’m approaching my monthly limit on 500 job minutes.

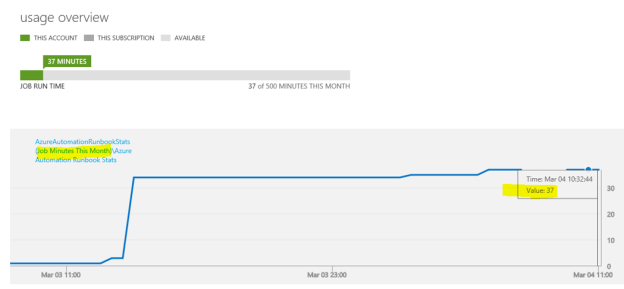
“Job Minutes This Month” is a counter that will get the sum of all job minutes for all runbook jobs across all automation accounts. In the classic Azure portal, you will have a usage overview like this:

With OMS I would get this information over a time period like this:

The search query for Job Minutes This Month as I have defined it via the PowerShell Script Rule in OMS is:

Type=Perf ObjectName=AzureAutomationRunbookStats InstanceName=”Job Minutes This Month”

This would give me all results for the defined time period, but to generate an alert I would want to look at the most recent results, for example for the last hour. In addition, I want to filter the results for my alert when the number of job minutes are over the threshold of 450 which means I’m getting close to the limit of 500 free minutes per month. My query for this would be:

Type=Perf ObjectName=AzureAutomationRunbookStats InstanceName=”Job Minutes This Month” AND TimeGenerated>NOW-1HOUR AND CounterValue > 450

Now, in my test environment, this will give med 0 results, because I’m currently at 37 minutes:

Let’s say, for sake of testing an Alert, I add criteria to include 37 minutes as well, like this:

This time I have 2 results. Let’s create an alert for this, press the ALERT button:

For the alert I give it a name and base it on the search query. I want to check every 60 minutes, and generate alert when the number of results is greater than 1 so that I make sure the passing of the threshold is consistent and not just temporary.

For actions I want an email notification, so I type in a Subject and my recipients.

I Save the alert rule, and verify that it was successfully created.

Soon I get my first alert on email:

Now, that it works, I can remove the Alert and create a new one without the OR CounterValue=37, this I leave to you 😉

With that, this blog post is concluded. Thanks for reading, I hope this post on how to get more insights on your Azure Automation Runbook Stats in OMS and getting data via NRT Perfomance Collection has been useful 😉

Collecting Service Manager Incident Stats in OMS via PowerShell Script Performance Collection in Operations Manager

I have been thinking about bringing in some key Service Manager statistics to Microsoft Operations Management Suite. The best way to do that now is to use the NRT Performance Data Collection in OMS and PowerShell Script rule in my Operations Manager Management Group that I have connected to OMS. The key solution to make this happen are the “Sample Management Pack – Wizard to Create PowerShell script Collection Rules” described in this blog article http://blogs.msdn.com/b/wei_out_there_with_system_center/archive/2015/09/29/oms-collecting-nrt-performance-data-from-an-opsmgr-powershell-script-collection-rule-created-from-a-wizard.aspx.

With this solution I can practically get any data I want into OMS via SCOM and PowerShell Script, so I will start my solution for bringing in Service Manager Stats by defining some PowerShell commands to get the values I want. For that I will use the SMLets PowerShell Module for Service Manager.

For this blog article, I will focus on Incident Stats from SCSM. In a later article I will get in some more SCSM data to OMS.

Getting Ready

I have to do some preparations first. This includes:

  1. Importing the “Sample Management Pack – Wizard to Create PowerShell script Collection Rules”
    1. This can be downloaded from Technet Gallery at https://gallery.technet.microsoft.com/Sample-Management-Pack-e48040f7
  2. Install the SMLets for SCSM PowerShell Module (at the chosen Target server for the PowerShell Script Rule).
    1. I chose to install it from the PowerShell Gallery at https://www.powershellgallery.com/packages/SMLets
    2. If you are running Windows Server 2012 R2, which I am, follow the instructions here to support the PowerShellGet module, https://www.powershellgallery.com/GettingStarted?section=Get%20Started.
  3. Choose Target for where to run the SCSM commands from
    1. Regarding the SMLets and where to install, I decided to use the SCOM Root Management Server Emulator. This server will then run the SCSM commands against the Service Manager Management Server.
  4. Choose account for Run As Profile
    1. I also needed to think about the run as account the SCSM commands will run under. As we will see later the PowerShell Script Rules will be set up with a Default Run As Profile.
    2. The Default Run As Profile for the RMS Emulator will be the Management Server Action Account, if I had chosen another Rule Target the Default Run As Profile would be the Local System Account.
    3. Alternatively, I could have created a custom Run As Profile with a SCSM user account that have permissions to read the required data from SCSM, and configured the PowerShell Script rules to use that.
    4. I decided to go with the Management Server Action Account, and make sure that this account is mapped to a Role in SCSM with access to the work items I want to query against, any Operator Role will do but you could chose to scope and restrict more if needed:

At this point I’m ready for the next step, which is to create some PowerShell commands for the Script Rule in SCOM.

Creating the PowerShell Command Script for getting SCSM data

First I needed to think about what kind of Incident data I wanted to get from SCSM. I decided to get the following values:

  • Active Incidents
  • Pending Incidents
  • Resolved Incidents
  • Closed Incidents
  • Incidents Opened Last Day
  • Incidents Opened Last Hour

These values will be retrieved by the Get-SCSMIncident cmdlet in SMLets, using different criteria. The complete script is shown below:

# Debug file
$debuglog = $env:TEMP+\powershell_perf_collect_debug.log

Date | Out-File $debuglog

Who Am I: | Out-File $debuglog -Append
whoami |
Out-File $debuglog -Append

$ErrorActionPreference = Stop

Try {

Import-Module C:\Program Files\WindowsPowerShell\Modules\SMLets

$API = new-object -comObject MOM.ScriptAPI

$scsmserver = MY-SCSM-MANAGEMENTSERVER-HERE

$beforetime = $(Get-Date).AddHours(1)
$beforedate = $(Get-Date).AddDays(1)

$PropertyBags=@()

$activeincidents = 0
$activeincidents = @(Get-SCSMIncident -ComputerName $scsmserver -Status Active).Count
$PropertyBag = $API.CreatePropertyBag()
$PropertyBag.AddValue(Instance, Active Incidents)
$PropertyBag.AddValue(Value, [UInt32]$activeincidents)
$PropertyBags += $PropertyBag

Active Incidents: | Out-File $debuglog -Append
$activeincidents | Out-File $debuglog -Append

$pendingincidents = 0
$pendingincidents = @(Get-SCSMIncident -ComputerName $scsmserver -Status Pending).Count
$PropertyBag = $API.CreatePropertyBag()
$PropertyBag.AddValue(Instance, Pending Incidents)
$PropertyBag.AddValue(Value, [UInt32]$pendingincidents)
$PropertyBags += $PropertyBag

Pending Incidents: | Out-File $debuglog -Append
$pendingincidents | Out-File $debuglog -Append

$resolvedincidents = 0
$resolvedincidents = @(Get-SCSMIncident -ComputerName $scsmserver -Status Resolved).Count
$PropertyBag = $API.CreatePropertyBag()
$PropertyBag.AddValue(Instance, Resolved Incidents)
$PropertyBag.AddValue(Value, [UInt32]$resolvedincidents)
$PropertyBags += $PropertyBag

Resolved Incidents: | Out-File $debuglog -Append
$resolvedincidents | Out-File $debuglog -Append

$closedincidents = 0
$closedincidents = @(Get-SCSMIncident -ComputerName $scsmserver -Status Closed).Count
$PropertyBag = $API.CreatePropertyBag()
$PropertyBag.AddValue(Instance, Closed Incidents)
$PropertyBag.AddValue(Value, [UInt32]$closedincidents)
$PropertyBags += $PropertyBag

Closed Incidents: | Out-File $debuglog -Append
$closedincidents | Out-File $debuglog -Append

$incidentsopenedlasthour = 0
$incidentsopenedlasthour = @(Get-SCSMIncident -CreatedAfter $beforetime -ComputerName $scsmserver).Count
$PropertyBag = $API.CreatePropertyBag()
$PropertyBag.AddValue(Instance, Incidents Opened Last Hour)
$PropertyBag.AddValue(Value, [UInt32]$incidentsopenedlasthour)
$PropertyBags += $PropertyBag

Incidents Opened Last Hour: | Out-File $debuglog -Append
$incidentsopenedlasthour | Out-File $debuglog -Append

$incidentsopenedlastday = 0
$incidentsopenedlastday = @(Get-SCSMIncident -CreatedAfter $beforedate -ComputerName $scsmserver).Count
$PropertyBag = $API.CreatePropertyBag()
$PropertyBag.AddValue(Instance, Incidents Opened Last Day)
$PropertyBag.AddValue(Value, [UInt32]$incidentsopenedlastday)
$PropertyBags += $PropertyBag

Incidents Opened Last Day: | Out-File $debuglog -Append
$incidentsopenedlastday | Out-File $debuglog -Append

$PropertyBags

} Catch {

Error Catched: | Out-File $debuglog -Append
$(
$_.Exception.GetType().FullName) | Out-File $debuglog -Append
$(
$_.Exception.Message) | Out-File $debuglog -Append

}

Some comments about the script. I usually like to include some debug logging in the script when I develop the solution. This way I can keep track of what happens underway in the script or get some exceptions if the script command fails. Be aware though that doing $ErrorActionPreference=Stop will end the script if any errors, so it might be an idea to remove the debug logging when confirmed that everything works.

In the next part I’m ready to create the PowerShell Script Rule.

Creating the PowerShell Script Rule

In the Operations Console, under Authoring, create a new PowerShell Script Rule as shown below:

  1. Select the PowerShell Script (Performance – OMS Bound) Rule:I have created a custom destination management pack for this script.
  2. Specifying a Rule name and Rule Category: Performance Collection. As mentioned earlier in this article the Rule target will be the Root Management Server Emulator:
  3. Selecting to run the script every 30 minutes, and at which time the interval will start from:
  4. Selecting a name for the script file and timeout, and entering the complete script as shown earlier:
  5. For the Performance Mapping information, the Object name must be in the \\FQDN\YourObjectName format. For FQDN I used the Target variable for PrincipalName, and for the Object Name ServiceManagerIncidentStats, and adding the “\\” at the start and “\” between: \\$Target/Host/Property[Type=”MicrosoftWindowsLibrary7585010!Microsoft.Windows.Computer”]/PrincipalName$\ServiceMgrIncidentStats I specified the Counter name as “Service Manager Incident Stats”, and the Instance and Value are specified as $Data/Property(@Name=’Instance’)$ and $Data/Property(@Name=Value)$. These reflect the PropertyBag instance and value created in the PowerShell script:
  6. After finishing the Create Rule Wizard, two new rules are created, which you can find by scoping to the Root Management Server Emulator I chose as target. Both Rules must be enabled, as they are not enabled by default:
  7. Looking into the Properties of the rules, we can make edits to the PowerShell script, and verify that the Run as profile is the Default. This is where I would change the profile if I wanted to create my own custom profile and run as account for it.

At this point we are finished configuring the SCOM side, and can wait for some hours to see that data are actually coming into my OMS workspace.

Looking at Service Manager Performance Data in OMS

After a while I will start seeing Performance Data coming into OMS with the specified Object and Counter Name, and for the different instances and values.

In Log Search, I can specify Type=Perf ObjectName=ServiceMgrIncidentStats, and I will find the Results and Metrics for the specified time frame.

I can now look at Service Manager stats as performance data, showing different scenarios like how many active, pending, resolved and closed incidents there are over a time period. I can also look at how many incidents are created by each hour or by each day.

Finally, I can also create saved searches and alerts that creates for example alerts when the number of incidents for any counters are over a set value.

Thanks for reading, and look for more blog posts on OMS and getting SCSM data via NRT Perfomance Collection in the future 😉