In this blog post I will show how you can trigger the Azure AD Connect Sync Scheduler with an Azure Automation Runbook PowerShell Script. Since the Azure AD Connect build 1.1.105.0 was released February 2016, a new scheduler is built-in that per default sync every 30 minutes (previously 3 hours). For more detail on Azure AD Connect Sync Scheduler, see https://azure.microsoft.com/en-us/documentation/articles/active-directory-aadconnectsync-feature-scheduler/.
Normally a sync schedule of 30 minutes is sufficient for most use, but sometimes you will need to do an immediate sync. So I thought it was a good idea to create a PowerShell script that creates a remote session to the Azure AD Connect Server, and then triggers a delta sync.
Now, this PowerShell script can of course be used with any of your favorite automation solutions, for example Orchestrator or SMA on-premises. But why not just use Azure Automation and a Hybrid Worker to run this script. This way you can trigger the script in a number of ways including in the Azure Portal, via Webhooks, remediating alerts in OMS and more.
Requirements
Lets first take a look at the requirements for this solution:
- You will have to have an Azure Subscription, so that an Azure Automation Account can be created (or use your existing account), and that a runbook script with the related assets can be created.
- You will need to have an OMS Workspace for the Azure Subscription, and have a Hybrid Worker set up that can communicate with the Azure AD Connect Server. The Hybrid Worker will use a credential asset and variable asset created in the first part.
In the following two parts I will look at these two requirements and how you can set it up to start triggering Azure AD Connect Scheduler with your Azure Automation Runbook.
Part 1 – Set up the Azure Automation Runbook and Assets
To set up the Azure Automation part of the solution, I have created a GitHub Repository where you can deploy the solution directly from https://github.com/skillriver/Trigger-AzureADSyncScheduler. This repository contains the Azure Resource Manager deployment template and PowerShell script that you need to get started.
You can also click this deploy button directly:

Lets step through what you experience when you click to “Deploy to Azure”. Please make sure that you are logged in to your correct Azure Subscription first.
Deploying with the Template
I will not go through how I created the ARM based JSON templates, but I will quickly show the user experience when doing the deployment.
The custom deployment will ask you for some parameter values:
- AUTOMATIONACCOUNTNAME. If you specify an existing Automation Account, this will be used, or else a new one will be created with the Free pricing tier.
- AAHYBRIDWORKERCREDENTIALNAME. There is a default value there, this will be used as a Credential Asset in the PowerShell script. You can change the value, but then you must remember to change it in the script as well.
- AAHYBRIDWORKERDOMAIN. The NETBIOS Domain Name for where the Azure AD Connect Server belongs to.
- AAHYBRIDWORKERUSERNAME. This is this the user name for the service account or other user account that has permission to connect to the Azure AD Connect Server and trigger the sync schedule.
- AAHYBRIDWORKERPASSWORD. The password for the user above.
- AADSSERVERNAME. The server name of the Azure AD Connect Server.
You will have to select the correct subscription, and either create a new Resource Group, or an existing one (please note that Azure Automation is not available in every region).

After saving the parameters, and reviewing and accepting legal terms, you are ready to create the custom deployment.
If everything went OK, you should see a confirmation:

You will have an Automation Account:

You will have a PowerShell Script Runbook with the name Trigger-AzureADSync:

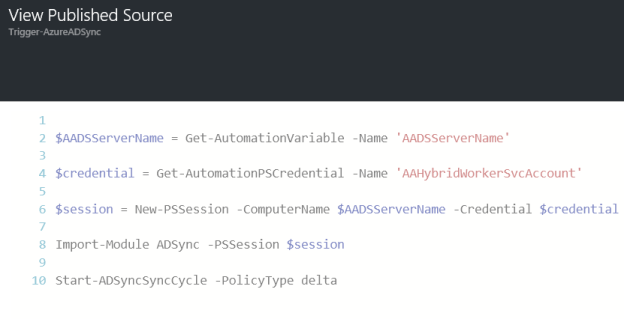
The script can be viewed as shown below. This script is short and simple, it will get the Asset Variable for Azure AD Connect Server name, and get the Credential Asset for the Hybrid Worker Account. It will the create a remote session, and run the delta sync cycle:

Lets take a look at the Assets created with the deployment as well, the Variable:

The Credential:

That’s the whole solution for this first part. If you for any reason could not or would not deploy the template directly, and would prefer to create this manually, you should be fine just following the images above. Just follow these steps:
- Create a Azure Automation Account (Free tier, and in your chosen supported Azure Region).
- Create a Variable Asset, with the name of the Azure AD Connect Server.
- Create a Credential Asset, with the DOMAIN\UserName of the account you will use to remote session to the Azure AD Connect Server.
- Create a new PowerShell Script Runbook, typing the CmdLets from above and using your variable assets.
By now you should be ready for the next step, because you cannot run this Automation Runbook just yet. You have to have in place OMS and a Hybrid Worker first, and that will be shown in the next part.
Part 2 – Set up the Hybrid Worker and Remote session permission
To be able to run Azure Automation Runbooks in your own datacenter, you will need to have an OMS workspace and at least one Hybrid Worker configured that will be able to execute the Runbook locally and connect to the Azure AD Connect Server.

I will not go through the details here on how to set up an OMS workspace and a Hybrid Worker if you don’t have this from before, you can just follow the documentation here https://azure.microsoft.com/en-us/documentation/articles/automation-hybrid-runbook-worker/.
After setting up and registering your Hybrid Worker, you will have a Hybrid Worker Group with at least one Hybrid Worker.

Now, running the Runbook with the right security is going to be essential here, after all the Runbook is going to connect to the Azure AD Connect Server and initiate the sync cycle. Lets first check the settings of the Hybrid Worker Group. We can either select a Default Run As account as I have here:

Or you can select a Custom Run As, specifying a credential Asset to use for all Runbooks running on this Hybrid Worker Group:

In my example here, I will use the Default Run As Account, because I specify my own credentials in the PowerShell Runbook, as shown earlier in Part 1 of this blog post:

Next, I will have to create a domain account in my local Active Directory. I have created a service account to be used for Azure Automation Hybrid Workers. This is the same account you specified when creating the credential asset in Part 1 in Azure Automation:

This account will need permission to remote PowerShell to the Azure AD Connect Server. In Computer Management and Local Users and Groups on the Azure AD Connect Server, add this service account to the Remote Management Users group:

And add the account to the ADSyncOperators group, so that the user has permission to Azure AD Connect operations:

That should be it, we are now ready to start the Runbook and verify that it works.
Starting the Runbook
From the Automation Account and the Trigger-AzureADSync Runbook, select Start and under Run Settings select Hybrid Worker and your Hybrid Worker Group:

You can verify that the job completed and with no errors:

Looking into the Synchronization Service on the Azure AD Connect Server, I can verify that the sync cycle has been running:

That concludes this blog article, hope it has been helpful!
