A Blog about Enterprise Mobility + Security, Azure AD, Datacenter Management, Service Delivery, Automation, Monitoring, Cloud OS, Azure and anything worthwhile sharing with the Cloud and Datacenter community.
I’m excited to to be travelling to Bonn, Germany, and to speak at the upcoming Cloud Identity Summit 2022, which will be held September 22nd at adesso SE, close to the city of Bonn.
This is my second time speaking at the Cloud Identity Summit, the first time was in 2020 and that was a virtual online conference only, as the Covid pandemic and its effects were felt all over the world. So I’m really looking forward to travel there and be there in-person this time around.
This is the 3rd time the Cloud Identity Summit is held, starting in 2020 it was originally planned as a on-site conference, but had to move to virtual. And again in 2021 it was an virtual conference, featuring 10 sessions over 2 tracks covering Cloud Identity and Security, with 250 participants from all over the world.
Some of the highlights of Cloud Identity Summit 2022:
Hybrid event and free of charge.
Morning workshops for in-person attendance in Bonn only, covering “Hands on with decentralised identifiers and verifiable credentials”, with Stefan van der Wiele and “Azure AD Security Testing with AADInternals” with Nestori Syynimaa. A tough choice to make there for sure!
The afternoon sessions, 8 sessions over 2 tracks (Identity Management and Identity Security), and the subsequent roundtable with all experts will be available both on-site in Bonn and online.
.. and as always at Communicty Conference, the ability to connect, ask, share and be with fellow members in the many communities around Microsoft solutions.
I will speak in the Identity Management track, about Azure AD Authentication Fundamentals . Modern authentication in Azure AD can be used in a variety of forms, from human identities to non-human identities like devices, and workload identities like applications and managed identities. While supporting industry standards for AuthN and AuthZ like OIDC and OAuth2, as an Azure AD admin, IT ops or Developer, you have to know what to use when. This session aim to give you that fundamental knowledge!
Sales for the in-person attendance is now ended, as the event is fully booked! You can still register a free ticket for the virtual attendance though, see this link:
I really look forwarding to visiting Bonn and Germany, and joining up with the Community at the Cloud Identity Summit 2022! Hope to see you there, please say hi!
I’m excited to to be travelling to Glasgow, Scotland, and to speak at the Scottish Summit 2022, which will be held June 10th and 11th at Strathclyde University TIC, Glasgow.
This is the first time I travel to Scotland and Glasgow, and to present in-person at the Scottish Summit, altthough I last year presented a session at the Virtual Scottish Summit 2021.
This is the 4th time the Scottish Summit is held, starting in 2019 as a way to showcase Microsoft Dynamics 365 in Scotland. The first event gathered 370 Dynamics professionals to Glasgow to watch 38 sessions. In 2020 the full Microsoft Cloud Community was invited to showcase all the Microsoft Cloud stack and over 1,100 people attended. Fast Forward to 2021 and world events allow the event to go Global to over 3,400 attendees who took in 365 sessions.
Some of the highlights of Scottish Summit 2022:
2 full days of conference content with 180+ sessions!
Opening Keynote from Connell McGinley on Disability Awareness & Inclusivity, sharing his experiences as a deaf person in IT, and a Closing Keynote with Dona Sarkar talking about Mental Health in I.T.
Sessions presented in 12 simultaneous tracks covering the complete Microsoft Technology stack including for Security, Microsoft 365, Dynamics 365, Azure, Power Platform, Modern Workplace, and much more for both Developers, IT Pros and Soft Skills.
Saturday Pub Quiz!
.. and as always at Communicty Conference, the ability to connect, ask, share and be with fellow members in the many communities around Microsoft solutions.
I will speak about why and how you can use Passwordless Azure ServerlessAuthentication using Managed Identities in Azure AD. Do you use Azure Services and Serverless solutions that need to authenticate to other resources and APIs? Have you been using App Registrations and Service Principals to achieve this? Have you felt the pain of managing secret credentials, who has access to the credentials and lifecycle management of these and want at better way to achieve Azure Authentication? This is where Managed Identities is the way to go.
I really look forwarding to visiting Glasgow and Scotland, and joining up with the Community at the Scottish Summit 2022! Hope to see you there, please say hi!
I’m very happy and excited to once again speak at NIC (Nordic Infrastructure Conference), which will be held May 31 – June 2, Oslo Spektrum, Norway. Previously held in a winterly Oslo in February, and last time held just before the Corona outbreak in 2020, attendants and speakers should this time experience a beautiful Oslo spring surrounding the event.
NIC is celebrating 10 years anniversery this time, and this in-person event gathers over 1000+ attendees, international and well-known speakers, in addition to partners, vendors and a great exhibition area, it is truly the place to be for IT professionals and decision makers that want to see and experience the latest and greatest content!
Some of the highligths of NIC X:
Pre-Conference where you can choose to learn from one the best in the industry: Sami Laiho, Paula Januszkiewicz, or John Craddock!
2 full days of conference content including Opening Keynote from Chen Goldberg (VP Google Cloud) and Closing Keynote from Ulrich Hoffman (Corporate VP Microsoft), and 65+ Breakout sessions, all honoring the conference motto: Less slides – more demos!
Session tracks for Security, Data, AI & ML, Architecture & Code, Server & Client, Operations & Automation, and Cloud!
.. and as always at NIC, the best food and mingling with fellow members of the industry.
Myself I will present two breakout sessions during the main conference, focusing on Security with Azure AD and Microsoft Cloud Solutions:
In my first session on the first day I will speak about How to Create an Azure AD Protected API in Azure in one hour!, where I will show you how you can create your own API in Azure and protect it with Azure AD using Oauth2. API’s can be anything you want, and in true NIC spirit this session will really will be most about the demos and very little slides!
In my second session the last day, I will speak about why and how you can use Azure Authentication using Managed Identities vs. Service Principals in Azure AD. Do you use Azure Services that need to authenticate to other resources and APIs? Have you been using App Registrations and Service Principals to achieve this? Have you felt the pain of managing secret credentials, who has access to the credentials and lifecycle management of these and want at better way to achieve Azure Authentication? This is where Managed Identities is the way to go.
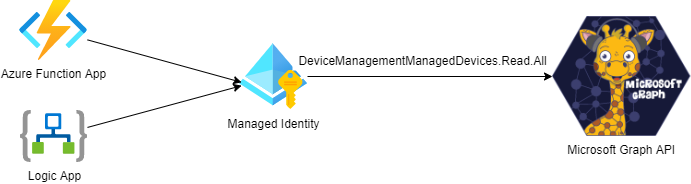
I use Managed Identites in Azure for a lot of different automation scenarios, for example if I want run a Logic App or an Azure Function that should securely call an API like Microsoft Graph..
In such a scenario, the Managed Identity, represented by its Service Principal, needs to be granted application permissions to the API. Let’s say for example that you want to list Intune Managed Devices in your Organization using the Microsoft Graph API, using a Function App or Logic App for example and connect to the Graph API using a Managed Identity.
Then you would need to give that Managed Identity an App Role assignment for the application permission in Graph that is called DeviceManagementManagedDevices.Read.All. If you use that Managed Identity for example in a Function App or Logic App, they could then call the Microsoft Graph API as illustrated below:
Currently there are no way to manage these application role assignments in the Azure Portal GUI. You can verify the permissions, but not add or remove them.
For reference, usually you would do this using cmdlets in Azure AD PowerShell:
Today I would like to show how you can do this with a “GUI” after all, by using the Microsoft Graph Explorer!
Prerequisite – Sign in and Connect to Graph Explorer
Many of you might be familiar with Graph Explorer, but if you aren’t you can find it at the Microsoft Graph documentation site, or just use this short url: https://aka.ms/ge.
In Graph Explorer you need to sign in (and consent to permissions) so that you can access your organizations’ data via Graph API. Note that your organisation might have restrictions in place for users consenting to permissions for API’s, and in any case if you want to use my example here for adding Microsoft Graph API application permissions, you will need to be a Global Administrator anyway.
Part 1 – Find the Service Principal of the Managed Identity
I will now search for the Service Principal in Graph Explorer. You can do this by running something similar to this query:
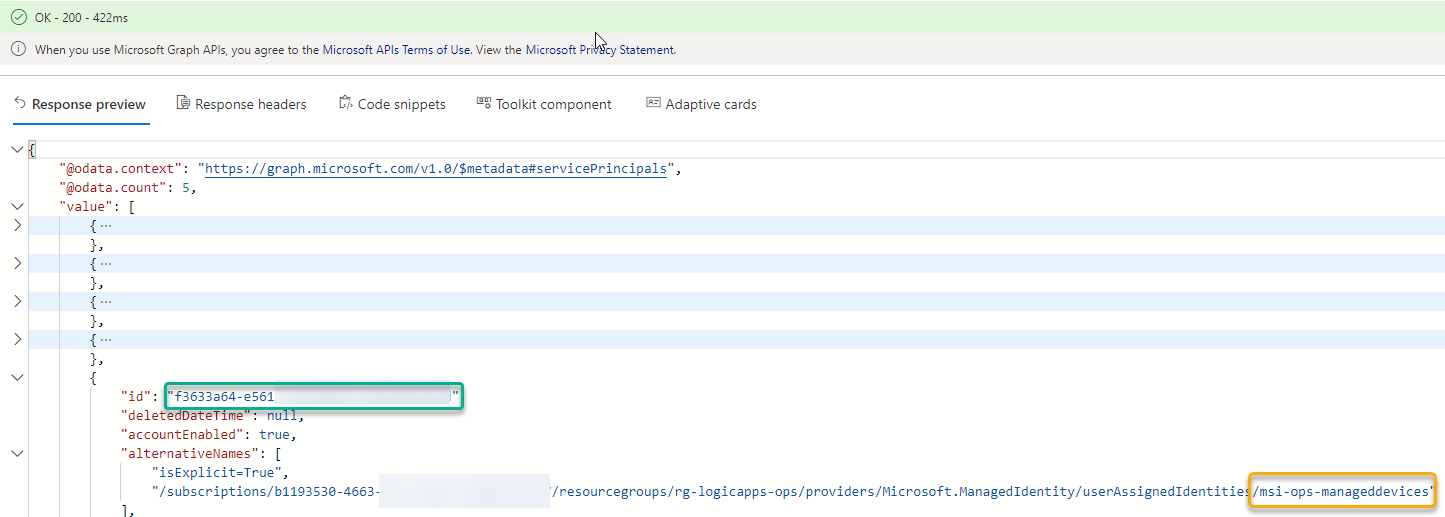
GET https://graph.microsoft.com/v1.0/servicePrincipals?$search="displayName:msi"&$count=true
PS! You must add ConsistencyLevel = eventual i Request Header to be able to run the search and count parameter.
In my example I’m searching for a User Assigned Managed Identity that I know I have prefixed with the name “msi”, but you can also search for System Assigned Managed Identities, these will have the name of the resource you have assigned it to (name of the Function App, Logic App, etc).
When I run this example query currently in my tenant, I get a count of 5 service principals, one of which is the Managed Identity I’m looking for. The thing of interest for me here is the Id of the Service Principal, in the green box below. I have also a yellow box around the name of the Managed Identity, which you can see is a User Assigned Identity created in a Resource Group where I connect it to Logic Apps.
Take a note of that Id, you will need it later. You can now also get the Service Principal directly by Id:
GET https://graph.microsoft.com/v1.0/servicePrincipals/{your-managed-identity-service-principal-id}
Part 2 – Find the Service Principal of the Microsoft Graph (or other) API
Next, we also need to find the service principal in your organisation that represent your instance of the multi tenant App that is “Microsoft Graph”.
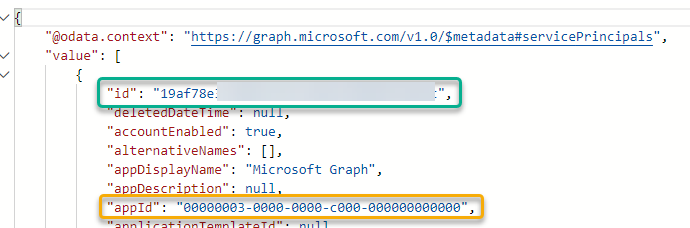
Microsoft Graph API always has the appId that is: 00000003-0000-0000-c000-000000000000
In every Azure AD organisation the Microsoft Graph API application is represented by a Service Principal, you can find this with the following query:
GET https://graph.microsoft.com/v1.0/servicePrincipals?$filter=appId eq '00000003-0000-0000-c000-000000000000'
You will now need to note the “id” of that Service Principal, that will be the “resourceId” to be used later, and this resource “id” is different for every Azure AD organization/tenant:
Part 3 – Find the Application Role that will be the Permission you want to assign
Now that we have the Service Principal Id of the Managed Identity, and the Service Principal Id of the Microsoft Graph Resource in your Azure AD Organization, we need to find the Id of the actual application role permission you want to assign.
You can now use the Service Principal Id you retreived in part 2, to list all available app roles by appending /appRoles to the query:
GET https://graph.microsoft.com/v1.0/servicePrincipals/{your-graph-serviceprincipal-id}/appRoles/
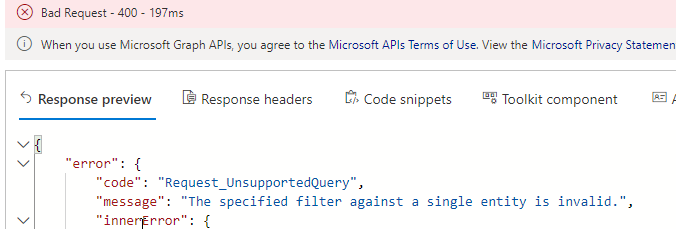
Now, there are a lot of application role permissions for Microsoft Graph, so we need to do a search. Unfortunately, not all Graph resources support all OData filter queries, and not everything is documented, but as far I can see I cannot use $search or $filter inside a specific service principal resource. For example I would want to do something similar to this query:
GET https://graph.microsoft.com/v1.0/servicePrincipals/{your-graph-serviceprincipal-id}/appRoles?$search="displayName:Intune"
But this will return an error like this:
This might be fixed at a later time, but for now we can just use the browser’s search function (CTRL+F), so when I query for all /appRoles, I will get them all listed, and then just search for the application permission I want:
Not so elegant, I know, but at least I will get that specific application role id I need for the next step.
(PS! Graph API will usually return max 100 values and in this case the Graph API has less than that. If there were to be more than 100 results, then the request will be paged and with a odata.nextlink for the next page of results).
Anyway, I now have the 3 parts I need to create the application role assigment for the Managed Identity.
Part 4 – Assign Application Role to Managed Identity
We can now assign the application role to the service principal, and as documented here, we will need the following 3 id’s:
principalId: The id of the user, group or client servicePrincipal to which you are assigning the app role. This will be the id of the Managed Identity service principal we found in part 1.
resourceId: The id of the resource servicePrincipal which has defined the app role. This will be the id of the Microsoft Graph service principal we found in part 2.
appRoleId: The id of the appRole (defined on the resource service principal) to assign to a user, group, or service principal. This the app role id we found by searching the appRoles for the resource id in part 3.
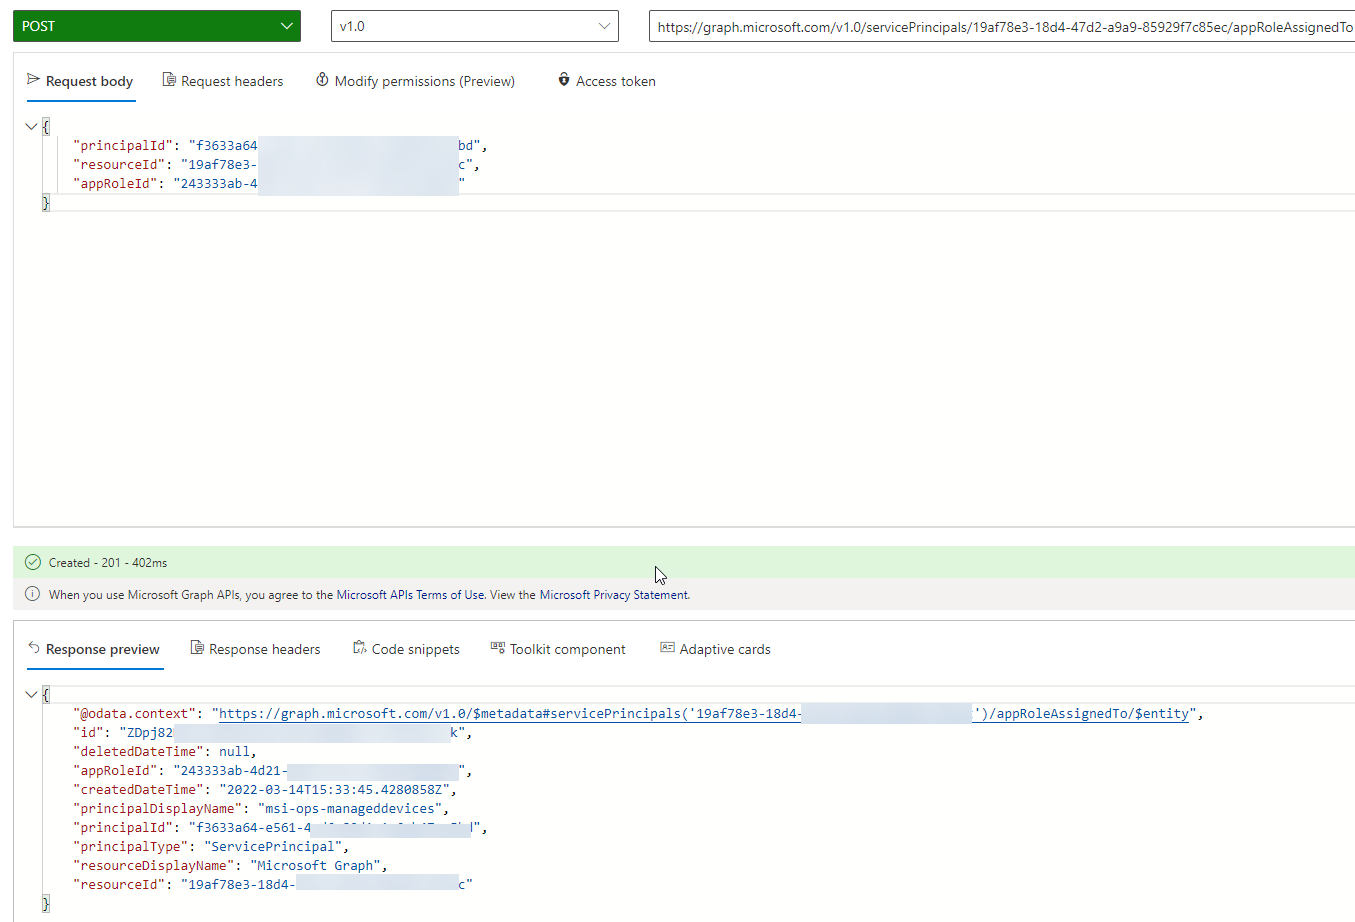
To create this assignement we need to do a POST query in Graph Explorer, with Content-Type application/json in the Header, and the following request body:
After you run this query, you should get a status of 201 Created and a response like the following:
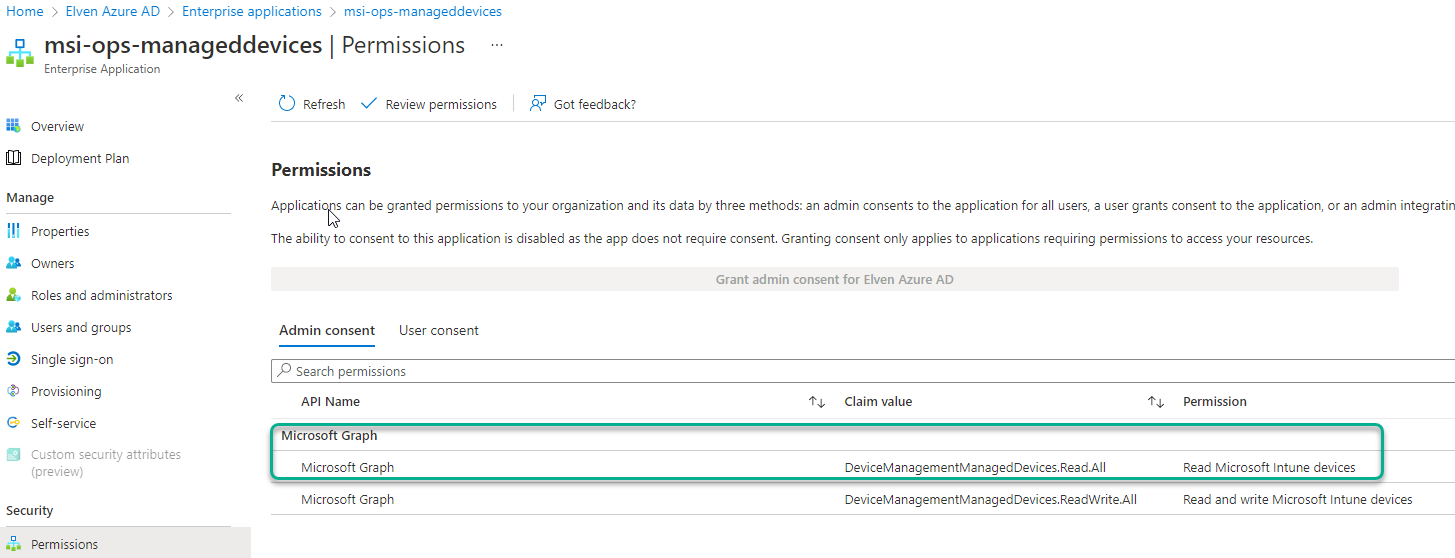
You can now also verify this assignment in the Azure AD Portal. If you go to Enterprise Applications, and search for {your-managed-identity-service-principal-id}, you should find your Managed Identity. From there you can click on Permissions under Security, and you will see the application permissions that you have granted. PS! I had already added another for writes as well:
Part 5 – Managing Application Role Assignments
After adding application permissions for the Managed Identity, you can also use Graph Explorer for viewing current application role assignments, as well as remove existing role assignments.
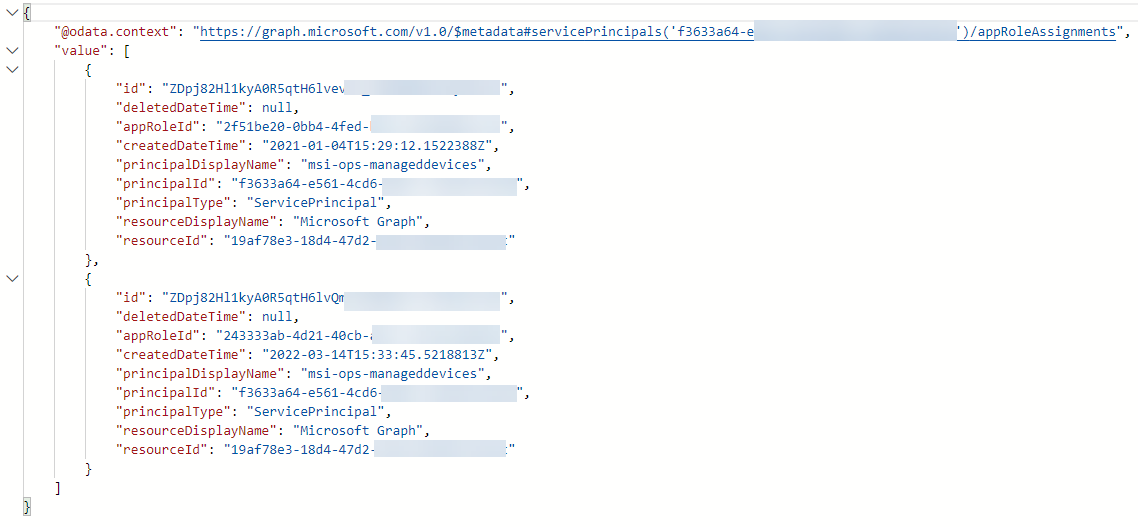
To get App Role Assignments for the Service Principal that is your Managed Identity, use the following query:
GET https://graph.microsoft.com/v1.0/servicePrincipals/{your-managed-identity-service-principal-id}/appRoleAssignments
This will return all the application permissions assigned to this Managed Identity Service Principal:
And then if you want to delete an application role assignment, you need to run a DELETE query as following:
The {appRoleAssignment-id} would be the “id” from the GET /appRoleAssignments shown above. When run successfully you should you should receive as status of 204 – No Content:
Summary
In this blog post I have show how you can use Graph Explorer to add Graph API application role permissions to your Managed Identity. Similar steps can be used against any Azure AD protected API other than Graph you would want your Managed Identity to access.
I’m looking forward to speak at the 3rd Edition of the Nordic Virtual Summit, which will happen online at 16th -17th March 2022. Nordic Virtual Summit is a 100% free virtual Microsoft IT Pro Community Event, organized by the joint scandinavian communities behind #MMUGSE #SCUGDK #SCUGFI #MMUGNO and the #MSEndpointMgr crew!
24 sessions, 1 keynote and 2 sponsor sessions will be delivered by expert speakers including MVPs and Microsoft Program Managers over the 2 days, across two tracks: Microsoft 365 Endpoint Management and Microsoft 365 Security and Compliance.
My session will be about Passwordless Azure Authentication using Managed Identities in Azure Active Directory. While users are more and more using passwordless as authentication method, what about your applications, workload identities and serverless solutions in Azure? Azure Services also need to authenticate to other resources and APIs, and this is where Managed Identities is the way to go. In this session I will show the capabilities and usage scenarios for using Managed Identities to get rid of application credentials once and for all!
This blog post will accompany my contribution for Festive Tech Calendar 2021, where I on the 22nd of December will present a live stream & interactive session where I in just a school hour will show you how you can create your own API in Azure and protect it with Azure AD using Oauth2. API’s can be anything you want, but let’s keep it festive!
This is some of the content I will cover in this blog post:
What is an API anyway?
What can you use in Azure to create APIs?
Get your tools out!
Why do we want to secure it?
How can we use Azure AD to secure it?
What is an API?
API, Application Programming Interface, is a middle layer of logic between the consumer (represented by a client), and the data and/or services that the client needs to access. An relevant example is a web application that reads and writes data to a database. To be able to read and write data in that database, you must provide a secure and consistent way to do that, and that is where the API’s come into play. By calling the API the Web Application don’t have to manage the logic and security of operating against the database, the API will handle all of that by exposing methods the client can send requests to and receive responses from.
There are different ways of how you can communicate with an API, or if it will be available on a public network or private, but it is common today that APIs are web based and openly accessible. In general, these APIs should adhere to:
Platform independence. Any clients should be able to call it, and that means using standard protocols.
Service evolution. The Web API should be able to evolve and add functionality without breaking the clients.
The RESTful API
REST, Representational State Transfer, is an architectural approach to designing web services. Most common REST API implementations use HTTP as the application protocol, making it easier to achieve the goal of platform independence.
Some of the most important guidelines for designing REST APIs for HTTP are (using Microsoft Graph API as examples):
In this blog post I will build on these design principles.
Using Azure to create your own APIs
Using Azure Resources you have a range of different solutions from where you can create your own APIs. You can develop and publish APIs using App Services, you can use Azure API Management, or you can start a little more simpler with Azure Serverless technologies like Azure Functions or Logic Apps.
In this blog post I will use Azure Functions for my demo scenario, creating a Serverless API that will receive and respond to HTTP requests. Azure Functions supports all the architectural guidelines from above, including connections to backend services like a database.
Demo Scenario
I will build the following scenario for the solution I want to demo. The theme will be Festive and build a solution for registering and managing Christmas Whishes!
A CosmosDB Account and Database, which will store whishes as document items.
An Azure Function App, with Functions that will serve as the API, and will:
Implement methods to GET whishes, create new whishes (POST), change existing (PUT) or DELETE whishes.
Provide a secure connection to the Cosmos DB account to update items accordingly.
An Azure App Service, running a web site as frontend, from where users will get, create, update and delete whishes, and this will use the Azure Functions API.
The following simple diagram shows an architectural overview over this solution as described above:
Later in this blog post I will show how we can add Azure AD Authentication and Authorization to this solution, and securing the API.
Get your tools ready!
I will use Visual Studio Code and Azure Functions Core Tools to create, work with and publish the serverless API, in addition to creating a frontend web based on Node.js.
If you want to follow along and recreate this scenario in your environment, make sure you have the following installed:
In addition, I will build the API logic using Azure Functions PowerShell so you need to have PowerShell Core installed as well.
In addition to the above tools, you will also need access to an Azure AD tenant where you can create App Registrations for Azure AD Authentication, as well as an Azure Subscription where you can create the required resources.
If you don’t have access to an Azure Subscription with at least Contributor access for a Resource Group, you can develop and run parts of the solution locally, but then you would not be able to fully complete all parts of the authentication and authorization requirements.
After making sure you have those components installed, configured or updated, you can proceed to the next steps.
You can download all the files using a ZIP file, or you can fork and/or clone the repository if you have your own GitHub account.
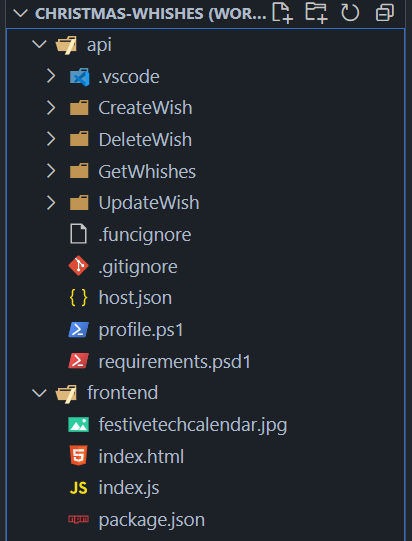
After the repository has been downloaded, open the workspace file “christmas-whishes.code-workspace” in VS Code, you should now see two folders, one for api and one for frontend.
The api folder contains the Functions Project, and the Functions I have pre-created and that we will build on later. The frontend folder contains the node.js website with the html file and a javascript file for connecting to the api logic.
Before we proceed with configuring the local project, we need to create the dependant Azure Resources like the Cosmos DB and Functions App.
Set up Azure Resources
In my repository you downloaded / cloned above, you will find instructions and some Az PowerShell samples for creating the required resources, this will include:
Create a Resource Group “rg-festivetechcalendar” in your chosen region (you can change the rg name to something other of your choice).
Create a Azure Function App of <yourid>-fa-festivetechcalendar-api in the above resource group. Choose your region and a consumption plan.
Create a Cosmos DB account in your region and in the above resource group with the name <-yourid>-festivetechcalendar-christmaswhishes, opt in for free tier.
In the Cosmos DB account, create a new database called “festivetechcalendar” and a container named “whishes” using /id as partition key.
In the above resource group, create an App Service for the frontend web site, with the name <yourid>-festivetechcalendar-christmaswhishes, using Node and Node 14 LTS as runtime and Linux as operationg system. If a Free plan is available in your region, you can use that, but else use a low cost dev/test plan.
PS! You can use other names for the above resources, but then you need to make sure that you change this in the repository code you will be working from.
In addition to the above resources, some supporting services like App Plans, Applications Insights and Storage Accounts are created as part of the process.
Connect to the Azure Account in VS Code
Using the Azure Accont extension i VS Code, make sure that you are signed in to the correct subscription, you should be able to see the above Function App for example, like in my environment:
PS! If you, like I have access to many subscriptions in different tenants, it might be worthwhile to add this azure.tenant setting to the VS Code workspace file:
Next we will make some changes to the Azure Functions API, so that we can successfully connect to the Cosmos DB and make the API RESTful following the architectural guidelines.
First we need to create/update a local.settings.json file in the api folder, where you need the following settings, replace the Festive_CosmosDB connection string with your own connection string from your Azure Resource:
Open a new Terminal Window in VS Code (if not already open) and choose the api folder. Then run the following command func start. This will start up the Functions Core Tools runtime and enable to send requests to the API locally. Typically when you create and run functions locally the will show something like the following:
You will see from above that I have created from before 4 functions:
CreateWhish: Function for creating new Christmas Whishes
DeleteWhish: Function for Deleting Whishes
GetWhishes: Function for Getting Whishes
UpdateWhish: Function for Updating Whishes
All of these functions are using an HTTP trigger for request and response. In addition I have used a CosmosInput trigger for getting existing items from the DB (via the connection string defined in local.settings.json) and CosmosOutput trigger for sending new or updated items back to the DB.
Deleting items from Cosmos DB is a little bit more trickier though, as the CosmosOutput trigger does not support deletes. So in that case I chose to do the delete via Cosmos REST API, using Managed Identity for the Function App, or the logged on user locally. More on that later.
First, lets make the APIs RESTful. As I mentioned earlier, the API should make use of resources. And while I have methods for CreateWhish, DeleteWhish and so on, I want to change this so that I will focus on the resource whish, and use the correct verbs for the operations I want. I will change the API to the following:
GET /api/whish (getting all whishes)
POST /api/whish (creating a new whish)
DELETE /api/whish (delete a whish)
PUT /api/whish (change a whish)
That should be much better! I should also specify and existing id for DELETE or PUT, and make it possible to GET a specific whish also by id. So let’s define that as well:
GET /api/whish/{id?}
POST /api/whish
DELETE /api/whish/{id}
PUT /api/whish/{id}
The question mark after GET /api/whish/{id?} means that it is optional (for getting all whishes) or a specific whish by id. DELETE and PUT should always have an id in the request.
Let’s make this changes in the Functions. Inside every function there is a function.json file, which defines all the input and output bindings. For doing the above changes, we will focus specifically on the HttpTrigger In binding. Two changes must be made, one is to change the method (the http verb) and the other is to add a “route” setting. So for example for GetWhishes, change the first binding to:
Now, run func start again in the terminal windows, and the Functions should now show the following:
The API is now much more RESTful, each method is focused on the resource whish, and using the correct http verbs for the operations.
The case of the Delete of Item in Cosmos DB
As mentioned earlier the CosmosOutput binding handles updates and creation of new items in the Cosmos DB, but not deleting. Barbara Forbes has a nice and more detailed walkthrough of how to use the Cosmos DB input and output bindings in this blog post, but for deletes I did it another way. Let’s look into that.
The code in run.ps1 for DeleteWhish function starts with the following, getting the input bindings and retrieving the whish by id from the CosmosInput:
using namespace System.Net

# Input bindings are passed in via param block.
param($Request, $TriggerMetadata, $CosmosInput)

# Write to the Azure Functions log stream.
Write-Host "PowerShell HTTP trigger function processed a request to delete a whish."

# Check id and get item to delete
If ($Request.Params.id) {
    $whish = $CosmosInput | Where-Object { $_.id -eq $Request.Params.id}
}
I now have the item I want to delete. Next I build the document URI for the item I want to delete using the Cosmos DB REST API:
# Build the Document Uri for Cosmos DB REST API
$cosmosConnection = $env:Festive_CosmosDB -replace ';',"`r`n" | ConvertFrom-StringData
$documentUri = $cosmosConnection.AccountEndpoint + "dbs/" + "festivetechcalendar" + "/colls/" + "whishes" + "/docs/" + $whish.id
Note that I have hardcoded my Database (festivetechcalendar) and container (whishes) above, you might want to change that in your environment if different. Next I check if the Azure Function is running in the Function App in Azure, or locally inside my VS Code. If running in the Function App I will use the Managed Identity to connect to the resource https://cosmos.azure.com and get an access token. If I run locally in VS Code I’ll just get an acces token using Get-AzAccessToken, providing that I have connected to my tenant and subscription earlier using Login-AzAccount.
NB! This operation requires RBAC Data Operations role assigment, more on that later!
# Check if running with MSI (in Azure) or Interactive User (local VS Code)
If ($env:MSI_SECRET) {

    # Get Managed Service Identity from Function App Environment Settings
    $msiEndpoint = $env:MSI_ENDPOINT
    $msiSecret = $env:MSI_SECRET

    # Specify URI and Token AuthN Request Parameters
    $apiVersion = "2017-09-01"
    $resourceUri = "https://cosmos.azure.com"
    $tokenAuthUri = $msiEndpoint + "?resource=$resourceUri&api-version=$apiVersion"

    # Authenticate with MSI and get Token
    $tokenResponse = Invoke-RestMethod -Method Get -Headers @{"Secret"="$msiSecret"} -Uri $tokenAuthUri
    $bearerToken = $tokenResponse.access_token
    Write-Host "Successfully retrieved Access Token Cosmos Document DB API using MSI."

} else {
    # Get Access Token for the interactively logged on user in local VS Code
    $accessToken = Get-AzAccessToken -TenantId elven.onmicrosoft.com -ResourceUrl "https://cosmos.azure.com"
    $bearerToken = $accessToken.Token
}
Then, when I got the Access Token for the Cosmos DB REST API, I can proceed to delete the document item. There are some special requirements for the headers to include the Authorization header, version and partition key as shown below. Then I can Invoke-RestMethod with Delete operation on the Document Uri and with the right Headers. Note also that PowerShell Core wasn’t to happy with this header format, so I had to use the SkipHeaderValidation:
# Prepare the API request to delete the document item
$partitionKey = $whish.id
$headers = @{
    'Authorization' = 'type=aad&ver=1.0&sig='+$bearerToken
    'x-ms-version' = '2018-12-31'
    'x-ms-documentdb-partitionkey' = '["'+$partitionKey+'"]'
}

Invoke-RestMethod -Method Delete -Uri $documentUri -Headers $headers -SkipHeaderValidation

$body = "Whish with Id " + $whish.id + " deleted successfully."

# Associate values to output bindings by calling 'Push-OutputBinding'.
Push-OutputBinding -Name Response -Value ([HttpResponseContext]@{
    StatusCode = [HttpStatusCode]::OK
    Body = $body
})
Now, for the user getting the access token, either interactively or the Managed Identity, you will need to assign roles for Data Operations. This is all documented here: https://docs.microsoft.com/en-us/azure/cosmos-db/how-to-setup-rbac, but the following commands should get you started:
In my commands from above I have assigned both my own user (running locally in VS Code) and the Managed Identity for the Function App to the Contributor Role.
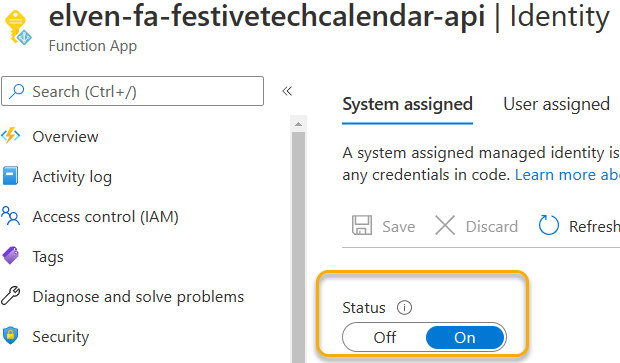
PS! Don’t forget to enable Managed Identity for the Function App:
That means that the API is now finished in this first phase, and we can deploy them to the Function App.
After you deploy the functions to the Function App, also make sure to update the app settings.
I won’t go into details for testing this now, I often use Postman for these testing scenarios, both locally and remotely to the Function App, but if you want to see this from a recording of my session at Festive Tech Calendar, you can find that here: https://www.youtube.com/watch?v=5zLbksF0Ejg.
The Web Frontend
A few words about the web frontend also, as I mentioned earlier this is built on Node.js as a Single Page Application (SPA). This means the entire application exists in the browser, there is no backend for the web. All the more reasons for separating the logic and security connections in the API.
The web frontend basically consists of an html page and a javascript file. The javascript file has some methods for using the api, as the screenshot below shows:
There is a API constant that points to the Azure Functions API urls that we saw when running func start. The getWhishes, updateWhish methods and so on use this API and the resource whish, together with the http verbs to send requests and receive responses from the API.
I’m not really a web developer myself, so I have depended on other Microsoft Identity samples and good help from collegueas and community, but I have been able to change the code such that the web frontend you downloaded from the repository earlier now should work with the API locally.
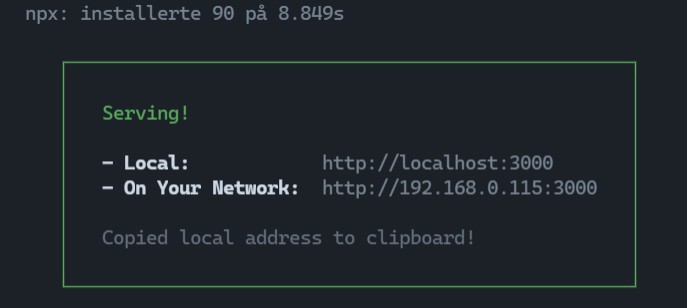
So while you still are running func start from before, open a new terminal window, choosing frontend as the folder, and run:
npm start
This will build and start the web frontend locally:
You can now go to your browser and use http://localhost:3000, which will show you the start page that will look something like this:
You can now Create a Whish, see existing as they are created, change or delete them, it should work provided you have followed the steps as layed out above.
With the API now working between the frontend and the backend Cosmos DB, we can proceed to secure the API!
Why secure the API?
The API is important to protect, as it contains connection strings in app settings and a managed idenity that can manipulate the Cosmos DB. While the default mode for functions require a knowledge of a function code query parameter, this will still be exposed in the web frontend code, any user can open this source code and get those URI’s and run them from other places.
Another reason is the increasing focus on security and zero trust, where every user and access should be verified and never trusted. For example, runnning requests from another unfamiliar location against the API, and as well the assume breach mindset should make sure that every connection is authenticated and audited.
Authentication is one thing, but also authorization is an important part of API protection. Take this simple, but relevant case of Christmas Whishes: Should really everyone be able to see both your own but also everybody elses whishes? Should you be able to write and delete other users whishes?
For this next scenario we will implement authentication and authorization for this Azure Functions API, using Azure AD and OAuth2.
How to use Azure AD to protect the API
Azure Active Directory can be the Identity Provider that can require and successfully authenticate users. Azure AD can also expose API scopes (delegated permissions) and roles (application permissions) as needed so that you can use OAuth2 for authorization decicions as well.
We can require authentication on the API, and provide a way for the frontend web to sign users in, consent to permissions that the scopes have defined, and securely call the API. In that way, there is no way an anonymous user can send requests to the API, they have to be authenticated.
We will use Azure AD App Registrations for setting this up. Let’s get started.
Create the API App Registration
We will first create a App Registration for defining the API. In the Azure AD Portal, select new App Registration, give it a name like FestiveTechCalendar API, and then select the multitenant setting of accounts in any organizational directory and personal Microsoft accounts, and the click create.
(NB! You can use single-tenant if you want to, then only users in your tenant will be able to authenticate to the API).
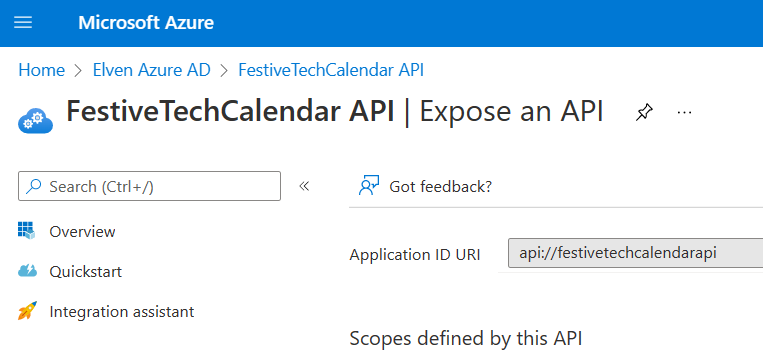
Next, go to Expose an API, and first set the Application ID URI to something like the following:
Then, we will add the following scopes to be defined by the API:
access_as_user, to let users sign in and access the api as themselves
Whish.ReadWrite, to let users be able to create, edit, delete or get their own whishes only.
Whish.ReadWrite.All, with admin consent only, to let privileged users be able to see all users’ whishes (for example Santa Claus should have this privilege 🎅🏻)
This should look something like this after:
This completes this App Registration for now. We will proceed by creating another App Registration, to be used from the clients.
Create the Frontend App Registration
Create a new App Registration, with the name for example FestiveTechCalendar Frontend, and with the same multitenant + Microsoft personal account setting as the API app. Click create.
Next, go to API permissions, and click Add a permission, from which you can select own APIs and find the FestiveTechCalendar API app and add our three custom scopes, as shown below:
PS! Do NOT click to grant admin consent for your organization: (I prefer that users consent themselves, providing that they are allowed to do so that is)
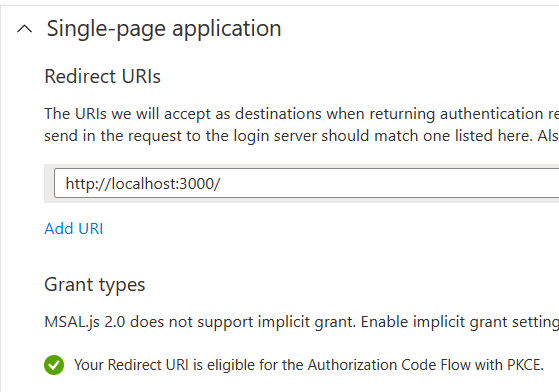
Next, under Authentication, click to Add a platform, select Single Page Application (SPA) and add http://localhost:3000 as redirect uri:
Adding localhost:3000 will make sure that when I run the web frontend locally, I can sign in from there.
Also, add the checkboxes for Access tokens and ID tokens, as we will need this in our scenario with the API:
Go back to Overview, and note/copy the Application (Client) ID, you will need that later.
Azure AD Authentication to the API with Postman
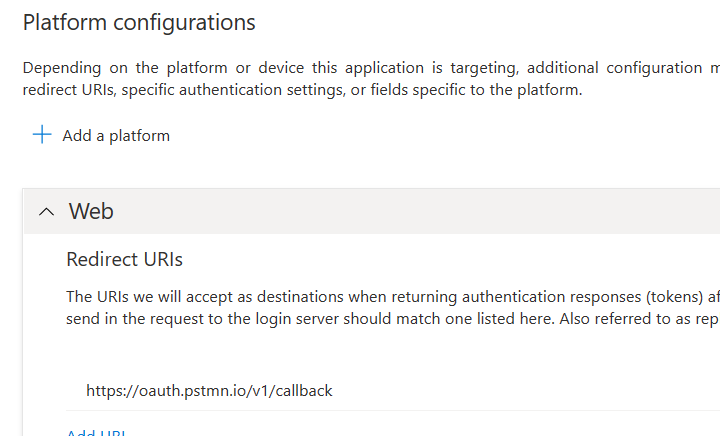
If you want to be able to test secured requests from Postman client, you can also add the following Web platform in addition to the Single Page Application platform:
For authenticating with Postman you also need to setup a Client Secret:
Take a note/copy of that Secret also, it will be needed for Postman testing later.
For now, this App Registration for the frontend client is finished.
Require Authentication on Azure Function App
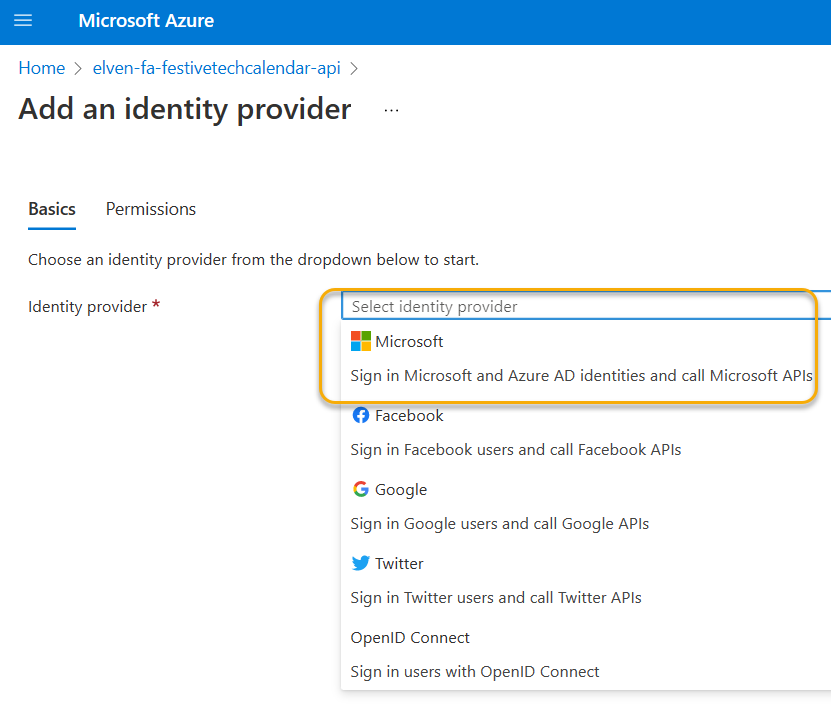
Wiht Azure AD App Registrations set up, we can now proceed to the Function App and require Azure AD Authentication.
Under Authentication, click to Add an identity provider:
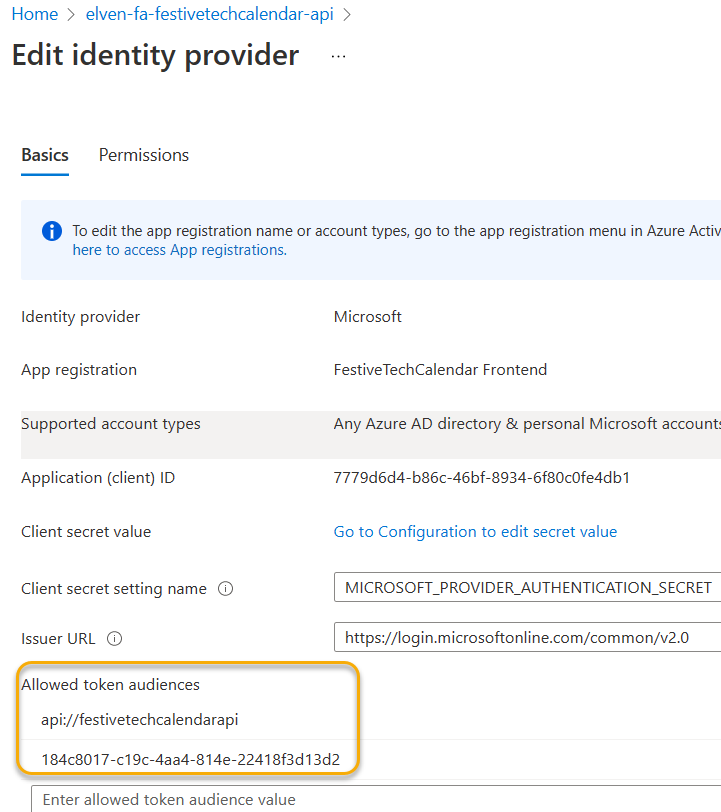
Select Microsoft, then pick and existing app registration and find the FestiveTechCalendar Fronted app. Change the Issuer URL to use the common endpoint, as we have configured this to support both multitenant and microsoft accounts:
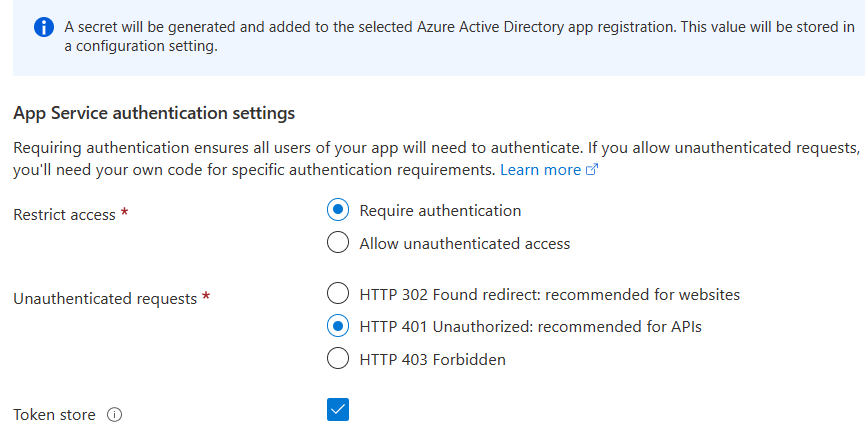
Set restric access to Require authentication, and for unauthenticated requests to the API to get a HTTP 401 Unauthorized:
Click Add to finish adding and configuring the Identity provider, the Function App and the Functions API are now protected!
The last step we need to do, is to configure the allowed audiences for the function app authentication, we need to add the following two audiences, and this is for the API App Registration. For v1.0 token formats, use api://festivetechcalendarapi, for v2.0 token formats (which should be default today), use the App ID for the API App Registration:
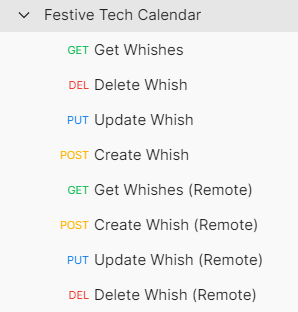
Now that the Function App in itself is protected with Azure AD Authentication, we can remove the Function Key authentication. For each of the functions (GetWhishes, UpdateWhish, etc), go into the function.json file, and change the authLevel from function to anonymous, like below:
After the functions have been changed, deploy from VS Code to the Function App again.
Testing Authentication with Postman
We can now try to do some testing against the API from Postman. This isn’t something you have to do, but it’s nice to use for some evaluating and testing before we proceed to the web frontend.
I have created myself a collection of requests for Festive Tech Calendar in Postman:
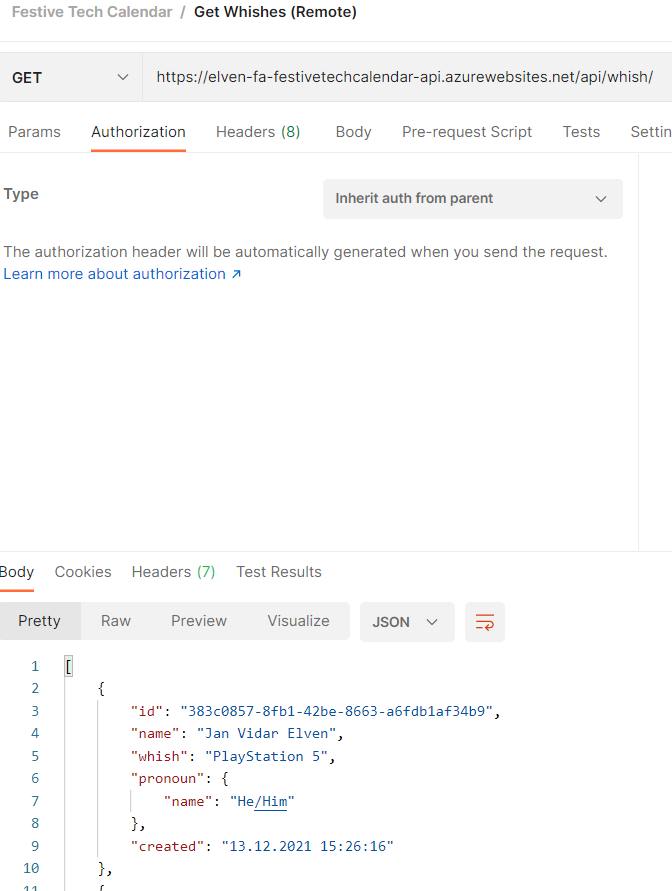
For example, if I try to Get Whishes Remote, without authentication, I will now recieve a 401 Unauthorized, and the message that I do not have permission:
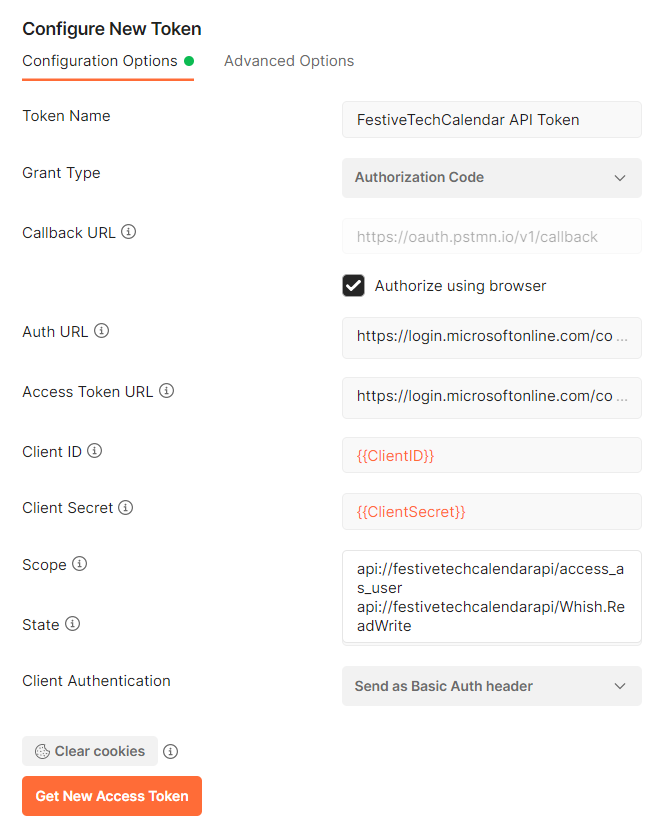
In Postman and on the Collection settings, you can add Authorization. Here I have added OAuth 2.0, and specified a Token Name and using Authorization Code grant flow. I will use the browser to authenticate, and note that the callback url should be the same as you added to the Frontend App registration earlier:
Important! You need to specify the scopes for which API you will get an access token for. In this case I use the api://festivetechcalendarapi/access_as_user and api://festivetechcalendarapi/Whish.ReadWrite:
With all that set up, you can now click to Get New Access Token. It will launch a browser session (if you are running multiple profiles, make sure it opens in your correct one), and you can authenticate. Upon successful authentication, an access token will be returned to Postman and you can again test a remote request, which this time should be successful:
Adding Authorization Logic to Azure Functions
So now we know that the Function App and API is protected using Azure AD.
The next step would be to implement authorization logic inside the functions. This is when a request has been triggered with an Authorization Header, which contains the Access Token for the API, and where we can get the details from the token and make authorization logic based on that.
For this scenario I’m going to use a community PowerShell module called JWTdetails, made by Darren Robinson.
First add a dependency on that module in requirements.psd1 inside the api folder:
@{
    # For latest supported version, go to 'https://www.powershellgallery.com/packages/Az'.
    # To use the Az module in your function app, please uncomment the line below.
    'Az' = '7.*'
    'JWTDetails' = '1.*'
}
Then in run.ps1 for each of the functions (Create, Update, Get and Delete Whish) add the following in the beginning, just after param statement and write-host for “PowerShell HTTP trigger…”:
$AuthHeader = $Request.Headers.'Authorization'
If ($AuthHeader) {
    $AuthHeader
    $parts = $AuthHeader.Split(" ")
    $accessToken = $parts[1]
    $jwt = $accessToken | Get-JWTDetails

    Write-Host "This is an authorized request by $($jwt.name) [$($jwt.preferred_username)]"

    # Check Tenant Id to be another Azure AD Organization or Personal Microsoft
    If ($jwt.tid -eq "9188040d-6c67-4c5b-b112-36a304b66dad") {
        Write-Host "This is a Personal Microsoft Account"
    } else {
        Write-Host "This is a Work or School Account from Tenant ID : $($jwt.tid)"
    }
}
The code you see above, retrieves the Authorization Header if it is present, and then splits the access token from the string “BEARER <jwt token>”. That JWT token can then be checked for details by the Get-JWTDetails command. I’m retreiving a couple of claims to get the user name and the user principal name, and also checks which organization or personal (fixed tenant id for MS accounts) the user is coming from.
In addition, for the GetWhishes function, I also add the authorization logic that the functions checks the scopes, and if the user does not have Whish.ReadWrite.All, then the user should only be allowed to see own whishes at not everybody elses.
This code should be placed right after getting the Cosmos DB items in the run.ps1 for GetWhishes function:
If ($AuthHeader) {
    Write-Host "The Requesting User has the Scopes: $($jwt.scp)"
    # Check for Scopes and Authorize
    If ($jwt.scp -notcontains "Whish.ReadWrite.All") {
        Write-Host "User is only authorized to see own whishes!"
        # $Whishes = $Whishes | Where-Object {$_.uid -eq $jwt.oid}
        # $Whishes = $Whishes | Where-Object {$_.upn -eq $jwt.preferred_username }
        $Whishes = $Whishes | Where-Object {$_.name -eq $jwt.name}
    }
} else {
    Write-Host "No Auth, return nothing!"
    $Whishes = $Whishes | Where-Object {$_.id -eq $null}
}
You will see that I can select a few alternatives for filtering (I have commented out the ones not in use). I can use a soft filter based on name, or if I want to I can filter based on user/object id, or user principal name. The last two options require that I add a couple of lines to the CreateWhish function as well:
$whish = [PSCustomObject]@{
    id = $guid.Guid
    name = $Request.Body.name
    whish = $Request.Body.whish
    pronoun = [PSCustomObject]@{
        name = $Request.Body.pronoun.name
    }
    created = $datetime.ToString()
    uid = $jwt.oid
    upn = $jwt.preferred_username
}
As you see from the last two lines above, I have added that the creation of a new item is also stored with the object id and the upn of the user that has authenticated to the API (using the JWT token).
With these changes, you should once again Deploy the local Functions to the Function App.
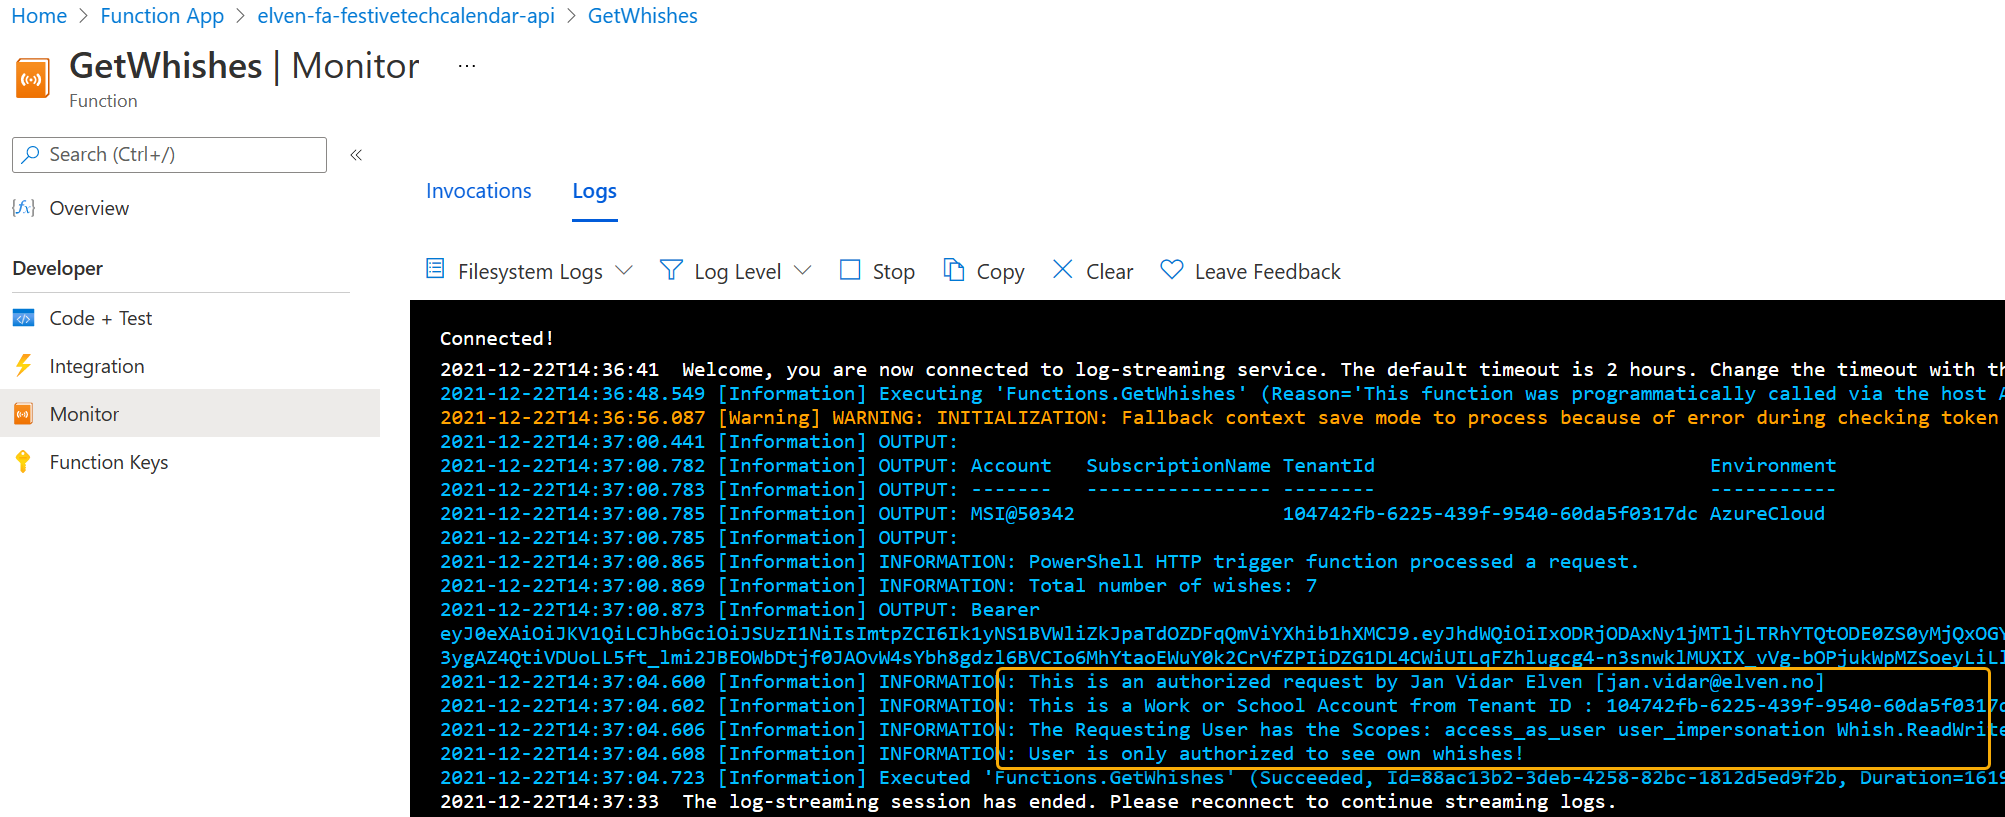
If I now do another remote test in Postman client, and follow the Azure Function App monitor in the Azure Portal, I can indeed see that my user has triggered the API securly, and is only authorized to see own whishes:
The last remaining step now is to change the web frontend to be able to use the API via Azure AD Authentication.
Authenticate to API from a Single Page Application (SPA)
We are now going to configure the web frontend application, which is based on JavaScript SPA, to be able to sign in and authorize, get ID and Access Token and send secured requests to our Christmas Whishes API, this will use the Oauth2 authorization code flow as shown below:
Configure Msal.js v2
We are going to use the Microsoft Authentication Library (MSAL) for Javascript, Msal.js v2, for the authentication and authorization flows in the web app.
First, in the frontend folder, create a file named authConfig.js, and add the following code:
const msalConfig = {
    auth: {
      clientId: "<your-app-id>",
      authority: "https://login.microsoftonline.com/common",
      redirectUri: "http://localhost:3000",
    },
    cache: {
      cacheLocation: "sessionStorage", // This configures where your cache will be stored
      storeAuthStateInCookie: false, // Set this to "true" if you are having issues on IE11 or Edge
    }
  };

  // Add here scopes for id token to be used at MS Identity Platform endpoints.
  const loginRequest = {
    scopes: ["openid", "profile"]
  };
Change the above code to your app id from the frontend app registration, and if you have other names for the api scopes change that as well for the tokenRequest constant.
Change the above endpoint to your function app name.
Next, create another file in the frontend folder named authUI.js, and add the following code:
// Select DOM elements to work with
const welcomeDiv = document.getElementById("welcomeMessage");
const signInButton = document.getElementById("signIn");

function showWelcomeMessage(account) {
  // Reconfiguring DOM elements
  welcomeDiv.innerHTML = `Welcome ${account.username}`;
  signInButton.setAttribute("onclick", "signOut();");
  signInButton.setAttribute('class', "btn btn-success")
  signInButton.innerHTML = "Sign Out";
}

function updateUI(data, endpoint) {
  console.log('Whishes API responded at: ' + new Date().toString());

}
The above code is used for hiding/showing document elements based on if the user is signed in or not.
Next, we need to have a script with functions that handles the sign-in and sign-out, and getting the access token for the API. Add a new file to the frontend folder called authPopup.js, and add the following script contents to that file:
// Create the main myMSALObj instance
// configuration parameters are located at authConfig.js
const myMSALObj = new msal.PublicClientApplication(msalConfig);

let username = "";

function loadPage() {
    /**
     * See here for more info on account retrieval:
     * https://github.com/AzureAD/microsoft-authentication-library-for-js/blob/dev/lib/msal-common/docs/Accounts.md
     */
    const currentAccounts = myMSALObj.getAllAccounts();
    if (currentAccounts === null) {
        return;
    } else if (currentAccounts.length > 1) {
        // Add choose account code here
        console.warn("Multiple accounts detected.");
    } else if (currentAccounts.length === 1) {
        username = currentAccounts[0].username;
        showWelcomeMessage(currentAccounts[0]);
    }
}

function handleResponse(resp) {
    if (resp !== null) {
        username = resp.account.username;
        console.log('id_token acquired at: ' + new Date().toString());
        showWelcomeMessage(resp.account);
    } else {
        loadPage();
    }
}

function signIn() {
    myMSALObj.loginPopup(loginRequest).then(handleResponse).catch(error => {
        console.error(error);
    });
}

function signOut() {
    const logoutRequest = {
        account: myMSALObj.getAccountByUsername(username)
    };

    myMSALObj.logout(logoutRequest);
}

loadPage();
We can now start to make some changes to the index.html file, so that it supports the Msal v2 library, shows a sign in button and a welcome message, and adds the app scripts from above.
First add the following html code to the HEAD section of the index.html file in frontend folder:
Then, back to the Visual Studio Code and Terminal Window, stop the node web application if it’s still running, and type the following command in the frontend folder:
npm install @azure/msal-browser
This will install and download the latest package references of Msal. After this has been run successfull you will see references updated in the package.json and package-lock.json files.
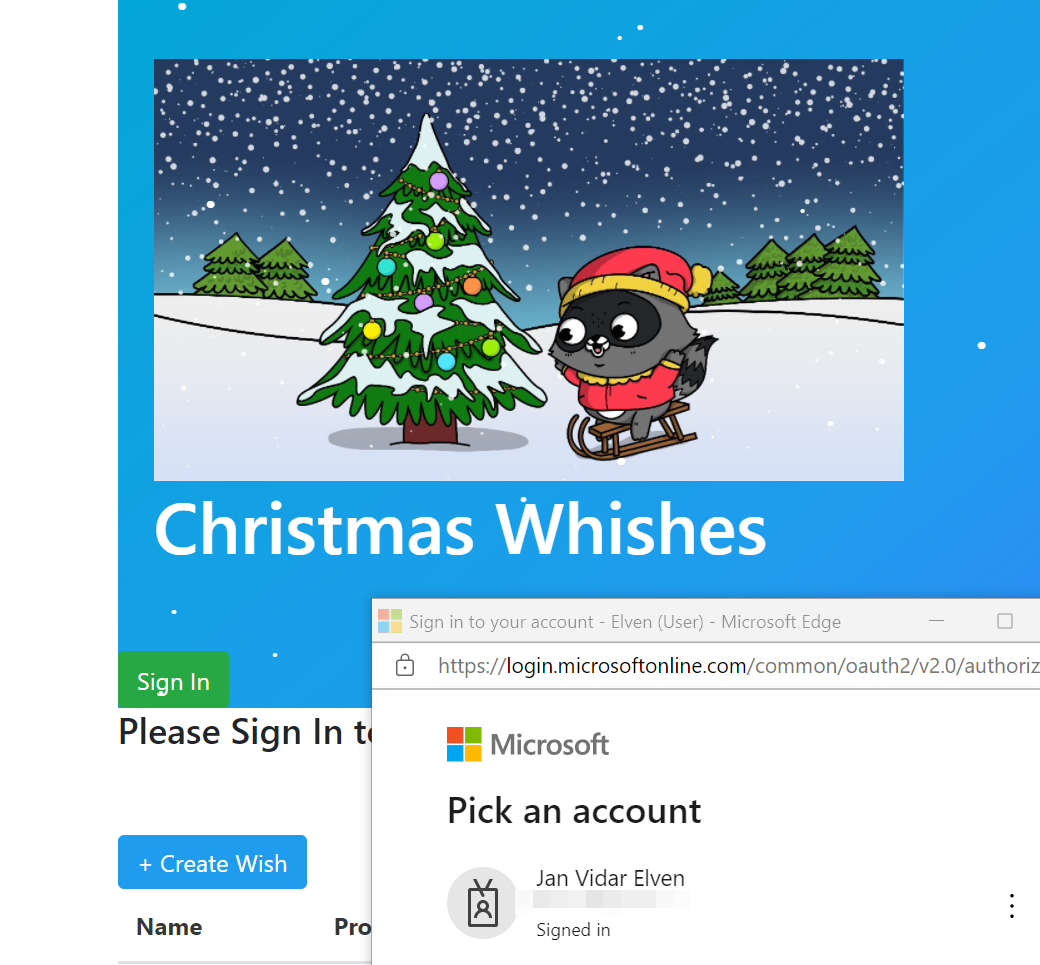
Save the index.html file with the above changes. We can now test the updated web page via http://localhost:3000. Type npm start in the terminal window to start the web application again. Now you can click the Sign in button, and you can sign in with your account:
PS! Note that the above application supports multi-tenant and personal microsoft accounts, so you can sign in with either.
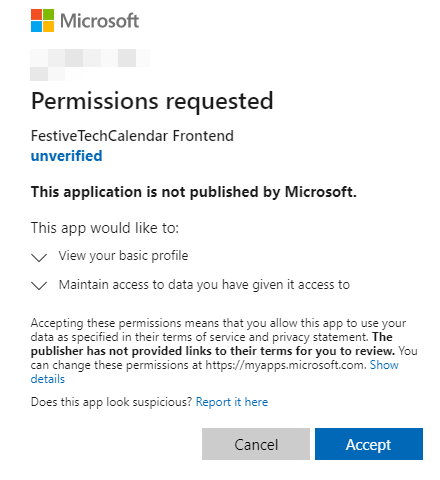
First time signing in you should get a consent prompt:
These are the permission scopes “openid” and “profile” defined in the login request above.
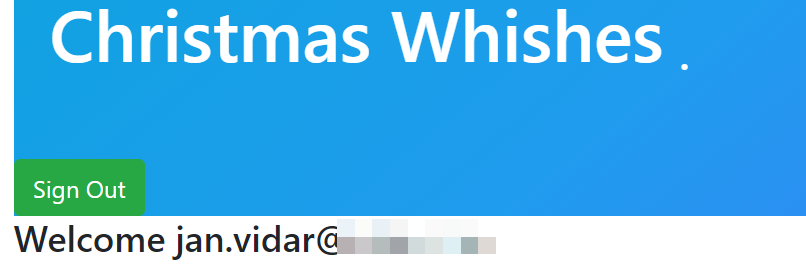
After signing in the welcome message should get updated accordingly:
We have now been able to sign in with the Identity Platform, and this will get an ID token for the signed in user. We are halfway there, because we will need an access token to be able to call the resource api.
Getting an Access Token for the API using Msal.js v2
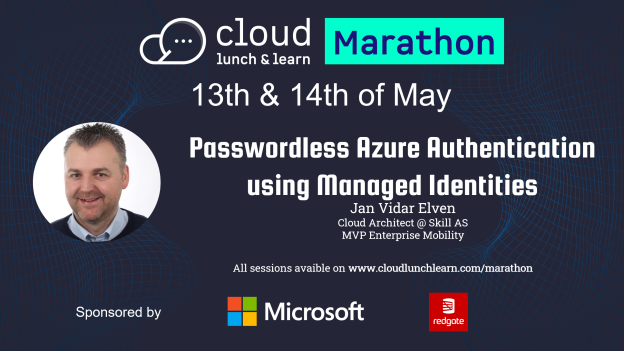
I’m excited to announce that I will be speaking at the Cloud Lunch & Learn Marathon 2021, a Global and Online Community event that will run for 24 hours between May 13th and 14th, with Speakers and Community experts from all over the world.
Sessions will cover a range of Cloud topics, including AI, Cloud Native, Blockchain, IoT, Data & BigData, Security, DevOps, GitHub, Backend, Frontend, Power Platform and, more.
Many sessions will also be held in other languages than English, like Portuguese, Spanish, Hindi, Chinese and Arabic!
My session will be about Passwordless for Azure Services. It is well known that Passwordless for Microsoft Identities is now the thing to do to secure your end users, but what about Azure Services that need to authenticate to other resources and APIs? This is where Managed Identities is the way to go. In my session I will show the capabilities and usage scenarios for using Managed Identities to get rid of application credentials once and for all!
You can see all the sessions at the link below, where you also will find registration details.
My Session details:
Session Title: Passwordless Azure Authentication using Managed Identities