Monthly Archives: March 2015

Shut Down Azure Servers for Earth Hour – 2015 Edition

One year ago, I published a blog article for shutting down, and later restart again, Azure Servers for one hour duration during Earth Hour 2014: https://systemcenterpoint.wordpress.com/2014/03/28/earth-hour-how-to-shut-down-and-restart-your-windows-azure-services-with-automation/.

In that article, I used three different Automation technologies to accomplish that:

  • Scheduled PowerShell script
  • System Center 2012 R2 Orchestrator
  • Service Management Automation in Windows Azure Pack

Today is Earth Hour 2015 (www.earthhour.org). While the Automation technologies referred still can be used for shutting down and restarting Azure Servers, I thought I should create an updated blog article using Azure Automation that has been launched during the last year.

This new example are built on the following:

  1. An Azure SQL Database with a table for specifying which Cloud Services and VM Names that should be shut down during Earth Hour
  2. An Azure Automation Runbook which connects to the Azure SQL Database, reads the Servers specified and shuts them down one by one (or later starts them up one by one).
  3. Two Schedules, one that triggers when the Earth Hour starts and one that triggers when Earth Hour begins, and calls the Runbook.

Creating a Azure SQL Database or a SQL Server is outside the scope of this article, but the table I have created is defined like this:

CREATE TABLE dbo.EarthHourServices
(
    ID int NOT NULL,
    CloudService varchar(50) NULL,
    VMName varchar(50) NULL,
    StayProvisioned bit NULL,
CONSTRAINT PK_ID PRIMARY KEY (ID)
)
GO

The StayProvisioned is a boolean data value where I can specify if VM’s should only be stopped, or stopped and deallocated.

This table is then filled with values for the servers I want to stop.

The Azure Automation Runbook I want to create have some requirements:

  1. I need to create a PowerShell Credential Asset for the SQL Server username and password
  2. I need to be able to Connect to my Azure Subscription. Previously I have been using the Connect-Azure solution (https://gallery.technet.microsoft.com/scriptcenter/Connect-to-an-Azure-f27a81bb) for connecting to my specified Azure Subscription. This is still working and I’m using this method in this blog post, but now depreciated and you should use this guide instead: http://azure.microsoft.com/blog/2014/08/27/azure-automation-authenticating-to-azure-using-azure-active-directory/.

This is the Runbook I have created:

workflow EarthHour_StartStopAzureServices
{
    param
    (
        # Fully-qualified name of the Azure DB server 
        [parameter(Mandatory=$true)] 
        [string] $SqlServerName,
        # Credentials for $SqlServerName stored as an Azure Automation credential asset
        [parameter(Mandatory=$true)] 
        [PSCredential] $SqlCredential,
        # Action, either Start or Stop for the specified Azure Services 
        [parameter(Mandatory=$true)] 
        [string] $Action
    )

    # Specify Azure Subscription Name
    $subName = 'My Azure Subscription'
    # Connect to Azure Subscription
    Connect-Azure `
        -AzureConnectionName $subName
    Select-AzureSubscription `
        -SubscriptionName $subName 

    inlinescript
    {

        # Setup credentials   
        $ServerName = $Using:SqlServerName
        $UserId = $Using:SqlCredential.UserName
        $Password = ($Using:SqlCredential).GetNetworkCredential().Password
        
        # Create connection to DB
        $Database = "SkillAutomationRepository"
        $DatabaseConnection = New-Object System.Data.SqlClient.SqlConnection
        $DatabaseConnection.ConnectionString = "Server = $ServerName; Database = $Database; User ID = $UserId; Password = $Password;"
        $DatabaseConnection.Open();

        # Get Table
        $DatabaseCommand = New-Object System.Data.SqlClient.SqlCommand
        $DatabaseCommand.Connection = $DatabaseConnection
        $DatabaseCommand.CommandText = "SELECT ID, CloudService, VMName, StayProvisioned FROM EarthHourServices"
        $DbResult = $DatabaseCommand.ExecuteReader()

        # Check if records are returned from SQL database table and loop through result set
        If ($DbResult.HasRows)
        {
            While($DbResult.Read())
            {
                # Get values from table
                $CloudService = $DbResult[1]
                $VMname = $DbResult[2]
                [bool]$StayProvisioned = $DbResult[3] 
 
                 # Check if we are starting or stopping the specified services
                If ($Using:Action -eq "Stop") {

                    Write-Output "Stopping: CloudService: $CloudService, VM Name: $VMname, Stay Provisioned: $StayProvisioned"
                
                    $vm = Get-AzureVM -ServiceName $CloudService -Name $VMname
                    
                    If ($vm.InstanceStatus -eq 'ReadyRole') {
                        If ($StayProvisioned -eq $true) {
                            Stop-AzureVM -ServiceName $vm.ServiceName -Name $vm.Name -StayProvisioned
                        }
                        Else {
                            Stop-AzureVM -ServiceName $vm.ServiceName -Name $vm.Name -Force
                        }
                    }
                                       
                }
                ElseIf ($Using:Action -eq "Start") {

                    Write-Output "Starting: CloudService: $CloudService, VM Name: $VMname, Stay Provisioned: $StayProvisioned"

                    $vm = Get-AzureVM -ServiceName $CloudService -Name $VMname
                    
                    If ($vm.InstanceStatus -eq 'StoppedDeallocated' -Or $vm.InstanceStatus -eq 'StoppedVM') {
                        Start-AzureVM -ServiceName $vm.ServiceName -Name $vm.Name    
                    }
                     
                }
 
            }
        }

        # Close connection to DB
        $DatabaseConnection.Close() 
    }    

}

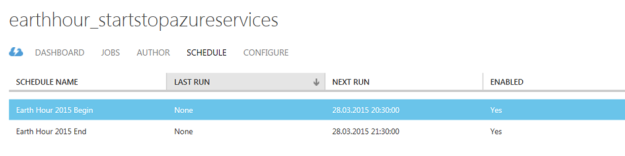
And this is my schedules which will run the Runbook when Earth Hour Begins and Ends. The Scedules specify the parameters I need to connect to Azure SQL and the Action for either Stop VM’s or Start VM’s.

Good luck with automating your Azure Servers and remember to turn off the lights as well J!

Publish the Cireson Self Service Portal with Azure AD Application Proxy

The Scenario

Update: This blog post is the first part in a series. See:
Part 2 – Using a Custom Domain Name for an Application Published with with Azure AD Application Proxy

I have been looking at different usable scenarios for publishing internal sites via the Azure AD Application Proxy, and decided to have a go at publishing the Cireson Self Service Portal. This will give me some interesting possibilities for pre-authentication and controlling user access.

I have been considering two scenarios for publishing the Self Service Portal:

  1. Publish without pre-authentication (pass through). This scenario is best used when the Self Service Portal is running Forms Authentication, so that the user can choose which identity they want to log in with.
  2. Publish with pre-authentication. This scenario will used Azure AD authentication, and is best used when the Self Service Portal is running Windows Authentication so that we can have single sign-on with the Azure AD identity.

It is the second scenario with pre-authentication I will configure here.

I went through these steps:

Configure Windows Authentication for Cireson Self Service Portal

The Cireson Self Service Portal installs per default with Forms Based Authentication. I need to configure Windows Integrated Authentication for the portal, and this is well documented in the Knowledge Article Cireson customers and partners can access at https://support.cireson.com/KnowledgeBase/View/45. From my environment, I can summarize the following configuration settings:

  • The Self Service Portal (v3.6 with hotfix) are running on the same server as the Service Manager Management Server (recommended and officially supported by Cireson)
  • The Portal/Management Server is configured with Kerberos Delegation in Active Directory with “Trust this computer for delegation to any service (Kerberos only)”
  • The Service Manager Service Account is configured with Service Principal Names (SPN) with:
    • SETSPN –s MSOMSDKSVC/NameOfYourServerHere SCSMServiceAccountHere
    • SETSPN –s MSOMSDKSVC/FQDNOfYourServerHere SCSMServiceAccountHere
  • Service Manager Service Account is added to the IIS_IUSRS local group on the Portal Server
  • The Cireson Portal Web Site are configured with Windows Authentication (Kernel Mode Authentication Enabled, Extended Protection to Off). For Providers Negotiate are listed on top.

It is a good idea at this point to verify that Windows Integrated Authentication is working correctly by browsing internally to http://portalservername. Your current logged on user (if permissions are correct) should be logged in automatically.

Create the Application in Azure AD

In this next step, I will create the Proxy Application in Azure AD where the Self Service Portal will be published. To be able to create Proxy Applications I will need to have either an Enterprise Mobility Suite license plan, or Azure AD Premium license plan. From the Azure Management Portal and Active Directory, under Applications, I add a new Application and select to “Publish an application that will be accessible from outside your network”:

I will then give a name for my application, specify the internal URL and pre-authentication method. I name my application “Self Service Portal”, use “http://portalserverfqdn” as internal URL and choose Azure Active Directory as Pre-Authentication method.

After the Proxy Application is added, there are some additional configurations to be done. If I have not already, Application Proxy for the directory have to be enabled. I have created other Proxy Applications before this, so I have already done that.

I also need to download the Application Proxy connector, install and register this on a Server that is member of my own Active Directory. The Server that I choose can be either on an On-Premise network, or in an Azure Network. As long as the Server running the Proxy connector can reach the internal URL, I can choose which Server that best fits my needs.

Since I choose to use pre-authentication, I can also assign individual users or groups to the Application. This enables me to control which users who will see the application under their My Apps and who will be able access the application’s external URL directly.

I now need to make additional configurations to the application, and go to the Configure menu. From here I can configure the name, external URL, pre-authentication method and internal URL, if I need to change something.

What I need to configure here is to use Internal Authentication Method to “Windows Integrated Authentication”. I also need to configure the Service Principal Name (SPN). Here I specify HTTP/portalserverfqdn, in my example this is HTTP/az-scsm-ms01.skill.local.

From the bottom part of the configuration settings I can configure Acces Rules, which at this time is in Preview. This is cool, because I can for example require for this Application that users will be required to use multi-factor authentication. I have not enabled that here though.

After I have configured this, I am finished at this step, and now need to configure some more settings in my local Active Directory.

Configure Kerberos Constrained Delegation for the Proxy Connector Server

I now need to configure so that the Server running the Proxy Connector can impersonate users pre-authenticating with Azure AD and use Windows Integrated Authentication to the Self Service Portal Server.

I find the Computer Account in Active Directory for the Connector Server, and on the Delegation tab click on “Trust this computer for delegation to specified services only”, and to “Use any authentication protocol”. Then I add the computer name for the portal server and specify the http service as shown below:

This was the last step in my configuration, and I am almost ready to test.

If you, like me, have an environment consisting on both On-Premise and Azure Servers in a Hybrid Datacenter, please allow room for AD replication of these SPN’s and more.

Testing the published application!

Now I am ready to test the published proxy application.

Remember from earlier that I have assigned the application either to a group of all or some users or directly to some pilot users for example.

I will now log on with my Azure AD user (which of course is synchronized from local Active Directory), and I will use the URL https://myapps.microsoft.com.

After logging on, I can see the applications I have access to. Some of these are SaaS applications I have configured, some are applications we have developed ourselves, and I can see the published Self Service Portal:

(Don’t mind the Norwegian captions and texts, you get the idea;)

I then click on the Self Service Portal, and can confirm that I am able to access the Self Service Portal. See the special proxy URL and that indeed I’m logged in with my Active Directory user with SSO.

Another cool thing is that I can use the App menu in Office 365 and add the Self Service Portal to the App chooser for easy access:

I can now also access the Self Service Application from the “My Apps” App on my Mobile Devices.

Copy SMA Runbooks from one Server to another

Recently I decided to scrap my old Windows Azure Pack environment and create a new environment for Windows Azure Pack partly based in Microsoft Azure. As a part of this reconfiguration I have set up a new SMA server, and wanted to copy my existing SMA runbooks from the old Server to the new Server.

This little script did the trick for me, hope it can be useful for others as well.


# Specify old and new SMA servers
$OldSMAServer = "myOldSMAServer"
$NewSMAServer = "myNewSMAServer"

# Define export directory
$exportdir = 'C:\_Source\SMARunbookExport\'

# Get which SMA runbooks I want to export, filtered by my choice of tags
$sourcerunbooks = Get-SmaRunbook -WebServiceEndpoint https://$OldSMAServer | Where { $_.Tags -iin ('Azure','Email','Azure,EarthHour','EarthHour,Azure')}

# Loop through and export definition to file, on for each runbook
foreach ($rb in $sourcerunbooks) {
    $exportrunbook = Get-SmaRunbookDefinition -Type Draft -WebServiceEndpoint https://$OldSMAServer -name $rb.RunbookName
    $exporttofile = $exportdir + $rb.RunbookName + '.txt'
    $exportrunbook.Content | Out-File $exporttofile
}

# Then loop through and import to new SMA server, keeping my tags
foreach ($rb in $sourcerunbooks) {
    $importfromfile = $exportdir + $rb.RunbookName + '.txt'
    Import-SmaRunbook -Path $importfromfile -WebServiceEndpoint https://$NewSMAServer -Tags $rb.Tags
}

# Check my new SMA server for existence of the imported SMA runbooks
Get-SmaRunbook -WebServiceEndpoint https://$NewSMAServer |  FT RunbookName, Tags