Category Archives: Microsoft Intune

Experts and Community unite at last ever #SCU_Europe 2016! #ExpertsLive next

This years SCU Europe 2016, for the first time outside Switzerland in the 4th year running, was held in Berlin at the BCC (Berlin Congress Center) close to the Alexander Platz in the eastern parts of “Berlin Mitte”.


The intro video introducing the Experts:

Let’s begin with the end: at the closing note SCUE general Marcel Zehner announced and with a little bit of emotion that this was the last ever SCU Europe to be held.. You and your organization should be proud of what you have achieved, Marcel, it is one of the best community conferences around, and I have been fortunate to be able to visit all 4 starting with Bern in 2013, Basel in 2014 and 2015, and now Berlin in 2016. It’s only cities with B’s is it? In fact, you never know what twists and turns your career takes, but looking back I’m not sure I would be where I am now in turn of being presenter, MVP and community influencer myself if I had not travelled alone to Bern 4 years ago, that’s where I really started working with and for the Community (with a capitol C)!

Luckily SCU Europe will continue as Experts Live Europe next year! Same place at BCC, same organization and format, and the same dates only next year it will be: 23rd – 25th of August 2017. A new web page was launched, www.expertslive.eu, and Twitter (@ExpertsLiveEU) and Facebook have been changed to reflect that. The hash tag #SCU_Europe will eventually be inactive and you should now use #ExpertsLive.

image

I think this is a very good decision, there has already been discussion on that the name “System Center Universe” is not really reflecting the content and focus of the conference, now embracing the Cloud, with content areas for Management, Productivity, Security, DevOps, Automation, Data Platform and more. ExpertsLive, originally a 1-day community conference in Netherland running each year back from 2009 and with up to 1200 participants, will now be a network of conferences, ranging from region based (ExpertsLive Europe, but also SCU APAC and SCU Australia will be ExpertsLive APAC and Australia next year), and local, country based ExpertsLive like the one in Netherlands, but more will come.

image

The closing note video announcing Experts Live Europe:

This year at SCU Europe I was one of the Experts and presented two sessions on “Premium Identity Management and Protection with Azure AD” and “Deep Dive: Publishing Applications with Azure AD”. I also took part in a “Ask-the-Experts” area together with Cameron Fuller and Kevin Greene where we took questions on the topic System Center 2016. I participated on a discussion panel on Friday morning with Markus Wilhelm from Microsoft Germany on the subject Defense Strategies and Security, and of course we had the Meet and greet with the Experts at the Networking party. It was a really great experience speaking at this conference, thanks for having me!


The content of the conference this year was great, and for the first time there was 5 tracks, with over 70 sessions presented! All presentations and session recordings will be at Channel 9 in a few weeks time, so make sure you look at anything you missed or want to see again if you where there, or if you weren’t at the conference this year you can look at your sessions of interest.

I was travelling with a group this year, both from my company and some of our customers, in total we were 7 in the group, and also had 3 cancellations the last week before the conference from some customers that could not make it after all. Moving the conference to Berlin is a big part of why it now was easier to attract more Nordic attendance I think. We stayed at the Park Inn by Radisson right by the Alexander Platz and BCC, so it was really central and nice.


In good tradition there are a lot of parties and social networking going on. On the first night there are the Sponsors and Speakers Party, which was held in Mio right by the TV Tower by Alexander Platz, on Thursday we had the attendee Networking Party at the conference center. Later that night our group and some more partners/customers of Squared Up went on to another party at Cosmic Kaspar. It was really hot, so basically the party was at the pavement! On the last day we had the Closing Drinks, sponsored by Cireson and itnetX at Club Carambar, also close to the Alexander Platz. In addition, there are a lot of unofficial gatherings going on, lots of laughs and new and old friends have a good time.


See you next year at Experts Live Europe in Berlin 23-25th August, 2017!

Publish the itnetX ITSM Portal with Azure AD App Proxy and with Conditional Access

Last week at SCU Europe 2016 in Berlin, I presented a session on Application Publishing with Azure AD. In one of my demos I showed how to use Azure AD Application Proxy to publish an internal web application like the itnetX ITSM Portal. The session was recorded and will be available later at itnetX’s Vimeo channel and on Channel 9.

In this blog post I will detail the steps for publishing the portal in Azure AD, and also how to configure Conditional Access for Users and Devices. Device compliance and/or Domain join conditional access recently went into preview for Azure AD Applications, so this will be a good opportunity to show how this can be configured and how the user experience is.

Overview

itnetX has recently released a new HTML based ITSM Portal for Service Manager, and later there will be an analyst portal as well.

This should be another good scenario for using the Azure AD Application Proxy, as the ITSM Portal Web Site needs to be installed either on the SCSM Management Server or on a Server that can connect to the Management Server internally.

In this blog article I will describe how to publish the new ITSM Portal Web Site. This will give me some interesting possibilities for either pass-through or pre-authentication and controlling user and device access.

There are two authentication scenarios for publishing the ITMS Portal Web Site with Azure AD App Proxy:

  1. Publish without pre-authentication (pass through). This scenario is best used when ITSM Portal is running Forms Authentication, so that the user can choose which identity they want to log in with.
  2. Publish with pre-authentication. This scenario will use Azure AD authentication, and is best used when ITSM Portal Web Site is running Windows Authentication so that we can have single sign-on with the Azure AD identity. Windows Authentication is also default mode for ITSM Portal installations.

I will go through both authentication scenarios here.

I went through these steps:

Configure the itnetX ITSM Portal Web Site

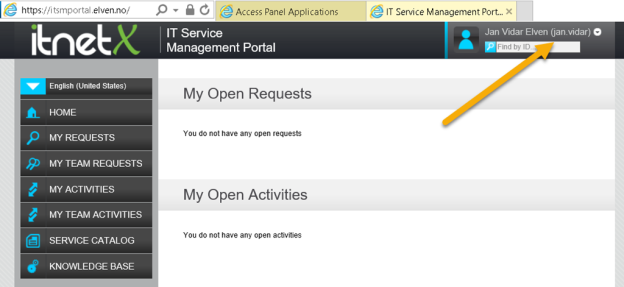
First I make sure that the portal is available and working internally. I have installed it on my SCSM Management Server, in my case with the URL http://azscsmms2:82.

In addition to that, I have configured the ITSM Portal to use Forms Authentication, so when I access the URL I see this:

image

Create the Application in Azure AD

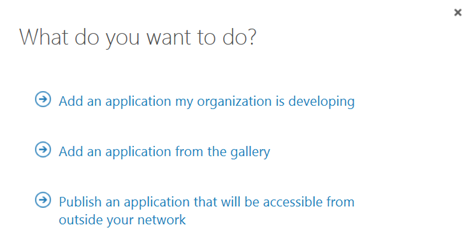
In this next step, I will create the Proxy Application in Azure AD where the ITSM Portal will be published. To be able to create Proxy Applications I will need to have either an Enterprise Mobility Suite license plan, or an Azure AD Basic/Premium license plan. App Proxy require at least Azure AD Basic for end-users accessing applications, and if using Conditional Access you will need a Azure AD Premium license. From the Azure Management Portal and Active Directory, under Applications, I add a new Application and select to “Publish an application that will be accessible from outside your network”:

I will then give a name for my application, specify the internal URL and pre-authentication method. I name my application “itnetX ITSM Portal”, use http://azscsmms2:82/ as internal URL and choose Passthrough as Pre-Authentication method.

After the Proxy Application is added, there are some additional configurations to be done. If I have not already, Application Proxy for the directory have to be enabled. I have created other Proxy Applications before this, so I have already done that.

After I have uploaded my own custom logo for the application, I see this status on my quickstart blade for the application:

image

I also need to download the Application Proxy connector, install and register this on a Server that is member of my own Active Directory. The Server that I choose can be either on an On-Premise network, or in an Azure Network. As long as the Server running the Proxy connector can reach the internal URL, I can choose which Server that best fits my needs.

When choosing pass through as authentication method, all users can directly access the Forms Based logon page as long as they know the external URL. Assigning accounts, either users or groups, will only decide which users that will see the application in the Access Panel or My Apps.

image

I now need to make additional configurations to the application, and go to the Configure menu. From here I can configure the name, external URL, pre-authentication method and internal URL, if I need to change something.

I choose to change the External URL so that I use my custom domain, and note the warning about creating a CNAME record in external DNS. After that I hit Save so that I can configure the Certificate.

image

After that I upload my certificate for that URL, and I can verify the configuration for the external and internal URL:image

When using passthrough I don’t need to configure any internal authentication method.

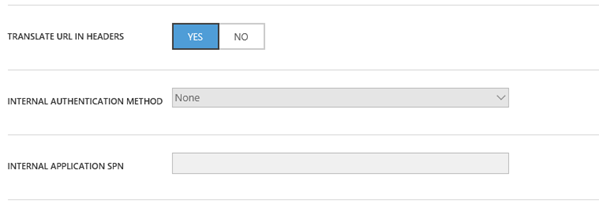
I have to select a connector group, where my installed Azure AD App Proxy Connectors are installed, and choose to have the default setting for URL translation. Internal authentication is not needed when using Pass Through authentication:

image

If I want, I can allow Self-Service Access to the published application. I have configured this here, so that users can request access to the application from the Access Panel (https://myapps.microsoft.com). This will automatically create an Azure AD Group for me, which I either can let users join automatically or via selected approvers:

image

After I have configured this, I am finished at this step, and can test the application using pass through.

Testing the application using pass through

When using Pass through I can go directly to the external URL, which in my case is https://itsmportal.elven.no. And as expected, I can reach the internal Forms Based login page:

image

For the users and groups I have assigned access to, they will also see the itnetX ITSM Portal application in the Access Panel (https://myapps.microsoft.com) or in My Apps, this application is linked to the external URL:

image

This is how the Access Panel looks in the coming new look:

image

Now I’m ready to do the next step which is change Pre-Authentication and use Azure AD Authentication and Single Sign-On.

Change Application to use Azure AD Authentication as Preauthentication

First I will reconfigure the Azure AD App Proxy Application, by changing the Preauthentication method to Azure Active Directory.

Next I need to configure to use Internal Authentication Method “Windows Integrated Authentication”. I also need to configure the Service Principal Name (SPN). Here I specify HTTP/portalserverfqdn, in my example this is HTTP/azscsmms2.elven.local.

image

PS! A new preview feature is available, to choose which login identity to delegate. I will continue using the default value of User principal name.

Since I now will use pre-authentication, it will be important to remember to assign individual users or groups to the Application. This enables me to control which users who will see the application under their My Apps and who will be able access the application’s external URL directly. If users are not given access they will not be able to be authorized for the application.

Enable Windows Authentication for itnetX ITSM Portal

The itnetX ITSM Portal site is configured for Windows Authentication by the default, but since I reconfigured the site to use Forms Authentication earlier, I just need to reverse that now. See installation and configuration documentation for that.

It is a good idea at this point to verify that Windows Integrated Authentication is working correctly by browsing internally to the ITSM Portal site. Your current logged on user (if permissions are correct) should be logged in automatically.

Configure Kerberos Constrained Delegation for the Proxy Connector Server

I now need to configure so that the Server running the Proxy Connector can impersonate users pre-authenticating with Azure AD and use Windows Integrated Authentication to the Squared Up Server.

I find the Computer Account in Active Directory for the Connector Server, and on the Delegation tab click on “Trust this computer for delegation to specified services only”, and to “Use any authentication protocol”. Then I add the computer name for the web server that the ITSM Portal is installed on and specify the http service as shown below (I already have an existing delegation set up):

image

This was the last step in my configuration, and I am almost ready to test.

If you, like me, have an environment consisting on both On-Premise and Azure Servers in a Hybrid Datacenter, please allow room for AD replication of these SPN’s and more.

Testing the published application with Azure AD Authentication!

Now I am ready to test the published proxy application with Azure AD Authentication.

When I go to my external URL https://itsmportal.elven.no, Azure AD will check if I already has an authenticated session, or else I will presented with the customized logon page for my Azure AD:

image

Remember from earlier that I have assigned the application either to a group of all or some users or directly to some pilot users for example.

If I log in with an assigned user, I will be directly logged in to the ITSM Portal:

image

However, if I try to log in with an Azure AD account that hasn’t been assigned access to the application, I will see this message:

image

This means that the pre-authentication works and I can control who can access the application via Azure AD.

Conditional Access for Users and Devices

When using Azure AD as preauthentication, I can also configure the application for conditional access for users and devices. Remember this is a Azure AD Premium feature.

From the the configuration settings for the application I can configure Access Rules via MFA and location, and Access Rules for devices which now is in Preview:

image

If I enable Access Rules for MFA and location I see the following settings, where I can either for all users or for selected groups require multi-factor authentication, or require multi-factor when not at work, or block access completely from outside work. I have define my network location IP ranges for that to take effect.

image

If I enable Access Rules for devices, I see the following settings. I can select for all users or selected groups that will have device based access rules applied (and any exceptions to that).

I can choose between two device rules:

  • All devices must me compliant
  • Only selected devices must be compliant, other devices will be allowed access

If I select all devices, a sub option for windows devices shows where I need to select between domain joined or marked as compliant, or just marked as compliant or domain joined selectively.

image

If I select the second option, I can even specify which devices will be checked for compliancy:

image

So I can with different access rules for both MFA, location and selected devices, in addition to the Azure AD Preauthentication, apply the needed conditional access for my application.

In this case I will select device rules for compliant/domain joined, and for all the different devices. This will mean that for users to access the ITSM Portal, their device must either be MDM enrolled (iOS, Android, Windows Phone) or in the case of Windows devices either be MDM enrolled, Azure AD Joined, Compliant or Domain Joined. Domain joined computers must be connected to Azure AD via the steps described here: https://azure.microsoft.com/en-us/documentation/articles/active-directory-azureadjoin-devices-group-policy/.

After I’m finished reconfiguring the Azure AD App Proxy Application, I can save and continue and test with my devices.

Testing device based conditional access

Lets see first when I try to access the ITSM Portal via an unknown device:

image

On the details I see that my device is Unregistered, so I will not be able to access the application.

Now, in the next step I can enroll my Windows 10 Device either through MDM or via Azure AD Join. In this scenario I have added my Windows 10 to Azure AD Join:

image

If I look at the Access Panel and Profile I will also se my devices:

image

The administrator can see the Device that the user has registered in Azure Active Directory:

image

Lets test the published ITSM Portal again:

image

Now I can see that my device has been registered, but that it is not compliant yet, so I still cannot access the ITSM Portal.

When I log on to the Client Manage Portal (https://portal.manage.microsoft.com), I can see that my Windows 10 Device not yet are Compliant:

image

So when I investigate, fix whatever issues this device has and then re-check compliance, I can successfully verify that I should be compliant and good to go:

image

After that, I’m successfully able to access the ITSM Portal again, this time after my device has been checked for compliance:

image

Summary

In this blog post we have seen have to publish and configure the itnetX ITSM Portal with Azure AD Application Proxy, using both pass-through authentication and Azure AD Preauthentication with Kerberos constrained delegation for single sign-on.

With the additional possibility for conditional access for users and devices, we have seen that we can require either MFA or location requirements, and device compliance for mobile platforms and windows devices.

Hope this has been an informative blog post, thanks for reading!

PS! In addition to access the application via the Access Panel (https://myapps.microsoft.com), I can use the App Launcher menu in Office 365 and add the ITSM Portal to the App chooser:

image

This will make it easy for my users to launch the application:

image

How to reset Mobile Device Management Authority from Config Mgr to Intune

I have a demo/test environment for Intune enrollment where I have configured Configuration Manager as the Mobile Device Management Authority. I have been thinking about a change in approach, as most of my test devices are either lightly managed PC’s or mobile devices. So I wanted to change and use Microsoft Intune only as the MDM Authority.

Referring to the official documentation for setting Mobile Device Management Authority, https://technet.microsoft.com/en-us/library/mt346013.aspx, this can only be set initially when configuring the tenant, and cannot be changed later!

But, there is a way. You can create a Service Request ticket with Microsoft, and request a reset of the mobile device authority.

There are some caveats to this reset request though:

  • You will have to retire and delete all registered mobile devices
  • You will have to delete all MDM related configurations in Configuration Manager

Basically, this is a real start over with clean sheets. If that is what you want, read on, if not, stop here Winking smile.

In this blog article I will show the steps I went through to reset my MDM authority.

Step 1 – Create a Service Request

The first step is to create the Service Request, requesting a reset. Identify the issue by selection feature Intune Service Administration, and symptom Reset mobile device authority. Provide a summary and issue details, like for example below:

image

Review and continue:

image

Add details if needed:

image

Confirm and submit:

image

Service Request is now pending, awaiting response:

image

Step 2 – Await response on Service Request on next steps

After a couple of hours I got a response with a checklist to be completed:

image

Here’s the checklist:

·  Retire all Modern Devices (mobile devices) from within the Configuration Manager Console. It is important that you do not attempt to retire a device from the device itself for this procedure to be executed.
Let us Know if any devices are in a “pending state’

·  Point the Intune Subscription to an empty user collection, or, remove all users from the targeted collection.  and confirm in the CloudUserSync.log that all users are removed.

· Remove all users from the Intune User Group.

·  Run the following SQL Procedure on the CM server to ensure all licenses are removed from the DB:
Insert into MDMCloudUserNotification Select ItemKey, 3, 0 from User_Disc where CloudUserId is not null

·  Then restart the CloudUserSync thread in ConfigMgr (or restart SMS_Executive if easier) and then when CloudUserSync starts up, it should deprov the users.

Restart SMS Executive

To reset the SMS_COLLECTION_EVALUATOR thread through registry, Open Registry console, navigate till below mentioned registry
–> Right click Requested Operation –> Modify –> type ”Stop” and click on ok.

Do refresh till data value reset to “None” and then again edit it with “start” data value
HKEY_LOCAL_MACHINE\SOFTWARE\Wow6432Node\Microsoft\SMS\Components\SMS_EXECUTIVE\Threads\SMS_COLLECTION_EVALUATOR | Requested Operation

Confirmed users are removed from cloudusersync.log

Open cloudusersync.log from C:\Program Files\Microsoft Configuration Manager\Logs and look for messages that users are removed

Please ask customers to provide a couple of sample UPNs after they remove all user licenses and confirm in Viewpoint the sample users no longer have SCCM licenses.

· Delete the iOS APNs certificate

· Delete any and all published applications that are for MDM Devices

· Delete any and all polices that are for MDM Devices

·  Remove the Windows Intune Connector from within the Configuration Manager Console

Provide info:

Tenant ID: xxx.onmicrosoft.com

Global administrator email: xxx.domain.com

Step 3 – Do the checklist

Lets step through the main parts of the checklist.

Retire all Modern Devices

All Clients of Type Mobile must be retired:

image

Depending on the Device Type you can either select to only wipe company content or the device completely:

image

Or for typically a Windows 10 computer managed as a Mobile Device, you can only remove company content:

image

Warning notification:

image

After that the clients are in a status of “Pending Retire”, they will eventually be removed when they sync again. Some of my devices are inactive test devices, so I just turn them on and initiate a sync.

image

After a while I have still some devices left in a pending state. I know that these devices are not existing anymore, so they will not be able to sync. I will let the service request technician know about these, as instructed in the checklist.

In this case, the service request technician instructed me to remove the devices registered for the users in question in the Azure AD management portal (http://manage.windowsazure.com), select the user and removing any mobile devices registered.

You can also remove the devices from the user with MSOnline PowerShell module:

Get-MsolDevice -RegisteredOwnerUpn [email protected] | Remove-MsolDevice

Or for all users that have workplace joined devices:

Get-Msoldevice -All | Where {$_.DeviceTrustType -eq ‘Workplace Joined’} | Remove-MsolDevice

Point the Intune Subscription to an empty user collection and remove cloud synced users

I created a User Collection with a query that I know will not return any users, for example a non existing domain:

image

After that I update the Intune Subscription to use that collection:

image

Connect to the SQL site database, and run the following SQL query to ensure all licenses are removed from the DB:

Insert into MDMCloudUserNotification Select ItemKey, 3, 0 from User_Disc where CloudUserId is not null

After that, restart the “SMS Executive” service, and look in the CloudUserSync.log to confirm that all users are removed.

image

Reset the SMS_COLLECTION_EVALUATOR thread through registry, Open Registry console, navigate to HKEY_LOCAL_MACHINE\SOFTWARE\Wow6432Node\Microsoft\SMS\Components\SMS_EXECUTIVE\Threads\SMS_COLLECTION_EVALUATOR

–> Right click Requested Operation –> Modify –> type ”Stop” and click on ok.

Do a refresh till data value reset to “None” and then again edit it with “start” data value

Take another look in cloudusersync.log from <configuration manager install dir>\Logs and look for messages that users are removed.

The service request technician might ask customers to provide a couple of sample UPNs after they remove all user licenses and confirm in Viewpoint the sample users no longer have SCCM licenses.

Remove MDM configurations from Config Mgr

After the users are removed, MDM configurations must be removed from Configuration Manager.

Delete the iOS APNs certificate:

How?

image

Delete any and all published applications that are for MDM Devices:

Under Software Library, find all applications for the Mobile Devices. Before the applications can be deleted, any deployments must be removed first.

Delete any and all polices that are for MDM Devices:

Under Asset and Compliance, delete all related to Mobile Devices..

  • Compliance Settings|Configuration Baselines and Deployments
  • Compliance Settings|Configuration Items
  • Compliance Settings|Compliance Policies
  • Company Resource Access|Certificate Profiles
  • Company Resource Access|Email Profiles
  • Company Resource Access|VPN Profiles
  • Company Resource Access|Wi-Fi Profiles

Finally, remove the Windows Intune Connector from within the Configuration Manager Console.

Step 4 – Update the Service Request

After I cleaned up, I provided my info to the service request technician and confirmed that I had completed the checklist:

Tenant ID: xxx.onmicrosoft.com

Global administrator email: xxx.domain.com

After a few days, I got the response that I should keep my hands off the subscription during the reset process:

image

Step 5 – MDM Authority Reset Confirmation

A couple of days later I got the confirmation that the MDM authority was now reset:

image

Checking in the Intune Management Portal (http://manage.microsoft.com), I can now select to set Microsoft Intune as the Mobile Device Management Authority:

image

Summary

All in all the whole process for me took 9 days. Some of these days was for me to complete the checklist, the rest was basically waiting for responses on questions, updates and the confirmation.

End result was as expected, I can now register my mobile devices with Microsoft Intune the MDM authority.

If I later want to go back to Configuration Manager as MDM Authority, I would have to do basically the whole reset process again, except that the cleanup will be in Microsoft Intune. A service request will provide details on that as well, and if I do it on a later time, I will put up a blog article on that as well!