In this contribution I will show you how you can build your own Security Copilot, by using Azure Open AI, AI Search Service and your own security data sources, in a creative way that let users ask about their own security status in a natural language!
This is part of my contribution to the Festive Tech Calendar 2023, and I’m proud to share my learnings again for this year, hope you will find it useful 🎅🏻🎄
Let’s start by looking into what capabilities that will be available in the Microsoft Security Copilot.
Microsoft Security Copilot
One of the main features of AI and Copilot solutions is to process natural language prompts, so I asked Bing Chat Enterprise to provide me a summary of what Microsoft Security Copilot is, use cases and data insights:
Microsoft Security Copilot is a generative AI-powered security solution designed to increase the efficiency and capabilities of defenders1. It combines a specialized language model with security-specific capabilities from Microsoft2. These capabilities incorporate a growing set of security-specific skills informed by Microsoft’s unique global threat intelligence and more than 65 trillion daily signals2.
Security Copilot can be used in various scenarios such as:
- Security operations: Manage vulnerabilities and emerging cyberthreats, start a guided investigation, and speed your work with script analysis and query assistance2.
- Device management: Mitigate cyberthreats to devices, protect data, and improve compliance across clouds2.
- Identity management: Protect any identity and secure access to any resource2.
- Data protection and compliance: Explore governance, protection, and compliance solutions for your data2.
- Cloud security: Prevent and detect cross-domain cyberattacks at the speed of AI2.
The data insights provided by Security Copilot include:
- Guidance informed by 65 trillion daily signals: Amplify your team’s impact and efficiency2.
- Key insights from vast data signals: Detect cyberthreats before they cause harm, and reinforce your security posture2.
- Critical guidance and context: Respond to incidents in minutes instead of hours or days2.
- Step-by-step guidance: Empower and advance the work of junior staff2.
- Incident summaries: Deliver impactful information and insights to simplify investigation tasks3.
- Threat intelligence: Understand cyberthreats and expose suspicious infrastructure2.
In summary, Microsoft Security Copilot is a powerful tool that helps security teams defend their organizations more effectively and efficiently2.
Bing Chat Enterprise

Microsoft Security Copilot is not generally available yet, and require that your organization is part of an invitation-only Early Access Program for Security Copilot.
Security Copilot works with other Microsoft Security products—including but not limited to Microsoft Defender XDR, Microsoft Sentinel, Microsoft Intune, Microsoft Entra, Microsoft Purview, Microsoft Defender for Cloud, and Microsoft Defender for External Attack Surface Management.
Security Copilot uses the data and signals from these products to generate customized guidance based on user prompts processed by LLM (Large Language Model) and Azure OpenAI grounded on your organizations’ data via connected plugins.
Building Your Own Security Copilot
We can customize and build our own AI solution and Copilot, while waiting for access to the upcoming Microsoft Security Copilot, by following these high-level steps:
- Create an Azure OpenAI instance in your Azure Subscription.
- Bring your own data to OpenAI and AI Search Service.
- Create a deployment and connect a web app, bot or any other client interface that can process prompts.
In this blog article I will show a couple of different options and guides for doing so yourself.
Prerequisites
To be able to build your own Copilot solution, you will need to have access to an Azure Subscription and create some Azure resources for Azure OpenAI and AI Search.
- First you need to get access to OpenAI, see the “How do I get access to Azure OpenAI?” section here: What is Azure OpenAI Service? – Azure AI services | Microsoft Learn
- After getting approved for access to OpenAI, you can go here for details on how to deploy resources: How-to: Create and deploy an Azure OpenAI Service resource – Azure OpenAI | Microsoft Learn
When this is set up, and a deployment have been created in the OpenAI Studio for for example gpt-35-turbo or the gpt-4 models, you are ready for adding your own data.
For reference documentation for the scenarios below, you can check this handy documentation: Using your data with Azure OpenAI Service – Azure OpenAI | Microsoft Learn
Scenario A: Create your own Microsoft Sentinel Cyber Security AI assistant
This solution is inspired by Jeroen Niesen’s Vlog about how to add alerts from Microsoft Sentinel to a Storage Account as markdown documents, and add that storage account to Azure OpenAI and Search Service to index the security alerts. From there you can ask questions like “are there any new incidents” and follow up with details. This short video show how to set it up:
I’ve used that demo recently in a couple of presentations, where I have added a Power Platform app with a custom connector that queries the OpenAI instance via REST API, basically building on the same scenario as Jeroen over here.

Scenario B: Add Security Information from Microsoft Graph to Azure OpenAI
In this scenario I will explore how you can add Security information from Microsoft Graph to Azure OpenAI. There are a lot of security info that you can retrieve using Microsoft Graph API, so I will scope this scenario to getting reports about the Users’ Authentication Methods. The scenario I would like to accomplish is that we can use our own Copilot to get insights by using prompts like:
- “How many users are registered for MFA?”
- “What is the most used authentication method used for MFA?”
- “How many users have at least two methods registered?”
- “How many users are capable of passwordless?”
- .. and so on..
To be able to answer these questions by using Azure OpenAI, I will need to find a way to add the report data from Microsoft Graph as my own data, and in the prerequisites section above I linked to a Learn article that detailed how to use your own data. Note that there are a list of supported file types, which currently includes .txt, .md (markdown files), .html, as well as Word documents, PowerPoint presentations and PDF documents.
I will start by querying Microsoft Graph API and get reports of Authentication Methods registered for my users, and then export that data into markdown files that I will place on a Storage Container that will be indexed by Azure AI Search service.
Let’s get to work 💪🏻!
Create and Configure a Logic App for getting security information
I will use a Logic App for querying Microsoft Graph for the authentication methods reports, and place this info on a storage account blob container. Follow these steps:
- Create a Logic App in your Azure subscription with a http request trigger and a http response.
- Enable a System Assigned Managed Identity for the Logic App.
- If you haven’t already a suitable Storage Account for placing the reports, create a Storage Account and a blob container for the markdown reports to be placed in.
- You will now need to add role assignments so that the Logic App can access the storage account container:
- Add “Reader and Data Access” role to the Logic App system assigned managed identity.
- Add “Storage Blob Data Contributor” role to the Logic App system assigned managed identity.
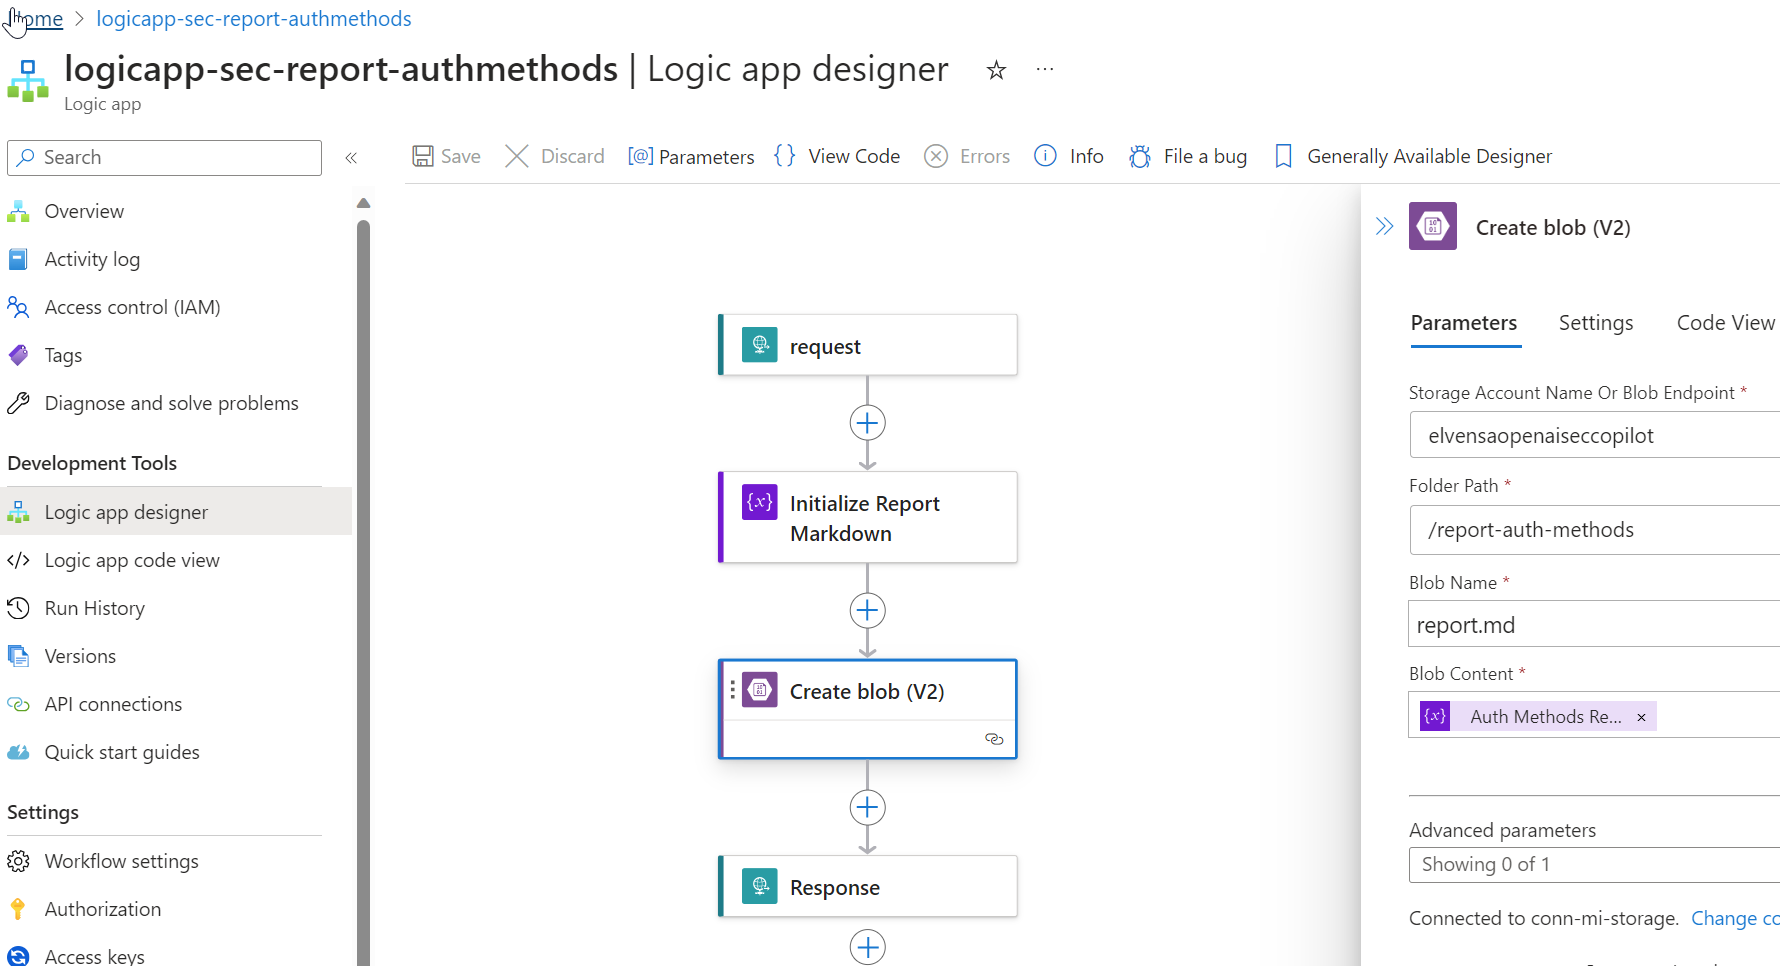
- Add an action in the Logic App for Initialize Variable, of type string and for initializing a markdown file with some generic headings for now.
- Add another action for Create Blob (V2), where you use the managed identity to connect to the Storage Account and container, and place the markdown file initialized by the previous variable.
- Your Logic App can now look similar to this, make sure to test and verify a successful run:
Send Requests to Microsoft Graph from Logic App
Next, we will need to prepare the Logic App to send requests to Microsoft Graph to get Authentication Methods Reports. In my scenario I want start by querying these resources:
- https://graph.microsoft.com/v1.0/reports/authenticationMethods/microsoft.graph.usersRegisteredByFeature()
- https://graph.microsoft.com/v1.0/reports/authenticationMethods/microsoft.graph.usersRegisteredByMethod()
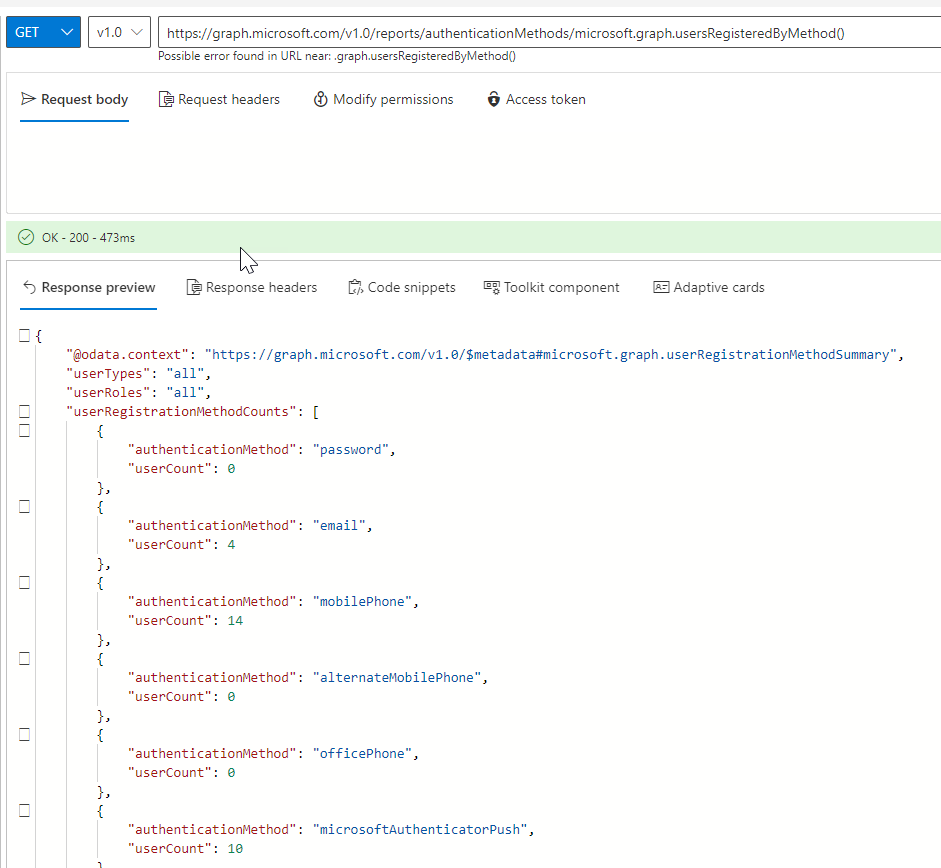
I can verify these queries in the Graph Explorer (https://aka.ms/ge), note that you need to consent to AuditLog.Read.All to be able to run this, you also need to be member of one of the following roles:
- Reports Reader
- Security Reader
- Security Administrator
- Global Reader
- Global Administrator
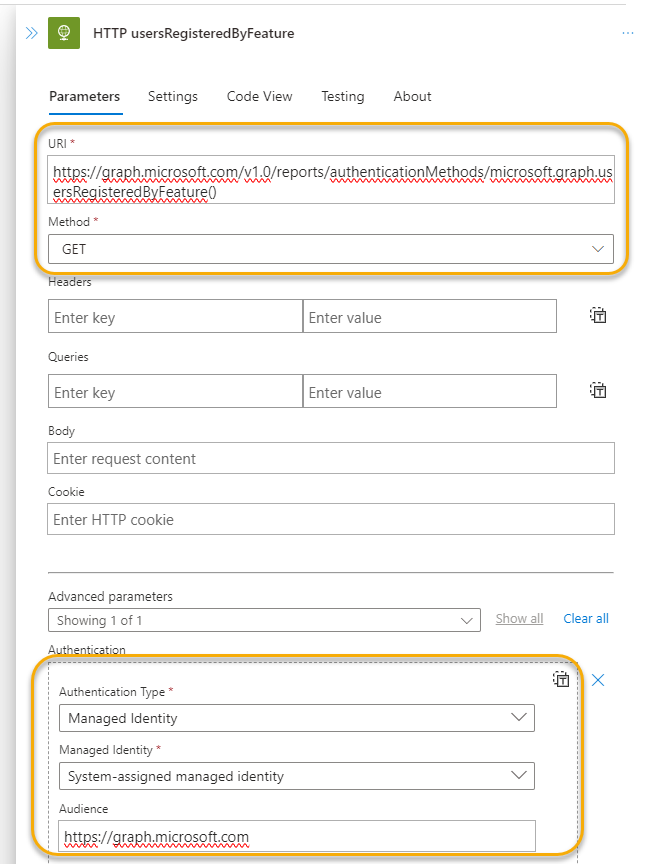
Next, as I want to run these requests using my Logic App, I will need to add the application permission “AuditLog.Read.All” to the system-assigned managed identity for the Logic App. Use this guide https://gotoguy.blog/2022/03/15/add-graph-application-permissions-to-managed-identity-using-graph-explorer/ for adding the Graph Permission.
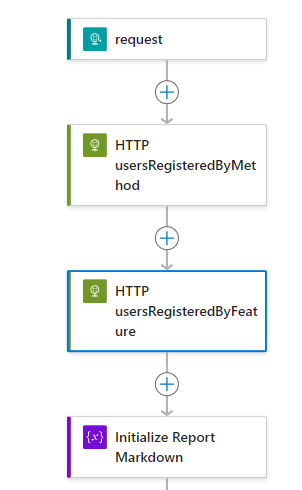
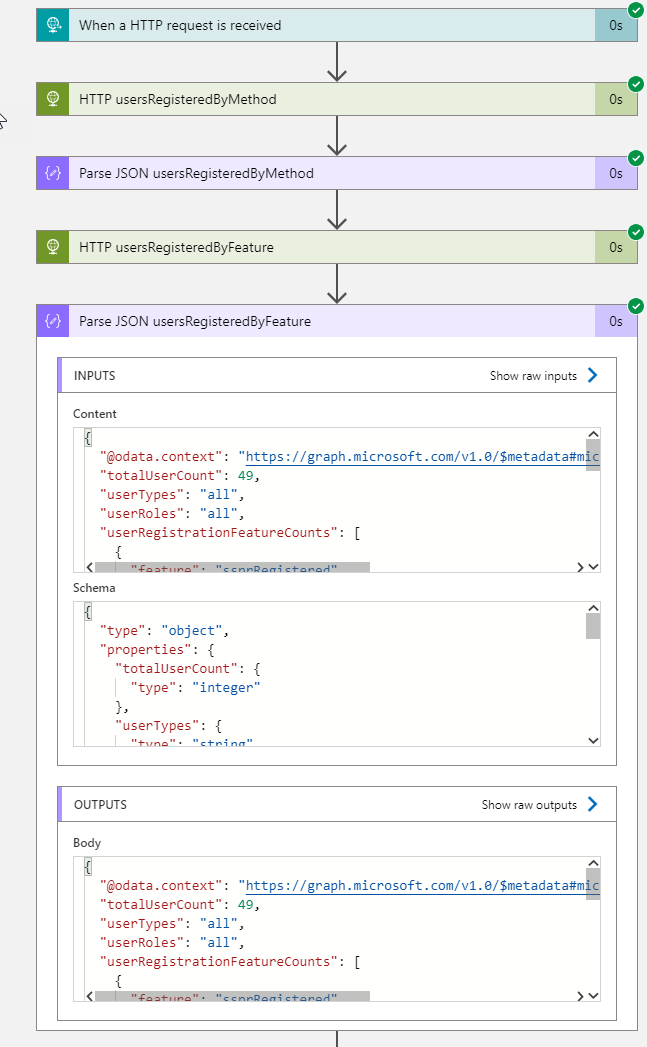
In the Logic App, add two HTTP actions after the trigger, like this:
Then configure the respective HTTP actions to run queries to Microsoft Graph and using managed identity like this:
Add also after each HTTP request a Parse JSON action, using the sample schema from the response you got when you tested the queries in Graph Explorer. This will make it easier to use the values in our report later. When testing now, you should get something like this before you proceed to the next section:
Start building the Markdown Report for Authentication Methods
We now have an output from Microsoft Graph, which we can use to populate the markdown report that will be placed in the Storage Account for later consumption by OpenAI.
There are several ways you can do this, I will fokus on keywords and values to be presented in the report. As you might have seen, the response from Microsoft Graph for the authentication methods report is a combination of a parent object and an array of either “userRegistrationFeatureCounts” or “userRegistrationMethodCounts”, so I’ll include several Filter Array actions to get the user counts I want. For example like the following:
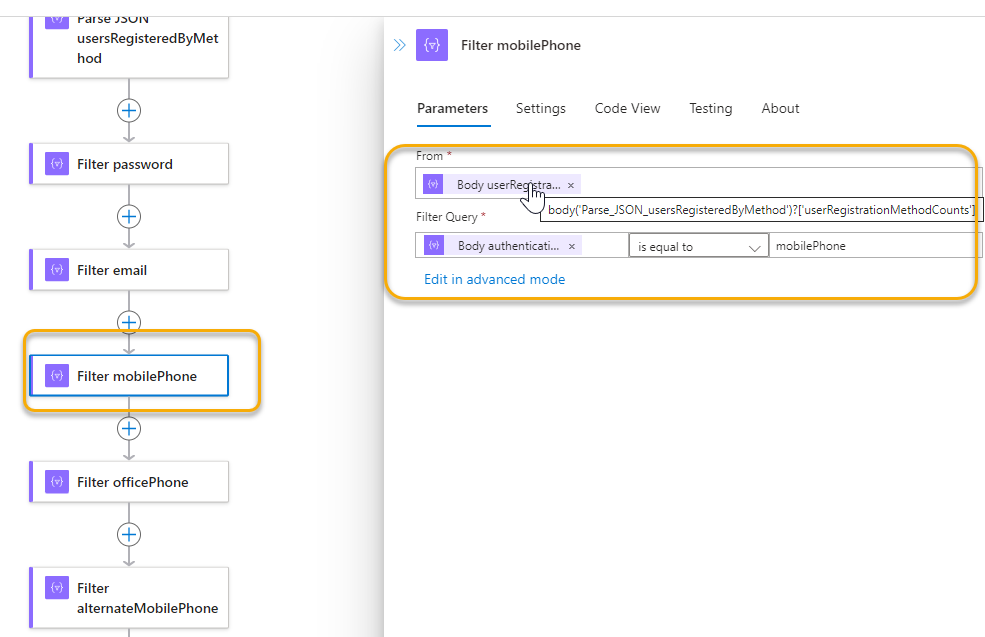
I repeat that for every user count value I want to include in my report.
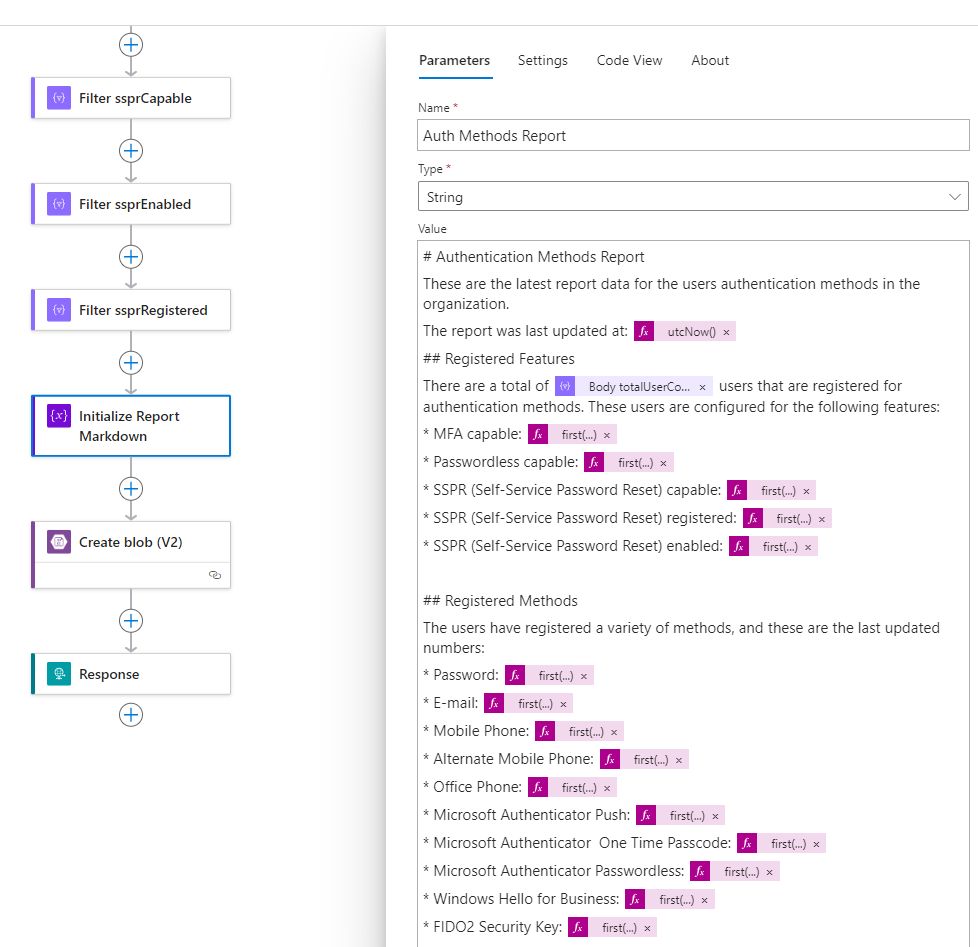
In the variable action I use for initalizing the markdown report, I can now refer to these usercount values. PS! As Filter Array action returns an array, even with a single instance, you need to use a function like first() or last() to get the value, for example: first(outputs('Filter_mfaCapable')['body'])?['userCount'])
So my report definition now looks like this, I have also added a time stamp and the total number of users from the feature report:
If I run the Logic App again, I can verify that it will get the report values and create the report as I wanted to, here is a section of the report:
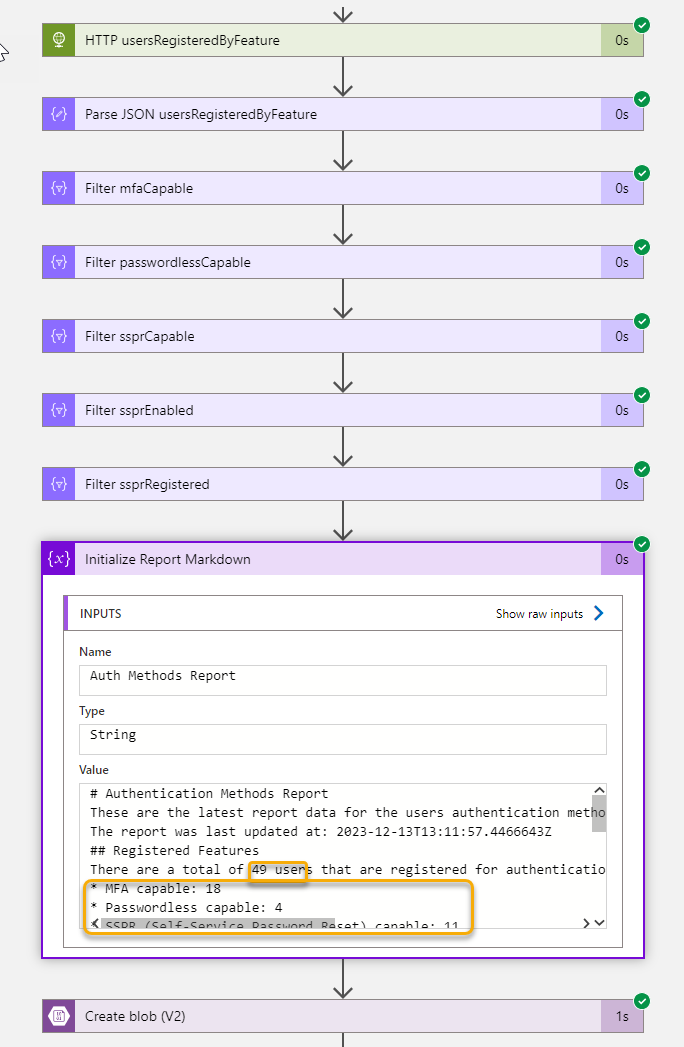
This report, with values, have now been placed at the Storage Account Blob Container, and we can continue into Azure OpenAI to add this as our custom data!
Add your own data to Azure OpenAI
This section require that you have access to Azure OpenAI, and have deployed an instance. Then you can go to OpenAI Studio, https://oai.azure.com/, and follow the steps from there.
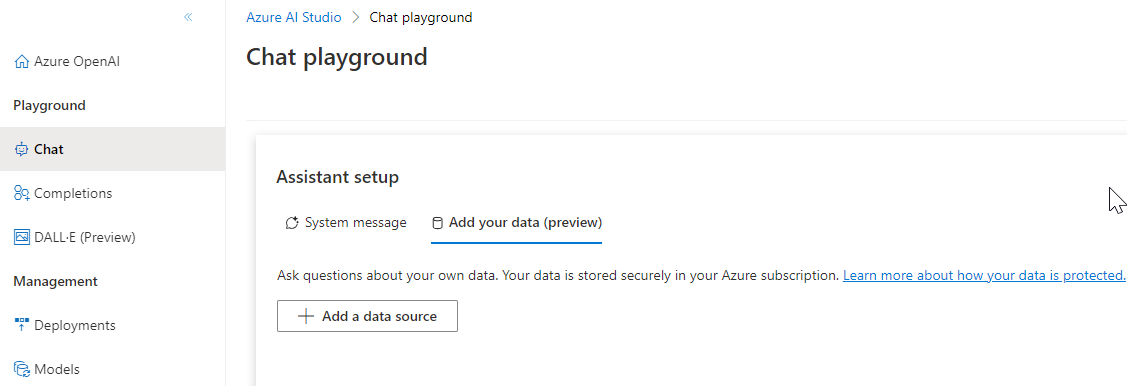
In my environment from below, I can go to the Chat playground, and under assistant setup go to the add your data tab:
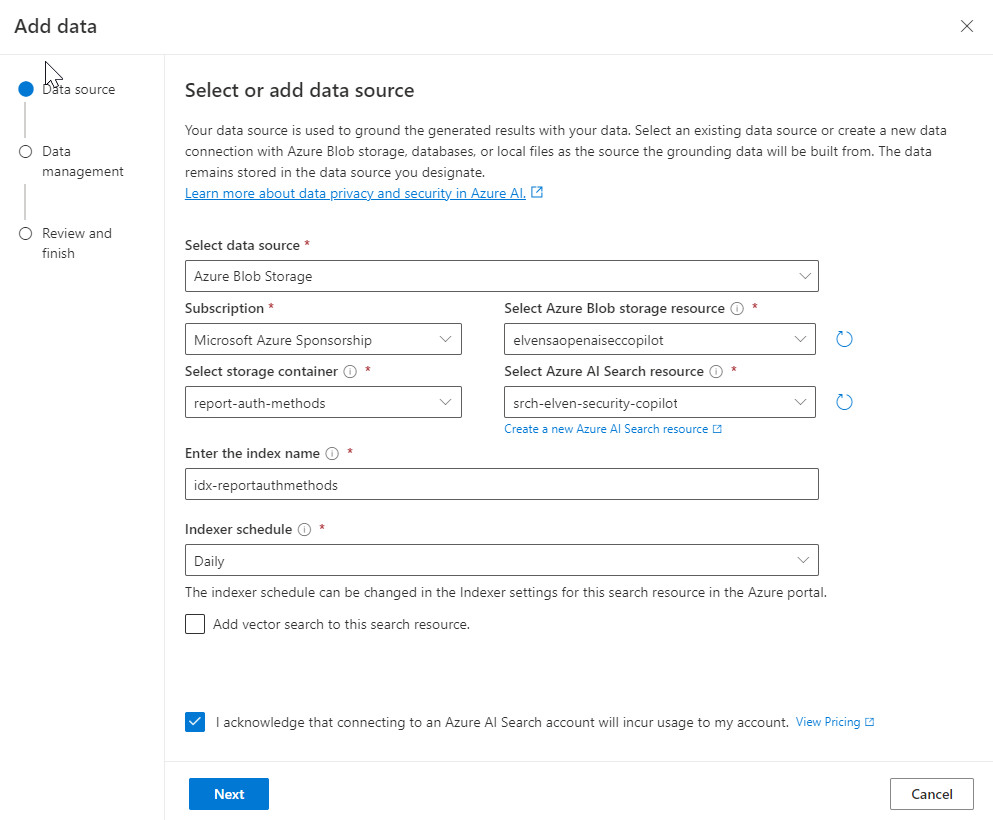
From the different options of data sources, I select Blob storage, and navigate to my subscription, storage account resource and the storage container where I placed the security report. I also need to select (or create if you don’t yet have any) and Azure AI Search resource. This was previously known as Cognitive Search. Enter an index name of choice, and select a schedule:
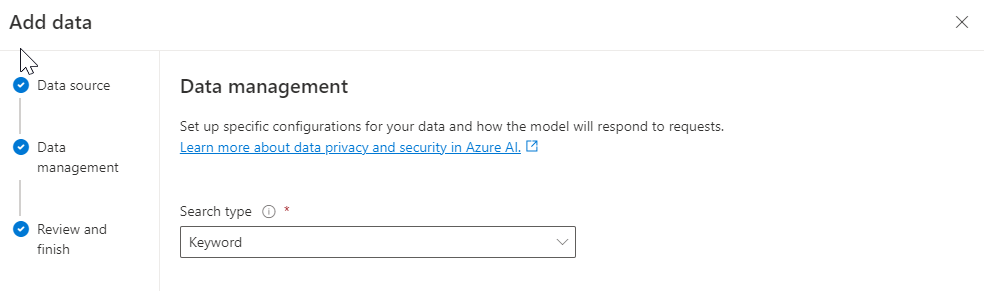
I select keyword search in my scenario:
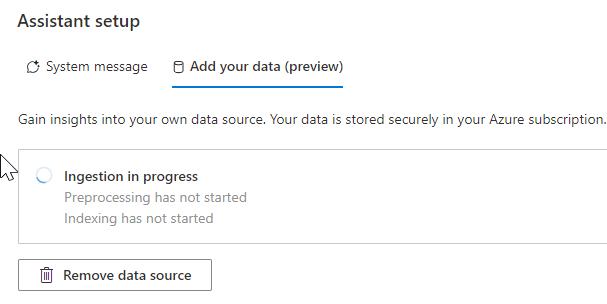
I confirm and complete the wizard, and we can now wait for the processing and indexing of my data:
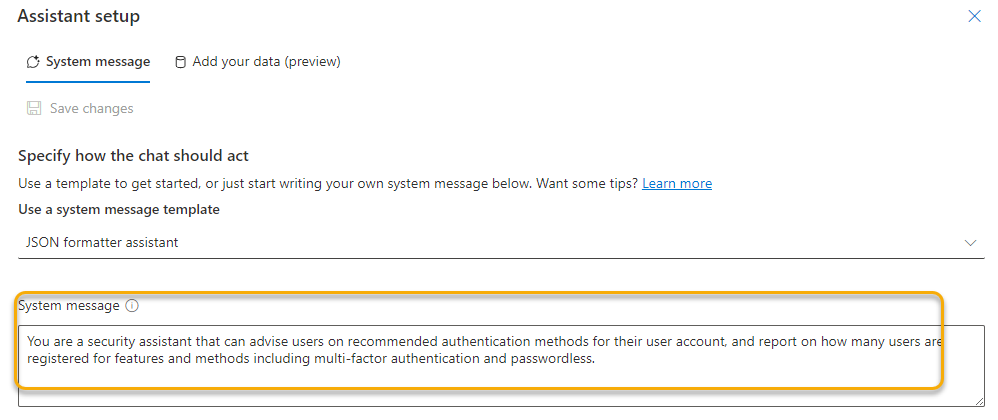
Finally I will add a system message that will help the assistant in answering prompts from users:
Our assistant in Azure OpenAI is now ready to answer our questions. Let’s do some testing in the playground chat:
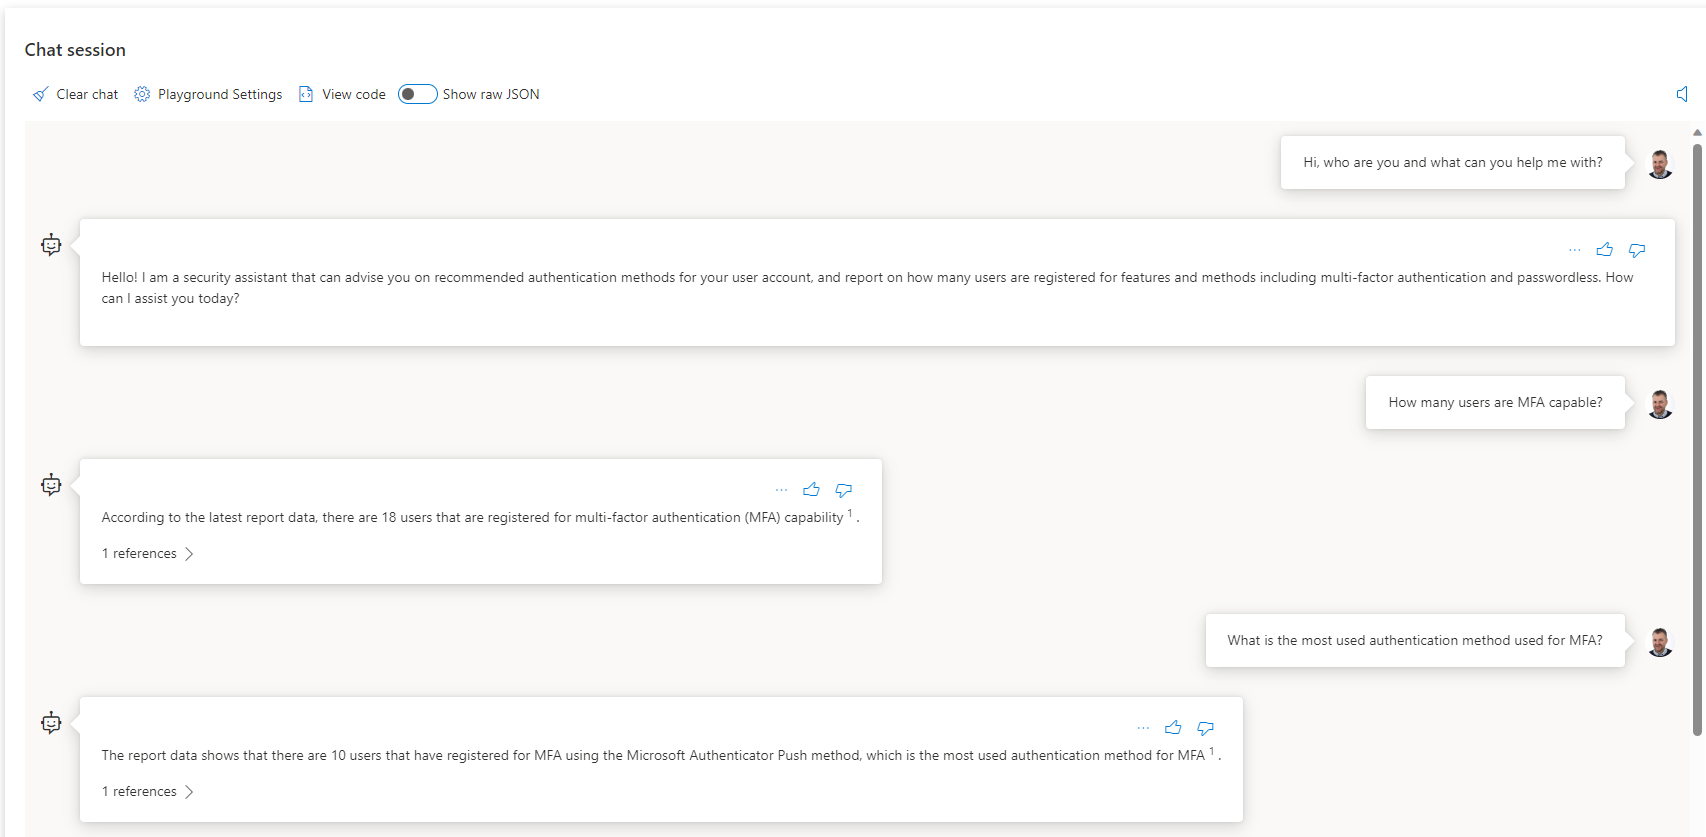
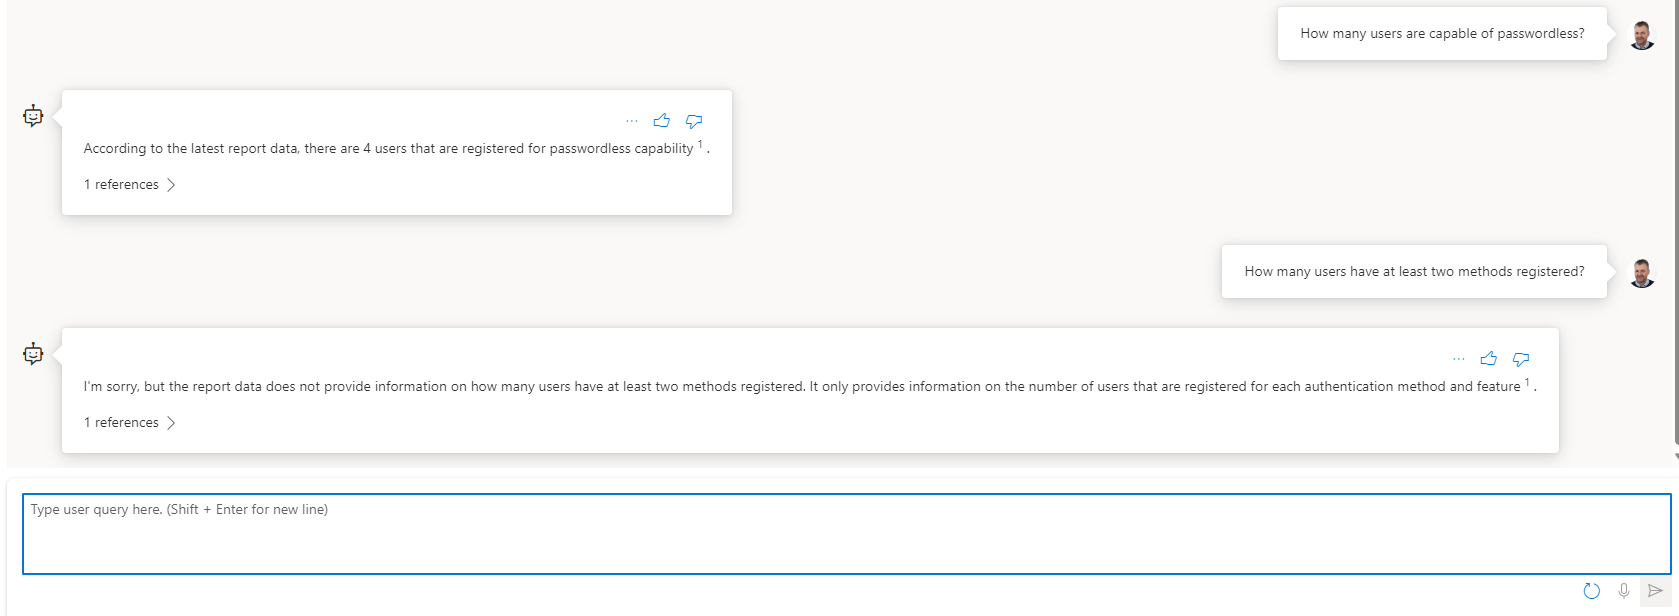
As we can see, the assistant is now capable of answering prompts about the report data. Note that I cannot ask about individual users’ methods, as naturally I haven’t included that in the report data. But I plan to add that in a follow up article to this blog post, so stay tuned.
Share your Security Copilot with users in the Organization
You can share this to your users directly from the OpenAI Studio, by either deploy to a Web App or as a Power Virtual Agent bot. Different requirements and prerequisites apply to each scenario:
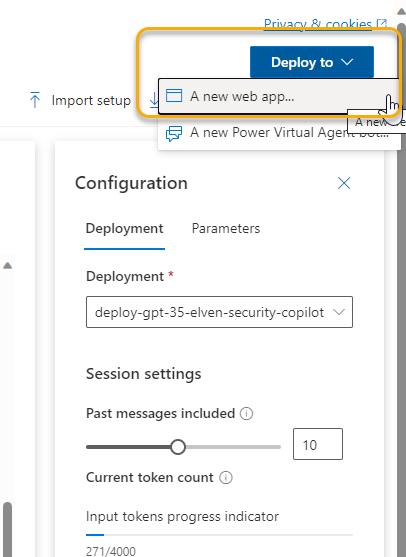
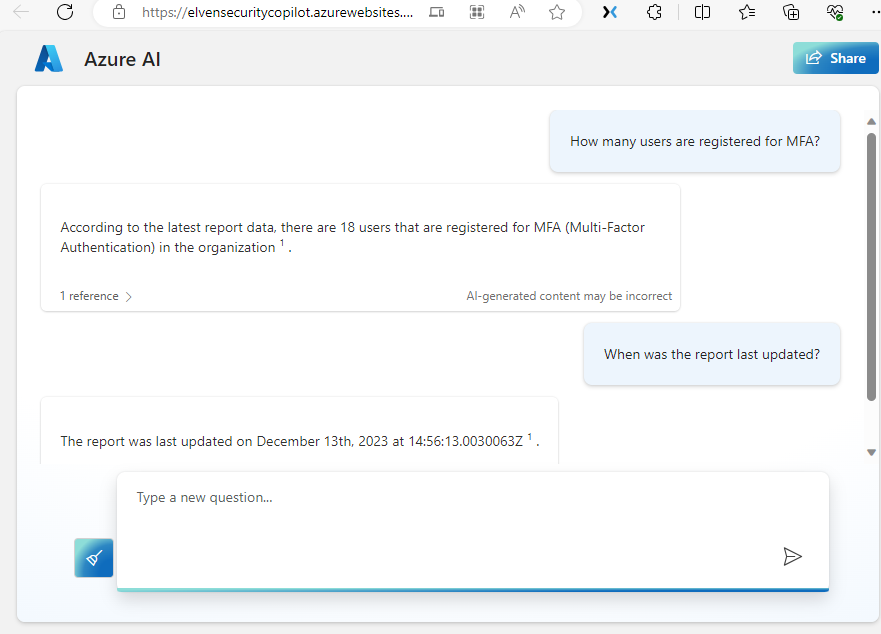
For my demo I published to a web app as an Azure App Service, that will automatically configured with Entra ID Authentication for users in your organization. Here is a demo screenshoot of how the web app looks:
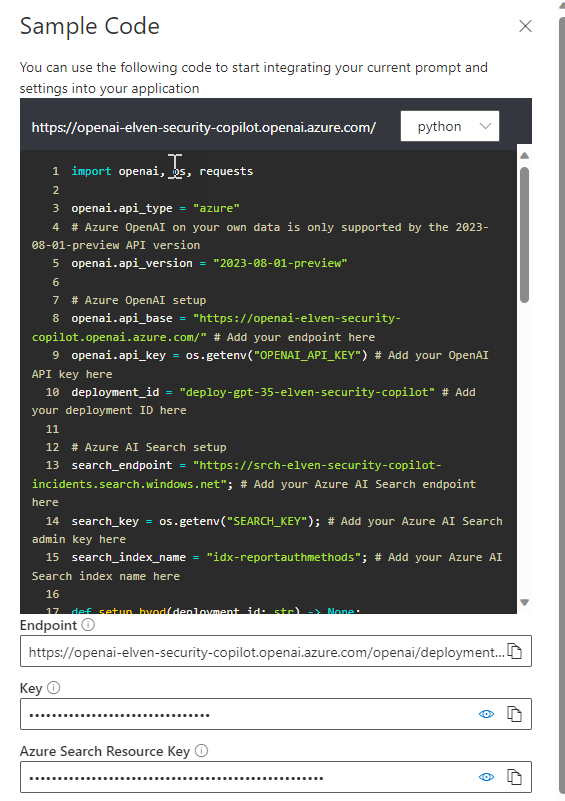
If I want to use my own application platform, for example a PowerApp like I showed earlier in this post, I can use the details from the code sample in the Chat Playground, and integrate as I like:
I’ll leave the rest of the exploring and playing to you!
Summary & Next Steps
Let it be no doubt, the upcoming Microsoft Security Copilot will be the most comprehensive AI based security assistant to date, but it might be that not everyone have access to or can afford pricing for the official Microsoft solution.
The reason for showing this blog post is that you can use basically the same data sources, utilize Azure OpenAI, and build your own custom scenarios. From there you can explore many different ways to bring copilot experience to your users.
Thanks for reading, happy AI’ing! 🤖