A Blog about Enterprise Mobility + Security, Azure AD, Datacenter Management, Service Delivery, Automation, Monitoring, Cloud OS, Azure and anything worthwhile sharing with the Cloud and Datacenter community.
I’m excited to announce that I will be speaking at the Cloud Lunch & Learn Marathon 2021, a Global and Online Community event that will run for 24 hours between May 13th and 14th, with Speakers and Community experts from all over the world.
Sessions will cover a range of Cloud topics, including AI, Cloud Native, Blockchain, IoT, Data & BigData, Security, DevOps, GitHub, Backend, Frontend, Power Platform and, more.
Many sessions will also be held in other languages than English, like Portuguese, Spanish, Hindi, Chinese and Arabic!
My session will be about Passwordless for Azure Services. It is well known that Passwordless for Microsoft Identities is now the thing to do to secure your end users, but what about Azure Services that need to authenticate to other resources and APIs? This is where Managed Identities is the way to go. In my session I will show the capabilities and usage scenarios for using Managed Identities to get rid of application credentials once and for all!
You can see all the sessions at the link below, where you also will find registration details.
My Session details:
Session Title: Passwordless Azure Authentication using Managed Identities
The purpose of this blog post is to show how you can run a PowerShell script on an Azure VM that will shutdown and deallocate the actual VM the script is run on.
Marcels blog learnt me of something I havent used before, Azure Instance Metadata Service, where I can get information on my current VM instance. I wanted to combine this with using Managed Service Identity (MSI), and actually let the VM authenticate to itself for running the shut down command. The shut down command will be using the Azure REST API.
First, let us set up the requirements and permissions to get this to work.
First, we need to set up the Managed Service Identiy the VMs in question. This is done under the VM configuration, by enabling Managed service identity as shown below:
After saving the configuration, wait for the Managed service identity to be successfully created. This will create a service principal in Azure AD, and for VMs this will have the same name as the virtual machine name.
Now we need to give that service principal access to its own VM. Under the VMs Access Control (IAM) node, select to add a permission for the service principal as shown under. I have given the role of Virtual Machine Contributor, which means that the MSI will be able to write to and perform operations on the VM like shutdown, restart and more:
So for each VM we want to use this PowerShell script, we will need to do the same 2 operations, enable MSI and add service principal permission to the VM:
PowerShell script for Shutdown and Deallocate using MSI
The following script will when run on the Azure VM do the following steps: (full script follows below as the images are small)
Read instance metadata and save subscription, resource group and vm name info:
When this script is run on a VM the following output will display that the REST operation was successful, and shortly after the server goes down and deallocates as excpected.
To summarize, this blog post showed how we can use Managed Service Identity together with Azure Instance Metadata Service, to let the VM manage itself. This example showed how to shut down and deallocate, but you can use the REST API for other operations like restart, get info, update the VM and so on. Best of all with using MSI, is that we don’t have to take care of application id’s, secret keys and more, and having those exposed in the script which can be a security issue.
The complete PowerShell script is shown below:
This file contains hidden or bidirectional Unicode text that may be interpreted or compiled differently than what appears below. To review, open the file in an editor that reveals hidden Unicode characters. Learn more about bidirectional Unicode characters
Managed Service Identity makes it possible to keep credentials out of code, and that is a very inviting prospect. As I have been exploring Microsoft Graph in different scenarios using PowerShell, I thought I should have a go at using Managed Service Identity in an Azure Function and run some PowerShell commands to get data from the Microsoft Graph. Lets get started!
Configuring the Azure Function
First, if you haven’t already created an existing Azure Function App, go ahead and do that. Here is my Function App I will use in this demo:
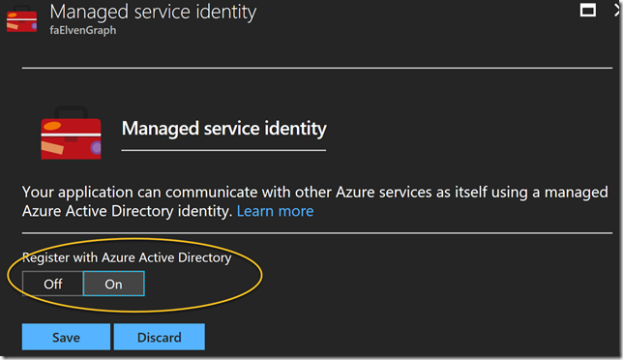
Next, open the Function App and go to Platform features, and then click on Managed service identity:
Under Managed service identity, select to Register with Azure Active Directory:
After saving you should get a successful notification that the managed service identity has been registered.
Let’s check what has happened in Azure AD, to that I will use the AzureAD PowerShell CmdLets. After connecting to my Azure AD tenant, I will try to get the Service Principal:
And get some properties of that object:
We can see that the Service Principal object is connected to the Azure Function App and of type ServiceAccount.
Now, we are ready for the next step, which is to create a function that will get data from Microsoft Graph. But first we will need to give this Service Principal some permissions.
Permissions and Roles for the Managed Service Identity
In my scenario I want to access the Microsoft Graph, and specifically get some Directory data like user information from my Azure AD. When accessing Microsoft Graph you would normally register an Azure AD Application and set up Application or Delegated Permissions, and follow the authentication flow for that. But in this case I want the Service Principal to be able to directly access Directory Data, so I will have to give my Service Principal permission to do that.
The following Azure AD commands adds my service principal to the AD Directory Role “Directory Readers”:
When listing membership in that role I can see my Service Principal has been added:
Creating a PowerShell Function for the Managed Service Identity
In your Function App, you can now create a new Function, selecting language PowerShell, and in this case I will create it as a HttpTrigger Function:
If you have been following the flow of the blog post until now, we can now check if the Function App is ready for using the Managed Service Identity (MSI). Two environment variables will be created, and you can check if they exist by going to Platform features, and then selecting Advanced tools (Kudo). Under environment you would se something like this if everything is ready (it could take a little time, so re-check until its there):
These two environment variables will be needed in the Azure Function, so we will start by getting that:
If I run the Function I can see from the output that I was able to retrieve the environment variables:
Next I will specify some URI and parameters for my authentication request using the managed service identity. I will need to specify the version (currently 2017-09-01 as specified in the documentation), and since I want to get data from the Microsoft Graph, I will need to specify that as the resource URI. I then build the URI for getting the authentication token:
With that, I can now do an authentication request, which if successful will return an access token I can use as a Bearer token in later queries agains the Microsoft Graph:
Let’s do another test run and verify that I can get an Access Token:
Querying the Microsoft Graph
With a valid Access Token, and with the correct permissions for the resources I will want to access, I can now run some Microsoft Graph API queries.
In my example I have some test users in my tenant named after the popular Seinfeld show. In fact I have set a “Seinfeld” department attribute value on those. So my query for getting those users would be:
A great way to test Microsoft Graph Commands is to use the Graph Explorer, https://developer.microsoft.com/en-us/graph/graph-explorer, and if you sign in to your own tenant you can query your own data. As an example, I have showed that here:
In my Azure Function I can define the same query like this (PS! note the escape character before the $filter for it to work):
And with that I can request the user list using Microsoft Graph and a Authorization Header consisting of the Access Token as a Bearer:
Let’s output some data from that response:
And there it is! I’m able to successfully query the Microsoft Graph using Managed Service Identity in an Azure Function, without handling any credentials.
For reference, I have attached both the Azure AD PowerShell commands, and the Function PowerShell commands below from my Gist. Enjoy!
Azure AD PowerShell SPN commands:
This file contains hidden or bidirectional Unicode text that may be interpreted or compiled differently than what appears below. To review, open the file in an editor that reveals hidden Unicode characters. Learn more about bidirectional Unicode characters
This file contains hidden or bidirectional Unicode text that may be interpreted or compiled differently than what appears below. To review, open the file in an editor that reveals hidden Unicode characters. Learn more about bidirectional Unicode characters