Category Archives: Azure AD Conditional Access

How to configure Conditional Access for Azure AD PIM

Azure AD Privileged Identity Management is a really great security feature for controlling those Azure AD and Azure Subscription administrator roles. By implementing Azure AD PIM you can let users with admin roles elevate themselves when they need to, using just in time (JIT) and eligible roles instead of permanent admin roles. You can even implement approval workflows and audit trails, so if you haven’t looked into it you should really take a look!

With Azure AD PIM you can require Azure MFA when activating admin roles, but outside that you cannot set conditions and access control scenarios like you can do with Azure AD Conditional Access.

But now recently there is a new option in public preview for assignments to users and groups for Conditional Access policies, you can assign the CA policy to directory roles!

image

So I was wondering how this would work together with Azure AD Privileged Identity Management, for example in the following scenario:

I have an Exchange Administrator that from time to time performs Exchange Online admin tasks, and have configured this admin user with Azure AD PIM and eligible for Exchange Administrator Role among others:

image

Lets say that I only want this user to perfom Exchange Administrator tasks from a Compliant Device. Even though the Azure AD PIM role is protected by MFA at activation, making the user secure and trusted, I really want the device he is using to be secure and compliant with any management profiles I have defined using Intune MDM. Especially when he is doing admin stuff in our Exchange Online tenant or even running some Exchange Online PowerShell commands.

Lets set up this scenario.

Creating Azure AD Conditional Access Policy for Directory Role

The first thing I set up is the CA policy for my specific Directory Role in this scenario. I specify a name and then select the Directory role of Exchange administrator as shown below:

image

Next for Cloud apps I select Exchange Online:

image

For Access controls I select to require the device to marked as compliant:

image

After that I enable the policy and save. We are now ready to test the user experience.

Testing Azure AD PIM Role Activation and Conditional Access

So now we can test the scenario. Remember that the idea is that the CA policy only will kick in when the user has activated his Azure AD PIM role assignment as Exchange Administrator.

PS! If this user also has a Exchange Online license and mailbox, the same CA policy will apply and require the device to be compliant as long as the Exchange Administrator role is active. That could pose some not intended side effects, requiring the devices that access Exchange Online for normal mailbox access to be compliant as well, but as long as the Exchange Online Admin isn’t available as a Cloud app in Conditional Access we have to do it this way.

With my admin user, I first go to http://aka.ms/myroles, which will redirect me to my roles defined in Azure AD PIM. Lets sign in first:

image

And here is my eligible roles:

image

I select the action link to activate my Exchange Administrator role, and then to verify my identity with Azure MFA:

image

After verifying I can specify a reason or adjust the activation duration:

image

After that I’m activated and has an access valid for the set period of time:

image

Now, let’s go to to the Exchange Online Admin portal: https://outlook.office365.com/ecp. After signing in, if I’m not already signed in, I will get this message:

image

The details will tell me that the access rules require a compliant device:

image

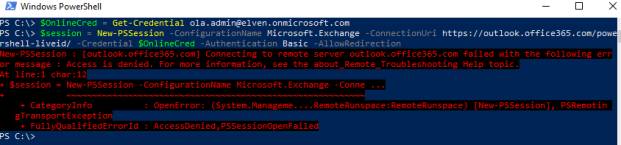
We could also check using Exchange Online PowerShell module, and I get the same message:

image

Note that this message only works with the Connect-EXOPSSession that use Modern Authentication. The “old” way of using remote PowerShell and credential object to Exchange Online use basic (legacy) authentication so we cannot control that information flow, but the admin user will be denied there as well:

ExoPS

To conclude this blog post, I have shown that by combining the new preview feature of Directory Roles assningments for Azure AD Conditional Access, and Azure AD Privileged Identity Management, we can implement more complex scenarios for conditions and access rules for using those directory roles. In my example I used compliant device, but you could also use any other of the conditions and access controls available.

Configure Azure AD Authentication for Project Honolulu version 1803

Just a few days ago a new version of Project Honolulu, technical preview 1830, was released for Windows Server Insiders, https://blogs.windows.com/windowsexperience/2018/03/13/announcing-project-honolulu-technical-preview-1803-and-rsat-insider-preview-for-windows-10/.

One of the major updates to that version was the support for changing access control from local group/Active Directory to Azure AD Authentication. Configuring Azure AD Authentication will provide the ability to pre-authenticate users with their Azure AD credentials, as well as restrict access to selected users or even integrate with Azure AD Conditional Access.

In this blog post I will provide some steps, examples and screenshots for how I did that configuration in my own environment.

This scenario builds on the previous installation I have made with Windows Server 1709 (Server Core) and Project Honolulu, see blog article for how my setup is: https://gotoguy.blog/2018/02/13/installing-windows-server-version-1709-on-intel-nuc-skull-canyon-and-configure-hyper-v-for-remote-management/

Update existing version of Project Honolulu to version 1803

Since I had an existing installation of Project Honolulu on this server ELVEN-NUC-HV1.nuc.group, I downloaded the 1803 installation file, connected to the server and ran the following command to silently install and update the existing installation:

msiexec /i HonoluluTechnicalPreview1803.msi /qn /L*v log1803.txt SME_PORT=443 SSL_CERTIFICATE_OPTION=generate

After that I navigated to the https://elven-nuc-hv1.nuc.group url from my client machine, and verified that I could sign in and see that the Project Honolulu website was updated.

image

I also note the certificate warning I receive because my client doesn’t trust the self generated certificate the gateway server installation provided. This will be a problem when using Azure AD Authentication, so in the next step I will make sure the client trusts that.

Export and trust self signed certificate

First, start a PowerShell session on the Honolulu Gateway Server, and then run the command:

Get-ChildItem –Path cert:\LocalMachine\My | FL

This will return any certificates in the machine store. As I have previously installed and generated a self signed certificate for Project Honolulu gateway server, I see 2 certificates now, and can note the thumbprint for the most recent one:

image

Next I will run the following commands for getting the certificate and exporting it to a .cer file:

$cert = (Get-ChildItem –Path cert:\LocalMachine\my\<THUMBPRINT>)
Export-Certificate –Cert $cert –FilePath <path>\<filename>.cer.

In my enviroment I ran the following:

imageAfter that, transfer the .cer file to the client computer(s) you want to be able to connect to the Project Honolulu website, and run the following commands to get and import the .cer certificate into trusted root store:

$cert = (Get-ChildItem –Path <path>\<filename>.cer)
$cert | Import-Certificate –CertStoreLocation cert:\LocalMachine\Root

In my enviroment this looked like this (from an elevated PowerShell window):

image

I took the extra step of verifying that the self signed certificate indeed was imported into trusted root store:

image

Change Access Control to Azure AD

Now I am ready to change access control in Project Honolulu. Click on the Settings cogwheel, and under Settings click Access.

My current settings are set to Active Directory or Local groups, so I click on Change access control:

image

I then change to Azure Active Directory (AAD), and see the prerequisites for connecting the gateway to Azure:

image

I downloaded the New-AadApp.ps1 script, note that this script requires the modules AzureRM.Resources and AzureAD to be installed at the machine where you run the script. If you don’t have them installed, you can install these using Install-Module, as shown in this example:

image

I chose to run this script on my client computer (not on my server core gateway computer), and with the following command:

.\New-AadApp1803.1.ps1 –GatewayEndpoint https://elven-nuc-hv1.nuc.group

(PS! I didn’t have the AzureAD module installed, but the AzureADPreview module instead. A simple change in the Requires section of the script fixed that;)

Running the script prompted me to specify a Global Administrator account for the tenant I wanted to register the Azure AD App in, and after sucessfully authenticating I got confirmation. Note the AAD Application name and other Id’s:

image

Back at the Access Control settings, refresh the browser, note the changed instructions show in the dialog below, and then Save. This will restart the gateway service.

image

After refreshing the browser again, you will be prompted by the following consent for permissions (provided that you already had an active logged on session, or else you will prompted to log in to the tenant you registered the app in):

image

After successfully authenticating and accepting, I’m logged into the Project Honolulu website. Under Settings and Azure, I can verify that I’m logged in and sign out again if needed.

image

Logging on with other users from the tenant

Remember by default all members of the Azure AD tenant will have user access to the Honolulu gateway service. That includes any B2B Guest Users!

Each user logging in need to first time consent to permissions, in the following screenshots I have logged on with a normal user account and then a B2B guest account:

imageimage

Only local administrators on the gateway machine will have administrator access to the Honolulu gateway.

Under Access Settings you can click on a link to go directly to the Azure AD App that got registered when you ran the script earlier:

image

Clicking on that link and logging in with a Global Administrator, you will get to your SME-<name> app. From there you can go to users and groups, and all users that have logged in until now will be listed. By default they will not have any role assigned, but you can change role between Gateway Administrator or Gateway User as I have done below:

image

If you want to restrict which users or groups that are allowed to log into the Project Honolulu site with their Azure AD Credentials, you can go to Properties and then enable the setting for require user assignment:

image

After enabling this setting users that aren’t added to the list of users or groups either directly or via group membership will not be allowed to log on to Project Honolulu.

Summary and next steps

In this blog post I have shown a first look for enabling Azure AD Authentication for Project Honolulu version 1803 technical preview.

The next step is to look into configuring Azure AD Conditional Access for this application, that will come in a later update to this blog article, stay tuned!

A couple of issues is also on my list:

  • I’m prompted to log on with local admin credentials in addition to the Azure AD credentials
  • When I follow the link from Access Control settings I’m able to find the Azure AD App, but I cannot see it by just browsing the Enterprise Applications list. Based on the documentation I this should have work. This means for now I cannot add that App to any Conditional Access policies as it is not browseable.
  • The .\New-AadApp1803.1.ps1 script cannot be run on the Windows Server 1709 core version, as there is no GUI and I get iframe errors, it could be that this is related to the issue above, as I ran the script on my client instead.

I will also look into these issues in an update to this blog post. Please comment below if you are seeing similar issues or have any other experiences. Thanks for reading 🙂

Secure Access to Project Honolulu with Azure AD App Proxy and Conditional Access

Last week Microsoft announced Project “Honolulu”, the new Windows Server remote management experience, and now you can download a technical preview to install in your own data center, read here for more details: https://blogs.technet.microsoft.com/windowsserver/2017/09/22/project-honolulu-technical-preview-is-now-available-for-download/.

As the management is browser based, I thought this was a perfect fit for using Azure AD and publishing the management portal using Azure AD Application Proxy, and even better to secure the access using Azure AD Conditional Access. Consider the following diagram, where you instead of just publishing DNS and open Firewall to access the management server directly, I would instead use Azure AD App Proxy for secure access.

ProjectHonolulu

So lets get started setting this up!

Install and configure Project “Honolulu” technical preview

I will not get into great detail on installing Project “Honolulu” here, you can just follow the technical deployment documentation, but in my environment I have installed some servers running as Azure Virtual Machines joined to a single-forest, single-domain Active Directory. I have “on-premises” AD users and groups, and I’m running Azure AD Connect with Password Hash Synchronization.

On one of these Azure VM’s, I’ve downloaded and installed the Project “Honolulu” technical preview, with the following configuration:

  • Management Port: 6516
  • Self-signed Certificate

I’m now able to access the web based management internally, using https://azhon1.elven.local:6516. I can now proceed with publishing this externally with Azure AD App Proxy.

Configure Azure AD Application Proxy

Before you can publish applications using Azure AD Application Proxy, you have enable the feature in your Azure AD tenant, and install and configure one or more servers running Azure AD App Proxy Connector, and configure those in a connector group to use for the application. If you already have this configured, you can proceed to the next section. If you want more details, see this previous blog post, and the first sections on enabling App Proxy and innstalling connectors: https://gotoguy.blog/2017/02/21/publish-the-cireson-configuration-manager-portal-with-azure-ad-application-proxy/

Publish the Project Honolulu as an Azure AD App Proxy App

In the Azure AD management blade in the Azure Portal, select Enterprise Applications and click to add a new application. Select On-premises application:

image Specify a Name for your application, and the Internal Url where you installed the Project Honolulu technical preview, including port number as shown below. If you want you can change parts of the External Url, even using your own domain and SSL certificate. I will just use the default here. I will use Azure Active Directory as Pre Authentication, meaning that no-one can access this website without beeing authenticated with Azure AD first. And last, I select my Connector Group of Azure AD App Proxy Connector Servers. PS! Remember that these servers need to be able to access the Internal Url directly, in case you have any Firewalls, NSGs or other components that might block traffic.

image

After adding the application, I have to do some more configurations. First, optionally, you can select a custom logo:

image

User assignment is required in this configuration, so next I need to assign some users to the application. Here I have added a normal domain user and a domain admin user. Both these users are synchronized from my local AD.

image

Next I wan’t to configure Single Sign-On, so that users that authenticate with Azure AD automatically will be signed in to the Project Honolulu management site. I select Integrated Windows Authentication for sign-on mode, and then I specify the internal application SPN for which is needed for Kerberos Constrained Delegation.

image

After that I have one more important step, and that is to configure delegation at my Application Proxy Connector servers. In my local Active Directory, open the Computer object for every server that acts as Azure AD App Proxy Connectors, and on the Delegation tab, add the server that you installed the Project Honolulu on, selecting http as the service. In my environment, I have added this now. I have some previous delegations for others servers as well.

image

We are now ready to test the application publishing via Azure AD!

Access Application using Azure AD

You now have basically two options for accessing the application:

When using the Azure AD Access Panel, if your users has been assigned access, you will see the application published:

image

When launching that, I will be automatically logged in to the Project Honolulu web site, configured via SSO and Windows Integrated Authentication:

image

And I can start managing my configured servers:

image

So, now we have successfully configured an Azure AD App Proxy Application, and can connect securely from external url using SSO with Windows Integrated Authentication and Azure AD Pre Authentication. The application also requires that only assigned users can access the application.

In the next section I will configure Conditional Access for the application.

Configuring Conditional Access

When publishing this server management tool for external access, I wan’t to secure access as much as possible. For example, if one of my admins credentials have been leaked, I want that extra layer of security that users have to use Azure Multi-Factor Authentication when accessing the Project Honolulu application. I will configure that using Azure AD Conditional Access. On the application, I select Conditional Access as shown below:

image

I select to create a new policy, giving it a name:

image

I then select this to apply for all users:

image

Confirm that this policy applies to the Project Honolulu application:

SNAGHTML7d43e5d

On Conditions I can optionally configure conditions for sign-in risk, device platforms, locations and client apps, but I will just let this policy apply for all conditions for now, so I’m leaving Conditions as it is.

image

Under Access Control I select to Require Multi-Factor Authentication, and the set to Enable the policy. Note that I can select additional controls for even more secure access, but for now I just want to require MFA:

SNAGHTML7d8d124

So, save the policy, and lets test how accessing the application works now.

If I either go directly to the external url, og via the Access Panel, I will now be prompted for MFA:

image

That concludes this blog post. I’m very excited for this new preview for Project “Honolulu”, and using the great Azure AD Application Proxy feature I can securely publish and access the management site from external locations and clients. And even better with Azure AD Conditional Access, I can create a policy that sets access control for multi-factor autentication requirements, and if I want I can even control which device clients and what apps they use to access.

Hopefully this has been helpful for you, if you have any questions reach out to me on Twitter or use the comments below this blog post 🙂