I use Managed Identites in Azure for a lot of different automation scenarios, for example if I want run a Logic App or an Azure Function that should securely call an API like Microsoft Graph..
In such a scenario, the Managed Identity, represented by its Service Principal, needs to be granted application permissions to the API. Let’s say for example that you want to list Intune Managed Devices in your Organization using the Microsoft Graph API, using a Function App or Logic App for example and connect to the Graph API using a Managed Identity.
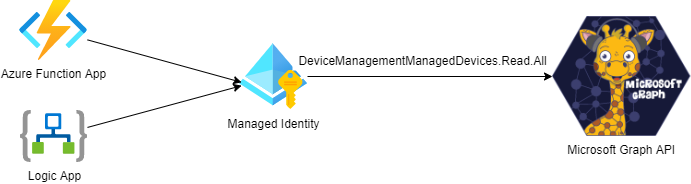
Then you would need to give that Managed Identity an App Role assignment for the application permission in Graph that is called DeviceManagementManagedDevices.Read.All. If you use that Managed Identity for example in a Function App or Logic App, they could then call the Microsoft Graph API as illustrated below:
Currently there are no way to manage these application role assignments in the Azure Portal GUI. You can verify the permissions, but not add or remove them.
For reference, usually you would do this using cmdlets in Azure AD PowerShell:
See Gist from my GitHub on how to create App Role Assignment for Managed Identity using PowerShell
Today I would like to show how you can do this with a “GUI” after all, by using the Microsoft Graph Explorer!
Prerequisite – Sign in and Connect to Graph Explorer
Many of you might be familiar with Graph Explorer, but if you aren’t you can find it at the Microsoft Graph documentation site, or just use this short url: https://aka.ms/ge.
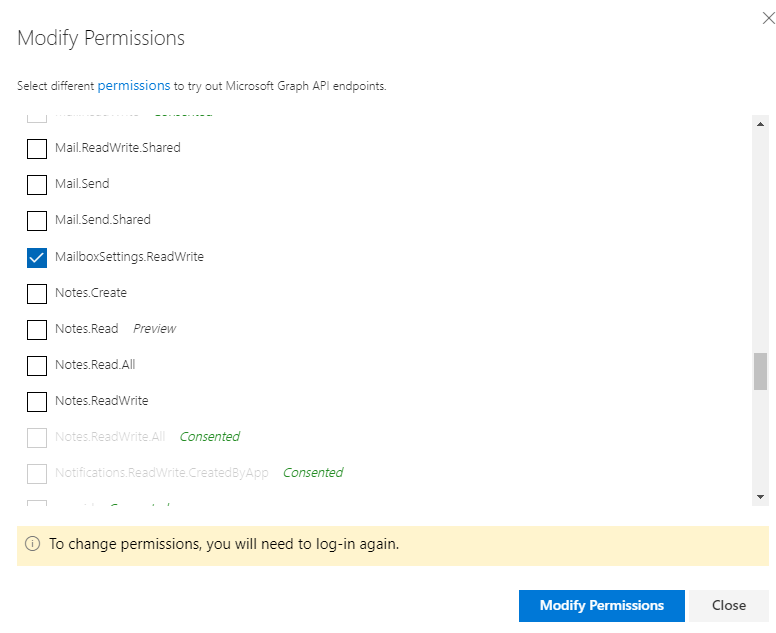
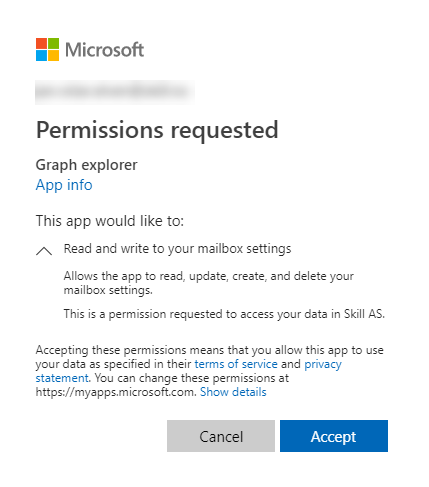
In Graph Explorer you need to sign in (and consent to permissions) so that you can access your organizations’ data via Graph API. Note that your organisation might have restrictions in place for users consenting to permissions for API’s, and in any case if you want to use my example here for adding Microsoft Graph API application permissions, you will need to be a Global Administrator anyway.
Part 1 – Find the Service Principal of the Managed Identity
The first thing we need to do is to find the Service Principal that represents your Managed Identity. I will assume that you already have a Managed Identity created and are familiar with the concept, if not you can read more about it and how to create on this link: https://docs.microsoft.com/en-us/azure/active-directory/managed-identities-azure-resources/overview.
I will now search for the Service Principal in Graph Explorer. You can do this by running something similar to this query:
GET https://graph.microsoft.com/v1.0/servicePrincipals?$search="displayName:msi"&$count=true
PS! You must add ConsistencyLevel = eventual i Request Header to be able to run the search and count parameter.
In my example I’m searching for a User Assigned Managed Identity that I know I have prefixed with the name “msi”, but you can also search for System Assigned Managed Identities, these will have the name of the resource you have assigned it to (name of the Function App, Logic App, etc).
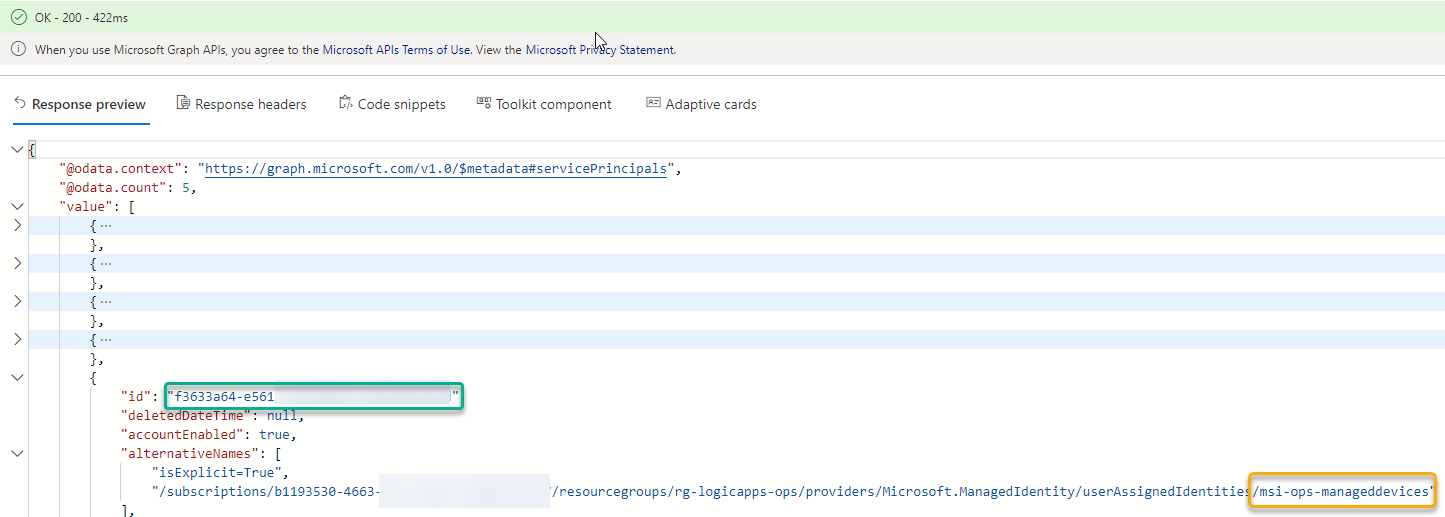
When I run this example query currently in my tenant, I get a count of 5 service principals, one of which is the Managed Identity I’m looking for. The thing of interest for me here is the Id of the Service Principal, in the green box below. I have also a yellow box around the name of the Managed Identity, which you can see is a User Assigned Identity created in a Resource Group where I connect it to Logic Apps.
Take a note of that Id, you will need it later. You can now also get the Service Principal directly by Id:
GET https://graph.microsoft.com/v1.0/servicePrincipals/{your-managed-identity-service-principal-id}
Part 2 – Find the Service Principal of the Microsoft Graph (or other) API
Next, we also need to find the service principal in your organisation that represent your instance of the multi tenant App that is “Microsoft Graph”.
Microsoft Graph API always has the appId that is: 00000003-0000-0000-c000-000000000000
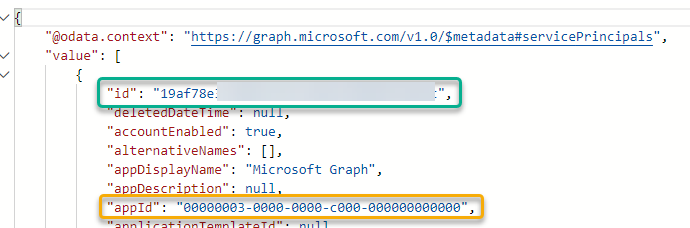
In every Azure AD organisation the Microsoft Graph API application is represented by a Service Principal, you can find this with the following query:
GET https://graph.microsoft.com/v1.0/servicePrincipals?$filter=appId eq '00000003-0000-0000-c000-000000000000'
You will now need to note the “id” of that Service Principal, that will be the “resourceId” to be used later, and this resource “id” is different for every Azure AD organization/tenant:
Part 3 – Find the Application Role that will be the Permission you want to assign
Now that we have the Service Principal Id of the Managed Identity, and the Service Principal Id of the Microsoft Graph Resource in your Azure AD Organization, we need to find the Id of the actual application role permission you want to assign.
You can now use the Service Principal Id you retreived in part 2, to list all available app roles by appending /appRoles to the query:
GET https://graph.microsoft.com/v1.0/servicePrincipals/{your-graph-serviceprincipal-id}/appRoles/
Now, there are a lot of application role permissions for Microsoft Graph, so we need to do a search. Unfortunately, not all Graph resources support all OData filter queries, and not everything is documented, but as far I can see I cannot use $search or $filter inside a specific service principal resource. For example I would want to do something similar to this query:
GET https://graph.microsoft.com/v1.0/servicePrincipals/{your-graph-serviceprincipal-id}/appRoles?$search="displayName:Intune"
But this will return an error like this:
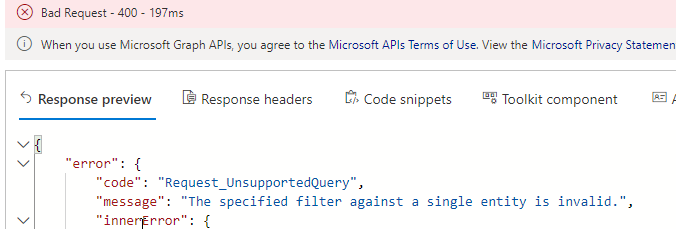
This might be fixed at a later time, but for now we can just use the browser’s search function (CTRL+F), so when I query for all /appRoles, I will get them all listed, and then just search for the application permission I want:

Not so elegant, I know, but at least I will get that specific application role id I need for the next step.
(PS! Graph API will usually return max 100 values and in this case the Graph API has less than that. If there were to be more than 100 results, then the request will be paged and with a odata.nextlink for the next page of results).
Anyway, I now have the 3 parts I need to create the application role assigment for the Managed Identity.
Part 4 – Assign Application Role to Managed Identity
We can now assign the application role to the service principal, and as documented here, we will need the following 3 id’s:
- principalId: The id of the user, group or client servicePrincipal to which you are assigning the app role. This will be the id of the Managed Identity service principal we found in part 1.
- resourceId: The id of the resource servicePrincipal which has defined the app role. This will be the id of the Microsoft Graph service principal we found in part 2.
- appRoleId: The id of the appRole (defined on the resource service principal) to assign to a user, group, or service principal. This the app role id we found by searching the appRoles for the resource id in part 3.
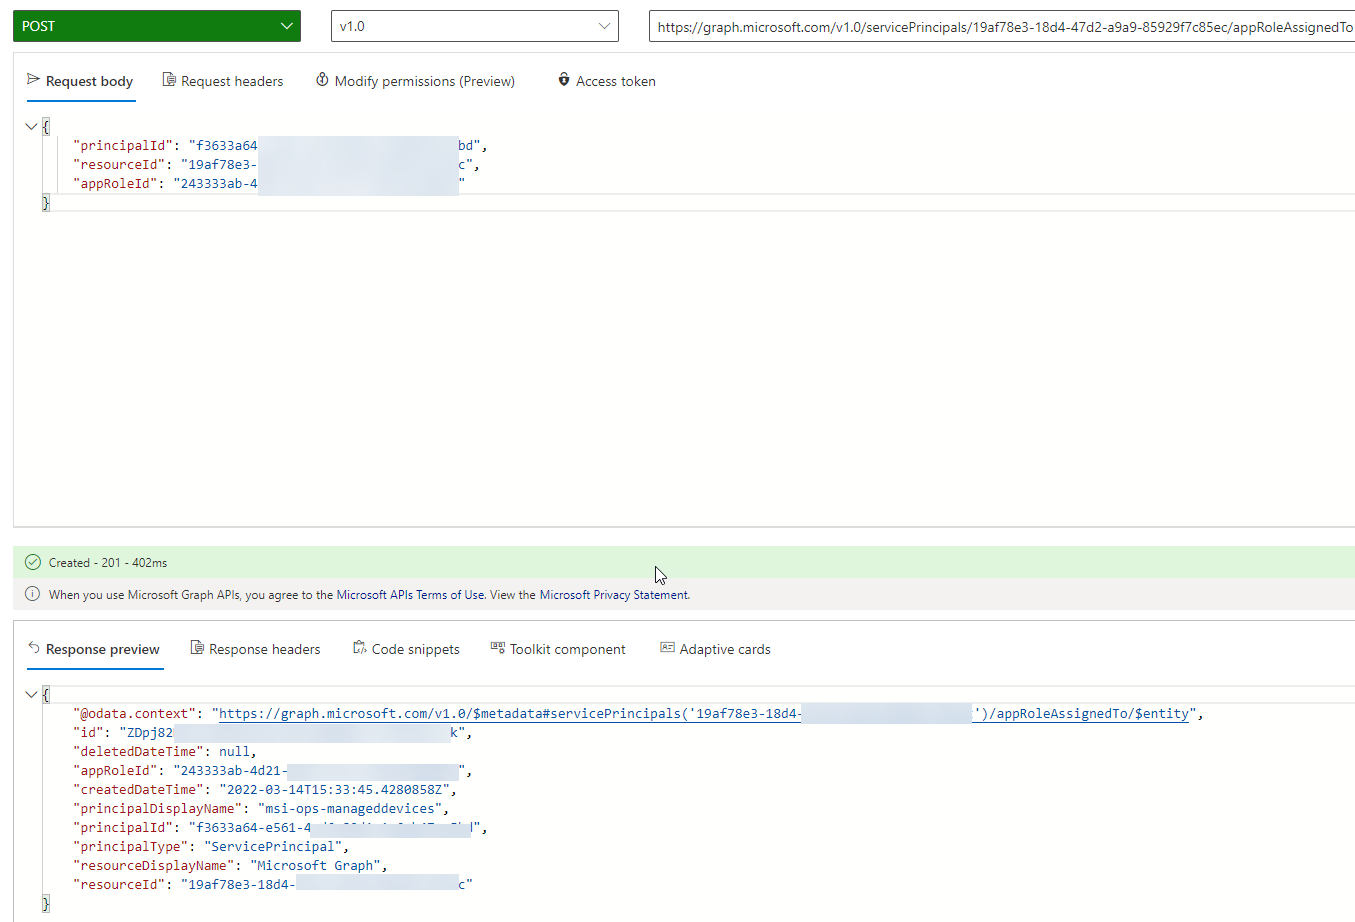
To create this assignement we need to do a POST query in Graph Explorer, with Content-Type application/json in the Header, and the following request body:
POST https://graph.microsoft.com/v1.0/servicePrincipals/{your-graph-serviceprincipal-id}/appRoleAssignedTo

Content-Type: application/json

{
  "principalId": "{your-managed-identity-service-principal-id}",
  "resourceId": "{your-graph-serviceprincipal-id}",
  "appRoleId": "{your-app-role-id}"
}
After you run this query, you should get a status of 201 Created and a response like the following:
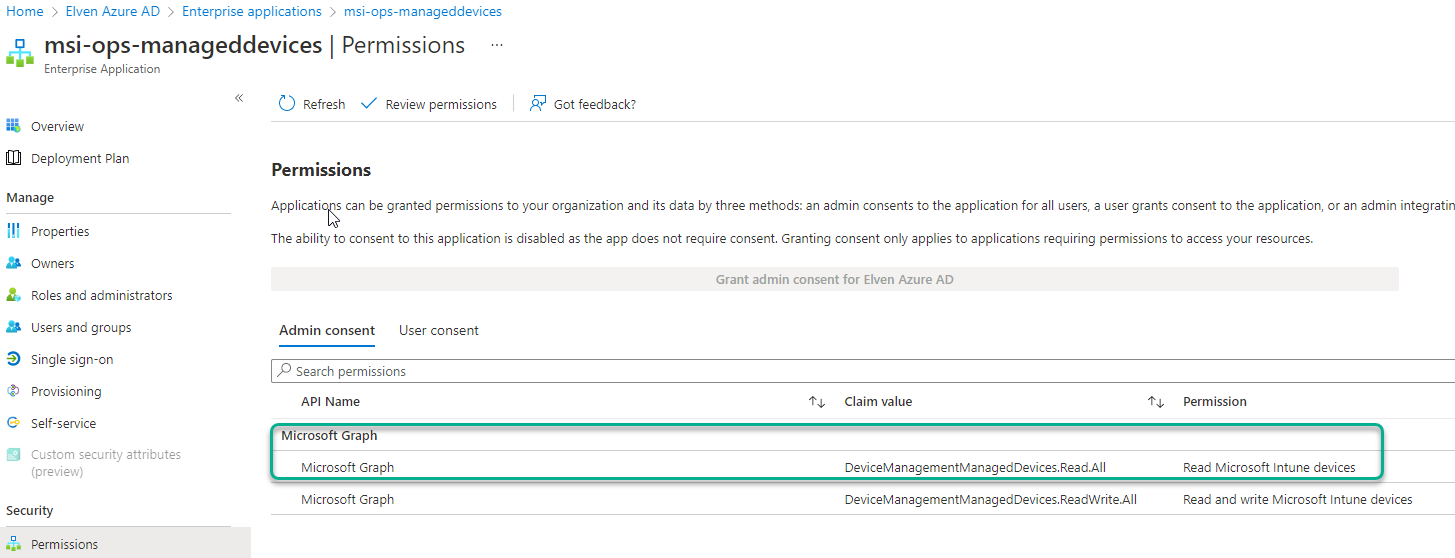
You can now also verify this assignment in the Azure AD Portal. If you go to Enterprise Applications, and search for {your-managed-identity-service-principal-id}, you should find your Managed Identity. From there you can click on Permissions under Security, and you will see the application permissions that you have granted. PS! I had already added another for writes as well:
Part 5 – Managing Application Role Assignments
After adding application permissions for the Managed Identity, you can also use Graph Explorer for viewing current application role assignments, as well as remove existing role assignments.
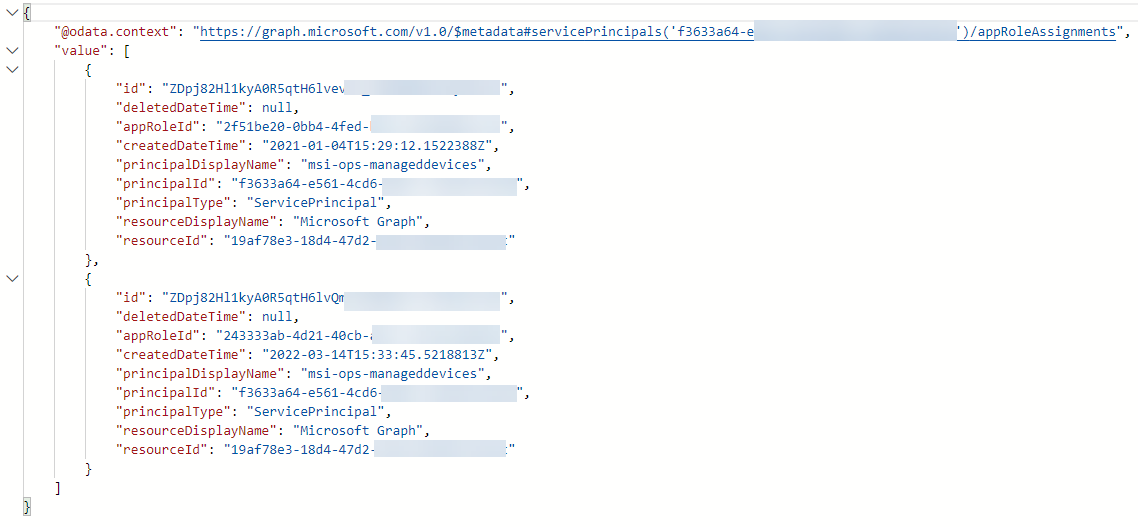
To get App Role Assignments for the Service Principal that is your Managed Identity, use the following query:
GET https://graph.microsoft.com/v1.0/servicePrincipals/{your-managed-identity-service-principal-id}/appRoleAssignments
This will return all the application permissions assigned to this Managed Identity Service Principal:
And then if you want to delete an application role assignment, you need to run a DELETE query as following:
DELETE https://graph.microsoft.com/v1.0/servicePrincipals/{your-graph-serviceprincipal-id}/appRoleAssignedTo/{appRoleAssignment-id}
The {appRoleAssignment-id} would be the “id” from the GET /appRoleAssignments shown above. When run successfully you should you should receive as status of 204 – No Content:

Summary
In this blog post I have show how you can use Graph Explorer to add Graph API application role permissions to your Managed Identity. Similar steps can be used against any Azure AD protected API other than Graph you would want your Managed Identity to access.
Thanks for reading!