A Blog about Enterprise Mobility + Security, Azure AD, Datacenter Management, Service Delivery, Automation, Monitoring, Cloud OS, Azure and anything worthwhile sharing with the Cloud and Datacenter community.
The above blog post is currently the only “graphical” or UI based way that you can assign those permissions today, most people use Microsoft Graph SDK PowerShell for this. On the other hand, many also rely on Infrastructure as Code to deploy Azure resources, for example by using Bicep, and while Bicep can provision Managed Identities and Role Assignments to Azure resources, you cannot assign application role permissions to Microsoft Graph without using another more “imperative” method.
While there a a limit set of scenarios where we can use Bicep for Graph at this time, mostly focusing on applications, service principals and groups, there is also support for managing scopes and role permissions via oauth2PermissionGrants and appRoleAssignedTo. And this caught my attention, as this was exactly the way I approached this via my blog post on how to add Graph application permissions using Graph Explorer.
Lets say that you have a Bicep deployment consisting of a Resource Group, User Assigned Managed Identity, and maybe a Function App or a Logic App or something similar that is assigned the managed identity, and you need to assign Graph application role permissions to that service principal. That can all be done now in Bicep, let me show you how!
Walkthrough
The complete bicep code is available at my GitHub and the following repository:
Then you can start building your bicep declarations. In my example I will start simple by using an existing Resource Group and User Assigned Managed Identity, and deploy at Subscription scope:
targetScope = 'subscription'

// Main Parameters for Existing Resources
param resourceGroupName string = 'rg-<your-resource-group>'
param managedIdentityName string = 'mi-<your-managed-identity>'

// Get existing Azure resources for Resource Group and Managed Identity
resource rg 'Microsoft.Resources/resourceGroups@2024-03-01' existing = {
  name: resourceGroupName
}
resource userManagedIdentity 'Microsoft.ManagedIdentity/userAssignedIdentities@2023-01-31' existing = {
  name: managedIdentityName
  scope: resourceGroup(rg.name)
}
Next I need to initalize the use of the MicrosoftGraph provider in the main.bicep file:
// Initialize the Graph provider
provider microsoftGraph
I can now use the Bicep Graph and get the existing Service Principal for the Managed Identity:
// Get the Principal Id of the Managed Identity resource
resource miSpn 'Microsoft.Graph/[email protected]' existing = {
  appId: userManagedIdentity.properties.clientId
  // Tip! If using a System Assigned managed identity, you can refer to the resource symbolic name
  // directly and use <resourcesymbolicname>.identity.principalId for appId
}
I also need to get the existing Service Principal for Microsoft Graph, using the well know Graph appId:
// Get the Resource Id of the Graph resource in the tenant
resource graphSpn 'Microsoft.Graph/[email protected]' existing = {
  appId: '00000003-0000-0000-c000-000000000000'
}
All that remains now then is to create an array of all the application roles I want to assign, and loop through to assign each of the role permissions:
// Define the App Roles to assign to the Managed Identity
param appRoles array = [
  'User.Read.All'
  'Device.Read.All'
]

// Looping through the App Roles and assigning them to the Managed Identity
resource assignAppRole 'Microsoft.Graph/[email protected]' = [for appRole in appRoles: {
  appRoleId: (filter(graphSpn.appRoles, role => role.value == appRole)[0]).id
  principalId: miSpn.id
  resourceId: graphSpn.id
}]
Basically I’m using the same logic here as my above mentioned blog post on using Graph Explorer, but in this case I’m able to use Bicep all the way.
Deploy
Now all that remains is to deploy:
az deployment sub create --location NorwayEast --name "bicep-graph-demo" --template-file .\main.bicep
Summary
This simple scenario shows how we now can use Bicep also for managing application role permissions together with Azure ressources that has assigned managed identities, and you no longer need to do this separately if you are using IaC. Note that the user running the deployment need permission to assign role permissions, see the documentation for details on that.
This opens for a lot of scenarios for Azure service connections, without the need to manage secrets for service principals and more security as there are no secrets that can be exposed or exfiltrated.
As I work a lot with Microsoft Graph and automation, I wanted to see if and how I could use Workload Identity Federation to connect to and send queries to Microsoft Graph using Azure Pipelines.
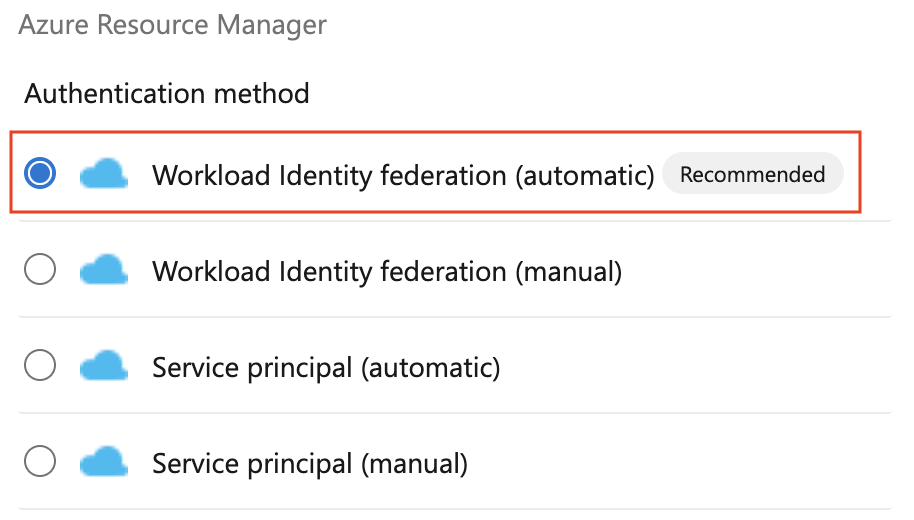
Create the Workload Identity Federation Service Connection
When you have access to the feature, you can create a new Workload Identity federation either by manual or automatic configuration:
I will now choose the Azure Subscription, and optionally a Resource Group. Choosing a resource group is a good idea, as the service connection will be given Contributor access only to that Resource Group, and not the whole subscription. But it also depends on what you want to use your Service Connection for, in my case it is a demo scenario for Microsoft Graph Access, so it makes sense to scope the permissions down:
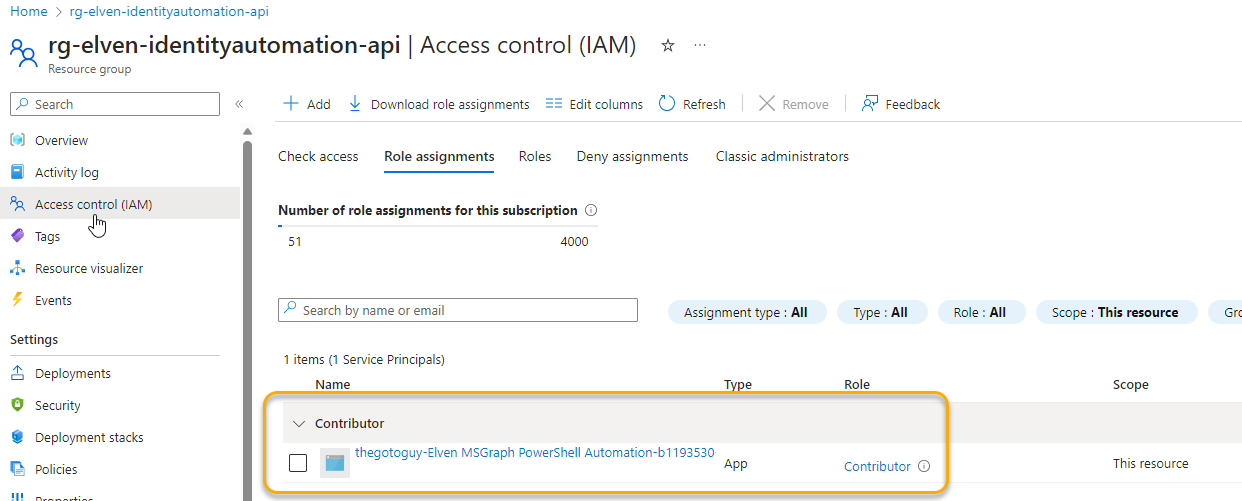
After creating the Service Connection, I can find it my Entra ID tenant. Let’s look at the role assignments for the Resource Group first:
The service principal has been given the name of <DevOps Org>-<DevOps Project>-<guid>, and been assigned with Contributor access to that RG.
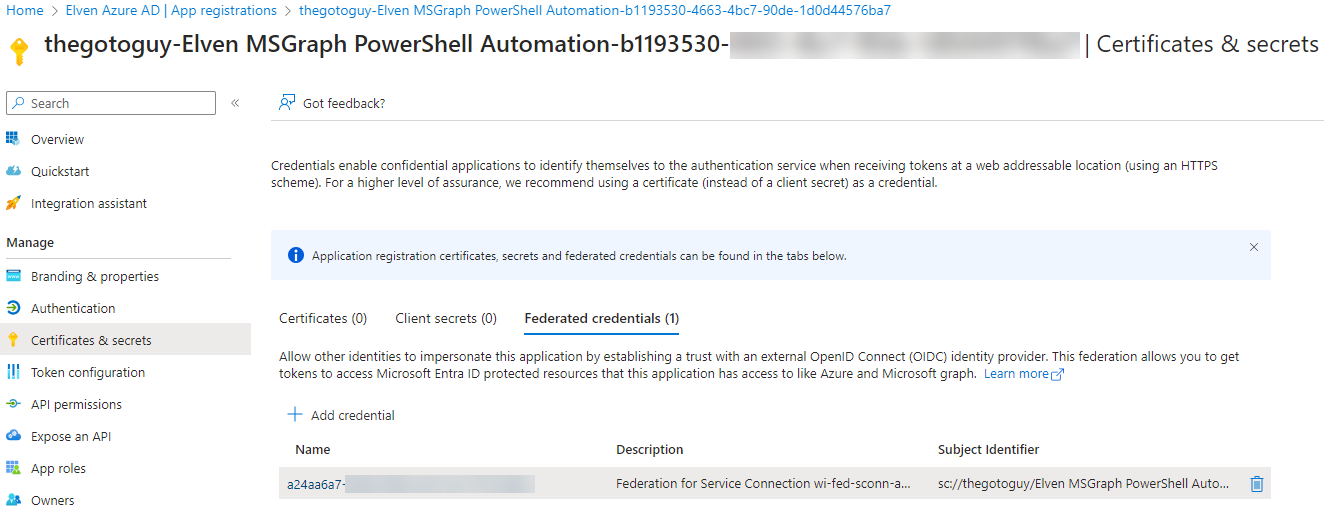
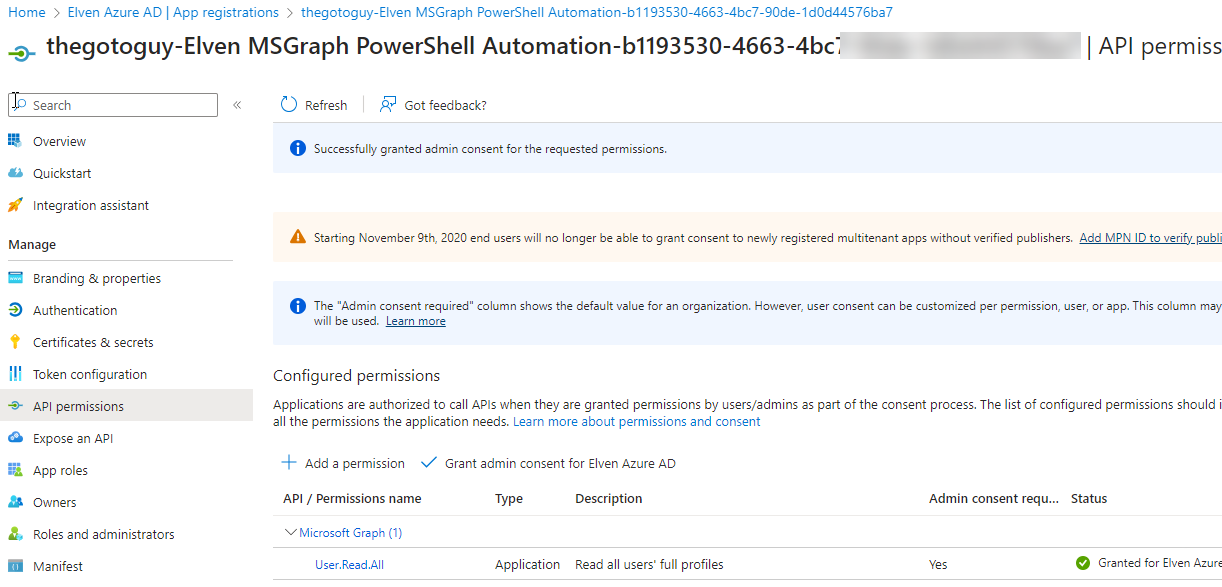
Next, let’s find the App Registration for the Service Connection. As you can see from below there has been no (0) credentials of secrets or certificates created, but there has been created a Federated credential:
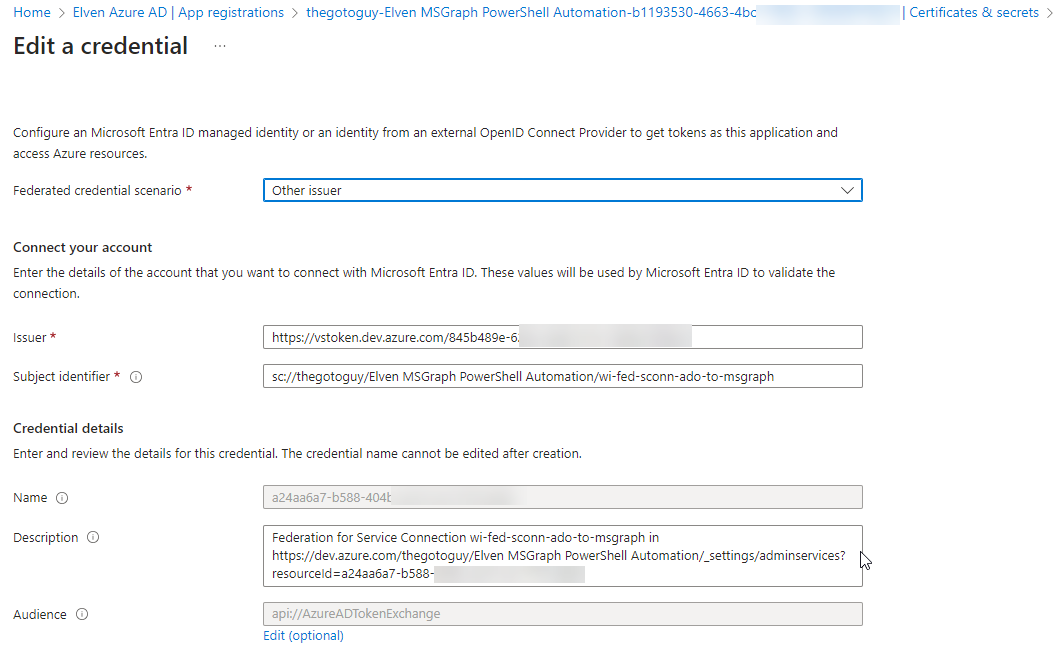
If we look at the detail for the federated credential, we can se the issuer, subject and audience, and confirm that this service principal only can be access by the service connection in Azure DevOps:
Next, go to API permissions. Here I will add a Microsoft Graph permission, so that we can use that for queries in the pipeline later. In my case I add the Application permission User.Read.All, so I can look up user information:
We are now ready to set up an Azure Pipeline to use this service connection.
Create the Azure Pipeline to access Microsoft Graph API
In your DevOps project, if this is a new project, make sure that you initialize the Repository, and that you have at least a Basic or Visual Studio access level, then head to Pipelines and create a “New Pipeline”. For my environment I will just choose the following steps:
Select Azure Repos Git (YAML)
Select my repository
Use a starter pipeline (or you can choose an existing if you have)
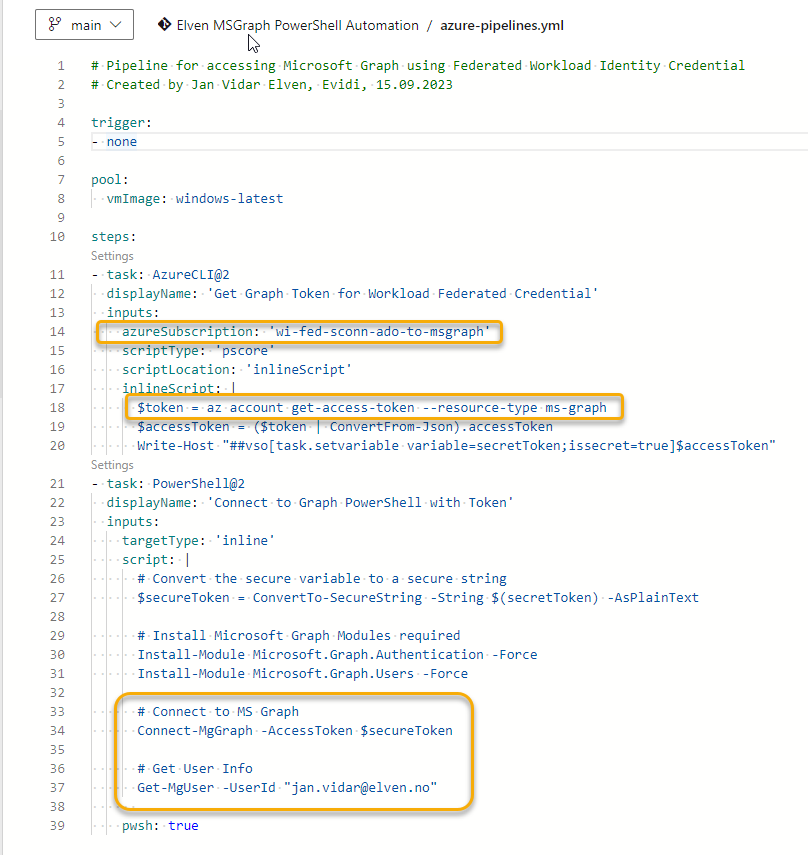
This is a sample YAML code that will use the service connection (se below picture) to get an access token for Microsoft Graph, and the use that access token to connect to Graph PowerShell SDK. In my example I’m just showing how to get some simple user information:
There are different ways you can go about this, in my case I was just using Azure CLI in one task to get the access token for the resource type that is Graph. (You can also use Az PowerShell task for this by the way). I also set and secure the variable for use in later steps in the pipeline job.
In the next task I use PowerShell Core to convert the token to a secure string, and then install the required Microsoft Graph PowerShell modules. I can then connect to Graph and get user information. Here is the complete YAML code:
# Pipeline for accessing Microsoft Graph using Federated Workload Identity Credential
# Created by Jan Vidar Elven, Evidi, 15.09.2023

trigger:
- none

pool:
  vmImage: windows-latest

steps:
- task: AzureCLI@2
  displayName: 'Get Graph Token for Workload Federated Credential'
  inputs:
    azureSubscription: 'wi-fed-sconn-ado-to-msgraph'
    scriptType: 'pscore'
    scriptLocation: 'inlineScript'
    inlineScript: |
      $token = az account get-access-token --resource-type ms-graph
      $accessToken = ($token | ConvertFrom-Json).accessToken
      Write-Host "##vso[task.setvariable variable=secretToken;issecret=true]$accessToken"
- task: PowerShell@2
  displayName: 'Connect to Graph PowerShell with Token'
  inputs:
    targetType: 'inline'
    script: |
      # Convert the secure variable to a secure string
      $secureToken = ConvertTo-SecureString -String $(secretToken) -AsPlainText

      # Install Microsoft Graph Modules required
      Install-Module Microsoft.Graph.Authentication -Force
      Install-Module Microsoft.Graph.Users -Force

      # Connect to MS Graph
      Connect-MgGraph -AccessToken $secureToken

      # Get User Info
      Get-MgUser -UserId "[email protected]"

    pwsh: true
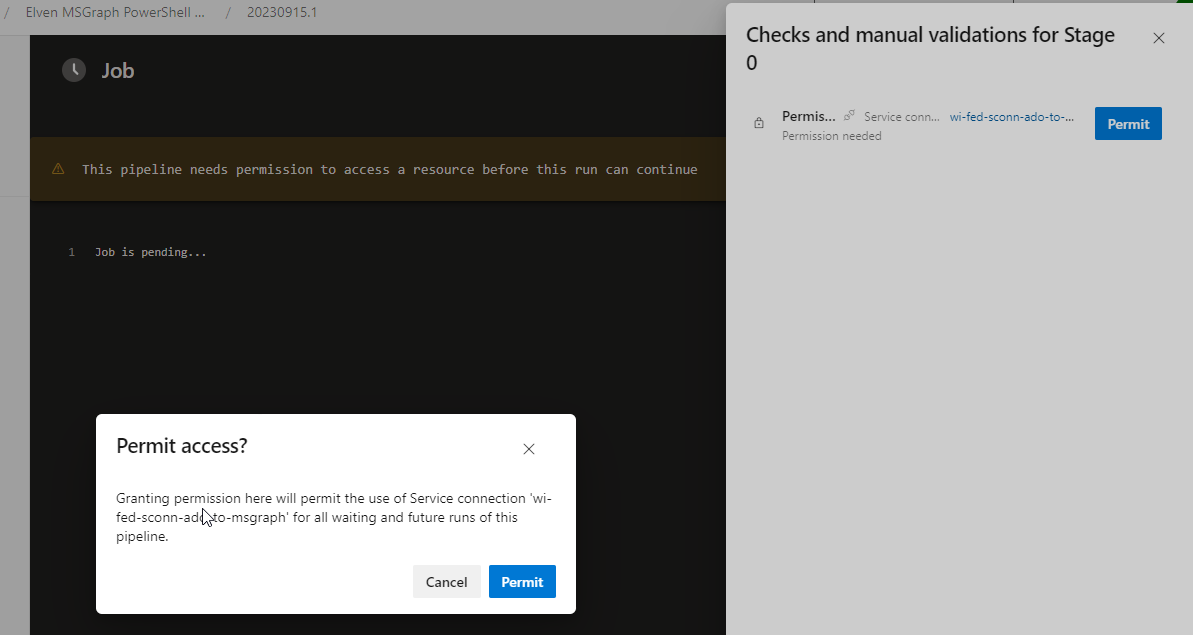
I can now try to run the pipeline. At first run you will have to validate and permit access to the service connection from the pipeline:
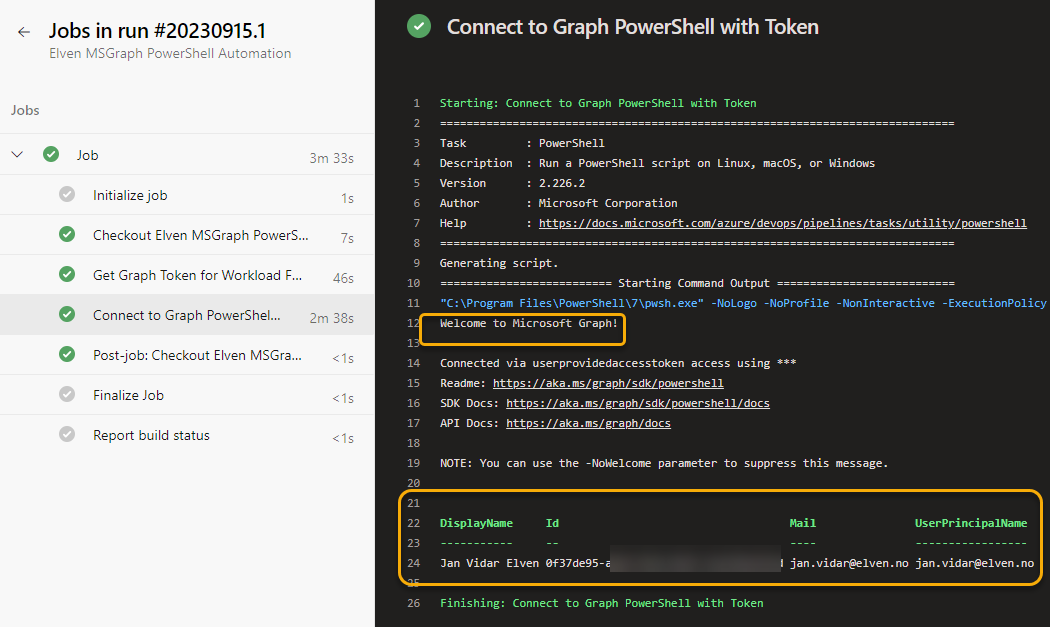
And then I can verify that it indeed can connect to the Graph via PowerShell SDK and get my resources via the Workload Identity Federation service connection:
Summary and Usage Scenarios
Most will use the new Workload Identity Federation for Azure Pipelines that access Azure subscriptions and resources, but I have shown as as long as this is using the Entra ID authentication platform and OIDC, it is possible to get access tokens for other API’s as well, in this case Microsoft Graph API.
You can use Graph API to get information about your tenant, to enrich and complement your exisiting CI/CD pipelines, or in some case automate consistent deployments also for Graph resources, like for example important settings and policies.
I’m excited to announce that I’m speaking at the inaugural Nordic Virtual Summit 2021, from 10th to 11th February. Nordic Virtual Summit is a Microsoft IT Pro Community Event, organized by the people behind #SGUCSE #SCUGDK #SCUGFI #MMUGNO and #MSEndpointMgr communities!
Sessions will be delivered in 3 tracks:
Endpoint Management
Security & Compliance
Azure & Automation
Each day will start with a pre-conference talk, and then the sessions kick off each hour mark, 3 sessions before lunch and 3 after. There will be 15 minutes break and Q/A between sessions, so you can catch your breath, fill up your coffee or just wait in excitement for the next session 🙂
My session will be about while Azure Serverless Automation solutions like Azure Functions & Logic Apps can be great for your automation scenarios, how can you secure access to sending requests and protect your serverless automation using Azure AD authentication and authorization.
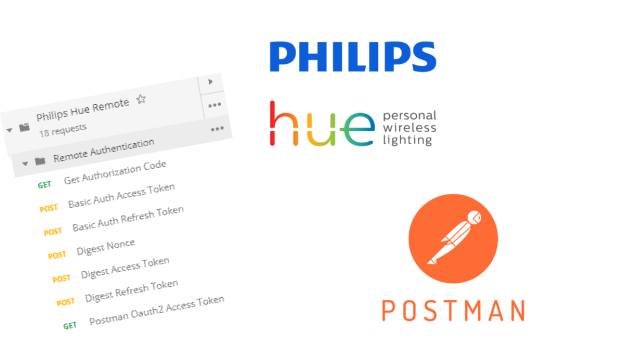
A while back I bought my first starter kit of Philips Hue lights and bridge, and since then I’ve bought several more bulbs, lamps, lights strips and more. One of the things I quickly got interested in was how to use the very well developed Hue API (https://developers.meethue.com/develop/hue-api/). You need to register and login with a Hue Developer Account, which is free, to be able to explore the API documentation, and for following the steps I describe in this blog post.
If you want to have a very quick look at the Hue API, you can start with this link which does not require a Hue Developer Account: https://developers.meethue.com/develop/get-started-2/. If you are familiar with Postman for exploring API’s, which may have brought you to this blog post to begin with, you should read on as I will describe and share some of the work I have been doing.
When I started exploring the API, I did what most people do: I searched online for tips and how-to’s. I found the following useful Postman Collection on GitHub: https://github.com/moldedbits/philips-hue-postman. So I downloaded that collection, and after configuring my Postman environment with the IP address to the bridge, and pushed the linked button to create a username, all described above on the get started link, I was good to go!
However, this let’s me explore the API only locally, requiring me to run the commands from a local device. This is where I should let you know my real reasons for wanting to use the Hue API, as I work with Microsoft and Cloud solutions daily. I wanted to look into scenarios where I can manipulate my Hue Lights dependent on events from the Microsoft Platform. It could be updating the lights to reflect my presence in Teams, it could be blinking the lights if some alerts happened, and so on. I want to be able to use Azure Functions, Power Platform, PowerShell etc. for controlling my Hue API.
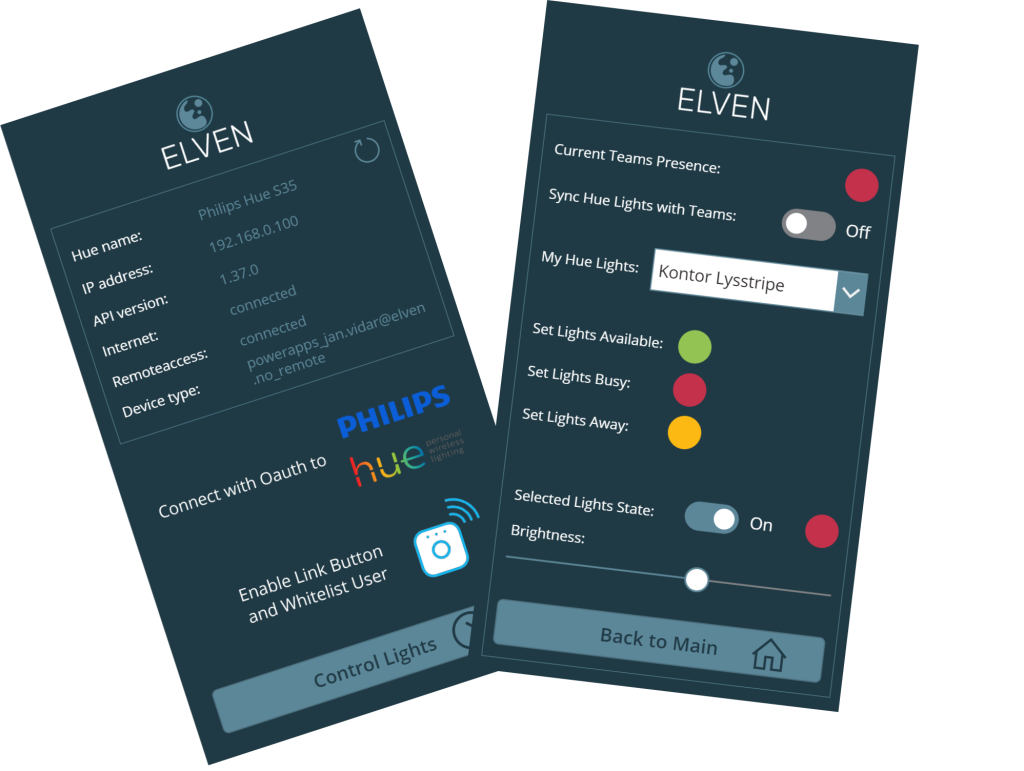
Before I go into the details of this blog post on how I set up remote authentication and control of my Hue API using Postman, I first wanted to share a proof and sneak peak of a coming blog post that I have succeeded in what I’ve wanted, I can now authenticate and control my lights using for example Power Platform:
It was really the foundation of what I learned using Postman to do Remote Authentication to Hue API that made me able to create the solution above, so lets get into the details.
Create a New Remote Hue API app
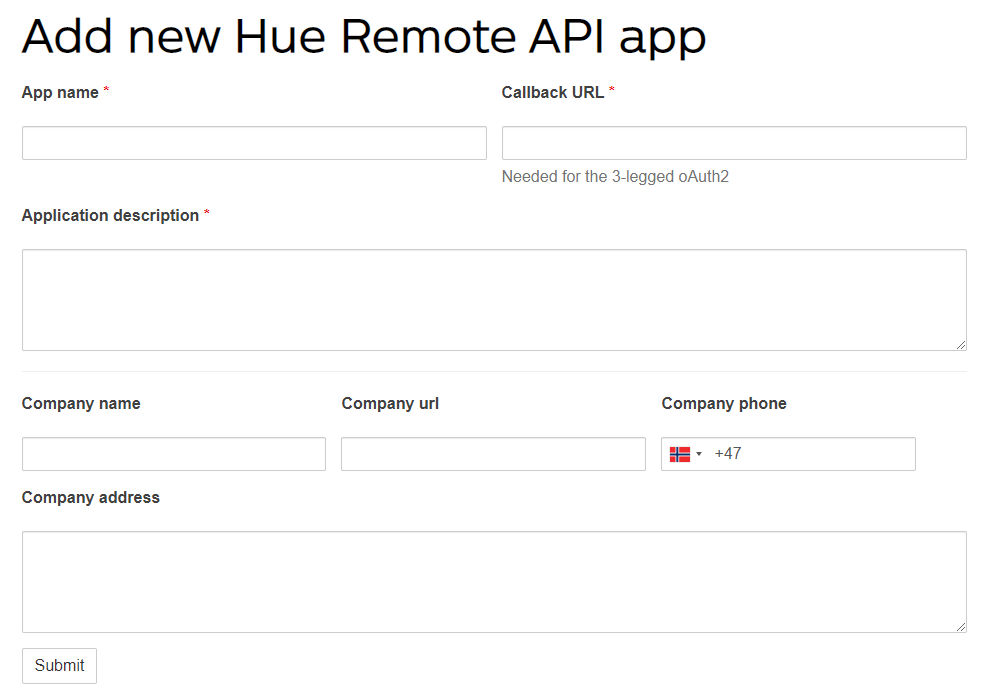
The first thing you need to do after you have create a Hue Developer account, is to create a new Remote Hue API app here: https://developers.meethue.com/my-apps/.
You need to specify the following required fields:
Application description: A short description for your remote app.
Optionally you can specify contact details.
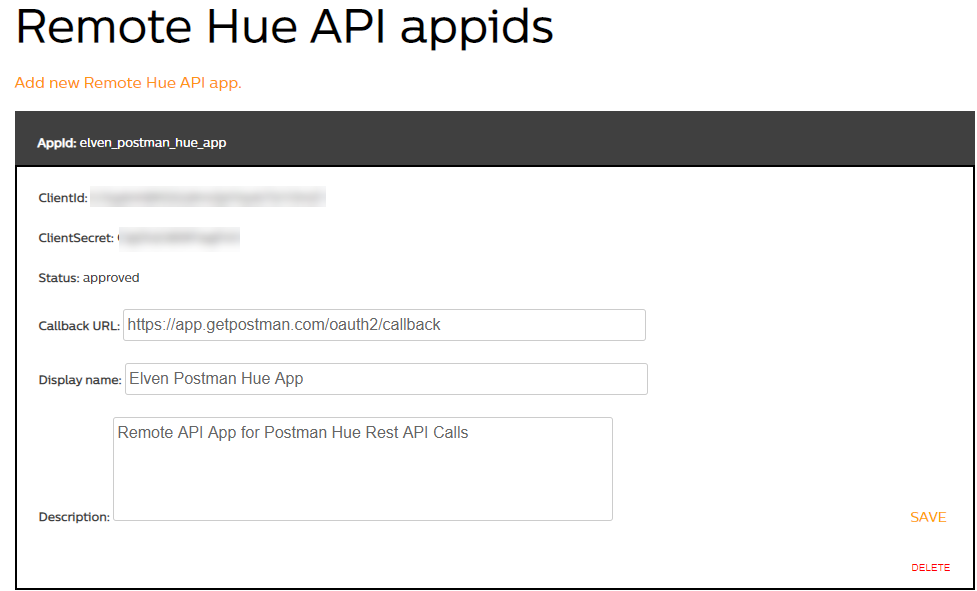
After submitting your new app is ready, and also an AppId, ClientId and ClientSecret will be provided, for example:
You are now ready to start setting up your Postman client. If you don’t have Postman installed you can get it at https://www.postman.com/downloads/.
Create Postman Environment and Collection
In the Postman client I have saved all my variables and requests against the Hue API in an environment and collection. At the end of this blog post, I will share with you the link to a GitHub repository where you download these samples for you to start with yourself.
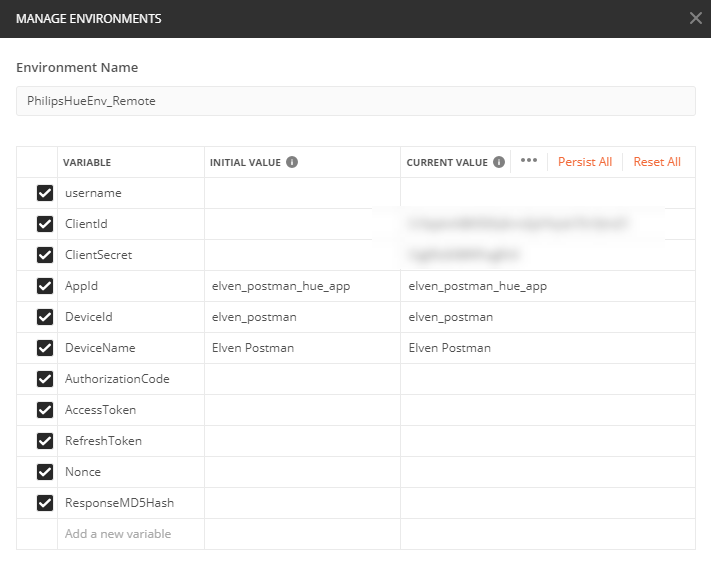
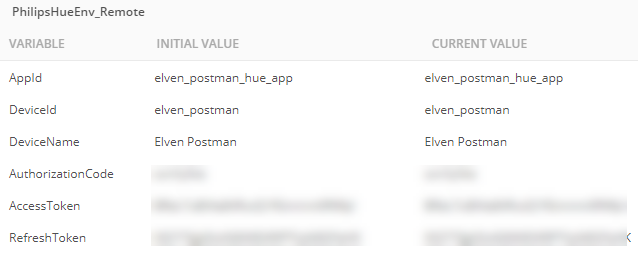
As I will be using several variables with my Postman queries against the Hue API, I’ve created an environment like the following:
Most of these variables are empty to begin with, but you can start by filling out:
ClientId: From the app registration at your Hue Developer Account.
ClientSecret: From the app registration.
AppId: From the app registration.
DeviceId: This is the id of the client you will be running queries from. It could be anything like the name of the computer, or the environment you are running from. I just chose my surname and postman.
DeviceName: Anything Display Name for the device you run the queries from.
The rest of the variables will be empty for now, but they will be calculated and updated based on responses later.
Also, since collections and variables can be synced and shared with other users or devices, I keep the sensitive variables like client id and secret only in current value column.
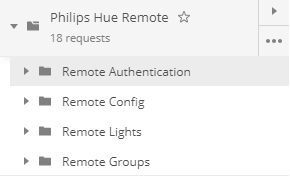
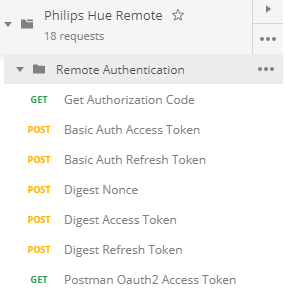
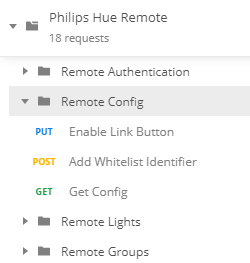
After creating my environment, I’ve created a collection with folders for my requests, for example like the following:
We can now proceed to start with Remote Authentication to Hue API.
Remote Authentication to Hue API
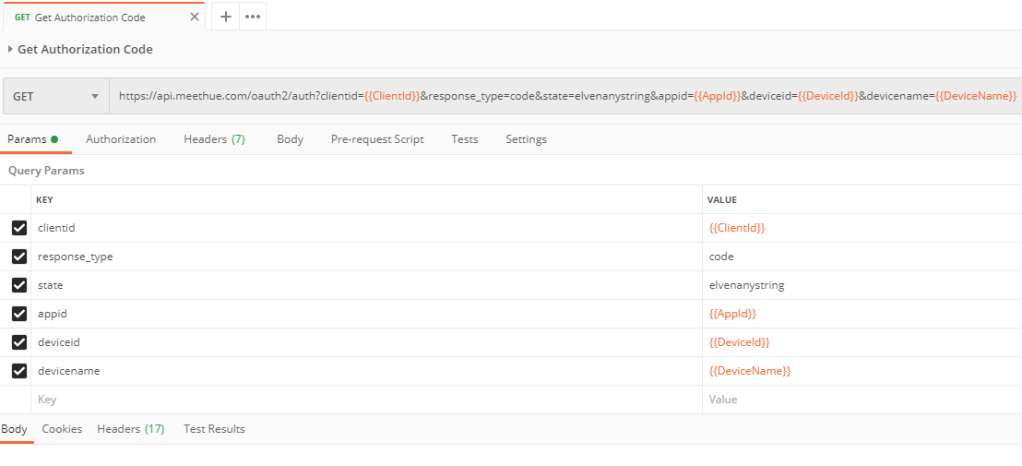
Hue Remote API use Oauth2 authorization code flow to get an access token that has to be included in the HTTP Authorization Header for every request to the API. We will use the app registration we did earlier to authenticate with the developer account and grant application access, and with the resulting authorization code we can request the access token to be used in the requests.
You can use Postman to construct the Url like the following, but you cannot really run the query from here as the Postman browser does not support the response:
You can use the code view on the right to get a preview of the request, and the copy it from there and paste it to your browser:
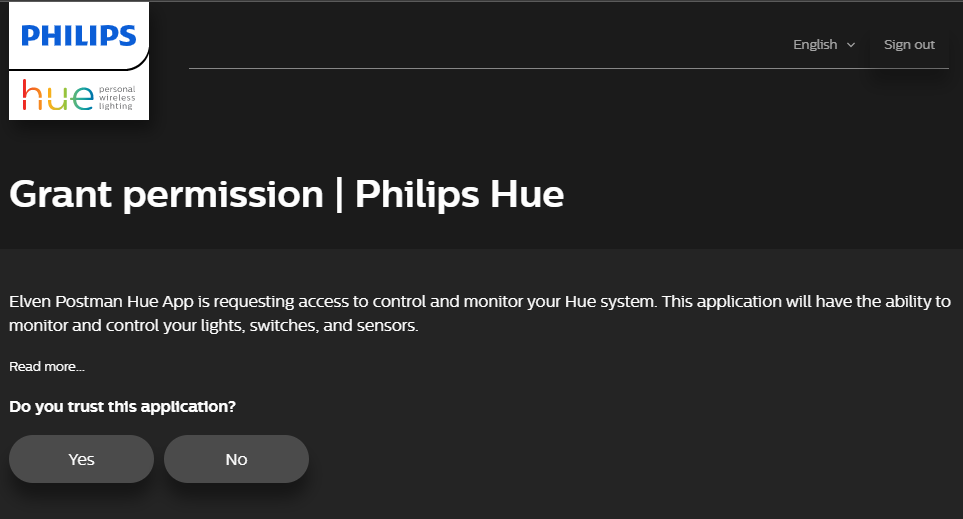
When you execute the authorization code url in your browser, you will be asked to log in with your Hue Developer account, if you aren’t already, and then you need to grant permission to your app registration:
After successfully granting permission, you will be redirected to the Callback Url you specified earlier, and from there you can get the authorization code:
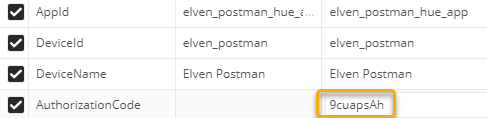
Copy that code and paste it in the environment variable for AuthorizationCode as shown below:
Now that we have the Authorization Code, we can proceed requesting the Access Token. There are two methods for getting an access token:
Basic Authentication, which sends your client id and secret as base64 encoded strings in the authorization header.
Digest Authentication, which use a more secure challenge-response handshake that handle the credentials more securely.
See documentation for more details on whether to use basic or digest. I will show both in the following.
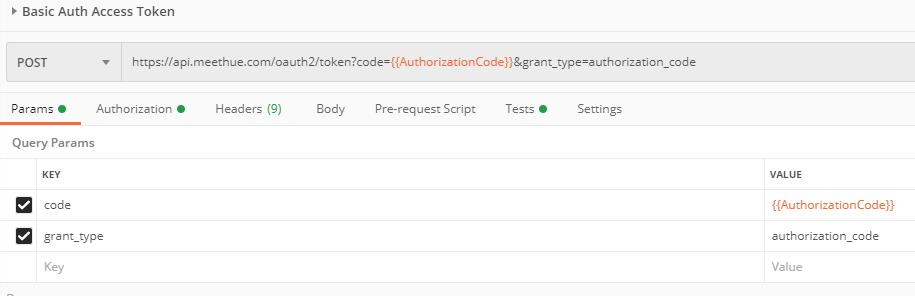
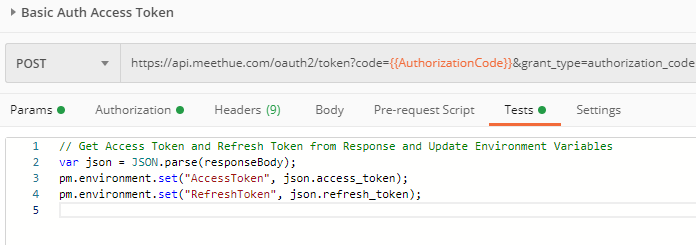
Get Access Token with Basic Authentication
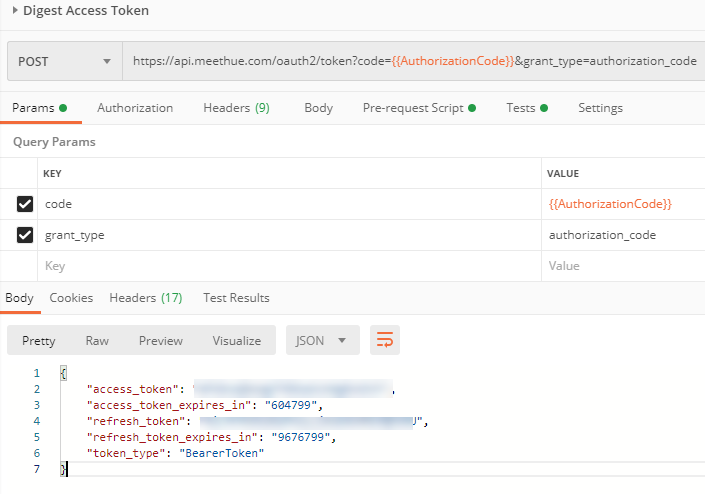
To get an access token with basic authentication, create a POST request to the token endpoint, specifying the following query parameters:
code=authorization code you received in the previous step, using the environment variable
grant_type=authorization_code
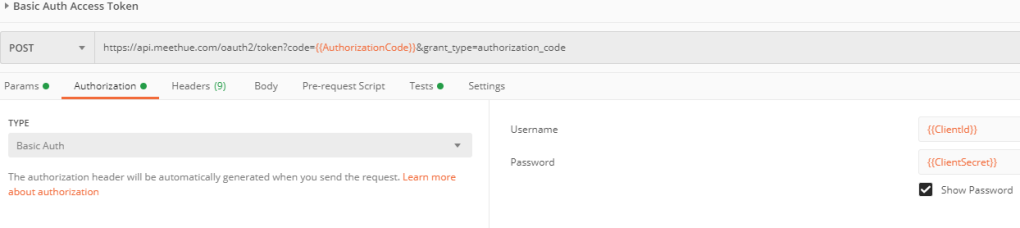
In addition to that you need to set the Authorization Header to type Basic Authm and specify the ClientId and ClientSecret as shown below:
Postman has this great feature called tests that you can use to run javascript commands before (pre-request) or after queries. You can use this to save response details and update your environment variables. In my example I’m saving the response which would include the access and refresh tokens, and update my environment variables with that:
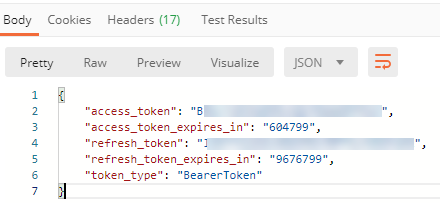
If I now run this request (and you haven’t waited to long to the authorization code to expire), you should get a successful response:
These tokens expire after the specified amount in seconds. For the Access Token this is 168 hours = 7 days. The Refresh Token expire after 112 days.
This means that after 7 days, you will need to use the refresh token to get a new access token. And when you do that, you will get a new access token valid for 7 more days, and a new refresh token again valid for another 112 days. This means in theory that as long as you refresh the access token regularly, this can last “forever” for your client.
You can also verify that the environment variables for access token and refresh token has been updated based on my javascript from above:
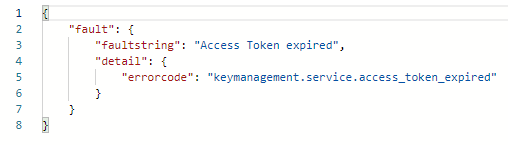
Refresh Token with Basic Authentication
If your access token has expired, you will get a response like the following:
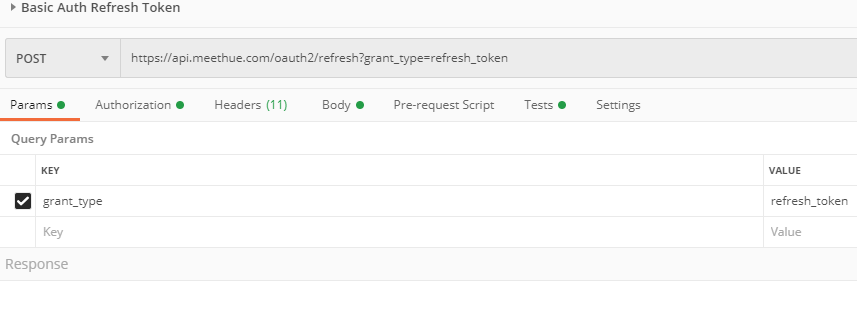
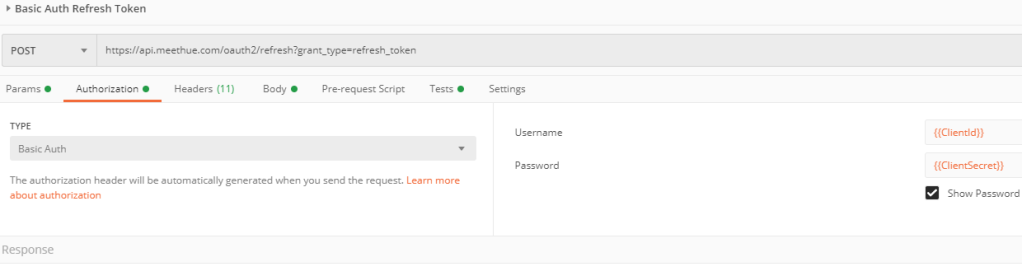
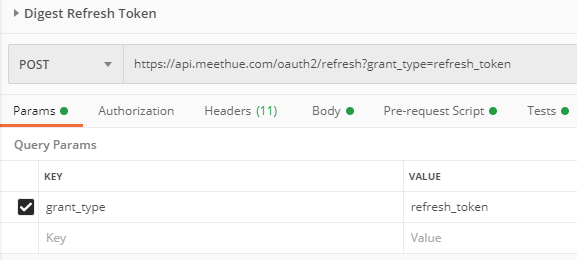
To refresh the access token, you need to use the oauth2/refresh endpoint and with the query parameter grant_type?refresh_token:
The same as getting access token with basic authentication, also when refreshing you need to specify the authorization header to use basic auth, and with client id and secret as username and password:
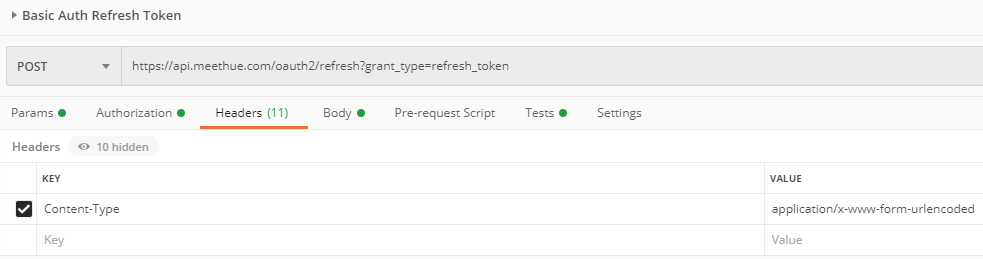
In Headers, specify that the Content-Type is application/x-www-form-urlencoded:
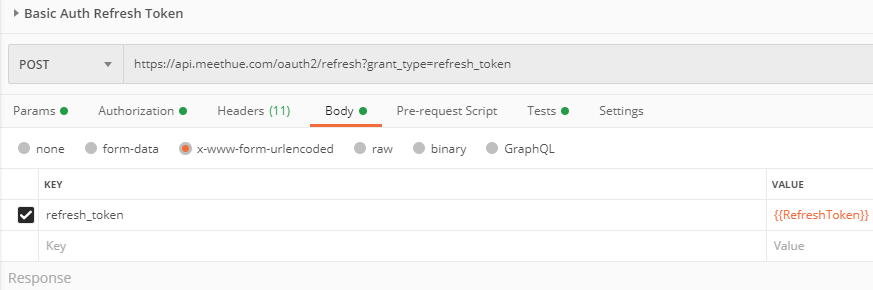
And in the Body of the request, specify the environment variable for refresh token as form parameter like this:
Under Tests I have the same javascript as shown earlier, which lets me save the refreshed access token and refresh token to my environment again. When I run the request to refresh the access token, I should get a successful response like the following:
Now that I have an access token and refresh token, I’m all set for doing the necessary remote config for getting a username to use in the requests, but first I will show how to do Digest Authentication. If you want you can skip right to the Remote Configure Link Button and Create User section below.
Get Access Token with Digest Authentication
When you want to get an access token using Digest Authentication, you will need to start over again with getting an authorization code as described earlier. After that I will just request an access token with a POST request to the oauth2/token endpoint with the query parameters of code=authorization code & grant_type=authorization_code. This is basically the same request as I used with basic authentication, but with one important difference: I will not specify the Authorization Header to be basic auth.
When I run this request without a authorization header, I will get a 401 unauthorized response like the following. In the response Header and the WWW-Authenticate key I will get the first part of the challenge-response needed for Digest Authentication, the value called Nonce:
As with previous requests, I run a javascript test that extracts the response, in this case it is a little more complicated as i need to examine the response header and split so that I can get the Nonce value. This is so saved to the Nonce environment variable like this:
Now that I have the Nonce I can proceed requesting an access token with Digest Authentication. This time I go to the request Headers and add an Authorization Header with a value as shown below:
This requires a little more explanation. The Authorization header consist of the following:
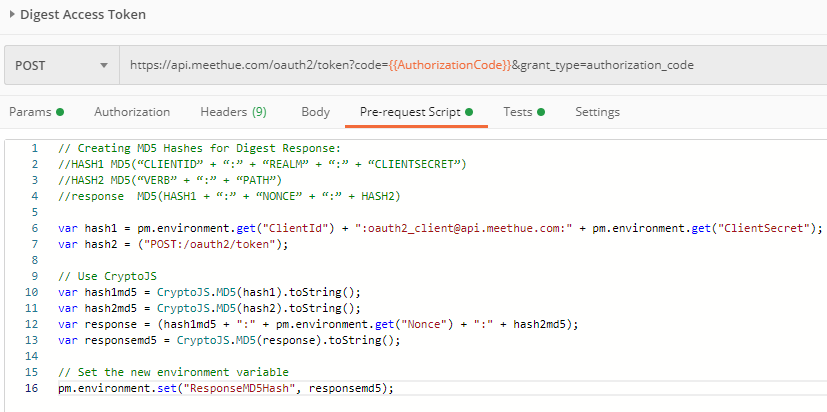
, where Nonce is the value I retrieved from the WWW-Authenticate response header in the first request, and the response is a calculated MD5 Hash as explained in the documentation linked earlier from Hue Remote API. But how did I get this value calculated? This time around I’m using a pre-request script to calculate that, based on the formula from the documentation (marked in green comment below):
So this little pre-request script calculates and sets the ResponseMD5Hash environment variable, so that I have that available when constructing the Authorization Header for Digest authentication.
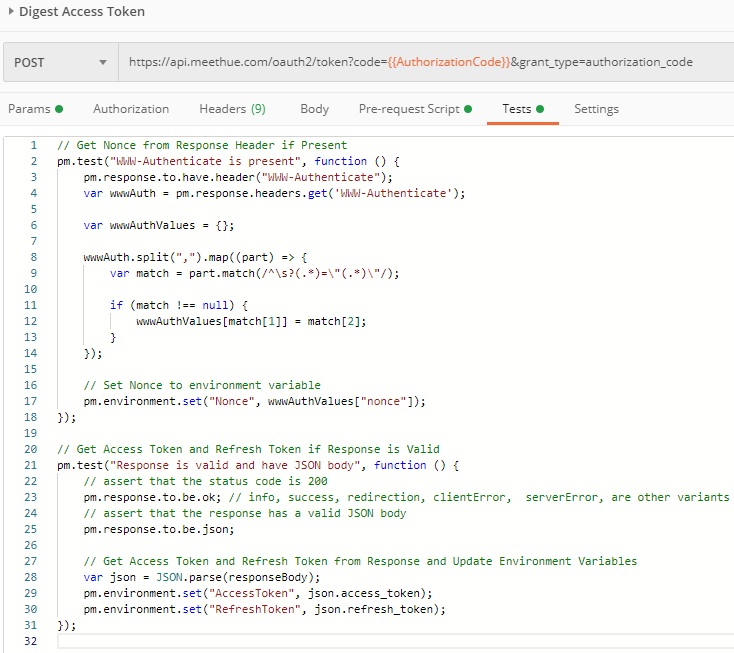
Before I proceed with requesting an access token using Digest Authentication, I need to put together a Test script that do 2 tests:
Check if there is a WWW-Authenticate response header, and if so save the Nonce to environment variable.
Check if there is a successful json response and if so save the access and refresh tokens to environment variables.
My script now looks like this:
This means that I will need to run the request twice in succession, the first time I will get a 401 Unauthorized response, in which I will get the Nonce:
The second time I will get the 200 OK and a JSON response:
I now have an access token using Digest Authentication:
Refresh Token with Digest Authentication
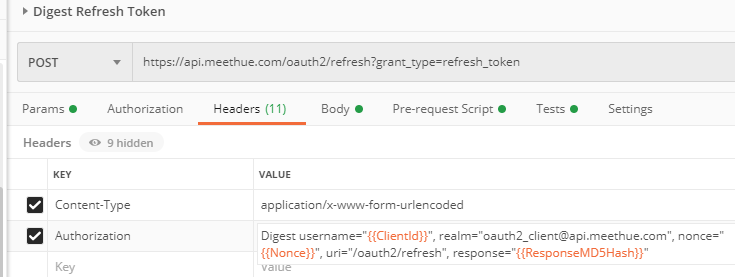
When the Access Token expire, I will need to use the Refresh Token to get a new Access Token with Digest Authentication. Refreshing using Digest is based on the same challenge-response flow as getting the access token.
First I need to construct a POST request to the oauth2/refresh endpoint like below:
Then I have to add to the Header Content-Type: application/x-www-form-urlencoded, and the Authorization using Digest like shown below:
This Digest Authorization Header is the same as with requesting the access token, with one important difference, uri is “/oauth2/refresh“.
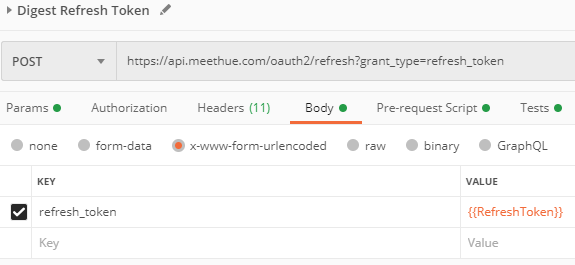
Next, in the Body I need to specify the refresh token:
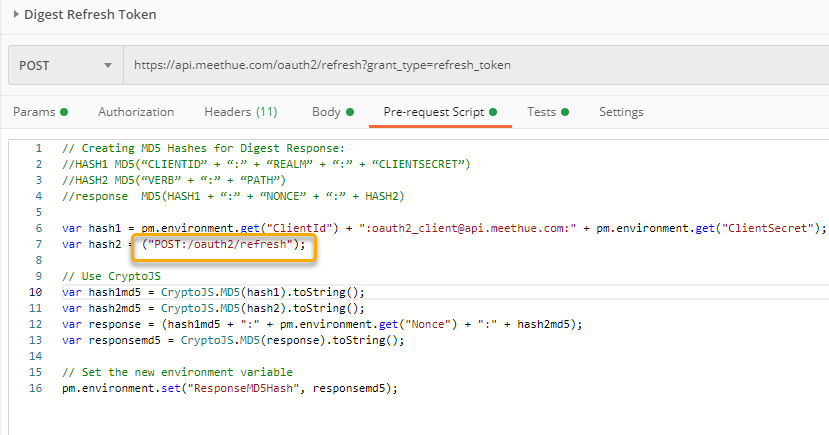
In the Pre-request Script, make sure to use “/oauth2/refresh” when calculating the md5 hash:
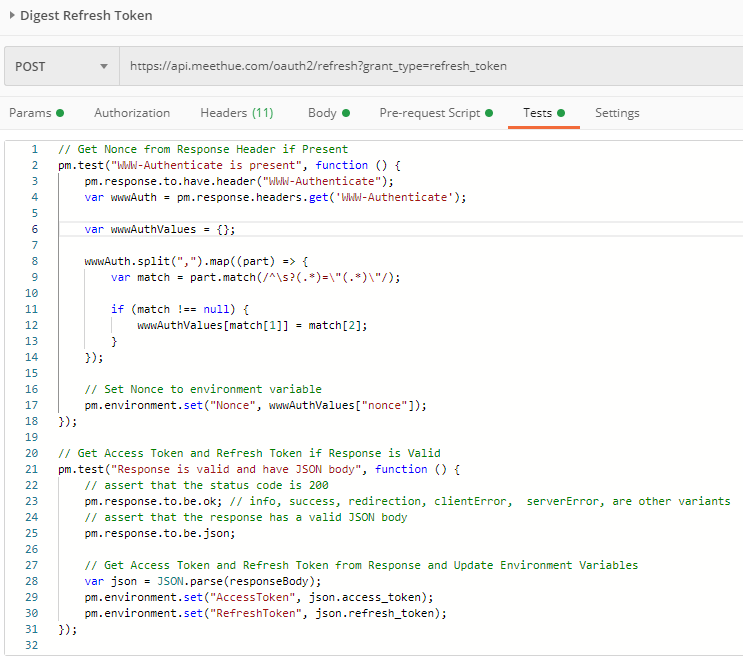
And the Tests scripts are the same as with getting an access token:
Remember that refreshing the access token using Digest will follow the same pattern as getting the access token, you will need to run the refresh request twice in succession for getting a 401 Unauthorized and then 200 OK like shown above.
Get Access Token with Postman Oauth2 Authorization
With the collection of requests shown above, you should now be able to use the access token and refresh when needed for as long time as you need to. Before I proceed to configuration and accessing my lights, I will add one more method of getting access token with Postman: Using the built-in Oauth2 Authorization method.
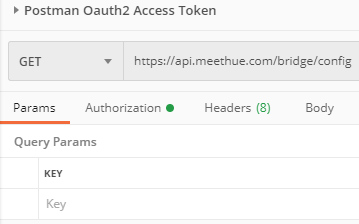
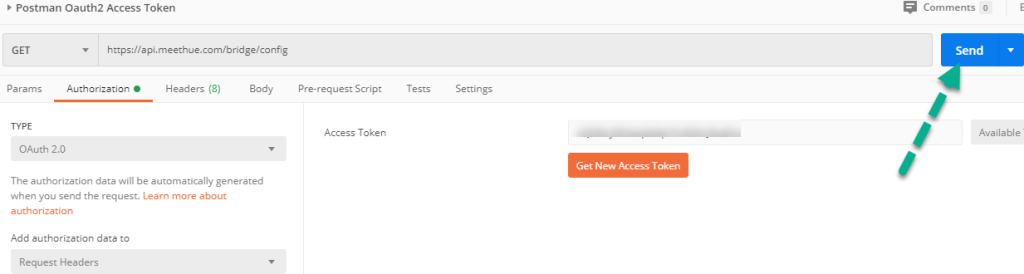
Lets start by creating the following GET request, this is just a simple request to get configuration from my HUE bridge:
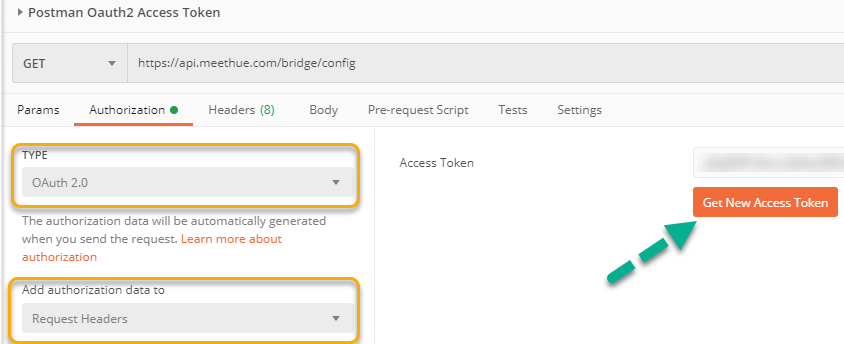
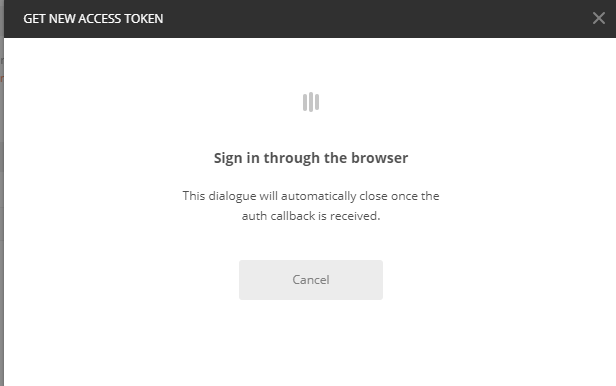
Next, go to Authorization, select Oauth 2.0 and add Authorization data to Request Headers as shown below. Then click on the Get New Access Token button:
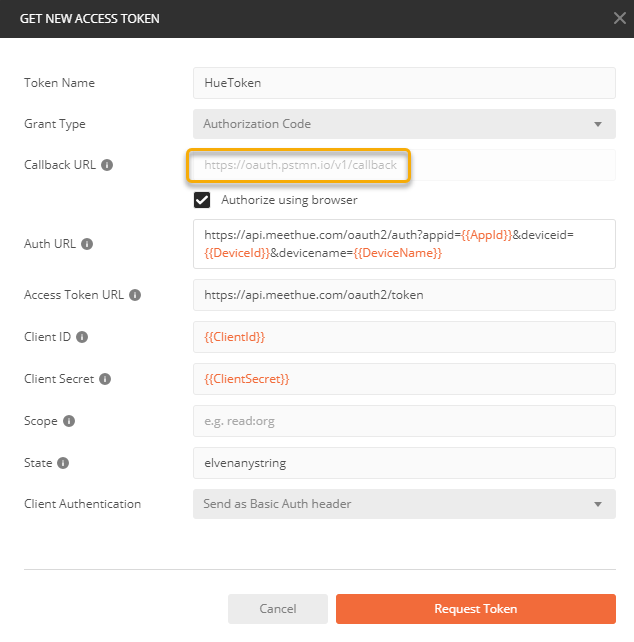
In the following dialog, give a name for your Token, and make sure that grant type is Authorization Code. Select Authorize using browser, and note the Callback URL. You need to copy this URL. Construct an Auth URL using your environment variables like I have shown below, the Access Token URL, specify ClientId and ClientSecret variables, type any string for state, and make sure that Client Authentication is Basic Auth header:
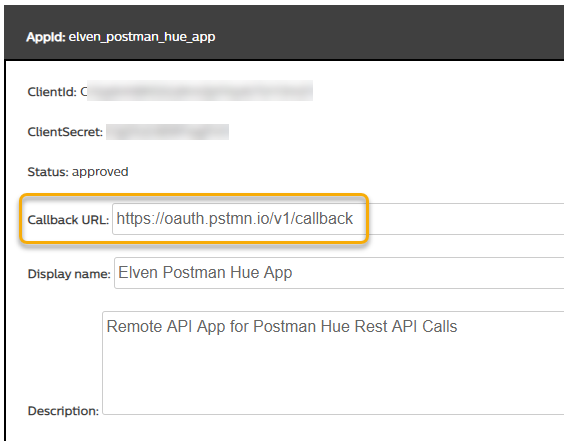
Now, before you click on Request Token, you need to go back to your Hue Developer Account and change the Callback URL to the one above:
When you have done that, you can click on Request Token, which will launch you default browser:
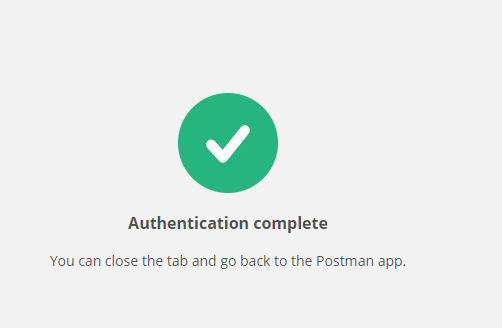
You need to be logged in with your Hue Developer account and grant permission:
After that you will get the following message when redirected:
You might have some issues with pop up blocker or redirects:
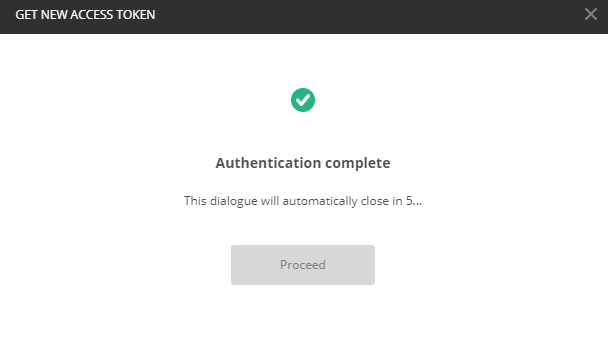
If everything works as expected, your Postman client will receive the callback and complete then authentication:
And you should receive your Access Token:
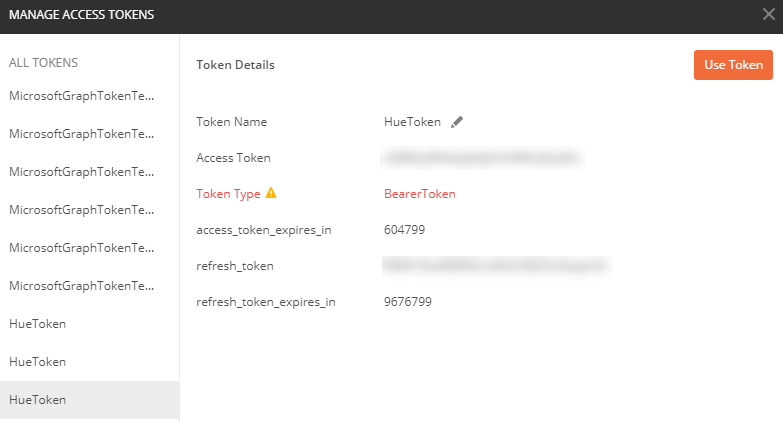
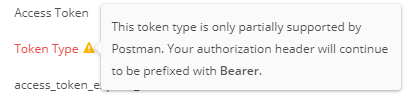
Note the little warning about partially support:
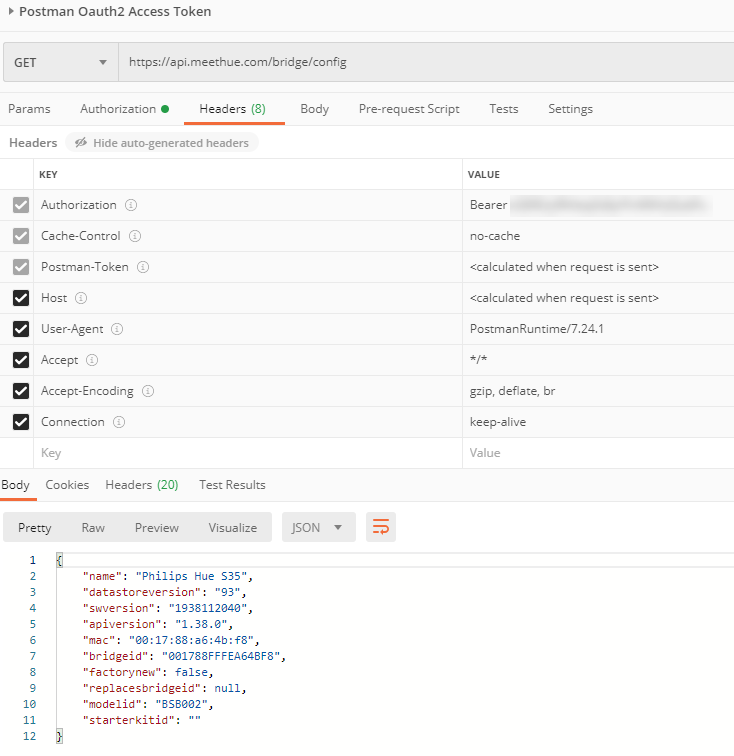
Click the Use Token button, which should fill in the Access Token field. Now click Send on the request:
This should now response with some config details of your Hue Bridge, like the name and versions. If you go to Headers and show the hidden Headers you will see that Authorization Header has been set with Bearer and your Access Token.
So going forward, and for the rest of this blog post, you now have two options for using Access Token:
Use the Access Token from environment variables that I have shown how you can retrieve with Basic or Digest Authentication, and Refresh when needed.
Use the Oauth2 Authorization for every request (or set it on the parent level of your collection of requests). When the Access Token expire, it won’t refresh automatically, so you need to Request a new one.
Remote Configure Link Button and Create User
Now for the next part we will have to remote configure the link button, so that the bridge will accept creating a new user for us to be able to control the lights.
Enable Link Button
Users of Hue will remember that you from time to time that you need to push the link button on your bridge when adding new users. With Remote API we can do this without having to run around the house 😉
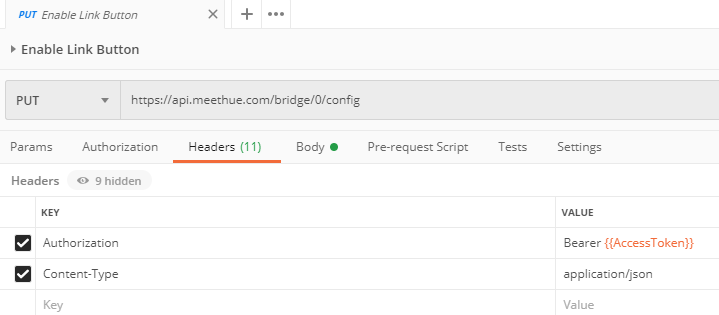
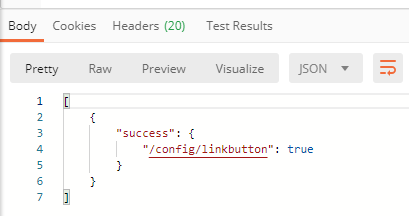
Create a PUT request like the following. On Headers specify Authorization and value to be Bearer {{AccessToken}}, which will get your environment variable from the previously retrieved access token. PS! For all the following requests: Always include this Authorization: Bearer {{AccessToken}} header!
Specify Content-Type: application/json:
Next, set the Body to {“linkbutton”: true}:
And then Send the Request, you should get a success response like below:
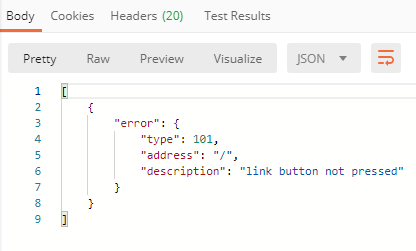
You now have 30 seconds to add your user..
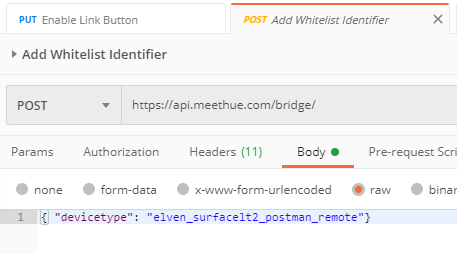
Add Whitelist Identifier
Next, create a POST request to the Bridge endpoint that specify devicetype in the Body, like shown below, where devicetype is a named description of your client and app, for example:
Run the request, but if 30 seconds have passed, you will get this response:
In that case, just run the PUT request again to enable the link button, and try again. When successful you should get a response like the following:
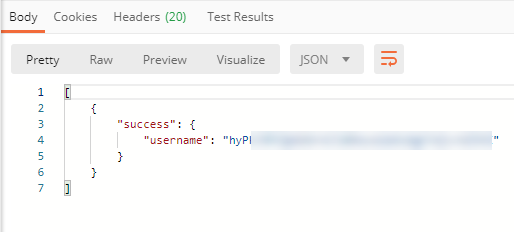
This username have to be included in every Hue Remote API request later, so make sure to save it in your environment variables:
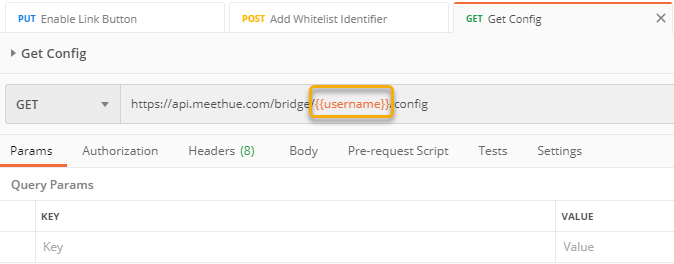
Get All Configuration
Your starting point now for all requests are https://api.meethue.com/bridge/{{username}}/ (and remember to include the Authorization: Bearer {{AccessToken}} header always).
If I want to list all configuration, I can run this GET request:
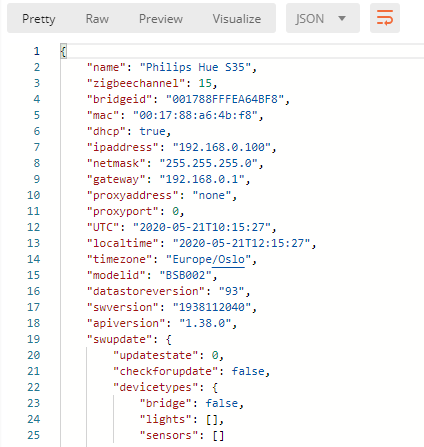
Which will provide me with all the configuration details of my Bridge:
We are now ready to start controlling the Lights and more!
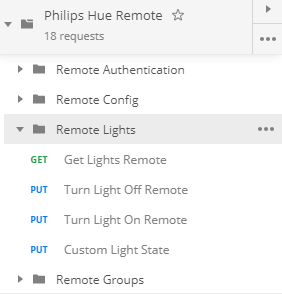
Control Lights Remotely
If will now show you some sample requests for controlling lights via Hue Remote API:
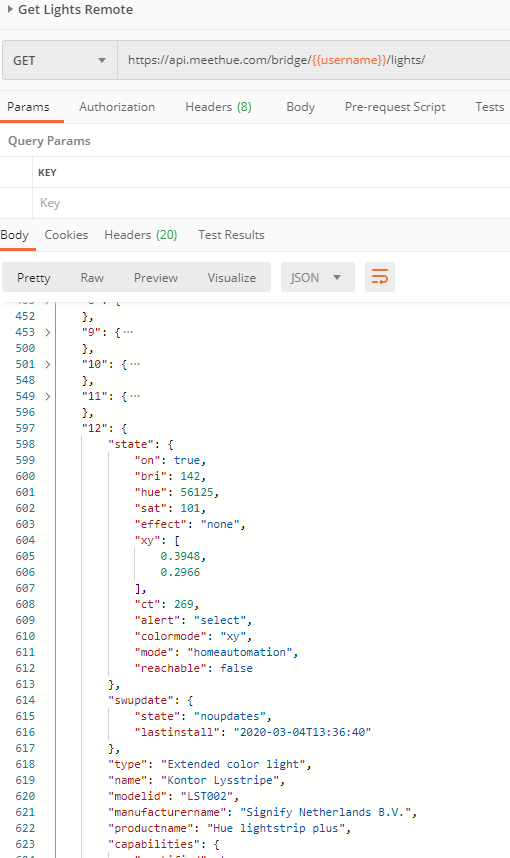
The response will show all lights, numbered from 1 to count of lights connected to your bridge. I’ve collapsed some details in the response above, but you can see from my light number 12 that the state is “on”, you can see the brightness, color and more.
PS! Every light is a new typed object, and not an array, which I find a bit unfortunate, so you need to be aware of that if you want to loop through your lights for example.
If you want to get a specific light, just add the light number at the end of the GET request URI, like this: https://api.meethue.com/bridge/{{username}}/lights/12
Turn a Light On/Off
You can control the state of a specific light by doing a PUT request to your specified light number, for example light number 12: https://api.meethue.com/bridge/{{username}}/lights/12/state
You need a Request Body that tells what the light state should be. For example to turn the light off, just include a body with {“on”:false}, the response will confirm success (and you should be able to visually confirm as well ;):
Likewise, to turn on again:
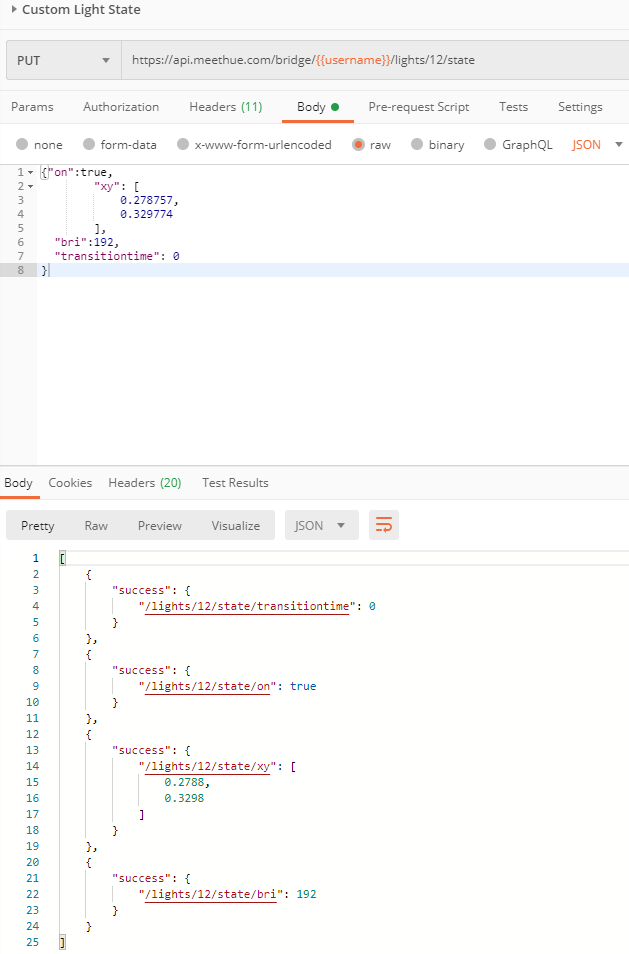
Controlling Light State and Colors
Now you can really start playing with your lights with custom states, you can change brightness, go from cold white to warm white, or maybe set a color scene for the millions of colors available if your light supports color. More info can be found here:
Here is an example where I both control brightness (1-254) and a custom color:
Now, you can just experiment and learn for yourself. A good tip is to use your Hue App on your mobile phone to set the color you like, and then use GET to get the light state color settings.
Summary and Github Repo
I hope you have learnt a lot about Hue Remote API when reading this, I certainly learnt a lot exploring and documenting this via Postman. This understanding has provided me with the knowledge and tools to look into automation and integration scenarios with the Microsoft solutions I use daily in my job. I’ve already been doing this with PowerShell, Azure Functions, Logic Apps and Power Automate to name a few. There is a blog post coming soon on Power Platform and how I did that to control my lights based on Teams Presence and more.
So whether you are a developer that loves to write code, or maybe you are more into the low-code, no-code solutions, I hope this has been helpful.
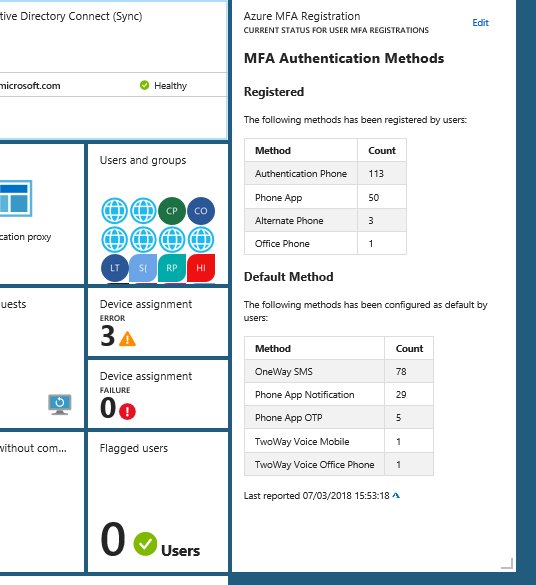
If you are working with EMS and implementing Azure AD, Intune, MDM, MAM, Information Protection and more, you can build yourself some great dashboards in the Azure Portal using tiles and pin blades to your customized dashboard. This is an example from my own workplace:
Often when I work with projects implementing Identity & Access, Conditional Access and Azure MFA, I wish I could have a dashboard to report on MFA registration, and be able to pin that to my EMS dashboard as shown above.
It might be in the future that Azure MFA registrations and methods will be native in the portal, but for now this information have to be retreived in another way. In this blog post I will show you how you can set up a solution for showing this information. I will use the Markdown Tile from the gallery for displaying this information, and in the end it will look like this:
I referred in the title of this blog post to the good, the bad and the ugly, and by that I mean the process of setting this up, because it starts easy enough in the beginning but it will get more “ugly” in the end 😉
The Good – Setting up the Markdown Tile
I will use the Markdown Tile for the content in my customized dashboard in my Azure Portal. The first part is easy to set up, just click Edit and find the Markdown tile from the gallery, as shown below:
Drag the tile to a place you want it on your dashboard, and the Edit the title, subtitle and content as prompted:
There is a sample content provided, other than that you can write your own markdown. I will not get into details on markdown format here, there is a lot of good guides for learning the format, for example this: https://guides.github.com/features/mastering-markdown/. I will however provide you with a sample for reporting MFA registrations and default methods. This is how I set up my markdown tile:
And here is a link to my github repository where you can get the complete MFAReport.md file sample:
Now we need to fill that markdown tile with some real Azure AD MFA report data to report on.
The Bad – PowerShell Script for getting MFA registration and methods to Markdown
So the “bad” news is that we are reliant on running some Azure AD PowerShell commands for getting user details for MFA registration and methods. For now we are also reliant on the Azure AD v1 PowerShell (MSOnline) Module, as the new v2 AzureAD Module does not yet have any methods to get MFA authentication data. We cannot use the Microsoft Graph API either to get MFA user data, but I expect that to change in the future.
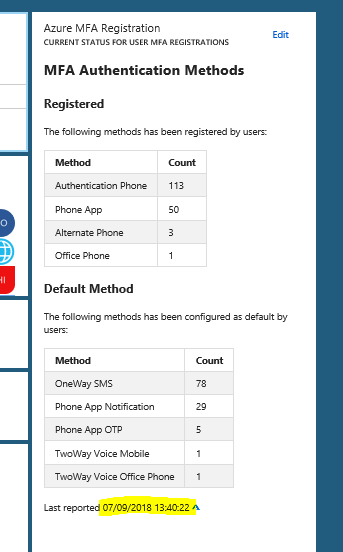
So lets look at the script I use, and after authenticating and connecting to Azure AD in my tenant with Connect-MSOLService, I will run the following commands to get details from each user where there has been configured one or more StrongAuthenticationMethods, and Group on those methods and save the results to a hash table. The results are stored in the $authMethodsRegistered object variable. Similarly I run the command once more, filtering on only showing the methods that are set to default for each user, and save to the $authMethodsDefault variable.
So now we have a script where we can get MFA authentication details for each user and create a markdown file that we can use in the tile in the Azure Portal custom dashboard. But it is all a manual process now, and it works fine for an ad hoc update. If we want to automate however, we have to get into the “ugly” stuff 😉
The Ugly – Automating Markdown creation and update Dashboard
This part requires multiple steps. First we need to schedule and run the PowerShell commands from above. Then we need to find a way to update the customized dashboard tile with the updated markdown file. To summary, this is what we need now:
Schedule the PowerShell script to run automatically. We can use Azure Automation for that.
Programmatically change the markdown tile in the customized dashboard. We can use Azure Resource Manager Rest API for that.
Lets get into the Azure Automation solution first. To run a PowerShell script I will need to create a Runbook, and in that Runbook I need to authenticate to Azure AD. I can define a Credential Asset with a username and password for a global admin user, but I like to use the least privilege possible, and besides that all my global admins are either protected by Azure AD PIM and/or MFA, so that won’t work. I prefer to use a service principal whereever possible, but after testing extensively with Connect-MSOLService that is not supported either.
So I tested with a dedicated Azure AD credential account, first by only adding the user to the Directory Readers role. I was able to list all users with Get-MSOLUser, but not any StrongAuthentication info. Neither did it work with Security Readers. In the end I added the user account to User Administrator role in Azure AD, and I was successful getting StrongAuthentication methods.
So, in my automation accont I will add or reuse my credentials:
Next, I will create a new PowerShell script based Runbook, basically I will use the PowerShell script from earlier in the blog, but with a couple of added parameter and getting the credential using the Get-PSAutomationCredential method. This is how it looks, you will get link to the complete script later:
And after testing, I can see that I successfully will get the MFAReport.md content (added a Get-Content .\MFAReport.md at the end to display the output):
Now that we have a solution for running the PowerShell script and generating the markdown file, the next part is how to update that data in the custom dashboard. And for that we need to look into programatically changing Azure Portal dashboards. There is a good resource and starting point for that in this article: https://docs.microsoft.com/en-us/azure/azure-portal/azure-portal-dashboards-create-programmatically.
First you need to share the custom dashboard, remember to include the markdown tile we set up in the first part of this blog post. At the top in the portal dashboard, select the Share button:
By sharing the dashboard will published as an Azure resource. Specify a name, select the subscription and either use the default dashboard resource group or select an existing one:
Go to Resource Explorer in the Portal:
Navigate to Subscriptions, Resource Groups, and find the resource group and resource containing the custom dashboard. From there you will be able to see the JSON definition of the dashboard and specifically the markdown tile containing the content we want to update:
So for next process now we need to copy this complete JSON definition containing all your tiles including the markdown tile. Locally on your computer, create a .json file in your favorite JSON editor, I use Visual Studio Code for this, and paste in the content. I have named my file DeploymentTemplateMFAReport.json.
Now we need to change this template to be ready for deployment, and for that we need to add or change a couple of things. First, in the start of the JSON file, add schema and versioning, and parameters, variables and resources section like I have shown below in line 1-17:
I have chosen to use 3 parameters, the markdown content itself, and name of the dashboard and the title of the dashboard.
Next, find the tile for the markdown content, and change the content value to the value of the parameter, like I have done at line 113 here:
And last, at the end of the json template, add and change the following settings, I have used my parameters for the dashboard name and the dashboard title here in the lines 401-411:
My deployment template for the customized dashboard is now completely general and can be used in every environment. In fact you are welcome to borrow and use my template from above her, I have included it in my github repository:
Working locally in my Visual Studio Code editor, I can now test the deployment using Azure PowerShell, as shown below and described with these simple steps:
Connect to Azure Resource Manager and select the Subscription
Specify a variable for the Resource Group you want to deploy to
The MFAreport.md file (which we created earlier) need some converting to JSON format, I’m removing all espace characters and any uneeded special characters
Specify variable names your environment for name and title for the dashboard
Deploy the custom dashboard to the resource group
However, now that we can test the deployment, I want to schedule a deployment using Azure Automation, and I will continue on my previous runbook from before. But first we need to set up some connections for authenticating to Azure and some variables.
I Azure Automation we can create an Azure Run As Account, this will also create a service principal. If you navigate to your Automation Account in the Azure Portal, and go to the section called Run as accounts, you can create an Azure Run As Account automatically, as I have done here:
If I look more closely at this generated Run As Account, I can see details for Azure AD App Registration, Service Principal, Certificate and more. This account will also automatically be assigned Contributor role for my Azure Subscription. If you want more control over Azure Run As Accounts, you can create your own as described in the following article: https://docs.microsoft.com/en-us/azure/automation/automation-create-runas-account
I will use this Azure Run As account in my environment to deploy the dashboard resource, I’ll just need to make sure the account has contributor access to the resource group. Next I will set ut a few variables under the Variables section for my Automation Account, I will use these variables when I deploy the resource:
Now we are ready to finally put together the complete Runbook and test it. You will have the complete link later in the blog post, but I will share some screenshots first:
After I’ve connected with Connect-MSOLService I’m creating a variable for the markdown content, so I’ve changed from earlier when I saved a .md file temporarily, now I just adding lines using the newline special character (`n):
The next part is for logging in to Azure (using the Azure Run As Account mentioned above), and then getting my variables ready for deployment:
Then I convert the markdown content to Json format, and removing any escape characters that I don’t need:
And then deploy the dashboard resource with parameters for markdown content and dashboard name & title. Note that I’m using my deployment template as a source from my github repository via the TemplateUri property:
You can use any TemplateUri you want, for example from a more private source like a storage account blob etc.
Testing the Runbook gives the following output, which shows it was successful:
When I now go and refresh the dasboard in the portal, I can see that the markdown tile has been updated:
That leaves me with just publishing and scheduling the runbook:
When creating a new schedule specify a name and recurrence:
Link the schedule to the runbook and any needed parameters, I have to specify my credential that are allowed to Connect-MSOLService:
That concludes this lengthy blog post. The script will now run regularly and update my custom markdown tile with MFA report data.
Here is the link to the PowerShell script used in my Azure Automation runbook, enjoy your MFA Reporting!
I wrote this PowerShell script that helps you configure this correctly in your domain/forest. Some notes:
You can use it in a single-domain, single-forest domain, or in a multi-domain forest, just remember to specify a Domain Controller for the wanted domain, and for the domain the Azure AD Connect account is in.
You have to find the Azure AD Connect Synchronization account, it would be MSOL_xxxx.. if you have used Express settings, or a dedicated account. Look at current configuration for details.
You can specify an OU for your users, and if inheritance is enabled all subordinate users and OUs will inherit the permissions. If not, please run the script once for each OU you want the permissions to be applied for.
Here is the script:
This file contains hidden or bidirectional Unicode text that may be interpreted or compiled differently than what appears below. To review, open the file in an editor that reveals hidden Unicode characters. Learn more about bidirectional Unicode characters
My Skill colleague Pål-Andre Kjøniksen wrote a blog post on how he can control the heating in his Tesla Model S based on his Office 365 Calendar appointments and Microsoft Flow.
The blog post is in Norwegian, but it should be fairly simple to follow the steps, where the idea was that if he creates a Calendar appointment that starts with “Tesla:”, the heating will start up 20 minutes before that, making sure that the car is warm when he drives off.
This years SCU Europe 2016, for the first time outside Switzerland in the 4th year running, was held in Berlin at the BCC (Berlin Congress Center) close to the Alexander Platz in the eastern parts of “Berlin Mitte”.
Let’s begin with the end: at the closing note SCUE general Marcel Zehner announced and with a little bit of emotion that this was the last ever SCU Europe to be held.. You and your organization should be proud of what you have achieved, Marcel, it is one of the best community conferences around, and I have been fortunate to be able to visit all 4 starting with Bern in 2013, Basel in 2014 and 2015, and now Berlin in 2016. It’s only cities with B’s is it? In fact, you never know what twists and turns your career takes, but looking back I’m not sure I would be where I am now in turn of being presenter, MVP and community influencer myself if I had not travelled alone to Bern 4 years ago, that’s where I really started working with and for the Community (with a capitol C)!
Luckily SCU Europe will continue as Experts Live Europe next year! Same place at BCC, same organization and format, and the same dates only next year it will be: 23rd – 25th of August 2017. A new web page was launched, www.expertslive.eu, and Twitter (@ExpertsLiveEU) and Facebook have been changed to reflect that. The hash tag #SCU_Europe will eventually be inactive and you should now use #ExpertsLive.
I think this is a very good decision, there has already been discussion on that the name “System Center Universe” is not really reflecting the content and focus of the conference, now embracing the Cloud, with content areas for Management, Productivity, Security, DevOps, Automation, Data Platform and more. ExpertsLive, originally a 1-day community conference in Netherland running each year back from 2009 and with up to 1200 participants, will now be a network of conferences, ranging from region based (ExpertsLive Europe, but also SCU APAC and SCU Australia will be ExpertsLive APAC and Australia next year), and local, country based ExpertsLive like the one in Netherlands, but more will come.
The closing note video announcing Experts Live Europe:
This year at SCU Europe I was one of the Experts and presented two sessions on “Premium Identity Management and Protection with Azure AD” and “Deep Dive: Publishing Applications with Azure AD”. I also took part in a “Ask-the-Experts” area together with Cameron Fuller and Kevin Greene where we took questions on the topic System Center 2016. I participated on a discussion panel on Friday morning with Markus Wilhelm from Microsoft Germany on the subject Defense Strategies and Security, and of course we had the Meet and greet with the Experts at the Networking party. It was a really great experience speaking at this conference, thanks for having me!
The content of the conference this year was great, and for the first time there was 5 tracks, with over 70 sessions presented! All presentations and session recordings will be at Channel 9 in a few weeks time, so make sure you look at anything you missed or want to see again if you where there, or if you weren’t at the conference this year you can look at your sessions of interest.
I was travelling with a group this year, both from my company and some of our customers, in total we were 7 in the group, and also had 3 cancellations the last week before the conference from some customers that could not make it after all. Moving the conference to Berlin is a big part of why it now was easier to attract more Nordic attendance I think. We stayed at the Park Inn by Radisson right by the Alexander Platz and BCC, so it was really central and nice.
In good tradition there are a lot of parties and social networking going on. On the first night there are the Sponsors and Speakers Party, which was held in Mio right by the TV Tower by Alexander Platz, on Thursday we had the attendee Networking Party at the conference center. Later that night our group and some more partners/customers of Squared Up went on to another party at Cosmic Kaspar. It was really hot, so basically the party was at the pavement! On the last day we had the Closing Drinks, sponsored by Cireson and itnetX at Club Carambar, also close to the Alexander Platz. In addition, there are a lot of unofficial gatherings going on, lots of laughs and new and old friends have a good time.
In this blog post I will show how you can trigger the Azure AD Connect Sync Scheduler with an Azure Automation Runbook PowerShell Script. Since the Azure AD Connect build 1.1.105.0 was released February 2016, a new scheduler is built-in that per default sync every 30 minutes (previously 3 hours). For more detail on Azure AD Connect Sync Scheduler, see https://azure.microsoft.com/en-us/documentation/articles/active-directory-aadconnectsync-feature-scheduler/.
Normally a sync schedule of 30 minutes is sufficient for most use, but sometimes you will need to do an immediate sync. So I thought it was a good idea to create a PowerShell script that creates a remote session to the Azure AD Connect Server, and then triggers a delta sync.
Now, this PowerShell script can of course be used with any of your favorite automation solutions, for example Orchestrator or SMA on-premises. But why not just use Azure Automation and a Hybrid Worker to run this script. This way you can trigger the script in a number of ways including in the Azure Portal, via Webhooks, remediating alerts in OMS and more.
Requirements
Lets first take a look at the requirements for this solution:
You will have to have an Azure Subscription, so that an Azure Automation Account can be created (or use your existing account), and that a runbook script with the related assets can be created.
You will need to have an OMS Workspace for the Azure Subscription, and have a Hybrid Worker set up that can communicate with the Azure AD Connect Server. The Hybrid Worker will use a credential asset and variable asset created in the first part.
In the following two parts I will look at these two requirements and how you can set it up to start triggering Azure AD Connect Scheduler with your Azure Automation Runbook.
Part 1 – Set up the Azure Automation Runbook and Assets
To set up the Azure Automation part of the solution, I have created a GitHub Repository where you can deploy the solution directly from https://github.com/skillriver/Trigger-AzureADSyncScheduler. This repository contains the Azure Resource Manager deployment template and PowerShell script that you need to get started.
You can also click this deploy button directly:
Lets step through what you experience when you click to “Deploy to Azure”. Please make sure that you are logged in to your correct Azure Subscription first.
Deploying with the Template
I will not go through how I created the ARM based JSON templates, but I will quickly show the user experience when doing the deployment.
The custom deployment will ask you for some parameter values:
AUTOMATIONACCOUNTNAME. If you specify an existing Automation Account, this will be used, or else a new one will be created with the Free pricing tier.
AAHYBRIDWORKERCREDENTIALNAME. There is a default value there, this will be used as a Credential Asset in the PowerShell script. You can change the value, but then you must remember to change it in the script as well.
AAHYBRIDWORKERDOMAIN. The NETBIOS Domain Name for where the Azure AD Connect Server belongs to.
AAHYBRIDWORKERUSERNAME. This is this the user name for the service account or other user account that has permission to connect to the Azure AD Connect Server and trigger the sync schedule.
AAHYBRIDWORKERPASSWORD. The password for the user above.
AADSSERVERNAME. The server name of the Azure AD Connect Server.
You will have to select the correct subscription, and either create a new Resource Group, or an existing one (please note that Azure Automation is not available in every region).
After saving the parameters, and reviewing and accepting legal terms, you are ready to create the custom deployment.
If everything went OK, you should see a confirmation:
You will have an Automation Account:
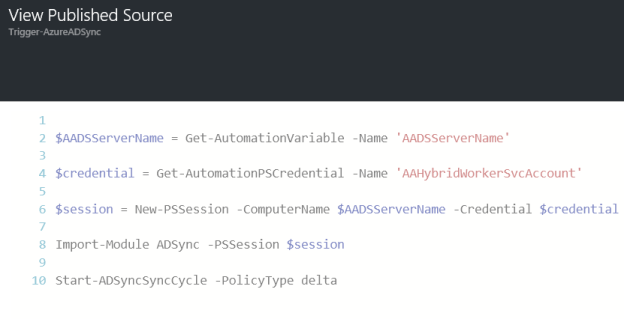
You will have a PowerShell Script Runbook with the name Trigger-AzureADSync:
The script can be viewed as shown below. This script is short and simple, it will get the Asset Variable for Azure AD Connect Server name, and get the Credential Asset for the Hybrid Worker Account. It will the create a remote session, and run the delta sync cycle:
Lets take a look at the Assets created with the deployment as well, the Variable:
The Credential:
That’s the whole solution for this first part. If you for any reason could not or would not deploy the template directly, and would prefer to create this manually, you should be fine just following the images above. Just follow these steps:
Create a Azure Automation Account (Free tier, and in your chosen supported Azure Region).
Create a Variable Asset, with the name of the Azure AD Connect Server.
Create a Credential Asset, with the DOMAIN\UserName of the account you will use to remote session to the Azure AD Connect Server.
Create a new PowerShell Script Runbook, typing the CmdLets from above and using your variable assets.
By now you should be ready for the next step, because you cannot run this Automation Runbook just yet. You have to have in place OMS and a Hybrid Worker first, and that will be shown in the next part.
Part 2 – Set up the Hybrid Worker and Remote session permission
To be able to run Azure Automation Runbooks in your own datacenter, you will need to have an OMS workspace and at least one Hybrid Worker configured that will be able to execute the Runbook locally and connect to the Azure AD Connect Server.
After setting up and registering your Hybrid Worker, you will have a Hybrid Worker Group with at least one Hybrid Worker.
Now, running the Runbook with the right security is going to be essential here, after all the Runbook is going to connect to the Azure AD Connect Server and initiate the sync cycle. Lets first check the settings of the Hybrid Worker Group. We can either select a Default Run As account as I have here:
Or you can select a Custom Run As, specifying a credential Asset to use for all Runbooks running on this Hybrid Worker Group:
In my example here, I will use the Default Run As Account, because I specify my own credentials in the PowerShell Runbook, as shown earlier in Part 1 of this blog post:
Next, I will have to create a domain account in my local Active Directory. I have created a service account to be used for Azure Automation Hybrid Workers. This is the same account you specified when creating the credential asset in Part 1 in Azure Automation:
This account will need permission to remote PowerShell to the Azure AD Connect Server. In Computer Management and Local Users and Groups on the Azure AD Connect Server, add this service account to the Remote Management Users group:
And add the account to the ADSyncOperators group, so that the user has permission to Azure AD Connect operations:
That should be it, we are now ready to start the Runbook and verify that it works.
Starting the Runbook
From the Automation Account and the Trigger-AzureADSync Runbook, select Start and under Run Settings select Hybrid Worker and your Hybrid Worker Group:
You can verify that the job completed and with no errors:
Looking into the Synchronization Service on the Azure AD Connect Server, I can verify that the sync cycle has been running:
That concludes this blog article, hope it has been helpful!
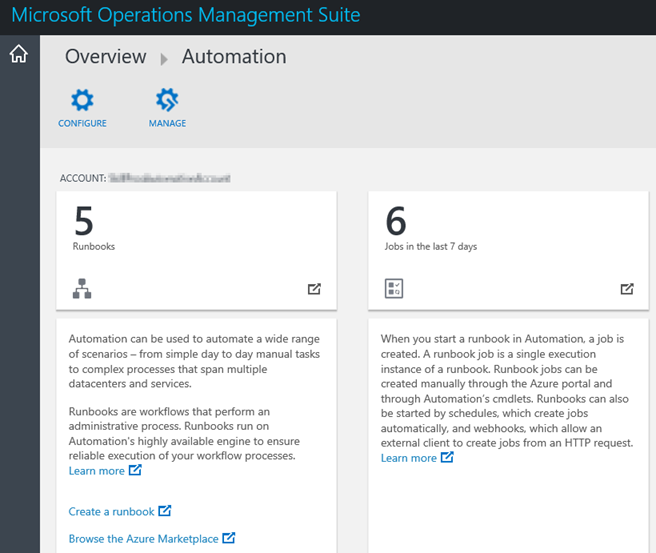
Wouldn’t it be great to get some more information about your Azure Automation Runbooks in the Operations Management Suite Portal? That’s a rhetorical question, of course the answer will be yes!
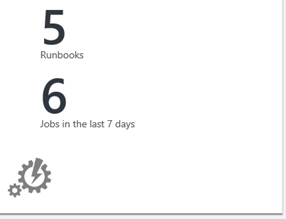
While Azure Automation is a part of the suite of components in OMS, today you only get the following information from the Azure Automation blade:
The blade shows the number of runbooks and jobs from the one Automation Account you have configured. You can only configure one Automation Account at a time, and for getting more details you are directed to the Azure Portal.
I will use the AzureRM PowerShell Module for the PowerShell commands that will connect to my Azure subscription and get the Azure Automation Runbooks data.
Getting Ready
Before I can create the PowerShell script rule for gettting the Azure Automation data, I have to do some preparations first. This includes:
Importing the “Sample Management Pack – Wizard to Create PowerShell script Collection Rules” to my Operations Manager environment.
Choose Target for where to run the AzureRM commands from
Regarding the AzureRM and where to install, I decided to use the SCOM Root Management Server Emulator. This server will then run the AzureRM commands against my Azure Subscription.
Choose account for Run As Profile
I also needed to think about the run as account the AzureRM commands will run under. As we will see later the PowerShell Script Rules will be set up with a Default Run As Profile.
The Default Run As Profile for the RMS Emulator will be the Management Server Action Account, if I had chosen another Rule Target the Default Run As Profile would be the Local System Account.
Alternatively, I could have created a custom Run As Profile with a user account that have permissions to execute the AzureRM cmdlets and connect to and read the required data from the Azure subscription, and configure the PowerShell Script rules to use that.
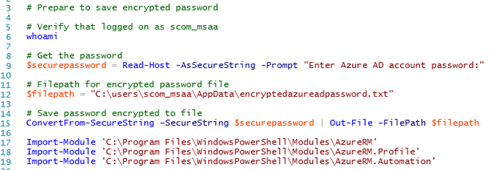
I decided to go with the Management Server Action Account, in my case SKILL\scom_msaa. This account will execute the AzureRM PowerShell cmdlets, so I need to make sure that I can login to my Azure subscription using that account.
Next, I started PowerShell ISE with “Run as different user”, specifying my scom_msaa account. I run the commands below, as I wanted to save the password for the user I’m going to connect to the Azure subscription and get the Automation data. I also did a test import-module of the AzureRM modules I will need in the main script.
The commands above are here in full:
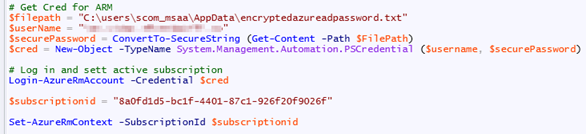
# Prepare to save encrypted password # Verify that logged on as scom_msaa whoami
# Get the password $securepassword=Read-Host-AsSecureString-Prompt“Enter Azure AD account password:“
# Filepath for encrypted password file $filepath=“C:\users\scom_msaa\AppData\encryptedazureadpassword.txt“
# Save password encrypted to file ConvertFrom-SecureString-SecureString$securepassword | Out-File-FilePath$filepath
At this point I’m ready for the next step, which is to create some PowerShell commands for the Script Rule in SCOM.
Creating the PowerShell Command Script for getting Azure Automation data
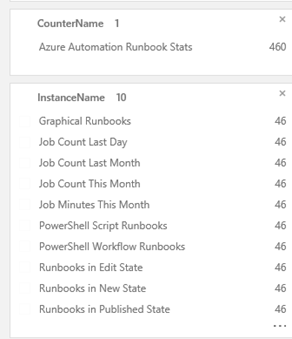
First I needed to think about what kind of Azure Automation and Runbook data I wanted to get from my Azure Subscription. I decided to get the following values:
Job Count Last Day
Job Count Last Month
Job Count This Month
Job Minutes This Month
Runbooks in New State
Runbooks in Published State
Runbooks in Edit State
PowerShell Workflow Runbooks
Graphical Runbooks
PowerShell Script Runbooks
I wanted to have the statistics for Runbooks Jobs to see the activity of the Runbooks. As I’m running the Free plan of Azure Automation, I’m restricted to 500 minutes a month, so it makes sense to count the accumulated job minutes for the month as well.
In addition to this I want some statistics for the number of Runbooks in the environment, separated on New, Published and Edit Runbooks, and the Runbook type separated on Workflow, Graphical and PowerShell Script.
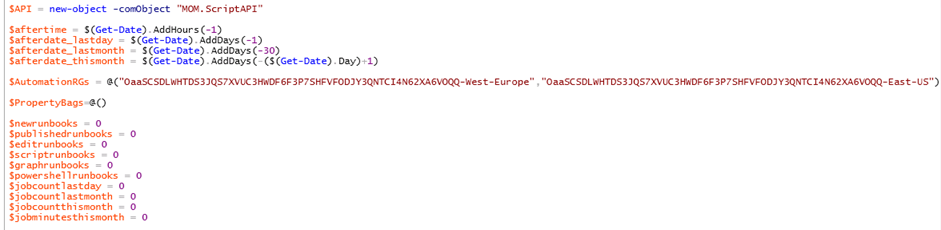
The PowerShell Script Rule for getting these data will be using the AzureRM PowerShell Module, and specifically the cmdlets in AzureRM.Profile and AzureRM.Automation:
To log in and authenticate to Azure, I will use the encrypted password saved earlier, and create a Credential object for the login:
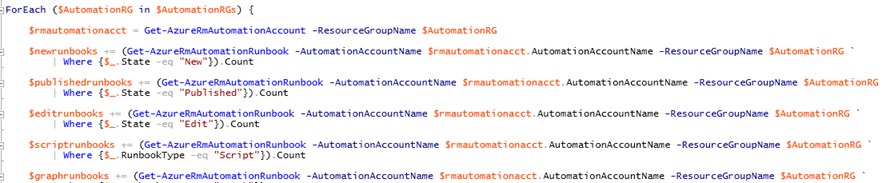
Initializing the script with date filters and setting default values for variables. I decided to create the script so that I can get data from all the Resource Groups I have Automation Accounts in. This way, If I have multiple Automation Accounts, I can get statistics combined for each of them:
Then, looping through each Resource Group, running the different commands to get the variable data. Since I potentially will loop through multiple Resource Groups and Automation Accounts, the variables will be using += to add to the previous loop value:
After setting each variable and exiting the loop, the $PropertyBag can be filled with the values for the different counters:
The complete script is shown below for how to get those Azure Automation data via SCOM and PowerShell Script Rule to to OMS:
“Who Am I: “ | Out-File$debuglog-Append
whoami | Out-File$debuglog-Append
$ErrorActionPreference=“Stop“
Try {
If (!(Get-Module–Name“AzureRM“)) { Import-Module‘C:\Program Files\WindowsPowerShell\Modules\AzureRM‘ } If (!(Get-Module–Name“AzureRM.Profile“)) { Import-Module‘C:\Program Files\WindowsPowerShell\Modules\AzureRM.Profile‘ } If (!(Get-Module–Name“AzureRM.Automation“)) { Import-Module‘C:\Program Files\WindowsPowerShell\Modules\AzureRM.Automation‘ }
# Get Cred for ARM $filepath=“C:\users\scom_msaa\AppData\encryptedazureadpassword.txt“ $userName=“myAzureADAdminAccount“ $securePassword=ConvertTo-SecureString (Get-Content-Path$FilePath) $cred=New-Object-TypeNameSystem.Management.Automation.PSCredential ($username, $securePassword)
# Log in and sett active subscription Login-AzureRmAccount -Credential $cred
$PropertyBag=$API.CreatePropertyBag() $PropertyBag.AddValue(“Instance“, “Job Count Last Day“) $PropertyBag.AddValue(“Value“, [UInt32]$jobcountlastday) $PropertyBags+=$PropertyBag
“Job Count Last Day: “ | Out-File$debuglog-Append $jobcountlastday | Out-File$debuglog-Append
$PropertyBag=$API.CreatePropertyBag() $PropertyBag.AddValue(“Instance“, “Job Count Last Month“) $PropertyBag.AddValue(“Value“, [UInt32]$jobcountlastmonth) $PropertyBags+=$PropertyBag
“Job Count Last Month: “ | Out-File$debuglog-Append $jobcountlastmonth | Out-File$debuglog-Append
$PropertyBag=$API.CreatePropertyBag() $PropertyBag.AddValue(“Instance“, “Job Count This Month“) $PropertyBag.AddValue(“Value“, [UInt32]$jobcountthismonth) $PropertyBags+=$PropertyBag
“Job Count This Month: “ | Out-File$debuglog-Append $jobcountthismonth | Out-File$debuglog-Append
$PropertyBag=$API.CreatePropertyBag() $PropertyBag.AddValue(“Instance“, “Job Minutes This Month“) $PropertyBag.AddValue(“Value“, [UInt32]$jobminutesthismonth) $PropertyBags+=$PropertyBag
“Job Minutes This Month: “ | Out-File$debuglog-Append $jobminutesthismonth | Out-File$debuglog-Append
$PropertyBag=$API.CreatePropertyBag() $PropertyBag.AddValue(“Instance“, “Runbooks in New State“) $PropertyBag.AddValue(“Value“, [UInt32]$newrunbooks) $PropertyBags+=$PropertyBag
“Runbooks in New State: “ | Out-File$debuglog-Append $newrunbooks | Out-File$debuglog-Append
$PropertyBag=$API.CreatePropertyBag() $PropertyBag.AddValue(“Instance“, “Runbooks in Published State“) $PropertyBag.AddValue(“Value“, [UInt32]$publishedrunbooks) $PropertyBags+=$PropertyBag
“Runbooks in Published State: “ | Out-File$debuglog-Append $publishedrunbooks | Out-File$debuglog-Append
$PropertyBag=$API.CreatePropertyBag() $PropertyBag.AddValue(“Instance“, “Runbooks in Edit State“) $PropertyBag.AddValue(“Value“, [UInt32]$editrunbooks) $PropertyBags+=$PropertyBag
“Runbooks in Edit State: “ | Out-File$debuglog-Append $editrunbooks | Out-File$debuglog-Append
PS! I have included debugging and logging in the script, be aware though that doing $ErrorActionPreference=Stop will end the script if any errors, for example with logging, so it might be an idea to remove the debug logging when confirmed that everything works.
In the next part I’m ready to create the PowerShell Script Rule.
Creating the PowerShell Script Rule
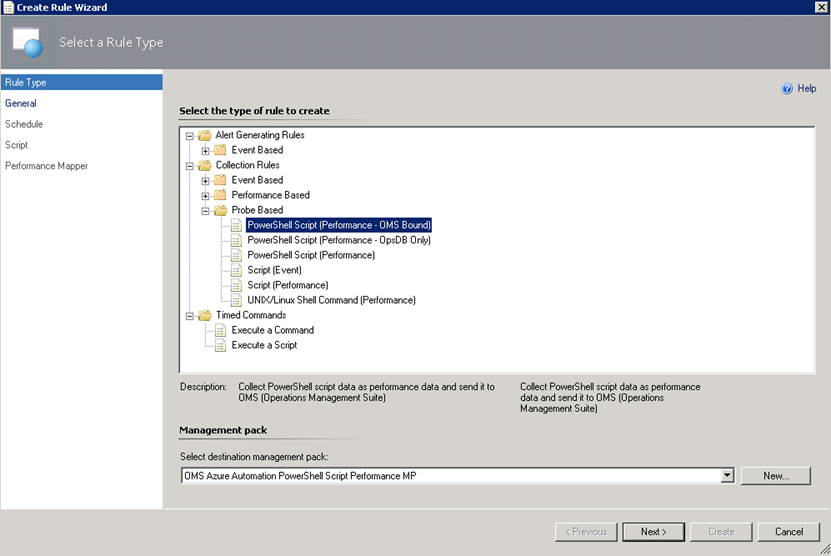
In the Operations Console, under Authoring, create a new PowerShell Script Rule as shown below:
Select the PowerShell Script (Performance – OMS Bound) Rule:I have created a custom destination management pack for this script.
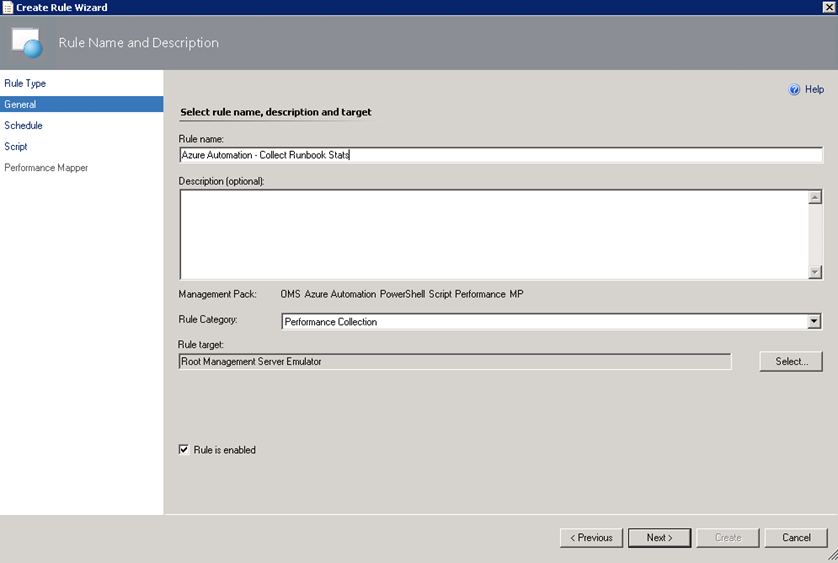
Specifying a Rule name and Rule Category: Performance Collection. As mentioned earlier in this article the Rule target will be the Root Management Server Emulator:
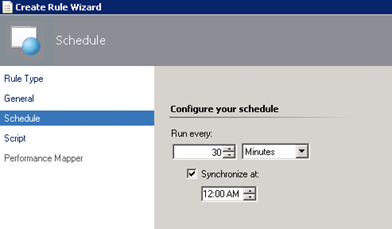
Selecting to run the script every 30 minutes, and at which time the interval will start from:
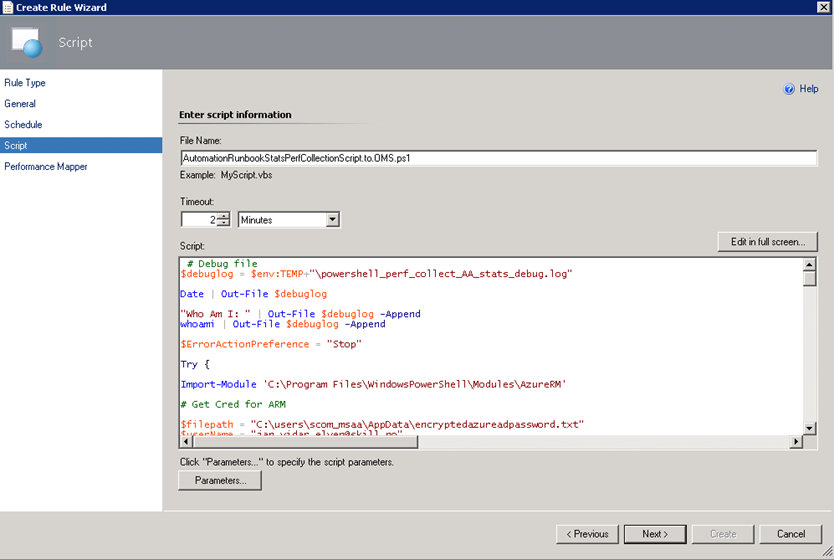
Selecting a name for the script file and timeout, and entering the complete script as shown earlier:
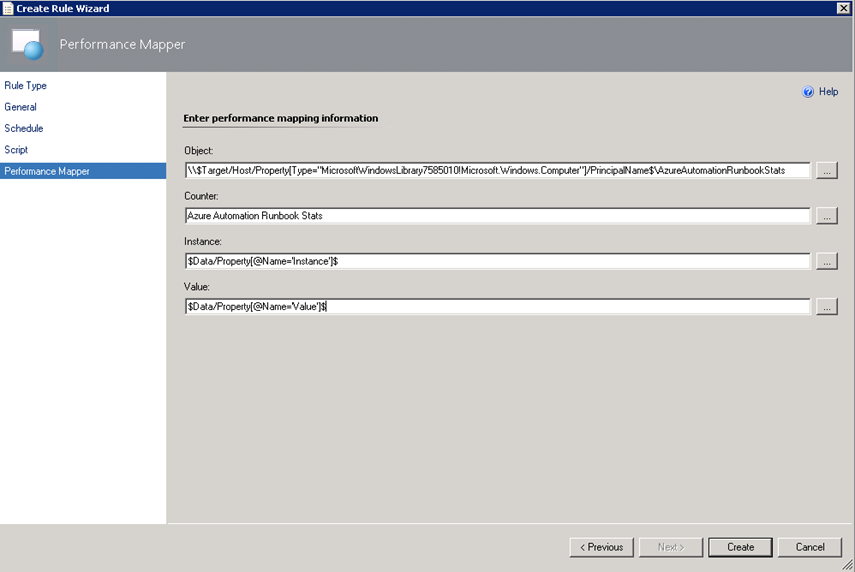
For the Performance Mapping information, the Object name must be in the \\FQDN\YourObjectName format. For FQDN I used the Target variable for PrincipalName, and for the Object Name AzureAutomationRunbookStats, and adding the “\\” at the start and “\” between: \\$Target/Host/Property[Type=”MicrosoftWindowsLibrary7585010!Microsoft.Windows.Computer”]/PrincipalName$\AzureAutomationRunbookStatsI specified the Counter name as “Azure Automation Runbook Stats”, and the Instance and Value are specified as $Data/Property(@Name=’Instance’)$ and $Data/Property(@Name=Value)$. These reflect the PropertyBag instance and value created in the PowerShell script:
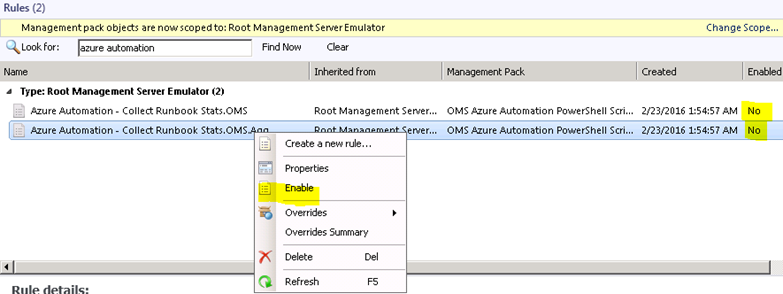
After finishing the Create Rule Wizard, two new rules are created, which you can find by scoping to the Root Management Server Emulator I chose as target. Both Rules must be enabled, as they are not enabled by default:
At this point we are finished configuring the SCOM side, and can wait for some hours to see that data are actually coming into my OMS workspace.
Looking at Azure Automation Runbook Stats Performance Data in OMS
After a while I will start seeing Performance Data coming into OMS with the specified Object and Counter Name, and for the different instances and values.
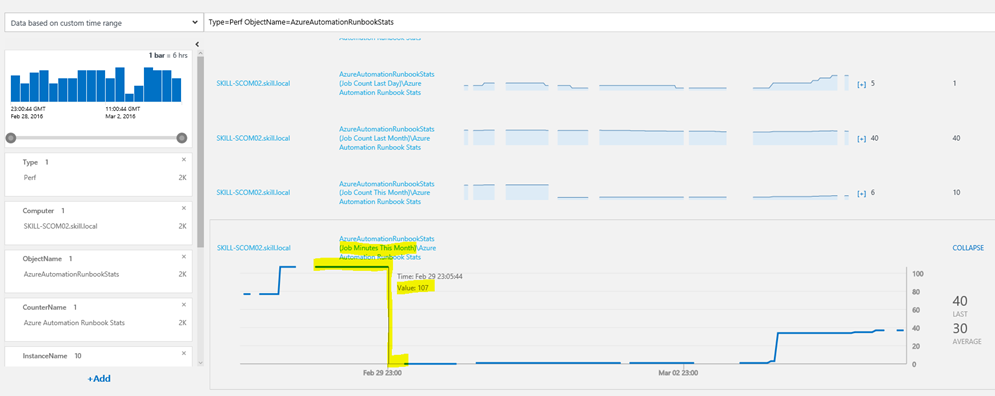
In Log Search, I can specify Type=Perf ObjectName=AzureAutomationRunbookStats, and I will find the Results and Metrics for the specified time frame.
In the example above I’m highlighting the Job Minutes This Month counter, which will steadily increase for each month, and as we can see the highest value was 107 minutes, after when the month changed to March we were back at 0 minutes. After a while when the number of job minutes increases it will be interesting to follow whether this counter will go close to 500 minutes.
This way, I can now look at Azure Automation Runbook stats as performance data, showing different scenarios like how many jobs and runbook job minutes there are over a time period. I can also look at how what type of runbooks I have and what state they are in.
I can also create saved searches and alerts for my search criteria.
Creating OMS Alerts for Azure Automation Runbook Counters
There is one specific scenario for Alerts I’m interested in, and that is when I’m approaching my monthly limit on 500 job minutes.
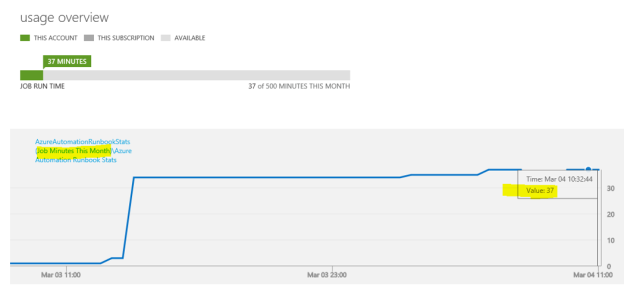
“Job Minutes This Month” is a counter that will get the sum of all job minutes for all runbook jobs across all automation accounts. In the classic Azure portal, you will have a usage overview like this:
With OMS I would get this information over a time period like this:
The search query for Job Minutes This Month as I have defined it via the PowerShell Script Rule in OMS is:
Type=Perf ObjectName=AzureAutomationRunbookStats InstanceName=”Job Minutes This Month”
This would give me all results for the defined time period, but to generate an alert I would want to look at the most recent results, for example for the last hour. In addition, I want to filter the results for my alert when the number of job minutes are over the threshold of 450 which means I’m getting close to the limit of 500 free minutes per month. My query for this would be:
Type=Perf ObjectName=AzureAutomationRunbookStats InstanceName=”Job Minutes This Month” AND TimeGenerated>NOW-1HOUR AND CounterValue > 450
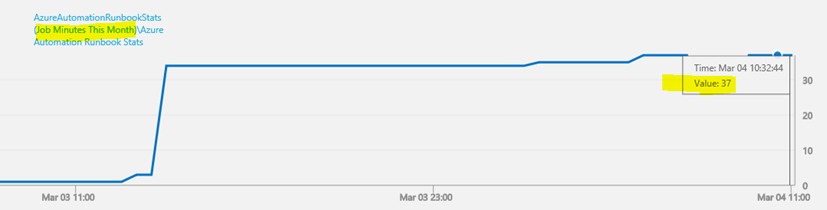
Now, in my test environment, this will give med 0 results, because I’m currently at 37 minutes:
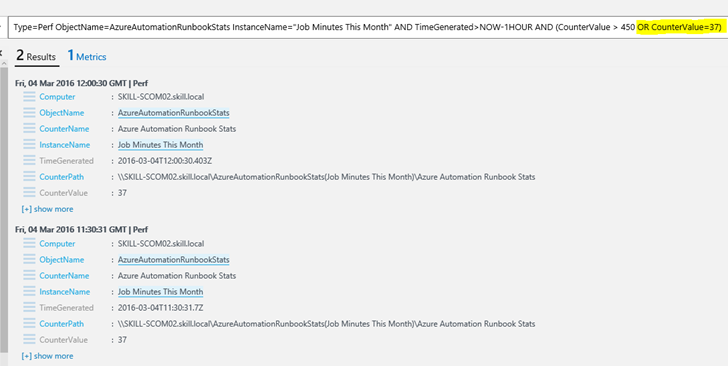
Let’s say, for sake of testing an Alert, I add criteria to include 37 minutes as well, like this:
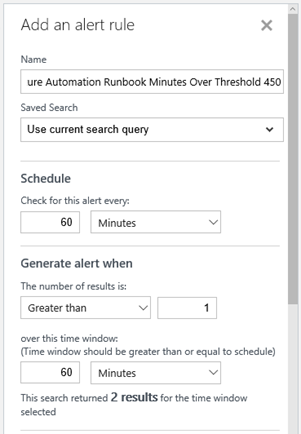
This time I have 2 results. Let’s create an alert for this, press the ALERT button:
For the alert I give it a name and base it on the search query. I want to check every 60 minutes, and generate alert when the number of results is greater than 1 so that I make sure the passing of the threshold is consistent and not just temporary.
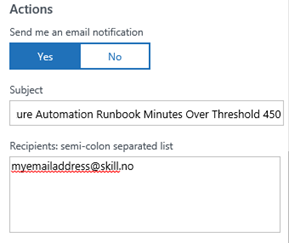
For actions I want an email notification, so I type in a Subject and my recipients.
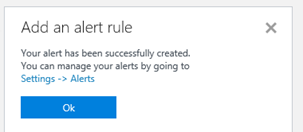
I Save the alert rule, and verify that it was successfully created.
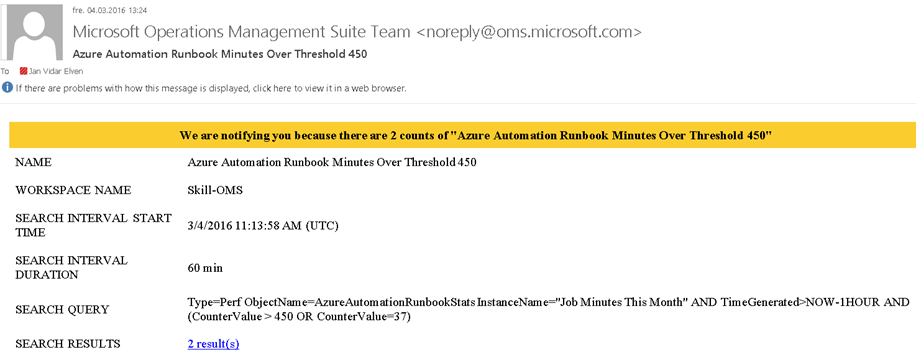
Soon I get my first alert on email:
Now, that it works, I can remove the Alert and create a new one without the OR CounterValue=37, this I leave to you 😉
With that, this blog post is concluded. Thanks for reading, I hope this post on how to get more insights on your Azure Automation Runbook Stats in OMS and getting data via NRT Perfomance Collection has been useful 😉


 I have created a custom destination management pack for this script.