Category Archives: PowerApps

Connect Power Platform to Azure AD Protected APIs using built-in HTTP connectors

There are several ways you can access the Azure AD Protected APIs in Power Platform Flows and Apps. Without creating Custom Connectors, which basically can connect to any REST based API that is available, it is useful to know what built-in HTTP connectors are available and can be used for delegated authentication to Azure AD Protected APIs like Microsoft Graph or other APIs.

This and more will be answered and demoed in this blog post.

What is an Azure AD Protected API?

First, lets do a quick explanation of what an Azure AD Protected API is.

The most known Microsoft API is the Microsoft Graph API. Another well known API is the Azure REST API. These APIs are protected by and accessed by identities and applications from Azure Active Directory organizations.

Other than that, any API has the possibility to be protected by Azure AD and by using industry standard authentication and authorization protocols like OpenID Connect (OIDC) and OAuth2.0. This includes APIs you might build yourself or APIs from third party services.

Delegated vs. Application Access

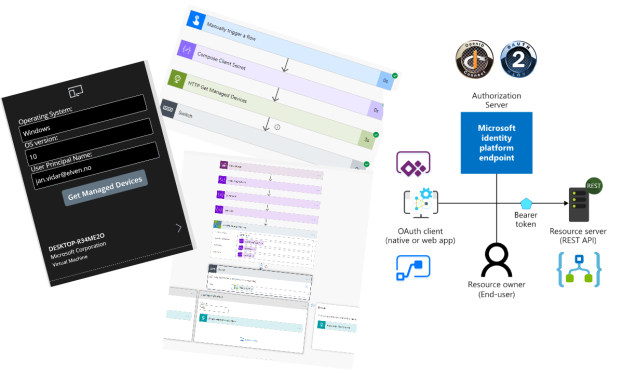
When you want to access Azure AD Protected APIs from Power Platform you also need to know the access scenarios you will need. There are 2 main access scenarios: Delegated access and Application-only access, and as shown in the picture below, there is a distinct difference in that the delegated access scenario always includes the user.

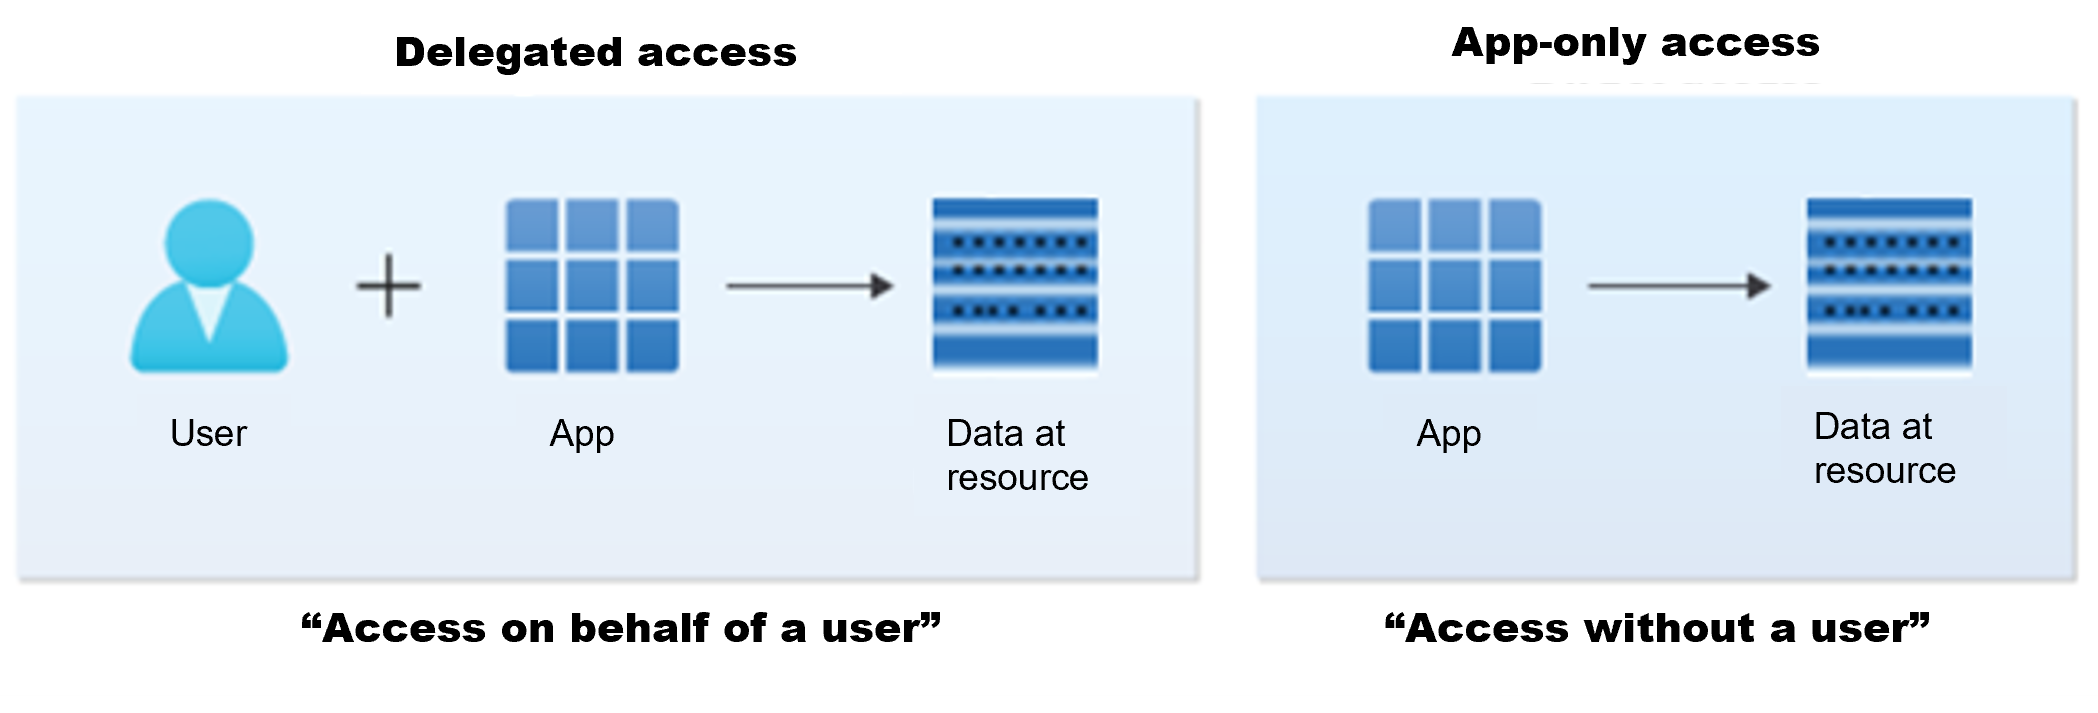
This means that if you are running a Power Automate flow, or a PowerApp, you will usually run that interactively as your user account, and any connections you use will be running via the app under your user context and permissions to access the data resources the app might be using. The data resource in this example can be represented by an Azure AD Protected API.

If you share the PowerApp or Power Automate flow with other users in your organization, then those users will use the connections to the API resource under their own user context.

If you, on the other hand, wants to run a Power Automate flow on a schedule or in any other way without user interaction or without a user context, then you typically will use the app-only access scenario.

In this blog post I will focus on delegated access scenarios, and where you can use built-in HTTP connectors that will run in connection based on the running user.

Built-in HTTP Connectors in Power Platform

Let’s start with an overview over what built-in HTTP connectors and actions for Azure AD Protected APIs we have available in Power Platform. These are HTTP connector actions you can use in Power Automate, PowerApps and in most cases also Logic Apps, and the following list is current as of December 2022:

  • “Send an HTTP request (preview)”, Office 365 Outlook connector.
  • “Send an HTTP request (preview)”, Office 365 Users connector.
  • “Send an HTTP request”, Office 365 Groups connector.
  • “Send an HTTP request V2 (preview)”, Office 365 Groups connector.
  • “Send an HTTP request (preview)”, Office 365 Groups Mail connector.
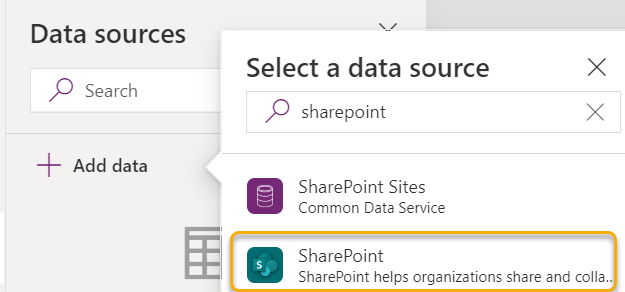
  • “Send an HTTP request to SharePoint”, SharePoint connector.
  • “Send an HTTP request (preview)”, LMS365 connector.

These are all Standard connectors that you can freely use if you are using the Power Apps/Automate plan for Microsoft 365.

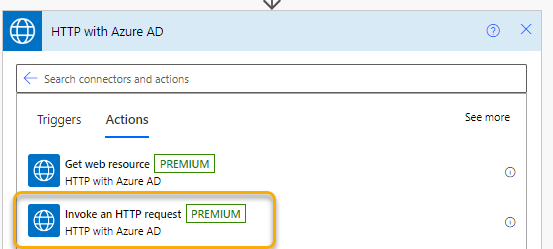
There is also an interesting HTTP action with Azure AD that is Premium and has the following action:

  • “Invoke an HTTP request”, HTTP with Azure AD connector.

Premium means you need to acquire a standalone Power Apps and Power Automate licensing plan.

There is also a “Send an HTTP request to Azure DevOps” in the Azure DevOps connector that is also Premium.

While these connectors are for querying resources that are under the scope of the data that are accessible via the connector, the most important part is that these are all dependent on the user connection and is using the delegated access scenario.

This makes them especially useful for calling Microsoft Graph API in the context of your own user.

If you want to send HTTP requests in an app-only access scenario, then you can use the built in HTTP connector, which is Premium. But that is not the scope of this blog post, so let’s continue looking into some scenarios and examples for the above delegated access connectors.

Send HTTP Request via Office 365 connectors

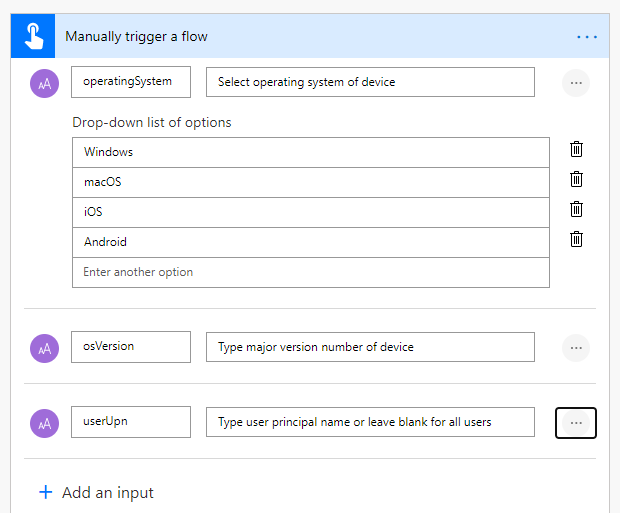
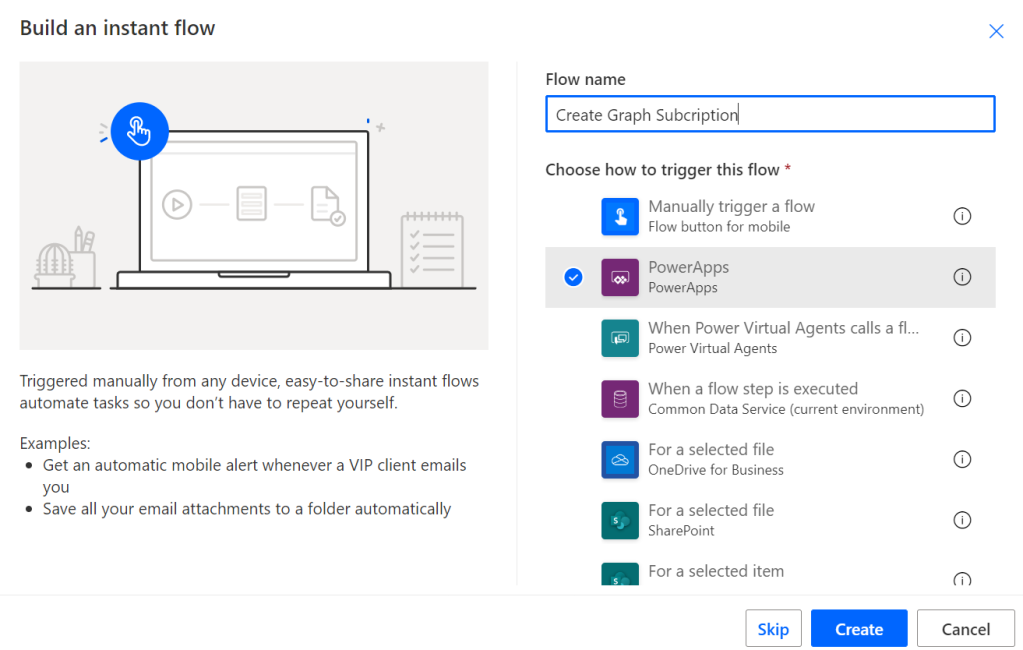
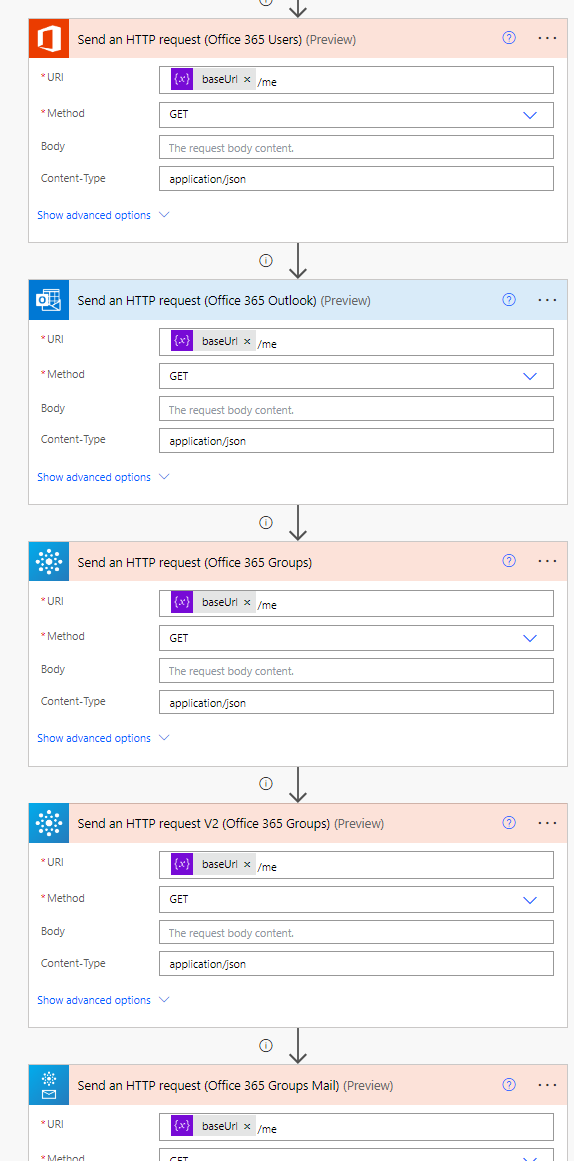
Lets do a couple of scenarios of the Office 365 Outlook/Users/Groups connectors from above, and their HTTP request actions. I have created a instant cloud flow with a manual trigger for now.

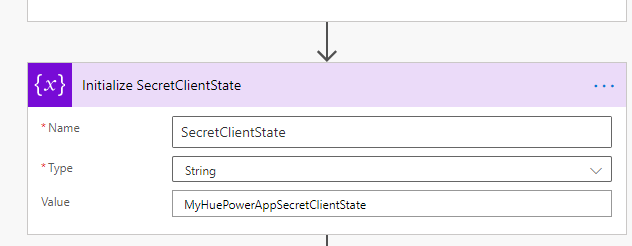
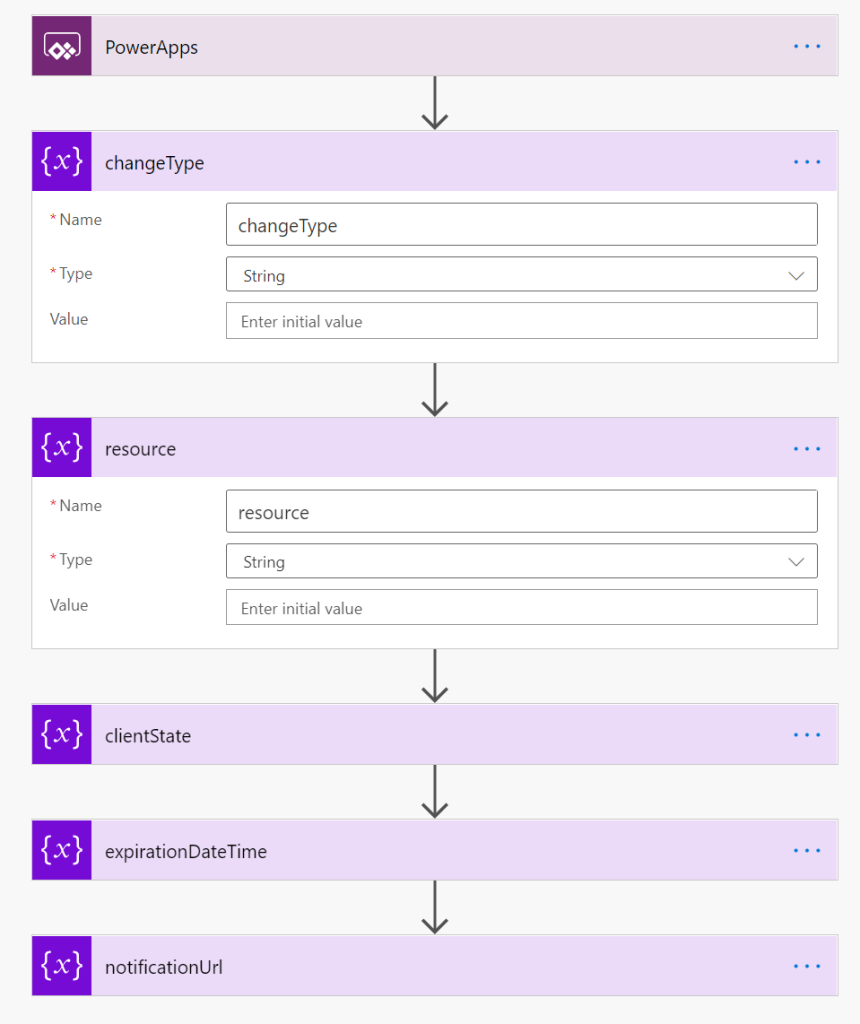
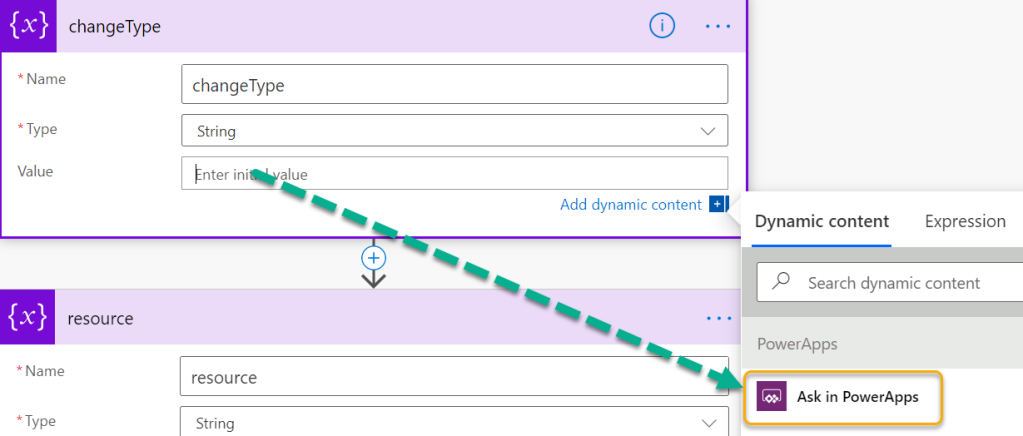
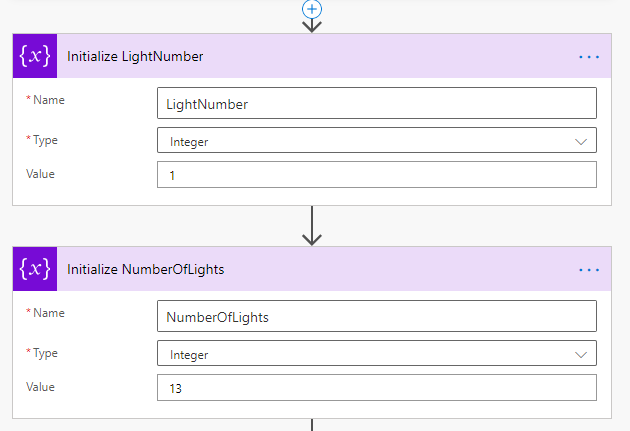
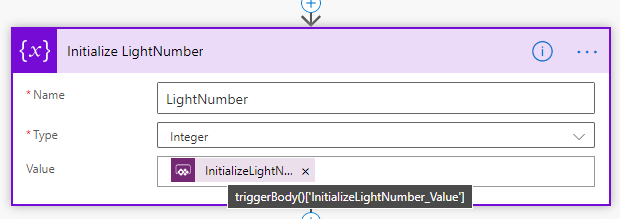
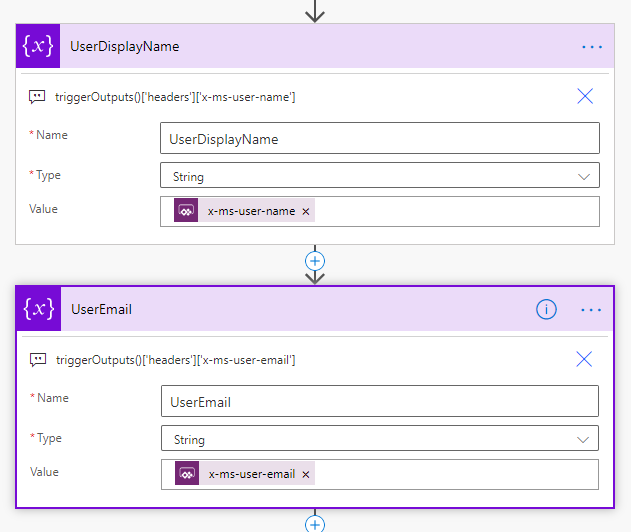
First I will initialize a variable for the base Url, this will be the Microsoft Graph API:

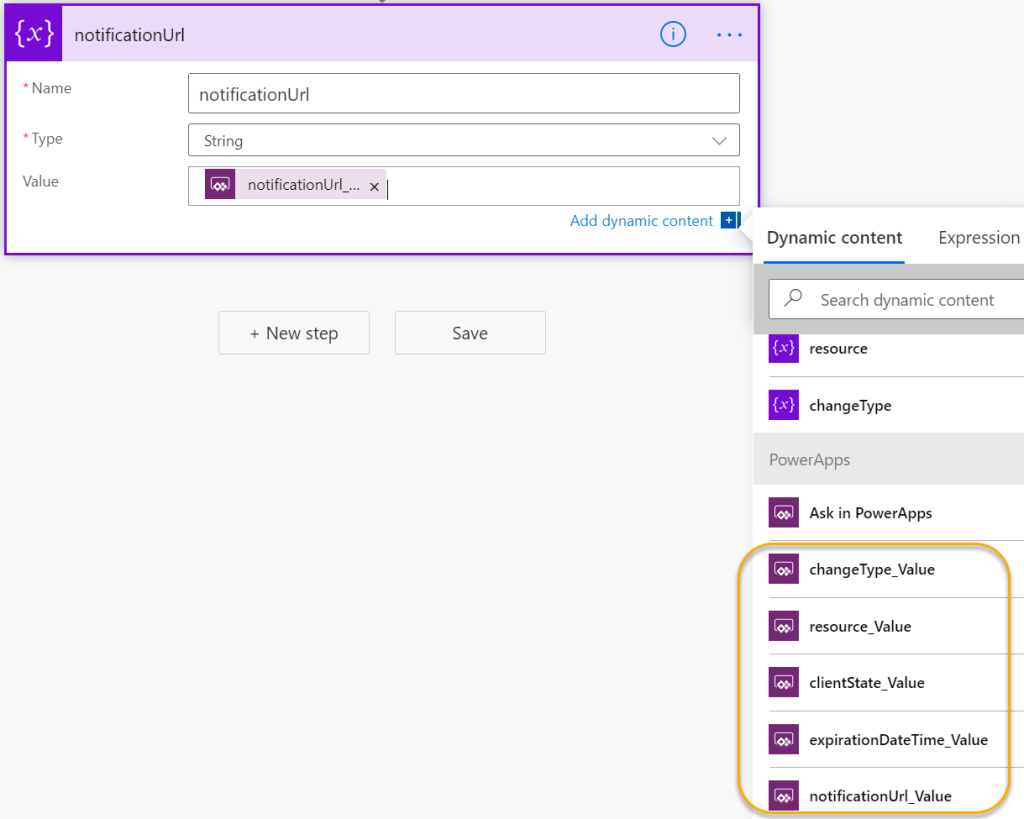
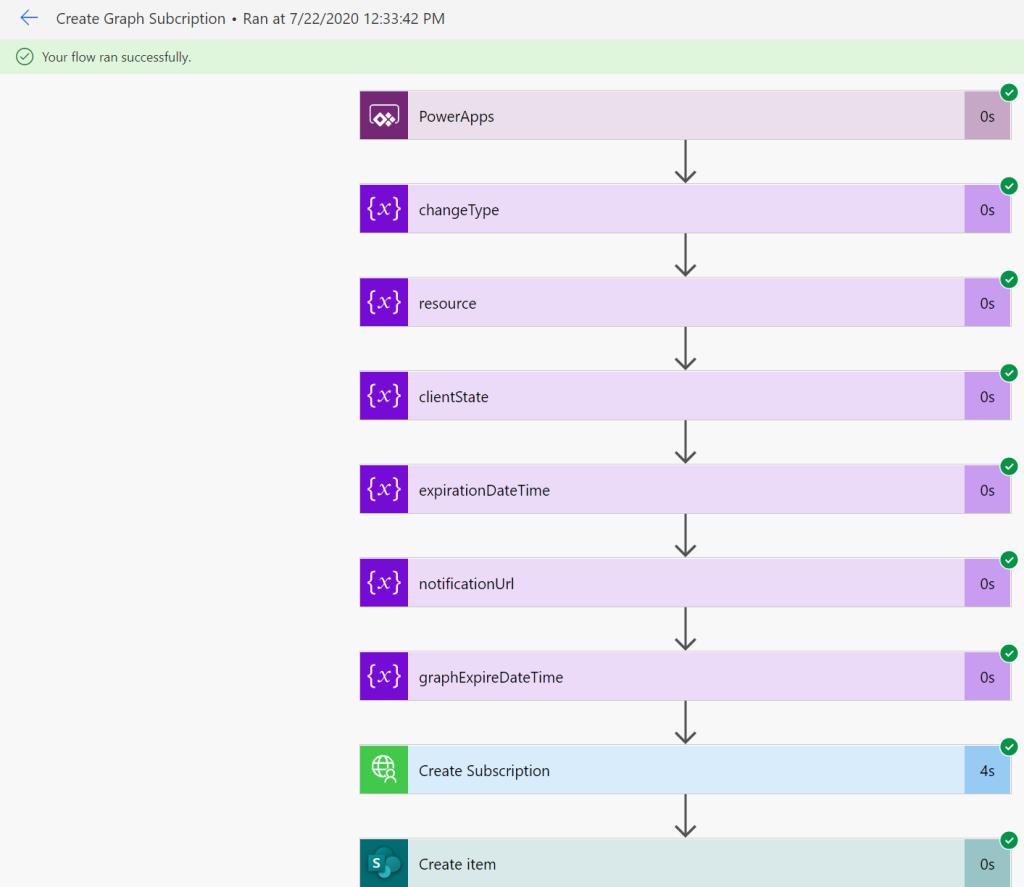
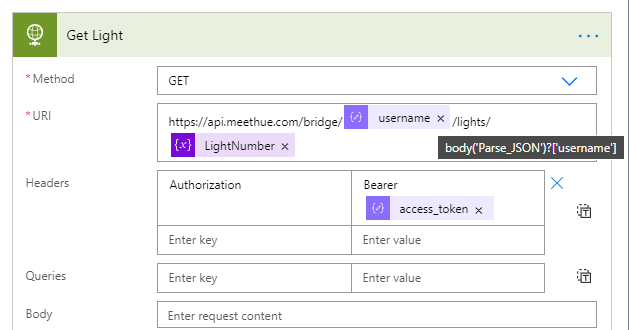
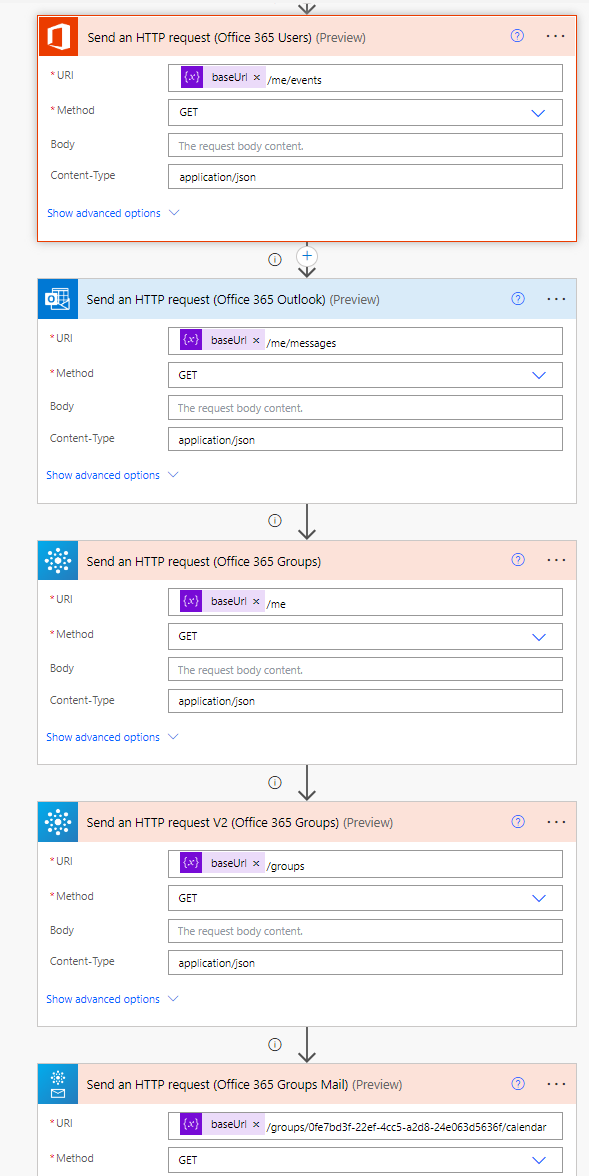
Then I add each of the HTTP actions from the Office 365 connectors, using the baseUrl and the “me” resource to start with. In the below image I’ve renamed the HTTP actions so that you can see from which connector they are from, and I’m running a simple GET method:

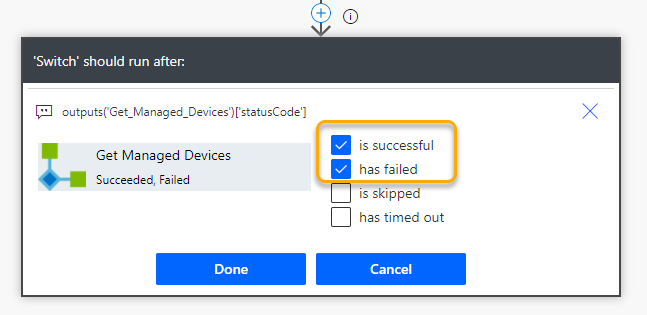
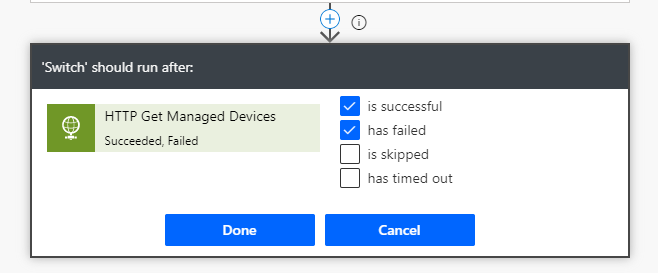
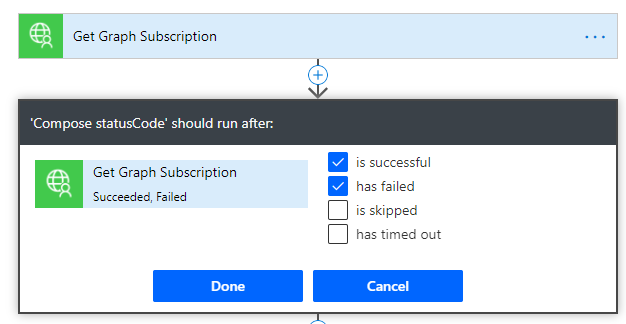
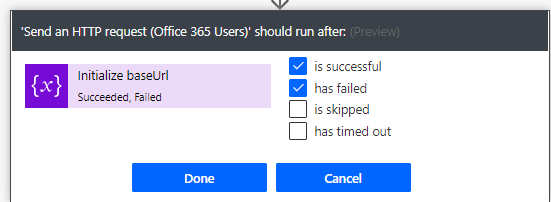
I’ve also configured the run after setting for each of the actions, so that I can verify the results of the others if anyone fails:

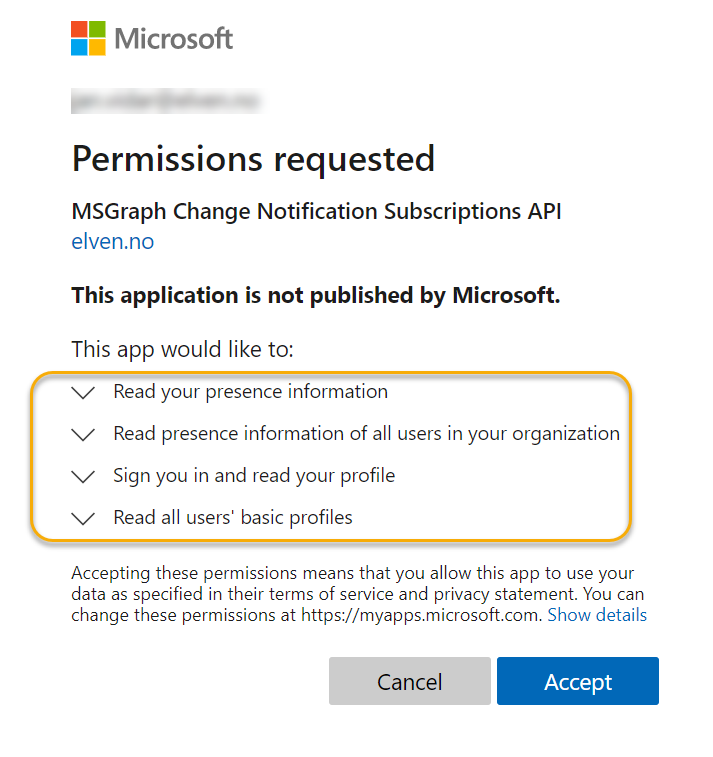
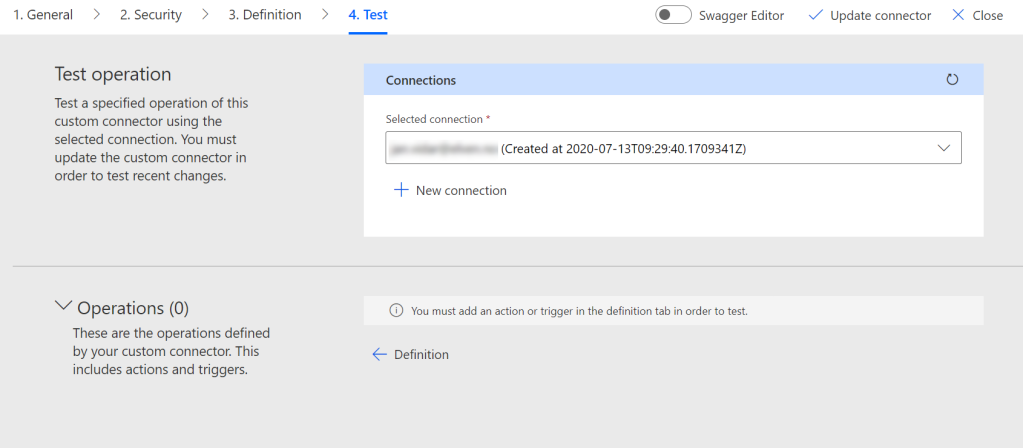
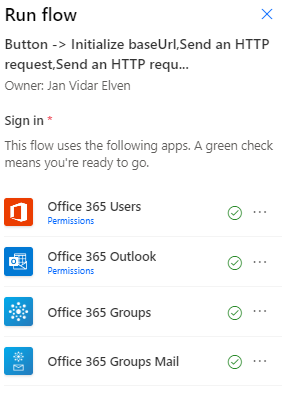
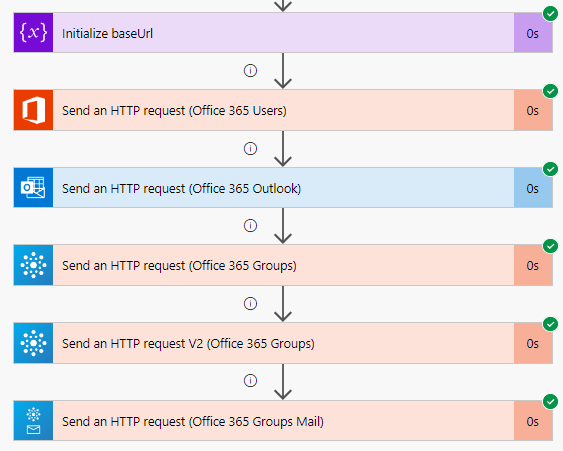
When I save and test the flow I can verify that I’ve signed in to the connectors as my own user, and any permissions that these have:

When I try to run this Flow, it will fail on several of the actions, this is expected:

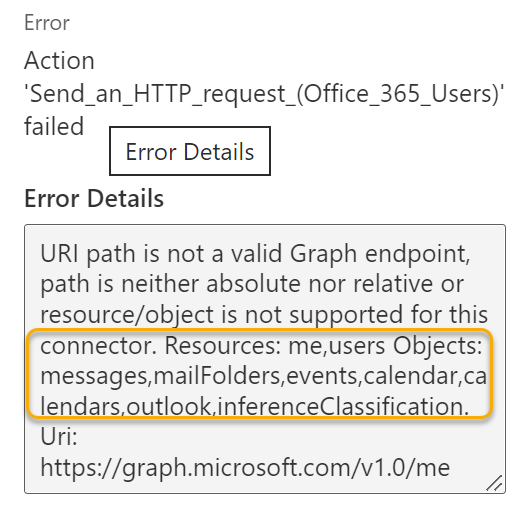
The reason it fails is because there are restrictions on the resources and objects the actions are allowed to query, for example for the first one we get the info on that this connector can use either “me” resource or “users” resource, but also only for the listed objects like messages, calendar etc:

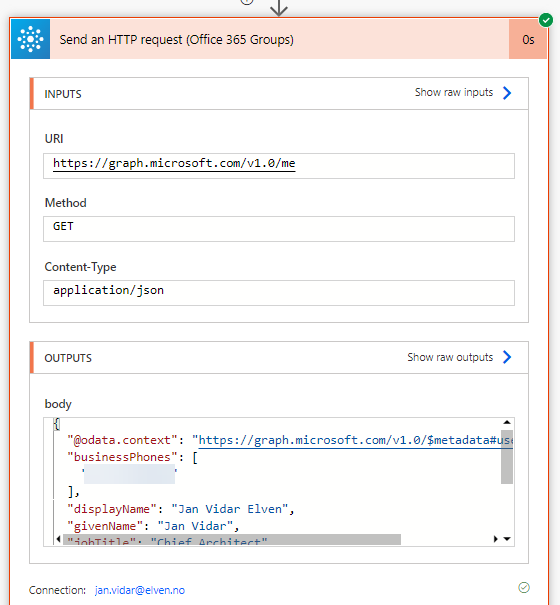
One of the actions is successful however, and that is from the Office 365 Groups connector and the first version of the Send an HTTP request, which is allowed to get the /me resource:

Lets make some adjustments to the queries for the different actions:

In the above image I’ve added some supported objects for the different actions, and all these should return a valid Graph response:

So this means as long as you either:

  • use the /me/{object} or
  • /users/{userid-or-userprincipalname}/{object} or
  • /groups or /groups/{groupid}/{object}

From the supported list of objects (messages, events, calendar, etc) then you can run any Microsoft Graph API queries including GET, POST, PUT, PATCH and DELETE.

From earlier we saw that one of the connector actions had more broad support than the others, and that was the Office 365 Groups connector and the original version of the “Send an HTTP request”. There has since been released a V2 version of the same action, and that limits only queries against /groups resource.

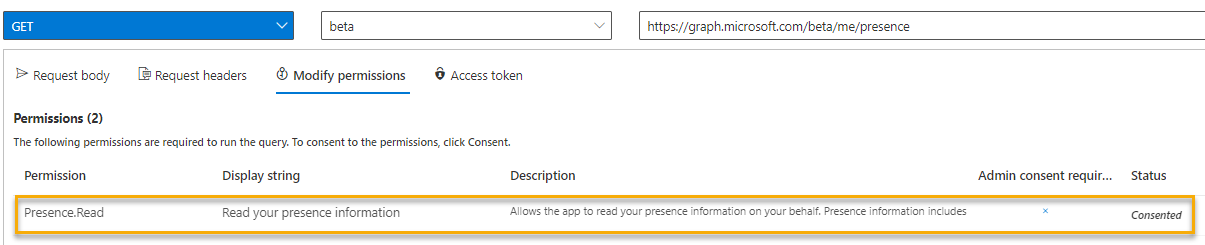
Lets do a quick test on if the first action supports getting the user’s registered authentication methods. If we run that same query using Graph Explorer, we will get a list of your users methods for authentication, including Authenticator, Phone, Windows Hello etc. In the action I will type /me/authentication/methods, but when I run it will fail with request authorization failed:

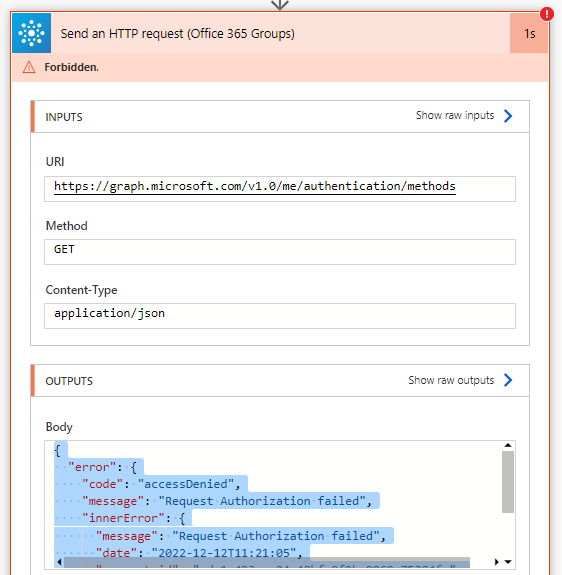
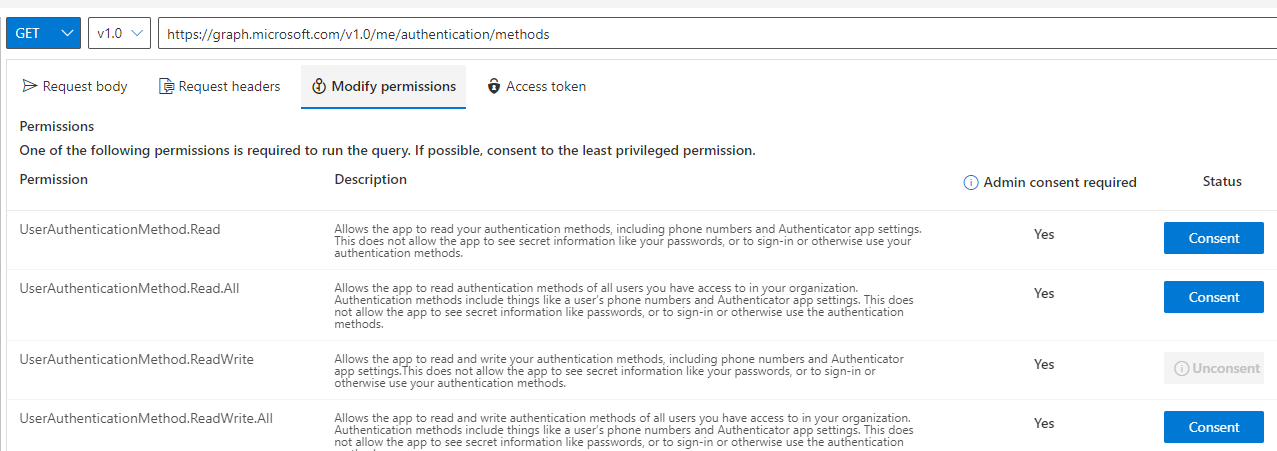
This means that even though I have permission as my self to query my authentication methods (see Graph Explorer for example), the connector does not have the correct delegated permissions to act on my behalf. From Graph Explorer I can verify that I need to consent to permissions for authentication methods:

So to summarize the Office 365 connectors and HTTP actions, they can be valuable for many Graph API requests for your users, but only for permitted objects and permissions.

This is where the “Invoke an HTTP request”, HTTP with Azure AD connector, can be useful, and we will look into that next.

Send Request via HTTP with Azure AD Connector

First of all, this is a Premium connector, so you must make sure you are licensed with a separate Power Apps / Power Automate plan for this, but a trial should also be available to for exploring the connector.

According to the documentation, the HTTP with Azure AD connector can be used to fetch resources from various web services that are authenticated by Azure AD. It can also be used to query from an on-premise web service.

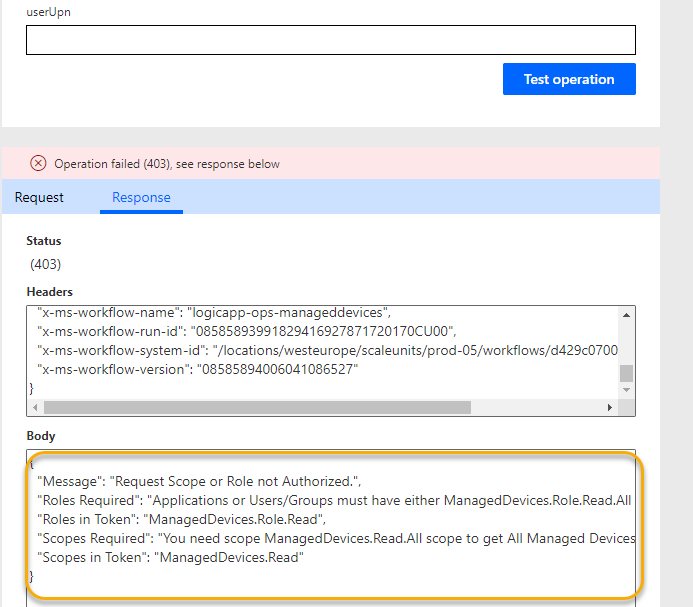
Note that there are known issues and limitations, such as if you get “Forbidden” or “Authorization Request Denied“, or “Insufficient privileges to complete the operation.” then it could be because this connector has a limited set of scopes.

The big advantage of this connector is that you can use it for several of Microsoft APIs, not just the Graph API.

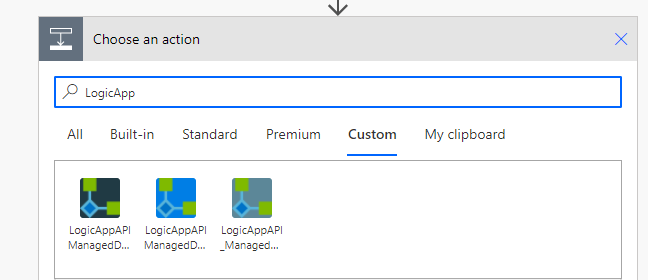
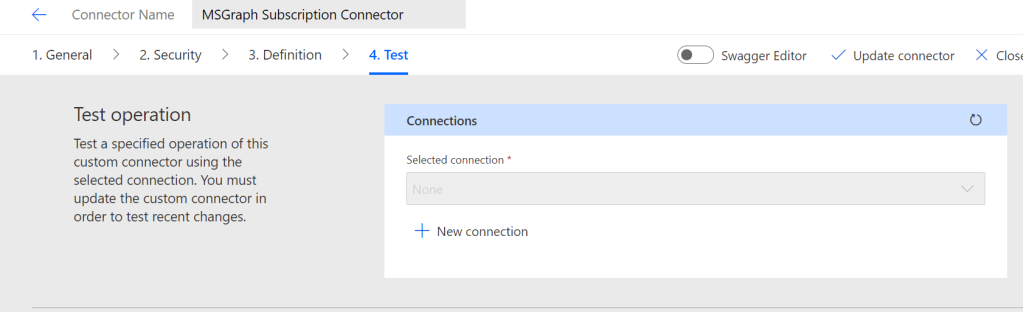
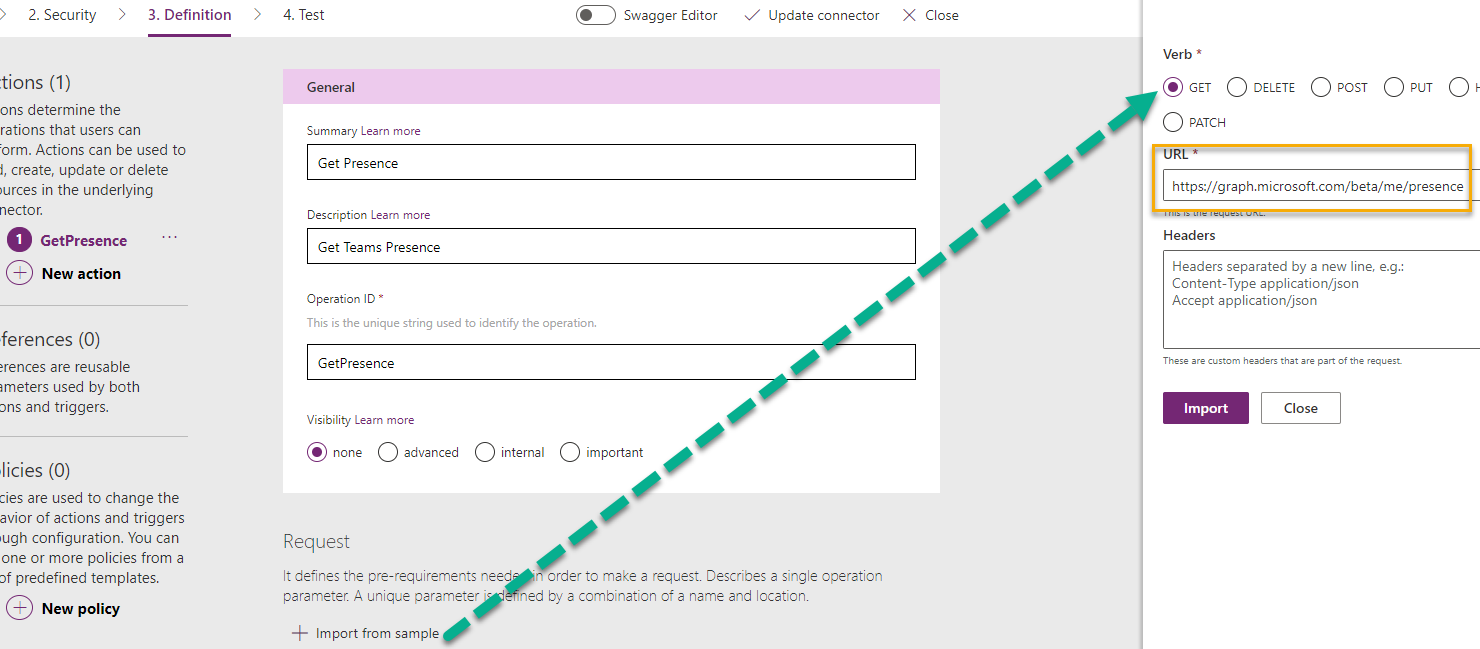
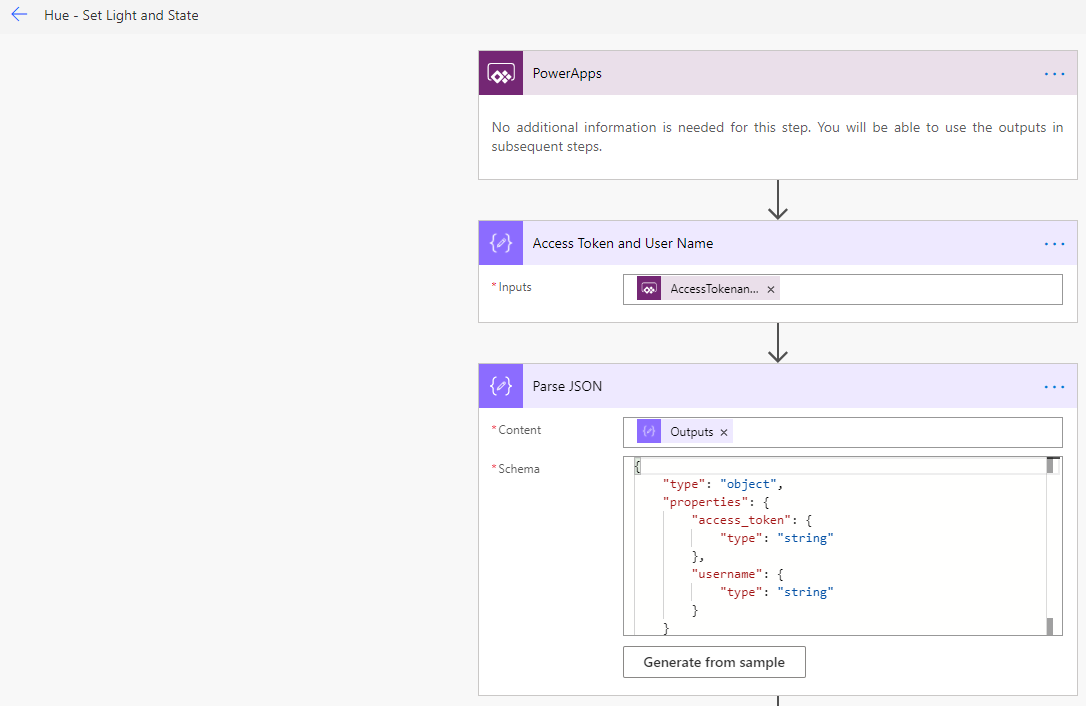
Lets try it out, I will create another instant cloud flow with manual trigger, and then add the HTTP with Azure AD connector and Invoke an HTTP request action:

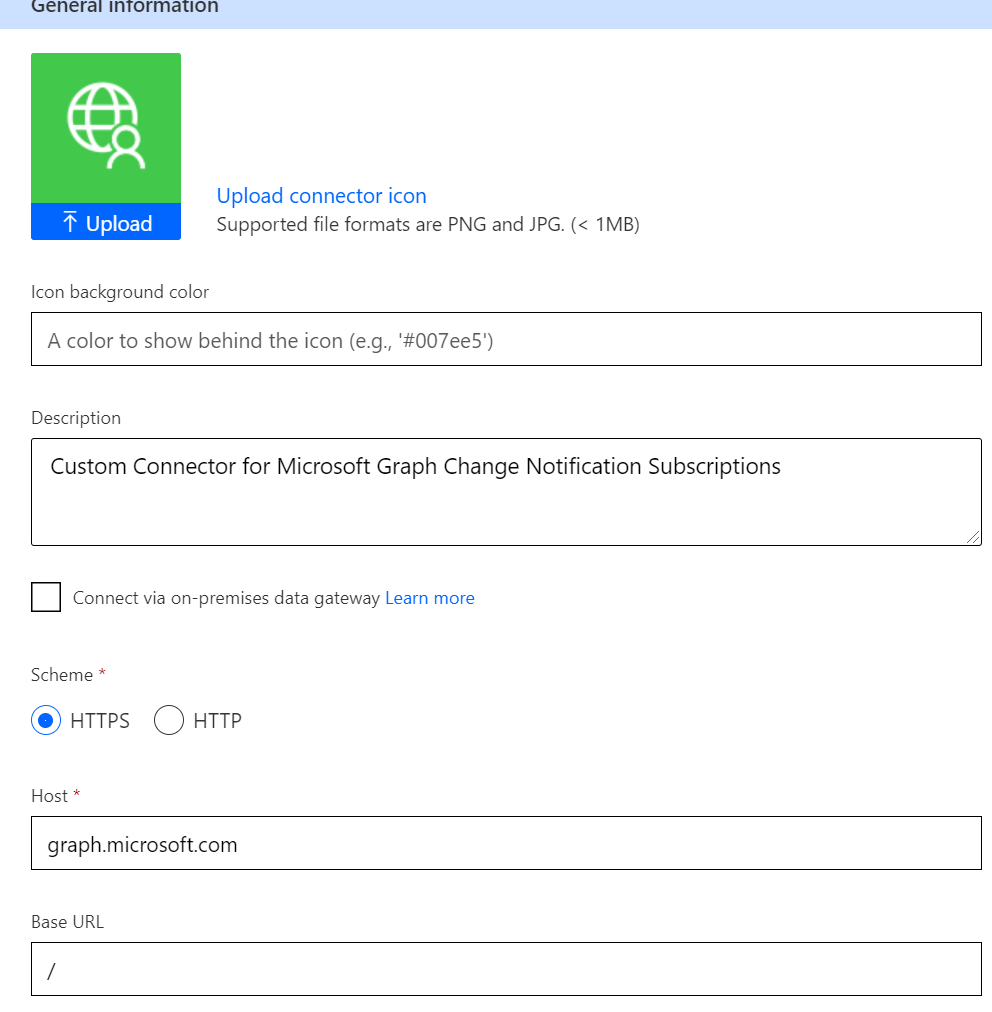
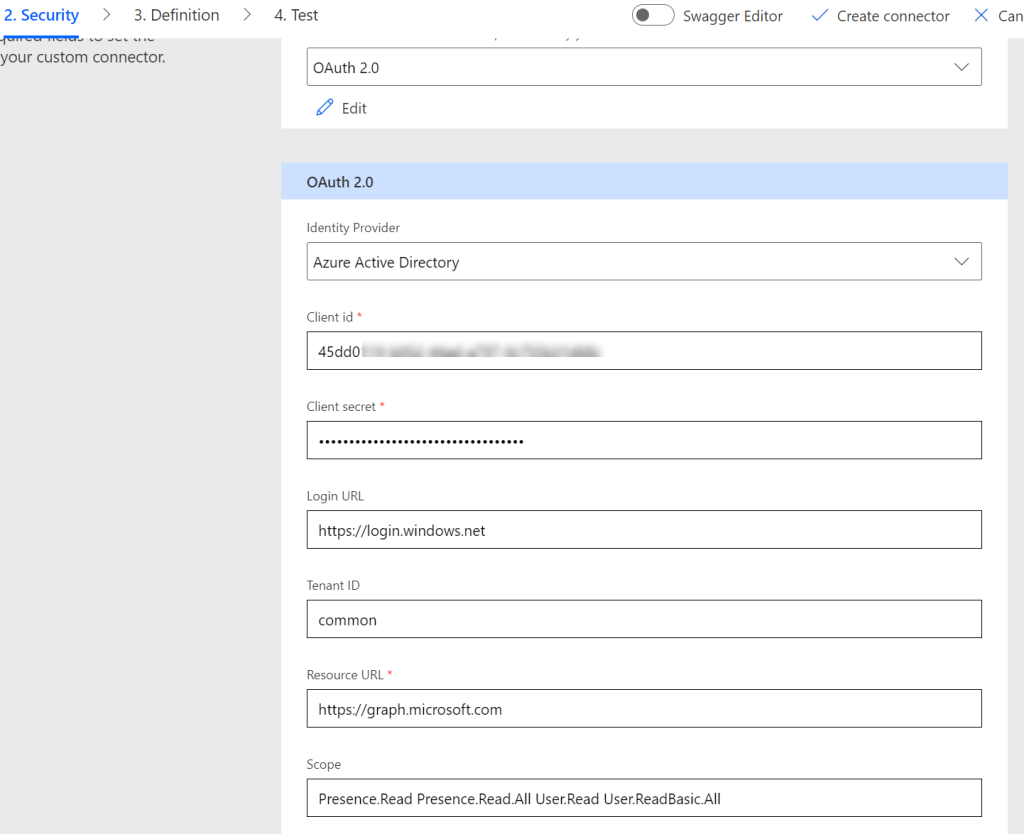
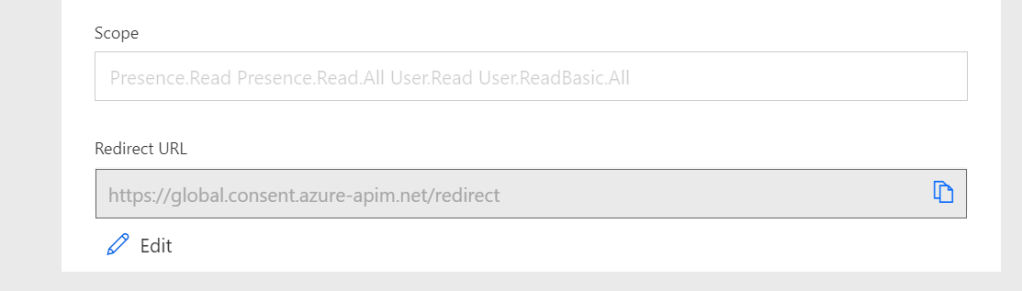
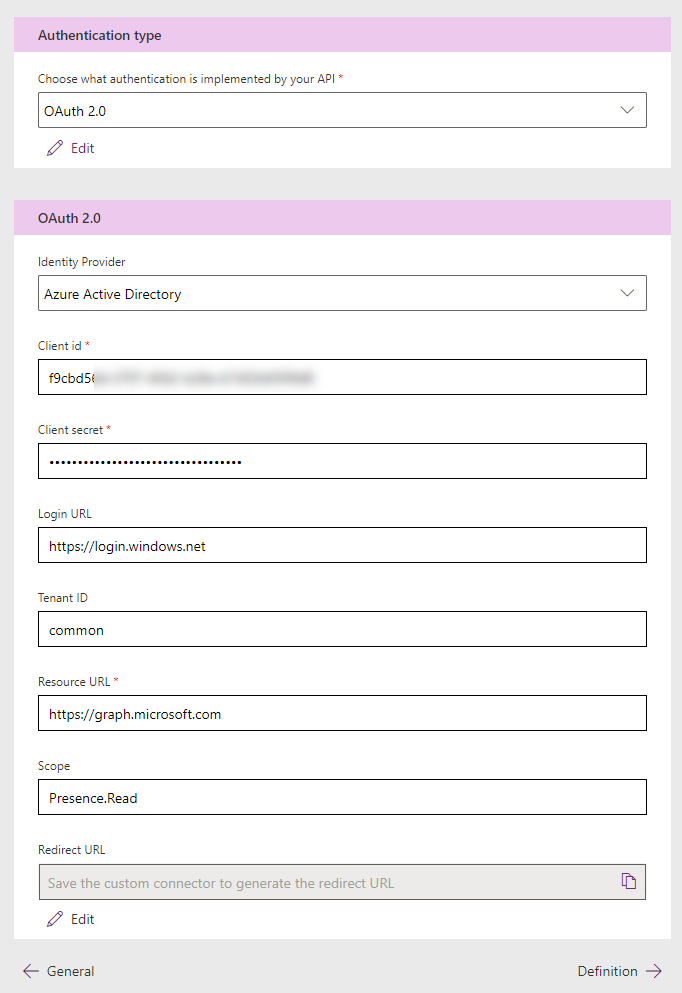
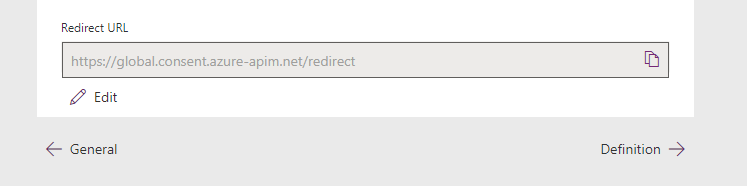
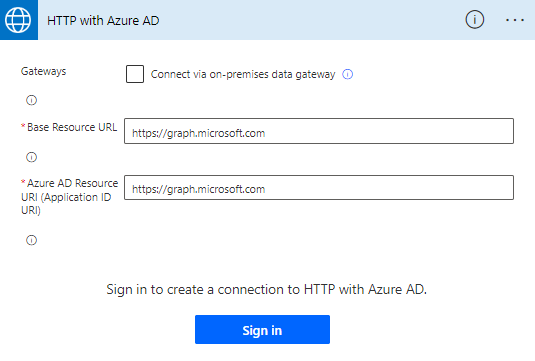
If this is the first time you have added that connector action and you don’t have any existing connections, then you need to configure that and sign in first. If we want to use the Microsoft Graph API, then you need to fill in this and then sign in:

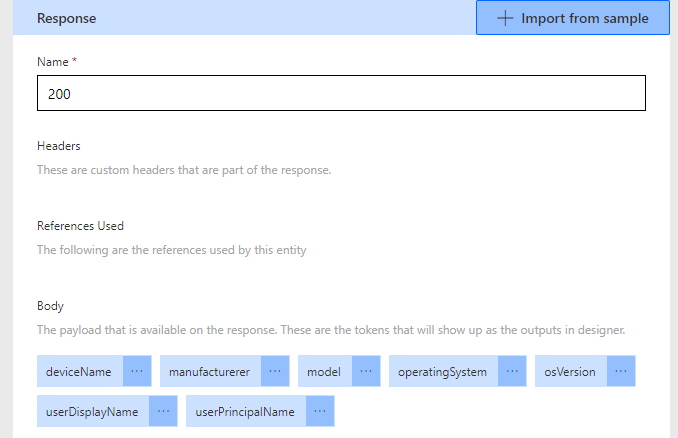
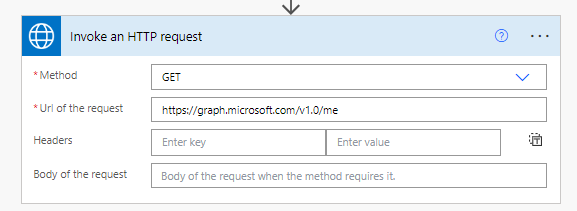
Then, we can start with a simple Graph request for getting my profile info:

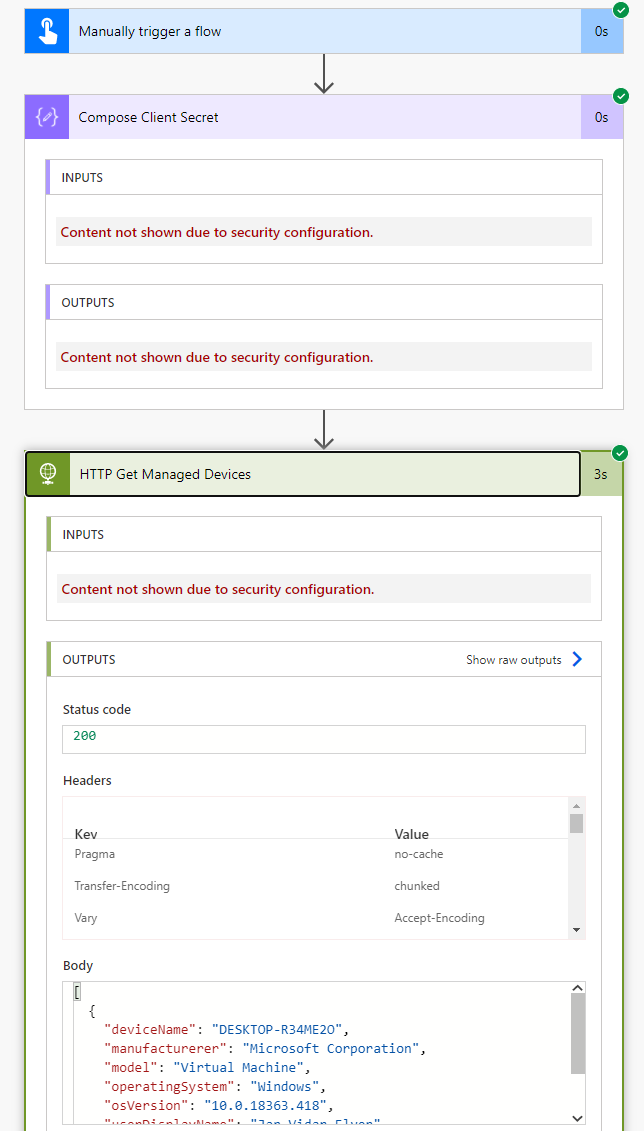
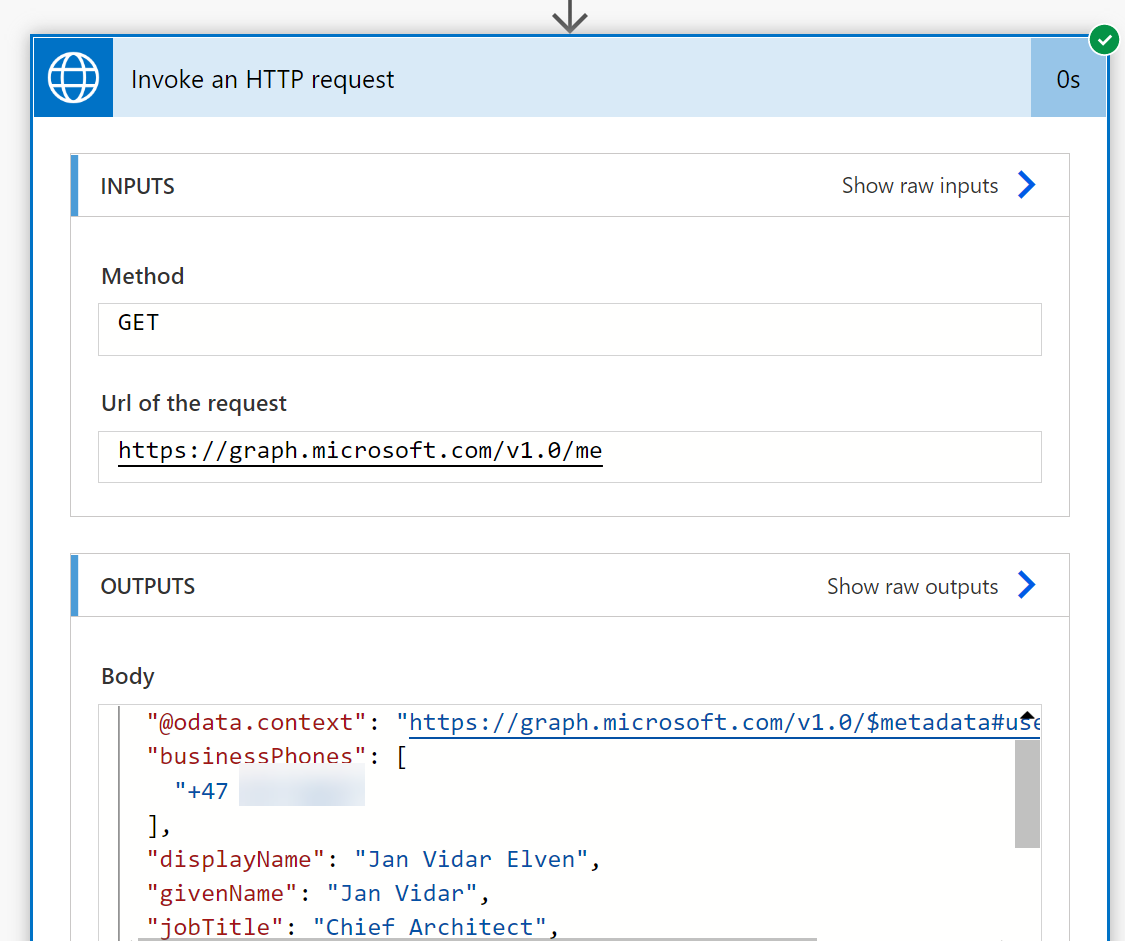
When we run that, it should successfully return the user profile:

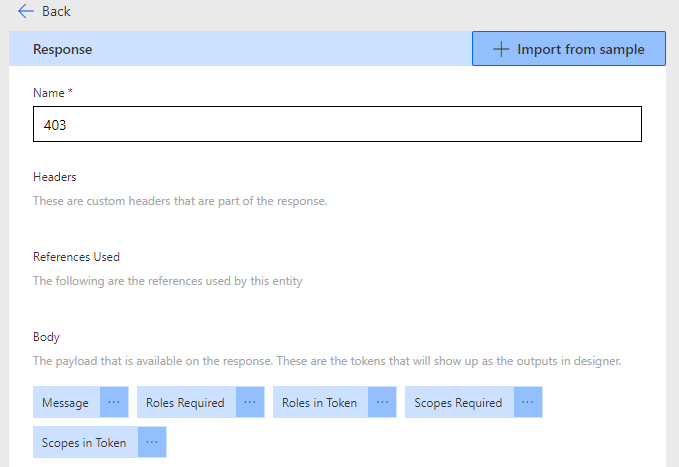
Ok, let’s try another request again, and see if this connector lets us query for authentication methods:

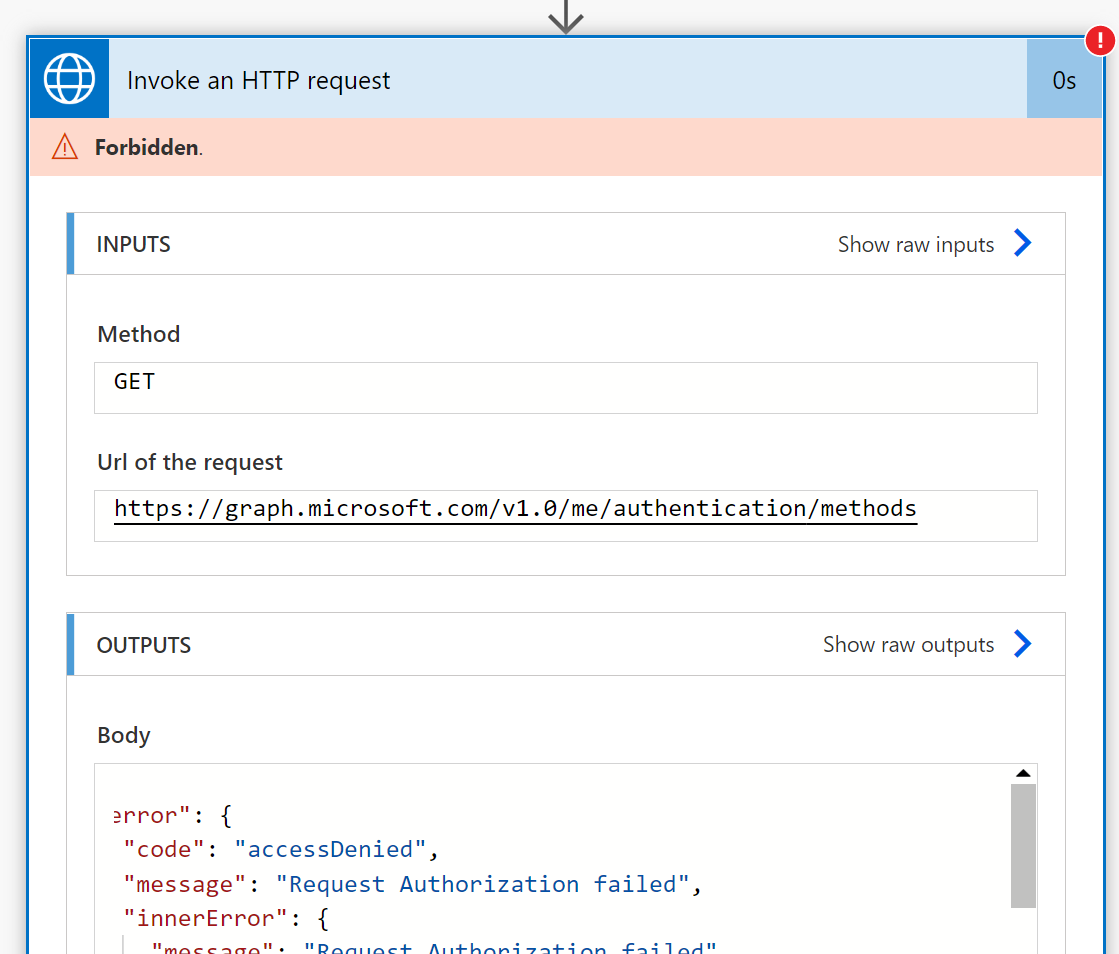
So here we can see that the limitations in scope also applies to this connector, as we get an access denied and request authorization failed.

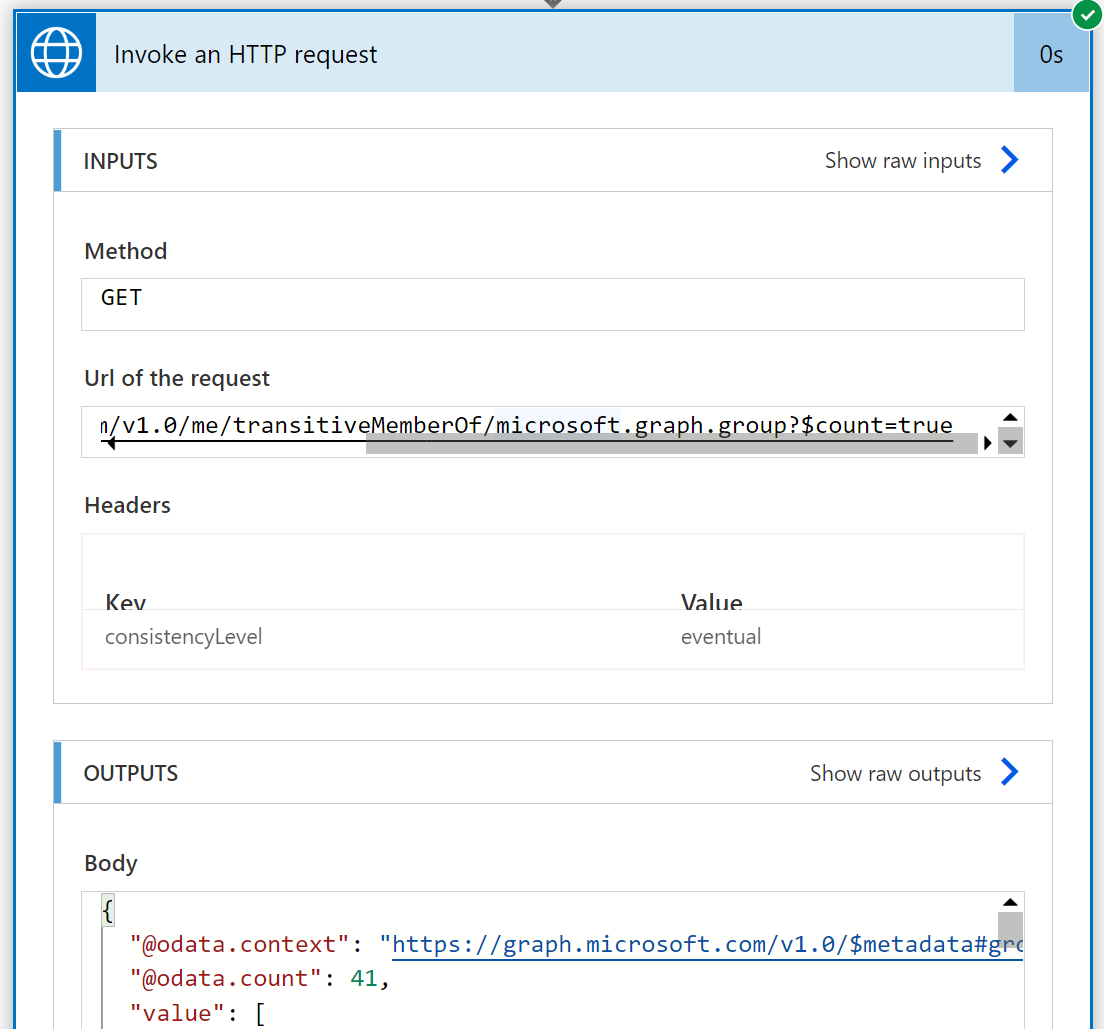
But there are more scenarios that this connector action support than the Office 365 connectors I described in the previous section. For example I can get my groups memberships, note the use of $count parameter and that it requires the consistencyLevel=eventual in the Request Header:

There aren’t really any good documentation on the HTTP for Azure AD connector to say which resources and objects you can send requests to, but you can assume that you can do a lot of the normal member of a directory can do, but not necessarily those that require Graph permission consent outside read user information.

Note that you can use the HTTP for Azure AD connector to other APIs than Microsoft Graph, and this is just a list of examples:

  • management.azure.com
  • vault.azure.net
  • <tenant>.sharepoint.com
  • api.loganalytics.io

But I thought I should wrap up the blog post by looking at how the HTTP for Azure AD connector can be used for invoking requests for APIs that you have built yourself, like for Azure Functions or Logic Apps.

Invoke Requests for your Serverless APIs with HTTP for Azure AD

Protected Logic Apps

I have previously written a blog post series on how you can protect Logic Apps with Azure AD: https://gotoguy.blog/2020/12/31/protect-logic-apps-with-azure-ad-oauth-part-1-management-access/

Lets use that knowledge to see if the HTTP for Azure AD connector can invoke requests to a Logic App that is protected with an Azure AD Authorization Policy.

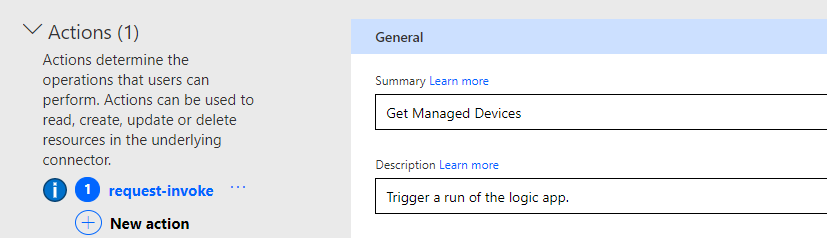
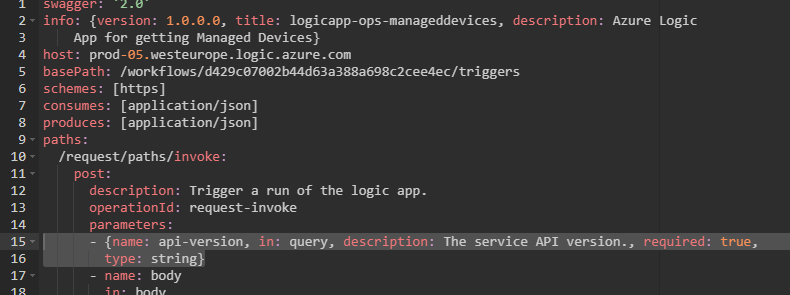
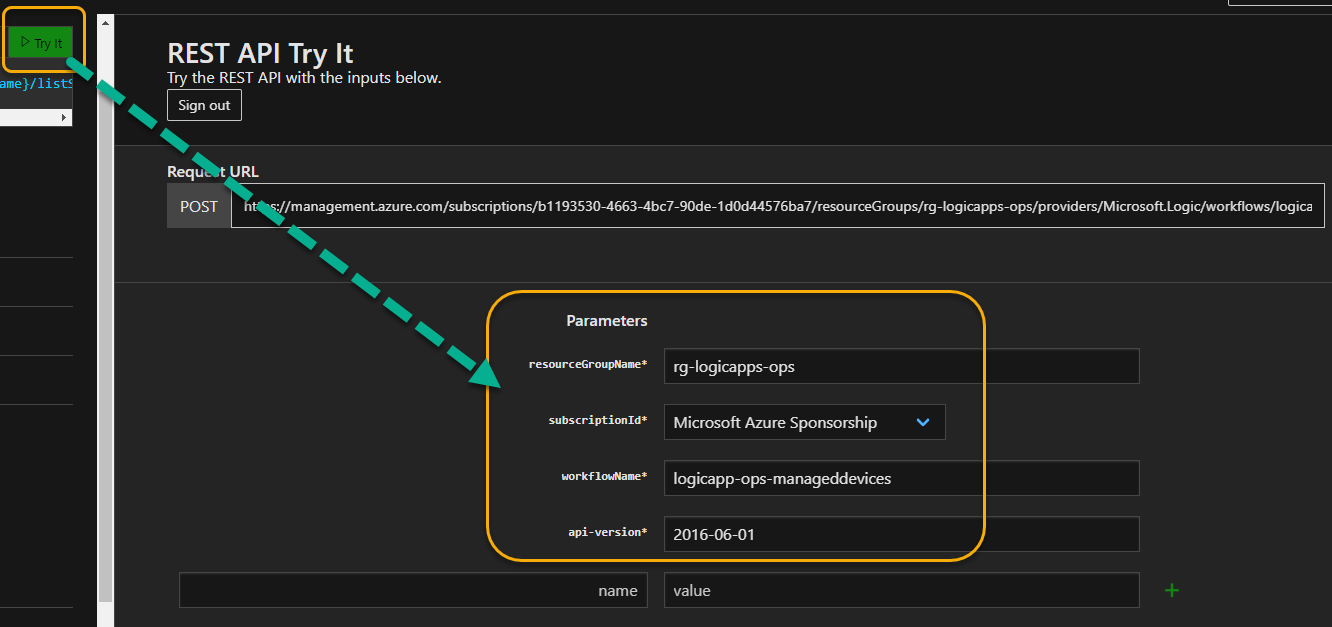
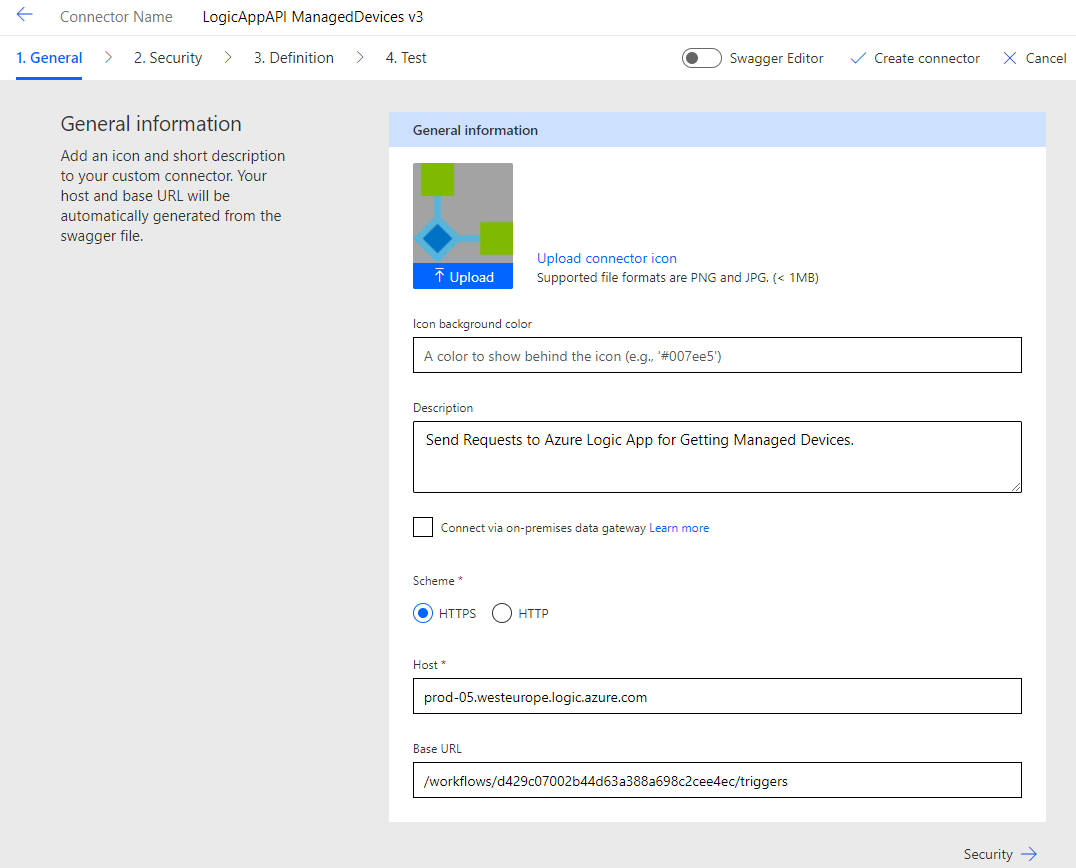
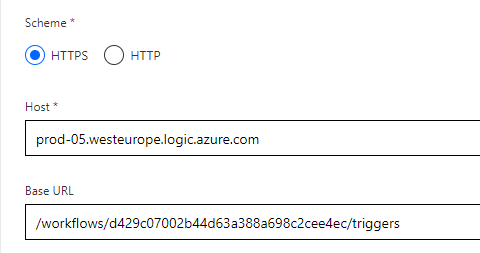
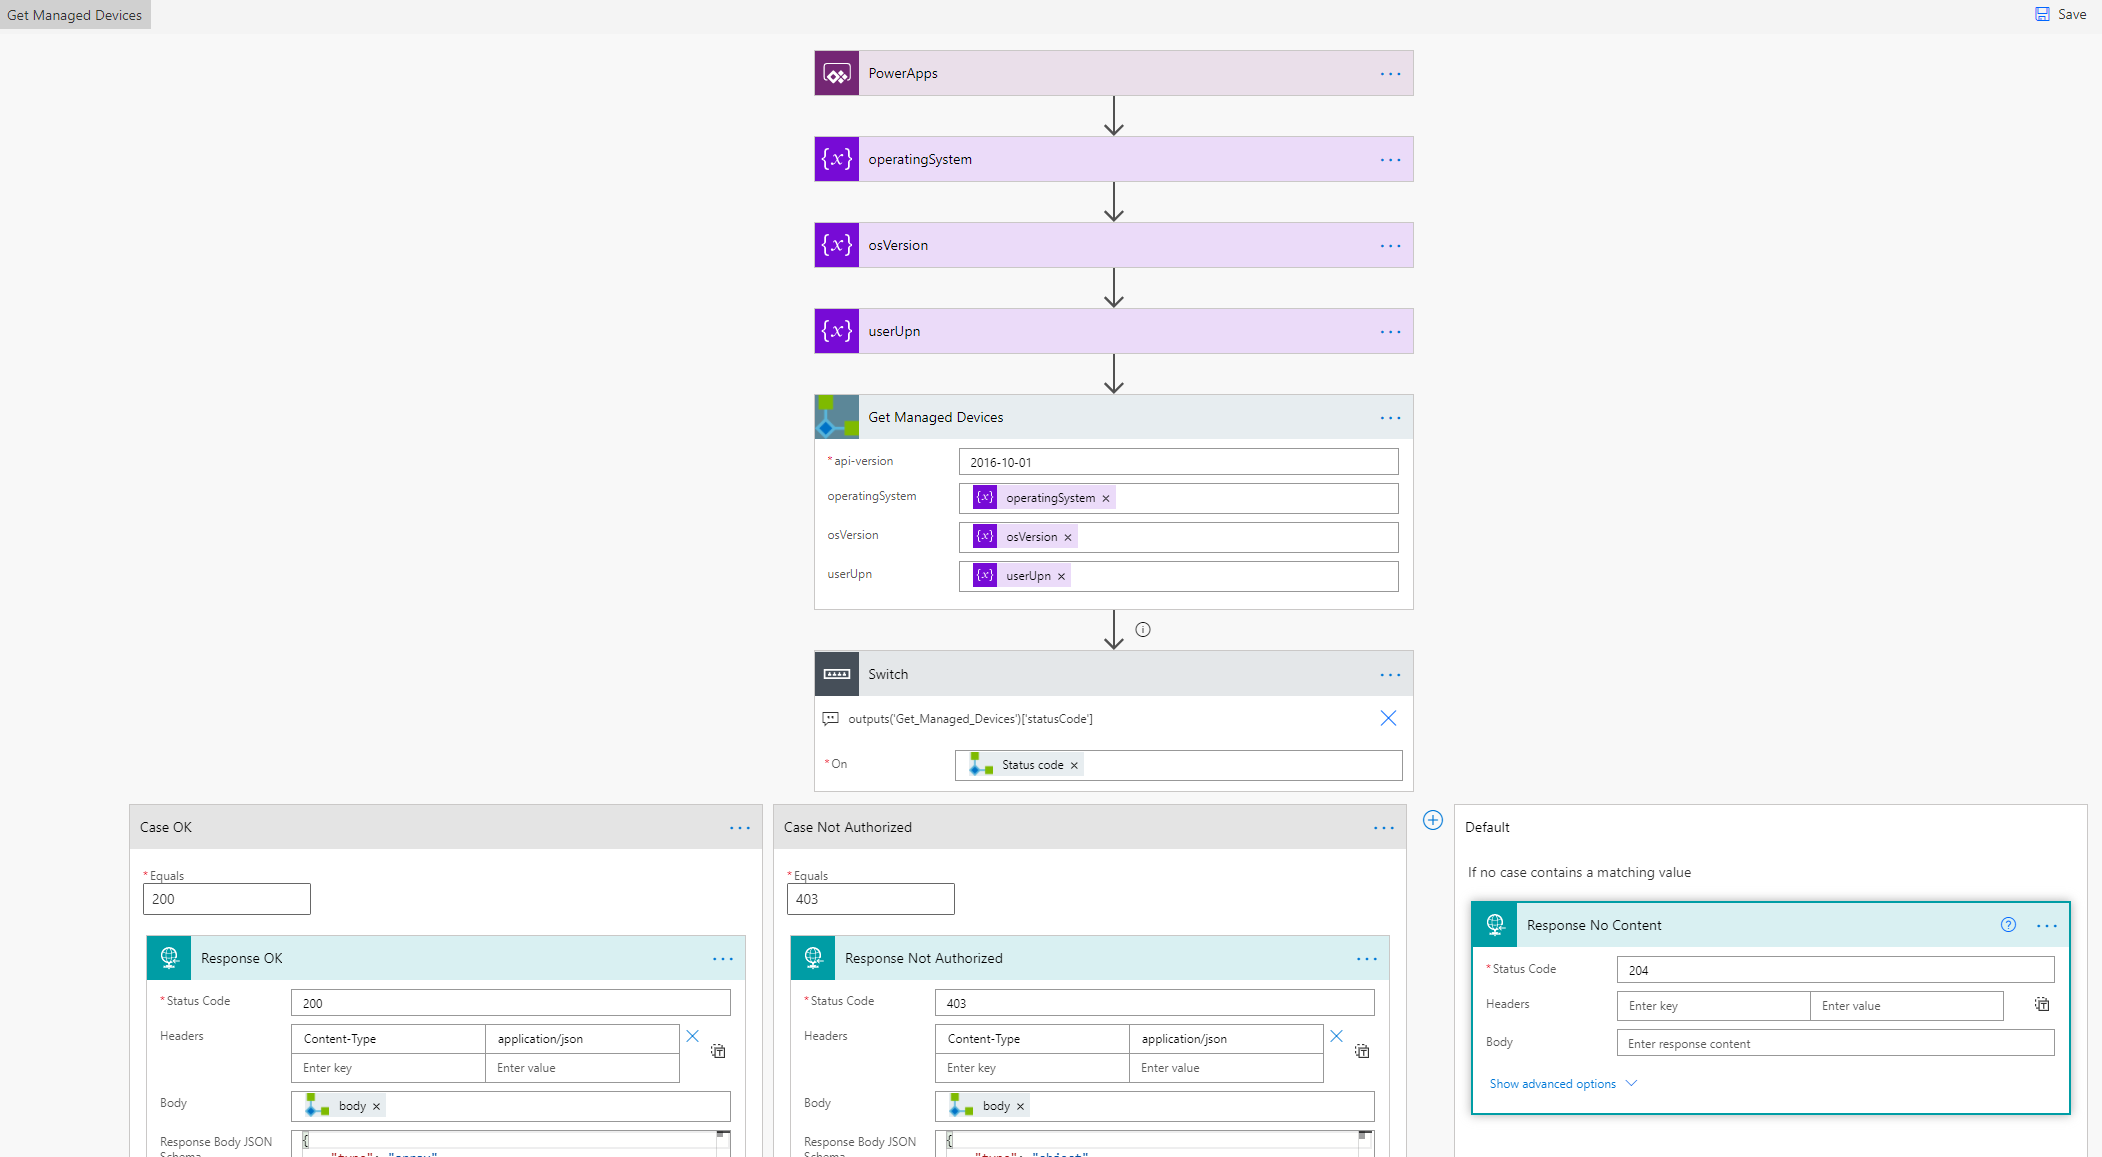
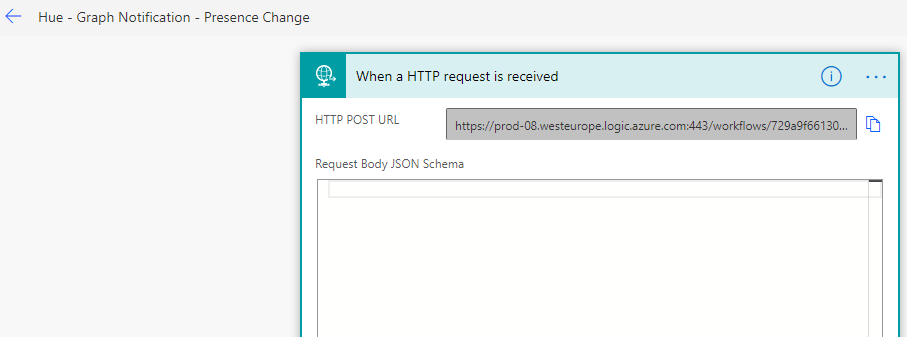
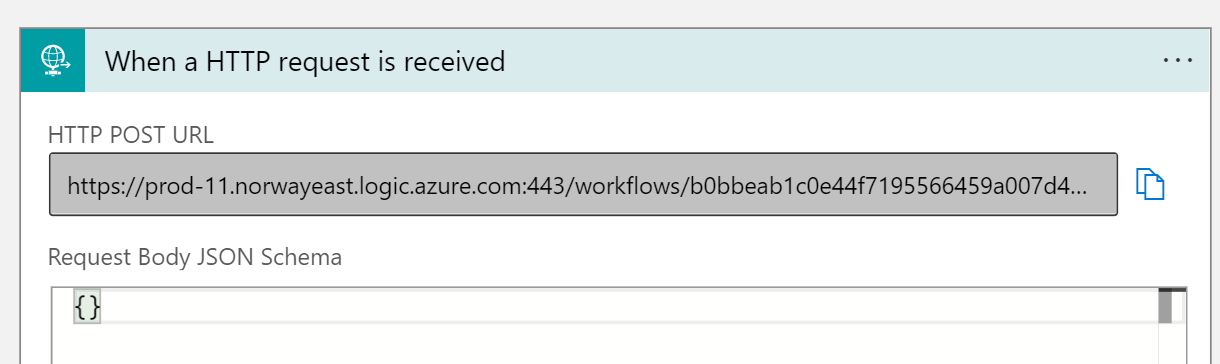
I have created a new simple Logic App with a HTTP request trigger:

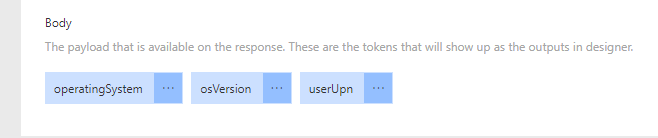
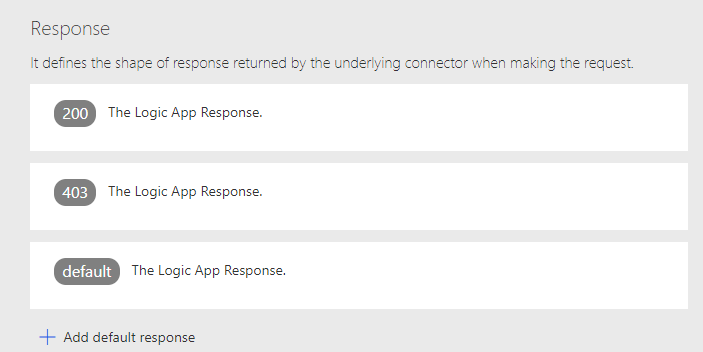
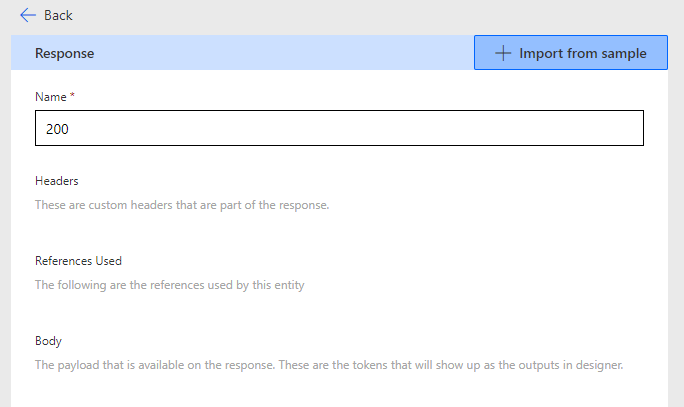
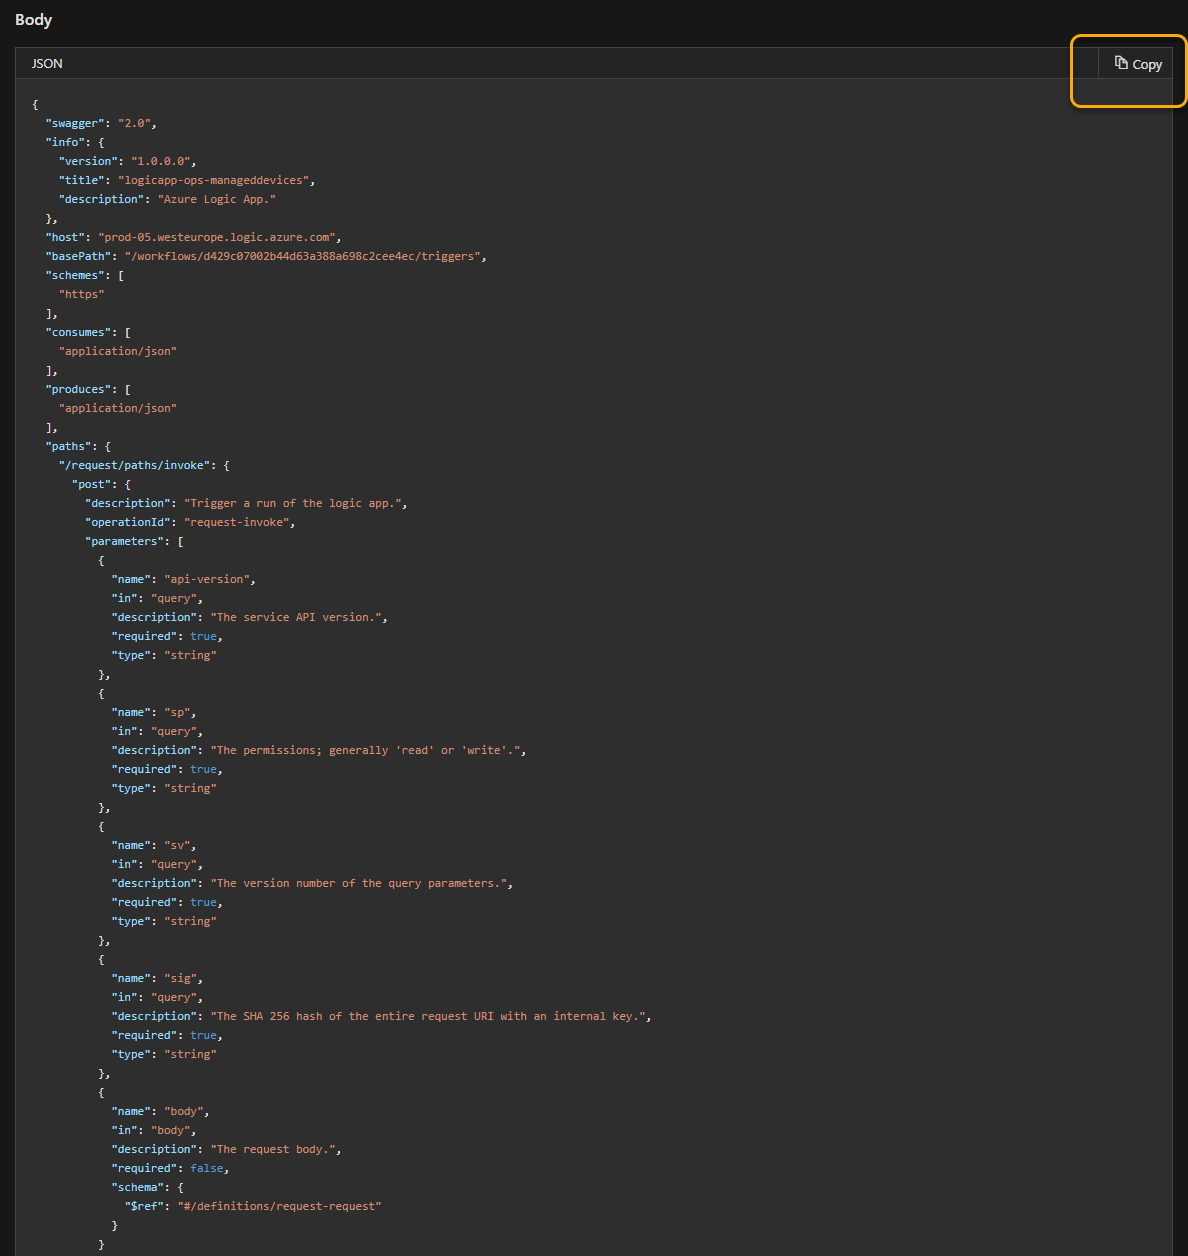
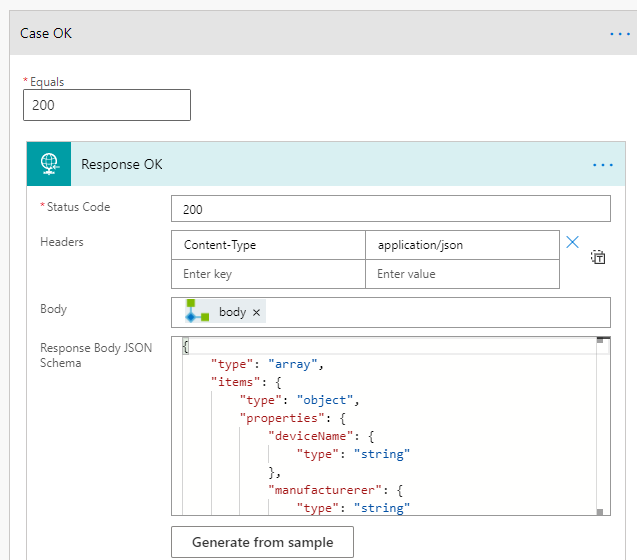
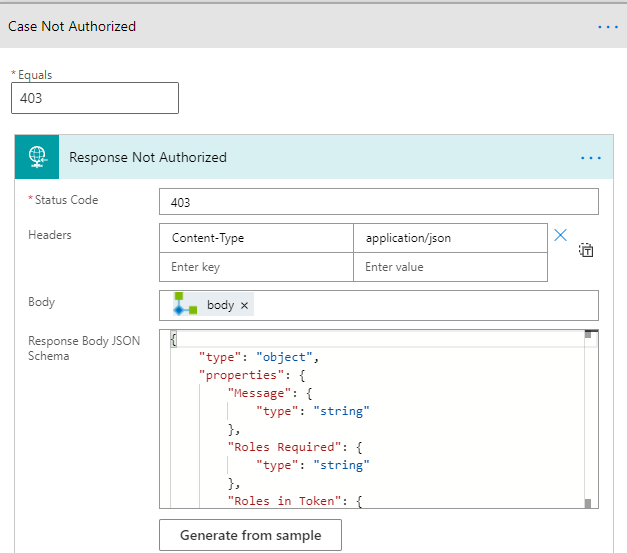
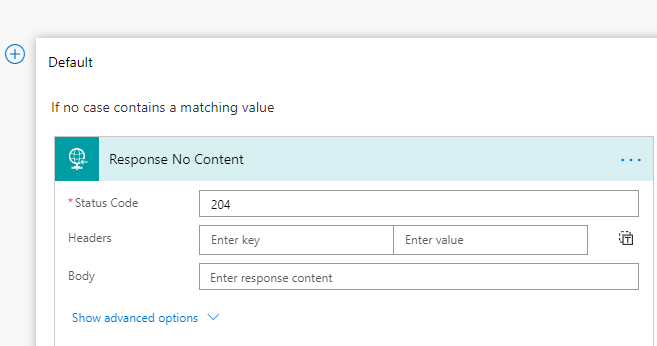
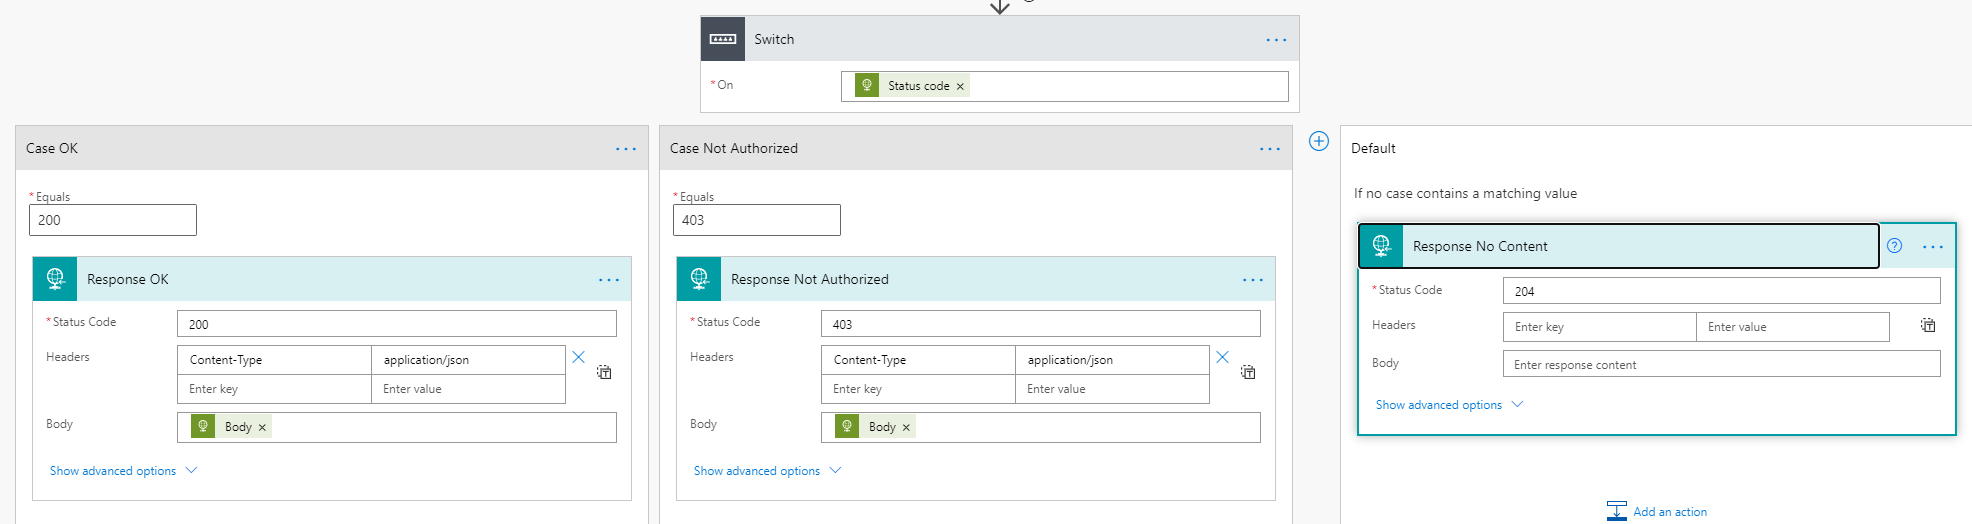
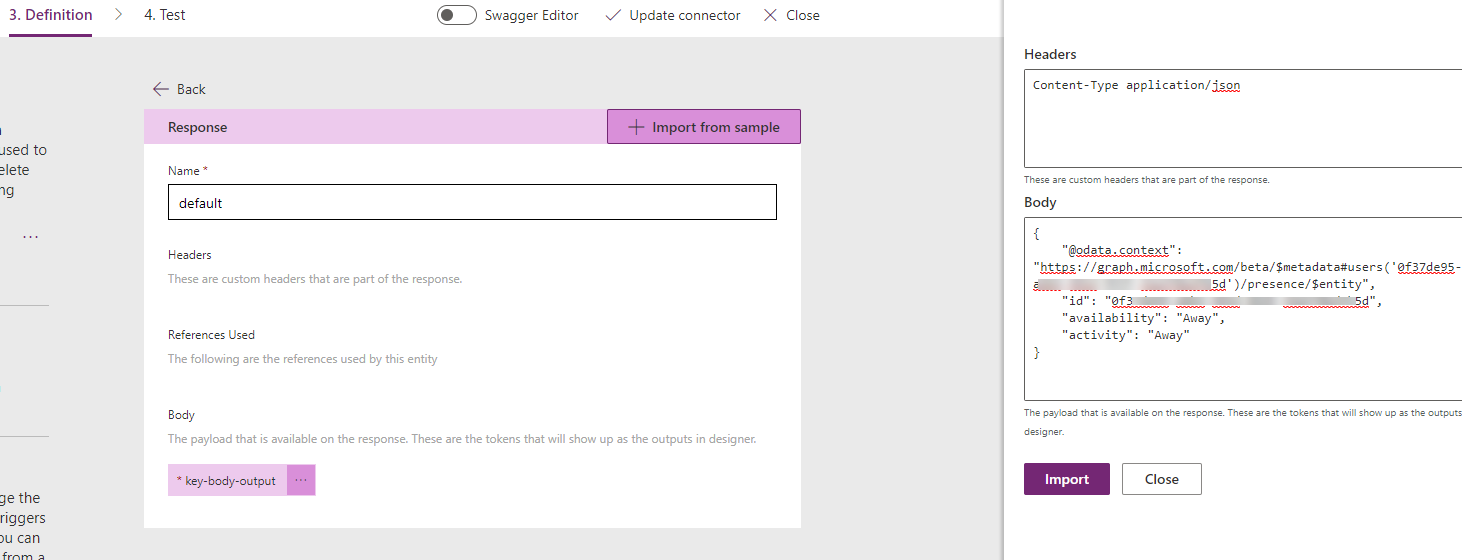
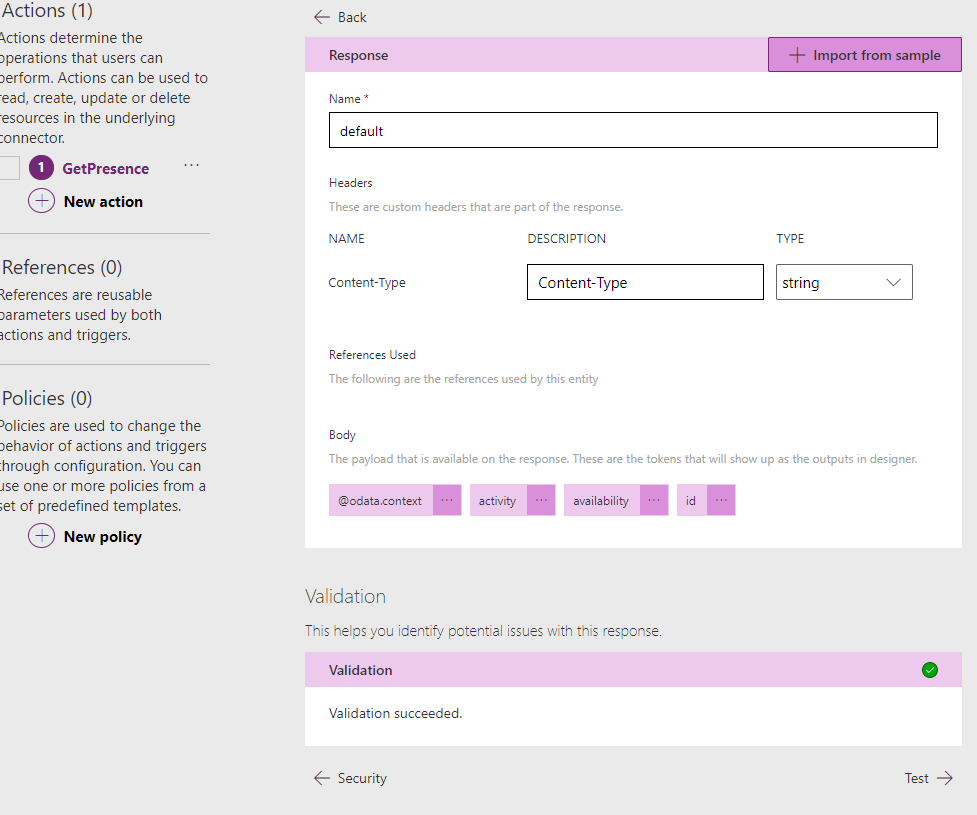
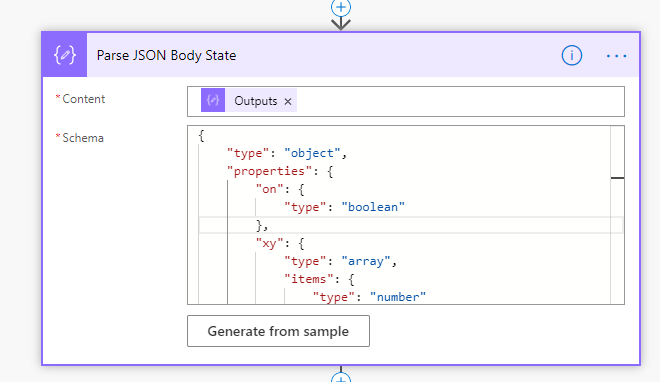
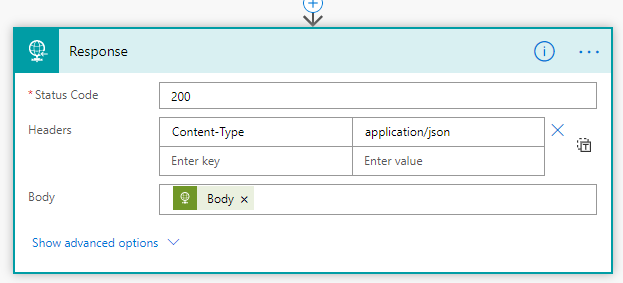
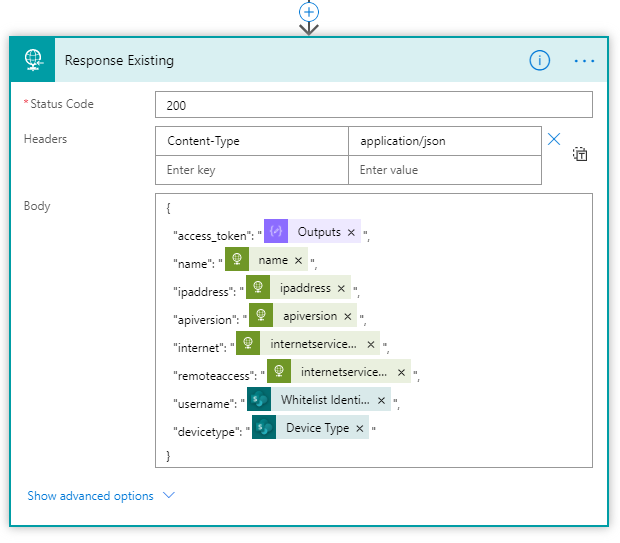
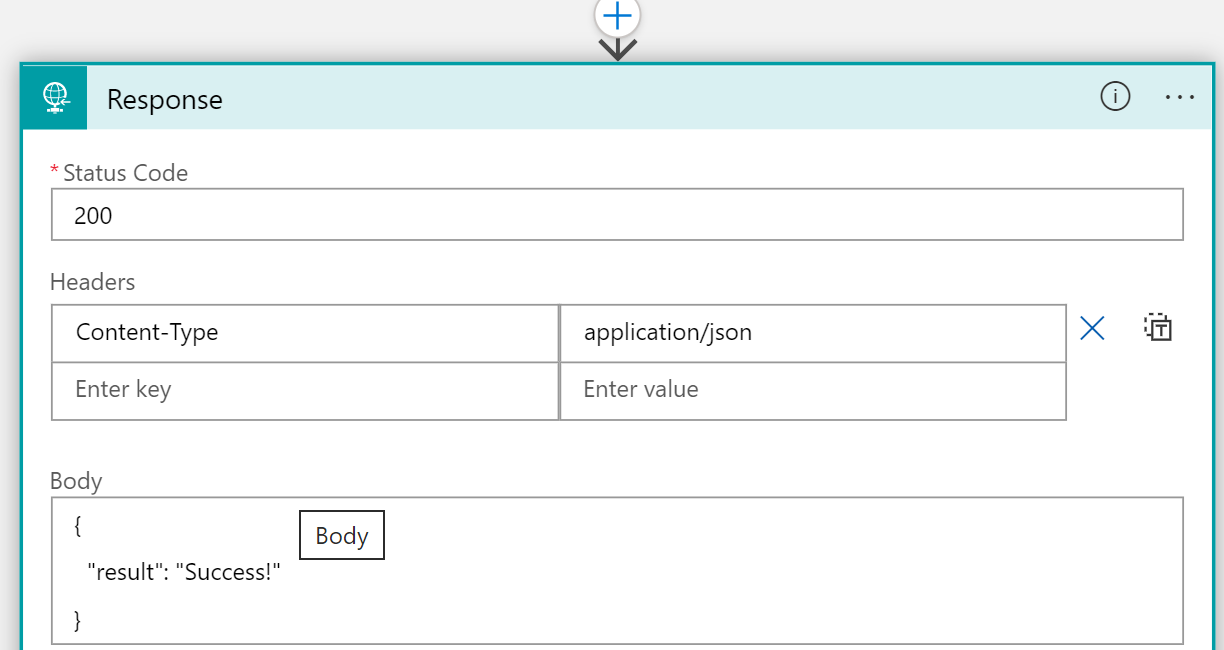
I’ve added a response action, and made sure that the response is returning JSON content like this:

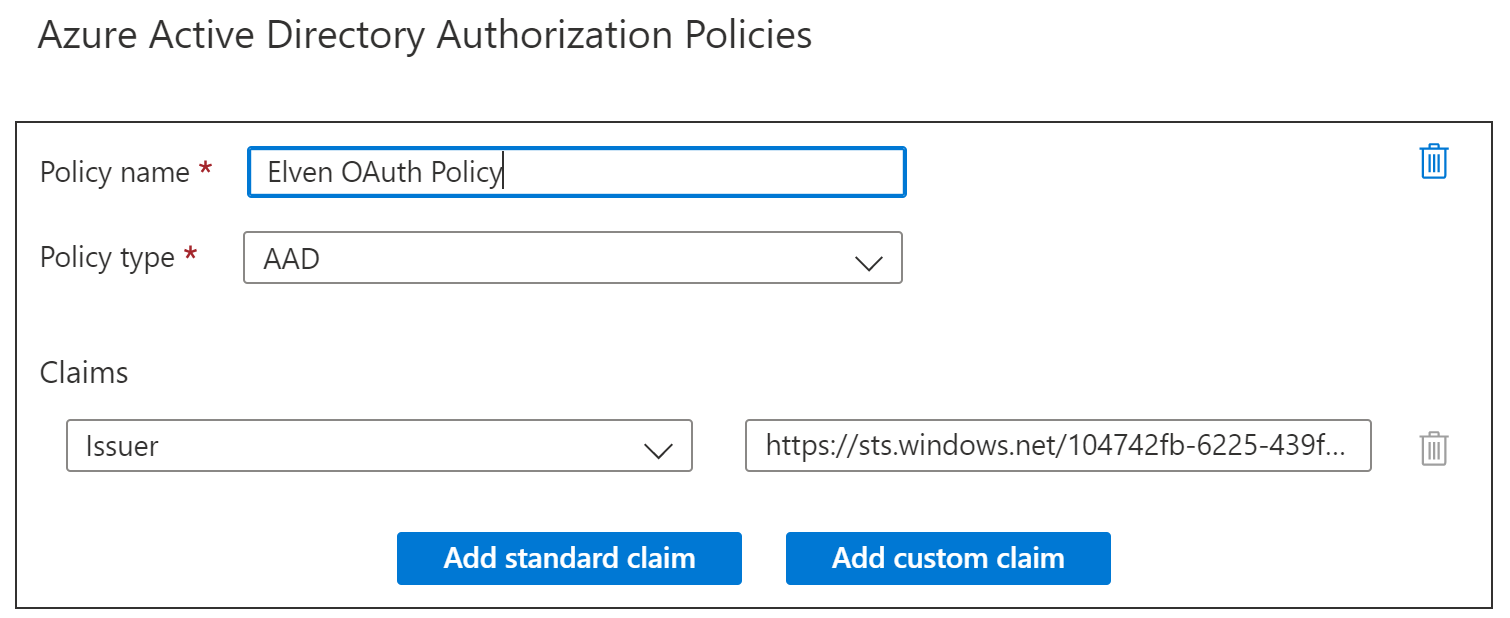
Then, I have added an Azure AD Authorization Policy like the following, requiring that the issuer claim in the authorization header is from my tenant:

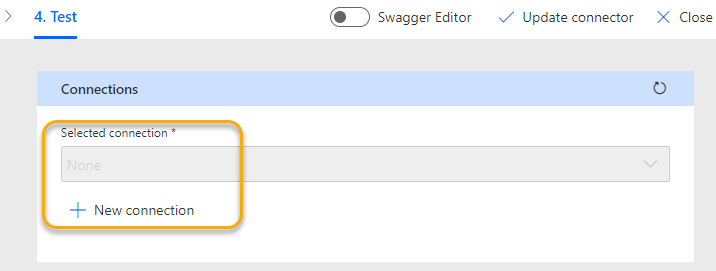
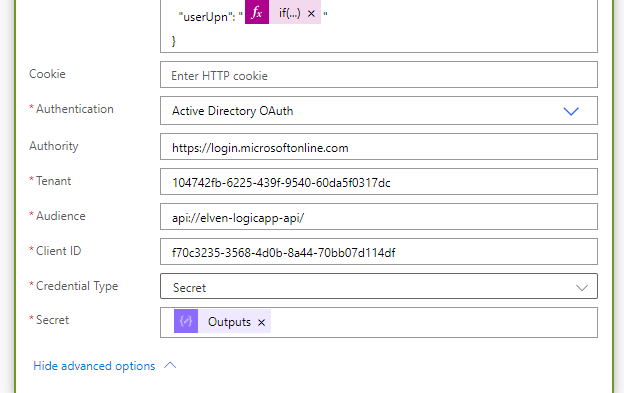
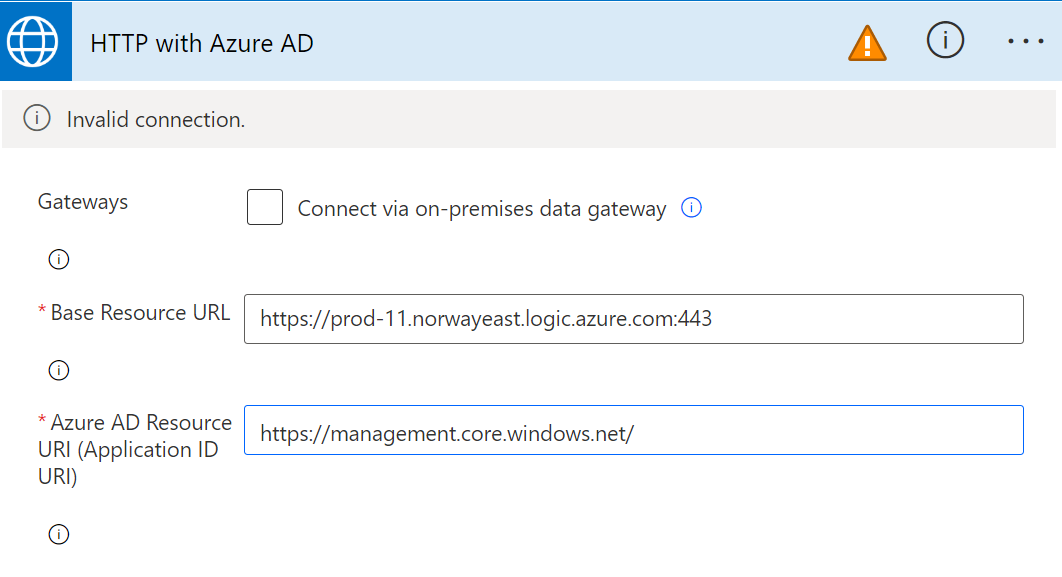
I can now go to my Power Automate flow, and add an HTTP for Azure AD connector action, but I need to set up a new connection like the following. Note that the base resource URL will be the Logic App instance, and the Azure AD Resouce URI will be one of the well known Azure APIs like below. (I haven’t been able to use graph.microsoft.com here, because I suspect the fact that Graph API tokens cannot be validated outside Microsoft Graph itself).

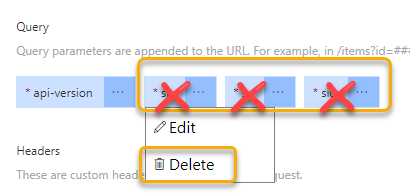
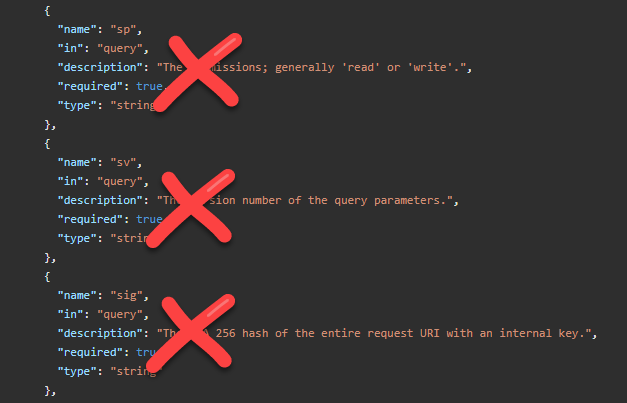
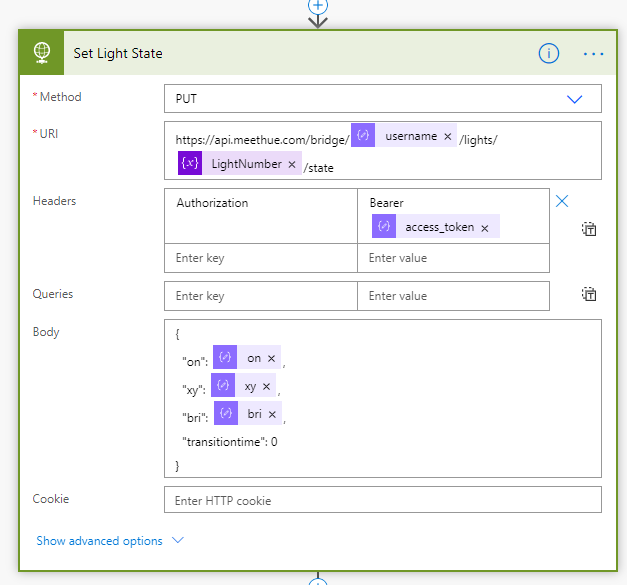
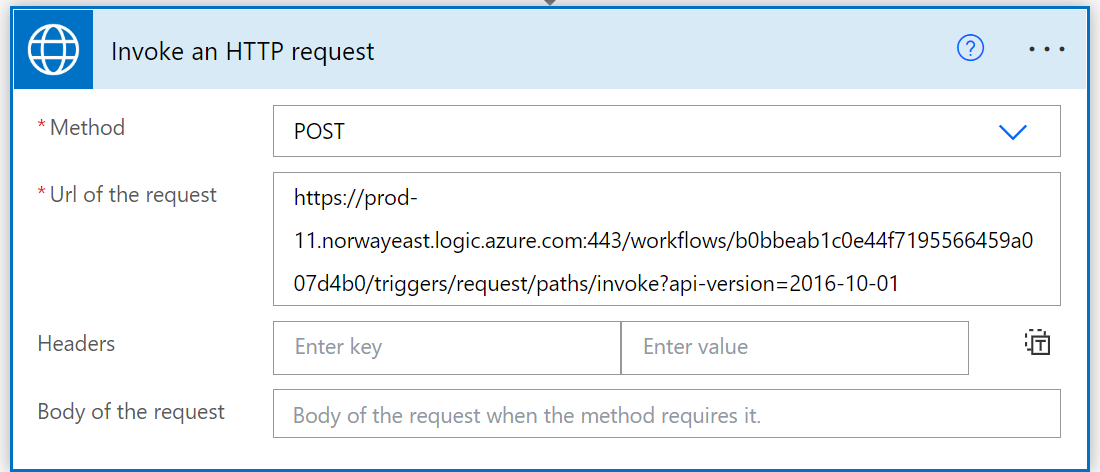
When I have signed in at set that connection active I can configure the Invoke an HTTP request action like the following, note that I have left out the parameters that belong to the SAS (shared access scheme) like sig, sv, sp, as you only can use on of SAS or OAuth2:

When I run this I get a successful response:

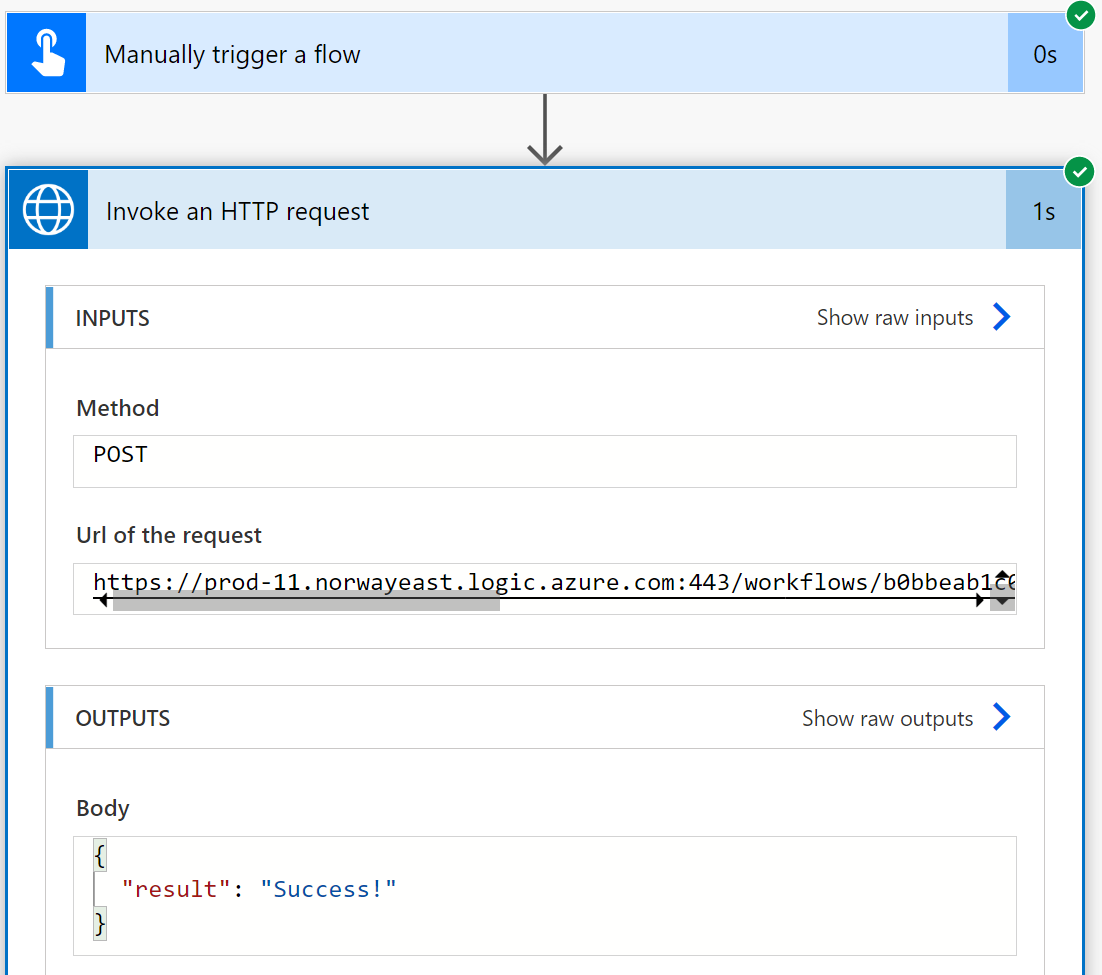
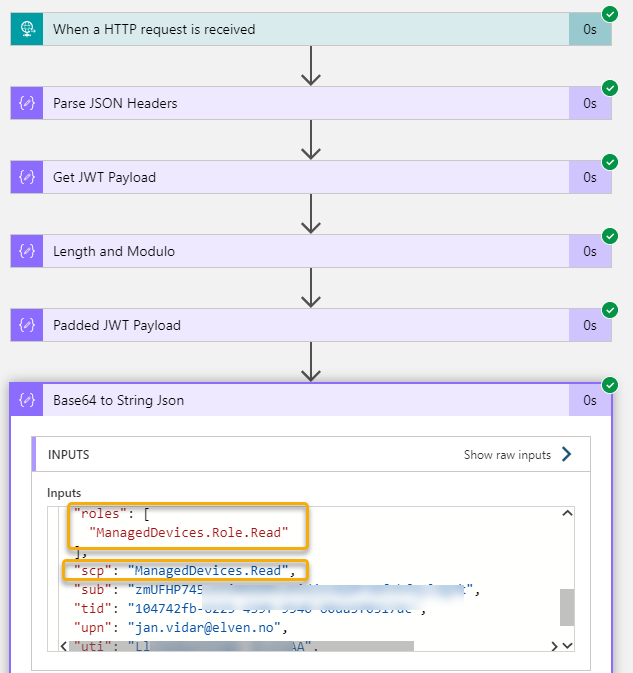
This means that the HTTP for Azure AD connector was now able to invoke a request for a protected API that I have built myself. Of course this was a simple request, but if you look at the aforementioned blog post series of protecting Logic Apps, you can see how you can include the Authorization Header in the Logic App trigger, and then get the claims and do authorization logic inside the Logic App.

In this example I didn’t include my own API definition, so lets now get even more advanced and look at an Azure Functions API example!

Protected Azure Functions with Custom API

Last year for Festive Tech Calendar in 2021, I created this solution for my contribution: https://gotoguy.blog/2021/12/22/creating-an-azure-ad-protected-api-in-azure-in-a-school-hour/

I will now use this as an example on how I can invoke requests for this API using Power Automate and the HTTP for Azure AD connector!

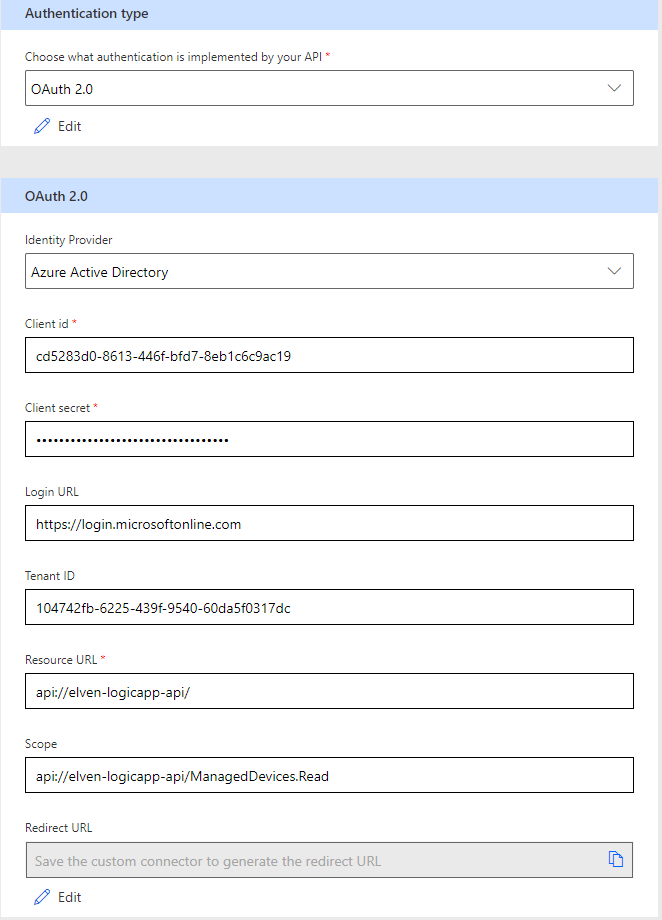
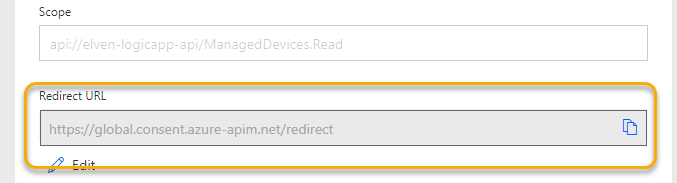
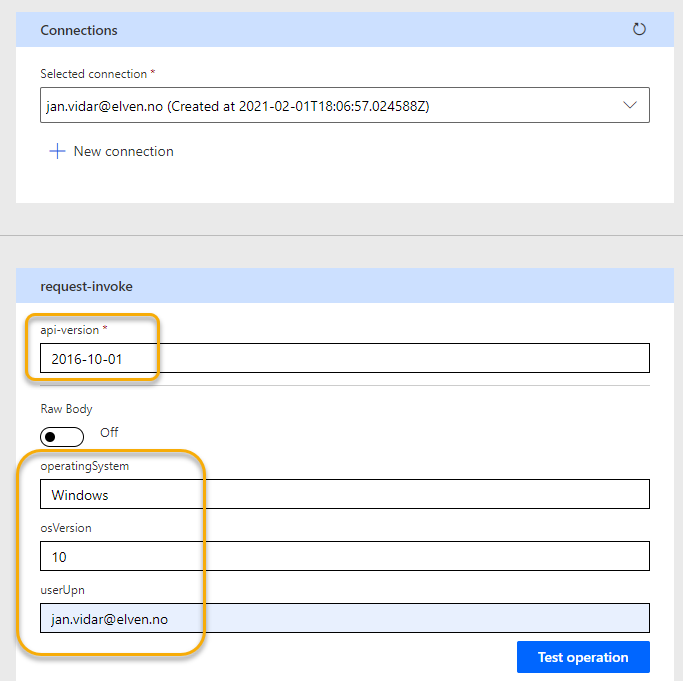
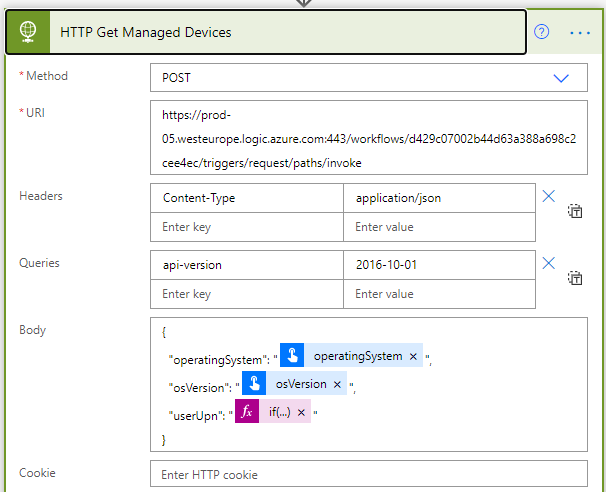
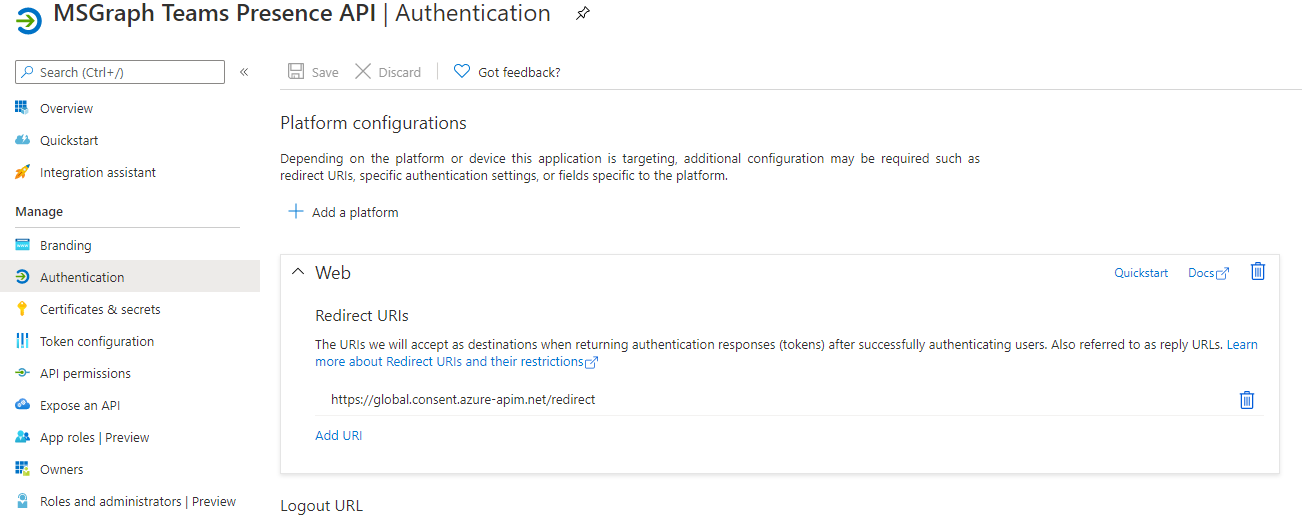
In another instant cloud flow, I’ve added the Invoke request with HTTP for Azure AD, and I need to create another connection, which will be configured as follow:

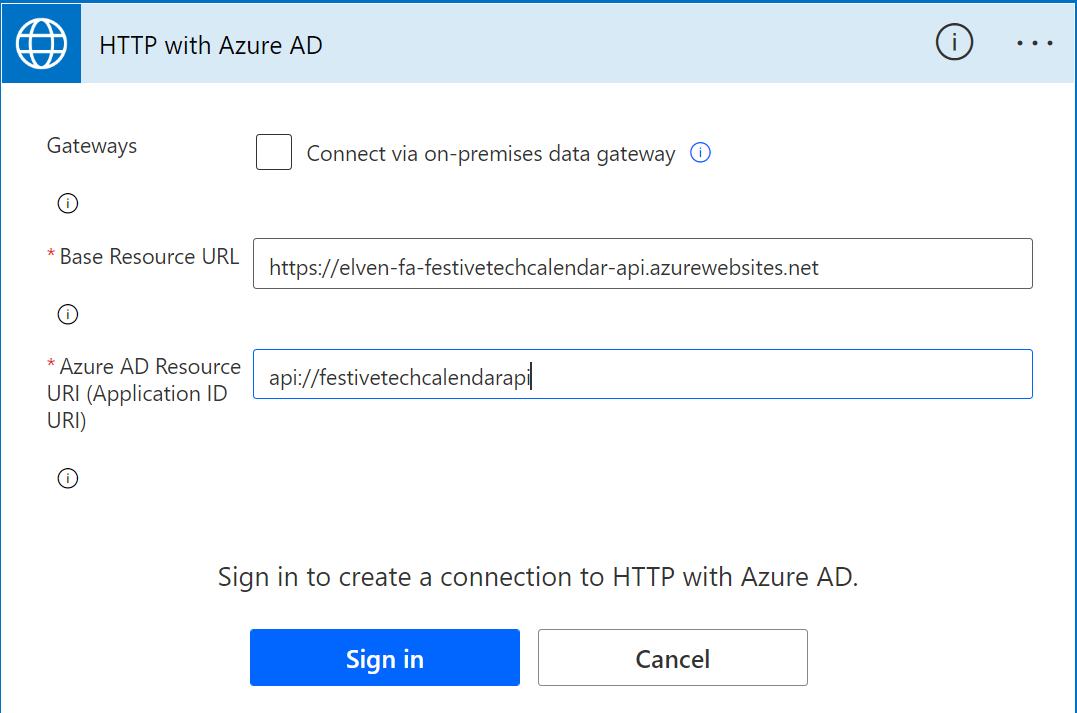
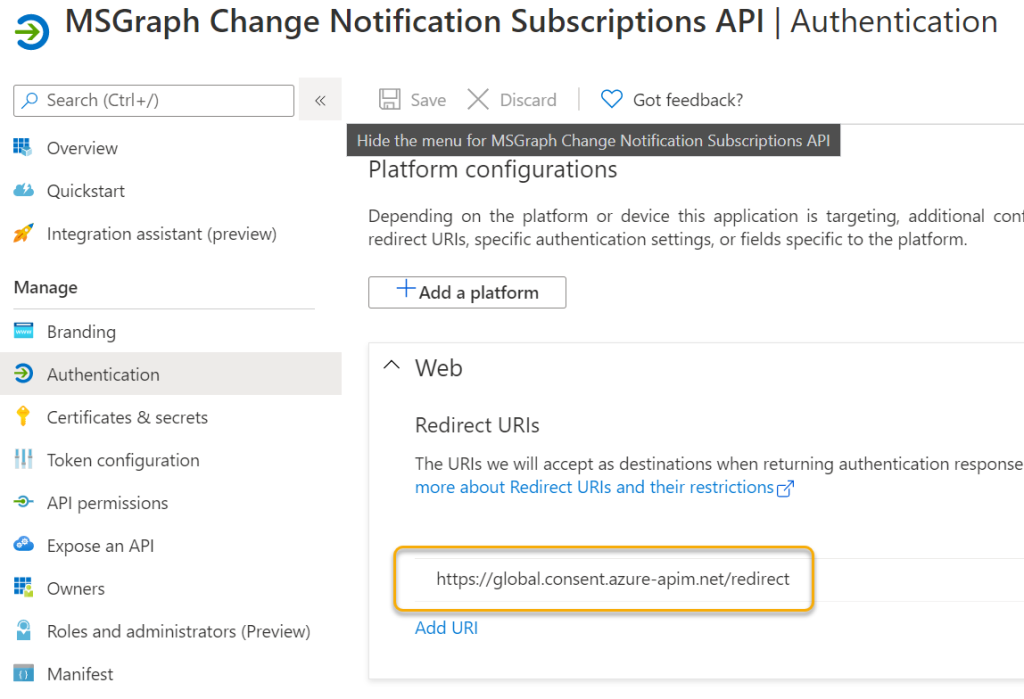
The base URL is the Function App URL, and for Resource URI I’ve used the Application ID URI I created when I defined the custom API (see the blog post for details).

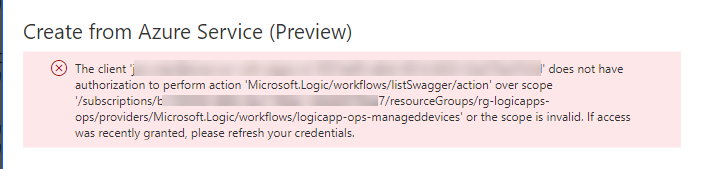
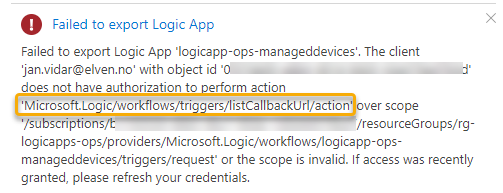
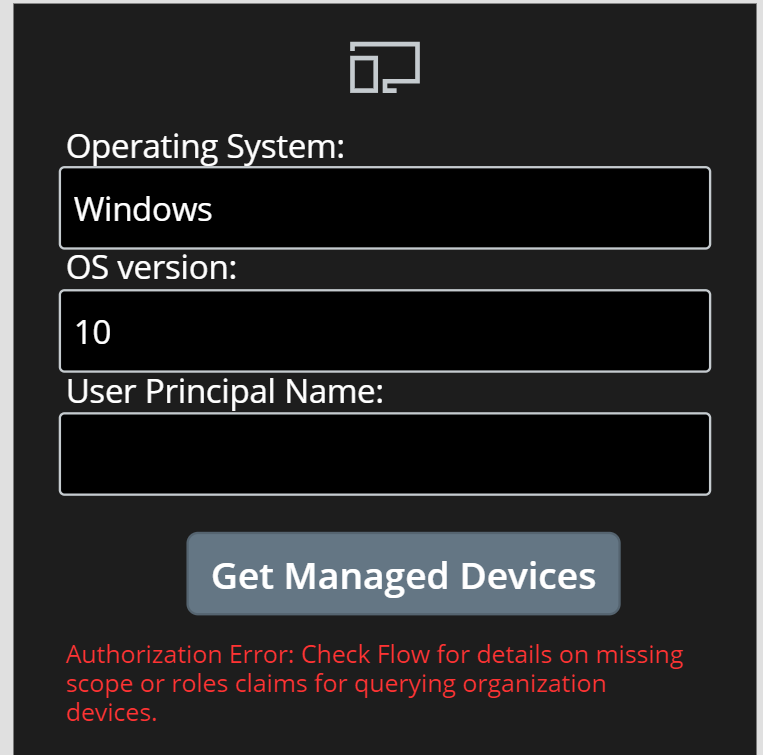
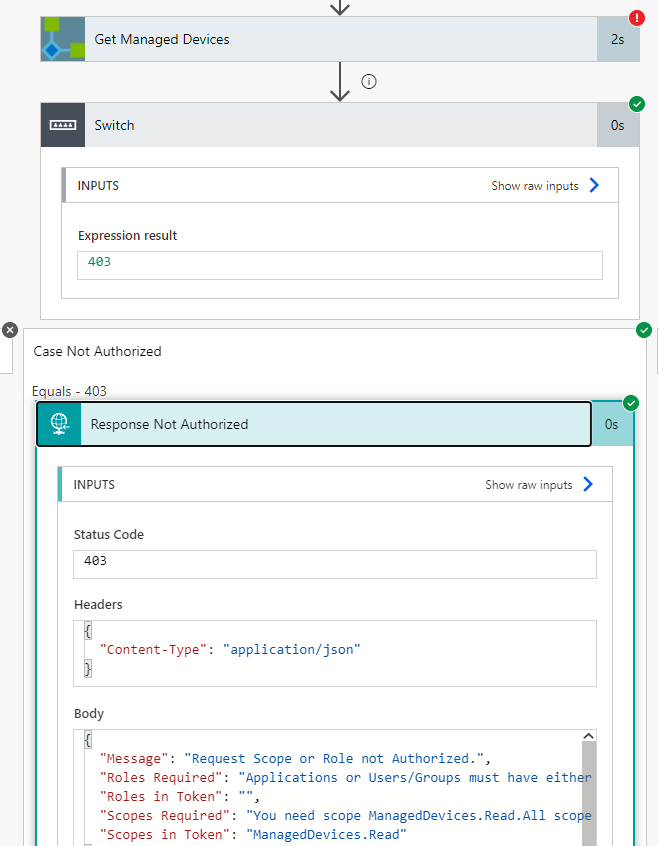
However, when I sign in I will first get an error like the following:

Note the client app id I’ve marked with a yellow shape above, this is a well known global confidential application ID for Power Platform, so this will be the same ID for you as it is for me. This is also described in this article: https://learn.microsoft.com/en-us/power-query/connectorauthentication.

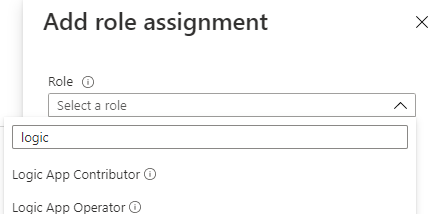
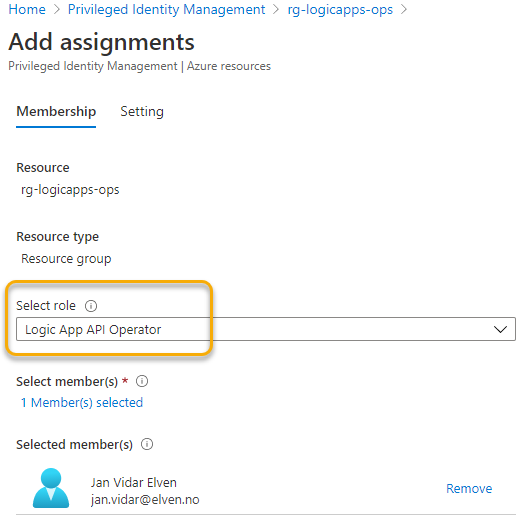
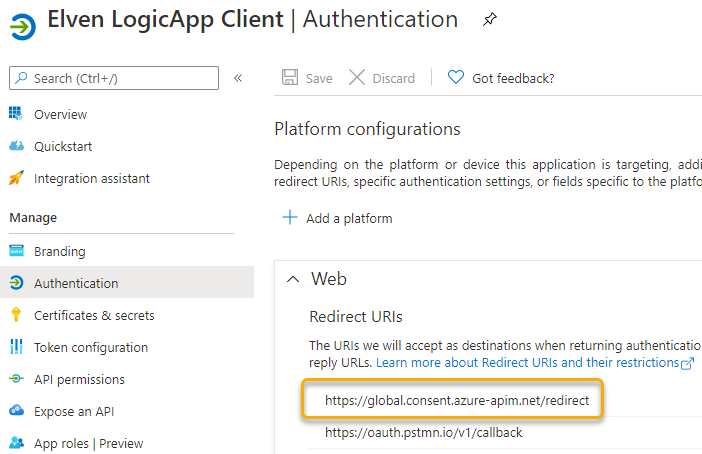
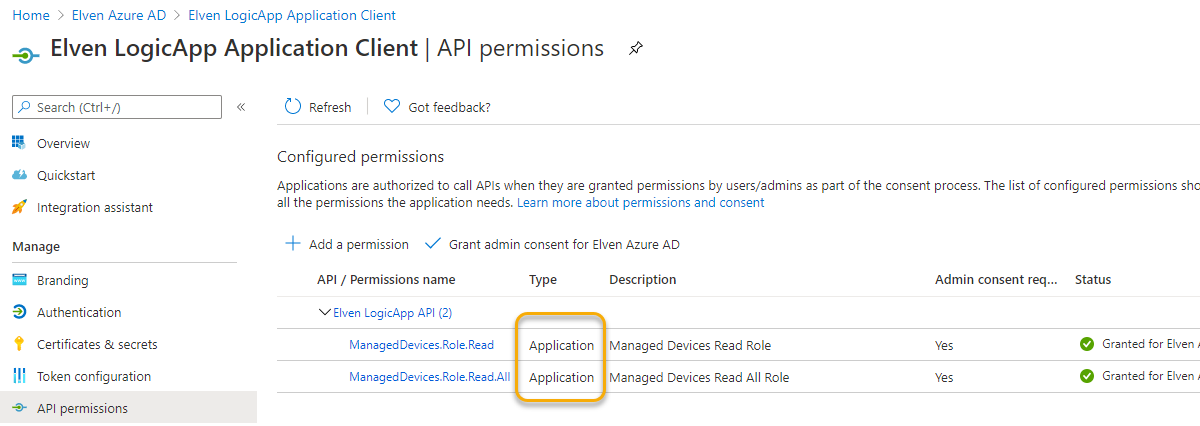
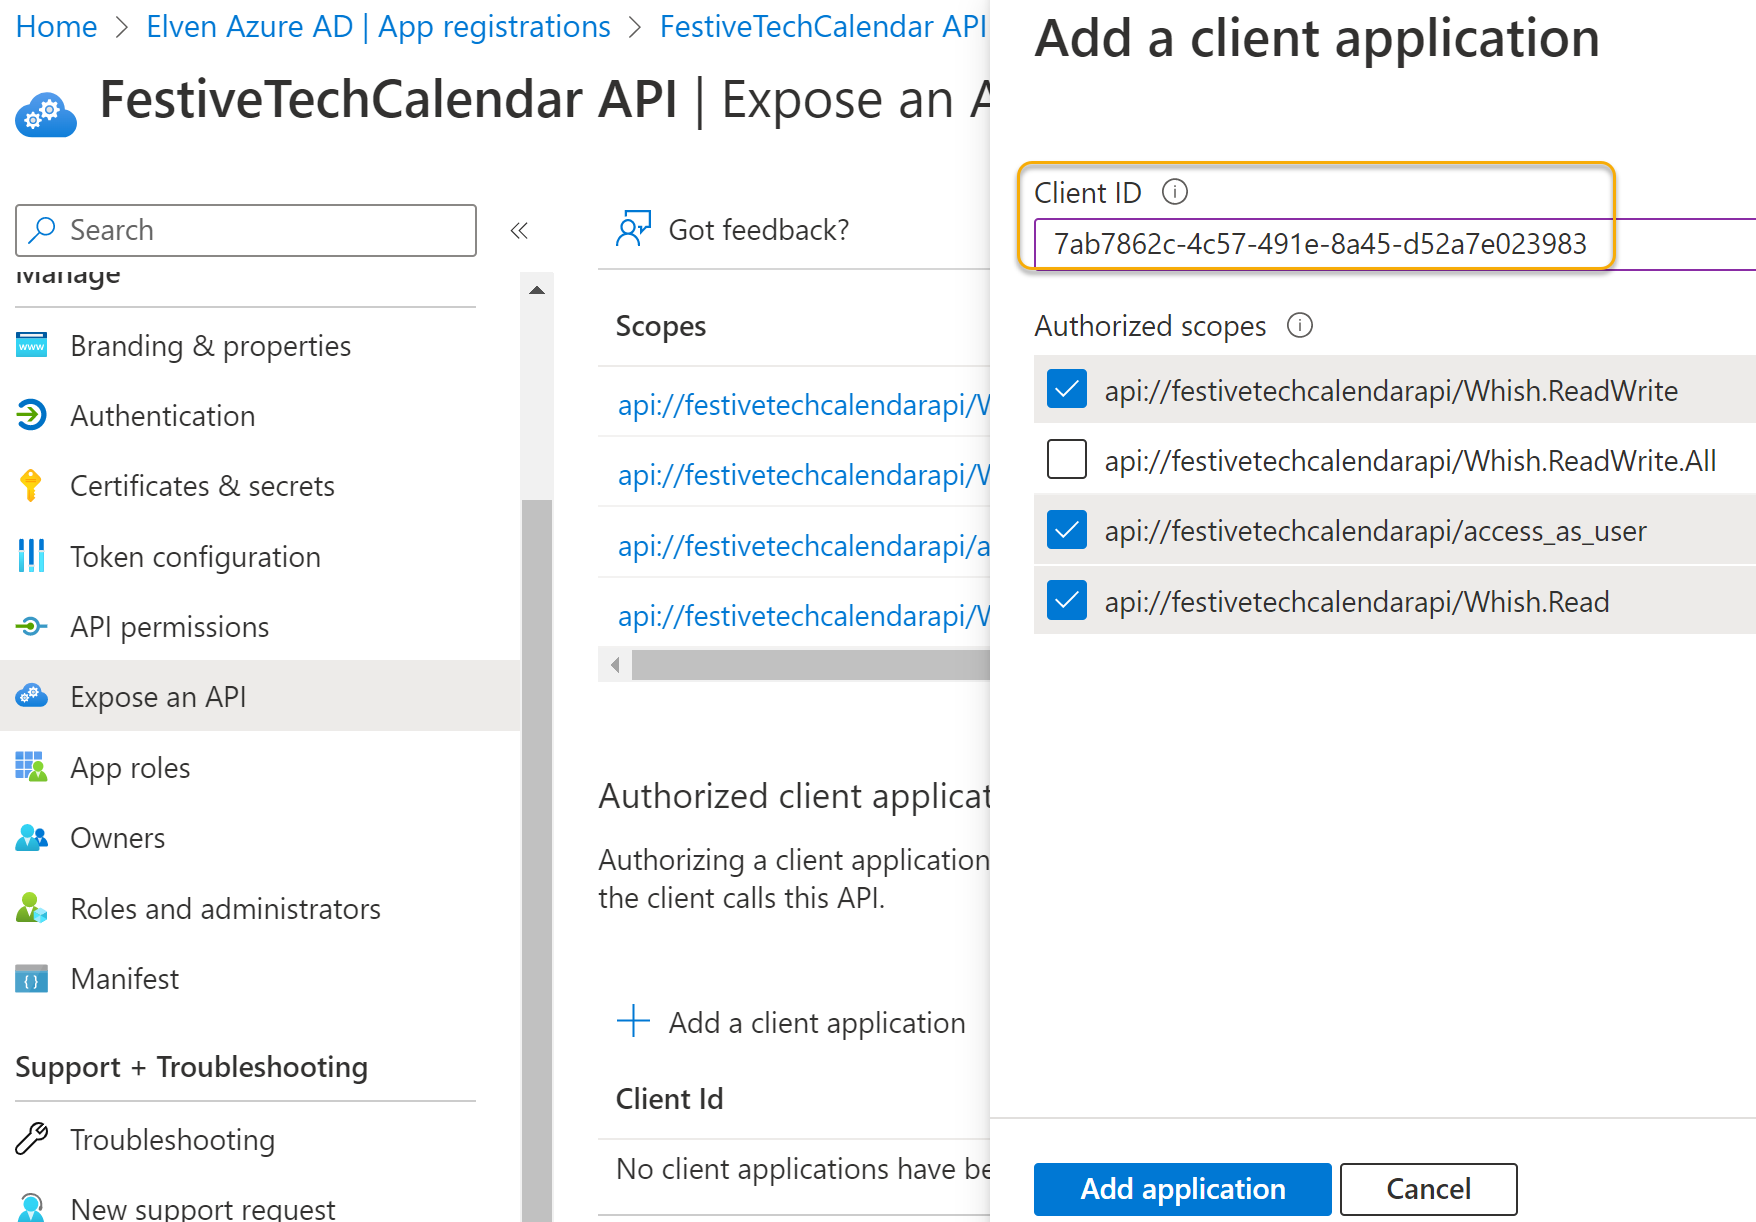
This means that I need to go to my custom API app registration, and add this ID as an authorized client application and which scopes it is authorized to use:

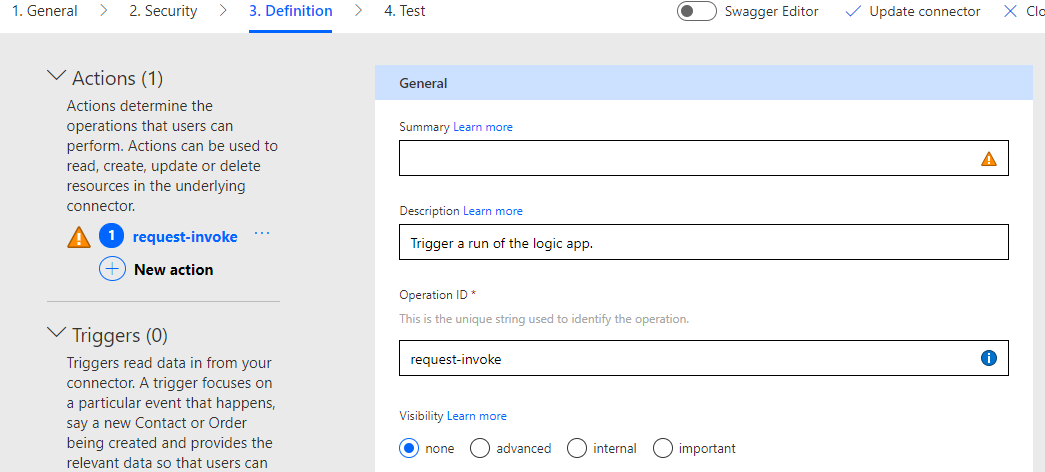
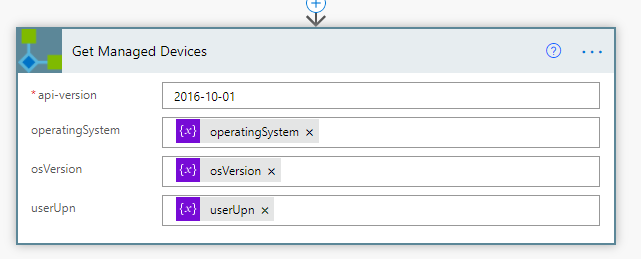
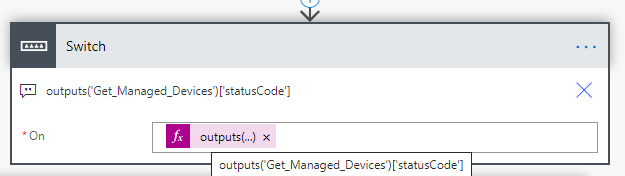
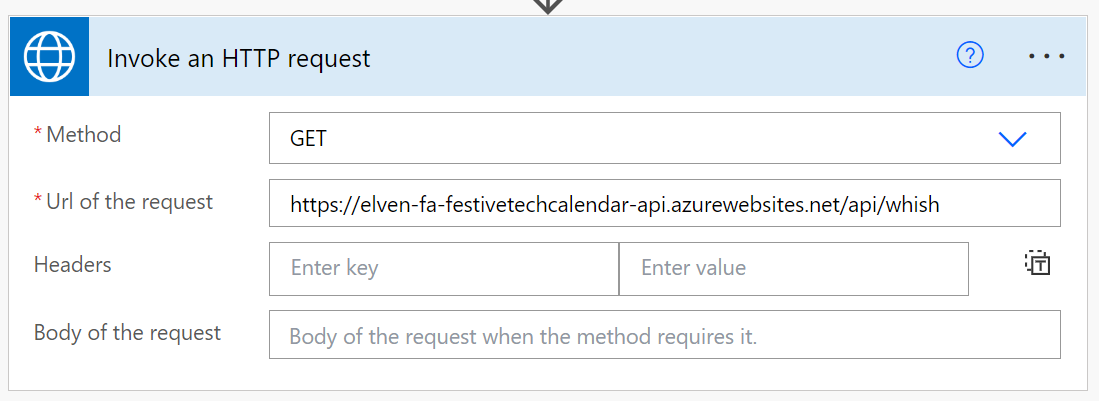
After adding that I can now sign in to create the connection, and next configure the invoke HTTP request as follows, using one of the API methods I’ve defined (again see my blog post from last year for details :):

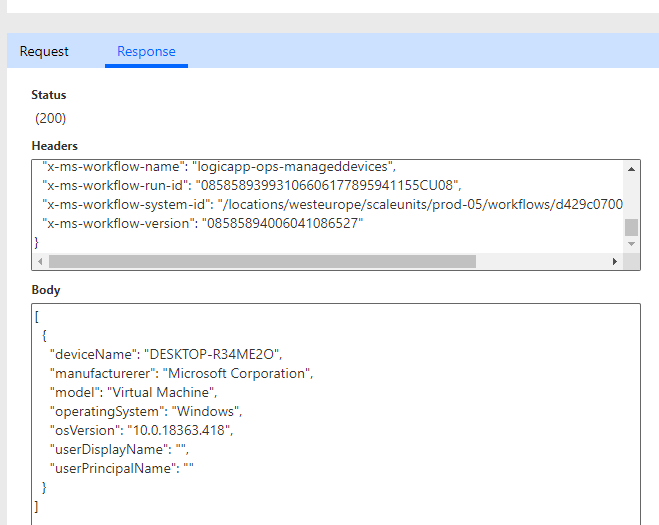
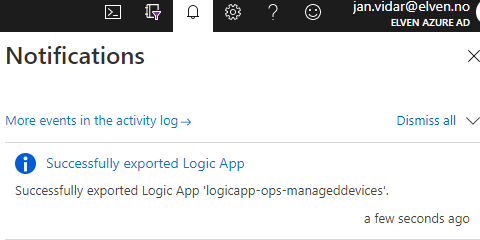
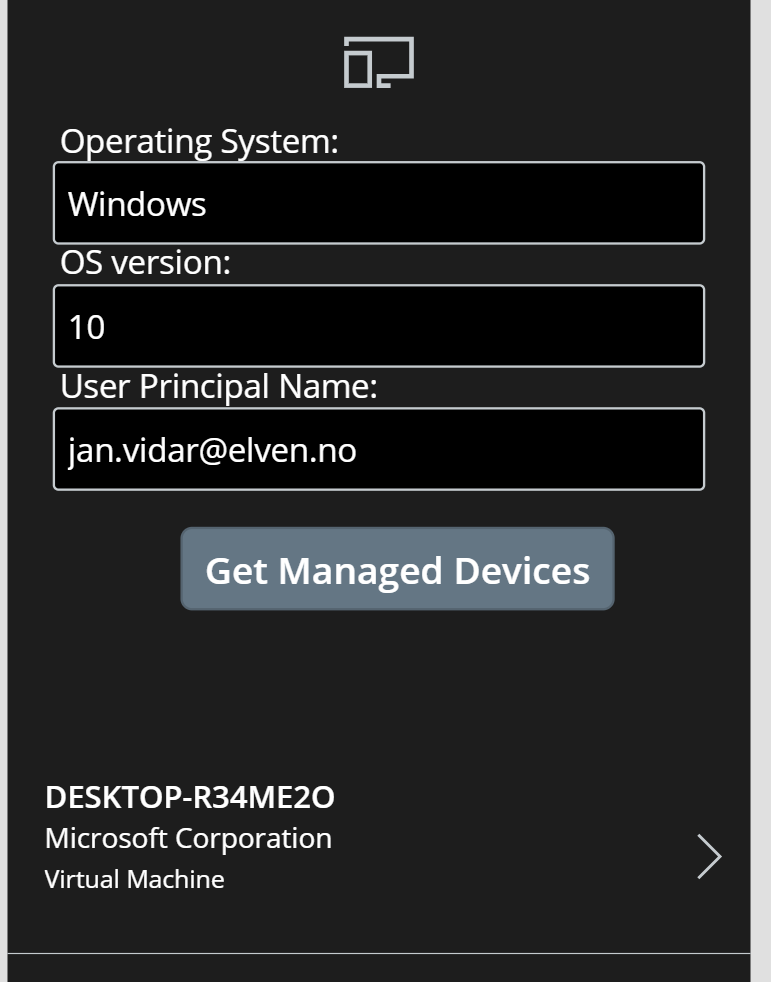
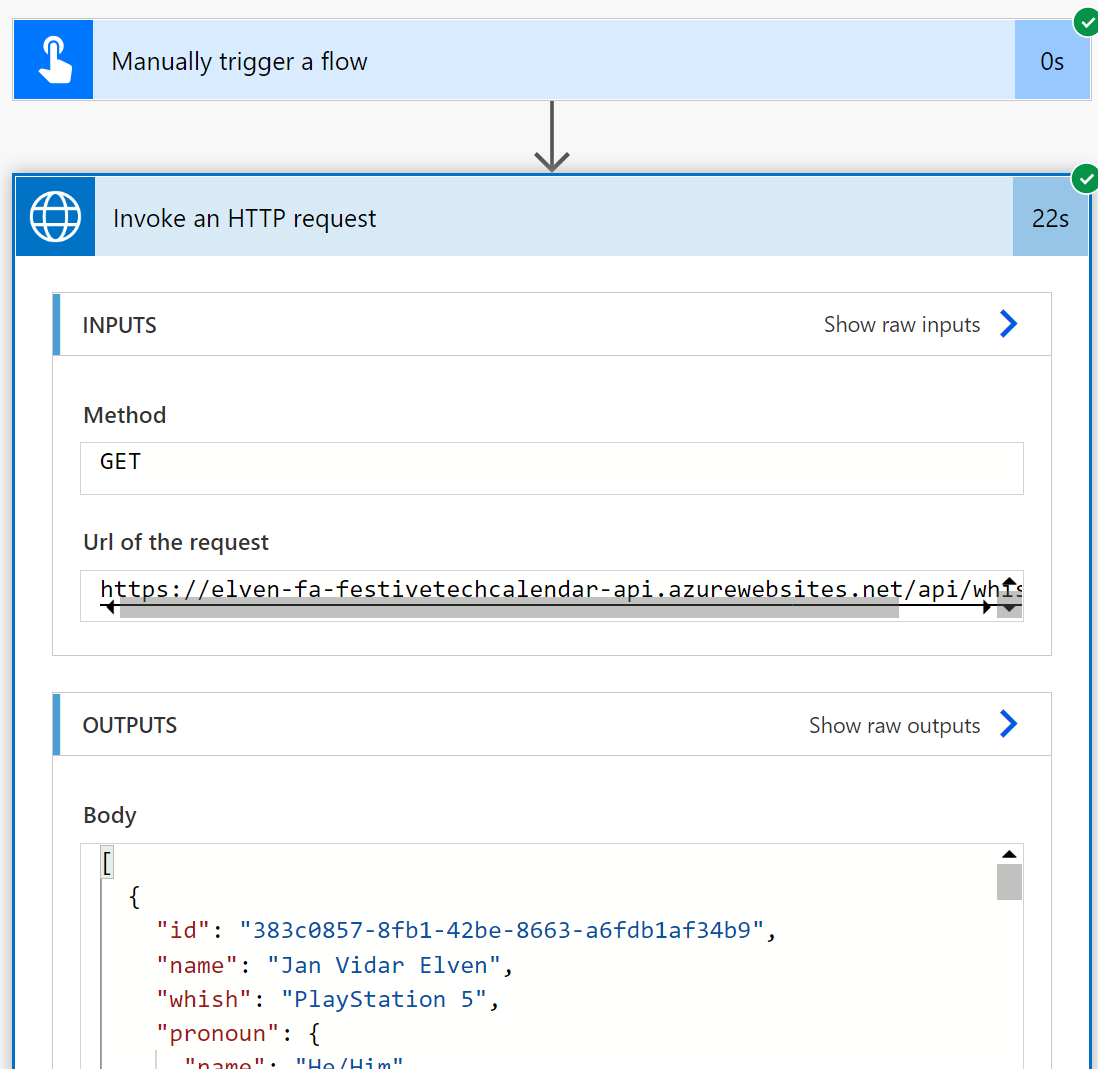
When I run the Flow I see that the request is successful, and I indeed get a response from the Protected Functions API:

Summary

In this blog post I have shown how you can use and connect Power Platform to Azure AD Protected APIs using built-in HTTP connectors that use the delegated access scenario.

While the Office 365 connectors are great for limited scenarios around Microsoft Graph, we could verify that the HTTP for Azure AD connector (Premium) had more usage scenarios, including the ability to invoke requests from both Microsoft APIs, as well as your own APIs.

Hope this has been useful, thanks for reading!

Speaking at Oslo Power Platform & Beyond!

I’m excited and very much looking forward to speak at the upcoming Oslo Power Platform & Beyond Community Event, which will happen in-person at May 21st 2022 at Microsoft Norway offices i Oslo.

Oslo Power Platform & Beyond is a Community Event hosted by the Dynamics User Group Norway , and will on this upcoming Saturday feature 21 sessions delivered by 23 international speakers and rockstars, MVP’s and community leaders!

My session will be about how you can Connect Power Platform to any Azure AD protected API using OAuth2 and Custom Connectors. While there are hundreds of built-in connectors you can use in your Power Automate Flows or Power Apps, there are many scenarios where you would want to access API’s like Microsoft Graph, or any other API that is protected by Azure AD. In this session I will show how you can access this using Custom Connectors and OAuth2, and my demo will show a self-built API using Azure Serverless solutions like Azure Functions and Logic Apps!

Session details:

The event starts in a few days, but there is still time to register for FREE:

For a full list of session program and speakers, see here: https://oslo-power-platform-and-beyond.sessionize.com/

Hope to see you there!

Speaking at Scottish Summit 2021!

I’m very much looking forward to speaking this Saturday 27th of February at the Virtual Scottish Summit 2021! This amazing Community conference will host 365 (!) virtual sessions from experts all over the world, ranging from first-time speakers to experienced community leaders.

Sessions will be delivered in a range of tracks covering Microsoft technologies and community topics, something to choose from for everyone.

My session will be about why it so important to have Zero Trust Admins with least privilege access, and why you start using Azure AD PIM (Privileged Identity Management) today!

I learned about the stereotype of cheap Scots from reading about Scrooge McDuck, I’ve no idea if this is true or not, probably not ;), but the thing that is true is that you should be really cheap when handing out admin privileges.

Today Microsoft 365 Global Administrators or Azure Subscription Owners are the new Domain/Enterprise Admins, in many organizations too many users have these roles. In the session I will show how by implementing just-in-time and just-enough-access (JIT/JEA) policies, we can reduce vulnerability and attack surface, and the right tool for the job is using Azure AD Privileged Identity Management (PIM).

I have been using AAD PIM for years, and in this session I will share my best practices and how to implement and use the right way.

Session details:

There is still time to register, but time and available tickets are running out fast. Go an register your free ticket for an awesome day of free community contents here:

Scottish Summit 2021 | Scottish Summit

Have a great conference and hope you visit my session if the topic is of your interest!

Protect Logic Apps with Azure AD OAuth – Part 3 Connect to API from Power Platform

In this article I’m going to build on my previous blog posts in this series where I have written about how to add Azure AD OAuth authentication and authorization to your Logic Apps and expose them as an API. For reference the links to these blog post articles are here:

If you want to connect to API’s using Power Platform (Power Automate Flows, PowerApps etc.), you can do this in two different ways:

  • Using HTTP action and send requests that use Azure AD OAuth authentication. This will use the “Client Credentials” OAuth flow, and is suitable for calling the API using application permissions and roles.
  • Setting up a Custom Connector for the API, and using the HTTP logic app trigger as operation. This will use the “Authorization Code” OAuth flow, and is suitable for using delegated permissions and scopes for the logged on user via connections.

So it depends on how you want your Power Platform users to be able to send requests your Logic App API. Should they do this as themselves with their logged on user, or should they use an application identity? There are use cases for both, so I will show both in this article.

Connect to Logic App API using Custom Connector

Using Custom Connectors is a great way to use your own identity for sending requests to an API. This way you can also securely share Custom Connectors, and Flows/PowerApps, using them in your organization, without needing to share sensitive credentials like client id and client secrets.

If you want to create a Custom Connector in Power Platform that triggers an HTTP request to a Logic App, you can currently do this in one of the following ways:

  1. Creating Custom Connector using Azure services and Logic App.
  2. Exporting the Logic App to a Power Platform environment.
  3. Creating the Custom Connector using an OpenAPI swagger definition file/url.
  4. Creating the Custom Connector from blank.

Lets take a quick look at each of these, but first we need to take care of some permissions in Azure for creating the Custom Connector automatically.

Azure Permissions for Logic Apps and listing swagger

There are some minimum permissions your user needs to be able to create a Custom Connector automatically by browsing the Azure Service.

A good starting point is using one of the built in Azure roles for Logic Apps:

But even these do not have the permissions necessary, if you try you will get an error similar to the following:

So we need to att this ../listSwagger/action for the scope, and you could give the user full Contributor access, but that seems rather excessive. Lets create a custom role instead. I will do this using Azure PowerShell, for reference please see the docs: Create or update Azure custom roles using Azure PowerShell – Azure RBAC | Microsoft Docs.

After connecting to Azure using an Azure account that can create custom roles for the scope (Owner or User Access Administrator), start by exporting an existing role as a starting point:

# 1. Export a JSON template as a reference based on an exisiting role
Get-AzRoleDefinition -Name "Logic App Operator" | ConvertTo-Json | Out-File .\LogicAppAPIOperator.json

Then edit this JSON file, by removing the Id parameter, defining a Name, setting the IsCustom to true, and Description to something descriptive like below. I have also set my Azure subscription id under assignable scopes, and added the required ../listSwagger/action:

{
  "Name": "Logic App API Operator",
  "IsCustom": true,
  "Description": "Lets you read, enable and disable logic app, and list swagger actions for API.",
  "Actions": [
    "Microsoft.Authorization/*/read",
    "Microsoft.Insights/alertRules/*/read",
    "Microsoft.Insights/metricAlerts/*/read",
    "Microsoft.Insights/diagnosticSettings/*/read",
    "Microsoft.Insights/metricDefinitions/*/read",
    "Microsoft.Logic/*/read",
    "Microsoft.Logic/workflows/disable/action",
    "Microsoft.Logic/workflows/enable/action",
    "Microsoft.Logic/workflows/validate/action",
    "Microsoft.Resources/deployments/operations/read",
    "Microsoft.Resources/subscriptions/operationresults/read",
    "Microsoft.Resources/subscriptions/resourceGroups/read",
    "Microsoft.Support/*",
    "Microsoft.Web/connectionGateways/*/read",
    "Microsoft.Web/connections/*/read",
    "Microsoft.Web/customApis/*/read",
    "Microsoft.Web/serverFarms/read",
    "Microsoft.Logic/workflows/listSwagger/action"
  ],
  "NotActions": [],
  "DataActions": [],
  "NotDataActions": [],
  "AssignableScopes": [
    "/subscriptions/<my azure sub id>"
  ]
}

After that you can create the custom role:

# 3. Create the new custom role:
New-AzRoleDefinition -InputFile .\LogicAppAPIOperator.json

This role can now be assigned to the Power Platform user(s) that need it, using the scope of your Logic Apps, for example the Resource Group. You can either add the role assignment to the user directly, or preferrably using Azure PIM:

With the correct permissions now in place, you can proceed to the next step.

Creating Custom Connector using Azure services and Logic App

Log in to Power Apps or Power Automate using your Power Platform user. Under Data and Custom Connectors, select to create a New custom connector. From there select “Create from Azure Service” (Preview as per now):

Next, type name for your Custom Connector, select which Azure subscription, and from which Azure service which in this case is Logic Apps. Note that you can create from Azure Functions and Azure API Management as well. Then select the Logic App name from the list:

If you don’t see or get any errors here, verify your permissions.

Click Continue, and you will see something like the following, where the Host and Base URL has automatically been set correctly for your Logic App HTTP trigger. If you want you can upload an icon, background color and desctription as well:

Click Next to go to Security. Here we need to change the Authentication to OAuth 2.0, as this is what we have implemented for authorizing requests to the Logic App. To authenticate and get the correct Access Token, we will reuse the LogicApp Client app registration that we created in the previous blog post. Copy the Application Client ID and Tenant ID:

And then create and copy a new secret for using in the Power Platform Custom Connector:

Fill in the rest of the OAuth 2.0 details for your environment like below:

Note from above that we need to specify the correct resource (the backend API) and scope. This is all very vell described in the previous blog post.

Click Create Connector to save the Connector details. Make sure that you copy the Redirect URL:

And add that to the App Registration redirect URLs:

Next, under the Custom Connector proceed to step 3. Definition. This is where the POST request trigger will be, and it should already be populated with an action:

We need to specify a value for Summary, in my case I will type “Get Managed Devices”:

Next, under Request Query, remove the “sp”, “sv” and “sig” parameters, as these will not be needed as long as we are using OAuth2 authorization scheme:

The Body parameter should be correctly specified, expecting an operatingSystem, osVersion and userUpn request body parameters:

Last, lets check the Responses from the Logic App. They have been successfully configured with status 200 (OK) and 403 (Not Authorized), as these two responses were defined in the Logic App.

If the Response body is empty like below, we would need to import from sample output from the Logic App (response body should have automatically been configured if the response action in Logic App had a response schema defined):

For response status 200, the sample import is:

[
  {
    "deviceName": "",
    "manufacturerer": "",
    "model": "",
    "operatingSystem": "",
    "osVersion": "",
    "userDisplayName": "",
    "userPrincipalName": ""
  }
]

Giving this response definition:

The sample response from the 403 not authorized should be:

{
  "Message": "",
  "Roles Required": "",
  "Roles in Token": "",
  "Scopes Required": "",
  "Scopes in Token": ""
}

Giving this response definition:

NB! It’s important to have correct responses defined like above, it will make it easier to consume those responses later in Power Automate Flows and Power Apps.

Click on Update Connector, and then go to next section 4. Test.

We can now test the Logic App trigger via the Custom Connector, first we need to create a new connection:

After logging in, and if needed consenting to the permissions scopes (se previous blog post for details), we should have a connection. We can now test the trigger by supplying the api-version (2016-10-01) and specify the operatingSystem, osVersion and userUpn parameters:

Click Test operation and verify a successful response like below:

Let’s try another test, this time leaving the userUpn blank (from the previous blog post this means that the Logic App tries to return all managed devices, if the user has the correct scope and/or roles). This time I get a 403 not authorized, which is expected as I don’t have the correct scope/role:

Checking the Logic App run history I can see that my Power Platform user triggered the Logic App and I can see the expected scp and roles claim:

Perfect so far! In the end of this blog post article I will show how we can get this response data to a Power App via a Flow and the Custom Connector, but first lets look into the other ways of creating a Custom Connector.

Exporting the Logic App to a Power Platform environment

In the previous example, I created the Custom Connector from my Power Platform environment, in this example I will do an Export from the Logic App. The user I will do this with needs to be a Power Platform licensed user and have access to the environments, or else I will get this:

To Export, click this button:

Then fill inn the name of the Custom Connector to create, I will call this ..v2, and select environment:

You might get another permission error:

If so, we need to update the Custom Role created earlier with this permission. Do the following:

# 3b. Update the custom role
$roleLogicAppAPIOperator = Get-AzRoleDefinition -Name "Logic App API Operator"
$roleLogicAppAPIOperator.Actions.Add("Microsoft.Logic/workflows/triggers/listCallbackUrl/action")
Set-AzRoleDefinition -Role $roleLogicAppAPIOperator

The role and the assignment should now be updated, so we can try again. You might need to refresh or log out and in again for the permission to be updated. After this the Export should be successful:

We can now find the Custom Connector right below the first we created:

We still need to edit the Custom Connector with the authentication details, adding the app/client id, secret etc. The export has also left out all the query parameters (sv, sp, sig) but also the required api-version. This must be fixed, the easiest way is to switch to Swagger Editor, and add the line 15 and 16 as shown below:

After this you should be able to Update the Connector, and the Test, Create a Connection and verify successful results.

Creating the Custom Connector using an OpenAPI swagger definition file/url

Both examples above, either importing a Custom Connector from Azure Service, or exporting the Logic App to a Custom Connector in a Power Platform environment, require that the user doing this both has:

  • Azure RBAC role assignment and permissions as detailed above.
  • Access to Power Platform environment and licensed for using Power Platform.

What if you as Azure administrator don’t want your Power Platform users to have access to Azure, but you still want to help them with creating Custom Connectors that send requests to selected Logic App workflow APIs?

Then you can provide them with an OpenAPI swagger definition file or url. You can get the swagger OpenAPI definition by running this Azure REST request: Workflows – List Swagger (Azure Logic Apps) | Microsoft Docs.

To get your swagger you can look at the first blog post in this series, where I showed how you could use Az PowerShell to get management access tokens using Get-AzAccessToken and running Invoke-RestMethod. In this example I’m just going to use the Try it button from the Docs link above, and then authenticate to my Azure subscription, and fill inn the required parameters:

Running this request should produce your requested swagger OpenAPI definition. You can now copy this to a file:

Before you share this OpenAPI file with your Power Platform developers, you should edit and remove the following request query parameters, as these are not needed when running the OAuth2 authorization scheme:

After this you can create a new Custom Connector, by specifying an OpenAPI file / url, depending on where you made the file available to your Power Platform Developers.

Browse to the filename and type a Connector name:

After this you will have the basis of the Connector defined, where you can customize general settings etc:

You will now need to add the authentication for Azure AD OAuth2 with client id, secret etc under Security, as well as creating the connector, and under test create a connection and test the operations. This is the same as I showed earlier, so I don’t need to show tthe details here.

Creating the Custom Connector from blank

You can of course create Power Platform Custom Connectors from blank as well, this should be easy enough based on the details I have provided above, but basically you will need to make sure to set the correct Host and Base URL path for your Logic App here:

After adding the authentication details for Azure AD OAuth2 (same as before), you will need to manually add actions, and providing a request from sample, as well as defining the default responses for 200 and 403 status, as shown in the earlier steps.

With the Custom Connector now in place for sending Requests to the Logic App using delegated authentication, we can now start using this Connector in our Flows/Power Apps.

Lets build a quick sample of that.

Creating a Power Automate Flow that will trigger Logic App API

I’ll just assume readers of this blog post knows a thing or two about Power Automate and Cloud Flows, so I’ll try to keep this high level.

I’ve created a new instant Cloud Flow, using PowerApps as a trigger. Then I add three initialize variables actions, giving the variables and actions name like below, before I set “Ask in PowerApps” for values:

Next, add a Custom Connector action, selecting the Custom Connector we created earlier (I have 3 versions here, as I shown above with the alternative ways to set up a Custom Connector from Logic Apps:

Next, select the action from the chosen Custom Connector, and fill in the parameters like below:

Next, we need to check the response status code we get back from the Custom Connector. Add a Switch control action, where we will check against the outputs from the Get Managed Devices and statusCode:

Make sure that the Switch action should run either if the Get Managed Devices is successful or failed:

For each case of statusCode we will check against, we need a Response action to return data back to the PowerApp. For status code 200 OK, I’ll return the Status Code as shown below, adding Headers to be Content-Type application/json, and using the Body output from the Get Managed Devices custom connector action. The Response Body JSON schema is based on the sample output from the Logic App API.

PS! To get the Body output, you can use the following custom expression: outputs('Get_Managed_Devices')?['body']:

For status code 403 I have added the following Case and Response action, using the Body output again, but this time the schema is based on the 403 response from the Logic App API:

Last, as every case should have Response, I’ll add the following Default Case:

The whole Flow visualized:

PS! Instead of using the Response action, I could also have used the “Respond to PowerApps” action. However this action only let me return text strings, numbers, boolean etc, and I wanted to return native JSON response.

Make sure that you test and verify the Flow before you proceed.

Creating the Power App to connect to the Flow

With the Flow ready, lets quickly build a PowerApp. My PowerApp is a Canvas App, and I have been using the Phone layout.

You can build this any way you want, but I used a dark theme, added an Icon at the top screen, and the 3 labels and text inputs for the parameters needed for the Flow. I then added a button for triggering the Flow, and under the button I have added a (hidden now) text label, for showing any error messages from the Flow. And I have added a Gallery control under there again for showing the resulting devices:

For the Button, select it and click on the Action menu and the Power Automate to connect your Flow. Next, change the “OnSelect” event for the Button to the following command:

Set(wait,true);
Clear(MyManagedDevices);Set(MyErrorMessage,Blank());
Set(MyDeviceResponse,GetManagedDevices.Run(textOperatingSystem.Text,textOSVersion.Text,textUserUpn.Text));
If(IsBlank(MyDeviceResponse),Set(MyErrorMessage,"Authorization Error: Check Flow for details on missing scope or roles claims for querying organization devices."),ClearCollect(MyManagedDevices,MyDeviceResponse));
Set(wait,!true)

A quick explanation of the commands above:

  • Set(wait,true) and Set(wait,!true) is to make the PowerApp “busy” when clicking.
  • I then Clear my Collection and Variable used.
  • I then use Set to get a “MyDeviceResponse”, this will return a collection of items (devices) returned via a JSON array from the Flow, or if I’m not authorized, it will return a failed response (based on the 403) and a blank MyDeviceResponse.
  • Next I do a If test, if the MyDeviceResponse i Blank, I’ll set the MyErrorMessage variable, if it’s not blank I will run a ClearCollect and fill the Collection with returned devices.

I fully appreciate that there might be other ways to do this fail checking and error handling, please let me know in the comments if you have other suggestions 🙂

For the Gallery I set the Data source to MyManagedDevices collection, and I have selected to use the layout of “Title, subtitle, and body”. You can change the device data that get filled in for these items in the Galleri, for example Manufacturer, Version, Name etc.

And last I set the Text property of my error message label to the MyErrorMessage variable:

Let’s Save, Publish and test this PowerApp!

First, I’ll try to add parameters for getting all Windows 10 devices, leaving user principal name blank. This will via the Custom Connector send a request to the Logic App API to return all devices, and in this case I’m not authorized to do so, so I’ll get an authorization error:

This is something I can verify in the Flow run history also:

Next, I’ll try to return my test users devices only, and this is successful and will fill the gallery:

We now have a working Flow and PowerApp connected to the Logic App API using the signed in users delegated permissions. If I want I can now share the PowerApp and Flow including the Custom Connector with other users in my organization, and they can use their own user identity for connections to the Logic App API.

In the next part of this blog post I will show how you can access the Logic App API using HTTP action and application permissions.

Connect to Logic App API using HTTP action

Sometimes you will have scenarios where you want to use an application identity to call an API like the Logic App I have used in this blog post article series. This is especially useful if you want to run a Power Automate Flow without a logged in user’s permissions.

I the previous blog post part 2 for exposing Logic App as an API, I created this App Registration to represent the Application Client scenarios and Application permissions:

In that App Registration, create a new Client Secret for using in Power Automate, and copy this to your clipboard:

Make sure to copy the Application (Client) ID and Tenant ID also:

Now let’s create a new Power Automate Flow to test this scenario. This type of Flow could use a range of different triggers based on your needs, but I’ll just use a Instant Cloud Flow as trigger where I have configured the following inputs:

Note that I have configured userUpn as an optional input.

Next add a “Compose” action for the Client Secret, give the action a name and paste in the Client Secret you created earlier. Note the Lock symbol:

Click on settings and select to Secure Inputs:

Next add a HTTP action, specifying the Method to POST and the URI to be the LogicApp API url, remember to not include the sv, sp and sig query parameters. Set Headers Content-Type to application/json, and under queries add the api-version. For body build the JSON request body using the inputs. We need to build a dynamic expression for userUpn, as this can be optional. I have used the following expression:

if(not(empty(triggerBody()?['text_2'])),triggerBody()?['text_2'],'')

Click to show advanced settings, and choose Authentication to use Azure AD OAuth. Add the authority, tenant id and set audience to the custom Logic App API URI. Then paste in the Application (Client) Id, and use the Outputs from the Compose Client Secret action:

This authentication above will use the Client Credentials Flow to get an access token that will be accepted by the Logic App API.

The remaining parts of this Flow can be exactly the same as the previous Flow we built, a Switch control that continiues on success/failure of the HTTP action:

And then returning Response objects from the HTTP action body for each case:

When testing the Flow now, I can see that the client secret is hidden from all relevant actions:

Summary and Next Steps

We are at the end of another extensive blog post. The focus for this article has been to show how you can use Power Automate to connect to your custom API, that we built in the previous blog post for exposing the Logic App as an API.

The community are increasingly creating Power Platform custom connectors and http actions that sends requests to API’s to Microsoft Graph directly, and that is great but it might result in too extensive permissions given to users and application clients. My focus has been to show how you can control authentication and authorization using on-behalf-of flows hidden behind a Logic App API where users and clients are allowed to send requests based on allowed permission scopes and/or roles, using the powers of Azure Active Directory and OAuth2.

There will be a later blog post in this series also, where I look into how Azure API Management can be used in these scenarios as well.

In the meantime, thanks for reading, hope it has been helpful!

Blog Series – Power’ing up your Home Office Lights: Part 10 – Subscribe to Graph and Teams Presence to automatically set Hue Lights based on my Teams Presence!

This blog post is part of the Blog Series: Power’ing up your Home Office Lights with Power Platform. See introduction post for links to the other articles in the series:
https://gotoguy.blog/2020/12/02/blog-series—powering-up-your-home-office-lights-using-power-platform—introduction/

In this last part of the blog series, we will build on the previous blog post where we could get the presence status from Teams to the Hue Power App. Now we will use Microsoft Graph and subscribe to change notifications for presence, so that both the Power App and my Hue Lights will automatically change status based on the presence.

In this blog post I will reuse the Custom Connector I created for managing Microsoft Graph Subscriptions in this previous blog post: Managing Microsoft Graph Change Notifications Subscriptions with Power Platform | GoToGuy Blog

To follow along, you will need at least to create the App Registration and the Custom Connector referred to in that blog post. You can also import the Custom Connector OpenAPI Swagger from this link: <MY GITHUB URL TO HERE>

Adding the Custom Connector to the PowerApp

In the Hue Power App, go to the View menu, and under Data click to “+ Add data source”. Add the MSGraph Subscription Connector as shown below. This way we can refer to this in the Hue Power App.

We are going to add the logic to creating the subscription based on this toggle button and the selected light source:

But before that we have somethings to prepare first. When creating a Graph Subscription, we will need to prepare a Webhook Url for where Graph will send its notifcations when the Teams presence changes. This will be handled in a Power Automate Flow, so lets create that first.

Creating the Flow for Graph Notifications and Hue Lights changes

Since I have built this all before, ref. https://gotoguy.blog/2020/10/24/managing-microsoft-graph-change-notifications-subscriptions-with-power-platform/, I will make a copy of the “Graph Notification – Presence Change” flow for this use case.

If you want to follow along, you will need to follow the instructions in that blog post first. After saving a copy, or if you created a new flow from blank using HTTP request webhook, you will need to copy the HTTP POST URL shown below, as that will be the “notification url” we will refer to later:

Next set some value that only you know for the secret client state:

The next part of the Flow are used to do a first-time validation of adding the change subscription, with Content-Type text/plain and request query containing a validation token. Microsoft Graph expects a response of status code 200 with the validation token back. If that is returned, Microsoft Graph will successfully create the subscription.

For subsequent requests, we must return a 202 Accepted response, and in the next step I parse the notification request body, so that we can look into what change we have been notified for:

Following the change notification, we can start looking into the change value. Firstly, I have added a verification of the secret client state I specified earlier, this is prevent misuse of the notification Url if that become known by others or used in the wrong context. After doing a simple test of the client state, where I do nothing if the client state don’t match, I can start building the logic behind the changes in presence status:

Inside the Switch Presence Status action, I will based on the availability status change, do a different case for each of the possible Teams Presence status values (see blog series post part 9 for explaining the different presence availability values):

Inside each of these cases I will define the light settings and colors, and after that call the Remote Hue API for setting the light. As you saw in part 8 of this blog series, in order to access the Hue API remotely I will need the following:

  • An Access Token to be included as a Bearer token in the Authorization Header
  • A username/whitelist identifier
  • The actual lightnumber to set the state for
  • A request body containing the light state, for example colors, brightness, on/off etc.

Remember, this Flow will be triggered from Microsoft Graph whenever there is a presence state change in Teams. So I need to be able to access/retreive the access token, username and for which lightnumber I created the subscription. This is how I will get it:

  • Access Token will be retreived via the Logic App I created in part 4 of the blog series.
  • Username/whitelist identifier will be retrieved via the SharePoint List i created in part 6, see below image.
  • However, I do need to store the lightnumber I will create the change notification for, and for this I will add a couple more columns in this list:

Customize the Configuration List for storing Subscription Details

I add the following two single-line-of-text columns to my List:

  • Subscribe Presence LightNumber. This will be the chosen Hue light I want to change when change notifications occur for Teams presence status.
  • Change Notification Subscription Id. This will be the Id I can refer back to when adding and removing the subscription when needed.

Customize the Flow for getting User Configuration and preparing Light States

Back to the Flow again, we need to add some actions. First, add a initialize variable action after the initialize SecretClientState action like here:

I set the type to Object and using the json function to create an empty json object. This variable will later be used for changing the light state.

Next, in the Flow after the “Parse Notification Body” action, add a “Get Items” action from SharePoint connector, and configure it to your site, list name and the following Filter Query:

My filter query:
first(body('Parse_Notification_Body')?['value'])?['subscriptionId']
will be used to find what username and light that have been set up for presence changes.

Next, lets set the variable for LigthState. Inside each of the Switch Cases, add the action Set Variable, and then set the variable to the chosen xy color code, as a json object like the following. This is for the color green:

Do the same for all of the other case, these are the values I have been using:

STATECOLORJSON VARIABLE
AwayYellowjson(‘{
“on”: true,
“bri”: 254,
“xy”: [ 0.517102, 0.474840 ],
“transitiontime”: 0
}’)
AvailableGreenjson(‘{
“on”: true,
“bri”: 254,
“xy”: [ 0.358189, 0.556853 ],
“transitiontime”: 0
}’)
AvailableIdleGreen (10% bright)json(‘{
“on”: true,
“bri”: 25,
“xy”: [ 0.358189, 0.556853 ],
“transitiontime”: 0
}’)
BusyRedjson(‘{
“on”: true,
“bri”: 254,
“xy”: [ 0.626564, 0.256591 ],
“transitiontime”: 0
}’)
BusyIdleRed (10% bright)json(‘{
“on”: true,
“bri”: 25,
“xy”: [ 0.626564, 0.256591 ],
“transitiontime”: 0
}’)
BeRightBackYellowjson(‘{
“on”: true,
“bri”: 254,
“xy”: [ 0.517102, 0.474840 ],
“transitiontime”: 0
}’)
DoNotDisturbRedjson(‘{
“on”: true,
“bri”: 254,
“xy”: [ 0.626564, 0.256591 ],
“transitiontime”: 0
}’)
OfflineGrey (10% bright)json(‘{
“on”: true,
“bri”: 25,
“xy”: [ 0.3146, 0.3303 ],
“transitiontime”: 0
}’)
PresenceUnknownWhitejson(‘{
“on”: true,
“bri”: 254,
“xy”: [ 0.3146, 0.3303 ],
“transitiontime”: 0
}’)

PS! The transitiontime is to get as close to realtime updates as possible. Add the colors similarly for rest of the states:

Get the Access Token and call Hue Remote API

Now we are ready to get the Access Token, and call the Hue Remote API with the selected light state.

First, add a HTTP action below the Switch Presence Status action, calling the Logic App previously created in part 4 of the blog series:

Next, add another HTTP request after, and this will call the Hue Remote API to set the lights:

When constructing Hue API URI above, I retreive the whitelist identifier for username with the following expression:

first(body('Get_My_Hue_User_Subscription')?['Value'])?['WhitelistIdentifier']

And then which light number with this expression:

first(body('Get_My_Hue_User_Subscription')?['Value'])?['SubscribePresenceLightNumber']

That should be the completion of this Flow. Remember to turn it on if needed. We are now ready for the last step.

Adding the Flow for Creating the Graph Subscription

In the beginning of this blog post I referred to the toggle “Sync Hue Lights with Teams” in the Power App. Now that we have prepared the Flow handling the notification Url, we need to add a new Flow that would handle the creating, or deletion, of Graph Subscriptions. As this is a toggle control, setting it to “On” should create a Graph subscription for the selected lights, and setting it to “Off” should remove that subscription again.

Create a new instant Flow with PowerApps as trigger:

Next, add an action for initialize variable for getting the UserDisplayName:

Use the following expression for getting the user display name:

triggerOutputs()['headers']['x-ms-user-name']

Next, add another initialize variable for getting the light number. After renaming the action, click on “Ask in PowerApps”:

Add another initialize variable, this time a boolean value, and for getting the value of the toggle sync control:

Next, we will retrieve our user config source from the SharePoint list again, this time filtered by the UserDisplayName variable:

We now need some logic to the next steps for the flow, lets start by the toogle button which will be either true or false:

If yes, that should mean that we either should create a new graph subscription, or update any exisiting ones.

Under Yes, add a new action. This action will call the Custom Connector I created in another blog post (https://gotoguy.blog/2020/10/24/managing-microsoft-graph-change-notifications-subscriptions-with-power-platform/). This Custom Connector should have the following actions:

Click on the Get Subscription action to add that. For the subscriptionId parameter I will refer to the first returned instance of any exisiting Graph Subscriptions I have in the SharePoint list returned earlier.

Here is the expression for your reference:

first(body('Get_My_Hue_User')?['Value'])?['ChangeNotificationSubscriptionId']

When running the Flow this action will either:

  • Return a 200 OK if the subscription is found, or if the SharePoint List has a blank value for ChangeNotificationSubscriptionId.
  • Return a 404 ResourceNotFound if the subscription is not found, this will happen if the subscription is expired. This is an error that will halt the Flow, so we need to handle it.

So lets start by getting the Status Code. I’ll do that by adding a compose action with the following expression:

outputs('Get_Graph_Subscription')['statusCode']

It’s also important to set that this action should run even if the Get Graph Subscription action fails:

Lets add another condition, where the outputs of the status code should be 200 (OK):

A status code of 200 will either indicate that either we found an existing Graph Subscription matching the configured subscription id from the SharePoint List, or that the list is blank and the Get Graph Subscription will return an empty array or any other Graph Subscriptions you might have. In the first case, we will just update the existing subscription, in the latter case we will create a new subscription. Lets start by adding another compose action:

Adding the Flow to the Hue Power App

Back in the Hue Power App, we can now link this Flow to the toggle control. With the sync toggle control selected, go to the Action menu, and then click on Power Automate. From there you should see the “Hue – Create Update Remove Graph Subscription” Flow, click to add it. On the OnChange event, add the Run parameters where the lightnumber value is read from the dropdown list and selected items lightnumber, and the toggle button value like this:

Managing Microsoft Graph Change Notifications Subscriptions with Power Platform

In a recent blog post, https://gotoguy.blog/2020/07/12/subscribing-to-teams-presence-with-graph-api-using-power-platform/, I described how you could create a subscription for change notifications for Teams Presence API. In that example, I created a subscription using Graph Explorer. As every subscription has an expiry lifetime, depending on the resource type, you need to have some management over renewing subscriptions before they expire, and re-creating if they have been expired. I also include deleting subscriptions that are no longer needed in that scenario.

In this blog post I’m going to use the Powers of Power Platform to set up this. I’m going to do this from an interactive users’ perspective, using delegated permissions. Many Microsoft Graph API resources supports application permissions, but not all especially those that are in the beta endpoint, so it makes sense for me now to concentrate on delegate permissions.

Lets get started, and as in many scenarios with Microsoft Graph, I will start by creating an App Registration in Azure AD.

Register an App for Managing Graph Subscriptions

Login to your Azure AD Portal (https://aad.portal.azure.com) and go to App Registrations to create a new.

Depending on the settings in your tenant, users can be allowed to create their own application registrations:

If your admin has set this to “No”, you will need to either be a Global Admin, or been added to one of these roles for creating app registrations:

Create the following App registration, just give a name and let the other settings be like default:

Add to the permissions so that you have the following Microsoft Graph delegated permissions:

  • Presence.Read
  • Presence.Read.All
  • User.ReadBasic.All

Note that none of these permissions require admin consent. If you later want to manage subsxcriptions to Graph resources that require admin consent, you will need assistance from your Global Admin to consent to any permissions that require this,

Next, on the Overview page, copy the Application (client) ID, you will need this for later. Next go to Certificates & Secrets, and create a new secret:

Copy this secret for later.

We will now use this app registration as our API to Microsoft Graph, using a Custom Connector in Power Platform.

Create a Custom Connector for Microsoft Graph

Initial creation and authentication

If you haven’t already, log in to flow.microsoft.com, and go to Data and Custom Connectors. The following procedure includes a lot of manual steps, if you want to import this connector and its actions from my swagger definition file, you will find a link at the end of this section.

Select to create a new Custom Connector, from blank. Give it a name, for example:

Provide an optional description, and specify graph.microsoft.com as Host:

Next, under Security, select OAuth 2.0 for Authentication and select Azure Active Directory for Identity Provider. Add the Application Id for the App Registration as Client id, and the Secret you created earlier for Client secret. Type https://graph.microsoft.com as resource, and add under Scope the permissions you added so that the user can consent to these permissions. Type each permission with a space between:

Now, click on Create Connector and verify that is has been successfully created, by now you will see that the Redirect URL field has been updated, copy this value:

Next, go back to your Azure AD App Registration, and under Authentication add a Web platform with the Redirect URI set to the copied value from the Custom Connector.

Lets verify the Custom Connector before we go to the operations. Go to 4. Test, and select to create a New connection:

Next, you will be asked to authenticate with your Azure AD user, note that you will have to consent to the permission scopes we defined for the connector:

And you should successfully have a connection to Microsoft Graph, via the Custom Connector and our App Registration:

Now, we need to add operations via 3. Definition, this where we will call the Microsoft Graph API for queries regarding creating subscriptions and more.

Define Operations for the Connector

Basically this Connector will be doing the same queries like I did by using Graph Explorer in the preceding blog post plus a few more. A pro tip is to use Graph Explorer for sample requests and response when defining operations. In the following I will set up operations for:

  • GET /users/{userUpn}/?$select=id: Get a specific user and id
  • GET /communications/presences/{userId}: Get Presence for a specific user by id
  • POST /subscriptions: Create a new subscription
  • GET /subscriptions: List all my active subscriptions
  • GET /subscriptions/{subscriptionId}: Get a specific subscription
  • PATCH /subscriptions/{subscriptionId}: Update an existing subscription to renew
  • DELETE /subscriptions/{subscriptionId}: Delete a subscription

Get a specific user and id

We will start with the first operation. Go to Definitions and add a new Action. Specify a summary and operation id:

Next under Request, click on Import from sample. Specify a GET query that has the format: https://graph.microsoft.com/v1.0/users/{userUpn}?$select=id, like this and click import:

This will interpret the request URL and recognize that userUpn is a Path parameter variable and $select is a query parameter:

Next, go over to Graph Explorer, and run the same query specifying your own user principal name, copy the response:

Back in the Custom Connector, under Response, click on the default response and click Import from sample. Paste the response you copied from Graph Explorer and click Import:

Click on Update Connector to save this action. You can now go to 4. Test. You can use the connection created earlier, and select which operation you want to test, in this case specify your Upn and to select id to be returned. Testing the operation should be successful:

With the first operation added, lets add the remaining. I will skip the screenshots in the following, just follow the same steps using the information below where I summarize the details.

Get Presence for a specific user by id

Create a new subscription

  • Action Summary: Create Subscription
  • Action Operation Id: CreateSubscription
  • Request Verb: POST
  • Request URL: https://graph.microsoft.com/beta/subscriptions
  • Request Body:
    {
    “changeType”: “updated”,
    “clientState”: “{MySecretClientState}”,
    “notificationUrl”: “{WebhookUrl}”,
    “resource”: “/communications/presences/{UserId}”,
    “expirationDateTime”: “{ExpiryDateTime}”
    }
  • Request Response: (copy example response from running this in Graph Explorer)

List all my active subscriptions

Get a specific subscription

  • Action Summary: Get Subscription
  • Action Operation Id: GetSubscription
  • Request Verb: GET
  • Request URL: https://graph.microsoft.com/beta/subscriptions/{subscriptionId}
  • Request Response: (copy example response from running this in Graph Explorer)

Update an existing subscription to renew

  • Action Summary: Update Subscription
  • Action Operation Id: UpdateSubscription
  • Request Verb: PATCH
  • Request URL: https://graph.microsoft.com/beta/subscriptions/{subscriptionId}
  • Request Body:
    { “expirationDateTime”:”2020-07-14T00:00Z” }
  • Request Response: (copy example response from running this in Graph Explorer)

Delete a subscription

Custom Connector Summary

By now you should have 7 actions defined, remember to test to verify that they work as expected:

NB! Currently I get an error when running GET /subscriptions/{id}, even though it is a correct subscription id and following offical docs: https://docs.microsoft.com/en-us/graph/api/subscription-get?view=graph-rest-beta&tabs=http. I’ll leave the action in the connector but testing it gives me an “internal storage error” both in Graph Explorer and testing with this Custom Connector.

As mentioned earlier, I’ll provide you a link to the complete swagger definition of this connector and its actions here on my GitHub repository:

github.com/JanVidarElven

The Custom Connector can now be used in Power Automate Flows and Power Apps, so in the next section I will start looking into some logic for managing subscriptions.

Choosing a Configuration Source

First we need to look into some kind of configuration source for your Subscriptions to Graph Change Notifications. Consider the following:

  • When you create a subscription, you need somewhere to store the subscription id if you want to be able to update/renew or delete an existing subscription.
  • If you want to continuously renew a subscription, you might want to set an end date for how long you want a subscription to exist.
  • You will want to store the webhook url for where to send the change notifications, and possibly being able to change that if needed.
  • You will want to store the resource/resources you want receive change notifications for and for what type of change.
  • It makes sense to store the clientstate secret so that can be re-used when creating/re-creating subscriptions.

The next question is, where should I store this configuration info? There are some options. If you have access to an Azure subscriptions, you could of course store this in an SQL Database or Cosmos DB to name a few common data stores, or maybe Azure Key Vault for some of the secret info. I want to focus on options typically available for end users though, so it makes sense to go more in the direction of Microsoft 365 services. You could use CDS, Common Data Service, part of the Power Platform and using solutions and custom entities, but that would require admin assistance in either configuring this for you, or giving your end-user permission roles to do this yourself. In addition, CDS will available for all users with access to the environment, so creating a dedicated environment should also be part of that.

In this blog post I will go for the simplest option, I will store it in a list, using SharePoint Online Lists. Another alternative could be to use Microsoft Lists. I will do this by creating a dedicated Teams, and go to the SharePoint Online teams site, and create the list from there.

So I have prepared this now, and my list now contains the following columns, subscriptionId, changeType, clientState, notificationUrl and resource all being field type single line of text, and an endDateTime wit field type of Date with Time:

This will be my configuration store for the following Flows and PowerApps that will mange my subscriptions using the Custom Connector created earlier.

Creating the PowerApp for Managing Subscriptions

My main user interface for managing Graph Subscriptions will be a PowerApp. From this PowerApp I will call actions from the Custom Connector directly, or call Power Automate Flows for where I will have more steps and logic.

Note that this PowerApp can be used to manage all sorts of Microsoft Graph Subscriptions you might have, not just for Team Presence API which is the main focus in this example but for other resources also.

Log in to make.powerapps.com to get started, and follow the general steps in the sections below.

Create a blank canvas app and main screen

Select to create a new Canvas app from blank, give it a name like below, and select format. I will use Table format because I will mainly use this from my PC:

Next in the PowerApps creator studio you can set a Theme for your app, or use your own custom colors and backgrounds. Then you can start adding controls to the canvas. In the below image I have added a custom background, my own logo, some labels for headings and some buttons I will add actions to later. I have also added an icon for later being able to manually refresh.

This main screen will list my active Graph subscriptions on the left part, this will be queried from GET https://graph.microsoft.com/beta/subscriptions. The right part will be from my configuration source, which is the SharePoint list.

It is also a good practice to name the controls using your own naming convention, this is mine for the screen above:

Add Data sources to the Main screen

Next we will start adding the data sources. Go to the View menu, select Data sources, and click “Add data”. Search for “SharePoint” and add the following data source:

Connect with your user, or create a new connection if needed:

Next paste in the SharePoint URL for the SharePoint site where you created the list earlier, and click Connect:

Choose the list:

We now have a data source we can use for this list in the PowerApp:

Next, add a new control to your app, click Insert and under Layout find the “Data table (preview)” control. This will then be placed on your canvas, and you are prompted to select a data source. This is where I select the SharePoint list:

The data table control should now be automatically configured with the fields you created in the list:

To make the data table smaller I will remove some of the fields to display, I’ll remove changeType, clientState and notificationUrl. This leaves me with the following data table which I place under the configured subscriptions part. The list is now empty, but that will be filled in later when I create subscriptions:

Now lets proceed to get the actual Graph subscriptions. Add a new data source, this time search for the name of the Custom Connector we added earlier:

Add that source and choose a connection, and the data source should be added alongside the SharePoint data source:

We will add another Data table control to the Canvas, select Insert and Data table, this time selecting the Custom Connector as data source.

The Items property for the Data table needs to be set as: (MSGraphSubscriptionConnector.GetSubscriptions()).value, which will return a data table for every registered Graph subscription. This should look like this:

After that you can configure the fields to display for the data table, I have added the id, resource and expirationDateTime fields, and placed this data table under the “My Active Graph Subscriptions” part:

I now have the data connections I need for the main screen. The next part is to add actions to the buttons, but before that I will add another screen for where to specify more details for creating a subscription.

Before you proceed, select the main screen from the Tree view and duplicate screen:

I will use this copied screen as starting point for adding the next set of controls.

Creating a Screen for adding new subscriptions

In this screen I have added controls on the left side where you can type in an user principal name, get the user id and get the presence for that user. In this way I can check that I have the correct permissions required for subscribing to change notifications for the specified user.

On the right part of the screen I have added controls for adding a new Graph subscription.

Most of the controls above is label and textbox controls. For User Id and Presence I have change the Display mode to View, and for Notification URL I have changed from single line to multi line.

The change type is a combo box, where I have added to the Items property: [“updated”,”created”,”deleted”]. The expire date time is a date picker control showing date and time in short format.

At the bottom left I have added an icon with a home symbol, and on the OnSelect event for that icon I have added a navigation back to the home screen:

Similarly, on the Home screen I have added a navigation on the “Create Subscription” button to the create subscription screen:

In the next section we will add some actions to the buttons.

Getting User Id and Presence

We will start on the left side of the screen, getting user id and presence for that user. When we created the Custom Connector earlier we created actions just for this scenario.

I will use the UpdateContext function in PowerApps to save the output of the called actions to a variable, and then use that variable for the text input property.

Select the “Get User Id” button, and type the following on the OnSelect event:
UpdateContext({UserId: MSGraphSubscriptionConnector.GetUserIdByUpn(txtUserUpn.Text)})

Like the following:

This will create/update my variable “UserId”, by calling the Custom Connector action GetUserIdByUpn using the input parameter that is the text value from the txtUserUpn text input box. When I click on this button, it will run a query against Microsoft Graph the will return a user record object where I can retreive the .id property.

Next, set the Default propery of the txtUserId text input to UserId.Id:

We can test this right away, click on Preview the App (F5), and type in an existing upn, and press the Get User Id button, it should return the id for your user. You can try several different user upn’s also:

We will do something similar on getting presence. On the OnSelect event for the “Get Presence” button:
UpdateContext({UserPresence: MSGraphSubscriptionConnector.GetPresenceForUser(txtUserId.Text)})

Then set the Default property for the Presence text input to:

When testing you should be able to get the specified users presence by user id.

I’ll add one more thing, on the right side of the screen, for the resource text input, add the following to the Default property:

This will pre-populate the resource based on the user I looked up on the left side, which will come in handy when I create the subscription later:

In the next part I will create the logic behind adding a new subscription, and this will be done using a Flow, as I will have several steps in this logic.

Creating Flow for adding new Graph Subscriptions

This Flow will be triggered from the PowerApp above, and use the Custom Connector action for adding a new Graph Subscription. In the same Flow I will also save the configuration of the subscription to my SharePoint list.

Start by going to flow.microsoft.com, select Create, Start from blank and select Instant flow. Tyoe a name for the Flow, for example “Create Graph Subscription”, and select PowerApps as trigger as shown below:

Next, add the action Initialize variable right after the PowerApps trigger. Set the name of the variable and rename the action to the same. Do this 5 times, as we need input of changeType, resource, clientState, expirationDateTime and notificationUrl. Leave the Default value blank at first.

Pro tip: Make sure that you rename the actions before you do the next step: For each variable, for value select Ask in PowerApps:

The input parameters will now be named nice and recognizable, which will make it easier when calling it from PowerApps:

Before we proceed, we need to convert the date time input from PowerApps to ISO8601 format and UTC timezone, which is expected by Graph API. Additionally subscription expiration can only be 4230 minutes in the future from creation. The thinking behind my PowerApp for adding new graph subscriptions is that the expire date time is sometime in the future including any renewals. So for now I need to create a new variable that can take todays date, add maximum of 4230 minutes, and convert it to ISO8601 UTC format.

Add a new initialize variable action. Give it the following name, set type to string and use the following expression for using now as time and adding 4230 minutes in UTC format: addMinutes(utcNow(),4230), like this:

For the next action, select the MSGraph Subscription Connector, and the Create Subscription action:

You can now add the variables as input parameters to the create subscription action, remember to use the calculated variable for graph expire date time as shown above:

The next step will be to save this configuration to the SharePoint list. Add an action called “Create item” from the SharePoint connector like below. Select the SharePoint site address and the list name for the configuration source created earlier:

Title is required for adding a list item, let’s call the Ask in PowerApps for this one also:

For subscriptionId, select the “id” output from the Create Subscription action:

For the rest of the list values, select the initial variables:

The Flow is now ready to be called. I could have added more error handling and custom response if input data is missing, but I will proceed for now with this.

Calling the Flow from PowerApps

Back in the PowerApp, select the “Add Subscription” button, and on the Action menu select “Power Automate”:

Select the “Create Graph Subscriptions” Flow, which then will be added to the PowerApp, and you are prompted to provide the parameters we defined as “Ask in PowerApps” in the Flow:

Fill in the parameters like below:

Now you can press F5 to preview the app. Type in a UPN, and click to get the User Id. On the right side, make sure that the change type is set to “updated” (if you want to subscribe to presence change) and that the resource is filled in with the correct user id. From the date picker, select any future date, we will later use this date for how long the subscription should be auto-renewed. Last, add the notification URL for the change notifications. Then click on “Add Subscription”, which now should trigger the Flow:

Visually, nothing changes in the PowerApp, so we need to look at the run history for the Flow to see if it ran successfully:

We can also look at the steps that indeed a Graph subscription was created and a list item was added to SharePoint:

While both the Graph subscription and the list has been updated, we need a way to refresh that into the PowerApp. We can use the Refresh(data source) method for the SharePoint list, but that won’t work for the Custom Connector. We will get to that later, let’s start with the SharePoint list. On the refresh icon I added for the main screen, on the OnSelect event, add the following: Refresh(‘Change Notification Subscriptions’);, like this:

If you now preview the app, and click on the refresh button, the right side of the data table should now show a SP list item that has been created (PS! if you have a dark background them, make sure that the data table control has a light background so you can see the text):

Next, for refreshing the Graph subscriptions via the connector, I will change to use a Collection and the ClearCollect method. On the refresh icon, add a new line like this: ClearCollect(GraphSubscriptions,(MSGraphSubscriptionConnector.GetSubscriptions()).value), as shown below:

Next, change the Items property for the left data table for Graph subscriptions to use this Collection:

This should now show the active Graph subscriptions like below:

Now that we have a way to manually refresh these two data tables, using the refresh icon, we can add the same logic to the “Add Subscriptions” button:

The above here in clear text, the set(wait, ..) is a nice way to add busy status to PowerApps when potential long running tasks:

Set(wait,true);
CreateGraphSubcription.Run(dropDownChangeType.SelectedText.Value,txtResource.Text,txtClientState.Text,dateExpireDateTime.SelectedDate,txtNotificationUrl.Text,(txtUserUpn.Text & " Presence"));
Refresh('Change Notification Subscriptions');
ClearCollect(GraphSubscriptions,(MSGraphSubscriptionConnector.GetSubscriptions()).value);
Set(wait,!true)

At this point we have the solution ready for creating Graph Subscriptions and refreshing that in the data tables. Next we need to create Flows for updating and deleting subscriptions.

Blog Series – Power’ing up your Home Office Lights: Part 9 – Using Microsoft Graph to get Teams Presence and show state in PowerApp.

This blog post is part of the Blog Series: Power’ing up your Home Office Lights with Power Platform. See introduction post for links to the other articles in the series:
https://gotoguy.blog/2020/12/02/blog-series—powering-up-your-home-office-lights-using-power-platform—introduction/

In this part 9 we will use Microsoft Graph to get the logged in user Teams Presence, and show that state in the PowerApp.

I have previously written another post on Teams Presence, Microsoft Graph and requirements here: Subscribing to Teams Presence with Graph API using Power Platform | GoToGuy Blog. If you want to dig deeper into that I would recommend that you read that post, but for now in this article I will show how you can get your Teams Presence into the Hue Power App.

Teams Presence is currently available in the beta endpoint of Microsoft Graph here: https://graph.microsoft.com/beta/me/presence

If you quickly want to check your own Teams Presence via the Microsoft Graph you can try the following. Just click this link that will launch in Graph Explorer: https://developer.microsoft.com/en-us/graph/graph-explorer?request=me%2Fpresence&method=GET&version=beta&GraphUrl=https://graph.microsoft.com

Just remember to consent to the Presence.Read permission as shown below:

As always when calling Microsoft Graph, we need to authenticate to Azure AD and authorize to Graph API to get an access token for quierying resources. And if we want to do that from Power Platform we need to create an app registration for that in Azure AD.

App Registration in Azure AD

This step might be dependent on if your tenant administrator has restricted the users’ right to create app registrations. If so, you will need to log into your tenant as a Global Administrator or Application Administrator, or get help from your IT admin to create the following App Registration in Azure AD.

If not, the following operations don’t require admin consent or permissions, so you can go ahead and create the App Registration. At the Azure AD Portal, go to https://aad.portal.azure.com, App Registrations and add a new like below:

Just leave the Redirect URI blank for now and click register.

Next, click on API Permissions, and click add a permission and select Microsoft Graph at the top, click on Delegated permissions, and add the Presence.Read permission as shown below:

You should now have the following permissions:

Next, go to Certificates & secrets, add a new client secret with a description, and select your chosen expiry:

Click Add and copy the secret value which will showed only this once. Save this secret for now, we will need it later. Also, go back to overview and copy the Application (Client) Id for later. We will need that as well.

There is just one thing left in this app registration, but for now we need to switch over to Power Platform for creating the Custom Connector.

Custom Connector in Power Platform for Microsoft Graph

We will now create a custom connector in Power Platform to reference this App Registration and get the Presence. Log either into make.powerapps.com, or flow.microsoft.com, for this next step.

Under the Data menu, select Custom Connectors. Select to add new connector from blank, and give it a name:

Select Continue, and on the General page, type graph.microsoft.com as host. You can also upload an icon and a description:

On the Security page, select OAuth 2.0 as type, and Azure Active Directory for Identity Provider. Client Id and Secret is the App Id and Secret from the App Registration earlier. Resource Url is https://graph.microsoft.com, and specify the scope to be Presence.Read:

After that, click on “Create Connector”, and the the “Redirect URL” will be populated:

Copy this URL and add it as a Web platform Redirect URI back in the Azure AD App Registration:

Back in the Custom Connector, go to Step 3. Definition, and click New Action. Type in a Summary “Get Presence” and Operation ID “GetPresence”, and under Request click Import from sample. Specify Get as verb, and URL to https://graph.microsoft.com/beta/me/presence, like below, and click Import:

Go to the Response section, and click on the Default response. Click on Import from sample and specify Content-Type application/json for Header response, and for Body, paste in the response you got when you tried the presence query in Graph Explorer in the beginning of this blog post:

The action should now look like this:

We can now proceed to Test. Click on Update Connector and under 4. Test click on “New connection”, and then Create:

Sign in and then accept the application to read your presence information and profile as shown below:

I can now test the GetPresence action with the signed in connection, and verify a successful response. In my case my availability just now is “Away”:

With the Custom Connector now ready, I can proceed to add this status to my PowerApp.

Customizing the Hue Power App to get Presence

Back in my Power App i created in earlier parts of this blog series, I want this icon to reflect my Teams Presence status. I will start simple by adding an OnSelect event to this icon, that will get my Presence status using the Custom Connector.

Under View menu, and Data, select to add the custom connector as a new connection to the PowerApp:

On the OnSelect event for the presence icon, I will use Set function and a variable called MyPresence, where I run the Custom connector and GetPresence operation like below:

Set(MyPresence,MSGraphPresenceConnector.GetPresence())

This is how it looks:

Holding down ALT button, I can now click on the Icon to run the OnSelect event, and after that I can go to the View menu again, then under variables I will find the MyPresence variable. When looking into that record, I can verify that I indeed have received my presence status:

The next part would be to update the color of the Icon to reflect the status. I also, for now at least want an extra label that specifies the status as a text value. Lets start by that. I add a label next to the Icon and then set the Text property to “MyPresence.availability”, as shown under:

You should now be able to change the Teams Presence and then click on the Icon in the Hue Power App to update presence status text:

From the Graph Documentation, presence resource type – Microsoft Graph beta | Microsoft Docs, the following values are possible for presence availability, and I have added the suggested colors for these statuses:

  • Away (Yellow)
  • Available (Green)
  • AvailableIdle (Green)
  • Busy (Red)
  • BusyIdle (Red)
  • BeRightBack (Yellow)
  • DoNotDisturb (Red)
  • Offline (Light Grey)
  • PresenceUnknown (White)

So what remaining is that I want to update the color of the Teams Presence Icon also to reflect the status. And for this I chose to use the Switch function, where I evaluate the MyPresence.availability variable, and have different results:

Switch( MyPresence.availability, "Away", "Result1", "Available", "Result2", "AvailableIdle", "Result3", "Busy", "Result4", "BusyIdle", "Result5", "BeRightBack", "Result6", "DoNotDisturb", "Result7", "Offline", "Result8", "PresenceUnknown", "Result9", "DefaultResult" )

I will use that Switch formula to set the Fill property of the Icon, which now is manually set to Red like this:

So after picking the colors, I end up with this formula:

Switch( MyPresence.availability, "Away", RGBA(253, 185, 19, 1), "Available", RGBA(146, 195, 83, 1), "AvailableIdle", RGBA(146, 195, 83, 1), "Busy", RGBA(196, 49, 75, 1), "BusyIdle", RGBA(196, 49, 75, 1), "BeRightBack", RGBA(253, 185, 19, 1), "DoNotDisturb", RGBA(196, 49, 75, 1), "Offline", RGBA(128, 130, 133, 1), "PresenceUnknown", RGBA(255, 255, 255, 1), RGBA(0, 0, 0, 0) )

Adding this to the Fill property of the Icon:

After this you should be able to change your Teams Presence status, and then click on the Icon to update the status in the PowerApp:

One last ting remains before I conclude this blog post, and that is that I want to update the presence status everytime I navigate to this screen in my PowerApp. I’ll just add the following line to the OnSelect event for the Control Lights button on the main screen:

Summary & Next Steps

In this blog post I have shown how you can get the Teams Presence status into the Hue Power App, and for now the status is manually updated either by clicking on the status Icon, or when navigating to the lights screen.

In the next, and last part, of this blog series, I will show how you can subscribe to Microsoft Graph changes, so that you can automatically get status updates.

Thanks for reading so far, see you in the last part 10 of this blog series!

Blog Series – Power’ing up your Home Office Lights: Part 8 – Using Power Automate Flows to Get and Set Lights State

This blog post is part of the Blog Series: Power’ing up your Home Office Lights with Power Platform. See introduction post for links to the other articles in the series:
https://gotoguy.blog/2020/12/02/blog-series—powering-up-your-home-office-lights-using-power-platform—introduction/

In Part 7 we built the main screen of the PowerApp, the topic for today is to build Flows and the PowerApp screen for controlling the Hue Lights:

If you want a quick summary of how this screen works, take a look at this video:

<YOUTUBE VIDEO PROCESSING, AVAILABLE SOON>

Building the Lights Control Screen

Start by adding another screen to the Hue PowerApp. If you have used a custom background color, logo and other graphical elements like I have you can do the same for this screen also. In addition to the label controls I’ve added for texts, I’ve added the following controls to my Hue PowerApp:

  • Small circle icons/shapes to reflect color states.
  • Toggle controls to set Light state On/Off and sync with Teams Presence On/Off.
  • Dropdown list for listing the Hue Lights.
  • Slider control for setting Brightness.
  • I’ve also added a Timer control and set it to not visible.

After adding and customizing the controls and named your controls after your chosen naming convention, your Hue PowerApp might look like the following:

Now we need to create a couple of Flows (as of today these are names Cloud Flows) for getting and setting Light State.

Creating Flow for Getting Lights and State

Create a new Instant Flow with PowerApps as Trigger. Name the Flow “Hue – Get Lights and State”. First add a Compose action, name the action “Access Token and User Name”, and select Ask in PowerApps under Dynamic Content:

Next, add a Parse JSON action below:

You can use the following schema:

{
    "type": "object",
    "properties": {
        "access_token": {
            "type": "string"
        },
        "username": {
            "type": "string"
        }
    }
}

We are now ready to query for the Lights for my Hue Remote API. But first it is helpful to understand a little about how the Hue Remote API returns lights. Earlier this year I published this blog post about exploring the Hue Remote API using Postman: Remote Authentication and Controlling Philips Hue API using Postman | GoToGuy Blog. For example when I query for all lights, https://api.meethue.com/bridge/{{username}}/lights/, I get a response similar to this:

The special thing to note here is that Hue returns every light as a named object identified by a light number. This is not an Array, so you cannot loop through that as you would expect. So I needed to think a little different in my solution.

I decided to create my own Array, and get the Lights one-by-one. For this I needed to start at light number “1”, and then do until some maximum value. I have currently 13 lights, so I created a variable for “13”. It makes it a little static, but at least it works with as little hassle as possible.

First add an Initialize variable action, of type Array and name arrayLights, and using the expression json('[]') as an empty json array as value:

Next, add two more Initialize variables actions, both of type Integer and named LightNumber with value 1, and NumberOfLights with value 13 (or whatever number of lights you have!).

Now, add a “Do until” action, setting LightNumber is greater than NumberOfLights as loop control:

Inside the Do until-loop, add a HTTP action, where we will run a GET query against the https://api.meethue.com/bridge/<whitelist identifer>/lights/<lightnumber>, using the access_token as a Bearer token in the Authorization Header:

This will return the first light state. Add a Append to array variable action, selecting the “arrayLights”, and adding the value like following:

This will add the Light number, the name of the Light source (body('Get_Light')?['name']) and if state on is true or false (body('Get_Light')?['state/on']).

Next action is to add an Increment variable action to increase the LightNumber by 1:

And last, outside the Do until, add a Response action so that we can return the data to the PowerApp. The important part here is to specify status code 200 and content-type application/json, and return the arrayLights variable as shown below:

Getting the Lights and State to the PowerApp

Now that we have to Flow for getting Lights and State, we can get that data into the PowerApp. Back in the PowerApp, select the Button control in the Main Screen with the name Control Lights. Click on the Action menu, and Power Automate to link the “Hue – Get Lights” and State Flow, and add the following lines to the OnSelect event:

Navigate(screenPresenceLights);
Set(wait,true);
ClearCollect(MyHueLights,'Hue-GetLightsandState'.Run(JSON(HueResponse)));
Set(wait,!true)

To explain, the Navigate(<screen>), is for changing to the other screen of course. I also use the Set(wait,true) and Set(wait,!true) on either side of the Flow run to make the PowerApp appear busy. And then, I save all the Lights and State back from the response from the Flow to a Collection, using ClearCollect and the Collection name “MyHueLights”. The Flow run expects that I supply the access_token and username, which I already has as a record variable in the shape of “HueResponse”. So, I’ll just add a JSON(..) function around that.

We can test. Hold down the “ALT” on your keyboard, and click on the “Control Lights” button. After this, go to the View menu and select Collections. You should see the “MyHueLights” collection, and a preview of the first 5 items:

Now we can get that data in to the PowerApp controls. Select the Drop Down list control, and set the Items property to “MyHueLights” and the Value to “Name”:

This should fill the Drop Down with Light names. Next, for the Drop Down list OnChange event, add the following:

Set(SelectedLight,(ddlMyLights.SelectedText));
Set(CheckStatus,false);
If(SelectedLight.State="True",Set(CheckStatus,true);Set(LightState,true),
Set(CheckStatus,true);Set(LightState,false)
)

So in the above expression for the OnChange event, I set a variable “SelectedLight” to the selected text from the Drop Down, and then I’m manipulating another variable with set “CheckStatus” and set “LightState”, depending on if the state on is true or false.

Proceeed to select the toggleLightState control, and set the Default property to the variable “LightState” and Reset property to “CheckStatus”:

We now have what we need for getting the Lights and State into the PowerApp. The next thing we need to build is to actually set Light states and colors back to the Hue Remote API.

Creating Flow for Setting Lights and State

Create a new Instant Flow with PowerApps as trigger, and name it “Hue – Set Light and State”. Start by adding the same two Compose actions as the “Hue – Get Light and State” Flow:

Next, add an Initialize variable action, with the name “Initialize LightNumber”, and select “Ask in PowerApps” under Dynamic content so that this input will be submitted from the PowerApp:

After that, add a Compose action. Name it “Body State”, and select “Ask in PowerApps” for input:

This input parameter is where we will supply the light state, colors etc.

Next add a Parse JSON action, using the outputs of the previous Body State input:

You can use the following schema:

{
    "type": "object",
    "properties": {
        "on": {
            "type": "boolean"
        },
        "xy": {
            "type": "array",
            "items": {
                "type": "number"
            }
        },
        "bri": {
            "type": "integer"
        }
    }
}

After this, add an HTTP action, using method PUT, and the address https://api.meethue.com/bridge/<whitelist identifier>/lights/<lightnumber>/state, and including the access_token as a Bearer token in the Authorization Header. For Body, construct the following JSON body:

And last, add a Response action to return status code and body to the PowerApp:

We now have a Flow in which we can call to set the light states in the PowerApp.

Control Light States from PowerApp

Lets start by turning selected Lights on and off. Select the Toggle control for Light State, and for the “OnCheck” event add the Power Automate Flow “Hue – Set Light and State” under the Action menu. For the OnCheck event add the following expression:

Set(MyLightState, "{'on':true }");
'Hue-SetLightandState'.Run(JSON(HueResponse), SelectedLight.LightNumber , MyLightState)

And for the UnCheck event:

Set(MyLightState, "{'on':false }");
'Hue-SetLightandState'.Run(JSON(HueResponse), SelectedLight.LightNumber , MyLightState)

So as you can see above, I’m using a variable named “MyLightState”, for dynamically storing the different light states I want to set and submit to the Flow. The ‘Hue-SetLightandState.Run’ takes three inputs in the form of access_token and username (via HueResponse variable), then selected LightNumber, and the MyLightState variable.

Next, lets go to the Slider control for setting Brightness. On the OnChange event, add the following expression:

Set(MyLightState, "{'bri': " & sliderBrightness.Value & " }");
'Hue-SetLightandState'.Run(JSON(HueResponse), SelectedLight.LightNumber , MyLightState)

Here I’m changing the state via the ‘bri’ value, and the sliderBrightness.Value. Btw, the Slider is set to minimum 2 and max 254, to support the values expected by the Hue API for ‘bri’.

And then finally we can set the color states for the three icons I have prepared. I have created pre-defined colors reflecting my presence status, green for available, red for busy and yellow for away.

For each of these, change the “OnSelect” event to the following:

Green (Available):

Set(MyLightState, "{'on':true, 'xy': [ 0.358189, 0.556853 ], 'bri':" & sliderBrightness.Value & " }");
 'Hue-SetLightandState'.Run(JSON(HueResponse), SelectedLight.LightNumber , MyLightState)

Red (Busy):

Set(MyLightState, "{'on':true, 'xy': [ 0.626564, 0.256591 ], 'bri':" & sliderBrightness.Value & " }");
 'Hue-SetLightandState'.Run(JSON(HueResponse), SelectedLight.LightNumber , MyLightState)

Yellow (Away):

Set(MyLightState, "{'on':true, 'xy': [ 0.517102, 0.474840 ], 'bri':" & sliderBrightness.Value & " }");
 'Hue-SetLightandState'.Run(JSON(HueResponse), SelectedLight.LightNumber , MyLightState)

A few words about the colors, this is something that could be a little difficult to get a grasp on. Hue has an explanation on the CIE color space and the “xy” resource here: Core Concepts – Philips Hue Developer Program (meethue.com).

You can also see some conversion functions here: Color Conversion Formulas RGB to XY and back – Philips Hue Developer Program (meethue.com)

Basically I’ve tested and learned. A good tip is to set the color you like using the official Hue Mobile App, and then read the state for the light.

Summary and Next Steps

The Hue PowerApp has now a working solution for getting Lights and State, as well as manually controlling colors, toggle on and off, and setting brightness.

In the next part of this blog post series, we will look into getting the presence status from Teams and show that in the Power App.

Thanks for reading!

Blog Series – Power’ing up your Home Office Lights: Part 7 – Building the PowerApp for Hue to Get Config and Link user

This blog post is part of the Blog Series: Power’ing up your Home Office Lights with Power Platform. See introduction post for links to the other articles in the series:
https://gotoguy.blog/2020/12/02/blog-series—powering-up-your-home-office-lights-using-power-platform—introduction/

With the Power Automate Flows we’ve built in the previous parts, we should now be able to get the Link and Whitelist the user and get the Hue Bridge Configuration details. It is time to build the main screen of the “Hue PowerApp”!

Here is a short video where I talk about the basics of the main screen of the PowerApp we are going to build:

Building the PowerApp and Main Screen

In my solution I wanted to build a canvas app with a phone layout, to be able to use it when on my mobile as well. Start by logging in to make.powerapps.com, and creating a new app from Blank, and either phone or tablet layout by your preference:

This next step is up to your preference and personal choice, but what I did was the following:

  • Added a custom background color from your palette (if you have a branding profile) or you could choose one of the built-in themes:
  • Add a Header logo
  • Add elements like frames and icons. I often use a Label control and set the border for it to create a frame like figure.
  • Add label controls for your text and placeholders for where you will update values later. Set font colors for labels and labels where you will have values.
  • Add some Images for where you want to add an action to the OnSelect event.
  • Add Button controls or Icons for navigating between screens.
  • Use a naming convenvtion for your controls.

In the end, adding and formatting all controls, and before I add any data to the PowerApp, my Hue PowerApp ends up like this:

I’ve uploaded Images for the Authorization and Linking, for your convenience I’ve attached those here:

After finishing the PowerApp main screen design, we can proceed to adding actions and getting data.

Connecting the PowerApp to Power Automate Flows

Start by selecting the Refresh Icon, on the Action menu, click the On Select button to change to the OnSelect event, and click the Power Automate button:

Under Data, select to associate the “Hue – Get Access Token and Config” Flow:

This will start populating the OnSelect event field, which you would edit so that you use the “Se”t function and save the response from calling the Flow in the variable HueResponse like this: Set(HueResponse,'Hue-GetAccessTokenandConfig'.Run())

Lets test this action. Before this I have removed my user from the Microsoft List “Elven Hue Users”, this list is empty now:

Hold down the “ALT” button on your keyboard, and click on the Refresh icon. The Flow will now run, you will see the small dots flying over the screen, but you won’t see any data yet. But you can check the contents of the “HueResponse” variable. Do this by going to the View menu, and click on the “Variables” button. From there you should see the HueResponse variable, it is of type “Record” and you can click on that Record icon:

You should now see something like the following values, if I hadn’t deleted the username from my List earlier I would see values for all these fields:

If I compare this with the response output from the Flow I triggered with the refresh icon above, I can see that the output really reflects the contents of the “HueResponse” variable:

Lets add these values to the labels I prepared in the PowerApp.

For the label containing the Hue name value, add the following to the Text property: If(HueResponse.access_token="","Hue not Connected!",If(HueResponse.username="","Connection to Hue OK, but User not linked!",HueResponse.name))

This should return something like this:

Proceed to add the following to the Text property for each of the remaining configuration value labels:

HueResponse.ipaddress
HueResponse.apiversion
HueResponse.internet
HueResponse.remoteaccess
HueResponse.devicetype

They won’t show any value in the PowerApp yet though. First we need to get the user registered at the Hue Remote API, which is the next step. Select the following image:

On the Action menu, for the OnSelect event, add the Power Automate Flow for Link and Whitelist User. Change the OnSelect event so that also this is using “Set” function and taking the response from the Flow to the same HueResponse variable, but you also need to supply an input to this flow. For this we will use the HueResponse.access_token, so your OnSelect event should look like this:

Set(HueResponse, 'Hue-LinkandWhitelistUser'.Run(HueResponse.access_token))

Lets test this button. Hold down “ALT” on your keyboard, and click on the image. The Flow should now run, register a user at Hue Remote API, create a new List item and return the configuration to the PowerApp:

Checking the HueResponse record variable now:

A couple of more things remain on the main screen. First, on the App’s OnStart event, add the same event as the refresh icon, this would get the config automatically at start:

Next, select this Image:

On the OnSelect event, add the following:

Launch("https://api.meethue.com/oauth2/auth?clientid=<your_client_id>&response_type=code&state=<youranystring>&appid=<your_app_id>&deviceid=<your_device_id>&devicename=<your device name>")

Replace the <your_…> values with the client id and app id from the Hue Remote API app registration, and your values for device id and name.

Clicking this image will now launch the Hue Developers portal, asking you to Grant permission to the App, and return to the Logic App that retrieves the Bearer Token and store that in the Key Vault as we have seen in previous parts of this blog series.

Summary and Next Steps

We’ve now built the foundation and first part of the PowerApp to retreive the configuration, create and link username, and if needed authorizing and getting a new Bearer Token via Hue Remote API if needed.

In the next part we will build the screen for getting lights and setting lights state and color.

Thanks for reading, see you in the next part!

Blog Series – Power’ing up your Home Office Lights: Part 6 – Using Power Automate Flow to Link Button and Whitelist user

This blog post is part of the Blog Series: Power’ing up your Home Office Lights with Power Platform. See introduction post for links to the other articles in the series:
https://gotoguy.blog/2020/12/02/blog-series—powering-up-your-home-office-lights-using-power-platform—introduction/

In the previous part 5 we created the first Power Automate Flow of the solution, for retreiving the Access Token and getting the configuration of the Hue Bridge via Remote API. To get all the configuration details of the Bridge, we were dependent on that the user had a Whitelist Identifier in the Microsoft List, and this is the Flow we will be working on in this blog post.

Lets do a quick video where I talk about this Flow and what it does:

Create the Flow for Linking and Whitelisting User

Create a new instant Flow, with PowerApps as Trigger. In my case I have named this Flow “Hue – Link and Whitelist User”.

As the first action in the Flow after the PowerApps trigger, add a Compose action:

Tips: Make sure that you set a name for the action, in my case I’ve named it “Access Token”, before you under Dynamic content selects “Ask in PowerApps”. This way the Input parameter will get a more descriptive name like “AccessToken_Inputs”, when we later call the Flow from the PowerApp.

Next, add two Initialize variable actions, called UserDisplayName and UserEmail and type String. For values use the following custom expressions (see comment for expression):

Next, add a Get Items action from SharePoint, and specify your Site and List. For Filter Query, add Title eq ‘<UserDisplayName variable>’:

Add a Condition action, where we will check if the Get Items returns an empty result to be false:

If false, meaning that the user already have a configuration in the List, under “If yes”, add a Get Item action. Specify the Site and List Name, and for Id add the following expression to return the first instance of results first(body('Check_if_User_Already_Linked')?['Value'])?['Id'] :

Next, add a HTTP action where we will query the Hue Remote API for the Bridge configuration details. Specify the URI to be https://api.meethue.com/bridge/<whitelist identifier>/config, and add an Authorization Header with Bearer <Token Outputs>:

This action should return all the details we want from the Hue Bridge, and we can add a Response action to return that back to the PowerApp:

In the other case, when a User Linked was not found in the SharePoint List, we need to add that user and get the Whitelist Identifier. Under “If no”, add a HTTP action. In this action we will “remotely” push the Hue Bridge button via a PUT method. This is basically the same procedure as when you add new lights or equipments, where you need to run and press the button down. But here we do it via the API like below:

PS! Note that above I’ve used “Raw” Authentication and for Value selected Bearer “AccessToken Outputs”. This is just another option to show, I could have have used an Authorization Header instead.

After the Link Button is enabled, we can add another HTTP action, this will register the username via a POST method and a request body containing the “devicetype” value. Device type is so that you can identify the registered usernames on your bridge:

After this action, add a Parse JSON action so that we can more easliy reuse the outputs from adding the username:

For Schema, select “Generate from sample”, and paste the sample output provided by the Hue API documentation here, https://developers.meethue.com/develop/hue-api/7-configuration-api/#create-user, under 7.1.5. Sample Response.

Next, add a “Create Item” action. Specify the Site and List Name, and add the following values for List columns:

Note that for Whitelist Identifier, use the expression body('Parse_JSON')?[0]?['success/username'], this is because the output from Hue API returns an array, so the [0] is to specify the first instance.

Now, using that newly created username, we can query for the Bridge config using the “Whitelist Identifier” from above:

And lastly, add a Response action that returns this back to the PowerApp:

Verify and Test the Flow

That should complete the Flow. We will link that into a PowerApp later, but if you want to you can test the Flow by performing the Trigger action yourself. Then you need to specify a valid Access Token, and the Flow should run successfully, creating a Linked User if you haven’t already:

If you check the List a new item should now represent your user:

Summary and Next Steps

We are now ready to start working on the PowerApp, linking the Flows we have created in this and the previous blog posts. That will come in the next part!

Thanks for reading so far 🙂