Category Archives: PowerApps

Blog Series – Power’ing up your Home Office Lights: Part 5 – Using Power Automate Flow to Get Access Token and Config

This blog post is part of the Blog Series: Power’ing up your Home Office Lights with Power Platform. See introduction post for links to the other articles in the series:
https://gotoguy.blog/2020/12/02/blog-series—powering-up-your-home-office-lights-using-power-platform—introduction/

In previous parts we have built the logic for authorizing and getting Bearer Token for Hue Remote API, and storing that as a Secret in Azure Key Vault, now it’s time to move over to the user side of things. In this part we will build a Power Automate Flow that retreives the Access Token and checks if the user has been set up for configuration. Here is a short video where I walk through that Flow:

Setting up a User State & Config Source

As the PowerApp and Flows we will build are stateless, in the sense it will get data from configured variables and data connections, we need to store some user state and configuration somewhere. The Hue Remote API require that we need to register a so called “whitelist identifer”, a username to be used when sending request to the Hue Remote API, for example: https://api.meethue.com/bridge/<whitelist_identifier>/lights&nbsp;

The way I have built the solution is that the Authorization part, getting, retreiving and if needed refreshing the Bearer Token, are done in the Logic Apps layer, and common for every user that uses the Power Platform solution. On the user side of things, I want every user that share the solution to have their own whitelist identifier.

This means that first time a user use the solution, the user must register their device and retreive the username to be used as the whitelist identifier. Subsequently users will use their own identifer when calling the Hue Remote API.

So we need something set up to store this information about users’ states and configuration, and I have chosen to use a SharePoint List/Microsoft List to do this. This List has been created in a Team where the users of the solution are members.

These are the steps I have done to set it up:

  1. Created a new Team in Microsoft Teams. I’ve named my Team “Elven Hue Lights”
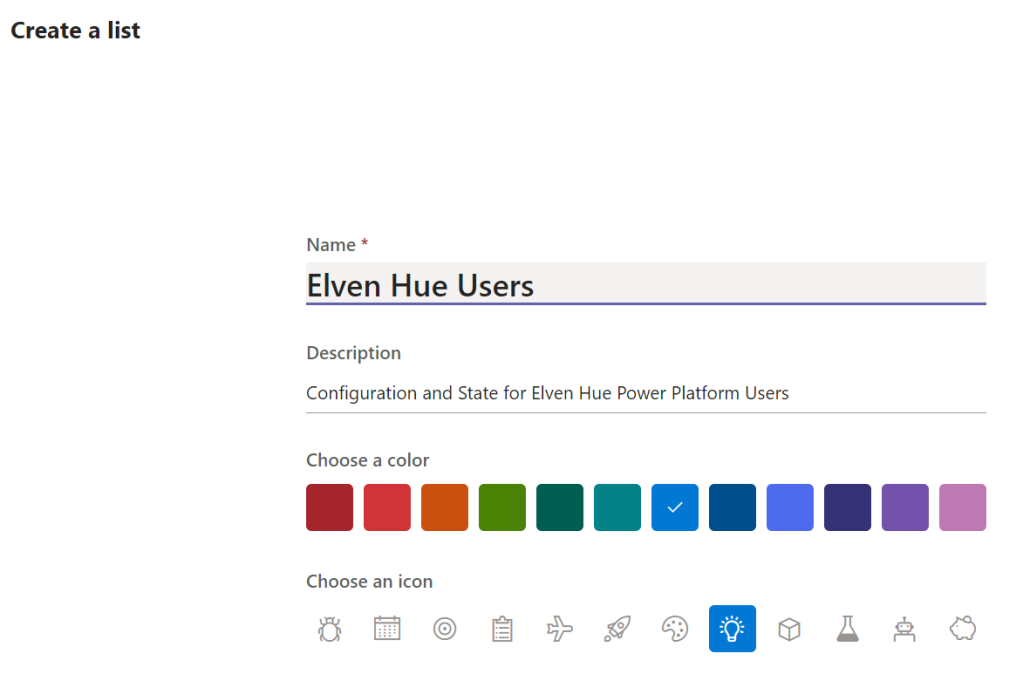
  2. Created a new SharePoint List/Microsoft List in that Team. You can either to this directly in the Team by adding Microsofts Lists to a Tab, and select to create a new List from Blank, or open Lists from the Office 365 launcher. I created a List like this:
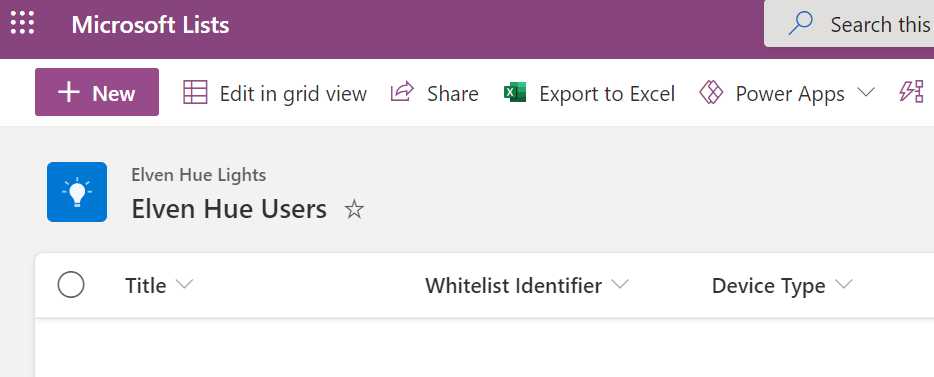
  1. Then, in addition to the Title column, add the following columns, single line of text, for storing “Whitelist Identifier” and “Device Type”:

This list will be used by the following Power Automate Flow, so that is the next step to set up.

Create the Flow for Hue Access Token and Config

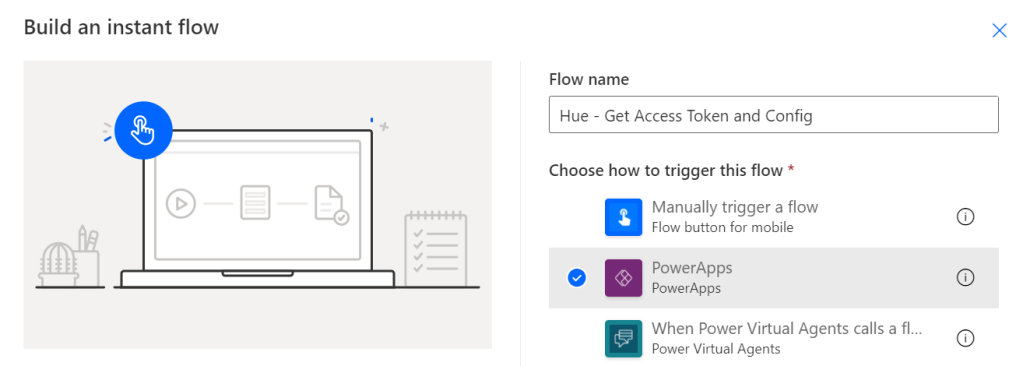
Create the following Power Automate Flow, of type Instant and using PowerApps as trigger, and using the name “Hue – Get Access Token and Config”:

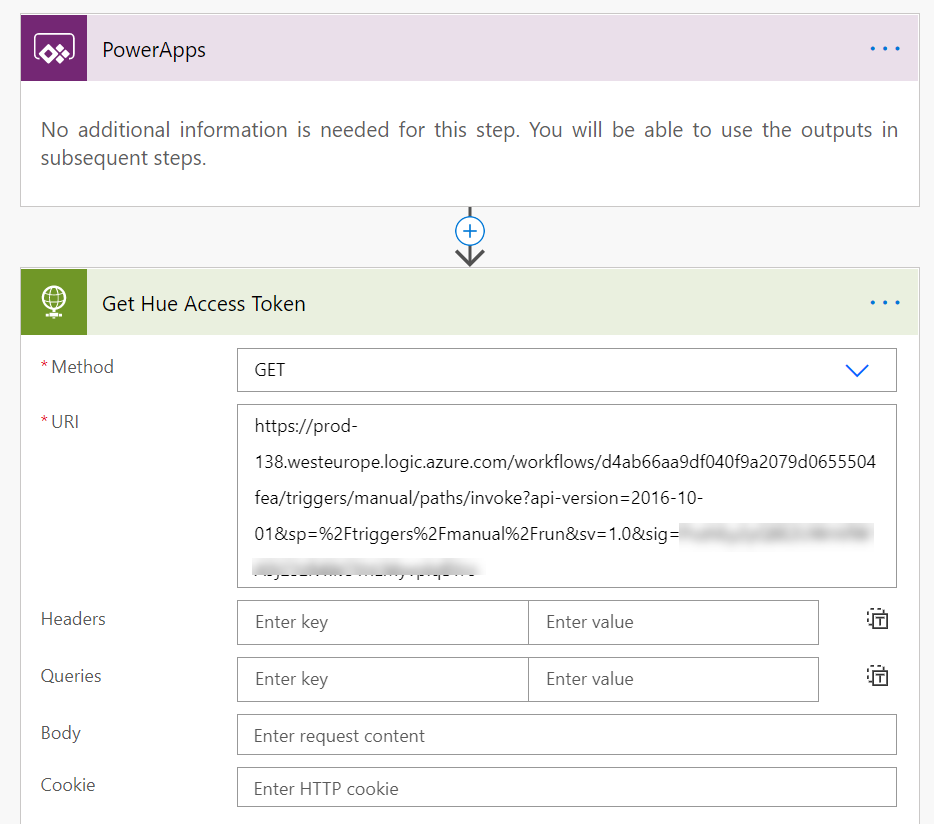
After the Trigger action for PowerApps, add a HTTP action. This action will send a GET request to the Logic App we created in the previous part “logicapp-hue-get-accesstoken”. So paste the Request Url for that Logic App in the URI field below:

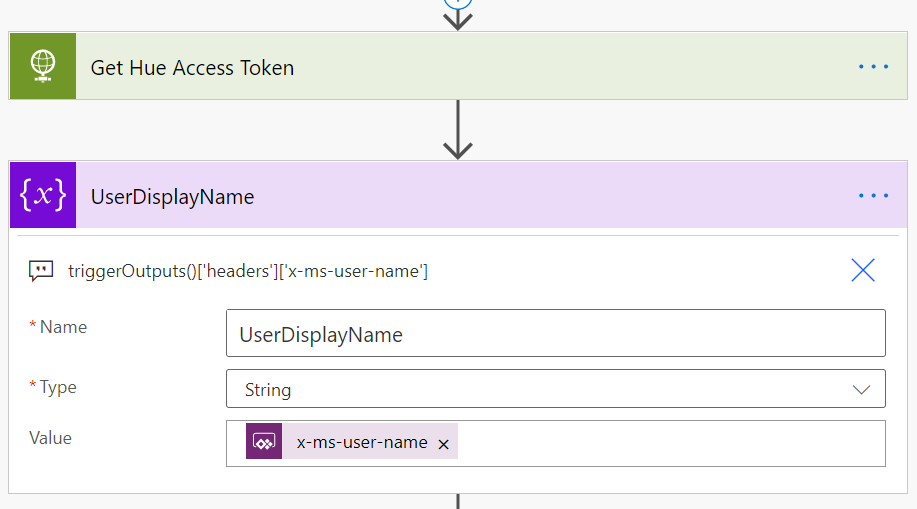
After getting the Access Token from the Logic App, add an Initialize variable to get the calling users Displayname via the triggerOutputs header and x-ms-user-name value:

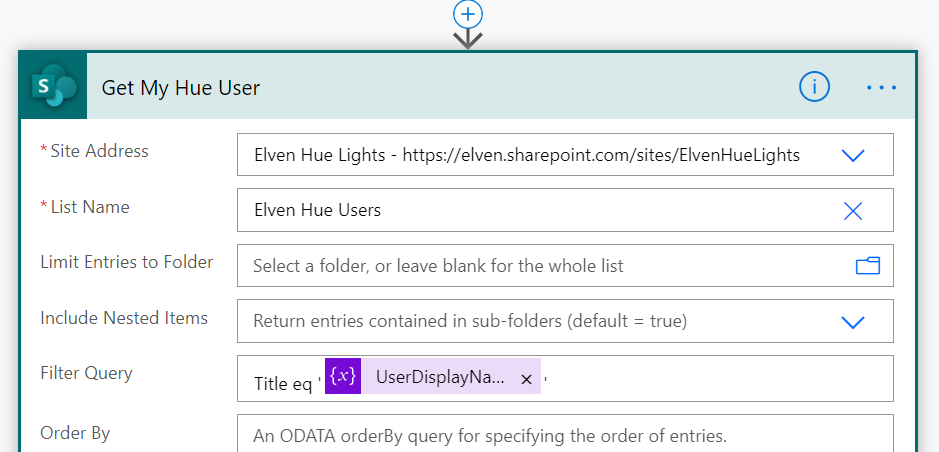
Next, add a Get Item action from SharePoint, this will retreive any items matching the User Display Name from the List we created for Hue Users. Specify the correct Site Address and List Name, and add a Filter query where Title equals the variable of the User Display Name we got in the previous step:

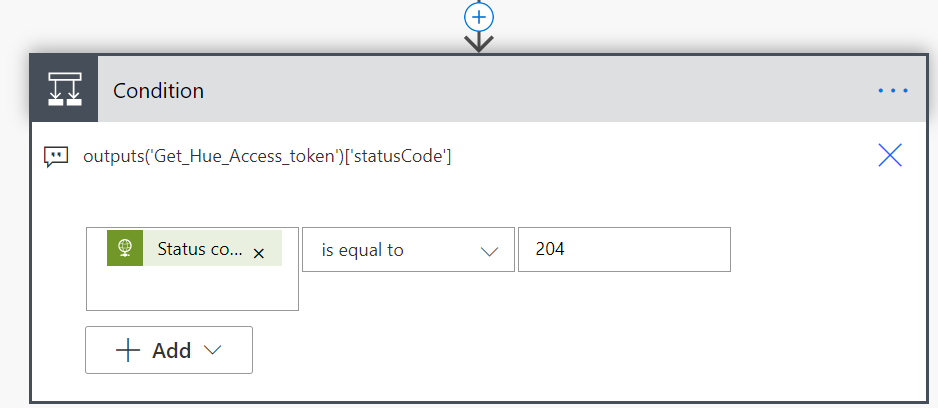
Next, add a Condition action, where we will evaluate the returned statusCode from the Logic App. This will be either 204 (No Content) or 200 (OK), as we configured back in the Logic App:

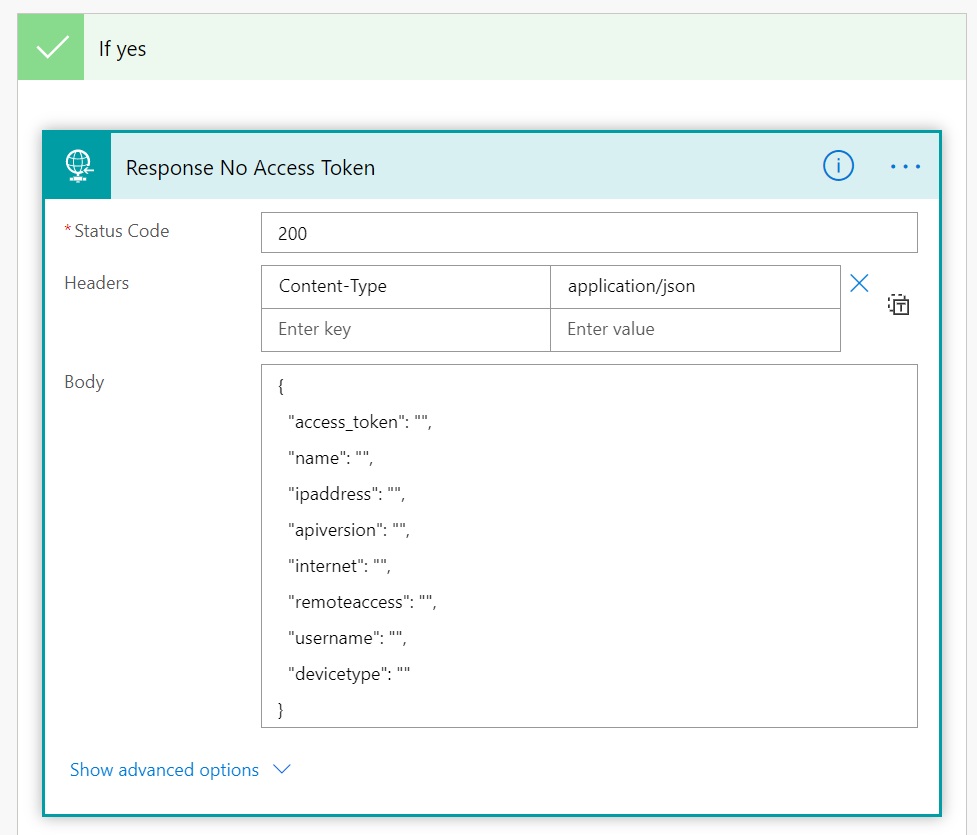
If Yes, add a Response action, this will return a JSON response object back to the PowerApp, but in this case it will be empty:

A quick comment on the above Response body, which will be clearer later in the Flow. I’ve prepared a structured response that will possibly return not only the access_token, but also the name (Hue Bridge), and the Bridge IP address, API version etc. But for now, this is empty data.

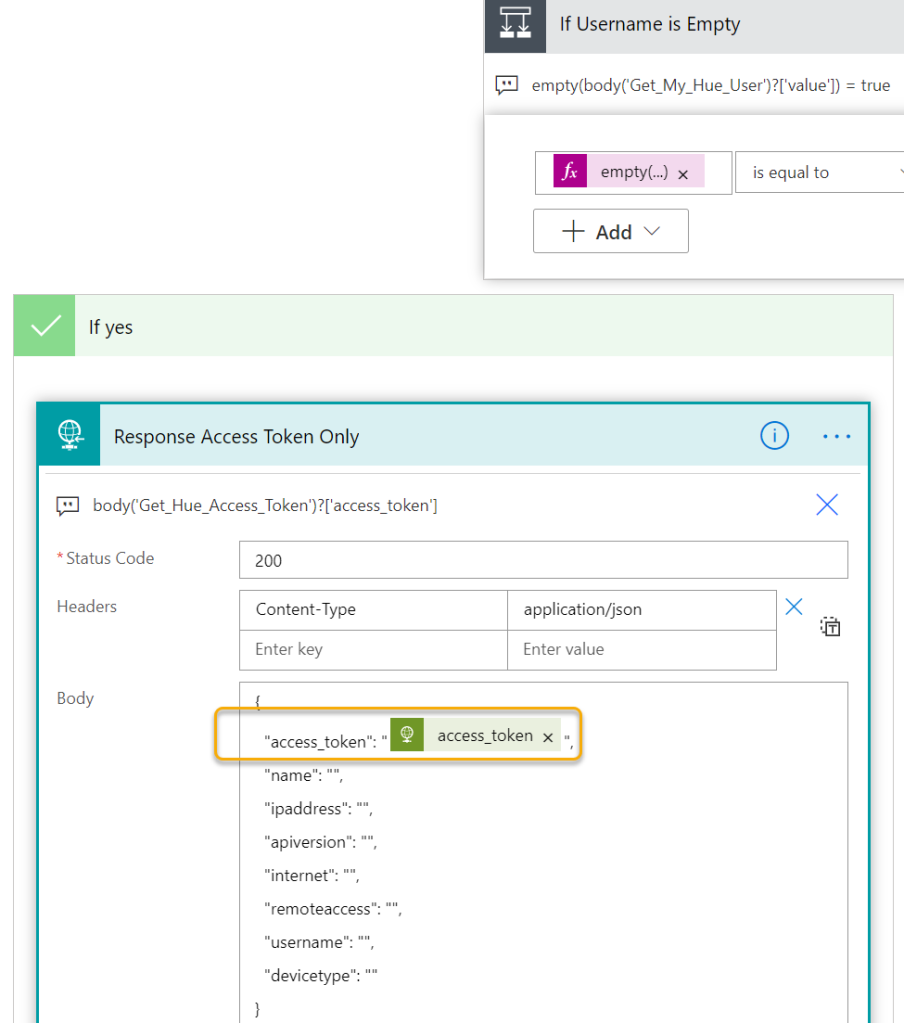
Let’s move over to the No side of the Condition. Inside “If no”, add another Condition, and name it “If Username is Empty”. This condition should apply if the Get Item action from the List returns no matching user for the display name:

I’m using an expression empty(body('Get_My_Hue_User')?['value']) and if that is equal to the expression true.

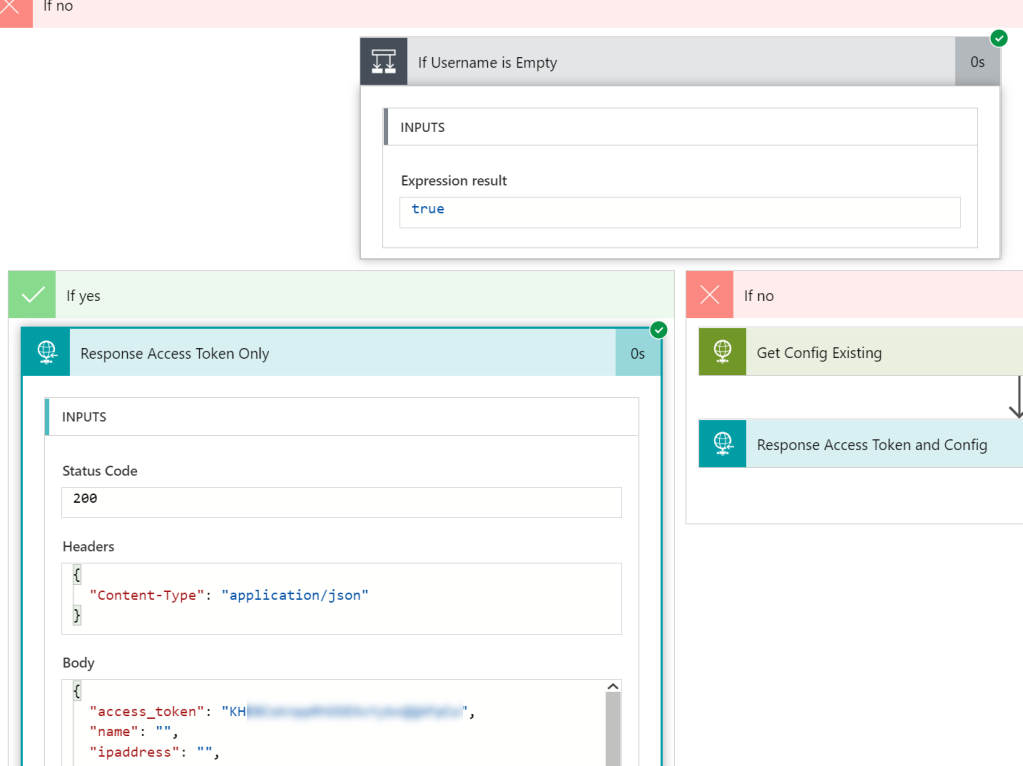
Under “If yes”, meaning that the Get Item returns empty results, add another Response action like the following:

In the above case, as we don’t have a matching user configuration stored, we can return the JSON object with only the access_token.

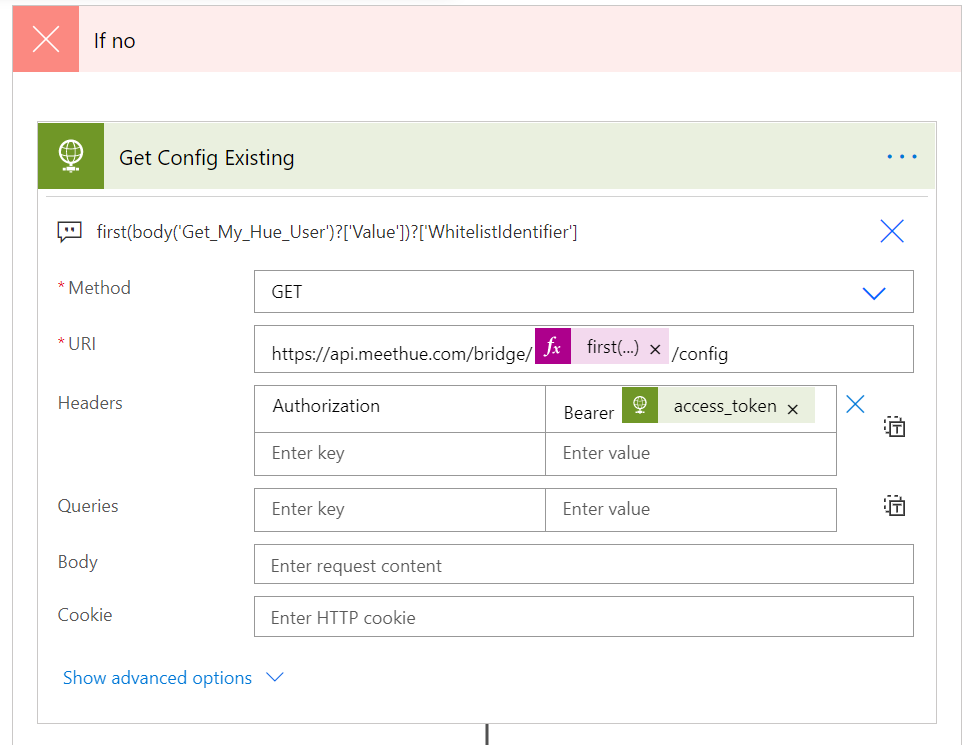
Next, under “If no”, meaning that a matching user was found in the List, add a HTTP action. This action will call the https://api.meethue.com/bridge/<whitelistidentifier>/config, getting the configuration of the Hue Bridge, and using the access_token as Bearer Token in the Authorization Header:

Note! Even though the Get Item action that is filtered for the user display name, in reality will return only one item (or empty), it is still returned as an array of results. So I’m using the expression and function “first” to return only the first item as a single item. So to get the Whitelist Identifier the expression to be used is:

first(body('Get_My_Hue_User')?['Value'])?['WhitelistIdentifier']

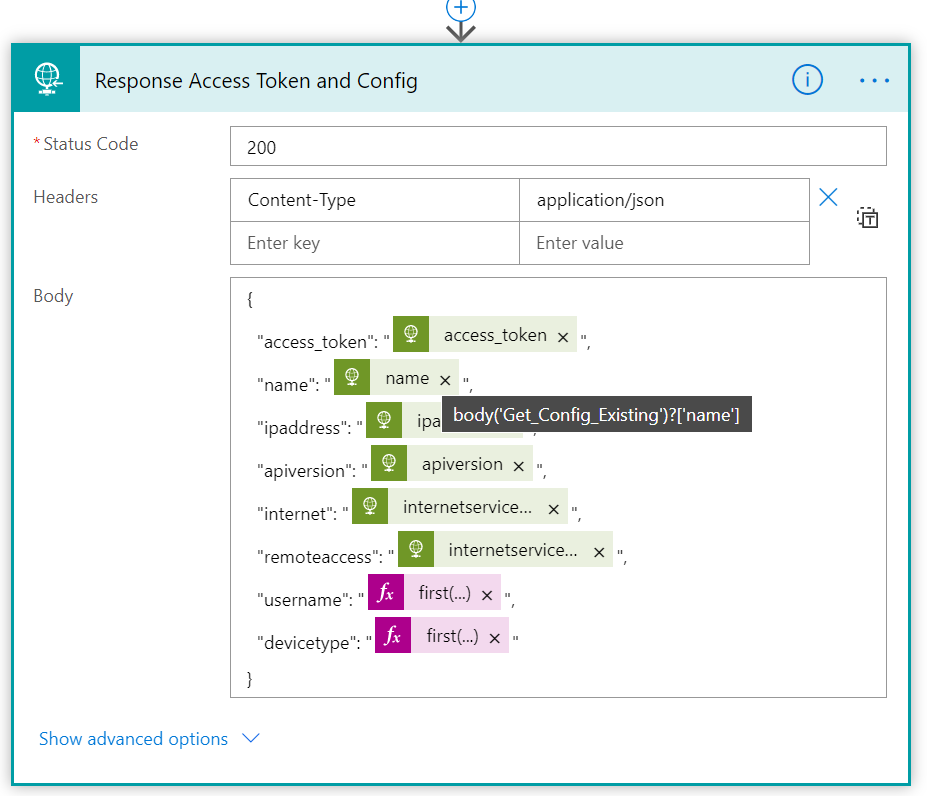
After this action, add another Response action, this time returning values for all config values in my custom JSON object:

Ok, quite a few custom expressions used above, so for your convenience I’ll list them here:

body('Get_Hue_Access_Token')?['access_token']
body('Get_Config_Existing')?['name']
body('Get_Config_Existing')?['ipaddress']
body('Get_Config_Existing')?['apiversion']
body('Get_Config_Existing')?['internetservices/internet']
body('Get_Config_Existing')?['internetservices/remoteaccess']
first(body('Get_My_Hue_User')?['Value'])?['WhitelistIdentifier']
first(body('Get_My_Hue_User')?['Value'])?['DeviceType']

That should be this Flow complete.

Test and Validate Flow

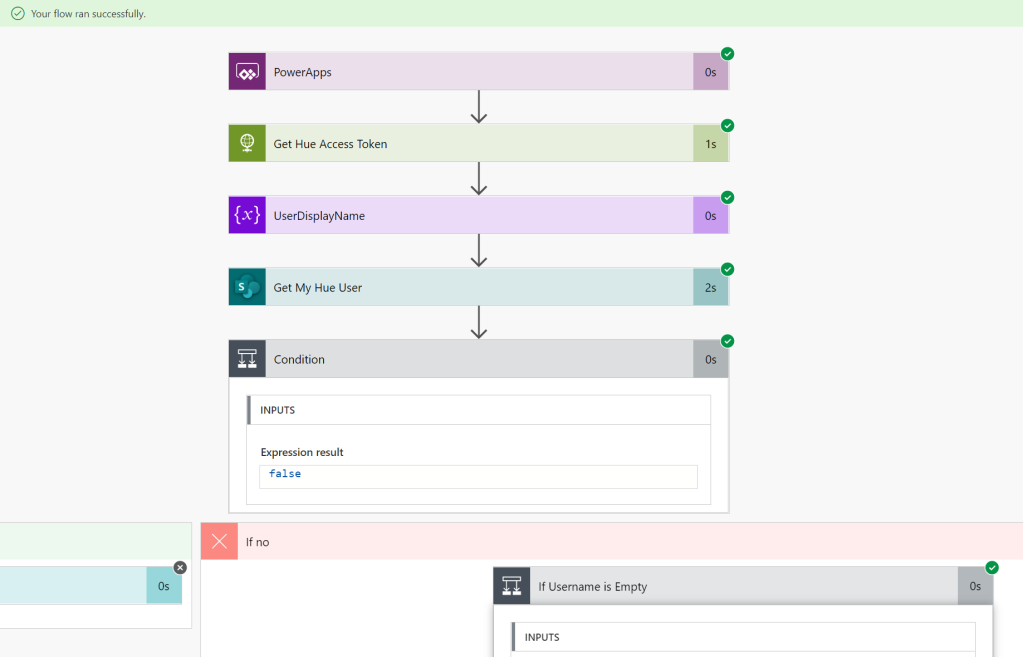
We can now validate the Flow using a simple test run. Save the Flow and click on the Test button and “I’ll perform the trigger action”. This should now complete successfully:

As expected the username should be returned as empty as we haven’t yet configured the user for Hue Remote API. So the Flow will return access_token only:

Summary and Next Steps

This Flow will be central later and used on every PowerApp launch to retrieve the access_token and configuration from the Hue Bridge. But first we need to build the Flow for linking User configuration and Whitelist Identifier. That will be in the next part!

Thanks for reading this far, see you in the next part of this blog series.

Blog Series – Power’ing up your Home Office Lights: Part 1 – Get to know your Hue Remote API and prepare for building your solution

This blog post is part of the Blog Series: Power’ing up your Home Office Lights with Power Platform. See introduction post for links to the other articles in the series:
https://gotoguy.blog/2020/12/02/blog-series—powering-up-your-home-office-lights-using-power-platform—introduction/

In this first part I wanted to introduce the requirements and preparations for automating with your Home Lights API. In my case I’m using Philips Hue, as Hue has a well developed API that also can be accessed from remote. And since I’m on the topic of automating with Power Platform, I need to be able to access the API from remote.

In principle, you could use this guide against any light system that has an API, but of course I will show all the examples and config based on Philips Hue in this blog series.

In this blog post I will show you how to set up and be ready for the next parts of this blog series. If you want to dive deeper into understanding the API and testing from remote, I would recommend you read this blog post I published earlier this year about authentication, exploring and controlling using Postman:

Remote Authentication and Controlling Philips Hue API using Postman | GoToGuy Blog

Here’s a quick video introduction to this articles topic, and below we will cover the necessary overview of how you should prepare for the next parts of the blog series:

Create a New Remote Hue API app

The first thing you need to do after you have created a Hue Developer account, is to create a new Remote Hue API app here: https://developers.meethue.com/my-apps/.

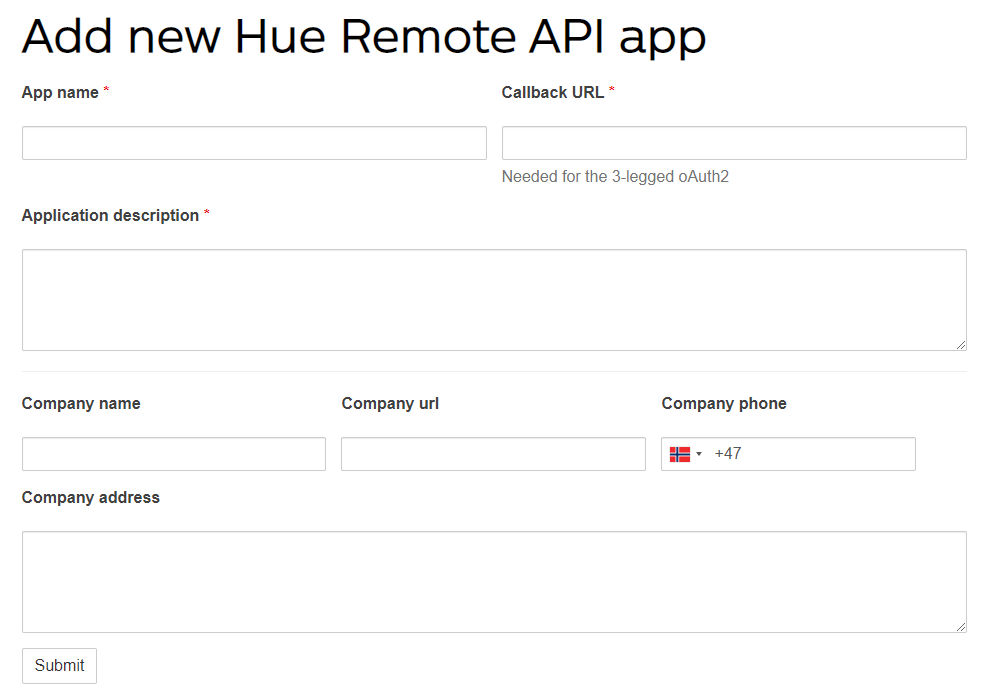
You need to specify the following required fields:

  • App name: A display name for your remote app
  • Callback URL: This is needed for the Oauth2 consent and returning an authorization code. It is here where we will specify the HTTP request URL for the Logic App we will create in Part 3 of this blog series. For now, you can just enter some dummy URL like http://localhost/mylogicapp.
  • Application description: A short description for your remote app.
  • Optionally you can specify contact details.

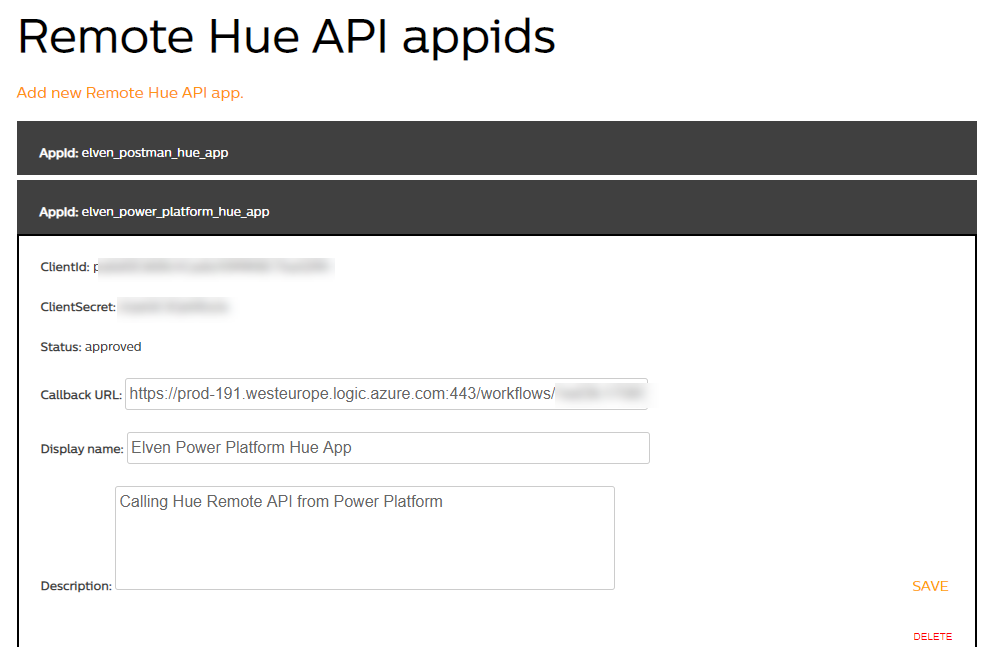
After submitting your new app is ready, and also an AppId, ClientId and ClientSecret will be provided, for example:

As you can see from above image, I’ve already configured the correct URL for my Logic App, meaning the Callback URL from above will trigger the Logic App below.

But as previously mentioned, you can now just specify something like http://localhost/mylogicapp.

Test if we can successfully get Authorization Code

As explained at Remote Authentication – Philips Hue Developer Program (meethue.com), the initial step in the authorization flow is granting permissions for the login user to the resources. This will be done using the following sample request:

GET https://api.meethue.com/oauth2/auth?clientid=<clientid>&appid=<appid>&deviceid=<deviceid>&devicename=<devicename>&state=<state>&response_type=code

Using a Demo App Registration,

ClientId: J9NckRHRPGAoYppWGtjnNJtriTOo5R4Q

AppId: elven_power_platform_demo_app

lets construct that URL, I’ve highlighted the parts you need to replace for your environment:

https://api.meethue.com/oauth2/auth?clientid=J9NckRHRPGAoYppWGtjnNJtriTOo5R4Q&appid=elven_power_platform_demo_app&deviceid=elvendemo&devicename=ElvenDemoLocal&state=anydemostring&response_type=code

Now, copy that URL, and paste it into your Browser, and hit Enter.

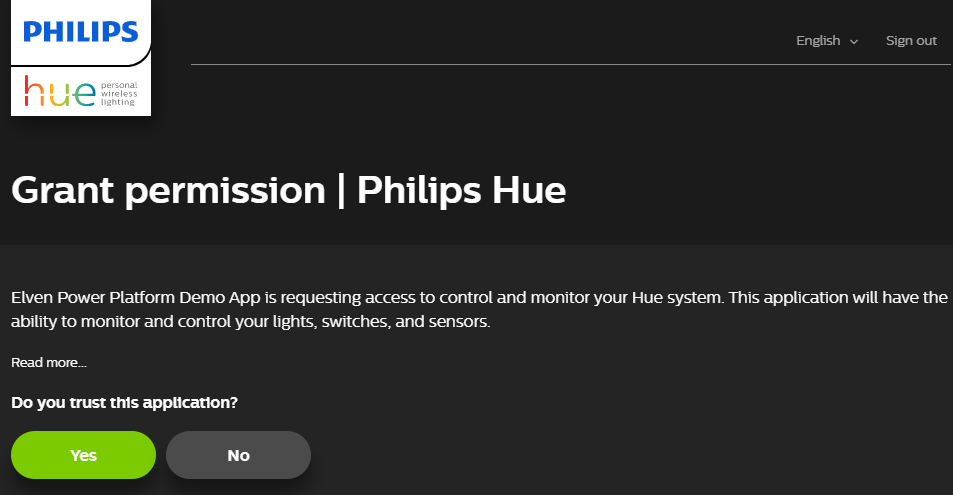
If you aren’t logged in with your Hue Developers account already, you must do so, and after that you will need to accept the following permission grant:

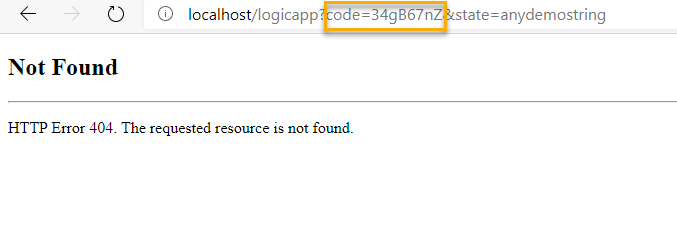
Now, if you are using localhost as the callback URL, the following response is perfectly normal:

Note the above authorization code, which is returned to the application together with the state string I supplied for verification. This Code, will together with the ClientId and Secret be used for accessing the Token endpoint and getting an Access Token. But that will come later in this series.

Summary and next steps

We have now prepared the necessary App Registration at Hue Developers portal, and laid the necessary foundations for the next steps in building the logic behind remote authentication.

If you want to explore more about authentication and access tokens, you can do that with the link in the beginning of the blog post using Postman.

Thanks for reading, hope to see you in the next part.

Blog Series – Power’ing up your Home Office Lights using Power Platform – Introduction

Microsoft Power Platform can be used in a variety of creative ways to both learn and create awesome automation solutions, and you can even use this platform for your home automation. In this series of blog posts and introductory videos I will show you how you can control your Home Office Lights (in my case Phillips Hue) via API and Power Platform components like PowerApps, Power Automate, Logic Apps and more.

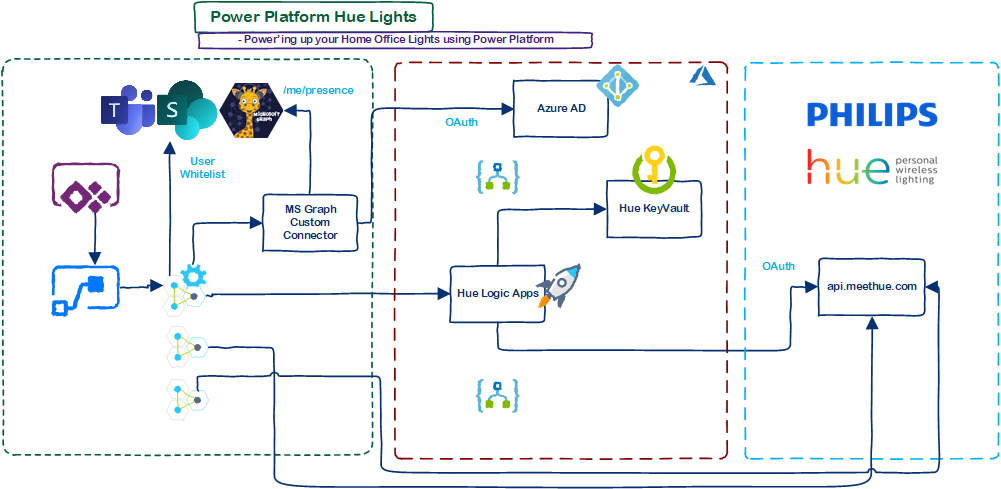
As an introduction, lets start with the “birds overview” over the solution I’ve built:

The main idea was to be able to both interactively, and triggered based on events, to be able to control my Philips Hue Lights using Power Platform components like PowerApps and Power Automate. Why you say? Well, it’s cool isn’t it! And fun, and a well worth project to invest time in because of the great learning potential. I have learnt tons of new stuff, about Power Platform, Microsoft Graph, SharePoint Lists, and Azure resources like Key Vault, Logic Apps etc. And not to forget, I’ve learnt a lot about the Hue Remote API and implementation of Oauth!

I will get into the chosen solutions and why I elected to use the technologies mentioned, and how they interact as shown in the diagram above, but first I wanted to provide you with this short introduction video from me on the concept:

This blog post is the introduction to the series of blog posts, and also a part of my contribution to the Festive Tech Calendar 2020 https://festivetechcalendar.com/. As soon as the schedule is published, I will at the allocated date later in December do a live stream broadcast where I will talk about this solution and do a Q/A where I will try to answer all your questions. But before that, I will publish the all parts of the blog series and accompanying videos as shown below. Links will become alive as soon as I have published. This way you can follow along and by the time of the live stream, you could have your own solution up and running!

The blog series will consist of the following parts, links will be available as soon as the parts are published:

  1. Power’ing up your Home Office Lights: Part 1 – Get to know your Hue Remote API and prepare for building your solution.
  2. Power’ing up your Home Office Lights: Part 2 – Prepare Azure Key Vault for storing your API secrets.
  3. Power’ing up your Home Office Lights: Part 3 – Using Logic Apps to Authorize and Get Access Token using Oauth and Hue Remote API.
  4. Power’ing up your Home Office Lights: Part 4 – Using Logic Apps to Get Access Token and Renew Access Token if needed.
  5. Power’ing up your Home Office Lights: Part 5 – Using Power Automate Flow to Get Access Token and Config.
  6. Power’ing up your Home Office Lights: Part 6 – Using Power Automate Flow to Link Button and Whitelist user.
  7. Power’ing up your Home Office Lights: Part 7 – Building the PowerApp for Hue to Get Config and Link user.
  8. Power’ing up your Home Office Lights: Part 8 – Using Power Automate Flows to Get and Set Lights State.
  9. Power’ing up your Home Office Lights: Part 9 – Using Microsoft Graph to get Teams Presence and show state in PowerApp.
  10. Power’ing up your Home Office Lights: Part 10 – Subscribe to Graph and Teams Presence to automatically set Hue Lights based on my Teams Presence!

Well, I certainly have my work cut out, so I better get started. Thanks for reading, please follow the progress and join me on the later live stream!

Exporting and Importing PowerApps and Flows Package that use a Custom Connector

Just recently I published a blog post on how to use PowerApps and Flow with a custom connector using Microsoft Graph API, to create an app for Azure AD PIM (Privileged Identity Management): https://gotoguy.blog/2018/09/15/create-your-own-azure-ad-pim-app-with-powerapps-and-flow-using-microsoft-graph/.

In this blog post I want to share some instructions and experiences on exporting the PowerApp and Flows to a package, and how you can export the Custom Connector definitions to a swagger file. After that I will show how you in a new environment can import these definitions, and import the PowerApp and Flow package.

Even better, based on the aforementioned blog post on the Azure AD PIM App, I will provide you with download links for the custom connector swagger defininiton for Microsoft Graph, as well as the PowerApp and Flows Package, so you can start from there without having to build all the stuff yourselves Smile!

Export the PowerApps Package

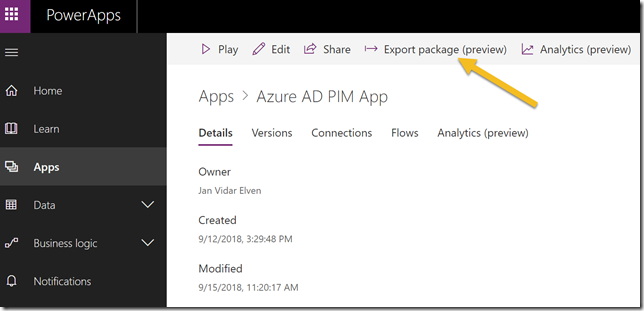
First, start in your Apps gallery of PowerApps, find the Export package (preview) button as shown below:

image

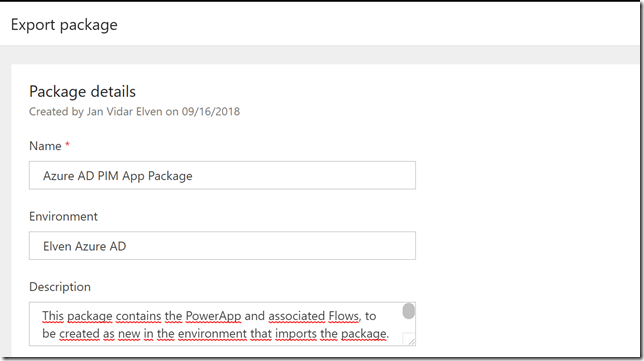
Specify a package name, environment and optionally a description as I have below:

image

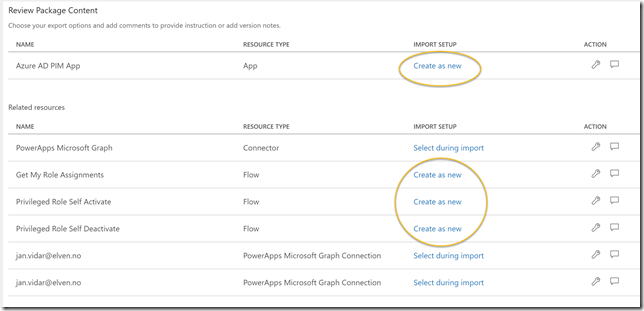
Next, review the package content. For the Azure AD PIM App, I’ll change the Import Setup to “Create as new”, the same for the 3 Flows, as shown below:

image

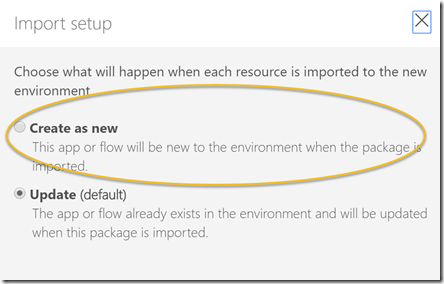
For some of the resources you can select between Create as new or Update, and as I’m planning to import this as a new App with new Flows in the environment, I’ll change this from the default.

image

The other resources (like the connector and connections) I will select during import. This means these will have to be already existing in the environment I want to import the package to.

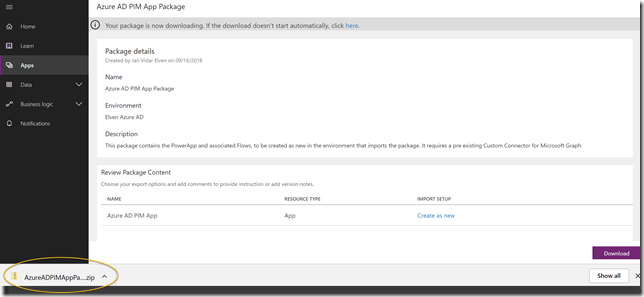
I can then download the package:

SNAGHTML9abd28

The package is downloaded as a zip file:

image

Inside the zip file there are some manifest json files and the PowerApps and Flows definitions:

image

Export the Custom Connector swagger file

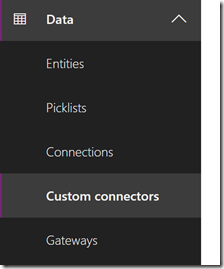
The next thing we want to do is to export the custom connector and its operations. Go to Custom connectors in the menu:

image

Find the “PowerApps Microsoft Graph” connector, and click on the down arrow as shown below. This will download a swagger definition file in JSON format:

SNAGHTMLb16f76

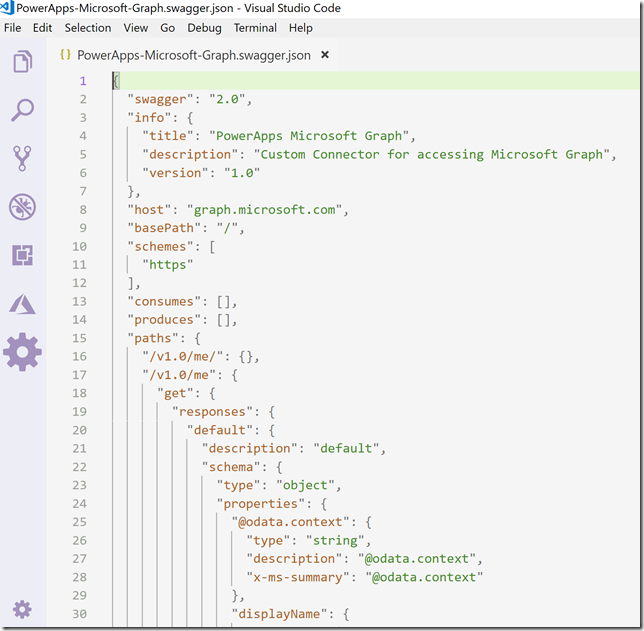
You can open and inspect that JSON file in your favorite JSON editor, here is mine shown in Visual Studio Code:

image

Community Download

Courtesy of gotoguy.blog, I’ll provide you with a download for both the PowerApps/Flows package, as well as the Custom Connector Swagger JSON file. This is helpful if you want to skip right ahead to the next Import section.

These files are placed at my GitHub, in the following repositories:

Import the Custom Connector swagger file

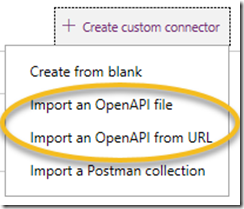
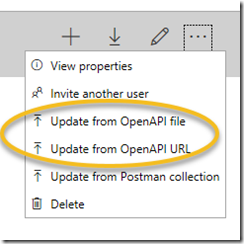
In the new/target environment we will first have to import the swagger file for the Custom Connector. Here you have 2 options:

  1. You can create a new custom connector, and Import from an OpenAPI file/URL:

    image

  2. Or, if you already have a Custom Connector for Microsoft Graph, you can select to Update the existing connector from OpenAPI file/URL:

    image

For sake of education, lets try both variants. The first time you will have to create a new custom connector anyway, but later you will only need to update if there are any changes. I will use OpenAPI URL, as the swagger file is avaiable at my GitHub here: https://raw.githubusercontent.com/skillriver/PowerAppsFlowCustomConnector/master/MicrosoftGraphApi/PowerApps-Microsoft-Graph.swagger.json

PS! Prerequisite

Remember that to be able to use a Custom Connector and Microsoft Graph, you will have to create or use an App Registration in Azure AD in your target enviroment, like I have described in this blog article, under the section “App Registration”: https://gotoguy.blog/2017/12/17/access-microsoft-graph-api-using-custom-connector-in-powerapps-and-flows/.

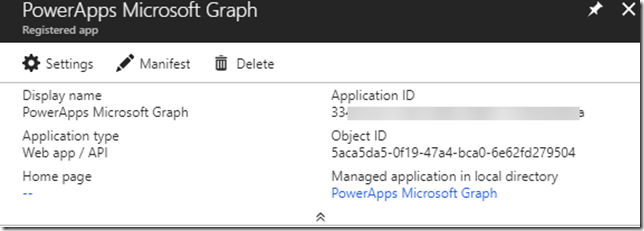
Take a note of the application ID and secret key:

image

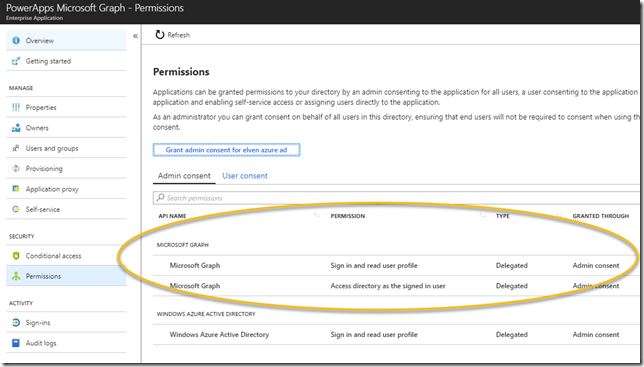
Remember also to give the App the right Microsoft Graph Permissions, and give Admin grant if needed:

image

Import from OpenAPI URL

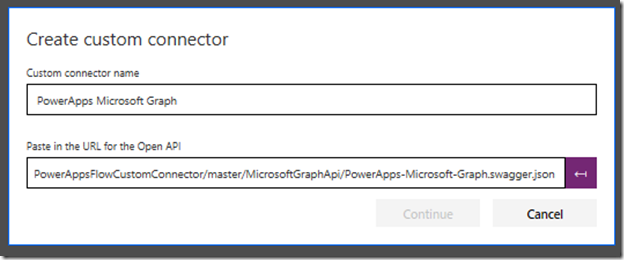
To create a new custom connector, select to import from OpenAPI URL:

  1. Type a name for the Custom connector, and paste in the URL for the swagger json file:

    image

    Verify the URL and click Continue.

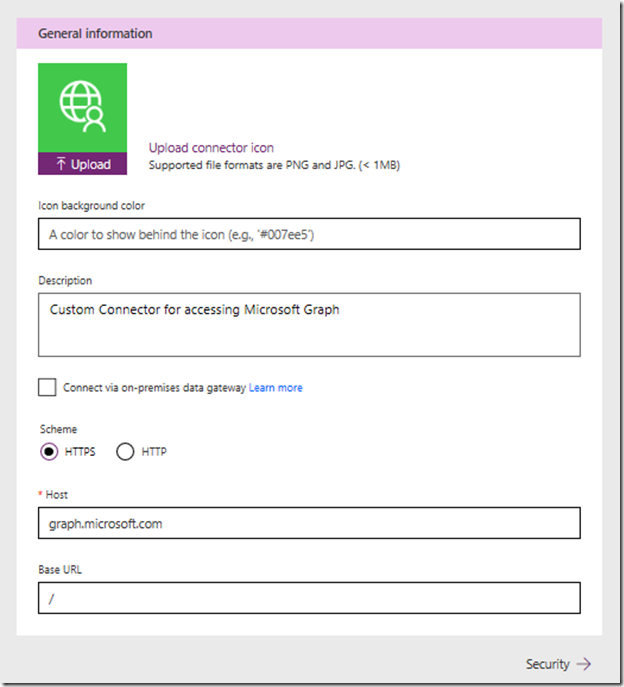
  2. Following that, verify that host is graph.microsoft.com and base URL is “/”, and optionally specify a connector icon, color and description:

    image

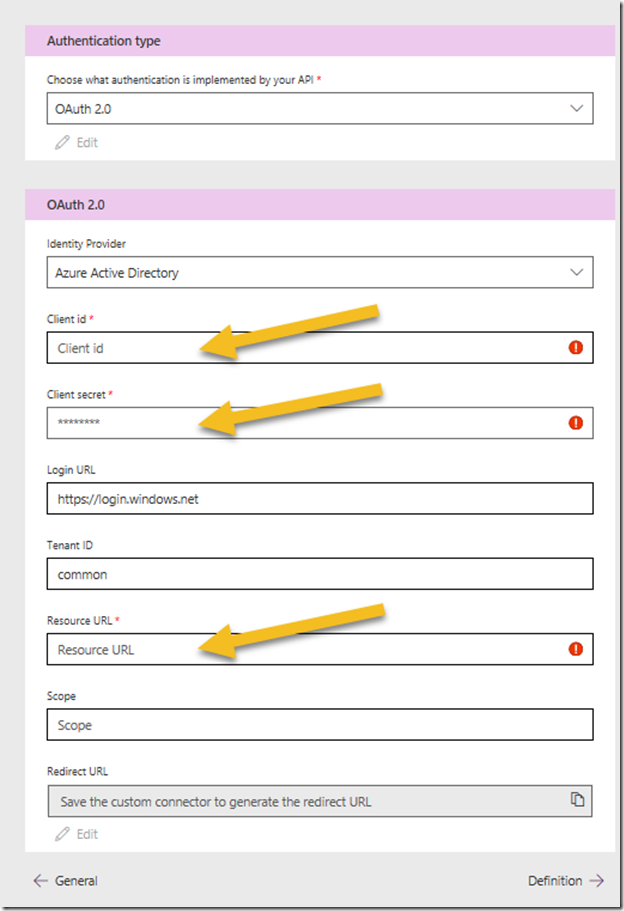
  3. On the security page you have to specify the client id which is the app id from the registered app in your target Azure AD environment, as well as client secret and resource URL:

    image
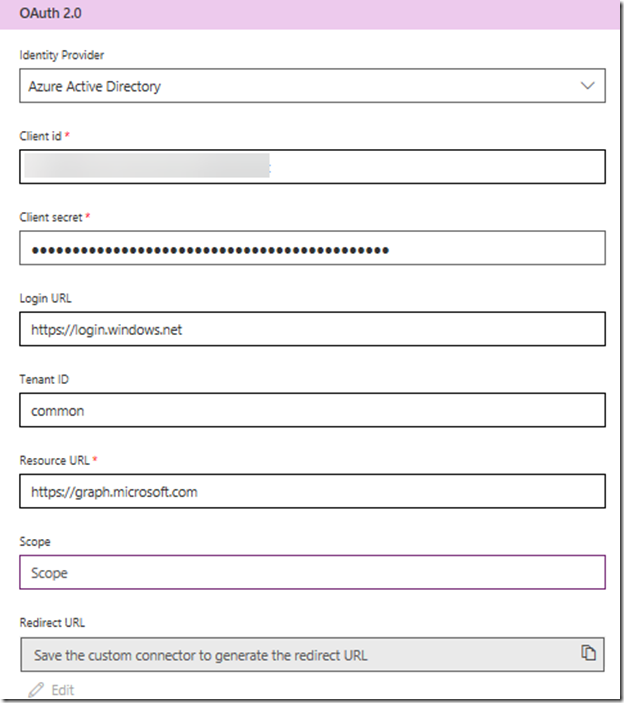
    In my target environment I have pasted in the client id, secret, and the resource URL is https://graph.microsoft.com. Note that the Redirect URL is not available before after the custom connector is saved:

    image

    Click to go to the next Definition page.

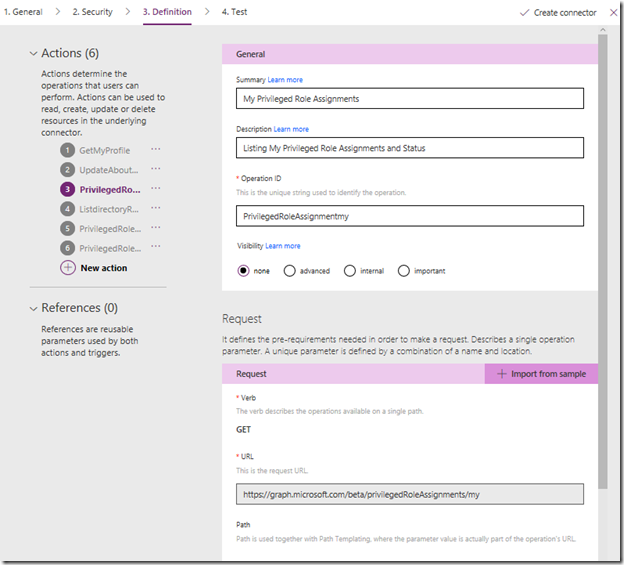
  4. At the Definition page, the actions are already in place because they were defined in the OpenAPI swagger file:

    image

    Click “Create connector”.

  5. After the Connector is created and saved, go back to Security, and copy the Redirect URL:

    image

  6. Make sure that the Redirect URL is on the list of the Reply URLs of the Azure AD App Registration:

    image

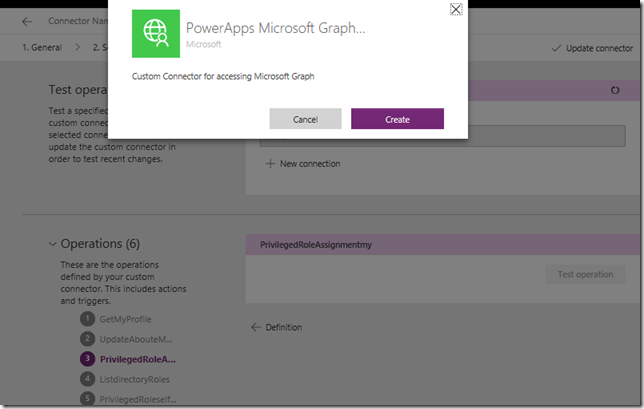
  7. Back in the Custom Connector, lets test the connector. Go to the Test page and create a connection:

    image

  8. After establishing a connection with your user account, you can go ahead and test one or more of the operations and verify that they run successfully:

    image

After testing this the custom connector is ready to use.

Update from OpenAPI URL

I you want to update an existing custom connector, select to Update from OpenAPI URL:

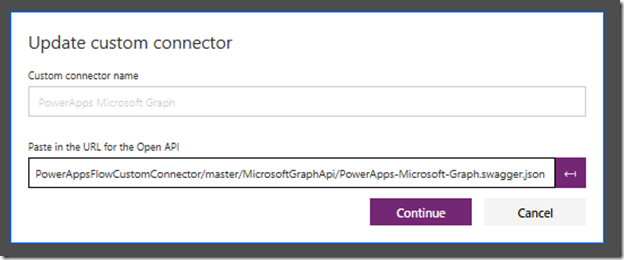
  1. Provide the URL for the swagger json file:

    image

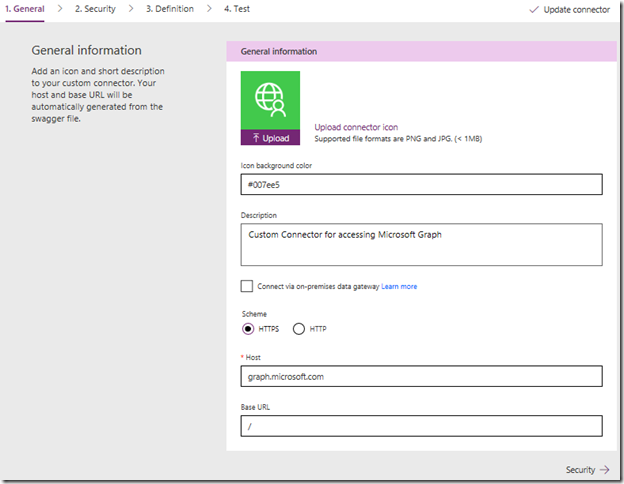
  2. As with when creating a new custom connector, verify that host is graph.microsoft.com and base URL is “/”, and optionally specify a connector icon, color and description:

    image

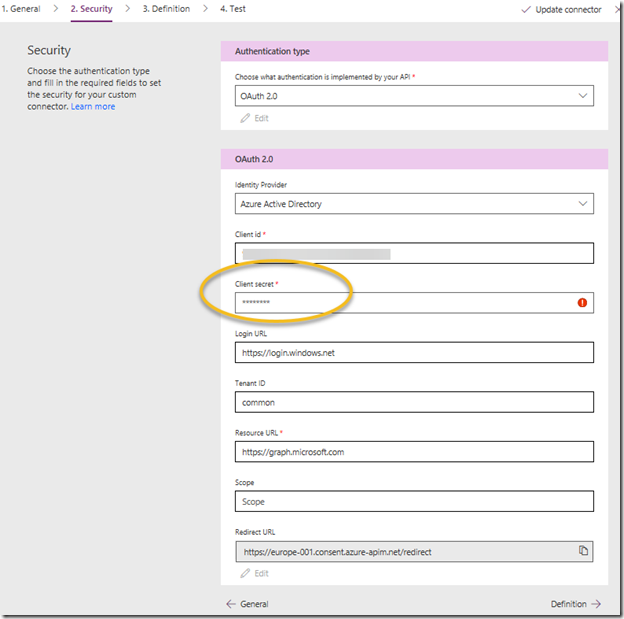
  3. When updating an existing connector, you only have to specify the client secret again:

    image

    If you don’t have the original secret stored securely somewhere, you have to go to the App Registration in Azure AD and generate a new one.

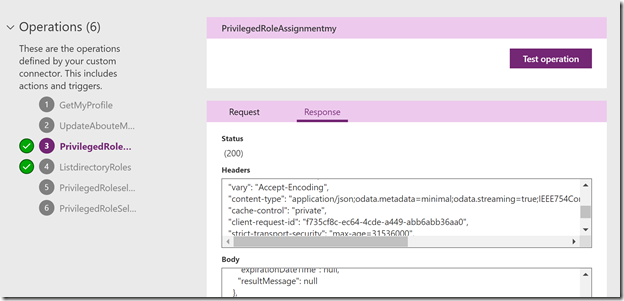
  4. Verify that the Operations now has been updated from the imported OpenAPI swagger json file:

    image

    Click Update Connector to save the changes.

  5. After this, go to Test, and either use an existing connection or create a new, and the Test some of the operations to verify:

    image

Now we are ready import the PowerApp and the Flows that will use this custom connector.

Import the PowerApps and Flows Package

We can now import the package we exported earlier, or if you want to use the community download from my GitHub repository, make sure that you download the zip package before this next step.

Start by selecting Import package (preview) from the PowerApps menu:

image

Then browse to the zip packaged to start uploading:

image

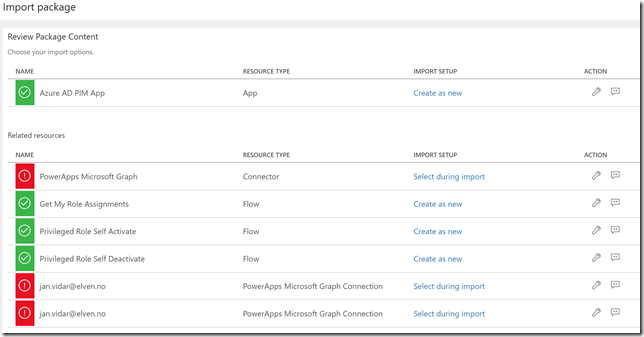
When the upload is complete, we can review the package content. We have to select during import the connector and connections, marked as red under here:

image

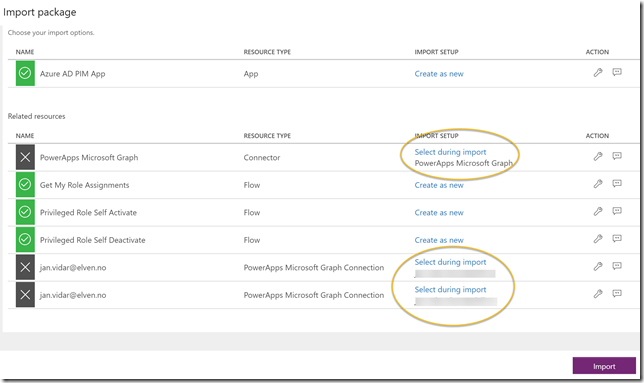
After selecting the custom connector, and changing the connections to the target environment, we are ready to Import:

image

Note that you also can change the name of the PowerApp and Flows by clicking on the wrench symbol.

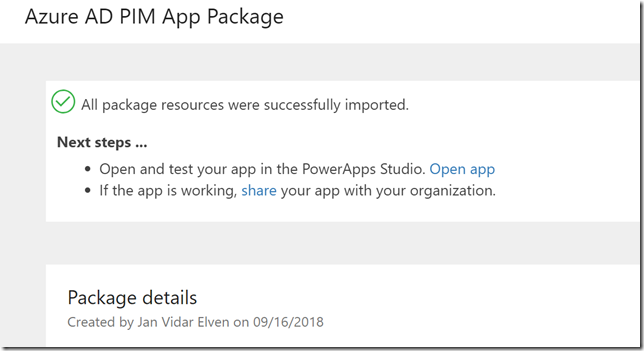
Click Import when you are ready, and verify that the import is successful:

image

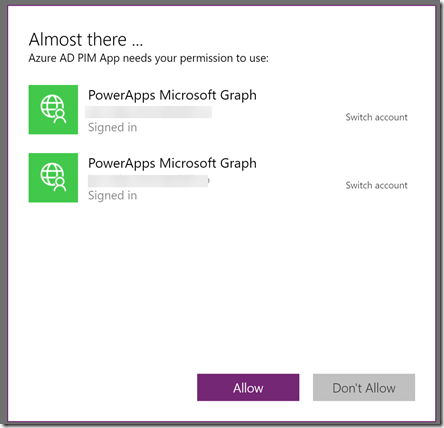
You can now proceed to open the app for customizations and testing. If prompted, click to Allow the permission request:

image

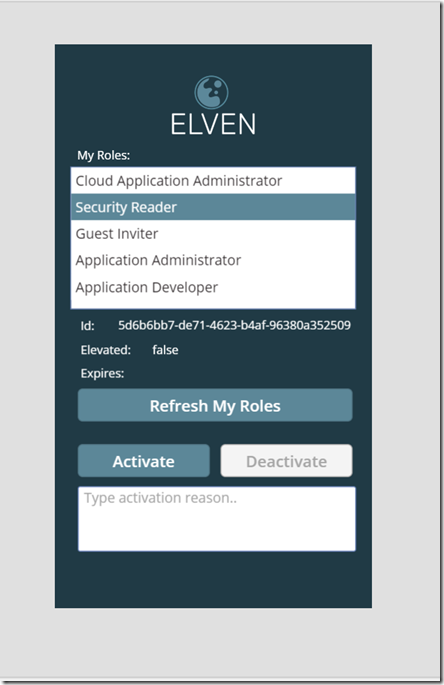
After opening the Azure AD PIM App, now in the target environment, hold down the ALT key and click Refresh My Roles to test. And you should get the logged on users roles:

image

Obviously, now in the target environment, you would probably start to customize the logo, colors, label texts and language, if you don’t want to proceed with the “Elven” theme 😉

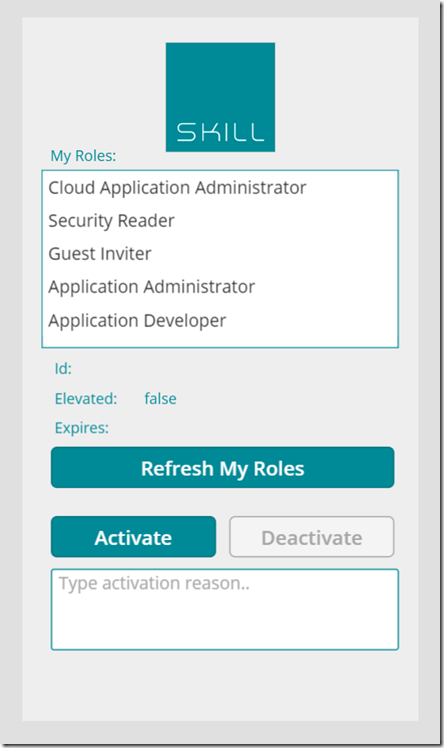
For example something like this from my company:

image

With that I can conclude this blog post, we have been able to export the custom connector definition and the PowerApps package including the Flows, and import these into a new environment. Now all that is left is to publish and share the PowerApp to be used in your organization.

Thanks for reading, hope it has been helpful!

Create your own Azure AD PIM App with PowerApps and Flow using Microsoft Graph

A while back I wrote a blog post on how you could access Microsoft Graph API using a custom connector in PowerApps and Flows: https://gotoguy.blog/2017/12/17/access-microsoft-graph-api-using-custom-connector-in-powerapps-and-flows/.

In this blog article I will build on that blog post to provide a practical example of using Microsoft Graph, and create an Azure AD PIM (Privileged Identity Management) App for activating any eligible admin roles for the logged on user.

First lets look into some of the documentation and what we need to prepare.

Microsoft Graph API for Azure AD PIM

Azure AD Privileged Identity Management provides you a way to enable on-demand time limited access for administrative roles. Microsoft Graph API for Azure AD PIM is currently available under the Beta endpoint, and documented here: https://developer.microsoft.com/en-us/graph/docs/api-reference/beta/resources/privilegedidentitymanagement_root.

If a user that has been assigned admin roles using Azure AD PIM, wants to activate any of the eligible role assignments, the user can navigate to the Azure AD PIM blade or just use this short url: https://aka.ms/myroles. In this blog post I will use my demo user account as an example, and this user has these roles assigned currently:

image

If I want to access my roles using Graph API I can use the privilegedRoleAssignment: my method (https://developer.microsoft.com/en-us/graph/docs/api-reference/beta/api/privilegedroleassignment_my).

Let’s try to do that using the Graph Explorer! (https://aka.ms/GE). Make sure you are signed in using your work account (normal user account), as I have in the screenshot below, and the run the GET command as shown below (https://graph.microsoft.com/beta/privilegedRoleAssignments/my):

SNAGHTML1778e65

In my case this returns the following (I have blurred out my userid for privacy):

image

Note that the response also shows if I have a current activation of any roles, and if so when that will expire. Roles that have isElevated set to “true”, and without an expirationDateTime are roles that are permanently assigned. If I want to query on that I can run the following GET command:

image

When my role assignments are returned I only get roleId’s though, so lets look at how I can get the displaynames of those roles.

For example, I see from the response above that one of the roleId’s returned is 29232cdf-9323-42fd-ade2-1d097af3e4de. In the Graph API for Azure AD PIM there is a method to list privilegedRoles (https://developer.microsoft.com/en-us/graph/docs/api-reference/beta/api/privilegedrole_list), so if I run the following in Graph Explorer: https://graph.microsoft.com/beta/privilegedroles/29232cdf-9323-42fd-ade2-1d097af3e4de, I should get more role information right?

No, I don’t have permission to do that:

image

Lets look at the documentation, and it clearly states that for the requestor (my normal user account) to be able to list privilegedRoles I need to be either a Global Administrator, PIM Administrator, Security Administrator or Security Reader:

image

So that won’t work for me, as I want to let normal user accounts to be able to use my Graph API commands.

However, one thing that normal users do have access to, is listing of directoryRoles (https://developer.microsoft.com/en-us/graph/docs/api-reference/beta/api/directoryrole_list). So if I run that, I will get all directory roles with their id and a roleTemplateId, and I have highlighted below the id I was looking for above, which turns out to be the Exchange Administrator role:

image

So, to get the displayName of the role I can run the following GET request: https://graph.microsoft.com/beta/directoryroles/?$filter=roleTemplateId eq ‘29232cdf-9323-42fd-ade2-1d097af3e4de’:

image

Ok, so now I have a way to query for my role assignments, and also a way to query for the display names of any roles. Now I need to see how I can activate (or deactivate) my role assignments.

I will use these methods: privilegedRole: selfActivate and privilegedRole: selfDeactivate, they are documented at https://developer.microsoft.com/en-us/graph/docs/api-reference/beta/api/privilegedrole_selfactivate / https://developer.microsoft.com/en-us/graph/docs/api-reference/beta/api/privilegedrole_selfdeactivate.

When I do a POST /privilegedRoles/{id}/selfActivate, I need to specify the role id in the request uri and and a request body:

{
  "reason": "reason-value",
  "duration": "duration-value",
  "ticketNumber": "ticketNumber-value",
  "ticketSystem": "ticketSystem-value"
}

For example I can try to activate the Exchange Administrator role by POST to: https://graph.microsoft.com/beta/privilegedRoles/5cfc2572-33b1-4839-8774-2bae31da1a29/selfActivate, and specify a request body like shown below. Note that all properties in the request body are optional, I can just leave them blank or provide default values:

image

Currently there is an error in the Graph Beta API for PIM that won’t let me activate roles that require MFA, so I’ll just accept this error and move on for now:

image

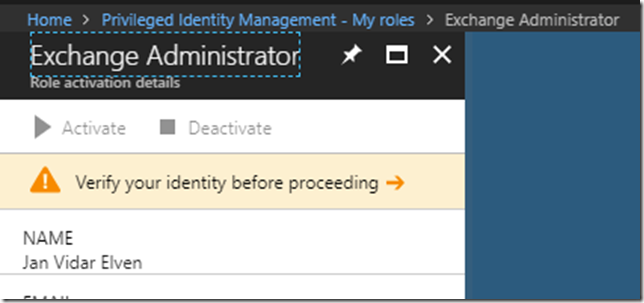
Before I deactivate a role I need to have it to be active, so for now I will go to https://aka.ms/myroles, and activate the Exchange Administrator role manually, promptly requiring MFA verification first:
image

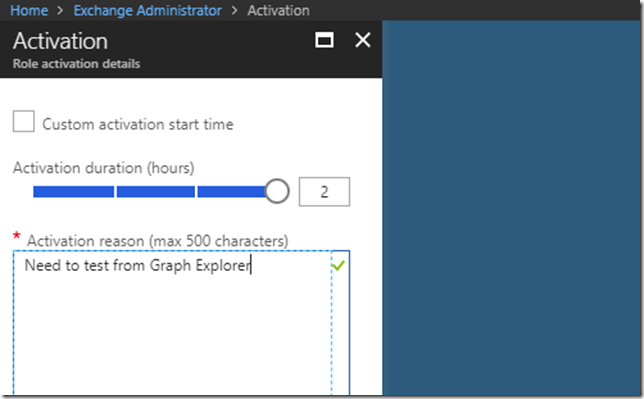
And after that I can activate the role:
image

To deactivate the Exchange Administrator role via Graph API I’ll just do a POST to /privilegedRoles/{id}/selfDeactivate, specifying the role id like this: https://graph.microsoft.com/beta/privilegedRoles/29232cdf-9323-42fd-ade2-1d097af3e4de/selfDeactivate

No request body is needed, and this time I get a successful response:

image

I think these 4 methods will do for now, there are a lot of other methods for managing PIM roles and settings as well, but we are now ready to start working with our PowerApps and Flow Custom Connector.

Add Microsoft Graph Permissions to App Registration

As I mentioned in the beginning of this blog post, I previously wrote a blog post on how to set up an App Registration for a custom connector for PowerApps and Flows. I will now build on this, so if you want to follow the steps I do here, please set up the prerequisites as described in the blog post: https://gotoguy.blog/2017/12/17/access-microsoft-graph-api-using-custom-connector-in-powerapps-and-flows/.

Looking at the documentation I see that I need to add Delegated Permissions for Directory.AccessAsUser.All to be able to list my assignments:

image

Similarly, if I check the documentation for the other methods from above,  I will need also Directory.AccessAsUser.All:

image

image

image

So I will go ahead and add that permission to my App Registration from before. Logged in as a Global Admin find the App Registration, go to Settings and Permissions, and add the following delegated permission for Microsoft Graph:

image

Note that it requires an admin to consent, so remember to click on Grant permissions:

image

Now we are ready to add the PIM API methods to the Custom Connector.

Adding PIM API’s to Custom Connector Operations

Again building on my linked blog post, you should now be able to log on to PowerApps, and find your PowerApps Microsoft Graph connector:

image

If you don’t have it, just follow the steps in the linked post to create it.

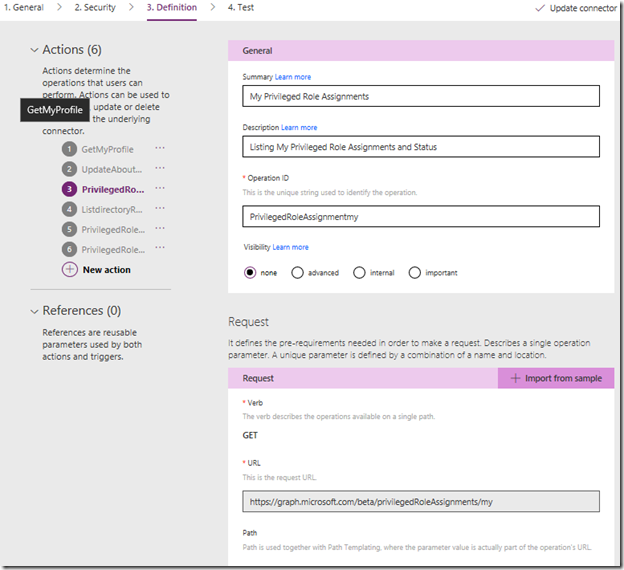
Select to edit, and go to step 3. Definition and add a new action. Lets first create a new action for getting my role assignments:

image

Scroll down to Request, this is where we will provide the details for our query. The best way to do this is to select to Import from sample. I specify the Method to be GET, and then the query like this, which is the same query I ran in the Graph Explorer earlier:

image

I don’t need to specify any Header or Body for this query, so I just press Import. Now my action looks like this:

image

Scroll down to the Response section, and then click on the default response. Click on Import from sample, and this time you paste in the response body from the previous Graph Explorer query:

image

This response will help the custom connector operation so that we can get the right output values mapped in our PowerApp later. Select Import.

The response now looks like this:

image

We can also validate that the response looks ok:

image

Click on Update connector to save this operation, do not select to Test at this point. We have more to do..

Next I want to create another action for List directoryRoles. I’ll create a new Action:

image

Request and Import from sample:

image

Note that the Request now will have a $filter parameter:

image

Default Response and Import from sample:

image

Check validation and the Update Connector:

image

Next I want to create another action for

privilegedRole: selfActivate. I’ll create a new Action:

image

Request and Import from sample, this time note the POST verb, and specifying {id} in URL, as well as the request body as shown below:

image

Note now that the request will have an id parameter in the path as well as a body parameter:

image

Default Response and Import from sample (response body is copied from documentation):

image

The response looks like this now and we can check validation:

image

Click Update Connector to save our progress so far. Now we can add the last action for privilegedRole: selfDeactivate :

image

Request and Import from sample, specifying verb POST and again using {id} in URL:

image

The request will look like this now:

image

Default Response and Import from sample:

image

And we can validate the response:

image

Click on Update Connector to save. We should now have 4 actions successfully configured, in addition to the ones we had from before:

image

Now we can do some testing, close the connector for now. Under Data, find Connections. If you previously had any connections to the “PowerApps Microsoft Graph” connector, like I have here, delete the connection:

image

After clearing any existing connections, select New connection at the top and find the PowerApps Microsoft Graph connector:

image

Click create and the log in with your current user to create the connection. Now you can go back to the custom connector, click Edit and then go to Test section. Select the current connection, and select the action to test. Then click Test operation:

image

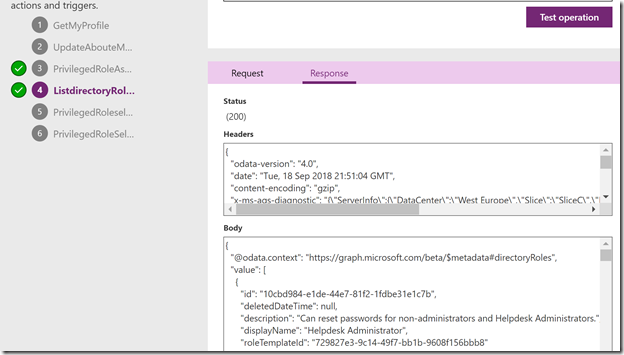
The test should complete successfully and return my role assignments:

image

Lets test the list directory roles, this time I need to specify the $filter:

image

Testing selfActivate will fail as it did with testing with Graph Explorer because of the MFA requirement: (we will explore that later)

image

image

Last test is for selfDeactivate, which willl have an empty response because the role is not active:

image

Starting with the PowerApp

Now that we have the Custom Connector Operations ready, we can proceed to create the PowerApp. We’ll begin with an empty app, create some controls and layouts before we get into the Flows needed.

Start by Create an app:

image

Then select a blank canvas, and phone layout:

image

You should now have an empty app like this:

image

Fast forward, and I’ll assume you have some basic PowerApps skills, add some controls, layout and image after your liking, ending up with something similar like this:

image

A quick summary of the above:

  • In addition to my selected logo and background, I’ve added labels for listing my roles and selected role details.
  • I’ve added three buttons, one for refreshing my roles, and one for activate and deactivate any roles.
  • I also have a text box to provide an activation reason, as well as a message label to show/hide any error message if I try to activate without a reason. We’ll get to that later.

Now we have an empty powerapp with some layouts and controls. It’s time to get into the Flows that will trigger the Microsoft Graph operations. First go to App Settings and specify an App name and choose a descriptive icon and color:

image

And then save the App:

image

Creating the Flow for Getting My Role Assignments

In the PowerApps main menu, find the link to Flows, and the select to create a Flow from blank:

image

After creating a blank Flow from here there will already be a step for input from PowerApps as shown below:

image

Click New step, add an action, and search for variables, and select the Variables – Initialize variable action:

image

Type the name MyRolesArray and select Type Array:

image

Add a new step of type action, and this time we will search for the custom connector “powerapps microsoft graph”, and that will list any operations we defined earlier. We will now select the operation for “My Privileged Role Assignments”:

image

Our Flow should look like this now:

image

When we tested via Graph Explorer earlier in this blog post, PIM role assignments returned with only role id’s, so we had to do an additional call to list directoryroles to get the displaynames of the roles. We will now implement some logic in the Flow to achieve this.

Add a new step, this time selecting More and Add an apply to each:

image

In the Apply to each, select “value” as output from the previous step as shown below:

image

It’s also a good idea to rename the step, like I have done below before you proceed:

image

Inside the For Each loop, add a new action, searching for the PowerApps Microsoft Graph connector again, this time selecting the List directoryRoles operation:

image

We need to provide a value for the $filter parameter, this is done by typing the filter definition and selecting the roleId from the dynamic content provided by previous step:

image

I also rename the step before I proceed:

image

Next, add another Apply to each section, using the value output from the List directoryRoles to get DisplayName:

image

Next add an action and search for append to array, and select that:

image

Now comes the most important part. I want to use the array variable I initialized in the beginning of the Flow, and build a custom JSON object array which integrates my role assignments as well as the displaynames in one single output. So in the following I select the array variable name, and for value I create my own custom JSON as shown below. In addition I use the dynamic content to search for the values I want to add:

image

At the end of the Flow, outside of the two nested Apply to each loops, add a Request – Response action:

image

In the Response, specify the MyRolesArray as Body, and provide a Response Body JSON Schema. The best way to get a JSON schema is to Save and Test the Flow, and look at the default Response. This is how it looks in my definition:

image

This is the JSON schema I used:

{
"type": "array",
"items": {
"type": "object",
"properties": {
"roleId": {
"type": "string"
},
"displayName": {
"type": "string"
},
"isElevated": {
"type": "boolean"
},
"expirationDateTime": {
"type": "string"
}
},
"required": [
"roleId",
"displayName",
"isElevated",
"expirationDateTime"
]
}
}

Next, Save and Test the Flow. Look for the Test button, and select like below:

image

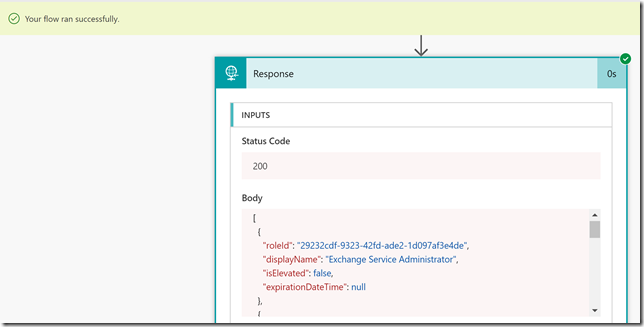
Follow the on-screen instructions for choosing test connection, and then start the Flow. Click the link to see the Flow run activity, and you should be able to see that the Flow executed successfully and you can look at the details on each step. I’m mostly interested in the Response output at the end, and it looks like this:
image

If I scroll down I can see that the output contains all my roles, and have the display name included in the output. This is the output I eventually will work with in my PowerApp.

Remember to give the Flow a describing name, and Save it before you proceed to the next section.

image

Creating the Flows for Self Activate and Deactivate Roles

Now we need to create the Flows for self activating and deactivating the selected roles. First start by creating a new blank Flow, starting with the input from PowerApps:

image

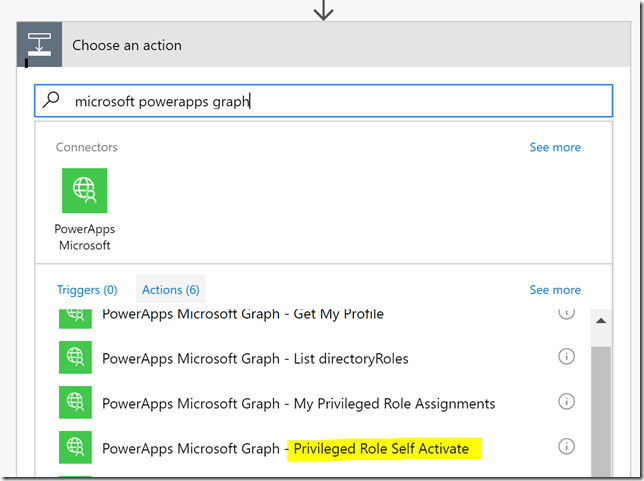
Add a new step and action for the Microsoft PowerApps Graph connector and the Privileged Role Self Activate operation:
image

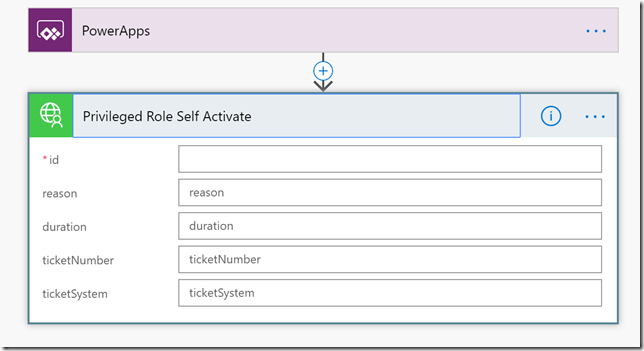
When choosing this operation we will get the opportunity to specify input fields, where id is required, as this is the role id for the role we want to activate. In addition we can specify a reason, as well as duration and ticketing info as optional fields:
image

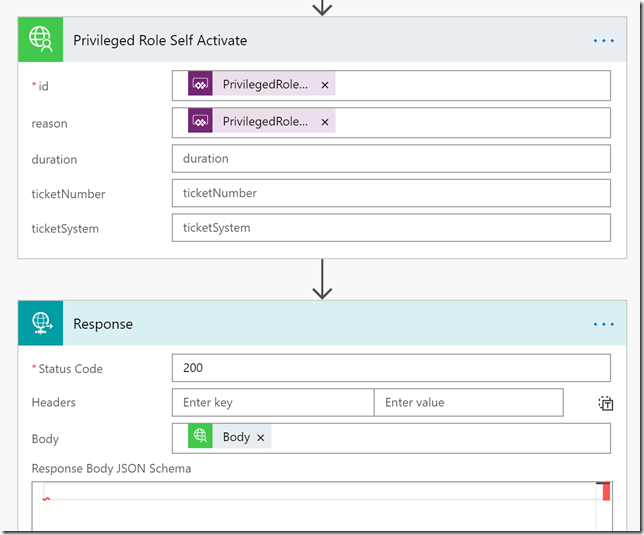
In my solution I want to specify id and reason, and just use the default duration. For the id field and reason field, just click “Ask in PowerApps”, which will create two parameters to use from PowerApps when I will call the flow:

image

In the third step I will add a Request – Response action, and use the Body from the previous step, like this:
image

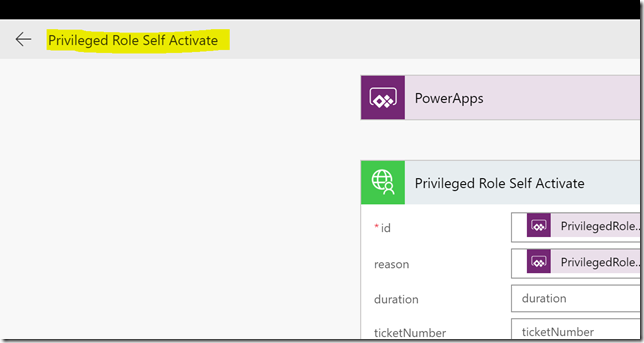
Save the Flow with a name like I have done below:
image

Then its a good idea to test the Flow, select the test button, provide the trigger for the flow, and when running we need to manually specify the role id to activate, and a reason, like shown below:

(PS! Remember to test with a role that does not require MFA on elevation, because of the previously reported bug.)

image

After clickin Run Now, verify that the Flow successfully started, and then click into the activity details. In the example below I can verify that indeed the role was activated:

image

So that is the Flow for self activating a role, now we need a similar Flow for deactivating a role. Now that we should start getting the hang of this, this is how that Flow should look after creating and saving it:

image

Deactivating a role only requires the role id as a parameter, as shown above. Lets test this as well:
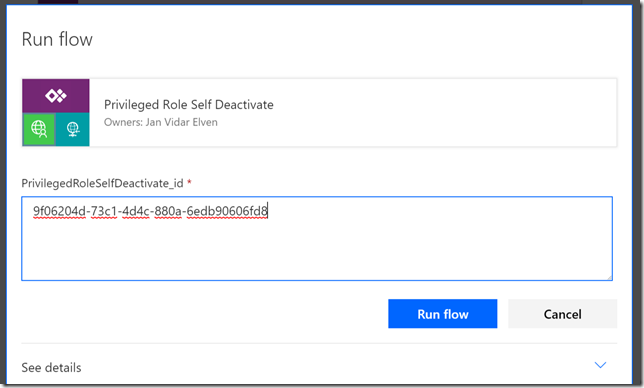
image

The Flow should start successfully, and you can verify the steps like in the following:
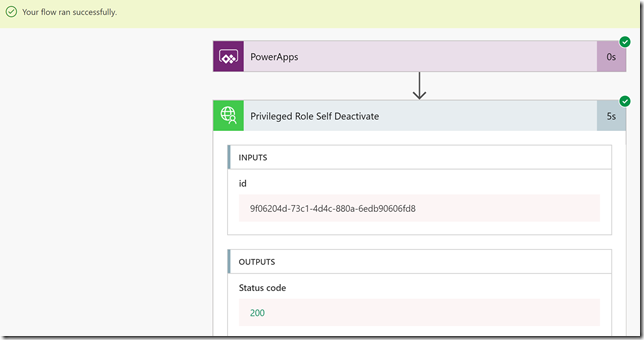
image

So, now we have created 3 Flows that we will use in the previously created PowerApp. In the next section we will add the flows and provide some logic to the application.

Connecting the PowerApp to the Flows

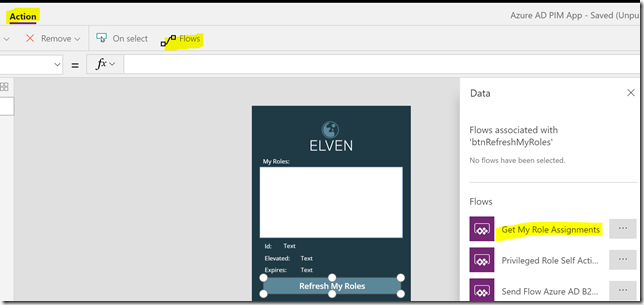
Back in the PowerApp created earlier, open it in Edit mode, and select the Refresh My Roles button. Click on the Action menu, and then on Flows, and from the Data section select the Flow we created earlier for Get My Role Assignments:
image

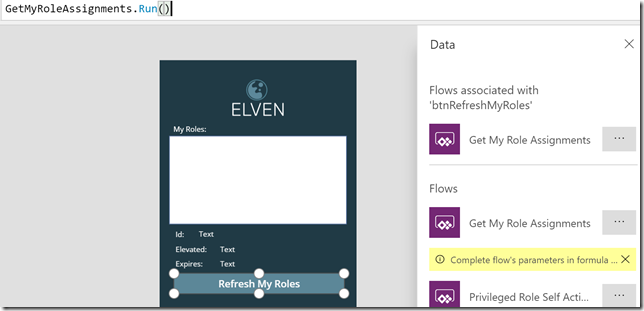
When selecting that Flow, the OnSelect event will populate with the name of the Flow and the Run method. As this Flow doesn’t have any input arguments we can just close the parenthis after like this .Run(), as shown below:
image

So now our button will get any role assignments for the connected user, but we have store the output we get back from the Flow, and use that in the listbox and in the details labels below. So while the Refresh My Roles is still selected, add the following to the OnSelect event:

Set(wait,true);
ClearCollect(MyPIMRoles,GetMyRoleAssignments.Run());
Set(wait,!true)

Like this:

image

A little explanation, the Set(wait,true) and Set(wait,!true) are used at the beginning and end of the action for indicating that the PowerApp is busy when calling the Flow. The ClearCollect is used to store the output response we get back from the Flow in a variable; MyPIMRoles.

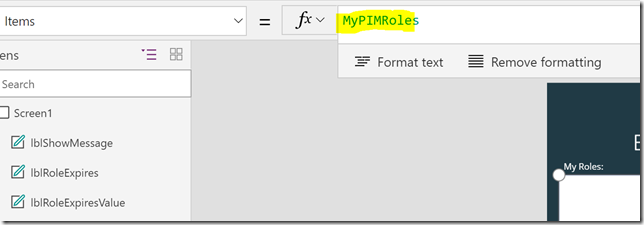
Next, set the Items property of the listbox for My Roles to MyPIMRoles:
image

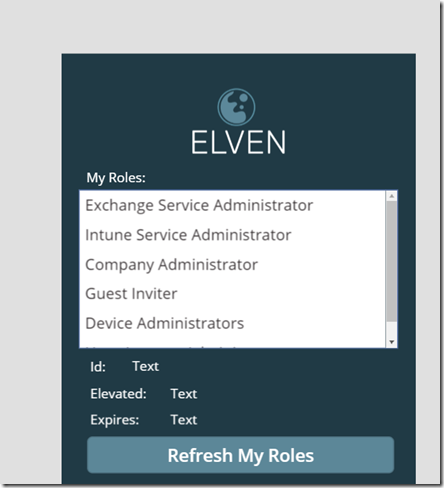
If we now du a test run of the PowerApp, the easiest way to do that is to hold the ALT button down and then click on the Refresh My Roles button. This should return the roles you are assigned to like this:
image

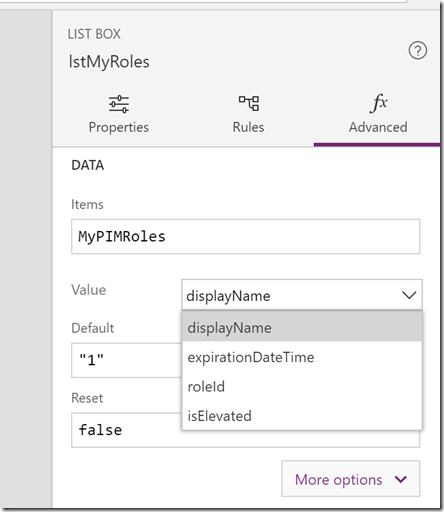
If your listbox is not showing the displayname of the roles, you can change that from the advanced properties of the listbox:
image

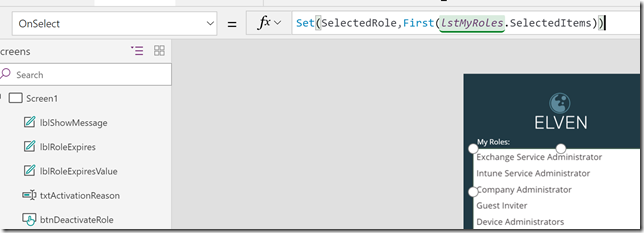
While the listbox i still selected, change to the OnSelect method and add the following:

Set(SelectedRole,First(lstMyRoles.SelectedItems))

It should look like this:
image

A quick explanation of this: I’m setting a variable “SelectedRole”, every time I click on a role in the listbox, by getting the first instance of the lstMyRoles.SelectedItems. (In fact, as my listbox only allows to select one item at a time, the first will always be the one I selected).

This “SelectedRole” variable can now be used in my other label details. First, set the lblRoleIdValue.Text property to the following:
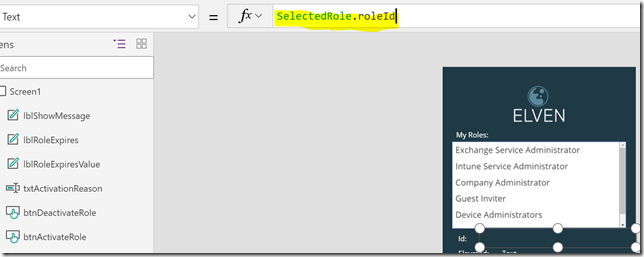
image

Likewise, set the lblRoleElevatedValue.Text property to the following:
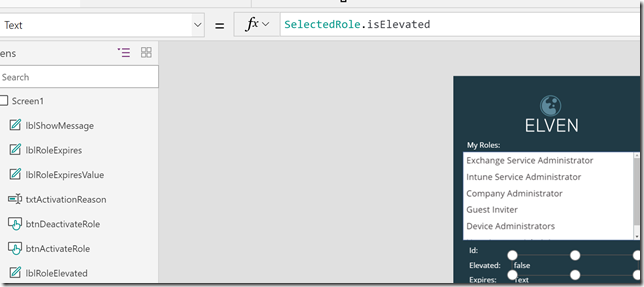
image

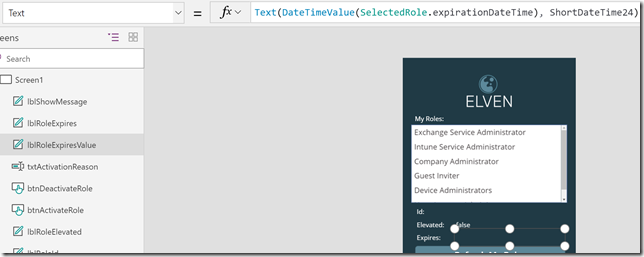
And then set the lblRoleExpiresValue.Text property to: Text(DateTimeValue(SelectedRole.expirationDateTime), DateTimeFormat.ShortDateTime24), like this:
image

As you can see, I’ve added some format functions to display any date and time values from the selected role in the format of short datetime 24 hour clock.

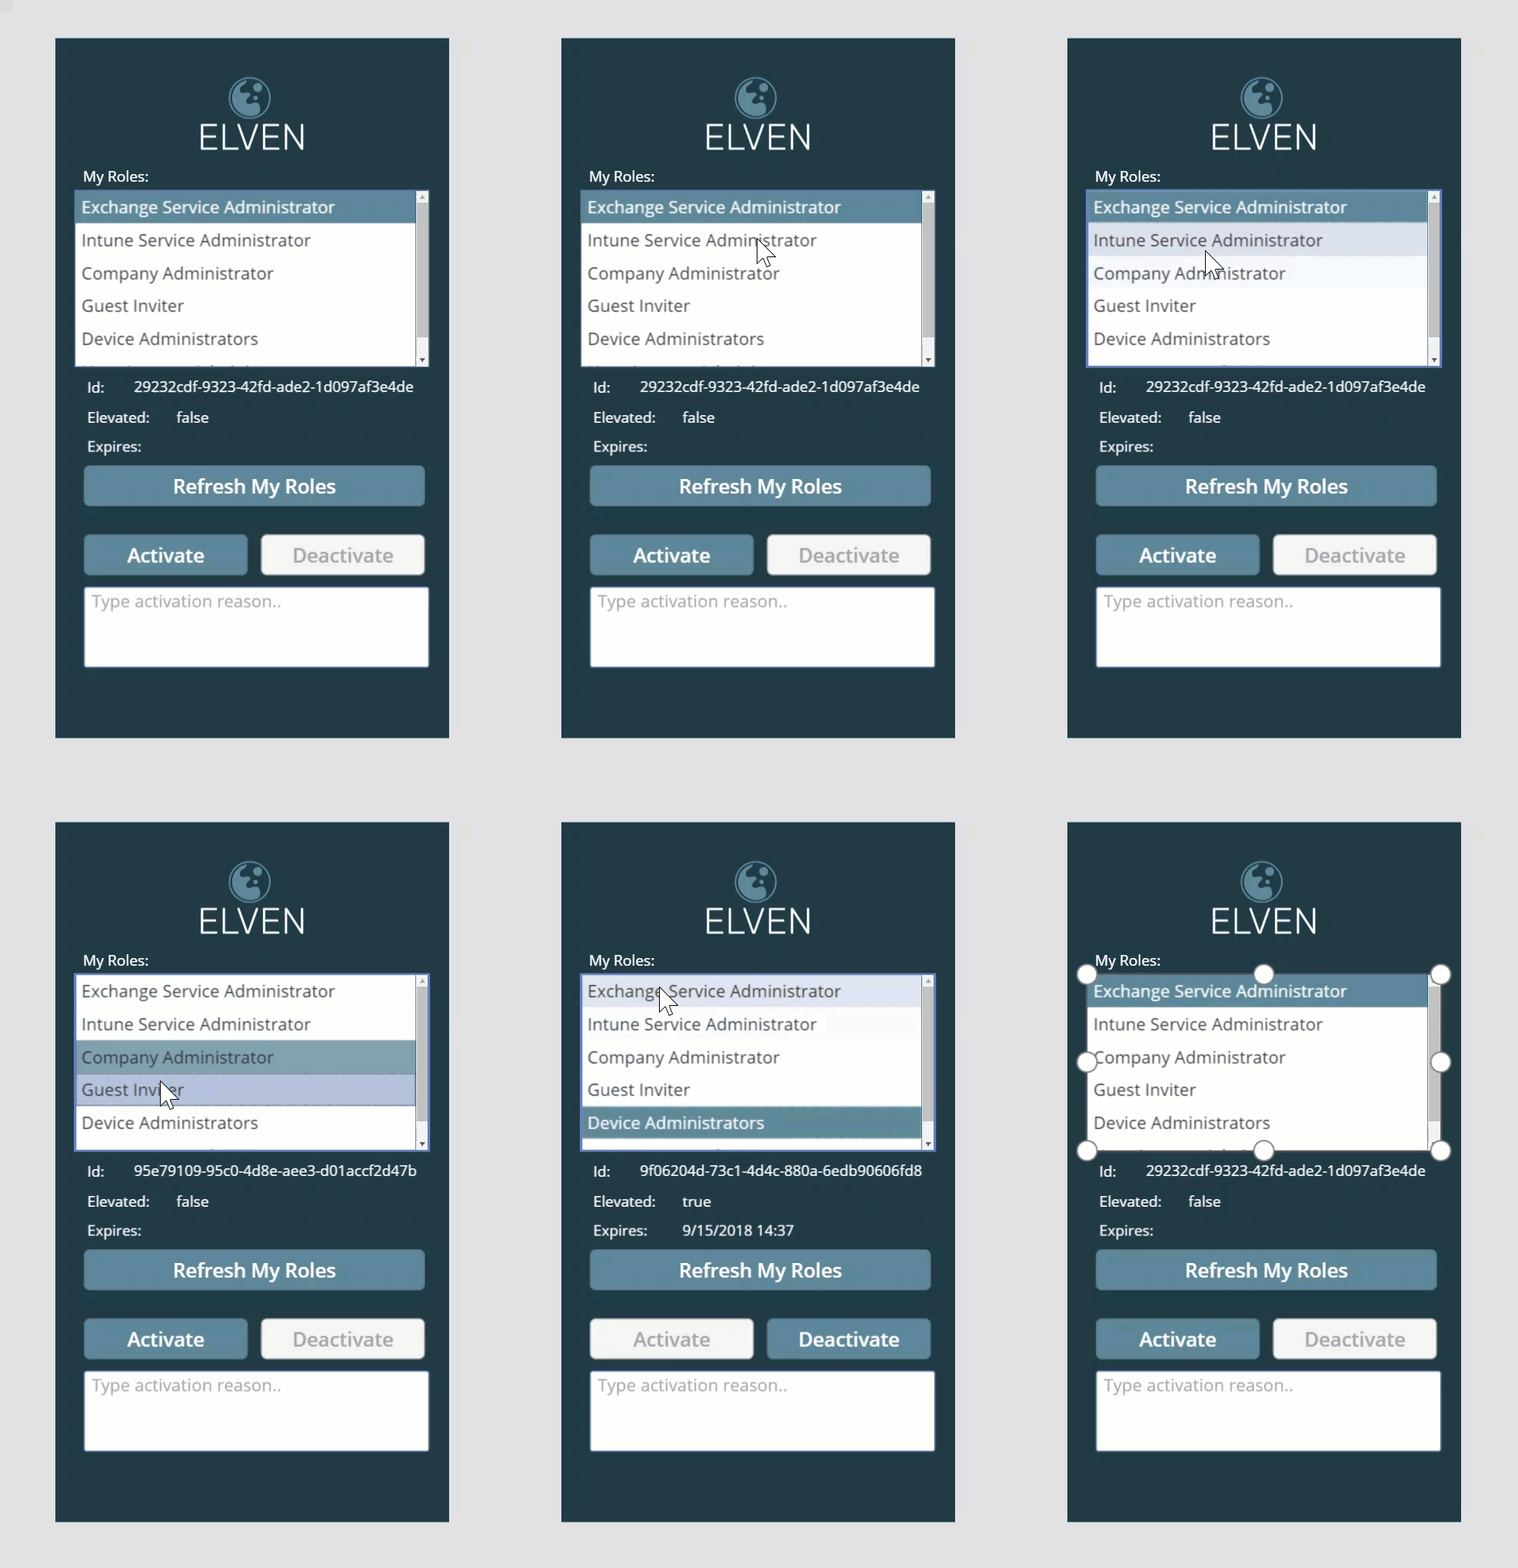
Now, if you hold down the ALT button again, you can click on the selected roles in the listbox, and the labels below will update with the selected role id, if it is elevated or not, and any expiry of existing elevations:
AzureADPIMApp1

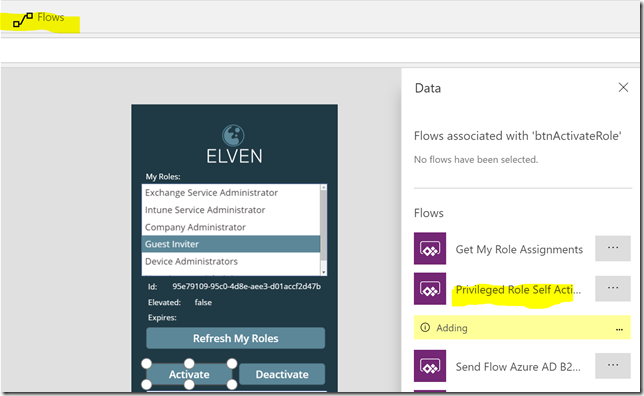
Now it’s time to add the other Flows to the Activate and Deactivate buttons, first select the Activate button, and on the Action and Flow menu, select to add the Priviliged Role Self Activate Flow:
image

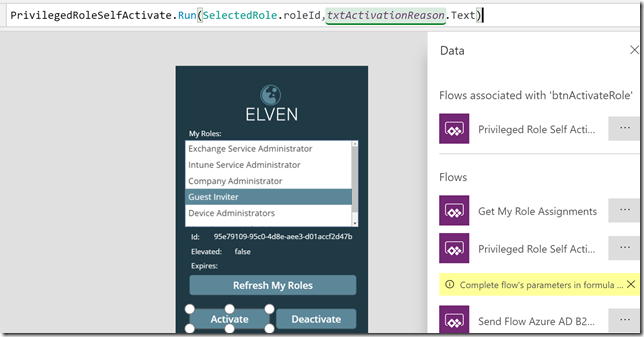
This Flow needs two inputs:

image

The first input we will get from SelectedRole.roleId, and the second from the txtActivationReason.Text, so it would look like this:
image

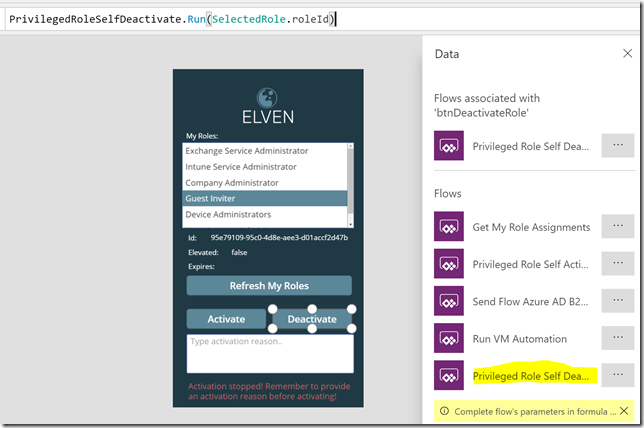
Similarly, add the Flow for the Deactivate button, specifying the SelectedRole.roleId as input:
image

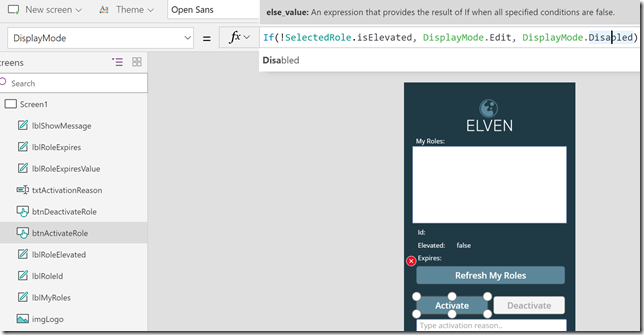
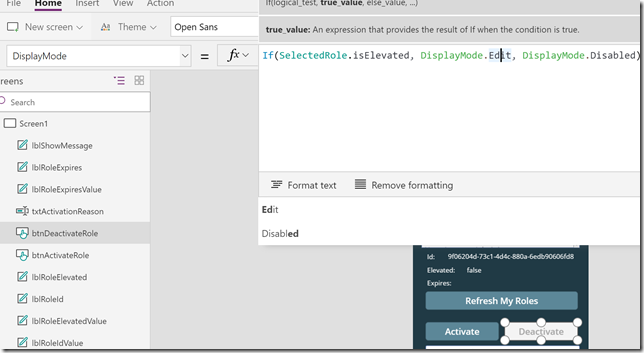
Now, at this point we should be able to get my role assignments in the list box, and also to be able to activate or deactivate the selected roles. I do want to add some more logic to the app though. Starting with activating/deactivating the buttons regarding the status of the role. On the Activate button, change the DisplayMode property to:

If(!SelectedRole.isElevated, DisplayMode.Edit, DisplayMode.Disabled)

Like this:
image

And similarly for the DisplayMode property for the Deactivate button:

If(SelectedRole.isElevated, DisplayMode.Edit, DisplayMode.Disabled)
image

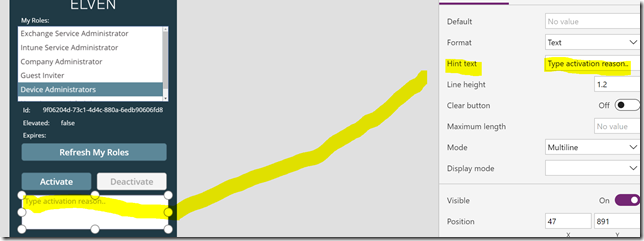
Next, I want to add some hint text to the text box for activation reason, this is done this way:
image

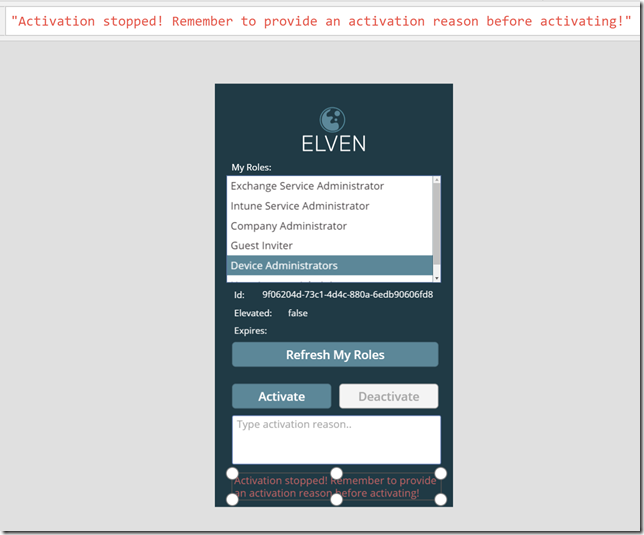
At the bottom I have created a label with a message, this lblShowMessage control I want to set visible if I try to activate a role without specifying a reason:
image

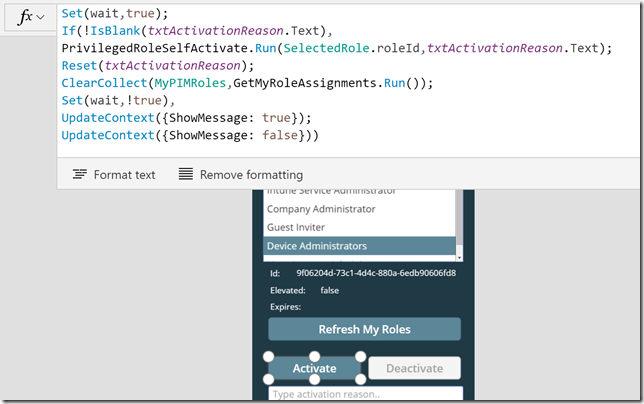
Now I need to make some changes to the Activate button and OnSelect method to implement some logic:
image

Lets break that down: First I use the Set method to control wait to indicate that the App is busy, then I do an If check on the txtActivationReason text box, and if I have specified a reason I proceed to run the Flow to self activate the role. After that I clear the txtActivationReason text box, and call the flow for refresh the roles in the list box. At the end I use a ShowMessage variable, setting it to true or false, which in turn is connected to the Visible property of the lblShowMessage control like this:
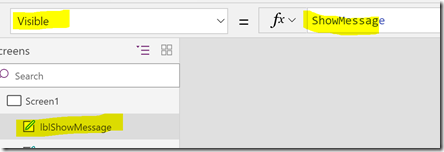
image

Here is the Activate button OnSelect code for you to copy:

Set(wait,true);
If(!IsBlank(txtActivationReason.Text),
PrivilegedRoleSelfActivate.Run(SelectedRole.roleId,txtActivationReason.Text);
Reset(txtActivationReason);
ClearCollect(MyPIMRoles,GetMyRoleAssignments.Run());
Set(wait,!true),
UpdateContext({ShowMessage: true});
UpdateContext({ShowMessage: false}))

And for the Deactivate button I change the OnSelect to:
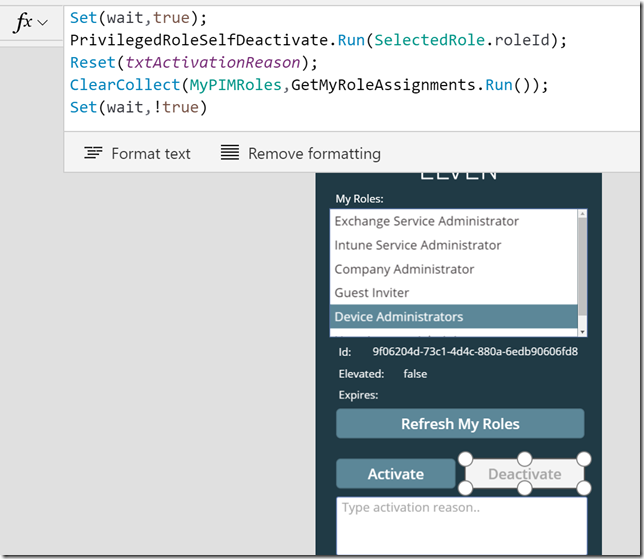
image

I don’t need to check the txtActivationReason text box now, so I’ll just clear it and refresh the roles. Here is the code:

Set(wait,true);
PrivilegedRoleSelfDeactivate.Run(SelectedRole.roleId);
Reset(txtActivationReason);
ClearCollect(MyPIMRoles,GetMyRoleAssignments.Run());
Set(wait,!true)

I’ll also add a reset of the activation reason text box to the Refresh My Roles button:
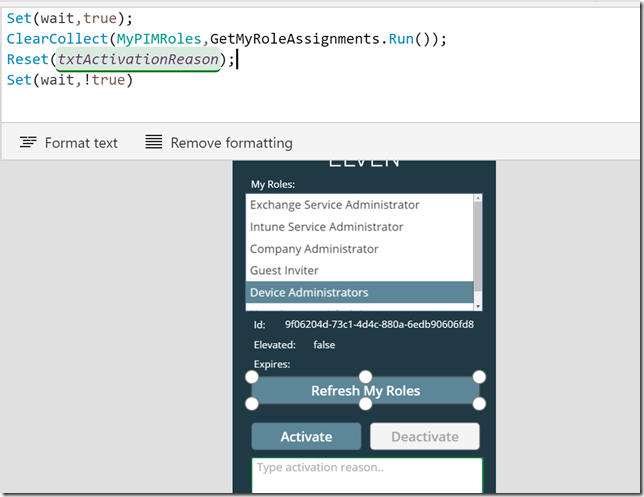
image

And finally, at the OnSelect method of the lstMyRoles listbox, I’ll set the ShowMessage variable to false whenever I click on different roles in the list, so that any previous activation error message is not shown.
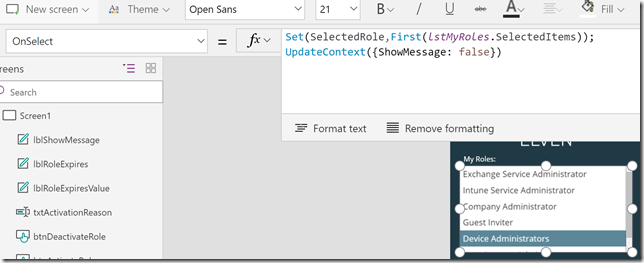
image

That should be it! We’ve now implemented some logic to the PowerApp, and are ready to publish and run the App.

Publish and Run the Azure AD PIM App

On the File menu click Save, and the Publish:
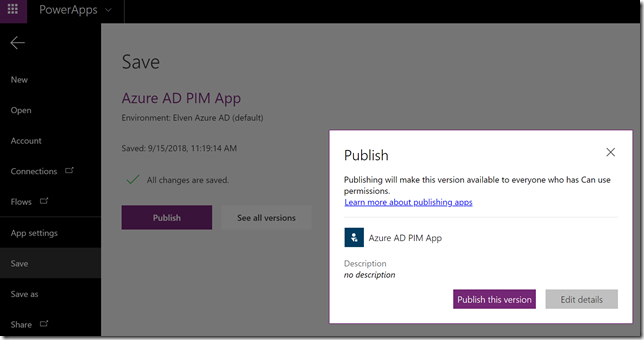
image

You can also Share the PowerApp in your organization:
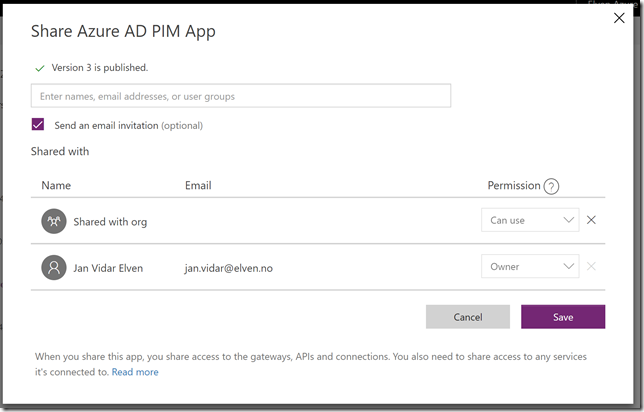
image

(please see my previous blog post https://gotoguy.blog/2017/12/17/access-microsoft-graph-api-using-custom-connector-in-powerapps-and-flows/, and the sharing section at the end for details on the experience on this).

After you have published the PowerApp, you can click the Play button to run the PowerApp. First time you will need to accept permission:
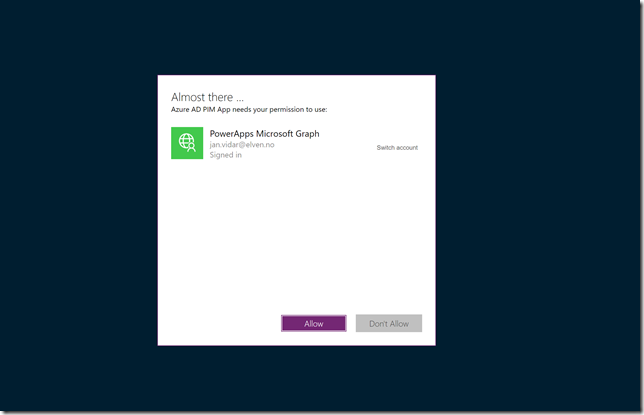
image

After that you should be able to refresh your roles:
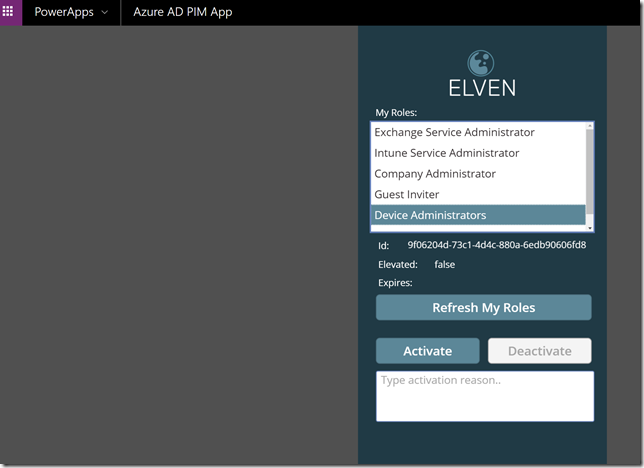
image

Let’s try to activate a role:

image

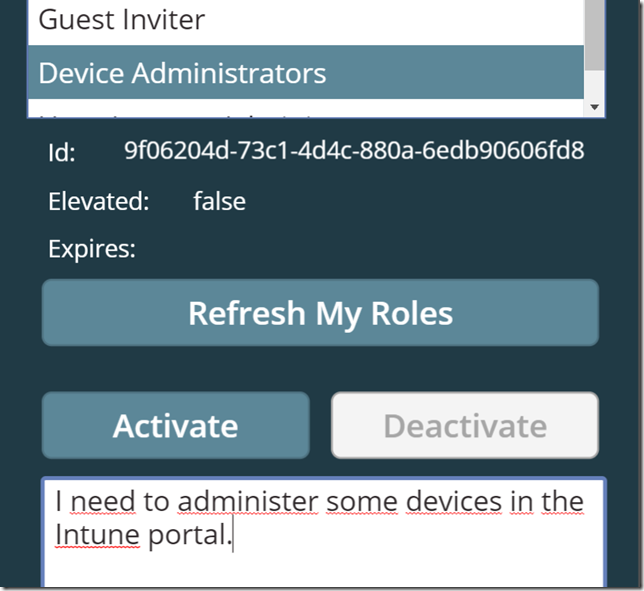
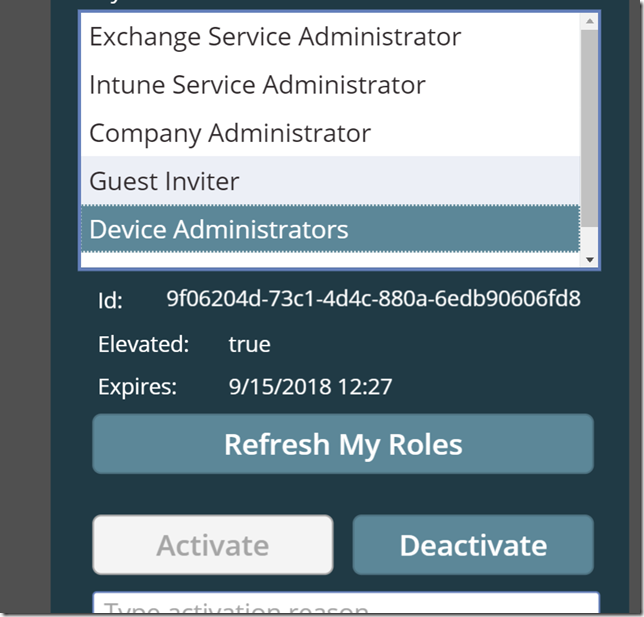
After I click the Activate button, the role will be activated, the list will be refreshed, and I can look at the Device Administrators role that it is now elevated and with an expiry time:
image

The Activate button is now disabled for that role, and the Deactivate button is enabled. Let’s try to deactivate the role again, clicking the Deactivate button. After a short time the role is deactivated, elevation status is false:
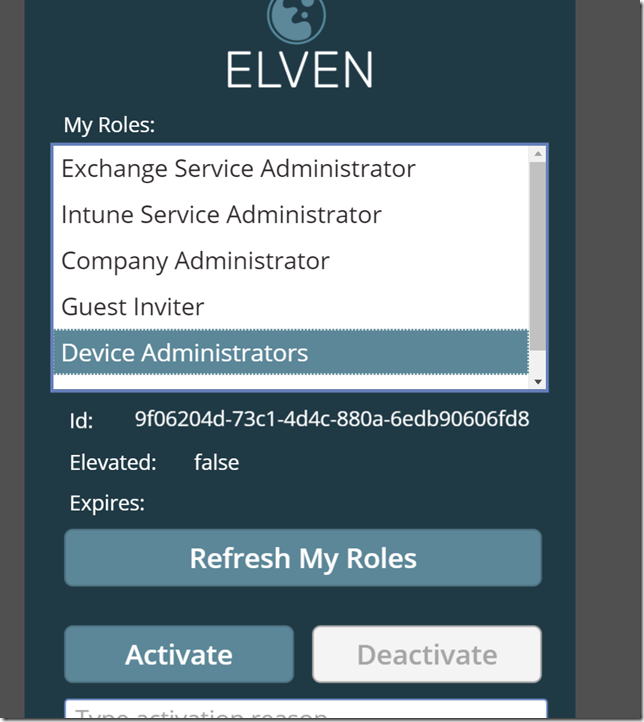
image

So now the Azure AD PIM App is working as intended, every user that have been assigned a role can now elevate themselves using the App. Even better is that my users also now can use the mobile PowerApps app to run this from their mobile phones!

As an administrator I can also see the results of the activations in the Directory roles audit history:

image

Known issues and tips

The biggest issue right now is a problem with the Microsoft Graph beta endpoint for selfactivate the role, as it currently does not support activating roles that require MFA. So I you want to use Microsoft Graph for activating roles now, you have to disable the requirement of requiring MFA for activation, either by default for all roles or for roles individually:
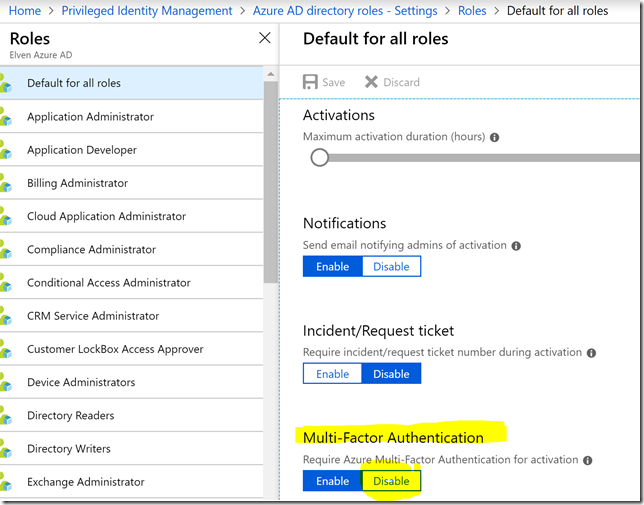
image

I’ll keep you posted of any changes to this issue, and update the blog post if that changes.

Another tip is that if you want to do some reporting on how many users are using the PowerApp for activating their PIM roles, you can for example use the ticketSystem string for specifying a constant like below:
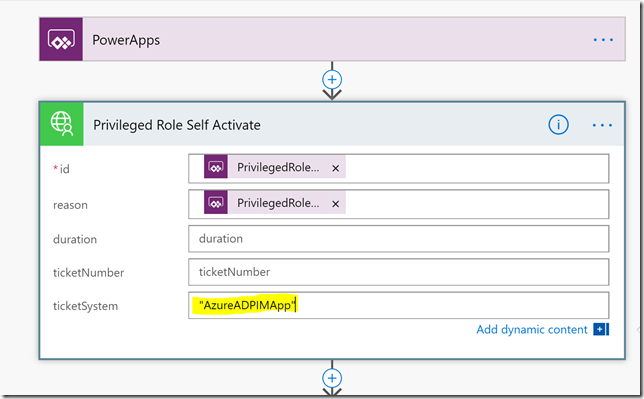
image

That should wrap up this blog post, hope this will be useful for you, thanks for reading Smile

Access Microsoft Graph API using Custom Connector in PowerApps and Flows

Microsoft PowerApps and Flows are great and simple to get started and use solutions for creating Apps and for how to “Code with No Code”. And the Microsoft Graph API is a great source of information for your Organizational data, including Users, Devices, Apps and Data. The Microsoft Graph has one common endpoint for which you can access and use all the information you want.

The purpose of this blog post is to show how to set up the requirements for accessing Microsoft Graph from PowerApps and Microsoft Flow.

image

I will show how you create an App Registration in your Azure AD tenant with the required settings and permissions for Microsoft Graph, and how you set up a custom connector in PowerApps and how to connect to that using PowerApps and Flows. We will create a simple App and see how you can share that App in your Organization. Let’s get started!

App Registration

If you want to access the Microsoft Graph you will need an App Registration, for which you can authenticate against the Graph API. There are two options available, depending on whether you want to authenticate only with Azure AD Work or School accounts, or if you also want to authenticate with Microsoft Accounts. The first option is to use the Azure AD portal (https://aad.portal.azure.com), the second option is to use the Application Registration Portal (https://apps.dev.microsoft.com). I will use the Azure AD Portal.

First, login as a Global Administrator to your Azure AD Portal, or have your IT admin perform the following steps for you. Under Azure Active Directory, create a new App Registration:

image

Provide a name like below, select Web app / API type, and then type any URL you want. It doesn’t have to be an accessible URL, as long as it is a valid format:

image

After the App Registration is created, you can open it and note the application id, which we will require later:

image

Next, under Settings, click Required Permissions. Here we will add the permissions we need for accessing the Microsoft Graph.

image

Click Add and then select Microsoft Graph from the list over available APIs:

image

Next, you will need to specify the permissions this App will have to access the Microsoft Graph. Note that there are two types of permissions:

  • Application Permissions. These permissions are for Apps that run without a user logged in, like a service or deamon.
  • Delegated Permissions. These permissions are for running apps in the context of the logged on user. The users effective permission will be a least privilege of these permissions you give the App, and the users actual permission in your organization.

image

In my scenario with using PowerApps and Flows, I will only use Delegated Permissions. Lets start with the most basic permission, and add that to the Microsoft Graph API:

image

Note that there is a column for Require Admin which either contains a Yes or No. If you select a permission that require Admin grant, the Global Administrator must click on the Grant Permissions. In our example now I don’t have to do this, but remember that any time you update the permissions for your app registration that require Admin, you must click on this Grant Permissions button.

image

Next, under Settings for the App Registration, go to Keys. We will now create a secret key to be used together with the application id when authenticating. Type in a description and select a period of expiry, and then click save. Your key will be displayed only once, so make sure you copy it and note it down for later use:

image

We are now ready to head over to PowerApps and create our Custom Connector that will use this App Registration.

Create a Custom Connector in PowerApps

Go to https://web.powerapps.com and log on as your normal user account, you don’t have to be an admin to do this.

Under Custom connectors, select Create Custom Connector, specify a name and continue:

image

On the General page, type a description and optionally change the icon or background color:

image

Under scheme select HTTPS, and under host, specify graph.microsoft.com. The base URL is “/”.

image

Click Continue. Under Security select OAuth 2.0 as authentication type, and then for Identity Provider select Azure Active Directory. For Client id, copy the Application id from the Application Registration we did in the previous section in the Azure AD portal:

image

Scroll down and for Client secret, paste in the secret key you generated from the app registration. Let login URL and tenant ID be as suggested and the type https://graph.microsoft.com as Resource URL:

image

Scroll further down. Scope is optional, and take a note of that Redirect URL will be generated after we save the connector.

image

Click continue to the Definition section. We will get back to this later, so for now just click Create connector:

image

The custom connector will be created, and we can go back and get the redirect URL:

image

Now you need to get back to the application registration in Azure AD and add that Redirect URL to the list of Reply URLs like this:

image

Save that and we are ready for the next step. To summarize, we have now created an App Registration in Azure AD with these 4 steps, as well as prepared a Custom Connector i PowerApps.

image

Now we need to prepare some queries we are going to run in Microsoft Graph.

Prepare queries in Graph Explorer

When working with Microsoft Graph, Graph Explorer is your best friend and resource. You can access the Graph Explorer via the https://graph.microsoft.com website, or even with this simple url:

http://aka.ms/ge

At the Graph Explorer page you can run from a  great collection of samples, and you can either run with a sample account, or log in using your own Work/School or Microsoft account.

image

I will log in as my normal user, and if this is the first time you log in to Graph Explorer you are prompted to consent to permissions needed by the Graph Explorer. From the picture below I have just Run Query for getting my profile:

image

With Microsoft Graph, you can also select just the attributes you want to see, so if I run the following query: https://graph.microsoft.com/v1.0/me/?$select=displayName,givenName,surname,userPrincipalName,aboutMe

I will get this response for my user:

image

From the response I see that my “aboutMe” attribute is empty. Let’s try to put a value into that. This is where the Microsoft Graph documentation is useful. If I look at the API reference for update user, https://developer.microsoft.com/en-us/graph/docs/api-reference/v1.0/api/user_update, I see that I will have to use a PATCH method and specify a Request Body which contains the attributes and values I want to update. So for example I will specify my request like this, and then Run Query:

image

I see that the status is success with a status code of 204, and if I check my profile again with the GET query from earlier, I will se that the aboutMe value now has been set: (It’s true by the way, I love working with Microsoft Graph!)

image

Now that we have seen how we can run queries for reading and writing to Microsoft Graph, lets try to implement that in a PowerApp, but first we need to create some Operations for our Custom Connector.

Create Custom Connector Operations

Back in PowerApps and under Custom connectors, I select edit for my connector:

image

I then go to Definition, and since there are no Actions created previously, I will add that now by clicking New Action. This will present me with the following form. I will specify a name, description and an operation id:

image

Scroll down to Request, this is where we will provide the details for our query. The best way to do this is to select to Import from sample. I specify the Method to be GET, and then the query like this, which is the same query I ran in the Graph Explorer earlier:

image

I don’t need to specify any Header or Body for this query, so I just press Import. Now my action looks like this:

image

Scroll down to the Response section, and then click on the default response. Click on Import from sample, and this time you paste in the response body from the previous Graph Explorer query:

image

This response will help the custom connector operation so that we can get the right output values mapped in our PowerApp later. Select Import.

The response now looks like this:

image

We can also validate that the response looks ok:

image

Click on Update connector to save this operation.

Next I want to create another action for updating the aboutMe attribute in my profile. I’ll create a new Action:

image

Under Request I will select Import from sample again, this time specifying PATCH as operation verb, the request URL is https://graph.microsoft.com/v1.0/me, and also add the Headers and Body as shown below. These samples are exactly the same as what I tested in Graph Explorer:

image

As this operation does not return a specific response object, I will let the default response be as it is, and will save my settings by Updating the connector.

Testing the custom connector

In my custom connector I can now move to the Test section:

image

The first thing I need to do is to create a New connection:

image

By logging in with my user I will be presented to consent to the permissions of the App, these are the delegated permissions we configured when registering the App in Azure AD (the reason for the double consent is that in addition to the Microsoft Graph delegated permission, there was also an Active Directory Graph permission for sign in and read profile) :

image

After creating the connection, go back to the custom connector and to the test section again. This time we have a valid connection to choose, and can test the action we want. I will test the GetMyProfile action first:

image

By using the $select parameter I can specify any attribute I want to get, and when clicking Test operation I get a successful response like this:

image

Now, let’s test the second action:

image

I specify the Content-Type to be application/json, and then an updated value for the aboutMe in the profile, and then Test operation:

image

The response is also successful.

Now that the operations are tested and verified, we know that the Custom connector can successfully access the Microsoft Graph, and we are finally ready for creating a PowerApp and testing it all out!

Set up the PowerApp and use the Connector

I will create a PowerApp that will get my profile details, and also be able to update the about me attribute. I will not get into great detail on the general instructions to set up the PowerApp, but the high level steps are:

  • Create a new PowerApp using the blank template and phone layout
  • Add some custom colors and an image (optional)
  • Add some labels and text boxes for getting some chosen profile attributes
  • One of the text boxes is for the “about me” value
  • Create a couple of buttons for getting profile data and to update the “about me” value

So after playing around a little bit I have this PowerApp ready:

image

So lets bring some action into the PowerApp. First, go to the View menu, and then Data Sources. From the list of data sources you should be able to see a connection with your username and the PowerApps Microsoft Graph connector (as I am using PowerApps for other data sources as well, I have a few more):

image

After I add the connection I now have a data source for this Connector:

image

Now I can refer to this data source in my PowerApp, for example in my buttons. I will for the first button add an action for getting my profile data, and for the second button add an action for writing back to “about me” in my profile.

For reading data from my profile, I will add the following action to the OnSelect event:

image

First a little explanation of this action:

  • UpdateContext is a function that would hold data into a variable i specify.
  • Calling the PowerAppsMicrosoftGraph.GetMyProfile operation would return a response I want to save to that variable.
  • Using arguments for $select I can specify which attributes I want to return as a response.
  • So by using UpdateContext and specifying that I save the response back to the MyProfile variable I can use that variable in other controls.

The complete operation is: UpdateContext({MyProfile: PowerAppsMicrosoftGraph.GetMyProfile({‘$select’:”DisplayName,givenName,surname,aboutMe”})})

Then for each textbox control I can get the value from the MyProfile variable, like this:

image

And l would do the same for the other text boxes, using MyProfile.givenName, MyProfile.surname and MyProfile.aboutMe.

Next, for updating the attribute “about me”, I will add the following action to the OnSelect event:

image

In this case I call the PowerAppsMicrosoftGraph.UpdateAboutMeProfile operation, specifying the arguments for content-type and using the text specified in the txtAboutMe.Text property:

PowerAppsMicrosoftGraph.UpdateAbouteMeProfile({‘Content-Type’:”application/json”,aboutMe:txtAboutMe.Text})

Now you can Save, give the PowerApp a Name and a chosen Icon, and then Publish the PowerApp. You are now ready to run the PowerApp!

Running the PowerApp

The PowerApp can be started in different ways, via the mobile app, desktop app or via the https://web.powerapps.com website. When I run this PowerApp I see this after starting up:

image

When I click Read Profile, it will call the Custom connector and get my profile information from Microsoft Graph:

image

Lets update some text in the About me textbox:

image

And then click on the butting Update About me, this will run the PATCH query against Microsoft Graph and update the “about me” attribute.

PS! The operation will run successfully, but it will return the following error when the custom connector to Graph API does not return a response object:

image

This is a flaw in PowerApps using Custom API connector, as it expext a JSON response object, but some operations against API’s are designed to return a 204 No Content response. We will fix that later by using a Flow.

To verify my profile has been updated, I can check in Dvelve and the about me section:

image

At this point we have seen that we can access the Microsoft Graph using a Custom connector from a PowerApp. There are a couple of more scenarios I will show before I wrap up this blog post, using Flows and Sharing the PowerApp with other users in my organization.

Using Microsoft Flow

Using Microsoft Flow with your PowerApps will make it possible to add workflows with actions and condtions to your apps. When creating a custom connector like we did to Microsoft Graph earlier, the same connector is available for your Flows.

I will go to the Flows section and create a new Flow. The first step for getting input from PowerApps is already there, so add a new step and select Action. From there you can search a lot of actions available, and you will find our PowerApps Microsoft Graph connector as well, with it’s 2 defined operations. Select the Update About Me Profile:

image

Next, the operation require 2 inputs, the first one I specify “application/json” which Microsoft Graph expects, and for the next aboutMe input, I select “Ask in PowerApps”:

image

This will create an input I later can use from PowerApps. This is all I need to do now, but I could have added more actions for example for sending an e-mail after updating the profile etc.
Now I specify a Flow name and Create or Update the Flow:

image

Back in my PowerApp, select the Update About me button, and then in the Action menu, select Flows:

image

Then find the Flow I created and add that:

image

You will see that the Run action for the Flow will prompt me for the Input I created with the “Ask in PowerApps” when I edited the Flow. This is where I would supply the the content from the txtAboutMe.Text control:

image

The OnSelect action for this button now looks like this, which will run the Flow:

image

Let’s Save and Publish the PowerApp again, and then launch it. First i Read the profile, and then I update some text in the About me:

image

When running Update About me now, the action successfully completes, with no error warning, and if I go to the Flow I can see the run history shows that it successfully completed. In the details I see that the Flow has triggered with the input I specified in the PowerApp:
image

Note that the Flow handles 204 No Content well, so now we have solved our problem in the PowerApps from earlier 🙂

Using a Flow will not only handle some types of inputs and outputs better for custom connectors than directly from PowerApps, but also make it possible to create more logic to your apps using workflows with actions, conditions and a lot of other data sources.
Sharing the PowerApp with other users

In the last part of this blog post I will show how you can share the PowerApp with other users. When you create a PowerApp it is only you that can access it:

image

Sharing an app that uses a custom connector, like we use for the Microsoft Graph, it will be automatically shared, but users must create their own connections to it.

And when sharing an app that includes a Flow, users who run the app will be prompted to confirm or update any connections on which the flow relies. In addition, only the person who created the flow can customize its parameters.

You can share the PowerApp to specific individuals, to groups or to the whole organization.

image

When sharing to the organization the users can find the PowerApp in the Dynamics 365 app store, under in-house apps:

image

Now, let’s test with another user, in this case I have a test user called [email protected]. When he launches the PowerApp for the first time he will need to create a connection to the custom connector:

image

After signing in he would need to  consent to the App permissions:

image

And after consenting click to Allow:

image

Now he can use the PowerApp, and when clicking Read Profile his details are filled in as expected. This is a test user I have based on the Seinfeild Show, so I will add to the “About me” with some text:

image

When I click Update About me, this users profile is updated. My test user does not have access to see the details of the Flow, but back with my original user that owns the Flow I can see that it indeed ran with the input from this user:

image

Summary

In this blog post we have seen how we can access the Microsoft Graph via a Custom connector in PowerApps and Flows. The sample shown in this post is simple with working with the profile of the logged on user, but with the power of the Microsoft Graph this opens up a lot of possibilities!

In later blog posts I will show some more exciting scenarios for using the Microsoft Graph, and I will link back to this blog post as a reference for how to get it all set up!

Thanks for reading, let me know in the omments if you have any questions or maybe some ideas for usage scenarios!