Tag Archives: Microsoft Teams

Blog Series – Power’ing up your Home Office Lights: Part 10 – Subscribe to Graph and Teams Presence to automatically set Hue Lights based on my Teams Presence!

This blog post is part of the Blog Series: Power’ing up your Home Office Lights with Power Platform. See introduction post for links to the other articles in the series:
https://gotoguy.blog/2020/12/02/blog-series—powering-up-your-home-office-lights-using-power-platform—introduction/

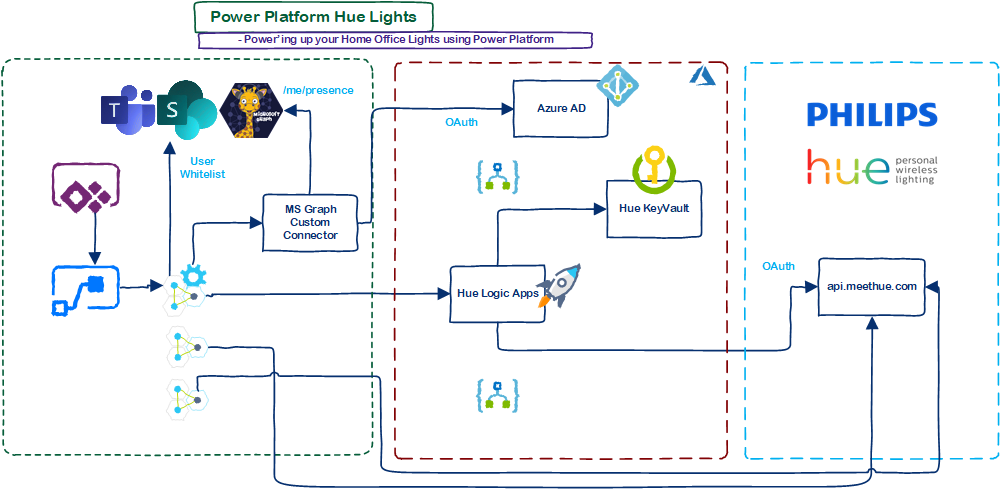
In this last part of the blog series, we will build on the previous blog post where we could get the presence status from Teams to the Hue Power App. Now we will use Microsoft Graph and subscribe to change notifications for presence, so that both the Power App and my Hue Lights will automatically change status based on the presence.

In this blog post I will reuse the Custom Connector I created for managing Microsoft Graph Subscriptions in this previous blog post: Managing Microsoft Graph Change Notifications Subscriptions with Power Platform | GoToGuy Blog

To follow along, you will need at least to create the App Registration and the Custom Connector referred to in that blog post. You can also import the Custom Connector OpenAPI Swagger from this link: <MY GITHUB URL TO HERE>

Adding the Custom Connector to the PowerApp

In the Hue Power App, go to the View menu, and under Data click to “+ Add data source”. Add the MSGraph Subscription Connector as shown below. This way we can refer to this in the Hue Power App.

We are going to add the logic to creating the subscription based on this toggle button and the selected light source:

But before that we have somethings to prepare first. When creating a Graph Subscription, we will need to prepare a Webhook Url for where Graph will send its notifcations when the Teams presence changes. This will be handled in a Power Automate Flow, so lets create that first.

Creating the Flow for Graph Notifications and Hue Lights changes

Since I have built this all before, ref. https://gotoguy.blog/2020/10/24/managing-microsoft-graph-change-notifications-subscriptions-with-power-platform/, I will make a copy of the “Graph Notification – Presence Change” flow for this use case.

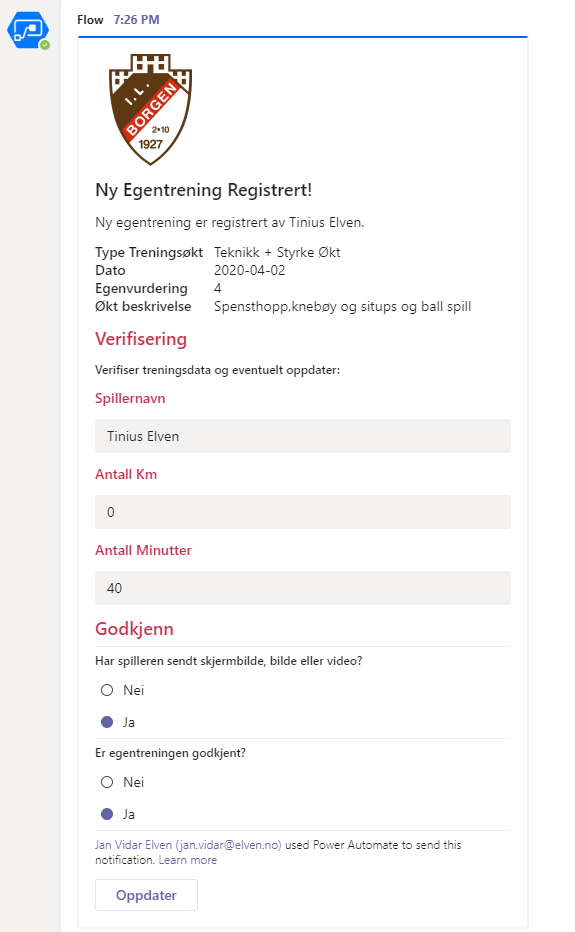
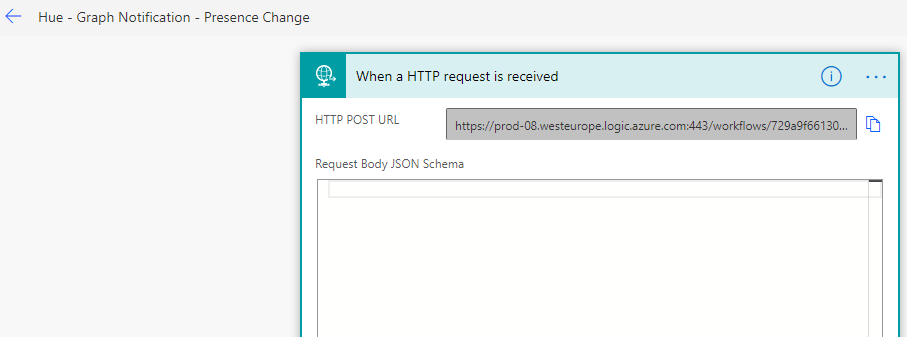
If you want to follow along, you will need to follow the instructions in that blog post first. After saving a copy, or if you created a new flow from blank using HTTP request webhook, you will need to copy the HTTP POST URL shown below, as that will be the “notification url” we will refer to later:

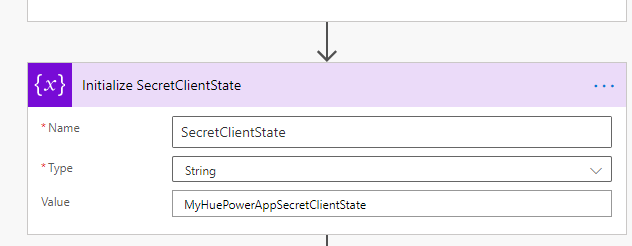
Next set some value that only you know for the secret client state:

The next part of the Flow are used to do a first-time validation of adding the change subscription, with Content-Type text/plain and request query containing a validation token. Microsoft Graph expects a response of status code 200 with the validation token back. If that is returned, Microsoft Graph will successfully create the subscription.

For subsequent requests, we must return a 202 Accepted response, and in the next step I parse the notification request body, so that we can look into what change we have been notified for:

Following the change notification, we can start looking into the change value. Firstly, I have added a verification of the secret client state I specified earlier, this is prevent misuse of the notification Url if that become known by others or used in the wrong context. After doing a simple test of the client state, where I do nothing if the client state don’t match, I can start building the logic behind the changes in presence status:

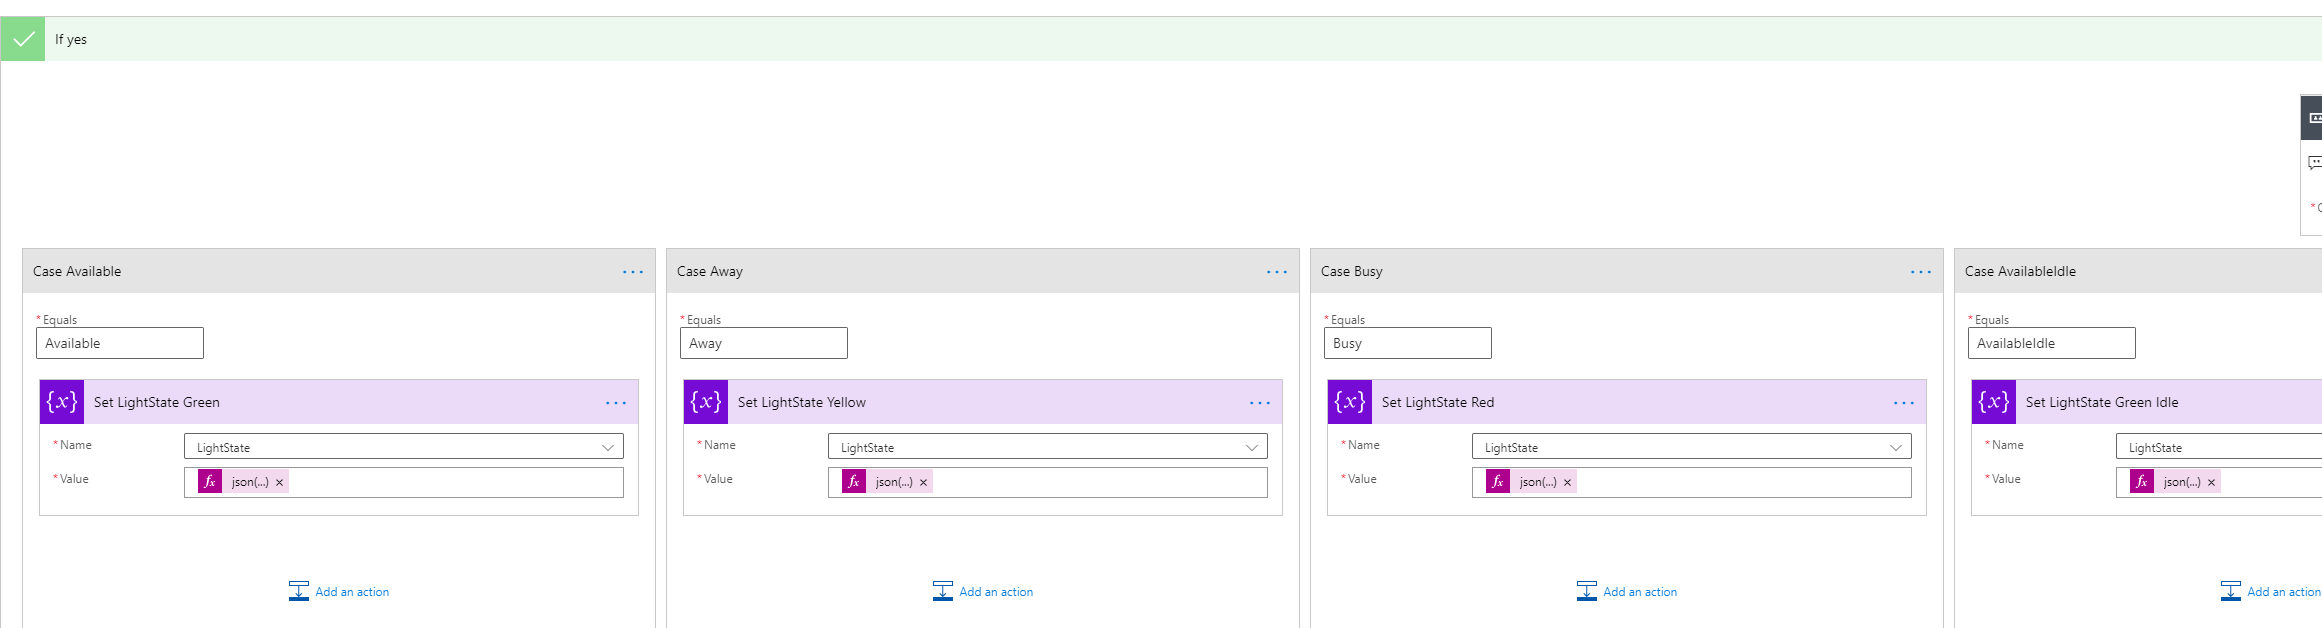
Inside the Switch Presence Status action, I will based on the availability status change, do a different case for each of the possible Teams Presence status values (see blog series post part 9 for explaining the different presence availability values):

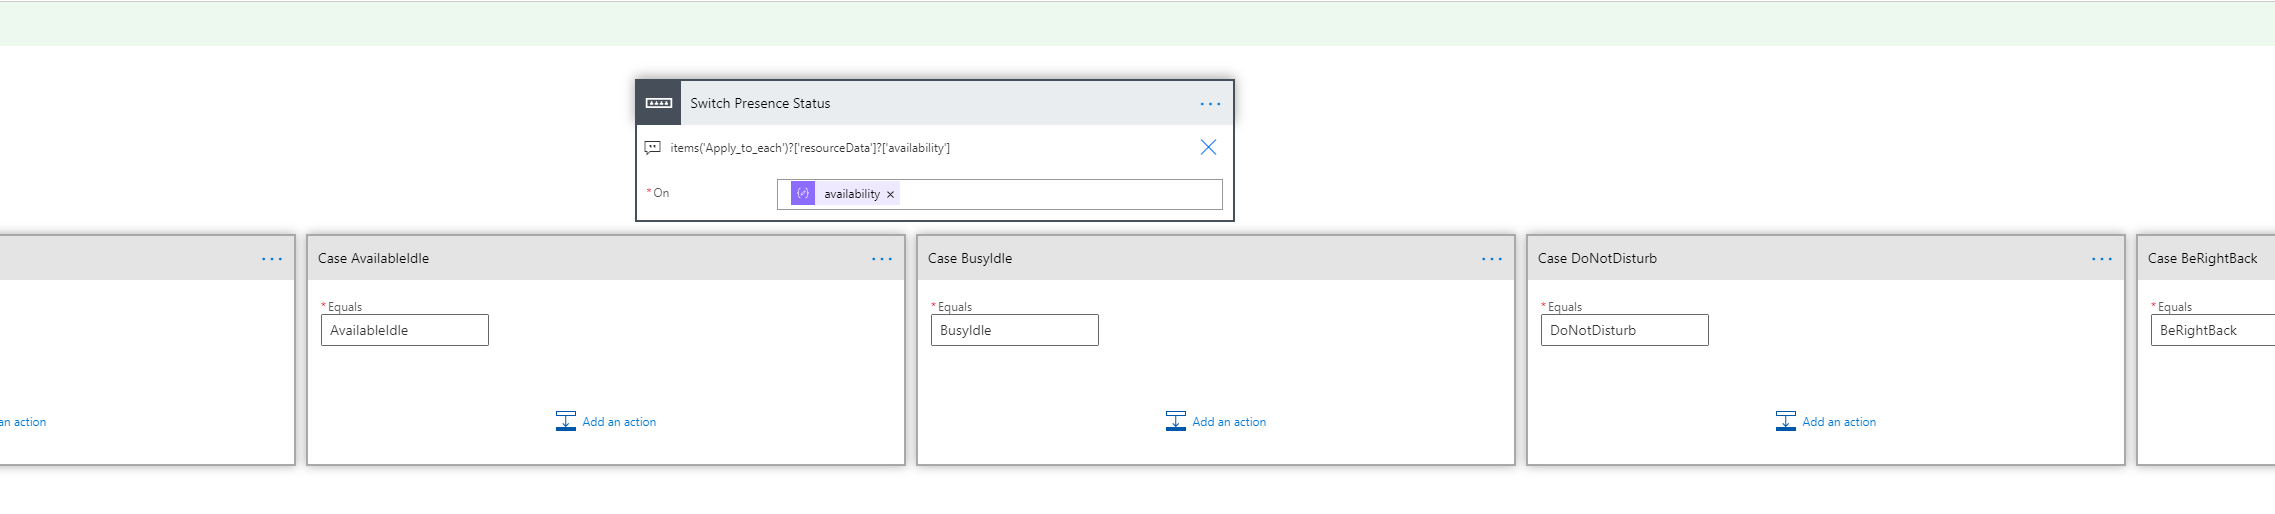
Inside each of these cases I will define the light settings and colors, and after that call the Remote Hue API for setting the light. As you saw in part 8 of this blog series, in order to access the Hue API remotely I will need the following:

  • An Access Token to be included as a Bearer token in the Authorization Header
  • A username/whitelist identifier
  • The actual lightnumber to set the state for
  • A request body containing the light state, for example colors, brightness, on/off etc.

Remember, this Flow will be triggered from Microsoft Graph whenever there is a presence state change in Teams. So I need to be able to access/retreive the access token, username and for which lightnumber I created the subscription. This is how I will get it:

  • Access Token will be retreived via the Logic App I created in part 4 of the blog series.
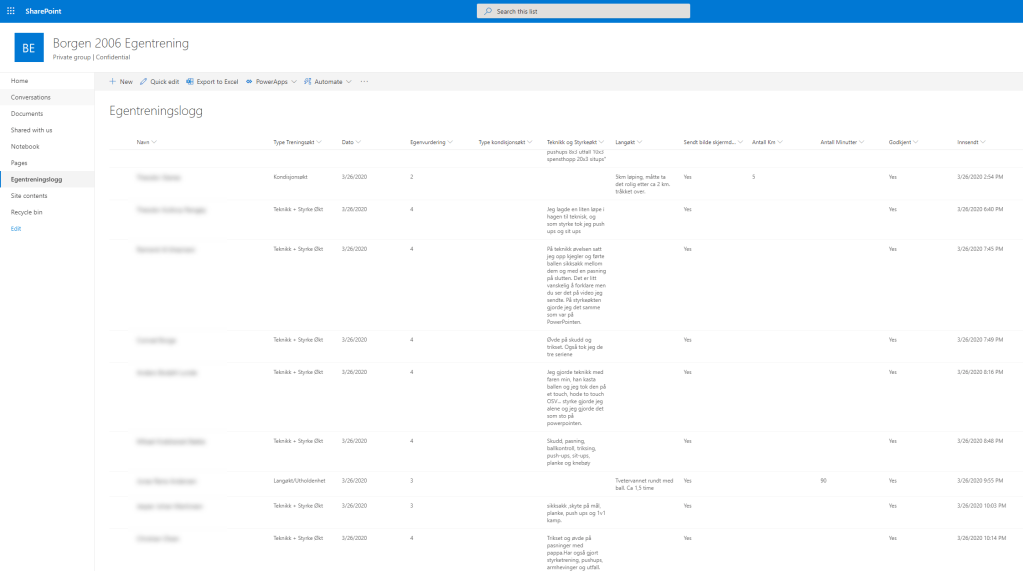
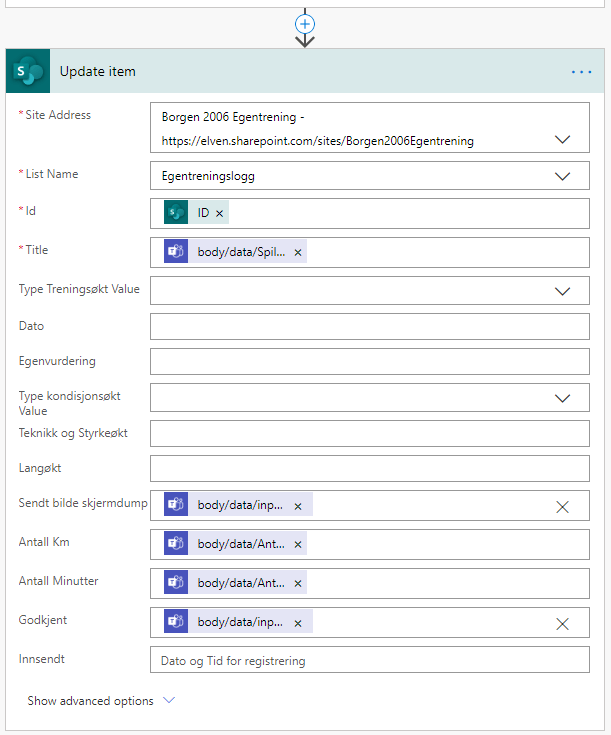
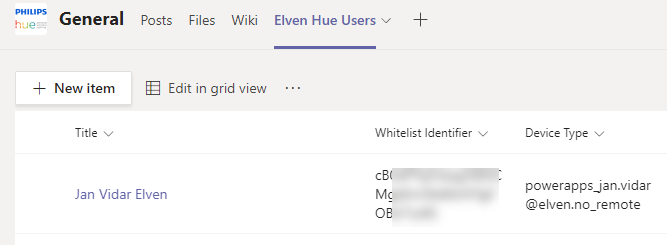
  • Username/whitelist identifier will be retrieved via the SharePoint List i created in part 6, see below image.
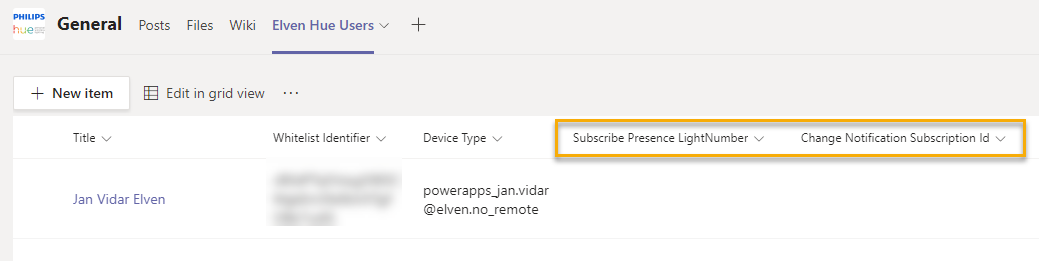
  • However, I do need to store the lightnumber I will create the change notification for, and for this I will add a couple more columns in this list:

Customize the Configuration List for storing Subscription Details

I add the following two single-line-of-text columns to my List:

  • Subscribe Presence LightNumber. This will be the chosen Hue light I want to change when change notifications occur for Teams presence status.
  • Change Notification Subscription Id. This will be the Id I can refer back to when adding and removing the subscription when needed.

Customize the Flow for getting User Configuration and preparing Light States

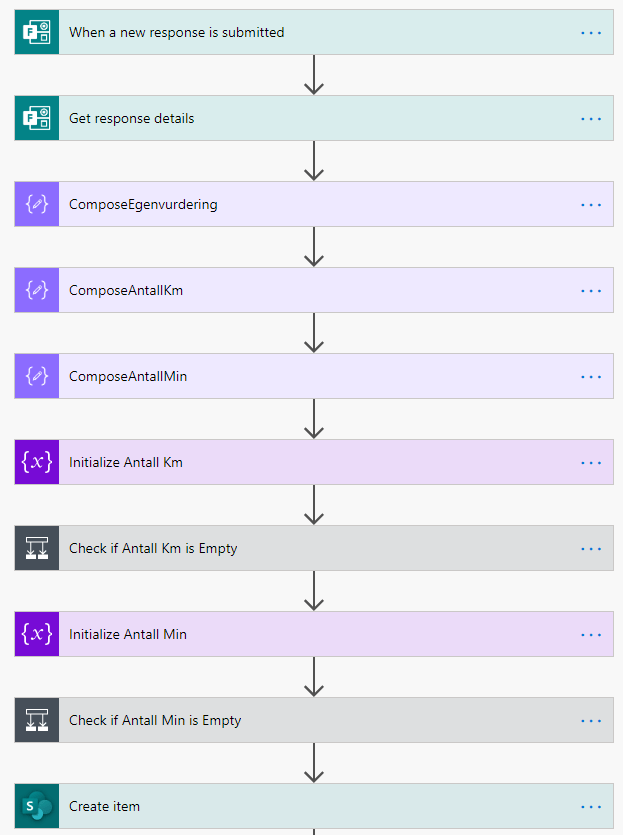
Back to the Flow again, we need to add some actions. First, add a initialize variable action after the initialize SecretClientState action like here:

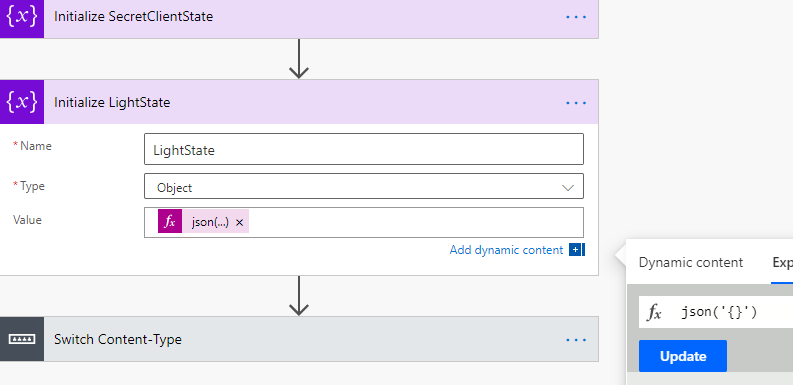
I set the type to Object and using the json function to create an empty json object. This variable will later be used for changing the light state.

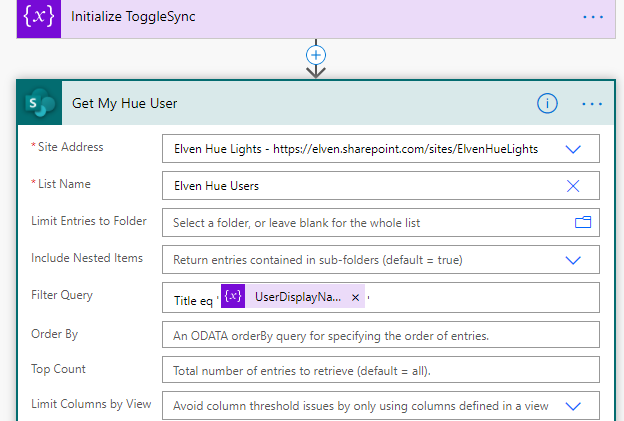
Next, in the Flow after the “Parse Notification Body” action, add a “Get Items” action from SharePoint connector, and configure it to your site, list name and the following Filter Query:

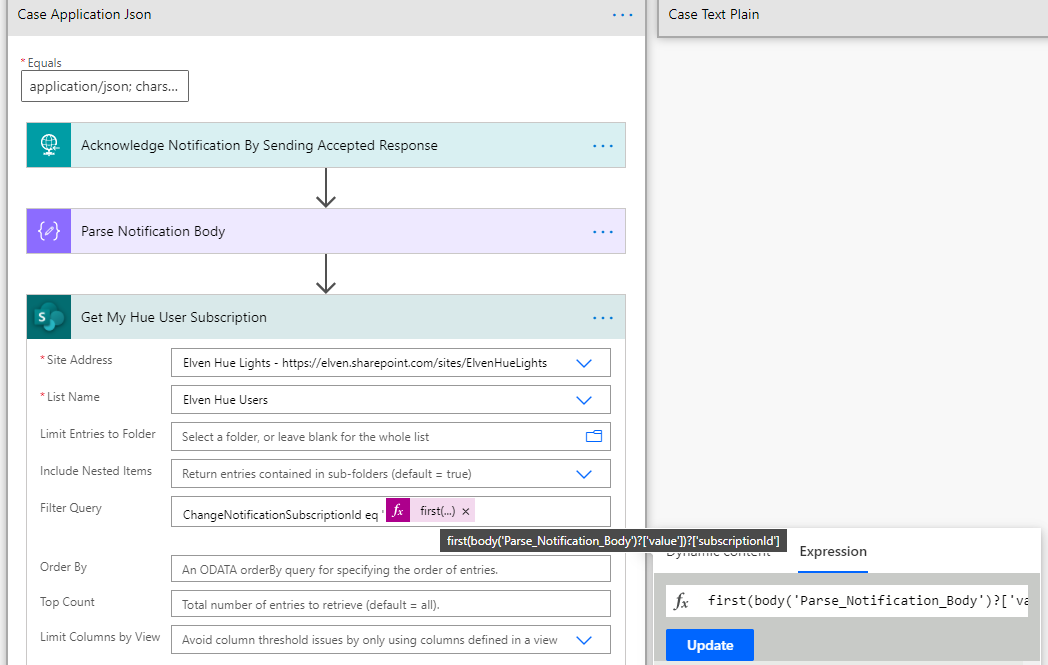
My filter query:
first(body('Parse_Notification_Body')?['value'])?['subscriptionId']
will be used to find what username and light that have been set up for presence changes.

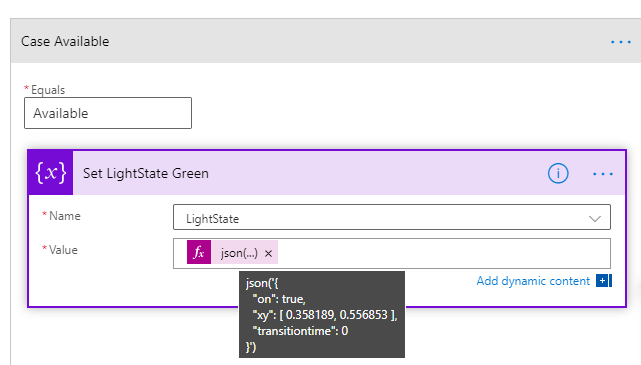
Next, lets set the variable for LigthState. Inside each of the Switch Cases, add the action Set Variable, and then set the variable to the chosen xy color code, as a json object like the following. This is for the color green:

Do the same for all of the other case, these are the values I have been using:

STATECOLORJSON VARIABLE
AwayYellowjson(‘{
“on”: true,
“bri”: 254,
“xy”: [ 0.517102, 0.474840 ],
“transitiontime”: 0
}’)
AvailableGreenjson(‘{
“on”: true,
“bri”: 254,
“xy”: [ 0.358189, 0.556853 ],
“transitiontime”: 0
}’)
AvailableIdleGreen (10% bright)json(‘{
“on”: true,
“bri”: 25,
“xy”: [ 0.358189, 0.556853 ],
“transitiontime”: 0
}’)
BusyRedjson(‘{
“on”: true,
“bri”: 254,
“xy”: [ 0.626564, 0.256591 ],
“transitiontime”: 0
}’)
BusyIdleRed (10% bright)json(‘{
“on”: true,
“bri”: 25,
“xy”: [ 0.626564, 0.256591 ],
“transitiontime”: 0
}’)
BeRightBackYellowjson(‘{
“on”: true,
“bri”: 254,
“xy”: [ 0.517102, 0.474840 ],
“transitiontime”: 0
}’)
DoNotDisturbRedjson(‘{
“on”: true,
“bri”: 254,
“xy”: [ 0.626564, 0.256591 ],
“transitiontime”: 0
}’)
OfflineGrey (10% bright)json(‘{
“on”: true,
“bri”: 25,
“xy”: [ 0.3146, 0.3303 ],
“transitiontime”: 0
}’)
PresenceUnknownWhitejson(‘{
“on”: true,
“bri”: 254,
“xy”: [ 0.3146, 0.3303 ],
“transitiontime”: 0
}’)

PS! The transitiontime is to get as close to realtime updates as possible. Add the colors similarly for rest of the states:

Get the Access Token and call Hue Remote API

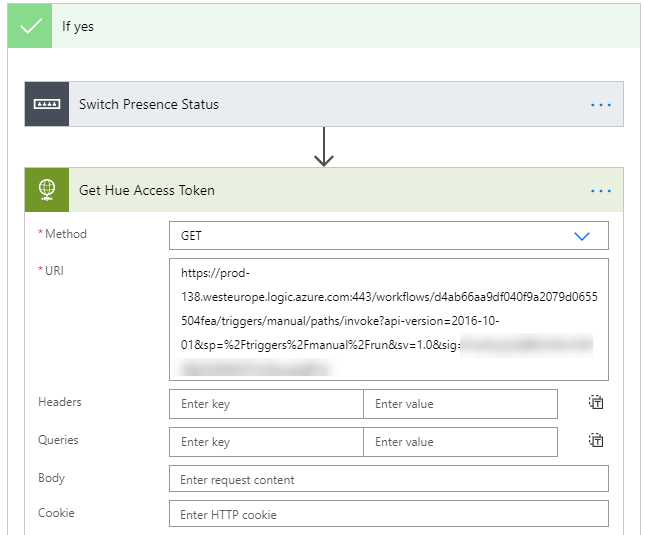
Now we are ready to get the Access Token, and call the Hue Remote API with the selected light state.

First, add a HTTP action below the Switch Presence Status action, calling the Logic App previously created in part 4 of the blog series:

Next, add another HTTP request after, and this will call the Hue Remote API to set the lights:

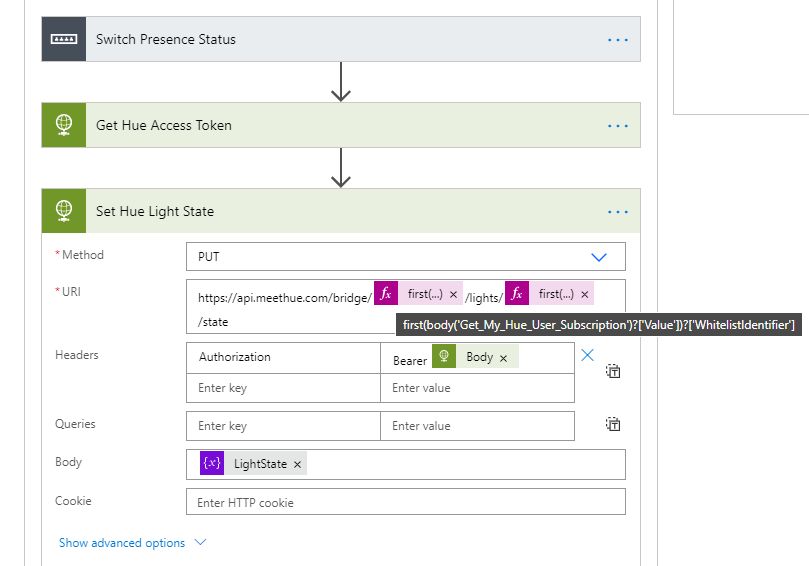
When constructing Hue API URI above, I retreive the whitelist identifier for username with the following expression:

first(body('Get_My_Hue_User_Subscription')?['Value'])?['WhitelistIdentifier']

And then which light number with this expression:

first(body('Get_My_Hue_User_Subscription')?['Value'])?['SubscribePresenceLightNumber']

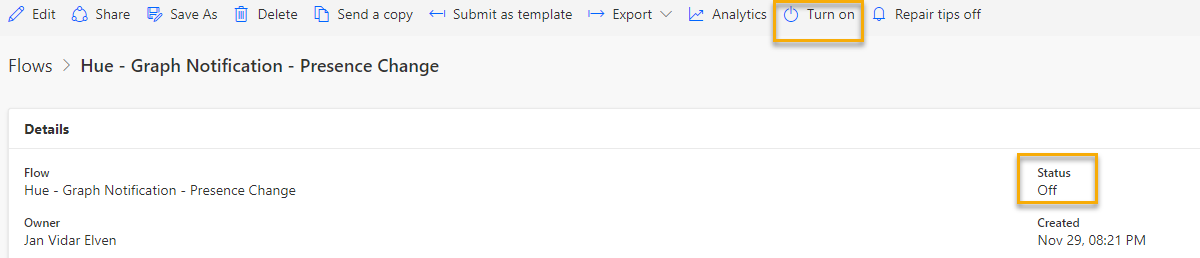
That should be the completion of this Flow. Remember to turn it on if needed. We are now ready for the last step.

Adding the Flow for Creating the Graph Subscription

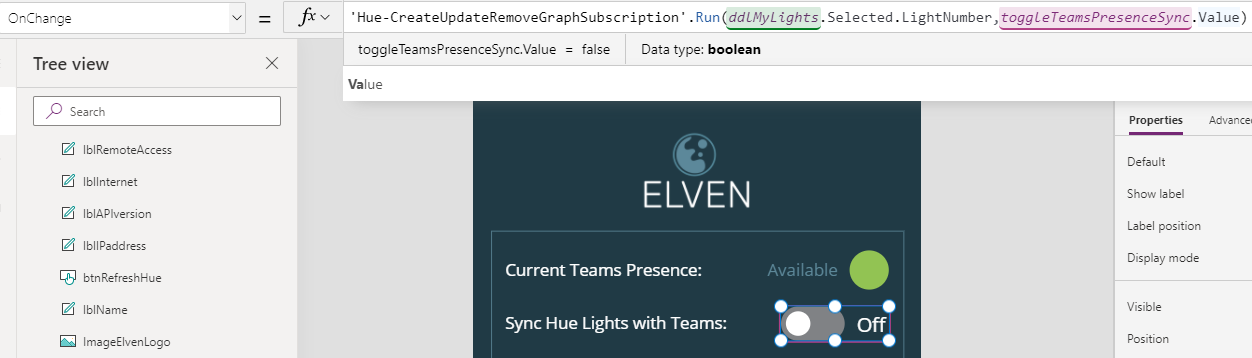
In the beginning of this blog post I referred to the toggle “Sync Hue Lights with Teams” in the Power App. Now that we have prepared the Flow handling the notification Url, we need to add a new Flow that would handle the creating, or deletion, of Graph Subscriptions. As this is a toggle control, setting it to “On” should create a Graph subscription for the selected lights, and setting it to “Off” should remove that subscription again.

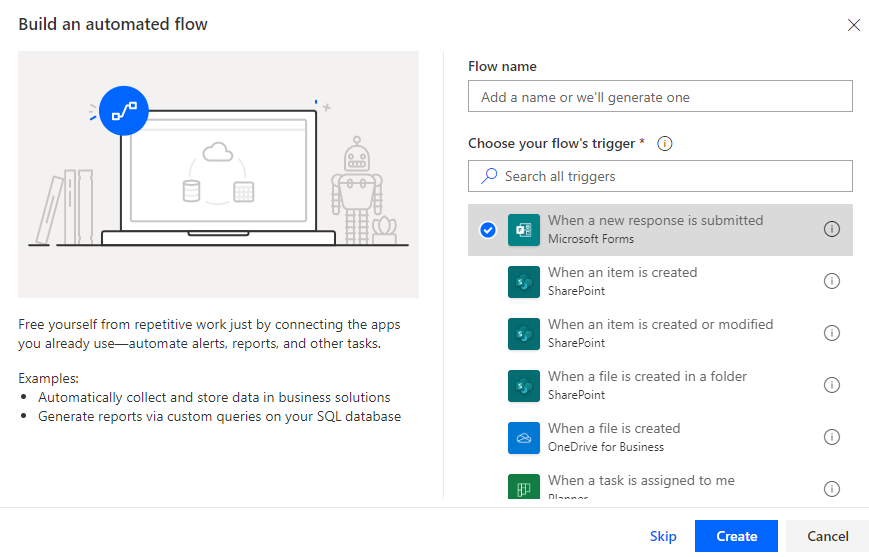
Create a new instant Flow with PowerApps as trigger:

Next, add an action for initialize variable for getting the UserDisplayName:

Use the following expression for getting the user display name:

triggerOutputs()['headers']['x-ms-user-name']

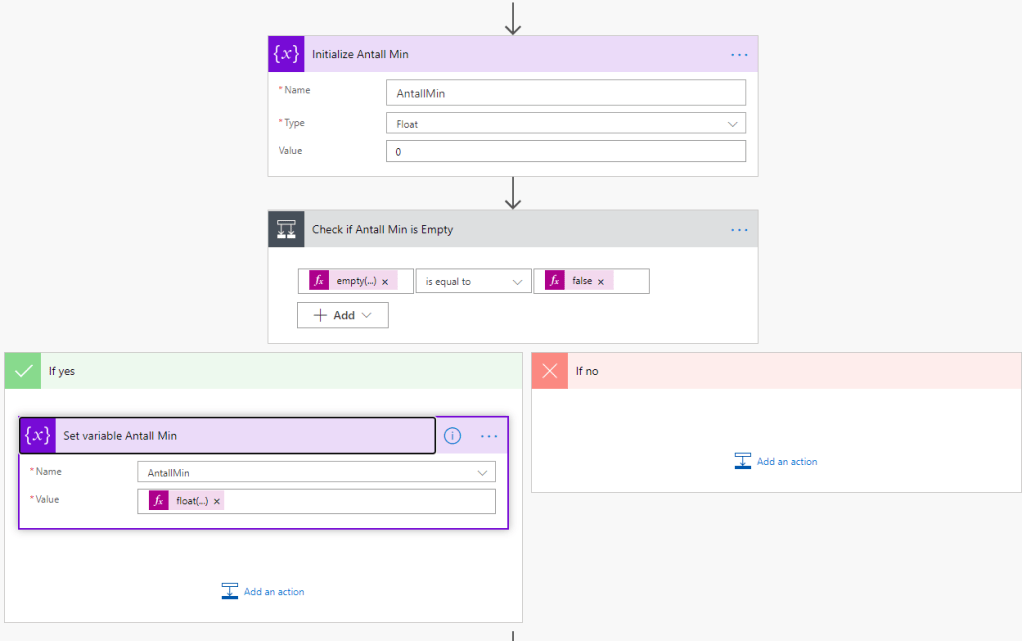
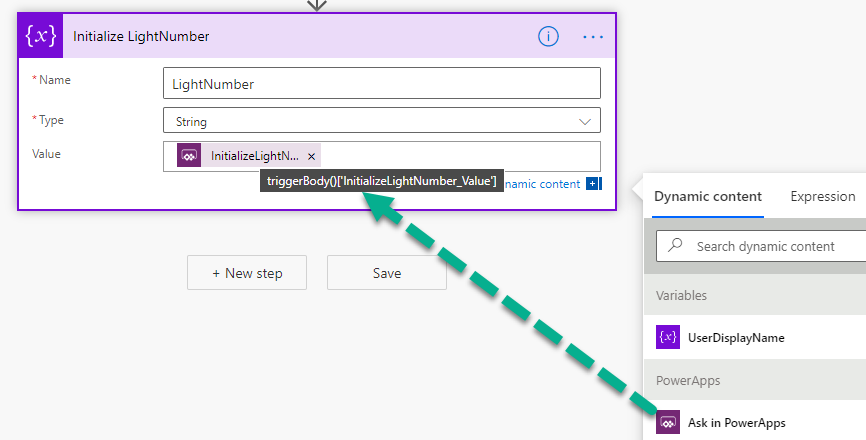
Next, add another initialize variable for getting the light number. After renaming the action, click on “Ask in PowerApps”:

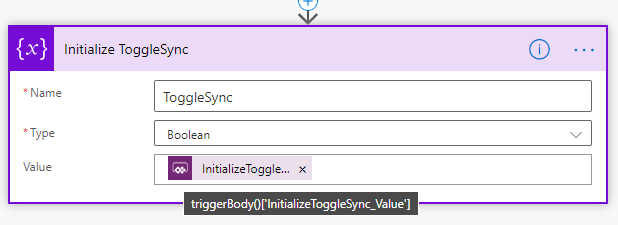
Add another initialize variable, this time a boolean value, and for getting the value of the toggle sync control:

Next, we will retrieve our user config source from the SharePoint list again, this time filtered by the UserDisplayName variable:

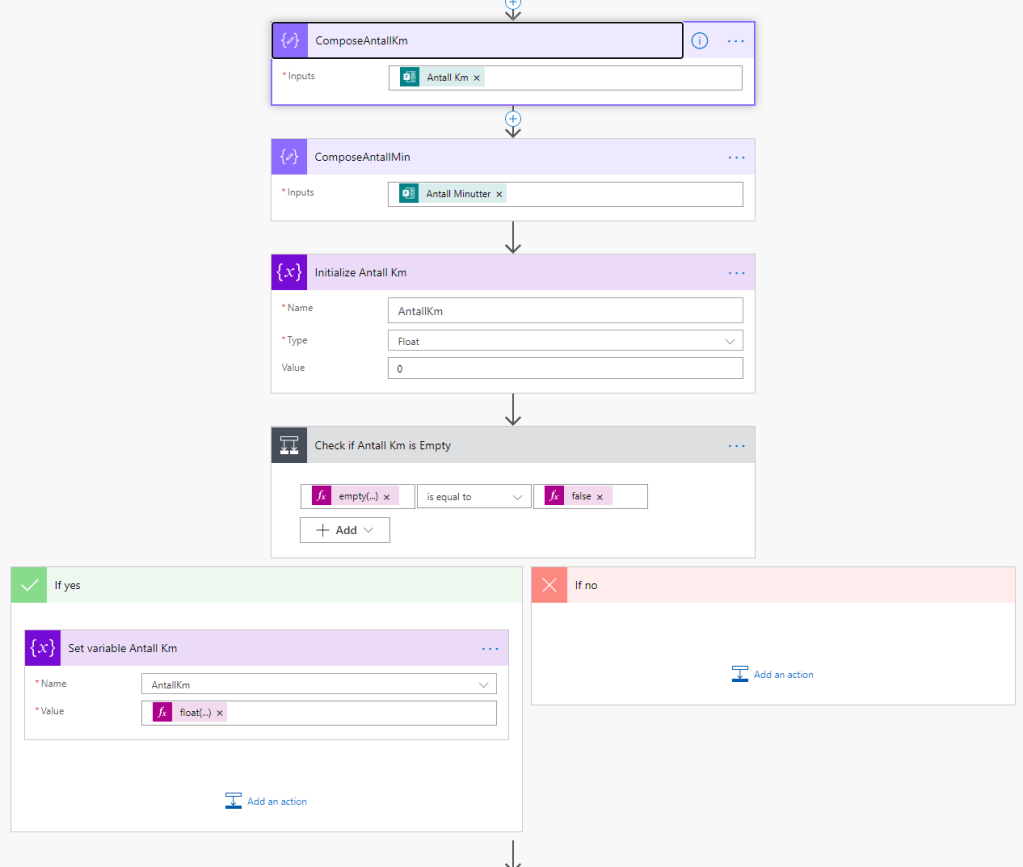
We now need some logic to the next steps for the flow, lets start by the toogle button which will be either true or false:

If yes, that should mean that we either should create a new graph subscription, or update any exisiting ones.

Under Yes, add a new action. This action will call the Custom Connector I created in another blog post (https://gotoguy.blog/2020/10/24/managing-microsoft-graph-change-notifications-subscriptions-with-power-platform/). This Custom Connector should have the following actions:

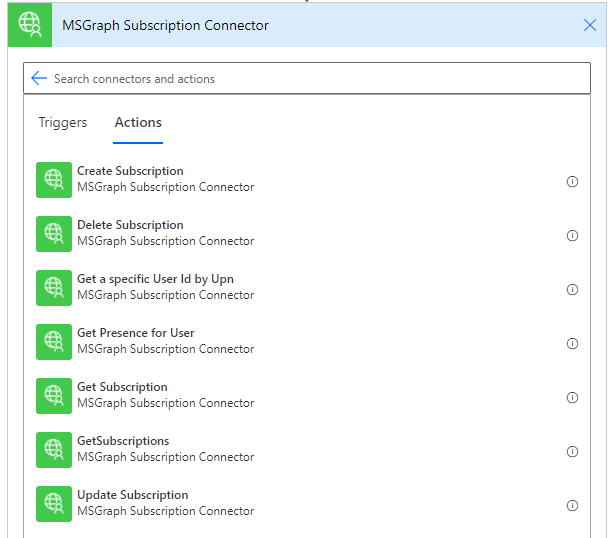
Click on the Get Subscription action to add that. For the subscriptionId parameter I will refer to the first returned instance of any exisiting Graph Subscriptions I have in the SharePoint list returned earlier.

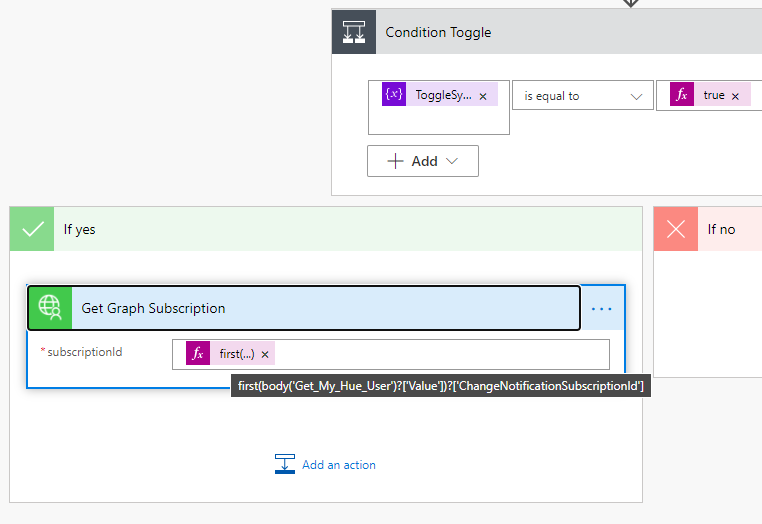
Here is the expression for your reference:

first(body('Get_My_Hue_User')?['Value'])?['ChangeNotificationSubscriptionId']

When running the Flow this action will either:

  • Return a 200 OK if the subscription is found, or if the SharePoint List has a blank value for ChangeNotificationSubscriptionId.
  • Return a 404 ResourceNotFound if the subscription is not found, this will happen if the subscription is expired. This is an error that will halt the Flow, so we need to handle it.

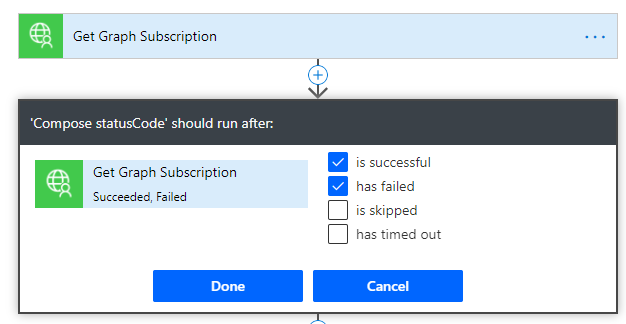
So lets start by getting the Status Code. I’ll do that by adding a compose action with the following expression:

outputs('Get_Graph_Subscription')['statusCode']

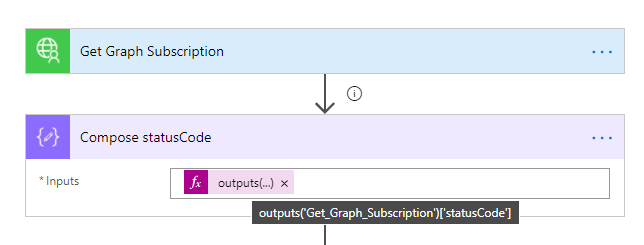
It’s also important to set that this action should run even if the Get Graph Subscription action fails:

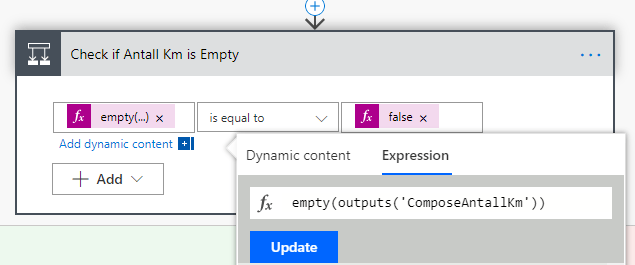
Lets add another condition, where the outputs of the status code should be 200 (OK):

A status code of 200 will either indicate that either we found an existing Graph Subscription matching the configured subscription id from the SharePoint List, or that the list is blank and the Get Graph Subscription will return an empty array or any other Graph Subscriptions you might have. In the first case, we will just update the existing subscription, in the latter case we will create a new subscription. Lets start by adding another compose action:

Adding the Flow to the Hue Power App

Back in the Hue Power App, we can now link this Flow to the toggle control. With the sync toggle control selected, go to the Action menu, and then click on Power Automate. From there you should see the “Hue – Create Update Remove Graph Subscription” Flow, click to add it. On the OnChange event, add the Run parameters where the lightnumber value is read from the dropdown list and selected items lightnumber, and the toggle button value like this:

Blog Series – Power’ing up your Home Office Lights using Power Platform – Introduction

Microsoft Power Platform can be used in a variety of creative ways to both learn and create awesome automation solutions, and you can even use this platform for your home automation. In this series of blog posts and introductory videos I will show you how you can control your Home Office Lights (in my case Phillips Hue) via API and Power Platform components like PowerApps, Power Automate, Logic Apps and more.

As an introduction, lets start with the “birds overview” over the solution I’ve built:

The main idea was to be able to both interactively, and triggered based on events, to be able to control my Philips Hue Lights using Power Platform components like PowerApps and Power Automate. Why you say? Well, it’s cool isn’t it! And fun, and a well worth project to invest time in because of the great learning potential. I have learnt tons of new stuff, about Power Platform, Microsoft Graph, SharePoint Lists, and Azure resources like Key Vault, Logic Apps etc. And not to forget, I’ve learnt a lot about the Hue Remote API and implementation of Oauth!

I will get into the chosen solutions and why I elected to use the technologies mentioned, and how they interact as shown in the diagram above, but first I wanted to provide you with this short introduction video from me on the concept:

This blog post is the introduction to the series of blog posts, and also a part of my contribution to the Festive Tech Calendar 2020 https://festivetechcalendar.com/. As soon as the schedule is published, I will at the allocated date later in December do a live stream broadcast where I will talk about this solution and do a Q/A where I will try to answer all your questions. But before that, I will publish the all parts of the blog series and accompanying videos as shown below. Links will become alive as soon as I have published. This way you can follow along and by the time of the live stream, you could have your own solution up and running!

The blog series will consist of the following parts, links will be available as soon as the parts are published:

  1. Power’ing up your Home Office Lights: Part 1 – Get to know your Hue Remote API and prepare for building your solution.
  2. Power’ing up your Home Office Lights: Part 2 – Prepare Azure Key Vault for storing your API secrets.
  3. Power’ing up your Home Office Lights: Part 3 – Using Logic Apps to Authorize and Get Access Token using Oauth and Hue Remote API.
  4. Power’ing up your Home Office Lights: Part 4 – Using Logic Apps to Get Access Token and Renew Access Token if needed.
  5. Power’ing up your Home Office Lights: Part 5 – Using Power Automate Flow to Get Access Token and Config.
  6. Power’ing up your Home Office Lights: Part 6 – Using Power Automate Flow to Link Button and Whitelist user.
  7. Power’ing up your Home Office Lights: Part 7 – Building the PowerApp for Hue to Get Config and Link user.
  8. Power’ing up your Home Office Lights: Part 8 – Using Power Automate Flows to Get and Set Lights State.
  9. Power’ing up your Home Office Lights: Part 9 – Using Microsoft Graph to get Teams Presence and show state in PowerApp.
  10. Power’ing up your Home Office Lights: Part 10 – Subscribe to Graph and Teams Presence to automatically set Hue Lights based on my Teams Presence!

Well, I certainly have my work cut out, so I better get started. Thanks for reading, please follow the progress and join me on the later live stream!

How I as a Soccer Coach….

…..moved trainings and meetings online using the modern collaboration tools I know and love!

When I’m not working or fulfilling my community activities as MVP, I spend many evenings and weekends at the soccer field, where I’m coaching and managing a soccer team consisting of 14 year old boys.

Due to the Coronavirus situation, as in many countries also Norway has closed it schools, many businesses are either closed or working from home, and in general we are all following the rules of isolating to make sure the virus doesn’t spread. And of course, this has also resulted in closing all grass roots football, for the time being at least to the end of April. I quickly understood that I needed to think in new ways..

So I decided to use the tools I have at hand, and I created virtual follow ups using tools like Microsoft Teams, Forms, Power Automate and SharePoint Online among a few to help support the boys doing self practice and have Virtual team Meetings..

This blog post is a technical version of a LinkedIn article I wrote in Norwegian, https://www.linkedin.com/pulse/hvordan-jeg-som-fotballtrener-jan-vidar-elven/, explaining more the reasons and why I set this up. In this post I will go more into the technical setup, and share some resources for those that want to learn or maybe do something similar themselves. Some of the screenshot images are in Norwegian, but you should be able to understand from my comments.

It all started with Microsoft Teams.. and a Form!

I knew already from before that Microsoft Teams would be more central in my daily work, but I also observed that my son and his classmates, that also plays on the aforementioned soccer team, use Teams themselves now for digital schooling at home. They have daily Teams meetings, as well as some online classes and homework delivery.

So I thought that I wanted to set up a player meeting on Teams, and later a meeting with their parents. This way we could have a social and digital arena to meet each other, as well as talk with the boys how we wanted them to do training with self practice at home. So the first thing was to invite to online meetings.

I knew that the boys already used Teams in school, but I needed to collect their school e-mail addresses. I also suspected several of the parents use Teams at their workplace, but not everyone, so I also needed to get an overview on that. So I decided to create a questionnaire in Microsoft Forms:

How I set it up:

I created a Form with the following inputs:

  • Name (Text). The person filling in the form.
  • Using Teams from before? (Choice). Yes, No and Don’t Know option for parents to answer if they use Teams already.
  • Parents, Teams e-mail address (Text). Their existing Teams work e-mail address or personal e-mail address.
  • Players, Teams e-mail address (Text). The Teams e-mail address they use at school.

In addition I used the club logo and customized the theme colors for the Form. Then I selected Share settings and selected so that “Anyone with the link can respond”. This will mean that all responses are anonymous, so that’s why I require that they type their name in the first input. Then I distributed the Forms link to the parents.

After I received all the responses, I created a Teams meeting invite to the players for the players online meeting, and a Teams meeting invite to the parents for the parents online meeting.

We were now ready for our inaugural online meetings!

Organizing Self Practice Trainings

Normally our soccer team practice at least 3 times a week, in addition to playing games or other activities. So before we had the online player meeting, a self practice training plan was created, focusing on 3 weekly trainings:

  • Conditioning (interval runs, with or without ball, dribbles, jumps and obstacles etc.)
  • Technique, Agility and Strength (ball possession, passing, runs, sprints, physical strength)
  • Endurance (long hikes and outdoor activity with family)

These training should be completed after plan where the boys will get approved attendance for each training they complete. To get a training approved they needed to self register a training form, as well as document by sharing pictures, video, screenshots of activity etc.

The players were shown examples of activities and drills they could complete themselves or with help of family. With this organization and training plan, the only thing that was missing was a system for registering self practice and how I could follow up on that.

I decided to create another Form. In this Form which the boys got a shared link to, they could register their name, date, self assessment, what kind of activity they did and type, provide a description and optionally register number of minutes and kilometres. They were also asked to send in documentation with video, pictures, etc.

This worked really great and next week we already had a lot of responses for completed trainings:

And from the media I received I could really see that the boys were doing their self practice:

How I set it up:

I created a Form with the following inputs:

  • Name (Text). The player name filling in the form.
  • Activity Type (Choice). Conditioning, Technique + Strength, or Endurance.
  • Date of Activity (Date).
  • Self Assessment (Rating). 1-5 stars where they could evaluate their own session.
  • Type of Condition (Choice). If they did conditioning work, what kind of interval (4×4, 60×60, 15×15).
  • Technique + Strength (Text, Long). Comment field for explaining how they did technique and strength work.
  • Endurance (Text, Long). Comment field for explaining what kind of long activity they did.
  • Number of Kilometres (Text, Restricted to Number). Optionally how many kilometres they practiced.
  • Number of Minutes (Text, Restricted to Number). Optionally how many minutes the activity lasted.
  • Sent media of activity (Choice). Yes or No for if they have sent picture, video or screenshot to our team e-mail address.

Also in this Form I used the club logo and customized the theme colors. Then I selected Share settings and selected so that “Anyone with the link can respond”.

PS! I was looking into a File Upload response in the Form, but this cannot be added to a Form that are shared externally. That is why I needed the boys, or their parents, to send their media files to our e-mail address in addition to the Form registration.

Following up on Registered Self Practice Trainings

With all those great responses coming in, I could look through the responses in Office Forms, and download an Excel copy of the responses, but I needed something more to follow up the trainings. So I created a private Team in Microsoft Teams:

Next I wanted to get all the responses from Forms into a SharePoint List. I created the List into the Teams SharePoint Site so that I could get all the registered self practice trainings in one place, and be able to do edits if needed. I also added some extra columns for approve the training and if there was sent media documentation:

Now the only thing I needed was some kind of automation that could bring every response from Forms over to this list: Enter Power Automate!

With the help of Power Automate I created the following Flow to automate that every time a new response is submitted in the Form, this would trigger the Flow:

Next I needed to do some magic on the number inputs, I’ll get back to that in the “How I did it:” section, but the Flow then created a new SharePoint List Item:

How I did it:

The first thing I did was to create the Team that would also host the SharePoint Online Site for my list. The Team was created in my own tenant as a private team, and I elected not to invite any player, or parent, to the Team as guests at this point.

The SharePoint list was created with the following columns to reflect the Form:

  • Renamed Title column to Name
  • Type of Activity (Choice, with the same values as from the Form)
  • Date (Date and Time, Include Time: No)
  • Self Assessment (Number)
  • Type of Fitness/Conditioning Activity (Choice, with same values as from the Form)
  • Technique + Strenght (Multiple Lines of Text)
  • Endurance/Long Actitivty (Multiple Lines of Text)
  • Sent Picture (Yes/No)
  • Number of Km (Number)
  • Number of Mins (Number)
  • Approved (Yes/No)
  • Submitted (Date and Time, Include Time: Yes)

After the list with all the columns was created, the next step was to create the Flow in Power Automate. You can create Flows directly from the SharePoint List, as shown below, and then use one of the provided templates:

Myself I started at https://flow.microsoft.com and selected to create a new Flow as Automated – from blank, and the selecting the trigger for “When a new response is submitted”:

After I give a name to the Flow and select which Form I want to trigger on responses from, I add an Action to get the response details, as shown below:

The next part is a little more complex. When a Form response is submitted, all response details will be provided as Strings. And if I try to update those values directly into the SharePoint list, it will fail because the Column require a number format. So I need to convert those string values to either Integer or Float respectively.

Power Automate have some Data Operation Actions I can use in Flows, and I have used the following three Compose actions, where I get the Self Assessment, Number of Km and Number of Min response details:

The Compose action will create objects I can refer back to later in the Flow. The next complex thing is that I need to check if there are any values for number of kilometers and minutes, and these Form fields are not required and can be empty. There could be several ways to do this, I did it this way:

As shown above, I first add an Action for Initialize Variable, and give it the name for AntallKm (Number of Km), and set the initial value to 0. I specify that the type is Float (as I want to have decimal values). Next I add a Condition action, where I check if the ComposeAntallKm is empty, meaning it is equal to false. I do this as an expression, where the expression is using the empty function and checking against the output from the ComposeAntallKM earlier: empty(outputs(‘ComposeAntallKm’))

If this condition evaluates to false, meaning that there has been provided a value in the Form, then the Flow will go to the If Yes action, and I convert the string to a Float value with the expression: float(outputs(‘ComposeAntallKm’)), I’ve tried to illustrate that with the green arrow below. This expression would have failed the Flow if I didn’t check if it was empty or not. If the value is empty, it would go to the If No action, and this is just empty because I then just let the value be the default 0 i provided when I initialized the variable (illustrated with the red arrow below).

Next in the Flow, I do the exact same logic for the number of minutes:

I’m now ready to update the SharePoint List with a new item. I select the SharePoint Online Create item action, and after specifying the Site and List name, I’ll choose most of the item values from the dynamic content picker. The Km and Minutes values are picked from the respective variable. And for Self Assessment, I do this with an expression consisting of the int function that converts the string to an integer from the Compose action further up.

For reference, my entire Flow at this point is shown below (collapsed without action details):

Take it to the Next Level – Teams Bot with Adaptive Card!

At this point I have a working solution where I get all new responses put in to the SharePoint List. I can now look through, edit and approve the registered trainings.

An even cooler solution would be that each registered training will be posted to the Team Channel as an adaptive card, where I can edit and approve and submit that back so that the list would be updated directly. That way I can follow up and check trainings in my Teams client on either my PC or Mobile, without needing to go to the SharePoint list.

So I added a couple of more steps to my Flow after the Create item action. First I added an action for posting an Adaptive Card to a Teams Channel and wait for a response, the next step was to Update the list item with the values.

I will go into more details later under the “How I did it” section, but the end result of this was that every time a player submits a new training activity, I will get this Adaptive Card in my Teams Channel, summarizing the details of the training and providing me with the ability to edit the player name in case they typed it wrong, update any values for km or minutes, and select yes or no for if the player has sent photos or the training is approved:

When I click the Update button, the values are submitted back to the Flow and the List item is updated.

How I did it:

Before I go into the Flow details on how to post adaptive card to Teams channel and process the response back, I want to show how I built the adaptive card.

Adaptive cards are posted as a JSON formatted message. You can read more about it here https://adaptivecards.io/, see samples and usage scenarios and more. There’s also a great resource called the Adaptive Cards Designer, https://adaptivecards.io/designer/, where you can build your own cards from blank or using one of the sample templates.

The designer lets you add controls and configure properties visually, while producing the JSON message you will need later. This is the design format of the card I ended up with, a little bit of Norwegian text here but you get the main idea, note that I have some placeholder values her, from where I will add data from my Flow later:

In the “Card Payload Editor” window you will see the JSON format you will need use in your Flow, and in the following snippet I’ll provide you with my JSON message for this example here for you to reuse or build on as you like:

{
    "type": "AdaptiveCard",
    "version": "1.0",
    "body": [
        {
            "type": "Image",
            "altText": "Borgen IL",
            "url": "https://borgensawebstorage.z6.web.core.windows.net/borgen_logo.png"
        },
        {
            "type": "TextBlock",
            "size": "Large",
            "weight": "Bolder",
            "id": "Title",
            "text": "Ny Egentrening Registrert!",
            "horizontalAlignment": "Left"
        },
        {
            "type": "TextBlock",
            "text": "Ny egentrening er registrert av <NAVN>.",
            "wrap": true
        },
        {
            "type": "FactSet",
            "facts": [
                {
                    "title": "Type Treningsøkt",
                    "value": ""
                },
                {
                    "title": "Dato",
                    "value": ""
                },
                {
                    "title": "Egenvurdering",
                    "value": ""
                },
                {
                    "title": "Økt beskrivelse",
                    "value": ""
                }
            ]
        },
        {
            "type": "TextBlock",
            "text": "Verifisering",
            "size": "Large",
            "weight": "Bolder",
            "color": "Attention"
        },
        {
            "type": "TextBlock",
            "text": "Verifiser treningsdata og eventuelt oppdater:",
            "size": "Small",
            "weight": "Bolder"
        },
        {
            "type": "TextBlock",
            "text": "Spillernavn",
            "size": "Medium",
            "weight": "Bolder",
            "color": "Attention"
        },
        {
            "type": "Input.Text",
            "value": "",
            "style": "text",
            "isMultiline": false,
            "maxLength": 50,
            "id": "Spillernavn_input"
        },
        {
            "type": "TextBlock",
            "text": "Antall Km",
            "size": "Medium",
            "weight": "Bolder",
            "color": "Attention"
        },
        {
            "type": "Input.Number",
            "value": "",
            "style": "text",
            "isMultiline": false,
            "maxLength": 20,
            "id": "AntallKm_input"
        },
        {
            "type": "TextBlock",
            "text": "Antall Minutter",
            "size": "Medium",
            "weight": "Bolder",
            "color": "Attention"
        },
        {
            "type": "Input.Number",
            "value": "",
            "style": "text",
            "isMultiline": false,
            "maxLength": 20,
            "id": "AntallMin_input"
        },
        {
            "type": "TextBlock",
            "size": "Large",
            "weight": "Bolder",
            "color": "Attention",
            "text": "Godkjenn",
            "horizontalAlignment": "Left"
        },
        {
            "type": "TextBlock",
            "size": "Small",
            "weight": "Bolder",
            "text": "Har spilleren sendt skjermbilde, bilde eller video?",
            "horizontalAlignment": "Left",
            "separator": true
        },
        {
            "type": "Input.ChoiceSet",
            "id": "input_media",
            "value": "1",
            "choices": [
                {
                    "title": "Nei",
                    "value": "false"
                },
                {
                    "title": "Ja",
                    "value": "true"
                }
            ],
            "style": "expanded"
        },
        {
            "type": "TextBlock",
            "size": "Small",
            "weight": "Bolder",
            "text": "Er egentreningen godkjent?",
            "horizontalAlignment": "Left",
            "separator": true
        },
        {
            "type": "Input.ChoiceSet",
            "id": "input_godkjent",
            "value": "1",
            "choices": [
                {
                    "title": "Nei",
                    "value": "false"
                },
                {
                    "title": "Ja",
                    "value": "true"
                }
            ],
            "style": "expanded"
        }
    ],
    "actions": [
        {
            "type": "Action.Submit",
            "title": "Oppdater"
        }
    ],
    "$schema": "http://adaptivecards.io/schemas/adaptive-card.json"
}

With that JSON message ready, I can now add the “Post an Adaptive Card to a Teams Channel and wait for a response” action to my Flow. I select my Team, and the Channel I want to post the adaptive card to, and then paste in the JSON message from the Adaptive Card Designer:


As you can see from the images above, I’ve added dynamic data from the Flow where I had placeholders for values. Note also that I use the values “false” and “true” for the Input.ChoiceSet, this will make it correct when I set the values back to the updated List item.

PS! Another important thing to note is the “id” property of the inputs I want to be able to update back to the Flow. This “id” property needs to be specified later.

The Update message is what will be shown back in Teams after the Adaptive Card has been updated and submitted back with the Action.Submit button. It will look like this:

After the card is updated, a response will be sent back to the Flow. So my next step would be to add a Update item action for updating the selected values in the SharePoint List. From here I will select the SharePoint Site and List Name, and then getting the Id for the existing list item I want to update. This Id is from the earlier action in the Flow from where I created the list item:

The values I want to update back in the List from the Adaptive Card Response is shown above with the blue Teams icon. I will have to specify these by adding an expression that looks like the following, as there are currently no dynamic output from the previous action I can select:

outputs('Post_Adaptive_Card_to_Egentrening_Teams_Channel_Wait_Response')?['body/data/Spillernavn_input']

Note the following from above, refers back to the action name (since I had blank spaces in the step name, I will have to refer back to it with underscore), and from the response body and data section I will refer to the “id” property of the adaptive card input.

Create similar expressions for the other inputs, and that should be it! The complete Flow step is now like this:

Summary and Next Steps

In this quite lengthy blog post I have shown how I built myself a great follow up solution for my soccer team self practice trainings. The boys find it easy to use, and I can use the tools and solutions I know and love for following up. I have also learnt quite a bit of new tricks and tips 😉

I also start to have some great statistics, I can summarize and rank the players so that I can create a top 10 list for example. And these ranks can be published to the boys, they do love a competition and this can motivate them to do some extra work. I have created this HTML table, that I update semi-manually now. I’m already working in the next Flow that will publish updates to this table automatically. So there might be a follow up blog post on this.. 😉

I hope this has been helpful or/and inspiring, reach out to me if you have questions, and remember the Power of the Flow 🙂