Protect Logic Apps with Azure AD OAuth - Part 3 Connect to API from Power Platform
In this article I’m going to build on my previous blog posts in this series where I have written about how to add Azure AD OAuth authentication and authorization to your Logic Apps and expose them as an API. For reference the links to these blog post articles are here:
- Protect Logic Apps with Azure AD OAuth – Part 1 Management Access | GoToGuy Blog
- Protect Logic Apps with Azure AD OAuth – Part 2 Expose Logic App as API | GoToGuy Blog
If you want to connect to API’s using Power Platform (Power Automate Flows, PowerApps etc.), you can do this in two different ways:
- Using HTTP action and send requests that use Azure AD OAuth authentication. This will use the “Client Credentials” OAuth flow, and is suitable for calling the API using application permissions and roles.
- Setting up a Custom Connector for the API, and using the HTTP logic app trigger as operation. This will use the “Authorization Code” OAuth flow, and is suitable for using delegated permissions and scopes for the logged on user via connections.
So it depends on how you want your Power Platform users to be able to send requests your Logic App API. Should they do this as themselves with their logged on user, or should they use an application identity? There are use cases for both, so I will show both in this article.
Connect to Logic App API using Custom Connector
Using Custom Connectors is a great way to use your own identity for sending requests to an API. This way you can also securely share Custom Connectors, and Flows/PowerApps, using them in your organization, without needing to share sensitive credentials like client id and client secrets.
If you want to create a Custom Connector in Power Platform that triggers an HTTP request to a Logic App, you can currently do this in one of the following ways:
- Creating Custom Connector using Azure services and Logic App.
- Exporting the Logic App to a Power Platform environment.
- Creating the Custom Connector using an OpenAPI swagger definition file/url.
- Creating the Custom Connector from blank.
Lets take a quick look at each of these, but first we need to take care of some permissions in Azure for creating the Custom Connector automatically.
Azure Permissions for Logic Apps and listing swagger
There are some minimum permissions your user needs to be able to create a Custom Connector automatically by browsing the Azure Service.
A good starting point is using one of the built in Azure roles for Logic Apps:
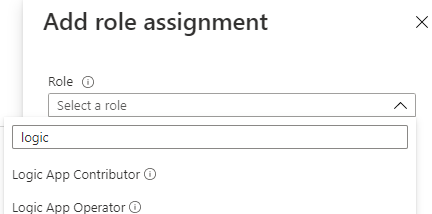
But even these do not have the permissions necessary, if you try you will get an error similar to the following:
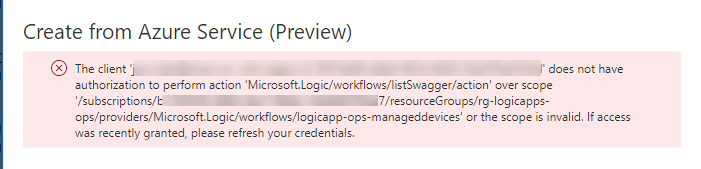
So we need to att this ../listSwagger/action for the scope, and you could give the user full Contributor access, but that seems rather excessive. Lets create a custom role instead. I will do this using Azure PowerShell, for reference please see the docs: Create or update Azure custom roles using Azure PowerShell - Azure RBAC | Microsoft Docs .
After connecting to Azure using an Azure account that can create custom roles for the scope (Owner or User Access Administrator), start by exporting an existing role as a starting point:
| |
Then edit this JSON file, by removing the Id parameter, defining a Name, setting the IsCustom to true, and Description to something descriptive like below. I have also set my Azure subscription id under assignable scopes, and added the required ../listSwagger/action:
| |
After that you can create the custom role:
| |
This role can now be assigned to the Power Platform user(s) that need it, using the scope of your Logic Apps, for example the Resource Group. You can either add the role assignment to the user directly, or preferrably using Azure PIM:
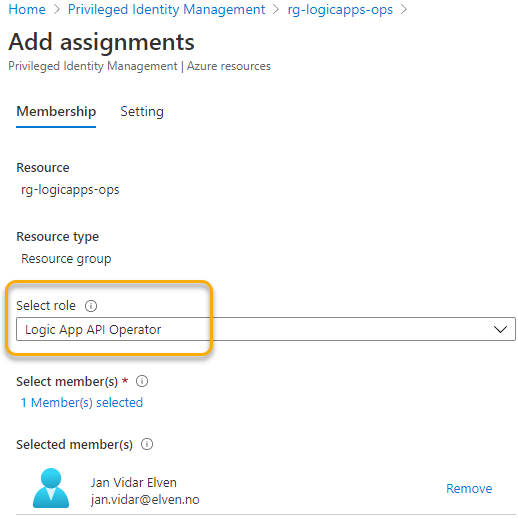
With the correct permissions now in place, you can proceed to the next step.
Creating Custom Connector using Azure services and Logic App
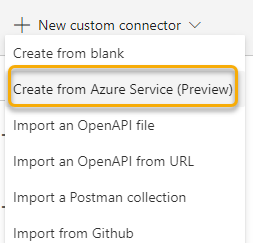
Log in to Power Apps or Power Automate using your Power Platform user. Under Data and Custom Connectors, select to create a New custom connector. From there select “Create from Azure Service” (Preview as per now):
Next, type name for your Custom Connector, select which Azure subscription, and from which Azure service which in this case is Logic Apps. Note that you can create from Azure Functions and Azure API Management as well. Then select the Logic App name from the list:
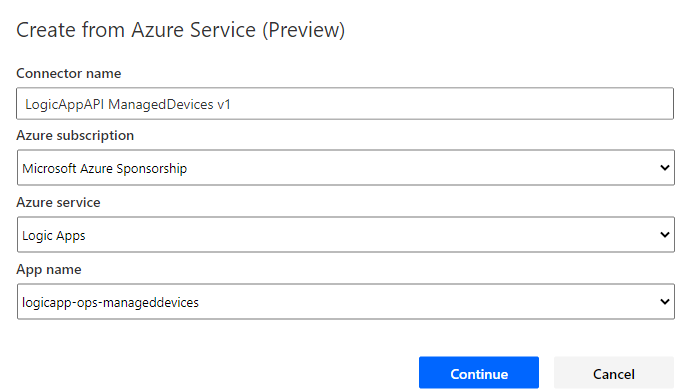
If you don’t see or get any errors here, verify your permissions.
Click Continue, and you will see something like the following, where the Host and Base URL has automatically been set correctly for your Logic App HTTP trigger. If you want you can upload an icon, background color and desctription as well:
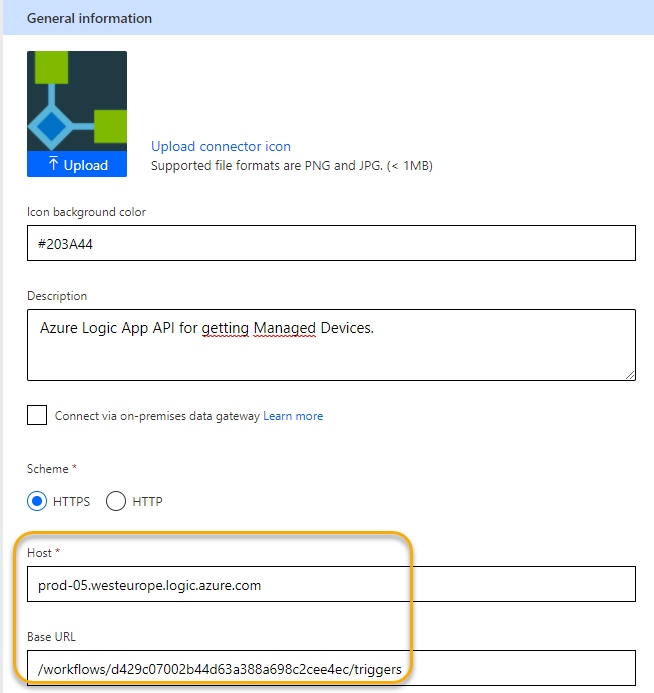
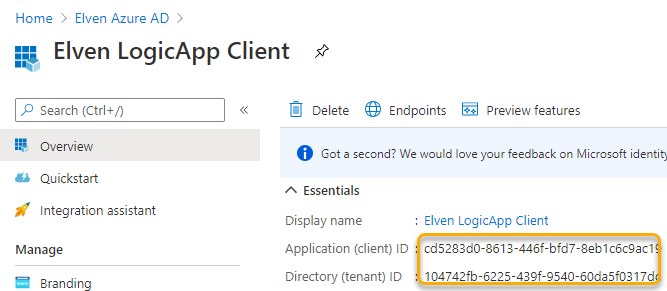
Click Next to go to Security. Here we need to change the Authentication to OAuth 2.0, as this is what we have implemented for authorizing requests to the Logic App. To authenticate and get the correct Access Token, we will reuse the LogicApp Client app registration that we created in the previous blog post. Copy the Application Client ID and Tenant ID:
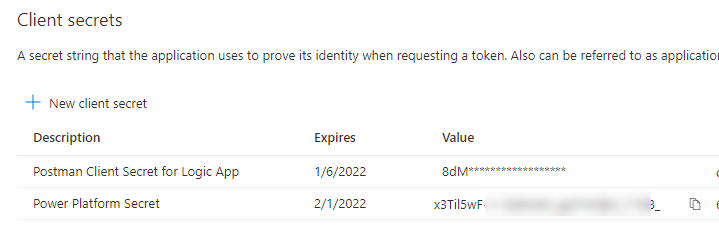
And then create and copy a new secret for using in the Power Platform Custom Connector:
Fill in the rest of the OAuth 2.0 details for your environment like below:
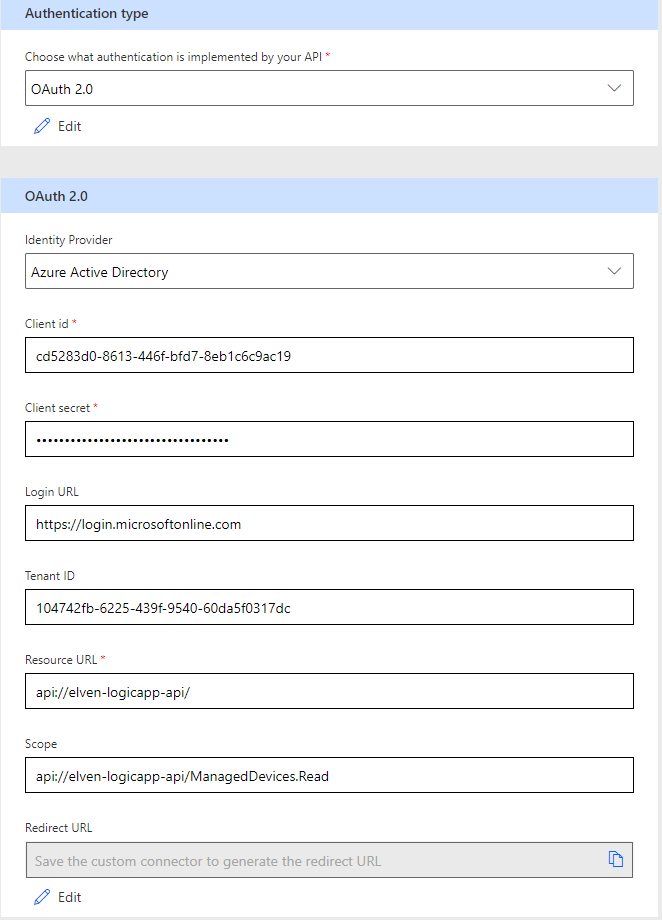
Note from above that we need to specify the correct resource (the backend API) and scope. This is all very vell described in the previous blog post.
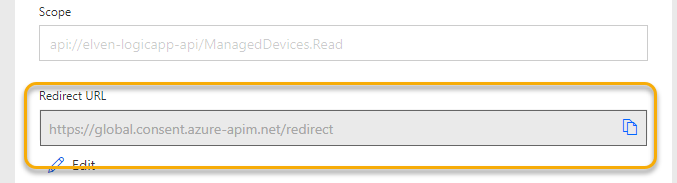
Click Create Connector to save the Connector details. Make sure that you copy the Redirect URL:
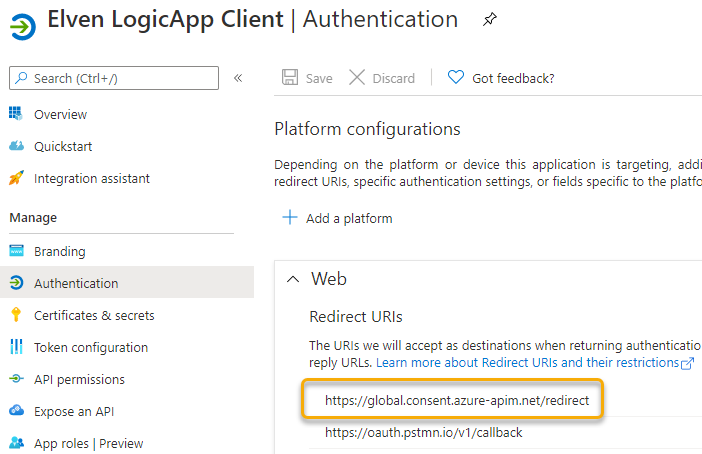
And add that to the App Registration redirect URLs:
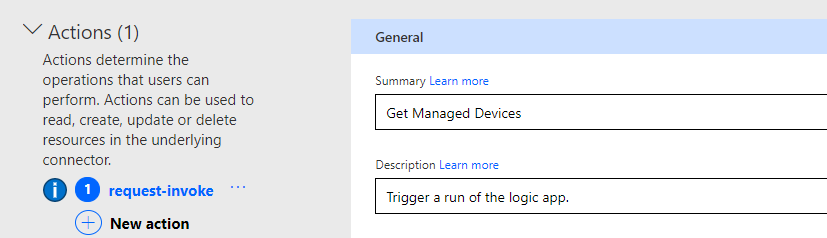
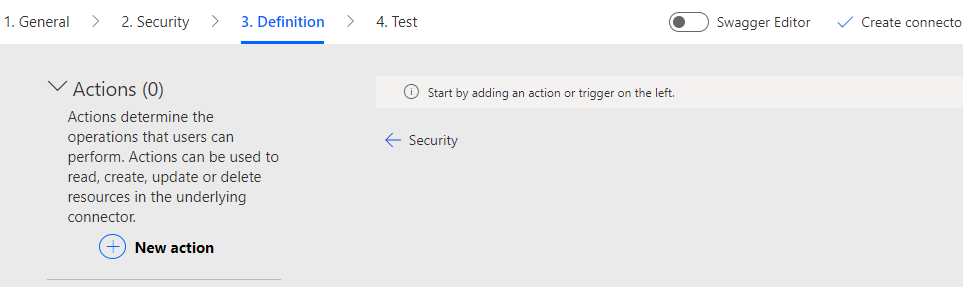
Next, under the Custom Connector proceed to step 3. Definition. This is where the POST request trigger will be, and it should already be populated with an action:
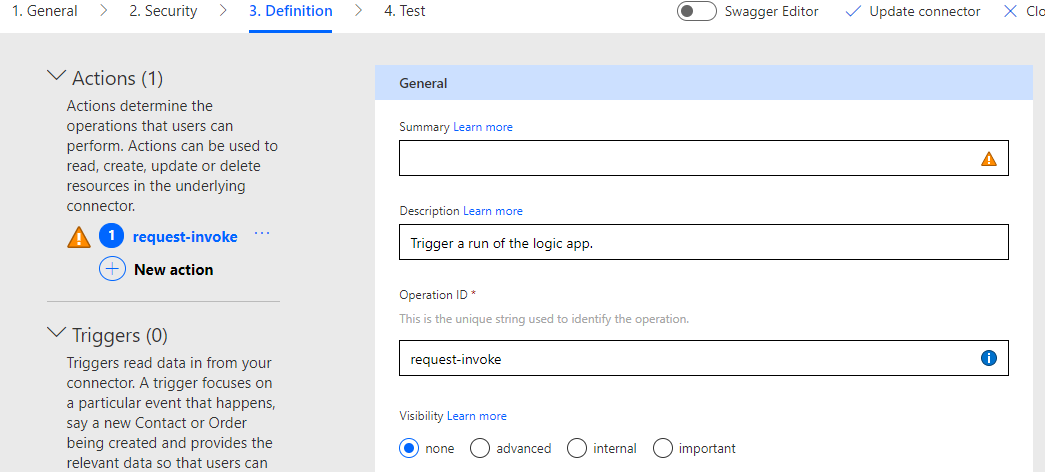
We need to specify a value for Summary, in my case I will type “Get Managed Devices”:
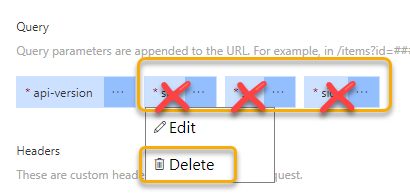
Next, under Request Query, remove the “sp”, “sv” and “sig” parameters, as these will not be needed as long as we are using OAuth2 authorization scheme:
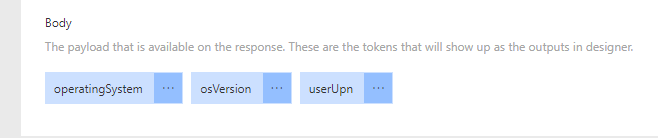
The Body parameter should be correctly specified, expecting an operatingSystem, osVersion and userUpn request body parameters:
Last, lets check the Responses from the Logic App. They have been successfully configured with status 200 (OK) and 403 (Not Authorized), as these two responses were defined in the Logic App.
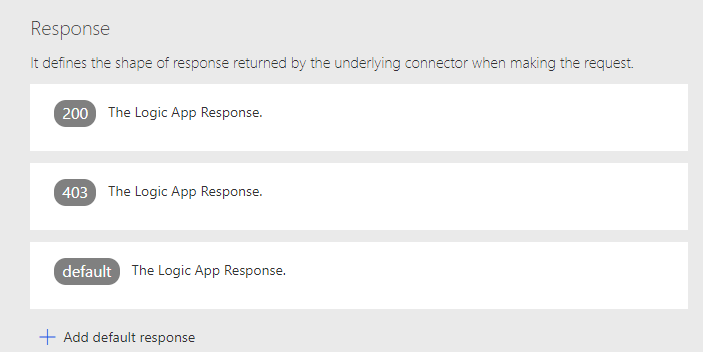
If the Response body is empty like below, we would need to import from sample output from the Logic App (response body should have automatically been configured if the response action in Logic App had a response schema defined):
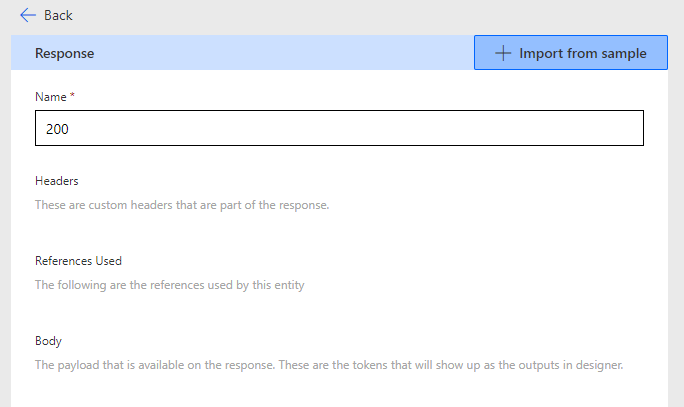
For response status 200, the sample import is:
| |
Giving this response definition:
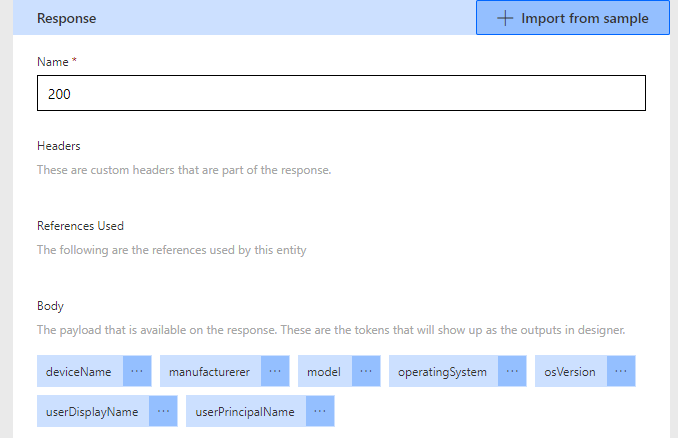
The sample response from the 403 not authorized should be:
| |
Giving this response definition:
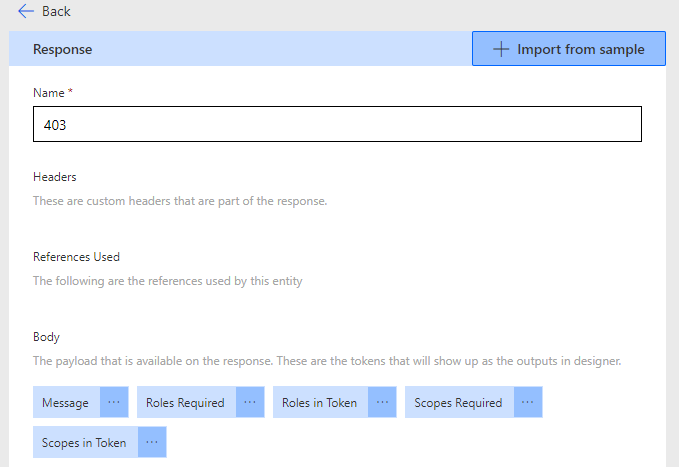
NB! It’s important to have correct responses defined like above, it will make it easier to consume those responses later in Power Automate Flows and Power Apps.
Click on Update Connector, and then go to next section 4. Test.
We can now test the Logic App trigger via the Custom Connector, first we need to create a new connection:
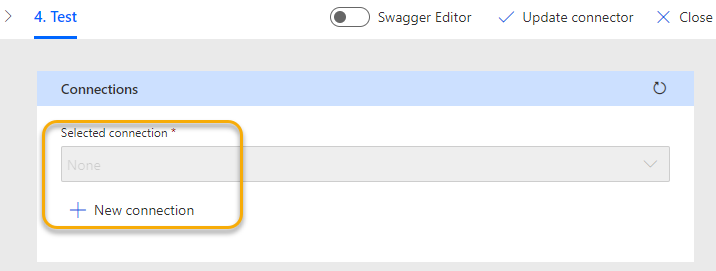
After logging in, and if needed consenting to the permissions scopes (se previous blog post for details), we should have a connection. We can now test the trigger by supplying the api-version (2016-10-01) and specify the operatingSystem, osVersion and userUpn parameters:
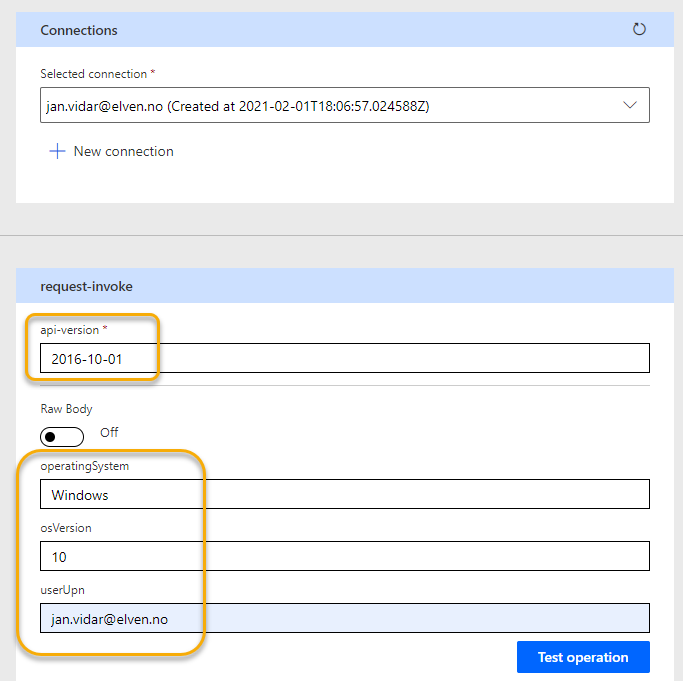
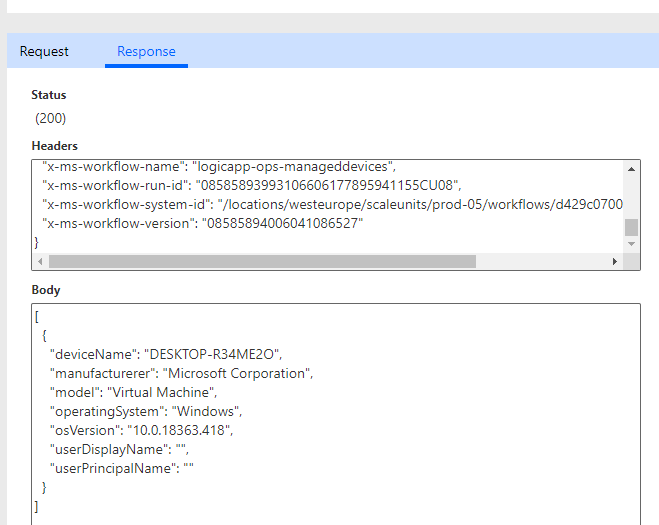
Click Test operation and verify a successful response like below:
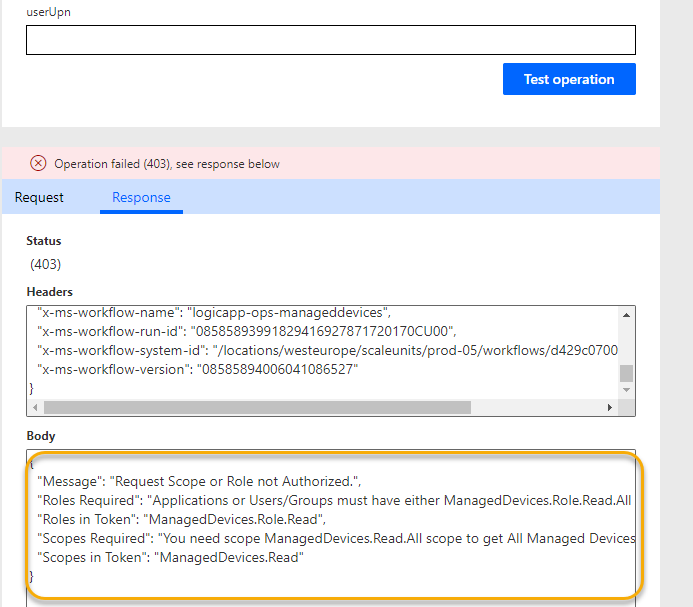
Let’s try another test, this time leaving the userUpn blank (from the previous blog post this means that the Logic App tries to return all managed devices, if the user has the correct scope and/or roles). This time I get a 403 not authorized, which is expected as I don’t have the correct scope/role:
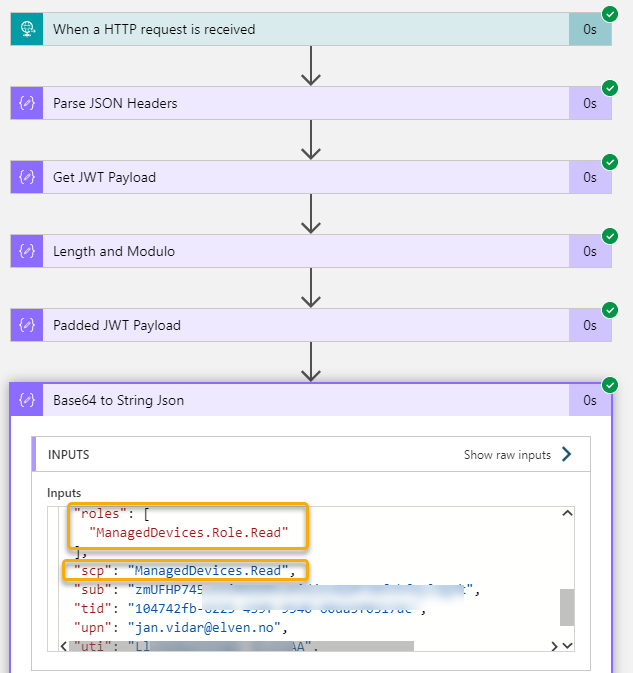
Checking the Logic App run history I can see that my Power Platform user triggered the Logic App and I can see the expected scp and roles claim:
Perfect so far! In the end of this blog post article I will show how we can get this response data to a Power App via a Flow and the Custom Connector, but first lets look into the other ways of creating a Custom Connector.
Exporting the Logic App to a Power Platform environment
In the previous example, I created the Custom Connector from my Power Platform environment, in this example I will do an Export from the Logic App. The user I will do this with needs to be a Power Platform licensed user and have access to the environments, or else I will get this:
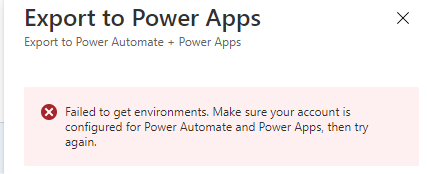
To Export, click this button:

Then fill inn the name of the Custom Connector to create, I will call this ..v2, and select environment:
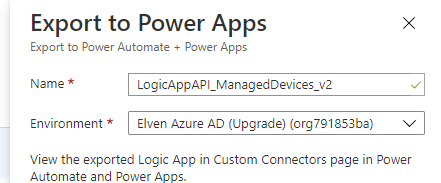
You might get another permission error:
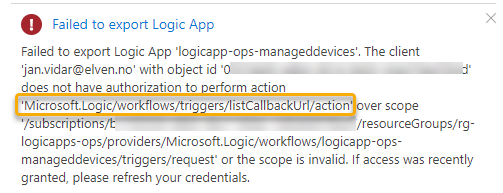
If so, we need to update the Custom Role created earlier with this permission. Do the following:
| |
The role and the assignment should now be updated, so we can try again. You might need to refresh or log out and in again for the permission to be updated. After this the Export should be successful:
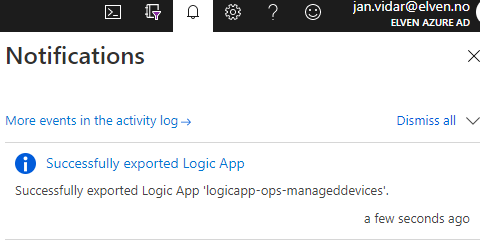
We can now find the Custom Connector right below the first we created:

We still need to edit the Custom Connector with the authentication details, adding the app/client id, secret etc. The export has also left out all the query parameters (sv, sp, sig) but also the required api-version. This must be fixed, the easiest way is to switch to Swagger Editor, and add the line 15 and 16 as shown below:
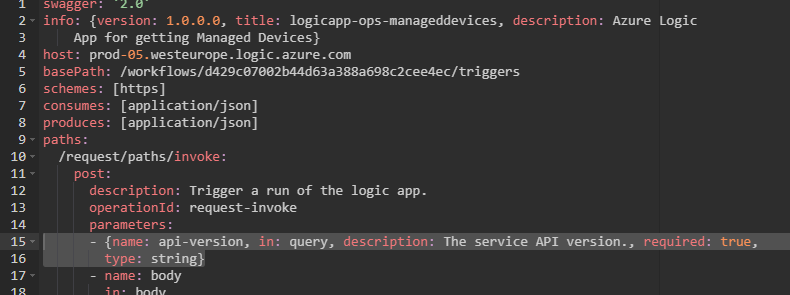
After this you should be able to Update the Connector, and the Test, Create a Connection and verify successful results.
Creating the Custom Connector using an OpenAPI swagger definition file/url
Both examples above, either importing a Custom Connector from Azure Service, or exporting the Logic App to a Custom Connector in a Power Platform environment, require that the user doing this both has:
- Azure RBAC role assignment and permissions as detailed above.
- Access to Power Platform environment and licensed for using Power Platform.
What if you as Azure administrator don’t want your Power Platform users to have access to Azure, but you still want to help them with creating Custom Connectors that send requests to selected Logic App workflow APIs?
Then you can provide them with an OpenAPI swagger definition file or url. You can get the swagger OpenAPI definition by running this Azure REST request: Workflows - List Swagger (Azure Logic Apps) | Microsoft Docs .
To get your swagger you can look at the first blog post in this series, where I showed how you could use Az PowerShell to get management access tokens using Get-AzAccessToken and running Invoke-RestMethod. In this example I’m just going to use the Try it button from the Docs link above, and then authenticate to my Azure subscription, and fill inn the required parameters:
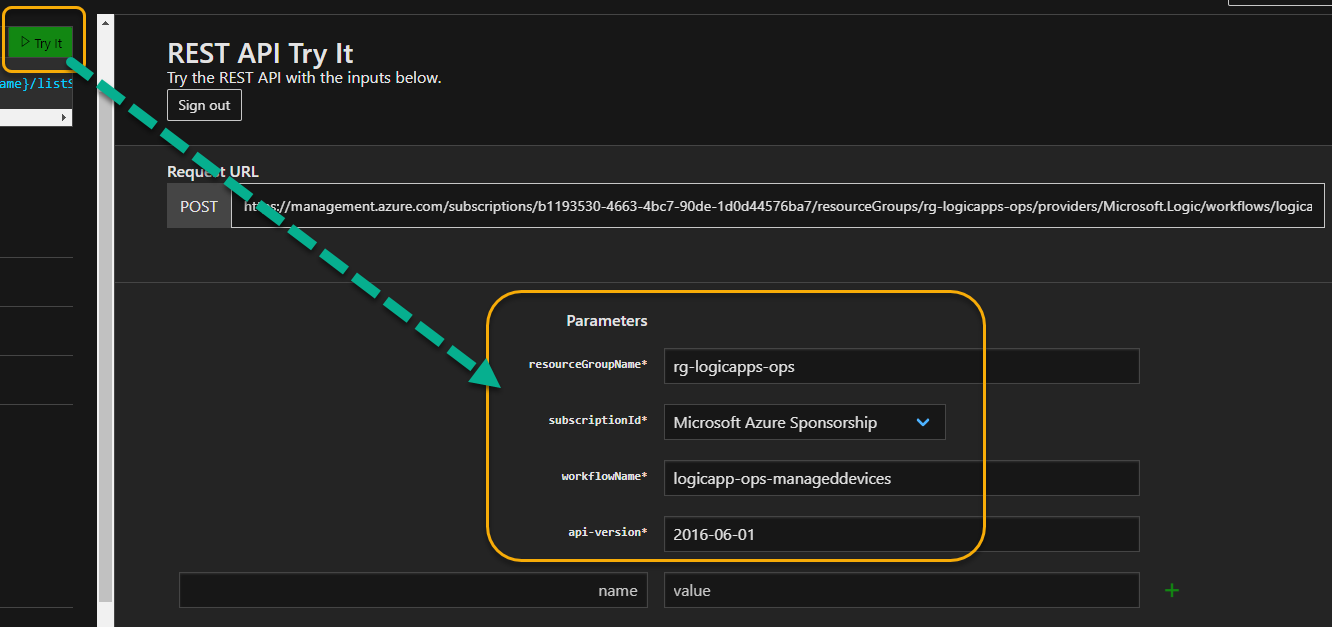
Running this request should produce your requested swagger OpenAPI definition. You can now copy this to a file:
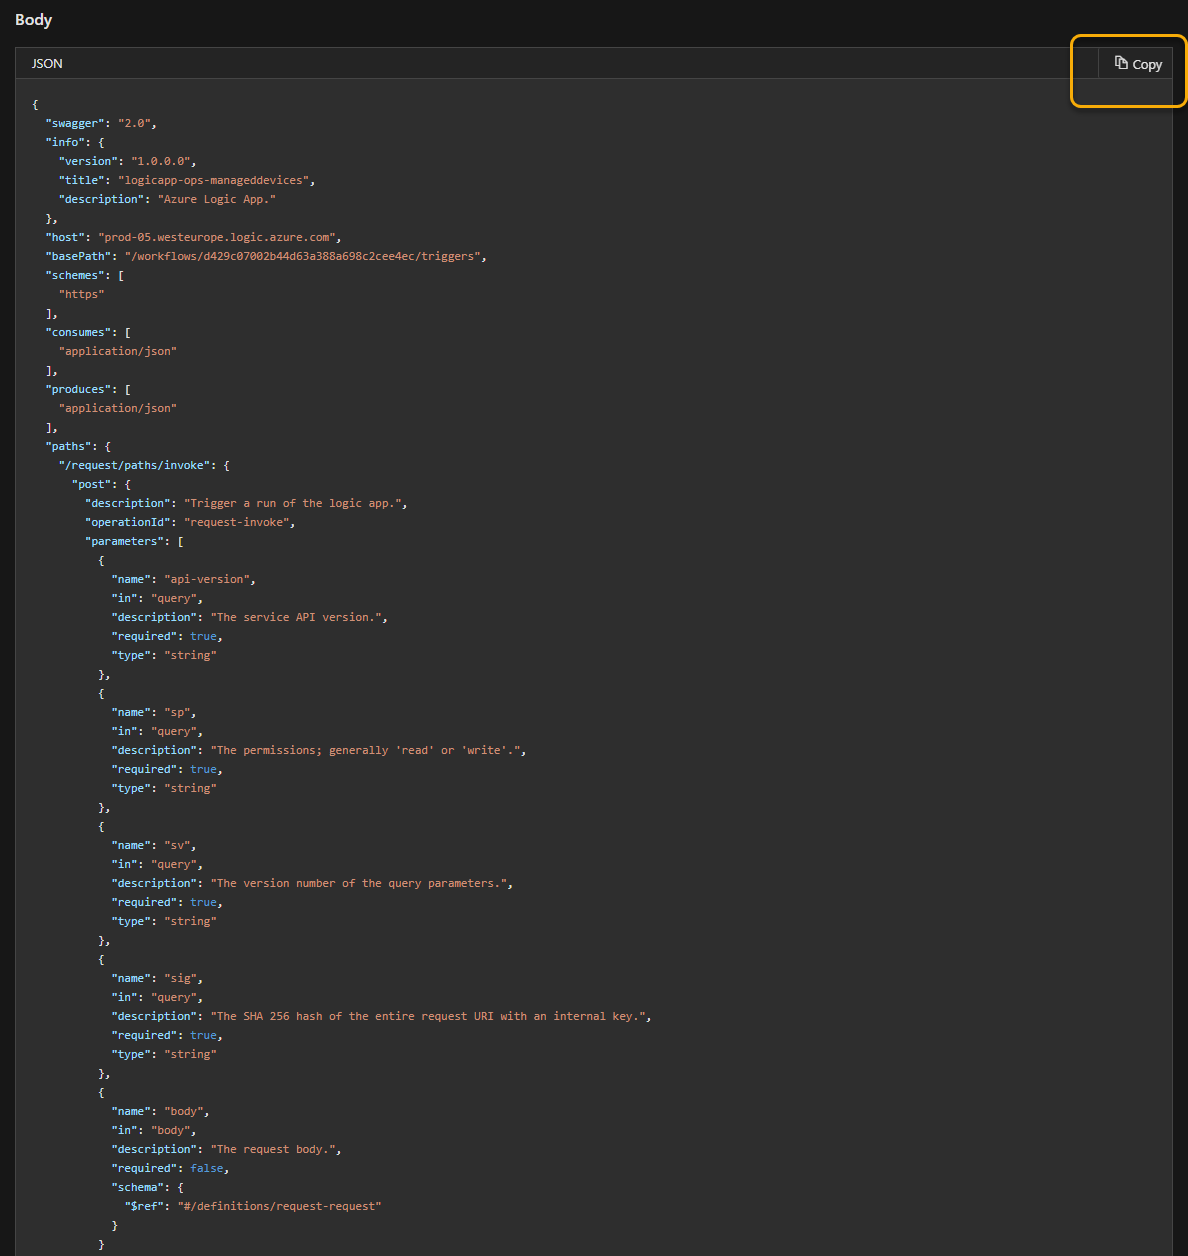
Before you share this OpenAPI file with your Power Platform developers, you should edit and remove the following request query parameters, as these are not needed when running the OAuth2 authorization scheme:
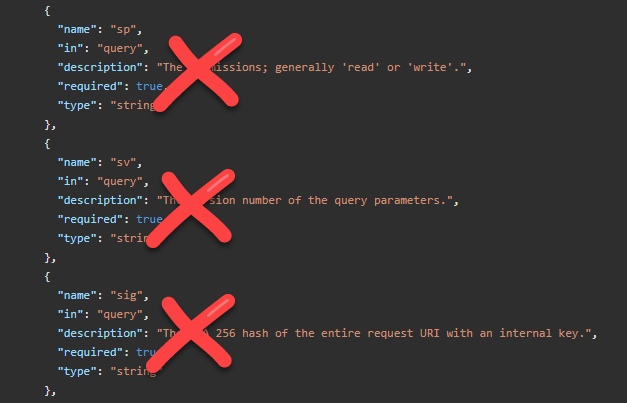
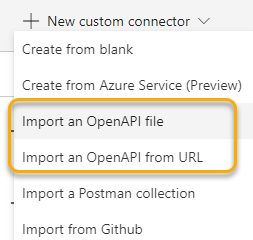
After this you can create a new Custom Connector, by specifying an OpenAPI file / url, depending on where you made the file available to your Power Platform Developers.
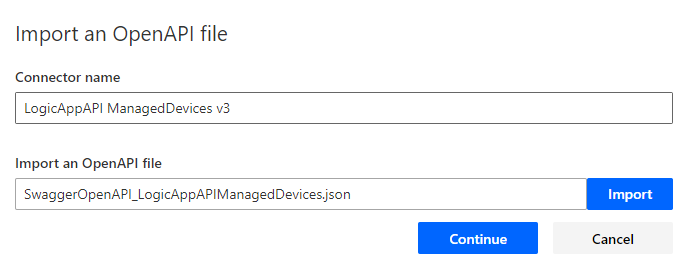
Browse to the filename and type a Connector name:
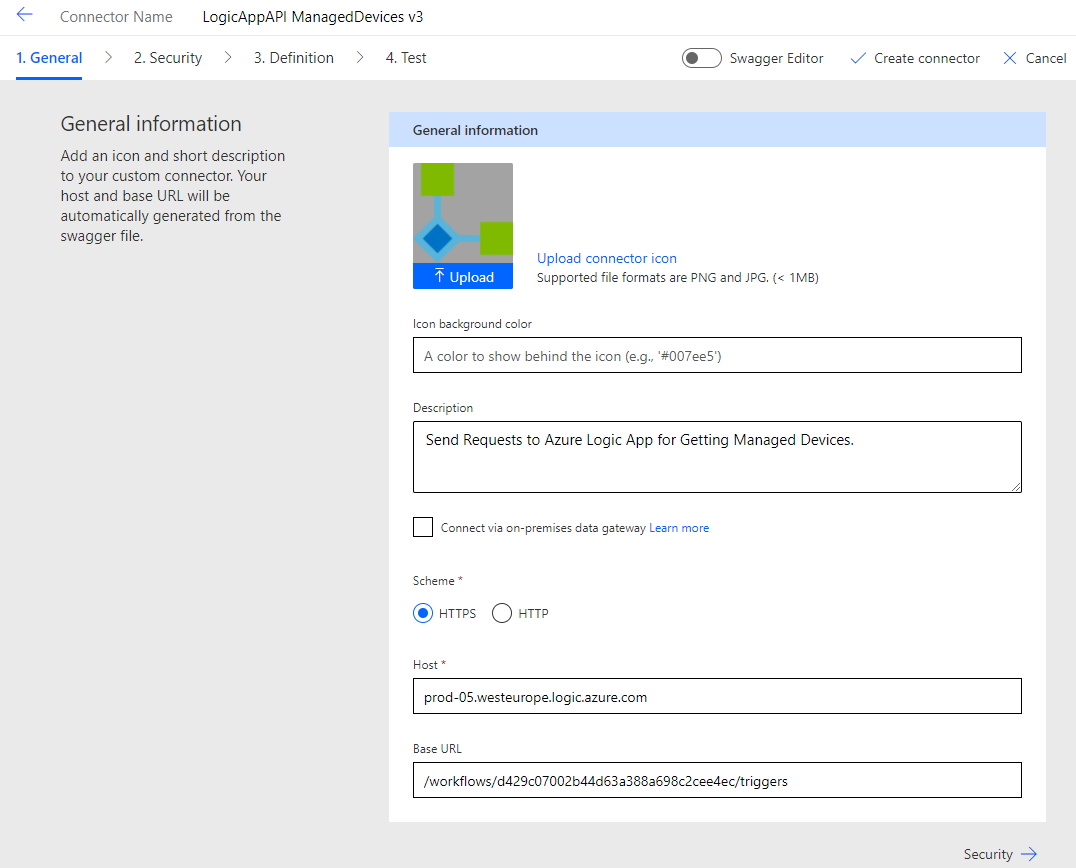
After this you will have the basis of the Connector defined, where you can customize general settings etc:
You will now need to add the authentication for Azure AD OAuth2 with client id, secret etc under Security, as well as creating the connector, and under test create a connection and test the operations. This is the same as I showed earlier, so I don’t need to show tthe details here.
Creating the Custom Connector from blank
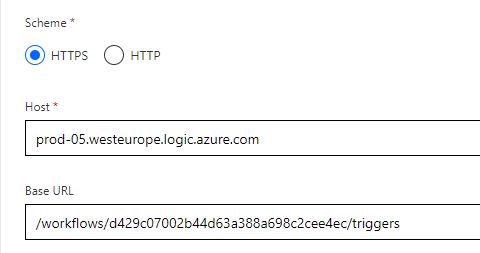
You can of course create Power Platform Custom Connectors from blank as well, this should be easy enough based on the details I have provided above, but basically you will need to make sure to set the correct Host and Base URL path for your Logic App here:
After adding the authentication details for Azure AD OAuth2 (same as before), you will need to manually add actions, and providing a request from sample, as well as defining the default responses for 200 and 403 status, as shown in the earlier steps.
With the Custom Connector now in place for sending Requests to the Logic App using delegated authentication, we can now start using this Connector in our Flows/Power Apps.
Lets build a quick sample of that.
Creating a Power Automate Flow that will trigger Logic App API
I’ll just assume readers of this blog post knows a thing or two about Power Automate and Cloud Flows, so I’ll try to keep this high level.
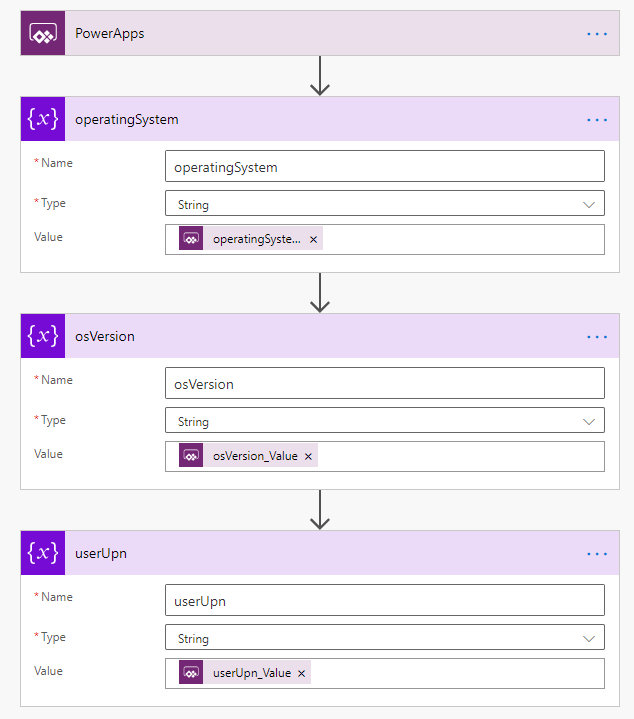
I’ve created a new instant Cloud Flow, using PowerApps as a trigger. Then I add three initialize variables actions, giving the variables and actions name like below, before I set “Ask in PowerApps” for values:
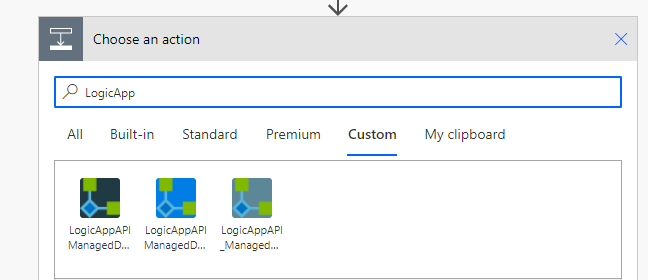
Next, add a Custom Connector action, selecting the Custom Connector we created earlier (I have 3 versions here, as I shown above with the alternative ways to set up a Custom Connector from Logic Apps:
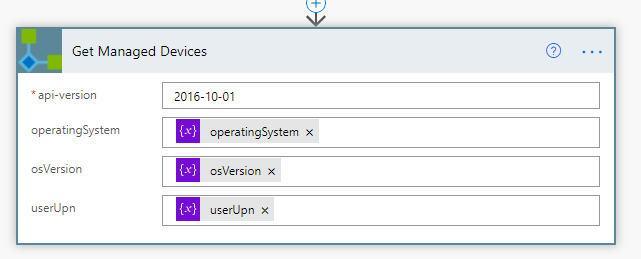
Next, select the action from the chosen Custom Connector, and fill in the parameters like below:
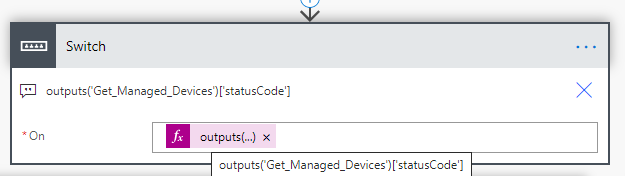
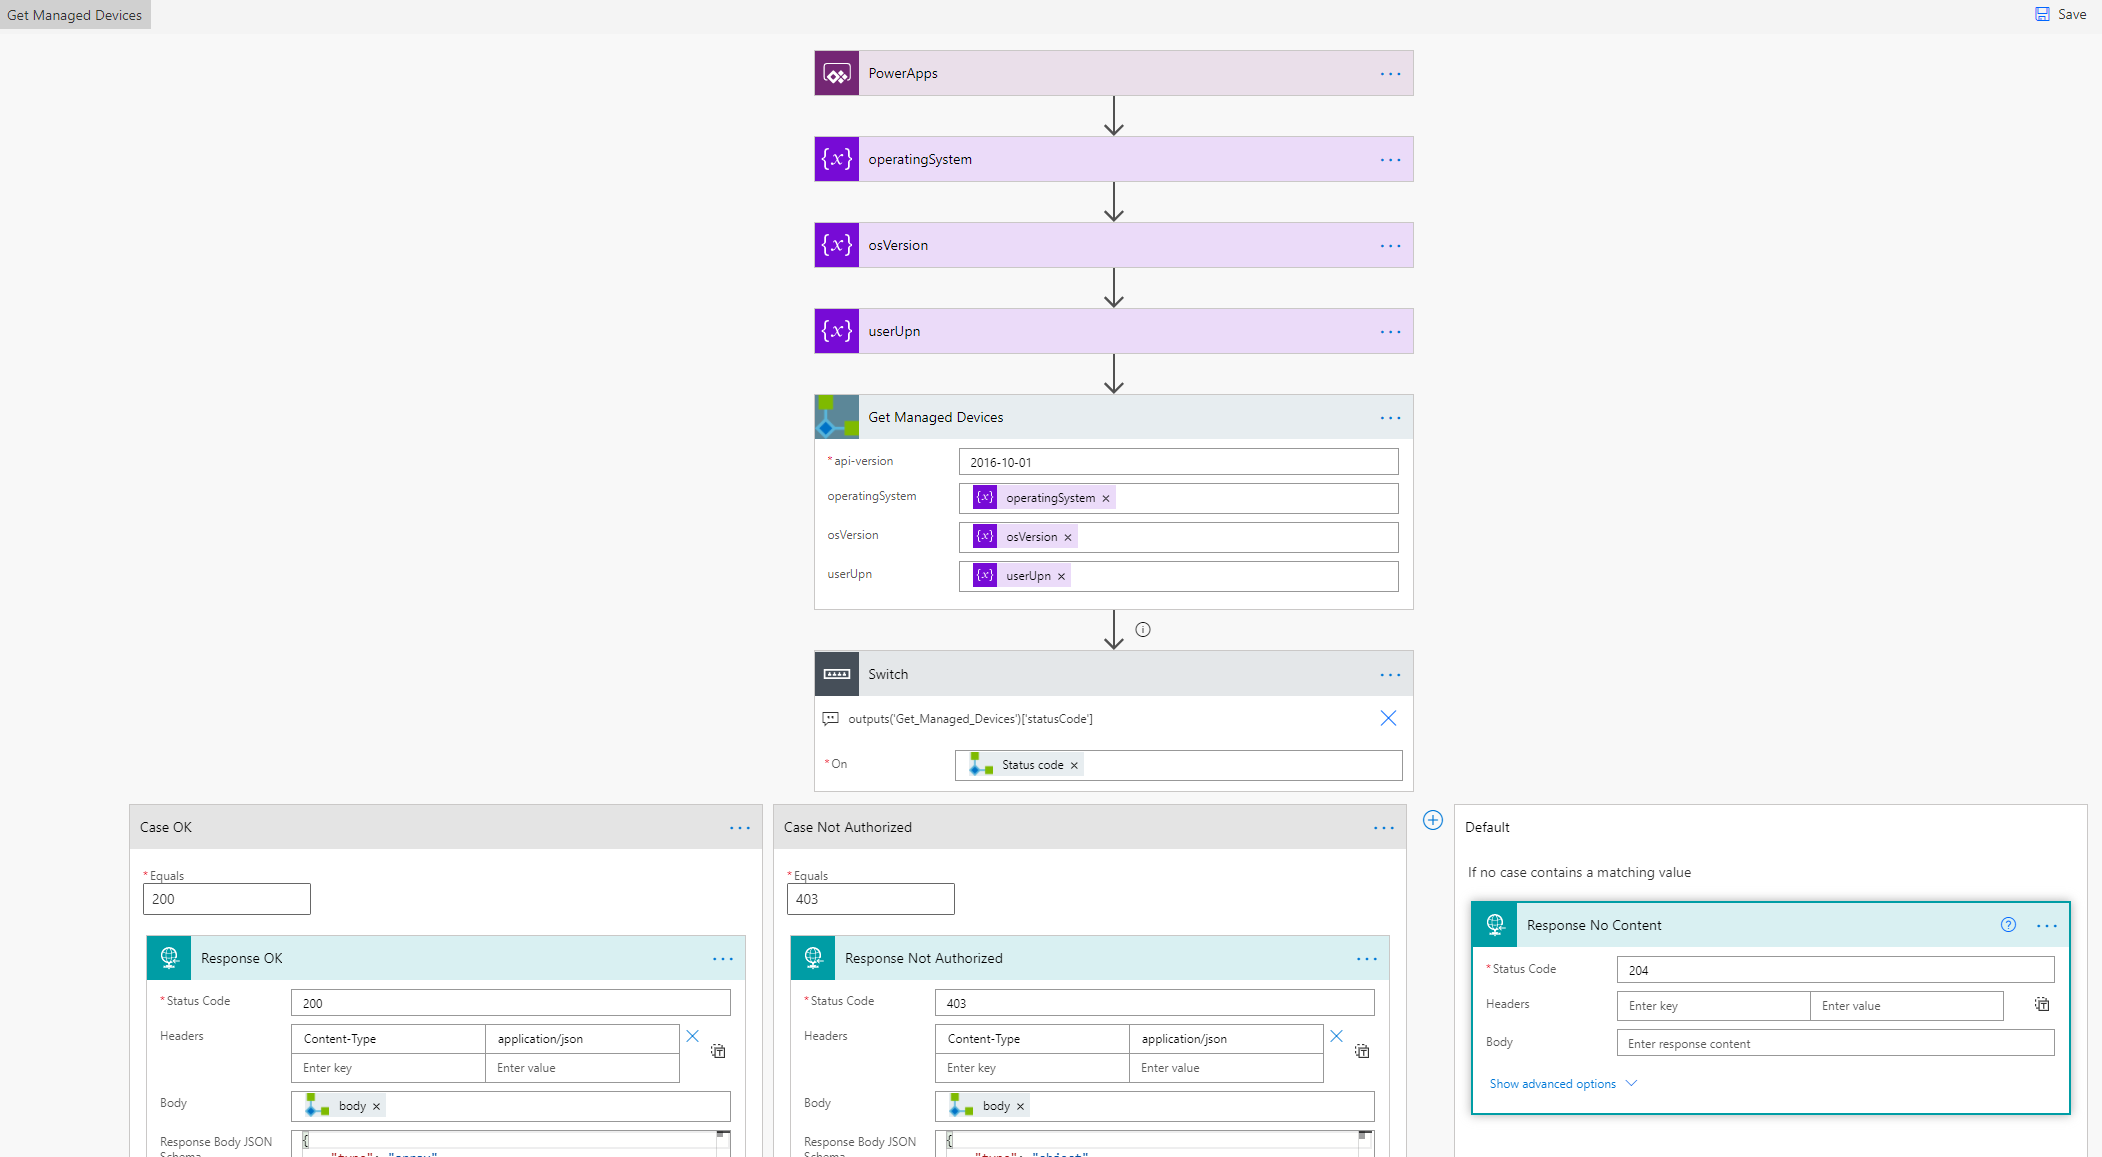
Next, we need to check the response status code we get back from the Custom Connector. Add a Switch control action, where we will check against the outputs from the Get Managed Devices and statusCode:
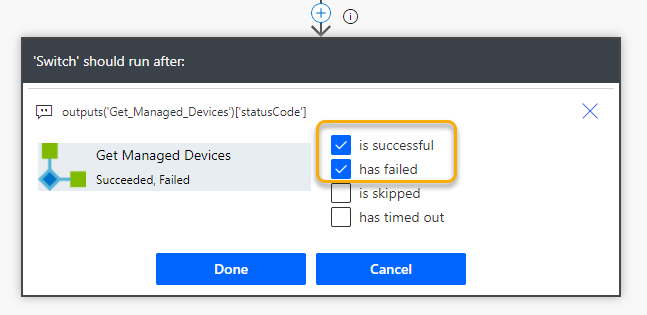
Make sure that the Switch action should run either if the Get Managed Devices is successful or failed:
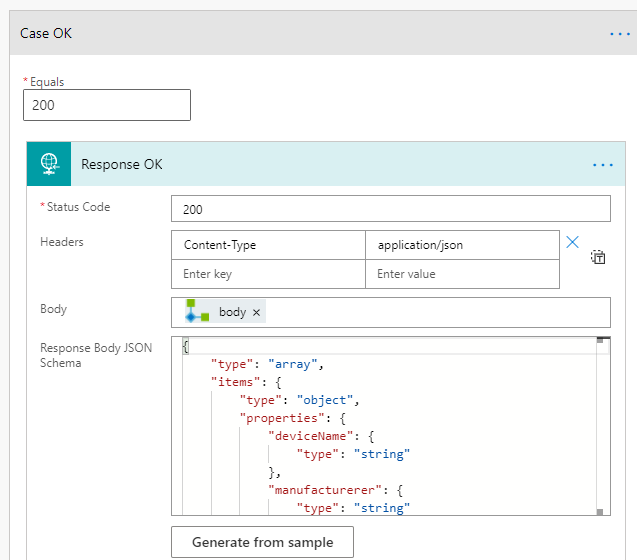
For each case of statusCode we will check against, we need a Response action to return data back to the PowerApp. For status code 200 OK, I’ll return the Status Code as shown below, adding Headers to be Content-Type application/json, and using the Body output from the Get Managed Devices custom connector action. The Response Body JSON schema is based on the sample output from the Logic App API.
PS! To get the Body output, you can use the following custom expression: outputs('Get_Managed_Devices')?['body']:
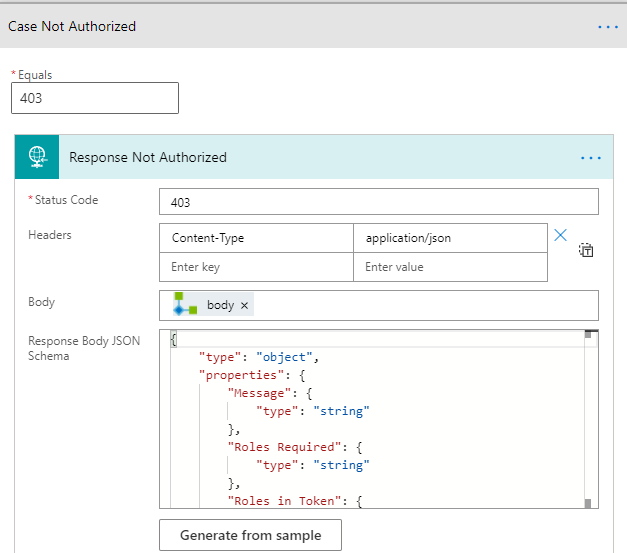
For status code 403 I have added the following Case and Response action, using the Body output again, but this time the schema is based on the 403 response from the Logic App API:
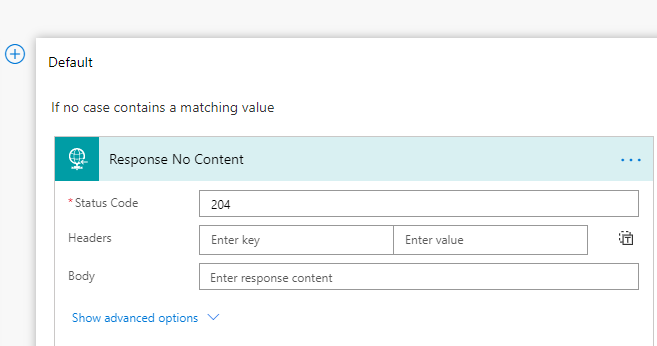
Last, as every case should have Response, I’ll add the following Default Case:
The whole Flow visualized:
PS! Instead of using the Response action, I could also have used the “Respond to PowerApps” action. However this action only let me return text strings, numbers, boolean etc, and I wanted to return native JSON response.
Make sure that you test and verify the Flow before you proceed.
Creating the Power App to connect to the Flow
With the Flow ready, lets quickly build a PowerApp. My PowerApp is a Canvas App, and I have been using the Phone layout.
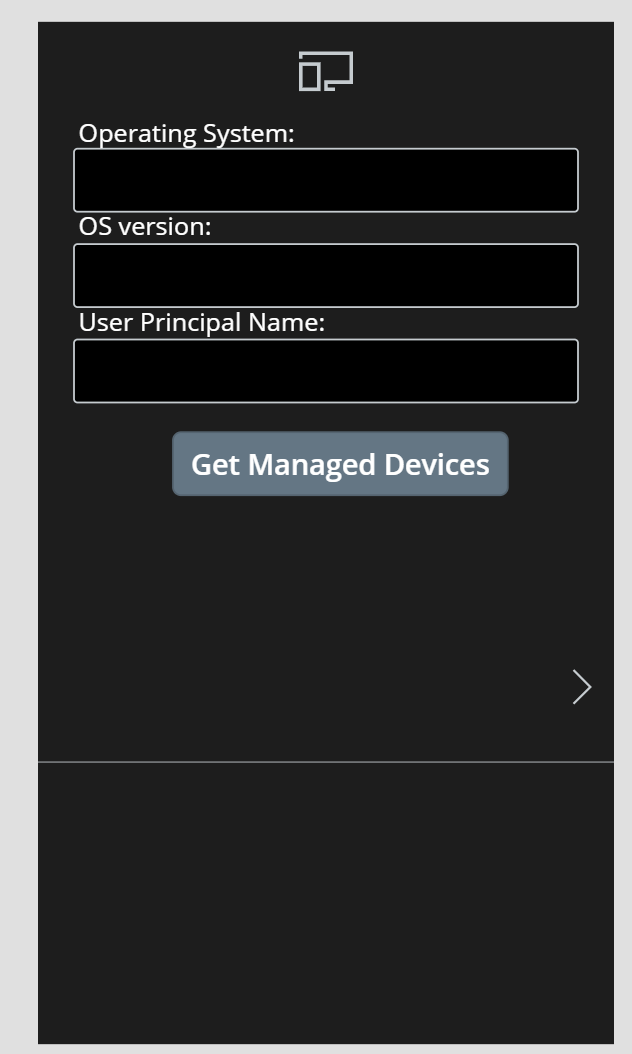
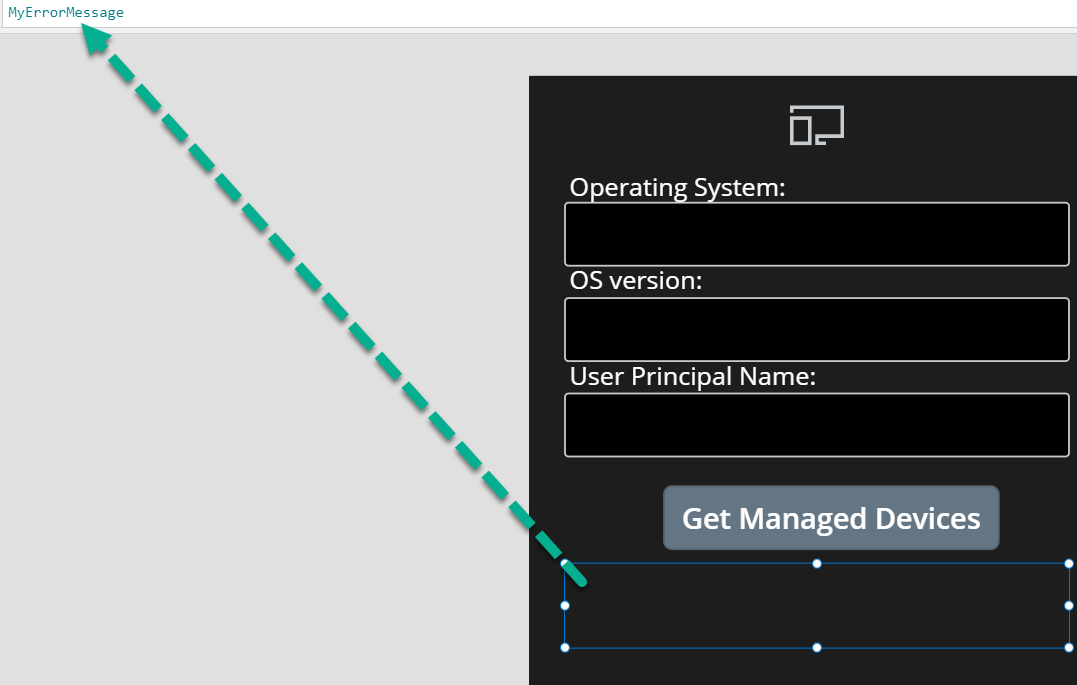
You can build this any way you want, but I used a dark theme, added an Icon at the top screen, and the 3 labels and text inputs for the parameters needed for the Flow. I then added a button for triggering the Flow, and under the button I have added a (hidden now) text label, for showing any error messages from the Flow. And I have added a Gallery control under there again for showing the resulting devices:
For the Button, select it and click on the Action menu and the Power Automate to connect your Flow. Next, change the “OnSelect” event for the Button to the following command:
| |
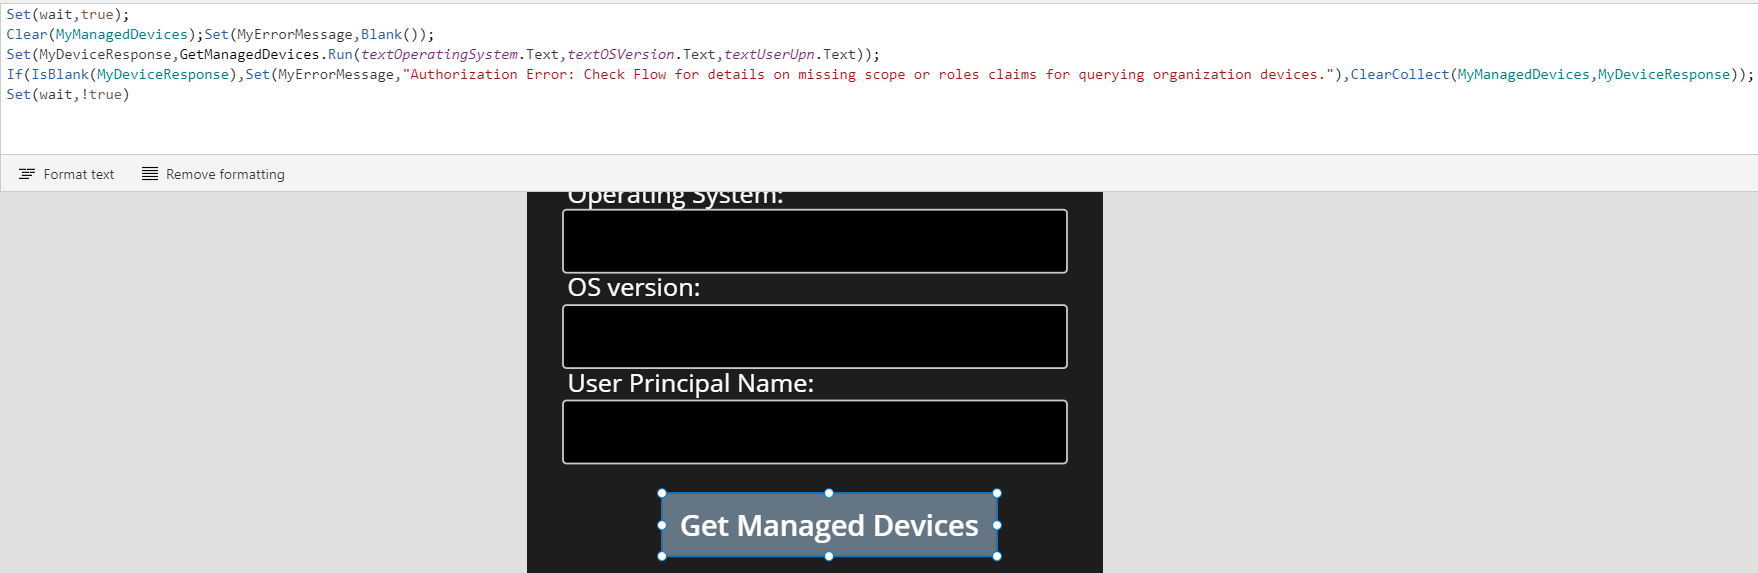
A quick explanation of the commands above:
- Set(wait,true) and Set(wait,!true) is to make the PowerApp “busy” when clicking.
- I then Clear my Collection and Variable used.
- I then use Set to get a “MyDeviceResponse”, this will return a collection of items (devices) returned via a JSON array from the Flow, or if I’m not authorized, it will return a failed response (based on the 403) and a blank MyDeviceResponse.
- Next I do a If test, if the MyDeviceResponse i Blank, I’ll set the MyErrorMessage variable, if it’s not blank I will run a ClearCollect and fill the Collection with returned devices.
I fully appreciate that there might be other ways to do this fail checking and error handling, please let me know in the comments if you have other suggestions :)
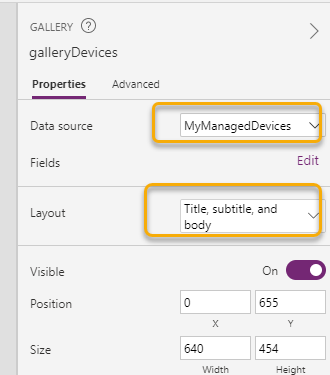
For the Gallery I set the Data source to MyManagedDevices collection, and I have selected to use the layout of “Title, subtitle, and body”. You can change the device data that get filled in for these items in the Galleri, for example Manufacturer, Version, Name etc.
And last I set the Text property of my error message label to the MyErrorMessage variable:
Let’s Save, Publish and test this PowerApp!
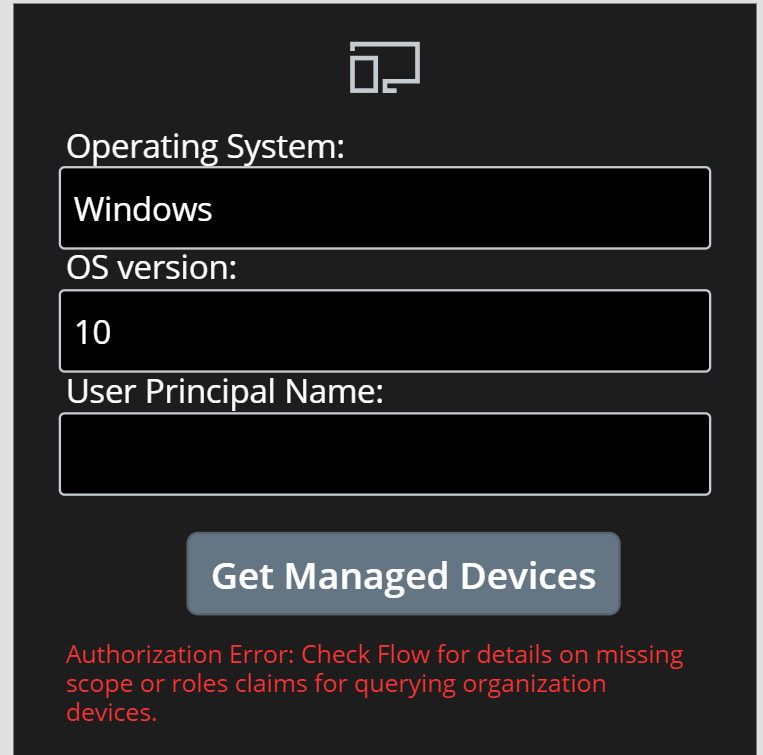
First, I’ll try to add parameters for getting all Windows 10 devices, leaving user principal name blank. This will via the Custom Connector send a request to the Logic App API to return all devices, and in this case I’m not authorized to do so, so I’ll get an authorization error:
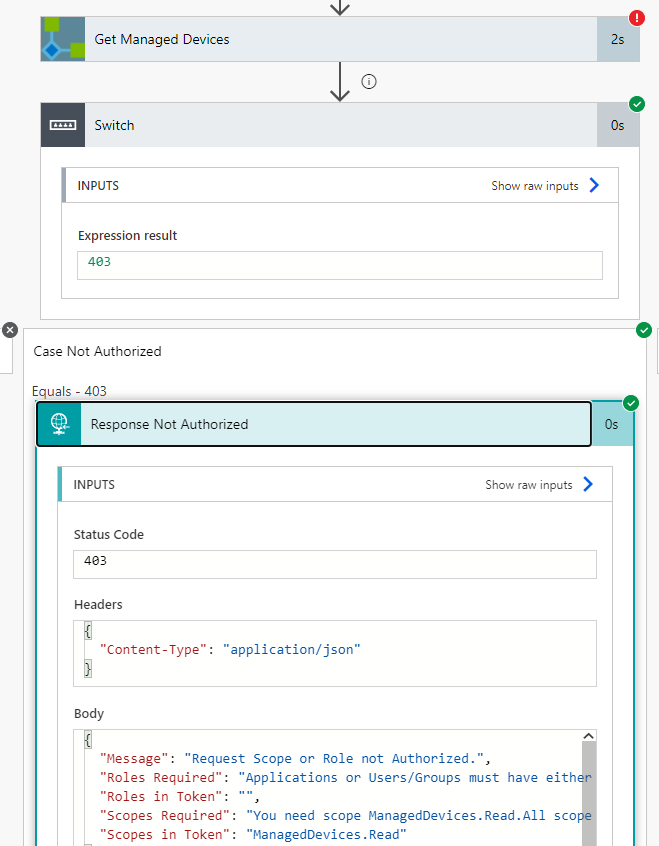
This is something I can verify in the Flow run history also:
Next, I’ll try to return my test users devices only, and this is successful and will fill the gallery:
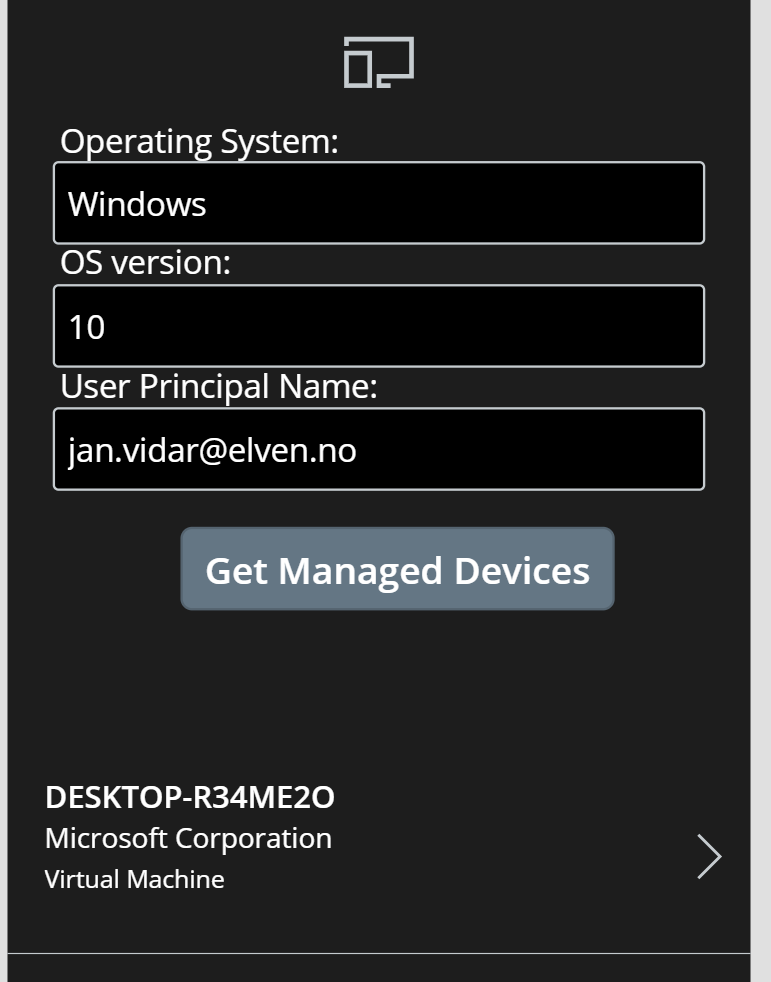
We now have a working Flow and PowerApp connected to the Logic App API using the signed in users delegated permissions. If I want I can now share the PowerApp and Flow including the Custom Connector with other users in my organization, and they can use their own user identity for connections to the Logic App API.
In the next part of this blog post I will show how you can access the Logic App API using HTTP action and application permissions.
Connect to Logic App API using HTTP action
Sometimes you will have scenarios where you want to use an application identity to call an API like the Logic App I have used in this blog post article series. This is especially useful if you want to run a Power Automate Flow without a logged in user’s permissions.
I the previous blog post part 2 for exposing Logic App as an API, I created this App Registration to represent the Application Client scenarios and Application permissions:
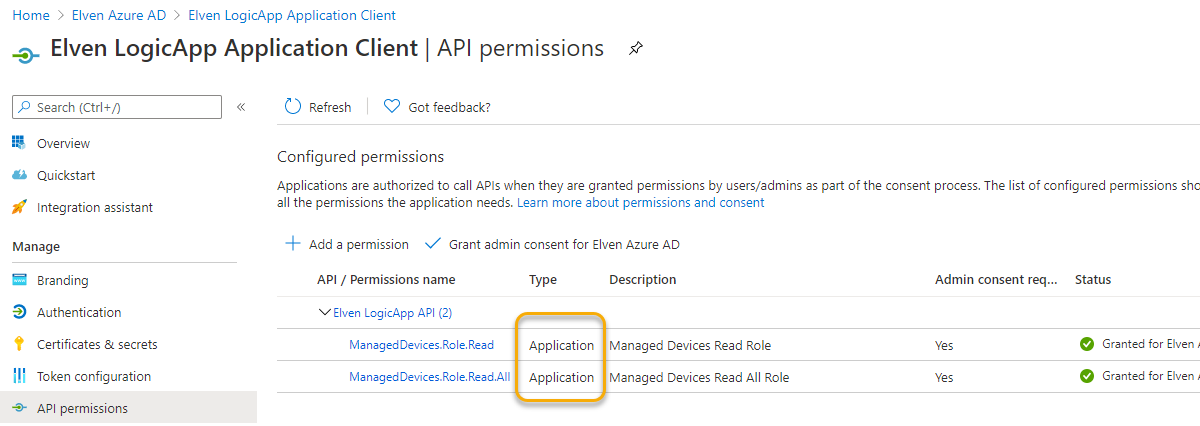
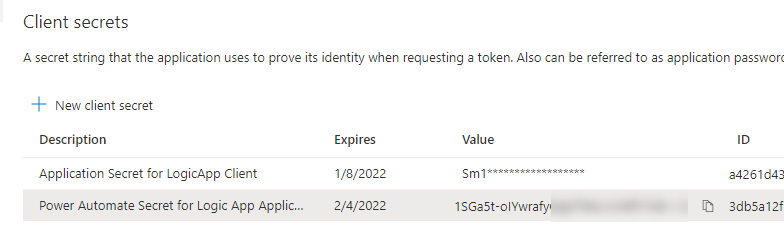
In that App Registration, create a new Client Secret for using in Power Automate, and copy this to your clipboard:
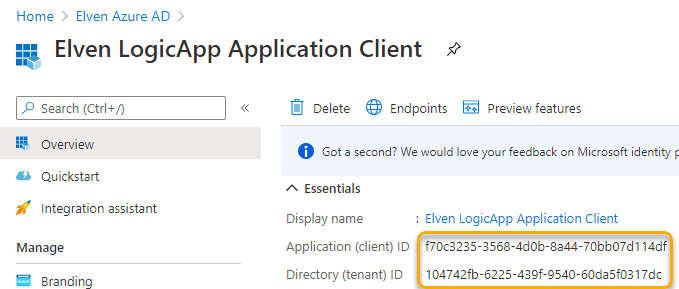
Make sure to copy the Application (Client) ID and Tenant ID also:
Now let’s create a new Power Automate Flow to test this scenario. This type of Flow could use a range of different triggers based on your needs, but I’ll just use a Instant Cloud Flow as trigger where I have configured the following inputs:
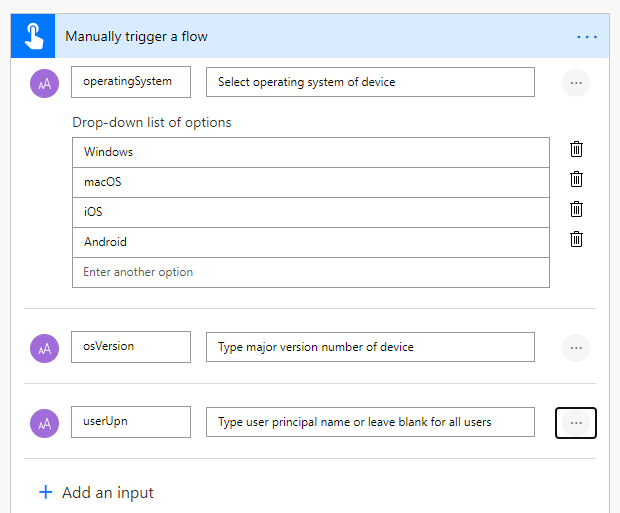
Note that I have configured userUpn as an optional input.
Next add a “Compose” action for the Client Secret, give the action a name and paste in the Client Secret you created earlier. Note the Lock symbol:
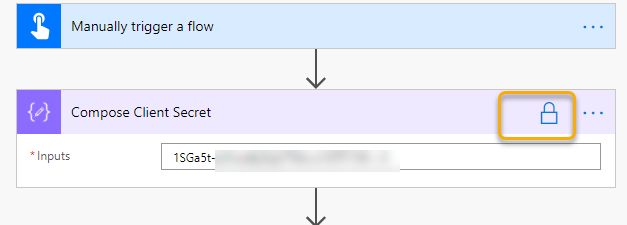
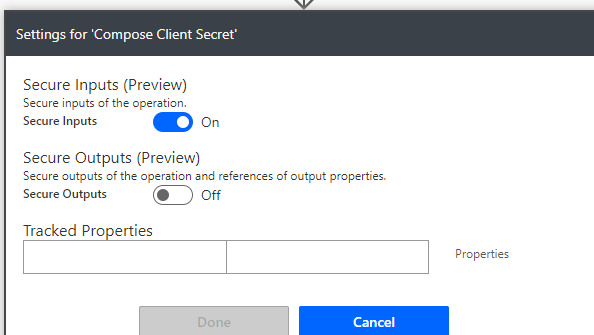
Click on settings and select to Secure Inputs:
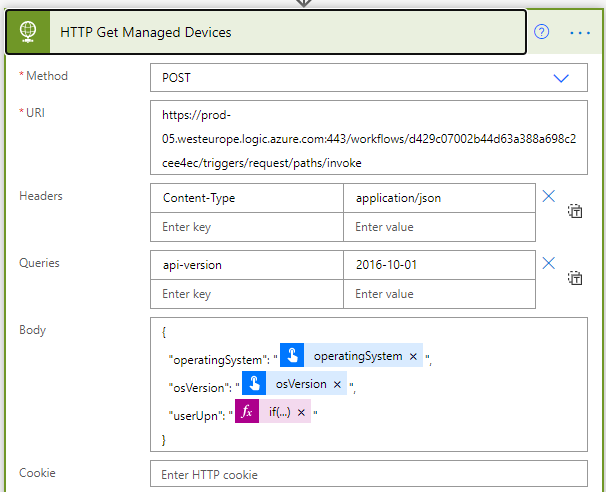
Next add a HTTP action, specifying the Method to POST and the URI to be the LogicApp API url, remember to not include the sv, sp and sig query parameters. Set Headers Content-Type to application/json, and under queries add the api-version. For body build the JSON request body using the inputs. We need to build a dynamic expression for userUpn, as this can be optional. I have used the following expression:
if(not(empty(triggerBody()?['text_2'])),triggerBody()?['text_2'],'')
Click to show advanced settings, and choose Authentication to use Azure AD OAuth. Add the authority, tenant id and set audience to the custom Logic App API URI. Then paste in the Application (Client) Id, and use the Outputs from the Compose Client Secret action:
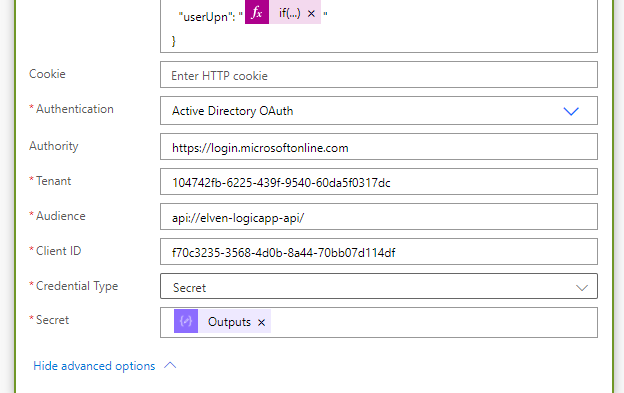
This authentication above will use the Client Credentials Flow to get an access token that will be accepted by the Logic App API.
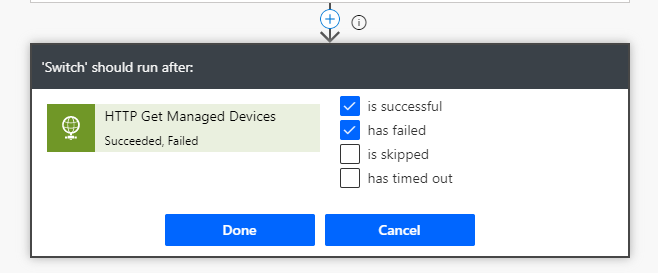
The remaining parts of this Flow can be exactly the same as the previous Flow we built, a Switch control that continiues on success/failure of the HTTP action:
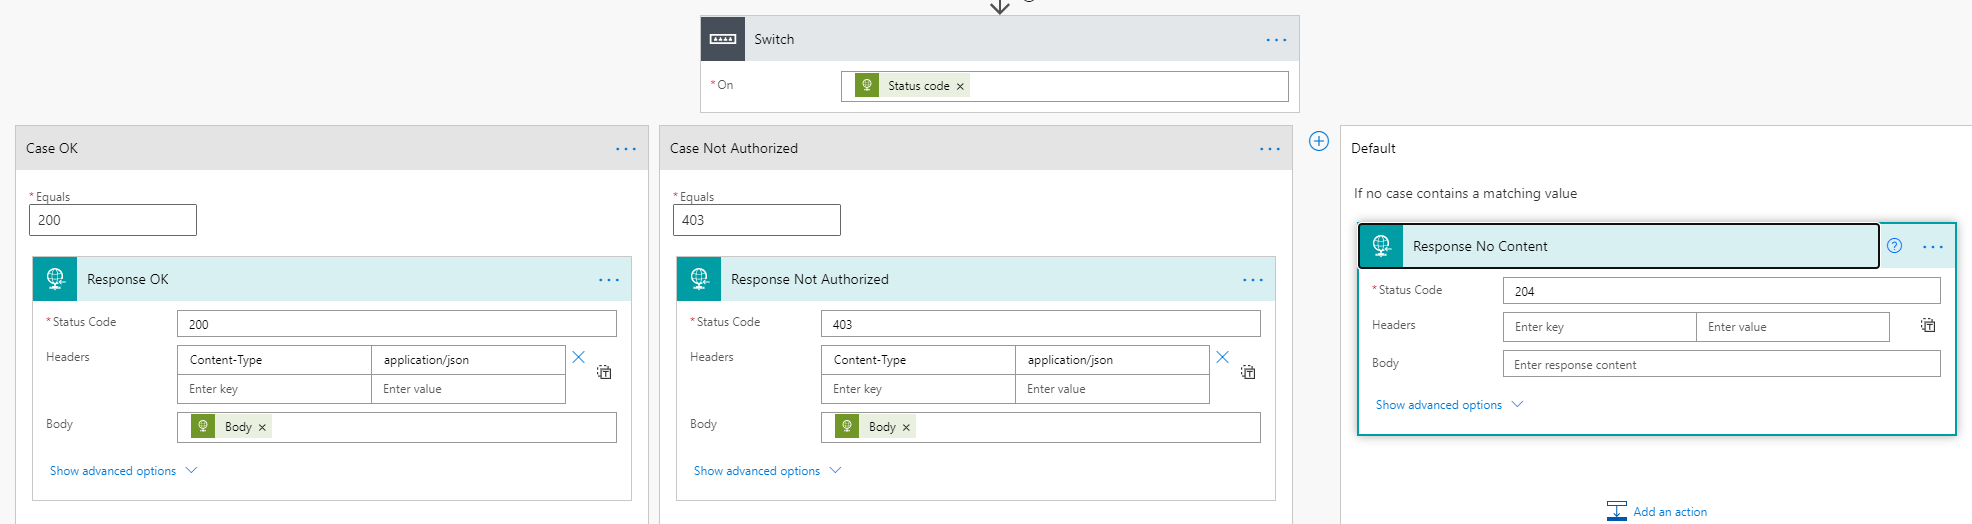
And then returning Response objects from the HTTP action body for each case:
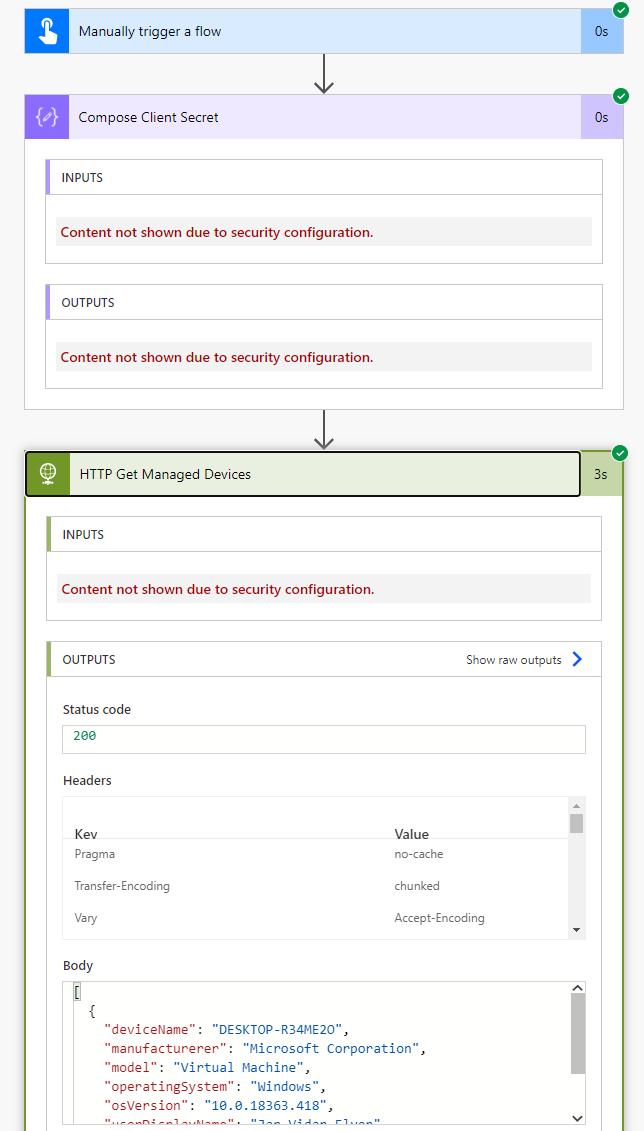
When testing the Flow now, I can see that the client secret is hidden from all relevant actions:
Summary and Next Steps
We are at the end of another extensive blog post. The focus for this article has been to show how you can use Power Automate to connect to your custom API, that we built in the previous blog post for exposing the Logic App as an API.
The community are increasingly creating Power Platform custom connectors and http actions that sends requests to API’s to Microsoft Graph directly, and that is great but it might result in too extensive permissions given to users and application clients. My focus has been to show how you can control authentication and authorization using on-behalf-of flows hidden behind a Logic App API where users and clients are allowed to send requests based on allowed permission scopes and/or roles, using the powers of Azure Active Directory and OAuth2.
There will be a later blog post in this series also, where I look into how Azure API Management can be used in these scenarios as well.
In the meantime, thanks for reading, hope it has been helpful!