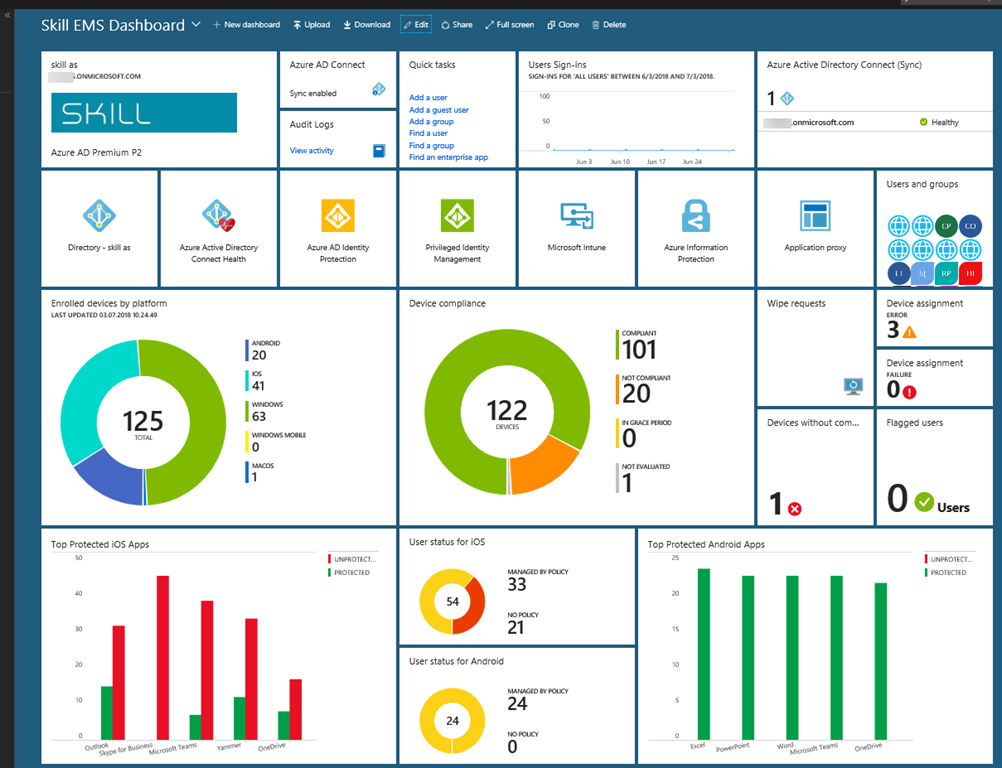
If you are working with EMS and implementing Azure AD, Intune, MDM, MAM, Information Protection and more, you can build yourself some great dashboards in the Azure Portal using tiles and pin blades to your customized dashboard. This is an example from my own workplace:
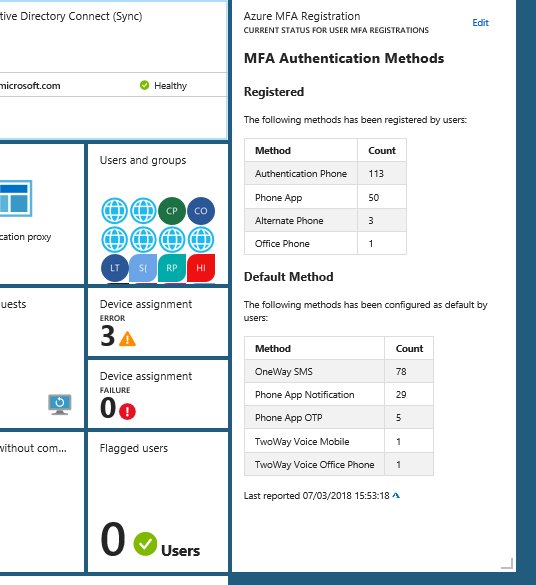
imageOften when I work with projects implementing Identity & Access, Conditional Access and Azure MFA, I wish I could have a dashboard to report on MFA registration, and be able to pin that to my EMS dashboard as shown above.
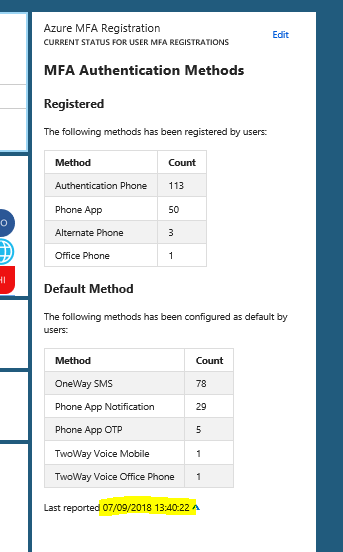
It might be in the future that Azure MFA registrations and methods will be native in the portal, but for now this information have to be retreived in another way. In this blog post I will show you how you can set up a solution for showing this information. I will use the Markdown Tile from the gallery for displaying this information, and in the end it will look like this:
I referred in the title of this blog post to the good, the bad and the ugly, and by that I mean the process of setting this up, because it starts easy enough in the beginning but it will get more “ugly” in the end ;)
The Good – Setting up the Markdown Tile
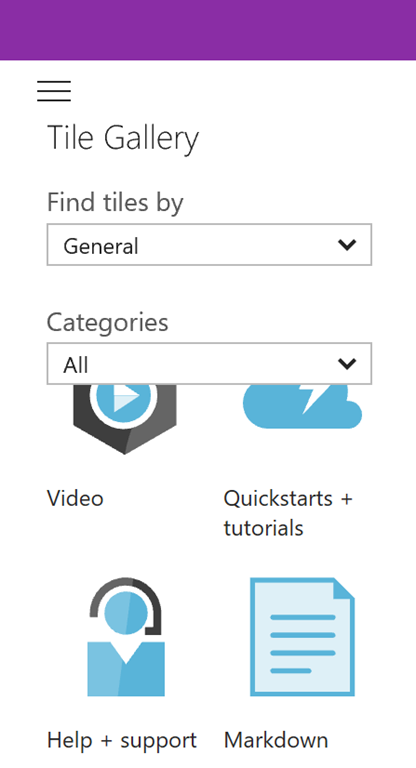
I will use the Markdown Tile for the content in my customized dashboard in my Azure Portal. The first part is easy to set up, just click Edit and find the Markdown tile from the gallery, as shown below:
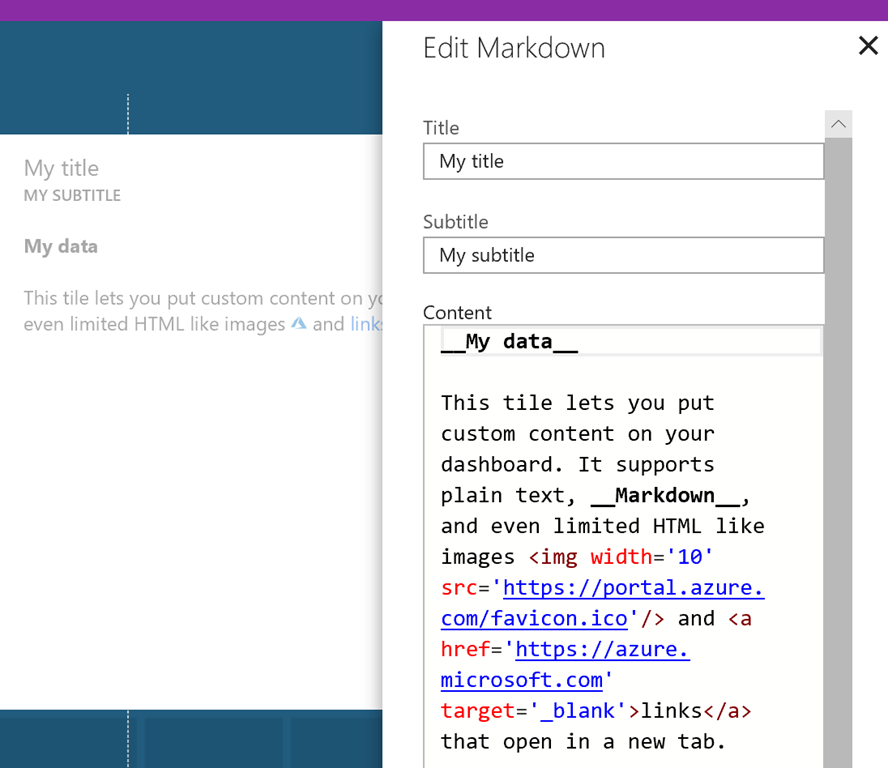
imageDrag the tile to a place you want it on your dashboard, and the Edit the title, subtitle and content as prompted:
imageThere is a sample content provided, other than that you can write your own markdown. I will not get into details on markdown format here, there is a lot of good guides for learning the format, for example this: https://guides.github.com/features/mastering-markdown/
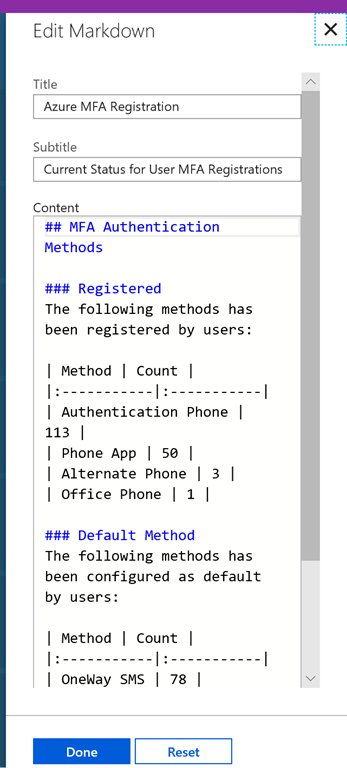
. I will however provide you with a sample for reporting MFA registrations and default methods. This is how I set up my markdown tile:
imageAnd here is a link to my github repository where you can get the complete MFAReport.md file sample:
https://github.com/skillriver/AzureMFADashboard/blob/master/MFAReport.md
Now we need to fill that markdown tile with some real Azure AD MFA report data to report on.
The Bad - PowerShell Script for getting MFA registration and methods to Markdown
So the “bad” news is that we are reliant on running some Azure AD PowerShell commands for getting user details for MFA registration and methods. For now we are also reliant on the Azure AD v1 PowerShell (MSOnline) Module, as the new v2 AzureAD Module does not yet have any methods to get MFA authentication data. We cannot use the Microsoft Graph API either to get MFA user data, but I expect that to change in the future.
So lets look at the script I use, and after authenticating and connecting to Azure AD in my tenant with Connect-MSOLService, I will run the following commands to get details from each user where there has been configured one or more StrongAuthenticationMethods, and Group on those methods and save the results to a hash table. The results are stored in the $authMethodsRegistered object variable. Similarly I run the command once more, filtering on only showing the methods that are set to default for each user, and save to the $authMethodsDefault variable.
# Connect to MSOnline PowerShell (Azure AD v1)Connect-MsolService# Get MFA Methods Registered as Hash Table$authMethodsRegistered=Get-MsolUser-All|Where-Object{$_.StrongAuthenticationMethods-ne$null}|Select-Object-PropertyUserPrincipalName-ExpandPropertyStrongAuthenticationMethods`|Group-ObjectMethodType-AsHashTable-AsString# Get Default MFA Methods as Hash Table$authMethodsDefault=Get-MsolUser-All|Where-Object{$_.StrongAuthenticationMethods-ne$null}|Select-Object-PropertyUserPrincipalName-ExpandPropertyStrongAuthenticationMethods`|Where-Object{$_.IsDefault-eq$true}|Group-ObjectMethodType-AsHashTable-AsString# Create a Custom Object for MFA Data$authMethodsData=New-ObjectPSObject$authMethodsData|Add-Member-MemberTypeNoteProperty-NameAuthPhoneRegistered-Value$authMethodsRegistered.TwoWayVoiceMobile.Count$authMethodsData|Add-Member-MemberTypeNoteProperty-NameAuthPhoneAppRegistered-Value$authMethodsRegistered.PhoneAppOTP.Count$authMethodsData|Add-Member-MemberTypeNoteProperty-NameOfficePhoneRegistered-Value$authMethodsRegistered.TwoWayVoiceOffice.Count$authMethodsData|Add-Member-MemberTypeNoteProperty-NameAlternatePhoneRegistered-Value$authMethodsRegistered.TwoWayVoiceAlternateMobile.Count$authMethodsData|Add-Member-MemberTypeNoteProperty-NameOneWaySMSDefault–Value$authMethodsDefault.OneWaySMS.Count$authMethodsData|Add-Member-MemberTypeNoteProperty-NamePhoneAppNotificationDefault–Value$authMethodsDefault.PhoneAppNotification.Count$authMethodsData|Add-Member-MemberTypeNoteProperty-NamePhoneAppOTPDefault–Value$authMethodsDefault.PhoneAppOTP.Count$authMethodsData|Add-Member-MemberTypeNoteProperty-NameTwoWayVoiceMobileDefault–Value$authMethodsDefault.TwoWayVoiceMobile.Count$authMethodsData|Add-Member-MemberTypeNoteProperty-NameTwoWayVoiceOfficeDefault–Value$authMethodsDefault.TwoWayVoiceOffice.Count# Write to Markdown file"## MFA Authentication Methods`n"|Set-Content.\MFAReport.md -Force-EncodingUTF8"### Registered`n"|Add-Content.\MFAReport.md -EncodingUTF8"The following methods has been registered by users:`n"|Add-Content.\MFAReport.md -EncodingUTF8"| Method | Count |"|Add-Content.\MFAReport.md -EncodingUTF8"|:-----------|:-----------|"|Add-Content.\MFAReport.md -EncodingUTF8"| Authentication Phone | "+[string]$authMethodsData.AuthPhoneRegistered+" |"|Add-Content.\MFAReport.md -EncodingUTF8"| Phone App | "+[string]$authMethodsData.AuthPhoneAppRegistered+" |"|Add-Content.\MFAReport.md -EncodingUTF8"| Alternate Phone | "+[string]$authMethodsData.AlternatePhoneRegistered+" |"|Add-Content.\MFAReport.md -EncodingUTF8"| Office Phone | "+[string]$authMethodsData.OfficePhoneRegistered+" |"|Add-Content.\MFAReport.md -EncodingUTF8""|Add-Content.\MFAReport.md -EncodingUTF8"### Default Method"|Add-Content.\MFAReport.md -EncodingUTF8"The following methods has been configured as default by users:"|Add-Content.\MFAReport.md -EncodingUTF8""|Add-Content.\MFAReport.md -EncodingUTF8"| Method | Count |"|Add-Content.\MFAReport.md -EncodingUTF8"|:-----------|:-----------|"|Add-Content.\MFAReport.md -EncodingUTF8"| OneWay SMS | "+[string]$authMethodsData.OneWaySMSDefault+" |"|Add-Content.\MFAReport.md -EncodingUTF8"| Phone App Notification | "+[string]$authMethodsData.PhoneAppNotificationDefault+" |"|Add-Content.\MFAReport.md -EncodingUTF8"| Phone App OTP | "+[string]$authMethodsData.PhoneAppOTPDefault+" |"|Add-Content.\MFAReport.md -EncodingUTF8"| TwoWay Voice Mobile | "+[string]$authMethodsData.TwoWayVoiceMobileDefault+" |"|Add-Content.\MFAReport.md -EncodingUTF8"| TwoWay Voice Office Phone | "+[string]$authMethodsData.TwoWayVoiceOfficeDefault+" |`n"|Add-Content.\MFAReport.md -EncodingUTF8"Last reported "+[string](Get-Date)|Add-Content.\MFAReport.md -EncodingUTF8""|Add-Content.\MFAReport.md
The complete PowerShell script can be found at my GitHub repository here:
https://github.com/skillriver/AzureMFADashboard/blob/master/MFAStrongAuthenticationUserReport.ps1
So now we have a script where we can get MFA authentication details for each user and create a markdown file that we can use in the tile in the Azure Portal custom dashboard. But it is all a manual process now, and it works fine for an ad hoc update. If we want to automate however, we have to get into the “ugly” stuff ;)
The Ugly – Automating Markdown creation and update Dashboard
This part requires multiple steps. First we need to schedule and run the PowerShell commands from above. Then we need to find a way to update the customized dashboard tile with the updated markdown file. To summary, this is what we need now:
Schedule the PowerShell script to run automatically. We can use Azure Automation for that.
Programmatically change the markdown tile in the customized dashboard. We can use Azure Resource Manager Rest API for that.
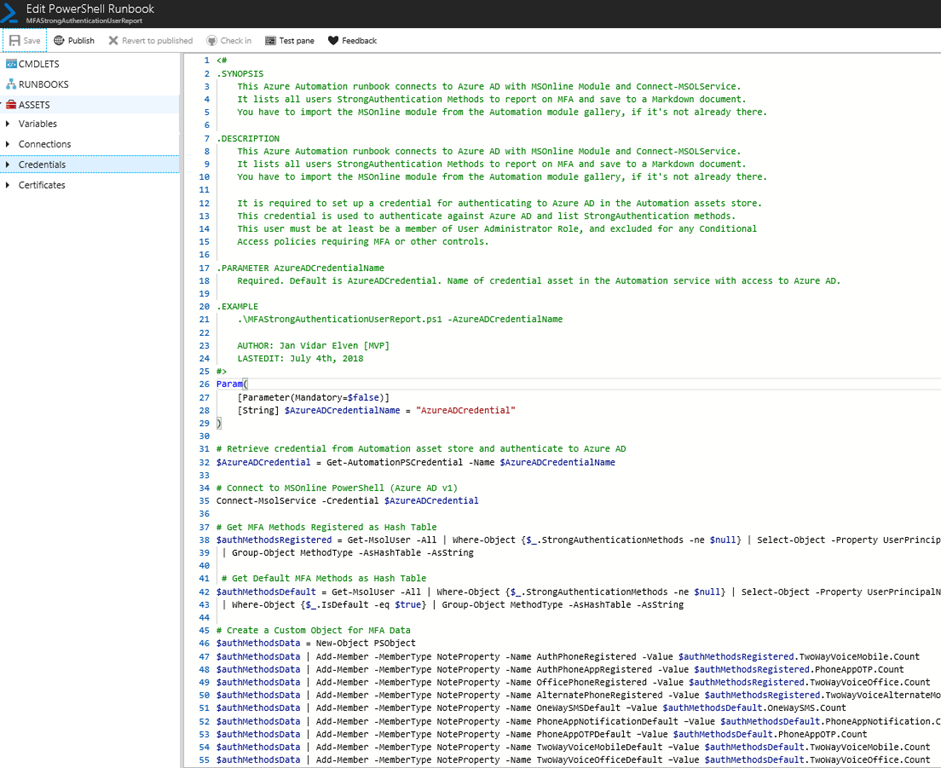
Lets get into the Azure Automation solution first. To run a PowerShell script I will need to create a Runbook, and in that Runbook I need to authenticate to Azure AD. I can define a Credential Asset with a username and password for a global admin user, but I like to use the least privilege possible, and besides that all my global admins are either protected by Azure AD PIM and/or MFA, so that won’t work. I prefer to use a service principal whereever possible, but after testing extensively with Connect-MSOLService that is not supported either.
So I tested with a dedicated Azure AD credential account, first by only adding the user to the Directory Readers role. I was able to list all users with Get-MSOLUser, but not any StrongAuthentication info. Neither did it work with Security Readers. In the end I added the user account to User Administrator role in Azure AD, and I was successful getting StrongAuthentication methods.
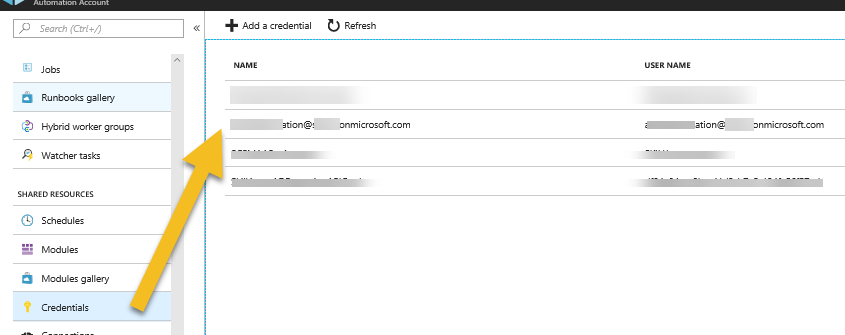
So, in my automation accont I will add or reuse my credentials:
imageNext, I will create a new PowerShell script based Runbook, basically I will use the PowerShell script from earlier in the blog, but with a couple of added parameter and getting the credential using the Get-PSAutomationCredential method. This is how it looks, you will get link to the complete script later:
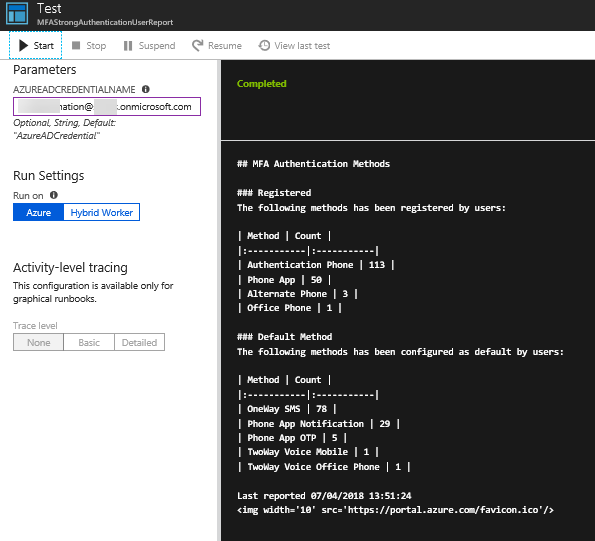
imageAnd after testing, I can see that I successfully will get the MFAReport.md content (added a Get-Content .\MFAReport.md at the end to display the output):
imageNow that we have a solution for running the PowerShell script and generating the markdown file, the next part is how to update that data in the custom dashboard. And for that we need to look into programatically changing Azure Portal dashboards. There is a good resource and starting point for that in this article: https://docs.microsoft.com/en-us/azure/azure-portal/azure-portal-dashboards-create-programmatically
.
First you need to share the custom dashboard, remember to include the markdown tile we set up in the first part of this blog post. At the top in the portal dashboard, select the Share button:
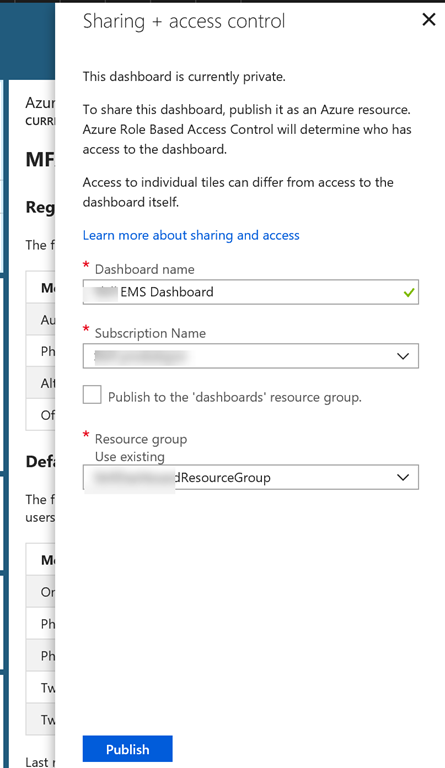
imageBy sharing the dashboard will published as an Azure resource. Specify a name, select the subscription and either use the default dashboard resource group or select an existing one:
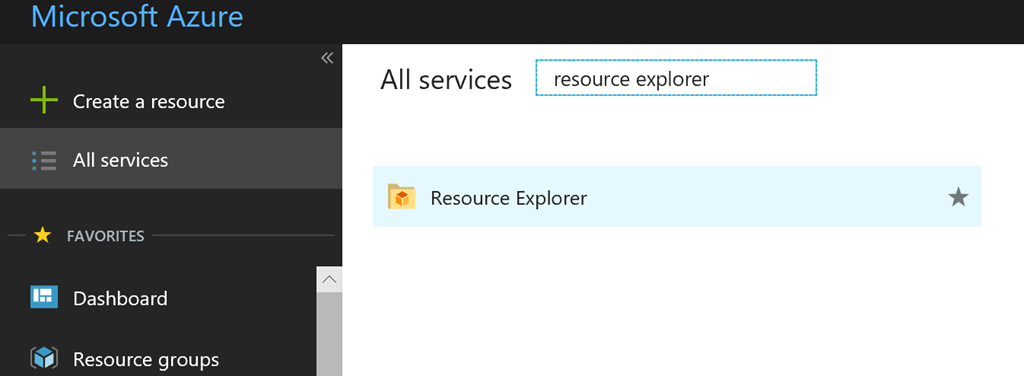
imageGo to Resource Explorer in the Portal:
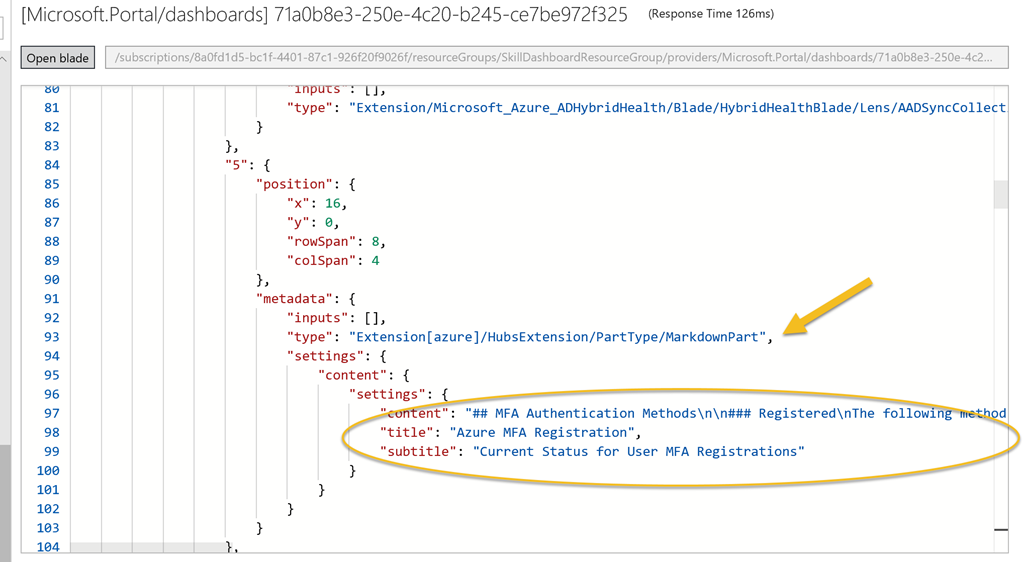
imageNavigate to Subscriptions, Resource Groups, and find the resource group and resource containing the custom dashboard. From there you will be able to see the JSON definition of the dashboard and specifically the markdown tile containing the content we want to update:
imageSo for next process now we need to copy this complete JSON definition containing all your tiles including the markdown tile. Locally on your computer, create a .json file in your favorite JSON editor, I use Visual Studio Code for this, and paste in the content. I have named my file DeploymentTemplateMFAReport.json.
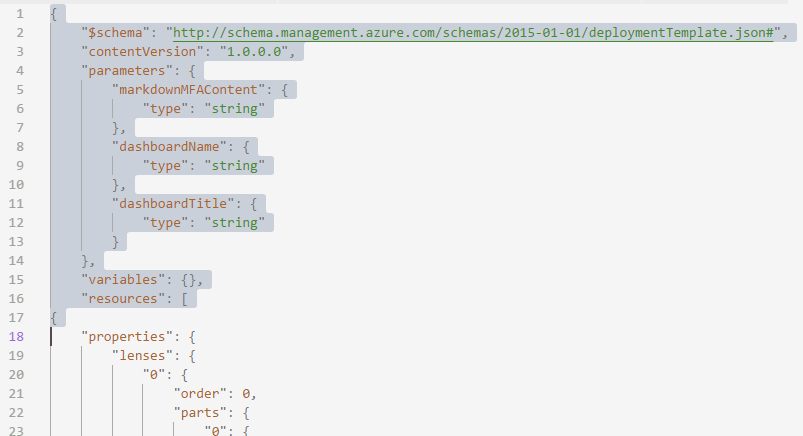
Now we need to change this template to be ready for deployment, and for that we need to add or change a couple of things. First, in the start of the JSON file, add schema and versioning, and parameters, variables and resources section like I have shown below in line 1-17:
imageI have chosen to use 3 parameters, the markdown content itself, and name of the dashboard and the title of the dashboard.
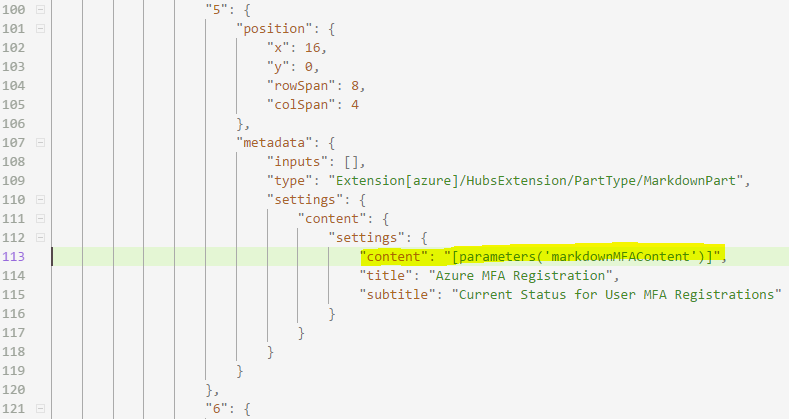
Next, find the tile for the markdown content, and change the content value to the value of the parameter, like I have done at line 113 here:
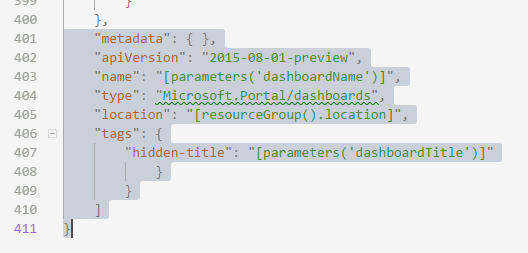
imageAnd last, at the end of the json template, add and change the following settings, I have used my parameters for the dashboard name and the dashboard title here in the lines 401-411:
imageMy deployment template for the customized dashboard is now completely general and can be used in every environment. In fact you are welcome to borrow and use my template from above her, I have included it in my github repository:
https://github.com/skillriver/AzureMFADashboard/blob/master/DeploymentTemplateMFAReport.json
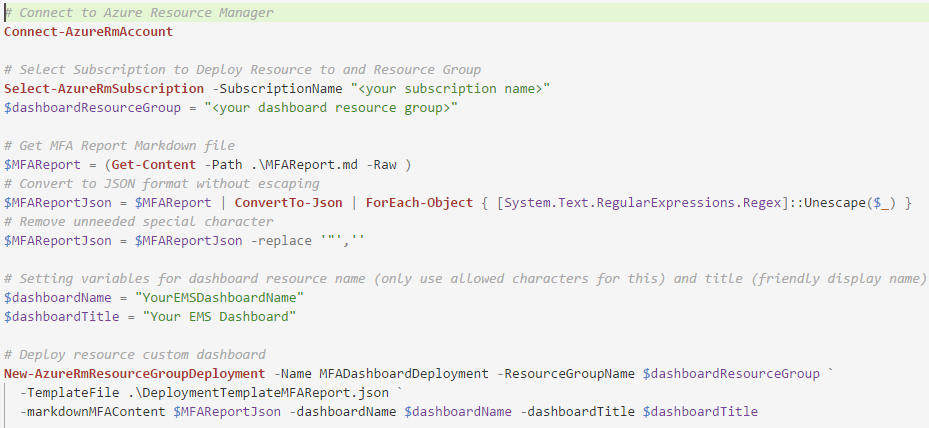
Working locally in my Visual Studio Code editor, I can now test the deployment using Azure PowerShell, as shown below and described with these simple steps:
Connect to Azure Resource Manager and select the Subscription
Specify a variable for the Resource Group you want to deploy to
The MFAreport.md file (which we created earlier) need some converting to JSON format, I’m removing all espace characters and any uneeded special characters
Specify variable names your environment for name and title for the dashboard
Deploy the custom dashboard to the resource group
imageHowever, now that we can test the deployment, I want to schedule a deployment using Azure Automation, and I will continue on my previous runbook from before. But first we need to set up some connections for authenticating to Azure and some variables.
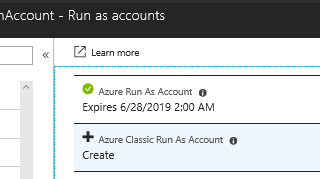
I Azure Automation we can create an Azure Run As Account, this will also create a service principal. If you navigate to your Automation Account in the Azure Portal, and go to the section called Run as accounts, you can create an Azure Run As Account automatically, as I have done here:
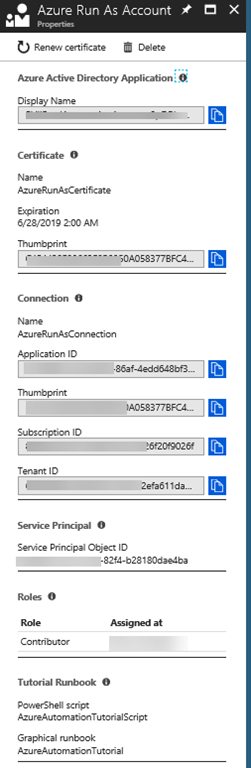
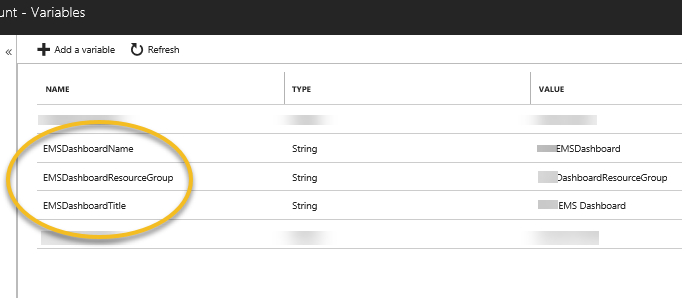
imageIf I look more closely at this generated Run As Account, I can see details for Azure AD App Registration, Service Principal, Certificate and more. This account will also automatically be assigned Contributor role for my Azure Subscription. If you want more control over Azure Run As Accounts, you can create your own as described in the following article: https://docs.microsoft.com/en-us/azure/automation/automation-create-runas-accountimageI will use this Azure Run As account in my environment to deploy the dashboard resource, I’ll just need to make sure the account has contributor access to the resource group. Next I will set ut a few variables under the Variables section for my Automation Account, I will use these variables when I deploy the resource:
imageNow we are ready to finally put together the complete Runbook and test it. You will have the complete link later in the blog post, but I will share some screenshots first:
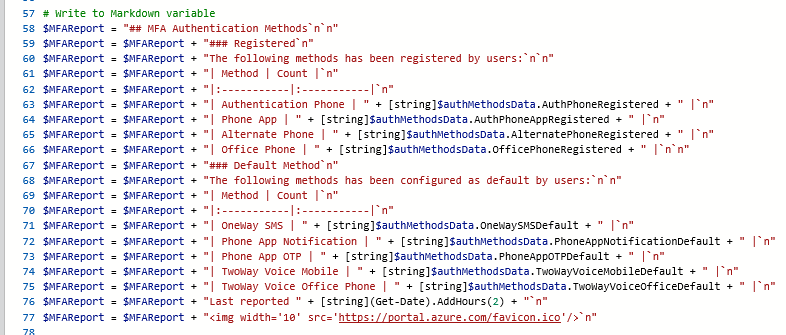
After I’ve connected with Connect-MSOLService I’m creating a variable for the markdown content, so I’ve changed from earlier when I saved a .md file temporarily, now I just adding lines using the newline special character (`n):
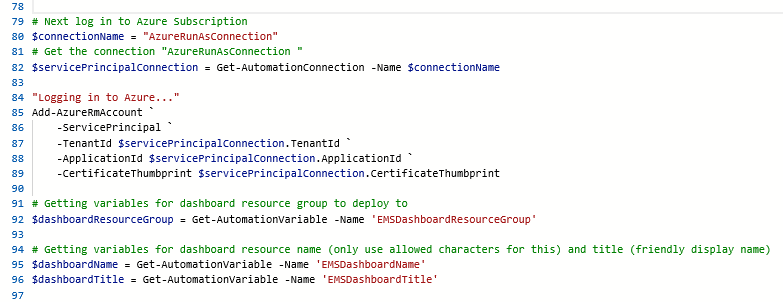
imageThe next part is for logging in to Azure (using the Azure Run As Account mentioned above), and then getting my variables ready for deployment:
imageThen I convert the markdown content to Json format, and removing any escape characters that I don’t need:
imageAnd then deploy the dashboard resource with parameters for markdown content and dashboard name & title. Note that I’m using my deployment template as a source from my github repository via the TemplateUri property:
imageYou can use any TemplateUri you want, for example from a more private source like a storage account blob etc.
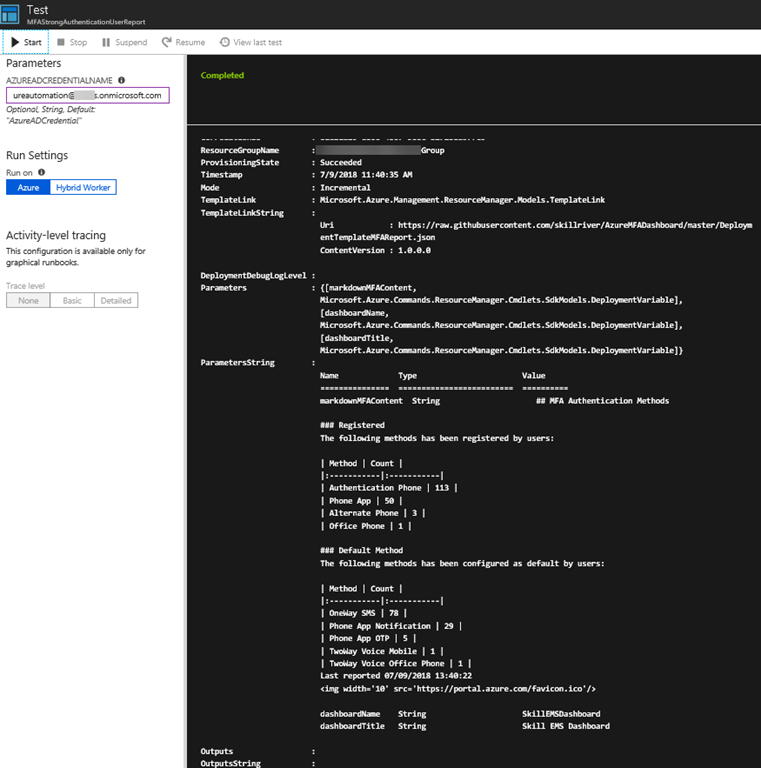
Testing the Runbook gives the following output, which shows it was successful:
imageWhen I now go and refresh the dasboard in the portal, I can see that the markdown tile has been updated:
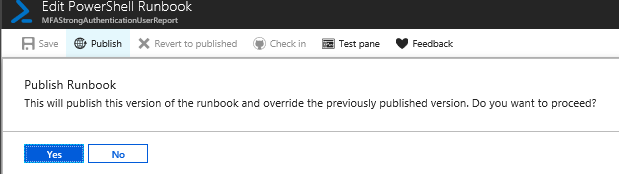
imageThat leaves me with just publishing and scheduling the runbook:
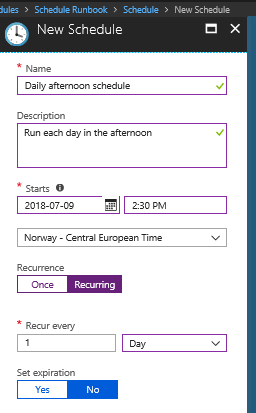
imageWhen creating a new schedule specify a name and recurrence:
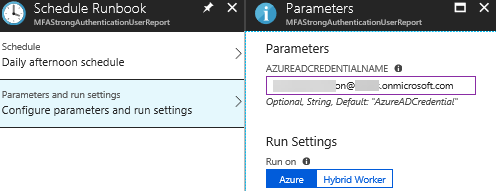
imageLink the schedule to the runbook and any needed parameters, I have to specify my credential that are allowed to Connect-MSOLService:
imageThat concludes this lengthy blog post. The script will now run regularly and update my custom markdown tile with MFA report data.
Here is the link to the PowerShell script used in my Azure Automation runbook, enjoy your MFA Reporting!
https://github.com/skillriver/AzureMFADashboard/blob/master/MFAStrongAuthenticationUserReportAutomation.ps1
This site uses Google Analytics only when you allow it, to understand traffic and improve the blog.
Read the privacy notice.
 I referred in the title of this blog post to the good, the bad and the ugly, and by that I mean the process of setting this up, because it starts easy enough in the beginning but it will get more “ugly” in the end ;)