Tag Archives: Azure

How to enable Conditional Access for Azure RemoteApp Programs

Last week I published a blog article on how to publish the System Center Service Manager and Operations Manager Consoles as Azure RemoteApp Programs. (See https://systemcenterpoint.wordpress.com/2016/02/02/publish-operations-and-service-manager-consoles-as-azure-remoteapp-programs/)

One great feature if you are using Azure AD Premium is that you can enable Conditional Access for your Azure RemoteApp Programs. Conditional Access will enable your organization to require Multi-Factor Authentication or required that the programs only can be accessed when at work. In this blog post I will show how this can be configured.

Requirements for Conditional Access for Azure RemoteApp Programs

The following requirements must be met to enable Conditional Access for Azure RemoteApp Programs:

  • Conditional Access are an Azure AD Premium feature, so your organization must be licensed for that
  • You must have created at least one Azure RemoteApp Collection
  • At least one user/group must be assigned to a Program in the Azure RemoteApp Collection

If all these requirements are met, you will see this “Microsoft Azure RemoteApp” Application in your Azure AD:

Configuring Conditional Access for Microsoft Azure RemoteApp

Select the Microsoft Azure RemoteApp Application and go to the Configure tab:

When enabling Access Rules, you can select to enable it for All Users, or for selected Groups. Both options can have exceptions for groups that you don’t want to have Access Rules:

For the Rules you have 3 options for Conditional Access:

You can require Multi-Factor Authentication for the groups/users you selected above, every time they launch a RemoteApp Program Session. I

Another scenario, if you define your work network locations, you can require MFA when not at work, or block the application completely.

To configure trusted IPs, click on the link to get to the MFA Service Settings:

User Experience for Azure RemoteApp Conditional Access

So, how does this look for the user when accessing Azure RemoteApp Programs?

Require Multi-Factor Authentication

I launch my selected Azure RemoteApp Client, and clicking on a RemoteApp Program:

When launching the program, I’m prompted for MFA as expected:

If I sign in with the Azure RemoteApp HTML5 Preview client, https://www.remoteapp.windowsazure.com/web, the Multi-Factor Authentication will be performed before you see your Work Resources.

Block access when not at work

If I selected the Access Rule for Blocking Access when not at work, I will get this message if I’m not on a trusted network:

Conclusion

Meeting the requirements, we can verify that Conditional Access can be enabled for selected groups of users, and it will apply to all the Azure RemoteApp Programs you have published. Note that you cannot enable this specifically for selected Azure RemoteApp Programs, it will be for all the RemoteApp Programs or none.

Publish Operations and Service Manager Consoles as Azure RemoteApp Programs

This blog post will show how you can publish System Center 2012 R2 Management Consoles like the Operations Console and Service Console as Azure Remote Apps.

I already have an environment in Azure that runs Service Manager and Operations Manager 2012 R2. Now I want remote clients and platforms to be able to run these consoles as remote apps.

When planning, I decided to use a Hybrid Collection, and the overall steps was (as documented in https://azure.microsoft.com/en-us/documentation/articles/remoteapp-create-hybrid-deployment/):

  1. Decide what image to use for your collection. You can create a custom image or use one of the Microsoft images included with your subscription.
  2. Set up your virtual network.
  3. Create a collection.
  4. Join your collection to your local domain.
  5. Add a template image to your collection.
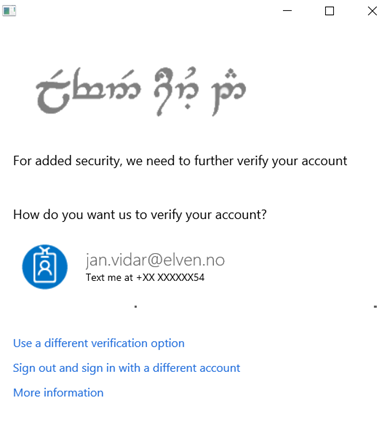
  6. Configure directory synchronization. Azure RemoteApp requires that you integrate with Azure Active Directory by either 1) configuring Azure Active Directory Sync with the Password Sync option, or 2) configuring Azure Active Directory Sync without the Password Sync option but using a domain that is federated to AD FS. Check out the configuration info for Active Directory with RemoteApp.
  7. Publish RemoteApp apps.
  8. Configure user access.

Azure Remote App can only be configured in the classic Azure Management Portal (manage.windowsazure.com), it’s on the roadmap for support in the new portal.azure.com and with Azure Resource Manager.

Step 1 – Create Custom Image for Installing Service Manager and Operations Consoles

There are several options available for creating a custom image. As my System Center environment already was set up in Azure, it made sense to create and use an image on an Azure VM, https://azure.microsoft.com/en-us/documentation/articles/remoteapp-image-on-azurevm/.

Create Azure VM for Image

First I created a VM based on template for Remote Desktop Session Host:

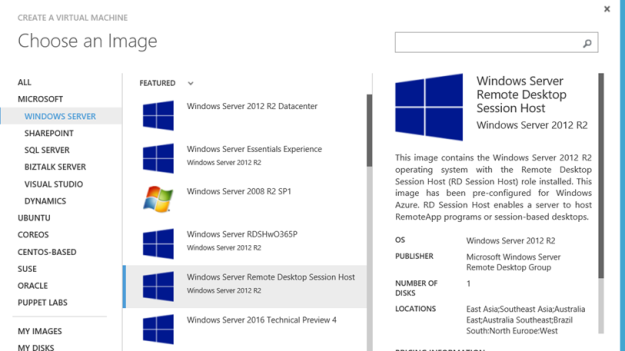
The VM template must be configured to run on a VNet that can contact the Domain Controller for the Domain that the System Center Servers are joined to.

After the VM was provisioned, I joined it to my AD Domain and rebooted.

After that I was ready to install and configure the Service Manager and Operations Consoles with all requirements on the image. I also added the most recent Update Rollups for System Center 2012 R2 Consoles (that already are updated on the System Center Servers of course).

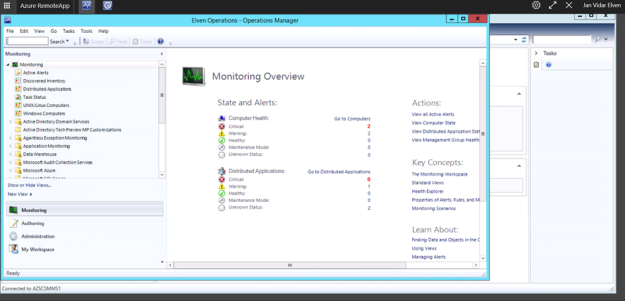
A this point I tested the Service Manager and Operations Consoles, and was successful in connecting the Management Servers.

Finally, the Azure VM needed to be Sysprepped. The desktop contains a validation script, it will validate the image for Azure RemoteApp requirements, and ask to launch Sysprep:

Then:

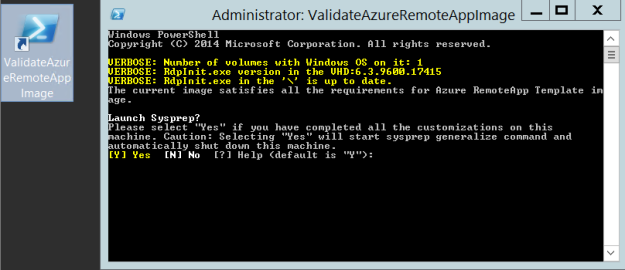
After running Sysprep the VM shuts down and we are ready for capturing the virtual machine.

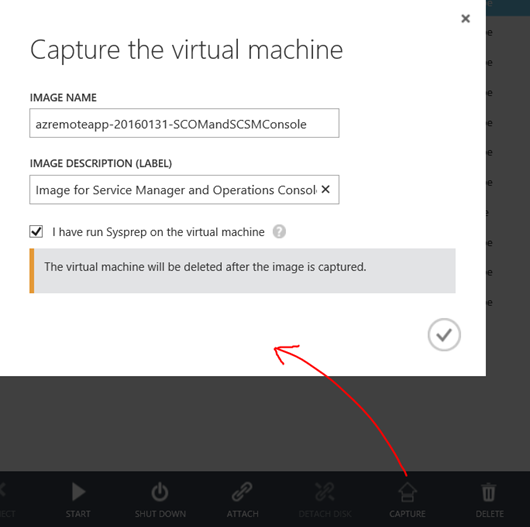
Capture the virtual machine

To capture the image follow the instructions as specified here https://azure.microsoft.com/en-us/documentation/articles/virtual-machines-capture-image-windows-server/.

I give the virtual machine an image name and description, and confirm that I have run Sysprep. Note that the VM will be deleted after the image is captured:

When finished, the captured image is deleted from the virtual machines instances, and available under images:

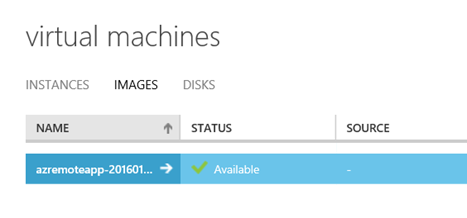
At this point I have a ready image to use. I can create new VM’s based on this image if I want, or I can use it as a RemoteApp image, which I will return to later. Now I’m ready for the next step.

Step 2 – Set up virtual network

Most will already have this in place if you have an existing Azure Subscription with Azure VMs. The requirement is that the Azure RemoteApp collection and image must be able to connect to the existing infrastructure. In this scenario where I want to use Service Manager and Operations Manager Consoles as Azure RemoteApp, I would need to be able to reach the Management Servers. Basically there are 3 scenarios:

  1. The Management Servers and the RemoteApp programs are on the same Azure Virtual Network.
  2. The Management Servers are on on-premise infrastructure, and the Virtual Network must be configured with a VPN to the on-premise infrastructure.
  3. The Management Servers are on another Virtual Network, and these two Virtual Networks must be connected to each other via Azure Site-to-Site VPN.
    1. A variant on the third scenario, where the Management Servers are created in a Resouce Group in ARM (Azure Resource Manager).

And of course, my scenario was the last one, as I have created my System Center 2012 R2 environment in a Resource Group using Azure Resource Manager J.

Since I cannot configure and deploy Azure RemoteApp in ARM, I needed to create a Site-to-Site VPN between my Azure Service Management environment (ASM) and ARM environment.

There are some good guidance on how to do that in this article: https://azure.microsoft.com/en-us/documentation/articles/virtual-networks-arm-asm-s2s/.

Since I already had VNets and VM’s in place I had to tweak a little in the guide, but I was able to make it work successfully. I will not get into details on that here, as I will focus on Azure RemoteApp, but that might be stuff for another blog post later :).

PS! Make sure that the Virtual Network has at least one DNS server to provide name resolution!

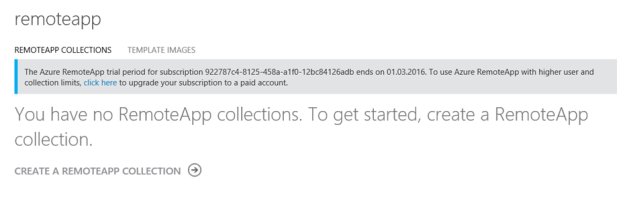
Step 3 – Create a collection

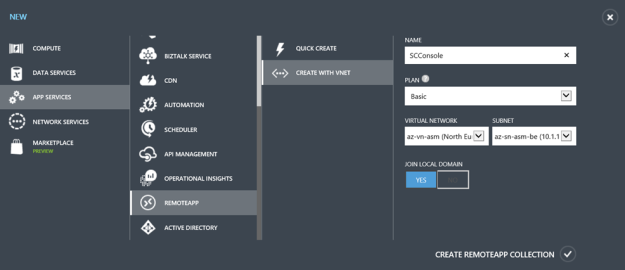
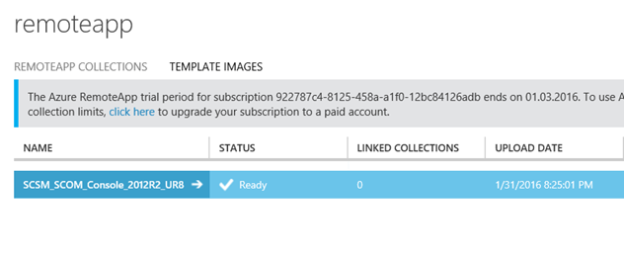
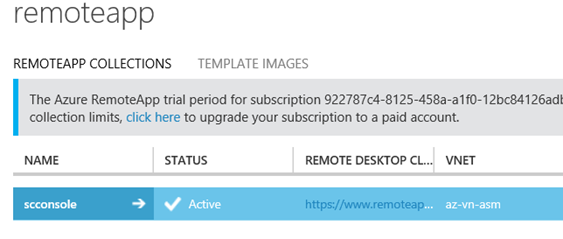
At this stage I was ready to create a RemoteApp Collection. I have signed up for a trial as notified in the image below, and selected to create a RemoteApp Collection with a Basic Plan. I specified my Virtual Network and Subnet that has connection to the ARM environment, and select to Join Local Domain.

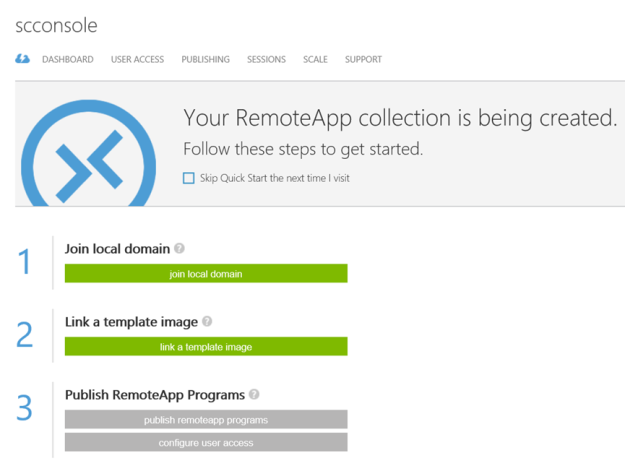
After creating the RemoteApp Collection, I get a status of Input Required:

At the Quick Start menu, the steps to follow are highlighted:

Step 4 – Join collection to local domain

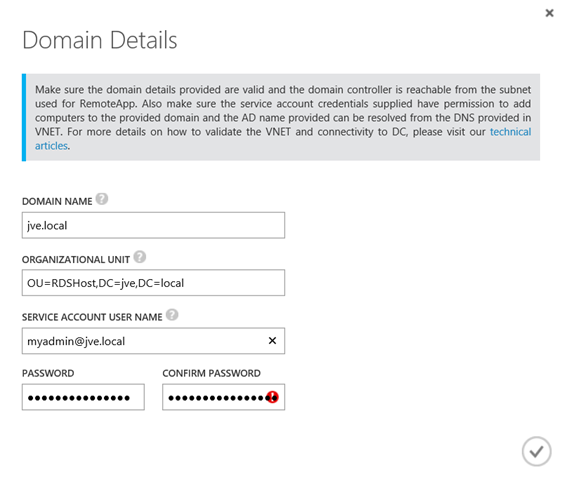
The next step is to join the local domain.

I specify my Active Directory Domain information, optionally specifying a OU for the RDS hosts that will provide the service. I also need a service account that has permissions to add computers to the domain.

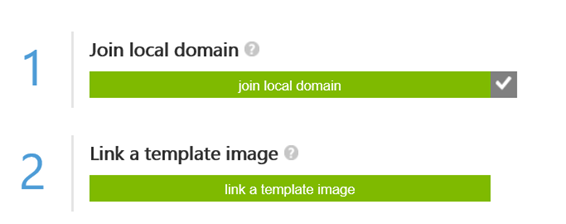
After successfully joining the domain, the first step is acknowledged and I’m ready for the next step:

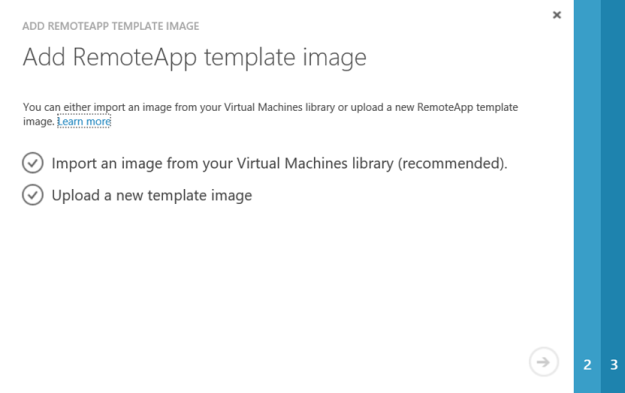
Step 5 – Add template image to collection

I now need to add the previously created Azure VM image I captured to the RemoteApp Collection.

Import the image into the Azure RemoteApp image library

First I add the image to the RemoteApp library:

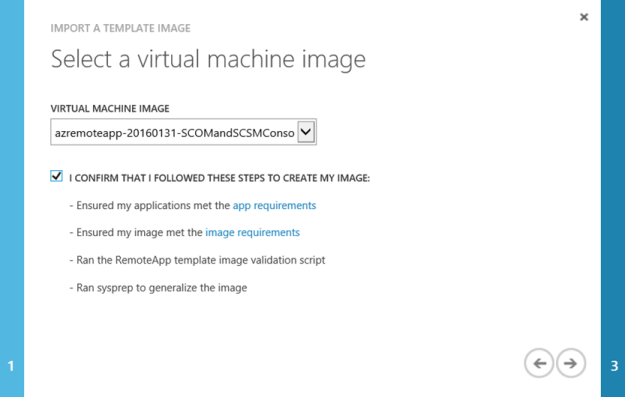
I select to import from the Virtual Machines library:

Find my image:

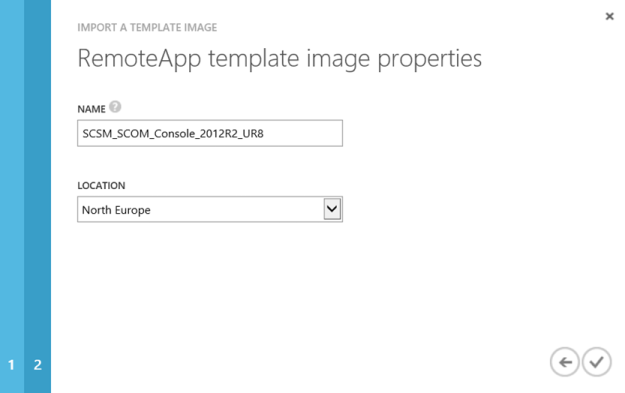
Give it a name for the RemoteApp template and specify a location consistent with my Azure infrastructure:

After that the Upload Pending status will be there for a while, about 15-20 minutes in my case:

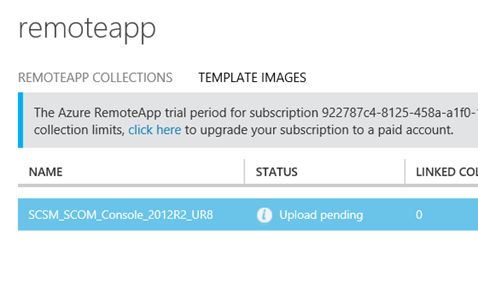
And then the RemoteApp image is ready:

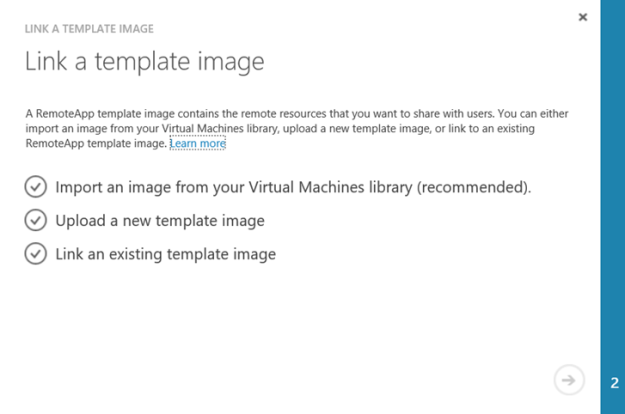
Link collection to existing template image

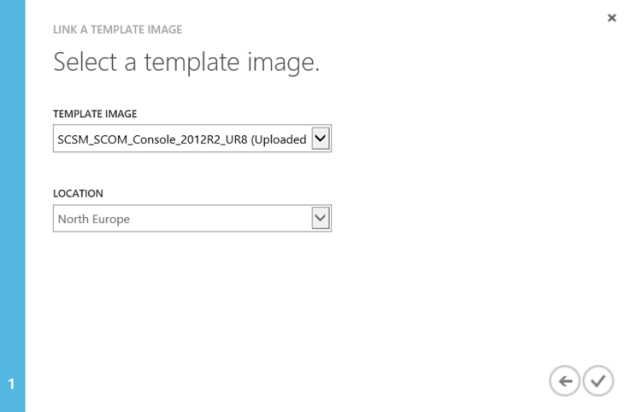
Now I can link the uploaded image to the collection:

Selecting my image template:

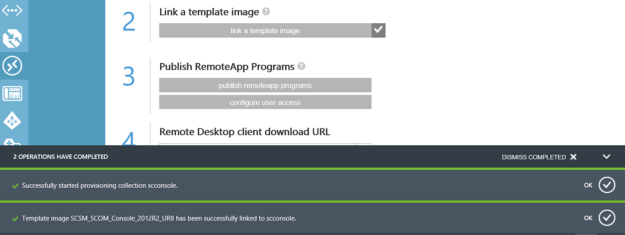
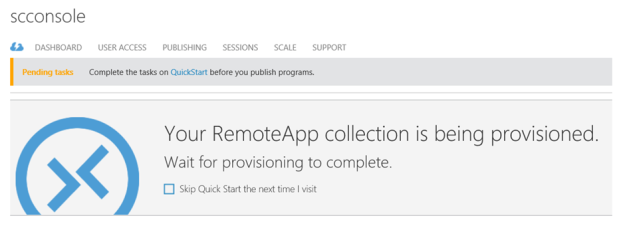
And after that provisioning of the collection with the image starts. This will take a while longer:

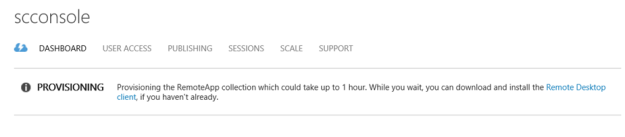
While its being provisioned, I can see that the status is pending, and that the operation can take up to 1 hour:

Provisioning status:

Finally, after provisioning:

Then we are ready for the last final steps before we can start testing!

Step 6 – Configure directory synchronization

Azure RemoteApp requires that you integrate with Azure Active Directory by either 1) configuring Azure Active Directory Sync with the Password Sync option, or 2) configuring Azure Active Directory Sync without the Password Sync option but using a domain that is federated to AD FS.

This is already in place in this environment, so the users I want to configure access for are already in Azure AD.

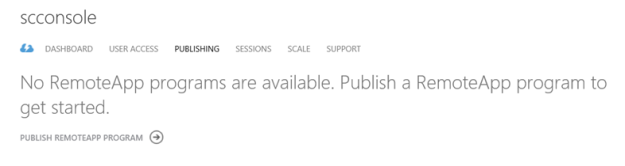
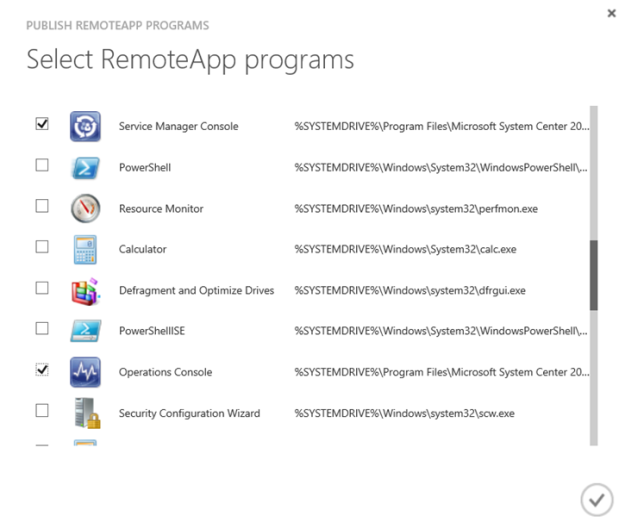
Step 7 – Publish RemoteApp apps

I can now publish the Remote App Programs from the provisioned image:

I select the Service Manager Console and Operations Console:

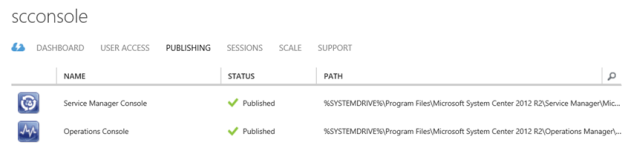
Verify that the RemoteApp programs are published:

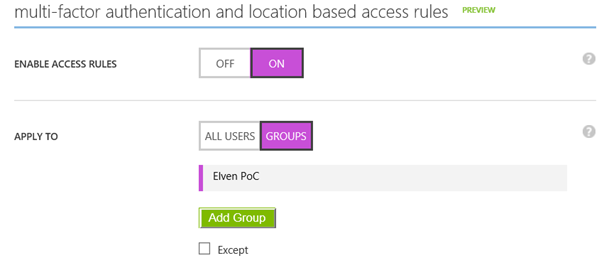
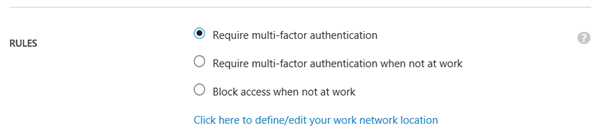
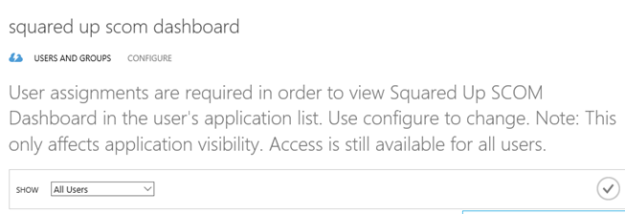
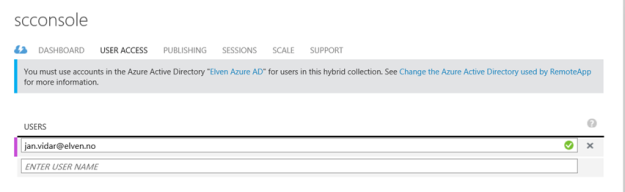
Step 8 – Configure user access

Next I need to configure the users that should have access to the RemoteApp Programs:

After that I’m ready for testing!

Testing the RemoteApp Programs

Now I can test the RemoteApp Programs.

HTML5 Remote App Web

First I test with the new HTML5 Remote App Web Client, this is now in Public Preview, and available at the following URL: https://www.remoteapp.windowsazure.com/web.

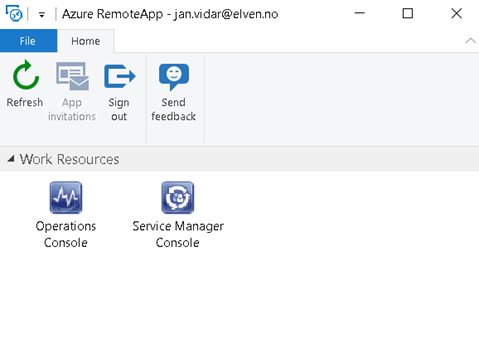
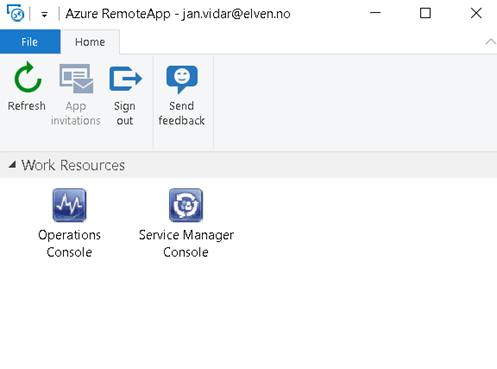
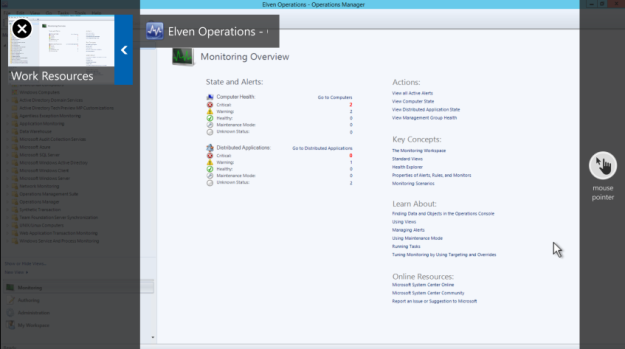
When logging in I’m presented with the following Work Resources:

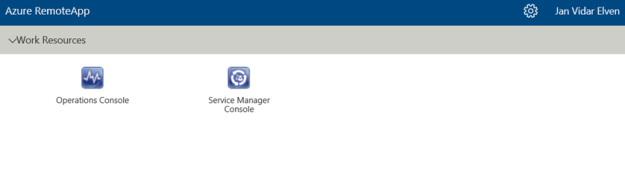
I can successfully launch the Service Manager and Operations Consoles. I can also easily switch between them in the top menu bar:

Azure Remote App Desktop App

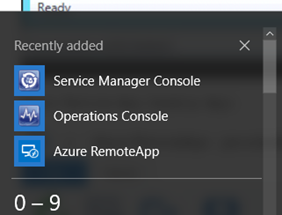
Next I test with the downloadable Azure RemoteApp Desktop Application. After signing in I can see my work resources and launch them:

The Azure RemoteApp client also seamlessly integrate the RemoteApp Programs at the Start and All Apps Menu in Windows 10:

Windows 10 Mobile Remote Desktop App

There are Remote Desktop Apps for all mobile platforms (Windows Mobile, iPhone, iOS, Android). Here I have tested the Windows 10 Mobile App:

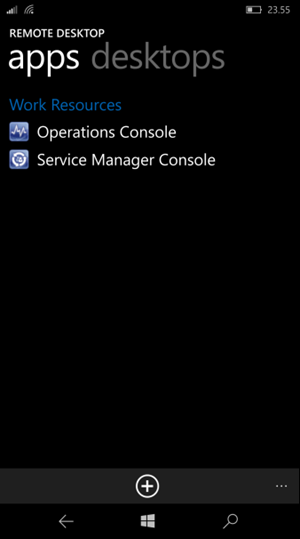
And I can launch the RemoteApp Program on my phone:

Windows 10 Continuum Support

There is a new Remote Desktop Preview App out for Windows 10 Mobile that support Continuum, but this Preview App does not currently support Azure RemoteApp. That will come later down the line though, and when that comes I will update this blog post or create a related post with my experiences on that!

Conclusion

This was quite fun to work with, and the whole process with the 8 steps above worked like a charm. The most challenging thing was to create the Site-to-Site VPN between my ASM and ARM environment in fact. Outside that I never had any errors or problems.

I’m eagerly awaiting Azure RemoteApp support for Azure Resource Manager though!

Speaking at NIC 2016 #NICConf

I’m very excited to have a session at Nordic Infrastructure Conference, 5th anniversary edition, in Oslo February 4.-5. 2016. In exactly one month from today (with a pre-conference day starting at Feb 3rd) NIC kicks off the fifth version of this premium event for IT professionals!

Aiming for up to 1400 participants, the sessions will be presented in 7 tracks:


For a list of current published sessions, see this link: http://www.nicconf.com/sessions

My session will be a deep dive on publishing applications with Azure AD, http://www.nicconf.com/deep-dive–publishing-applications-with-azure-ad.

The session will cover Azure AD Single Sign-On and Password Single Sign-On, integrating Azure AD SSO with your internally developed applications, and publishing applications with Azure AD App Proxy that either use pre-authentication or pass through. The session will cover how to assign users, configure access control with MFA per-application, use self-servicing and how users can access these applications on different platforms and through which portals.

The session will honor the NIC original concept: Less slides, more demos!

I’m very much looking forward to next month, and hope to see you there!

Read more about NIC here: http://www.nicconf.com.

Creating SCSM Incidents from OMS Alerts using Azure Automation – Part 2

This is the second part of a 2-part blog article that will show how you can create a new Service Manager Incident from an Azure Automation Runbook using a Hybrid Worker Group, and with OMS Alerts search for a condition and generate an alert which triggers this Azure Automation Runbook for creating an Incident in Service Manager via a Webhook and some contextual data for the Alert.

In Part 1 of the blog I prepared my Service Manager environment, and created Azure Automation Runbook and Assets to run via Hybrid Worker for generating incidents in Service Manager. In this second part of the blog I will configure my Operations Management Suite environment for OMS Alerting and Alert Remediation, and create an OMS Alert that will trigger this PowerShell Runbook.

Configuring OMS Alerting and Remediation

If you haven’t already for your OMS Workspace, you will need to enable the OMS Alerting and Alert Remediation under Settings and Preview Features. This is shown in the picture below:

Creating the OMS Alert

The next step is to create the OMS Alert. To do this I will need to do a Log Search with the criteria I want. For my example in this article, I will use an EventLog Search where I have previously added Azure AD Application Proxy Connector Event Log to OMS, and where I also have created a custom field for events where “The Connector was unable to connect to the service due to networking issues”.

The result of this Log Search is shown below, where I have 7 results in the last 7 days:

When I enabled OMS Alerting and Remediation under Settings, I can now see that I have a new Alert button at the bottom of the screen. I click on that to create my new OMS Alert.

I give the OMS Alert a descriptive name, using my current search query, and checking every 15 minutes for this alert. I can also specify a threshold over a specified time windows, in this case I want the Alert to trigger if there are more than 0 occurrences. If I want to I can also send an email notification to specified recipient(s).

Since I want to generate a SCSM Incident when this OMS Alert triggers, I select to Enable Remediation and select my Create-SCSMIncident Runbook.

After saving the OMS Alert I get a successful confirmation, and a link to where I can see my configured Alerts:

While in Preview I can only create up to 10 Alerts, and I can also remove them but not edit existing for now:

That is all I need to configure in Operations Management Suite to get the OMS Alert to trigger. Now I need to go back to the Azure Portal and configure some changes for my PowerShell Runbook!

Configuring Azure Automation PowerShell Runbook for Webhook and Hybrid Worker Group

In the Azure Portal and under my Automation Account and the PowerShell Runbook I created for Create-SCSMIncident (see Part 1), there will now automatically be created a Webhook for OMS Alert Remediation. This Webhook has a expiry date of one year ahead of creation.

I now need to specify the Parameters for the Webhook, so that it runs on my Hybrid Worker group:

After I have specified the Hybrid Worker group, any OMS Alerts will now trigger this Runbook and run on my local environment, and in this case create the SCSM incident as specified in the PowerShell Runbook. But, I also want to have some contextual data in the Incident, so I need to look at the Webhook data in the next step.

Configuring and using Webhook for contextual data in Runbook

Whenever the OMS Alert triggers the remediation Azure Automation Runbook via the Webhook, event information will be submitted from OMS to the Runbook via WebhookData input parameter.

An example of this is shown in the image below, where the WebhookData Input Parameter contains event information formatted as JSON (JavaScript Object Notation):

So, I need to configure my PowerShell Runbook to process this WebhookData, and to use that information when creating the Incident.

Let’s first take a look at the WebhookData. If I copy the input from above to for example Visual Studio Code, I can see clearer that the WebhookData consists of a WebhookName, RequestBody and RequestHeader. The values I’m looking for are in the RequestBody and SearchResults:

I update my PowerShell Runbook so that I can process the WebhookData, and get the WebhookName, WebhookHeaders and WebhookBody. When I have the WebhookBody, I can get the SearchResults and by using ConvertFrom-JSON loop trough the value array to get the fields I’m looking for like this:

In this case I want the Source, EventID and RenderedDescription, which also corresponds to the values from the Alert in OMS, as shown below. I then use these values for the Incident Title and Description in the PowerShell Runbook.

The complete Azure Automation PowerShell Runbook is shown below:

param (
[
object]$WebhookData
)

if ($WebhookData -ne $null) {

# Get Webhook Data
$WebhookName = $WebhookData.WebhookName
$WebhookHeaders = $WebhookData.RequestHeader
$WebhookBody = $WebhookData.RequestBody

# Writing Webhook Data to verbose output
Write-Verbose Webhook name: ‘$WebhookName’
Write-Verbose Webhook header:
Write-Verbose $WebhookHeaders
Write-Verbose Webhook body:
Write-Verbose $WebhookBody

# Searching Webhook Data for Value Results
$SearchResults = (ConvertFrom-JSON $WebhookBody).SearchResults
$SearchResultsValue = $SearchResults.value
Foreach ($item in $SearchResultsValue)
{
# Getting Alert Source, EventID and RenderedDescription
$AlertSource = $item.Source
Write-Verbose Alert Name: ‘$AlertSource’
$AlertEventId = $item.EventID
Write-Verbose Alert EventID: ‘$AlertEventId’
$AlertDescription = $item.RenderedDescription
Write-Verbose Alert Description: ‘$AlertDescription’
}

# Setting Incident Title and Description based on OMS Alert
$incident_title = OMS Alert: + $AlertSource
$incident_desc = $AlertDescription
}
else
{
# Setting Generic Incident Title and Description
$incident_title = Azure Automation Generated Alert
$incident_desc = This Incident is generated from an Azure Automation Runbook via Hybrid Worker
}

# Getting Assets for SCSM Management Server Name and Credentials
$scsm_mgmtserver = Get-AutomationVariable -Name SCSMServerName
$credential = Get-AutomationPSCredential -Name SCSMAASvcAccount

# Create Remote Session to SCSM Management Server
#
(Specified credential must be in Remote Management Users local group and SCSM operator)
$session = New-PSSession -ComputerName $scsm_mgmtserver -Credential $credential

# Import module for Service Manager PowerShell CmdLets
$SMDIR = Invoke-Command -ScriptBlock {(Get-ItemProperty hklm:/software/microsoft/System Center/2010/Service Manager/Setup).InstallDirectory} -Session $session
Invoke-Command -ScriptBlock { param($SMDIR) Set-Location -Path $SMDIR } -Args $SMDIR -Session $session
Import-Module .\Powershell\System.Center.Service.Manager.psd1 -PSSession $session

# Create Incident
Invoke-Command -ScriptBlock { param ($incident_title, $incident_desc)

# Get Incident Class
$IncidentClass = Get-SCSMClass -Name System.WorkItem.Incident

# Get Prefix for Incident IDs
$IncidentPrefix = (Get-SCSMClassInstance -Class (Get-SCSMClass -Name System.WorkItem.Incident.GeneralSetting)).PrefixForId

# Set Incident Properties
$Property = @{Id=$IncidentPrefix{0}
Title
= $incident_title
Description
= $incident_desc
Urgency
= System.WorkItem.TroubleTicket.UrgencyEnum.Medium
Source
= SkillSCSM.IncidentSourceEnum.OMS
Impact
= System.WorkItem.TroubleTicket.ImpactEnum.Medium
Status
= IncidentStatusEnum.Active
}

# Create the Incident
New-SCSMClassInstance -Class $IncidentClass -Property $Property -PassThru

} -Args $incident_title, $incident_desc -Session $session

Remove-PSSession $session

After publishing the updated Runbook I’m ready for the OMS Alert to trigger.

When the OMS Alert triggers

The next time this OMS Alert triggers, I can verify that the Runbook is started and an Incident is created. Since I also wanted an email notification, I also received that:

In Operations Management Suite, I search for any OMS Alerts generated by using the query “Type=Alert SourceSystem=OMS”:

In Azure Automation, I can see that the Runbook has launched a job:

And most importantly, I can see that the Incident is created in Service Manager with the info I specified:

That concludes this two-part blog article on how to create SCSM Incidents from OMS Alerts. OMS Automation rocks!

Creating SCSM Incidents from OMS Alerts using Azure Automation – Part 1

There has been some great announcements recently for OMS Alerts in Public Preview (http://blogs.technet.com/b/momteam/archive/2015/12/02/announcing-the-oms-alerting-public-preview.aspx) and Webhooks support for Hybrid Worker Runbooks (https://azure.microsoft.com/en-us/updates/hybrid-worker-runbooks-support-webhooks/). This opens up for some scenarios I have been thinking about.

This 2-part blog will show how you can create a new Service Manager Incident from an Azure Automation Runbook using a Hybrid Worker Group, and with OMS Alerts search for a condition and generate an alert which triggers this Azure Automation Runbook for creating an Incident in Service Manager via a Webhook and some contextual data for the Alert.

This is the first part of this blog post, so I will start by preparing the Service Manager environment, creating the Azure Automation Runbook, and testing the Incident creation via the Hybrid Worker.

Prepare the Service Manager Environment

First I want to prepare my Service Manager Environment for the Incident creation via Azure Automation PowerShell Runbooks. I decided to create a new Incident Source Enumeration for ‘Operations Management Suite’, and also to create a new account with permissions to create incidents in Service Manager to be used in the Runbooks.

To create the Source I edited the Library List for Incident Source like this:

To make it easier to refer to this Enumeration Value in PowerShell scripts, I define my own ID in the corresponding Management Pack XML:

And specifying the DisplayString for the ElementID for the Languages I want:

The next step is to prepare the account for the Runbook. As Azure Automation Runbooks on Hybrid Workers will run as Local System, I need to be able to run my commands as an account with permissions to Service Manager and to create Incidents.

I elected to create a new local Active Directory account, and give that account permission to my Service Manager Management Server.

With the new account created, I added it to the Remote Management Users local group on the Service Manager Management Server:

Next I added this account to the Advanced Operators Role Group in Service Manager:

Adding the account to the Advanced Operators group is more permission than I need for this scenario, but will make me able to use the same account for other work item scenarios in the future.

With the Service Manager Enviroment prepared, I can go to the next step which is the PowerShell Runbook in Azure Automation.

Create an Azure Automation Runbook for creating SCSM Incidents

I created a new PowerShell Script based Runbook in Azure Automation for Creating Incidents. This Runbook are using a Credential Asset to run Remote PowerShell session commands to my Service Manager Management Server. The Credential Asset is the local Active Directory Account I created in the previous step:

I also have created a variable for the SCSM Management Server Name to be used in the Runbook.

The PowerShell Runbook can then be created in Azure Automation, using my Automation Assets, and connecting to Service Manager for creating a new Incident as specified:

The complete PowerShell Runbook is show below:

# Setting Generic Incident Title and Description
$incident_title = Azure Automation Generated Alert
$incident_desc = This Incident is generated from an Azure Automation Runbook via Hybrid Worker

# Getting Assets for SCSM Management Server Name and Credentials
$scsm_mgmtserver = Get-AutomationVariable -Name SCSMServerName
$credential = Get-AutomationPSCredential -Name SCSMAASvcAccount

# Create Remote Session to SCSM Management Server
#
(Specified credential must be in Remote Management Users local group and SCSM operator)
$session = New-PSSession -ComputerName $scsm_mgmtserver -Credential $credential

# Import module for Service Manager PowerShell CmdLets
$SMDIR = Invoke-Command -ScriptBlock {(Get-ItemProperty hklm:/software/microsoft/System Center/2010/Service Manager/Setup).InstallDirectory} -Session $session
Invoke-Command -ScriptBlock { param($SMDIR) Set-Location -Path $SMDIR } -Args $SMDIR -Session $session
Import-Module .\Powershell\System.Center.Service.Manager.psd1 -PSSession $session

# Create Incident
Invoke-Command -ScriptBlock { param ($incident_title, $incident_desc)

# Get Incident Class
$IncidentClass = Get-SCSMClass -Name System.WorkItem.Incident

# Get Prefix for Incident IDs
$IncidentPrefix = (Get-SCSMClassInstance -Class (Get-SCSMClass -Name System.WorkItem.Incident.GeneralSetting)).PrefixForId

# Set Incident Properties
$Property = @{Id=$IncidentPrefix{0}
Title
= $incident_title
Description
= $incident_desc
Urgency
= System.WorkItem.TroubleTicket.UrgencyEnum.Medium
Source
= SkillSCSM.IncidentSourceEnum.OMS
Impact
= System.WorkItem.TroubleTicket.ImpactEnum.Medium
Status
= IncidentStatusEnum.Active
}

# Create the Incident
New-SCSMClassInstance -Class $IncidentClass -Property $Property -PassThru

} -Args $incident_title, $incident_desc -Session $session

Remove-PSSession $session
The script should be pretty straightforward to interpret. The most important part is that it would require to be run on a Hybrid Worker Group with Servers that can connect via PowerShell Remote to the specified Service Manager Management Server. The Incident that will be created are using a few variables for incident title and description (these will be updated for contextual data from OMS Alerts in part 2), and some fixed data for Urgency, Impact and Status, along with my custom Source for Operations Management Suite (ref. the Enumeration Value created in the first step).

After publishing this Runbook I’m ready to run it with a Hybrid Worker.

Testing the PowerShell Runbook with a Hybrid Worker

Now I can run my Azure Automation PowerShell Runbook. I select to run it on my previously defined Hybrid Worker Group.

The Runbook is successfully completed, and the output is showing the new incident details:

I can also see the Incident created in Service Manager:

That concludes this first part of this blog post. Stay tuned for how to create an OMS Alert and trigger this Runbook in part 2!

Publish the Squared Up SCOM Web Dashboard with Azure AD Application Proxy

The Scenario

Squared Up is a Web based Dashboard solution for SCOM environments, and since its built on HTML5 it works on any device or browser as long as you can connect to the Web Server the solution is installed on.

This should be another good scenario for using the Azure AD Application Proxy, as the Squared Up Web Site needs to be installed either on the SCOM Management Server or on a Server that can connect to the Management Server internally.

In this blog article I will describe how to publish the new Squared Up Web Site. This will give me some interesting possibilities for either pass-through or pre-authentication and controlling user access.

There are two authentication scenarios for publishing the Squared Up Web Site with Azure AD App Proxy:

  1. Publish without pre-authentication (pass through). This scenario is best used when Squared Up is running Forms Authentication, so that the user can choose which identity they want to log in with. Forms Authentication is also default mode for Squared Up installations.
  2. Publish with pre-authentication. This scenario will use Azure AD authentication, and is best used when Squared Up Web Site is running Windows Authentication so that we can have single sign-on with the Azure AD identity.

I will go through both authentication scenarios here.

I went through these steps:

Create the Application in Azure AD

In this next step, I will create the Proxy Application in Azure AD where the Self Service Portal will be published. To be able to create Proxy Applications I will need to have either an Enterprise Mobility Suite license plan, or Azure AD Basic/Premium license plan. From the Azure Management Portal and Active Directory, under Applications, I add a new Application and select to “Publish an application that will be accessible from outside your network”:

I will then give a name for my application, specify the internal URL and pre-authentication method. I name my application “Squared Up SCOM Dashboard”, use http://scomdashboardserver/SquaredUp/ as internal URL and choose Passthrough as Pre-Authentication method.

After the Proxy Application is added, there are some additional configurations to be done. If I have not already, Application Proxy for the directory have to be enabled. I have created other Proxy Applications before this, so I have already done that.

I also need to download the Application Proxy connector, install and register this on a Server that is member of my own Active Directory. The Server that I choose can be either on an On-Premise network, or in an Azure Network. As long as the Server running the Proxy connector can reach the internal URL, I can choose which Server that best fits my needs.

When choosing passthrough as authentication method, all users can directly access the Forms Based logon page as long as they know the external URL. Assigning accounts, either users or groups, will only decide which users that will see the application in the Access Panel or My Apps.

I now need to make additional configurations to the application, and go to the Configure menu. From here I can configure the name, external URL, pre-authentication method and internal URL, if I need to change something.

I choose to change the External URL so that I use my custom domain, and note the warning about creating a CNAME record in external DNS. After that I hit Save so that I can configure the Certificate.

Since I have already uploaded a certificate (see previous blog post https://systemcenterpoint.wordpress.com/2015/06/10/using-a-custom-domain-name-for-an-application-published-with-with-azure-ad-application-proxy/), I can just verify that it is correct.

When using passthrough I don’t need to configure any internal authentication method.

Another feature that is in Preview, is to allow Self-Service Access to the published application. I have configured this here, so that users can request access to the application from the Access Panel (https://myapps.microsoft.com).

After I have configured this and uploaded a logo, I am finished at this step, and can test the application using passthrough.

Testing the application using passthrough

When using Passthrough I can go directly to the external URL, which in my case is https://scom.skill.no/squaredup. And as expected, I can reach the internal Forms Based login page:

For the users and groups I have assigned access to, they will also see the Squared Up application in the Access Panel or in My Apps, this application is linked to the external URL:

Now I’m ready to do the next step which is change Pre-Authentication and use Azure AD Authentication and Single Sign-On.

Change Application to use Azure AD Authentication as Pre-Authentication

First I will reconfigure the Azure AD App Proxy Application, by changing the Preauthentication method to Azure Active Directory.

Next I need to configure to use Internal Authentication Method “Windows Integrated Authentication”. I also need to configure the Service Principal Name (SPN). Here I specify HTTP/scomdashboardserverfqdn, in my example this is HTTP/skill-scom02.skill.local.

PS! A new preview feature is available, to choose which login identity to delegate. I will continue using the default value of User principal name.

Since I now will use pre-authentication, it will be important to remember to assign individual users or groups to the Application. This enables me to control which users who will see the application under their My Apps and who will be able access the application’s external URL directly.

From the bottom part of the configuration settings I can configure Access Rules, which at this time is in Preview. This is cool, because I can for example require for this Application that users will be required to use multi-factor authentication. I have not enabled that here though.

After I’m finished reconfiguring the Azure AD App Proxy Application, I can save and continue with the other requirements.

Enable Windows Authentication for Squared Up

The Squared Up Web site supports Windows Authentication, the instructions for configuring that is described here: http://support.squaredup.com/support/solutions/articles/4136-enable-integrated-windows-authentication-single-sign-on-.

Follow that article and you should be ready for the next step.

It is a good idea at this point to verify that Windows Integrated Authentication is working correctly by browsing internally to http://scomdashboardserver/SquaredUp. Your current logged on user (if permissions are correct) should be logged in automatically.

Configure Kerberos Constrained Delegation for the Proxy Connector Server

I now need to configure so that the Server running the Proxy Connector can impersonate users pre-authenticating with Azure AD and use Windows Integrated Authentication to the Squared Up Server.

I find the Computer Account in Active Directory for the Connector Server, and on the Delegation tab click on “Trust this computer for delegation to specified services only”, and to “Use any authentication protocol”. Then I add the computer name for the web server that Squared Up is installed on and specify the http service as shown below (I already have an existing delegation set up):

This was the last step in my configuration, and I am almost ready to test.

If you, like me, have an environment consisting on both On-Premise and Azure Servers in a Hybrid Datacenter, please allow room for AD replication of these SPN’s and more.

Testing the published application with Azure AD Authentication!

Now I am ready to test the published proxy application with Azure AD Authentication.

When I go to my external URL https://scom.skill.no/squaredup, Azure AD will check if I already has an authenticated session, or else I will presented with the logon page for Azure AD (in Norwegian but you get the picture ;):

Remember from earlier that I have assigned the application either to a group of all or some users or directly to some pilot users for example.

If I log in with an assigned user, I will be directly logged in to the Squared Up Dashboard:

In addition to access the application via the Access Panel (https://myapps.microsoft.com), I can use the App Launcher menu in Office 365 and add the Squared Up Dashboard to the App chooser for easy access:

I can also access the Squared Up Application from the “My Apps” App on my Mobile Devices.

So to conclude, Squared Up is another great solution for publishing with Azure AD Application Proxy !

Publish the Service Manager Self Service Portal with Azure AD Application Proxy

The Scenario

Updated blog post: 10th November 2015. With todays release of Update Rollup 8 for Service Manager 2012 R2 (https://www.microsoft.com/en-us/download/details.aspx?id=49556) and the new HTML5 based Self Service Portal, I have made some changes to this blog post where the scenario is updated. Please read on for how to publish this portal externally via Azure AD App Proxy:

Recently in a SCSM LyncUp call news came of a coming Self Service Portal that the Service Manager Team are working on. This portal will no longer have a requirement for SharePoint and Silverlight, and will be built on HTML5. Stefan Johner has a good write-up on the features here: http://jhnr.ch/2015/08/22/service-manager-lync-up-summary-august-2015-new-portal-sneak-preview/.

For a while ago I had a blog article on how to publish the Cireson Self Service Portal via the Azure AD Application Proxy (https://systemcenterpoint.wordpress.com/2015/03/26/publish-the-cireson-self-service-portal-with-azure-ad-application-proxy/), and in this blog article I will describe how to publish the new SCSM Self Service Portal. This will give me some interesting possibilities for pre-authentication and controlling user access.

There are two authentication scenarios for publishing this Self Service Portal with Azure AD App Proxy:

  1. Publish without pre-authentication (pass through). This scenario is best used when the Self Service Portal is running Forms Authentication, so that the user can choose which identity they want to log in with. As the new SCSM Self Service Portal doesn’t support Forms Authentication, this is not really an option here.
  2. Publish with pre-authentication. This scenario will use Azure AD authentication, and is best used when the Self Service Portal is running Windows Authentication so that we can have single sign-on with the Azure AD identity.

It is the second scenario with pre-authentication I will configure here.

I went through these steps:

Verify Windows Authentication for Service Manager Self Service Portal

The Service Manager Self Service Portal installs per default with Windows Integrated Authentication. From my environment, I can verify the following configuration settings:

  • Windows Authentication is enabled for the Web Site Application
  • On Advanced settings for the Web Site Application, Kernel Mode Authentication Enabled and Extended Protection to Off. For Providers Negotiate are listed on top.

It is a good idea at this point to verify that Windows Integrated Authentication is working correctly by browsing internally to http[s]://scsmportalservername:[port]/selfserviceportal. Your current logged on user (if permissions are correct) should be logged in automatically.

Create the Application in Azure AD

In this next step, I will create the Proxy Application in Azure AD where the Self Service Portal will be published. To be able to create Proxy Applications I will need to have either an Enterprise Mobility Suite license plan, or Azure AD Basic/Premium license plan. From the Azure Management Portal and Active Directory, under Applications, I add a new Application and select to “Publish an application that will be accessible from outside your network”:

I will then give a name for my application, specify the internal URL and pre-authentication method. I name my application “SCSM Self Service Portal”, use “http://portalserverfqdn:%5Bport%5D” as internal URL and choose Azure Active Directory as Pre-Authentication method.

After the Proxy Application is added, there are some additional configurations to be done. If I have not already, Application Proxy for the directory have to be enabled. I have created other Proxy Applications before this, so I have already done that.

I also need to download the Application Proxy connector, install and register this on a Server that is member of my own Active Directory. The Server that I choose can be either on an On-Premise network, or in an Azure Network. As long as the Server running the Proxy connector can reach the internal URL, I can choose which Server that best fits my needs.

Update: Regarding AADP Connector, you can now greate connector groups and configure the application to use the group of connector(s) you choose:

AADPConnectorGroup

Since I choose to use pre-authentication, I can also assign individual users or groups to the Application. This enables me to control which users who will see the application under their My Apps and who will be able access the application’s external URL directly.

I now need to make additional configurations to the application, and go to the Configure menu. From here I can configure the name, external URL, pre-authentication method and internal URL, if I need to change something.

I choose to change the External URL so that I use my custom domain, and note the warning about creating a CNAME record in external DNS. After that I hit Save so that I can configure the Certificate.

AADPCustomDomain

Since I have already uploaded a certificate (see previous blog post https://systemcenterpoint.wordpress.com/2015/06/10/using-a-custom-domain-name-for-an-application-published-with-with-azure-ad-application-proxy/), I can just verify that it is correct.

AADPCert

Next I need to configure to use Internal Authentication Method “Windows Integrated Authentication”. I also need to configure the Service Principal Name (SPN). Here I specify HTTP/portalserverfqdn, in my example this is HTTP/az-scsm-ms01.skill.local.

Update: You can now choose which Identity to delegate, in this case UPN is fine.

AADPIntegratedWinAuth

From the bottom part of the configuration settings I can configure Acces Rules, which at this time is in Preview. This is cool, because I can for example require for this Application that users will be required to use multi-factor authentication. I have not enabled that here though.

Another feature that is in Preview, is to allow Self-Service Access to the published application. I have configured this here, so that users can request access to the application from the Access Panel (https://myapps.microsoft.com).

After I have configured this and uploaded a logo, I am finished at this step, and now need to configure some more settings in my local Active Directory.

Configure Kerberos Constrained Delegation for the Proxy Connector Server

I now need to configure so that the Server running the Proxy Connector can impersonate users pre-authenticating with Azure AD and use Windows Integrated Authentication to the Self Service Portal Server.

I find the Computer Account in Active Directory for the Connector Server, and on the Delegation tab click on “Trust this computer for delegation to specified services only”, and to “Use any authentication protocol”. Then I add the computer name for the portal server and specify the http service as shown below (I already have an existing delegation set up):

This was the last step in my configuration, and I am almost ready to test.

If you, like me, have an environment consisting on both On-Premise and Azure Servers in a Hybrid Datacenter, please allow room for AD replication of these SPN’s and more.

Testing the published application!

Now I am ready to test the published proxy application.

Remember from earlier that I have assigned the application either to a group of all or some users or directly to some pilot users for example.

I will now log on with my Azure AD user (which of course is synchronized from local Active Directory), and I will use the URL https://myapps.microsoft.com.

After logging on, I can see the applications I have access to. Some of these are SaaS applications I have configured, some are applications we have developed ourselves, and I can see the published Self Service Portal:

(Don’t mind the Norwegian captions and texts, you get the idea;)

I then click on the SCSM Self Service Portal, and can confirm that I am able to access the Self Service Portal. See the external URL I specified and that indeed I’m logged in with my Active Directory user with SSO.

AADPSCSMPortal

Another cool thing is that I can use the App menu in Office 365 and add the Self Service Portal to the App chooser for easy access:

I can now also access the Self Service Application from the “My Apps” App on my Mobile Devices.

How to add Azure AD Application Proxy Connector Log to Operations Management Suite

If you have published Proxy Applications with Azure AD App Proxy, you will also have installed one or more Application Proxy Connectors in your environment.

When you install the Application Proxy Connector, you will also get an event log for the Connectors Information, Warning or Error events.

I wanted to bring these events to my Operations Management Suite (OMS) environment, so this blog post shows how to do that.

First, let us look at the event log in question. Here I have some events, I also see that I have some warning and error events, showing that I have an issue with connecting to a backend server published with Azure AD App Proxy:

Before I can add this event log to OMS, I need to determine the name of the event log. I select Properties for the log:

The name of the log is Microsoft-AadApplicationProxy-Connector/Admin.

Now I can log into Operations Management Suite to configure the log source. I go to Settings and select the Logs section. I then add the name of the Application Proxy Connector log, and select which type of events that I want to collect. In my case I select Error and Warning.

When saving that, OMS will soon start collection event log entries from the Connector Proxy log, assuming of course that the server in question have an agent installed, either directly or via Operations Manager Management Group:

Let us see how it looks when data from the event log are appearing in OMS.

I start by doing a Log Search. I can either specify the query directly, like this: Type=Event EventLog=”Microsoft-AadApplicationProxy-Connector/Admin”, or I can select from all events and filter my way to the event log I want to.

This is how I specified the query:

I can see that I have some errors and warnings, let us drill into one of them. I do this by clicking [+] show more. I can now see the same error with backend as I had in the local event log:

So, my objective for getting the Connector Proxy event log data to OMS has been fulfilled, and I can start grouping, filtering and searching the log data.

As a last step, let us add a Dashboard view for this data.

First, I select to Save my Search:

Then I go to My Dashboard, and select Customize:

I find my Saved Search and add it to the Dashboard:

If I want to I can customize the Tile Visualization:

When I finish customizing, I now have a Dashboard Tile for Azure AD App Proxy Events, and by clicking it, I am going directly to the Log Search:

Hope this has been helpful, happy log searching in OMS!

Service Manager Self Service Portal – Password Reset with Azure AD Premium

One challenge with using a Self Service Portal for Service Manager is that the user must have a valid Active Directory user name and password to be able to log on to the Self Service portal. So what do you do if have forgotten your password or the password has expired?

Previously in Service Manager, we have addressed this by having another user request a password reset on your behalf, that user being either a Service Desk analysts or a Super User allowed to create that password reset request.

The optimal solution would be to enable the user to reset their own password. This blog article will show how you can use Azure AD Premium to accomplish just that!

Some requirements

First of all, this solution will have some requirements:

  • You must have Azure AD with Directory Integration enabled for your on-premises Active Directory
  • You must have configured password write-back to on-premises Active Directory

  • You must configure a user password reset policy in Azure AD, and users must at least have one authentication method defined:
  • You must have either configured federated (SSO with ADFS) users or users with password synchronization in the directory integration set up
  • Each user, and any administrator setting this up, needs to have an Azure AD Premium license. Azure AD Premium is either licensed directly or part of the Enterprise Mobility Suite (EMS)

Some recommendations

In addition to the requirements above, I have some recommendations as well:

How this works

With all these requirements in place, this is how it works when a user tries to access the Self Service Portal and wants to reset the password.

In my environment, I am using the Self Service Portal from Cireson, but this should work for the built-in Service Manager Portal as well.

  1. First, I go to my application URL, https://selfservice.skill.no. Since I have published this with Azure AD App Proxy, I must sign in with my hybrid Azure AD identity. I am presented with my customized Azure AD sign in page:
  2. Since I have forgotten my password or maybe my password has expired, I select the link for “Can’t access your account” under the Sign in button. This will bring me to the reset password page where I can specify my user identity and write the captcha code:
  3. Next I select one of my defined authentication methods, in this example I will receive a text message to my mobile phone:
  4. I receive the SMS verification code and type it in:
  5. Next after successfully verifying my SMS code, I can specify my new password:
  6. And my password has been reset:
  7. Since my user are a federated user I will now be redirected back to the ADFS on-premises and my customized sign-in page there:

  8. After logging in, I’m redirected directly to the published Self Service Portal:

Conclusion

By using the powers of Azure AD Premium and directory integration with my local Active Directory, I can as an end-user reset my passwords, and directly access my published Self Service Portal for Service Manager in this case.

PS! For those that are not in Azure AD yet, Cireson will soon deliver their own password reset solution in the Identity Management Stream. I’ll come back to that later.

Discussing Azure AD on Skill TV

Recently I did an interview on our video blog at Skill TV, talking about Azure AD with our HR Manager Elham Binai.


The interview is in Norwegian and can be seen here: https://www.youtube.com/watch?v=pkRHW-ZJC2w

I have below provided a translated version from our interview transcript. While some questions and answers flowed a little bit different in the real recording, the transcript quite covers it all. Apologize for a couple of cuts as well, we had some problems with noise from spotlight fans and had to pause recording when that happened.

Here it goes:

Elham: Today I am lucky to have Jan Vidar Elven with me here at Skill TV. He is an Architect in our Infrastructure Department and an expert on the Azure Active Directory, which is the topic of today. Welcome you are, Jan Vidar.

Jan Vidar: Thanks for that, Elham. Very glad to come and talk about something I am very engaged in and work a lot with!

Elham: Jan Vidar, in recent years we have moved us more and more to the Cloud. More companies are using these Cloud solutions. However, it has not been without challenges, many companies are concerned that their business secrets should leak out, afraid of hackers, unfortunate leaks etc. … simply the security around the cloud. What are your thoughts about this?

Jan Vidar: Well, when you move the solutions out in the cloud, so also follows users identities and access control with these. It is then important to have confidence that the authentication and authorization take place in a secure manner, so that one can be assured that no one but those who should HAVE access GET access to their solutions. It is this and more Azure Active Directory delivers. Azure AD is a platform for identity management and access control solutions in the cloud, AND for the local data center.

Elham: What are the challenges around users now? Moreover, what does it require when it comes to security around systems that companies use? We live in a world where users use many devices and they take these with them everywhere … This offers some challenges. How can you resolve it with Azure AD?

Jan Vidar: The challenge of users now is two-part. One is that they increasingly use the PC’s and mobile devices delivered to them by their workplace at home or on the go. The second is that they are using their personal mobile phones, tablets and laptops to log on to the company’s solutions. Very often, these are also to the disposal of the other members in the family. When the solutions are located in the cloud, it can be a concern that only the use of your user name and password is not enough, especially when some Apps store the credentials as well.

A solution to this in Azure AD is to make use of Multi-factor authentication. Multi-factor authentication is free for Office 365 users and Azure AD administrators. With the MFA do you get an SMS, a phone call or a notification in a separate App where you have to authenticate authentication before you can access. We can also choose to use MFA only when the user is outside the company’s network. In the Premium version of Azure AD, MFA is included in hybrid scenarios so that you can protect your own solutions in the on premise data center as well.

Another way to solve the challenges is to require that devices be registered before you get access to log on to the solutions in the cloud. You can also require that the devices should be in compliance with company policy, for example require that they have a password on the lock screen. Requirements for registration of mobile devices can be set up in the Office 365, which is powered by the MDM platform in Microsoft Intune, or you can use of the entire platform to configure Intune MDM and MAM, Mobile Device Management and Mobile Application Management, for device management, application management and policies for the company’s Devices and Apps. All this is linked to the user’s identity in the Azure AD.

Elham: Many IT managers believe that things were easier in the past, where they were very close to their solutions and data and now might feel that they have lost control … What is your experience around that?

Jan Vidar: Not only are the users and devices spread, but the data exchanged in the solutions both internally between each other and externally with others is also important to have control on. When it was easier in the past, it probably meant that you had the solutions in the local data center, you had them integrated with Active Directory, and had one simple and transparent Single Sign-On, a user name and a password to all or at least most services at the same time that we had control of the data locally. When we now apply the solutions in the cloud, we must have a solution that facilitates the same, and at the same time to have control of the data. Azure AD together with Azure Rights Management Services can associate the identity and protection at the file level. However, this only applies to the solutions in the cloud and the Apps that IT has control over and know about.

Elham: The IT department don’t have much control over all the cloud apps and outside the local firewall and it concerns many, what is your advice around this? Users are going to use it anyway, what should our customers think about?

Jan Vidar: What we are talking about here is what is we call shadow IT; users find their own solutions where there is lack of personalized services from the company. Email, file sharing, social media, productivity applications are areas for SaaS applications used by users in business context. This is concerns applications, user names, passwords, and data that IT has no control over. What can IT do? Azure AD has the ability to facilitate applications from a catalog of over 2400 SaaS applications, you can also add your own self-developed applications and as well publish internal applications from the local data center. That way one can arrange for authentication via Azure AD, Single Sign-On for those applications that support it, or Same Sign-On with password storage for other applications. In this way IT can take control of your applications and facilitate the access of its users. IT can also run discovery, and reports to find out what the users actually use on the devices they has to identify if there are applications it is important to provide and facilitate.

Elham: We know Active Directory, but now it can also be located in Azure if you wish it? It can then be managed in both cloud and on premise, explain this a bit more.

Jan Vidar: By integrating local Active Directory with Azure AD through synchronization, companies can manage users and groups in one place at the same time as you can give access to solutions in the cloud. With hybrid identities and Single Sign-On, users can relate to the same user name and password for either using solutions in the cloud or in the local data center, at the same time that IT has control of the authentication, both who, what, where and when.

Elham: IT can actually go in and see how, when and where users have logged in from – and have more control over the activities?

Jan Vidar: Yes, Azure AD Premium will provide opportunities to monitor and run reports on authentications and application usage, as well as view suspicious pattern in sign-on, credentials that may have been lost, or devices that may be infected, for example.

Elham: Does this work on any device? Single Sign-On? You have only one password and can log in once?

Jan Vidar: Yes, both iOS, Android and Mac are supported in addition to Windows and Windows Phone. Office applications, SSO, Device Management and Rights Management is supported on these, and all linked together with your identity in Azure AD. With the upcoming Windows 10, these devices can also be joined directly into Azure AD, and you can log on with your Azure AD identity. One can also use a pin code associated with the device for even easier authentication, or use biometric authentication with Windows Hello!

Elham: How will this take away the uncertainty around the Cloud, security, and control over users?

Jan Vidar: It all starts with control of identities, and Azure AD will facilitate this for the solutions running in the cloud, and not necessarily just for Microsoft solutions but also for SaaS solutions that support SSO and Federation with Azure AD. With control of the devices and rights management for the files as well, as well as security mechanisms for authentication and conditional access, you have the tools you need to get started. Azure AD can also provide for Self Service IT, where users can reset their passwords, or access to an application if they want it.

Elham: Azure AD has really simplified my life without me noticing it, I can log in from anywhere and on any device. If customers would like to know more about this then you can come visit and tell about how Azure AD can simplify a lot for IT departments as well as security. Thank you so much for that I got to talk to you today.

Jan Vidar: Thank you for inviting me!