The upcoming Saturday, 29th of March 2014, Earth Hour will be honored between 8:30 PM and 9:30 PM in your local time zone. Organized by the WWF (www.earthhour.org), Earth Hour is an incentive where amongst other activities people are asked to turn off their lights for an hour.
I thought this also was an excellent opportunity to give some examples of how you can use automation technologies to shut down and restart Windows Azure Services. Let’s turn off the lights of our selected Windows Azure servers for an hour!
I will use three of my favorite automation technologies to accomplish this:
- Windows PowerShell
- System Center 2012 R2 Orchestrator
- Windows Azure Pack with SMA
I also wanted some kind of list of which services I would want to turn off, as not all of my services in Azure are available to be turned off. There are many ways to accomplish this, I chose to use a comma separated text file. My CSV file includes the name of the Cloud Services in Azure I want to shut down (and later restart), and all VM roles inside the specified Cloud Services will be shut down.
In the following, I will give examples for using each of the automation technologies to accomplish this.
Windows PowerShell
In my first example, I will use Windows PowerShell and create a scheduled PowerShell Job for the automation. This has a couple of requirements:
- I must download and install Windows Azure PowerShell.
- I must register my Azure Subscription so I can automate it from PowerShell.
For instructions for these prerequisites, see http://www.windowsazure.com/en-us/documentation/articles/install-configure-powershell.
First, I start PowerShell at the machine that will run my PowerShell Scheduled Jobs. I prefer PowerShell ISE for this, and as the job will automatically run on Saturday evening, I will use a server machine that will be online at the time the schedule kicks off.
The following commands creates job triggers and options for the job:
# Job Trigger
$trigger_stop = New-JobTrigger -Once -At “03/29/2014 20:30”
$trigger_start = New-JobTrigger -Once -At “03/29/2014 21:30”
# Job Option
$option = New-ScheduledJobOption -RunElevated
After that, I specify some parameters, as my Azure subscription name and importing the CSV file that contains the name of the Cloud Services I want to turn off and later start again:
# Azure Parameters
$az_subscr = “my subscription name“
$az_cloudservices = Import-Csv -Path C:\_Source\Script\EarthHour_CloudServices.csv -Encoding UTF8
Then I create some script strings, one for the stop job, and one for the start job. It is out of the scope of this blog article to explain in detail the PowerShell commands used here, but you will see that the CSV file is imported, and for each Cloud Service a command is run to stop or start the Azure Virtual Machines.
Another comment is that for the Stop-AzureVM command I chose to use the switch “-StayProvisioned”, which will make the server to keep its internal IP address and the Cloud Service will keep its public IP address. I could also use the “-Force” switch which will deallocated the VM’s and Cloud Services. Deallocating will save costs but also risks that the VM’s and Cloud Services will be provisioned with different IP addresses when restarted.
# Job Script Strings
$scriptstring_stop = “Import-Module Azure `
Set-AzureSubscription -SubscriptionName ‘” + $az_subscr + “‘ `
Import-Csv -Path C:\_Source\Script\EarthHour_CloudServices.csv -Encoding UTF8 | ForEach-Object { Get-AzureVM -ServiceName `$_.CloudService | Where-Object {`$_.InstanceStatus -eq ‘ReadyRole’} | ForEach-Object {Stop-AzureVM -ServiceName `$_.ServiceName -Name `$_.Name -StayProvisioned } } “
$scriptstring_start = “Import-Module Azure `
Set-AzureSubscription -SubscriptionName ‘” + $az_subscr + “‘ `
Import-Csv -Path C:\_Source\Script\EarthHour_CloudServices.csv -Encoding UTF8 | ForEach-Object { Get-AzureVM -ServiceName `$_.CloudService | Where-Object {`$_.InstanceStatus -eq ‘StoppedDeallocated’} | ForEach-Object {Start-AzureVM -ServiceName `$_.ServiceName -Name `$_.Name } } “
# Define Job Script Blocks
$sb_stop = [scriptblock]::Create($scriptstring_stop)
$sb_start = [scriptblock]::Create($scriptstring_start)
To create the PowerShell Jobs my script strings must be formatted as script blocks, as shown above. Next I specify my credentials that will run the job, and then register the jobs. I create two jobs for each the stop and start automation, and with the configured script blocks, triggers, options and credentials.
# Get Credentials
$jobcreds = Get-Credential
# Register Jobs
Register-ScheduledJob -Name Stop_EarthHourSkillAzure -ScriptBlock $sb_stop -Trigger $trigger_stop -ScheduledJobOption $option -Credential $jobcreds
Register-ScheduledJob -Name Start_EarthHourSkillAzure -ScriptBlock $sb_start -Trigger $trigger_start -ScheduledJobOption $option -Credential $jobcreds
And that’s it! The jobs are now registered and will run at the specified schedules.
If you want to test a job, you can do this with the command:
# Test Stop Job
Start-Job -DefinitionName Stop_EarthHourSkillAzure
You can also verify the jobs in Task Scheduler, under Task Scheduler Library\Microsoft\Windows\PowerShell\ScheduledJobs:

System Center 2012 R2 Orchestrator
Since its release with System Center 2012, Orchestrator have become a popular automation technology for data centers. With Integration Packs for Orchestrator, many tasks can be performed by creating Orchestrated Runbooks that automates your IT processes. Such Integration Packs exists for System Center Products, Active Directory, Exchange Server, SharePoint Server and many more. For this task, I will use the Integration Pack for Windows Azure.
To be able to do this, the following requirements must be met:
- A System Center 2012 SP1 or R2 Orchestrator Server, with Azure Integration Pack installed.
- Create and configure an Azure Management Certificate to be used from Orchestrator.
- Create a Windows Azure Configuration in Orchestrator.
- Create the Runbooks and Schedules.
I will not get into detail of these first requirements. Azure Integration Pack can be downloaded from http://www.microsoft.com/en-us/download/details.aspx?id=39622.
To create and upload an Azure Management Certificate, please follow the guidelines here: http://msdn.microsoft.com/en-us/library/windowsazure/gg551722.aspx.
Note that from the machine you create the certificate, you will have the private key for then certificate in your store. You must then do two things:
- Upload the .cer file (without the private key) to Azure. Note your subscription ID.
- Export the certificate to a .pfx file with password, and transfer this file to your Orchestrator Server.
In Runbook Designer, create a new Windows Azure configuration, with .pfx file location and password, and the subscription ID. For example like this:

You are now ready to use the Azure activities in your Orchestrator Runbooks.
In Orchestrator it is recommended to create different Runbooks that call upon each other, rather than creating a very big Runbook that do all the work. I have created the following Runbooks and Schedules:
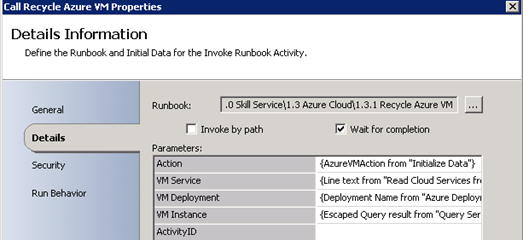
- A generic Recycle Azure VM Runbook, that either Starts, Shutdown or Restarts Azure VM’s based on input parameters for Action to do, Cloud Service, Deployment and VM instance names.
- An Earth Hour Azure Runbook, that reads Cloud Services from CSV file and gets the Deployment Name and VM Role Name, with input parameter for Action. This Runbook will call the first generic Runbook.
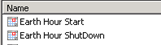
- I will have two Schedule Runbooks, that are Started, and will kick off at ..
- .. two specified Schedules, for Earth Hour Start and Stop.
Let’s have a look:
My first generic Recycle Azure VM Runbook looks like this:

This Runbook is really simple, based on input parameter for Action either Start, Shutdown and Restart are sent to the specified VM instance, Deployment and Cloud Service. The input parameters for the Runbook is:
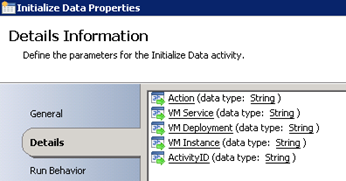
I also have an ActivityID parameter, as I also use this Runbook for Service Requests from Service Manager.
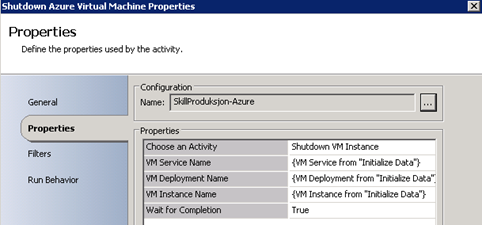
My parameters are then used in the activities, for example for Shutdown:
After this I have the Earth Hour Azure Runbook. This Runbook looks like this:

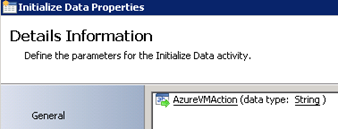
This Runbook takes one input parameter, that would be Start or Shutdown for example:
First, I read the Cloud Services from my CSV file:
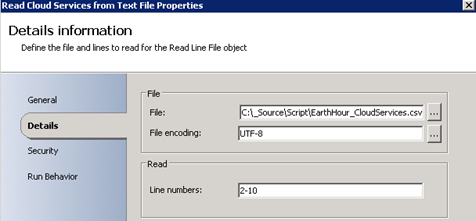
I don’t read from line 1 as it contains my header. Next I get my Azure deployments, where the input is from the text file:
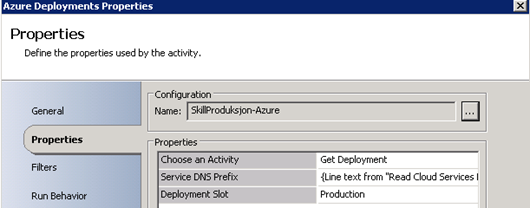
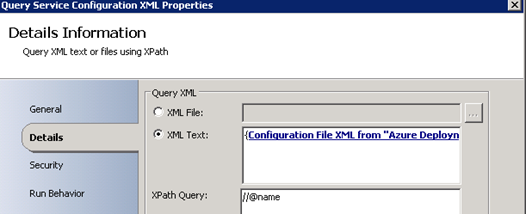
The next activity I had to think about, as the Azure Integration Pack doesn’t really have an activity to get all VM role instances in a Deployment. But, the Get Deployment task returns a Configuration File XML, and I was able to do a Query XML activity XPath Query for getting the VM instance role names:
After that I do a Send Platform Event just for debug really, and last I call my first Recycle Azure Runbook, with the parameters from my Activities:
I don’t use ActivityID here as this Runbook is initiated from Orchestrator and not a Service Manager Service Request.
Until now I can now start this Runbook manually, specify Start or Shutdown actions, and the Cloud Services from the CSV file will be processed.
To schedule these to run automatically, I will need to create some Schedules first:
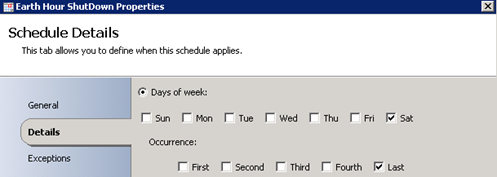
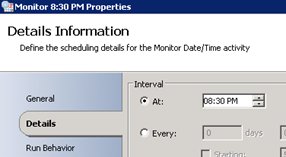
These schedules are created like this. I specify last Saturday in the month.
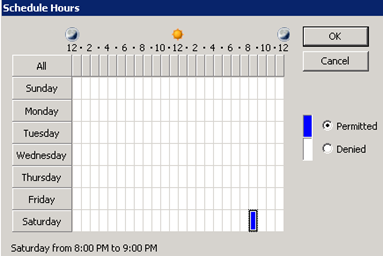
And with the hours 8:00-9:00 PM. (I will check against this schedule at 8:30 PM)
The other schedule for Start is configured the same way, only with Hours from 9:00-10:00 PM.
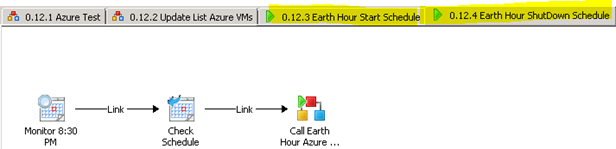
The last thing I have to do is to create two different Runbooks, which monitors time:
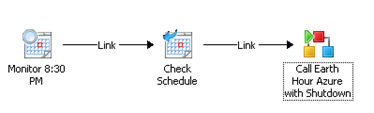
And:
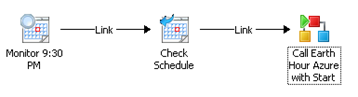
These two Runbooks will check for the monitor time:
If the time is correct, it will check againt the Schedule, and if that is correct, it will call the Earth Hour Azure with Start and Shutdown.
The scheduling functionality is a bit limited in Orchestrator for running Runbooks only one time, so in reality these Runbooks if left running will actually run every last Saturday every month.
Anyway, the last thing to do before the weekend is to kick of these two last Runbooks, and it will run as planned on Saturday night.
Windows Azure Pack with SMA
The last automation technology I want to show is using SMA, Service Management Automation, with Windows Azure Pack. Service Management Automation (SMA) is a new feature of System Center 2012 R2 Orchestrator, released in October 2013. At the same time Windows Azure Pack (WAP) was released as a component in System Center 2012 R2 and Windows Server 2012 R2. I will not get into great detail of WAP and SMA here, but these solutions are very exciting for Private Cloud scenarios. SMA does not require Windows Azure Pack, but it is recommended to install WAP to use as a portal and user interface for authoring and administering the SMA runbooks.
The example I will use here have the following requirements:
- I must download and install Windows Azure PowerShell.
- I must configure a connection to my Azure Subscription.
- I must create a connection object in SMA to Windows Azure.
- I must create the SMA runbooks.
The prerequisites above are well described here: http://blogs.technet.com/b/privatecloud/archive/2014/03/12/managing-windows-azure-with-sma.aspx.
So I will concentrate on creating the the SMA runbooks.
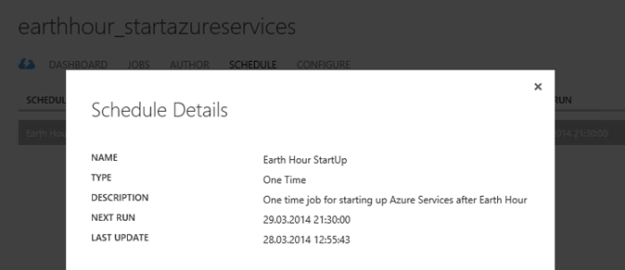
The SMA runbooks will use PowerShell workflow. I will create two SMA runbooks, one for ShutDown and one for Starting the Azure Services.
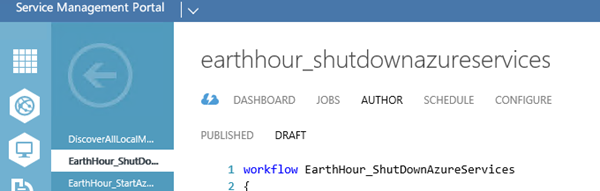
My PowerShell workflow for the ShutDown will then look like this:
workflow
EarthHour_ShutDownAzureServices
{
# Get the Azure connection
$con = Get-AutomationConnection -Name ‘My-SMA-AzureConnection‘
# Convert the password to a SecureString to be used in a PSCredential object
$securepassword = ConvertTo-SecureString -AsPlainText -String $con.Password -Force
# Create a PS Credential Object
$cred = New-Object -TypeName System.Management.Automation.PSCredential -ArgumentList $con.Username, $securepassword
inlinescript
{
Import-Module “Azure”
# Select the Azure subscription
Select-AzureSubscription -SubscriptionName “my subscription name“
# Import Cloud Services from CSV file and Stop VMs for each specified service
Import-Csv -Path C:\_Source\EarthHour_CloudServices.csv -Encoding UTF8 | `
ForEach-Object { Get-AzureVM -ServiceName $_.CloudService | `
Where-Object {$_.InstanceStatus -eq ‘ReadyRole’} | `
ForEach-Object {Stop-AzureVM -ServiceName $_.ServiceName -Name $_.Name -StayProvisioned } }
} -PSComputerName $con.ComputerName -PSCredential $cred
}
As for the first automation example with PowerShell Job I read the Cloud Services from a CSV file, and loop through the Cloud Services and Azure VM’s for the Stop commands.
Similarly I have the workflow for Start the Azure services again:
workflow
EarthHour_StartAzureServices
{
# Get the Azure connection
$con = Get-AutomationConnection -Name ‘My-SMA-AzureConnection‘
# Convert the password to a SecureString to be used in a PSCredential object
$securepassword = ConvertTo-SecureString -AsPlainText -String $con.Password -Force
# Create a PS Credential Object
$cred = New-Object -TypeName System.Management.Automation.PSCredential -ArgumentList $con.Username, $securepassword
inlinescript
{
Import-Module “Azure”
# Select the Azure subscription
Select-AzureSubscription -SubscriptionName “my subscription name“
# Import Cloud Services from CSV file and Stop VMs for each specified service
Import-Csv -Path C:\_Source\EarthHour_CloudServices.csv -Encoding UTF8 | `
ForEach-Object { Get-AzureVM -ServiceName $_.CloudService | `
Where-Object {$_.InstanceStatus -eq ‘StoppedDeallocated’ -Or $_.InstanceStatus -eq ‘StoppedVM’ } | `
ForEach-Object {Start-AzureVM -ServiceName $_.ServiceName -Name $_.Name } }
} -PSComputerName $con.ComputerName -PSCredential $cred
}
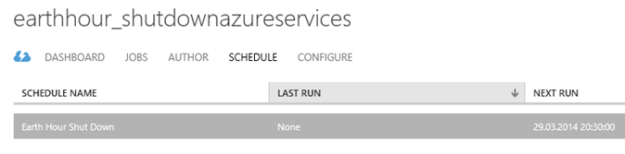
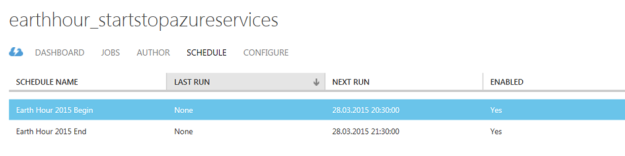
These workflows can now be tested I you want by running Start action. I however want to schedule them for Earth Hour on Saturday. This is really easy to do using the SMA assets for schedules:

These schedules are then linked to each of the SMA runbooks:
And similarly, with details:
That concludes this blog post. Happy automating, and remember to turn off your lights!


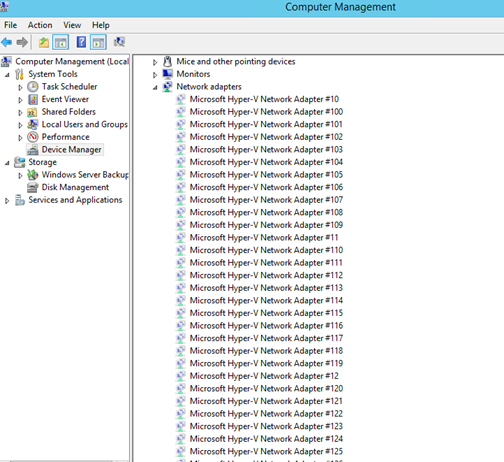 I found in some forums that the cause of the network browse problem I had with the server could be related to this for Azure VM’s. I don’t know the actual limit, or if it’s a fixed value, but the solution would be to uninstall these hidden network adapters. Although it is easy to right click and uninstall each network adapter, I wanted to create a PowerShell Script to be more efficient. There are no native PowerShell cmdlets or Commands that could help me with this, so after some research I ended with a combination of these two solutions:
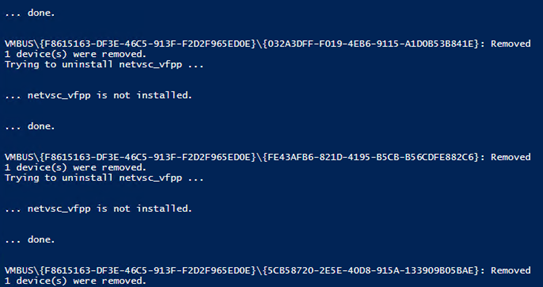 In the end I booted the VM and after that everything was working on the network again!