A Blog about Enterprise Mobility + Security, Azure AD, Datacenter Management, Service Delivery, Automation, Monitoring, Cloud OS, Azure and anything worthwhile sharing with the Cloud and Datacenter community.
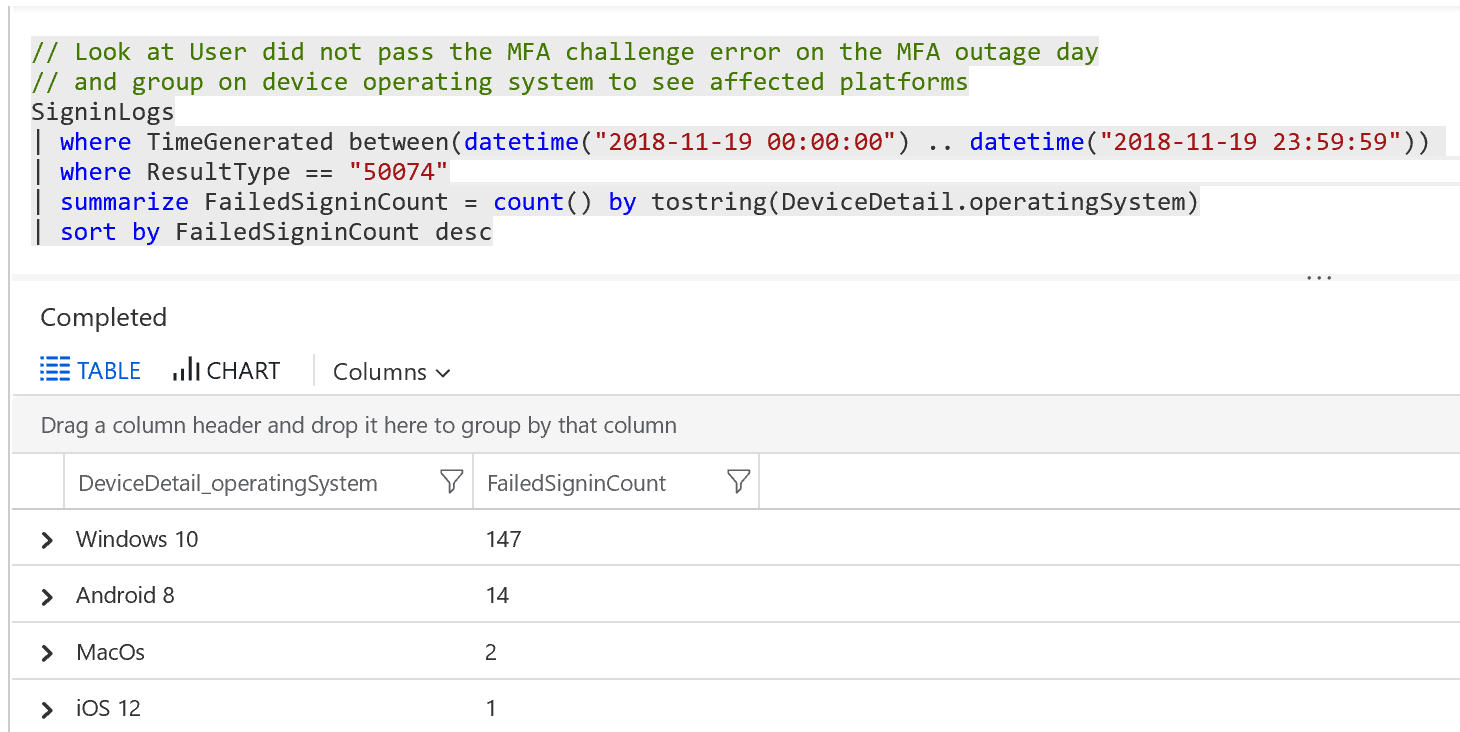
I’m happy to announce that I’m part of the amazing global initiative of automation bootcamps in starting from February 5th to 20th 2021!
Update: The Azure Automation track has now been pushed back one week from February 20th to February 27th.
I will speak about how Azure Serverless Automation solutions like Azure Functions, Logic Apps and more can be protected by Azure AD and how Power Platform can securely send requests to trigger your automation scenarios. Session details:
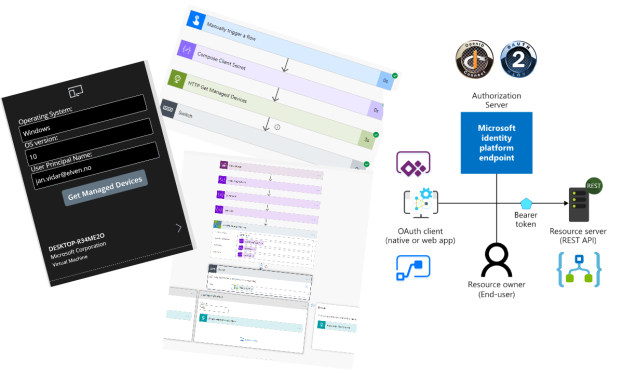
In this article I’m going to build on my previous blog posts in this series where I have written about how to add Azure AD OAuth authentication and authorization to your Logic Apps and expose them as an API. For reference the links to these blog post articles are here:
If you want to connect to API’s using Power Platform (Power Automate Flows, PowerApps etc.), you can do this in two different ways:
Using HTTP action and send requests that use Azure AD OAuth authentication. This will use the “Client Credentials” OAuth flow, and is suitable for calling the API using application permissions and roles.
Setting up a Custom Connector for the API, and using the HTTP logic app trigger as operation. This will use the “Authorization Code” OAuth flow, and is suitable for using delegated permissions and scopes for the logged on user via connections.
So it depends on how you want your Power Platform users to be able to send requests your Logic App API. Should they do this as themselves with their logged on user, or should they use an application identity? There are use cases for both, so I will show both in this article.
Connect to Logic App API using Custom Connector
Using Custom Connectors is a great way to use your own identity for sending requests to an API. This way you can also securely share Custom Connectors, and Flows/PowerApps, using them in your organization, without needing to share sensitive credentials like client id and client secrets.
If you want to create a Custom Connector in Power Platform that triggers an HTTP request to a Logic App, you can currently do this in one of the following ways:
Creating Custom Connector using Azure services and Logic App.
Exporting the Logic App to a Power Platform environment.
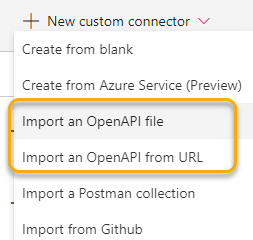
Creating the Custom Connector using an OpenAPI swagger definition file/url.
Creating the Custom Connector from blank.
Lets take a quick look at each of these, but first we need to take care of some permissions in Azure for creating the Custom Connector automatically.
Azure Permissions for Logic Apps and listing swagger
There are some minimum permissions your user needs to be able to create a Custom Connector automatically by browsing the Azure Service.
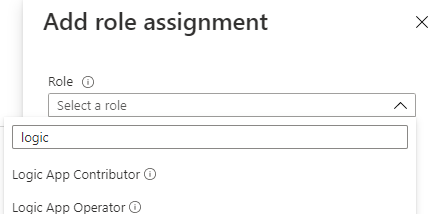
A good starting point is using one of the built in Azure roles for Logic Apps:
But even these do not have the permissions necessary, if you try you will get an error similar to the following:
After connecting to Azure using an Azure account that can create custom roles for the scope (Owner or User Access Administrator), start by exporting an existing role as a starting point:
# 1. Export a JSON template as a reference based on an exisiting role
Get-AzRoleDefinition -Name "Logic App Operator" | ConvertTo-Json | Out-File .\LogicAppAPIOperator.json
Then edit this JSON file, by removing the Id parameter, defining a Name, setting the IsCustom to true, and Description to something descriptive like below. I have also set my Azure subscription id under assignable scopes, and added the required ../listSwagger/action:
{
  "Name": "Logic App API Operator",
  "IsCustom": true,
  "Description": "Lets you read, enable and disable logic app, and list swagger actions for API.",
  "Actions": [
    "Microsoft.Authorization/*/read",
    "Microsoft.Insights/alertRules/*/read",
    "Microsoft.Insights/metricAlerts/*/read",
    "Microsoft.Insights/diagnosticSettings/*/read",
    "Microsoft.Insights/metricDefinitions/*/read",
    "Microsoft.Logic/*/read",
    "Microsoft.Logic/workflows/disable/action",
    "Microsoft.Logic/workflows/enable/action",
    "Microsoft.Logic/workflows/validate/action",
    "Microsoft.Resources/deployments/operations/read",
    "Microsoft.Resources/subscriptions/operationresults/read",
    "Microsoft.Resources/subscriptions/resourceGroups/read",
    "Microsoft.Support/*",
    "Microsoft.Web/connectionGateways/*/read",
    "Microsoft.Web/connections/*/read",
    "Microsoft.Web/customApis/*/read",
    "Microsoft.Web/serverFarms/read",
    "Microsoft.Logic/workflows/listSwagger/action"
  ],
  "NotActions": [],
  "DataActions": [],
  "NotDataActions": [],
  "AssignableScopes": [
    "/subscriptions/<my azure sub id>"
  ]
}
After that you can create the custom role:
# 3. Create the new custom role:
New-AzRoleDefinition -InputFile .\LogicAppAPIOperator.json
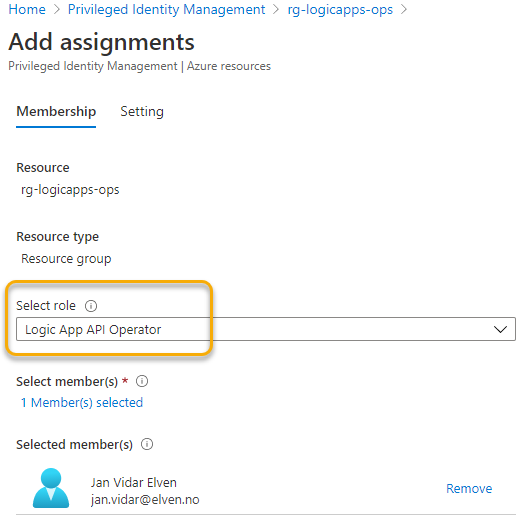
This role can now be assigned to the Power Platform user(s) that need it, using the scope of your Logic Apps, for example the Resource Group. You can either add the role assignment to the user directly, or preferrably using Azure PIM:
With the correct permissions now in place, you can proceed to the next step.
Creating Custom Connector using Azure services and Logic App
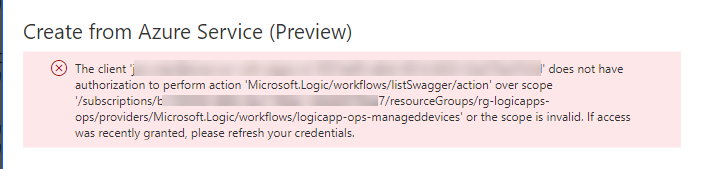
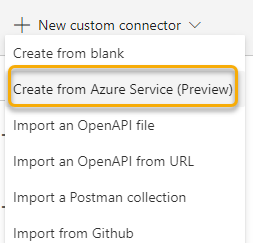
Log in to Power Apps or Power Automate using your Power Platform user. Under Data and Custom Connectors, select to create a New custom connector. From there select “Create from Azure Service” (Preview as per now):
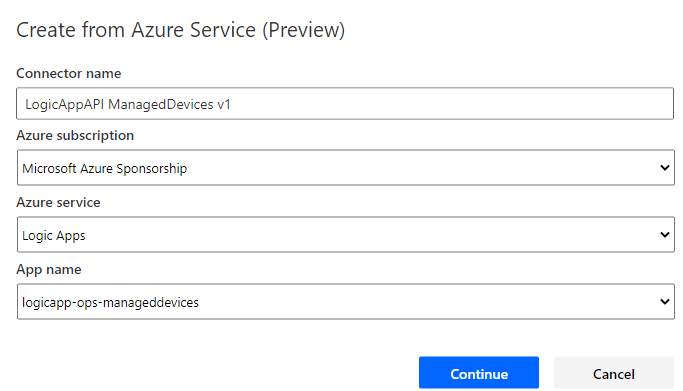
Next, type name for your Custom Connector, select which Azure subscription, and from which Azure service which in this case is Logic Apps. Note that you can create from Azure Functions and Azure API Management as well. Then select the Logic App name from the list:
If you don’t see or get any errors here, verify your permissions.
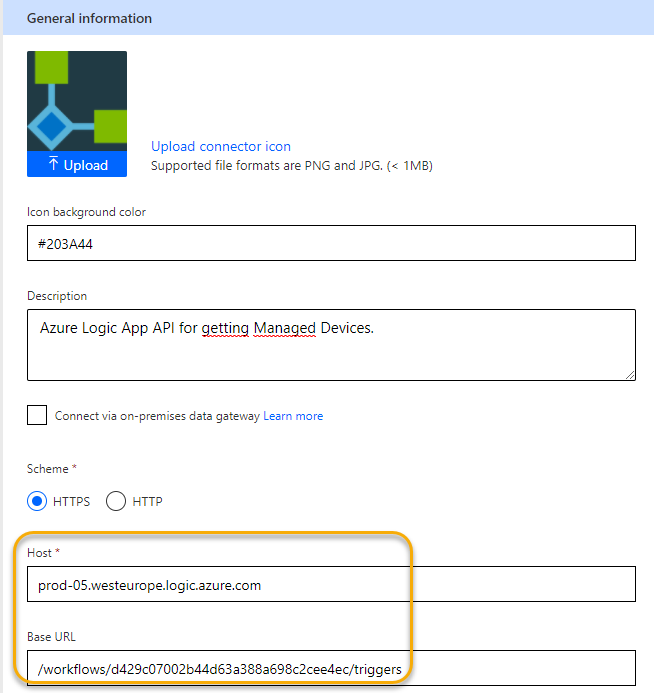
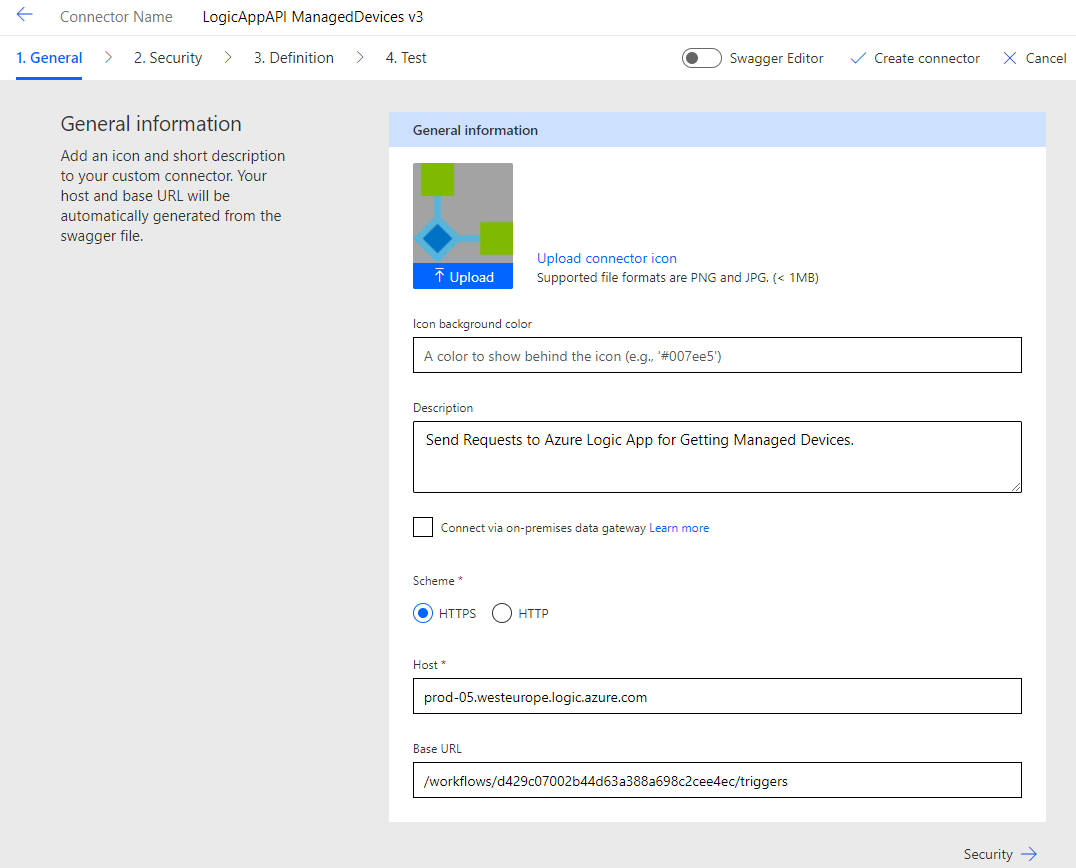
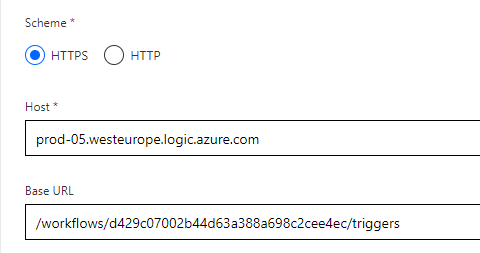
Click Continue, and you will see something like the following, where the Host and Base URL has automatically been set correctly for your Logic App HTTP trigger. If you want you can upload an icon, background color and desctription as well:
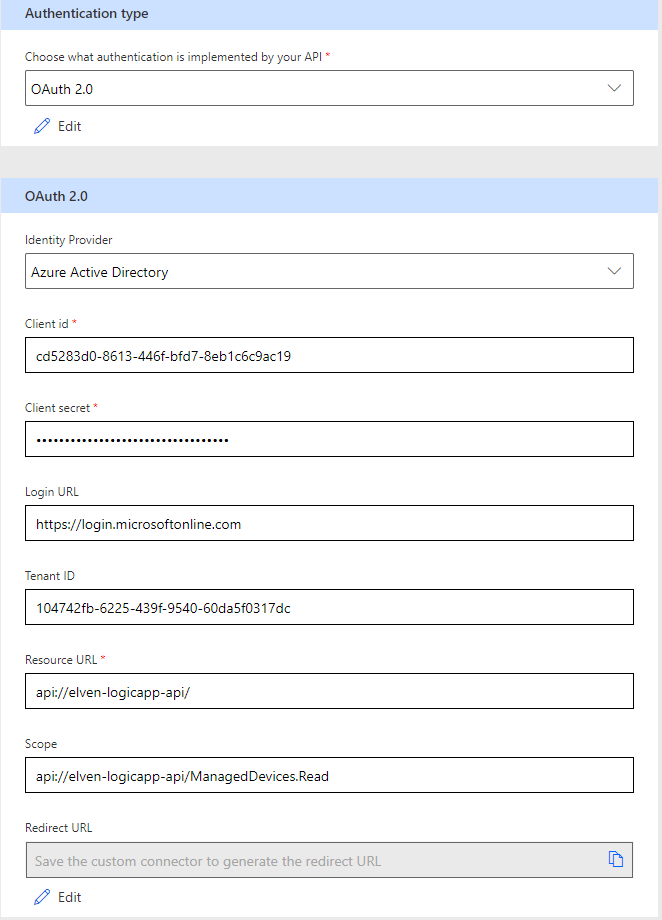
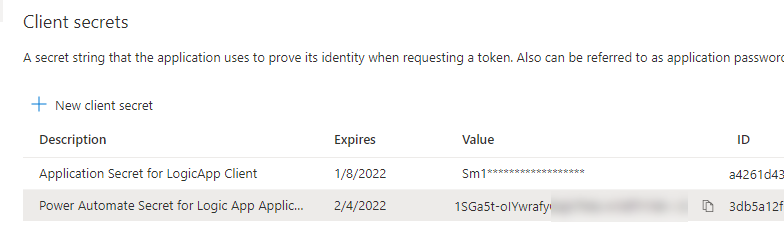
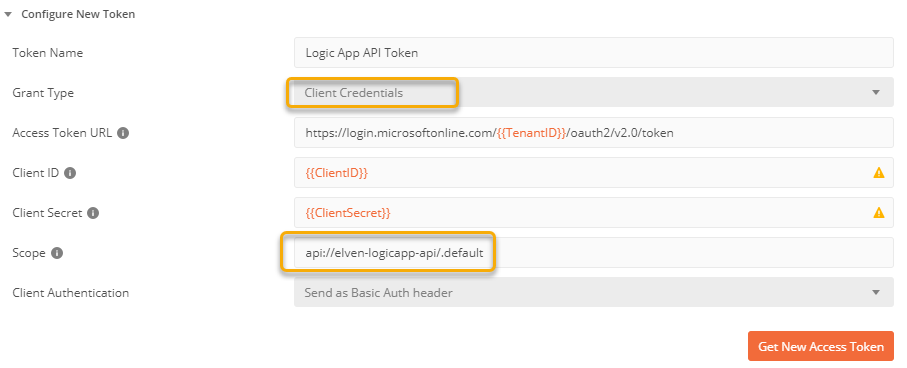
Click Next to go to Security. Here we need to change the Authentication to OAuth 2.0, as this is what we have implemented for authorizing requests to the Logic App. To authenticate and get the correct Access Token, we will reuse the LogicApp Client app registration that we created in the previous blog post. Copy the Application Client ID and Tenant ID:
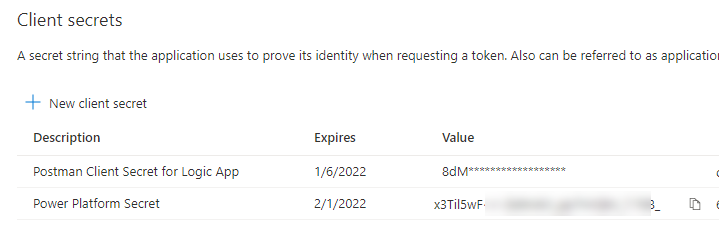
And then create and copy a new secret for using in the Power Platform Custom Connector:
Fill in the rest of the OAuth 2.0 details for your environment like below:
Note from above that we need to specify the correct resource (the backend API) and scope. This is all very vell described in the previous blog post.
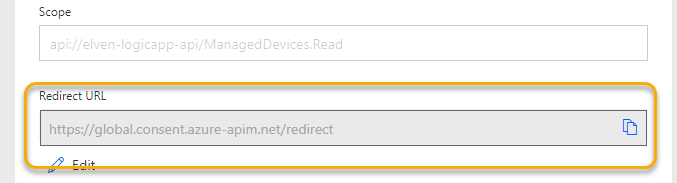
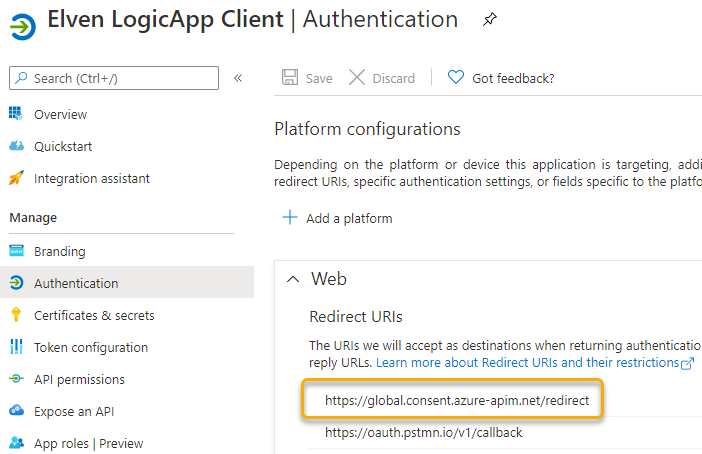
Click Create Connector to save the Connector details. Make sure that you copy the Redirect URL:
And add that to the App Registration redirect URLs:
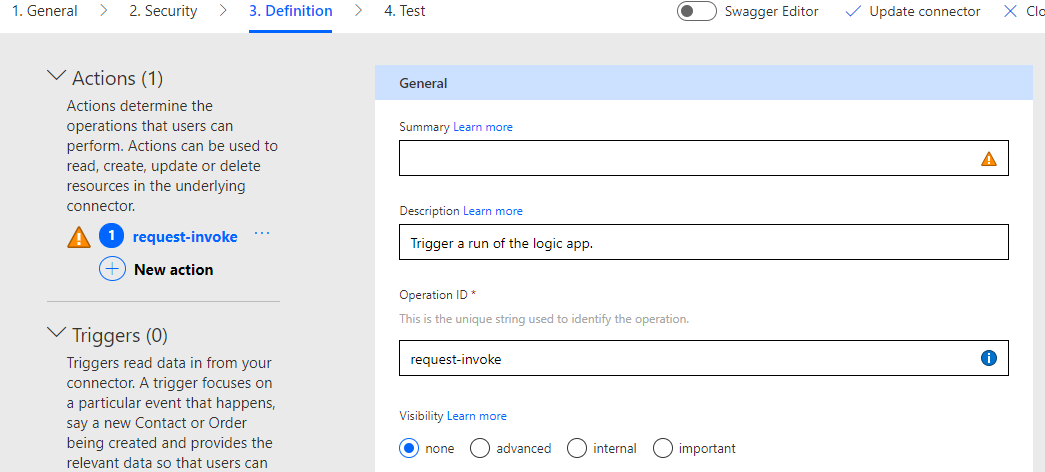
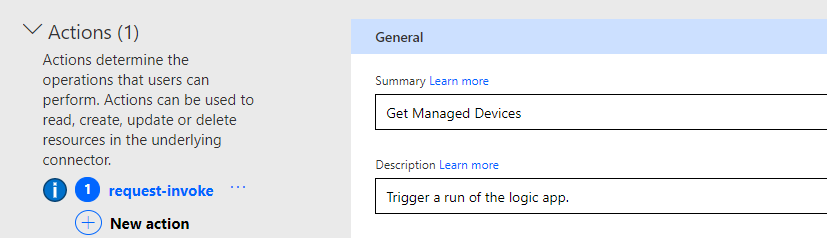
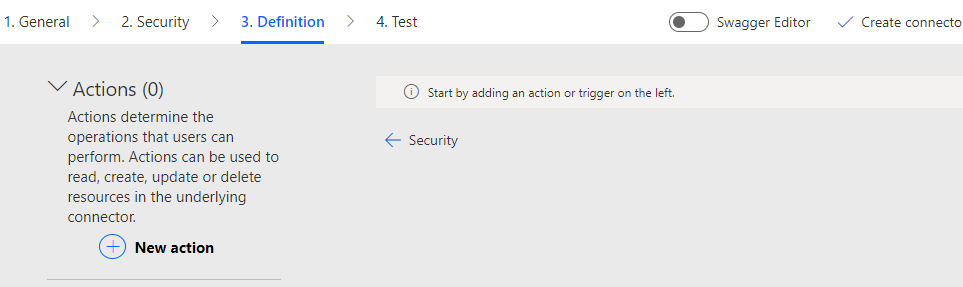
Next, under the Custom Connector proceed to step 3. Definition. This is where the POST request trigger will be, and it should already be populated with an action:
We need to specify a value for Summary, in my case I will type “Get Managed Devices”:
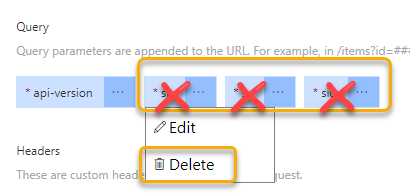
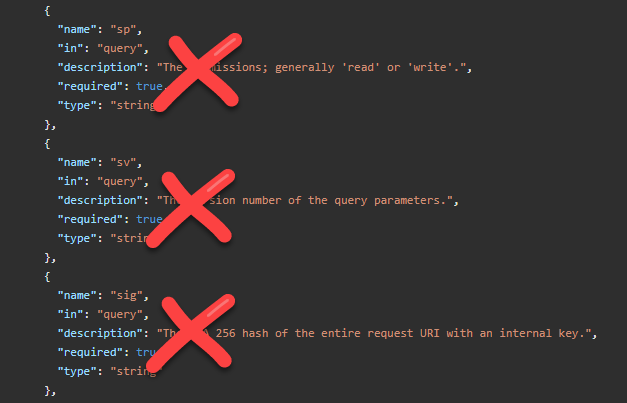
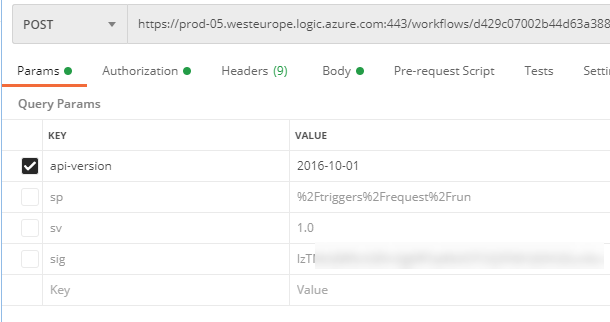
Next, under Request Query, remove the “sp”, “sv” and “sig” parameters, as these will not be needed as long as we are using OAuth2 authorization scheme:
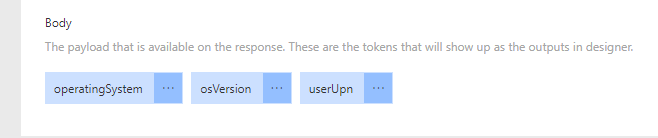
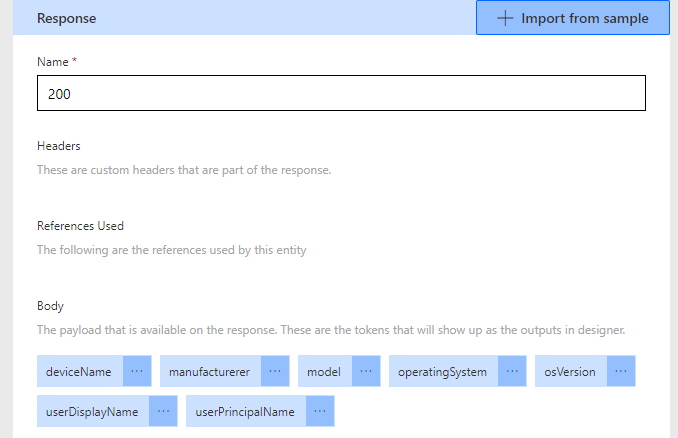
The Body parameter should be correctly specified, expecting an operatingSystem, osVersion and userUpn request body parameters:
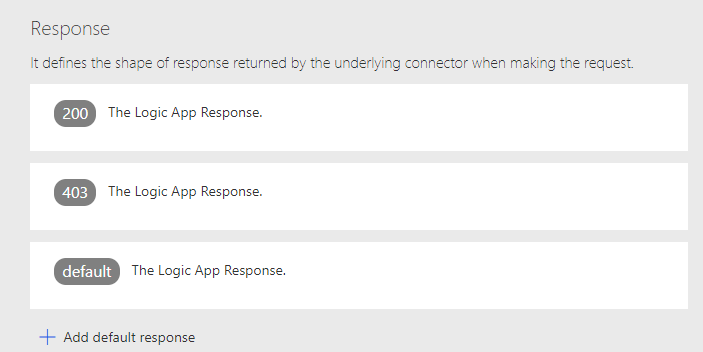
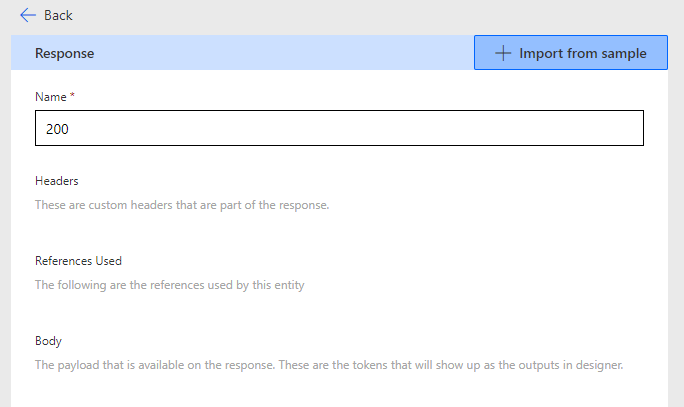
Last, lets check the Responses from the Logic App. They have been successfully configured with status 200 (OK) and 403 (Not Authorized), as these two responses were defined in the Logic App.
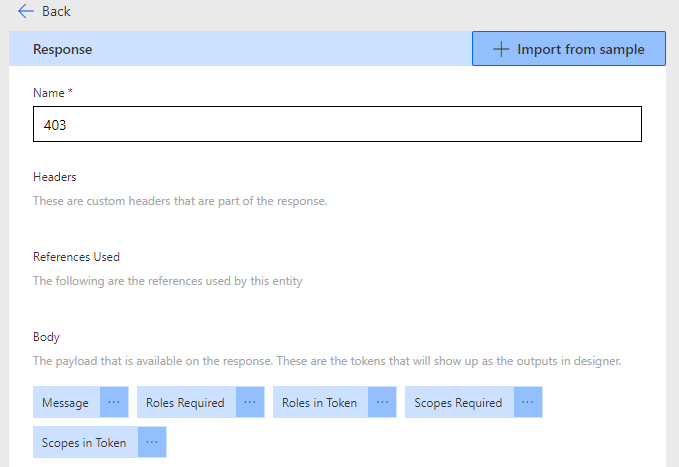
If the Response body is empty like below, we would need to import from sample output from the Logic App (response body should have automatically been configured if the response action in Logic App had a response schema defined):
The sample response from the 403 not authorized should be:
{
  "Message": "",
  "Roles Required": "",
  "Roles in Token": "",
  "Scopes Required": "",
  "Scopes in Token": ""
}
Giving this response definition:
NB! It’s important to have correct responses defined like above, it will make it easier to consume those responses later in Power Automate Flows and Power Apps.
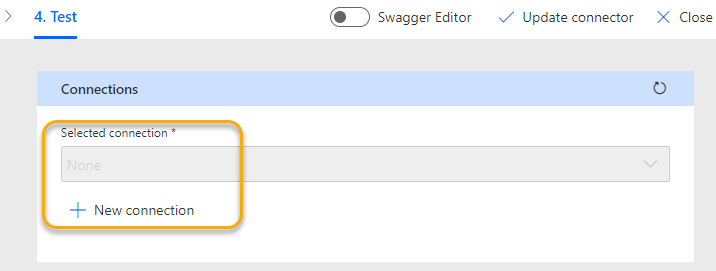
Click on Update Connector, and then go to next section 4. Test.
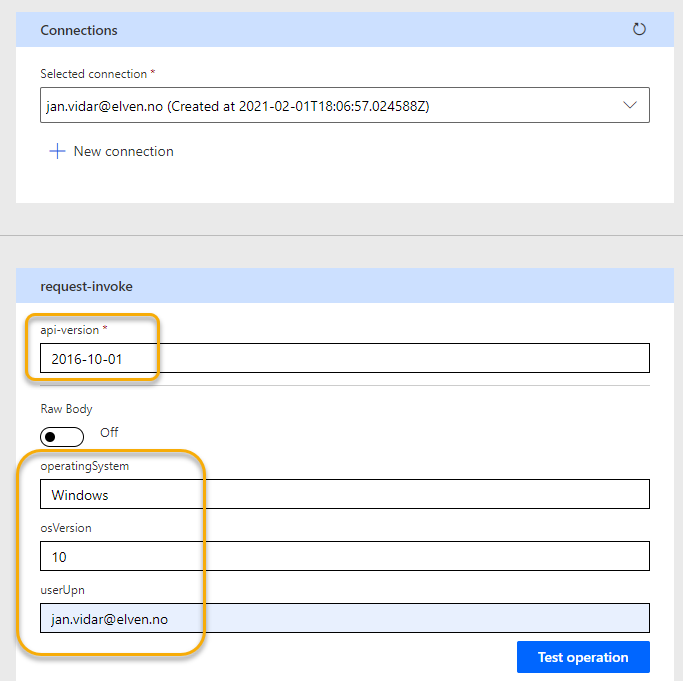
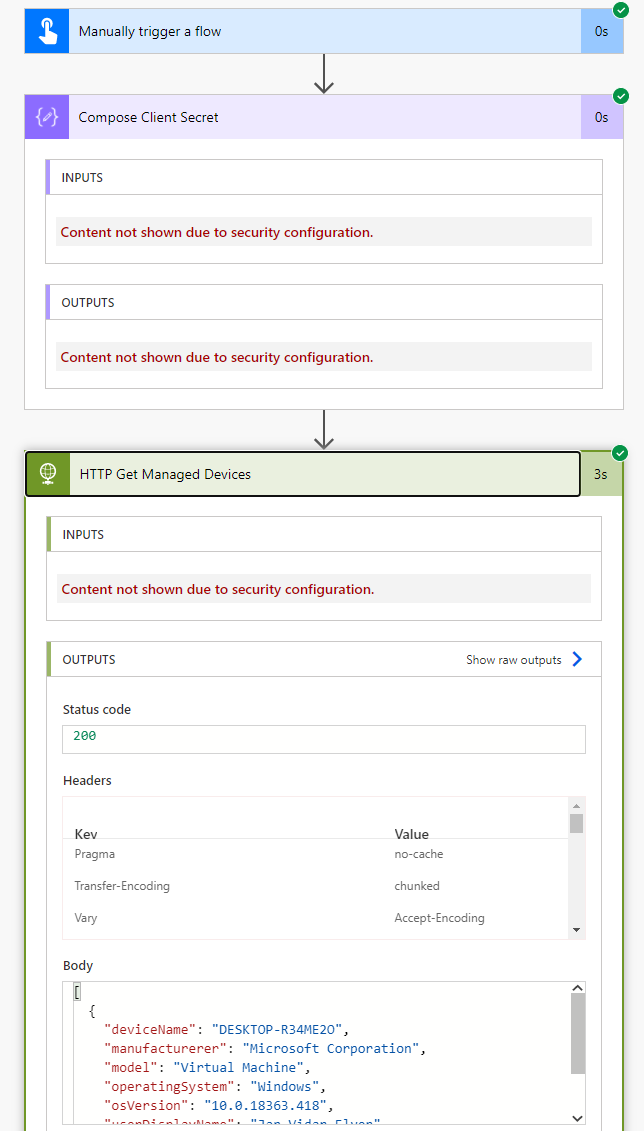
We can now test the Logic App trigger via the Custom Connector, first we need to create a new connection:
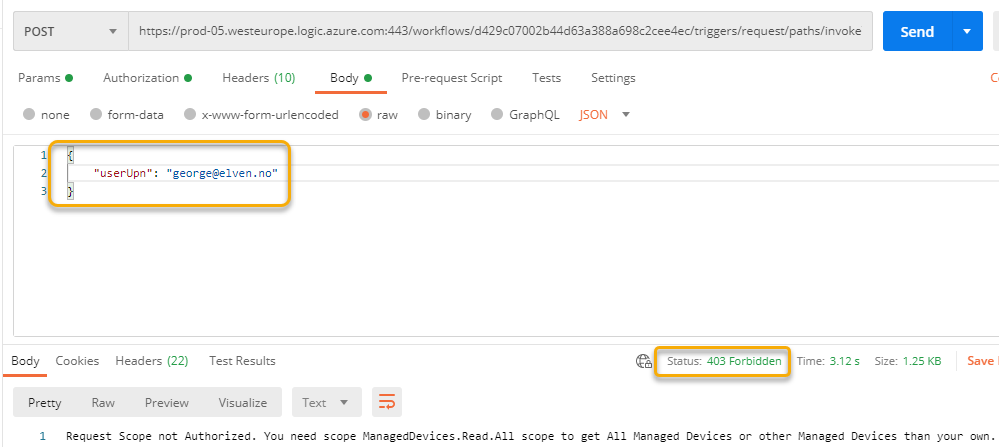
After logging in, and if needed consenting to the permissions scopes (se previous blog post for details), we should have a connection. We can now test the trigger by supplying the api-version (2016-10-01) and specify the operatingSystem, osVersion and userUpn parameters:
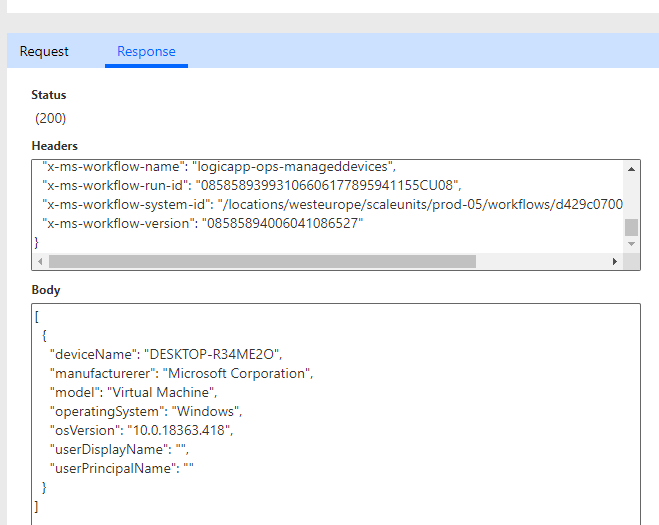
Click Test operation and verify a successful response like below:
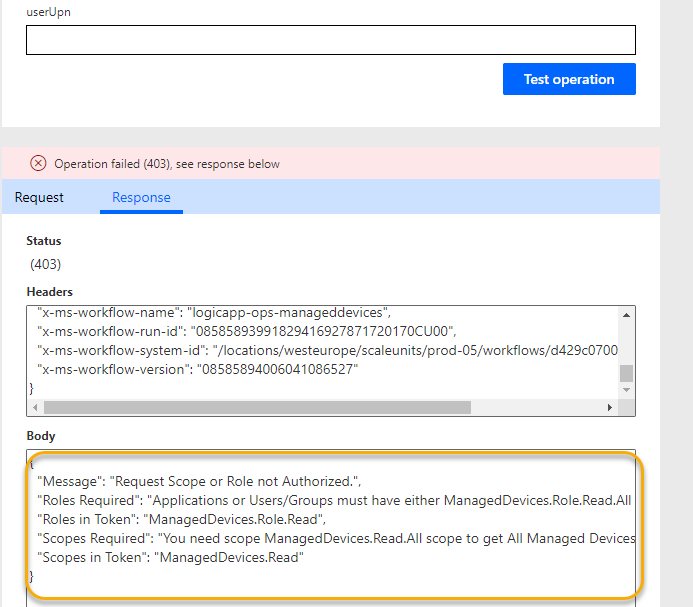
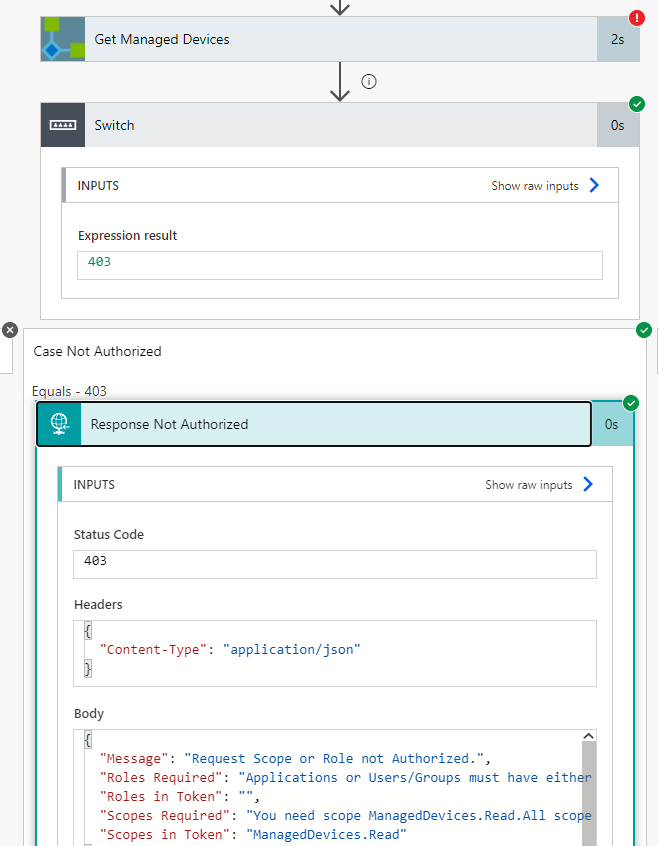
Let’s try another test, this time leaving the userUpn blank (from the previous blog post this means that the Logic App tries to return all managed devices, if the user has the correct scope and/or roles). This time I get a 403 not authorized, which is expected as I don’t have the correct scope/role:
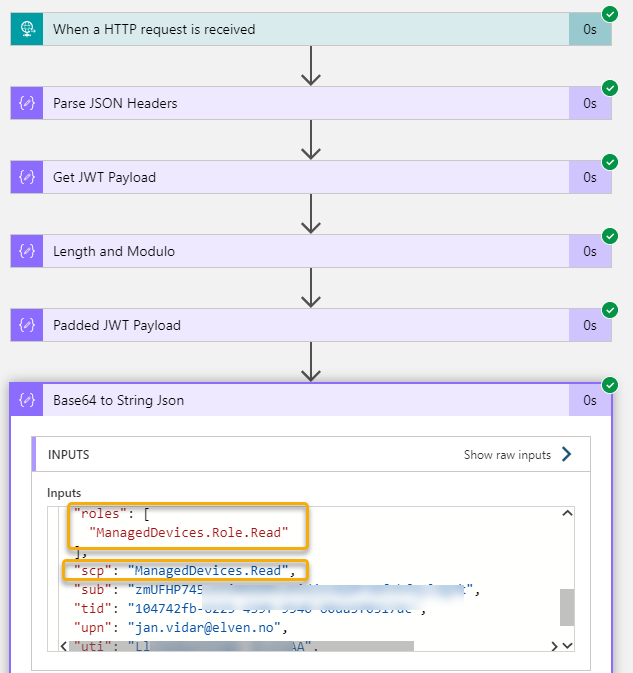
Checking the Logic App run history I can see that my Power Platform user triggered the Logic App and I can see the expected scp and roles claim:
Perfect so far! In the end of this blog post article I will show how we can get this response data to a Power App via a Flow and the Custom Connector, but first lets look into the other ways of creating a Custom Connector.
Exporting the Logic App to a Power Platform environment
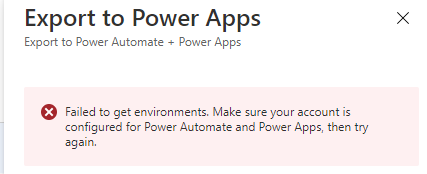
In the previous example, I created the Custom Connector from my Power Platform environment, in this example I will do an Export from the Logic App. The user I will do this with needs to be a Power Platform licensed user and have access to the environments, or else I will get this:
To Export, click this button:
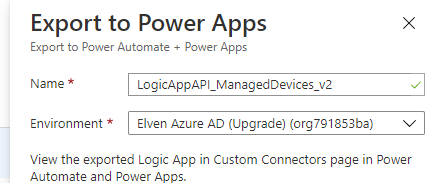
Then fill inn the name of the Custom Connector to create, I will call this ..v2, and select environment:
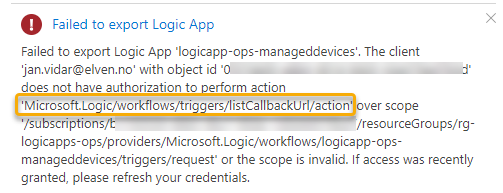
You might get another permission error:
If so, we need to update the Custom Role created earlier with this permission. Do the following:
# 3b. Update the custom role
$roleLogicAppAPIOperator = Get-AzRoleDefinition -Name "Logic App API Operator"
$roleLogicAppAPIOperator.Actions.Add("Microsoft.Logic/workflows/triggers/listCallbackUrl/action")
Set-AzRoleDefinition -Role $roleLogicAppAPIOperator
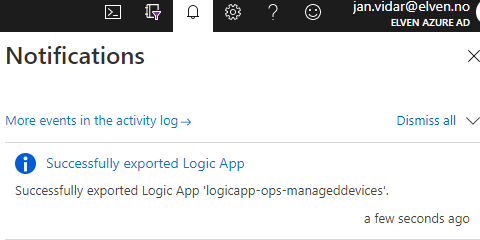
The role and the assignment should now be updated, so we can try again. You might need to refresh or log out and in again for the permission to be updated. After this the Export should be successful:
We can now find the Custom Connector right below the first we created:
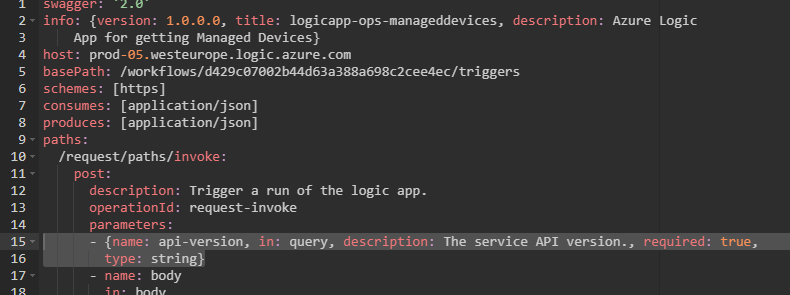
We still need to edit the Custom Connector with the authentication details, adding the app/client id, secret etc. The export has also left out all the query parameters (sv, sp, sig) but also the required api-version. This must be fixed, the easiest way is to switch to Swagger Editor, and add the line 15 and 16 as shown below:
After this you should be able to Update the Connector, and the Test, Create a Connection and verify successful results.
Creating the Custom Connector using an OpenAPI swagger definition file/url
Both examples above, either importing a Custom Connector from Azure Service, or exporting the Logic App to a Custom Connector in a Power Platform environment, require that the user doing this both has:
Azure RBAC role assignment and permissions as detailed above.
Access to Power Platform environment and licensed for using Power Platform.
What if you as Azure administrator don’t want your Power Platform users to have access to Azure, but you still want to help them with creating Custom Connectors that send requests to selected Logic App workflow APIs?
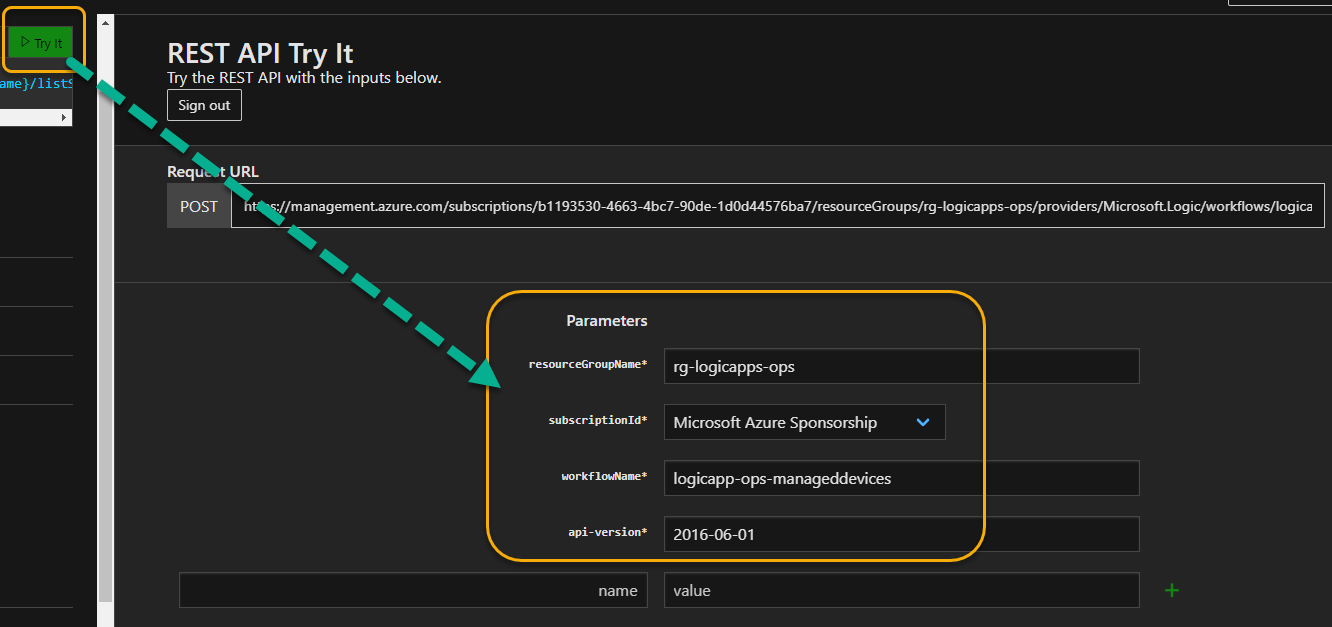
To get your swagger you can look at the first blog post in this series, where I showed how you could use Az PowerShell to get management access tokens using Get-AzAccessToken and running Invoke-RestMethod. In this example I’m just going to use the Try it button from the Docs link above, and then authenticate to my Azure subscription, and fill inn the required parameters:
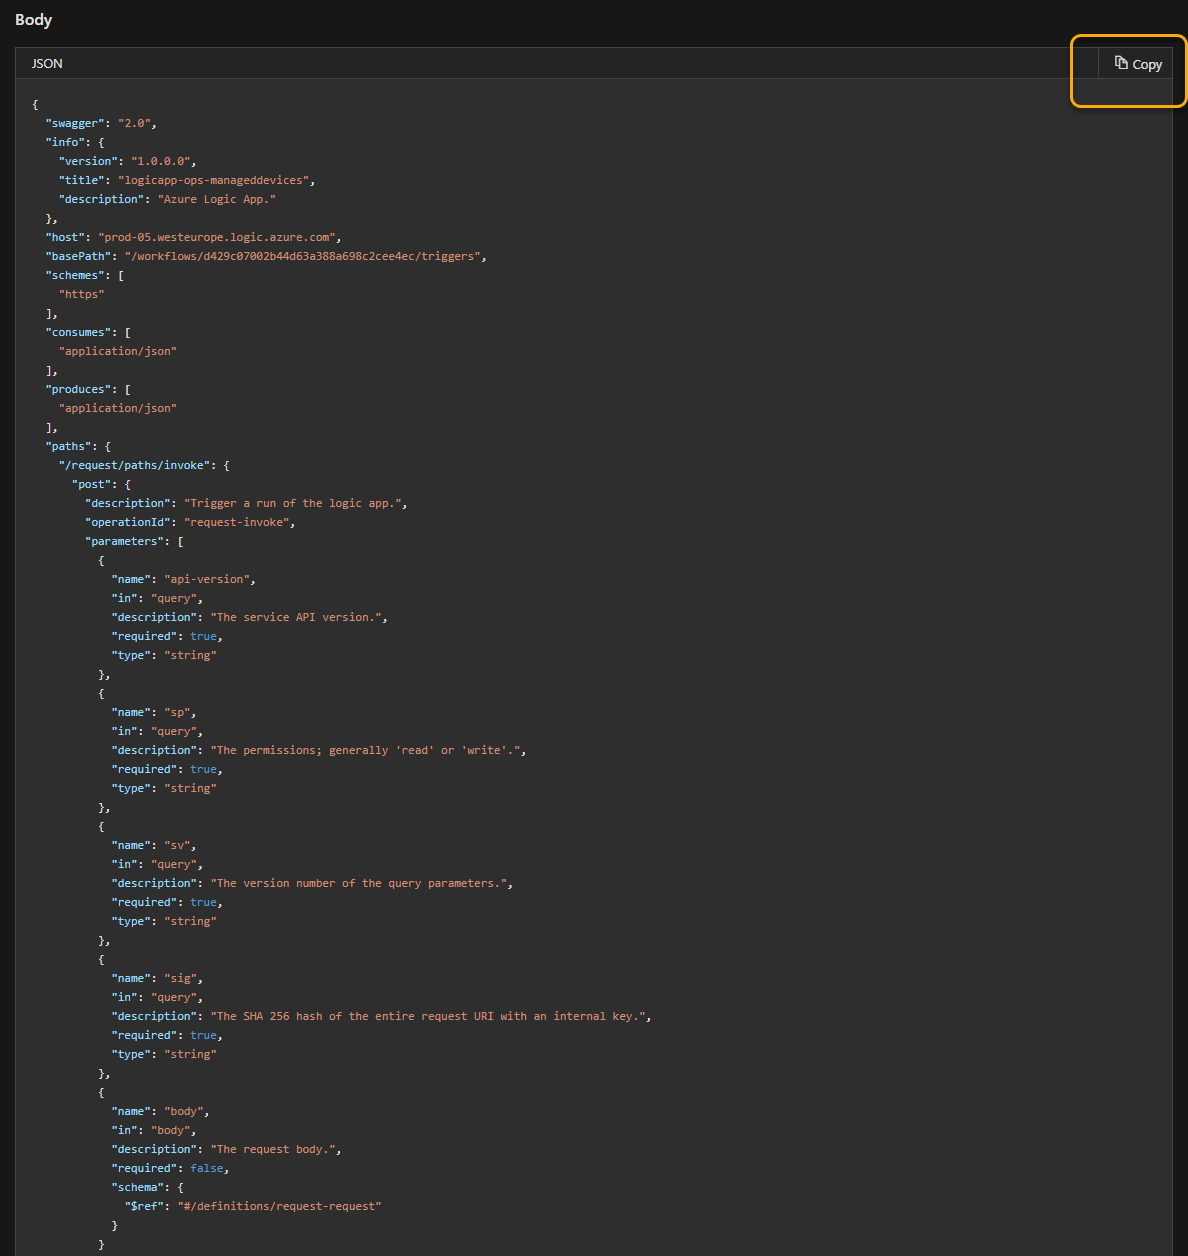
Running this request should produce your requested swagger OpenAPI definition. You can now copy this to a file:
Before you share this OpenAPI file with your Power Platform developers, you should edit and remove the following request query parameters, as these are not needed when running the OAuth2 authorization scheme:
After this you can create a new Custom Connector, by specifying an OpenAPI file / url, depending on where you made the file available to your Power Platform Developers.
Browse to the filename and type a Connector name:
After this you will have the basis of the Connector defined, where you can customize general settings etc:
You will now need to add the authentication for Azure AD OAuth2 with client id, secret etc under Security, as well as creating the connector, and under test create a connection and test the operations. This is the same as I showed earlier, so I don’t need to show tthe details here.
Creating the Custom Connector from blank
You can of course create Power Platform Custom Connectors from blank as well, this should be easy enough based on the details I have provided above, but basically you will need to make sure to set the correct Host and Base URL path for your Logic App here:
After adding the authentication details for Azure AD OAuth2 (same as before), you will need to manually add actions, and providing a request from sample, as well as defining the default responses for 200 and 403 status, as shown in the earlier steps.
With the Custom Connector now in place for sending Requests to the Logic App using delegated authentication, we can now start using this Connector in our Flows/Power Apps.
Lets build a quick sample of that.
Creating a Power Automate Flow that will trigger Logic App API
I’ll just assume readers of this blog post knows a thing or two about Power Automate and Cloud Flows, so I’ll try to keep this high level.
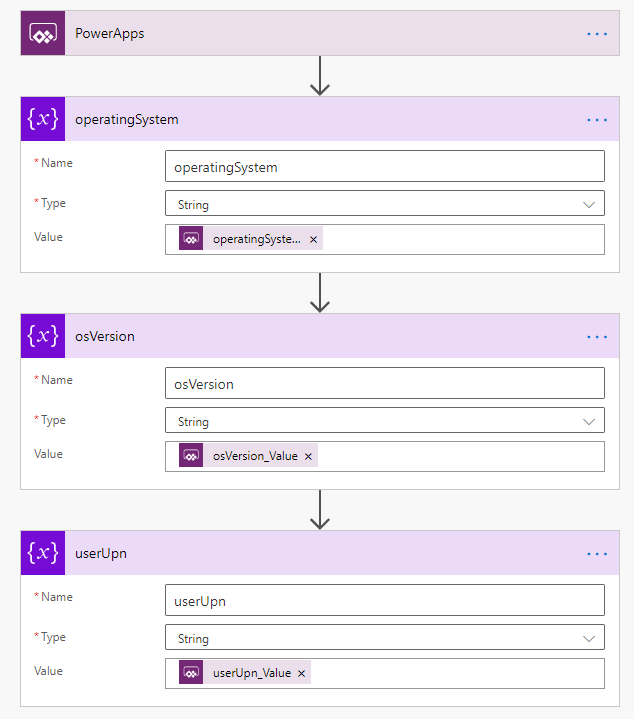
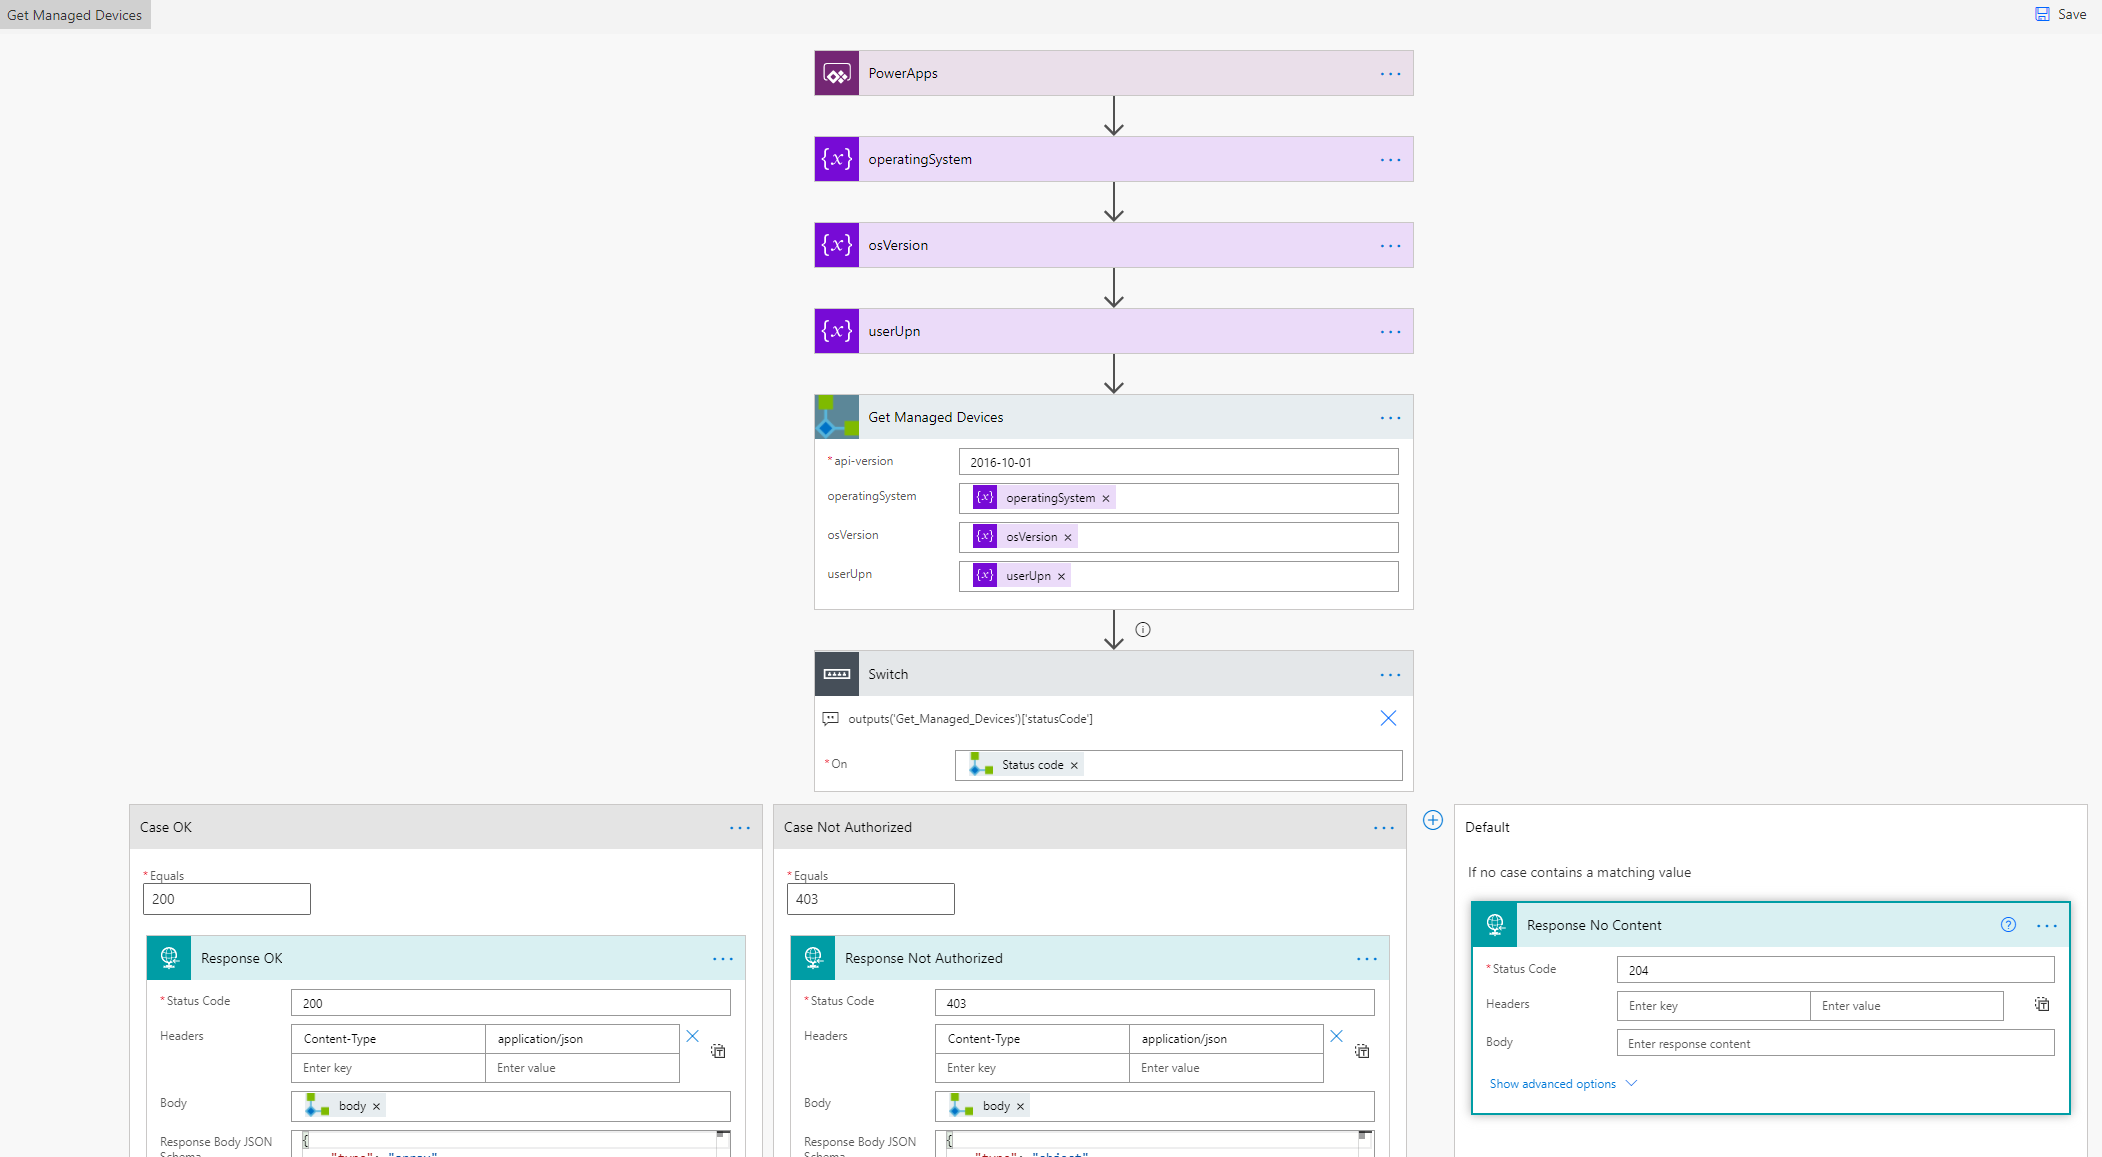
I’ve created a new instant Cloud Flow, using PowerApps as a trigger. Then I add three initialize variables actions, giving the variables and actions name like below, before I set “Ask in PowerApps” for values:
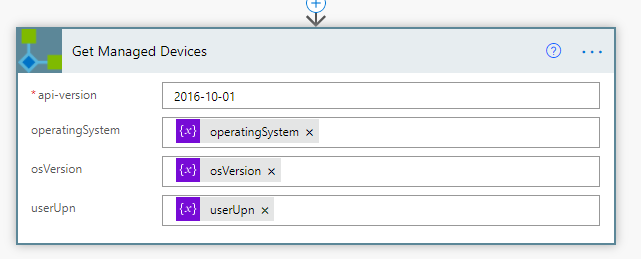
Next, add a Custom Connector action, selecting the Custom Connector we created earlier (I have 3 versions here, as I shown above with the alternative ways to set up a Custom Connector from Logic Apps:
Next, select the action from the chosen Custom Connector, and fill in the parameters like below:
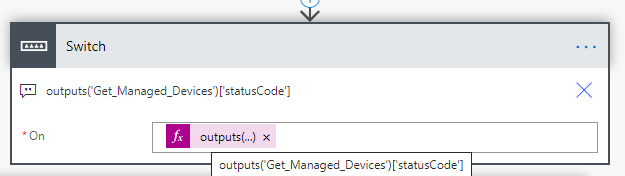
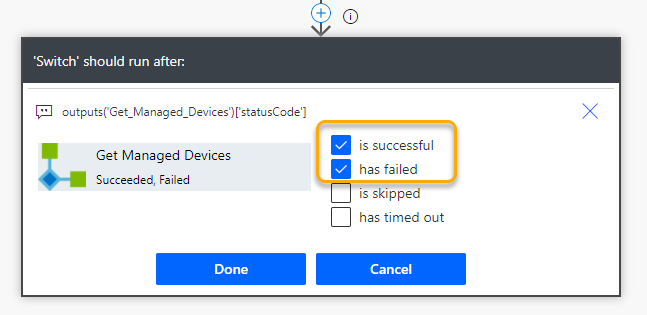
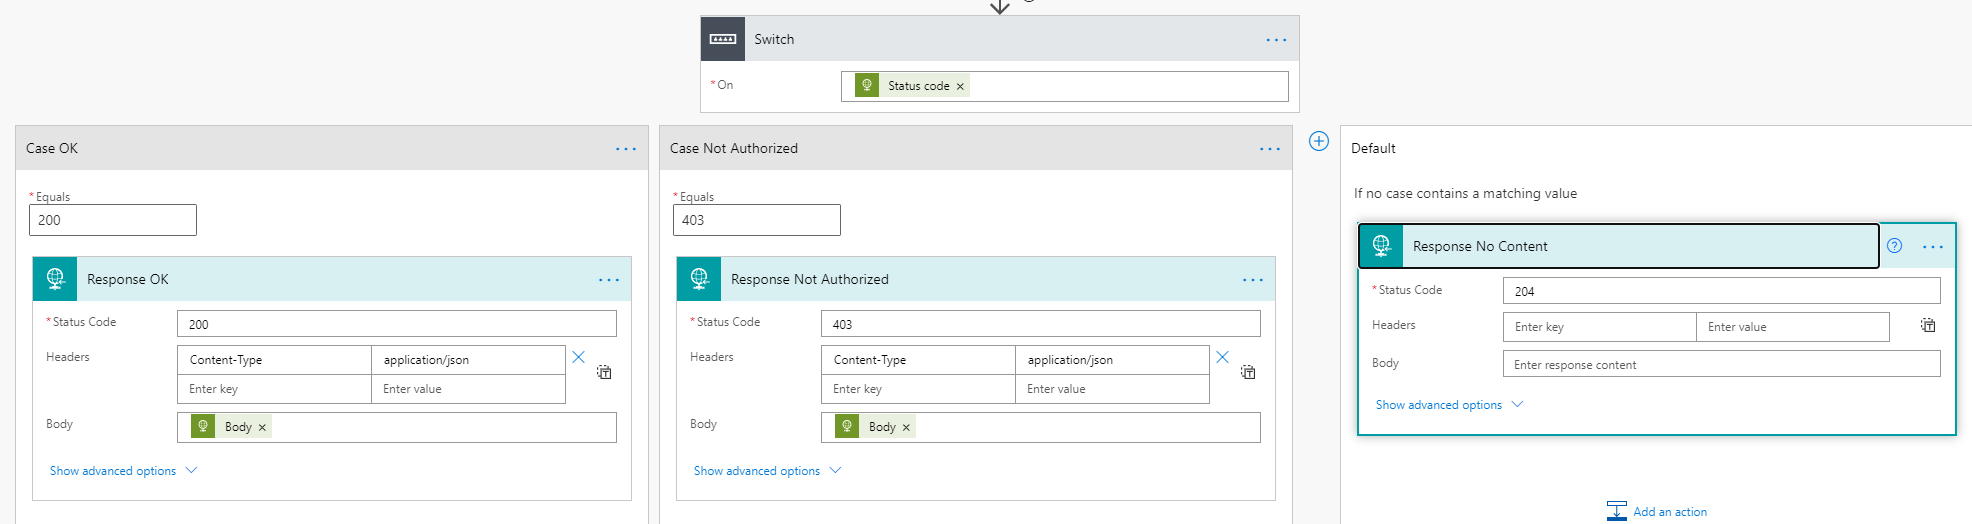
Next, we need to check the response status code we get back from the Custom Connector. Add a Switch control action, where we will check against the outputs from the Get Managed Devices and statusCode:
Make sure that the Switch action should run either if the Get Managed Devices is successful or failed:
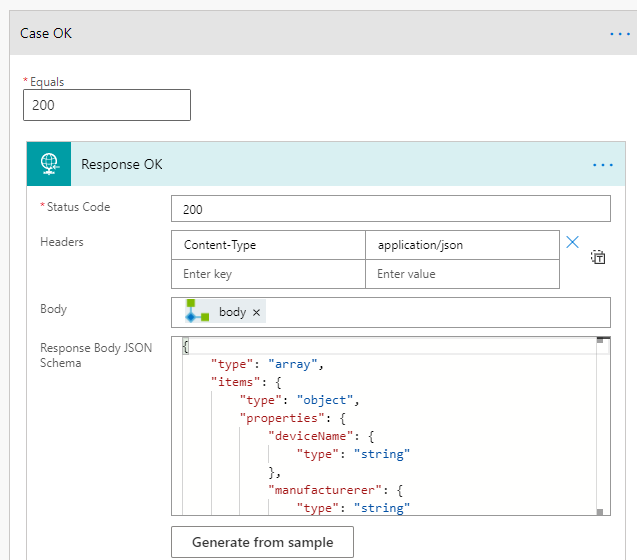
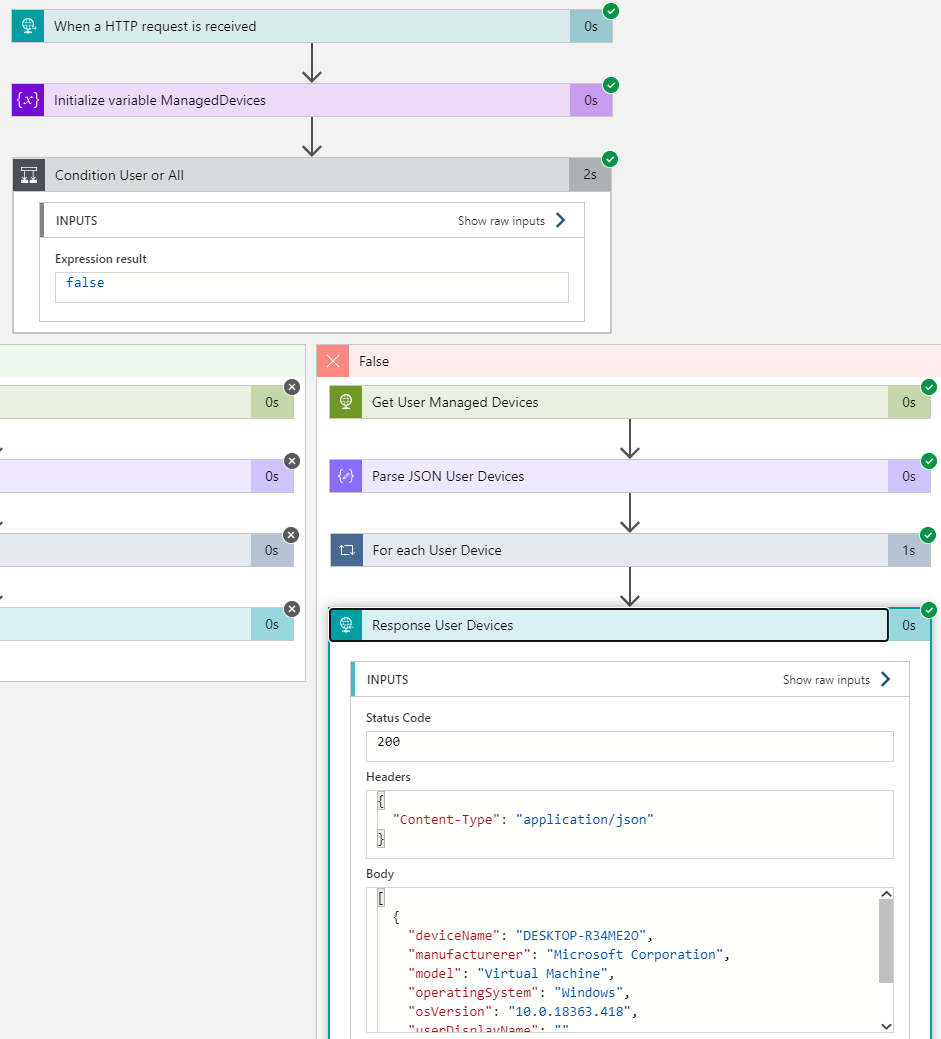
For each case of statusCode we will check against, we need a Response action to return data back to the PowerApp. For status code 200 OK, I’ll return the Status Code as shown below, adding Headers to be Content-Type application/json, and using the Body output from the Get Managed Devices custom connector action. The Response Body JSON schema is based on the sample output from the Logic App API.
PS! To get the Body output, you can use the following custom expression: outputs('Get_Managed_Devices')?['body']:
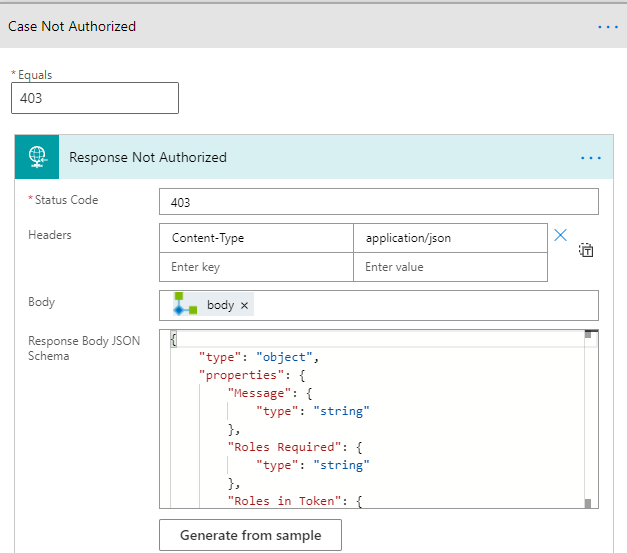
For status code 403 I have added the following Case and Response action, using the Body output again, but this time the schema is based on the 403 response from the Logic App API:
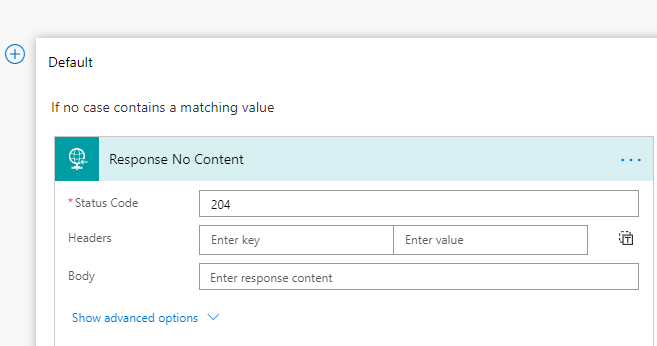
Last, as every case should have Response, I’ll add the following Default Case:
The whole Flow visualized:
PS! Instead of using the Response action, I could also have used the “Respond to PowerApps” action. However this action only let me return text strings, numbers, boolean etc, and I wanted to return native JSON response.
Make sure that you test and verify the Flow before you proceed.
Creating the Power App to connect to the Flow
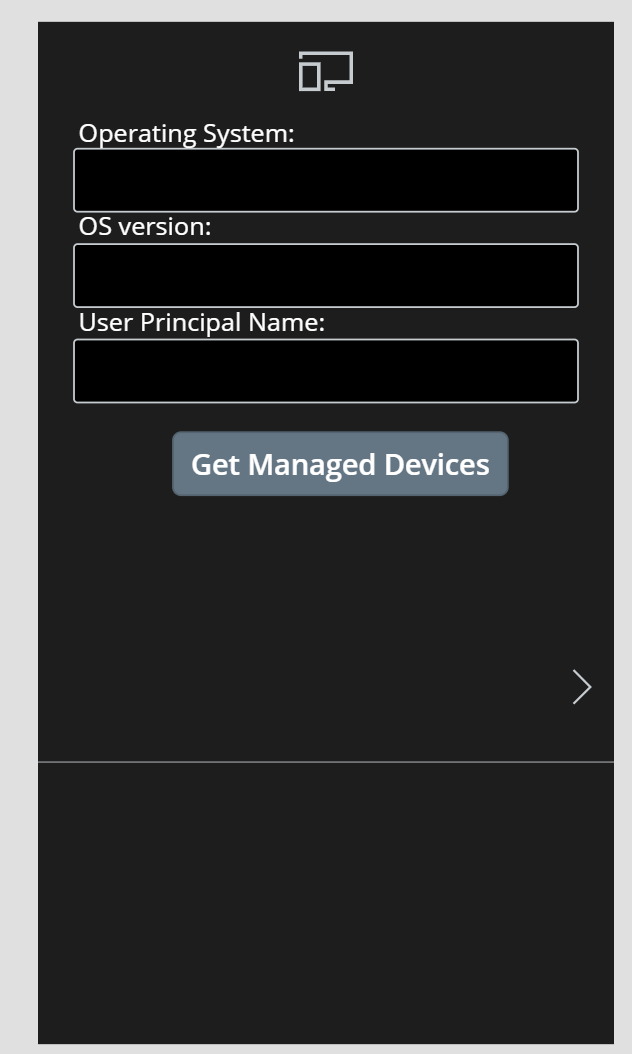
With the Flow ready, lets quickly build a PowerApp. My PowerApp is a Canvas App, and I have been using the Phone layout.
You can build this any way you want, but I used a dark theme, added an Icon at the top screen, and the 3 labels and text inputs for the parameters needed for the Flow. I then added a button for triggering the Flow, and under the button I have added a (hidden now) text label, for showing any error messages from the Flow. And I have added a Gallery control under there again for showing the resulting devices:
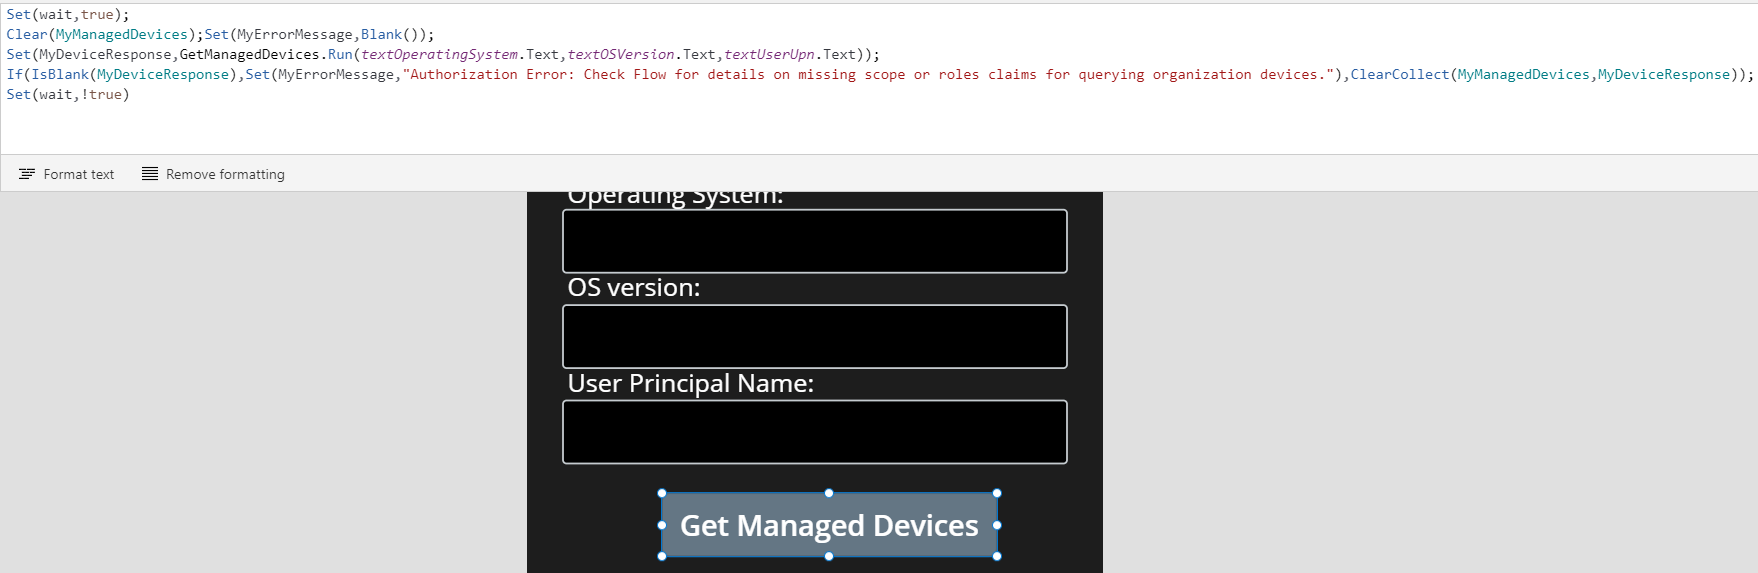
For the Button, select it and click on the Action menu and the Power Automate to connect your Flow. Next, change the “OnSelect” event for the Button to the following command:
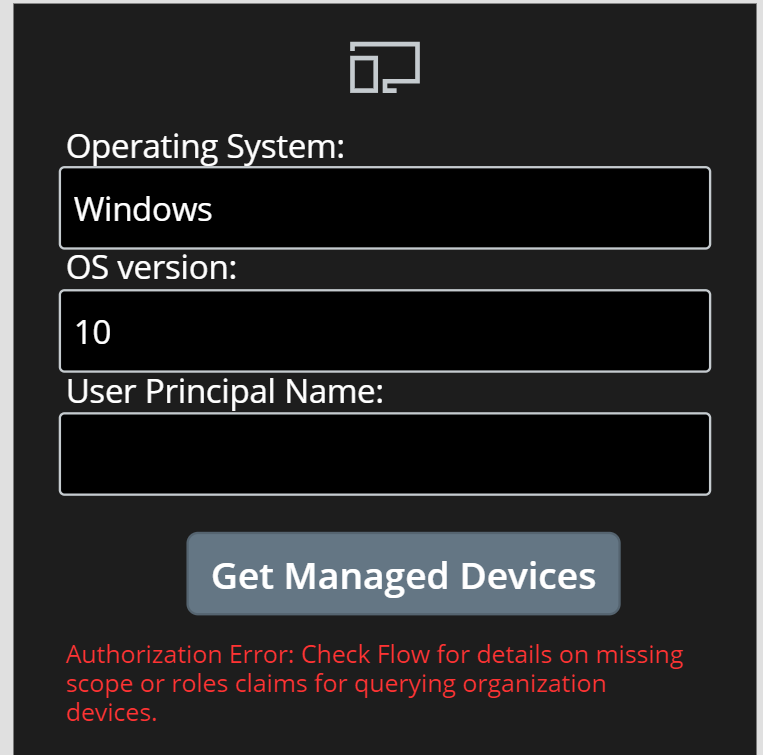
Set(wait,true);
Clear(MyManagedDevices);Set(MyErrorMessage,Blank());
Set(MyDeviceResponse,GetManagedDevices.Run(textOperatingSystem.Text,textOSVersion.Text,textUserUpn.Text));
If(IsBlank(MyDeviceResponse),Set(MyErrorMessage,"Authorization Error: Check Flow for details on missing scope or roles claims for querying organization devices."),ClearCollect(MyManagedDevices,MyDeviceResponse));
Set(wait,!true)
A quick explanation of the commands above:
Set(wait,true) and Set(wait,!true) is to make the PowerApp “busy” when clicking.
I then Clear my Collection and Variable used.
I then use Set to get a “MyDeviceResponse”, this will return a collection of items (devices) returned via a JSON array from the Flow, or if I’m not authorized, it will return a failed response (based on the 403) and a blank MyDeviceResponse.
Next I do a If test, if the MyDeviceResponse i Blank, I’ll set the MyErrorMessage variable, if it’s not blank I will run a ClearCollect and fill the Collection with returned devices.
I fully appreciate that there might be other ways to do this fail checking and error handling, please let me know in the comments if you have other suggestions 🙂
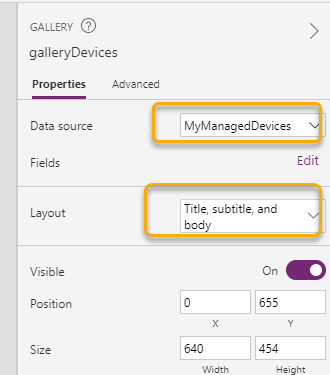
For the Gallery I set the Data source to MyManagedDevices collection, and I have selected to use the layout of “Title, subtitle, and body”. You can change the device data that get filled in for these items in the Galleri, for example Manufacturer, Version, Name etc.
And last I set the Text property of my error message label to the MyErrorMessage variable:
Let’s Save, Publish and test this PowerApp!
First, I’ll try to add parameters for getting all Windows 10 devices, leaving user principal name blank. This will via the Custom Connector send a request to the Logic App API to return all devices, and in this case I’m not authorized to do so, so I’ll get an authorization error:
This is something I can verify in the Flow run history also:
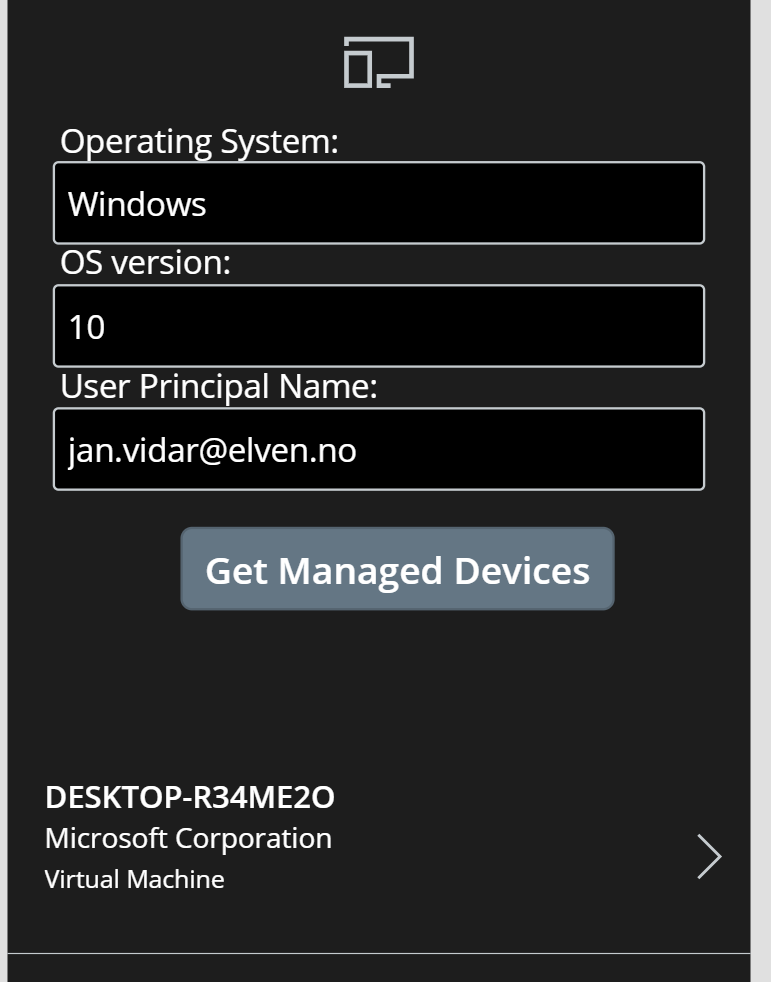
Next, I’ll try to return my test users devices only, and this is successful and will fill the gallery:
We now have a working Flow and PowerApp connected to the Logic App API using the signed in users delegated permissions. If I want I can now share the PowerApp and Flow including the Custom Connector with other users in my organization, and they can use their own user identity for connections to the Logic App API.
In the next part of this blog post I will show how you can access the Logic App API using HTTP action and application permissions.
Connect to Logic App API using HTTP action
Sometimes you will have scenarios where you want to use an application identity to call an API like the Logic App I have used in this blog post article series. This is especially useful if you want to run a Power Automate Flow without a logged in user’s permissions.
I the previous blog post part 2 for exposing Logic App as an API, I created this App Registration to represent the Application Client scenarios and Application permissions:
In that App Registration, create a new Client Secret for using in Power Automate, and copy this to your clipboard:
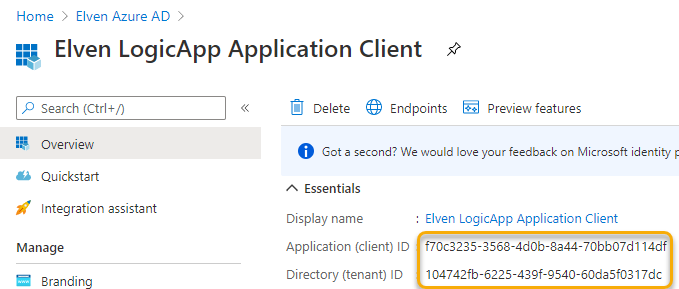
Make sure to copy the Application (Client) ID and Tenant ID also:
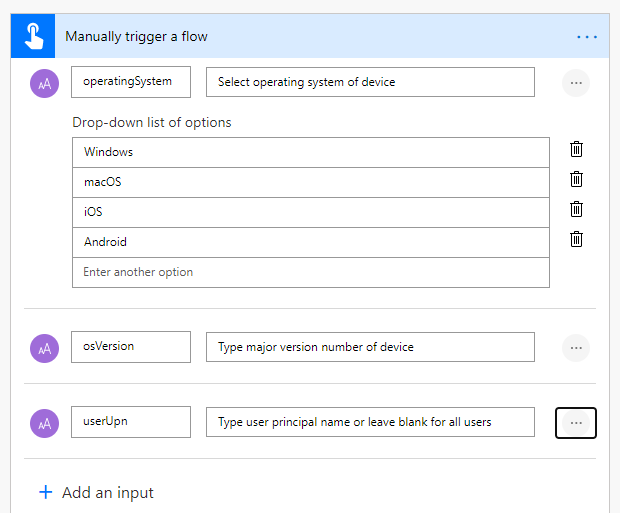
Now let’s create a new Power Automate Flow to test this scenario. This type of Flow could use a range of different triggers based on your needs, but I’ll just use a Instant Cloud Flow as trigger where I have configured the following inputs:
Note that I have configured userUpn as an optional input.
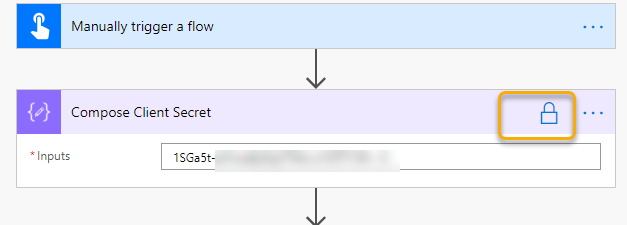
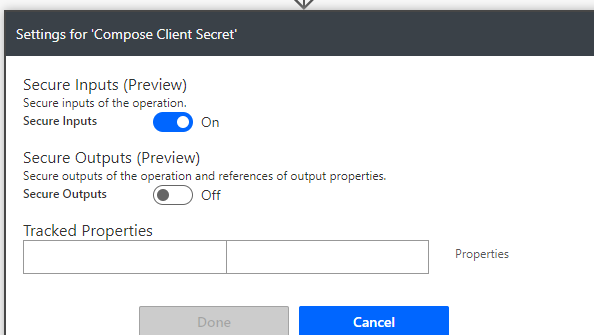
Next add a “Compose” action for the Client Secret, give the action a name and paste in the Client Secret you created earlier. Note the Lock symbol:
Click on settings and select to Secure Inputs:
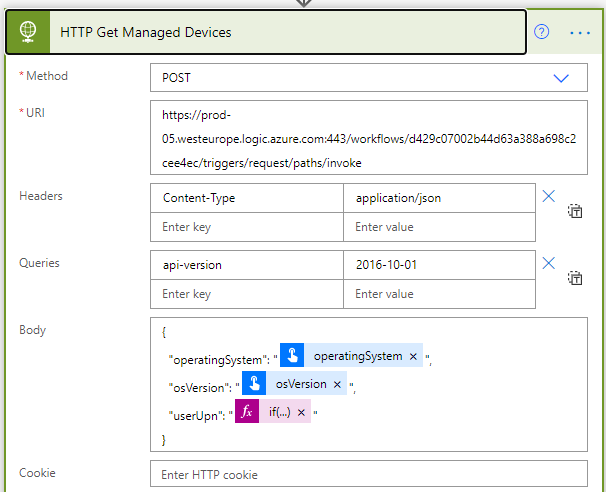
Next add a HTTP action, specifying the Method to POST and the URI to be the LogicApp API url, remember to not include the sv, sp and sig query parameters. Set Headers Content-Type to application/json, and under queries add the api-version. For body build the JSON request body using the inputs. We need to build a dynamic expression for userUpn, as this can be optional. I have used the following expression:
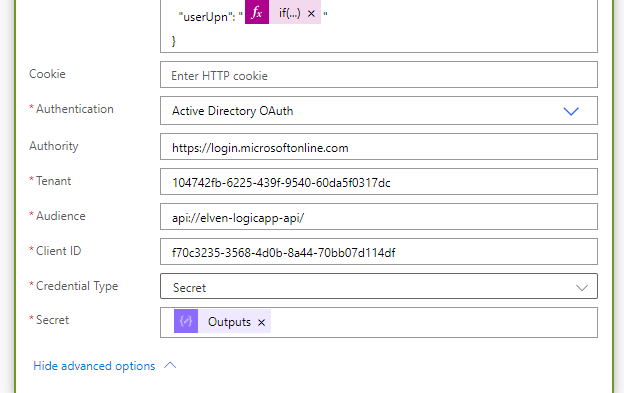
Click to show advanced settings, and choose Authentication to use Azure AD OAuth. Add the authority, tenant id and set audience to the custom Logic App API URI. Then paste in the Application (Client) Id, and use the Outputs from the Compose Client Secret action:
This authentication above will use the Client Credentials Flow to get an access token that will be accepted by the Logic App API.
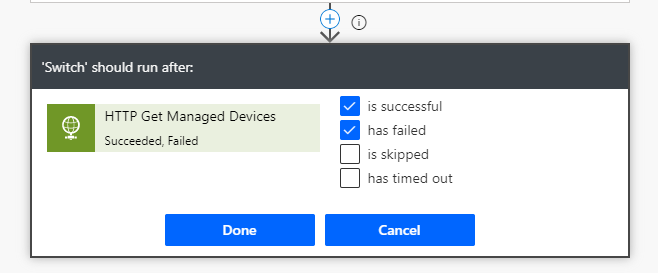
The remaining parts of this Flow can be exactly the same as the previous Flow we built, a Switch control that continiues on success/failure of the HTTP action:
And then returning Response objects from the HTTP action body for each case:
When testing the Flow now, I can see that the client secret is hidden from all relevant actions:
Summary and Next Steps
We are at the end of another extensive blog post. The focus for this article has been to show how you can use Power Automate to connect to your custom API, that we built in the previous blog post for exposing the Logic App as an API.
The community are increasingly creating Power Platform custom connectors and http actions that sends requests to API’s to Microsoft Graph directly, and that is great but it might result in too extensive permissions given to users and application clients. My focus has been to show how you can control authentication and authorization using on-behalf-of flows hidden behind a Logic App API where users and clients are allowed to send requests based on allowed permission scopes and/or roles, using the powers of Azure Active Directory and OAuth2.
There will be a later blog post in this series also, where I look into how Azure API Management can be used in these scenarios as well.
In the meantime, thanks for reading, hope it has been helpful!
In this blog I will build on that, creating a scenario where a Logic App will be exposed as an API to end users. In this API, I will call another popular API: Microsoft Graph.
My scenario will use a case where end users does not have access themselves to certain Microsoft Graph requests, but where the Logic App does. Exposing the Logic App as an API will let users be able to authenticate and authorize, requesting and consenting to the custom Logic App API permissions I choose. Some of these permissions can users consent to themselves, while other must be admin consented. This way I can use some authorizing inside the Logic App, and only let the end users be able to request what they are permitted to.
I will also look into assigning users and groups, and using scopes and roles for additional fine graining end user and principal access to the Logic App.
A lot of topics to cover, so let’s get started by first creating the scenario for the Logic App.
Logic App calling Microsoft Graph API
A Logic App can run requests against the Microsoft Graph API using the HTTP action and specifying the method (GET, POST, etc) and resource URI. For authentication against Graph from the Logic App you can use either:
Using Azure Active Directory OAuth and Client Credentials Flow with Client Id and Secret.
Using System or User Assigned Managed Identity.
Permissions for Microsoft Graph API are either using “delegated” (in context of logged in user) or “application” (in context of application/deamon service). These scenarios using Logic App will use application permissions for Microsoft Graph.
PS! Using Logic Apps Custom Connectors (Custom connectors overview | Microsoft Docs) you can also use delegated permissions by creating a connection with a logged in user, but this outside of the scope of this article.
Scenario for using Microsoft Graph in Logic App
There are a variety of usage scenarios for Microsoft Graph, so for the purpose of this Logic App I will focus on one of the most popular: Device Management (Intune API) resources. This is what I want the Logic App to do in this first phase:
Listing a particular user’s managed devices.
Listing all of the organization’s managed devices.
Filtering managed devices based on operating system and version.
In addition to the above I want to implement the custom API such that any assigned user can list their own devices through end-user consent, but to be able to list all devices or any other user than your self you will need an admin consented permission for the custom API.
Creating the Logic App
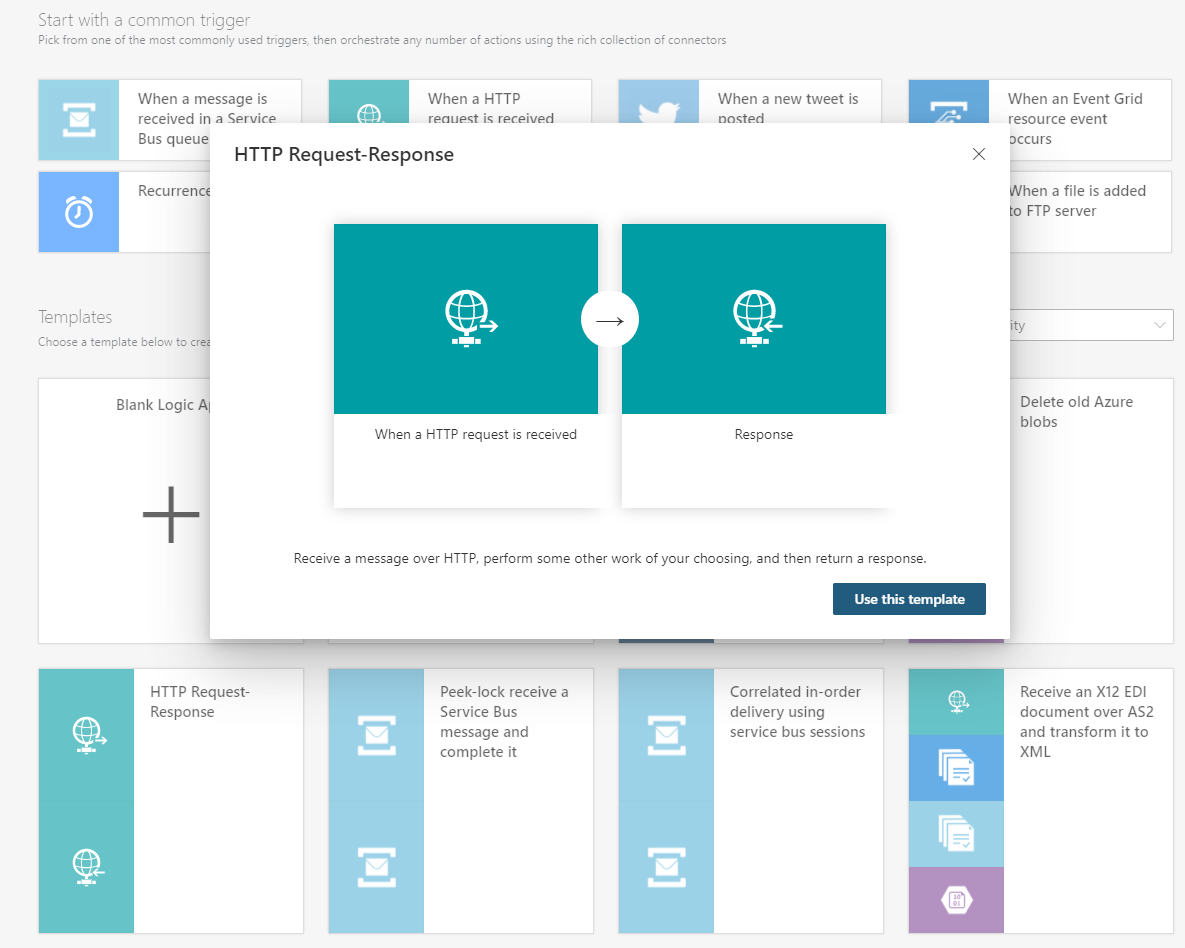
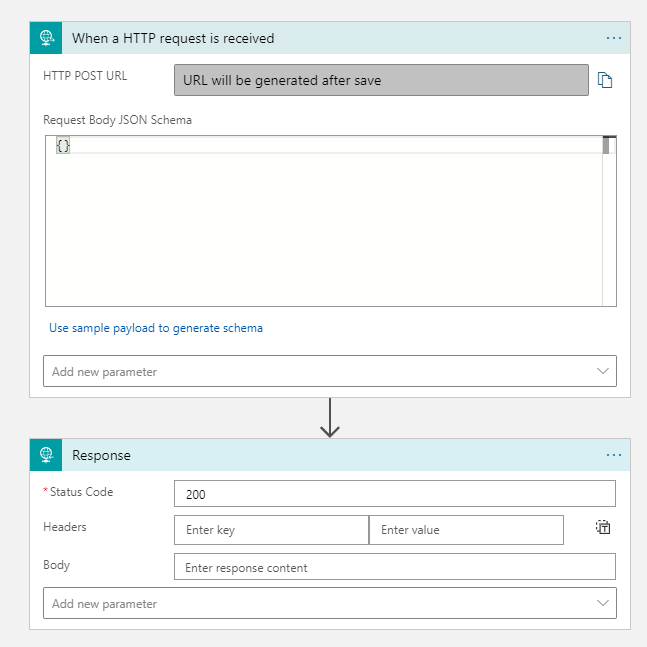
In your Azure subscription, add a new Logic App to your chosen resource group and name it according to your naming standard. After the Logic App is created, you will need add the trigger. As this will be a custom API, you will need it to use HTTP as trigger, and you will also need a response back to the caller, so the easiest way is to use the template for HTTP Request-Response as shown below:
Your Logic App will now look like this:
Save the Logic App before proceeding.
Create a Managed Identity for the Logic App
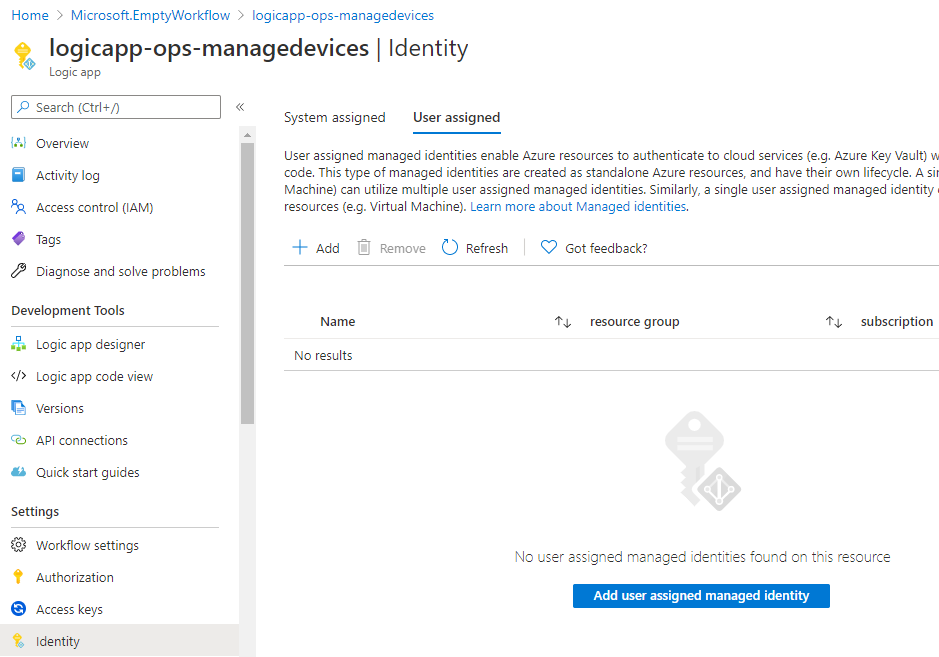
Exit the designer and go to the Identity section of the Logic App. We need a managed identity, either system assigned or user assigned, to let the Logic App authenticate against Microsoft Graph.
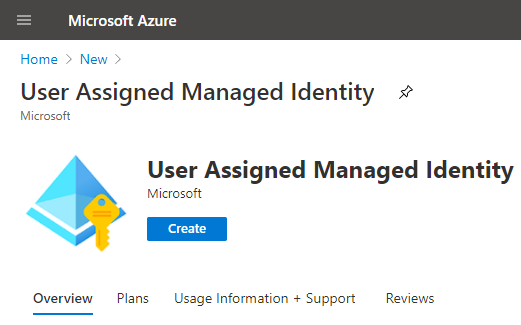
A system assigned managed identity will follow the lifecycle of this Logic App, while a user assigned managed identity will have it’s own lifecycle, and can be used by other resources also. I want that flexibility, so I will create a user assigned managed identity for this scenario. In the Azure Portal, select to create a new resource and find User Assigned Managed Identity:
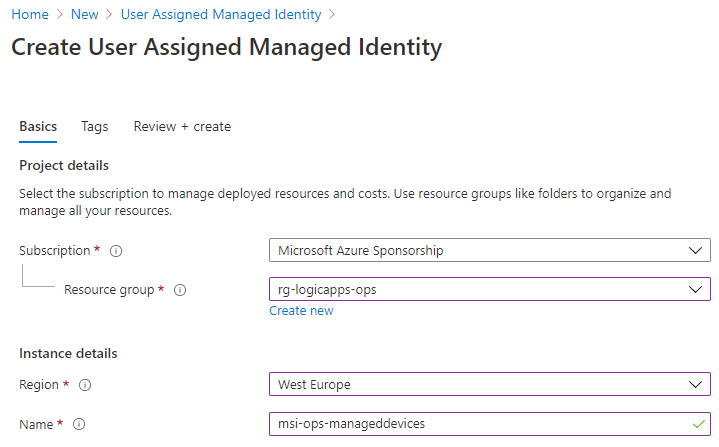
Create a new User Assigned Managed Identity in your selected resource group and give it a name based on your naming convention:
After creating the managed identity, go back to your Logic App, and then under Identity section, add the newly created managed identity under User Assigned Managed Identity:
Before we proceed with the Logic App, we need to give the Managed Identity the appropriate Microsoft Graph permissions.
Adding Microsoft Graph Permissions to the Managed Identity
Now, if we wanted the Logic App to have permissions to the Azure Rest API, we could have easily added Azure role assignments to the managed identity directly:
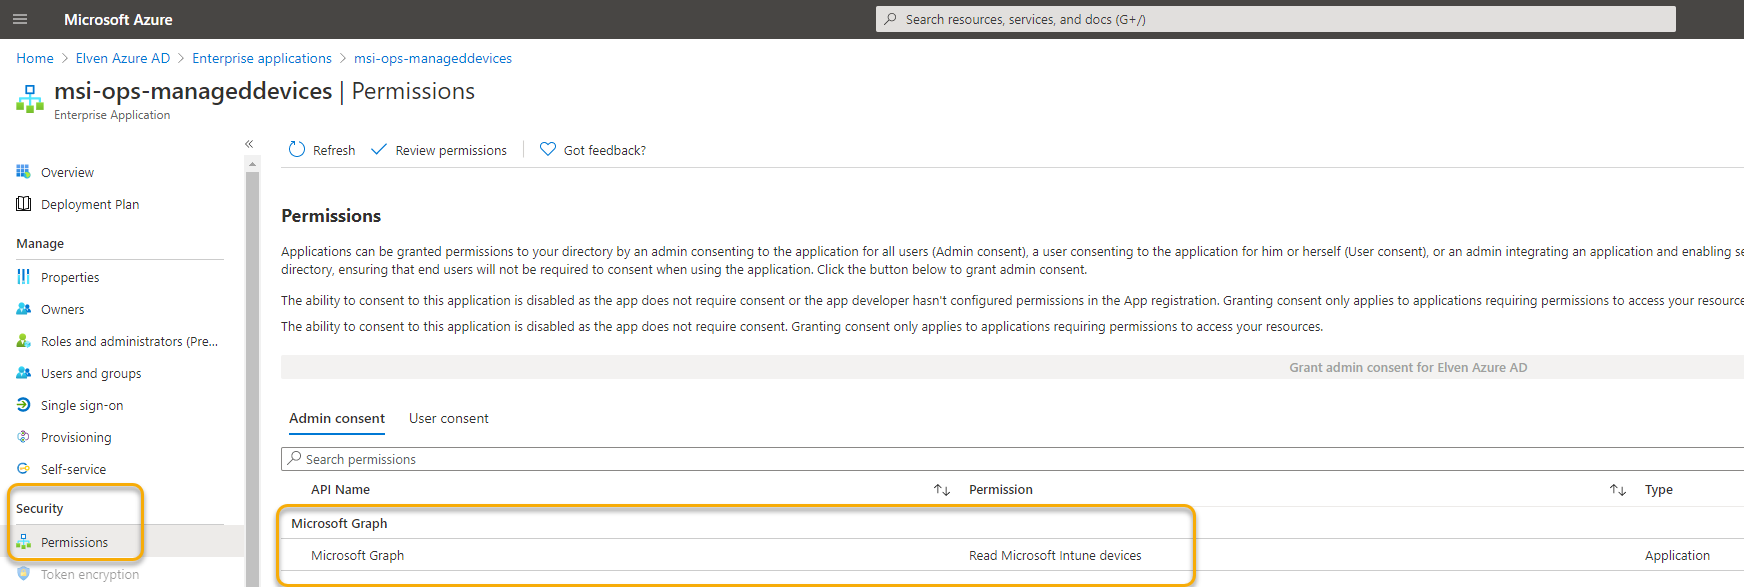
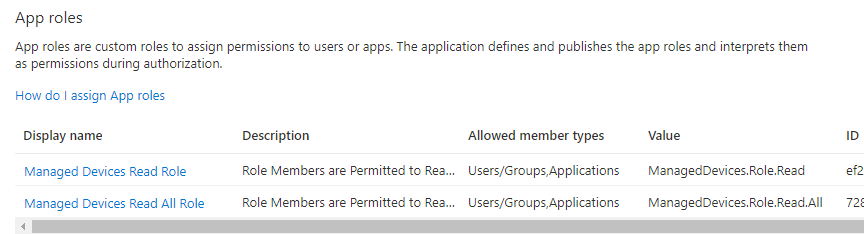
So we need a minimum of: DeviceManagementManagedDevices.Read.All.
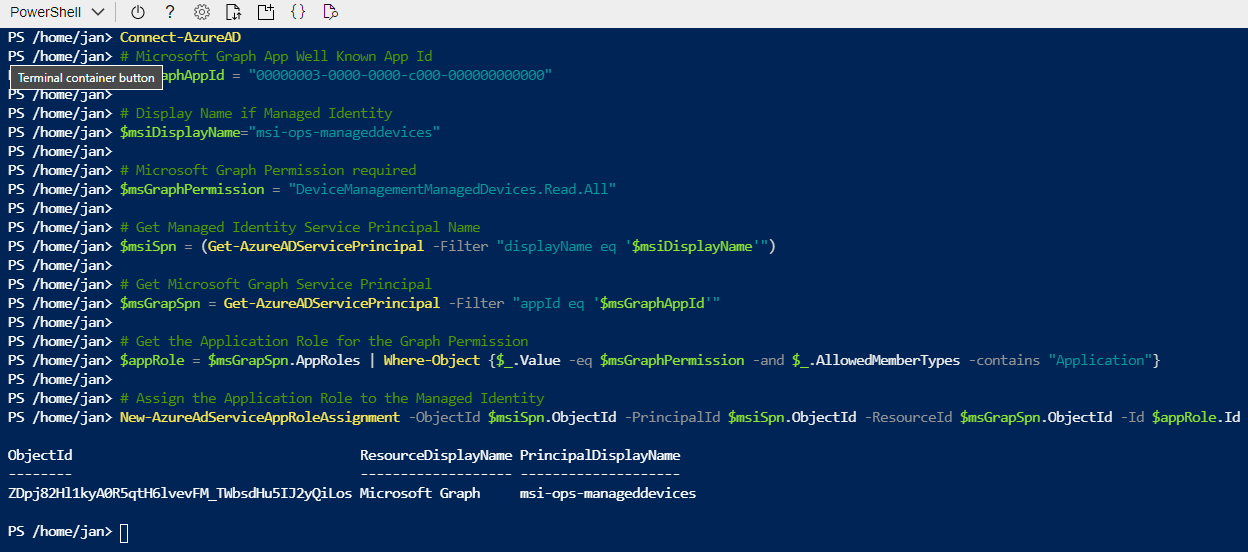
To add these permissions we need to run some PowerShell commands using the AzureAD module. If you have that installed locally, you can connect and proceed with the following commands, for easy of access you can also use the Cloud Shell in the Azure Portal, just run Connect-AzureAD first:
PS! You need to be a Global Admin to add Graph Permissions.
You can run each of these lines separately, or run it as a script:
# Microsoft Graph App Well Known App Id
$msGraphAppId = "00000003-0000-0000-c000-000000000000"

# Display Name if Managed Identity
$msiDisplayName="msi-ops-manageddevices"

# Microsoft Graph Permission required
$msGraphPermission = "DeviceManagementManagedDevices.Read.All"

# Get Managed Identity Service Principal Name
$msiSpn = (Get-AzureADServicePrincipal -Filter "displayName eq '$msiDisplayName'")

# Get Microsoft Graph Service Principal
$msGraphSpn = Get-AzureADServicePrincipal -Filter "appId eq '$msGraphAppId'"

# Get the Application Role for the Graph Permission
$appRole = $msGraphSpn.AppRoles | Where-Object {$_.Value -eq $msGraphPermission -and $_.AllowedMemberTypes -contains "Application"}

# Assign the Application Role to the Managed Identity
New-AzureAdServiceAppRoleAssignment -ObjectId $msiSpn.ObjectId -PrincipalId $msiSpn.ObjectId -ResourceId $msGraphSpn.ObjectId -Id $appRole.Id
Verify that it runs as expected:
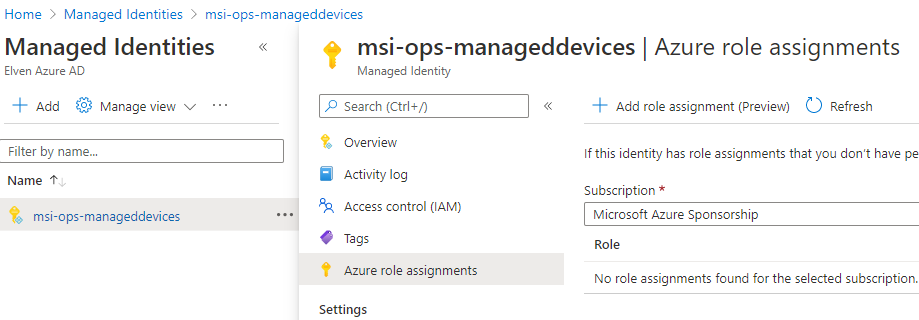
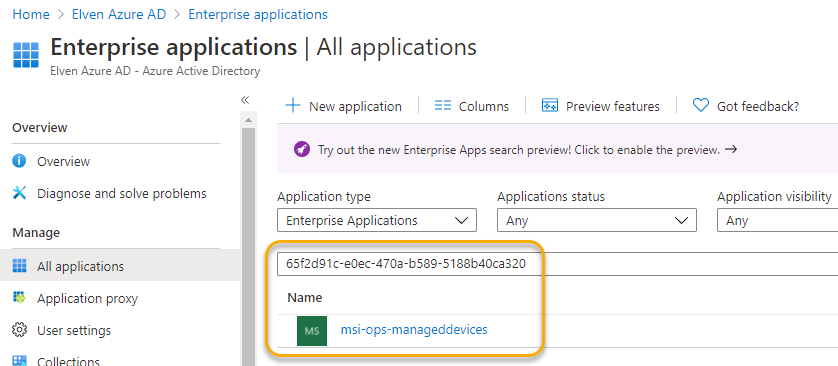
As mentioned earlier, adding these permissions has to be done using script commands, but there is a way to verify the permissions by doing the following:
Find the Managed Identity, and copy the Client ID:
Under Azure Active Directory and Enterprise Applications, make sure you are in the Legacy Search Experience and paste in the Client ID:
Which you then can click into, and under permissions you will see the admin has consented to Graph permissions:
The Logic App can now get Intune Managed Devices from Microsoft Graph API using the Managed Identity.
Calling Microsoft Graph from the Logic App
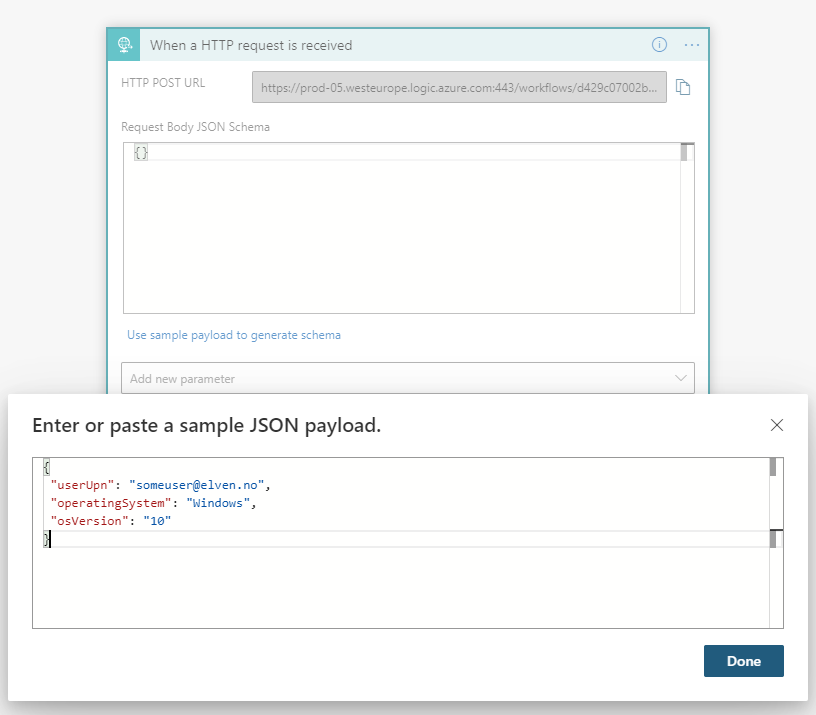
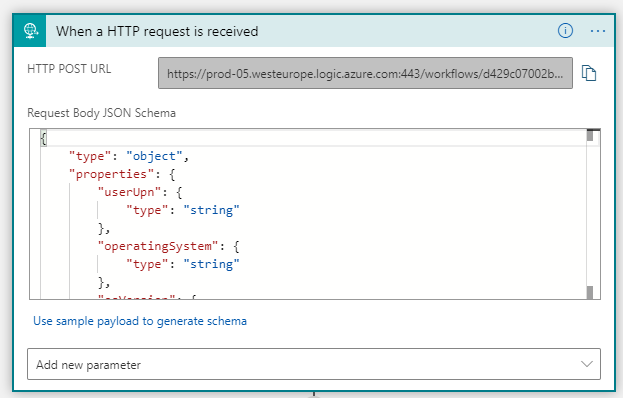
Let’s start by adding some inputs to the Logic App. I’m planning to trigger the Logic App using an http request body like the following:
In the Logic App request trigger, paste as a sample JSON payload:
The request body schema will be updated accordingly, and the Logic App is prepared to receive inputs:
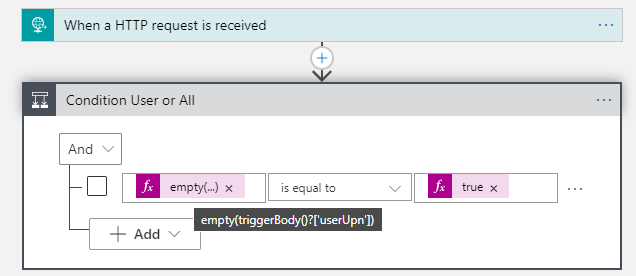
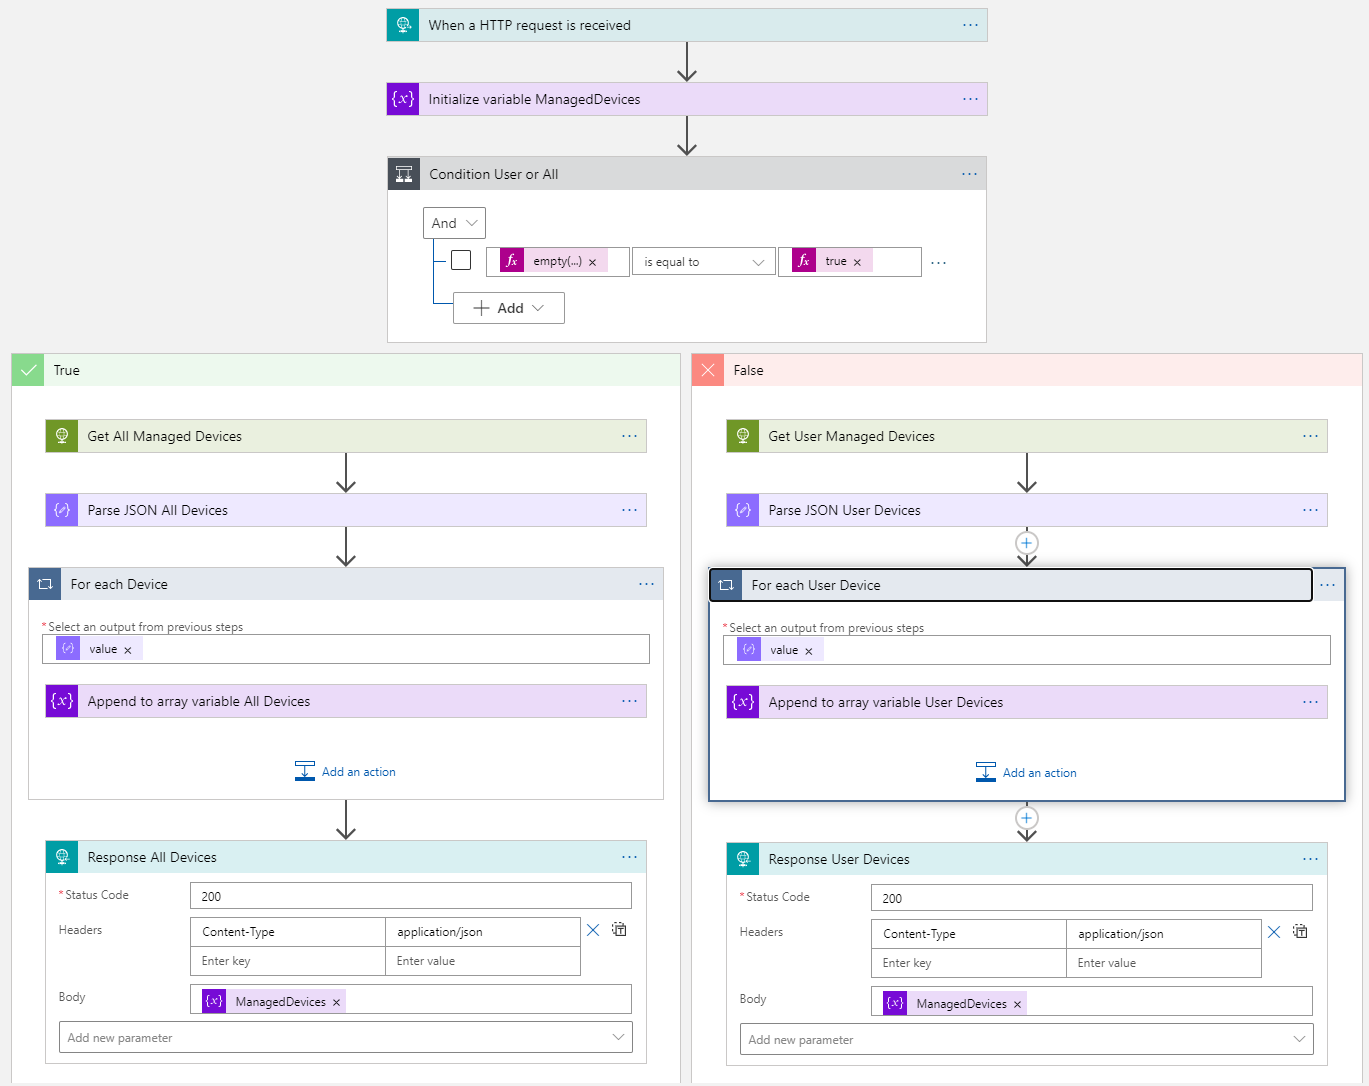
Next, add a Condition action, where we will check if we should get a users’ managed devices, or all. Use an expression with the empty function to check for userUpn, and another expression for the true value, like below:
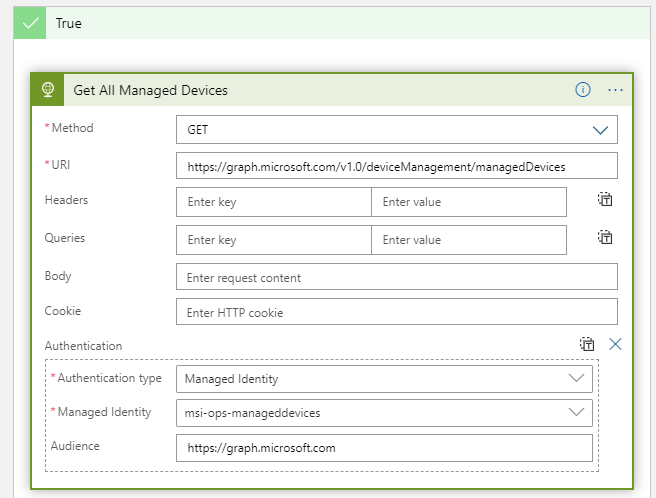
We will add more logic and conditions later for the filtering of the operating system and version, but for now add an HTTP action under True like the following:
Note the use of the Managed Identity and Audience, which will have permission for querying for managed devices.
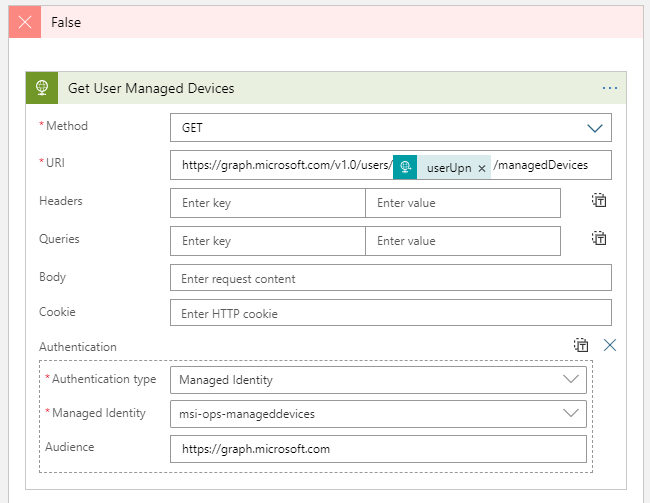
Under False, we will get the managed devices for a specific user. So add the following, using the userUpn input in the URI:
Both these actions should be able to run successfully now, but we will leave the testing for a bit later. First I want to return the managed devices found via the Response action.
Add an Initialize Variable action before the Condition action. Set the Name and Type to Array as shown below, but the value can be empty for now:
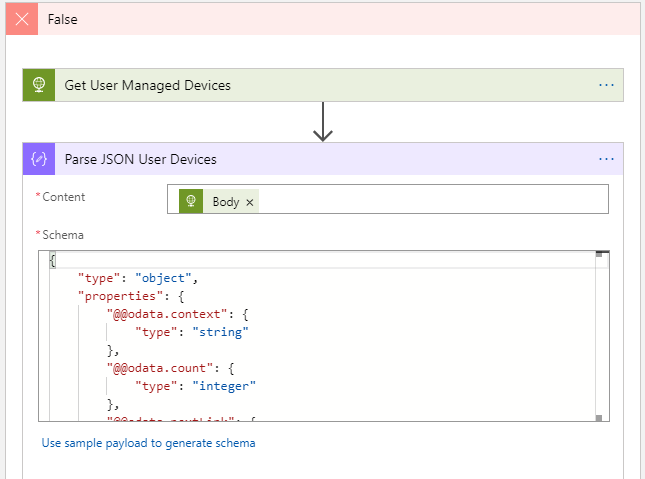
Next, under True and Get All Managed Devices, add a Parse JSON action, adding the output body from the http action and using either the sample response from the Microsoft Graph documentation, or your own to create the schema.
PS! Note that if you have over 1000 managed devices, Graph will page the output, so you should test for odata.nextLink to be present as well. You can use the following anonymized sample response for schema which should work in most cases:
{
     "@odata.context": "https://graph.microsoft.com/v1.0/$metadata#deviceManagement/managedDevices",
     "@odata.count": 1000,
     "@odata.nextLink": "https://graph.microsoft.com/v1.0/deviceManagement/managedDevices?$skiptoken=",
     "value": [
         {
             "id": "id Value",
             "userId": "User Id value",
             "deviceName": "Device Name value",
             "managedDeviceOwnerType": "company",
             "operatingSystem": "Operating System value",
             "complianceState": "compliant",
             "managementAgent": "mdm",
             "osVersion": "Os Version value",
             "azureADRegistered": true,
             "deviceEnrollmentType": "userEnrollment",
             "azureADDeviceId": "Azure ADDevice Id value",
             "deviceRegistrationState": "registered",
             "isEncrypted": true,
             "userPrincipalName": "User Principal Name Value ",
             "model": "Model Value",
             "manufacturer": "Manufacturer Value",
             "userDisplayName": "User Display Name Value",
             "managedDeviceName": "Managed Device Name Value"
         }
     ]
 }
PS! Remove any sample response output from schema if values will be null or missing from your output. For example I needed to remove the configurationManagerClientEnabledFeatures from my schema, as this is null in many cases.
Add another Parse JSON action under the get user managed devices action as well:
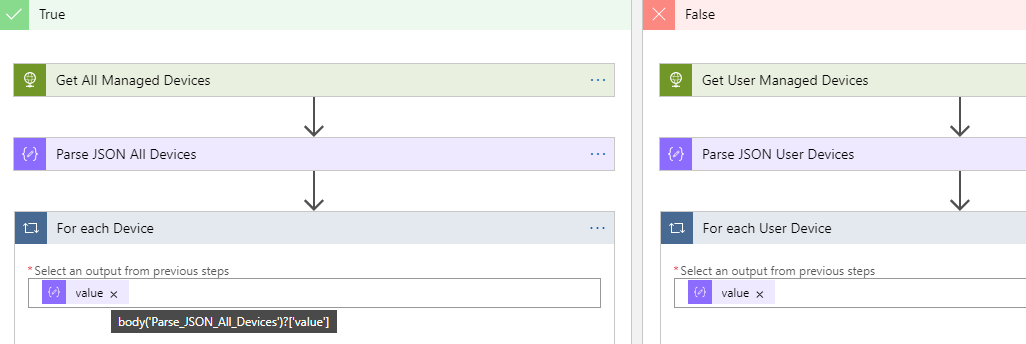
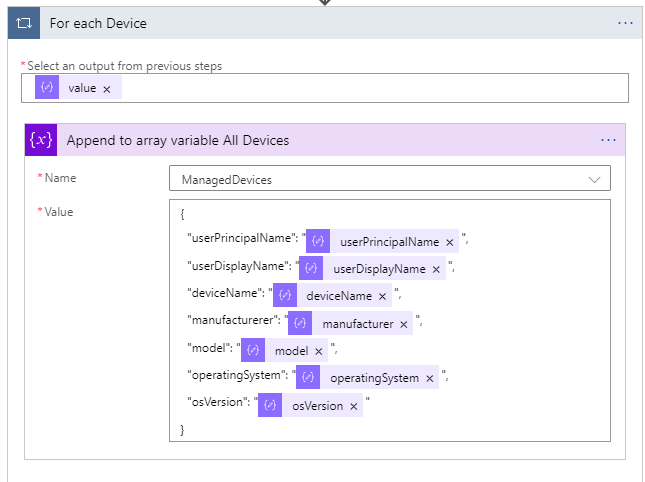
Now we will take that output and do a For Each loop for each value. On both sides of the conditon, add a For Each action, using the value from the previous HTTP action:
Inside that For Each loop, add an Append to Array variable action. In this action we will build a JSON object, returning our chosen attributes (you can change to whatever you want), and selecting the properties from the value that was parsed:
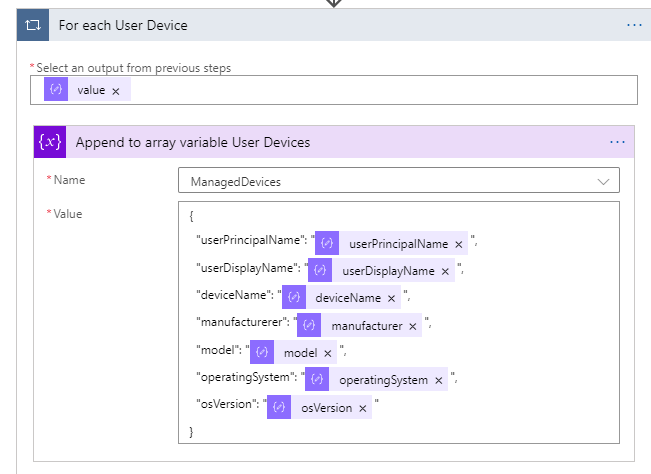
Do the exact same thing for the user devices:
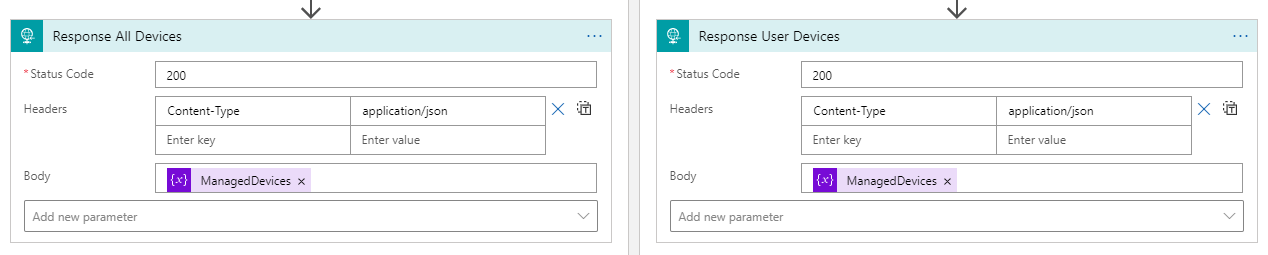
Now, on each side of the condition, add a response action, that will return the ManagedDevices array variable, this will be returned as a JSON som set the Content-Type to application/json:
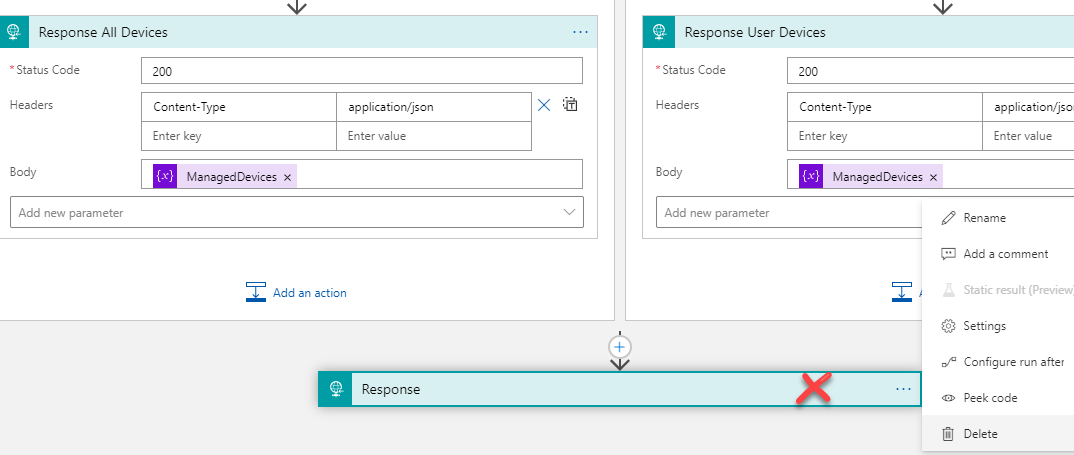
Finally, remove the default response action that is no longer needed:
The complete Logic App should look like the following now:
As I mentioned earlier, we’ll get to the filtering parts later, but now it’s time for some testing.
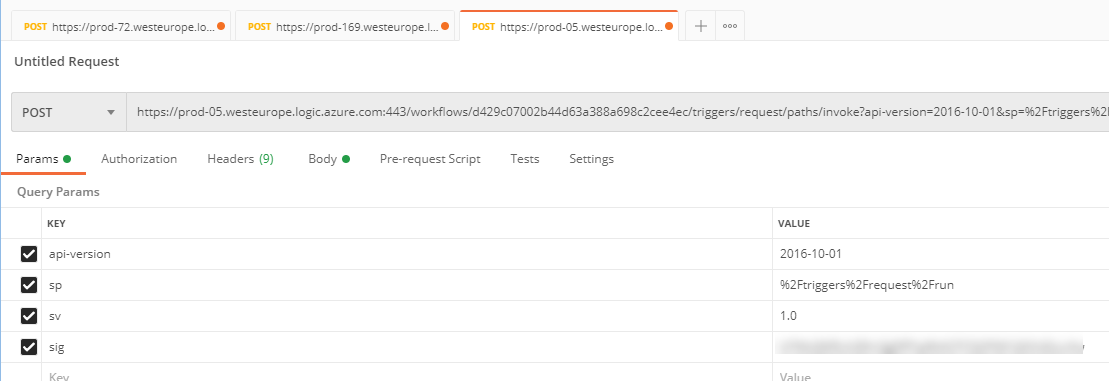
Let’s test this Logic App now with Postman. Copy the HTTP POST URL:
And paste it to Postman, remember to change method to POST:
You can now click Send, and the Logic App will trigger, and should return all your managed devices.
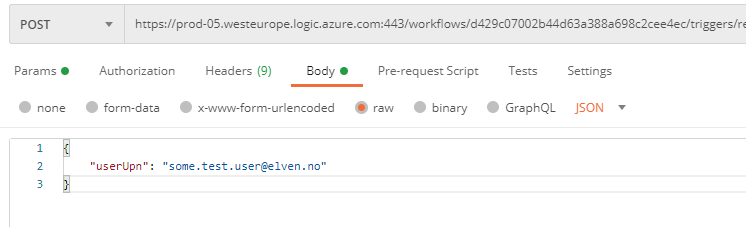
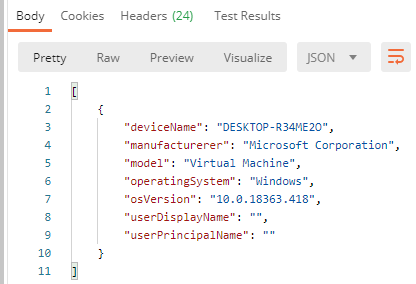
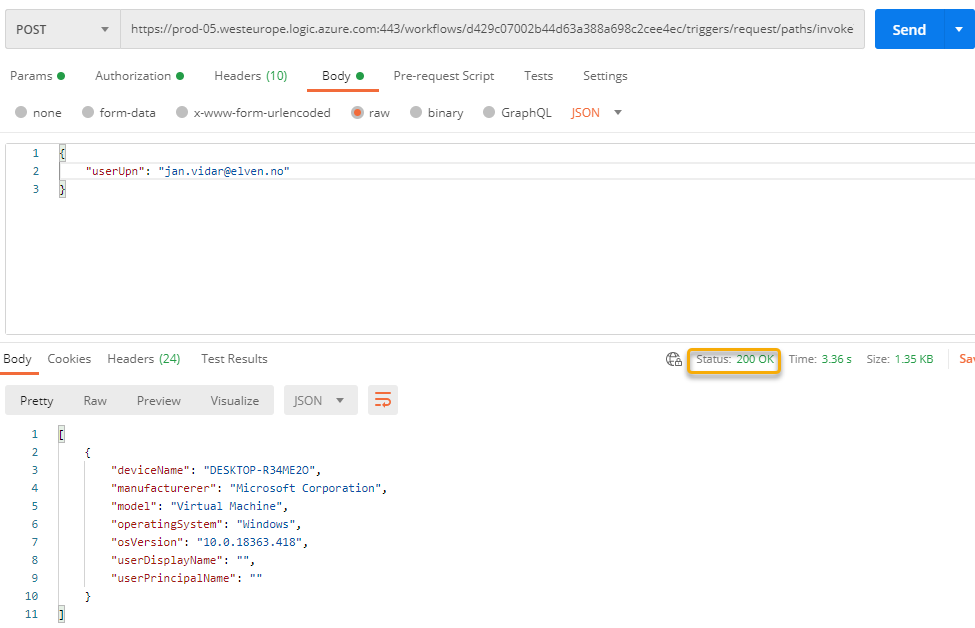
If you want a specific users’ managed devices, then you need to go to the Body parameter, and add like the following with an existing user principal name in your organization:
You should then be able to get this users’ managed devices, for example for my test user this was just a virtual machine with Window 10:
And I can verify a successful run from the Logic App history:
Summary so far
We’ve built a Logic App that uses it’s own identity (User Assigned Managed Identity) to access the Microsoft Graph API using Application Permissions to get managed devices for all users or a selected user by UPN. Now it’s time to exposing this Logic App as an API son end users can call this securely using Azure AD OAuth.
Building the Logic App API
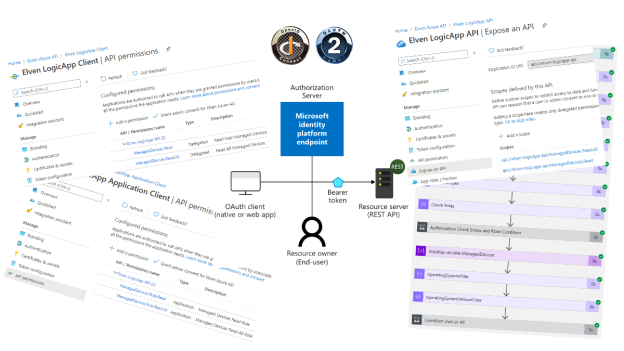
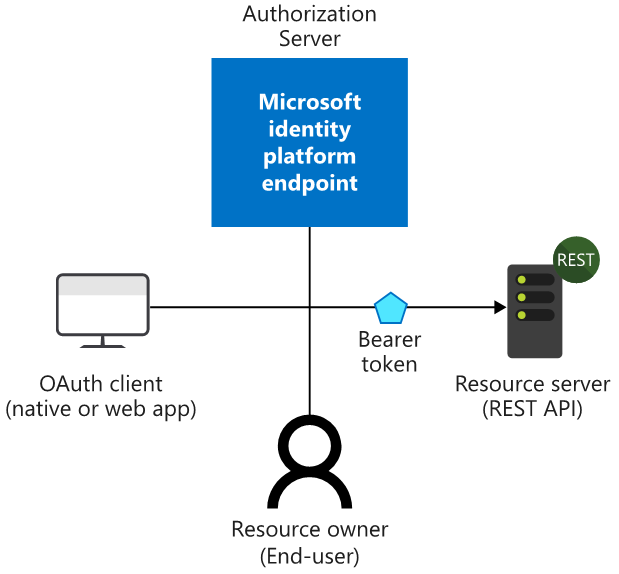
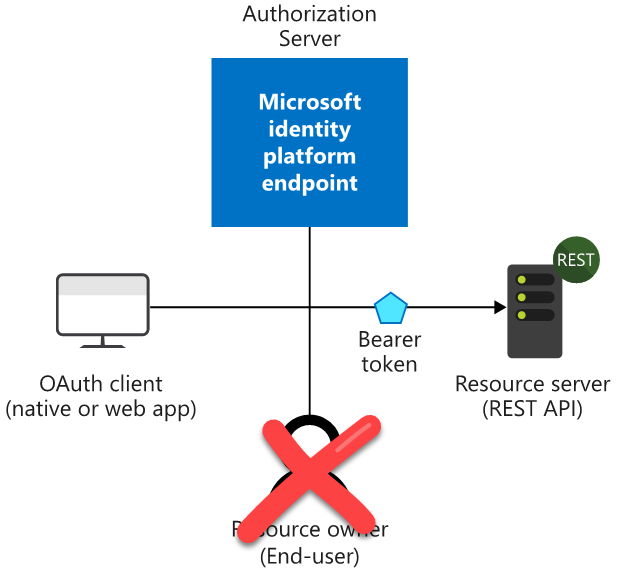
When exposing the Logic App as an API, this will be the resource that end users will access and call as a REST API. Consider the following diagram showing the flow for OpenID Connect and OAuth, where Azure AD will be the Authorization Server from where end users can request access tokens where the audience will be the Logic App resource:
Our next step will be to create Azure AD App Registrations, and we will start with the App Registration for the resource API.
Creating App Registration for Logic App API
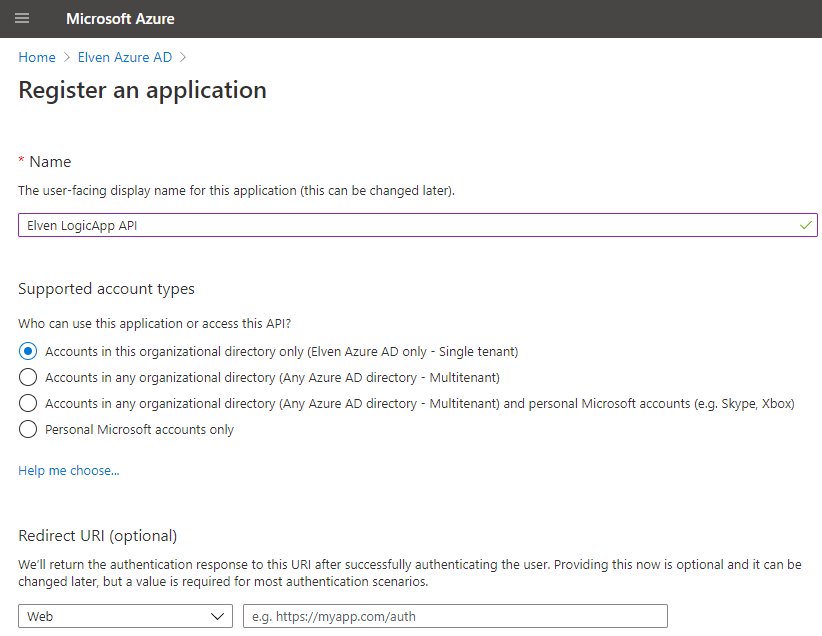
In your Azure AD tenant, create a new App Registration, and call it something like (YourName) LogicApp API:
I will use single tenant for this scenario, leave the other settings as it is and create.
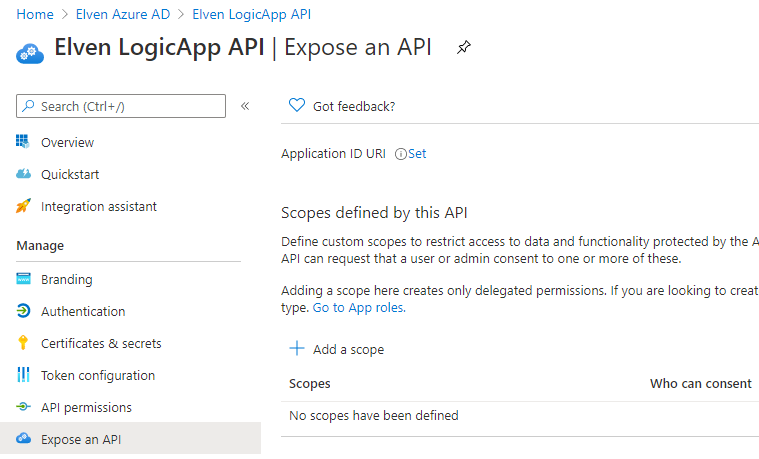
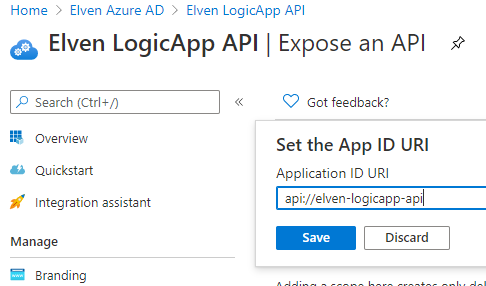
Next, go to Expose an API:
Click on Set right next to Application ID URI, and save the App ID URI to your choice. You can keep the GUID if you want, but you can also type any URI value you like here (using api:// or https://). I chose to set the api URI to this:
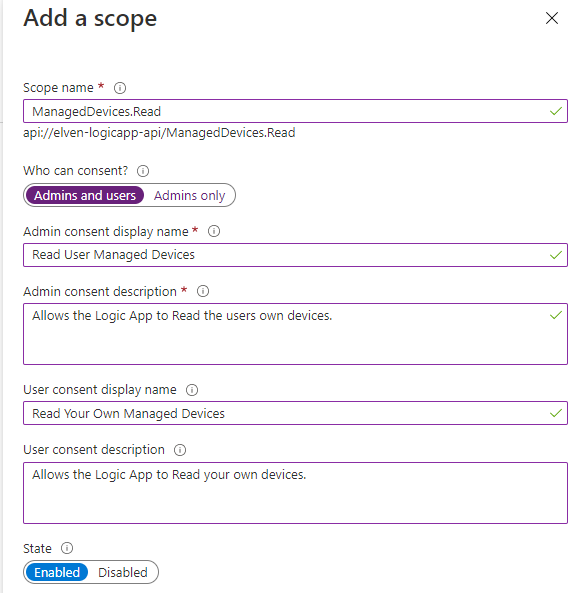
Next we need to add scopes that will be the permissions that delegated end users can consent to. This will be the basis of the authorization checks we can do in the Logic App later.
Add a scope with the details shown below. This will be a scope end users can consent to themselves, but it will only allow them to read their own managed devices:
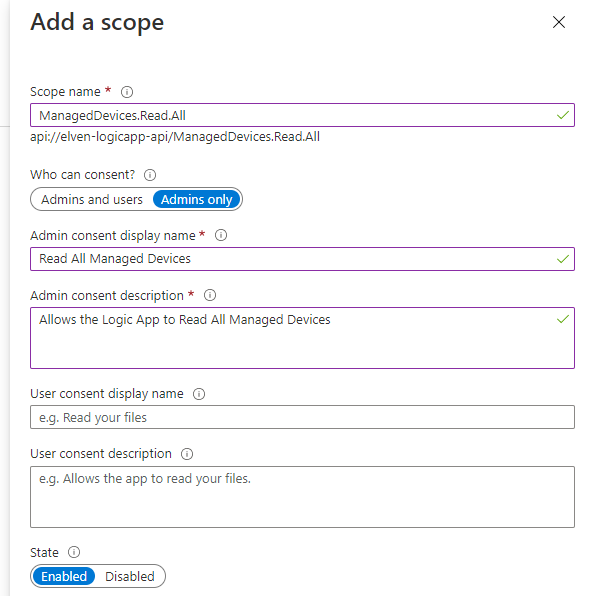
Next, add another Scope, with the following details. This will be a scope that only Admins can consent to, and will be authorized to read all devices:
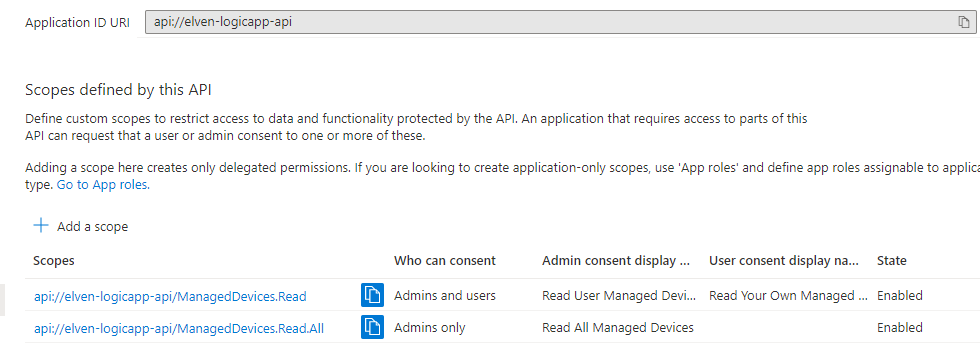
You should now have the following scopes defined:
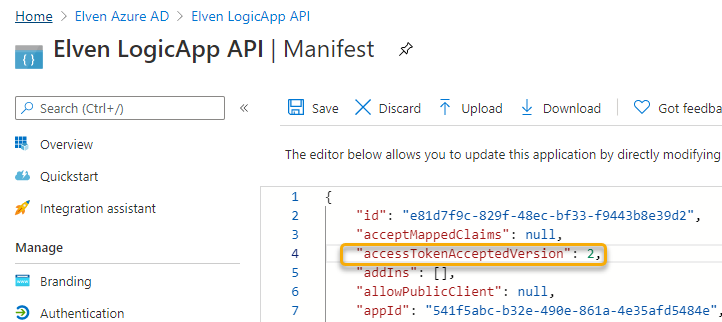
Next, go to the Manifest and change the accessTokenAcceptedVersion from null to 2, this will configure so that Tokens will use the OAuth2 endpoints:
That should be sufficient for now. In the next section we will prepare for the OAuth client.
Create App Registration for the Logic App Client
I choose to create a separate App Registration in Azure AD for the Logic App Client. This will represent the OAuth client that end users will use for OAuth authentication flows and requesting permissions for the Logic App API. I could have configured this in the same App Registration as the API created in the previous section, but this will provide better flexibility and security if I want to share the API with other clients also later, or if I want to separate the permission grants between clients.
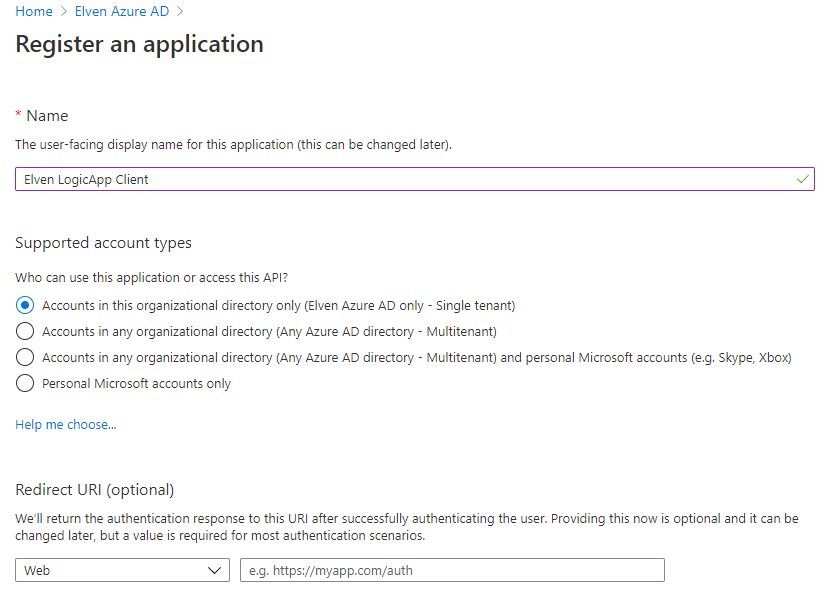
Go to App Registrations in Azure AD, and create a new registration calling it something like (yourname) LogicApp Client:
Choose single tenant and leave the other settings for now.
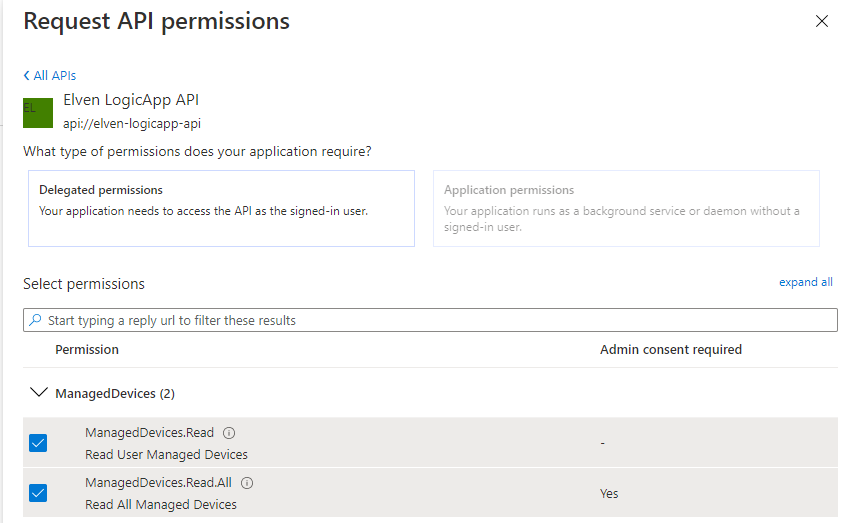
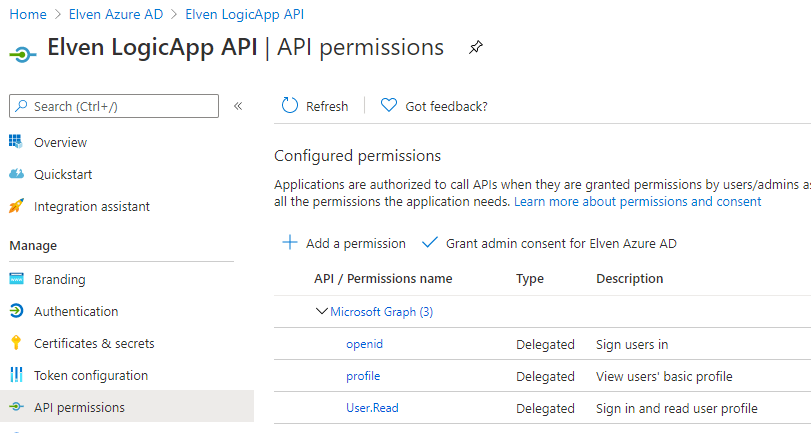
After registering, go to API permissions, and click on Add a permission. From there you can browse to “My APIs” and you should be able to locate the (yourname) Logic API. Select to add the delegated permissions as shown below:
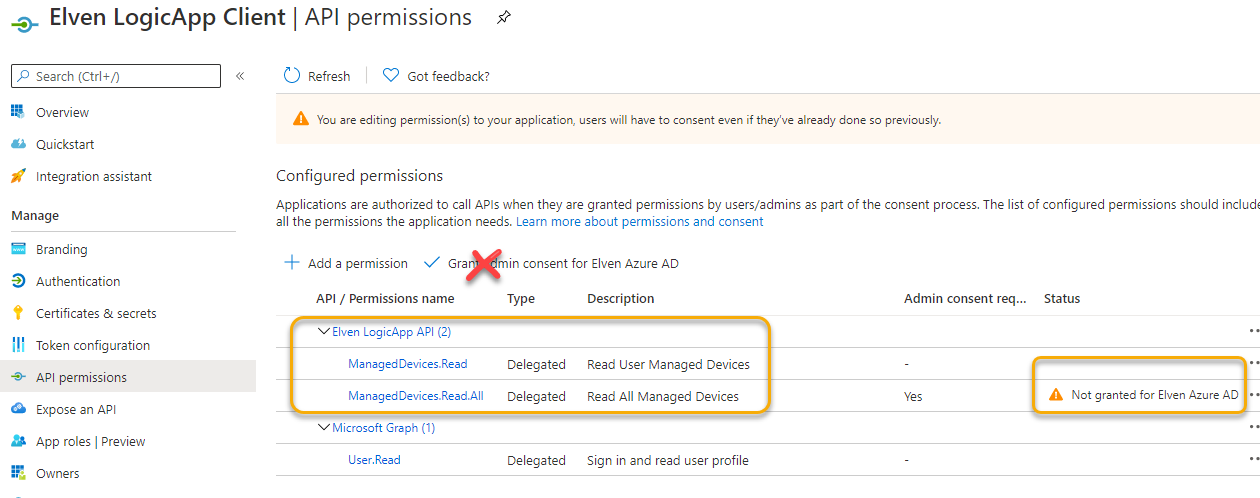
These delegated permissions reflect the scopes we defined in the API earlier. Your App registration and API permission should now look like below. NB! Do NOT click to Grant admin consent for your Azure AD! This will grant consent on behalf of all your users, which will work against our intended scenario later.
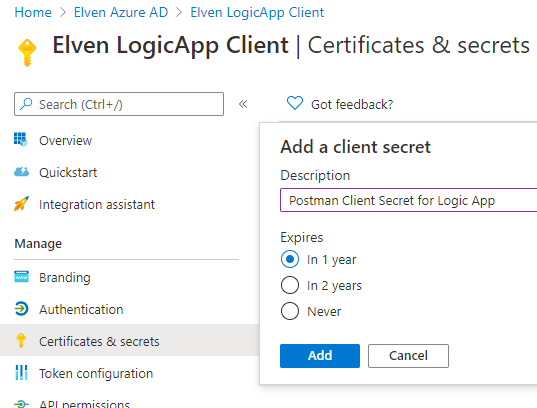
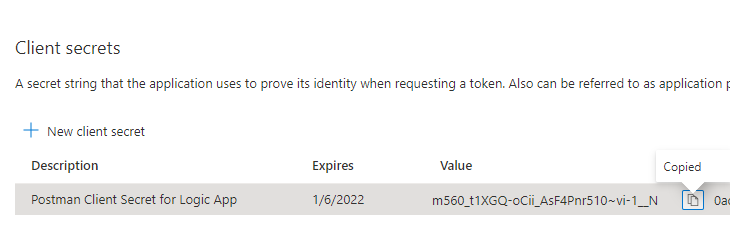
Next, we need to provide a way for clients to authenticate using Oauth flows, so go to the Certificates & secrets section. Click to create a Client secret, I will name my secret after where I want to use it for testing later (Postman):
Make sure you copy the secret value for later:
(Don’t worry, I’ve already invalidated the secret above and created a new one).
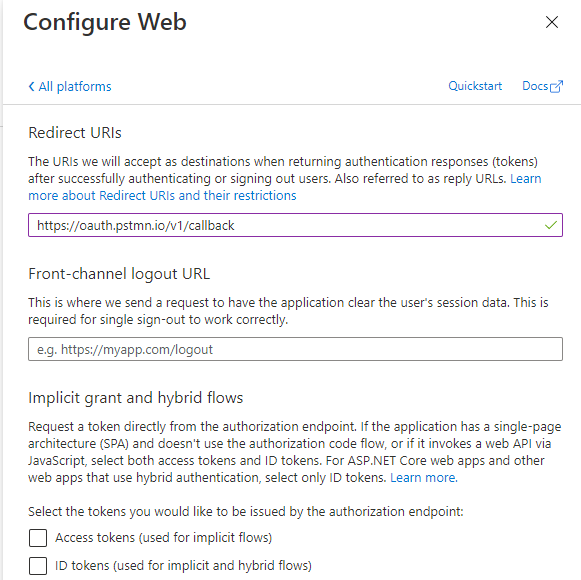
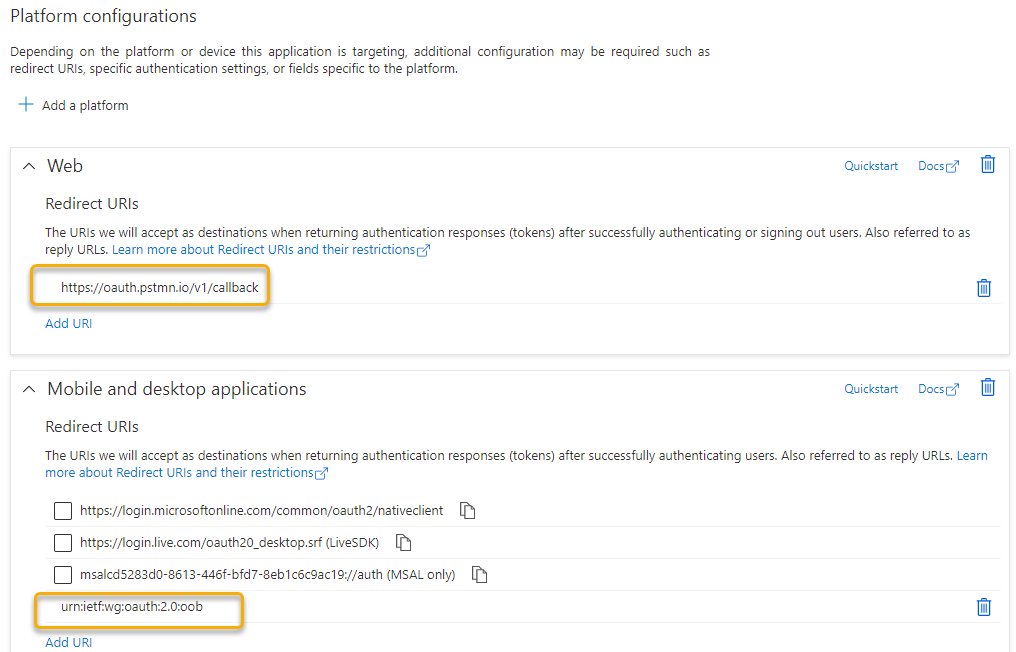
Next, go to Authentication. We need to add a platform for authentication flows, so click Add a platform and choose Web. For using Postman later for testing, add the following as Redirect URI: https://oauth.pstmn.io/v1/callback
Next, we will also provide another test scenario using PowerShell or Azure CLI client, so click on Add a platform one more time, this time adding Mobile desktop and apps as platform and use the following redirect URI: urn:ietf:wg:oauth:2.0:oob
Your platform configuration should now look like this:
Finally, go to advanced and set yes to allow public client flows, as this will aid in testing from PowerShell or Azure CLI clients later:
Now that we have configured the necessary App registrations, we can set up the Azure AD OAuth Authorization Policy for the Logic App.
Configuring Azure AD OAuth Authorization Policy for Logic App
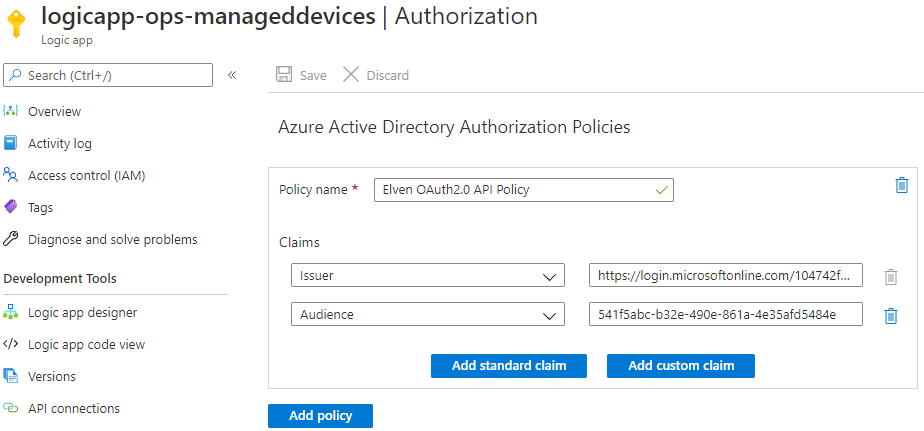
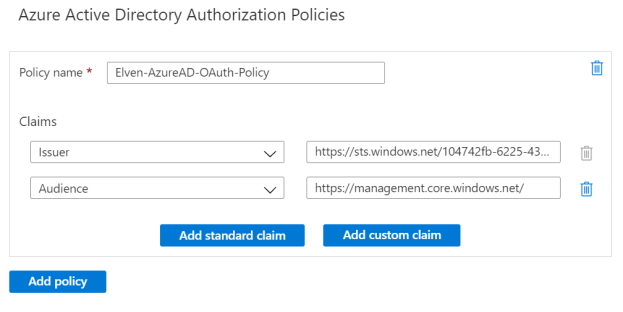
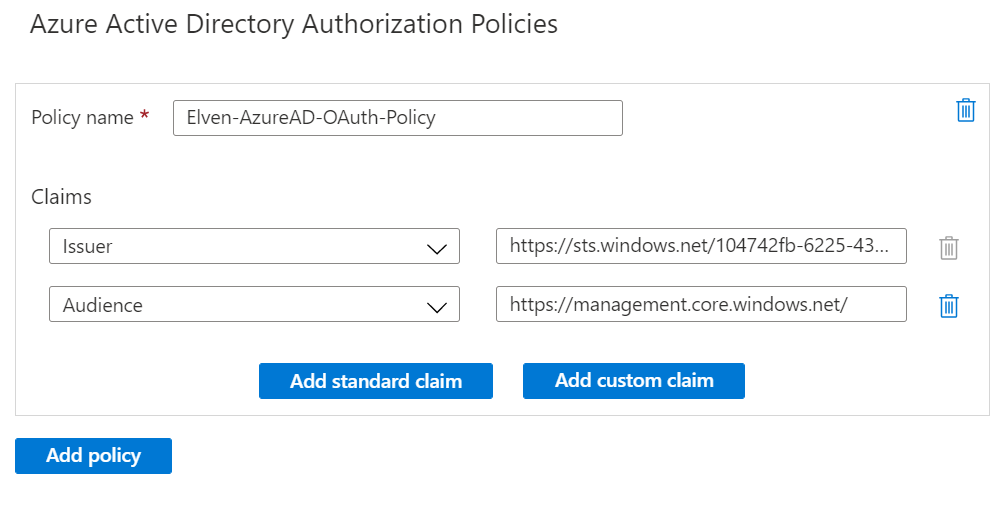
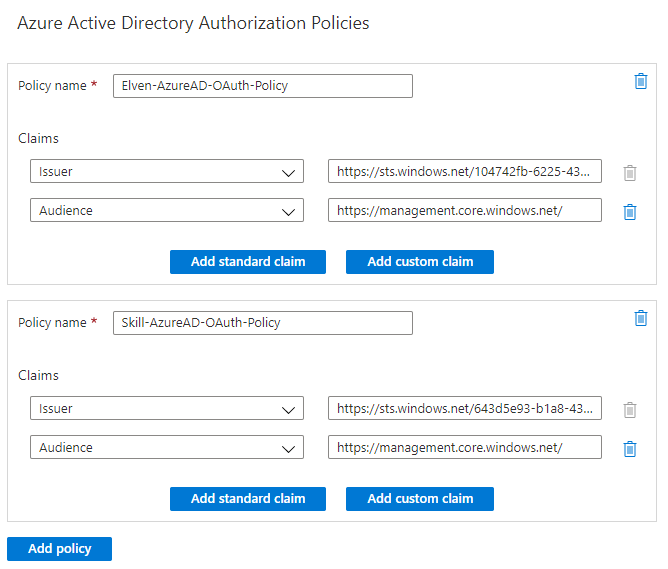
Back in the Logic App, create an Azure AD Authorization Policy with issuer and audience as shown below:
Audience: {app id for logic app api app registration}
We are using the v2.0 endpoint as we configured in the manifest of the App Registration that accessTokenAcceptedVersion should be 2. (as opposed to v1.0 issuer that would be in the format https://sts.windows.net/{tenantId}/). And the Audience claim would be our configured API App ID. (for v1.0 the audience would be the App ID URI, like api://elven-logicapp-api).
Save the Logic App, and we can now start to do some testing where we will use the client app registration to get an access token for the Logic App API resource.
Testing with Postman Client
The first test scenario we will explore is using Postman Client and the Authorization Code flow for getting the correct v2.0 Token.
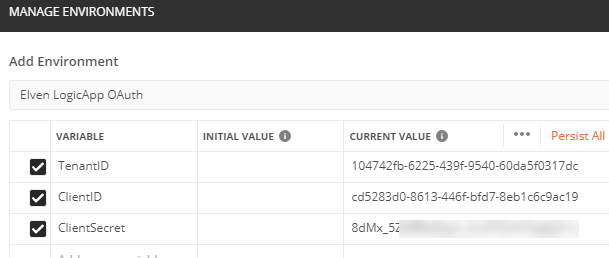
A recommended practice when using Postman and reusing variable values is to create an Environment. I’ve created this Environment for storing my Tenant ID, Client ID (App ID for the Client App Registration) and Client Secret (the secret I created for using Postman):
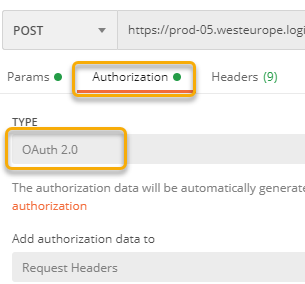
Previously in this blog article, we tested the Logic App using Postman. On that request, select the Authorization tab, and set type to OAuth 2.0:
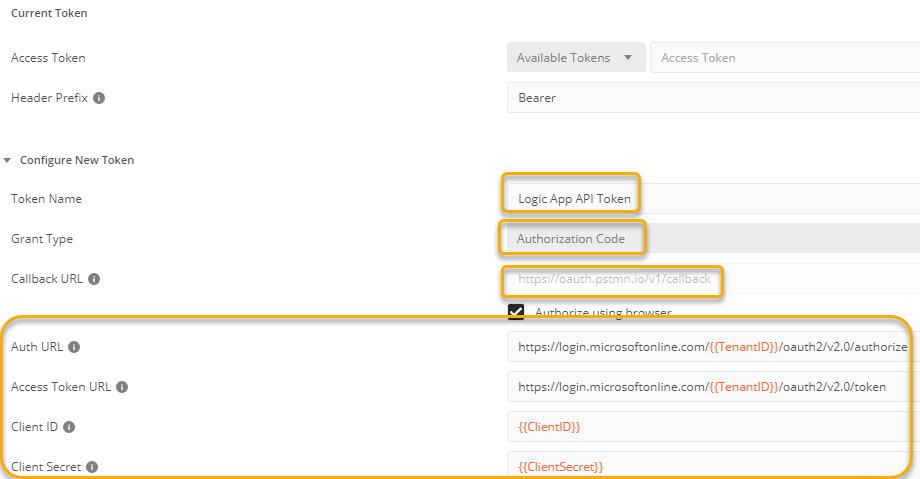
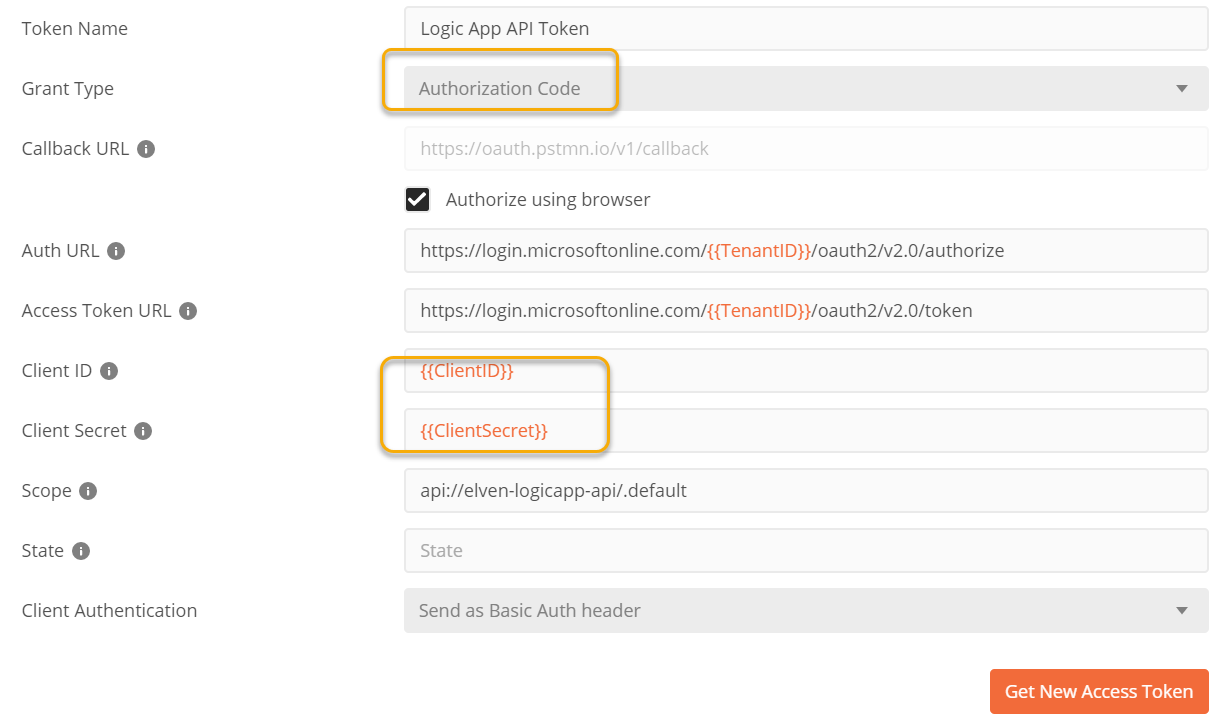
Next, under Token configuration add the values like the following. Give the Token a recognizable name, this is just for Postman internal refererence. Make sure that the Grant Type is Authorization Code. Note the Callback URL, this is the URL we configured for the App registration and Callback Url. In the Auth and Access Token URL, configure the use of the v2.0 endpoints, using TenantID from the environment variables. (Make sure to set the current environment top right). And for Client ID and Client Secret these will also refer to the environment variables:
One important step remains, and that is to correctly set the scope for the access token. Using something like user.read here will only produce an Access Token for Microsoft Graph as audience. So we need to change to the Logic App API, and the scope for ManagedDevices.Read in this case:
Let’s get the Access Token, click on the Get New Access Token button:
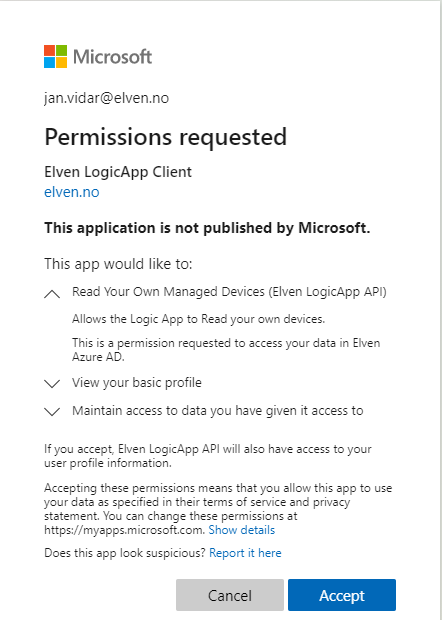
A browser window launches, and if you are not already logged in, you must log in first. Then you will be prompted to consent to the permission as shown below. The end user is prompted to consent for the LogicApp API, as well as basic OpenID Connect consents:
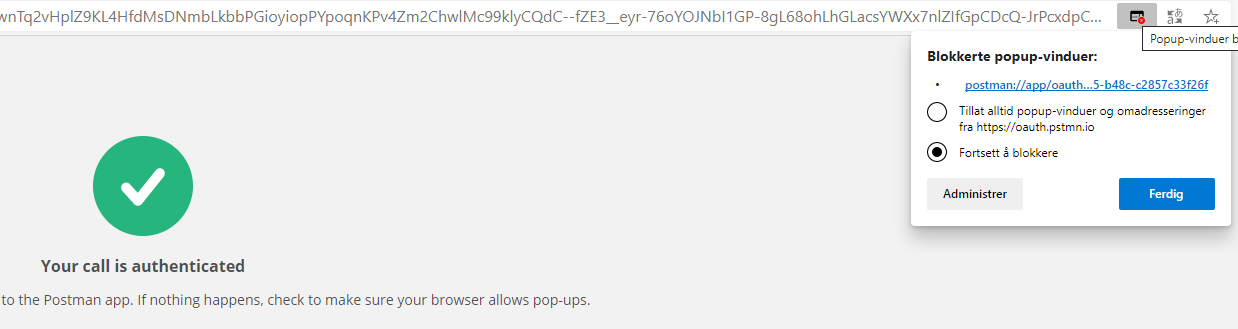
After accepting, a popup will try to redirect you to Postman, so make sure you don’t block that:
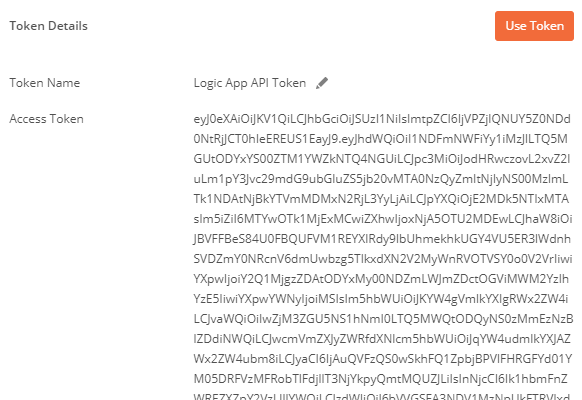
Back in Postman, you will see that we have got a new Access Token:
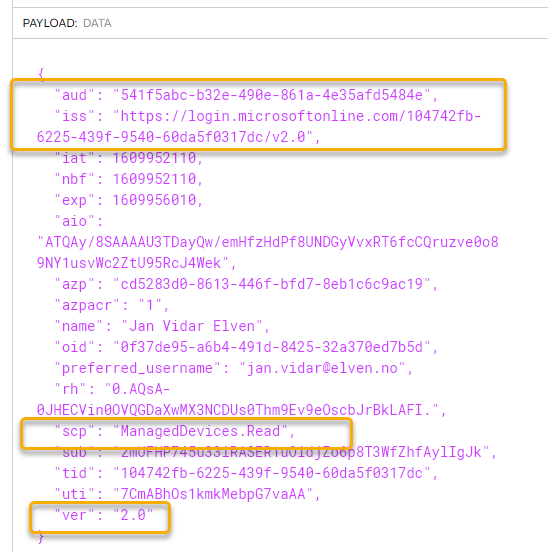
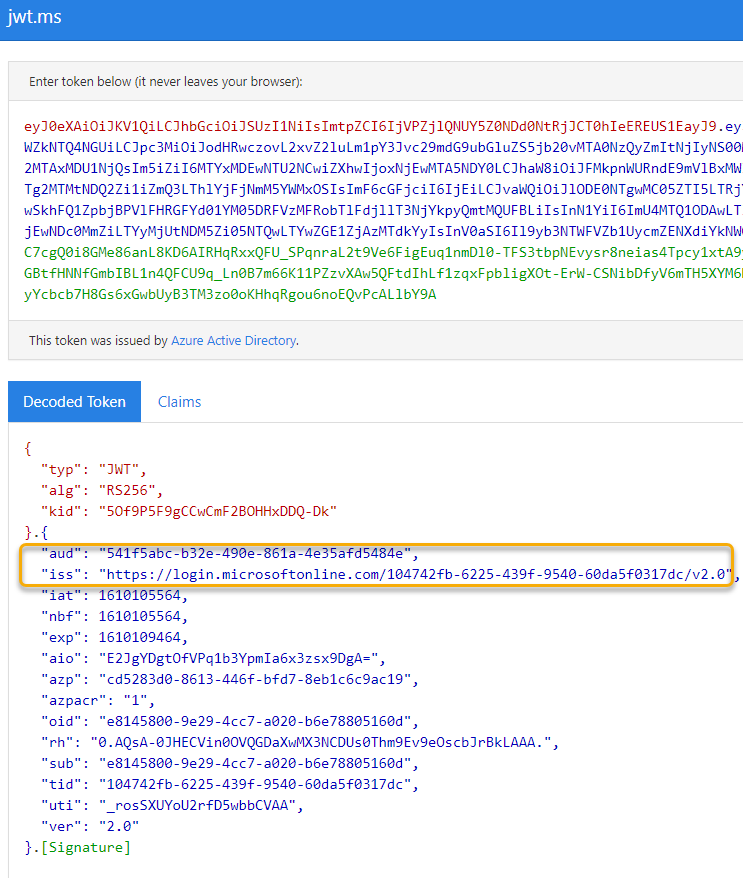
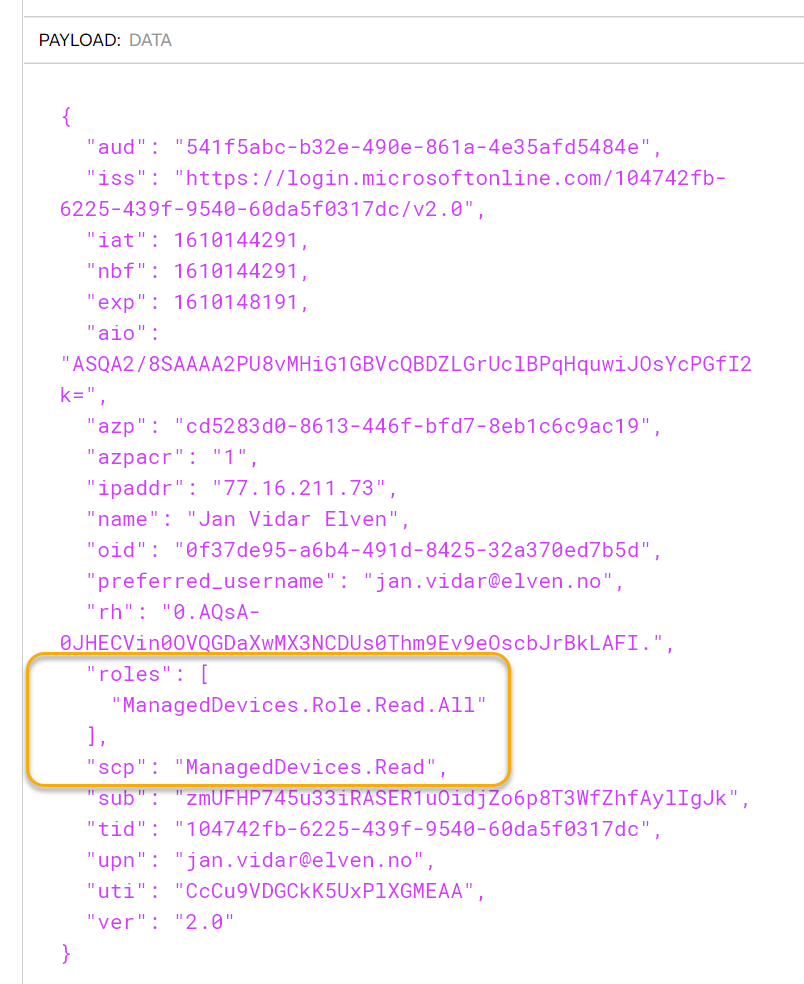
Copy that Access Token, and paste it into a JWT debugger like jwt.ms or jwt.io. You should see in the data payload that the claims for audience and issuer is the same values we configured in the Logic App Azure AD OAuth policy:
Note also the token version is 2.0.
Click to use the Token in the Postman request, it should populate this field:
Before testing the request, remember to remove the SAS query parameters from the request, so that sv, sp and sig are not used with the query for the Logic App:
Now, we can test. Click Send on the Request. It should complete successfully with at status of 200 OK, and return the managed device details:
Let’s add to the permission scopes, by adding the ManagedDevices.Read.All:
Remember just to have a blank space between the scopes, and then click Get New Access Token:
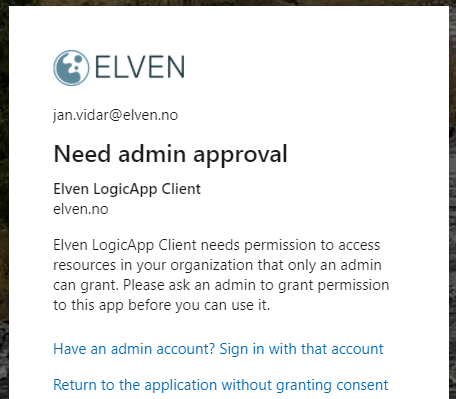
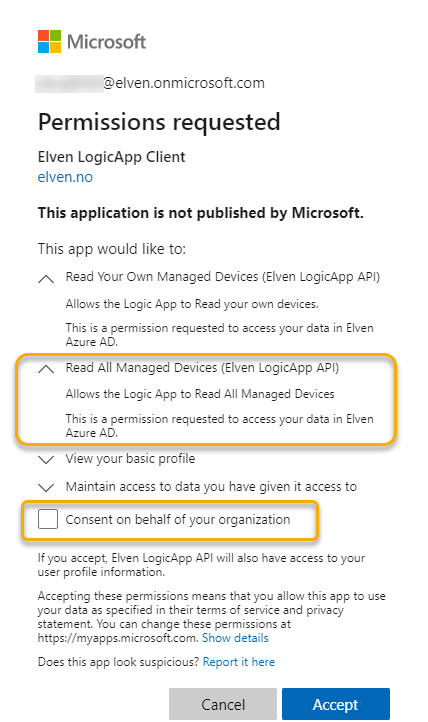
If I’m logged on with a normal end user, I will get the prompt above that I need admin privileges. If I log in with an admin account, this will be shown:
Note that I can now do one of two actions:
I can consent only on behalf of myself (the logged in admin user), OR..
I can consent on behalf of the organization, by selecting the check box. This way all users will get that permission as well.
Be very conscious when granting consents on behalf of your organization.
At this point the Logic App will authorize if the Token is from the correct issuer and for the correct audience, but the calling user can still request any managed device or all devices. Before we get to that, I will show another test scenario using a public client like PowerShell.
Testing with PowerShell and MSAL.PS
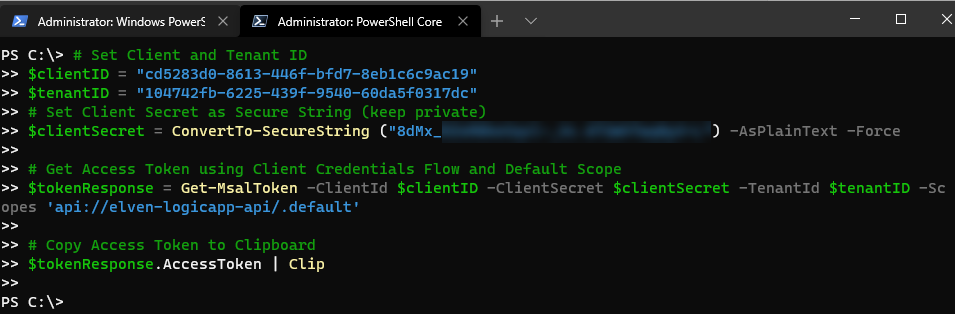
MSAL.PS is a perfect companion for using MSAL (Microsoft Authentication Library) to get Access Tokens in PowerShell. You can install MSAL.PS from PowerShellGallery using Install-Module MSAL.PS.
The following commands show how you can get an Access Token using MSAL.PS:
# Set Client and Tenant ID
$clientID = "cd5283d0-8613-446f-bfd7-8eb1c6c9ac19"
$tenantID = "104742fb-6225-439f-9540-60da5f0317dc"
# Get Access Token using Interactive Authentication for Specified Scope and Redirect URI (Windows PowerShell)
$tokenResponse = Get-MsalToken -ClientId $clientID -TenantId $tenantID -Interactive -Scope 'api://elven-logicapp-api/ManagedDevices.Read' -RedirectUri 'urn:ietf:wg:oauth:2.0:oob'
# Get Access Token using Interactive Authentication for Specified Scope and Redirect URI (PowerShell Core)
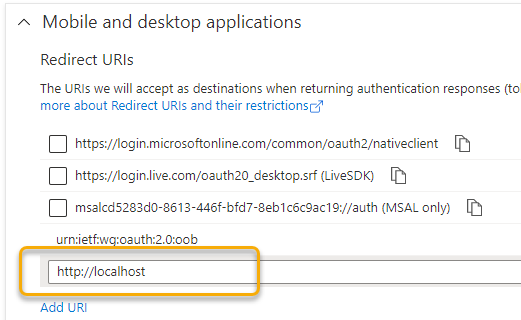
$tokenResponse = Get-MsalToken -ClientId $clientID -TenantId $tenantID -Interactive -Scope 'api://elven-logicapp-api/ManagedDevices.Read' -RedirectUri 'http://localhost'
MSAL.PS can be used both for Windows PowerShell, and for PowerShell Core, so in the above commands, I show both. Note that the redirect URI for MSAL.PS on PowerShell Core need to be http://localhost. You also need to add that redirect URI to the App Registration:
Running the above command will prompt an interactive logon, and should return a successful response saved in the $tokenResponse variable.
We can verify the response, for example checking scopes or copying the Access Token to the clipboard so that we can check the token in a JWT debugger:
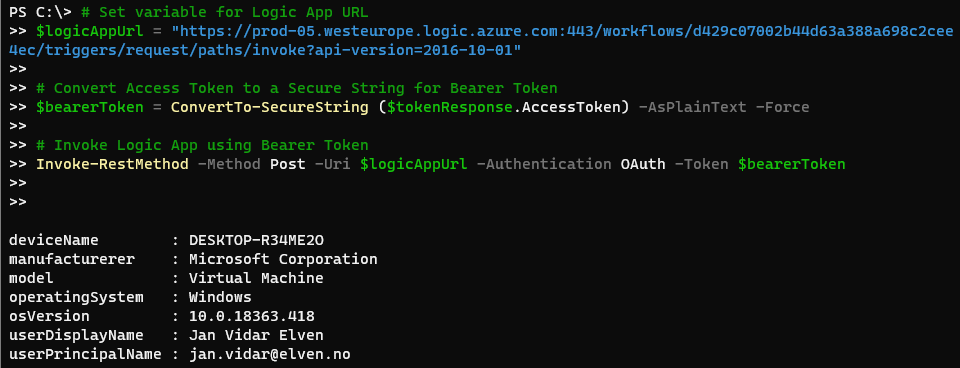
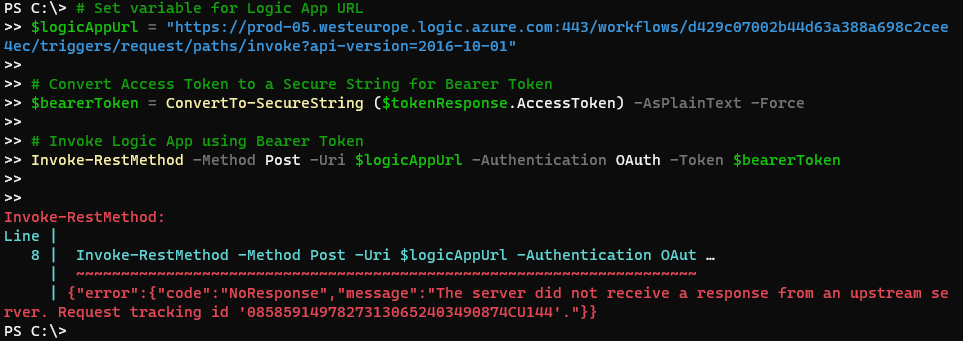
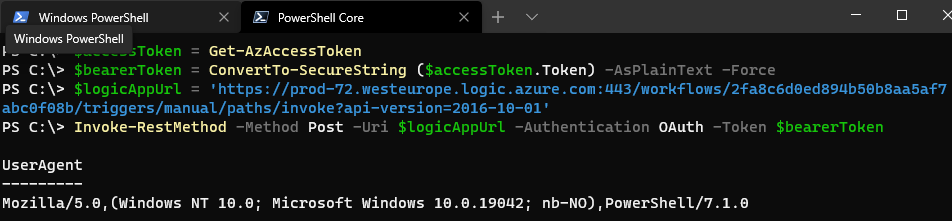
In the first blog post of this article series I covered how you can use Windows PowerShell and Core to use Invoke-RestMethod for calling the Logic App, here is an example where I call my Logic App using the Access Token (in PowerShell Core):
# Set variable for Logic App URL
$logicAppUrl = "https://prod-05.westeurope.logic.azure.com:443/workflows/d429c07002b44d63a388a698c2cee4ec/triggers/request/paths/invoke?api-version=2016-10-01"

# Convert Access Token to a Secure String for Bearer Token
$bearerToken = ConvertTo-SecureString ($tokenResponse.AccessToken) -AsPlainText -Force

# Invoke Logic App using Bearer Token
Invoke-RestMethod -Method Post -Uri $logicAppUrl -Authentication OAuth -Token $bearerToken
And I can verify that it works:
Great. I now have a couple of alternatives for calling my Logic App securely using Azure AD OAuth. In the next section we will get into how we can do authorization checks inside the Logic App.
Authorization inside Logic App
While the Logic App can have an authorization policy that verifies any claims like issuer and audience, or other custom claims, we cannot use that if we want to authorize inside the logic app based on scopes, roles etc.
In this section we will look into how we can do that.
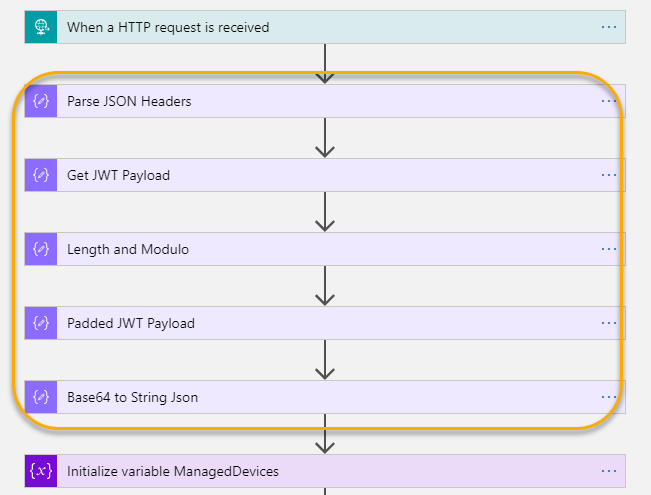
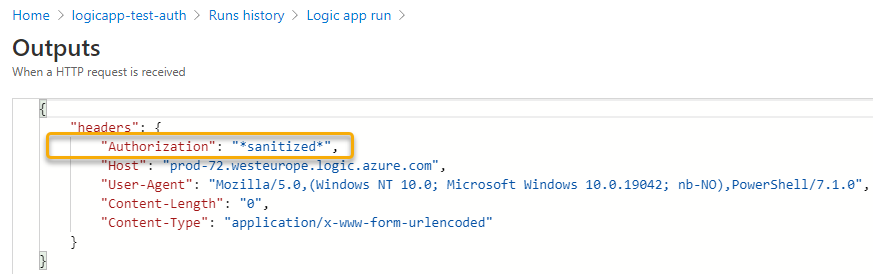
Include Authorization Header in Logic Apps
First we need to include the Authorization header from the OAuth access token in the Logic App. To do this, open the Logic App in code view, and add the operationOptions to IncludeAuthorizationHeadersInOutputs for the trigger like this:
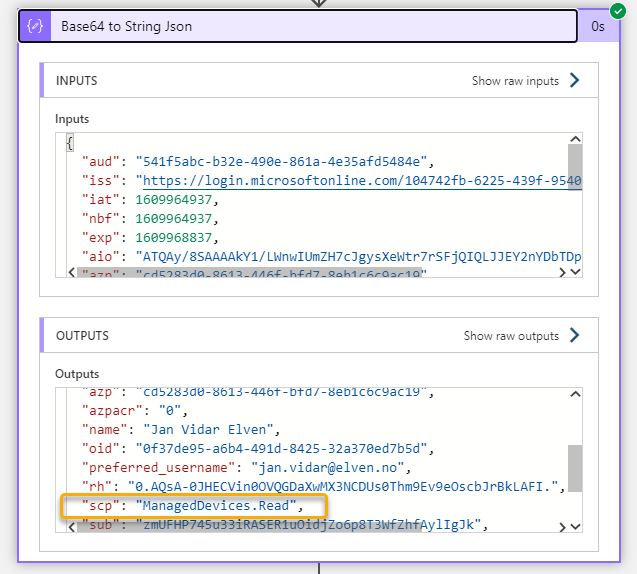
After applying the above steps, I can test the Logic App again, and get the details of the decoded JWT token, for example of interest will be to check the scopes:
Implement Logic to check the Scopes
When I created the LogicApp API app registration, I added two scopes: ManagedDevices.Read and ManagedDevices.Read.All. The authorization logic I want to implement now is to only let users calling the Logic App and that has the scope ManagedDevices.Read.All to be able to get ALL managed devices, or to get managed devices other than their own devices.
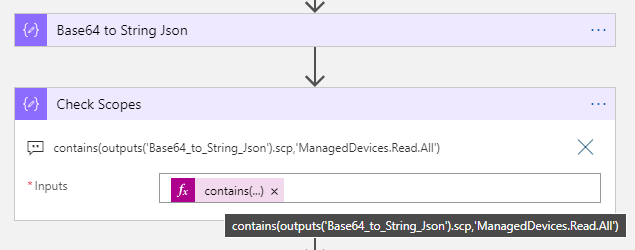
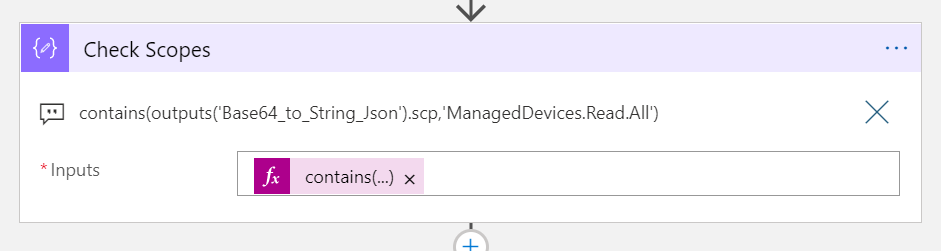
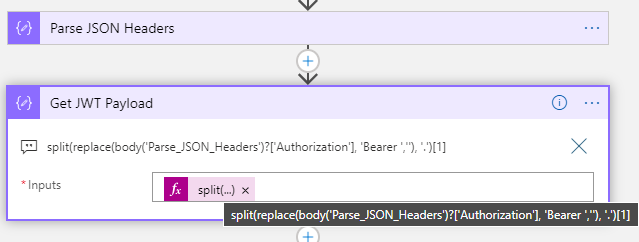
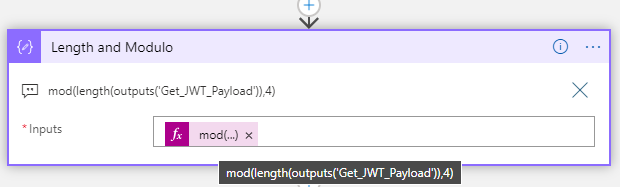
The first step will be to check if the JWT payload for scope “scp” contains the ManagedDevices.Read.All. Add a Compose action with the following expression:
This expression will return either true or false depending on the scp value.
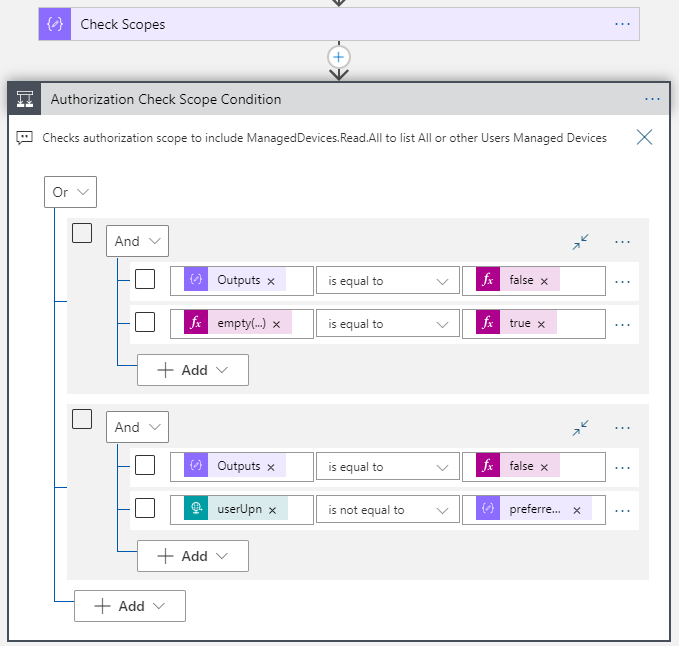
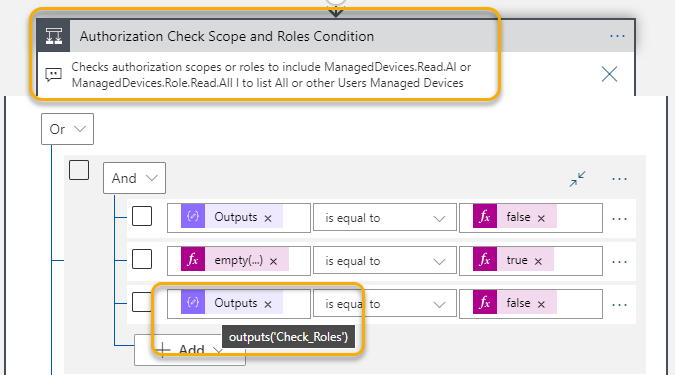
Next after this action, add a Condition action, where we will do some authorization checks. I have created two groups of checks, where one OR the other needs to be true.
Here are the details for these two groups:
Group 1 (checks if scp does not contain ManagedDevices.Read.All and calling user tries to get All managed devices):
Outputs('Check_Scopes') = false
empty(triggerBody()?['userUpn']) = true
Group 2 (checks if scp does not contain ManagedDevices.Read.All, and tries to get managed devices for another user than users’ own upn):
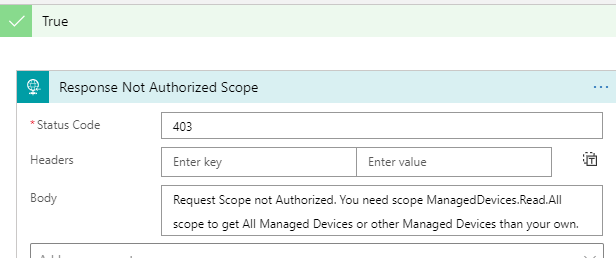
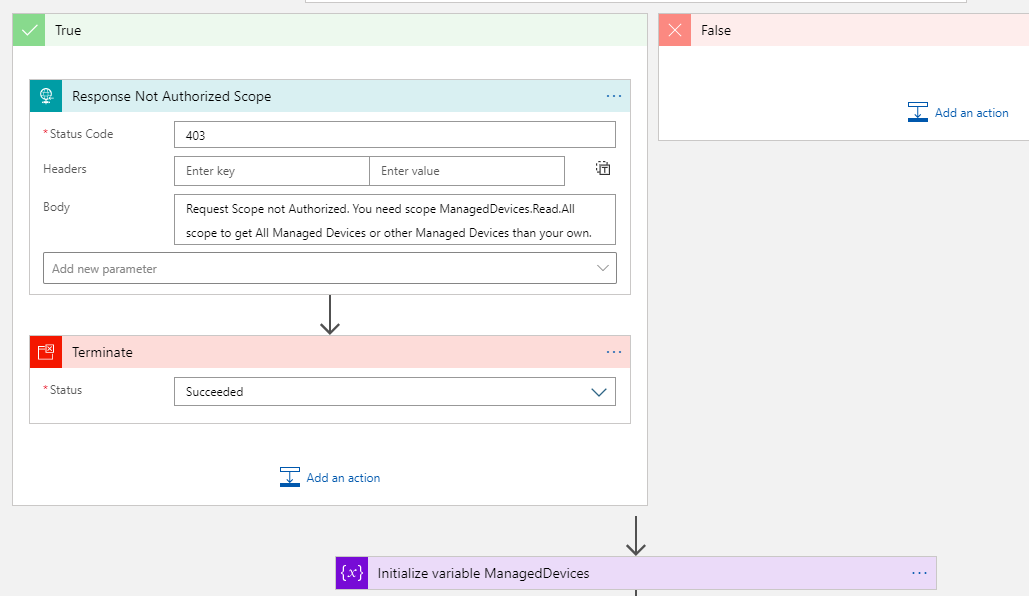
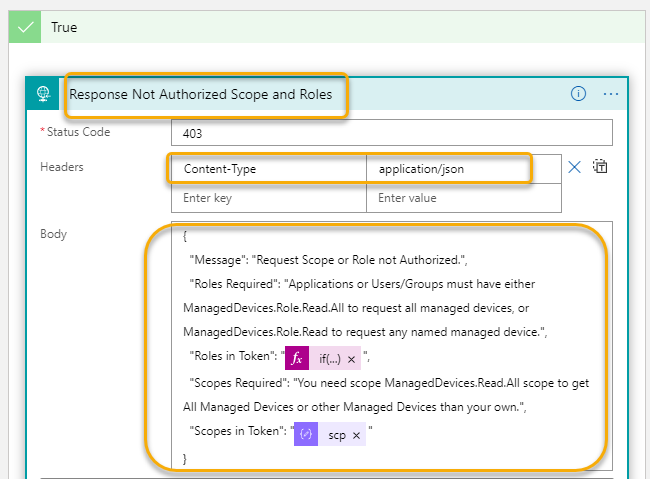
If either of those two groups is True, then we know that the calling user tries to do something the user is not authorized to do. This is something we need to give a customized response for. So inside the True condition, add a new Response action with something like the following:
I’m using a status code of 403, meaning that the request was successfully authenticated but was missing the required authorization for the resource.
Next, add a Terminate action, so that the Logic App stops with a successful status. Note also that on the False side of the condition, I leave it blank because I want it to proceed with the next steps in the Logic Apps.
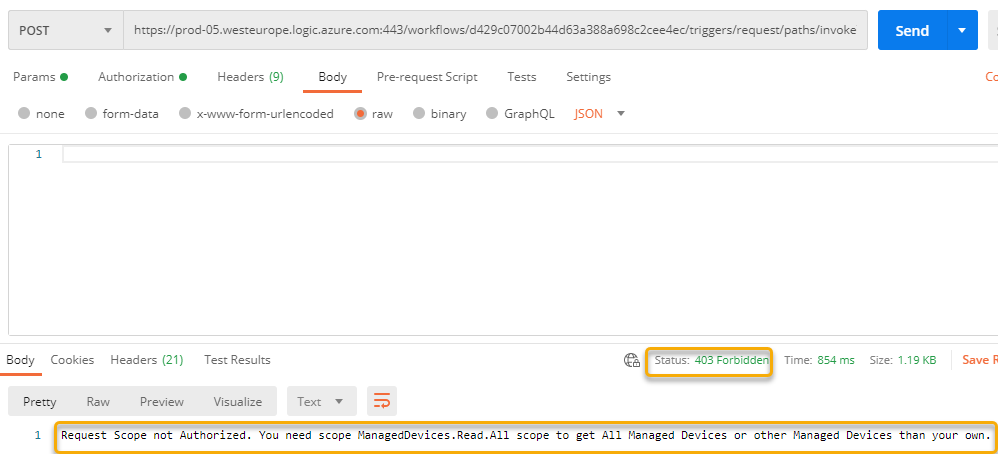
Test the Authorization Scope Logic
We can now test the authorization scopes logic implemented above. In Postman, either use an existing Access Token or get a new Token that only include the ManagedDevices.Read scope.
Then, send a request with an empty request body. You should get the following response:
Then, try another test, this time specifying another user principal name than your own, which also should fail:
And then test with your own user principal name, which will match the ‘preferred_username’ claim in the Access Token, this should be successful and return your devices:
Perfect! It works as intended, normal end users can now only request their own managed devices.
Let’s test with an admin account and the ManagedDevices.Read.All scope. In Postman, add that scope, and get a new Access Token:
When logging in with a user that has admin privileges you will now get a Token that has the scope for getting all devices, for which your testing should return 200 OK for all or any users devices:
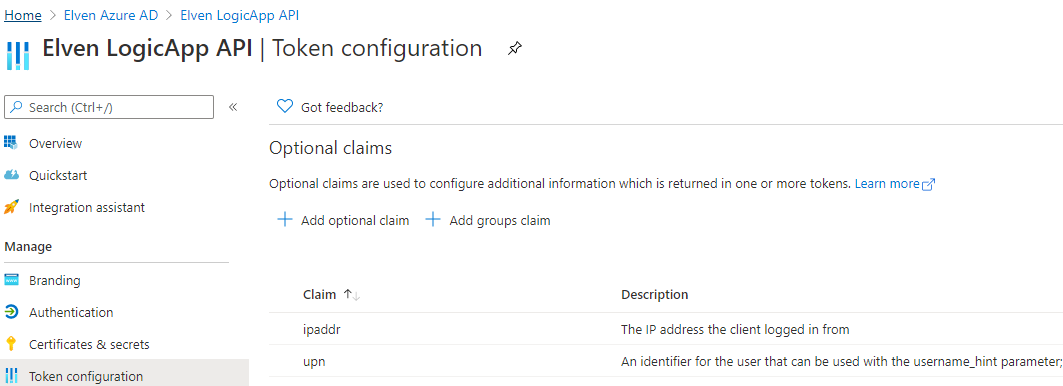
Adding Custom Claims to Access Token
In addition to the default claims and scopes in the Access Token, you can customize a select set of additional claims to be included in the JWT data payload. Since the Access Token is for the resource, you will need to customize this on the App Registration for the LogicApp API.
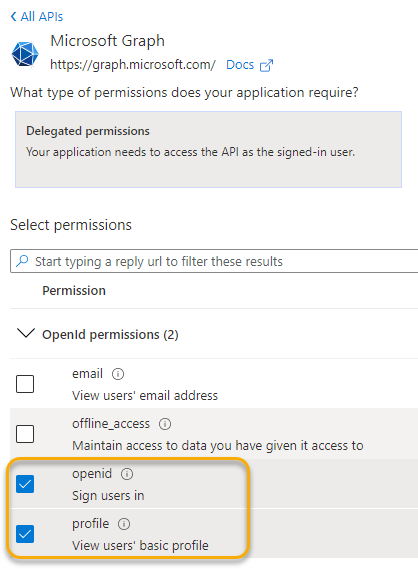
In Azure AD, select the App Registration for the API, and go to API permissions first. You need to add the OpenID scopes first. Add the following OpenID permissions:
Your API App Registration should look like this:
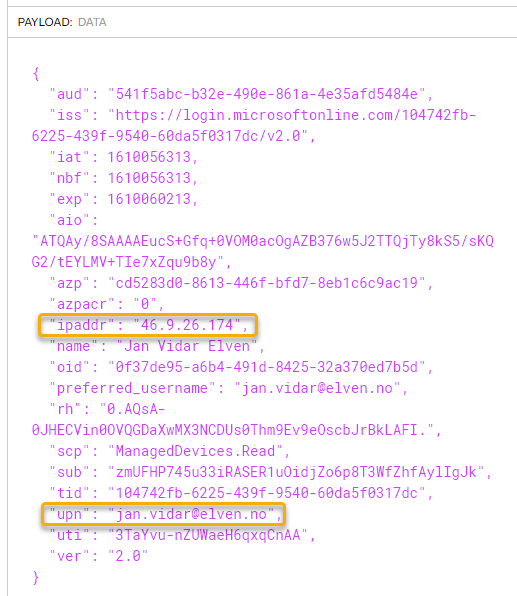
Next, go to Token configuration. Click Add optional claim, and select Access Token. For example you can add the ipaddr and upn claims as I have done below:
Note the optional claims listed for the resource API registration:
Next time I get a new access token, I can see that the claims are there:
Summary of User Authorization so far
What we have accomplished now is that users can get an Access Token for the Logic App API resource. This is the first requirement for users to be able to call the Logic App, that they indeed have a Bearer Token in the Authorization Header that includes the configured issuer and audience.
In my demos I have shown how to get an access token using Postman (Authorization Code Flow) and a Public Client using MSAL.PS. But you can use any kind of Web application, browser/SPA or, Client App, using any programming libraries that either support MSAL or OpenID Connect and OAuth2. Your solution, your choice 😉
After that I showed how you can use scopes for delegated permissions, and how you can do internal authorization logic in the Logic App depending on what scope the user has consented to/allowed to.
We will now build on this, by looking into controlling access and using application roles for principals.
Assigning Users and Restricting Access
One of the most powerful aspects of exposing your API using Microsoft Identity Platform and Azure AD is that you now can control who can access your solution, in this case call the Logic App.
Better yet, you can use Azure AD Conditional Access to apply policies for requiring MFA, devices to be compliant, require locations or that sign-ins are under a certain risk level, to name a few.
Let’s see a couple of examples of that.
Require User Assignment
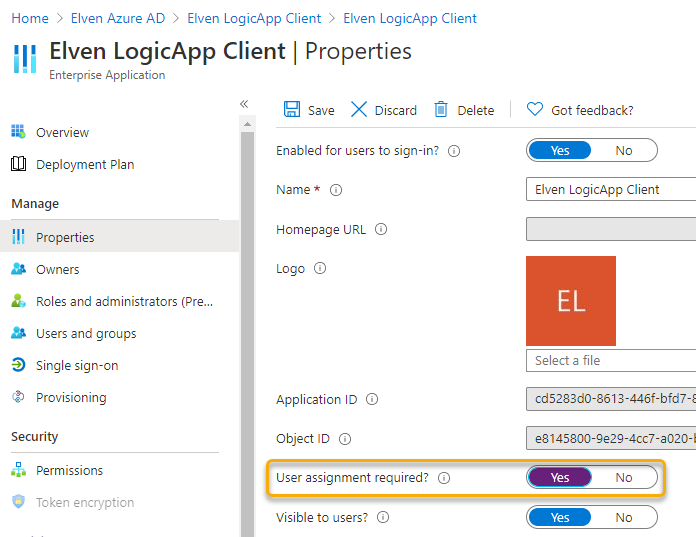
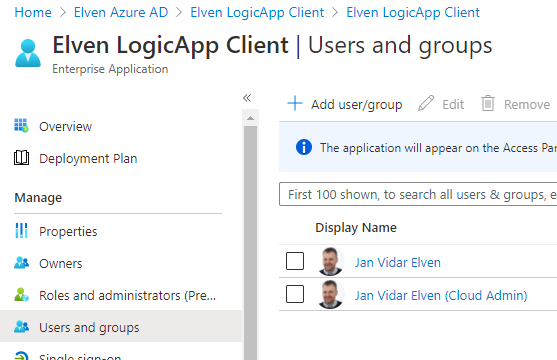
The first thing we need to do is to change the settings for the Enterprise Application. We created an App registration for the LogicApp Client, for users to able to authenticate and access the API. From that LogicApp Client, you can get to the Enterprise Application by clicking on the link for Managed application:
In the Enterprise App, go to Properties, and select User assignment required:
We can now control which users, or groups, that can authenticate to and get access to the Logic App API via the Client:
If I try to log in with a user that is not listed under Users and groups, I will get an error message that the “signed in user is not assigned to a role for the application”:
PS! The above error will show itself a little different based on how you authenticate, the above image is using a public client, if you use Postman, the error will be in the postman console log, if you use a web application you will get the error in the browser etc.
Configuring Conditional Access for the Logic App
In addition to controlling which users and groups that can access the Logic App, I can configure a Conditional Access policy in Azure AD for more fine grained access and security controls.
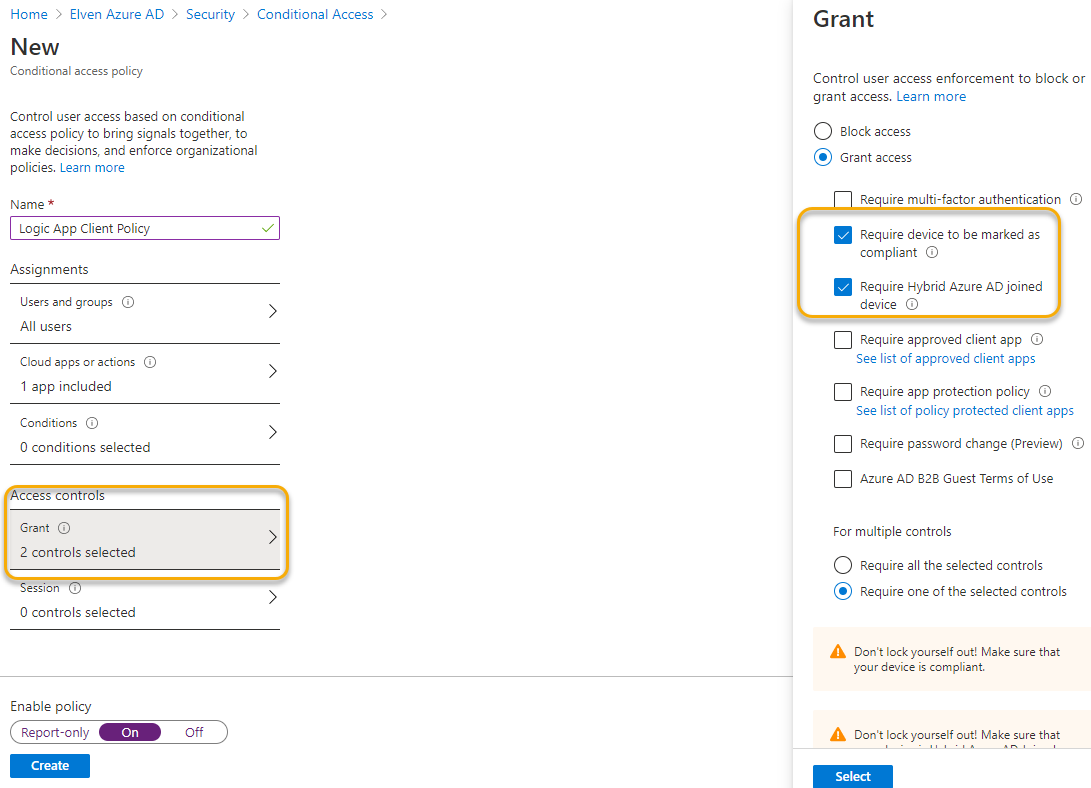
In your Azure AD blade, go to Security and Conditional Access. If you already have a CA policy that affects all Applications and Users, for example requiring MFA, your LogicApp API would already be affected by that.
Note that as we are protecting the resource here, your Conditional Access policy must be targeted to the LogicApp API Enterprise App.
Click to create a new policy specific for the Logic App API, as shown below:
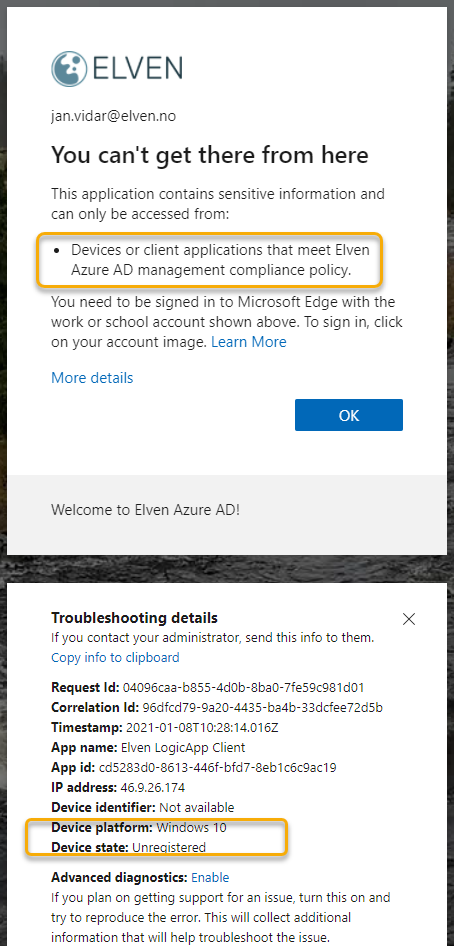
For example I can require that my Logic App API only can be called from a managed and compliant device, or a Hybrid Azure AD Joined device as shown below:
If I create that policy, and then tries to get an access token using a device that are not registered or compliant with my organization, I will get this error:
Summary of Restricting Access for Users and Groups
With the above steps we can see that by adding an Azure AD OAuth authorization policy to the Logic App, we can control which users and groups that can authenticate to and get an Access Token required for calling the Logic App, and we can use Conditional Access for applying additional fine grained access control and security policies.
So far we have tested with interactive users and delegated permission acccess scenarios, in the next section we will dive into using application access and roles for authorization scenarios.
Adding Application Access and Roles
Sometimes you will have scenarios that will let application run as itself, like a deamon or service, without requiring an interactive user present.
Comparing that to the OIDC and OAuth flow from earlier the Client will access the Resource directly, by using an Access Token aquired from Azure AD using the Client Credentials Flow:
Using the Client Credentials Flow from Postman
Back in the Postman client, under the Authorization tab, just change the Grant Type to Client Credentials like the following. NB! When using application access, there are no spesific delegated scopes, so you need to change the scope so that it refers to .default after the scope URI:
Click Get New Access Token, and after successfully authenticating click to Use Token. Copy the Token to the Clipboard, and paste to a JWT debugger. Let’s examine the JWT payload:
Note that the audience and issuer is the same as when we got an access token for an end user, but also that the JWT payload does not contain any scopes (scp) or any other user identifiable claims.
Using the Client Credentials Flow from MSAL.PS
To get an Access Token for an application client in MSAL.PS, run the following commands:
# Set Client and Tenant ID
$clientID = "cd5283d0-8613-446f-bfd7-8eb1c6c9ac19"
$tenantID = "104742fb-6225-439f-9540-60da5f0317dc"
# Set Client Secret as Secure String (keep private)
$clientSecret = ConvertTo-SecureString ("<your secret in plain text") -AsPlainText -Force

# Get Access Token using Client Credentials Flow and Default Scope
$tokenResponse = Get-MsalToken -ClientId $clientID -ClientSecret $clientSecret -TenantId $tenantID -Scopes 'api://elven-logicapp-api/.default'
You can then validate this Token and copy it to a JWT debugger:
# Copy Access Token to Clipboard
$tokenResponse.AccessToken | Clip
Calling the Logic App using Client Application
We can send requests to the Logic App using an Access Token in an application by including it as a Bearer Token in the Authorization Header exactly the same way we did previously, however it might fail internally if the Logic App processing of the access token fails because it now contains a different payload with claims:
Looking into the run history of the Logic App I can see that the reason it fails is that it is missing scp (scopes) in the token.
This is expected when authenticating as an application, so we will fix that a little later.
A few words on Scopes vs. Roles
In delegated users scenarios, permissions are defined as Scopes. When using application permissions, we will be using Roles. Role permissions will always be granted by an admin, and every role permission granted for the application will be included in the token, and they will be provided by the .default scope for the API.
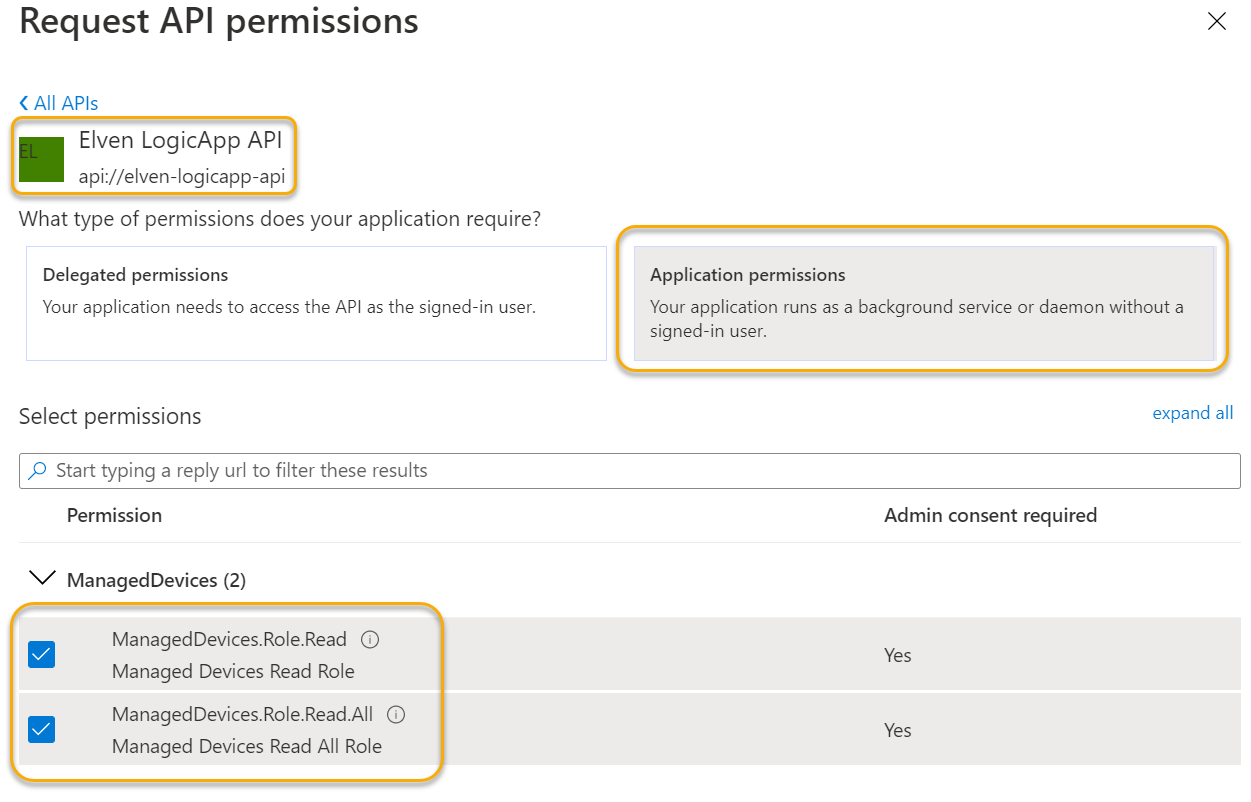
Adding Application Roles for Applications
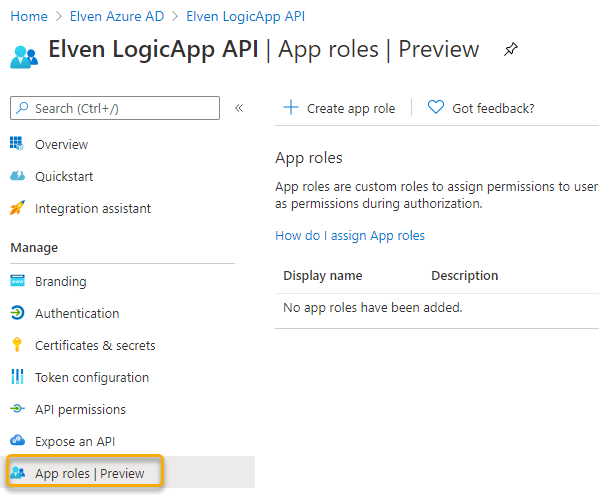
Now, let’s look into adding Roles to our LogicApp API. Locate the App registration for the API, and go to the App roles | Preview blade. (this new preview let us define roles in the GUI, where until recently you had to go to the manifest to edit).
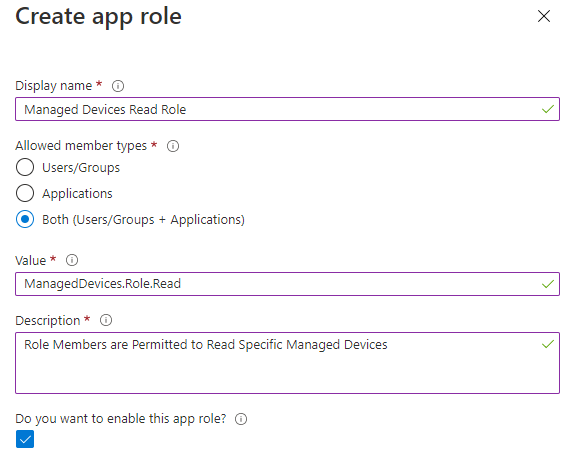
Next, click on Create app role. Give the app role a display name and value. PS! The value must be unique, so if you already have that value as a scope name, then you need to distinguish it eg. by using Role in the value as I have here:
The allowed member types give you a choice over who/what can be assigned the role. You can select either application or user/groups, or both.
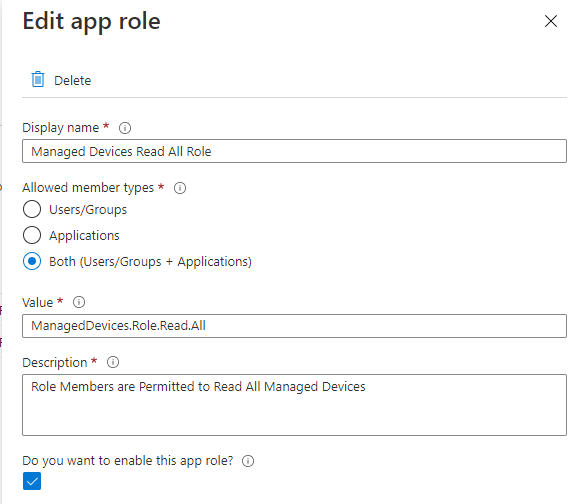
Add another App Role as shown below:
You should now have the following two roles:
Assigning Roles to Application
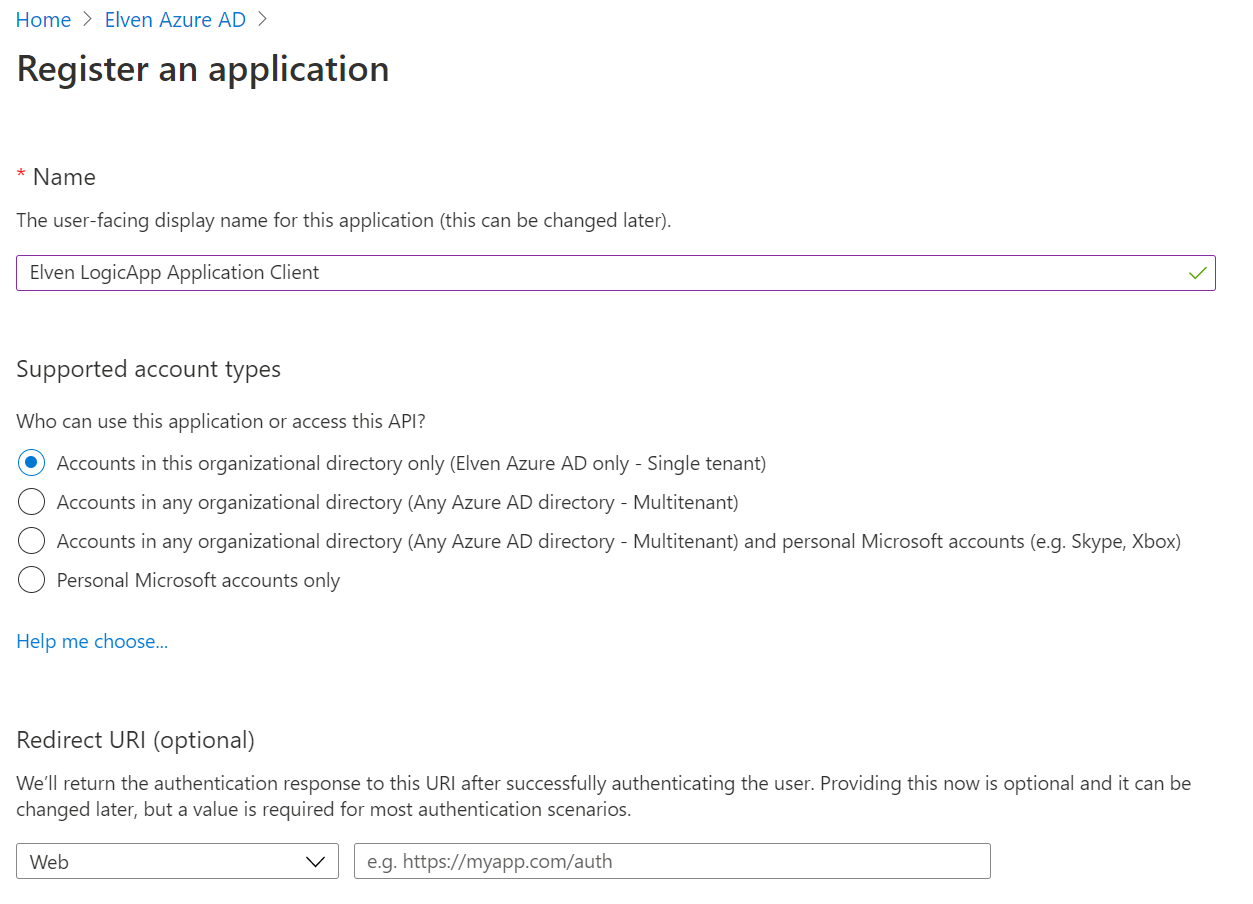
I recommend that you create a new App Registration for application access scenarios. This way you can avoid mixing delegated and application permissions in the same app registration, it will make it easier to differentiate user and admins consents, and secret credentials will be easier to separate, and you can use different settings for restricting access using Azure AD Users/Groups and Conditional Access.
So create a new App registration, call it something like (Yourname) LogicApp Application Client:
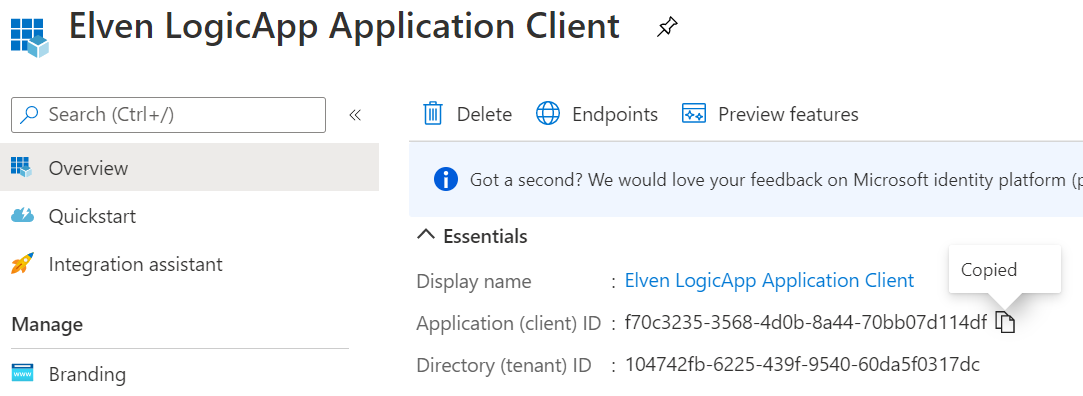
Choose single tenant and leave the other settings as default. Click Register and copy the Application (Client ID) and store it for later:
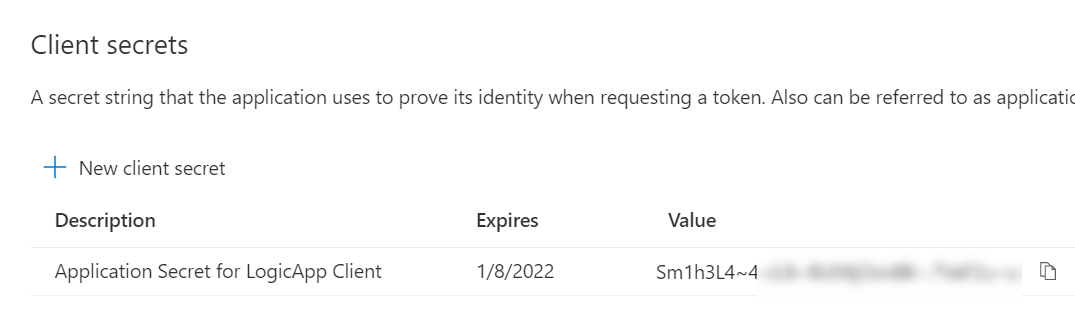
Next, go to Certificates & secrets, and create a new Client secret:
Copy the secret and store it for later.
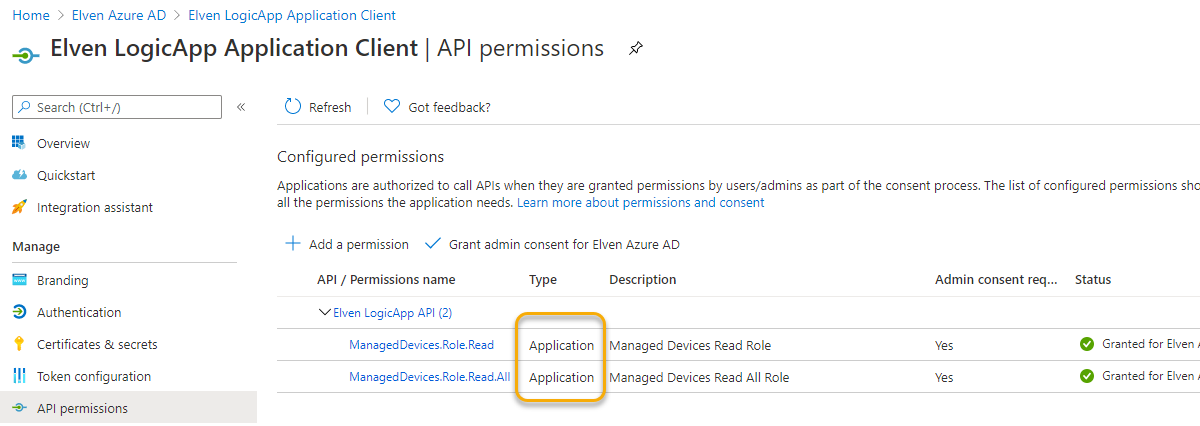
Go to API permissions, click Add a permission, and from My APIs, find the LogicApp API. Add the Application permissions as shown below, these are the App Roles we added to the API earlier:
Under API permissions you can remove the Microsoft Graph user.read permission, it won’t be needed here, the two remaining permissions should be:
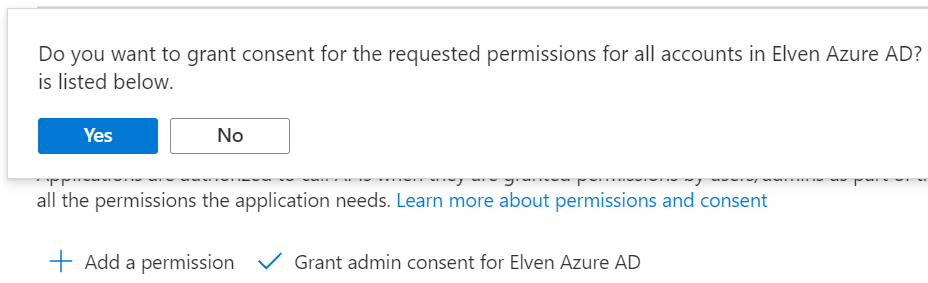
These you NEED to grant admin consent for, as no interactive user will be involved in consent prompt:
The admin consent are granted as shown below:
Now we can test getting access token via this new app registration, either use Postman or MSAL.PS , remember to use the new app (client) id and app (client) secret. I chose to add the two values to my Postman environment like this:
Next, change the token settings for Client Credentials flow so that the Client ID and Secret use the new variable names. Click to Get New Access Token:
After successfully getting the access token, click Use Token and copy it to clipboard so we can analyze it in the JWT debugger. From there we can indeed see that the roles claims has been added:
We will look for these roles claims in the Logic App later. But first we will take a look at how we can add these roles to users as well.
Assigning Roles to Users/Groups
Adding roles to users or groups can be used for authorizing access based on the roles claim. Go to the Enterprise App for the Logic App API registration, you can get to the Enterprise App by clicking on the Managed application link:
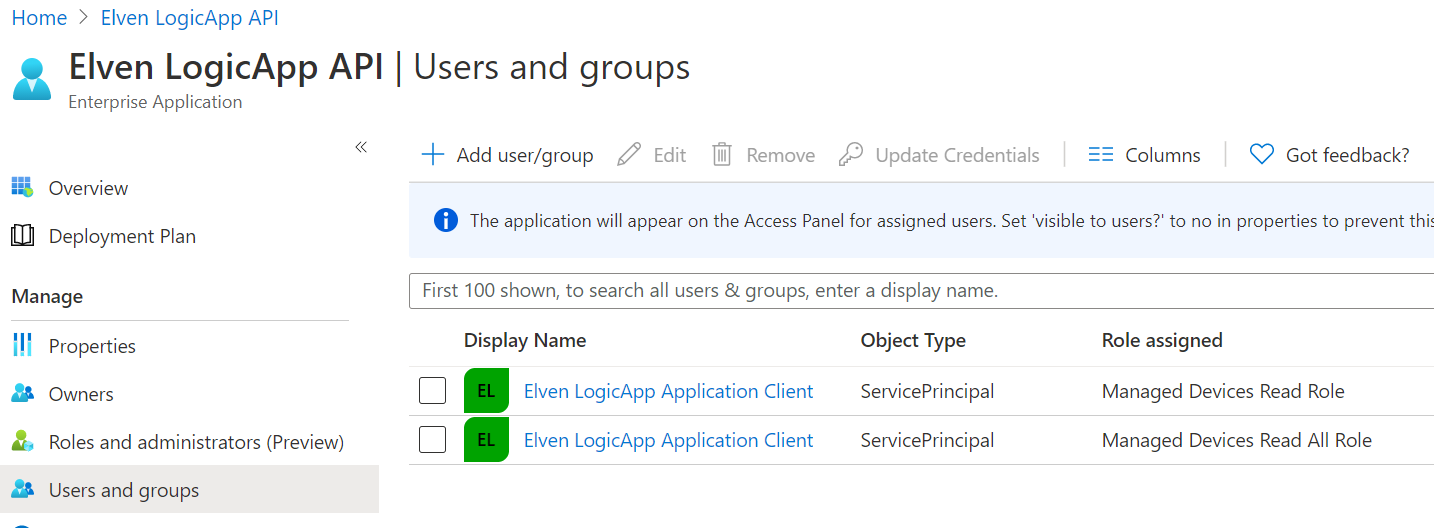
In the Enterprise App, under Users and Groups, you will already see the ServicePrincipal’s for the LogicApp Application Client with the Roles assigned. This is because these role permissions were granted by admin consent:
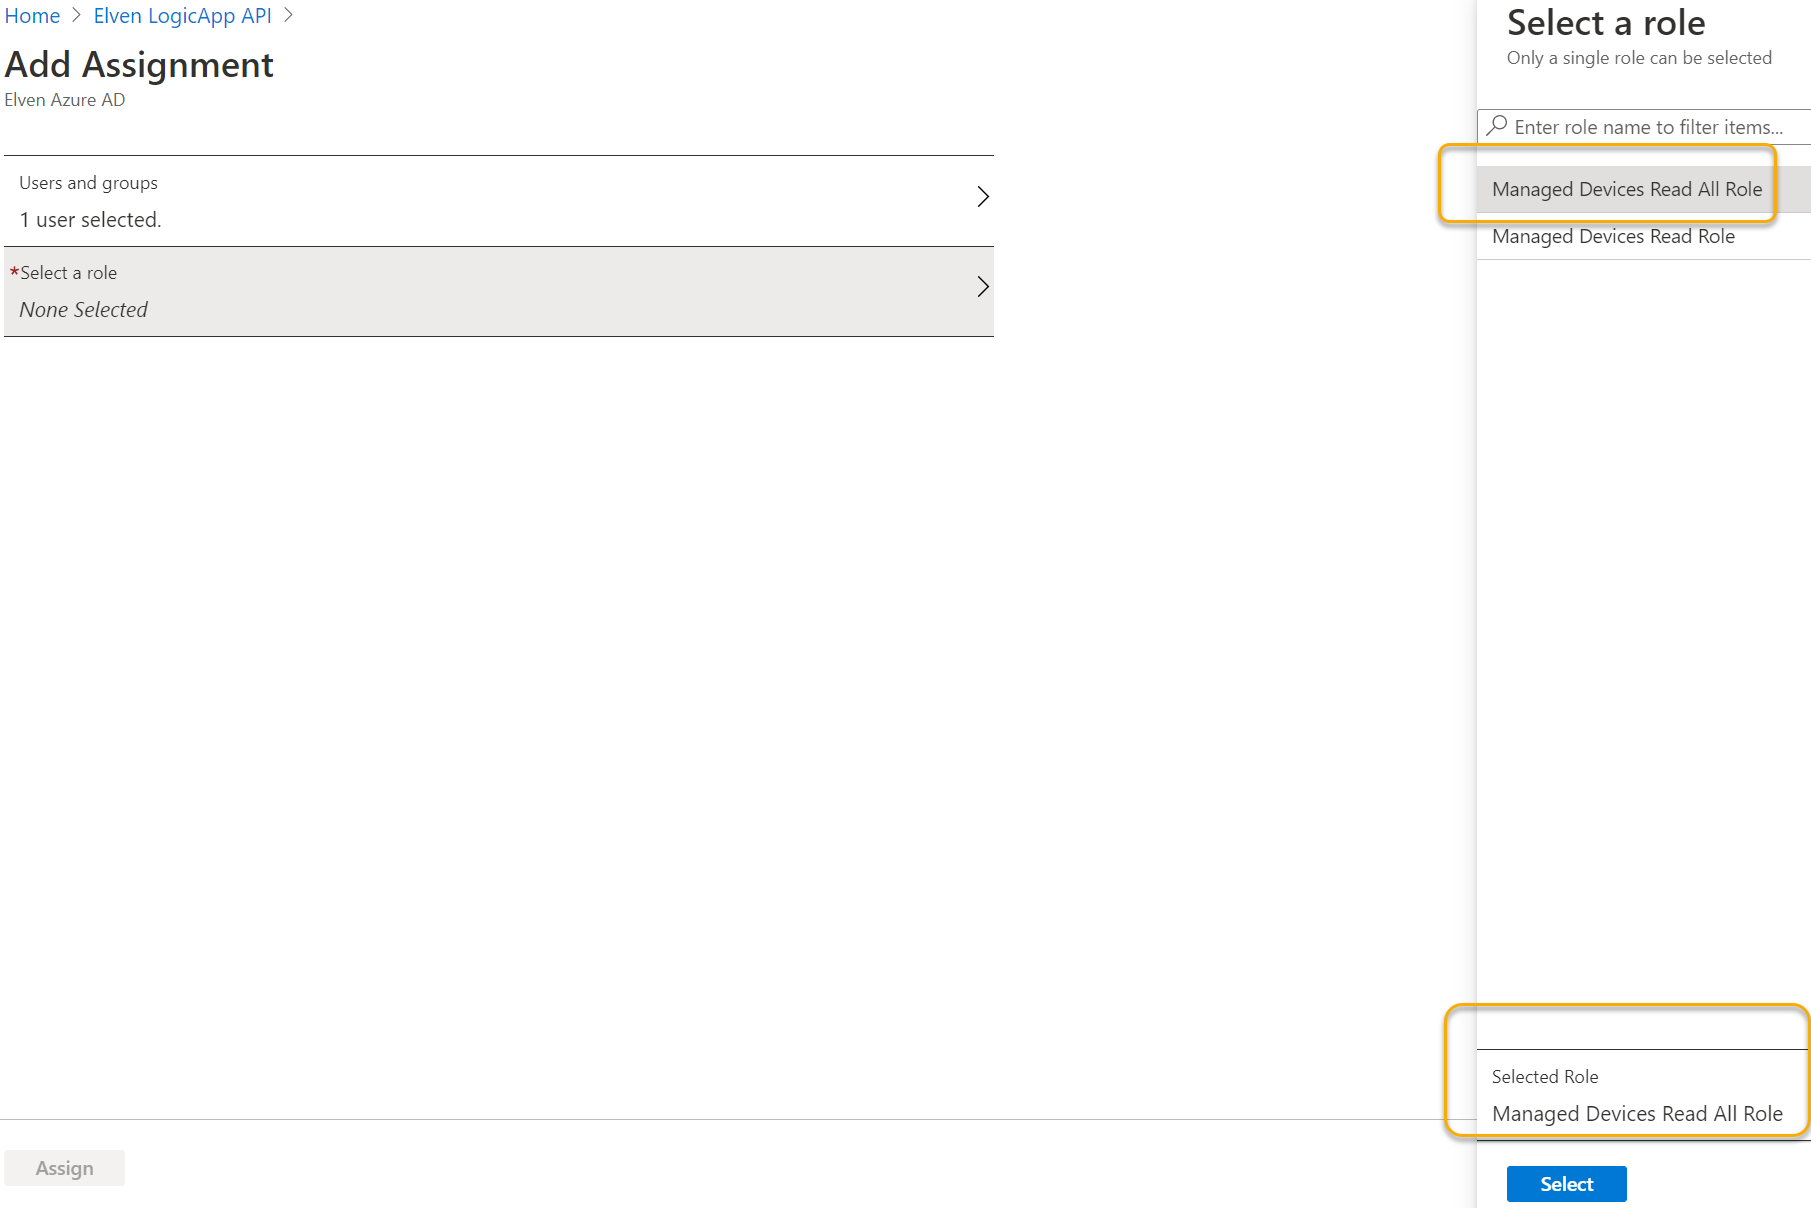
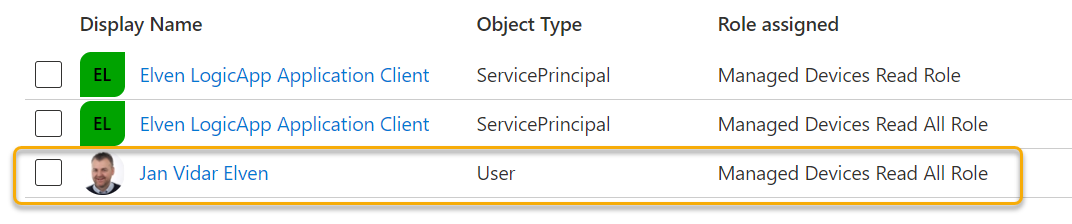
Click on Add user/group, add for a user in your organization the selected role:
You can add more users or groups to assigned roles:
Lets do a test for this user scenario. We need to do an interactive user login again, so change to using Authorization Code Flow in Postman, and change to the originial ClientID and ClientSecret:
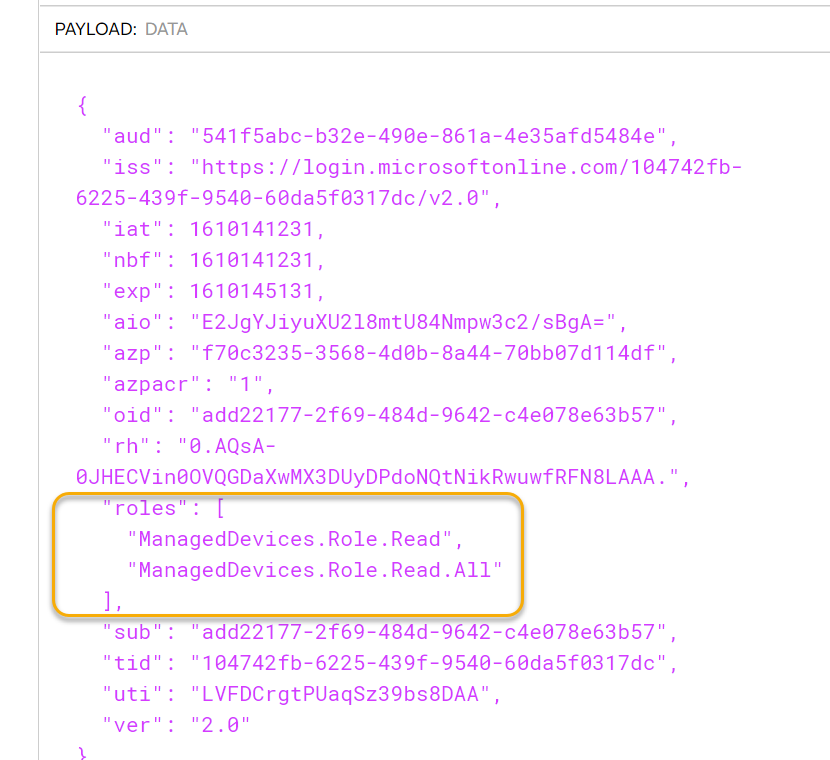
Click to Get New Access Token, authenticate with your user in the browser (the user you assigned a role to), and then use the token and copy it to clipboard. If we now examine that token and look at the JWT data payload, we can see that the user has now a role claim, as well as the scope claim:
We can now proceed to adjust the authorization checks in the Logic App.
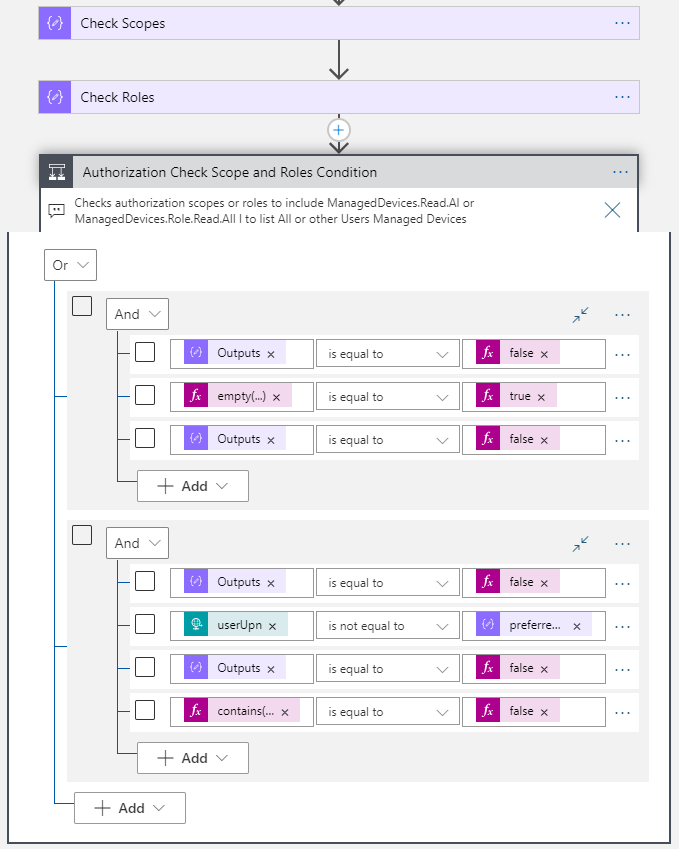
Customizing Logic App to handle Roles Claims
Previously in the Logic App we did checks against the scopes (scp claim). We need to do some adjustment to this steps, as it will fail if there are no scp claim in the Token:
Change to the following expression, with a if test that returns false if no scp claim, in addition to the original check for scope to be ManagedDevices.Read.All:
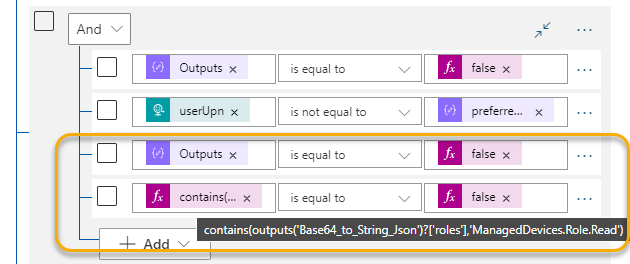
Next we need to add more checks to the authorization logic. Add a new line to the first group, where we also check the output of the Check Roles action to be false:
In the above image I’ve also updated the action name and comment to reflect new checks.
To the second group, add two more lines, where line number 3 is checking outputs from Check Roles to be false (same as above), and line 4 do a check if the roles claim contains the role ManagedDevices.Role.Read:
The complete authorization checks logic should now be:
And this is the summary of conditions:
Group 1 (checks if scp does not contain ManagedDevices.Read.All and roles does not contain ManagedDevices.Role.Read.All and calling user tries to get All managed devices):
Outputs('Check_Scopes') = false
empty(triggerBody()?['userUpn']) = true
Outputs('Check_Roles') = false
Group 2 (checks if scp does not contain ManagedDevices.Read.All and roles does not contain ManagedDevices.Role.Read.All, and tries to get managed devices for another user than users’ own upn, and roles does not contain ManagedDevices.Role.Read):
If any of the two groups of checks above returns true, then it means that the request was not authorized. To give a more customized response, change the response action like the following:
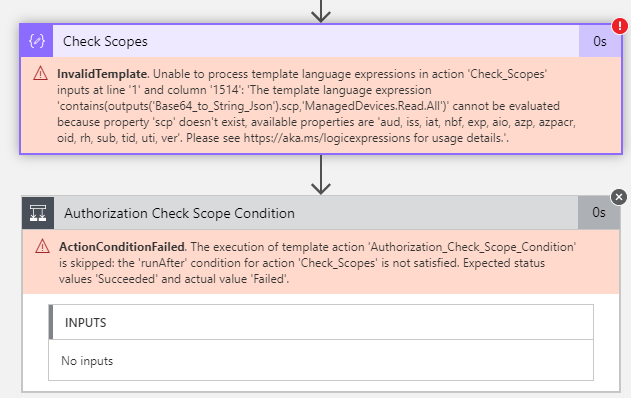
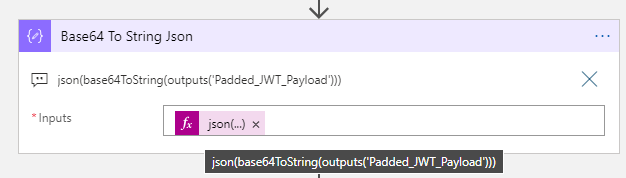
In the above action I have changed that response is returned as a JSON object, and then changed the body so that it returns JSON data. I have also listed the values from the token that the user/application use when calling the Logic App. The dynamic expression for getting roles claim (for which will be in an array if there are any roles claim) is: if(empty(outputs('Base64_to_String_Json')?['roles']),'',join(outputs('Base64_to_String_Json')?['roles'],' ')) And for getting any scopes claim, which will be a text string or null: outputs('Base64_to_String_Json')?['scp']
Test Scenario Summary
I’ll leave the testing over to you, but if you have followed along and customized the Logic App as I described above, you should now be able to verify the following test scenarios:
User/App
Scope
Roles
Result
User
ManagedDevices.Read
Can get own managed devices. Not authorized to get all devices or other users’ managed devices.
User (Admin)
ManagedDevices.Read.All
Can get any or all devices.
User
ManagedDevices,Read
ManagedDevices.Role.Read
Can get own managed devices. Can get other users’ managed devices by userUpn. Not authorized to get all devices.
User
ManagedDevices.Read
ManagedDevices.Role.Read.All
Can get any or all devices.
Application
ManagedDevices.Role.Read
Can any users’ managed devices by userUpn. Not authorized to get all devices.
Application
ManagedDevices.Role.Read.All
Can get any or all devices.
When testing the above scenarios, you need a new access token using either authorization code flow (user) or client credentials (application). For testing with roles and user scenarios, you can change the role assignments for the user at the Enterprise Application for the LogicAPI API. For testing with roles with application scenarios, make sure that you only grant admin consent for the applicable roles you want to test.
Final Steps and Summary
This has been quite the long read. The goal of this blog post was to show how your Logic App workflows can be exposed as an API, and how Azure AD OAuth Authorization Policies can control who can send requests to the Logic App as well as how you can use scopes and roles in the Access Token to make authorization decisions inside the Logic App. And even of more importance, integrating with Azure AD let’s you control user/group access, as well as adding additional security layer with Conditional Access policies!
My demo scenario was to let the Logic App call Microsoft Graph and return managed devices, which require privileged access to Graph API, and by exposing the Logic App as an API I can now let end users/principals call that Logic App as long as they are authorized to do so using my defined scopes and/or roles. I can easily see several other Microsoft Graph API (or Azure Management APIs, etc) scenarios using Logic App where I can control user access similarly.
Note also that any callers of the Logic App that now will try to call the Logic App using SAS access scheme will fail, as a Bearer Token is expected in the Authorization Header and the custom authorization actions that has been implemented. You might want to implement some better error handling if you like.
There’s an added bonus at the end of this article, where I add the filters for getting managed devices. But for now I want to thank you for reading and more article in this series will come later, including:
Calling Logic Apps protected by Azure AD from Power Platform
Protecting Logic App APIs using Azure API Management (APIM)
Bonus read
To complete the filtering of Managed Devices from Microsoft Graph, the Logic App prepared inputs of operatingSystem and osVersion in addition to userUpn. Let’s how we can implement that support as well.
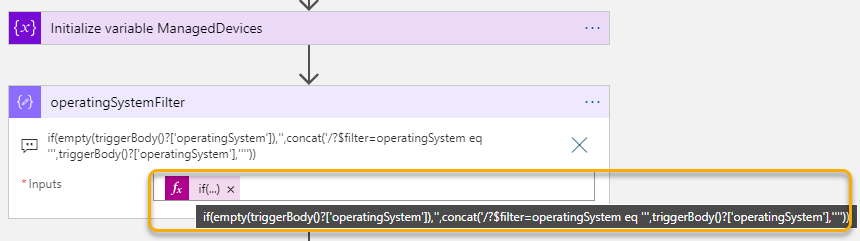
After the initialize variable ManagedDevices action, add a Compose action. In this action, which I rename to operatingSystemFilter, I add a long dynamic expression:
This expression will check if the request trigger has an operatingSystem value, it not this value will be a empty string, but if not empty the I start building a text string using concat function where I build the filter string. There are some complexities here, amongs others using escaping of single apostroph, by adding another single apostroph etc. But this expression works:
Next, add another Compose action and name it operatingSystemVersionFilter. This expression is even longer, checking the request trigger for osVersion, and if empty, it just returns the operatingSystemFilter from the previos action, but if present another string concat where I ‘and’ with the previous filter:
The expression from above image:
if(empty(triggerBody()?['osVersion']),outputs('operatingSystemFilter'),concat(outputs('operatingSystemFilter'),' and startswith(osVersion,''',triggerBody()?['osVersion'],''')'))
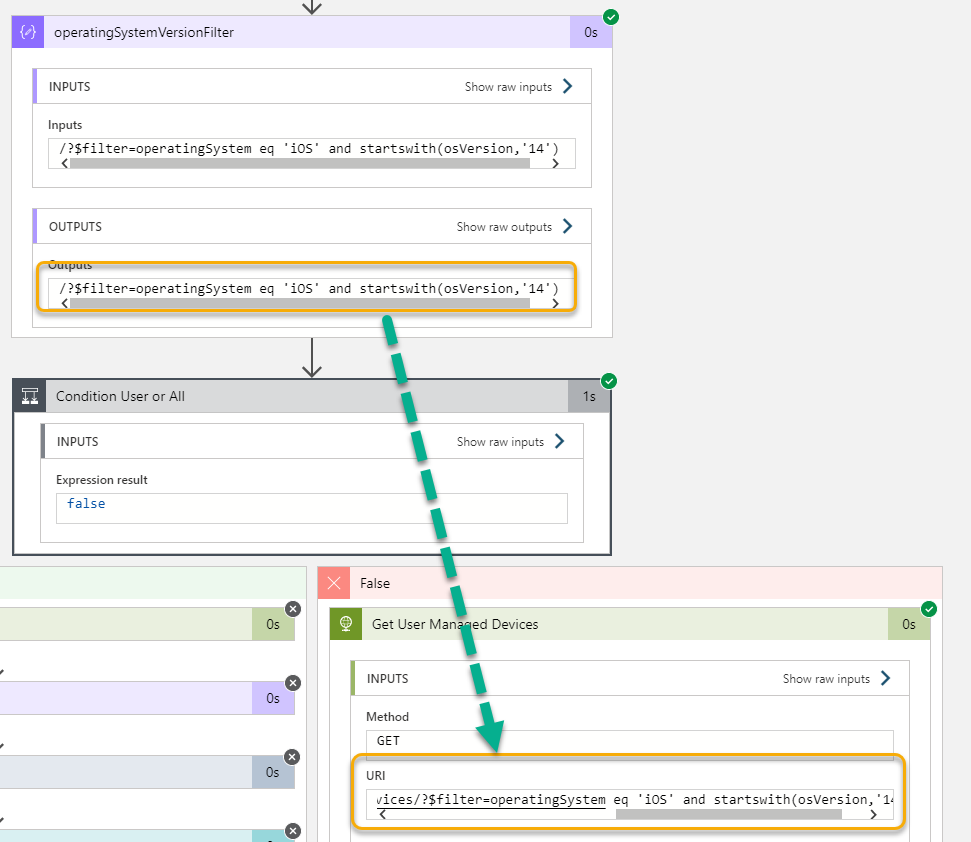
We can now add that output to the Graph queries, both when getting all or a specific user’s devices:
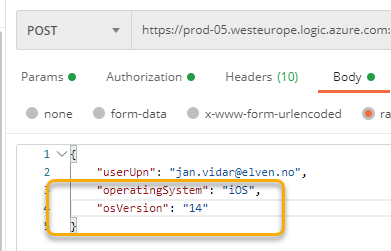
I can now add operatingSystem and osVersion to the request body when calling the Logic App:
And if I check the run history when testing the Logic App, I can see that the filter has been appended to the Graph query:
You can if you want also build more error handling logic for when if users specify the wrong user principalname, or any other filtering errors that may occur because of syntax etc.
That concludes the bonus tip, thanks again for reading 🙂
Azure Logic Apps are great for creating workflows for your IT automation scenarios. Logic App workflows can be triggered using a variety of sources and events, including schedules, but a popular trigger is using a HTTP trigger for starting the Logic App workflow interactively or on-demand from outside the Logic App.
To trigger a Logic App using a HTTP trigger, you need to know the endpoint URL, for example:
This URL consist of the endpoint address of the Logic App and workflow trigger, and with the following query parameters:
api-version
sp (specifies permissions for permitted HTTP methods to use)
sv (SAS version to use)
sig (shared access signature)
Anyone with access to this URL and query parameters kan trigger the Logic App, so it’s very important to protect it from unauthorized access and use.
In this multi part blog post series we will look into how Logic Apps can be protected by Azure AD.
Scenarios this multi-part blog post articles will cover:
Provide Management Access Tokens and Restrict Issuer and Audience via OAuth
Restrict External Guest User Access
Expose Logic App as API
Restrict permitted Enterprise Application Users and Groups and Conditional Access policies.
Scopes and Roles Authorization in Logic Apps.
Logic Apps and APIM (Azure API Management).
Lets first look at the other methods for protecting Logic Apps you should be aware of.
Protect Logic Apps Keys and URLs
Before we move on to protecting Logic Apps with Azure AD Open Authentication (OAuth), lets take a quick summary of other protections you should be aware of:
Regenerate access keys. If you have reason to think SAS keys are shared outside your control, you can regenerate and thus making previous SAS keys invalid.
Create expiring Callback URLs. If you need to share URLs with people outside your organization or team, you can limit exposure by creating a Callback URL that expire on a certain date and time.
Create Callback URL with primary or secondary key. You can select to create the Callback URL with the specified primary or secondary SAS key.
The above methods should be part of any governance and security strategy for protecting Logic Apps that perform privilieged actions or might return sensitive data.
Protect Logic Apps via restricting inbound IP address
Another way to protect Logic Apps is to restrict from where the Logic App can be triggered via inbound IP address restrictions.
This opens up scenarios where you can specify your datacenter IP ranges, or only let other Logic Apps outbound IP addresses call nested Logic Apps, or only allow Azure API management to call Logic App.
Protect Logic Apps with Azure AD OAuth
By creating an Authtorization Policy for your Logic App you can use a Authorization header with a Bearer Token and require that the token contains the specified issuer, audience or other claims. Showing how that works in detail, and usable scenarios will be the main focus for this blog post.
Let’s start by building a basic Logic App we can use for demo purpose.
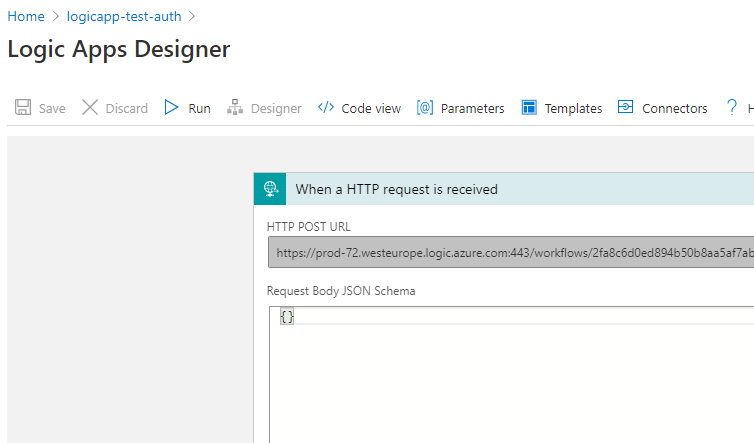
Creating a basic Logic App with HTTP Trigger and Response
In you Azure Subcription, create a new Logic App, specifying to use a HTTP trigger. In my example below I have named my Logic App “logicapp-test-auth”:
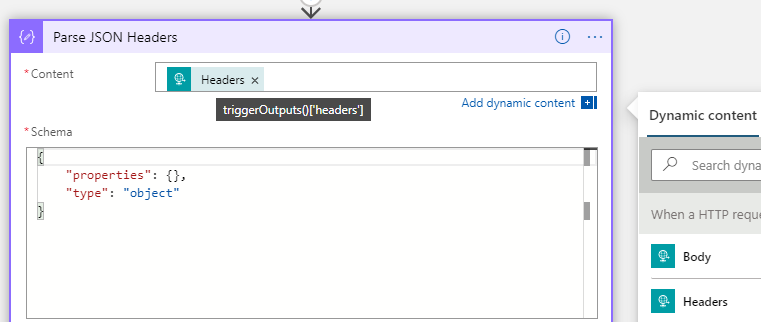
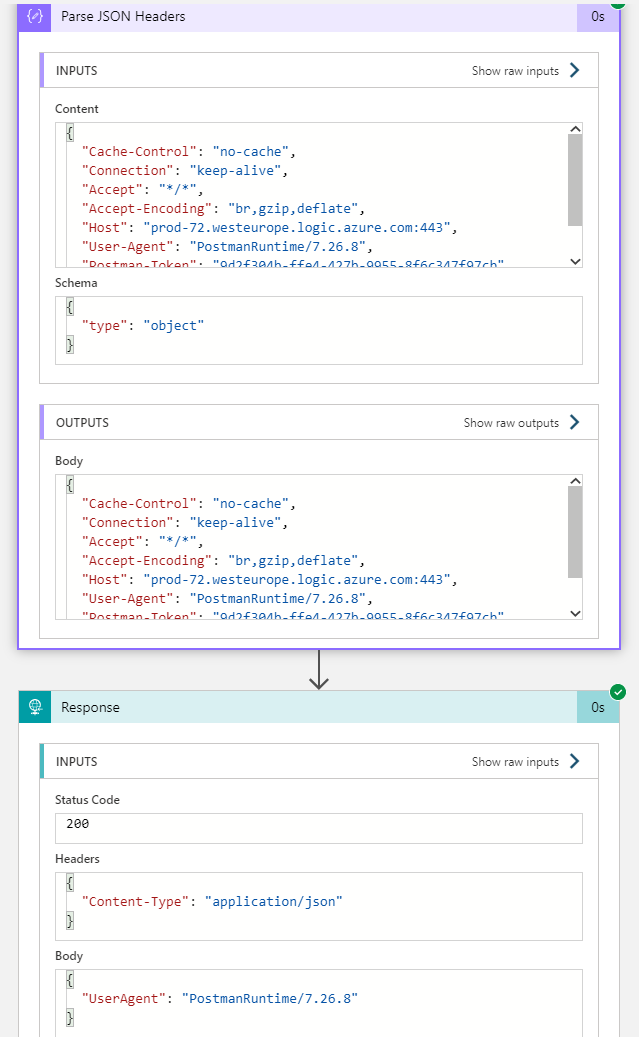
Next, add a Parse JSON action, where the Content is set to the trigger headers, as shown below. I’ve just specified a simple schema output, this can be customized later if needed:
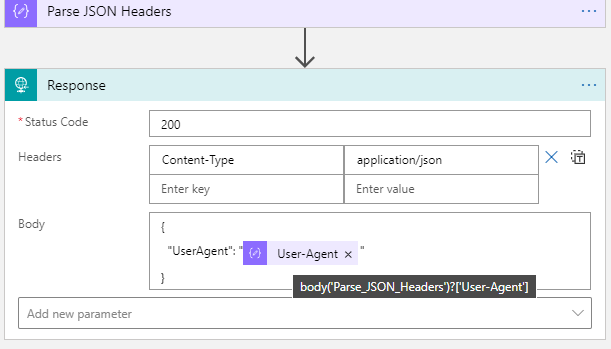
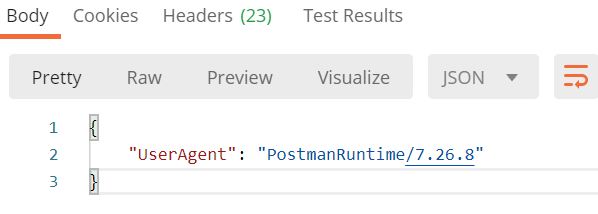
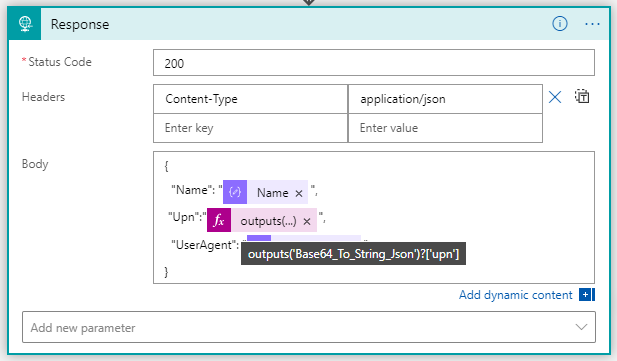
After that activity, add a Response action to return data to the caller. In my example below I return a Status Code of 200 (OK), and set the Content-Type to application/json, and return a simple JSON body of UserAgent where the value is set to the parsed header output from the trigger, using dynamic expression: body('Parse_JSON_Headers')?['User-Agent']
Testing Logic App with Postman
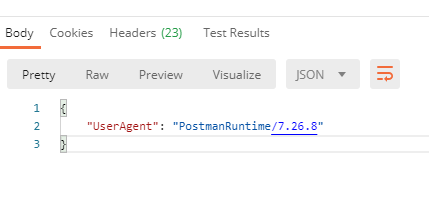
A great way to test and explore HTTP and REST API calls from your client is to use Postman (Download Postman | Try Postman for Free). When testing the above Logic App, paste in the HTTP POST URL for your trigger, and set the method to POST as shown below:
From the above image, you can see the URL, and also the query parameters listed (api-version, sp, sv, and sig, remember that these should be shared publicly).
When I send the request, it will trigger the Logic App, and should response back:
We can also verify the run history for the Logic App:
We have now successfully tested the Logic App using SAS authentication scheme, and can proceed to adding Azure AD OAuth. First we need to create an Authorization Policy.
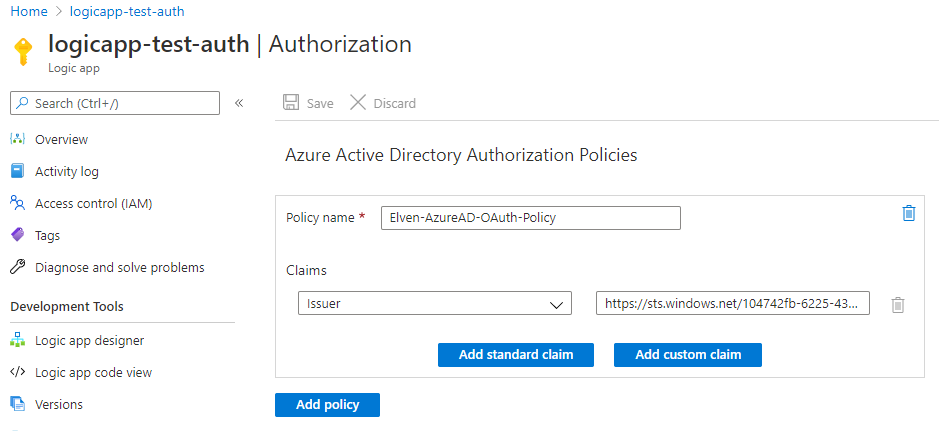
Creating an Azure AD Authorization Policy
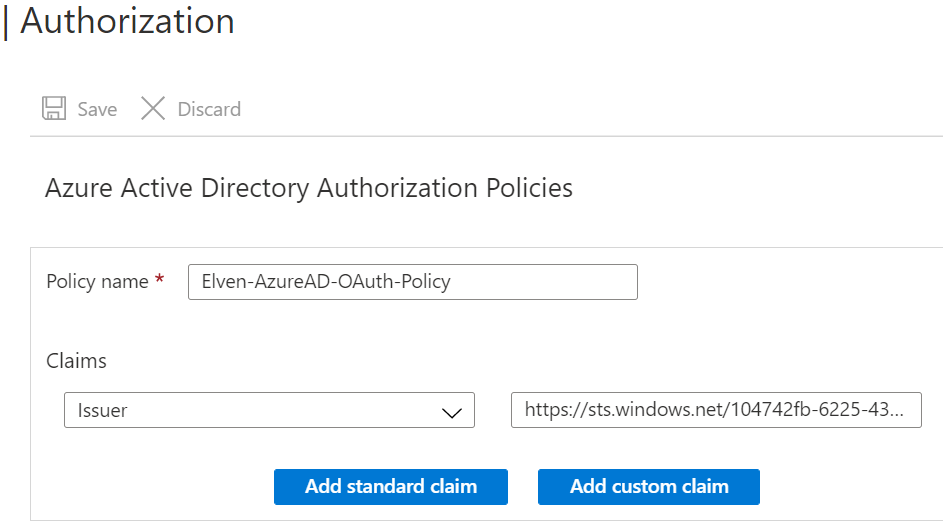
Under Settings and Authorization for your Logic App, add a new Authorization Policy with your name, and add the Issuer claim for your tenant. Issuer will be either https://sts.windows.net/{your-tenant-id}/ or https://login.microsoftonline.com/{your-tenant-id}/ depending on the version of the Access Token:
We will add more Claims later, but for now we will just test against the Issuer. Before we can test however, we need to get an Access Token. There are several ways to easily get an access token, basically we can consider one of the following two scenarios:
Aquire an Access Token for well known Azure Management Resource Endpoints.
Create an App Registration in Azure AD exposing an API.
We’ll cover App Registration and more advanced scenarios later, but for now we will get an Access Token using well known resource endpoints for Azure management.
PS! Just a quick note on Access Tokens aquired for Microsoft Graph resources: These cannot be used for Logic Apps Azure AD OAuth authorization policies, because Graph access tokens does not allow for signature validation.
If you haven’t already, you will first need to login to Azure using az login. You can login interactively using default browser which supports modern authentication, including MFA, but if you are running multiple browsers and profiles it might be easier to use the device code flow:
az login --use-device-code
You will be prompted to open the microsoft.com/devicelogin page and enter the supplied device code, and after authentication with your Azure AD account, you will get a list of all subscriptions you have access to.
PS! If your account has access to subscriptions in multiple tenants, you can also specify which tenant to log into using:
az login --tenant elven.onmicrosoft.com --use-device-code
To get an Access Token you can just run az account get-access-token, like the following:
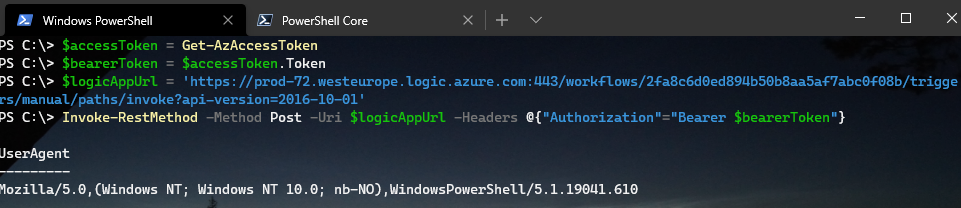
Let’s save that into a variable and get the token:
$accessToken = az account get-access-token | ConvertFrom-Json
$accessToken.accessToken | Clip
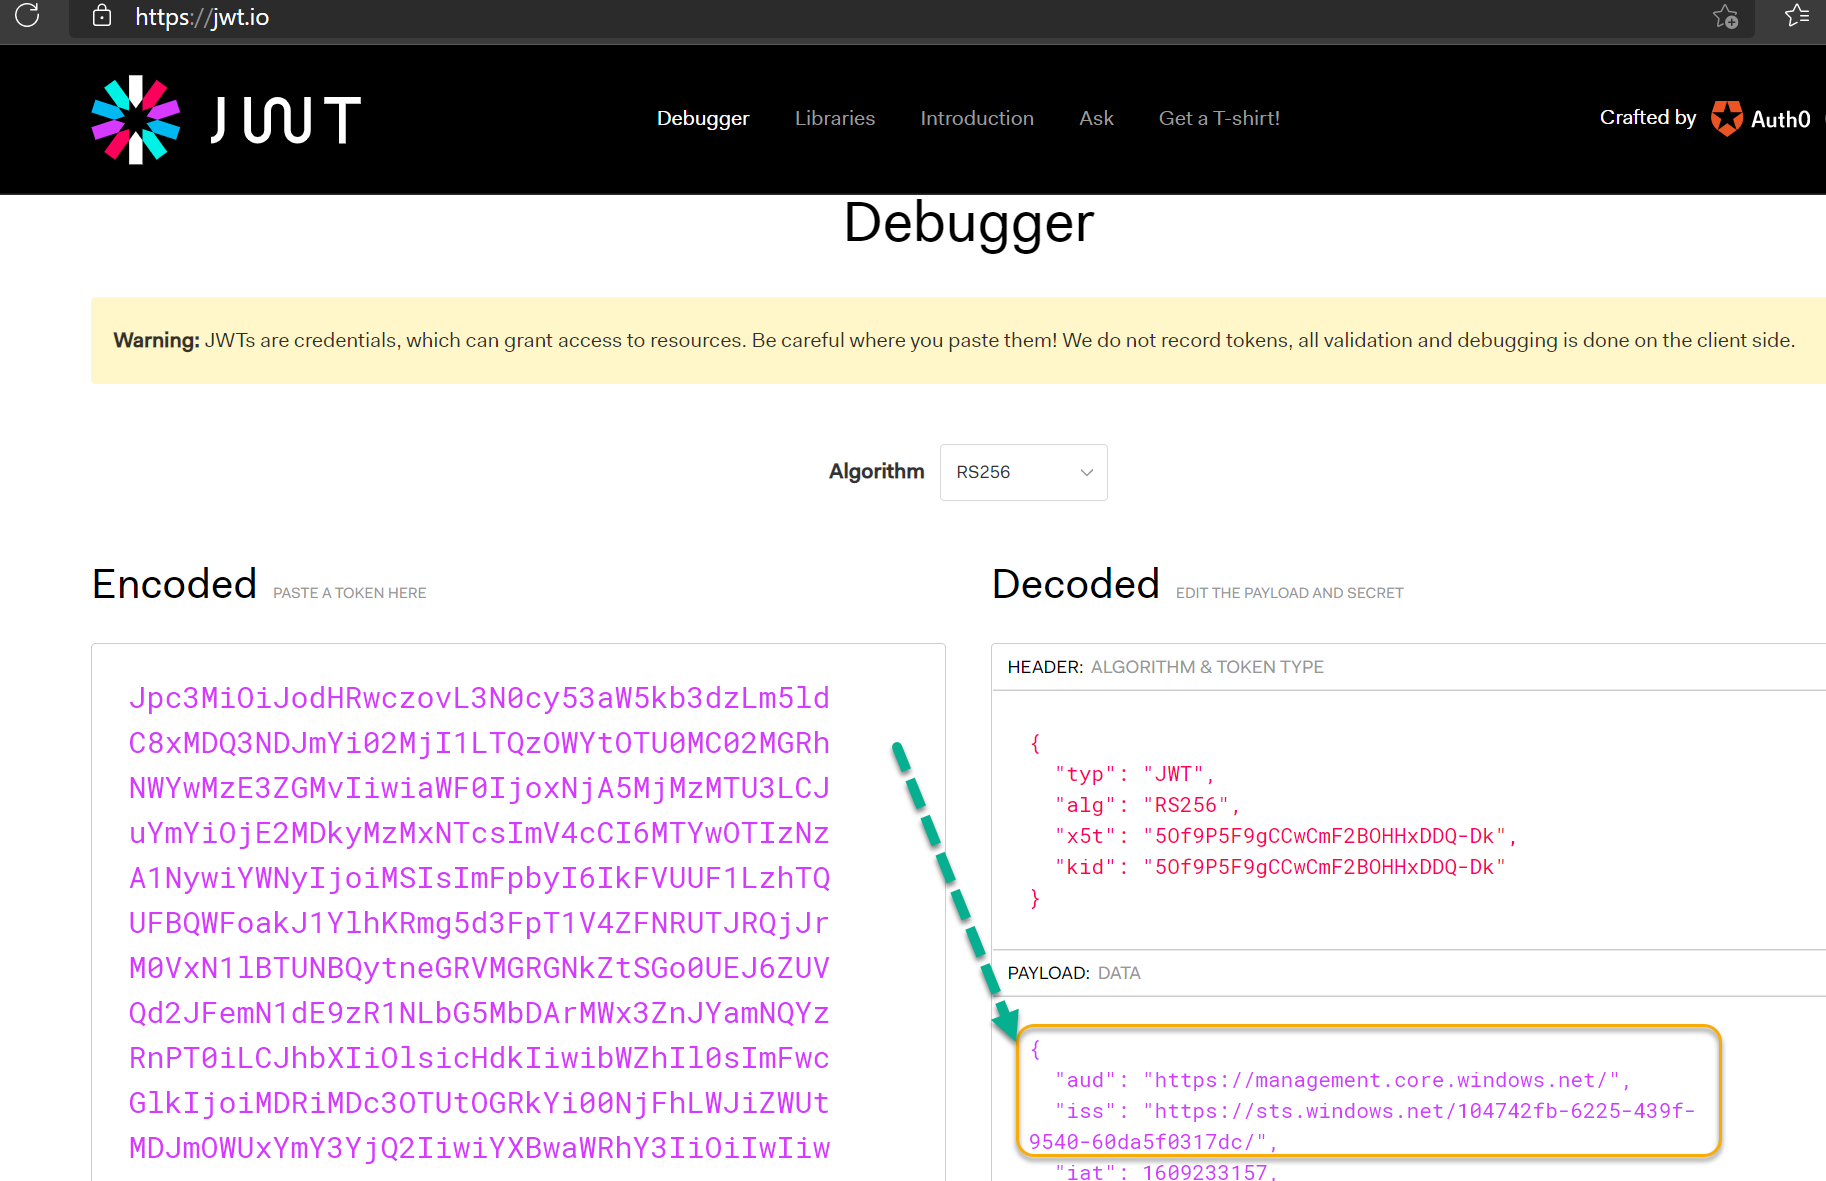
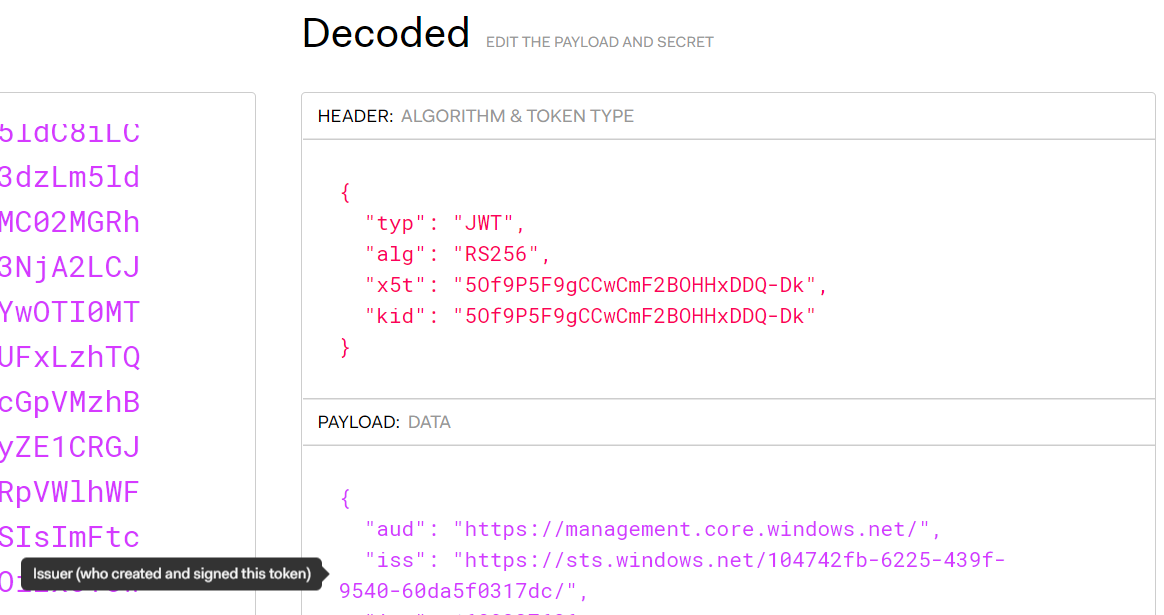
The above command copies the Access Token to the Clipboard. Let’s take a look at the token. Open the website jwt.ms or jwt.io, and paste in the token. From the debugger you can look at the decoded token payload. The most interesting part for now is the issuer (iss) and audience (aud), which tells us where the token has been issued from, and to which audience:
As we can see from above, the audience for the token is “management.core.windows.net”. You can also get an access token for a specific resource endpoint using:
$accessToken = az account get-access-token --resource-type arm | ConvertFrom-Json
To show all available resource endpoints use:
az cloud show --query endpoints
Now that we have the method to get the access token using Az Cli, lets take a look at Az PowerShell as well. For reference for az account command and parameters, see docs here: az account | Microsoft Docs
Azure PowerShell
First you need to login to your Azure Subscription by using:
Connect-AzAccount
If your account has access to multiple subscriptions in multiple tenant, you can use the following command to specify tenant:
Connect-AzAccount -Tenant elven.onmicrosoft.com
If there are multiple subscriptions, you might need to specify which subscription to access using Set-AzContext -Subscription <Subscription>. Tip, use Get-AzContext -ListAvailable for listing available subscriptions.
To get an access token using Az PowerShell, use the following command to save to variable and copy to clipboard:
Now that we have the Access Token for an Azure Management resource endpoint, let’s see how we can use that against the Logic App.
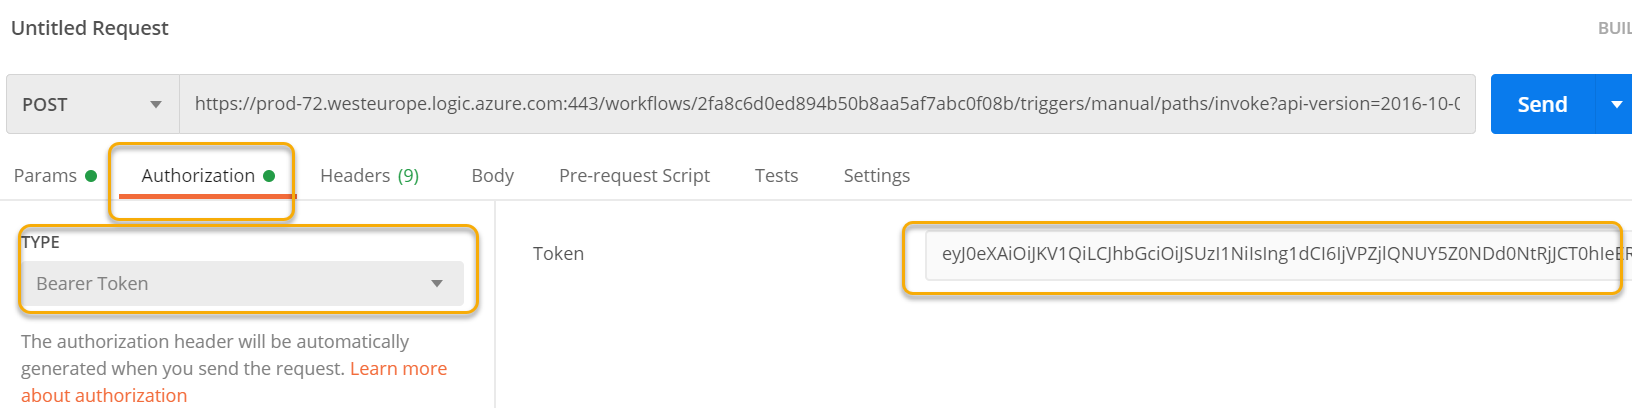
Use Bearer Token in Postman
From the previous test using Postman earlier in this article, go to the Authorization section, and specify Bearer Token, and then Paste the management access token you should still have in your clipboard like the following:
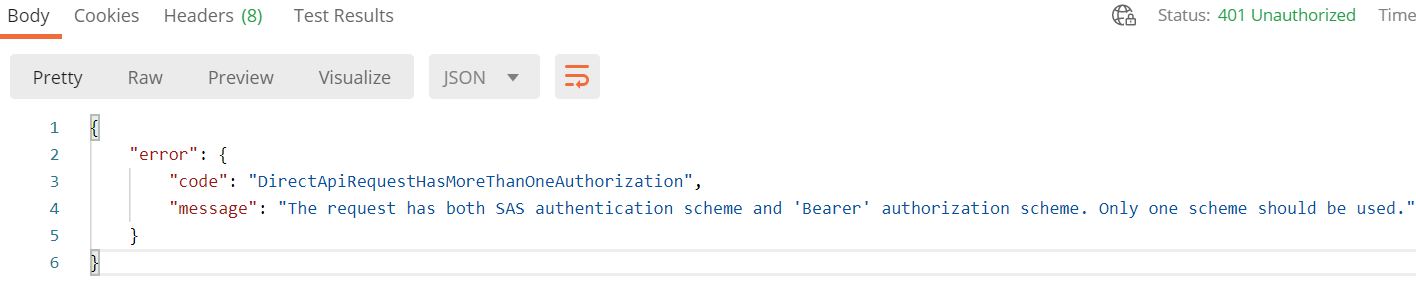
When clicking Send request, observe the following error:
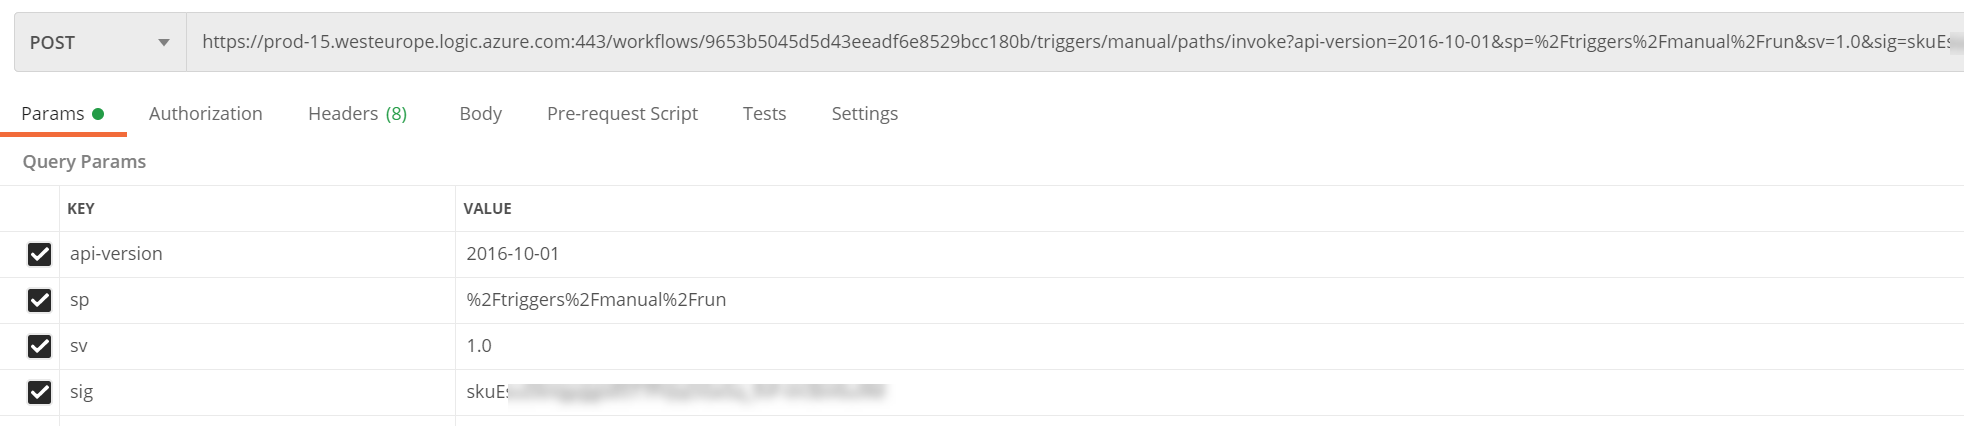
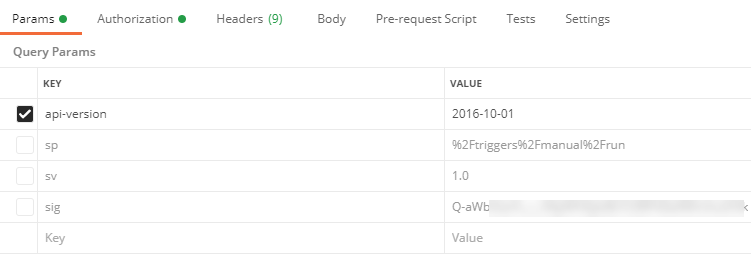
We cannot combine both SAS (Shared Access Signature) and Bearer Token, so we need to adjust the POST URL to the Logic Apps. In Postman, this can be easily done in Postman under Params. Deselect the sp, sv and sig query parameters like the following, which will remove these from the POST URL:
When you now click Send request, you should get a successful response again, provided that tha access token is valid:
Perfect! We have now authorized triggering the Logic App using Azure AD OAuth, based on the Authorization policy:
And the Access Token that match that Issuer:
I will now add the audience to the Authorization Policy as well, so that only Access Tokens for the management endpoint resource can be used:
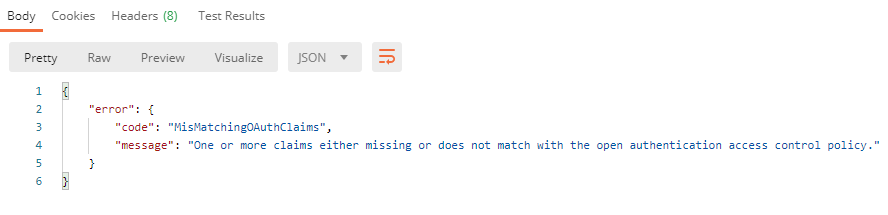
Any HTTP requests to the Logic App that has a Bearer Token that does not comply with the above Authorization Policy, will received this 403 – Forbidden error:
Test using Bearer Token in Azure CLI
You can trigger HTTP REST methods in Azure CLI using az rest --method .. --url ...
When using az rest an authorization header with bearer token will be automatically added, trying to use the url as resource endpoint (if url is one of the well known resource endpoints). As we will be triggering the Logic App endpoint as url, we need to specify the resource endpoint as well. In my example, I will run the following command for my Logic App:
az rest --method POST --resource 'https://management.core.windows.net/' --url 'https://prod-72.we
steurope.logic.azure.com:443/workflows/2fa8c6d0ed894b50b8aa5af7abc0f08b/triggers/manual/paths/invoke?api-
version=2016-10-01'
From above, I specify the resource endpoint of management.core.windows.net, from which the access token will be aquired for, and for url I specify my Logic App endpoint url, without the sp, sv and sig query parameters. This results in the following response:
So the Logic App triggered successfully, this time returning my console (Windows Terminal using Azure CLI).
Test using Bearer Token in Azure PowerShell
I will also show you how you can do a test using Az PowerShell. Make sure that you get an access token and saving the bearer token to a variable using this command first:
There are 2 ways you can use Az PowerShell, either using Windows PowerShell or PowerShell Core.
For Windows PowerShell, use Invoke-RestMethod and add a Headers parameter specifying the Authorization header to use Bearer token:
Invoke-RestMethod -Method Post -Uri $logicAppUrl -Headers @{"Authorization"="Bearer $bearerToken"}
Running this should return this successfully, specifying my Windows PowerShell version (5.1) as User Agent:
For PowerShell Core, Invoke-RestMethod has now support for using OAuth as authentication, but I first need to convert the Bearer Token to a Secure String:
Invoke-RestMethod -Method Post -Uri $logicAppUrl -Authentication OAuth -Token $bearerToken
This should successfully return the following response, this time the User Agent is my PowerShell Core version (7.1):
Summary so far of Management Access Tokens and Logic Apps
At this point we can summarize the following:
You can trigger your Logic App either by using SAS URL or using Bearer Token in Authorization Header, but not both at the same time.
You can add an Azure AD Authorization Policy to your Logic App that specifies the Issuer and Audience, so that calling clients only can use Bearer Tokens from the specified issuer (tenant id), and audience (resource endpoint).
While you cannot disable use of SAS signatures altogether, you can keep them secret, and periodically rollover, and only share the Logic App url endpoint and trigger path with clients.
This is especially great for automation scenarios where users can use CLI or Azure PowerShell and call your Logic Apps securely using OAuth and Access Tokens.
In the next part we will look more into how we can customize the Logic App to get the details of the Access Token so we can use that in the actions.
Include Authorization Header in Logic Apps
You can include the Authorization header from the OAuth access token in the Logic App. To do this, open the Logic App in code view, and add the operationOptions to IncludeAuthorizatioNHeadersInOutputs for the trigger like this:
For subsequent runs of the Logic App, we can now see that the Authorization Header has been included:
And if we parse the headers output, we can access the Bearer Token:
If we want to decode that Bearer token to get a look into the payload claims, we can achieve that with some custom expression magic. Add a Compose action to the Logic App and use the following custom expression:
Let’s break it down:
The Replace function replaces the string ‘Bearer ‘ with blank (including the space after)
The Split function splits the token into the header, payload data, and signature parts of the JWT. We are interested in the payload, so refers to that with index [1]
Now it becomes a little tricky. We will have to use the base64ToString function to get the payload into readable string, but if the length of the payload isn’t dividable by 4 we will get an error. Therefore we need to see if we need to add padding (=), as explained here: (Base64 – Wikipedia).
First I get the length of the payload data, and then use modulo function to see if there are any remaining data after dividing by 4:
mod(length(outputs('Get_JWT_Payload')),4)
Then I can do a conditional logic, where I use concat to add padding (=) to make it dividable by 4:
Now that we have access to the claims, we can later be able to do some authorization in the Logic Apps, for example based on roles or scopes, but we can also get some information on which user that has called the Logic App.
In the Response action, add the following to return the Name claim:
And if I test the Logic App http request again, I can see at it indeed returns my name based on the claims from the access token:
We now have a way to identify users or principals calling the Logic App. The Authorization Policy for the Logic App now permits users and principals from my own organization (based on the issuer claim) and as long as the audience is for management.core.windows.net. But what if I want external access as well? Let’s add to the authorization policies next.
Add OAuth Authorization Policy for Guests
A logic app can have several Azure AD Authorization Policies, so if I want to let external guest users to be allowed to trigger the logic app, I will need to create another authorization policy that allows that issuer:
Lets also add the upn claim to the response, so it is easier to see which user from which tenant that triggered the Logic App:
When I now test with different users, internal to my tenant and external, I can see that it works and the response output is as expected:
Summary of Management Access Scenarios
The purpose of the above steps has been to provide a way for management scenarios, where users and principals can get an Access Token using one of the Azure Management well known endpoints, and provide that when calling the Logic App. The access token is validated using OAuth Authorization Policies, requiring specific issuer (tenant id) and audience (management endpoint). This way we can make sure that we don’t have to share the SAS details which lets users that have access to this URL call the Logic App without authentication.
In the next parts of this blog post articles, we will look into more advanced scenarios where we will expose the Logic App as an API and more.
Tomorrow Thursday October 22nd, at 17:40 CET, I will be speaking an Online Session on the Identity Management Track at Cloud Identity Summit ’20.
My session will be about the Identity Governance solutions available i Azure Active Directory, we will cover the following topics in an hour long session:
Identity Access and Privileged Access Lifecycle
Entitlement Management
Access Reviews
Terms of Use
Privileged Identity Management (PIM)
.. and demos!
If you are new to Azure AD Identity Governance, I promise you will get a good overview over the value these solutions will provide and the challenges this will help solve. If you have been using some of these solutions from before, I will provide some tips and tricks, and real life experiences as well.
You can sign up to the FREE Cloud Identity Summit ’20 here: http://identitysummit.cloud/. There are some great other sessions also, in two tracks “Management” and “Security”. You can learn more about Azure AD Sync, Azure AD B2B, Identity Protection, Passwordless, Yubikeys and AAD Internals! Full agenda here: Agenda – Cloud Identity Summit 2020.
A while back I wrote a blog post on how you could download, install and use a separate Azure AD PIM PowerShell Module for managing Privileged Roles, https://gotoguy.blog/2018/05/22/getting-started-with-azure-ad-pim-powershell-module/. With the recent update of the AzureADPreview Module, the cmdlets for managing Privileged Roles are now included in the module, so there is no longer required to install a separate module for this!
In this blog post I will explain and show how these commands can be used. These PowerShell CmdLets are also at parity with the Graph API, so I will also show equivalent methods for this.
Install or Update AzureADPreview Module
First you need to either install or update the AzureADPreview Module, so that you are running on version 2.0.2.27 or newer.
Update November 23 2020: Latest version of AzureADPreview Module is 2.0.2.129.
The AzureADPreview Module can be installed from PowerShellGallery using Install-Module or Update-Module, and you can verify which version you have installed using Get-Module <modulename> –ListAvailable like this:
With that requirement out of the way we can proceed to look at the commands.
Privileged Role Management Commands
Currently in the AzureADPreview Module, there are 13 commands related to Privileged Roles:
Note that some of the above commands are not in that documentation, all the new commands have a *MS* which means it is mapped to equivalent Microsoft Graph API’s.
In the interest of this blog post, here is a quick explanation of each of the available commands:
Add-AzureADMSPrivilegedResource. Use this API to add a new azure AD MS privileged resource.
Close-AzureADMSPrivilegedRoleAssignmentRequest. Cancel a AzureADMSPrivilegedRoleAssignmentRequest.
Get-AzureADMSPrivilegedResource. Get azure AD MS privileged resource.
Get-AzureADMSPrivilegedRoleAssignment. Get role assignments for a specific provider and resource.
Get-AzureADMSPrivilegedRoleAssignmentRequest. Get role assignment request for a specific resource.
Get-AzureADMSPrivilegedRoleDefinition. Get role definitions.
Get-AzureADMSPrivilegedRoleSetting. Get role settings.
Open-AzureADMSPrivilegedRoleAssignmentRequest. Create a role assignment request.
Set-AzureADMSPrivilegedRoleAssignmentRequest. Update a role assignment request.
Set-AzureADMSPrivilegedRoleSetting. Update role setting.
The other 3 Privileged Role commands that are still available to use, but currently are not documented on the above link to docs are:
Get-AzureADPrivilegedRole. List all Directory Roles available for Privileged Roles assignments.
Get-AzureADPrivilegedRoleAssignment. List active and eligible privileged role assignments.
New-AzureADPrivilegedRoleAssignment. Creates a new privileged role assignment for specified role and user.
(*) As soon as your tenant is upgraded to using the updated Privileged Identity Management experience for Azure AD roles (see below) these three commands will be outdated and should not be used anymore.
Further on in this blog post I will provide some more examples and usage scenarios for the new Azure AD Privileged Role Management commands, and their equivalent Microsoft Graph API methods, but first something on the difference between Azure Resources and Azure AD, changes in management experience and current limitations in the PowerShell commands.
Azure Resources vs. Azure AD
As you might know, Azure AD PIM can be used for managing privileged role assignments to both Azure AD roles and Azure Resources:
The new PowerShell commands that follows the syntax verb-AzureADMSPrivilegedRole…. all require a parameter called ProviderId, which as per today only support “AzureResources”. This means that currently you can only use the new Azure AD PowerShell commands for managing PIM for Azure resources, not for Azure AD roles yet! I had this confirmed with the Microsoft Program Manager for Azure AD PIM, as you can see from the conversation https://twitter.com/stevemsft/status/1143977432690466816?s=20 and shown in the below image:
This is related to the following notice from the Azure AD PIM Microsoft Graph documentation, stating that Azure AD roles will move to the Azure resource API in the coming months:
Update March 19 2020: Tenants are now starting to get migrated to the new Azure AD PIM provider similar to Azure Resources! If you log in to your tenant and see the following info in the Privileged Identity Management blade, then you can also use the new Azure AD provider, as I will show in the examples below:
As the new PowerShell commands are built on Microsoft Graph, this also means that they will work for Azure AD roles depending o the move to the Azure resources API.
Explore Privileged Resources
There are two commands for exploring and adding Privileged Azure Resources:
The equivalent Graph API methods for Azure AD roles are (Beta endpoint only as per march 2020):
List: GET /privilegedAccess/aadRoles/resources
Get: GET /privilegedAccess/aadRoles/resources/{tenantid}
Register: POST /privilegedAccess/aadRoles/resources/register (Note per march 2020: There are currently no way to programmatically onboard tenants to PIM for Azure AD roles)
This will return a list (capped at max 200 results), with the Id, ExternalId, Type, DisplayName and more for each resource that have been registered to Azure AD PIM:
As mentioned above the list is capped at max 200 results, which is a Microsoft Graph limitation for this privileged resource API. You can use the –Top parameter to specify a lower number of returned results, like –Top 50, but it will just ignore and cap at 200 if you for example type –Top 300.
So to return fewer results we can use the –Filter parameter which support Odata query. I have tried some different combinations, and not all will work as expected. Some examples of working filters:
..or any other specific resource type like Microsoft.Network/loadBalancers, Microsoft.Network/networkSecurityGroups, etc., which I find is a bit strange as I would like to filter on those as well.
If you know the specific resource id you can also get that privileged resource object directly:
Lets compare this to the Microsoft Graph API methods, using Graph Explorer. To list all managed Azure Resources I run the GET /privilegedAccess/azureResources/resources like this:
Which pretty much returns the same list of resources and attributes as I did when running the PowerShell command. There is one important change though, and I mentioned earlier that the PowerShell command would only return max 200 results. In the Graph response I will receive a skip token from where if I run that I will get the next set of potentially 200 more results, and so on.
Graph can also handle filters of course, so lets try that. Here are some variations you can try out:
GET /privilegedAccess/azureResources/resources?$filter=type eq ‘resourcegroup’&$top=5
GET /privilegedAccess/azureResources/resources?$filter=displayName eq ‘rg-auth-dc’
GET /privilegedAccess/azureResources/resources?$filter=startswith(displayName,’rg-‘)
And if you want to get a specific resource with Graph, just specify the id like this:
GET /privilegedAccess/azureResources/resources/ad7327ba-50f4-4f03-a4ee-029f310b6775
Which will return the specific resource in the response:
Last, to add a resource as a managed resource to Azure AD PIM, using PowerShell can be done like this:
These commands are just to get a list of and adding managed Azure resources for Azure AD PIM, i the next parts we will look into actually managing assignments and settings.
Examples of Exploring Privileged Azure AD role resource
To get a list over all tenants registered for privileged Azure AD roles, just run:
This will return a list of directories that have been onboarded for PIM for Azure AD Roles, with the Id referring to tenant id, Type, DisplayName and more:
If you know the specific tenant id you can also get that privileged resource object directly:
Lets compare this to the Microsoft Graph API methods, using Graph Explorer. To list all managed Azure AD roles directories I run the GET /privilegedAccess/aadRoles/resources like this:
Note that you also can specify the resource for Azure AD roles directly, by specifying the tenant id like this:
GET /privilegedAccess/aadRoles/resources/{tenant-id}
These commands are just to get a list and settings for tenant onboarded to Azure AD roles management with Azure AD PIM, i the next parts we will look into actually managing assignments and settings.
Explore Role Assignments
The following command can be used for listing or getting specific role assignments for Azure resources:
The equivalent Microsoft Graph API methods for Azure Resources:
List: GET /privilegedAccess/azureResources/resources/{resourceId}/roleAssignments
List: GET /privilegedAccess/azureResources/roleAssignments?$filter=resourceId+eq+'{resourceId}’
List (Mine): GET /privilegedAccess/azureResources/roleAssignments?$filter=subjectId+eq+'{myId}’
Get: GET /privilegedAccess/azureResources/resources/{resourceId}/roleAssignments/{id}
Get: GET /privilegedAccess/azureResources/roleAssignments/{id}?$filter=resourceId+eq+'{resourceId}’
Get (Mine): GET /privilegedAccess/azureResources/roleAssignments/{id}?$filter=subjectId+eq+'{myId}’
And these are the main Graph API methods for Azure AD roles:
List: GET /privilegedAccess/aadRoles/resources/{tenantId}/roleAssignments
List (Mine): GET /privilegedAccess/aadRoles/resources/{tenantId}/roleAssignments?$filter=subjectId+eq+'{myId}’
List (Role): GET privilegedAccess/aadRoles/resources/{tenantId}/roleAssignments?filter=roleDefinitionId eq ‘{myRoleDefinitionId}’
Now that seems a lot of different variations for Graph calls for the one PowerShell command, but as you will see later Graph can be a little more flexible in querying in different ways.
Examples of Exploring Role Assignments for Azure Resources
Lets see some samples for PowerShell first. Now we need to supply a resource id, that can be subscription object, a resource group object, any type of resource objects like virtual machines, virtual networks and so on, and even management group objects. So based on the commands previously shown in the blog post, we should be able to get out the resource id’s first, for example like this:
So this returns a list of role assignments for the specified resource, each assignment has its own id, as well as the ResourceId, the RoleDefinitionId (which role that has been assigned, like reader, contributor, owner, etc), SubjectId (which user, service principal, group, etc has been assigned the role). In addition we can get info on any linked eligible assignements, start and end time for assignements, assignment state and if the assignment is active or not, or if the type is inherited or assigned directly to the resource.
The same results can be retrieved by first querying for the resource id:
And then querying for the role assignments belonging to this resource:
Basically the above command returns the same as this blade in the Azure Portal:
Examples of Exploring Role Assignments for Azure AD roles
If i want to look at Role Assignments for Azure AD roles via PowerShell you would specify ProviderId as aadRoles and the ResourceId to be the tenant id:
This will return all Azure AD role assignments in your tenant:
To return fewer results we can use the –Filter parameter which support Odata query. I have tried some different combinations, here are some examples of working filters:
Most IT admins, pros and end users from organizations that use Office 365 and Azure AD will by now have heard about the big Azure MFA outage on Monday November 19. When something like this happens, it is important to get insights on which users that were affected, and in what type of scenarios they most experienced the problem. Microsoft MVP Tony Redmond wrote a useful blog post (https://office365itpros.com/2018/11/21/reporting-mfa-enabled-accounts/) on how to report on possible/potentially affected and MFA enabled users, and how to disable and re-enable those users. But many organizations are now using Conditional Access policies using Azure AD Premium, so this will be of limited help for those.
If I could wish one thing from Microsoft for Christmas this year, it would be to be able to manage MFA and Conditional Access policies with Azure AD PowerShell and Microsoft Graph! Admins could then run “break-the-glass” administrative users (or even “break-the-glass service principals”) to disable/re-enable policies when big MFA outages happens. A good CA policy design, trusting compliant devices and secure locations could also go a long way in mitigating such big outage problems.
By exploring the Sign-in logs in Log Analytics I could get some more insights into how my organization was affected by the MFA outage on November 19. Please see the above blog post on how to get started setting up this integration, the rest of this blog post will show some sample queries for the SigninLogs.
Querying the SigninLogs for failed and interrupted sign-ins
All the queries seen below are shown in screenshot images, but I have listed all them for you to copy at the end of the blog post.
First I can take a look at the SigninLogs for the specific day of 19th November, and the grouping on the result type and description of the sign-in events. For example I can see that there is a high number of event 50074: User did not pass the MFA challenge. Interestingly there is also a relatively high number of invalid username or password, that could be a separate issue but could also be that users that fails MFA sign-ins tries to log in again thinking they had wrong password first time.
Changing that query a little, I can exclude the successful sign-ins (ResultType 0), and sort on the most count of failures. Two of the events of most interest here is 50074 and 50076:
In this next query I focus on the “50074: User did not pass the MFA challenge” error. By increasing the time range to last 31 days, and adding a bin(TimeGenerated, 1d) to the summarize group, I’ll be able to see the count of this error on each day in the last month. This will give me a baseline, and we can see that on the 19th this number spikes. I have added a render to timechart for graphical display. There are also some other days where this number increases, I can look into more insights for that if I want as well, but for now I will focus on the 19th.
Back to the time range of the 19th of November, I can modify the summarize to group by each hour, by using bin(TimeGenerated, 1h). This will show me how the problems evolved during the day. Must errors occurred about 10 am in the morning:
Lets look at some queries for how this error affected my environment. First I can group on the Users and how many errors they experience. Some users were really persistent in trying to get through the MFA error. I have masked the real names. We also see some admin accounts but admins quickly recognized that something was wrong, and actively sought information on the outage. By midday most users were notified on the on-going outage and the number of errors slowly decrease during the day.
In this next query, I group on the Apps the users tried to reach:
And in this following query, what kind of Client App they used. It would be normal that Browser is quite high, as mobile apps and desktop clients are more likely to have valid refresh tokens.
In this query I can look into the device operating system the users tried to sign in from:
In the following query I can look at which network the users tried to log in from, by identifying IP address:
And in this query we can get more location details from where users tried to sign in:
Summary
Querying Log Analytics for Sign-in events as shown above can provide valuable insights into how such an outage can affect users. This can also give me some input on how to design Conditional Access policies. Querying this data over time can also provide a baseline for normal operations in your environment, and make it easier to set alert thresholds if you want to get alerts when number of failures inside a time interval gets higher than usual. Using Azure Monitor and action groups you can be pro-active and be notified if something similar should occur again.
Here are all the queries shown above:
// Look at SigninLogs for a custom date time interval and group by sign in results
SigninLogs
| where TimeGenerated between(datetime("2018-11-19 00:00:00") .. datetime("2018-11-19 23:59:59"))
| summarize count() by ResultType, ResultDescription

// Exclude successful signins and format results with sorting
SigninLogs
| where TimeGenerated between(datetime("2018-11-19 00:00:00") .. datetime("2018-11-19 23:59:59"))
| where ResultType != "0"
| summarize FailedSigninCount = count() by ResultDescription, ResultType
| sort by FailedSigninCount desc

// Look at User did not pass the MFA challenge error last month to see trend
// and present to line chart group by each 1 day
SigninLogs
| where TimeGenerated >= ago(31d)
| where ResultType == "50074"
| summarize FailedSigninCount = count() by ResultDescription, bin(TimeGenerated, 1d)
| render timechart

// Look at User did not pass the MFA challenge error on the MFA outage day
// and present to line chart group by each 1 hour to see impact during day
SigninLogs
| where TimeGenerated between(datetime("2018-11-19 00:00:00") .. datetime("2018-11-19 23:59:59"))
| where ResultType == "50074"
| summarize FailedSigninCount = count() by ResultDescription, bin(TimeGenerated, 1h)
| render timechart

// Look at User did not pass the MFA challenge error on the MFA outage day
// and group on users to see affected users
SigninLogs
| where TimeGenerated between(datetime("2018-11-19 00:00:00") .. datetime("2018-11-19 23:59:59"))
| where ResultType == "50074"
| summarize FailedSigninCount = count() by UserDisplayName
| sort by FailedSigninCount desc

// Look at User did not pass the MFA challenge error on the MFA outage day
// and group on Apps to see affected applications the users tried to sign in to
SigninLogs
| where TimeGenerated  between(datetime("2018-11-19 00:00:00") .. datetime("2018-11-19 23:59:59"))
| where ResultType == "50074"
| summarize FailedSigninCount = count() by AppDisplayName
| sort by FailedSigninCount desc

// Look at User did not pass the MFA challenge error on the MFA outage day
// and group on client apps to see affected apps the users tried to sign in from
SigninLogs
| where TimeGenerated between(datetime("2018-11-19 00:00:00") .. datetime("2018-11-19 23:59:59"))
| where ResultType == "50074"
| summarize FailedSigninCount = count() by ClientAppUsed
| sort by FailedSigninCount desc

// Look at User did not pass the MFA challenge error on the MFA outage day
// and group on device operating system to see affected platforms
SigninLogs
| where TimeGenerated between(datetime("2018-11-19 00:00:00") .. datetime("2018-11-19 23:59:59"))
| where ResultType == "50074"
| summarize FailedSigninCount = count() by tostring(DeviceDetail.operatingSystem)
| sort by FailedSigninCount desc

// Look at User did not pass the MFA challenge error on the MFA outage day
// and group on IP address to see from which network users tried to sign in from
SigninLogs
| where TimeGenerated between(datetime("2018-11-19 00:00:00") .. datetime("2018-11-19 23:59:59"))
| where ResultType == "50074"
| summarize FailedSigninCount = count() by IPAddress
| sort by FailedSigninCount desc

// Look at User did not pass the MFA challenge error on the MFA outage day
// and group on users location details to see which country, state and city users tried to sign in from
SigninLogs
| where TimeGenerated between(datetime("2018-11-19 00:00:00") .. datetime("2018-11-19 23:59:59"))
| where ResultType == "50074"
| summarize FailedSigninCount = count() by tostring(LocationDetails.countryOrRegion), tostring(LocationDetails.state), tostring(LocationDetails.city)
| sort by FailedSigninCount desc
In this blog post I wanted to show a practical example on how to create an alert for when Azure AD Self Service Password fails in password writeback because of connectivity error to the On-premises environment.
Build the query
If you know the schema, you can write the query directly, but more often than not you will work out these scenarios by exploring your actual log data. In my example we had a concrete example where password resets failed because of On-premises connectivity error. Looking into the Azure Log Analytics logs, I started with this simple query against AuditLogs:
After that I looked into the filters, and found that I could filter on Failures:
This resultated in some failure results. Exploring the results in the bottom right windows, I found that the failures had a ResultDescription of “OnPremisesConnectivityError”:
By clicking on the plus sign above I add that to the query:
I want to save my query next, so that I have it available for later:
Now that I have the results I want I can proceed to create an Alert Rule. Btw, here is the full query (I have since amended it to include OnPremisesConnectivityFailure in addition):
AuditLogs
| where Category == "Self-service Password Management"
| where ResultType == "Failure"
| where ResultDescription == "OnPremisesConnectivityError" or ResultDescription == "OnPremisesConnectivtyFailure"
Create an Alert Rule
Next, I can create a new Alert Rule for this query, something you can do directly from the query:
This next step would bring me over to the Azure Monitor and Rules Management section. The alert target (OMS/Log Analytics Workspace) and target hierarchy (Azure Subscription and Resource Group) should already be specifed:
Now I need to configure the alert criteria. Note that currently monthly cost for this alert is $1.50. Click on the criteria to configure the signal logic:
Here we see the query from before, as well as we need to set a threshold for number of results, and a period and frequency. Pricing details can be found at: https://azure.microsoft.com/en-us/pricing/details/monitor/. If you look at Alert signals and Log section, you’ll see that alerts with frequency of 5 minutes is $1.5, 10 minutes $1 and 15 minutes $0.5. This is per log monitored. I changed my period and frequency to 15 minutes:
After I click done I see that the alert criteria is correctly configured with a price of $0.50:
Next I need to specify the alert details, for example like below. You also have the option to supress multiple alerts inside a time window. I configured 60 minutes:
Next I need to either select an existing action group or create a new. An action group decides which action to take when an alert occures:
I’ll create a new action group for now. In this action group I will select to send an e-mail to a group in my company. As you see in the image below I have several options for action type, examples of use can be:
Trigger e-mail, SMS, push or other notifications.
Trigger Azure Functions for running some code logic.
Trigger Logic App for executing a business flow logic.
Trigger a webhook for posting a status, for example to a Microsoft Teams webhook.
Send the Alert via ITSM connector to create an incident in your connected ITSM system.
Trigger a Runbook in Azure Automation to run your own PowerShell runbooks, or you can use one of the built-in runbooks for restart, stop, remove or scale up/down VM.
When selecting Email I need to specify an e-mail address for the user/group I want to notify:
After that I’m ready to create the Alert rule:
After I created the rule, the group e-mail address I specified received this e-mail, confirming that it is now part of an action group:
If you want to locate and change this alert rule at a later stage, you will find it under Azure Monitor and Alert Rules:
Thats it, now we can just wait for future Self-Service Password Reset or Change connectivity errors, and we will get notified.
Testing the Alert rule Notification
For testing, I just wanted to force the error by logging into my Azure AD Connect Server and stop the service.
After that I tried to reset or change my password, resulting in this error message shown to the user:
Now in this situation, most users will either just wait and try again later, try one more time and then give up, and if you are lucky they will contact their IT admin and notify of the error. More often than not users just leave it there, and not notify anyone. This is where it is useful to get an alert as we have created here, because then you as an IT admin can proactively analyze and fix the error before it affects more users. This is the alert I received to my specified group:
We can directly click on the result to get into details for the error, for example which user was affected, from which IP address and more:
I don’t know about you, but I think this is just brilliant 🙂 With the integration of Azure AD Activity Logs in Log Analytics, I can really explore and analyze a lot of the operations going on in my tenant, and using Azure Monitor I can create alert rules that notifies or trigger other actions to handle those alerts.
Thanks for reading, more blog post will follow on this subject of Azure AD and Log Analytics, so stay tuned!
By bringing thousands (or even millions depending on your organization size and use of Azure AD), of sign-in and audit log events to Log Analytics you can finally use the power of Log Analytics for query, analyze, visualize and alert on your data.
In this blog post I will show how to get started and provide some useful tips. Most of this is already well documented in the following Microsoft Docs, but I will provide my own perspective and experience and as well let this blog post be an anchor for future detailed blog posts on the subject of analyzing Azure AD sign-in and audit logs in Log Analytics and Azure Monitor:
The first action we need to do is to Turn on diagnostics in the Azure AD Portal. You will need to be a Global Administrator or Security Administrator to do this:
PS! Another way to get to this setting to Turn on diagnostics is to either go to Sign-ins or Audit logs under Monotoring, and from there click on Export Data Settings:
Next select to Send to Log Analytics, and then select either or both of the AuditLogs or SigninLogs.
Note that to be able to export Sign-in data, your organization needs Azure AD Premium P1 or P2 (or EMS E3/E5). This requirement only applies to sign-in logs, not audit logs.
After selecting Log Analytics, and which logs to export, you need to configure which Log Analytics (still named as OMS) workspace to export the data to:
Note that this requires access to an Azure Subscription. You can either select an existing OMS workspace or create a new:
Important info! Usually you will need to be a Global Administrator or Security Administrator to be able to access the details of Sign-in logs or Audit logs in Azure AD, but by exporting this data to either an existing or a new Log Analytics workspace, potentially a lot more users can access that data. You need to think about if this is something you want to do, and at least control and govern which users can access that Log Analytics workspace.
For this reason alone it would probably be a better idea to create a dedicated Log Analytics workspace for the Azure AD activity logs:
Regarding pricing, using a Log Analytics workspace for Azure AD Activity Logs alone should not incur a notable cost in most normal environments. In an environment of less than 100 users I found the following consumption per day, which is way below the amount of free data you get included:
If you want to save and use that same query yourself, here it is:
Usage| where TimeGenerated > startofday(ago(31d))| where IsBillable == true
| where (DataType == "SigninLogs" or DataType == "AuditLogs") and Solution == "LogManagement"
| summarize TotalVolumeGB = sum(Quantity) / 1024 by bin(TimeGenerated, 1d), Solution| render barchart
Choosing a pricing tier depends on whether the Subscription was created before April 2, 2018 or not, or whether you have elected to move to a new pricing model. The older pricing model had a choice of free tier, which had a daily cap of 500 MB and a data retention of 7 days. As the diagram above showed, most organizations will be way below the 500 MB daily cap, but a retention of only 7 days will be considered short for most analyzing needs. So under the older pricing model you would consider a standalone per GB model, giving a retention of 1 month by default, but a cost of $2.30 per GB.
The new pricing model after April 2, 2018 has a simplified pricing model. Here the first 5 GB are free and you have a default retention of 31 days. Additional GBs for ingestion are $2.99 per month, and extra retention after the first 31 days is $0.13 per GB per month. Note that this pricing model is on subscription level and affects all your Log Analytics workspaces, so you need to carefully consider any changes to the new pricing model in your subscription.
After you have selected/created a Log Analytics workspace, and provided a name for the Diagnostic settings, you are ready to Save:
After about 15 minutes you can start explore the Logs in the Log Analytics workspace.
Start to Analyze Azure AD Activity logs with Log Analytics
To begin analyze the exported Azure AD Activity Logs with Log Analytics, you can either go to the Log Analytics section in your Azure Portal. You can also access the logs directly from Azure Active Directory from under the Monitoring section, which will take you directly to the configured Log Analytics workspace:
By default this will open a search query showing sample data from all your Log Analytics workspace.
I find that a good way to start learning about the sign-in and audit logs is to look at the schema. The SigninLogs and AuditLogs schemas should appear right under LogManagement as shown below:
To look at the SigninLogs just add that to the query window and select a time range and click Run:
Depending on your sample data you can start filter on the left side, for example to look at only certain app sign ins, or client apps used, location and more..
Similarly for AuditLogs, in the following example I have set a time range of last 7 days:
See the links in the beginning of this blog post for some more sample queries and you can also import some sample views.
So now that we have a working diagnostic setting that exports my Azure AD sign-in and audit logs to Azure Log Analytics, I’m ready to explore some interesting scenarios for analyzing this data. This will be a topic for upcoming blog posts, so stay tuned for that!
Thanks for reading so far, I’m really excited for this feature!
In this blog article I will build on that blog post to provide a practical example of using Microsoft Graph, and create an Azure AD PIM (Privileged Identity Management) App for activating any eligible admin roles for the logged on user.
First lets look into some of the documentation and what we need to prepare.
If a user that has been assigned admin roles using Azure AD PIM, wants to activate any of the eligible role assignments, the user can navigate to the Azure AD PIM blade or just use this short url: https://aka.ms/myroles. In this blog post I will use my demo user account as an example, and this user has these roles assigned currently:
In my case this returns the following (I have blurred out my userid for privacy):
Note that the response also shows if I have a current activation of any roles, and if so when that will expire. Roles that have isElevated set to “true”, and without an expirationDateTime are roles that are permanently assigned. If I want to query on that I can run the following GET command:
When my role assignments are returned I only get roleId’s though, so lets look at how I can get the displaynames of those roles.
Lets look at the documentation, and it clearly states that for the requestor (my normal user account) to be able to list privilegedRoles I need to be either a Global Administrator, PIM Administrator, Security Administrator or Security Reader:
So that won’t work for me, as I want to let normal user accounts to be able to use my Graph API commands.
However, one thing that normal users do have access to, is listing of directoryRoles (https://developer.microsoft.com/en-us/graph/docs/api-reference/beta/api/directoryrole_list). So if I run that, I will get all directory roles with their id and a roleTemplateId, and I have highlighted below the id I was looking for above, which turns out to be the Exchange Administrator role:
Ok, so now I have a way to query for my role assignments, and also a way to query for the display names of any roles. Now I need to see how I can activate (or deactivate) my role assignments.
Currently there is an error in the Graph Beta API for PIM that won’t let me activate roles that require MFA, so I’ll just accept this error and move on for now:
Before I deactivate a role I need to have it to be active, so for now I will go to https://aka.ms/myroles, and activate the Exchange Administrator role manually, promptly requiring MFA verification first:
No request body is needed, and this time I get a successful response:
I think these 4 methods will do for now, there are a lot of other methods for managing PIM roles and settings as well, but we are now ready to start working with our PowerApps and Flow Custom Connector.
Add Microsoft Graph Permissions to App Registration
Looking at the documentation I see that I need to add Delegated Permissions for Directory.AccessAsUser.All to be able to list my assignments:
Similarly, if I check the documentation for the other methods from above, I will need also Directory.AccessAsUser.All:
So I will go ahead and add that permission to my App Registration from before. Logged in as a Global Admin find the App Registration, go to Settings and Permissions, and add the following delegated permission for Microsoft Graph:
Note that it requires an admin to consent, so remember to click on Grant permissions:
Now we are ready to add the PIM API methods to the Custom Connector.
Adding PIM API’s to Custom Connector Operations
Again building on my linked blog post, you should now be able to log on to PowerApps, and find your PowerApps Microsoft Graph connector:
If you don’t have it, just follow the steps in the linked post to create it.
Select to edit, and go to step 3. Definition and add a new action. Lets first create a new action for getting my role assignments:
Scroll down to Request, this is where we will provide the details for our query. The best way to do this is to select to Import from sample. I specify the Method to be GET, and then the query like this, which is the same query I ran in the Graph Explorer earlier:
I don’t need to specify any Header or Body for this query, so I just press Import. Now my action looks like this:
Scroll down to the Response section, and then click on the default response. Click on Import from sample, and this time you paste in the response body from the previous Graph Explorer query:
This response will help the custom connector operation so that we can get the right output values mapped in our PowerApp later. Select Import.
The response now looks like this:
We can also validate that the response looks ok:
Click on Update connector to save this operation, do not select to Test at this point. We have more to do..
Next I want to create another action for List directoryRoles. I’ll create a new Action:
Request and Import from sample:
Note that the Request now will have a $filter parameter:
Default Response and Import from sample:
Check validation and the Update Connector:
Next I want to create another action for
privilegedRole: selfActivate. I’ll create a new Action:
Request and Import from sample, this time note the POST verb, and specifying {id} in URL, as well as the request body as shown below:
Note now that the request will have an id parameter in the path as well as a body parameter:
Default Response and Import from sample (response body is copied from documentation):
The response looks like this now and we can check validation:
Click Update Connector to save our progress so far. Now we can add the last action for privilegedRole: selfDeactivate :
Request and Import from sample, specifying verb POST and again using {id} in URL:
The request will look like this now:
Default Response and Import from sample:
And we can validate the response:
Click on Update Connector to save. We should now have 4 actions successfully configured, in addition to the ones we had from before:
Now we can do some testing, close the connector for now. Under Data, find Connections. If you previously had any connections to the “PowerApps Microsoft Graph” connector, like I have here, delete the connection:
After clearing any existing connections, select New connection at the top and find the PowerApps Microsoft Graph connector:
Click create and the log in with your current user to create the connection. Now you can go back to the custom connector, click Edit and then go to Test section. Select the current connection, and select the action to test. Then click Test operation:
The test should complete successfully and return my role assignments:
Lets test the list directory roles, this time I need to specify the $filter:
Testing selfActivate will fail as it did with testing with Graph Explorer because of the MFA requirement: (we will explore that later)
Last test is for selfDeactivate, which willl have an empty response because the role is not active:
Starting with the PowerApp
Now that we have the Custom Connector Operations ready, we can proceed to create the PowerApp. We’ll begin with an empty app, create some controls and layouts before we get into the Flows needed.
Start by Create an app:
Then select a blank canvas, and phone layout:
You should now have an empty app like this:
Fast forward, and I’ll assume you have some basic PowerApps skills, add some controls, layout and image after your liking, ending up with something similar like this:
A quick summary of the above:
In addition to my selected logo and background, I’ve added labels for listing my roles and selected role details.
I’ve added three buttons, one for refreshing my roles, and one for activate and deactivate any roles.
I also have a text box to provide an activation reason, as well as a message label to show/hide any error message if I try to activate without a reason. We’ll get to that later.
Now we have an empty powerapp with some layouts and controls. It’s time to get into the Flows that will trigger the Microsoft Graph operations. First go to App Settings and specify an App name and choose a descriptive icon and color:
And then save the App:
Creating the Flow for Getting My Role Assignments
In the PowerApps main menu, find the link to Flows, and the select to create a Flow from blank:
After creating a blank Flow from here there will already be a step for input from PowerApps as shown below:
Click New step, add an action, and search for variables, and select the Variables – Initialize variable action:
Type the name MyRolesArray and select Type Array:
Add a new step of type action, and this time we will search for the custom connector “powerapps microsoft graph”, and that will list any operations we defined earlier. We will now select the operation for “My Privileged Role Assignments”:
Our Flow should look like this now:
When we tested via Graph Explorer earlier in this blog post, PIM role assignments returned with only role id’s, so we had to do an additional call to list directoryroles to get the displaynames of the roles. We will now implement some logic in the Flow to achieve this.
Add a new step, this time selecting More and Add an apply to each:
In the Apply to each, select “value” as output from the previous step as shown below:
It’s also a good idea to rename the step, like I have done below before you proceed:
Inside the For Each loop, add a new action, searching for the PowerApps Microsoft Graph connector again, this time selecting the List directoryRoles operation:
We need to provide a value for the $filter parameter, this is done by typing the filter definition and selecting the roleId from the dynamic content provided by previous step:
I also rename the step before I proceed:
Next, add another Apply to each section, using the value output from the List directoryRoles to get DisplayName:
Next add an action and search for append to array, and select that:
Now comes the most important part. I want to use the array variable I initialized in the beginning of the Flow, and build a custom JSON object array which integrates my role assignments as well as the displaynames in one single output. So in the following I select the array variable name, and for value I create my own custom JSON as shown below. In addition I use the dynamic content to search for the values I want to add:
At the end of the Flow, outside of the two nested Apply to each loops, add a Request – Response action:
In the Response, specify the MyRolesArray as Body, and provide a Response Body JSON Schema. The best way to get a JSON schema is to Save and Test the Flow, and look at the default Response. This is how it looks in my definition:
Next, Save and Test the Flow. Look for the Test button, and select like below:
Follow the on-screen instructions for choosing test connection, and then start the Flow. Click the link to see the Flow run activity, and you should be able to see that the Flow executed successfully and you can look at the details on each step. I’m mostly interested in the Response output at the end, and it looks like this:
If I scroll down I can see that the output contains all my roles, and have the display name included in the output. This is the output I eventually will work with in my PowerApp.
Remember to give the Flow a describing name, and Save it before you proceed to the next section.
Creating the Flows for Self Activate and Deactivate Roles
Now we need to create the Flows for self activating and deactivating the selected roles. First start by creating a new blank Flow, starting with the input from PowerApps:
Add a new step and action for the Microsoft PowerApps Graph connector and the Privileged Role Self Activate operation:
When choosing this operation we will get the opportunity to specify input fields, where id is required, as this is the role id for the role we want to activate. In addition we can specify a reason, as well as duration and ticketing info as optional fields:
In my solution I want to specify id and reason, and just use the default duration. For the id field and reason field, just click “Ask in PowerApps”, which will create two parameters to use from PowerApps when I will call the flow:
In the third step I will add a Request – Response action, and use the Body from the previous step, like this:
Save the Flow with a name like I have done below:
Then its a good idea to test the Flow, select the test button, provide the trigger for the flow, and when running we need to manually specify the role id to activate, and a reason, like shown below:
(PS! Remember to test with a role that does not require MFA on elevation, because of the previously reported bug.)
After clickin Run Now, verify that the Flow successfully started, and then click into the activity details. In the example below I can verify that indeed the role was activated:
So that is the Flow for self activating a role, now we need a similar Flow for deactivating a role. Now that we should start getting the hang of this, this is how that Flow should look after creating and saving it:
Deactivating a role only requires the role id as a parameter, as shown above. Lets test this as well:
The Flow should start successfully, and you can verify the steps like in the following:
So, now we have created 3 Flows that we will use in the previously created PowerApp. In the next section we will add the flows and provide some logic to the application.
Connecting the PowerApp to the Flows
Back in the PowerApp created earlier, open it in Edit mode, and select the Refresh My Roles button. Click on the Action menu, and then on Flows, and from the Data section select the Flow we created earlier for Get My Role Assignments:
When selecting that Flow, the OnSelect event will populate with the name of the Flow and the Run method. As this Flow doesn’t have any input arguments we can just close the parenthis after like this .Run(), as shown below:
So now our button will get any role assignments for the connected user, but we have store the output we get back from the Flow, and use that in the listbox and in the details labels below. So while the Refresh My Roles is still selected, add the following to the OnSelect event:
A little explanation, the Set(wait,true) and Set(wait,!true) are used at the beginning and end of the action for indicating that the PowerApp is busy when calling the Flow. The ClearCollect is used to store the output response we get back from the Flow in a variable; MyPIMRoles.
Next, set the Items property of the listbox for My Roles to MyPIMRoles:
If we now du a test run of the PowerApp, the easiest way to do that is to hold the ALT button down and then click on the Refresh My Roles button. This should return the roles you are assigned to like this:
If your listbox is not showing the displayname of the roles, you can change that from the advanced properties of the listbox:
While the listbox i still selected, change to the OnSelect method and add the following:
Set(SelectedRole,First(lstMyRoles.SelectedItems))
It should look like this:
A quick explanation of this: I’m setting a variable “SelectedRole”, every time I click on a role in the listbox, by getting the first instance of the lstMyRoles.SelectedItems. (In fact, as my listbox only allows to select one item at a time, the first will always be the one I selected).
This “SelectedRole” variable can now be used in my other label details. First, set the lblRoleIdValue.Text property to the following:
Likewise, set the lblRoleElevatedValue.Text property to the following:
And then set the lblRoleExpiresValue.Text property to: Text(DateTimeValue(SelectedRole.expirationDateTime), DateTimeFormat.ShortDateTime24), like this:
As you can see, I’ve added some format functions to display any date and time values from the selected role in the format of short datetime 24 hour clock.
Now, if you hold down the ALT button again, you can click on the selected roles in the listbox, and the labels below will update with the selected role id, if it is elevated or not, and any expiry of existing elevations:
Now it’s time to add the other Flows to the Activate and Deactivate buttons, first select the Activate button, and on the Action and Flow menu, select to add the Priviliged Role Self Activate Flow:
This Flow needs two inputs:
The first input we will get from SelectedRole.roleId, and the second from the txtActivationReason.Text, so it would look like this:
Similarly, add the Flow for the Deactivate button, specifying the SelectedRole.roleId as input:
Now, at this point we should be able to get my role assignments in the list box, and also to be able to activate or deactivate the selected roles. I do want to add some more logic to the app though. Starting with activating/deactivating the buttons regarding the status of the role. On the Activate button, change the DisplayMode property to:
Next, I want to add some hint text to the text box for activation reason, this is done this way:
At the bottom I have created a label with a message, this lblShowMessage control I want to set visible if I try to activate a role without specifying a reason:
Now I need to make some changes to the Activate button and OnSelect method to implement some logic:
Lets break that down: First I use the Set method to control wait to indicate that the App is busy, then I do an If check on the txtActivationReason text box, and if I have specified a reason I proceed to run the Flow to self activate the role. After that I clear the txtActivationReason text box, and call the flow for refresh the roles in the list box. At the end I use a ShowMessage variable, setting it to true or false, which in turn is connected to the Visible property of the lblShowMessage control like this:
Here is the Activate button OnSelect code for you to copy:
I’ll also add a reset of the activation reason text box to the Refresh My Roles button:
And finally, at the OnSelect method of the lstMyRoles listbox, I’ll set the ShowMessage variable to false whenever I click on different roles in the list, so that any previous activation error message is not shown.
That should be it! We’ve now implemented some logic to the PowerApp, and are ready to publish and run the App.
Publish and Run the Azure AD PIM App
On the File menu click Save, and the Publish:
You can also Share the PowerApp in your organization:
After you have published the PowerApp, you can click the Play button to run the PowerApp. First time you will need to accept permission:
After that you should be able to refresh your roles:
Let’s try to activate a role:
After I click the Activate button, the role will be activated, the list will be refreshed, and I can look at the Device Administrators role that it is now elevated and with an expiry time:
The Activate button is now disabled for that role, and the Deactivate button is enabled. Let’s try to deactivate the role again, clicking the Deactivate button. After a short time the role is deactivated, elevation status is false:
So now the Azure AD PIM App is working as intended, every user that have been assigned a role can now elevate themselves using the App. Even better is that my users also now can use the mobile PowerApps app to run this from their mobile phones!
As an administrator I can also see the results of the activations in the Directory roles audit history:
Known issues and tips
The biggest issue right now is a problem with the Microsoft Graph beta endpoint for selfactivate the role, as it currently does not support activating roles that require MFA. So I you want to use Microsoft Graph for activating roles now, you have to disable the requirement of requiring MFA for activation, either by default for all roles or for roles individually:
I’ll keep you posted of any changes to this issue, and update the blog post if that changes.
Another tip is that if you want to do some reporting on how many users are using the PowerApp for activating their PIM roles, you can for example use the ticketSystem string for specifying a constant like below:
That should wrap up this blog post, hope this will be useful for you, thanks for reading