A Blog about Enterprise Mobility + Security, Azure AD, Datacenter Management, Service Delivery, Automation, Monitoring, Cloud OS, Azure and anything worthwhile sharing with the Cloud and Datacenter community.
Now that we have registered the application for Hue Remote API, and stored the client Id and Secret in Azure Key Vault, we can start build the Logic App that will authorize and get access token via Oauth2.
Here is a short video where I introduce the concept:
Create the Logic App and HTTP Trigger
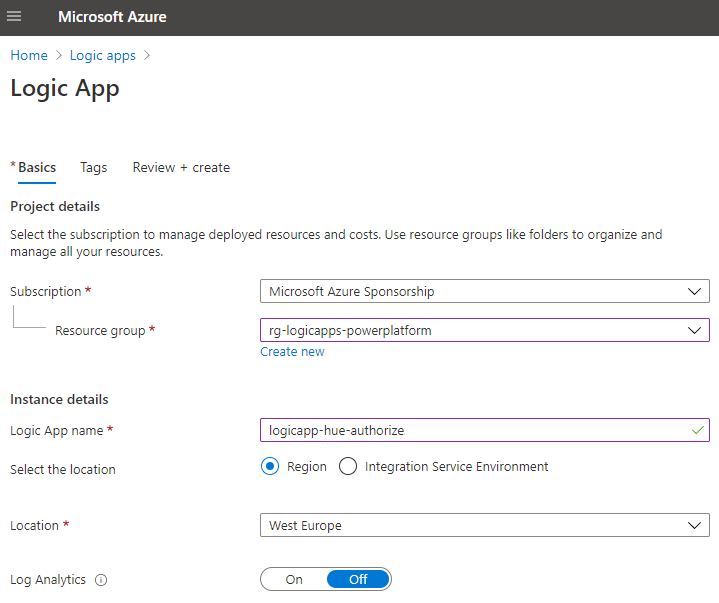
The first thing you need to do, is to create a new Logic App in your Azure subscription. Select the Resource Group you have contributor access to, and give the Logic App a suitable name, as per your naming guidelines:
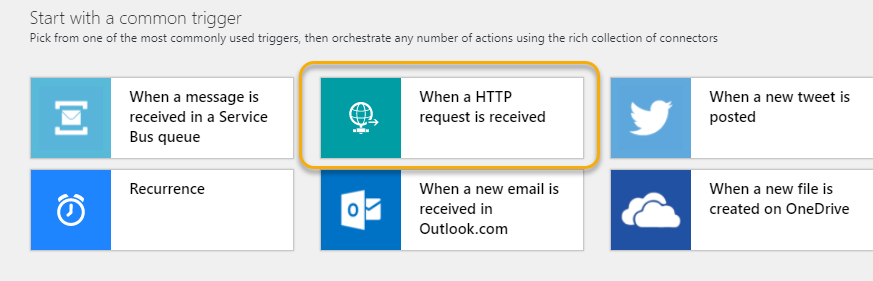
Next, select HTTP request to be the trigger for the Logic App:
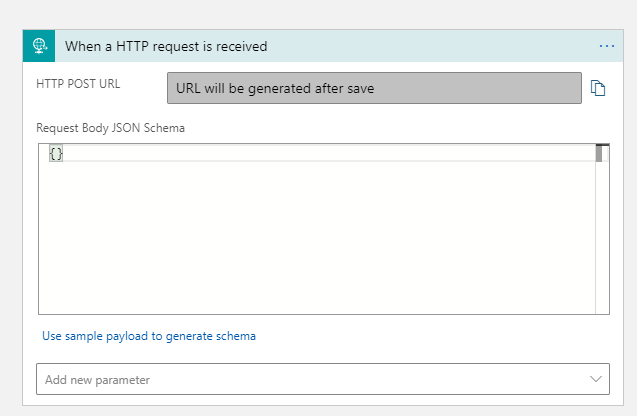
After that you will see the following in the Logic App designer:
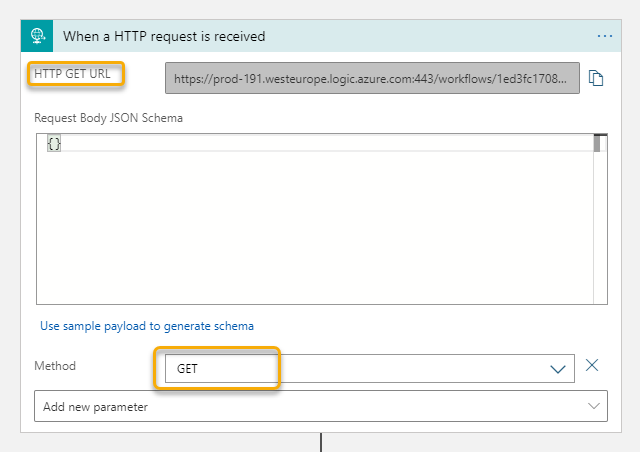
Make sure you hit Save on the Logic App before the next step. You will now be shown the URL, but first go down to the “Add new parameter” and select Method and GET for method. This way your Logic App will trigger on HTTP GET requests, which is required for the Authorization Code flow with Hue:
Now copy this URL, and make sure that no one but you can access this URL, as this is a SAS (Shared Access Signature) URL that anyone in the world can send requests to if they know the URL. Save the Logic App.
Go back to your App Registration in the Hue Developers Portal, and change your temporary http://localhost/logicapp Callback URL to your Logic App URL:
This means that from now on, the Logic App will handle the authorization code for the Hue App. But first we will need to let the Logic App access the Key Vault.
Adding Logic App Identity and Key Vault Access
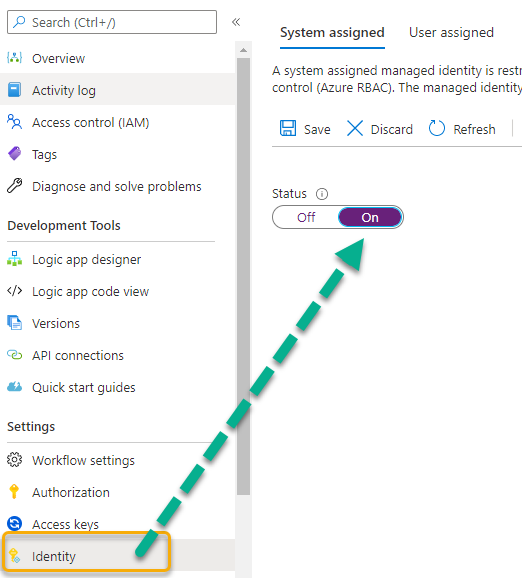
For the Logic App, under Settings and Identity, set system assigned managed identity to On:
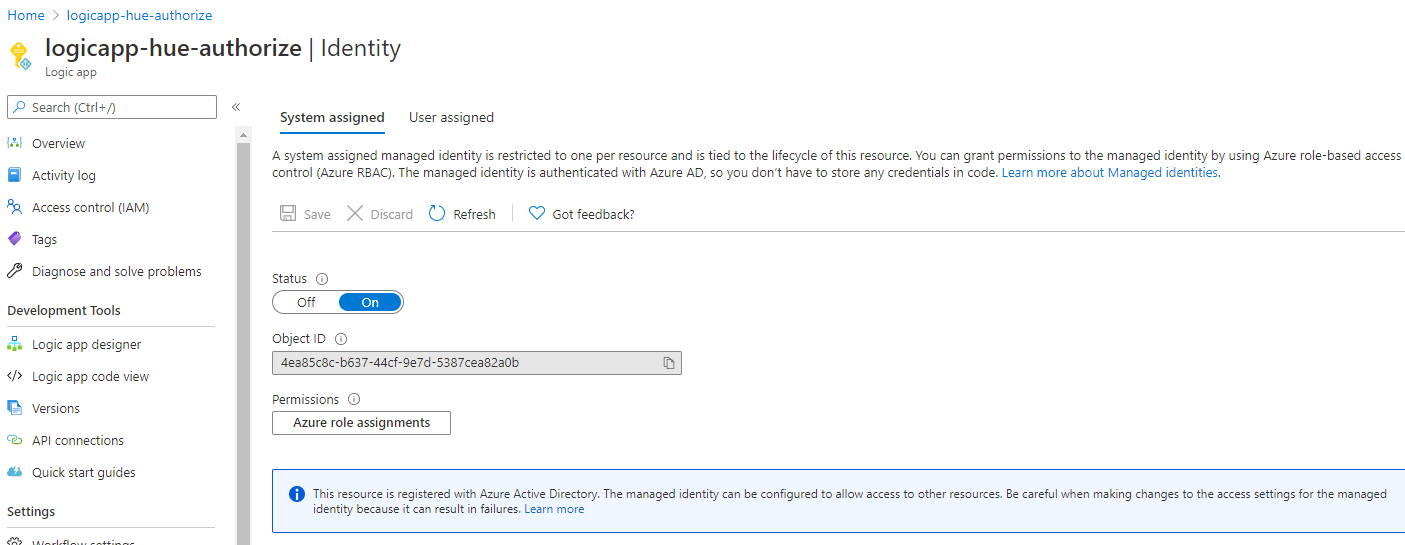
After this setting is saved, you can later see the status and the object id of the service principal.
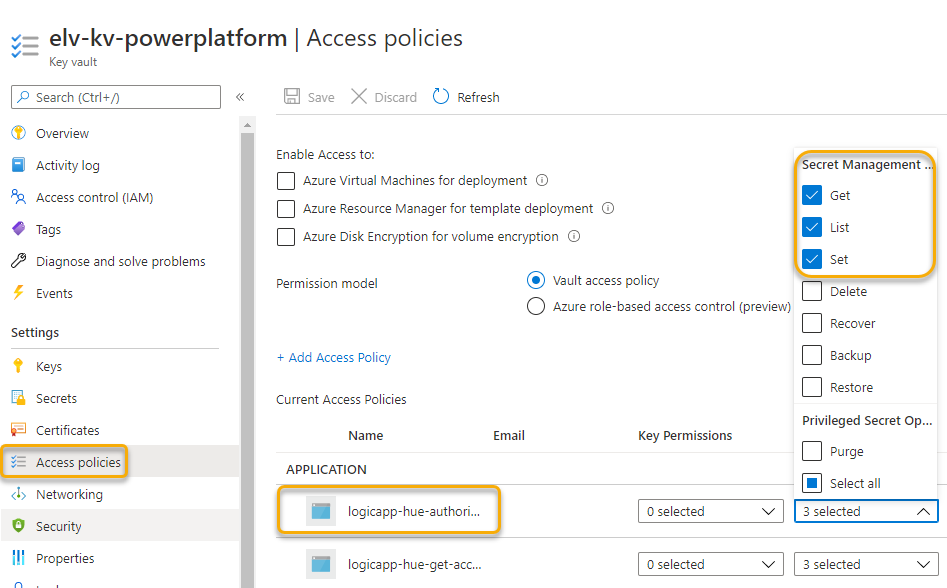
Next, under your Key Vault, click on Access Policies and Add Access Policy, from there selec the Get, Set and List Secret Management operations, and for principal search for and add the Logic App. This should look like this after adding:
With permissions in place, we are now ready to add actions to the Logic App.
Add Actions for getting Access Token
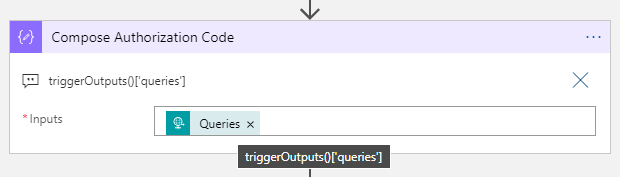
The first ting we need to do is to get the authorization code after the Hue App registration redirects back to the callback URL. This is returned as a querystring appended to the URL. Add a “Compose” action and use the following expression for getting the request queries:
(I’ve added the custom expression to comments for better visibility).
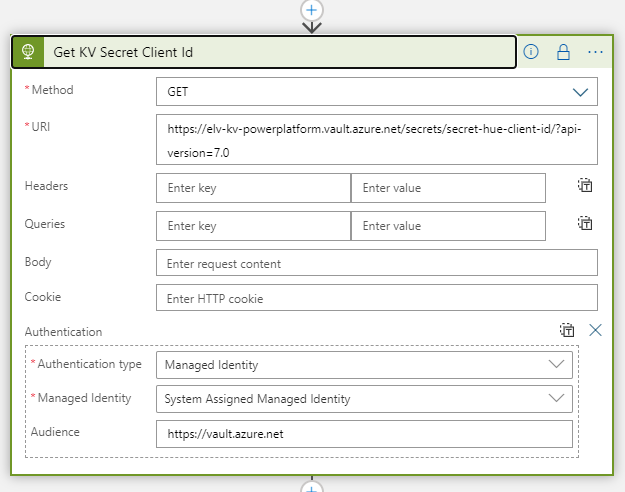
Then we need to get the Client Id and Secret from the Kay Vault. Add a HTTP action next, where we will use the Azure Rest API for getting the secret, and authenticate with the Managed Service Identity:
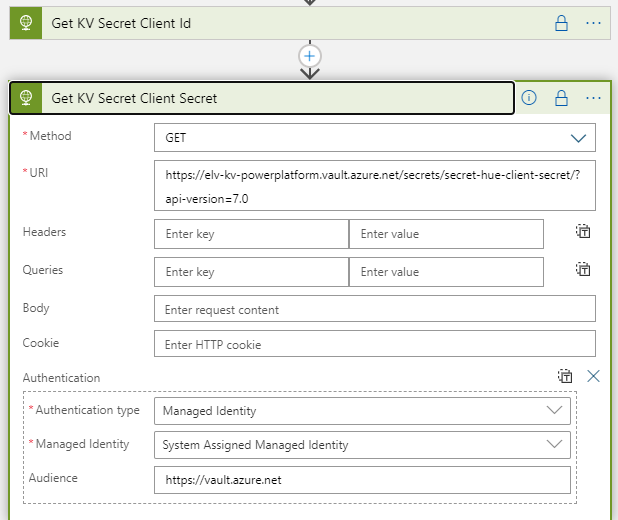
The same applies to getting the Client Secret, add another HTTP action:
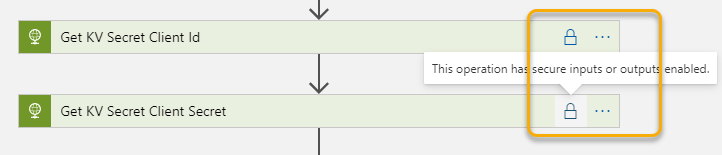
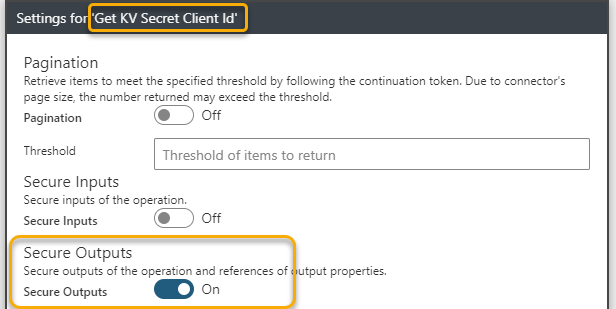
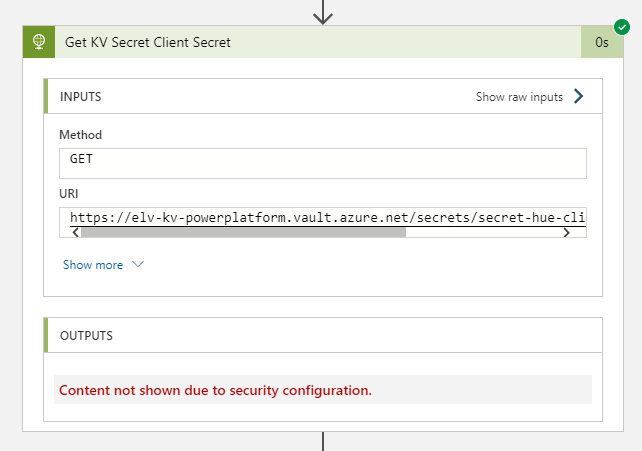
The get an access token from Hue Remote API we must either use Basic Authentication or Digest Authentication. Since I’m running this as a Logic App in a controlled environment and trusting the SSL encryption I will use Basic Authentication. In addition, I will secure the outputs from getting Client Id and Secret from Key Vault, so that other users cannot see those values from the run history:
This setting has been enabled for both the actions getting KV Secret Client Id and Client Secret:
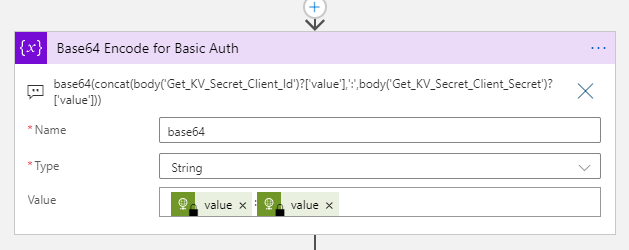
For obtaining an Access Token with Basic Authentication the following header is required: Authorization: Basic <base64(clientid:clientsecret)>
This means that we need to base64 encode the clientid + “:” + clientsecret. This can be done using this lengthy expression, here in a “initialize variable” action:
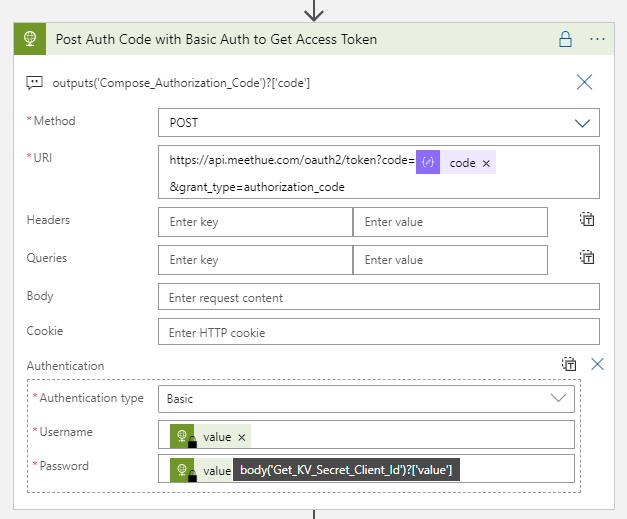
This above action is just for reference though, as the HTTP action supports base64 encoding out of the box. So when posting to the token endpoint, the best way is to use the following:
(PS! Another way to do Basic Authentication in a HTTP action would be to add the Authorization header manually in the Action above with: “Basic <your calculated base64>” as value, and leaving the Authentication type to None.)
From the above settings, in the URI add the authorization code we got from the request queries earlier, using the expression:
outputs('Compose_Authorization_Code')?['code']
When selecting Authentication type to Basic, the username (client id) and password (secret) will automatically be base64 encoded. The values for username and password are the valies from the Get KV Secret Client actions earlier, in the following format:
body('Get_KV_Secret_Client_Id')?['value']
And this action will return the Bearer Token from Hue Remote API if everything is correctly inputted.
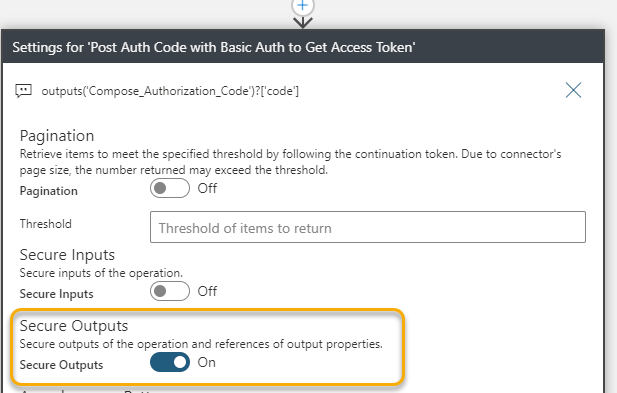
I also make sure that the output of this action is secured from viewing:
With the Bearer Token now retrieved, the next actions is to calculate the expiry time and write the Token back to the Key Vault secret.
Add Actions for getting expiry time and write Token to Key Vault
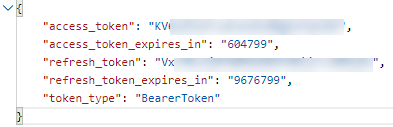
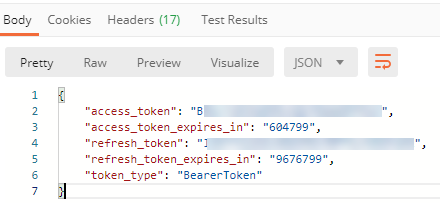
The Bearer Token returned by Hue Remote API will be in the format of the following masked response:
The _expires_in values are in seconds, so that means that the Access Token is valid for 7 days, and the Refresh Token about 112 days. It would then make sense to only refresh the token when needed.
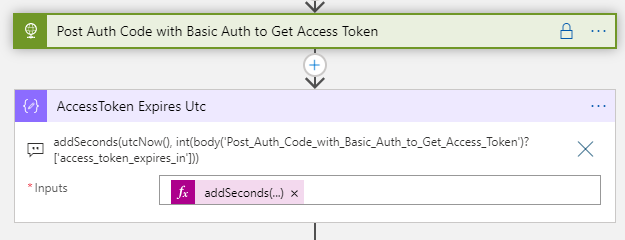
Lets start by calculating when the access_token expires, with the following expression in a Compose action:
The above expression takes the current time and add the number of seconds for when the access token expires.
This will return a new datetime 7 days ahead. This value will be used to set the expiry time on the Key Vault secret for Bearer Token. By setting an expiry time I can later calculate if I need to refresh the Access Token or not.
Based on this I need to convert the timestamp to Ticks (64-bit). Ticks is a built in function in Logic Apps, but to be able to convert to Epoch I will need to calculate the difference in ticks between when the Access Token expire, and the first value of Epoch which is 1970-01-01T00:00:00Z. This is well explained in the above reference blog, but here are my resulting actions.
After calculating the Access Token expiry, I add a compose action which converts this to Ticks:
Using the following expression: ticks(outputs('AccessToken_Expires_Utc'))
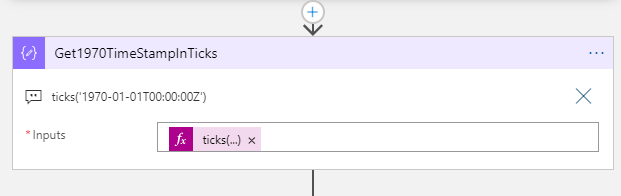
Then I need to find the 1970-01-01T00:00:00Z value in Ticks:
Using this expression: ticks('1970-01-01T00:00:00Z')
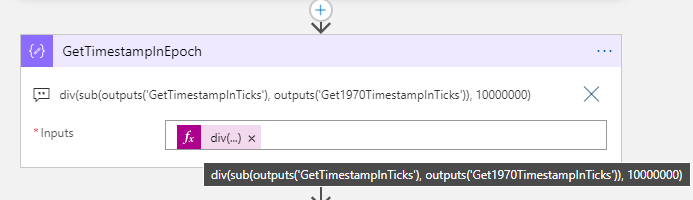
Then we can convert this to Epoch by subtracting the two Ticks values calculated above, and divide by 1 million:
This is the expression used above: div(sub(outputs('GetTimestampInTicks'), outputs('Get1970TimestampInTicks')), 10000000)
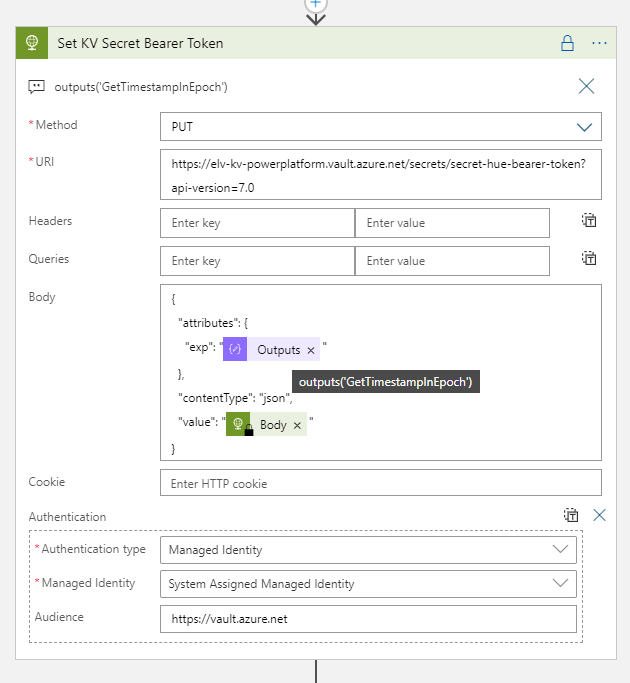
We now have the correct format for the “exp” attribute to update the Key Vault secret. Add a new HTTP action and configure like below:
Remember to secure the Output for this action also:
Finally we can finish this Logic App by adding a Response action and do a quick test to verify that everything works as expected.
Adding Response action and verify Logic App
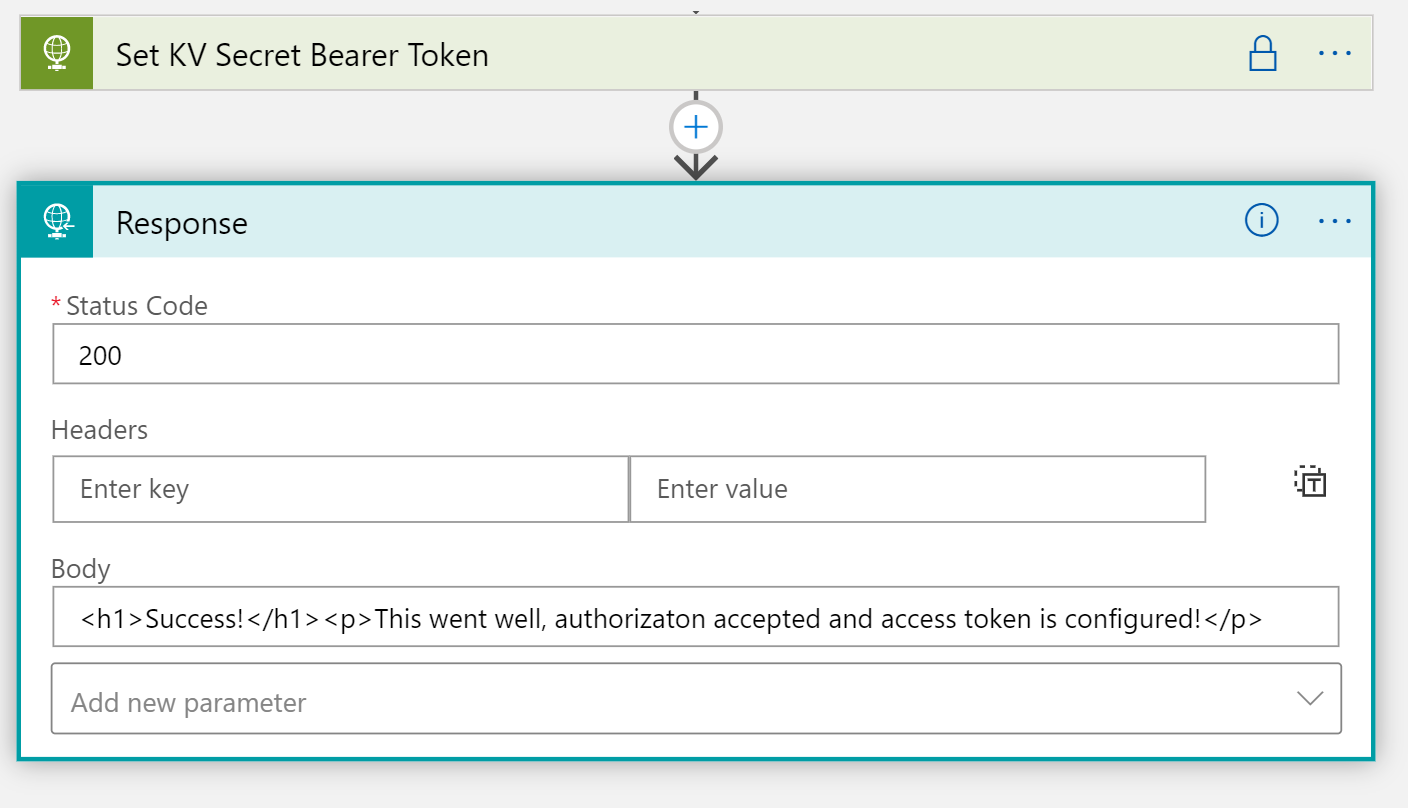
Add a Response action with status code 200 and a body like below:
Tips: It can be difficult to troubleshoot the Logic App when securing outputs, so you might hold back in that when testing. It will show your secrets in the run history though, so it might be best to do this in a test enviroment depending on your needs.
Now we can test. Construct the URL for authorizing the App again, like we did in Part 1:
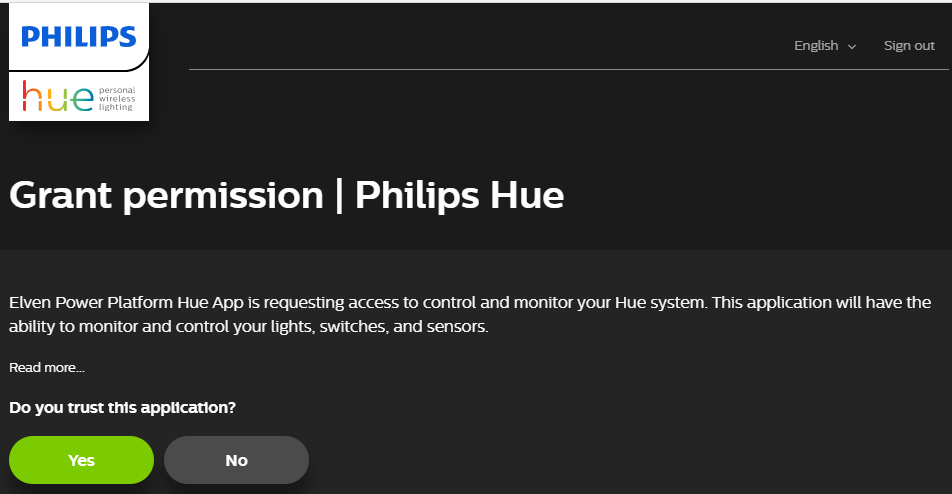
Paste it in the Browser, and after granting access to the App in Hue Developer portal:
You should be redirected to the Logic App:
.. and with a respons success!
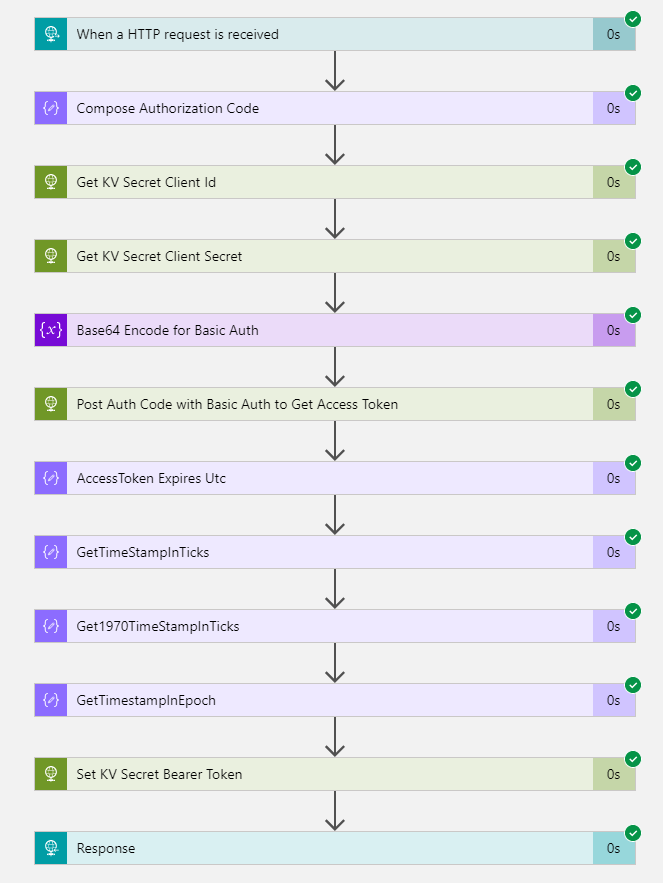
Looking at the Run history, we can verify the steps were successful:
You can also look into the inputs and outputs of the actions, except the actions where we secured the output:
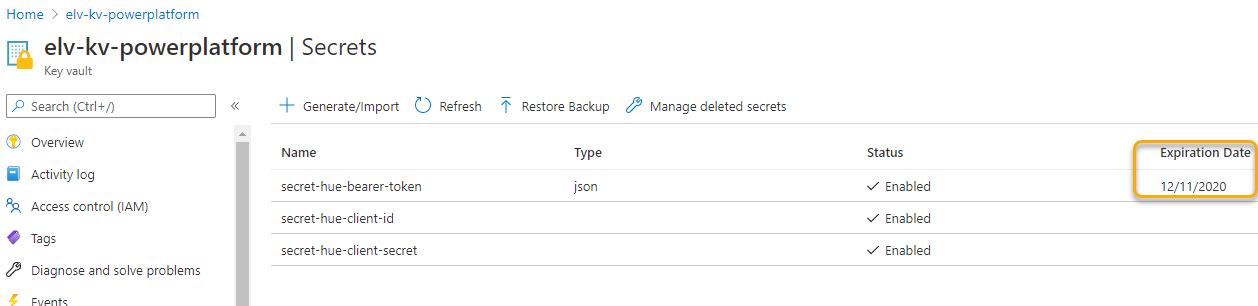
We can also verify that the Key Vault secret storing the Bearer Token has been updated and have an Expiration Date one week forward:
Summary and next steps
That concludes this blog post. Thanks for reading this far, in the next part we will build the Logic App that will respond back the Access Token and renew using Refresh Token if needed.
Continuing on Part 1, where we created an App Registration for Hue Remote API, I will need a secure place to store the App credentials like Client ID and Secret. I will also need to store the Access Token and Refresh Token, so that I can retrieve it when I need to call the Hue Remote API, and use the Refresh Token to renew the Access Token when it expires.
To start with, here is a short video where I explain the concept:
Choosing Azure Key Vault as Secret Storage
Client ID and Secret from the App registration are credentials that needs to be protected from unauthorized access. Likewise, if unauthorized users get hold of your Access Token, they can access your Hue Bridge remotely and create user access for themselves to your Hue Lights.
If you are planning to build this solution only for yourself, and no other users will share your Hue Power Apps and Flows, then you can store the credentials and tokens in a personal storage, for example in a SharePoint Online List. Just make sure that this resource never will be shared with other users internally, or externally. This would also be a logical choice if you don’t have access to an Azure subscription for yourself.
In my case, I wanted to be able to share the user part of the solution with other users, while making sure that my credentials and tokens were as protected as possible. So I decided to create some logic around that in Azure, and to store my secrets in Azure Key Vault.
Setting up Azure Resources for Key Vault
You will need access to an Azure Subscription to do this part. Your organization might provide you with access to a subscription, or there are several pathways to starting with Azure for free, amongst others Visual Studio subscription, Azure for Free, Azure for Students to name a few.
At a minimum you will need Contributor access to a Resource Group, where you can deploy the following:
Azure Key Vault resource for storing secrets for Power Platform and Hue Remote API.
Adding the secrets necessary for the solution.
Access policy that allows you, and later the Logic Apps access to get, set and list secrets from the Key Vault.
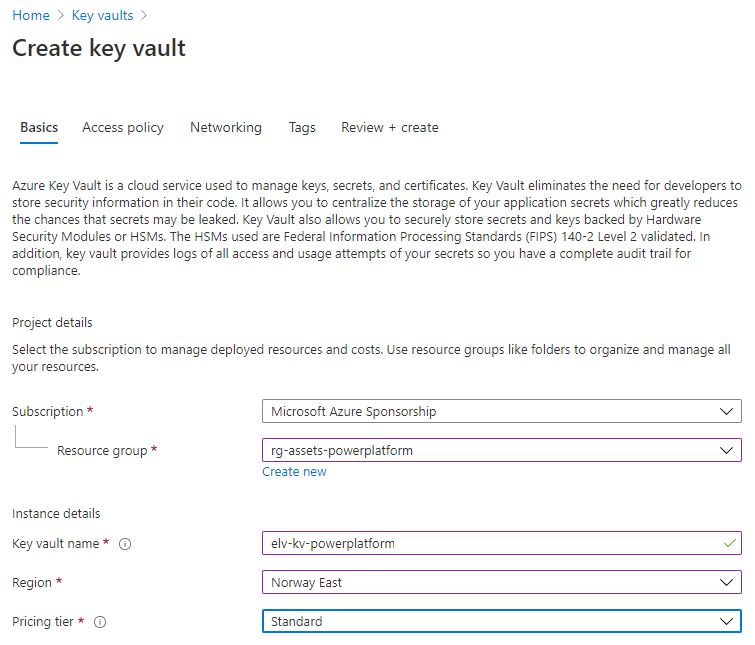
In your resource group, create a new Key Vault. The name needs to be globally unique, so it makes sense to use any naming convention:
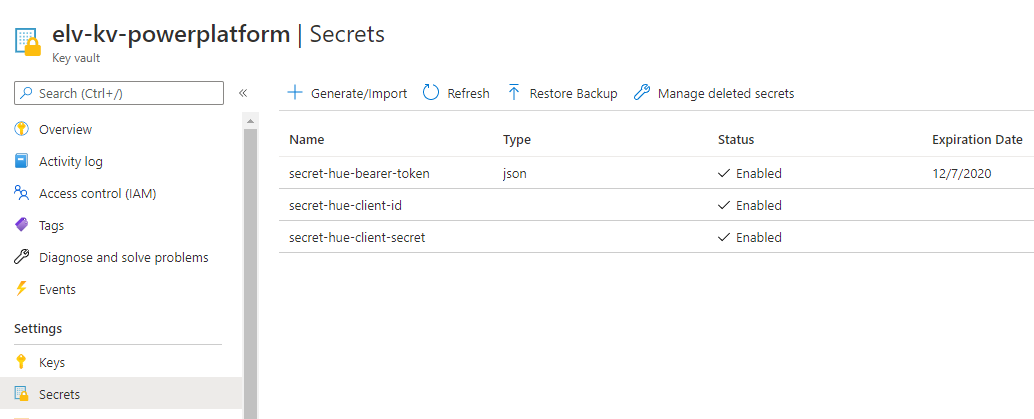
For the purpose of the Hue Remote API, you will need to create the following 3 secrets:
The “secret-hue-client-id” and “secret-hue-client-secret” are created manually with the client id and secret from the Hue App registration.
The “secret-hue-bearer-token” will be populated via the Logic App we will look into in a later part in this blog series. Note that this secret has an expiration date, which is when the token expires. I will get into that later as well.
Managing Access to the Key Vault
You need to configure the Key Vault access policy so that you, and any services that interact with the Key Vault have the right access to get, set or list secrets.
In this case, I have configured my Hue Logic Apps with access via Managed Service Identity (MSI), at this point you might not have these in place yet, but we will get there also in a later part:
With that we can conclude this part, in the next part of the blog series we will start looking into the Logic Apps for Hue authorization and managing access token.
In this first part I wanted to introduce the requirements and preparations for automating with your Home Lights API. In my case I’m using Philips Hue, as Hue has a well developed API that also can be accessed from remote. And since I’m on the topic of automating with Power Platform, I need to be able to access the API from remote.
In principle, you could use this guide against any light system that has an API, but of course I will show all the examples and config based on Philips Hue in this blog series.
In this blog post I will show you how to set up and be ready for the next parts of this blog series. If you want to dive deeper into understanding the API and testing from remote, I would recommend you read this blog post I published earlier this year about authentication, exploring and controlling using Postman:
Here’s a quick video introduction to this articles topic, and below we will cover the necessary overview of how you should prepare for the next parts of the blog series:
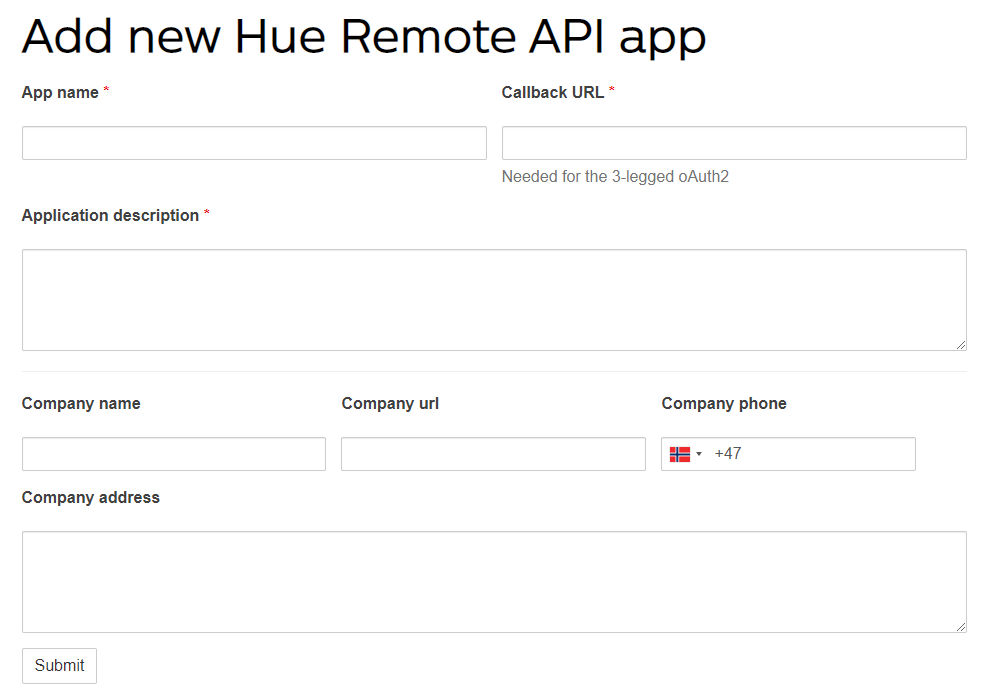
Create a New Remote Hue API app
The first thing you need to do after you have created a Hue Developer account, is to create a new Remote Hue API app here: https://developers.meethue.com/my-apps/.
You need to specify the following required fields:
App name: A display name for your remote app
Callback URL: This is needed for the Oauth2 consent and returning an authorization code. It is here where we will specify the HTTP request URL for the Logic App we will create in Part 3 of this blog series. For now, you can just enter some dummy URL like http://localhost/mylogicapp.
Application description: A short description for your remote app.
Optionally you can specify contact details.
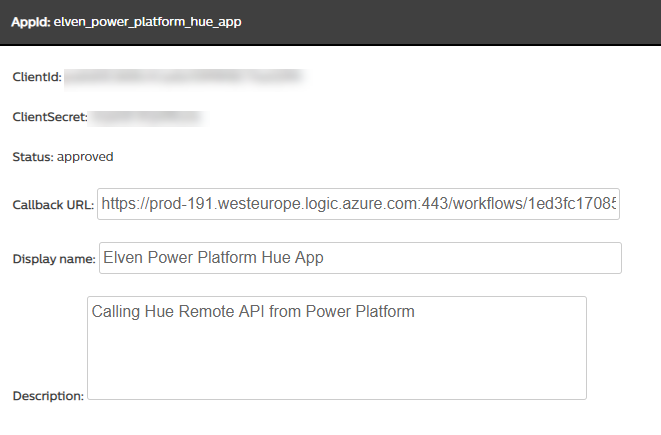
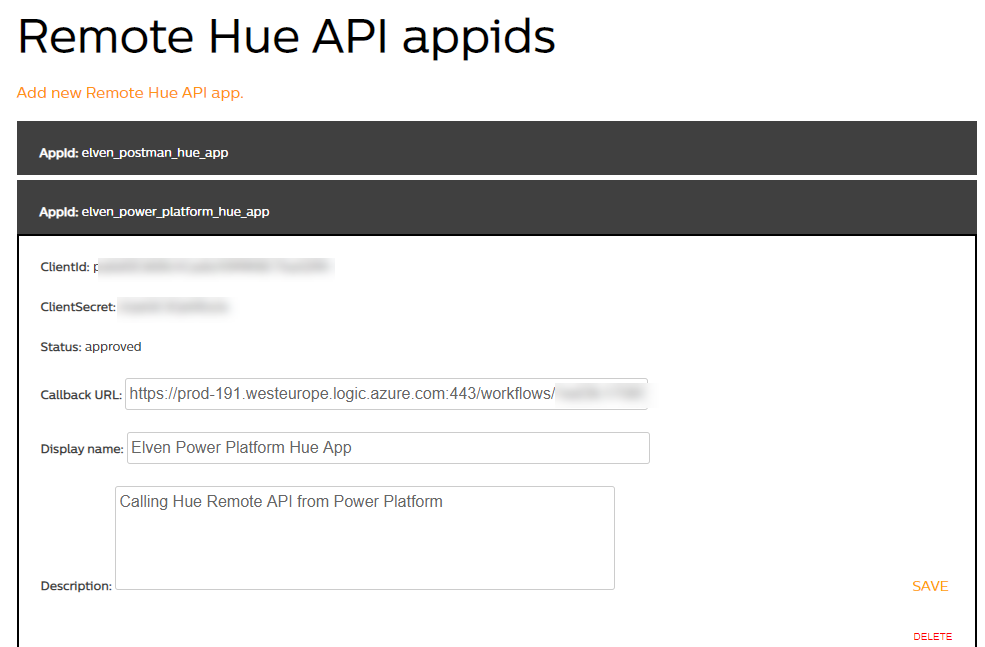
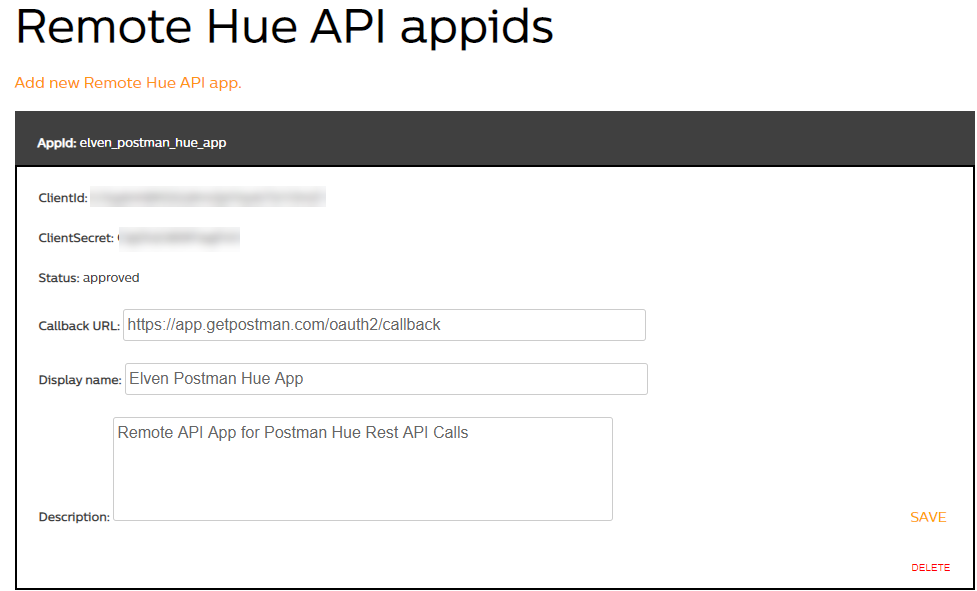
After submitting your new app is ready, and also an AppId, ClientId and ClientSecret will be provided, for example:
As you can see from above image, I’ve already configured the correct URL for my Logic App, meaning the Callback URL from above will trigger the Logic App below.
Now, copy that URL, and paste it into your Browser, and hit Enter.
If you aren’t logged in with your Hue Developers account already, you must do so, and after that you will need to accept the following permission grant:
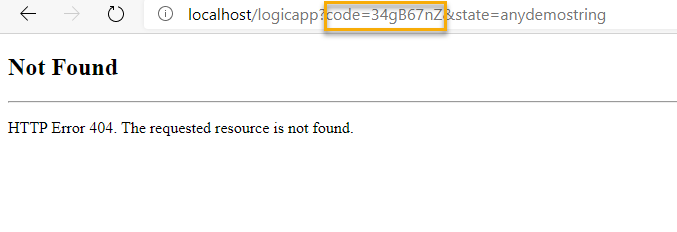
Now, if you are using localhost as the callback URL, the following response is perfectly normal:
Note the above authorization code, which is returned to the application together with the state string I supplied for verification. This Code, will together with the ClientId and Secret be used for accessing the Token endpoint and getting an Access Token. But that will come later in this series.
Summary and next steps
We have now prepared the necessary App Registration at Hue Developers portal, and laid the necessary foundations for the next steps in building the logic behind remote authentication.
If you want to explore more about authentication and access tokens, you can do that with the link in the beginning of the blog post using Postman.
Thanks for reading, hope to see you in the next part.
Microsoft Power Platform can be used in a variety of creative ways to both learn and create awesome automation solutions, and you can even use this platform for your home automation. In this series of blog posts and introductory videos I will show you how you can control your Home Office Lights (in my case Phillips Hue) via API and Power Platform components like PowerApps, Power Automate, Logic Apps and more.
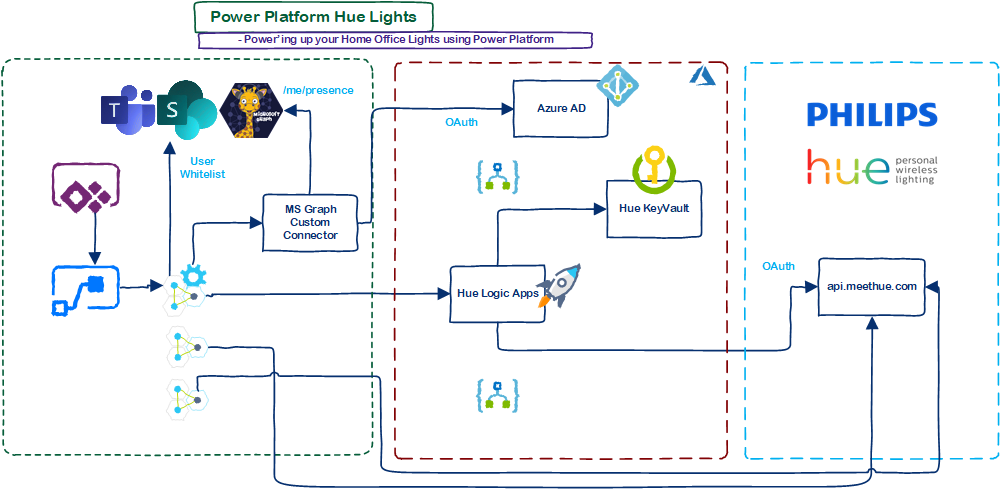
As an introduction, lets start with the “birds overview” over the solution I’ve built:
The main idea was to be able to both interactively, and triggered based on events, to be able to control my Philips Hue Lights using Power Platform components like PowerApps and Power Automate. Why you say? Well, it’s cool isn’t it! And fun, and a well worth project to invest time in because of the great learning potential. I have learnt tons of new stuff, about Power Platform, Microsoft Graph, SharePoint Lists, and Azure resources like Key Vault, Logic Apps etc. And not to forget, I’ve learnt a lot about the Hue Remote API and implementation of Oauth!
I will get into the chosen solutions and why I elected to use the technologies mentioned, and how they interact as shown in the diagram above, but first I wanted to provide you with this short introduction video from me on the concept:
This blog post is the introduction to the series of blog posts, and also a part of my contribution to the Festive Tech Calendar 2020 https://festivetechcalendar.com/. As soon as the schedule is published, I will at the allocated date later in December do a live stream broadcast where I will talk about this solution and do a Q/A where I will try to answer all your questions. But before that, I will publish the all parts of the blog series and accompanying videos as shown below. Links will become alive as soon as I have published. This way you can follow along and by the time of the live stream, you could have your own solution up and running!
The blog series will consist of the following parts, links will be available as soon as the parts are published:
Tomorrow Thursday October 22nd, at 17:40 CET, I will be speaking an Online Session on the Identity Management Track at Cloud Identity Summit ’20.
My session will be about the Identity Governance solutions available i Azure Active Directory, we will cover the following topics in an hour long session:
Identity Access and Privileged Access Lifecycle
Entitlement Management
Access Reviews
Terms of Use
Privileged Identity Management (PIM)
.. and demos!
If you are new to Azure AD Identity Governance, I promise you will get a good overview over the value these solutions will provide and the challenges this will help solve. If you have been using some of these solutions from before, I will provide some tips and tricks, and real life experiences as well.
You can sign up to the FREE Cloud Identity Summit ’20 here: http://identitysummit.cloud/. There are some great other sessions also, in two tracks “Management” and “Security”. You can learn more about Azure AD Sync, Azure AD B2B, Identity Protection, Passwordless, Yubikeys and AAD Internals! Full agenda here: Agenda – Cloud Identity Summit 2020.
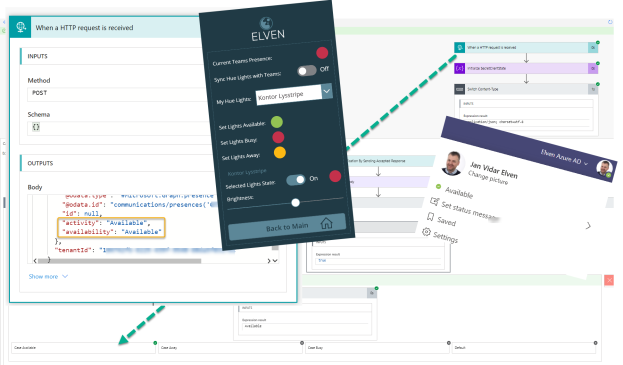
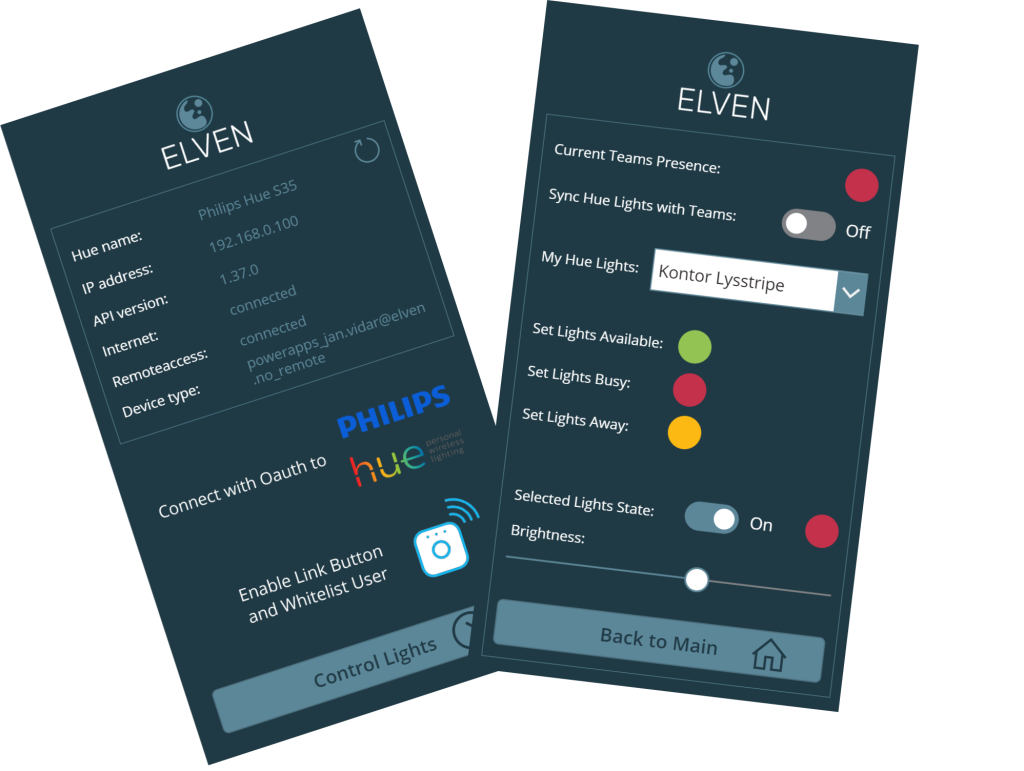
Since the support for getting Teams Presence via Microsoft Graph API came into public preview earlier this year, https://docs.microsoft.com/en-us/graph/api/presence-get?view=graph-rest-beta&tabs=http, many where seeing interesting scenarios for automating Microsoft 365 using this presence status. In fact many, myself included, created different solutions for setting light bulbs etc to reflect the Teams presence. If busy, then red lights, if available green lights, and so on. I have this setup myself using Philips Hue lights, and have created a PowerApp using Flows to control my lights:
There has been one problem though, getting Teams Presence has only been possible by continuously querying the API to check if the status has changed. This can be scheduled of course, but running this every minute or so seems like an excessive way to achieve the goal: being able to see if the Teams Presence has changed!
In this blog post I wlll show how to create a subscription for change notifications for Teams Presence for a specified user, and the requirements for doing this. And I will use Power Platform and Power Automate Flows to achieve this.
Let’s start with the Requirements..
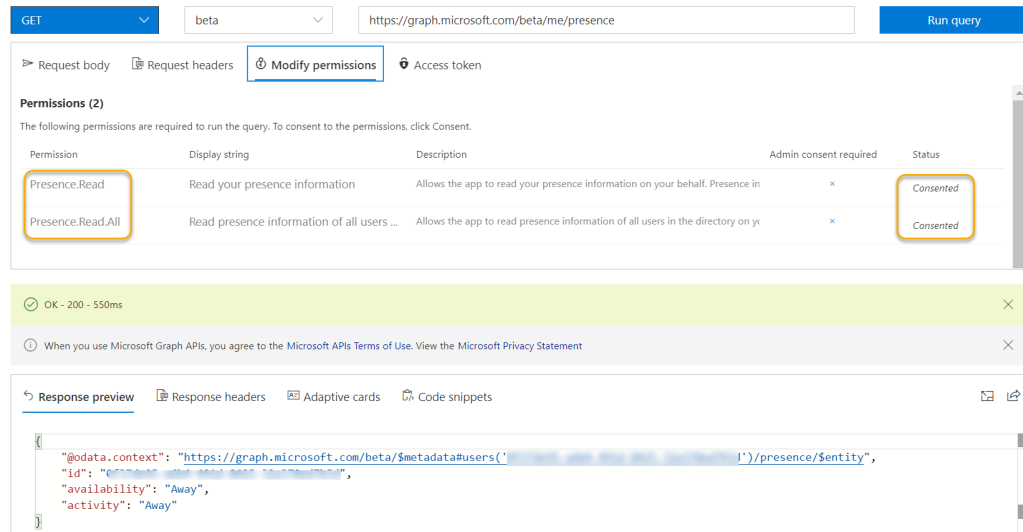
First of all, to be able to set up a change notification for a resource, you need the same API permission as the resource require itself, for Teams Presence this is one of the following:
Presence.Read, for being able to read your own users presence status.
Presence.Read.All, for being able to read all users in your organization’s presence status.
Currently in the Beta endpoint, getting presence is only supported for Delegated permissions using work account, so you will have to to this with a logged in user.
The other important requirement is that you need a webhook uri for where the change notification can send a POST request for the resource that has been changed. This webhook uri can be on your preferred platform, many are using Azure Functions for this, but it can also be a third party platform. I will do it using Power Automate, another alternative could be using Azure Logic Apps also.
This webhook uri need to be able to:
Process the initial creation of the change notification subscription. Microsoft Graph expects a text response with a validation token for it to be successful.
Process every change to the resource that you subscribe to, in this example a Teams Users Presence Status.
We will get into the details on this, but for now, we will start explore using Graph Explorer.
Explore Presence and Subscriptions with Graph Explorer
Go to the Microsoft Graph Docs site and find Graph Explorer there, or just go to https://aka.ms/ge, and log in with your work account.
You need to be a Teams user to run this, but if permissions are consented, you should be able to see your own presence status like my example below. If you are getting a permission error, make sure that one of the permissions for Presence.Read or Presence.Read.All er consented. This can already been done by your administrator, if not you need to consent to them yourself.
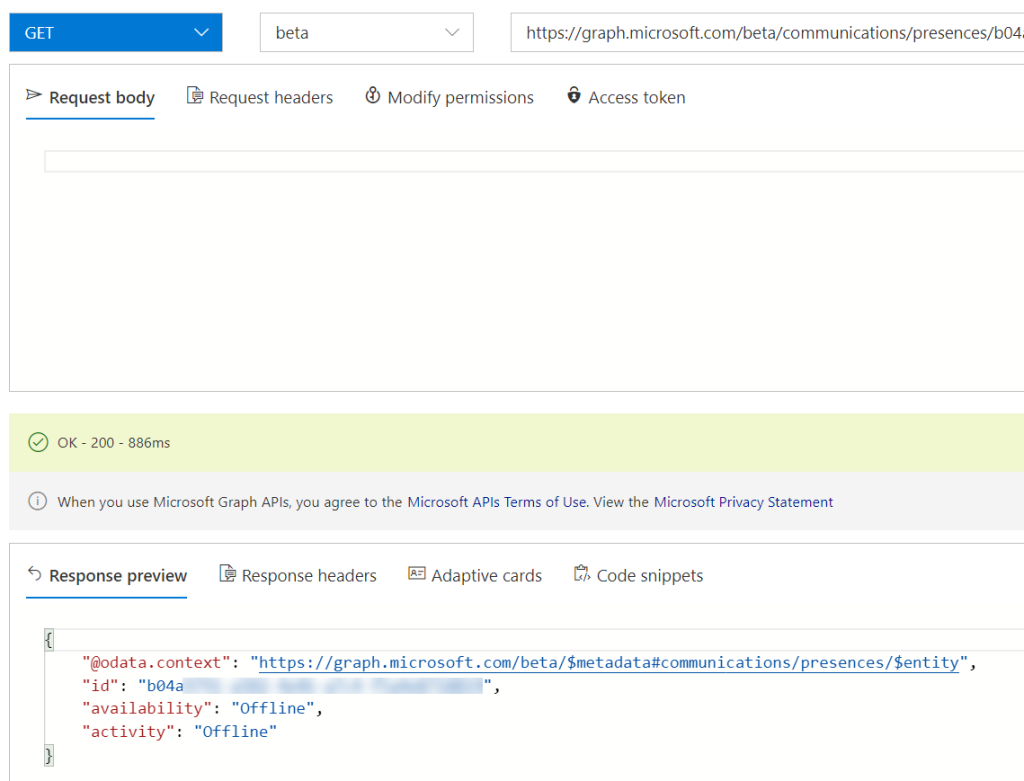
Great, let’s check another users’ presence status. PS! The permissions don’t require admin consent, and using delegated permissions every user can check other users presence status, but you need Presence.Read.All to do that.
The next part would be to create a subscription for change notifications for presence, but first we need to prepare the Flow for receiving the webhook uri.
Create a Power Automate Flow for Change Notification Webhook
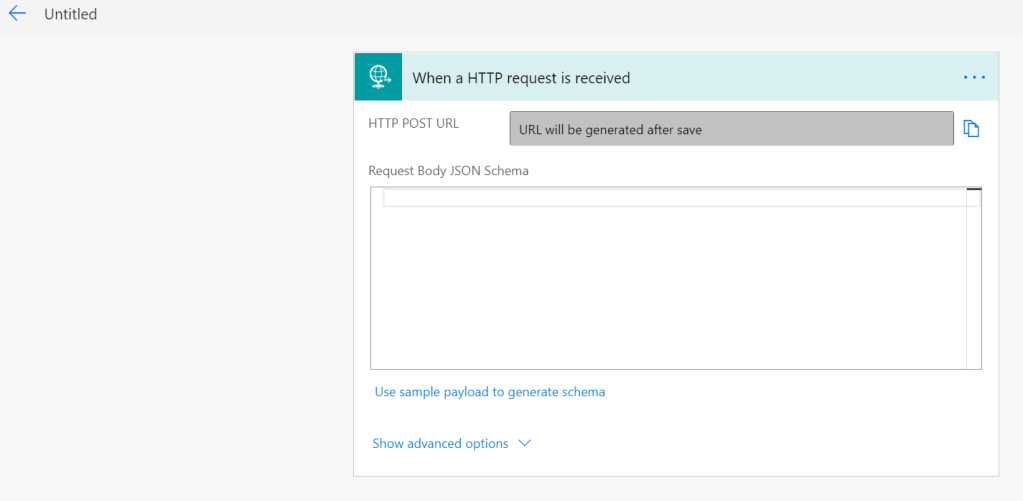
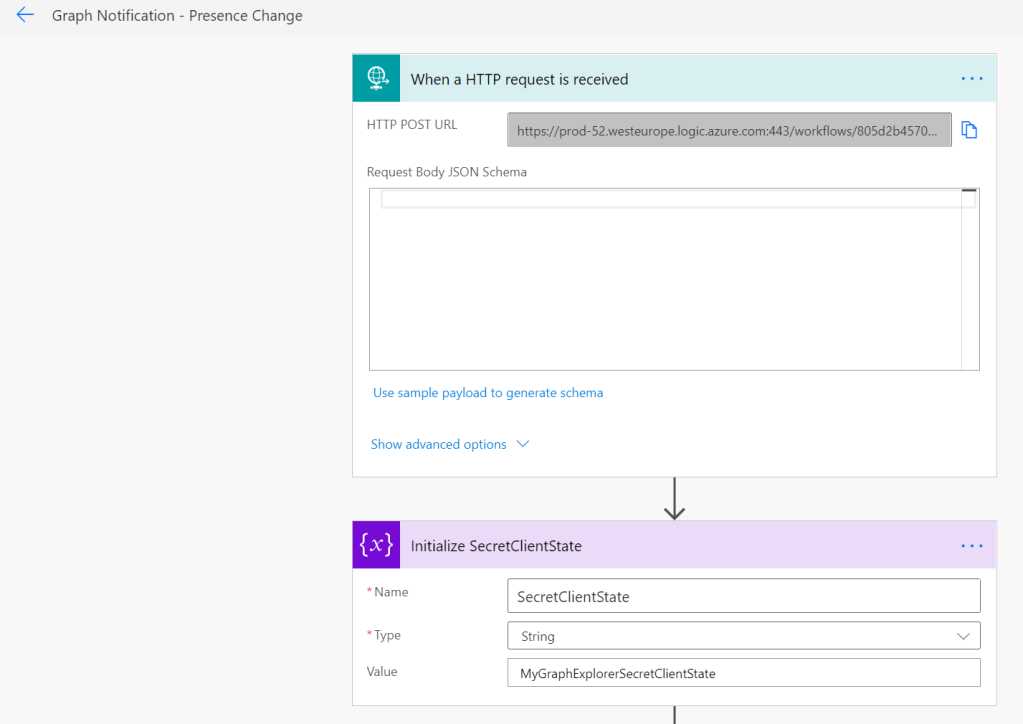
Log in with your work account to flow.microsoft.com, and create a new flow of type automated and blank, skip the first part of using pre-selected triggers. Search for the Request type trigger that is called “When a HTTP request is received”:
Next add a Initialize Variable action for setting the ClientState which we will use later for the creating the subscription. Set the variable to anything you want, give a name to the Flow and then save. When saved the HTTP POST URL will show the value you later will use as the webhook uri for the change notifications:
When the Subscription is created, a POST request is sent with Content-Type text/plain and a query parameter that contains a validationToken. Microsoft Graph expects a 200 OK response and a text/plain body that contains the validationToken to be able to successfully create the subscription.
Immediately after creation, and for every change notification, a POST request is sent with Content-Type application/json. Microsoft Graph expects a 202 Accepted response to this, if not it will continuously try to send the same change notification. You should also check the ClientState for verification, and of course include your own business logic for what to do in the Flow for when changes occur.
So your Flow needs to address these requirements, and there can be different ways to achieve this, but this is how I did it in my setup:
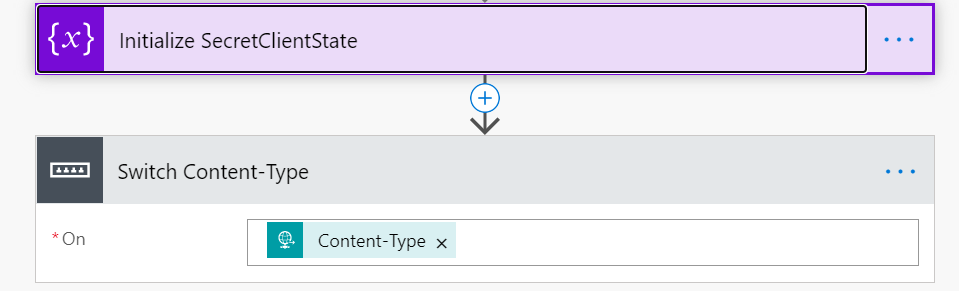
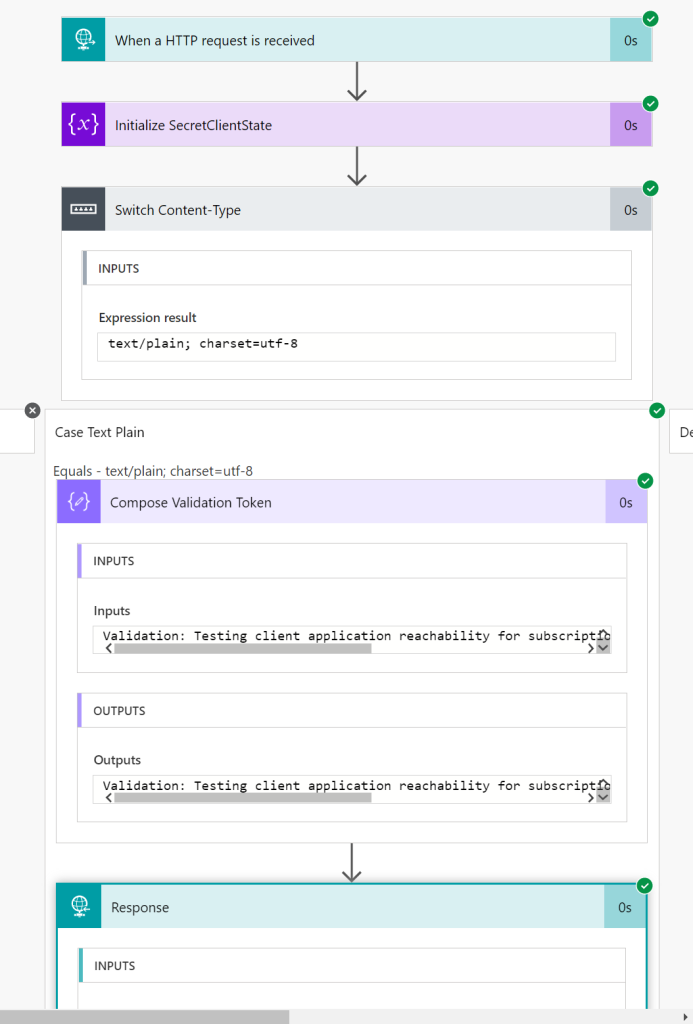
After the initialize variable, I created a Switch control action, using Content-Type from the HTTP Request trigger. In this way I can separate the logic in my flow for the initial creation and validation, and for the updates.
Validating the Subscription
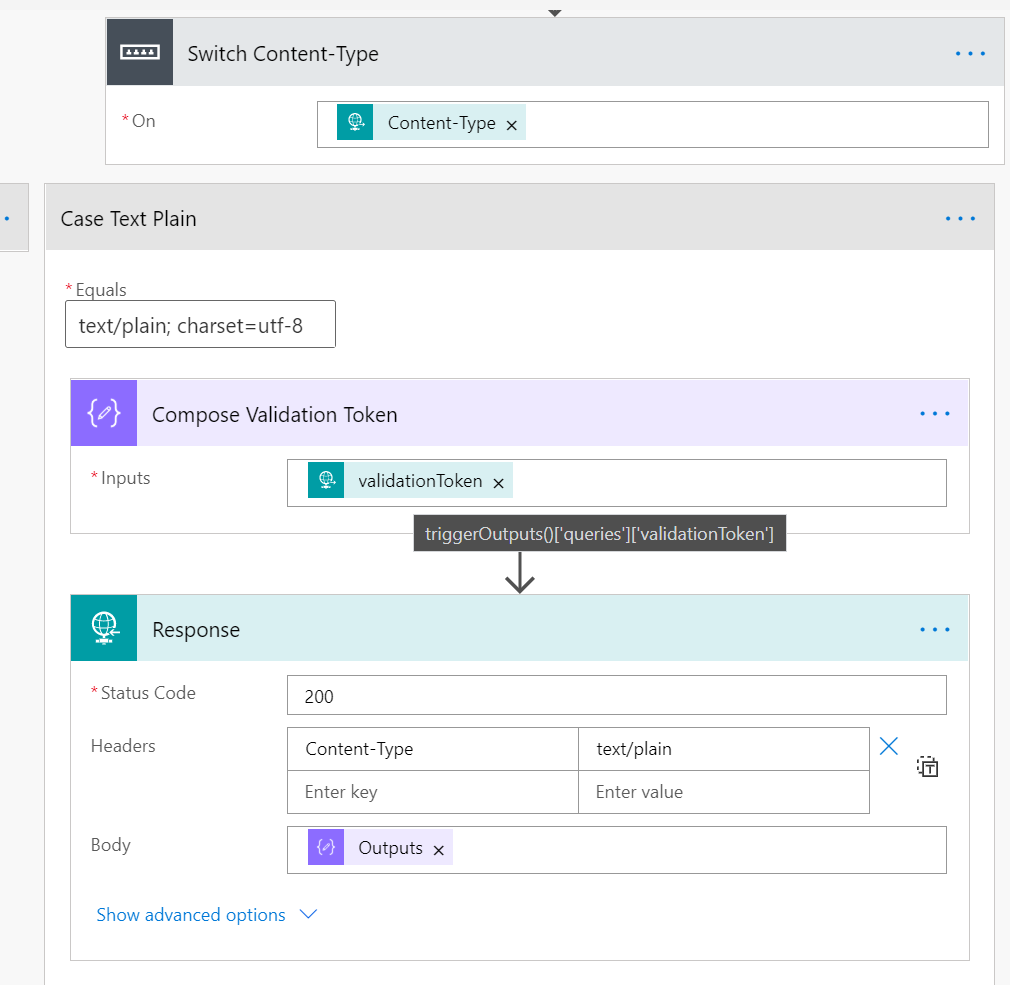
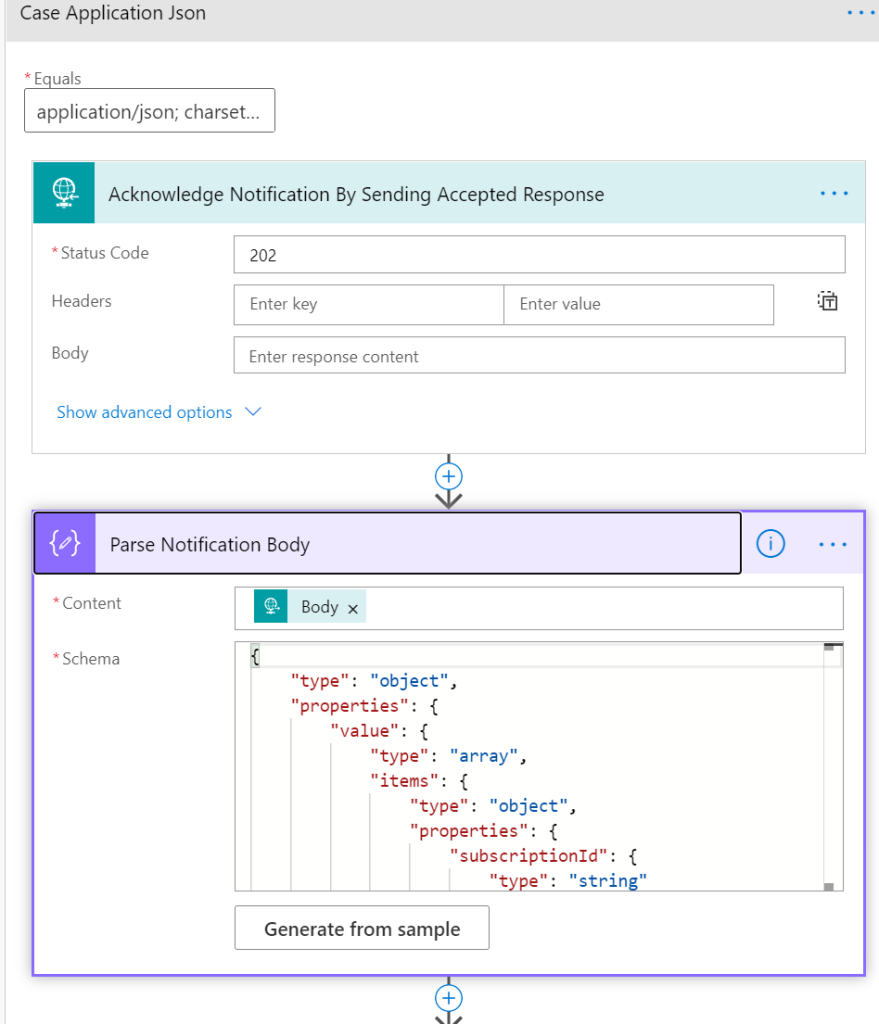
If the Content-Type is text/plain; charset=utf-8, I will try to get the validation token sent by Microsoft Graph, and create a response that returns status 200 OK and the validation token back in a text/plain body.
I used the Compose data operation, and a custom expression that retrieves the validationToken from the query parameters. The expression I use is: @triggerOutputs()[‘queries’][‘validationToken’].
The Request Response action returns a status code of 200, set the Content-Type to text/plain and for Body select the Output from the Compose Validation Token.
The above steps should be sufficient for creating the subscription, it is recommended to validate the ClientState also, in my case I have done that in the next step.
Processing and Responding to Change Notifications
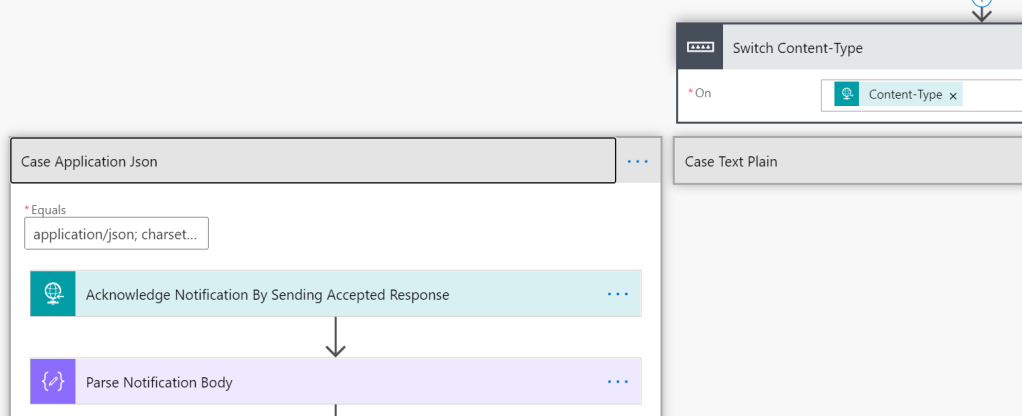
The change notifications will come as Content-Type “application/json; charset=utf-8”, so I add a case for that under my Switch. Microsoft Graph expects a 202 Accepted Response, it is recommended to respond this early in your flow, so that any later actions or your own business logic generates errors that prevents this response.
In the Response action I just return 202 Accepted. I have then added a Parse Json action to make it easier to reference the values later in the flow:
You can generate the schema from an existing sample, from the Microsoft Graph docs, referred above, or you can just use the following sample from me here:
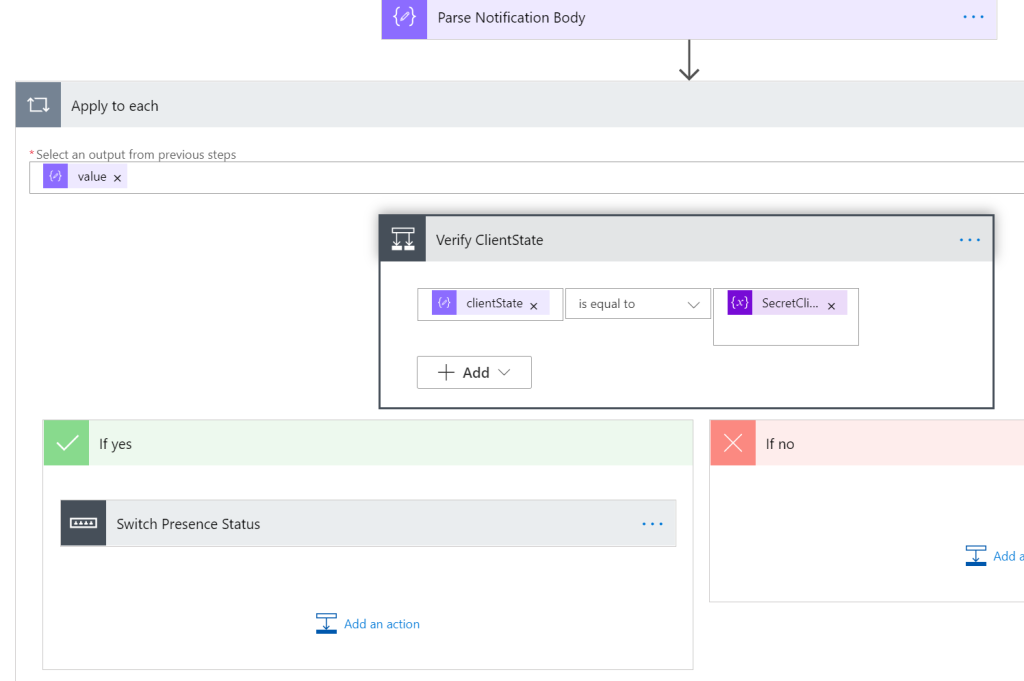
Now I can begin my business logic. As the value from the notification body is of type array, an Apply to each block will be needed, it will be automatically added if you select any of the attributes in the resulting actions. I will first verify that the clientState is matching the variable i defined in the beginning of the flow. This is a safestep that only the Graph subscription I created can call this Flow.
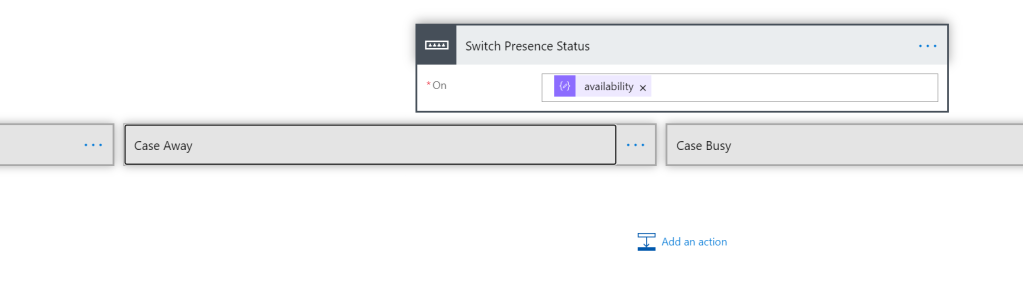
In the next part I have added a new Switch control, where I retrieve the presence status that have changed.
And this is where you add your own business logic, so I will stop here. In my own example (see PowerApp for Hue Lights above) I will control my lights based on presence updates, but this is a theme for a upcoming blog post.
With the Flow ready, we can now create the Subscription.
Creating Microsoft Graph Change Notification for Teams Presence
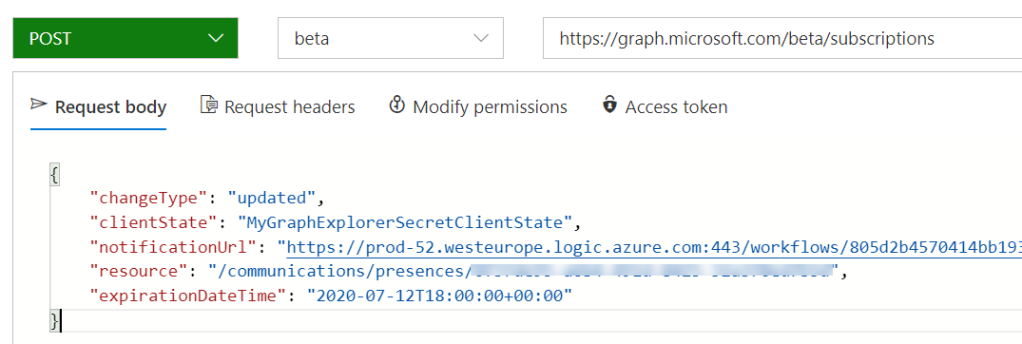
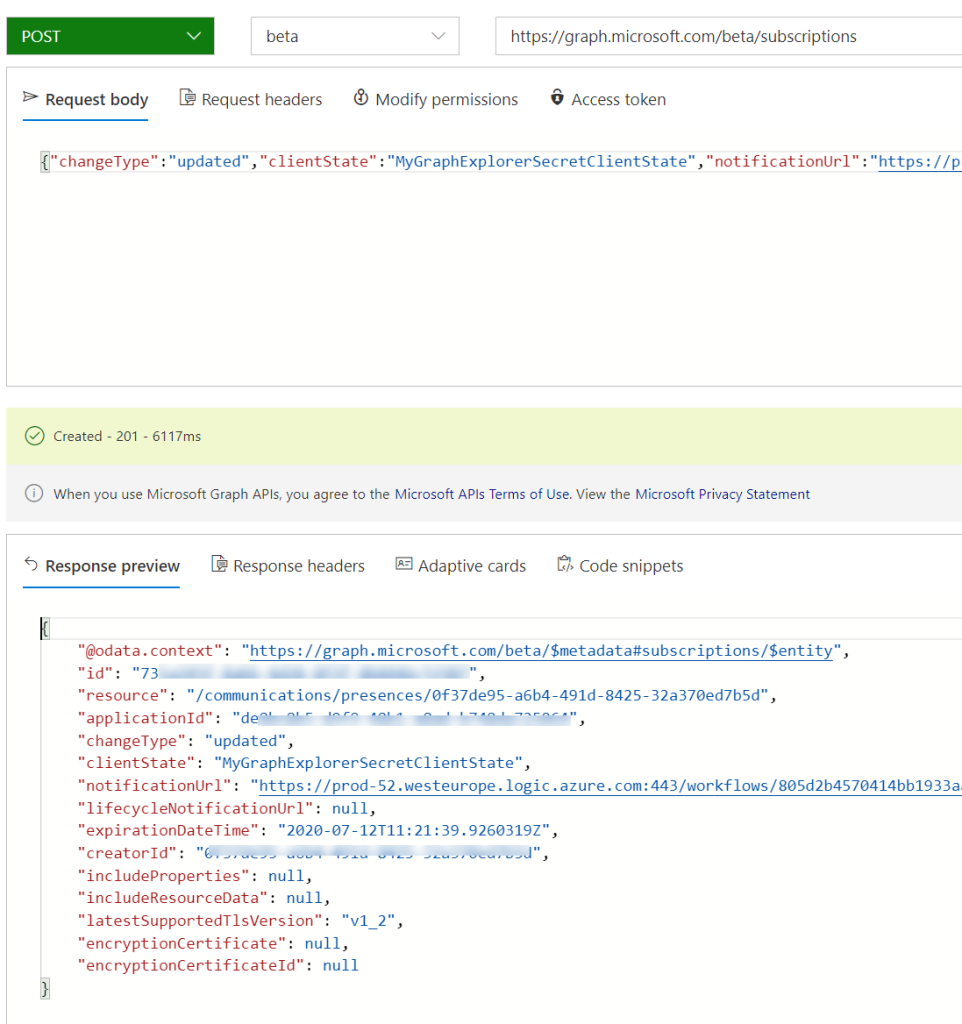
I will now create the Subscription in Graph Explorer, using a POST request to https://graph.microsoft.com/beta/subscriptions. In this POST request you will need a request body that contains the following:
Here is a quick explanation of the above values:
changeType: can be “updated”, “created”, “deleted”. Only “updated” is relevant for presence changes.
clientState: For verification in the webhook that the call is coming from the expected source, consider this a sensitive value.
notificationUrl: This is the webhook uri, and for my Flow this will be HTTP POST URL shown earlier.
expirationDateTime: Every subscription only lasts for a specific time depending on resource type. The subscription needs to be renewed before expiry. For Teams Presence subscriptions only last one hour, same as chatMessage. See details for different types of resources: https://docs.microsoft.com/en-us/graph/api/resources/subscription?view=graph-rest-beta#properties. If you select an expiry time that is larger than supported, it will reset to one hour max.
Let’s run this query to create the subscription, if everything works, I will now get a 201 response that the subscription is created. Note the expiration time that is one hour from now:
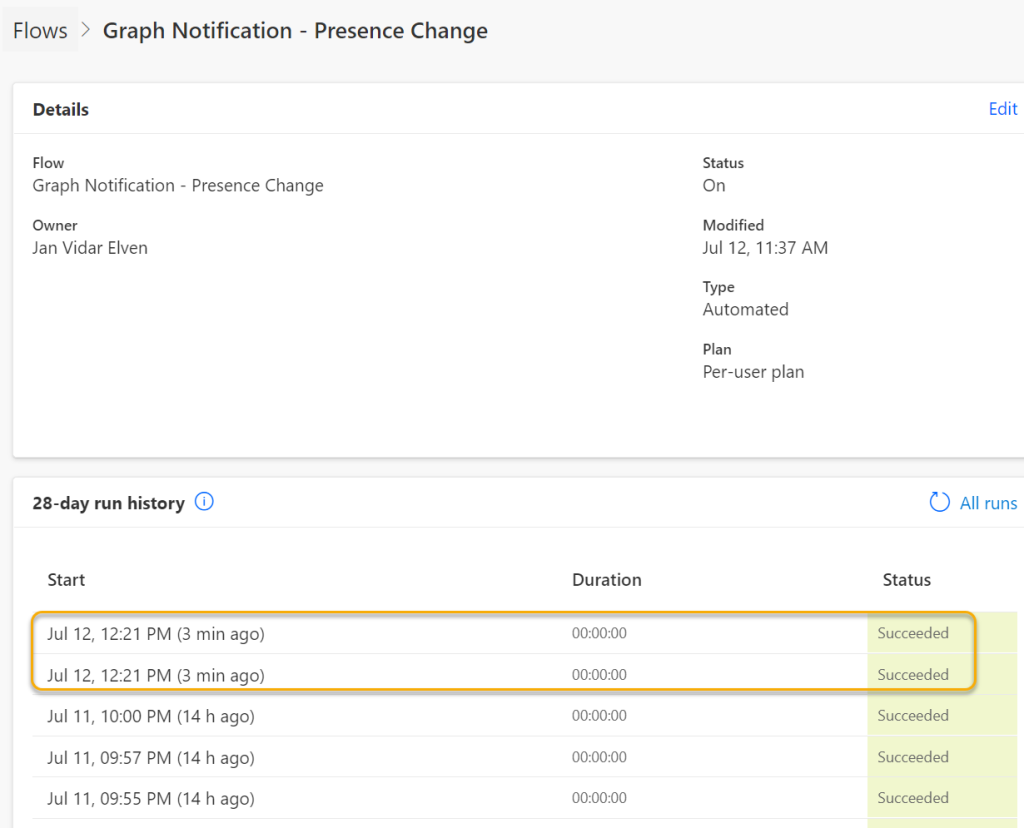
This wouldn’t work if my Flow had failed, so let’s look into the run history on that. I see that I have 2 recent successful runs:
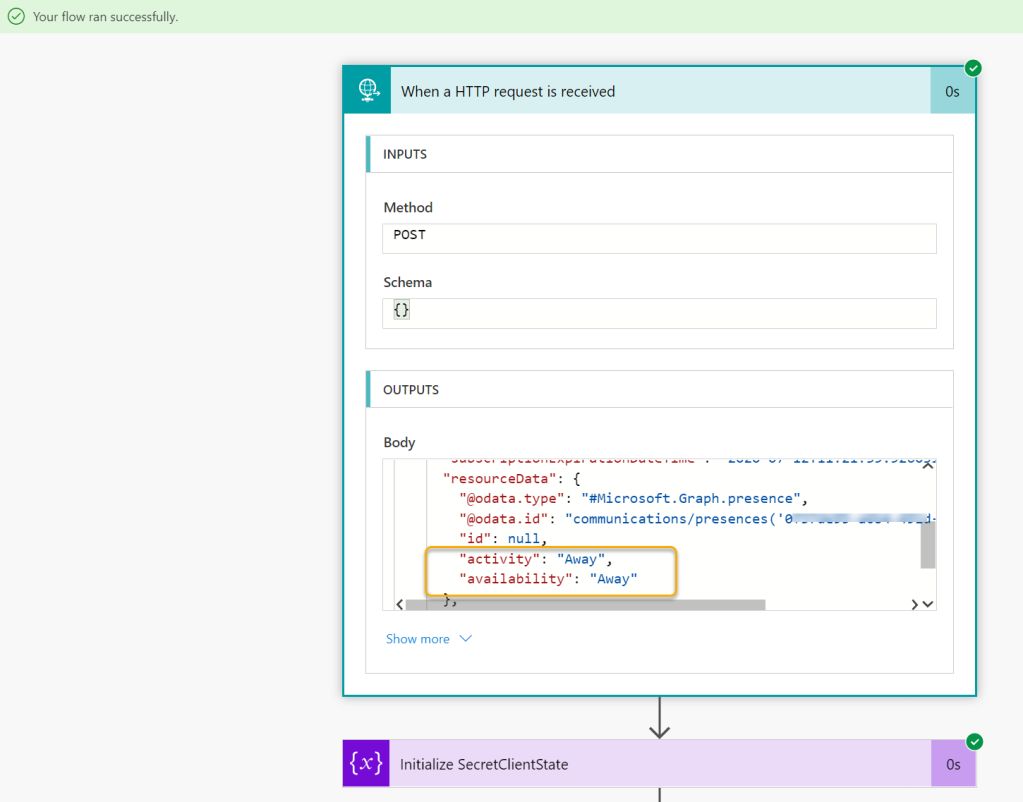
Let’s look into the first one. I see that the request is coming in as a text/plain with a validationToken, which I then return to Microsoft Graph:
Let’s look into the second run. This returns the first presence update, I can see that the user is “away”:
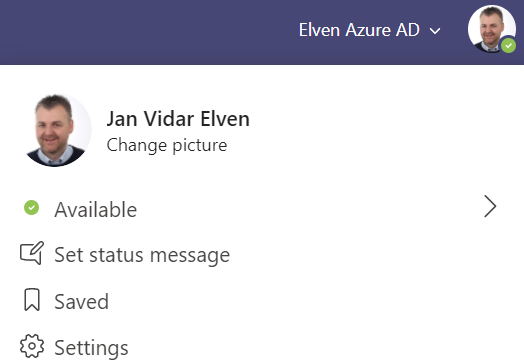
Now, let’s test this. With my user I go to Teams client, it should automatically change my presence from away to available or busy depending on my calendar, or I can set the status manually myself:
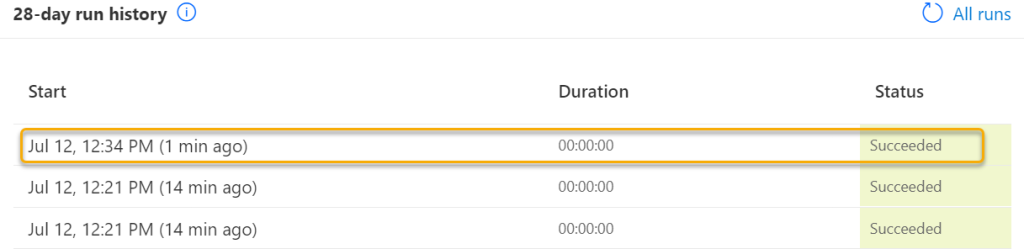
Checking the Flow runs again, I can indeed see that the Flow has been triggered via the Change Notification:
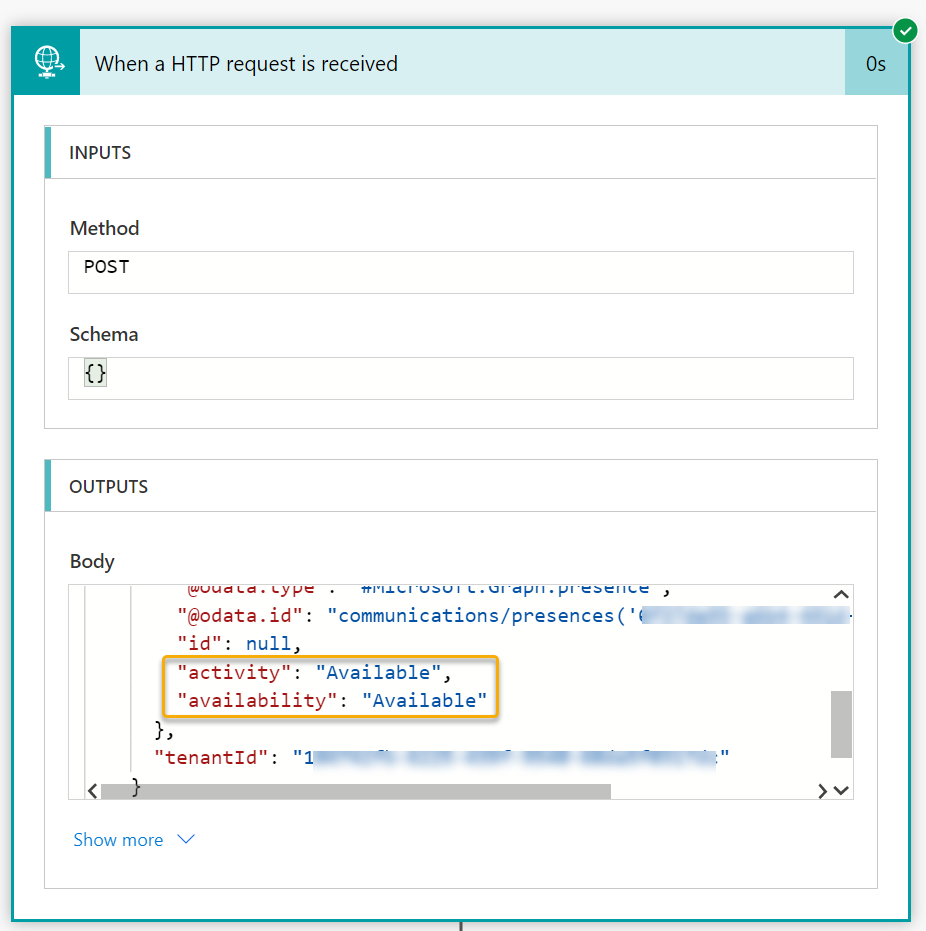
If I look into the details, the status update is Available:
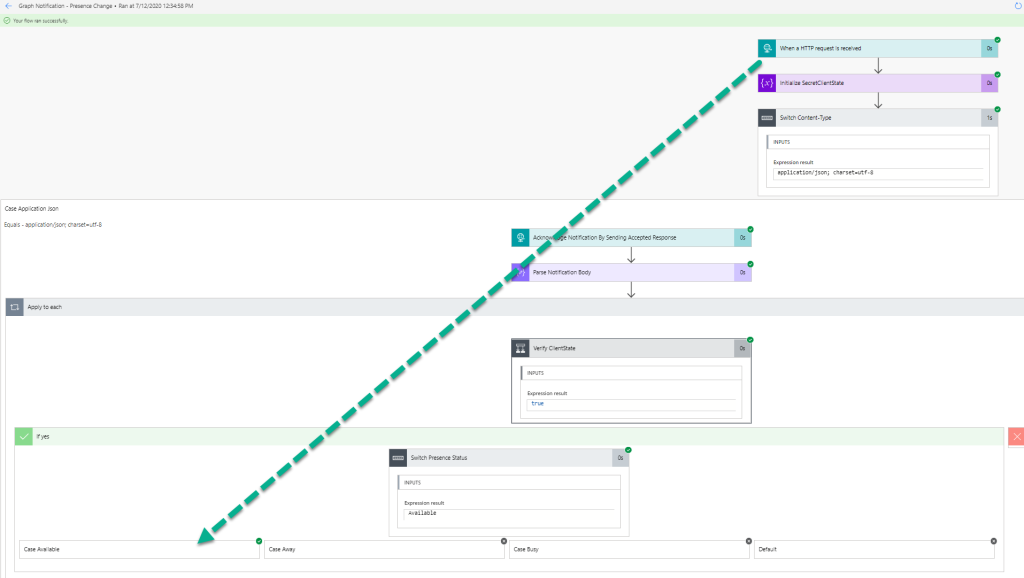
If I bring up the Flow in a bigger picture I can indeed see that my logic ends up where the switch case checks for available status:
My Flow will now be triggered for every change as long as the subscription don’t expire.
Summary
In this blog post I have shown how you can create a Microsoft Graph Subscription for Change Notifications to selected users Teams Presence, using Power Automate to validate subscriptions and process the changes.
There are more work to do, as I need some logic for renewing and managing my subscriptions. But that will be the topic for the next blog post coming soon!
A while back I bought my first starter kit of Philips Hue lights and bridge, and since then I’ve bought several more bulbs, lamps, lights strips and more. One of the things I quickly got interested in was how to use the very well developed Hue API (https://developers.meethue.com/develop/hue-api/). You need to register and login with a Hue Developer Account, which is free, to be able to explore the API documentation, and for following the steps I describe in this blog post.
If you want to have a very quick look at the Hue API, you can start with this link which does not require a Hue Developer Account: https://developers.meethue.com/develop/get-started-2/. If you are familiar with Postman for exploring API’s, which may have brought you to this blog post to begin with, you should read on as I will describe and share some of the work I have been doing.
When I started exploring the API, I did what most people do: I searched online for tips and how-to’s. I found the following useful Postman Collection on GitHub: https://github.com/moldedbits/philips-hue-postman. So I downloaded that collection, and after configuring my Postman environment with the IP address to the bridge, and pushed the linked button to create a username, all described above on the get started link, I was good to go!
However, this let’s me explore the API only locally, requiring me to run the commands from a local device. This is where I should let you know my real reasons for wanting to use the Hue API, as I work with Microsoft and Cloud solutions daily. I wanted to look into scenarios where I can manipulate my Hue Lights dependent on events from the Microsoft Platform. It could be updating the lights to reflect my presence in Teams, it could be blinking the lights if some alerts happened, and so on. I want to be able to use Azure Functions, Power Platform, PowerShell etc. for controlling my Hue API.
Before I go into the details of this blog post on how I set up remote authentication and control of my Hue API using Postman, I first wanted to share a proof and sneak peak of a coming blog post that I have succeeded in what I’ve wanted, I can now authenticate and control my lights using for example Power Platform:
It was really the foundation of what I learned using Postman to do Remote Authentication to Hue API that made me able to create the solution above, so lets get into the details.
Create a New Remote Hue API app
The first thing you need to do after you have create a Hue Developer account, is to create a new Remote Hue API app here: https://developers.meethue.com/my-apps/.
You need to specify the following required fields:
Application description: A short description for your remote app.
Optionally you can specify contact details.
After submitting your new app is ready, and also an AppId, ClientId and ClientSecret will be provided, for example:
You are now ready to start setting up your Postman client. If you don’t have Postman installed you can get it at https://www.postman.com/downloads/.
Create Postman Environment and Collection
In the Postman client I have saved all my variables and requests against the Hue API in an environment and collection. At the end of this blog post, I will share with you the link to a GitHub repository where you download these samples for you to start with yourself.
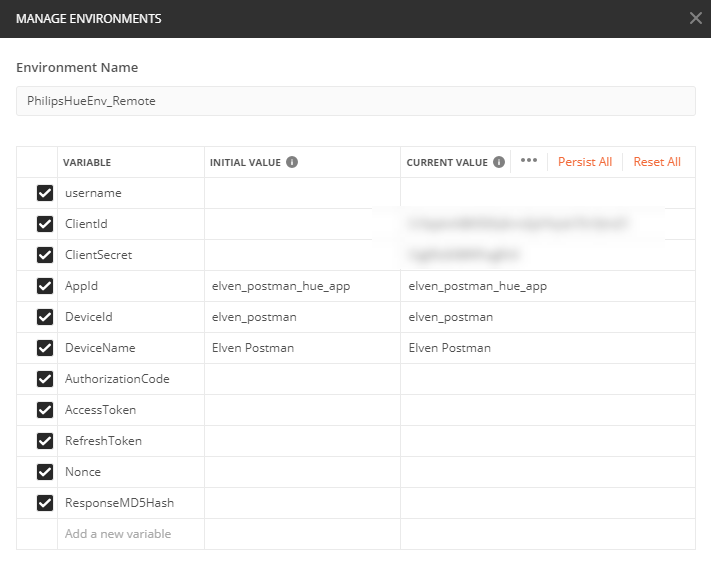
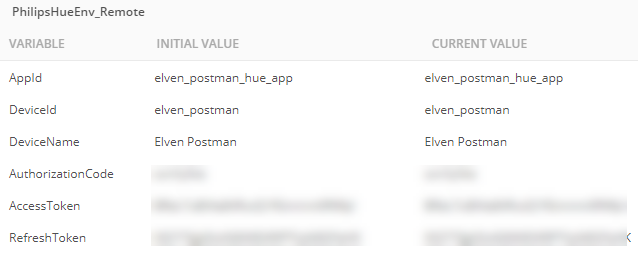
As I will be using several variables with my Postman queries against the Hue API, I’ve created an environment like the following:
Most of these variables are empty to begin with, but you can start by filling out:
ClientId: From the app registration at your Hue Developer Account.
ClientSecret: From the app registration.
AppId: From the app registration.
DeviceId: This is the id of the client you will be running queries from. It could be anything like the name of the computer, or the environment you are running from. I just chose my surname and postman.
DeviceName: Anything Display Name for the device you run the queries from.
The rest of the variables will be empty for now, but they will be calculated and updated based on responses later.
Also, since collections and variables can be synced and shared with other users or devices, I keep the sensitive variables like client id and secret only in current value column.
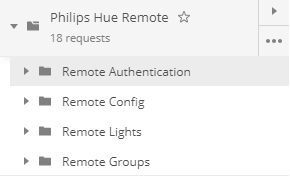
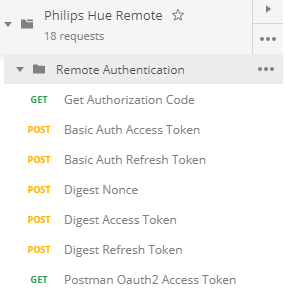
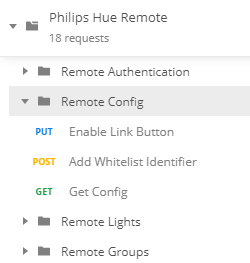
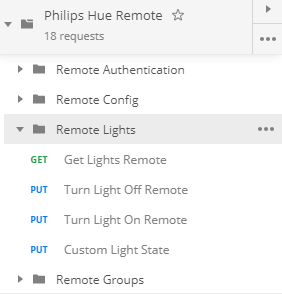
After creating my environment, I’ve created a collection with folders for my requests, for example like the following:
We can now proceed to start with Remote Authentication to Hue API.
Remote Authentication to Hue API
Hue Remote API use Oauth2 authorization code flow to get an access token that has to be included in the HTTP Authorization Header for every request to the API. We will use the app registration we did earlier to authenticate with the developer account and grant application access, and with the resulting authorization code we can request the access token to be used in the requests.
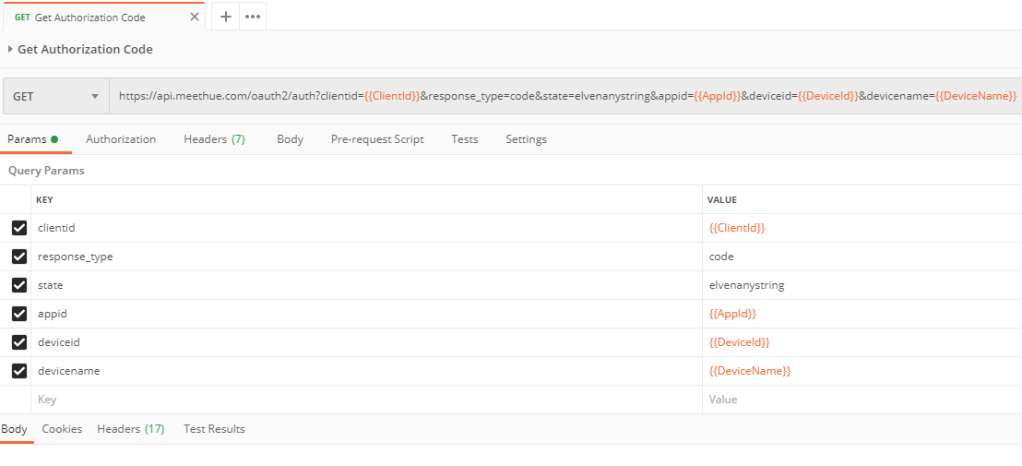
You can use Postman to construct the Url like the following, but you cannot really run the query from here as the Postman browser does not support the response:
You can use the code view on the right to get a preview of the request, and the copy it from there and paste it to your browser:
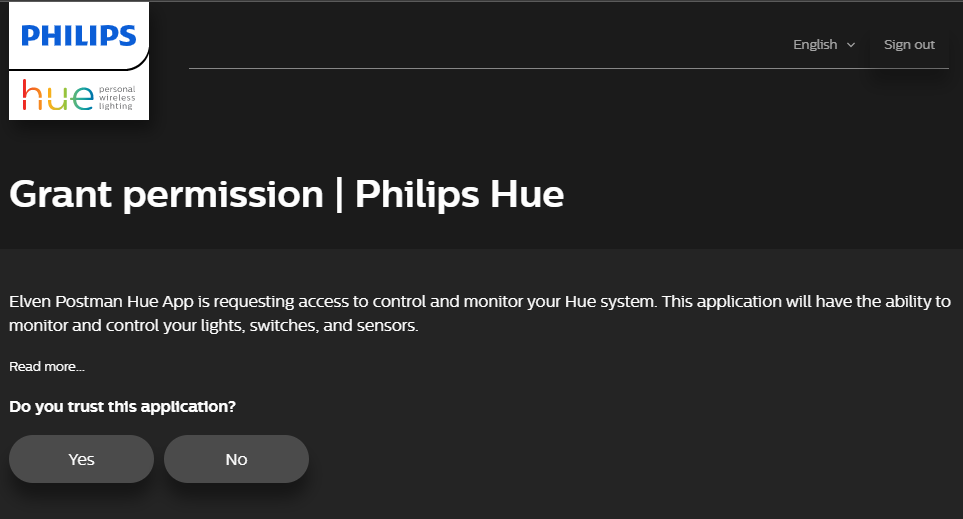
When you execute the authorization code url in your browser, you will be asked to log in with your Hue Developer account, if you aren’t already, and then you need to grant permission to your app registration:
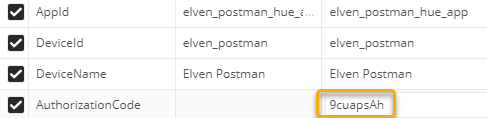
After successfully granting permission, you will be redirected to the Callback Url you specified earlier, and from there you can get the authorization code:
Copy that code and paste it in the environment variable for AuthorizationCode as shown below:
Now that we have the Authorization Code, we can proceed requesting the Access Token. There are two methods for getting an access token:
Basic Authentication, which sends your client id and secret as base64 encoded strings in the authorization header.
Digest Authentication, which use a more secure challenge-response handshake that handle the credentials more securely.
See documentation for more details on whether to use basic or digest. I will show both in the following.
Get Access Token with Basic Authentication
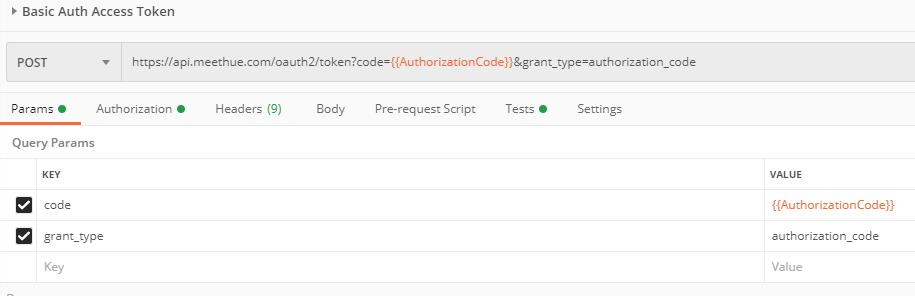
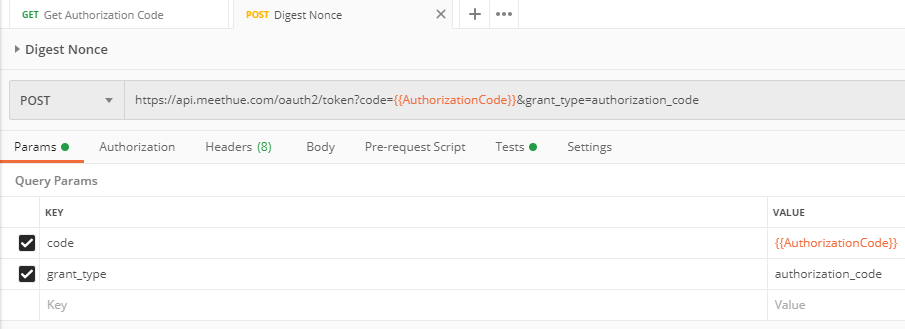
To get an access token with basic authentication, create a POST request to the token endpoint, specifying the following query parameters:
code=authorization code you received in the previous step, using the environment variable
grant_type=authorization_code
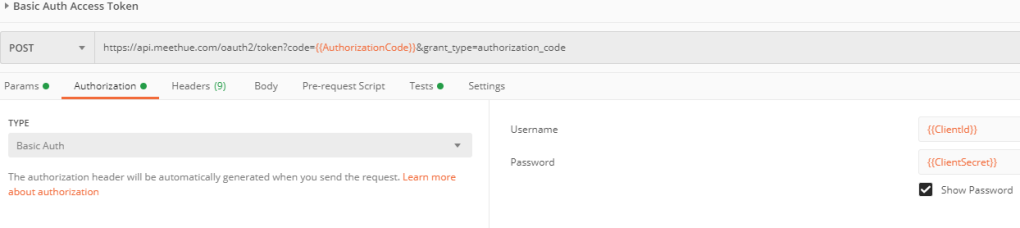
In addition to that you need to set the Authorization Header to type Basic Authm and specify the ClientId and ClientSecret as shown below:
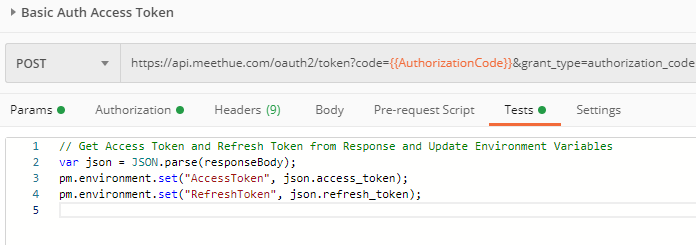
Postman has this great feature called tests that you can use to run javascript commands before (pre-request) or after queries. You can use this to save response details and update your environment variables. In my example I’m saving the response which would include the access and refresh tokens, and update my environment variables with that:
If I now run this request (and you haven’t waited to long to the authorization code to expire), you should get a successful response:
These tokens expire after the specified amount in seconds. For the Access Token this is 168 hours = 7 days. The Refresh Token expire after 112 days.
This means that after 7 days, you will need to use the refresh token to get a new access token. And when you do that, you will get a new access token valid for 7 more days, and a new refresh token again valid for another 112 days. This means in theory that as long as you refresh the access token regularly, this can last “forever” for your client.
You can also verify that the environment variables for access token and refresh token has been updated based on my javascript from above:
Refresh Token with Basic Authentication
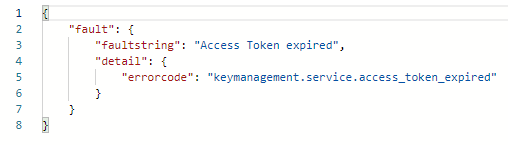
If your access token has expired, you will get a response like the following:
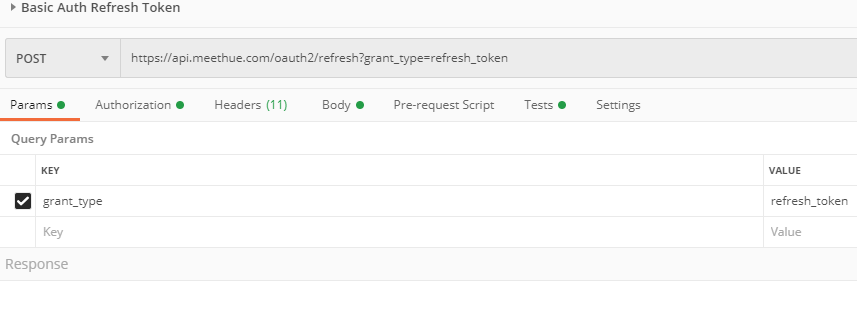
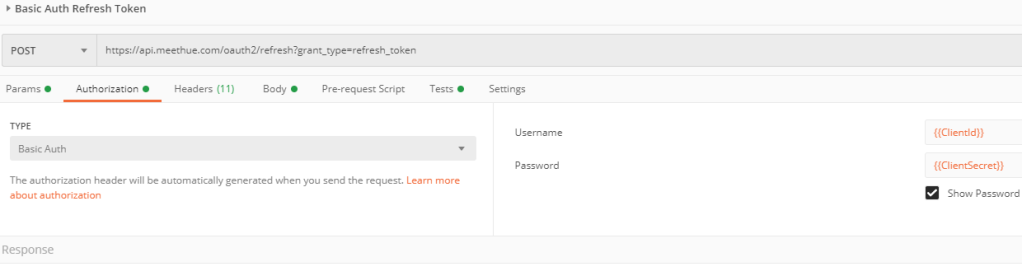
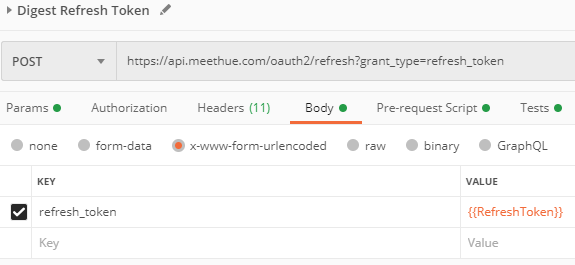
To refresh the access token, you need to use the oauth2/refresh endpoint and with the query parameter grant_type?refresh_token:
The same as getting access token with basic authentication, also when refreshing you need to specify the authorization header to use basic auth, and with client id and secret as username and password:
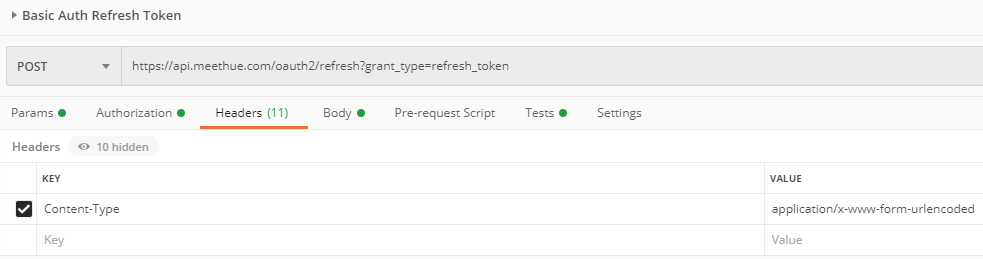
In Headers, specify that the Content-Type is application/x-www-form-urlencoded:
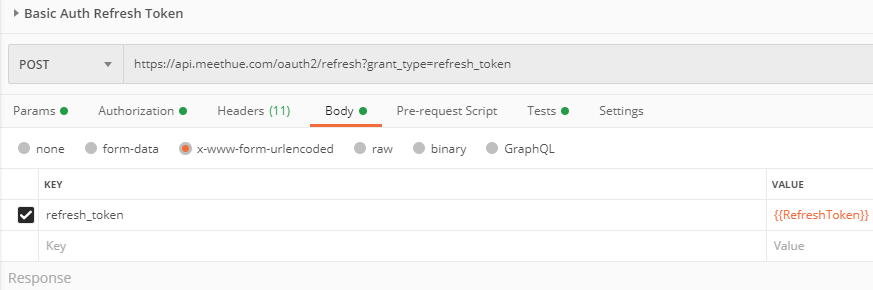
And in the Body of the request, specify the environment variable for refresh token as form parameter like this:
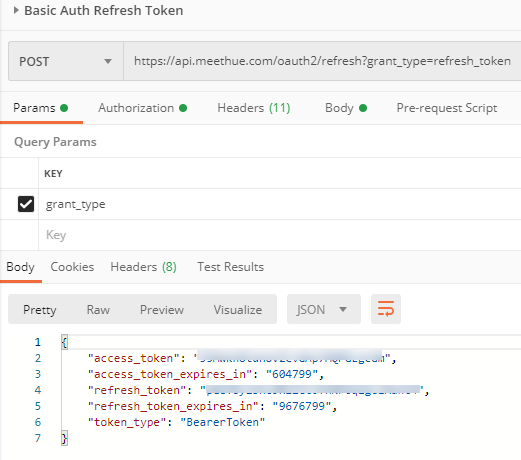
Under Tests I have the same javascript as shown earlier, which lets me save the refreshed access token and refresh token to my environment again. When I run the request to refresh the access token, I should get a successful response like the following:
Now that I have an access token and refresh token, I’m all set for doing the necessary remote config for getting a username to use in the requests, but first I will show how to do Digest Authentication. If you want you can skip right to the Remote Configure Link Button and Create User section below.
Get Access Token with Digest Authentication
When you want to get an access token using Digest Authentication, you will need to start over again with getting an authorization code as described earlier. After that I will just request an access token with a POST request to the oauth2/token endpoint with the query parameters of code=authorization code & grant_type=authorization_code. This is basically the same request as I used with basic authentication, but with one important difference: I will not specify the Authorization Header to be basic auth.
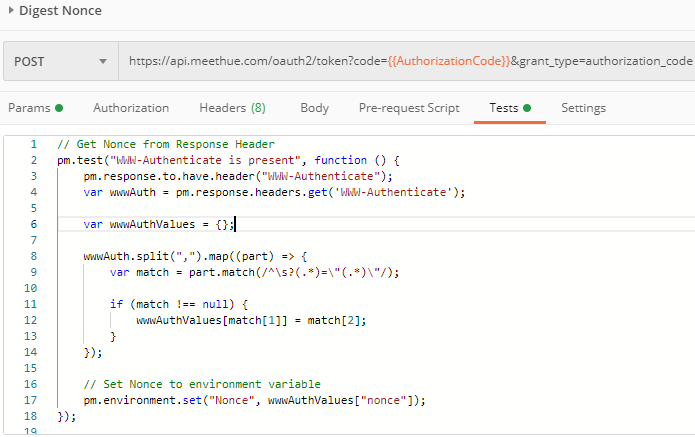
When I run this request without a authorization header, I will get a 401 unauthorized response like the following. In the response Header and the WWW-Authenticate key I will get the first part of the challenge-response needed for Digest Authentication, the value called Nonce:
As with previous requests, I run a javascript test that extracts the response, in this case it is a little more complicated as i need to examine the response header and split so that I can get the Nonce value. This is so saved to the Nonce environment variable like this:
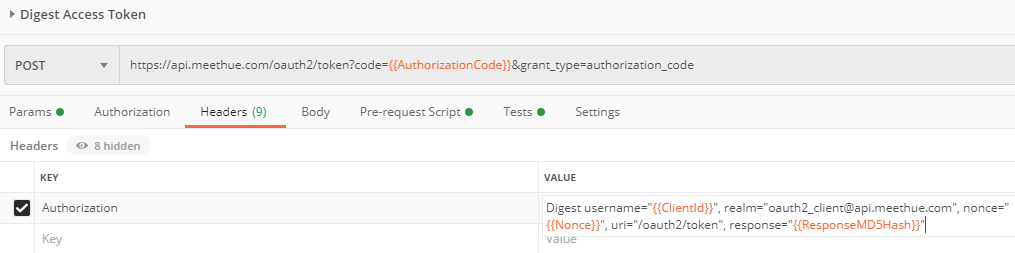
Now that I have the Nonce I can proceed requesting an access token with Digest Authentication. This time I go to the request Headers and add an Authorization Header with a value as shown below:
This requires a little more explanation. The Authorization header consist of the following:
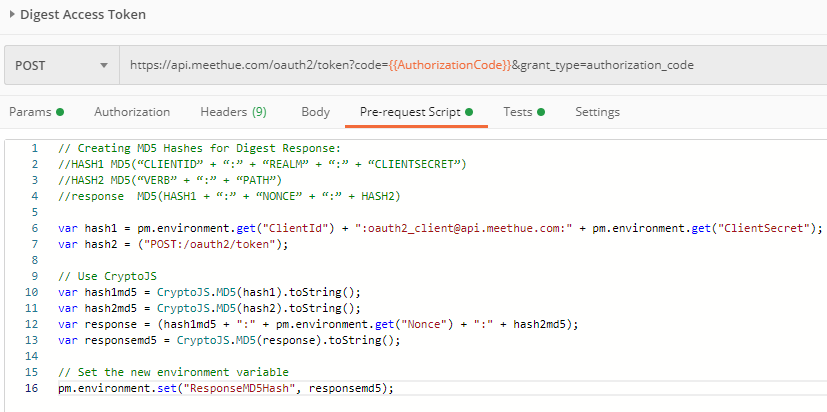
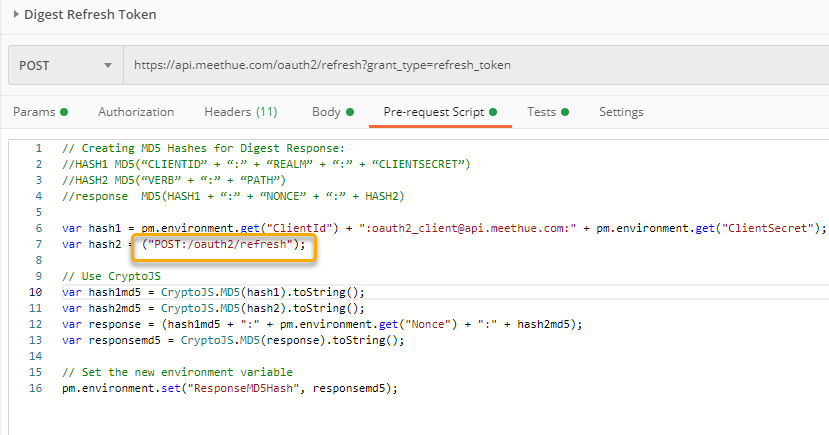
, where Nonce is the value I retrieved from the WWW-Authenticate response header in the first request, and the response is a calculated MD5 Hash as explained in the documentation linked earlier from Hue Remote API. But how did I get this value calculated? This time around I’m using a pre-request script to calculate that, based on the formula from the documentation (marked in green comment below):
So this little pre-request script calculates and sets the ResponseMD5Hash environment variable, so that I have that available when constructing the Authorization Header for Digest authentication.
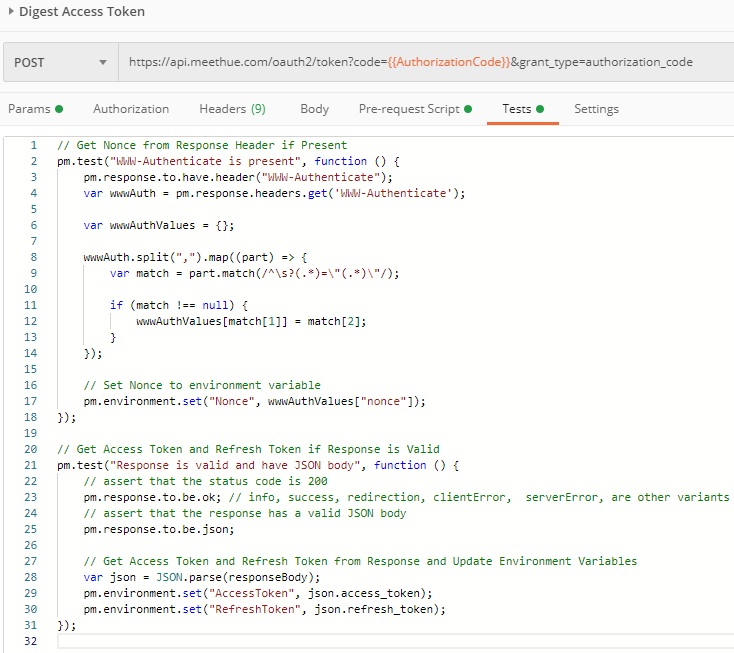
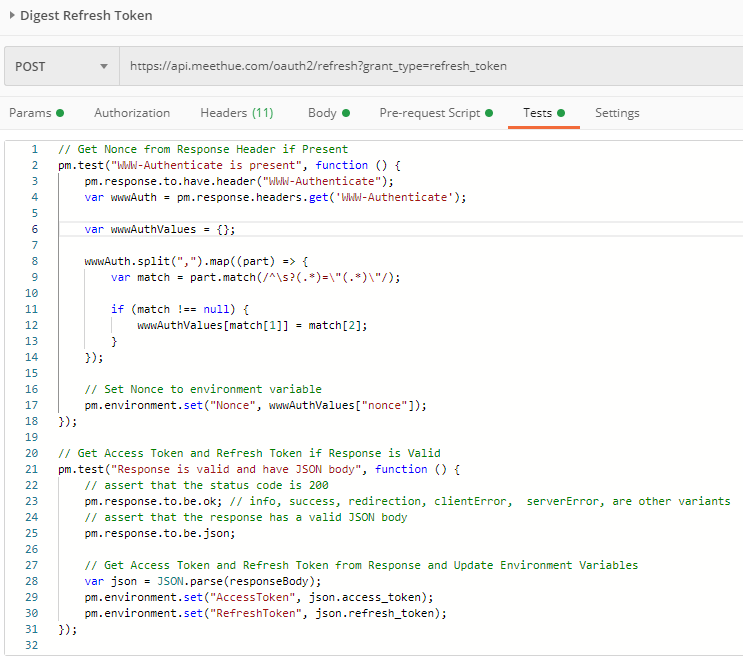
Before I proceed with requesting an access token using Digest Authentication, I need to put together a Test script that do 2 tests:
Check if there is a WWW-Authenticate response header, and if so save the Nonce to environment variable.
Check if there is a successful json response and if so save the access and refresh tokens to environment variables.
My script now looks like this:
This means that I will need to run the request twice in succession, the first time I will get a 401 Unauthorized response, in which I will get the Nonce:
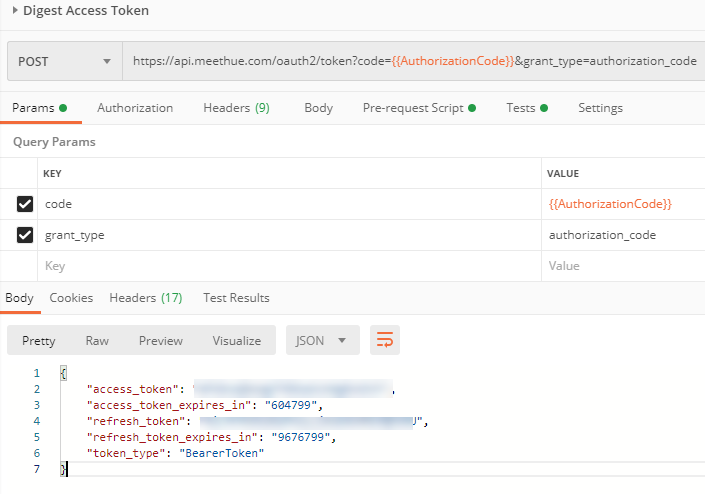
The second time I will get the 200 OK and a JSON response:
I now have an access token using Digest Authentication:
Refresh Token with Digest Authentication
When the Access Token expire, I will need to use the Refresh Token to get a new Access Token with Digest Authentication. Refreshing using Digest is based on the same challenge-response flow as getting the access token.
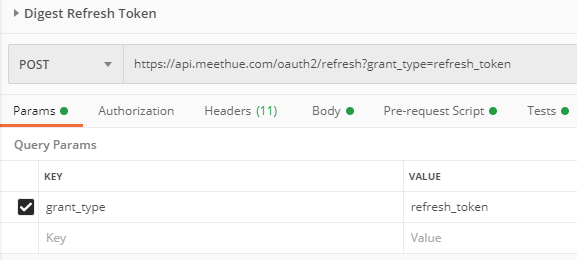
First I need to construct a POST request to the oauth2/refresh endpoint like below:
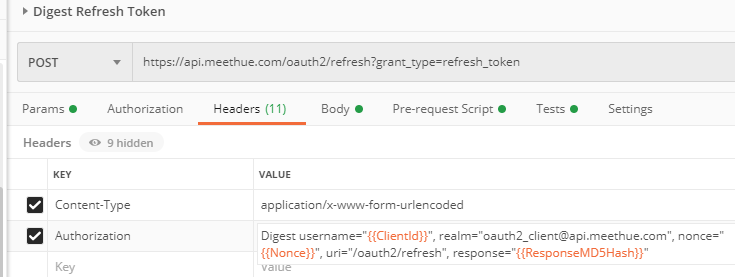
Then I have to add to the Header Content-Type: application/x-www-form-urlencoded, and the Authorization using Digest like shown below:
This Digest Authorization Header is the same as with requesting the access token, with one important difference, uri is “/oauth2/refresh“.
Next, in the Body I need to specify the refresh token:
In the Pre-request Script, make sure to use “/oauth2/refresh” when calculating the md5 hash:
And the Tests scripts are the same as with getting an access token:
Remember that refreshing the access token using Digest will follow the same pattern as getting the access token, you will need to run the refresh request twice in succession for getting a 401 Unauthorized and then 200 OK like shown above.
Get Access Token with Postman Oauth2 Authorization
With the collection of requests shown above, you should now be able to use the access token and refresh when needed for as long time as you need to. Before I proceed to configuration and accessing my lights, I will add one more method of getting access token with Postman: Using the built-in Oauth2 Authorization method.
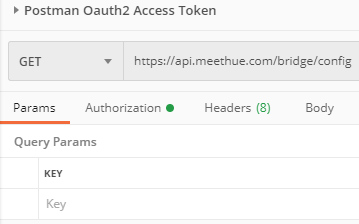
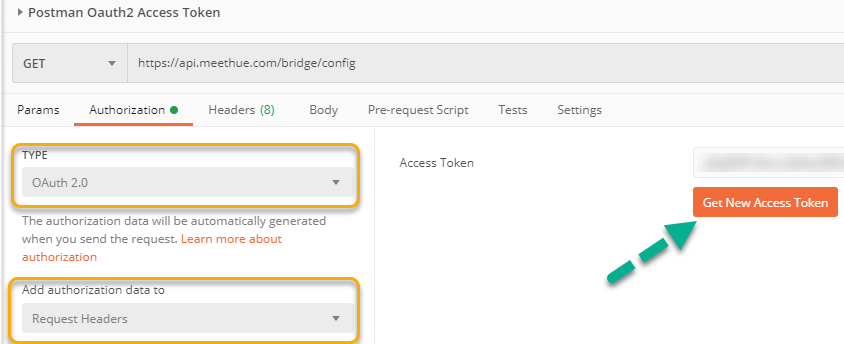
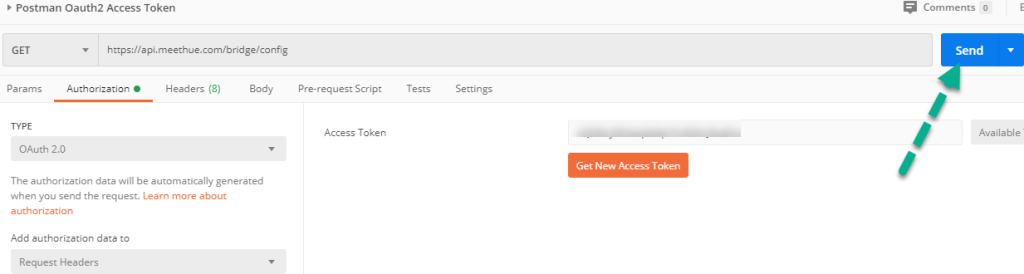
Lets start by creating the following GET request, this is just a simple request to get configuration from my HUE bridge:
Next, go to Authorization, select Oauth 2.0 and add Authorization data to Request Headers as shown below. Then click on the Get New Access Token button:
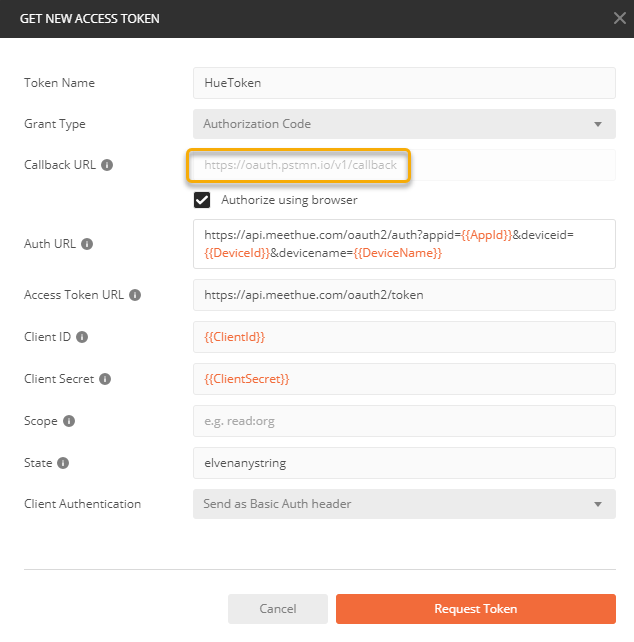
In the following dialog, give a name for your Token, and make sure that grant type is Authorization Code. Select Authorize using browser, and note the Callback URL. You need to copy this URL. Construct an Auth URL using your environment variables like I have shown below, the Access Token URL, specify ClientId and ClientSecret variables, type any string for state, and make sure that Client Authentication is Basic Auth header:
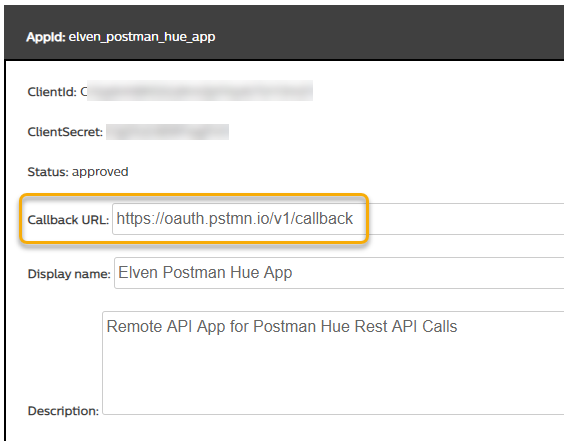
Now, before you click on Request Token, you need to go back to your Hue Developer Account and change the Callback URL to the one above:
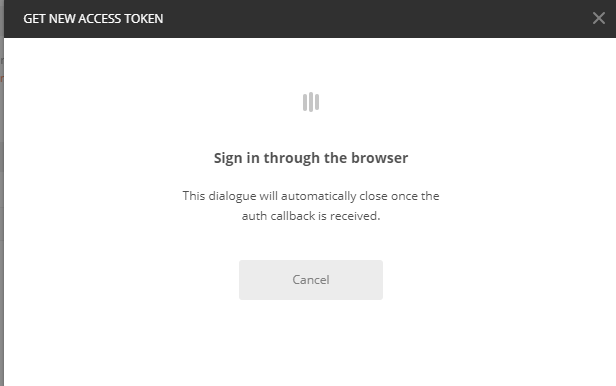
When you have done that, you can click on Request Token, which will launch you default browser:
You need to be logged in with your Hue Developer account and grant permission:
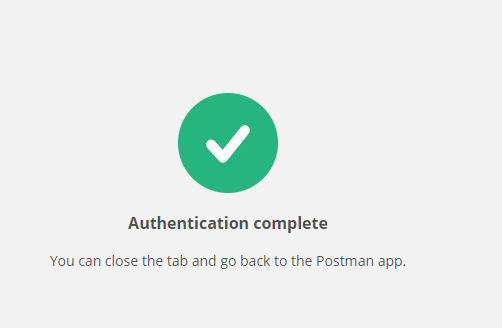
After that you will get the following message when redirected:
You might have some issues with pop up blocker or redirects:
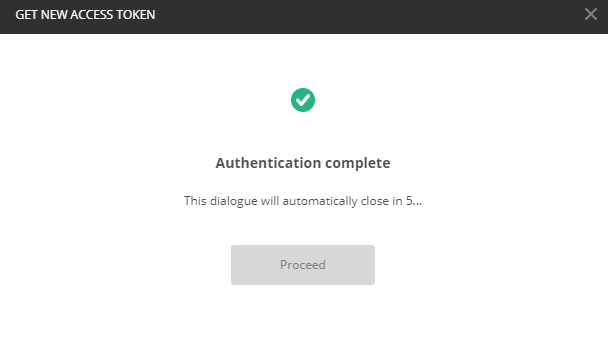
If everything works as expected, your Postman client will receive the callback and complete then authentication:
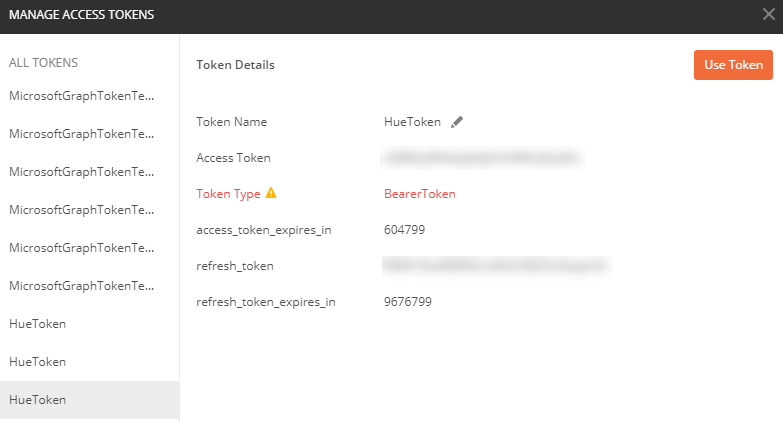
And you should receive your Access Token:
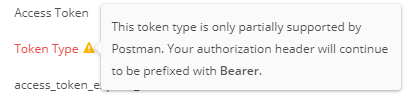
Note the little warning about partially support:
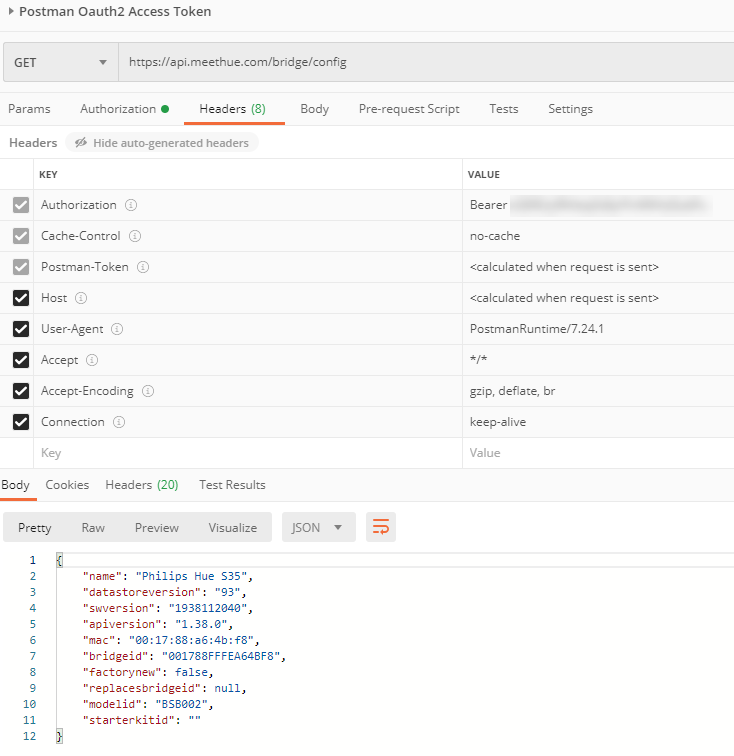
Click the Use Token button, which should fill in the Access Token field. Now click Send on the request:
This should now response with some config details of your Hue Bridge, like the name and versions. If you go to Headers and show the hidden Headers you will see that Authorization Header has been set with Bearer and your Access Token.
So going forward, and for the rest of this blog post, you now have two options for using Access Token:
Use the Access Token from environment variables that I have shown how you can retrieve with Basic or Digest Authentication, and Refresh when needed.
Use the Oauth2 Authorization for every request (or set it on the parent level of your collection of requests). When the Access Token expire, it won’t refresh automatically, so you need to Request a new one.
Remote Configure Link Button and Create User
Now for the next part we will have to remote configure the link button, so that the bridge will accept creating a new user for us to be able to control the lights.
Enable Link Button
Users of Hue will remember that you from time to time that you need to push the link button on your bridge when adding new users. With Remote API we can do this without having to run around the house 😉
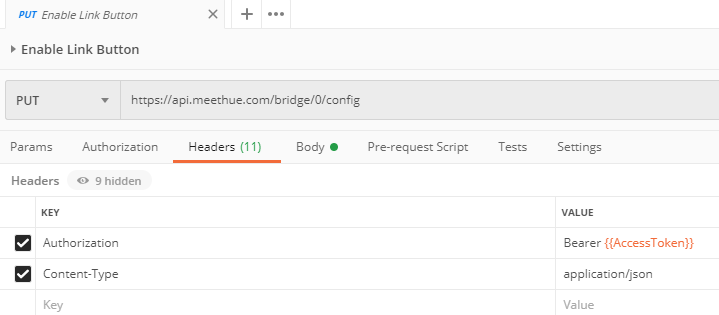
Create a PUT request like the following. On Headers specify Authorization and value to be Bearer {{AccessToken}}, which will get your environment variable from the previously retrieved access token. PS! For all the following requests: Always include this Authorization: Bearer {{AccessToken}} header!
Specify Content-Type: application/json:
Next, set the Body to {“linkbutton”: true}:
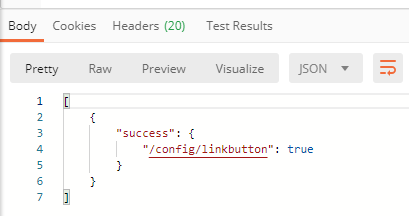
And then Send the Request, you should get a success response like below:
You now have 30 seconds to add your user..
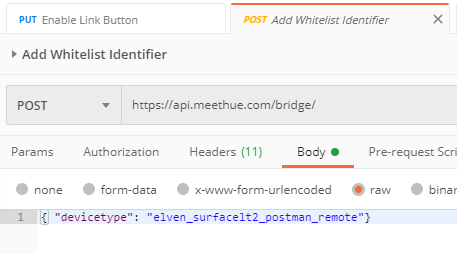
Add Whitelist Identifier
Next, create a POST request to the Bridge endpoint that specify devicetype in the Body, like shown below, where devicetype is a named description of your client and app, for example:
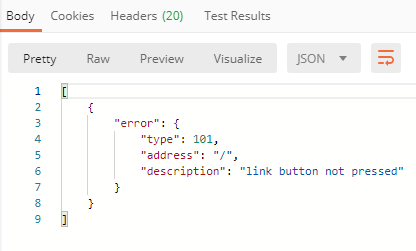
Run the request, but if 30 seconds have passed, you will get this response:
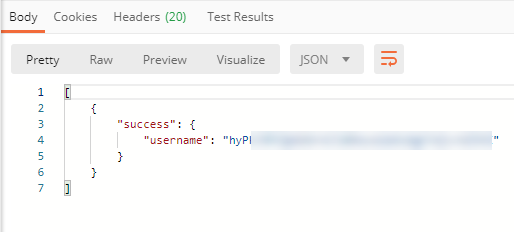
In that case, just run the PUT request again to enable the link button, and try again. When successful you should get a response like the following:
This username have to be included in every Hue Remote API request later, so make sure to save it in your environment variables:
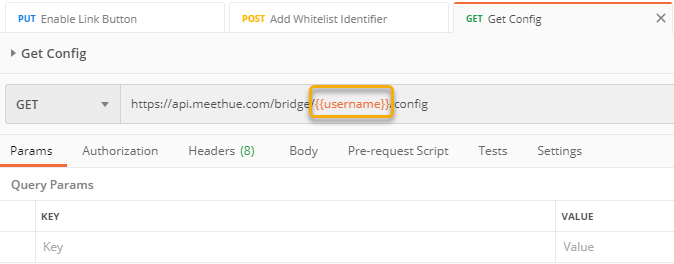
Get All Configuration
Your starting point now for all requests are https://api.meethue.com/bridge/{{username}}/ (and remember to include the Authorization: Bearer {{AccessToken}} header always).
If I want to list all configuration, I can run this GET request:
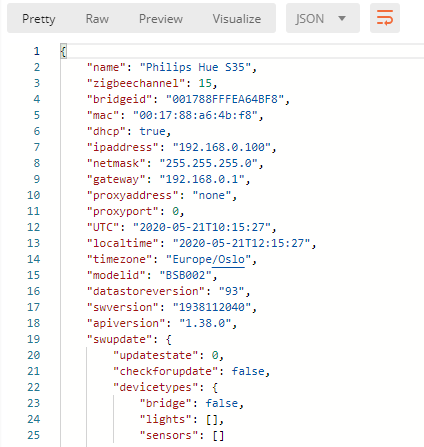
Which will provide me with all the configuration details of my Bridge:
We are now ready to start controlling the Lights and more!
Control Lights Remotely
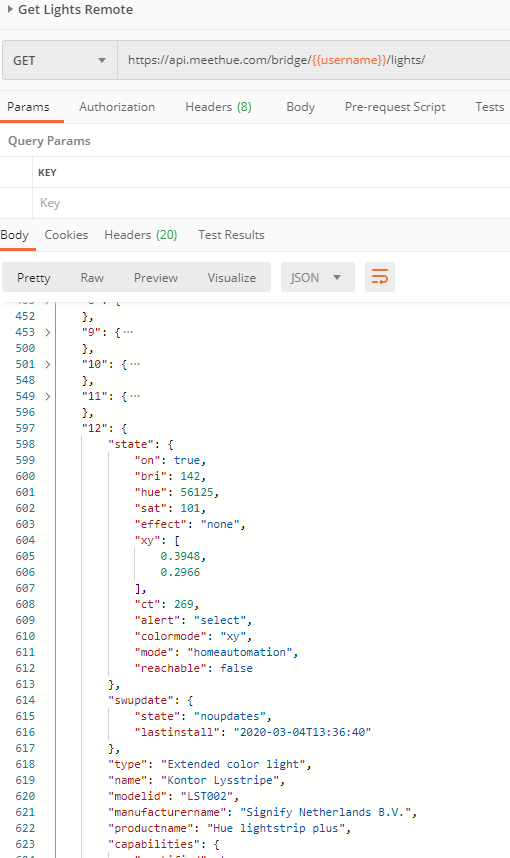
If will now show you some sample requests for controlling lights via Hue Remote API:
The response will show all lights, numbered from 1 to count of lights connected to your bridge. I’ve collapsed some details in the response above, but you can see from my light number 12 that the state is “on”, you can see the brightness, color and more.
PS! Every light is a new typed object, and not an array, which I find a bit unfortunate, so you need to be aware of that if you want to loop through your lights for example.
If you want to get a specific light, just add the light number at the end of the GET request URI, like this: https://api.meethue.com/bridge/{{username}}/lights/12
Turn a Light On/Off
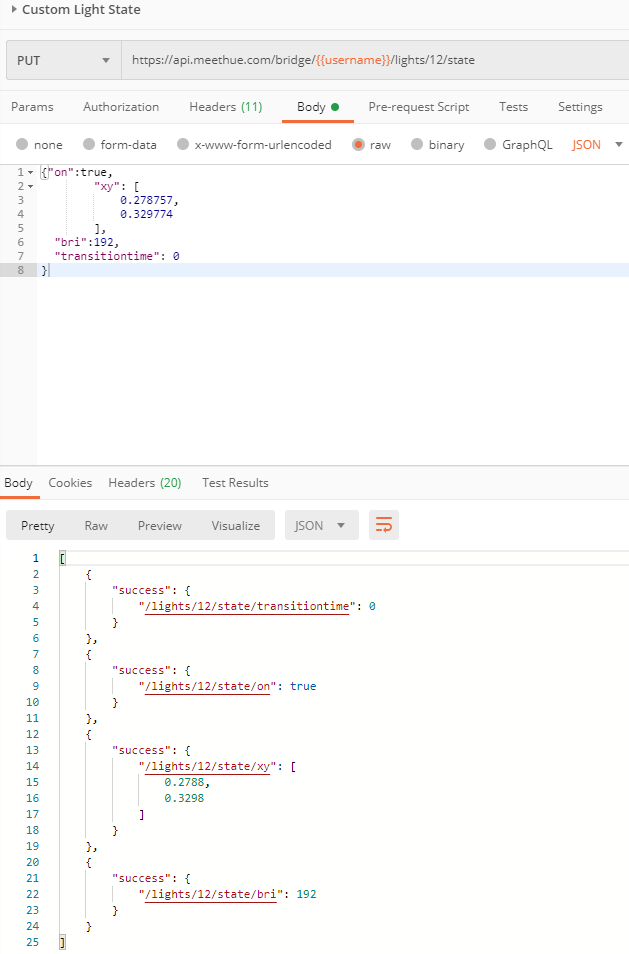
You can control the state of a specific light by doing a PUT request to your specified light number, for example light number 12: https://api.meethue.com/bridge/{{username}}/lights/12/state
You need a Request Body that tells what the light state should be. For example to turn the light off, just include a body with {“on”:false}, the response will confirm success (and you should be able to visually confirm as well ;):
Likewise, to turn on again:
Controlling Light State and Colors
Now you can really start playing with your lights with custom states, you can change brightness, go from cold white to warm white, or maybe set a color scene for the millions of colors available if your light supports color. More info can be found here:
Here is an example where I both control brightness (1-254) and a custom color:
Now, you can just experiment and learn for yourself. A good tip is to use your Hue App on your mobile phone to set the color you like, and then use GET to get the light state color settings.
Summary and Github Repo
I hope you have learnt a lot about Hue Remote API when reading this, I certainly learnt a lot exploring and documenting this via Postman. This understanding has provided me with the knowledge and tools to look into automation and integration scenarios with the Microsoft solutions I use daily in my job. I’ve already been doing this with PowerShell, Azure Functions, Logic Apps and Power Automate to name a few. There is a blog post coming soon on Power Platform and how I did that to control my lights based on Teams Presence and more.
So whether you are a developer that loves to write code, or maybe you are more into the low-code, no-code solutions, I hope this has been helpful.
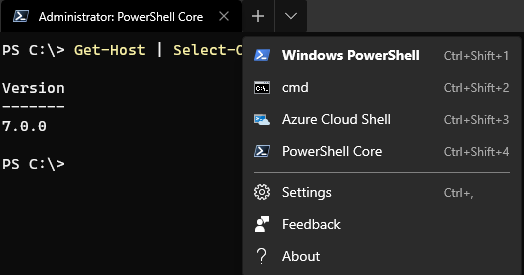
I’ve been using Windows PowerShell mostly previously, as I’m running Windows 10 and use a lot of PowerShell modules that variously depend on SDKs or other Windows Components, but I’m increasingly using PowerShell Core in scenarios for example with Azure Functions PowerShell ( https://docs.microsoft.com/en-us/azure/azure-functions/functions-reference-powershell). My computer now runs Visual Studio Code and Windows Terminal with different Profiles, so that I can easily change between environments and run side-by-side:
Let’s compare the “old” way and the “new” way, but first lets get an Access Token for Microsoft Graph.
Get Access Token using Graph Explorer
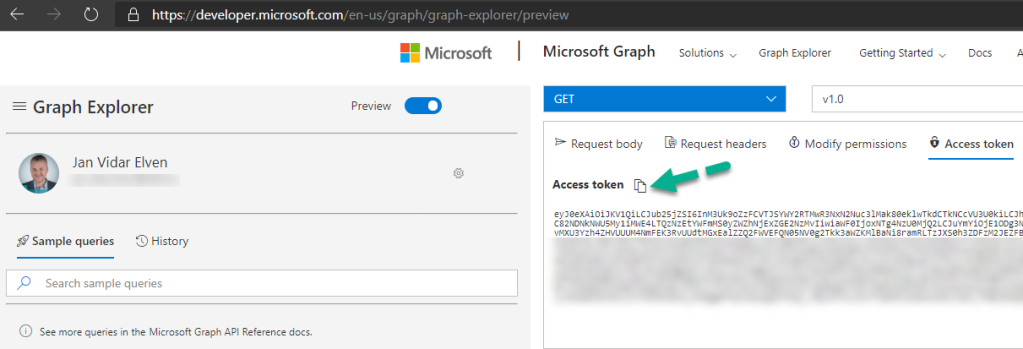
If you want to learn Microsoft Graph and start with some sample queries, Graph Explorer should be your main starting point: https://developer.microsoft.com/en-us/graph/graph-explorer/preview. The new preview version of the Graph Explorer lets you get a copy of your Access Token if you sign in with your account as shown below, you can copy it to your clipboard:
This Access Token will run queries as the logged on user (yourself) using the consented permissions in Graph Explorer, so you should only use this token for your own sample queries and not share it with anyone else.
Preferably you would get an Access Token by registering your own App Registration in Azure AD and authenticate using one of the following authentication flows:
Authorization Code Flow (Delegated User – Web Apps and APIs)
Device Code Flow (Delegated User – Native Clients, recommended for PowerShell)
Client Credentials Flow (Application Permissions – Scripts and Background Processes that don’t require user interactivity)
But for now I would use use the Access Token from Graph Explorer for the following samples.
The “old” way, using Authorization Header with Bearer Token
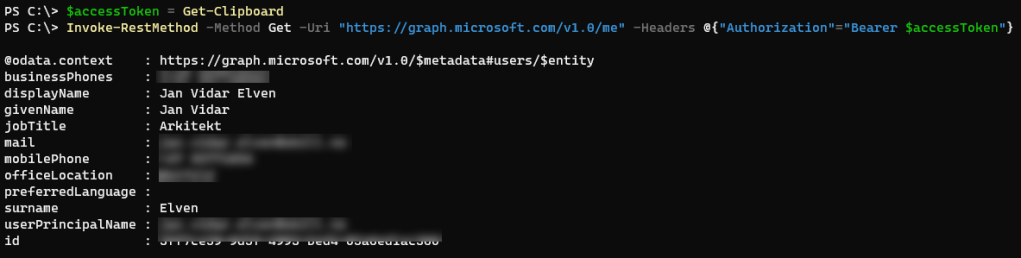
This method works with both Windows PowerShell and PowerShell Core. After aquiring an Access Token you would need to specify an Authorization Header with a Bearer Token for every request. In this example I get the Access Token from the Clipboard, as I copied that from the Graph Explorer.
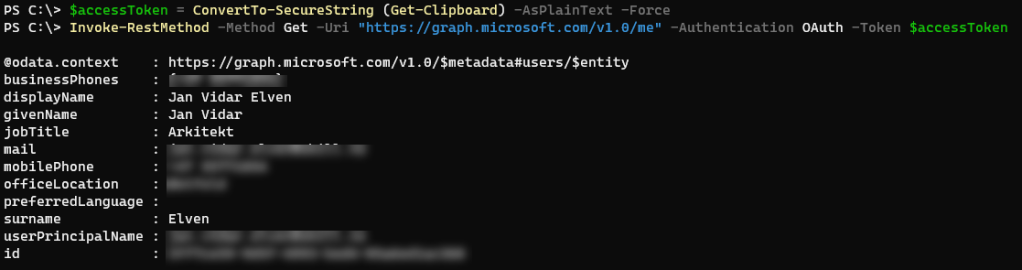
And then you would run the request specifying the Authentication parameter to be Oauth, and the Token parameter to be the secure string:
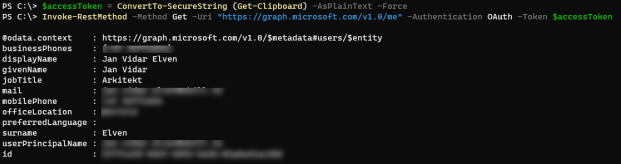
Invoke-RestMethod -Method Get -Uri "https://graph.microsoft.com/v1.0/me" -Authentication OAuth -Token $accessToken
This should return a response like below:
Summary
So in summary you can start using the Authentication and Token parameters in PowerShell Core, it would add / override the Authorization Header and Bearer Token for you. There can also be some added security gains as the Token is submitted as a securestring, which means you can try to keep it out of code as clear text.
…..moved trainings and meetings online using the modern collaboration tools I know and love!
When I’m not working or fulfilling my community activities as MVP, I spend many evenings and weekends at the soccer field, where I’m coaching and managing a soccer team consisting of 14 year old boys.
Due to the Coronavirus situation, as in many countries also Norway has closed it schools, many businesses are either closed or working from home, and in general we are all following the rules of isolating to make sure the virus doesn’t spread. And of course, this has also resulted in closing all grass roots football, for the time being at least to the end of April. I quickly understood that I needed to think in new ways..
So I decided to use the tools I have at hand, and I created virtual follow ups using tools like Microsoft Teams, Forms, Power Automate and SharePoint Online among a few to help support the boys doing self practice and have Virtual team Meetings..
This blog post is a technical version of a LinkedIn article I wrote in Norwegian, https://www.linkedin.com/pulse/hvordan-jeg-som-fotballtrener-jan-vidar-elven/, explaining more the reasons and why I set this up. In this post I will go more into the technical setup, and share some resources for those that want to learn or maybe do something similar themselves. Some of the screenshot images are in Norwegian, but you should be able to understand from my comments.
It all started with Microsoft Teams.. and a Form!
I knew already from before that Microsoft Teams would be more central in my daily work, but I also observed that my son and his classmates, that also plays on the aforementioned soccer team, use Teams themselves now for digital schooling at home. They have daily Teams meetings, as well as some online classes and homework delivery.
So I thought that I wanted to set up a player meeting on Teams, and later a meeting with their parents. This way we could have a social and digital arena to meet each other, as well as talk with the boys how we wanted them to do training with self practice at home. So the first thing was to invite to online meetings.
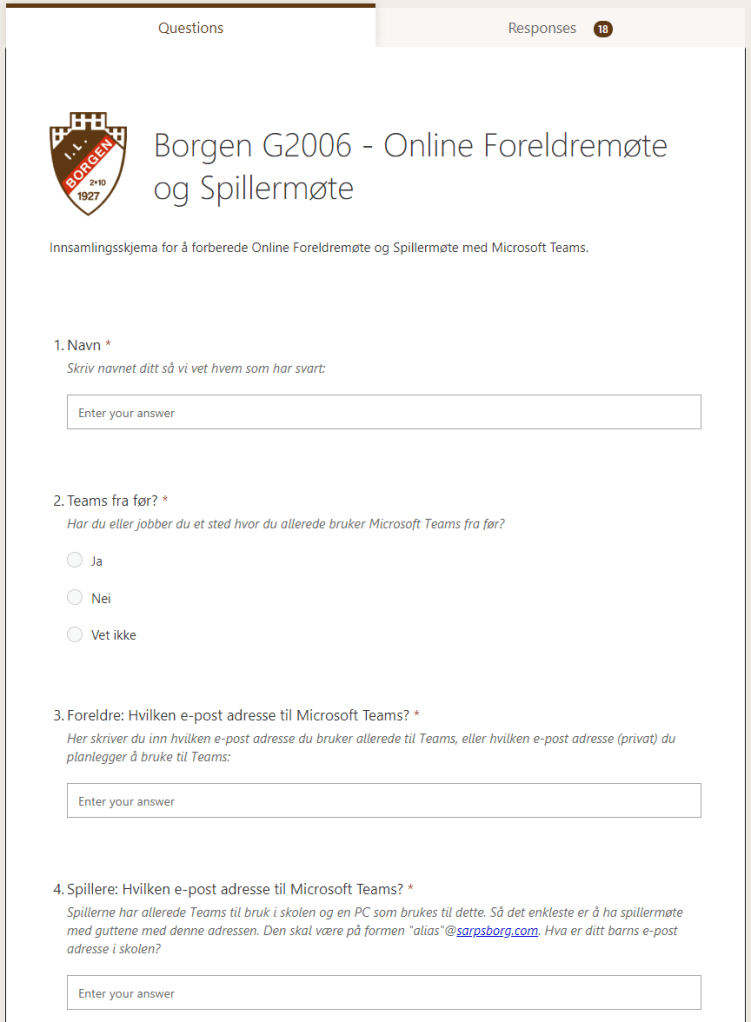
I knew that the boys already used Teams in school, but I needed to collect their school e-mail addresses. I also suspected several of the parents use Teams at their workplace, but not everyone, so I also needed to get an overview on that. So I decided to create a questionnaire in Microsoft Forms:
How I set it up:
I created a Form with the following inputs:
Name (Text). The person filling in the form.
Using Teams from before? (Choice). Yes, No and Don’t Know option for parents to answer if they use Teams already.
Parents, Teams e-mail address (Text). Their existing Teams work e-mail address or personal e-mail address.
Players, Teams e-mail address (Text). The Teams e-mail address they use at school.
In addition I used the club logo and customized the theme colors for the Form. Then I selected Share settings and selected so that “Anyone with the link can respond”. This will mean that all responses are anonymous, so that’s why I require that they type their name in the first input. Then I distributed the Forms link to the parents.
After I received all the responses, I created a Teams meeting invite to the players for the players online meeting, and a Teams meeting invite to the parents for the parents online meeting.
We were now ready for our inaugural online meetings!
Organizing Self Practice Trainings
Normally our soccer team practice at least 3 times a week, in addition to playing games or other activities. So before we had the online player meeting, a self practice training plan was created, focusing on 3 weekly trainings:
Conditioning (interval runs, with or without ball, dribbles, jumps and obstacles etc.)
Endurance (long hikes and outdoor activity with family)
These training should be completed after plan where the boys will get approved attendance for each training they complete. To get a training approved they needed to self register a training form, as well as document by sharing pictures, video, screenshots of activity etc.
The players were shown examples of activities and drills they could complete themselves or with help of family. With this organization and training plan, the only thing that was missing was a system for registering self practice and how I could follow up on that.
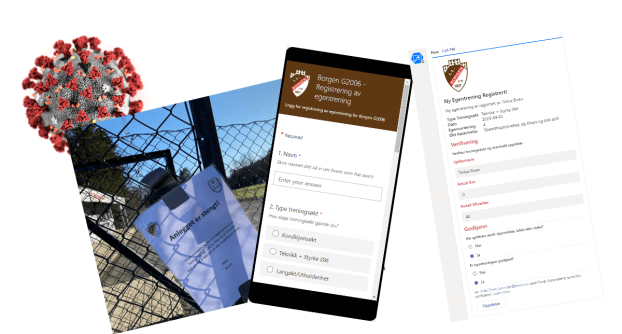
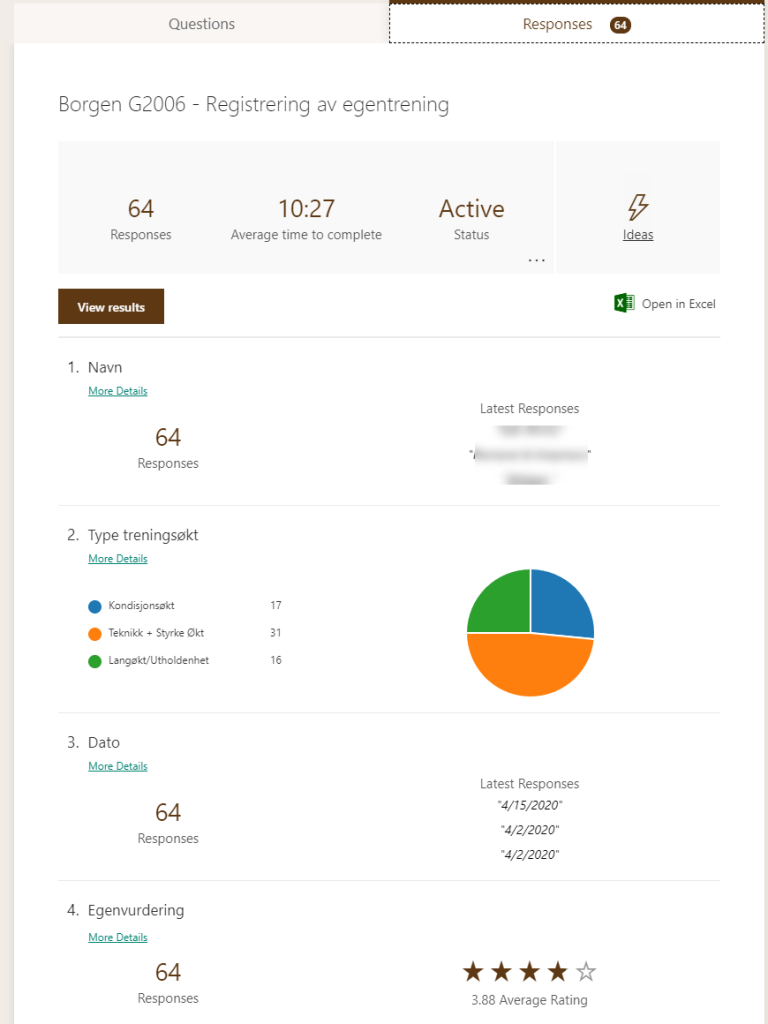
I decided to create another Form. In this Form which the boys got a shared link to, they could register their name, date, self assessment, what kind of activity they did and type, provide a description and optionally register number of minutes and kilometres. They were also asked to send in documentation with video, pictures, etc.
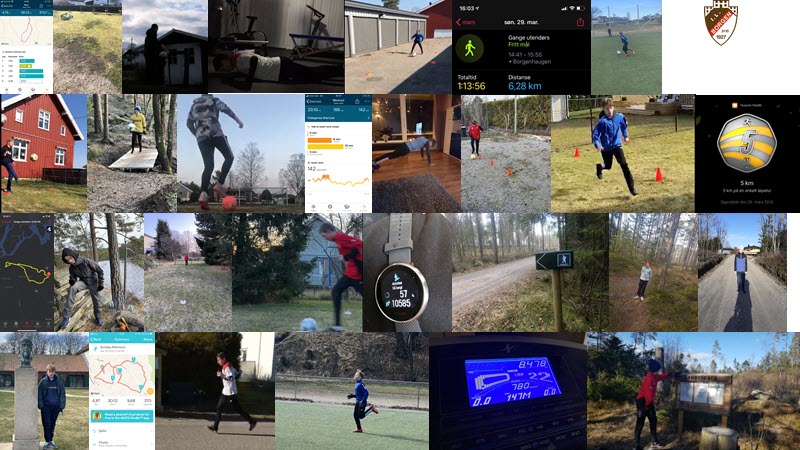
This worked really great and next week we already had a lot of responses for completed trainings:
And from the media I received I could really see that the boys were doing their self practice:
How I set it up:
I created a Form with the following inputs:
Name (Text). The player name filling in the form.
Activity Type (Choice). Conditioning, Technique + Strength, or Endurance.
Date of Activity (Date).
Self Assessment (Rating). 1-5 stars where they could evaluate their own session.
Type of Condition (Choice). If they did conditioning work, what kind of interval (4×4, 60×60, 15×15).
Technique + Strength (Text, Long). Comment field for explaining how they did technique and strength work.
Endurance (Text, Long). Comment field for explaining what kind of long activity they did.
Number of Kilometres (Text, Restricted to Number). Optionally how many kilometres they practiced.
Number of Minutes (Text, Restricted to Number). Optionally how many minutes the activity lasted.
Sent media of activity (Choice). Yes or No for if they have sent picture, video or screenshot to our team e-mail address.
Also in this Form I used the club logo and customized the theme colors. Then I selected Share settings and selected so that “Anyone with the link can respond”.
PS! I was looking into a File Upload response in the Form, but this cannot be added to a Form that are shared externally. That is why I needed the boys, or their parents, to send their media files to our e-mail address in addition to the Form registration.
Following up on Registered Self Practice Trainings
With all those great responses coming in, I could look through the responses in Office Forms, and download an Excel copy of the responses, but I needed something more to follow up the trainings. So I created a private Team in Microsoft Teams:
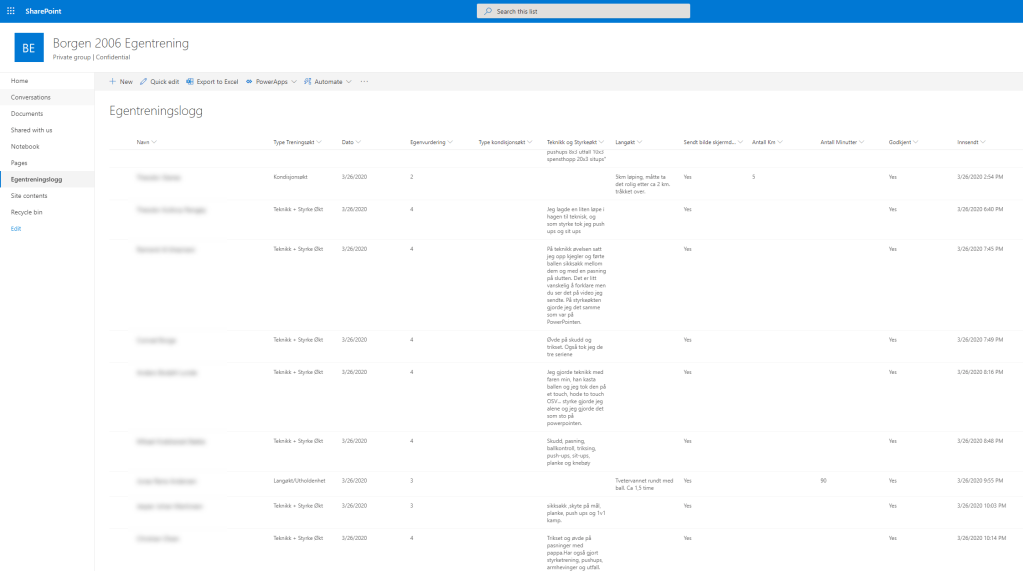
Next I wanted to get all the responses from Forms into a SharePoint List. I created the List into the Teams SharePoint Site so that I could get all the registered self practice trainings in one place, and be able to do edits if needed. I also added some extra columns for approve the training and if there was sent media documentation:
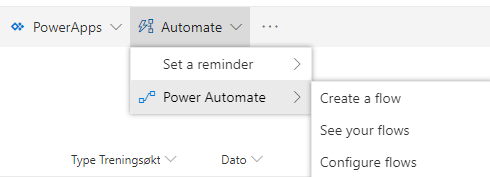
Now the only thing I needed was some kind of automation that could bring every response from Forms over to this list: Enter Power Automate!
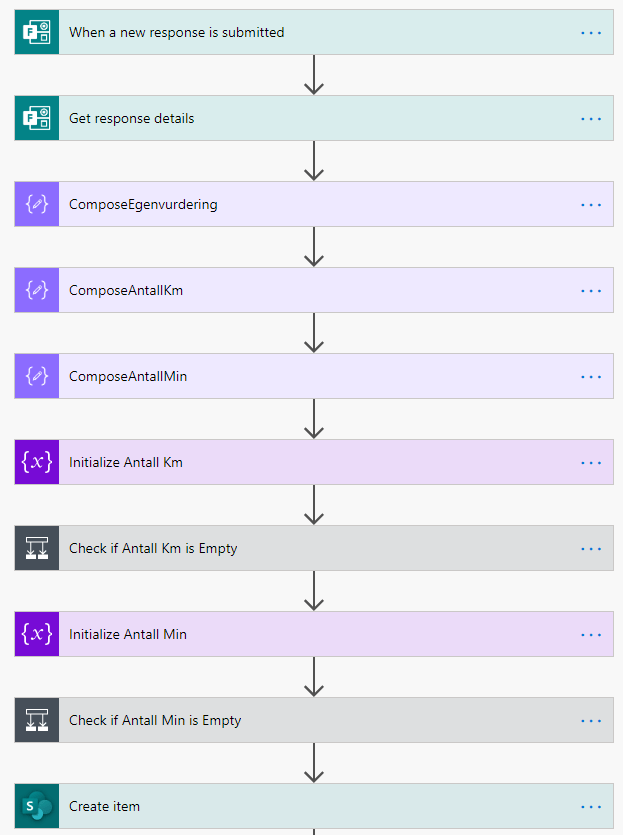
With the help of Power Automate I created the following Flow to automate that every time a new response is submitted in the Form, this would trigger the Flow:
Next I needed to do some magic on the number inputs, I’ll get back to that in the “How I did it:” section, but the Flow then created a new SharePoint List Item:
How I did it:
The first thing I did was to create the Team that would also host the SharePoint Online Site for my list. The Team was created in my own tenant as a private team, and I elected not to invite any player, or parent, to the Team as guests at this point.
The SharePoint list was created with the following columns to reflect the Form:
Renamed Title column to Name
Type of Activity (Choice, with the same values as from the Form)
Date (Date and Time, Include Time: No)
Self Assessment (Number)
Type of Fitness/Conditioning Activity (Choice, with same values as from the Form)
Technique + Strenght (Multiple Lines of Text)
Endurance/Long Actitivty (Multiple Lines of Text)
Sent Picture (Yes/No)
Number of Km (Number)
Number of Mins (Number)
Approved (Yes/No)
Submitted (Date and Time, Include Time: Yes)
After the list with all the columns was created, the next step was to create the Flow in Power Automate. You can create Flows directly from the SharePoint List, as shown below, and then use one of the provided templates:
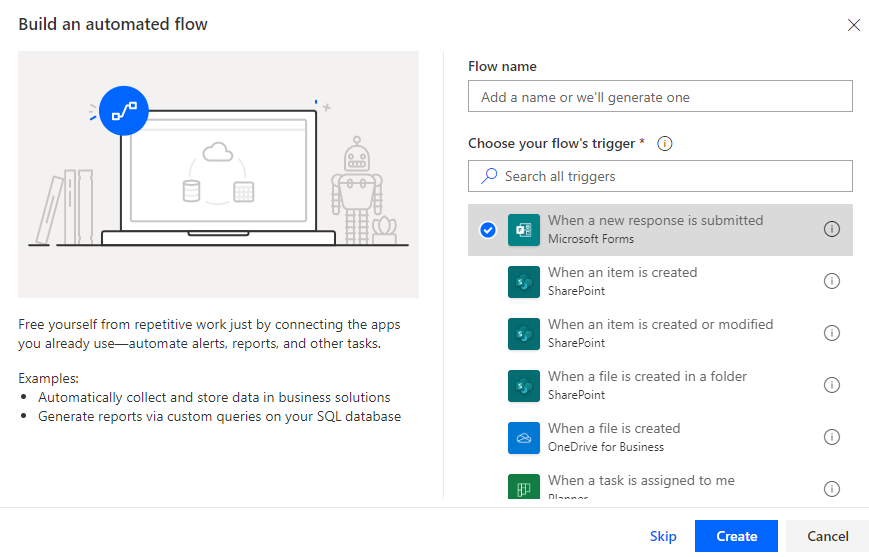
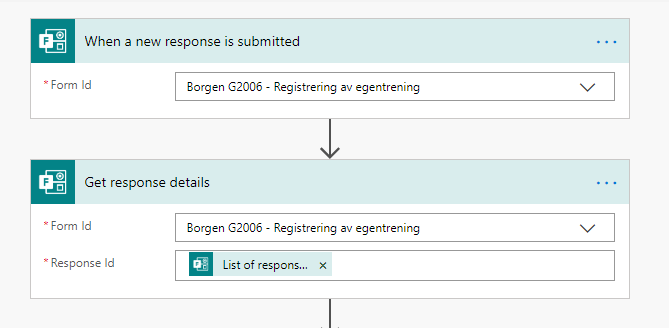
Myself I started at https://flow.microsoft.com and selected to create a new Flow as Automated – from blank, and the selecting the trigger for “When a new response is submitted”:
After I give a name to the Flow and select which Form I want to trigger on responses from, I add an Action to get the response details, as shown below:
The next part is a little more complex. When a Form response is submitted, all response details will be provided as Strings. And if I try to update those values directly into the SharePoint list, it will fail because the Column require a number format. So I need to convert those string values to either Integer or Float respectively.
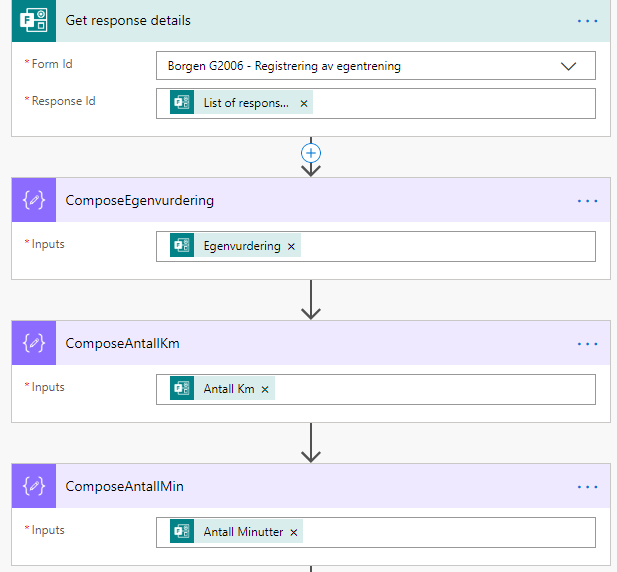
Power Automate have some Data Operation Actions I can use in Flows, and I have used the following three Compose actions, where I get the Self Assessment, Number of Km and Number of Min response details:
The Compose action will create objects I can refer back to later in the Flow. The next complex thing is that I need to check if there are any values for number of kilometers and minutes, and these Form fields are not required and can be empty. There could be several ways to do this, I did it this way:
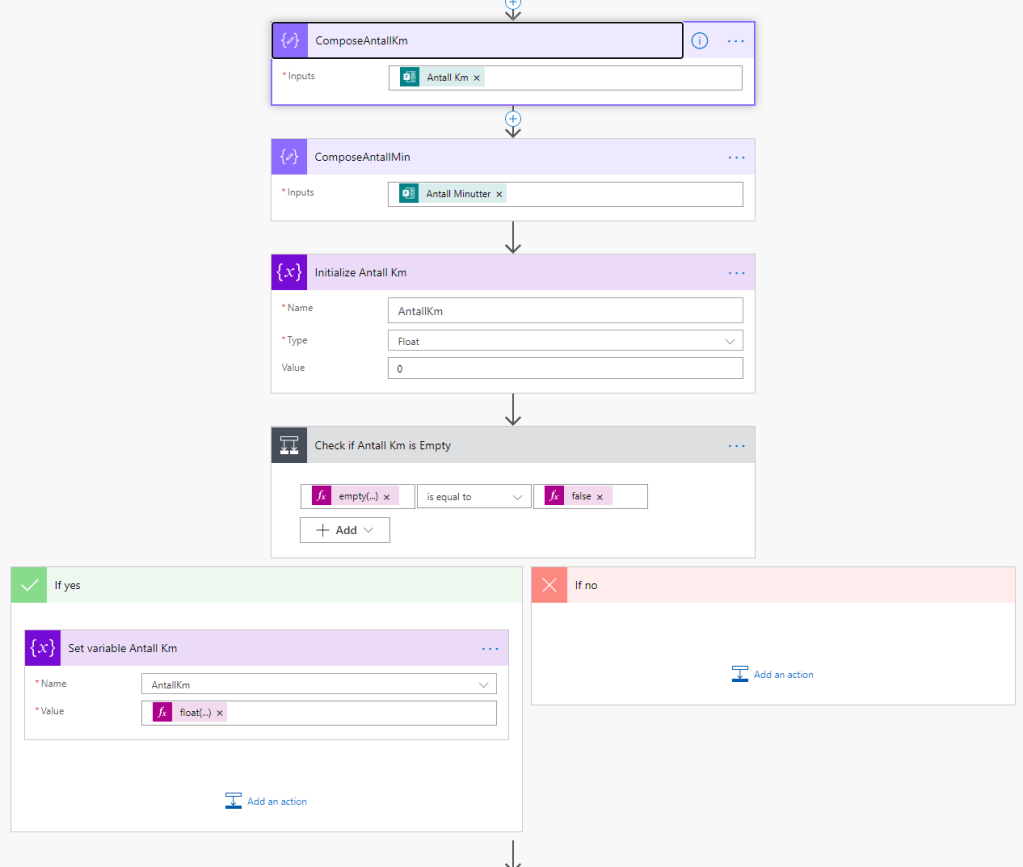
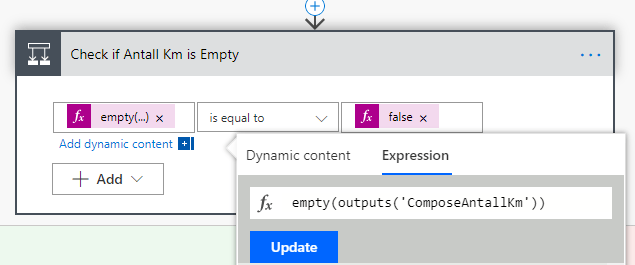
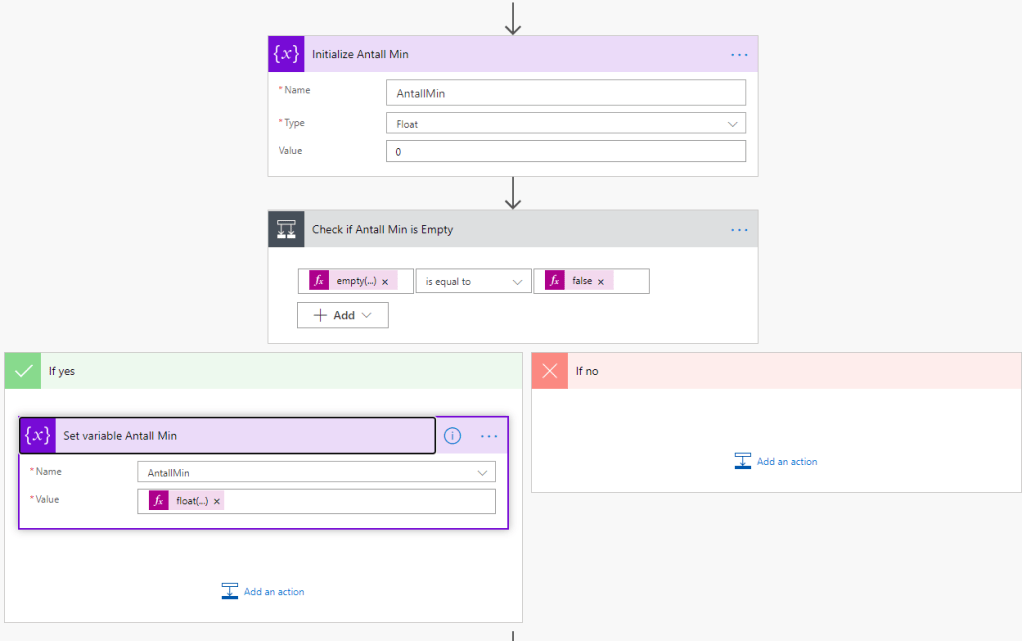
As shown above, I first add an Action for Initialize Variable, and give it the name for AntallKm (Number of Km), and set the initial value to 0. I specify that the type is Float (as I want to have decimal values). Next I add a Condition action, where I check if the ComposeAntallKm is empty, meaning it is equal to false. I do this as an expression, where the expression is using the empty function and checking against the output from the ComposeAntallKM earlier: empty(outputs(‘ComposeAntallKm’))
If this condition evaluates to false, meaning that there has been provided a value in the Form, then the Flow will go to the If Yes action, and I convert the string to a Float value with the expression: float(outputs(‘ComposeAntallKm’)), I’ve tried to illustrate that with the green arrow below. This expression would have failed the Flow if I didn’t check if it was empty or not. If the value is empty, it would go to the If No action, and this is just empty because I then just let the value be the default 0 i provided when I initialized the variable (illustrated with the red arrow below).
Next in the Flow, I do the exact same logic for the number of minutes:
I’m now ready to update the SharePoint List with a new item. I select the SharePoint Online Create item action, and after specifying the Site and List name, I’ll choose most of the item values from the dynamic content picker. The Km and Minutes values are picked from the respective variable. And for Self Assessment, I do this with an expression consisting of the int function that converts the string to an integer from the Compose action further up.
For reference, my entire Flow at this point is shown below (collapsed without action details):
Take it to the Next Level – Teams Bot with Adaptive Card!
At this point I have a working solution where I get all new responses put in to the SharePoint List. I can now look through, edit and approve the registered trainings.
An even cooler solution would be that each registered training will be posted to the Team Channel as an adaptive card, where I can edit and approve and submit that back so that the list would be updated directly. That way I can follow up and check trainings in my Teams client on either my PC or Mobile, without needing to go to the SharePoint list.
So I added a couple of more steps to my Flow after the Create item action. First I added an action for posting an Adaptive Card to a Teams Channel and wait for a response, the next step was to Update the list item with the values.
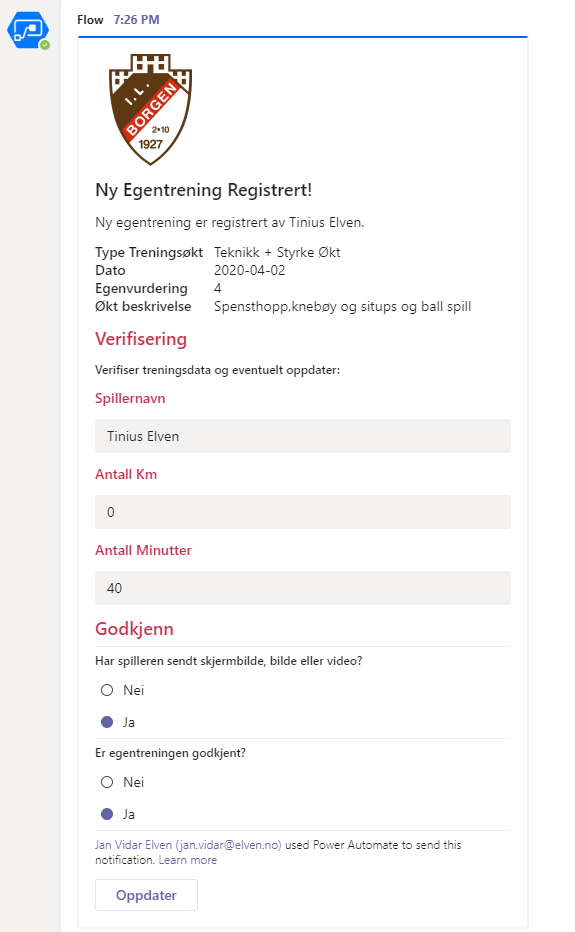
I will go into more details later under the “How I did it” section, but the end result of this was that every time a player submits a new training activity, I will get this Adaptive Card in my Teams Channel, summarizing the details of the training and providing me with the ability to edit the player name in case they typed it wrong, update any values for km or minutes, and select yes or no for if the player has sent photos or the training is approved:
When I click the Update button, the values are submitted back to the Flow and the List item is updated.
How I did it:
Before I go into the Flow details on how to post adaptive card to Teams channel and process the response back, I want to show how I built the adaptive card.
Adaptive cards are posted as a JSON formatted message. You can read more about it here https://adaptivecards.io/, see samples and usage scenarios and more. There’s also a great resource called the Adaptive Cards Designer, https://adaptivecards.io/designer/, where you can build your own cards from blank or using one of the sample templates.
The designer lets you add controls and configure properties visually, while producing the JSON message you will need later. This is the design format of the card I ended up with, a little bit of Norwegian text here but you get the main idea, note that I have some placeholder values her, from where I will add data from my Flow later:
In the “Card Payload Editor” window you will see the JSON format you will need use in your Flow, and in the following snippet I’ll provide you with my JSON message for this example here for you to reuse or build on as you like:
With that JSON message ready, I can now add the “Post an Adaptive Card to a Teams Channel and wait for a response” action to my Flow. I select my Team, and the Channel I want to post the adaptive card to, and then paste in the JSON message from the Adaptive Card Designer:
As you can see from the images above, I’ve added dynamic data from the Flow where I had placeholders for values. Note also that I use the values “false” and “true” for the Input.ChoiceSet, this will make it correct when I set the values back to the updated List item.
PS! Another important thing to note is the “id” property of the inputs I want to be able to update back to the Flow. This “id” property needs to be specified later.
The Update message is what will be shown back in Teams after the Adaptive Card has been updated and submitted back with the Action.Submit button. It will look like this:
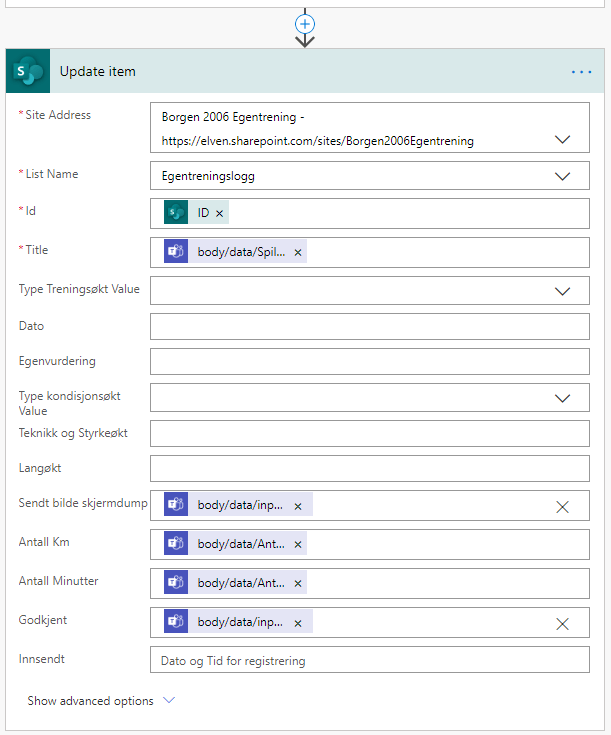
After the card is updated, a response will be sent back to the Flow. So my next step would be to add a Update item action for updating the selected values in the SharePoint List. From here I will select the SharePoint Site and List Name, and then getting the Id for the existing list item I want to update. This Id is from the earlier action in the Flow from where I created the list item:
The values I want to update back in the List from the Adaptive Card Response is shown above with the blue Teams icon. I will have to specify these by adding an expression that looks like the following, as there are currently no dynamic output from the previous action I can select:
Note the following from above, refers back to the action name (since I had blank spaces in the step name, I will have to refer back to it with underscore), and from the response body and data section I will refer to the “id” property of the adaptive card input.
Create similar expressions for the other inputs, and that should be it! The complete Flow step is now like this:
Summary and Next Steps
In this quite lengthy blog post I have shown how I built myself a great follow up solution for my soccer team self practice trainings. The boys find it easy to use, and I can use the tools and solutions I know and love for following up. I have also learnt quite a bit of new tricks and tips 😉
I also start to have some great statistics, I can summarize and rank the players so that I can create a top 10 list for example. And these ranks can be published to the boys, they do love a competition and this can motivate them to do some extra work. I have created this HTML table, that I update semi-manually now. I’m already working in the next Flow that will publish updates to this table automatically. So there might be a follow up blog post on this.. 😉
I hope this has been helpful or/and inspiring, reach out to me if you have questions, and remember the Power of the Flow 🙂
Today is 18th December and my turn to being part of the awesome Azure Advent Calendar. Thanks to Gregor Suttie (@gregor_suttie) and Richard Hooper (@Pixel_Robots) for this great initiative.
In today’s video, linked below, I’m speaking about Azure Information Protection (https://docs.microsoft.com/en-us/azure/information-protection/). I tried to keep the video under 30 minutes, but there is so much to talk about that I ended up doing a full 45 minute session. If you are new to Azure Information Protection, this will hopefully be a good start. If you already know a thing or two about AIP and RMS, you might pick up some tips and pointers as well. I will also go into the new functionality of Unifying Labeling, and look at some of the client experiences.
So with that, here is my contribution for Azure Advent Calendar 2019: