Category Archives: Logic Apps

Protect Logic Apps with Azure AD OAuth – Part 1 Management Access

Azure Logic Apps are great for creating workflows for your IT automation scenarios. Logic App workflows can be triggered using a variety of sources and events, including schedules, but a popular trigger is using a HTTP trigger for starting the Logic App workflow interactively or on-demand from outside the Logic App.

To trigger a Logic App using a HTTP trigger, you need to know the endpoint URL, for example:

This URL consist of the endpoint address of the Logic App and workflow trigger, and with the following query parameters:

  • api-version
  • sp (specifies permissions for permitted HTTP methods to use)
  • sv (SAS version to use)
  • sig (shared access signature)

Anyone with access to this URL and query parameters kan trigger the Logic App, so it’s very important to protect it from unauthorized access and use.

In this multi part blog post series we will look into how Logic Apps can be protected by Azure AD.

Scenarios this multi-part blog post articles will cover:

  • Provide Management Access Tokens and Restrict Issuer and Audience via OAuth
  • Restrict External Guest User Access
  • Expose Logic App as API
  • Restrict permitted Enterprise Application Users and Groups and Conditional Access policies.
  • Scopes and Roles Authorization in Logic Apps.
  • Logic Apps and APIM (Azure API Management).

Lets first look at the other methods for protecting Logic Apps you should be aware of.

Protect Logic Apps Keys and URLs

Before we move on to protecting Logic Apps with Azure AD Open Authentication (OAuth), lets take a quick summary of other protections you should be aware of:

  • Regenerate access keys. If you have reason to think SAS keys are shared outside your control, you can regenerate and thus making previous SAS keys invalid.
  • Create expiring Callback URLs. If you need to share URLs with people outside your organization or team, you can limit exposure by creating a Callback URL that expire on a certain date and time.
  • Create Callback URL with primary or secondary key. You can select to create the Callback URL with the specified primary or secondary SAS key.

The above methods should be part of any governance and security strategy for protecting Logic Apps that perform privilieged actions or might return sensitive data.

Protect Logic Apps via restricting inbound IP address

Another way to protect Logic Apps is to restrict from where the Logic App can be triggered via inbound IP address restrictions.

This opens up scenarios where you can specify your datacenter IP ranges, or only let other Logic Apps outbound IP addresses call nested Logic Apps, or only allow Azure API management to call Logic App.

Protect Logic Apps with Azure AD OAuth

By creating an Authtorization Policy for your Logic App you can use a Authorization header with a Bearer Token and require that the token contains the specified issuer, audience or other claims. Showing how that works in detail, and usable scenarios will be the main focus for this blog post.

Let’s start by building a basic Logic App we can use for demo purpose.

Creating a basic Logic App with HTTP Trigger and Response

In you Azure Subcription, create a new Logic App, specifying to use a HTTP trigger. In my example below I have named my Logic App “logicapp-test-auth”:

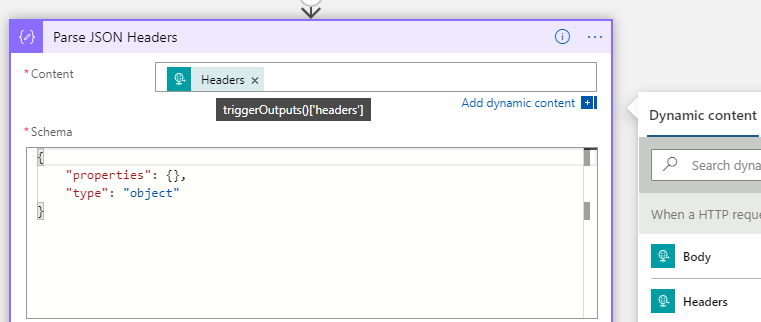
Next, add a Parse JSON action, where the Content is set to the trigger headers, as shown below. I’ve just specified a simple schema output, this can be customized later if needed:
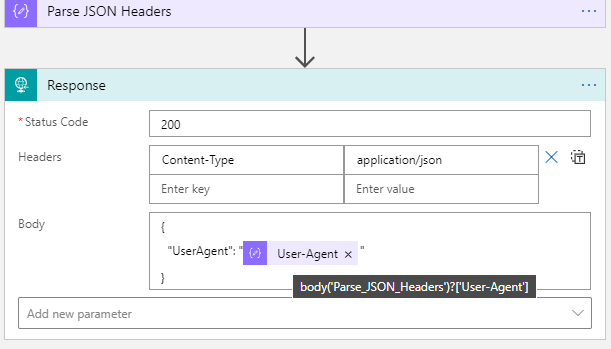
After that activity, add a Response action to return data to the caller. In my example below I return a Status Code of 200 (OK), and set the Content-Type to application/json, and return a simple JSON body of UserAgent where the value is set to the parsed header output from the trigger, using dynamic expression:
body('Parse_JSON_Headers')?['User-Agent']
Testing Logic App with Postman

A great way to test and explore HTTP and REST API calls from your client is to use Postman (Download Postman | Try Postman for Free). When testing the above Logic App, paste in the HTTP POST URL for your trigger, and set the method to POST as shown below:

From the above image, you can see the URL, and also the query parameters listed (api-version, sp, sv, and sig, remember that these should be shared publicly).

When I send the request, it will trigger the Logic App, and should response back:

We can also verify the run history for the Logic App:

We have now successfully tested the Logic App using SAS authentication scheme, and can proceed to adding Azure AD OAuth. First we need to create an Authorization Policy.

Creating an Azure AD Authorization Policy

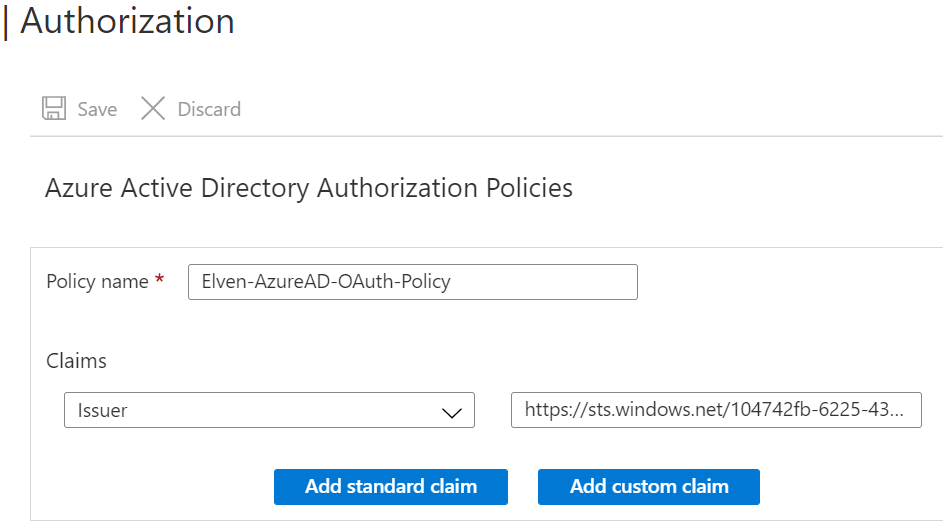
Under Settings and Authorization for your Logic App, add a new Authorization Policy with your name, and add the Issuer claim for your tenant. Issuer will be either https://sts.windows.net/{your-tenant-id}/ or https://login.microsoftonline.com/{your-tenant-id}/ depending on the version of the Access Token:

We will add more Claims later, but for now we will just test against the Issuer. Before we can test however, we need to get an Access Token. There are several ways to easily get an access token, basically we can consider one of the following two scenarios:

  1. Aquire an Access Token for well known Azure Management Resource Endpoints.
  2. Create an App Registration in Azure AD exposing an API.

We’ll cover App Registration and more advanced scenarios later, but for now we will get an Access Token using well known resource endpoints for Azure management.

PS! Just a quick note on Access Tokens aquired for Microsoft Graph resources: These cannot be used for Logic Apps Azure AD OAuth authorization policies, because Graph access tokens does not allow for signature validation.

Management Access Tokens

The following examples require that you either have installed Azure CLI (Install the Azure CLI | Microsoft Docs) or Az PowerShell (Install Azure PowerShell with PowerShellGet | Microsoft Docs).

Azure CLI

If you haven’t already, you will first need to login to Azure using az login. You can login interactively using default browser which supports modern authentication, including MFA, but if you are running multiple browsers and profiles it might be easier to use the device code flow:

az login --use-device-code

You will be prompted to open the microsoft.com/devicelogin page and enter the supplied device code, and after authentication with your Azure AD account, you will get a list of all subscriptions you have access to.

PS! If your account has access to subscriptions in multiple tenants, you can also specify which tenant to log into using:

az login --tenant elven.onmicrosoft.com --use-device-code

To get an Access Token you can just run az account get-access-token, like the following:

Let’s save that into a variable and get the token:

$accessToken = az account get-access-token | ConvertFrom-Json
$accessToken.accessToken | Clip

The above command copies the Access Token to the Clipboard. Let’s take a look at the token. Open the website jwt.ms or jwt.io, and paste in the token. From the debugger you can look at the decoded token payload. The most interesting part for now is the issuer (iss) and audience (aud), which tells us where the token has been issued from, and to which audience:

As we can see from above, the audience for the token is “management.core.windows.net”. You can also get an access token for a specific resource endpoint using:

$accessToken = az account get-access-token --resource-type arm | ConvertFrom-Json

To show all available resource endpoints use:

az cloud show --query endpoints

Now that we have the method to get the access token using Az Cli, lets take a look at Az PowerShell as well. For reference for az account command and parameters, see docs here: az account | Microsoft Docs

Azure PowerShell

First you need to login to your Azure Subscription by using:

Connect-AzAccount

If your account has access to multiple subscriptions in multiple tenant, you can use the following command to specify tenant:

Connect-AzAccount -Tenant elven.onmicrosoft.com

If there are multiple subscriptions, you might need to specify which subscription to access using Set-AzContext -Subscription <Subscription>. Tip, use Get-AzContext -ListAvailable for listing available subscriptions.

To get an access token using Az PowerShell, use the following command to save to variable and copy to clipboard:

$accessToken = Get-AzAccessToken
$accessToken.Token | Clip

We can once again look at the JWT debugger to verify the token:

As with Az CLI, you can also specify resource endpoint by using the following command in Az PowerShell specifying the resource Url:

$accessToken = Get-AzAccessToken -ResourceUrl 'https://management.core.windows.net'

Now that we have the Access Token for an Azure Management resource endpoint, let’s see how we can use that against the Logic App.

Use Bearer Token in Postman

From the previous test using Postman earlier in this article, go to the Authorization section, and specify Bearer Token, and then Paste the management access token you should still have in your clipboard like the following:

When clicking Send request, observe the following error:

We cannot combine both SAS (Shared Access Signature) and Bearer Token, so we need to adjust the POST URL to the Logic Apps. In Postman, this can be easily done in Postman under Params. Deselect the sp, sv and sig query parameters like the following, which will remove these from the POST URL:

When you now click Send request, you should get a successful response again, provided that tha access token is valid:

Perfect! We have now authorized triggering the Logic App using Azure AD OAuth, based on the Authorization policy:
And the Access Token that match that Issuer:

I will now add the audience to the Authorization Policy as well, so that only Access Tokens for the management endpoint resource can be used:

Any HTTP requests to the Logic App that has a Bearer Token that does not comply with the above Authorization Policy, will received this 403 – Forbidden error:

Test using Bearer Token in Azure CLI

You can trigger HTTP REST methods in Azure CLI using az rest --method .. --url ...

When using az rest an authorization header with bearer token will be automatically added, trying to use the url as resource endpoint (if url is one of the well known resource endpoints). As we will be triggering the Logic App endpoint as url, we need to specify the resource endpoint as well. In my example, I will run the following command for my Logic App:

az rest --method POST --resource 'https://management.core.windows.net/' --url 'https://prod-72.we
steurope.logic.azure.com:443/workflows/2fa8c6d0ed894b50b8aa5af7abc0f08b/triggers/manual/paths/invoke?api-
version=2016-10-01'

From above, I specify the resource endpoint of management.core.windows.net, from which the access token will be aquired for, and for url I specify my Logic App endpoint url, without the sp, sv and sig query parameters. This results in the following response:

So the Logic App triggered successfully, this time returning my console (Windows Terminal using Azure CLI).

Test using Bearer Token in Azure PowerShell

I will also show you how you can do a test using Az PowerShell. Make sure that you get an access token and saving the bearer token to a variable using this command first:

$accessToken = Get-AzAccessToken
$bearerToken = $accessToken.Token

I will also set the Logic App url to a variable for easier access:

$logicAppUrl = 'https://prod-72.westeurope.logic.azure.com:443/workflows/2fa8c6d0ed894b50b8aa5af7abc0f08b/triggers/manual/paths/invoke?api-version=2016-10-01'

There are 2 ways you can use Az PowerShell, either using Windows PowerShell or PowerShell Core.

For Windows PowerShell, use Invoke-RestMethod and add a Headers parameter specifying the Authorization header to use Bearer token:

Invoke-RestMethod -Method Post -Uri $logicAppUrl -Headers @{"Authorization"="Bearer $bearerToken"}

Running this should return this successfully, specifying my Windows PowerShell version (5.1) as User Agent:

For PowerShell Core, Invoke-RestMethod has now support for using OAuth as authentication, but I first need to convert the Bearer Token to a Secure String:

$accessToken = Get-AzAccessToken
$bearerToken = ConvertTo-SecureString ($accessToken.Token) -AsPlainText -Force

Then I can call the Logic App url using:

Invoke-RestMethod -Method Post -Uri $logicAppUrl -Authentication OAuth -Token $bearerToken

This should successfully return the following response, this time the User Agent is my PowerShell Core version (7.1):

Summary so far of Management Access Tokens and Logic Apps

At this point we can summarize the following:

  1. You can trigger your Logic App either by using SAS URL or using Bearer Token in Authorization Header, but not both at the same time.
  2. You can add an Azure AD Authorization Policy to your Logic App that specifies the Issuer and Audience, so that calling clients only can use Bearer Tokens from the specified issuer (tenant id), and audience (resource endpoint).
  3. While you cannot disable use of SAS signatures altogether, you can keep them secret, and periodically rollover, and only share the Logic App url endpoint and trigger path with clients.
  4. This is especially great for automation scenarios where users can use CLI or Azure PowerShell and call your Logic Apps securely using OAuth and Access Tokens.

In the next part we will look more into how we can customize the Logic App to get the details of the Access Token so we can use that in the actions.

Include Authorization Header in Logic Apps

You can include the Authorization header from the OAuth access token in the Logic App. To do this, open the Logic App in code view, and add the operationOptions to IncludeAuthorizatioNHeadersInOutputs for the trigger like this:

        "triggers": {
            "manual": {
                "inputs": {
                    "schema": {}
                },
                "kind": "Http",
                "type": "Request",
                "operationOptions": "IncludeAuthorizationHeadersInOutputs"
            }
        }

For subsequent runs of the Logic App, we can now see that the Authorization Header has been included:

And if we parse the headers output, we can access the Bearer Token:

If we want to decode that Bearer token to get a look into the payload claims, we can achieve that with some custom expression magic. Add a Compose action to the Logic App and use the following custom expression:

Let’s break it down:

  • The Replace function replaces the string ‘Bearer ‘ with blank (including the space after)
  • The Split function splits the token into the header, payload data, and signature parts of the JWT. We are interested in the payload, so refers to that with index [1]
split(replace(body('Parse_JSON_Headers')?['Authorization'], 'Bearer ',''), '.')[1]

Now it becomes a little tricky. We will have to use the base64ToString function to get the payload into readable string, but if the length of the payload isn’t dividable by 4 we will get an error. Therefore we need to see if we need to add padding (=), as explained here: (Base64 – Wikipedia).

First I get the length of the payload data, and then use modulo function to see if there are any remaining data after dividing by 4:

mod(length(outputs('Get_JWT_Payload')),4)

Then I can do a conditional logic, where I use concat to add padding (=) to make it dividable by 4:

if(equals(outputs('Length_and_Modulo'),1),concat(outputs('Get_JWT_Payload'),'==='),if(equals(outputs('Length_and_Modulo'),2),concat(outputs('Get_JWT_Payload'),'=='),if(equals(outputs('Length_and_Modulo'),3),concat(outputs('Get_JWT_Payload'),'='),outputs('Get_JWT_Payload'))))

After this I can use base64ToString to convert to a readable string object and format to JSON object:

json(base64ToString(outputs('Padded_JWT_Payload')))

Now that we have access to the claims, we can later be able to do some authorization in the Logic Apps, for example based on roles or scopes, but we can also get some information on which user that has called the Logic App.

In the Response action, add the following to return the Name claim:
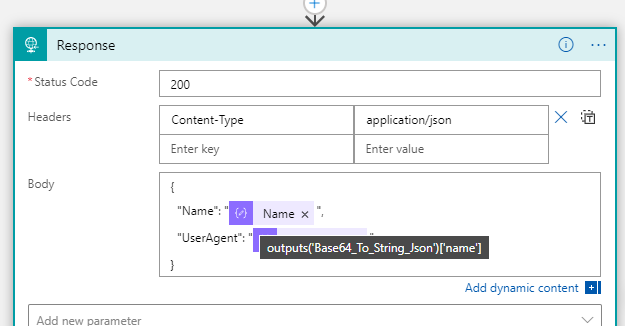
And if I test the Logic App http request again, I can see at it indeed returns my name based on the claims from the access token:

We now have a way to identify users or principals calling the Logic App. The Authorization Policy for the Logic App now permits users and principals from my own organization (based on the issuer claim) and as long as the audience is for management.core.windows.net. But what if I want external access as well? Let’s add to the authorization policies next.

Add OAuth Authorization Policy for Guests

A logic app can have several Azure AD Authorization Policies, so if I want to let external guest users to be allowed to trigger the logic app, I will need to create another authorization policy that allows that issuer:

Lets also add the upn claim to the response, so it is easier to see which user from which tenant that triggered the Logic App:

When I now test with different users, internal to my tenant and external, I can see that it works and the response output is as expected:

Summary of Management Access Scenarios

The purpose of the above steps has been to provide a way for management scenarios, where users and principals can get an Access Token using one of the Azure Management well known endpoints, and provide that when calling the Logic App. The access token is validated using OAuth Authorization Policies, requiring specific issuer (tenant id) and audience (management endpoint). This way we can make sure that we don’t have to share the SAS details which lets users that have access to this URL call the Logic App without authentication.

In the next parts of this blog post articles, we will look into more advanced scenarios where we will expose the Logic App as an API and more.

Blog Series – Power’ing up your Home Office Lights: Part 5 – Using Power Automate Flow to Get Access Token and Config

This blog post is part of the Blog Series: Power’ing up your Home Office Lights with Power Platform. See introduction post for links to the other articles in the series:
https://gotoguy.blog/2020/12/02/blog-series—powering-up-your-home-office-lights-using-power-platform—introduction/

In previous parts we have built the logic for authorizing and getting Bearer Token for Hue Remote API, and storing that as a Secret in Azure Key Vault, now it’s time to move over to the user side of things. In this part we will build a Power Automate Flow that retreives the Access Token and checks if the user has been set up for configuration. Here is a short video where I walk through that Flow:

Setting up a User State & Config Source

As the PowerApp and Flows we will build are stateless, in the sense it will get data from configured variables and data connections, we need to store some user state and configuration somewhere. The Hue Remote API require that we need to register a so called “whitelist identifer”, a username to be used when sending request to the Hue Remote API, for example: https://api.meethue.com/bridge/<whitelist_identifier>/lights&nbsp;

The way I have built the solution is that the Authorization part, getting, retreiving and if needed refreshing the Bearer Token, are done in the Logic Apps layer, and common for every user that uses the Power Platform solution. On the user side of things, I want every user that share the solution to have their own whitelist identifier.

This means that first time a user use the solution, the user must register their device and retreive the username to be used as the whitelist identifier. Subsequently users will use their own identifer when calling the Hue Remote API.

So we need something set up to store this information about users’ states and configuration, and I have chosen to use a SharePoint List/Microsoft List to do this. This List has been created in a Team where the users of the solution are members.

These are the steps I have done to set it up:

  1. Created a new Team in Microsoft Teams. I’ve named my Team “Elven Hue Lights”
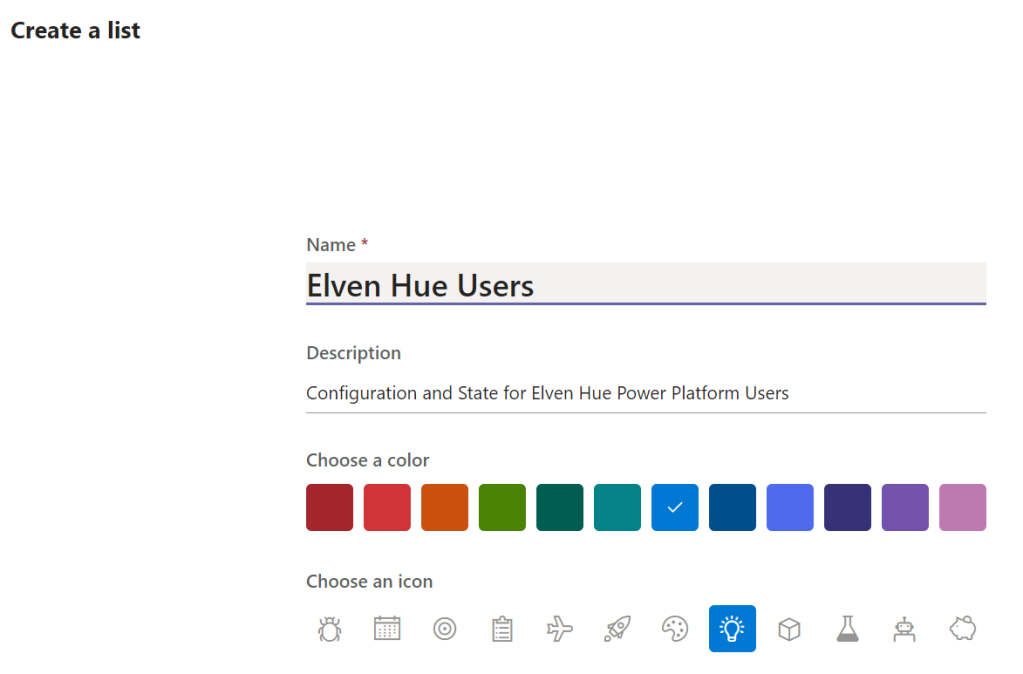
  2. Created a new SharePoint List/Microsoft List in that Team. You can either to this directly in the Team by adding Microsofts Lists to a Tab, and select to create a new List from Blank, or open Lists from the Office 365 launcher. I created a List like this:
  1. Then, in addition to the Title column, add the following columns, single line of text, for storing “Whitelist Identifier” and “Device Type”:

This list will be used by the following Power Automate Flow, so that is the next step to set up.

Create the Flow for Hue Access Token and Config

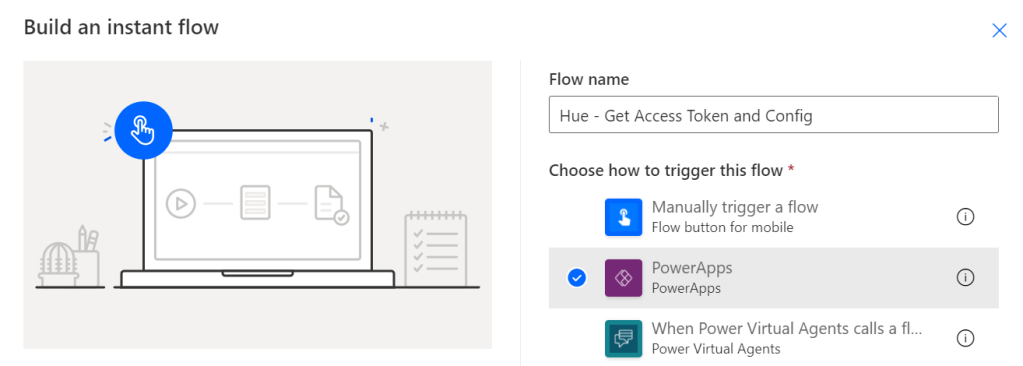
Create the following Power Automate Flow, of type Instant and using PowerApps as trigger, and using the name “Hue – Get Access Token and Config”:

After the Trigger action for PowerApps, add a HTTP action. This action will send a GET request to the Logic App we created in the previous part “logicapp-hue-get-accesstoken”. So paste the Request Url for that Logic App in the URI field below:

After getting the Access Token from the Logic App, add an Initialize variable to get the calling users Displayname via the triggerOutputs header and x-ms-user-name value:

Next, add a Get Item action from SharePoint, this will retreive any items matching the User Display Name from the List we created for Hue Users. Specify the correct Site Address and List Name, and add a Filter query where Title equals the variable of the User Display Name we got in the previous step:

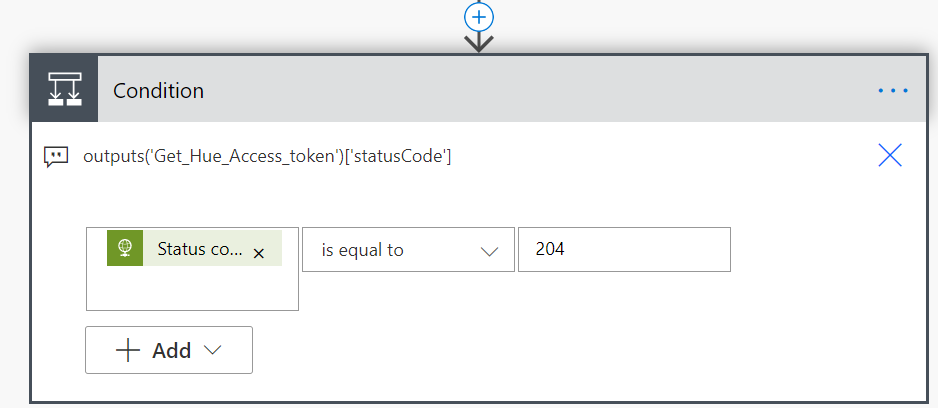
Next, add a Condition action, where we will evaluate the returned statusCode from the Logic App. This will be either 204 (No Content) or 200 (OK), as we configured back in the Logic App:

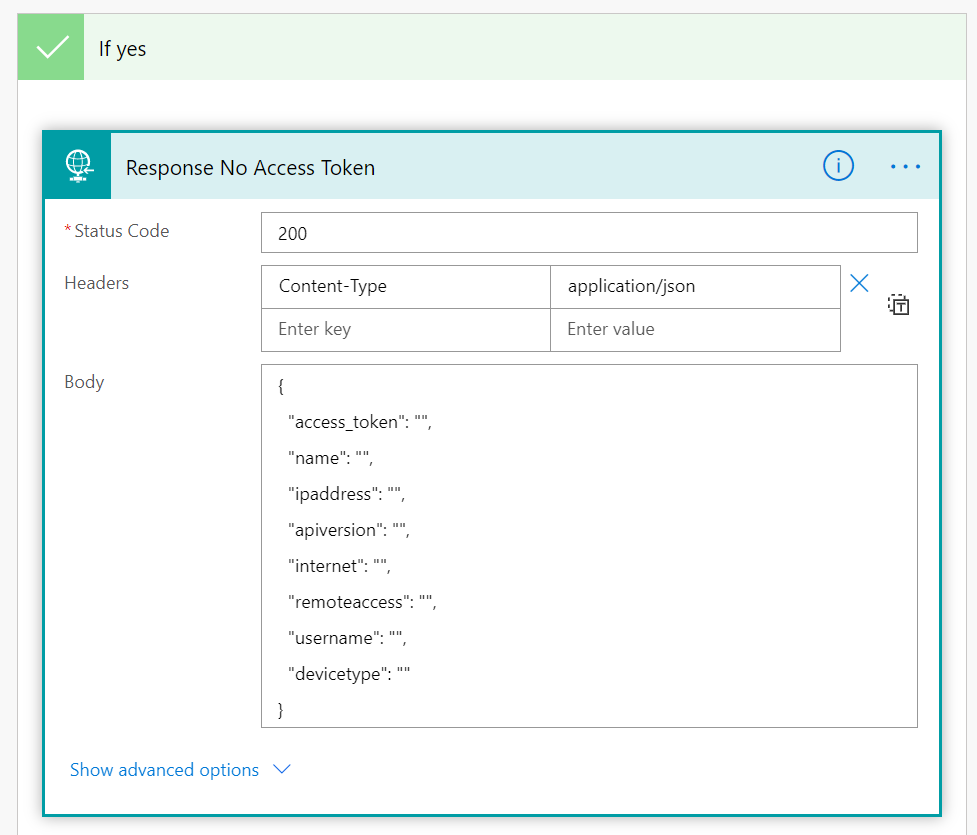
If Yes, add a Response action, this will return a JSON response object back to the PowerApp, but in this case it will be empty:

A quick comment on the above Response body, which will be clearer later in the Flow. I’ve prepared a structured response that will possibly return not only the access_token, but also the name (Hue Bridge), and the Bridge IP address, API version etc. But for now, this is empty data.

Let’s move over to the No side of the Condition. Inside “If no”, add another Condition, and name it “If Username is Empty”. This condition should apply if the Get Item action from the List returns no matching user for the display name:

I’m using an expression empty(body('Get_My_Hue_User')?['value']) and if that is equal to the expression true.

Under “If yes”, meaning that the Get Item returns empty results, add another Response action like the following:

In the above case, as we don’t have a matching user configuration stored, we can return the JSON object with only the access_token.

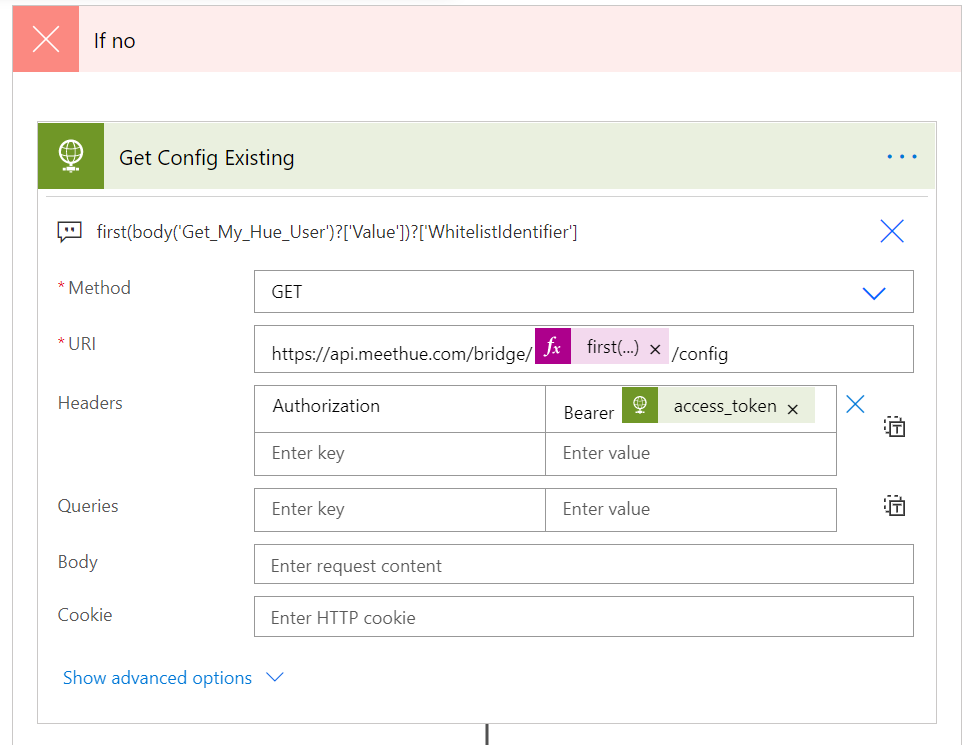
Next, under “If no”, meaning that a matching user was found in the List, add a HTTP action. This action will call the https://api.meethue.com/bridge/<whitelistidentifier>/config, getting the configuration of the Hue Bridge, and using the access_token as Bearer Token in the Authorization Header:

Note! Even though the Get Item action that is filtered for the user display name, in reality will return only one item (or empty), it is still returned as an array of results. So I’m using the expression and function “first” to return only the first item as a single item. So to get the Whitelist Identifier the expression to be used is:

first(body('Get_My_Hue_User')?['Value'])?['WhitelistIdentifier']

After this action, add another Response action, this time returning values for all config values in my custom JSON object:

Ok, quite a few custom expressions used above, so for your convenience I’ll list them here:

body('Get_Hue_Access_Token')?['access_token']
body('Get_Config_Existing')?['name']
body('Get_Config_Existing')?['ipaddress']
body('Get_Config_Existing')?['apiversion']
body('Get_Config_Existing')?['internetservices/internet']
body('Get_Config_Existing')?['internetservices/remoteaccess']
first(body('Get_My_Hue_User')?['Value'])?['WhitelistIdentifier']
first(body('Get_My_Hue_User')?['Value'])?['DeviceType']

That should be this Flow complete.

Test and Validate Flow

We can now validate the Flow using a simple test run. Save the Flow and click on the Test button and “I’ll perform the trigger action”. This should now complete successfully:

As expected the username should be returned as empty as we haven’t yet configured the user for Hue Remote API. So the Flow will return access_token only:

Summary and Next Steps

This Flow will be central later and used on every PowerApp launch to retrieve the access_token and configuration from the Hue Bridge. But first we need to build the Flow for linking User configuration and Whitelist Identifier. That will be in the next part!

Thanks for reading this far, see you in the next part of this blog series.

Blog Series – Power’ing up your Home Office Lights: Part 4 – Using Logic Apps to Get Access Token and Renew Access Token if needed

This blog post is part of the Blog Series: Power’ing up your Home Office Lights with Power Platform. See introduction post for links to the other articles in the series:
https://gotoguy.blog/2020/12/02/blog-series—powering-up-your-home-office-lights-using-power-platform—introduction/

After building the Logic App in part 3 that will authorize and get access token via Oauth2, we will now create another Logic App that will retrieve the Bearer Token from the Key Vault secret, and renew the Token using Refresh Token whenever it is expired.

Here is a short video where I walk through that Logic App scenario:

Create the Logic App and HTTP Trigger

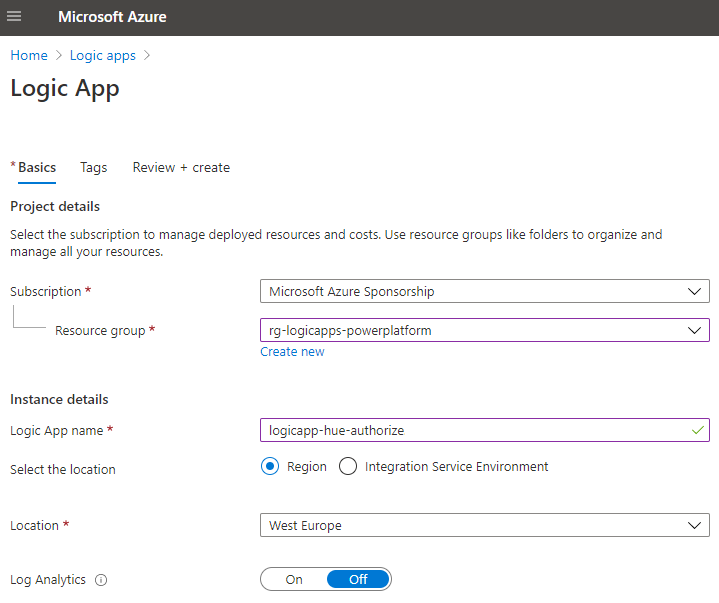
The first thing you need to do, is to create a new Logic App in your Azure subscription. Select the Resource Group you have contributor access to, and give the Logic App a suitable name, as per your naming guidelines. This is the Logic App I created in my environment:

Add a HTTP request trigger for this Logic App as well:

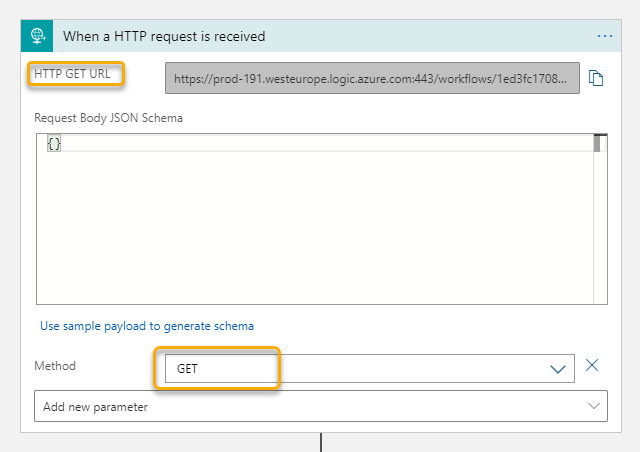
In the Logic App Designer, make sure you hit Save on the Logic App before the next step. You will now be shown the URL, but first go down to the “Add new parameter” and select Method and GET for method. This way your Logic App will trigger on HTTP GET requests.

Adding Logic App Identity and Key Vault Access

As this Logic App also will request secrets from Key Vault, we will need to add a Managed Service Identity and add that to the Key Vault access policy.

Go to Identity settings, and set the System assigned Identity to On:

Next, go to your Key Vault and under Access policies, add the the newly created Logic App with the following Secret permissions (Get, Set, List):

Add Actions for Getting or Renewing Bearer Token

The actions in this Logic App will retrieve the Bearer Token from the Key Vault and return the Access Token as a Response. If Token is expired, it will be renewed using the Refresh token.

Start by adding a HTTP request, and get the Secret for the Bearer Token like the following:

Next, add a Compose action, getting the outputs from the Get KV Secret Bearer Token action. This secret was stored as a Json Object, but will be returned as a String, so I have used the following custom expression to convert to Json:

json(outputs('Get_KV_Secret_Bearer_Token')?['body/value'])

Next, add the following Compose actions for getting the timestamps in Ticks, and converting to Epoch. See the previous blog post for explanation of why this is necessary, but we need to do this to be able to calculate wether the secret is expired or not:

For your convenience, I’ve added the custom expressions as comments to the actions above, or you can copy it from below:

ticks(utcNow())

ticks('1970-01-01T00:00:00Z')

div(sub(outputs('GetNowTimeStampInTicks'), outputs('Get1970TimestampInTicks')), 10000000)

Next, add a Condition action. Here we will check if the expiry date time of the secret is greater than the current calculated timestamp in Epoch:

Use the following custom expression for getting the “exp” attribute from Key Vault Secret:

outputs('Get_KV_Secret_Bearer_Token')?['body/attributes/exp']

If the secret hasn’t expired, we will return the access token as a Response action as shown below. Note that I will only return the access_token, not the complete Bearer Token stored in the Key Vault secret, as this also contains the refresh_token. The reasoning behind this is that the calling clients (users from PowerApps/Automate) only need the access_token.

As you see from above, I’ve built a Json body and schema for the response, and the custom expression returing the value of access_token is outputs('Compose_Bearer_Token')?['access_token'].

On the False side of the Condition, meaning that the Secret is expired, we will have the logic that renews the Bearer Token. First add two HTTP actions, for getting the Client Id and Client Secret from Key Vault:

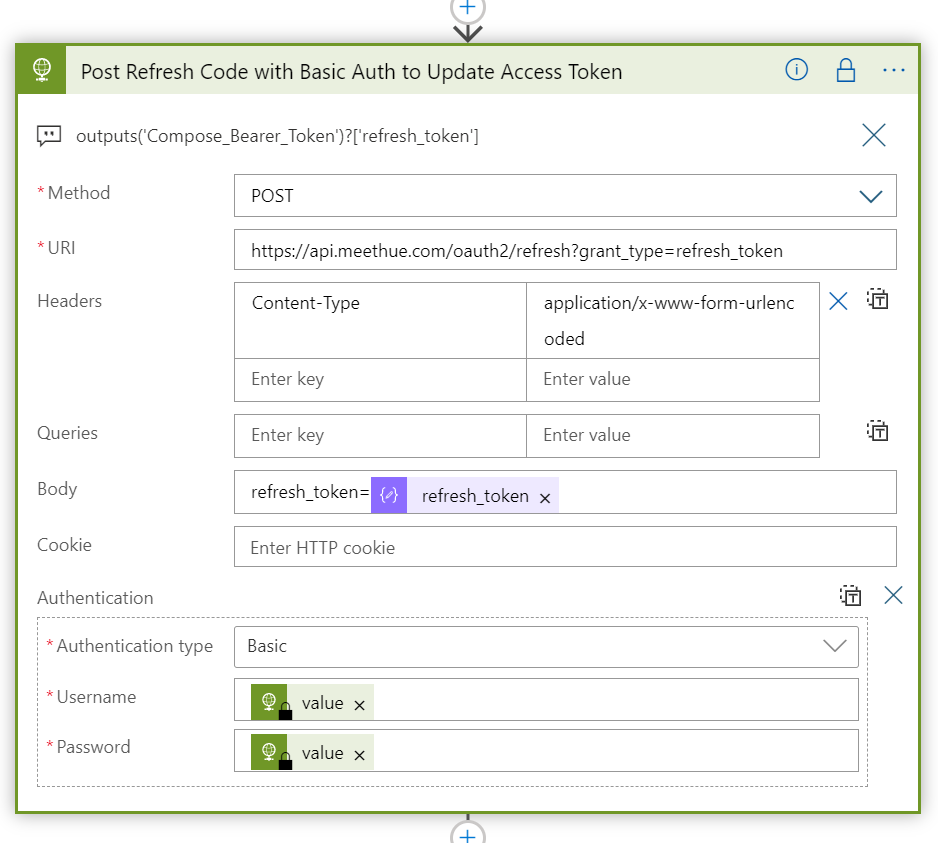
Next, add another HTTP action, using Method POST we will send a request to the oauth2/refresh endpoint at Hue Remote API:

The refresh_token need to be sent in a Request Body, using the expression: outputs('Compose_Bearer_Token')?['refresh_token']

Remember to set Content-Type: application/x-www-form-urlencoded. And Authentication Type should be set to Basic, using the retrieved Client Id and Secret from Key Vault as username and password.

Refreshing the Token correctly will return a new Bearer Token. We now need to get and convert the time stamps to Epoch integer, to calulate when the Access Token expires. This is the same process as we used in the Logic App “logicapp-hue-authorize” in part 3 of this blog series. Add 3 new Compose actions like below:

For your convenience, here are the custom expressions used for the above actions:

addSeconds(utcNow(), int(body('Post_Refresh_Code_with_Basic_Auth_to_Update_Access_Token')?['access_token_expires_in']))

ticks(outputs('AccessToken_Expires_Utc'))

div(sub(outputs('GetTimestampInTicks'), outputs('Get1970TimestampInTicks')), 10000000)

Next step is to update the Bearer Token Secret in Key Vault with the new Token we received now and the new expiry date. Add a HTTP action like below:

We can now return the access_token using the HTTP action like below:

The last action we need to add is a default response if any accest_token could not be returned. This is important as we are going to call this Logic App using Power Automate Flows, and we need to have a response for any scenario. Add this after the condition action like below:

For the Null Response action, change the Configure run after setting like the following:

That should be it. Remember to secure outputs for any actions that return credential information:

Verify Logic App

We can now test the Logic App. You can use Postman, Invoke-RestMethod in PowerShell, or just run in the Browser your Logic App Http Trigger Url:

This should return your Access Token:

Looking at the Run History for the Logic App, we should see a sucessful run:

Summary and Next Steps

That should conclude this blog post. In this post, and the previous, we have built the logic behind authorizing and getting the Bearer Token for Philips Hue Remote API, as well as providing and refresh the Token when needed.

In the next part we are going to start building the solution in Power Automate. Thanks for reading, see you in the next part!

Blog Series – Power’ing up your Home Office Lights: Part 3 – Using Logic Apps to Authorize and Get Access Token using Oauth and Hue Remote API

This blog post is part of the Blog Series: Power’ing up your Home Office Lights with Power Platform. See introduction post for links to the other articles in the series:
https://gotoguy.blog/2020/12/02/blog-series—powering-up-your-home-office-lights-using-power-platform—introduction/

Now that we have registered the application for Hue Remote API, and stored the client Id and Secret in Azure Key Vault, we can start build the Logic App that will authorize and get access token via Oauth2.

Here is a short video where I introduce the concept:

Create the Logic App and HTTP Trigger

The first thing you need to do, is to create a new Logic App in your Azure subscription. Select the Resource Group you have contributor access to, and give the Logic App a suitable name, as per your naming guidelines:

Next, select HTTP request to be the trigger for the Logic App:

After that you will see the following in the Logic App designer:

Make sure you hit Save on the Logic App before the next step. You will now be shown the URL, but first go down to the “Add new parameter” and select Method and GET for method. This way your Logic App will trigger on HTTP GET requests, which is required for the Authorization Code flow with Hue:

Now copy this URL, and make sure that no one but you can access this URL, as this is a SAS (Shared Access Signature) URL that anyone in the world can send requests to if they know the URL. Save the Logic App.

Go back to your App Registration in the Hue Developers Portal, and change your temporary http://localhost/logicapp Callback URL to your Logic App URL:

This means that from now on, the Logic App will handle the authorization code for the Hue App. But first we will need to let the Logic App access the Key Vault.

Adding Logic App Identity and Key Vault Access

For the Logic App, under Settings and Identity, set system assigned managed identity to On:

After this setting is saved, you can later see the status and the object id of the service principal.

Next, under your Key Vault, click on Access Policies and Add Access Policy, from there selec the Get, Set and List Secret Management operations, and for principal search for and add the Logic App. This should look like this after adding:

With permissions in place, we are now ready to add actions to the Logic App.

Add Actions for getting Access Token

The first ting we need to do is to get the authorization code after the Hue App registration redirects back to the callback URL. This is returned as a querystring appended to the URL. Add a “Compose” action and use the following expression for getting the request queries:

(I’ve added the custom expression to comments for better visibility).

Then we need to get the Client Id and Secret from the Kay Vault. Add a HTTP action next, where we will use the Azure Rest API for getting the secret, and authenticate with the Managed Service Identity:

The URI above points to my Azure Key Vault URI, and the specified secret. The documentation for getting secrets can be seen here: Get Secret – Get Secret (Azure Key Vault) | Microsoft Docs.

The same applies to getting the Client Secret, add another HTTP action:

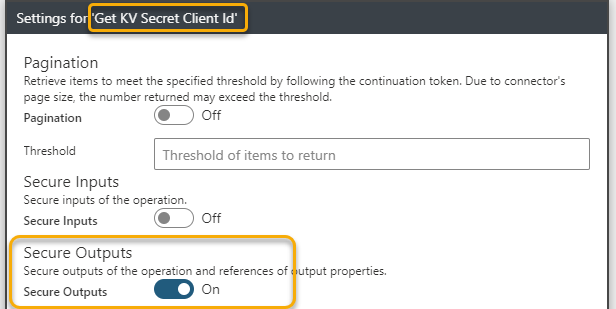
The get an access token from Hue Remote API we must either use Basic Authentication or Digest Authentication. Since I’m running this as a Logic App in a controlled environment and trusting the SSL encryption I will use Basic Authentication. In addition, I will secure the outputs from getting Client Id and Secret from Key Vault, so that other users cannot see those values from the run history:

This setting has been enabled for both the actions getting KV Secret Client Id and Client Secret:

For obtaining an Access Token with Basic Authentication the following header is required: Authorization: Basic <base64(clientid:clientsecret)>

This means that we need to base64 encode the clientid + “:” + clientsecret. This can be done using this lengthy expression, here in a “initialize variable” action:

This above action is just for reference though, as the HTTP action supports base64 encoding out of the box. So when posting to the token endpoint, the best way is to use the following:

(PS! Another way to do Basic Authentication in a HTTP action would be to add the Authorization header manually in the Action above with: “Basic <your calculated base64>” as value, and leaving the Authentication type to None.)

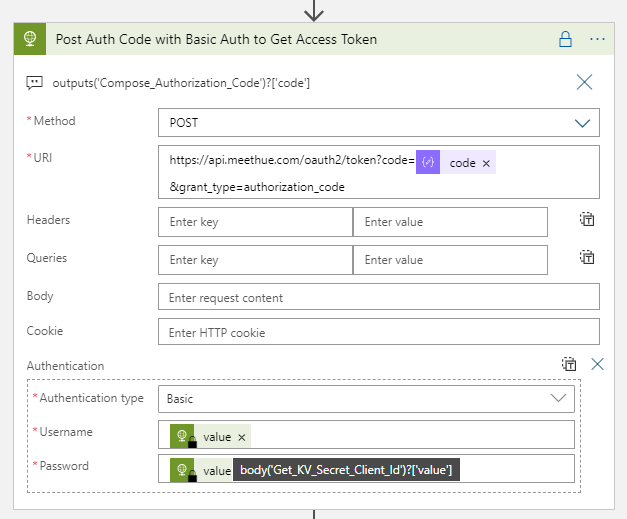
From the above settings, in the URI add the authorization code we got from the request queries earlier, using the expression:

outputs('Compose_Authorization_Code')?['code']

When selecting Authentication type to Basic, the username (client id) and password (secret) will automatically be base64 encoded. The values for username and password are the valies from the Get KV Secret Client actions earlier, in the following format:

body('Get_KV_Secret_Client_Id')?['value']

And this action will return the Bearer Token from Hue Remote API if everything is correctly inputted.

I also make sure that the output of this action is secured from viewing:

With the Bearer Token now retrieved, the next actions is to calculate the expiry time and write the Token back to the Key Vault secret.

Add Actions for getting expiry time and write Token to Key Vault

The Bearer Token returned by Hue Remote API will be in the format of the following masked response:

The _expires_in values are in seconds, so that means that the Access Token is valid for 7 days, and the Refresh Token about 112 days. It would then make sense to only refresh the token when needed.

Lets start by calculating when the access_token expires, with the following expression in a Compose action:

addSeconds(utcNow(), int(body('Post_Auth_Code_with_Basic_Auth_to_Get_Access_Token')?['access_token_expires_in']))

The above expression takes the current time and add the number of seconds for when the access token expires.

This will return a new datetime 7 days ahead. This value will be used to set the expiry time on the Key Vault secret for Bearer Token. By setting an expiry time I can later calculate if I need to refresh the Access Token or not.

But it’s not that easy.. The calculated time above will need to be converted to Epoch (32-bit “Unix”) integer format to be able to set the Key Vault secret “exp” attribute. This isn’t so clear when seeing the API docs, Set Secret – Set Secret (Azure Key Vault) | Microsoft Docs, so took me a little trial and error. And I found great help in this blog article: https://devkimchi.com/2018/11/04/converting-tick-or-epoch-to-timestamp-in-logic-app/.

Based on this I need to convert the timestamp to Ticks (64-bit). Ticks is a built in function in Logic Apps, but to be able to convert to Epoch I will need to calculate the difference in ticks between when the Access Token expire, and the first value of Epoch which is 1970-01-01T00:00:00Z. This is well explained in the above reference blog, but here are my resulting actions.

After calculating the Access Token expiry, I add a compose action which converts this to Ticks:

Using the following expression: ticks(outputs('AccessToken_Expires_Utc'))

Then I need to find the 1970-01-01T00:00:00Z value in Ticks:

Using this expression: ticks('1970-01-01T00:00:00Z')

Then we can convert this to Epoch by subtracting the two Ticks values calculated above, and divide by 1 million:

This is the expression used above: div(sub(outputs('GetTimestampInTicks'), outputs('Get1970TimestampInTicks')), 10000000)

We now have the correct format for the “exp” attribute to update the Key Vault secret. Add a new HTTP action and configure like below:

Remember to secure the Output for this action also:

Finally we can finish this Logic App by adding a Response action and do a quick test to verify that everything works as expected.

Adding Response action and verify Logic App

Add a Response action with status code 200 and a body like below:

Tips: It can be difficult to troubleshoot the Logic App when securing outputs, so you might hold back in that when testing. It will show your secrets in the run history though, so it might be best to do this in a test enviroment depending on your needs.

Now we can test. Construct the URL for authorizing the App again, like we did in Part 1:

https://api.meethue.com/oauth2/auth?clientid=&response_type=code&state=elvenanystring&appid=elven_demo_hue_app&deviceid=elven_demo&devicename=Elven Demo

Paste it in the Browser, and after granting access to the App in Hue Developer portal:

You should be redirected to the Logic App:

.. and with a respons success!

Looking at the Run history, we can verify the steps were successful:

You can also look into the inputs and outputs of the actions, except the actions where we secured the output:

We can also verify that the Key Vault secret storing the Bearer Token has been updated and have an Expiration Date one week forward:

Summary and next steps

That concludes this blog post. Thanks for reading this far, in the next part we will build the Logic App that will respond back the Access Token and renew using Refresh Token if needed.

Blog Series – Power’ing up your Home Office Lights using Power Platform – Introduction

Microsoft Power Platform can be used in a variety of creative ways to both learn and create awesome automation solutions, and you can even use this platform for your home automation. In this series of blog posts and introductory videos I will show you how you can control your Home Office Lights (in my case Phillips Hue) via API and Power Platform components like PowerApps, Power Automate, Logic Apps and more.

As an introduction, lets start with the “birds overview” over the solution I’ve built:

The main idea was to be able to both interactively, and triggered based on events, to be able to control my Philips Hue Lights using Power Platform components like PowerApps and Power Automate. Why you say? Well, it’s cool isn’t it! And fun, and a well worth project to invest time in because of the great learning potential. I have learnt tons of new stuff, about Power Platform, Microsoft Graph, SharePoint Lists, and Azure resources like Key Vault, Logic Apps etc. And not to forget, I’ve learnt a lot about the Hue Remote API and implementation of Oauth!
I will get into the chosen solutions and why I elected to use the technologies mentioned, and how they interact as shown in the diagram above, but first I wanted to provide you with this short introduction video from me on the concept:

This blog post is the introduction to the series of blog posts, and also a part of my contribution to the Festive Tech Calendar 2020 https://festivetechcalendar.com/. As soon as the schedule is published, I will at the allocated date later in December do a live stream broadcast where I will talk about this solution and do a Q/A where I will try to answer all your questions. But before that, I will publish the all parts of the blog series and accompanying videos as shown below. Links will become alive as soon as I have published. This way you can follow along and by the time of the live stream, you could have your own solution up and running!

The blog series will consist of the following parts, links will be available as soon as the parts are published:

  1. Power’ing up your Home Office Lights: Part 1 – Get to know your Hue Remote API and prepare for building your solution.
  2. Power’ing up your Home Office Lights: Part 2 – Prepare Azure Key Vault for storing your API secrets.
  3. Power’ing up your Home Office Lights: Part 3 – Using Logic Apps to Authorize and Get Access Token using Oauth and Hue Remote API.
  4. Power’ing up your Home Office Lights: Part 4 – Using Logic Apps to Get Access Token and Renew Access Token if needed.
  5. Power’ing up your Home Office Lights: Part 5 – Using Power Automate Flow to Get Access Token and Config.
  6. Power’ing up your Home Office Lights: Part 6 – Using Power Automate Flow to Link Button and Whitelist user.
  7. Power’ing up your Home Office Lights: Part 7 – Building the PowerApp for Hue to Get Config and Link user.
  8. Power’ing up your Home Office Lights: Part 8 – Using Power Automate Flows to Get and Set Lights State.
  9. Power’ing up your Home Office Lights: Part 9 – Using Microsoft Graph to get Teams Presence and show state in PowerApp.
  10. Power’ing up your Home Office Lights: Part 10 – Subscribe to Graph and Teams Presence to automatically set Hue Lights based on my Teams Presence!

Well, I certainly have my work cut out, so I better get started. Thanks for reading, please follow the progress and join me on the later live stream!