Tag Archives: PowerShell

Collecting Service Manager Incident Stats in OMS via PowerShell Script Performance Collection in Operations Manager

I have been thinking about bringing in some key Service Manager statistics to Microsoft Operations Management Suite. The best way to do that now is to use the NRT Performance Data Collection in OMS and PowerShell Script rule in my Operations Manager Management Group that I have connected to OMS. The key solution to make this happen are the “Sample Management Pack – Wizard to Create PowerShell script Collection Rules” described in this blog article http://blogs.msdn.com/b/wei_out_there_with_system_center/archive/2015/09/29/oms-collecting-nrt-performance-data-from-an-opsmgr-powershell-script-collection-rule-created-from-a-wizard.aspx.

With this solution I can practically get any data I want into OMS via SCOM and PowerShell Script, so I will start my solution for bringing in Service Manager Stats by defining some PowerShell commands to get the values I want. For that I will use the SMLets PowerShell Module for Service Manager.

For this blog article, I will focus on Incident Stats from SCSM. In a later article I will get in some more SCSM data to OMS.

Getting Ready

I have to do some preparations first. This includes:

  1. Importing the “Sample Management Pack – Wizard to Create PowerShell script Collection Rules”
    1. This can be downloaded from Technet Gallery at https://gallery.technet.microsoft.com/Sample-Management-Pack-e48040f7
  2. Install the SMLets for SCSM PowerShell Module (at the chosen Target server for the PowerShell Script Rule).
    1. I chose to install it from the PowerShell Gallery at https://www.powershellgallery.com/packages/SMLets
    2. If you are running Windows Server 2012 R2, which I am, follow the instructions here to support the PowerShellGet module, https://www.powershellgallery.com/GettingStarted?section=Get%20Started.
  3. Choose Target for where to run the SCSM commands from
    1. Regarding the SMLets and where to install, I decided to use the SCOM Root Management Server Emulator. This server will then run the SCSM commands against the Service Manager Management Server.
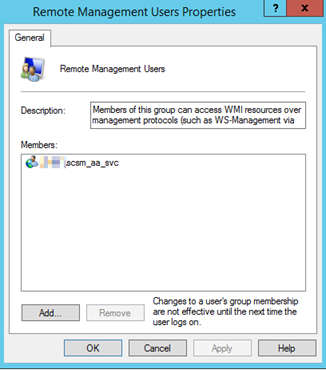
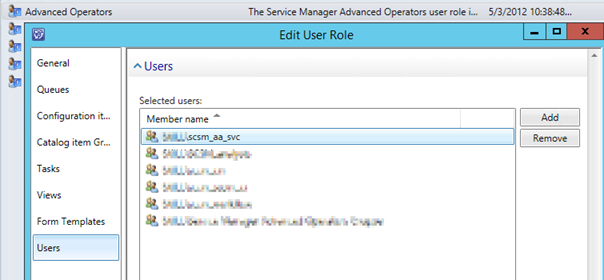
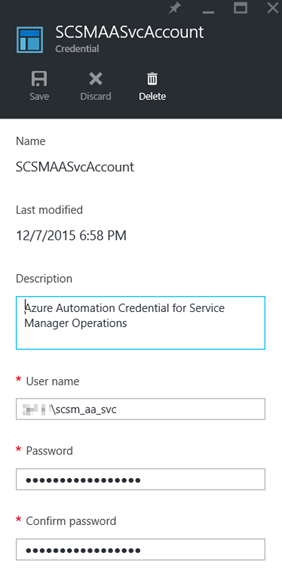
  4. Choose account for Run As Profile
    1. I also needed to think about the run as account the SCSM commands will run under. As we will see later the PowerShell Script Rules will be set up with a Default Run As Profile.
    2. The Default Run As Profile for the RMS Emulator will be the Management Server Action Account, if I had chosen another Rule Target the Default Run As Profile would be the Local System Account.
    3. Alternatively, I could have created a custom Run As Profile with a SCSM user account that have permissions to read the required data from SCSM, and configured the PowerShell Script rules to use that.
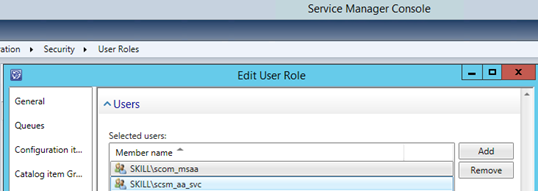
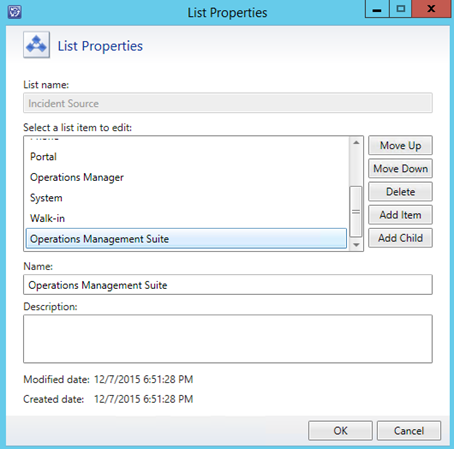
    4. I decided to go with the Management Server Action Account, and make sure that this account is mapped to a Role in SCSM with access to the work items I want to query against, any Operator Role will do but you could chose to scope and restrict more if needed:

At this point I’m ready for the next step, which is to create some PowerShell commands for the Script Rule in SCOM.

Creating the PowerShell Command Script for getting SCSM data

First I needed to think about what kind of Incident data I wanted to get from SCSM. I decided to get the following values:

  • Active Incidents
  • Pending Incidents
  • Resolved Incidents
  • Closed Incidents
  • Incidents Opened Last Day
  • Incidents Opened Last Hour

These values will be retrieved by the Get-SCSMIncident cmdlet in SMLets, using different criteria. The complete script is shown below:

# Debug file
$debuglog = $env:TEMP+\powershell_perf_collect_debug.log

Date | Out-File $debuglog

Who Am I: | Out-File $debuglog -Append
whoami |
Out-File $debuglog -Append

$ErrorActionPreference = Stop

Try {

Import-Module C:\Program Files\WindowsPowerShell\Modules\SMLets

$API = new-object -comObject MOM.ScriptAPI

$scsmserver = MY-SCSM-MANAGEMENTSERVER-HERE

$beforetime = $(Get-Date).AddHours(1)
$beforedate = $(Get-Date).AddDays(1)

$PropertyBags=@()

$activeincidents = 0
$activeincidents = @(Get-SCSMIncident -ComputerName $scsmserver -Status Active).Count
$PropertyBag = $API.CreatePropertyBag()
$PropertyBag.AddValue(Instance, Active Incidents)
$PropertyBag.AddValue(Value, [UInt32]$activeincidents)
$PropertyBags += $PropertyBag

Active Incidents: | Out-File $debuglog -Append
$activeincidents | Out-File $debuglog -Append

$pendingincidents = 0
$pendingincidents = @(Get-SCSMIncident -ComputerName $scsmserver -Status Pending).Count
$PropertyBag = $API.CreatePropertyBag()
$PropertyBag.AddValue(Instance, Pending Incidents)
$PropertyBag.AddValue(Value, [UInt32]$pendingincidents)
$PropertyBags += $PropertyBag

Pending Incidents: | Out-File $debuglog -Append
$pendingincidents | Out-File $debuglog -Append

$resolvedincidents = 0
$resolvedincidents = @(Get-SCSMIncident -ComputerName $scsmserver -Status Resolved).Count
$PropertyBag = $API.CreatePropertyBag()
$PropertyBag.AddValue(Instance, Resolved Incidents)
$PropertyBag.AddValue(Value, [UInt32]$resolvedincidents)
$PropertyBags += $PropertyBag

Resolved Incidents: | Out-File $debuglog -Append
$resolvedincidents | Out-File $debuglog -Append

$closedincidents = 0
$closedincidents = @(Get-SCSMIncident -ComputerName $scsmserver -Status Closed).Count
$PropertyBag = $API.CreatePropertyBag()
$PropertyBag.AddValue(Instance, Closed Incidents)
$PropertyBag.AddValue(Value, [UInt32]$closedincidents)
$PropertyBags += $PropertyBag

Closed Incidents: | Out-File $debuglog -Append
$closedincidents | Out-File $debuglog -Append

$incidentsopenedlasthour = 0
$incidentsopenedlasthour = @(Get-SCSMIncident -CreatedAfter $beforetime -ComputerName $scsmserver).Count
$PropertyBag = $API.CreatePropertyBag()
$PropertyBag.AddValue(Instance, Incidents Opened Last Hour)
$PropertyBag.AddValue(Value, [UInt32]$incidentsopenedlasthour)
$PropertyBags += $PropertyBag

Incidents Opened Last Hour: | Out-File $debuglog -Append
$incidentsopenedlasthour | Out-File $debuglog -Append

$incidentsopenedlastday = 0
$incidentsopenedlastday = @(Get-SCSMIncident -CreatedAfter $beforedate -ComputerName $scsmserver).Count
$PropertyBag = $API.CreatePropertyBag()
$PropertyBag.AddValue(Instance, Incidents Opened Last Day)
$PropertyBag.AddValue(Value, [UInt32]$incidentsopenedlastday)
$PropertyBags += $PropertyBag

Incidents Opened Last Day: | Out-File $debuglog -Append
$incidentsopenedlastday | Out-File $debuglog -Append

$PropertyBags

} Catch {

Error Catched: | Out-File $debuglog -Append
$(
$_.Exception.GetType().FullName) | Out-File $debuglog -Append
$(
$_.Exception.Message) | Out-File $debuglog -Append

}

Some comments about the script. I usually like to include some debug logging in the script when I develop the solution. This way I can keep track of what happens underway in the script or get some exceptions if the script command fails. Be aware though that doing $ErrorActionPreference=Stop will end the script if any errors, so it might be an idea to remove the debug logging when confirmed that everything works.

In the next part I’m ready to create the PowerShell Script Rule.

Creating the PowerShell Script Rule

In the Operations Console, under Authoring, create a new PowerShell Script Rule as shown below:

  1. Select the PowerShell Script (Performance – OMS Bound) Rule:
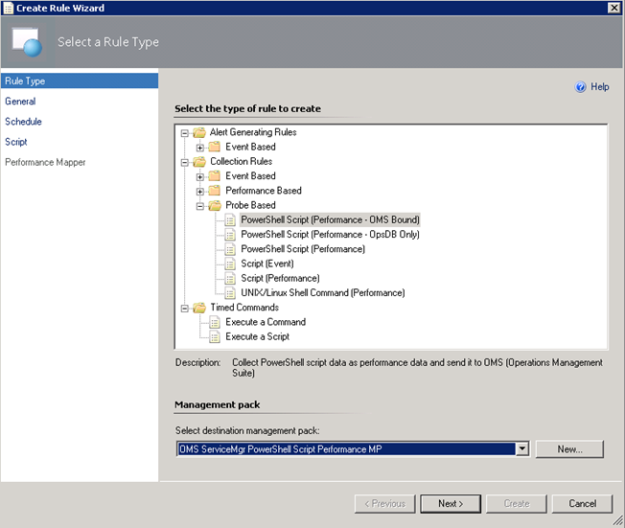
I have created a custom destination management pack for this script.
  2. Specifying a Rule name and Rule Category: Performance Collection. As mentioned earlier in this article the Rule target will be the Root Management Server Emulator:
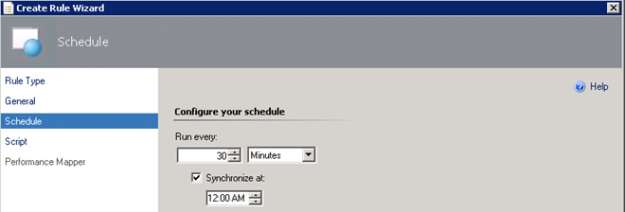
  3. Selecting to run the script every 30 minutes, and at which time the interval will start from:
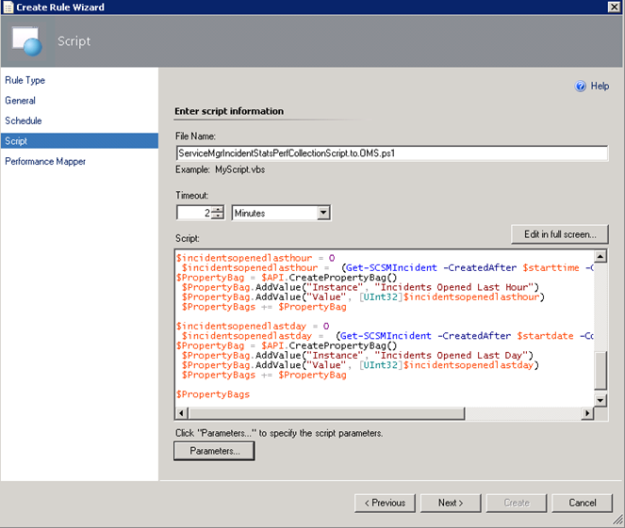
  4. Selecting a name for the script file and timeout, and entering the complete script as shown earlier:
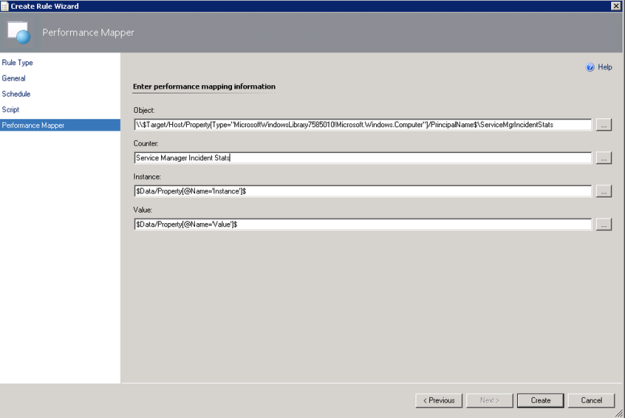
  5. For the Performance Mapping information, the Object name must be in the \\FQDN\YourObjectName format. For FQDN I used the Target variable for PrincipalName, and for the Object Name ServiceManagerIncidentStats, and adding the “\\” at the start and “\” between: \\$Target/Host/Property[Type=”MicrosoftWindowsLibrary7585010!Microsoft.Windows.Computer”]/PrincipalName$\ServiceMgrIncidentStats I specified the Counter name as “Service Manager Incident Stats”, and the Instance and Value are specified as $Data/Property(@Name=’Instance’)$ and $Data/Property(@Name=Value)$. These reflect the PropertyBag instance and value created in the PowerShell script:
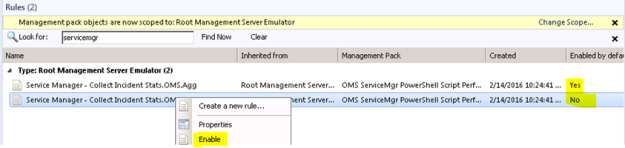
  6. After finishing the Create Rule Wizard, two new rules are created, which you can find by scoping to the Root Management Server Emulator I chose as target. Both Rules must be enabled, as they are not enabled by default:
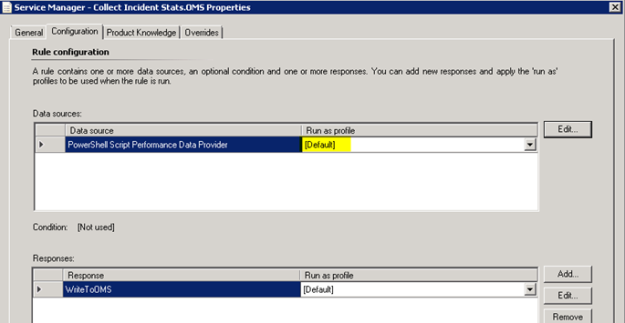
  7. Looking into the Properties of the rules, we can make edits to the PowerShell script, and verify that the Run as profile is the Default. This is where I would change the profile if I wanted to create my own custom profile and run as account for it.

At this point we are finished configuring the SCOM side, and can wait for some hours to see that data are actually coming into my OMS workspace.

Looking at Service Manager Performance Data in OMS

After a while I will start seeing Performance Data coming into OMS with the specified Object and Counter Name, and for the different instances and values.

In Log Search, I can specify Type=Perf ObjectName=ServiceMgrIncidentStats, and I will find the Results and Metrics for the specified time frame.

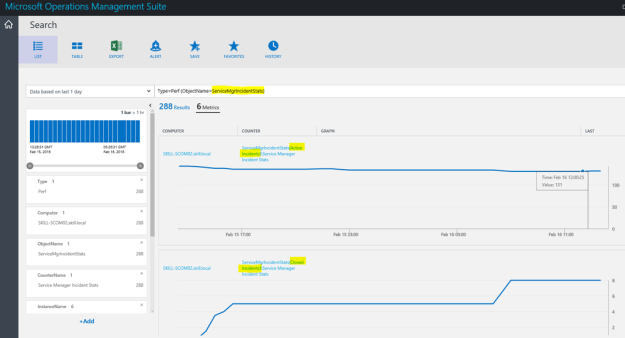
I can now look at Service Manager stats as performance data, showing different scenarios like how many active, pending, resolved and closed incidents there are over a time period. I can also look at how many incidents are created by each hour or by each day.

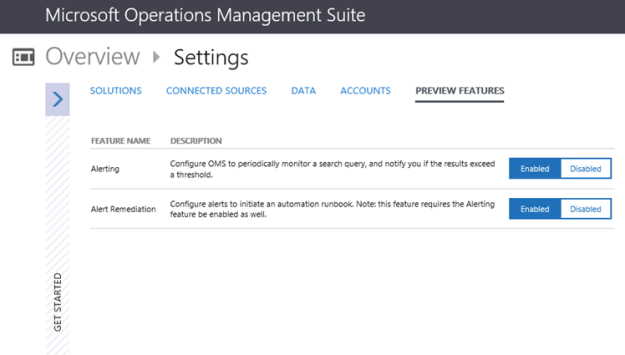
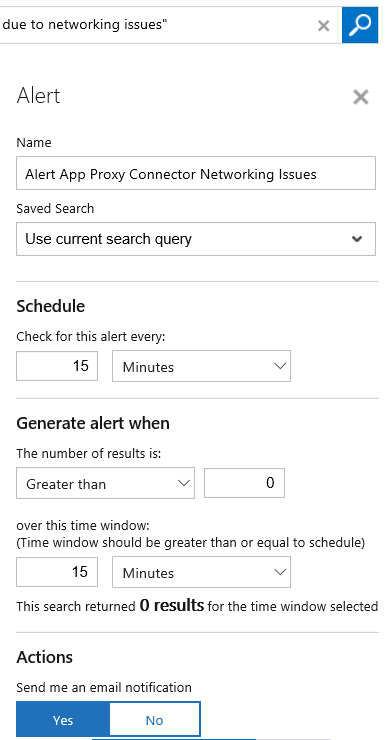
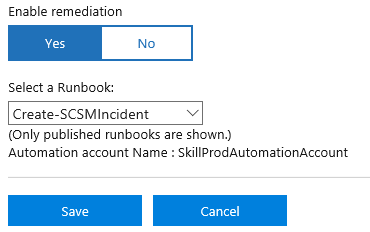
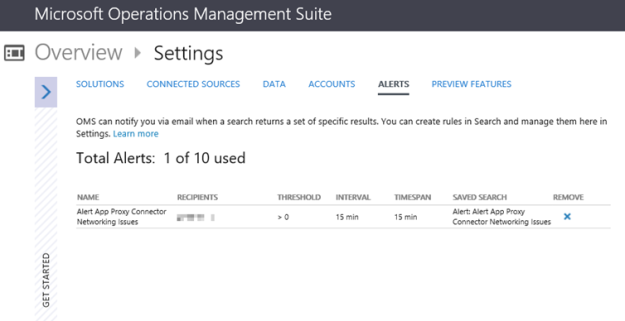
Finally, I can also create saved searches and alerts that creates for example alerts when the number of incidents for any counters are over a set value.

Thanks for reading, and look for more blog posts on OMS and getting SCSM data via NRT Perfomance Collection in the future 😉

Getting SCSM Object History using PowerShell and SDK

Some objects in the Service Manager CMDB, does not have the History tab. For example for Active Directory Users:

image

This makes it more difficult to keep track of changes made by either the AD Connector or Relationship Changes.

Some years ago this blog post from Technet showed how you could access object history programmatically using the SDK and a Console Application: http://blogs.technet.com/b/servicemanager/archive/2011/09/16/accessing-object-history-programmatically-using-the-sdk.aspx

I thought I could accomplish the same using PowerShell and the SDK instead, so I wrote the following script based on the mentioned blog article:

# Import module for Service Manager PowerShell CmdLets
$SMDIR    = (Get-ItemProperty 'hklm:/software/microsoft/System Center/2010/Service Manager/Setup').InstallDirectory
Set-Location -Path $SMDIR
If (!(Get-Module –Name System.Center.Service.Manager)) { Import-Module ".\Powershell\System.Center.Service.Manager.psd1" }

# Connect to Management Server
$EMG = New-Object Microsoft.EnterpriseManagement.EnterpriseManagementGroup "localhost"

# Specify Object Class
# In this example AD User
$aduserclass = Get-SCSMClass -DisplayName "Active Directory User"

# Get Instance of Class
$aduser = Get-SCSMClassInstance -Class $aduserclass | Where {$_.UserName -eq 'myusername'}

# Get History of Object Changes
$listhistory = $emg.EntityObjects.GetObjectHistoryTransactions($aduser)

# Loop History and Output to Console
ForEach ($emoht in $listhistory) {

    Write-Host "*************************************************************" -ForegroundColor Cyan
    Write-Host $emoht.DateOccurred `t $emoht.ConnectorDisplayName `t $emoht.UserName -ForegroundColor Cyan
    Write-Host "*************************************************************" -ForegroundColor Cyan

    ForEach ($emoh in $emoht.ObjectHistory) {

        If ($emoh.Values.ClassHistory.Count -gt 0) {
        
            Write-Host "*************************" -ForegroundColor Yellow
            Write-Host "Property Value Changes"  -ForegroundColor Yellow
            Write-Host "*************************"  -ForegroundColor Yellow

            ForEach ($emoch in $emoh.Values.ClassHistory) {
                ForEach ($propertyChange in $emoch.PropertyChanges) {
                    $propertyChange.GetEnumerator() | % {
                        Write-Host $emoch.ChangeType `t $_.Key `t $_.Value.First `t $_.Value.Second -ForegroundColor Yellow
                    }
                }
            }

        }
        
        If ($emoh.Values.RelationshipHistory.Count -gt 0) {

            Write-Host "*************************" -ForegroundColor Green
            Write-Host "Relationship Changes" -ForegroundColor Green
            Write-Host "*************************" -ForegroundColor Green

            ForEach ($emorh in $emoh.Values.RelationshipHistory) {

                $mpr = $emg.EntityTypes.GetRelationshipClass($emorh.ManagementPackRelationshipTypeId)
                Write-Host $mpr.DisplayName `t $emorh.ChangeType `t (Get-SCSMClassInstance -Id $emorh.SourceObjectId).DisplayName `t (Get-SCSMClassInstance -Id $emorh.TargetObjectId).DisplayName -ForegroundColor Green
            
            }

        }

    }

}


Running the script outputs the source of the changes, and any Property or Relationship changes, as shown in the below sample image:

image

Creating SCSM Incidents from OMS Alerts using Azure Automation – Part 2

This is the second part of a 2-part blog article that will show how you can create a new Service Manager Incident from an Azure Automation Runbook using a Hybrid Worker Group, and with OMS Alerts search for a condition and generate an alert which triggers this Azure Automation Runbook for creating an Incident in Service Manager via a Webhook and some contextual data for the Alert.

In Part 1 of the blog I prepared my Service Manager environment, and created Azure Automation Runbook and Assets to run via Hybrid Worker for generating incidents in Service Manager. In this second part of the blog I will configure my Operations Management Suite environment for OMS Alerting and Alert Remediation, and create an OMS Alert that will trigger this PowerShell Runbook.

Configuring OMS Alerting and Remediation

If you haven’t already for your OMS Workspace, you will need to enable the OMS Alerting and Alert Remediation under Settings and Preview Features. This is shown in the picture below:

Creating the OMS Alert

The next step is to create the OMS Alert. To do this I will need to do a Log Search with the criteria I want. For my example in this article, I will use an EventLog Search where I have previously added Azure AD Application Proxy Connector Event Log to OMS, and where I also have created a custom field for events where “The Connector was unable to connect to the service due to networking issues”.

The result of this Log Search is shown below, where I have 7 results in the last 7 days:

When I enabled OMS Alerting and Remediation under Settings, I can now see that I have a new Alert button at the bottom of the screen. I click on that to create my new OMS Alert.

I give the OMS Alert a descriptive name, using my current search query, and checking every 15 minutes for this alert. I can also specify a threshold over a specified time windows, in this case I want the Alert to trigger if there are more than 0 occurrences. If I want to I can also send an email notification to specified recipient(s).

Since I want to generate a SCSM Incident when this OMS Alert triggers, I select to Enable Remediation and select my Create-SCSMIncident Runbook.

After saving the OMS Alert I get a successful confirmation, and a link to where I can see my configured Alerts:

While in Preview I can only create up to 10 Alerts, and I can also remove them but not edit existing for now:

That is all I need to configure in Operations Management Suite to get the OMS Alert to trigger. Now I need to go back to the Azure Portal and configure some changes for my PowerShell Runbook!

Configuring Azure Automation PowerShell Runbook for Webhook and Hybrid Worker Group

In the Azure Portal and under my Automation Account and the PowerShell Runbook I created for Create-SCSMIncident (see Part 1), there will now automatically be created a Webhook for OMS Alert Remediation. This Webhook has a expiry date of one year ahead of creation.

I now need to specify the Parameters for the Webhook, so that it runs on my Hybrid Worker group:

After I have specified the Hybrid Worker group, any OMS Alerts will now trigger this Runbook and run on my local environment, and in this case create the SCSM incident as specified in the PowerShell Runbook. But, I also want to have some contextual data in the Incident, so I need to look at the Webhook data in the next step.

Configuring and using Webhook for contextual data in Runbook

Whenever the OMS Alert triggers the remediation Azure Automation Runbook via the Webhook, event information will be submitted from OMS to the Runbook via WebhookData input parameter.

An example of this is shown in the image below, where the WebhookData Input Parameter contains event information formatted as JSON (JavaScript Object Notation):

So, I need to configure my PowerShell Runbook to process this WebhookData, and to use that information when creating the Incident.

Let’s first take a look at the WebhookData. If I copy the input from above to for example Visual Studio Code, I can see clearer that the WebhookData consists of a WebhookName, RequestBody and RequestHeader. The values I’m looking for are in the RequestBody and SearchResults:

I update my PowerShell Runbook so that I can process the WebhookData, and get the WebhookName, WebhookHeaders and WebhookBody. When I have the WebhookBody, I can get the SearchResults and by using ConvertFrom-JSON loop trough the value array to get the fields I’m looking for like this:

In this case I want the Source, EventID and RenderedDescription, which also corresponds to the values from the Alert in OMS, as shown below. I then use these values for the Incident Title and Description in the PowerShell Runbook.

The complete Azure Automation PowerShell Runbook is shown below:

param (
[
object]$WebhookData
)

if ($WebhookData -ne $null) {

# Get Webhook Data
$WebhookName = $WebhookData.WebhookName
$WebhookHeaders = $WebhookData.RequestHeader
$WebhookBody = $WebhookData.RequestBody

# Writing Webhook Data to verbose output
Write-Verbose Webhook name: ‘$WebhookName’
Write-Verbose Webhook header:
Write-Verbose $WebhookHeaders
Write-Verbose Webhook body:
Write-Verbose $WebhookBody

# Searching Webhook Data for Value Results
$SearchResults = (ConvertFrom-JSON $WebhookBody).SearchResults
$SearchResultsValue = $SearchResults.value
Foreach ($item in $SearchResultsValue)
{
# Getting Alert Source, EventID and RenderedDescription
$AlertSource = $item.Source
Write-Verbose Alert Name: ‘$AlertSource’
$AlertEventId = $item.EventID
Write-Verbose Alert EventID: ‘$AlertEventId’
$AlertDescription = $item.RenderedDescription
Write-Verbose Alert Description: ‘$AlertDescription’
}

# Setting Incident Title and Description based on OMS Alert
$incident_title = OMS Alert: + $AlertSource
$incident_desc = $AlertDescription
}
else
{
# Setting Generic Incident Title and Description
$incident_title = Azure Automation Generated Alert
$incident_desc = This Incident is generated from an Azure Automation Runbook via Hybrid Worker
}

# Getting Assets for SCSM Management Server Name and Credentials
$scsm_mgmtserver = Get-AutomationVariable -Name SCSMServerName
$credential = Get-AutomationPSCredential -Name SCSMAASvcAccount

# Create Remote Session to SCSM Management Server
#
(Specified credential must be in Remote Management Users local group and SCSM operator)
$session = New-PSSession -ComputerName $scsm_mgmtserver -Credential $credential

# Import module for Service Manager PowerShell CmdLets
$SMDIR = Invoke-Command -ScriptBlock {(Get-ItemProperty hklm:/software/microsoft/System Center/2010/Service Manager/Setup).InstallDirectory} -Session $session
Invoke-Command -ScriptBlock { param($SMDIR) Set-Location -Path $SMDIR } -Args $SMDIR -Session $session
Import-Module .\Powershell\System.Center.Service.Manager.psd1 -PSSession $session

# Create Incident
Invoke-Command -ScriptBlock { param ($incident_title, $incident_desc)

# Get Incident Class
$IncidentClass = Get-SCSMClass -Name System.WorkItem.Incident

# Get Prefix for Incident IDs
$IncidentPrefix = (Get-SCSMClassInstance -Class (Get-SCSMClass -Name System.WorkItem.Incident.GeneralSetting)).PrefixForId

# Set Incident Properties
$Property = @{Id=$IncidentPrefix{0}
Title
= $incident_title
Description
= $incident_desc
Urgency
= System.WorkItem.TroubleTicket.UrgencyEnum.Medium
Source
= SkillSCSM.IncidentSourceEnum.OMS
Impact
= System.WorkItem.TroubleTicket.ImpactEnum.Medium
Status
= IncidentStatusEnum.Active
}

# Create the Incident
New-SCSMClassInstance -Class $IncidentClass -Property $Property -PassThru

} -Args $incident_title, $incident_desc -Session $session

Remove-PSSession $session

After publishing the updated Runbook I’m ready for the OMS Alert to trigger.

When the OMS Alert triggers

The next time this OMS Alert triggers, I can verify that the Runbook is started and an Incident is created. Since I also wanted an email notification, I also received that:

In Operations Management Suite, I search for any OMS Alerts generated by using the query “Type=Alert SourceSystem=OMS”:

In Azure Automation, I can see that the Runbook has launched a job:

And most importantly, I can see that the Incident is created in Service Manager with the info I specified:

That concludes this two-part blog article on how to create SCSM Incidents from OMS Alerts. OMS Automation rocks!

Creating SCSM Incidents from OMS Alerts using Azure Automation – Part 1

There has been some great announcements recently for OMS Alerts in Public Preview (http://blogs.technet.com/b/momteam/archive/2015/12/02/announcing-the-oms-alerting-public-preview.aspx) and Webhooks support for Hybrid Worker Runbooks (https://azure.microsoft.com/en-us/updates/hybrid-worker-runbooks-support-webhooks/). This opens up for some scenarios I have been thinking about.

This 2-part blog will show how you can create a new Service Manager Incident from an Azure Automation Runbook using a Hybrid Worker Group, and with OMS Alerts search for a condition and generate an alert which triggers this Azure Automation Runbook for creating an Incident in Service Manager via a Webhook and some contextual data for the Alert.

This is the first part of this blog post, so I will start by preparing the Service Manager environment, creating the Azure Automation Runbook, and testing the Incident creation via the Hybrid Worker.

Prepare the Service Manager Environment

First I want to prepare my Service Manager Environment for the Incident creation via Azure Automation PowerShell Runbooks. I decided to create a new Incident Source Enumeration for ‘Operations Management Suite’, and also to create a new account with permissions to create incidents in Service Manager to be used in the Runbooks.

To create the Source I edited the Library List for Incident Source like this:

To make it easier to refer to this Enumeration Value in PowerShell scripts, I define my own ID in the corresponding Management Pack XML:

And specifying the DisplayString for the ElementID for the Languages I want:

The next step is to prepare the account for the Runbook. As Azure Automation Runbooks on Hybrid Workers will run as Local System, I need to be able to run my commands as an account with permissions to Service Manager and to create Incidents.

I elected to create a new local Active Directory account, and give that account permission to my Service Manager Management Server.

With the new account created, I added it to the Remote Management Users local group on the Service Manager Management Server:

Next I added this account to the Advanced Operators Role Group in Service Manager:

Adding the account to the Advanced Operators group is more permission than I need for this scenario, but will make me able to use the same account for other work item scenarios in the future.

With the Service Manager Enviroment prepared, I can go to the next step which is the PowerShell Runbook in Azure Automation.

Create an Azure Automation Runbook for creating SCSM Incidents

I created a new PowerShell Script based Runbook in Azure Automation for Creating Incidents. This Runbook are using a Credential Asset to run Remote PowerShell session commands to my Service Manager Management Server. The Credential Asset is the local Active Directory Account I created in the previous step:

I also have created a variable for the SCSM Management Server Name to be used in the Runbook.

The PowerShell Runbook can then be created in Azure Automation, using my Automation Assets, and connecting to Service Manager for creating a new Incident as specified:

The complete PowerShell Runbook is show below:

# Setting Generic Incident Title and Description
$incident_title = Azure Automation Generated Alert
$incident_desc = This Incident is generated from an Azure Automation Runbook via Hybrid Worker

# Getting Assets for SCSM Management Server Name and Credentials
$scsm_mgmtserver = Get-AutomationVariable -Name SCSMServerName
$credential = Get-AutomationPSCredential -Name SCSMAASvcAccount

# Create Remote Session to SCSM Management Server
#
(Specified credential must be in Remote Management Users local group and SCSM operator)
$session = New-PSSession -ComputerName $scsm_mgmtserver -Credential $credential

# Import module for Service Manager PowerShell CmdLets
$SMDIR = Invoke-Command -ScriptBlock {(Get-ItemProperty hklm:/software/microsoft/System Center/2010/Service Manager/Setup).InstallDirectory} -Session $session
Invoke-Command -ScriptBlock { param($SMDIR) Set-Location -Path $SMDIR } -Args $SMDIR -Session $session
Import-Module .\Powershell\System.Center.Service.Manager.psd1 -PSSession $session

# Create Incident
Invoke-Command -ScriptBlock { param ($incident_title, $incident_desc)

# Get Incident Class
$IncidentClass = Get-SCSMClass -Name System.WorkItem.Incident

# Get Prefix for Incident IDs
$IncidentPrefix = (Get-SCSMClassInstance -Class (Get-SCSMClass -Name System.WorkItem.Incident.GeneralSetting)).PrefixForId

# Set Incident Properties
$Property = @{Id=$IncidentPrefix{0}
Title
= $incident_title
Description
= $incident_desc
Urgency
= System.WorkItem.TroubleTicket.UrgencyEnum.Medium
Source
= SkillSCSM.IncidentSourceEnum.OMS
Impact
= System.WorkItem.TroubleTicket.ImpactEnum.Medium
Status
= IncidentStatusEnum.Active
}

# Create the Incident
New-SCSMClassInstance -Class $IncidentClass -Property $Property -PassThru

} -Args $incident_title, $incident_desc -Session $session

Remove-PSSession $session
The script should be pretty straightforward to interpret. The most important part is that it would require to be run on a Hybrid Worker Group with Servers that can connect via PowerShell Remote to the specified Service Manager Management Server. The Incident that will be created are using a few variables for incident title and description (these will be updated for contextual data from OMS Alerts in part 2), and some fixed data for Urgency, Impact and Status, along with my custom Source for Operations Management Suite (ref. the Enumeration Value created in the first step).

After publishing this Runbook I’m ready to run it with a Hybrid Worker.

Testing the PowerShell Runbook with a Hybrid Worker

Now I can run my Azure Automation PowerShell Runbook. I select to run it on my previously defined Hybrid Worker Group.

The Runbook is successfully completed, and the output is showing the new incident details:

I can also see the Incident created in Service Manager:

That concludes this first part of this blog post. Stay tuned for how to create an OMS Alert and trigger this Runbook in part 2!

Shut Down Azure Servers for Earth Hour – 2015 Edition

One year ago, I published a blog article for shutting down, and later restart again, Azure Servers for one hour duration during Earth Hour 2014: https://systemcenterpoint.wordpress.com/2014/03/28/earth-hour-how-to-shut-down-and-restart-your-windows-azure-services-with-automation/.

In that article, I used three different Automation technologies to accomplish that:

  • Scheduled PowerShell script
  • System Center 2012 R2 Orchestrator
  • Service Management Automation in Windows Azure Pack

Today is Earth Hour 2015 (www.earthhour.org). While the Automation technologies referred still can be used for shutting down and restarting Azure Servers, I thought I should create an updated blog article using Azure Automation that has been launched during the last year.

This new example are built on the following:

  1. An Azure SQL Database with a table for specifying which Cloud Services and VM Names that should be shut down during Earth Hour
  2. An Azure Automation Runbook which connects to the Azure SQL Database, reads the Servers specified and shuts them down one by one (or later starts them up one by one).
  3. Two Schedules, one that triggers when the Earth Hour starts and one that triggers when Earth Hour begins, and calls the Runbook.

Creating a Azure SQL Database or a SQL Server is outside the scope of this article, but the table I have created is defined like this:

CREATE TABLE dbo.EarthHourServices
(
    ID int NOT NULL,
    CloudService varchar(50) NULL,
    VMName varchar(50) NULL,
    StayProvisioned bit NULL,
CONSTRAINT PK_ID PRIMARY KEY (ID)
)
GO

The StayProvisioned is a boolean data value where I can specify if VM’s should only be stopped, or stopped and deallocated.

This table is then filled with values for the servers I want to stop.

The Azure Automation Runbook I want to create have some requirements:

  1. I need to create a PowerShell Credential Asset for the SQL Server username and password
  2. I need to be able to Connect to my Azure Subscription. Previously I have been using the Connect-Azure solution (https://gallery.technet.microsoft.com/scriptcenter/Connect-to-an-Azure-f27a81bb) for connecting to my specified Azure Subscription. This is still working and I’m using this method in this blog post, but now depreciated and you should use this guide instead: http://azure.microsoft.com/blog/2014/08/27/azure-automation-authenticating-to-azure-using-azure-active-directory/.

This is the Runbook I have created:

workflow EarthHour_StartStopAzureServices
{
    param
    (
        # Fully-qualified name of the Azure DB server 
        [parameter(Mandatory=$true)] 
        [string] $SqlServerName,
        # Credentials for $SqlServerName stored as an Azure Automation credential asset
        [parameter(Mandatory=$true)] 
        [PSCredential] $SqlCredential,
        # Action, either Start or Stop for the specified Azure Services 
        [parameter(Mandatory=$true)] 
        [string] $Action
    )

    # Specify Azure Subscription Name
    $subName = 'My Azure Subscription'
    # Connect to Azure Subscription
    Connect-Azure `
        -AzureConnectionName $subName
    Select-AzureSubscription `
        -SubscriptionName $subName 

    inlinescript
    {

        # Setup credentials   
        $ServerName = $Using:SqlServerName
        $UserId = $Using:SqlCredential.UserName
        $Password = ($Using:SqlCredential).GetNetworkCredential().Password
        
        # Create connection to DB
        $Database = "SkillAutomationRepository"
        $DatabaseConnection = New-Object System.Data.SqlClient.SqlConnection
        $DatabaseConnection.ConnectionString = "Server = $ServerName; Database = $Database; User ID = $UserId; Password = $Password;"
        $DatabaseConnection.Open();

        # Get Table
        $DatabaseCommand = New-Object System.Data.SqlClient.SqlCommand
        $DatabaseCommand.Connection = $DatabaseConnection
        $DatabaseCommand.CommandText = "SELECT ID, CloudService, VMName, StayProvisioned FROM EarthHourServices"
        $DbResult = $DatabaseCommand.ExecuteReader()

        # Check if records are returned from SQL database table and loop through result set
        If ($DbResult.HasRows)
        {
            While($DbResult.Read())
            {
                # Get values from table
                $CloudService = $DbResult[1]
                $VMname = $DbResult[2]
                [bool]$StayProvisioned = $DbResult[3] 
 
                 # Check if we are starting or stopping the specified services
                If ($Using:Action -eq "Stop") {

                    Write-Output "Stopping: CloudService: $CloudService, VM Name: $VMname, Stay Provisioned: $StayProvisioned"
                
                    $vm = Get-AzureVM -ServiceName $CloudService -Name $VMname
                    
                    If ($vm.InstanceStatus -eq 'ReadyRole') {
                        If ($StayProvisioned -eq $true) {
                            Stop-AzureVM -ServiceName $vm.ServiceName -Name $vm.Name -StayProvisioned
                        }
                        Else {
                            Stop-AzureVM -ServiceName $vm.ServiceName -Name $vm.Name -Force
                        }
                    }
                                       
                }
                ElseIf ($Using:Action -eq "Start") {

                    Write-Output "Starting: CloudService: $CloudService, VM Name: $VMname, Stay Provisioned: $StayProvisioned"

                    $vm = Get-AzureVM -ServiceName $CloudService -Name $VMname
                    
                    If ($vm.InstanceStatus -eq 'StoppedDeallocated' -Or $vm.InstanceStatus -eq 'StoppedVM') {
                        Start-AzureVM -ServiceName $vm.ServiceName -Name $vm.Name    
                    }
                     
                }
 
            }
        }

        # Close connection to DB
        $DatabaseConnection.Close() 
    }    

}

And this is my schedules which will run the Runbook when Earth Hour Begins and Ends. The Scedules specify the parameters I need to connect to Azure SQL and the Action for either Stop VM’s or Start VM’s.

Good luck with automating your Azure Servers and remember to turn off the lights as well J!

Copy SMA Runbooks from one Server to another

Recently I decided to scrap my old Windows Azure Pack environment and create a new environment for Windows Azure Pack partly based in Microsoft Azure. As a part of this reconfiguration I have set up a new SMA server, and wanted to copy my existing SMA runbooks from the old Server to the new Server.

This little script did the trick for me, hope it can be useful for others as well.


# Specify old and new SMA servers
$OldSMAServer = "myOldSMAServer"
$NewSMAServer = "myNewSMAServer"

# Define export directory
$exportdir = 'C:\_Source\SMARunbookExport\'

# Get which SMA runbooks I want to export, filtered by my choice of tags
$sourcerunbooks = Get-SmaRunbook -WebServiceEndpoint https://$OldSMAServer | Where { $_.Tags -iin ('Azure','Email','Azure,EarthHour','EarthHour,Azure')}

# Loop through and export definition to file, on for each runbook
foreach ($rb in $sourcerunbooks) {
    $exportrunbook = Get-SmaRunbookDefinition -Type Draft -WebServiceEndpoint https://$OldSMAServer -name $rb.RunbookName
    $exporttofile = $exportdir + $rb.RunbookName + '.txt'
    $exportrunbook.Content | Out-File $exporttofile
}

# Then loop through and import to new SMA server, keeping my tags
foreach ($rb in $sourcerunbooks) {
    $importfromfile = $exportdir + $rb.RunbookName + '.txt'
    Import-SmaRunbook -Path $importfromfile -WebServiceEndpoint https://$NewSMAServer -Tags $rb.Tags
}

# Check my new SMA server for existence of the imported SMA runbooks
Get-SmaRunbook -WebServiceEndpoint https://$NewSMAServer |  FT RunbookName, Tags


Creating a Console Task for Cireson’s Remote Manage App in Service Manager

Cireson recently released a Remote Manage App for Configuration Manager, read more about it here: http://cireson.com/blog/remote-manage-app/. The App is even free, so go get your download.

As I am working a lot on Service Manager and customizations, I thought it would be useful to create a console task in Service Manager Console for this Remote Manage App. I have previously been using a similar task for the built in Remote Control functionality in Configuration Manager.

The first thing I verified was that the Remote Manage App from Cireson supports launching from command line and with parameters. How to do that is described in the above link where you would specify the command like this:

Installpath\ConfigMgrClientTools.exe client
smsprovider

Actually, it is easy to create your own task in the Library section of the Service Manager Console and use the built in Wizard, but I will show the whole process from creating the XML Management Pack and the required contents in it to get the task up and running. This will also let me specify an Image for the task, which I cannot do if I use the wizard in the Console.

I will even leave the complete Management Pack for you to download and just import in your own environment. After all, Christmas is coming up!

Requirements

There are some requirements for this to work:

  1. You have to have the Remote Manage App installed on the same computer you are using Service Manager Console.
  2. You will need permissions to connect to the Configuration Manager site as well as administrative permissions to the clients you will Remote Manage.

Management Pack

The content of my Management Pack is shown below, and I will comment on each section. At first, I have the Manifest with the Identity, Version and Name of the Management Pack, and the required references with aliases. These references will be used later in the MP.

<ManagementPack ContentReadable=true SchemaVersion=2.0 OriginalSchemaVersion=1.1xmlns:xsd=http://www.w3.org/2001/XMLSchema xmlns:xsl=http://www.w3.org/1999/XSL/Transform>
<Manifest>
<Identity>
<ID>SkillSCSM.RemoteManageApp.ConsoleTask</ID>
<Version>1.0.0.0</Version>
</Identity>
<Name>SkillSCSM Remote Manage App Console Task</Name>
<References>
<Reference Alias=EnterpriseManagement>
<ID>Microsoft.EnterpriseManagement.ServiceManager.UI.Console</ID>
<Version>7.5.3079.236</Version>
<PublicKeyToken>31bf3856ad364e35</PublicKeyToken>
</Reference>
<Reference Alias=CustomMicrosoft_Windows_Library>
<ID>Microsoft.Windows.Library</ID>
<Version>7.5.8501.0</Version>
<PublicKeyToken>31bf3856ad364e35</PublicKeyToken>
</Reference>
<Reference Alias=ConfigurationManagement>
<ID>ServiceManager.ConfigurationManagement.Library</ID>
<Version>7.5.3079.0</Version>
<PublicKeyToken>31bf3856ad364e35</PublicKeyToken>
</Reference>
</References>
</Manifest>

The next section is the Categories. The first Category ID is for the MP itself. After that, I can have Categories where I can control where the Task will be shown. I have commented them out here, but two Categories are shown for how to Hide the Task either from the Console Tasks section, or from the Form Tasks section. Leaving it like shown under here will show the task in both the Console and Form tasks.

<Categories>
<Category ID=Category.SkillSCSM.RemoteManageApp.ConsoleTask Value=EnterpriseManagement!Microsoft.EnterpriseManagement.ServiceManager.ManagementPack>
<ManagementPackName>SkillSCSM.RemoteManageApp.ConsoleTask</ManagementPackName>
<ManagementPackVersion>1.0.0.0</ManagementPackVersion>
</Category>
<!–<Category ID=”Category.SkillSCSM.Hide.RemoteManageApp.FromConsole” Target=”RemoteManageAppTask” Value=”Console!Microsoft.EnterpriseManagement.ServiceManager.UI.Console.DonotShowConsoleTask” />–>
<!–<Category ID=”Category.SkillSCSM.Hide.RemoteManageApp.FromForms” Target=”RemoteManageAppTask” Value=”Console!Microsoft.EnterpriseManagement.ServiceManager.UI.Console.DonotShowFormTask” />–>
</Categories>

Following that is the Presentation section. This is where I define the actual Task and its Target. As you can see, I have targeted it to Windows Computers, meaning that the task will show up everywhere I select a Windows Computer either in a View or open the Windows Computer Form. I am running the task as a Command Line Task, and the Parameters are specified as arguments.

Important! Here you must verify that the Application Path is the same as where you would be running it.

The last argument is constructed of the variable where I choose to use the Netbios Computer Name as client name. Here you can if you like to replace that with the DNS FQDN or IP address or whatever fits your need. The second part of the argument is to specify your SMS Provider Host, make sure you fill inn your own Servername there.

At the end of the Presentation section, I have included an Image Reference to the task, with an Image ID. This ID is later specified in the Resources section.

<Presentation>
<ConsoleTasks>
<ConsoleTask ID=RemoteManageAppTask Accessibility=Public Enabled=true
Target=CustomMicrosoft_Windows_Library!Microsoft.Windows.Computer RequireOutput=false>
<Assembly>EnterpriseManagement!SdkDataAccessAssembly</Assembly>
<Handler>Microsoft.EnterpriseManagement.UI.SdkDataAccess.CommandLineHandler</Handler>
<Parameters>
<Argument Name=LoggingEnabled>False</Argument>
<Argument Name=Application>C:\Program Files (x86)\Cireson\Remote Manage app\ConfigMgrClientTools.exe</Argument>
<Argument Name=WorkingDirectory>%windir%\system32</Argument>
<Argument Name=“”>$Context/Property[Type=’CustomMicrosoft_Windows_Library!Microsoft.Windows.Computer’]/NetbiosComputerName$ YOURSMSPROVIDERHOST</Argument>
</Parameters>
</ConsoleTask>
</ConsoleTasks>
<ImageReferences>
<ImageReference ElementID=RemoteManageAppTask ImageID=ImageRemoteManageApp />
</ImageReferences>
</Presentation>

Following this we have the Language Packs section, where the string values for the different translations are available. Feel free to add your own language packs and strings here.

<LanguagePacks>
<LanguagePack ID=ENU IsDefault=true>
<DisplayStrings>
<DisplayString ElementID=SkillSCSM.RemoteManageApp.ConsoleTask>
<Name>SkillSCSM Remote Manage App Console Task</Name>
<Description>Management Pack for Remote Manage App Console Task</Description>
</DisplayString>
<DisplayString ElementID=RemoteManageAppTask>
<Name>Remote Manage Computer</Name>
</DisplayString>
</DisplayStrings>
</LanguagePack>
</LanguagePacks>

And at last in the Management Pack, we have the Resources section where I specify the Image ID and the FileName. I have included a small 24×24 PNG file, which are similar to the icon Cireson use for Remote Manage App.

<Resources>
<Image ID=ImageRemoteManageApp FileName=ConsoleTaskRemoteManageApp24x24.png
Accessibility=Public HasNullStream=false Comment=Remote Manage App Image />
</Resources>
</ManagementPack>

Importing the Management Pack

With the Management Pack now ready, the next step is to import it to Service Manager. There is one important thing though, since I chose to add an Image for my task, I will need to create a Management Pack Bundle file (.mpb) before I can import it. This can easily be done with some Service Manager PowerShell. These are the CmdLets I have been using:PowerGUI Script Editor


# Import Module for Service Manager PowerShell CmdLets
$SMDIR    = (Get-ItemProperty 'hklm:/software/microsoft/System Center/2010/Service Manager/Setup').InstallDirectory
Set-Location -Path $SMDIR
If (!(Get-Module –Name "System.Center.Service.Manager")) { Import-Module ".\Powershell\System.Center.Service.Manager.psd1" }

# Change to Directory for MP files
$MPDIR = "C:\_Source\ServiceMgrAuthoring"
Set-Location -Path $MPDIR

# Set variables for MPB, MP og Resource files
$mpbPath = "SkillSCSM.RemoteManageApp.ConsoleTask.mpb"
$mp1 = "SkillSCSM.RemoteManageApp.ConsoleTask.xml"
$r1 = "ConsoleTaskRemoteManageApp24x24.png"

# Opprette MP Bundle
New-SCSMManagementPackBundle -Name $mpbPath -ManagementPack $mp1 -Resource $r1 -Force

After the Management Pack Bundle has been created, import it to Service Manager under the Administration Pane and Management Packs Node.

Using the Remote Manage Console Task

Now that I have the Console Task imported to Service Manager, I can lookup any Windows Computer I would want to Remote Manage. For example by going to Configuration Items Pane, and choosing the View for All Windows Computers. When I select a Computer Name I can see my Remote Manage Computer Task in my right Console Task window.

When clicking on the Task, the Remote Manage App is launched and are immediately starting to connect the selected Computer (if it has permission and FW permits that is):

Similarly, if I am working with an Incident Work Item, and have added this users Computer as related CI, I can also open the Computer Form and launch the Task from there.

Downloading the solution

As promised I have made this solution freely downloadable, please click the link below to start downloading a Zip file consisting of:

  • SkillSCSM.RemoteManageApp.ConsoleTask.xml
  • ConsoleTaskRemoteManageApp24x24.png
  • CreateRemoteManageAppConsoleTaskMpbBundle.ps1

Download the Zip file from here: http://1drv.ms/1BIxW5G

Good luck and Happy Christmas!

Assigning a Public Reserved IP to existing Azure Cloud Service

I have been running a SQL Server AlwaysOn Cluster in Azure for my System Center environment. I use this mostly for Demo and Development for partner solutions, so I like to shutdown and deallocate the cloud services when I’m not using them. This would also mean that the Public IP address for my Cloud Services would be deallocated and a new IP adresse would be created when I start the Cloud Service deployment again.

So, I have been looking into the new possibility of creating a reservation for the Public IP address, as described here: http://msdn.microsoft.com/en-us/library/azure/dn690120.aspx.

As described in the link:

  • You must reserve the IP address first, before deploying.
  • At this time, you can’t go back and apply a reservation to something that’s already been deployed.

Unfortunately, I had already deployed my cloud service and VMs.

The solution? Well, If I’m willing to accept a small downtime, I can easily remove and re-deploy my Cloud Service and VMs while keeping my data and configurations!

My solution was using Azure PowerShell, and save the VM configuration to XML files, then delete the VMs (NB! Important not to delete the disks). After that I recreate the VMs from the config XML files, and specify my IP address reservation which I had already created before. Now my Cloud Service and VM deployment have a reservation, and in that way my SQL AlwaysOn listener keeps a fixed IP address.

The complete solution is listed in the script window below, the script is meant to run interactively snippet by snippet. Please make sure that you do a backup first if this is required.

# PowerShell command to set a reserved IP address for Cloud Service in Azure
# Reference:
# Reserved IP addresses: http://msdn.microsoft.com/en-us/library/azure/dn690120.aspx

# Log on to my Azure account
Add-AzureAccount

# Set active subscription
Get-AzureSubscription -SubscriptionName "mysubscriptionname" | Select-AzureSubscription

# Create a Public Reserved IP for SQL AlwaysOn Listener IP
$ReservedIP = New-AzureReservedIP -ReservedIPName "SCSQLAlwaysOnListenerIP" -Label "SCSQLAlwaysOnListenerIP" -Location "West Europe"

$workingDir = (Get-Location).Path

# Define VMs and Cloud Service
$vmNames = 'az-scsql02', 'az-scsql01', 'az-scsqlquorum'
$serviceName = "mycloudsvc-az-scsql"

# Export VM Config and Stop VM
ForEach ($vmName in $vmNames) {

    $Vm = Get-AzureVM –ServiceName $serviceName –Name $vmName
    $vmConfigurationPath = $workingDir + "\exportedVM_" + $vmName +".xml"
    $Vm | Export-AzureVM -Path $vmConfigurationPath

    Stop-AzureVM –ServiceName $serviceName –Name $vmName -Force

}

# Remove VMs while keeping disks
ForEach ($vmName in $vmNames) {

    $Vm = Get-AzureVM –ServiceName $serviceName –Name $vmName
    $vm | Remove-AzureVM -Verbose

}

# Specify VNet for the VMs
$vnetname = "myvnet-prod"

# Re-create VMs in specified order
$vmNames = 'az-scsqlquorum', 'az-scsql01', 'az-scsql02'

ForEach ($vmName in $vmNames) {

    $vmConfigurationPath = $workingDir + "\exportedVM_" + $vmName +".xml"
    $vmConfig = Import-AzureVM -Path $vmConfigurationPath

    New-AzureVM -ServiceName $serviceName -VMs $vmConfig -VNetName $vnetname -ReservedIPName $ReservedIP.ReservedIPName -WaitForBoot:$false

}


Hidden Network Adapters in Azure VM and unable to access network resources

I have some Azure VM’s that I regulary Stop (deallocate) and Start using Azure Automation. The idea is to cut costs while at night or weekends, as these VM’s are not used then anyway. I recently had a problem with one of these Virtual Machines, I was unable to browse or connect to network resources, could not connect to the domain to get Group Policy updates and more. When looking into it, I found out that I had a lot of hidden Network Adapters in Device Manager. The cause of this is that every time a VM is shut down and deallocated, on next start it will provision a new network adapter. The old network adapter is kept hidden. The result of this over time as I automate shut down and start every day, is that I get a lot of these, as shown below: 
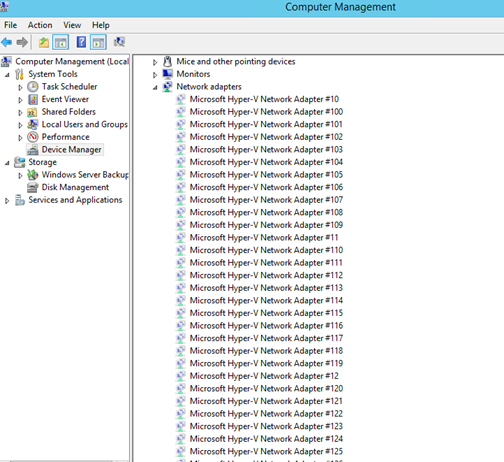
I found in some forums that the cause of the network browse problem I had with the server could be related to this for Azure VM’s. I don’t know the actual limit, or if it’s a fixed value, but the solution would be to uninstall these hidden network adapters. Although it is easy to right click and uninstall each network adapter, I wanted to create a PowerShell Script to be more efficient. There are no native PowerShell cmdlets or Commands that could help me with this, so after some research I ended with a combination of these two solutions:

I then ended up with the following PowerShell script. The script first get all hidden devices of type Microsoft Hyper-V Network Adapter and their InstanceId. Then for each device uninstall/remove with DevCon.exe. The Script:

Set-Location C:\_Source\DeviceManagement

Import-Module .\Release\DeviceManagement.psd1 -Verbose

# List Hidden Devices

Get-Device -ControlOptions DIGCF_ALLCLASSES | Sort-Object -Property Name | Where-Object {($_.IsPresent -eq $false) -and ($_.Name -like “Microsoft Hyper-V Network Adapter*”) } | ft Name, DriverVersion, DriverProvider, IsPresent, HasProblem, InstanceId -AutoSize

# Get Hidden Hyper-V Net Devices

$hiddenHypVNics = Get-Device -ControlOptions DIGCF_ALLCLASSES | Sort-Object -Property Name | Where-Object {($_.IsPresent -eq $false) -and ($_.Name -like “Microsoft Hyper-V Network Adapter*”) }

# Loop and remove with DevCon.exe

ForEach ($hiddenNic In $hiddenHypVNics) {

$deviceid = “@” + $hiddenNic.InstanceId

.\devcon.exe -r remove $deviceid

}

And after a while all hidden network adapter devices was uninstalled: 
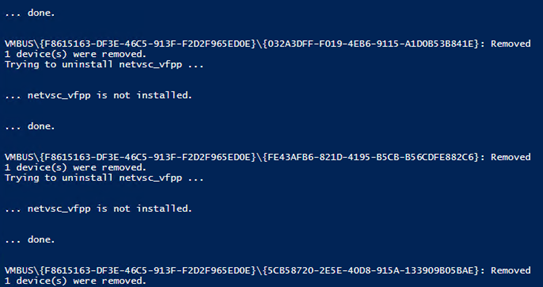
In the end I booted the VM and after that everything was working on the network again!

Earth Hour – How to Shut Down and Restart your Windows Azure Services with Automation

The upcoming Saturday, 29th of March 2014, Earth Hour will be honored between 8:30 PM and 9:30 PM in your local time zone. Organized by the WWF (www.earthhour.org), Earth Hour is an incentive where amongst other activities people are asked to turn off their lights for an hour.

I thought this also was an excellent opportunity to give some examples of how you can use automation technologies to shut down and restart Windows Azure Services. Let’s turn off the lights of our selected Windows Azure servers for an hour!

I will use three of my favorite automation technologies to accomplish this:

  1. Windows PowerShell
  2. System Center 2012 R2 Orchestrator
  3. Windows Azure Pack with SMA

I also wanted some kind of list of which services I would want to turn off, as not all of my services in Azure are available to be turned off. There are many ways to accomplish this, I chose to use a comma separated text file. My CSV file includes the name of the Cloud Services in Azure I want to shut down (and later restart), and all VM roles inside the specified Cloud Services will be shut down.

In the following, I will give examples for using each of the automation technologies to accomplish this.

Windows PowerShell

In my first example, I will use Windows PowerShell and create a scheduled PowerShell Job for the automation. This has a couple of requirements:

  1. I must download and install Windows Azure PowerShell.
  2. I must register my Azure Subscription so I can automate it from PowerShell.

For instructions for these prerequisites, see http://www.windowsazure.com/en-us/documentation/articles/install-configure-powershell.

First, I start PowerShell at the machine that will run my PowerShell Scheduled Jobs. I prefer PowerShell ISE for this, and as the job will automatically run on Saturday evening, I will use a server machine that will be online at the time the schedule kicks off.

The following commands creates job triggers and options for the job:

# Job Trigger

$trigger_stop = New-JobTrigger -Once -At “03/29/2014 20:30”

$trigger_start = New-JobTrigger -Once -At “03/29/2014 21:30”

# Job Option

$option = New-ScheduledJobOption -RunElevated

After that, I specify some parameters, as my Azure subscription name and importing the CSV file that contains the name of the Cloud Services I want to turn off and later start again:

# Azure Parameters

$az_subscr = my subscription name

$az_cloudservices = Import-Csv -Path C:\_Source\Script\EarthHour_CloudServices.csv -Encoding UTF8

Then I create some script strings, one for the stop job, and one for the start job. It is out of the scope of this blog article to explain in detail the PowerShell commands used here, but you will see that the CSV file is imported, and for each Cloud Service a command is run to stop or start the Azure Virtual Machines.

Another comment is that for the Stop-AzureVM command I chose to use the switch “-StayProvisioned”, which will make the server to keep its internal IP address and the Cloud Service will keep its public IP address. I could also use the “-Force” switch which will deallocated the VM’s and Cloud Services. Deallocating will save costs but also risks that the VM’s and Cloud Services will be provisioned with different IP addresses when restarted.

# Job Script Strings

$scriptstring_stop = “Import-Module Azure `

Set-AzureSubscription -SubscriptionName ‘” + $az_subscr + “‘ `

Import-Csv -Path C:\_Source\Script\EarthHour_CloudServices.csv -Encoding UTF8 | ForEach-Object { Get-AzureVM -ServiceName `$_.CloudService | Where-Object {`$_.InstanceStatus -eq ‘ReadyRole’} | ForEach-Object {Stop-AzureVM -ServiceName `$_.ServiceName -Name `$_.Name -StayProvisioned } } “

$scriptstring_start = “Import-Module Azure `

Set-AzureSubscription -SubscriptionName ‘” + $az_subscr + “‘ `

Import-Csv -Path C:\_Source\Script\EarthHour_CloudServices.csv -Encoding UTF8 | ForEach-Object { Get-AzureVM -ServiceName `$_.CloudService | Where-Object {`$_.InstanceStatus -eq ‘StoppedDeallocated’} | ForEach-Object {Start-AzureVM -ServiceName `$_.ServiceName -Name `$_.Name } } “

# Define Job Script Blocks

$sb_stop = [scriptblock]::Create($scriptstring_stop)

$sb_start = [scriptblock]::Create($scriptstring_start)

To create the PowerShell Jobs my script strings must be formatted as script blocks, as shown above. Next I specify my credentials that will run the job, and then register the jobs. I create two jobs for each the stop and start automation, and with the configured script blocks, triggers, options and credentials.

# Get Credentials

$jobcreds = Get-Credential

# Register Jobs

Register-ScheduledJob -Name Stop_EarthHourSkillAzure -ScriptBlock $sb_stop -Trigger $trigger_stop -ScheduledJobOption $option -Credential $jobcreds

Register-ScheduledJob -Name Start_EarthHourSkillAzure -ScriptBlock $sb_start -Trigger $trigger_start -ScheduledJobOption $option -Credential $jobcreds

And that’s it! The jobs are now registered and will run at the specified schedules.

If you want to test a job, you can do this with the command:

# Test Stop Job

Start-Job -DefinitionName Stop_EarthHourSkillAzure

You can also verify the jobs in Task Scheduler, under Task Scheduler Library\Microsoft\Windows\PowerShell\ScheduledJobs:

System Center 2012 R2 Orchestrator

Since its release with System Center 2012, Orchestrator have become a popular automation technology for data centers. With Integration Packs for Orchestrator, many tasks can be performed by creating Orchestrated Runbooks that automates your IT processes. Such Integration Packs exists for System Center Products, Active Directory, Exchange Server, SharePoint Server and many more. For this task, I will use the Integration Pack for Windows Azure.

To be able to do this, the following requirements must be met:

  1. A System Center 2012 SP1 or R2 Orchestrator Server, with Azure Integration Pack installed.
  2. Create and configure an Azure Management Certificate to be used from Orchestrator.
  3. Create a Windows Azure Configuration in Orchestrator.
  4. Create the Runbooks and Schedules.

I will not get into detail of these first requirements. Azure Integration Pack can be downloaded from http://www.microsoft.com/en-us/download/details.aspx?id=39622.

To create and upload an Azure Management Certificate, please follow the guidelines here: http://msdn.microsoft.com/en-us/library/windowsazure/gg551722.aspx.

Note that from the machine you create the certificate, you will have the private key for then certificate in your store. You must then do two things:

  1. Upload the .cer file (without the private key) to Azure. Note your subscription ID.
  2. Export the certificate to a .pfx file with password, and transfer this file to your Orchestrator Server.

In Runbook Designer, create a new Windows Azure configuration, with .pfx file location and password, and the subscription ID. For example like this:

You are now ready to use the Azure activities in your Orchestrator Runbooks.

In Orchestrator it is recommended to create different Runbooks that call upon each other, rather than creating a very big Runbook that do all the work. I have created the following Runbooks and Schedules:

  • A generic Recycle Azure VM Runbook, that either Starts, Shutdown or Restarts Azure VM’s based on input parameters for Action to do, Cloud Service, Deployment and VM instance names.
  • An Earth Hour Azure Runbook, that reads Cloud Services from CSV file and gets the Deployment Name and VM Role Name, with input parameter for Action. This Runbook will call the first generic Runbook.
  • I will have two Schedule Runbooks, that are Started, and will kick off at ..
  • .. two specified Schedules, for Earth Hour Start and Stop.

Let’s have a look:

My first generic Recycle Azure VM Runbook looks like this:

This Runbook is really simple, based on input parameter for Action either Start, Shutdown and Restart are sent to the specified VM instance, Deployment and Cloud Service. The input parameters for the Runbook is:

I also have an ActivityID parameter, as I also use this Runbook for Service Requests from Service Manager.

My parameters are then used in the activities, for example for Shutdown:

After this I have the Earth Hour Azure Runbook. This Runbook looks like this:

This Runbook takes one input parameter, that would be Start or Shutdown for example:

First, I read the Cloud Services from my CSV file:

I don’t read from line 1 as it contains my header. Next I get my Azure deployments, where the input is from the text file:

The next activity I had to think about, as the Azure Integration Pack doesn’t really have an activity to get all VM role instances in a Deployment. But, the Get Deployment task returns a Configuration File XML, and I was able to do a Query XML activity XPath Query for getting the VM instance role names:

After that I do a Send Platform Event just for debug really, and last I call my first Recycle Azure Runbook, with the parameters from my Activities:

I don’t use ActivityID here as this Runbook is initiated from Orchestrator and not a Service Manager Service Request.

Until now I can now start this Runbook manually, specify Start or Shutdown actions, and the Cloud Services from the CSV file will be processed.

To schedule these to run automatically, I will need to create some Schedules first:

These schedules are created like this. I specify last Saturday in the month.

And with the hours 8:00-9:00 PM. (I will check against this schedule at 8:30 PM)

The other schedule for Start is configured the same way, only with Hours from 9:00-10:00 PM.

The last thing I have to do is to create two different Runbooks, which monitors time:

And:

These two Runbooks will check for the monitor time:

If the time is correct, it will check againt the Schedule, and if that is correct, it will call the Earth Hour Azure with Start and Shutdown.

The scheduling functionality is a bit limited in Orchestrator for running Runbooks only one time, so in reality these Runbooks if left running will actually run every last Saturday every month.

Anyway, the last thing to do before the weekend is to kick of these two last Runbooks, and it will run as planned on Saturday night.

Windows Azure Pack with SMA

The last automation technology I want to show is using SMA, Service Management Automation, with Windows Azure Pack. Service Management Automation (SMA) is a new feature of System Center 2012 R2 Orchestrator, released in October 2013. At the same time Windows Azure Pack (WAP) was released as a component in System Center 2012 R2 and Windows Server 2012 R2. I will not get into great detail of WAP and SMA here, but these solutions are very exciting for Private Cloud scenarios. SMA does not require Windows Azure Pack, but it is recommended to install WAP to use as a portal and user interface for authoring and administering the SMA runbooks.

The example I will use here have the following requirements:

  1. I must download and install Windows Azure PowerShell.
  2. I must configure a connection to my Azure Subscription.
  3. I must create a connection object in SMA to Windows Azure.
  4. I must create the SMA runbooks.

The prerequisites above are well described here: http://blogs.technet.com/b/privatecloud/archive/2014/03/12/managing-windows-azure-with-sma.aspx.

So I will concentrate on creating the the SMA runbooks.

The SMA runbooks will use PowerShell workflow. I will create two SMA runbooks, one for ShutDown and one for Starting the Azure Services.

My PowerShell workflow for the ShutDown will then look like this:

workflow
EarthHour_ShutDownAzureServices

{

    # Get the Azure connection


$con = Get-AutomationConnection -Name My-SMA-AzureConnection

    # Convert the password to a SecureString to be used in a PSCredential object


$securepassword = ConvertTo-SecureString -AsPlainText -String $con.Password -Force

    # Create a PS Credential Object

    $cred = New-Object -TypeName System.Management.Automation.PSCredential -ArgumentList $con.Username, $securepassword


inlinescript

{


Import-Module “Azure”

 # Select the Azure subscription

 Select-AzureSubscription -SubscriptionName my subscription name

 # Import Cloud Services from CSV file and Stop VMs for each specified service

 Import-Csv -Path C:\_Source\EarthHour_CloudServices.csv -Encoding UTF8 | `

 ForEach-Object { Get-AzureVM -ServiceName $_.CloudService | `

 Where-Object {$_.InstanceStatus -eq ‘ReadyRole’} | `

 ForEach-Object {Stop-AzureVM -ServiceName $_.ServiceName -Name $_.Name -StayProvisioned } }

} -PSComputerName $con.ComputerName -PSCredential $cred

}

As for the first automation example with PowerShell Job I read the Cloud Services from a CSV file, and loop through the Cloud Services and Azure VM’s for the Stop commands.

Similarly I have the workflow for Start the Azure services again:

workflow
EarthHour_StartAzureServices

{

    # Get the Azure connection

 $con = Get-AutomationConnection -Name My-SMA-AzureConnection

    # Convert the password to a SecureString to be used in a PSCredential object

 $securepassword = ConvertTo-SecureString -AsPlainText -String $con.Password -Force

    # Create a PS Credential Object

    $cred = New-Object -TypeName System.Management.Automation.PSCredential -ArgumentList $con.Username, $securepassword

 inlinescript

{

 Import-Module “Azure”

 # Select the Azure subscription

 Select-AzureSubscription -SubscriptionName my subscription name

 # Import Cloud Services from CSV file and Stop VMs for each specified service

 Import-Csv -Path C:\_Source\EarthHour_CloudServices.csv -Encoding UTF8 | `

 ForEach-Object { Get-AzureVM -ServiceName $_.CloudService | `

 Where-Object {$_.InstanceStatus -eq ‘StoppedDeallocated’ -Or $_.InstanceStatus -eq ‘StoppedVM’ } | `

 ForEach-Object {Start-AzureVM -ServiceName $_.ServiceName -Name $_.Name } }

} -PSComputerName $con.ComputerName -PSCredential $cred

}

These workflows can now be tested I you want by running Start action. I however want to schedule them for Earth Hour on Saturday. This is really easy to do using the SMA assets for schedules:

These schedules are then linked to each of the SMA runbooks:

And similarly, with details:

That concludes this blog post. Happy automating, and remember to turn off your lights!