Cireson recently released a Remote Manage App for Configuration Manager, read more about it here: http://cireson.com/blog/remote-manage-app/. The App is even free, so go get your download.
As I am working a lot on Service Manager and customizations, I thought it would be useful to create a console task in Service Manager Console for this Remote Manage App. I have previously been using a similar task for the built in Remote Control functionality in Configuration Manager.
The first thing I verified was that the Remote Manage App from Cireson supports launching from command line and with parameters. How to do that is described in the above link where you would specify the command like this:
Installpath\ConfigMgrClientTools.exe client
smsprovider
Actually, it is easy to create your own task in the Library section of the Service Manager Console and use the built in Wizard, but I will show the whole process from creating the XML Management Pack and the required contents in it to get the task up and running. This will also let me specify an Image for the task, which I cannot do if I use the wizard in the Console.
I will even leave the complete Management Pack for you to download and just import in your own environment. After all, Christmas is coming up!
Requirements
There are some requirements for this to work:
- You have to have the Remote Manage App installed on the same computer you are using Service Manager Console.
- You will need permissions to connect to the Configuration Manager site as well as administrative permissions to the clients you will Remote Manage.
Management Pack
The content of my Management Pack is shown below, and I will comment on each section. At first, I have the Manifest with the Identity, Version and Name of the Management Pack, and the required references with aliases. These references will be used later in the MP.
<ManagementPack ContentReadable=“true“ SchemaVersion=“2.0“ OriginalSchemaVersion=“1.1” xmlns:xsd=“http://www.w3.org/2001/XMLSchema“ xmlns:xsl=“http://www.w3.org/1999/XSL/Transform“>
<Manifest>
<Identity>
<ID>SkillSCSM.RemoteManageApp.ConsoleTask</ID>
<Version>1.0.0.0</Version>
</Identity>
<Name>SkillSCSM Remote Manage App Console Task</Name>
<References>
<Reference Alias=“EnterpriseManagement“>
<ID>Microsoft.EnterpriseManagement.ServiceManager.UI.Console</ID>
<Version>7.5.3079.236</Version>
<PublicKeyToken>31bf3856ad364e35</PublicKeyToken>
</Reference>
<Reference Alias=“CustomMicrosoft_Windows_Library“>
<ID>Microsoft.Windows.Library</ID>
<Version>7.5.8501.0</Version>
<PublicKeyToken>31bf3856ad364e35</PublicKeyToken>
</Reference>
<Reference Alias=“ConfigurationManagement“>
<ID>ServiceManager.ConfigurationManagement.Library</ID>
<Version>7.5.3079.0</Version>
<PublicKeyToken>31bf3856ad364e35</PublicKeyToken>
</Reference>
</References>
</Manifest>
The next section is the Categories. The first Category ID is for the MP itself. After that, I can have Categories where I can control where the Task will be shown. I have commented them out here, but two Categories are shown for how to Hide the Task either from the Console Tasks section, or from the Form Tasks section. Leaving it like shown under here will show the task in both the Console and Form tasks.
<Categories>
<Category ID=“Category.SkillSCSM.RemoteManageApp.ConsoleTask“ Value=“EnterpriseManagement!Microsoft.EnterpriseManagement.ServiceManager.ManagementPack“>
<ManagementPackName>SkillSCSM.RemoteManageApp.ConsoleTask</ManagementPackName>
<ManagementPackVersion>1.0.0.0</ManagementPackVersion>
</Category>
<!–<Category ID=”Category.SkillSCSM.Hide.RemoteManageApp.FromConsole” Target=”RemoteManageAppTask” Value=”Console!Microsoft.EnterpriseManagement.ServiceManager.UI.Console.DonotShowConsoleTask” />–>
<!–<Category ID=”Category.SkillSCSM.Hide.RemoteManageApp.FromForms” Target=”RemoteManageAppTask” Value=”Console!Microsoft.EnterpriseManagement.ServiceManager.UI.Console.DonotShowFormTask” />–>
</Categories>
Following that is the Presentation section. This is where I define the actual Task and its Target. As you can see, I have targeted it to Windows Computers, meaning that the task will show up everywhere I select a Windows Computer either in a View or open the Windows Computer Form. I am running the task as a Command Line Task, and the Parameters are specified as arguments.
Important! Here you must verify that the Application Path is the same as where you would be running it.
The last argument is constructed of the variable where I choose to use the Netbios Computer Name as client name. Here you can if you like to replace that with the DNS FQDN or IP address or whatever fits your need. The second part of the argument is to specify your SMS Provider Host, make sure you fill inn your own Servername there.
At the end of the Presentation section, I have included an Image Reference to the task, with an Image ID. This ID is later specified in the Resources section.
<Presentation>
<ConsoleTasks>
<ConsoleTask ID=“RemoteManageAppTask“ Accessibility=“Public“ Enabled=“true“
Target=“CustomMicrosoft_Windows_Library!Microsoft.Windows.Computer“ RequireOutput=“false“>
<Assembly>EnterpriseManagement!SdkDataAccessAssembly</Assembly>
<Handler>Microsoft.EnterpriseManagement.UI.SdkDataAccess.CommandLineHandler</Handler>
<Parameters>
<Argument Name=“LoggingEnabled“>False</Argument>
<Argument Name=“Application“>C:\Program Files (x86)\Cireson\Remote Manage app\ConfigMgrClientTools.exe</Argument>
<Argument Name=“WorkingDirectory“>%windir%\system32</Argument>
<Argument Name=“”>$Context/Property[Type=’CustomMicrosoft_Windows_Library!Microsoft.Windows.Computer’]/NetbiosComputerName$ YOURSMSPROVIDERHOST</Argument>
</Parameters>
</ConsoleTask>
</ConsoleTasks>
<ImageReferences>
<ImageReference ElementID=“RemoteManageAppTask“ ImageID=“ImageRemoteManageApp“ />
</ImageReferences>
</Presentation>
Following this we have the Language Packs section, where the string values for the different translations are available. Feel free to add your own language packs and strings here.
<LanguagePacks>
<LanguagePack ID=“ENU“ IsDefault=“true“>
<DisplayStrings>
<DisplayString ElementID=“SkillSCSM.RemoteManageApp.ConsoleTask“>
<Name>SkillSCSM Remote Manage App Console Task</Name>
<Description>Management Pack for Remote Manage App Console Task</Description>
</DisplayString>
<DisplayString ElementID=“RemoteManageAppTask“>
<Name>Remote Manage Computer</Name>
</DisplayString>
</DisplayStrings>
</LanguagePack>
</LanguagePacks>
And at last in the Management Pack, we have the Resources section where I specify the Image ID and the FileName. I have included a small 24×24 PNG file, which are similar to the icon Cireson use for Remote Manage App.
<Resources>
<Image ID=“ImageRemoteManageApp“ FileName=“ConsoleTaskRemoteManageApp24x24.png“
Accessibility=“Public“ HasNullStream=“false“ Comment=“Remote Manage App Image“ />
</Resources>
</ManagementPack>
Importing the Management Pack
With the Management Pack now ready, the next step is to import it to Service Manager. There is one important thing though, since I chose to add an Image for my task, I will need to create a Management Pack Bundle file (.mpb) before I can import it. This can easily be done with some Service Manager PowerShell. These are the CmdLets I have been using:PowerGUI Script Editor
# Import Module for Service Manager PowerShell CmdLets
$SMDIR    = (Get-ItemProperty 'hklm:/software/microsoft/System Center/2010/Service Manager/Setup').InstallDirectory
Set-Location -Path $SMDIR
If (!(Get-Module –Name "System.Center.Service.Manager")) { Import-Module ".\Powershell\System.Center.Service.Manager.psd1" }

# Change to Directory for MP files
$MPDIR = "C:\_Source\ServiceMgrAuthoring"
Set-Location -Path $MPDIR

# Set variables for MPB, MP og Resource files
$mpbPath = "SkillSCSM.RemoteManageApp.ConsoleTask.mpb"
$mp1 = "SkillSCSM.RemoteManageApp.ConsoleTask.xml"
$r1 = "ConsoleTaskRemoteManageApp24x24.png"

# Opprette MP Bundle
New-SCSMManagementPackBundle -Name $mpbPath -ManagementPack $mp1 -Resource $r1 -Force
After the Management Pack Bundle has been created, import it to Service Manager under the Administration Pane and Management Packs Node.
Using the Remote Manage Console Task
Now that I have the Console Task imported to Service Manager, I can lookup any Windows Computer I would want to Remote Manage. For example by going to Configuration Items Pane, and choosing the View for All Windows Computers. When I select a Computer Name I can see my Remote Manage Computer Task in my right Console Task window.
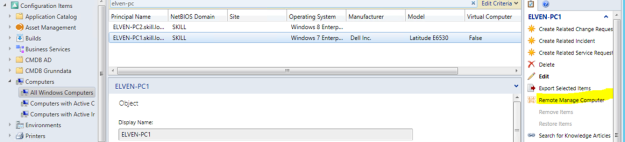
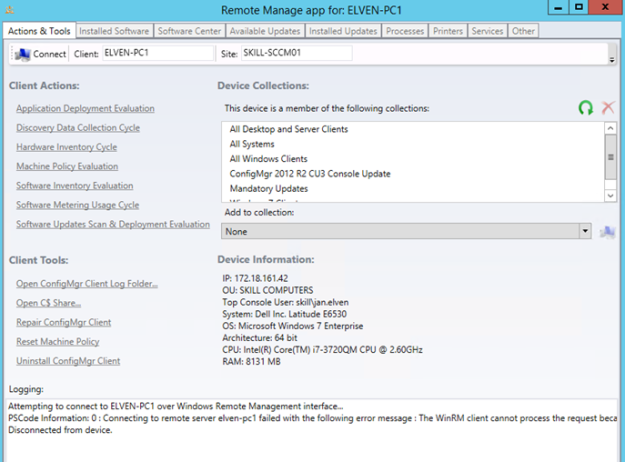
When clicking on the Task, the Remote Manage App is launched and are immediately starting to connect the selected Computer (if it has permission and FW permits that is):
Similarly, if I am working with an Incident Work Item, and have added this users Computer as related CI, I can also open the Computer Form and launch the Task from there.
Downloading the solution
As promised I have made this solution freely downloadable, please click the link below to start downloading a Zip file consisting of:
- SkillSCSM.RemoteManageApp.ConsoleTask.xml
- ConsoleTaskRemoteManageApp24x24.png
- CreateRemoteManageAppConsoleTaskMpbBundle.ps1
Download the Zip file from here: http://1drv.ms/1BIxW5G
Good luck and Happy Christmas!
