Tag Archives: OAuth2

Blog Series – Power’ing up your Home Office Lights: Part 10 – Subscribe to Graph and Teams Presence to automatically set Hue Lights based on my Teams Presence!

This blog post is part of the Blog Series: Power’ing up your Home Office Lights with Power Platform. See introduction post for links to the other articles in the series:
https://gotoguy.blog/2020/12/02/blog-series—powering-up-your-home-office-lights-using-power-platform—introduction/

In this last part of the blog series, we will build on the previous blog post where we could get the presence status from Teams to the Hue Power App. Now we will use Microsoft Graph and subscribe to change notifications for presence, so that both the Power App and my Hue Lights will automatically change status based on the presence.

In this blog post I will reuse the Custom Connector I created for managing Microsoft Graph Subscriptions in this previous blog post: Managing Microsoft Graph Change Notifications Subscriptions with Power Platform | GoToGuy Blog

To follow along, you will need at least to create the App Registration and the Custom Connector referred to in that blog post. You can also import the Custom Connector OpenAPI Swagger from this link: <MY GITHUB URL TO HERE>

Adding the Custom Connector to the PowerApp

In the Hue Power App, go to the View menu, and under Data click to “+ Add data source”. Add the MSGraph Subscription Connector as shown below. This way we can refer to this in the Hue Power App.

We are going to add the logic to creating the subscription based on this toggle button and the selected light source:

But before that we have somethings to prepare first. When creating a Graph Subscription, we will need to prepare a Webhook Url for where Graph will send its notifcations when the Teams presence changes. This will be handled in a Power Automate Flow, so lets create that first.

Creating the Flow for Graph Notifications and Hue Lights changes

Since I have built this all before, ref. https://gotoguy.blog/2020/10/24/managing-microsoft-graph-change-notifications-subscriptions-with-power-platform/, I will make a copy of the “Graph Notification – Presence Change” flow for this use case.

If you want to follow along, you will need to follow the instructions in that blog post first. After saving a copy, or if you created a new flow from blank using HTTP request webhook, you will need to copy the HTTP POST URL shown below, as that will be the “notification url” we will refer to later:

Next set some value that only you know for the secret client state:

The next part of the Flow are used to do a first-time validation of adding the change subscription, with Content-Type text/plain and request query containing a validation token. Microsoft Graph expects a response of status code 200 with the validation token back. If that is returned, Microsoft Graph will successfully create the subscription.

For subsequent requests, we must return a 202 Accepted response, and in the next step I parse the notification request body, so that we can look into what change we have been notified for:

Following the change notification, we can start looking into the change value. Firstly, I have added a verification of the secret client state I specified earlier, this is prevent misuse of the notification Url if that become known by others or used in the wrong context. After doing a simple test of the client state, where I do nothing if the client state don’t match, I can start building the logic behind the changes in presence status:

Inside the Switch Presence Status action, I will based on the availability status change, do a different case for each of the possible Teams Presence status values (see blog series post part 9 for explaining the different presence availability values):

Inside each of these cases I will define the light settings and colors, and after that call the Remote Hue API for setting the light. As you saw in part 8 of this blog series, in order to access the Hue API remotely I will need the following:

  • An Access Token to be included as a Bearer token in the Authorization Header
  • A username/whitelist identifier
  • The actual lightnumber to set the state for
  • A request body containing the light state, for example colors, brightness, on/off etc.

Remember, this Flow will be triggered from Microsoft Graph whenever there is a presence state change in Teams. So I need to be able to access/retreive the access token, username and for which lightnumber I created the subscription. This is how I will get it:

  • Access Token will be retreived via the Logic App I created in part 4 of the blog series.
  • Username/whitelist identifier will be retrieved via the SharePoint List i created in part 6, see below image.
  • However, I do need to store the lightnumber I will create the change notification for, and for this I will add a couple more columns in this list:

Customize the Configuration List for storing Subscription Details

I add the following two single-line-of-text columns to my List:

  • Subscribe Presence LightNumber. This will be the chosen Hue light I want to change when change notifications occur for Teams presence status.
  • Change Notification Subscription Id. This will be the Id I can refer back to when adding and removing the subscription when needed.

Customize the Flow for getting User Configuration and preparing Light States

Back to the Flow again, we need to add some actions. First, add a initialize variable action after the initialize SecretClientState action like here:

I set the type to Object and using the json function to create an empty json object. This variable will later be used for changing the light state.

Next, in the Flow after the “Parse Notification Body” action, add a “Get Items” action from SharePoint connector, and configure it to your site, list name and the following Filter Query:

My filter query:
first(body('Parse_Notification_Body')?['value'])?['subscriptionId']
will be used to find what username and light that have been set up for presence changes.

Next, lets set the variable for LigthState. Inside each of the Switch Cases, add the action Set Variable, and then set the variable to the chosen xy color code, as a json object like the following. This is for the color green:

Do the same for all of the other case, these are the values I have been using:

STATECOLORJSON VARIABLE
AwayYellowjson(‘{
“on”: true,
“bri”: 254,
“xy”: [ 0.517102, 0.474840 ],
“transitiontime”: 0
}’)
AvailableGreenjson(‘{
“on”: true,
“bri”: 254,
“xy”: [ 0.358189, 0.556853 ],
“transitiontime”: 0
}’)
AvailableIdleGreen (10% bright)json(‘{
“on”: true,
“bri”: 25,
“xy”: [ 0.358189, 0.556853 ],
“transitiontime”: 0
}’)
BusyRedjson(‘{
“on”: true,
“bri”: 254,
“xy”: [ 0.626564, 0.256591 ],
“transitiontime”: 0
}’)
BusyIdleRed (10% bright)json(‘{
“on”: true,
“bri”: 25,
“xy”: [ 0.626564, 0.256591 ],
“transitiontime”: 0
}’)
BeRightBackYellowjson(‘{
“on”: true,
“bri”: 254,
“xy”: [ 0.517102, 0.474840 ],
“transitiontime”: 0
}’)
DoNotDisturbRedjson(‘{
“on”: true,
“bri”: 254,
“xy”: [ 0.626564, 0.256591 ],
“transitiontime”: 0
}’)
OfflineGrey (10% bright)json(‘{
“on”: true,
“bri”: 25,
“xy”: [ 0.3146, 0.3303 ],
“transitiontime”: 0
}’)
PresenceUnknownWhitejson(‘{
“on”: true,
“bri”: 254,
“xy”: [ 0.3146, 0.3303 ],
“transitiontime”: 0
}’)

PS! The transitiontime is to get as close to realtime updates as possible. Add the colors similarly for rest of the states:

Get the Access Token and call Hue Remote API

Now we are ready to get the Access Token, and call the Hue Remote API with the selected light state.

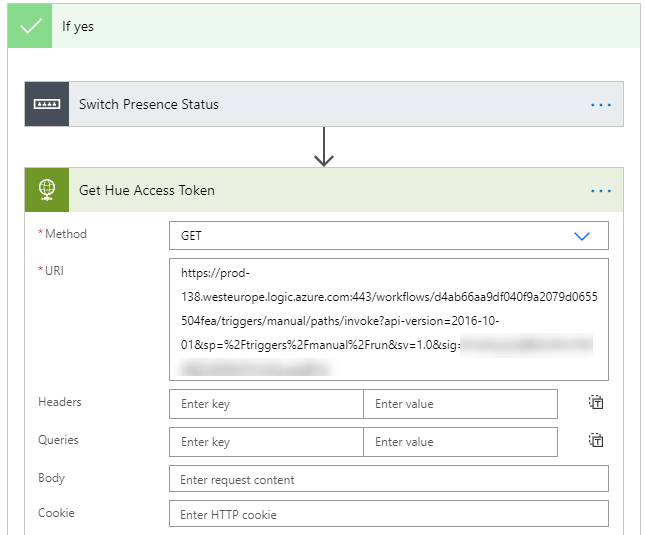
First, add a HTTP action below the Switch Presence Status action, calling the Logic App previously created in part 4 of the blog series:
Next, add another HTTP request after, and this will call the Hue Remote API to set the lights:

When constructing Hue API URI above, I retreive the whitelist identifier for username with the following expression:

first(body('Get_My_Hue_User_Subscription')?['Value'])?['WhitelistIdentifier']

And then which light number with this expression:

first(body('Get_My_Hue_User_Subscription')?['Value'])?['SubscribePresenceLightNumber']

That should be the completion of this Flow. Remember to turn it on if needed. We are now ready for the last step.

Adding the Flow for Creating the Graph Subscription

In the beginning of this blog post I referred to the toggle “Sync Hue Lights with Teams” in the Power App. Now that we have prepared the Flow handling the notification Url, we need to add a new Flow that would handle the creating, or deletion, of Graph Subscriptions. As this is a toggle control, setting it to “On” should create a Graph subscription for the selected lights, and setting it to “Off” should remove that subscription again.

Create a new instant Flow with PowerApps as trigger:

Next, add an action for initialize variable for getting the UserDisplayName:
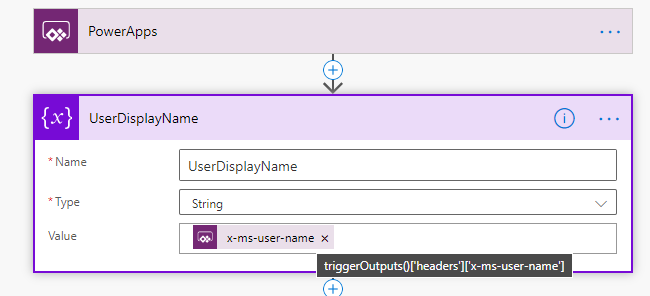
Use the following expression for getting the user display name:

triggerOutputs()['headers']['x-ms-user-name']

Next, add another initialize variable for getting the light number. After renaming the action, click on “Ask in PowerApps”:

Add another initialize variable, this time a boolean value, and for getting the value of the toggle sync control:

Next, we will retrieve our user config source from the SharePoint list again, this time filtered by the UserDisplayName variable:

We now need some logic to the next steps for the flow, lets start by the toogle button which will be either true or false:

If yes, that should mean that we either should create a new graph subscription, or update any exisiting ones.

Under Yes, add a new action. This action will call the Custom Connector I created in another blog post (https://gotoguy.blog/2020/10/24/managing-microsoft-graph-change-notifications-subscriptions-with-power-platform/). This Custom Connector should have the following actions:

Click on the Get Subscription action to add that. For the subscriptionId parameter I will refer to the first returned instance of any exisiting Graph Subscriptions I have in the SharePoint list returned earlier.

Here is the expression for your reference:

first(body('Get_My_Hue_User')?['Value'])?['ChangeNotificationSubscriptionId']

When running the Flow this action will either:

  • Return a 200 OK if the subscription is found, or if the SharePoint List has a blank value for ChangeNotificationSubscriptionId.
  • Return a 404 ResourceNotFound if the subscription is not found, this will happen if the subscription is expired. This is an error that will halt the Flow, so we need to handle it.

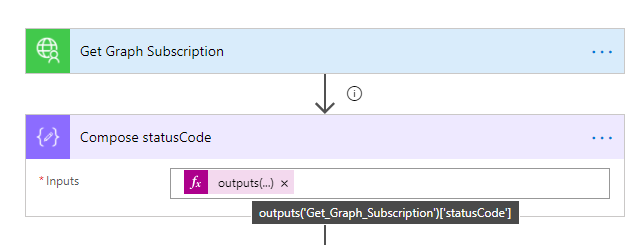
So lets start by getting the Status Code. I’ll do that by adding a compose action with the following expression:

outputs('Get_Graph_Subscription')['statusCode']
It’s also important to set that this action should run even if the Get Graph Subscription action fails:

Lets add another condition, where the outputs of the status code should be 200 (OK):

A status code of 200 will either indicate that either we found an existing Graph Subscription matching the configured subscription id from the SharePoint List, or that the list is blank and the Get Graph Subscription will return an empty array or any other Graph Subscriptions you might have. In the first case, we will just update the existing subscription, in the latter case we will create a new subscription. Lets start by adding another compose action:

Adding the Flow to the Hue Power App

Back in the Hue Power App, we can now link this Flow to the toggle control. With the sync toggle control selected, go to the Action menu, and then click on Power Automate. From there you should see the “Hue – Create Update Remove Graph Subscription” Flow, click to add it. On the OnChange event, add the Run parameters where the lightnumber value is read from the dropdown list and selected items lightnumber, and the toggle button value like this:

Blog Series – Power’ing up your Home Office Lights: Part 4 – Using Logic Apps to Get Access Token and Renew Access Token if needed

This blog post is part of the Blog Series: Power’ing up your Home Office Lights with Power Platform. See introduction post for links to the other articles in the series:
https://gotoguy.blog/2020/12/02/blog-series—powering-up-your-home-office-lights-using-power-platform—introduction/

After building the Logic App in part 3 that will authorize and get access token via Oauth2, we will now create another Logic App that will retrieve the Bearer Token from the Key Vault secret, and renew the Token using Refresh Token whenever it is expired.

Here is a short video where I walk through that Logic App scenario:

Create the Logic App and HTTP Trigger

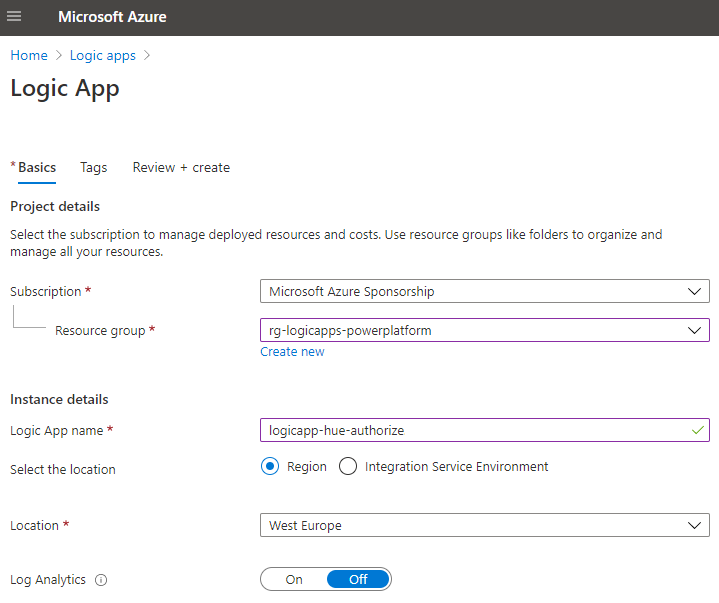
The first thing you need to do, is to create a new Logic App in your Azure subscription. Select the Resource Group you have contributor access to, and give the Logic App a suitable name, as per your naming guidelines. This is the Logic App I created in my environment:

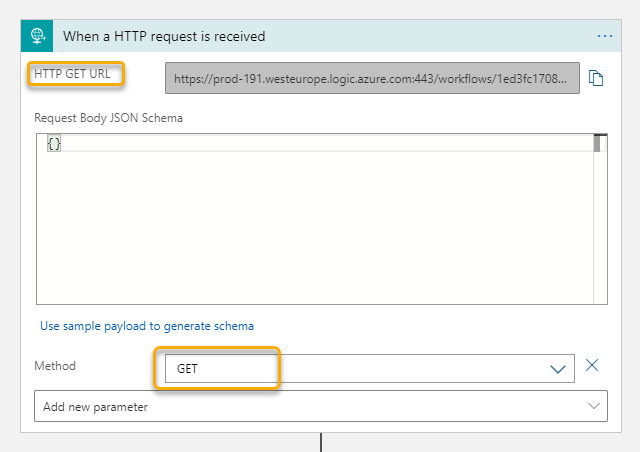
Add a HTTP request trigger for this Logic App as well:

In the Logic App Designer, make sure you hit Save on the Logic App before the next step. You will now be shown the URL, but first go down to the “Add new parameter” and select Method and GET for method. This way your Logic App will trigger on HTTP GET requests.

Adding Logic App Identity and Key Vault Access

As this Logic App also will request secrets from Key Vault, we will need to add a Managed Service Identity and add that to the Key Vault access policy.

Go to Identity settings, and set the System assigned Identity to On:

Next, go to your Key Vault and under Access policies, add the the newly created Logic App with the following Secret permissions (Get, Set, List):

Add Actions for Getting or Renewing Bearer Token

The actions in this Logic App will retrieve the Bearer Token from the Key Vault and return the Access Token as a Response. If Token is expired, it will be renewed using the Refresh token.

Start by adding a HTTP request, and get the Secret for the Bearer Token like the following:

Next, add a Compose action, getting the outputs from the Get KV Secret Bearer Token action. This secret was stored as a Json Object, but will be returned as a String, so I have used the following custom expression to convert to Json:

json(outputs('Get_KV_Secret_Bearer_Token')?['body/value'])

Next, add the following Compose actions for getting the timestamps in Ticks, and converting to Epoch. See the previous blog post for explanation of why this is necessary, but we need to do this to be able to calculate wether the secret is expired or not:

For your convenience, I’ve added the custom expressions as comments to the actions above, or you can copy it from below:

ticks(utcNow())

ticks('1970-01-01T00:00:00Z')

div(sub(outputs('GetNowTimeStampInTicks'), outputs('Get1970TimestampInTicks')), 10000000)

Next, add a Condition action. Here we will check if the expiry date time of the secret is greater than the current calculated timestamp in Epoch:

Use the following custom expression for getting the “exp” attribute from Key Vault Secret:

outputs('Get_KV_Secret_Bearer_Token')?['body/attributes/exp']

If the secret hasn’t expired, we will return the access token as a Response action as shown below. Note that I will only return the access_token, not the complete Bearer Token stored in the Key Vault secret, as this also contains the refresh_token. The reasoning behind this is that the calling clients (users from PowerApps/Automate) only need the access_token.

As you see from above, I’ve built a Json body and schema for the response, and the custom expression returing the value of access_token is outputs('Compose_Bearer_Token')?['access_token'].

On the False side of the Condition, meaning that the Secret is expired, we will have the logic that renews the Bearer Token. First add two HTTP actions, for getting the Client Id and Client Secret from Key Vault:

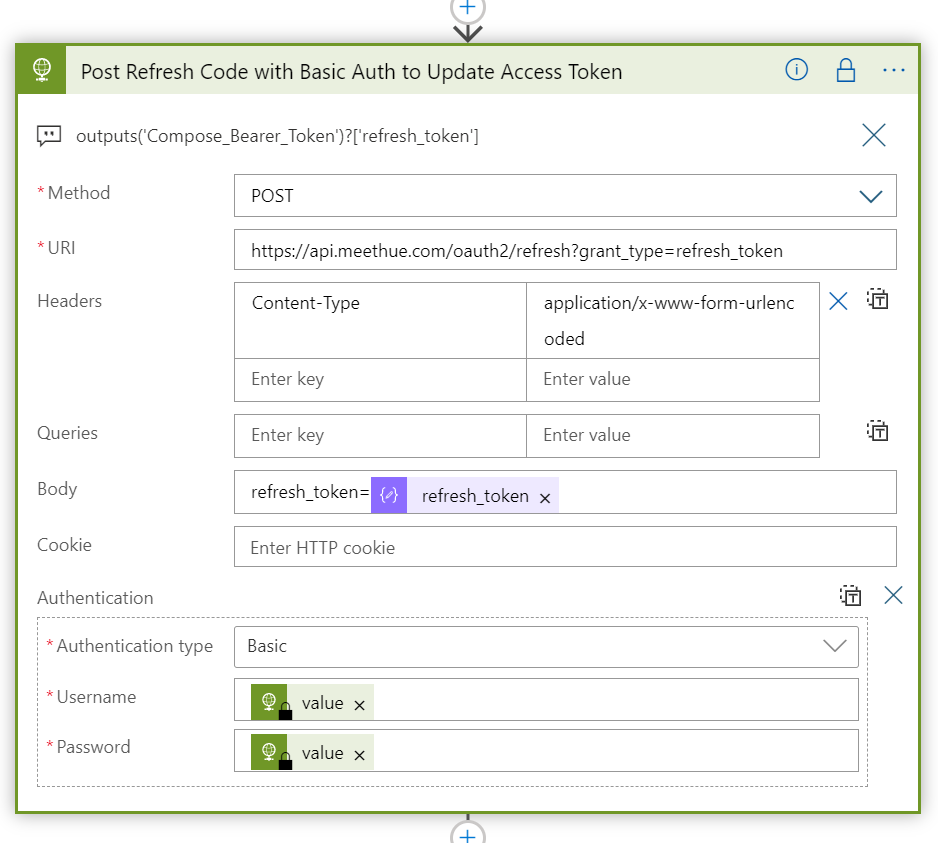
Next, add another HTTP action, using Method POST we will send a request to the oauth2/refresh endpoint at Hue Remote API:

The refresh_token need to be sent in a Request Body, using the expression: outputs('Compose_Bearer_Token')?['refresh_token']

Remember to set Content-Type: application/x-www-form-urlencoded. And Authentication Type should be set to Basic, using the retrieved Client Id and Secret from Key Vault as username and password.

Refreshing the Token correctly will return a new Bearer Token. We now need to get and convert the time stamps to Epoch integer, to calulate when the Access Token expires. This is the same process as we used in the Logic App “logicapp-hue-authorize” in part 3 of this blog series. Add 3 new Compose actions like below:

For your convenience, here are the custom expressions used for the above actions:

addSeconds(utcNow(), int(body('Post_Refresh_Code_with_Basic_Auth_to_Update_Access_Token')?['access_token_expires_in']))

ticks(outputs('AccessToken_Expires_Utc'))

div(sub(outputs('GetTimestampInTicks'), outputs('Get1970TimestampInTicks')), 10000000)

Next step is to update the Bearer Token Secret in Key Vault with the new Token we received now and the new expiry date. Add a HTTP action like below:

We can now return the access_token using the HTTP action like below:

The last action we need to add is a default response if any accest_token could not be returned. This is important as we are going to call this Logic App using Power Automate Flows, and we need to have a response for any scenario. Add this after the condition action like below:

For the Null Response action, change the Configure run after setting like the following:

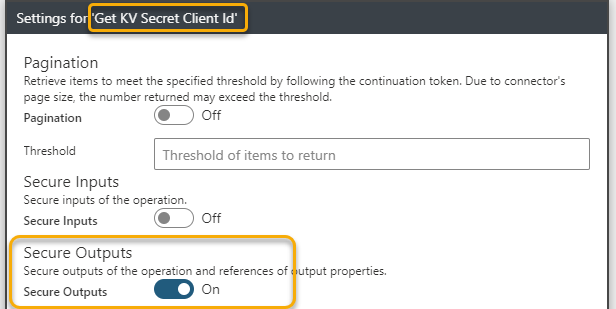
That should be it. Remember to secure outputs for any actions that return credential information:

Verify Logic App

We can now test the Logic App. You can use Postman, Invoke-RestMethod in PowerShell, or just run in the Browser your Logic App Http Trigger Url:

This should return your Access Token:

Looking at the Run History for the Logic App, we should see a sucessful run:

Summary and Next Steps

That should conclude this blog post. In this post, and the previous, we have built the logic behind authorizing and getting the Bearer Token for Philips Hue Remote API, as well as providing and refresh the Token when needed.

In the next part we are going to start building the solution in Power Automate. Thanks for reading, see you in the next part!

Blog Series – Power’ing up your Home Office Lights: Part 3 – Using Logic Apps to Authorize and Get Access Token using Oauth and Hue Remote API

This blog post is part of the Blog Series: Power’ing up your Home Office Lights with Power Platform. See introduction post for links to the other articles in the series:
https://gotoguy.blog/2020/12/02/blog-series—powering-up-your-home-office-lights-using-power-platform—introduction/

Now that we have registered the application for Hue Remote API, and stored the client Id and Secret in Azure Key Vault, we can start build the Logic App that will authorize and get access token via Oauth2.

Here is a short video where I introduce the concept:

Create the Logic App and HTTP Trigger

The first thing you need to do, is to create a new Logic App in your Azure subscription. Select the Resource Group you have contributor access to, and give the Logic App a suitable name, as per your naming guidelines:

Next, select HTTP request to be the trigger for the Logic App:

After that you will see the following in the Logic App designer:

Make sure you hit Save on the Logic App before the next step. You will now be shown the URL, but first go down to the “Add new parameter” and select Method and GET for method. This way your Logic App will trigger on HTTP GET requests, which is required for the Authorization Code flow with Hue:

Now copy this URL, and make sure that no one but you can access this URL, as this is a SAS (Shared Access Signature) URL that anyone in the world can send requests to if they know the URL. Save the Logic App.

Go back to your App Registration in the Hue Developers Portal, and change your temporary http://localhost/logicapp Callback URL to your Logic App URL:

This means that from now on, the Logic App will handle the authorization code for the Hue App. But first we will need to let the Logic App access the Key Vault.

Adding Logic App Identity and Key Vault Access

For the Logic App, under Settings and Identity, set system assigned managed identity to On:

After this setting is saved, you can later see the status and the object id of the service principal.

Next, under your Key Vault, click on Access Policies and Add Access Policy, from there selec the Get, Set and List Secret Management operations, and for principal search for and add the Logic App. This should look like this after adding:

With permissions in place, we are now ready to add actions to the Logic App.

Add Actions for getting Access Token

The first ting we need to do is to get the authorization code after the Hue App registration redirects back to the callback URL. This is returned as a querystring appended to the URL. Add a “Compose” action and use the following expression for getting the request queries:

(I’ve added the custom expression to comments for better visibility).

Then we need to get the Client Id and Secret from the Kay Vault. Add a HTTP action next, where we will use the Azure Rest API for getting the secret, and authenticate with the Managed Service Identity:

The URI above points to my Azure Key Vault URI, and the specified secret. The documentation for getting secrets can be seen here: Get Secret – Get Secret (Azure Key Vault) | Microsoft Docs.

The same applies to getting the Client Secret, add another HTTP action:

The get an access token from Hue Remote API we must either use Basic Authentication or Digest Authentication. Since I’m running this as a Logic App in a controlled environment and trusting the SSL encryption I will use Basic Authentication. In addition, I will secure the outputs from getting Client Id and Secret from Key Vault, so that other users cannot see those values from the run history:

This setting has been enabled for both the actions getting KV Secret Client Id and Client Secret:

For obtaining an Access Token with Basic Authentication the following header is required: Authorization: Basic <base64(clientid:clientsecret)>

This means that we need to base64 encode the clientid + “:” + clientsecret. This can be done using this lengthy expression, here in a “initialize variable” action:

This above action is just for reference though, as the HTTP action supports base64 encoding out of the box. So when posting to the token endpoint, the best way is to use the following:

(PS! Another way to do Basic Authentication in a HTTP action would be to add the Authorization header manually in the Action above with: “Basic <your calculated base64>” as value, and leaving the Authentication type to None.)

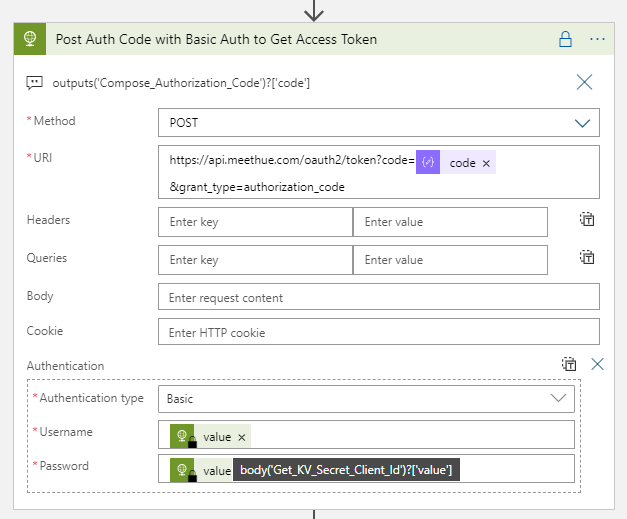
From the above settings, in the URI add the authorization code we got from the request queries earlier, using the expression:

outputs('Compose_Authorization_Code')?['code']

When selecting Authentication type to Basic, the username (client id) and password (secret) will automatically be base64 encoded. The values for username and password are the valies from the Get KV Secret Client actions earlier, in the following format:

body('Get_KV_Secret_Client_Id')?['value']

And this action will return the Bearer Token from Hue Remote API if everything is correctly inputted.

I also make sure that the output of this action is secured from viewing:

With the Bearer Token now retrieved, the next actions is to calculate the expiry time and write the Token back to the Key Vault secret.

Add Actions for getting expiry time and write Token to Key Vault

The Bearer Token returned by Hue Remote API will be in the format of the following masked response:

The _expires_in values are in seconds, so that means that the Access Token is valid for 7 days, and the Refresh Token about 112 days. It would then make sense to only refresh the token when needed.

Lets start by calculating when the access_token expires, with the following expression in a Compose action:

addSeconds(utcNow(), int(body('Post_Auth_Code_with_Basic_Auth_to_Get_Access_Token')?['access_token_expires_in']))

The above expression takes the current time and add the number of seconds for when the access token expires.

This will return a new datetime 7 days ahead. This value will be used to set the expiry time on the Key Vault secret for Bearer Token. By setting an expiry time I can later calculate if I need to refresh the Access Token or not.

But it’s not that easy.. The calculated time above will need to be converted to Epoch (32-bit “Unix”) integer format to be able to set the Key Vault secret “exp” attribute. This isn’t so clear when seeing the API docs, Set Secret – Set Secret (Azure Key Vault) | Microsoft Docs, so took me a little trial and error. And I found great help in this blog article: https://devkimchi.com/2018/11/04/converting-tick-or-epoch-to-timestamp-in-logic-app/.

Based on this I need to convert the timestamp to Ticks (64-bit). Ticks is a built in function in Logic Apps, but to be able to convert to Epoch I will need to calculate the difference in ticks between when the Access Token expire, and the first value of Epoch which is 1970-01-01T00:00:00Z. This is well explained in the above reference blog, but here are my resulting actions.

After calculating the Access Token expiry, I add a compose action which converts this to Ticks:

Using the following expression: ticks(outputs('AccessToken_Expires_Utc'))

Then I need to find the 1970-01-01T00:00:00Z value in Ticks:

Using this expression: ticks('1970-01-01T00:00:00Z')

Then we can convert this to Epoch by subtracting the two Ticks values calculated above, and divide by 1 million:

This is the expression used above: div(sub(outputs('GetTimestampInTicks'), outputs('Get1970TimestampInTicks')), 10000000)

We now have the correct format for the “exp” attribute to update the Key Vault secret. Add a new HTTP action and configure like below:

Remember to secure the Output for this action also:

Finally we can finish this Logic App by adding a Response action and do a quick test to verify that everything works as expected.

Adding Response action and verify Logic App

Add a Response action with status code 200 and a body like below:

Tips: It can be difficult to troubleshoot the Logic App when securing outputs, so you might hold back in that when testing. It will show your secrets in the run history though, so it might be best to do this in a test enviroment depending on your needs.

Now we can test. Construct the URL for authorizing the App again, like we did in Part 1:

https://api.meethue.com/oauth2/auth?clientid=&response_type=code&state=elvenanystring&appid=elven_demo_hue_app&deviceid=elven_demo&devicename=Elven Demo

Paste it in the Browser, and after granting access to the App in Hue Developer portal:

You should be redirected to the Logic App:

.. and with a respons success!

Looking at the Run history, we can verify the steps were successful:

You can also look into the inputs and outputs of the actions, except the actions where we secured the output:

We can also verify that the Key Vault secret storing the Bearer Token has been updated and have an Expiration Date one week forward:

Summary and next steps

That concludes this blog post. Thanks for reading this far, in the next part we will build the Logic App that will respond back the Access Token and renew using Refresh Token if needed.