A Blog about Enterprise Mobility + Security, Azure AD, Datacenter Management, Service Delivery, Automation, Monitoring, Cloud OS, Azure and anything worthwhile sharing with the Cloud and Datacenter community.
I’m looking forward to speak at the 3rd Edition of the Nordic Virtual Summit, which will happen online at 16th -17th March 2022. Nordic Virtual Summit is a 100% free virtual Microsoft IT Pro Community Event, organized by the joint scandinavian communities behind #MMUGSE #SCUGDK #SCUGFI #MMUGNO and the #MSEndpointMgr crew!
24 sessions, 1 keynote and 2 sponsor sessions will be delivered by expert speakers including MVPs and Microsoft Program Managers over the 2 days, across two tracks: Microsoft 365 Endpoint Management and Microsoft 365 Security and Compliance.
My session will be about Passwordless Azure Authentication using Managed Identities in Azure Active Directory. While users are more and more using passwordless as authentication method, what about your applications, workload identities and serverless solutions in Azure? Azure Services also need to authenticate to other resources and APIs, and this is where Managed Identities is the way to go. In this session I will show the capabilities and usage scenarios for using Managed Identities to get rid of application credentials once and for all!
This blog post will accompany my contribution for Festive Tech Calendar 2021, where I on the 22nd of December will present a live stream & interactive session where I in just a school hour will show you how you can create your own API in Azure and protect it with Azure AD using Oauth2. API’s can be anything you want, but let’s keep it festive!
This is some of the content I will cover in this blog post:
What is an API anyway?
What can you use in Azure to create APIs?
Get your tools out!
Why do we want to secure it?
How can we use Azure AD to secure it?
What is an API?
API, Application Programming Interface, is a middle layer of logic between the consumer (represented by a client), and the data and/or services that the client needs to access. An relevant example is a web application that reads and writes data to a database. To be able to read and write data in that database, you must provide a secure and consistent way to do that, and that is where the API’s come into play. By calling the API the Web Application don’t have to manage the logic and security of operating against the database, the API will handle all of that by exposing methods the client can send requests to and receive responses from.
There are different ways of how you can communicate with an API, or if it will be available on a public network or private, but it is common today that APIs are web based and openly accessible. In general, these APIs should adhere to:
Platform independence. Any clients should be able to call it, and that means using standard protocols.
Service evolution. The Web API should be able to evolve and add functionality without breaking the clients.
The RESTful API
REST, Representational State Transfer, is an architectural approach to designing web services. Most common REST API implementations use HTTP as the application protocol, making it easier to achieve the goal of platform independence.
Some of the most important guidelines for designing REST APIs for HTTP are (using Microsoft Graph API as examples):
In this blog post I will build on these design principles.
Using Azure to create your own APIs
Using Azure Resources you have a range of different solutions from where you can create your own APIs. You can develop and publish APIs using App Services, you can use Azure API Management, or you can start a little more simpler with Azure Serverless technologies like Azure Functions or Logic Apps.
In this blog post I will use Azure Functions for my demo scenario, creating a Serverless API that will receive and respond to HTTP requests. Azure Functions supports all the architectural guidelines from above, including connections to backend services like a database.
Demo Scenario
I will build the following scenario for the solution I want to demo. The theme will be Festive and build a solution for registering and managing Christmas Whishes!
A CosmosDB Account and Database, which will store whishes as document items.
An Azure Function App, with Functions that will serve as the API, and will:
Implement methods to GET whishes, create new whishes (POST), change existing (PUT) or DELETE whishes.
Provide a secure connection to the Cosmos DB account to update items accordingly.
An Azure App Service, running a web site as frontend, from where users will get, create, update and delete whishes, and this will use the Azure Functions API.
The following simple diagram shows an architectural overview over this solution as described above:
Later in this blog post I will show how we can add Azure AD Authentication and Authorization to this solution, and securing the API.
Get your tools ready!
I will use Visual Studio Code and Azure Functions Core Tools to create, work with and publish the serverless API, in addition to creating a frontend web based on Node.js.
If you want to follow along and recreate this scenario in your environment, make sure you have the following installed:
In addition, I will build the API logic using Azure Functions PowerShell so you need to have PowerShell Core installed as well.
In addition to the above tools, you will also need access to an Azure AD tenant where you can create App Registrations for Azure AD Authentication, as well as an Azure Subscription where you can create the required resources.
If you don’t have access to an Azure Subscription with at least Contributor access for a Resource Group, you can develop and run parts of the solution locally, but then you would not be able to fully complete all parts of the authentication and authorization requirements.
After making sure you have those components installed, configured or updated, you can proceed to the next steps.
You can download all the files using a ZIP file, or you can fork and/or clone the repository if you have your own GitHub account.
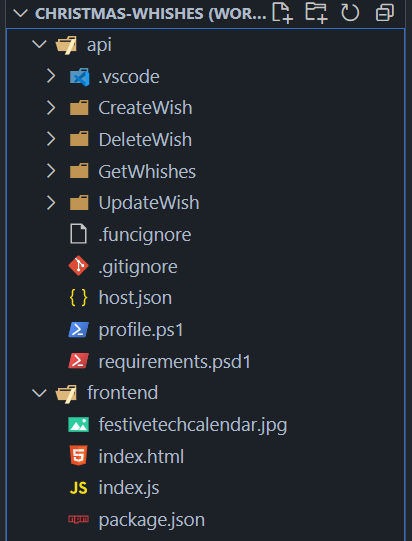
After the repository has been downloaded, open the workspace file “christmas-whishes.code-workspace” in VS Code, you should now see two folders, one for api and one for frontend.
The api folder contains the Functions Project, and the Functions I have pre-created and that we will build on later. The frontend folder contains the node.js website with the html file and a javascript file for connecting to the api logic.
Before we proceed with configuring the local project, we need to create the dependant Azure Resources like the Cosmos DB and Functions App.
Set up Azure Resources
In my repository you downloaded / cloned above, you will find instructions and some Az PowerShell samples for creating the required resources, this will include:
Create a Resource Group “rg-festivetechcalendar” in your chosen region (you can change the rg name to something other of your choice).
Create a Azure Function App of <yourid>-fa-festivetechcalendar-api in the above resource group. Choose your region and a consumption plan.
Create a Cosmos DB account in your region and in the above resource group with the name <-yourid>-festivetechcalendar-christmaswhishes, opt in for free tier.
In the Cosmos DB account, create a new database called “festivetechcalendar” and a container named “whishes” using /id as partition key.
In the above resource group, create an App Service for the frontend web site, with the name <yourid>-festivetechcalendar-christmaswhishes, using Node and Node 14 LTS as runtime and Linux as operationg system. If a Free plan is available in your region, you can use that, but else use a low cost dev/test plan.
PS! You can use other names for the above resources, but then you need to make sure that you change this in the repository code you will be working from.
In addition to the above resources, some supporting services like App Plans, Applications Insights and Storage Accounts are created as part of the process.
Connect to the Azure Account in VS Code
Using the Azure Accont extension i VS Code, make sure that you are signed in to the correct subscription, you should be able to see the above Function App for example, like in my environment:
PS! If you, like I have access to many subscriptions in different tenants, it might be worthwhile to add this azure.tenant setting to the VS Code workspace file:
Next we will make some changes to the Azure Functions API, so that we can successfully connect to the Cosmos DB and make the API RESTful following the architectural guidelines.
First we need to create/update a local.settings.json file in the api folder, where you need the following settings, replace the Festive_CosmosDB connection string with your own connection string from your Azure Resource:
Open a new Terminal Window in VS Code (if not already open) and choose the api folder. Then run the following command func start. This will start up the Functions Core Tools runtime and enable to send requests to the API locally. Typically when you create and run functions locally the will show something like the following:
You will see from above that I have created from before 4 functions:
CreateWhish: Function for creating new Christmas Whishes
DeleteWhish: Function for Deleting Whishes
GetWhishes: Function for Getting Whishes
UpdateWhish: Function for Updating Whishes
All of these functions are using an HTTP trigger for request and response. In addition I have used a CosmosInput trigger for getting existing items from the DB (via the connection string defined in local.settings.json) and CosmosOutput trigger for sending new or updated items back to the DB.
Deleting items from Cosmos DB is a little bit more trickier though, as the CosmosOutput trigger does not support deletes. So in that case I chose to do the delete via Cosmos REST API, using Managed Identity for the Function App, or the logged on user locally. More on that later.
First, lets make the APIs RESTful. As I mentioned earlier, the API should make use of resources. And while I have methods for CreateWhish, DeleteWhish and so on, I want to change this so that I will focus on the resource whish, and use the correct verbs for the operations I want. I will change the API to the following:
GET /api/whish (getting all whishes)
POST /api/whish (creating a new whish)
DELETE /api/whish (delete a whish)
PUT /api/whish (change a whish)
That should be much better! I should also specify and existing id for DELETE or PUT, and make it possible to GET a specific whish also by id. So let’s define that as well:
GET /api/whish/{id?}
POST /api/whish
DELETE /api/whish/{id}
PUT /api/whish/{id}
The question mark after GET /api/whish/{id?} means that it is optional (for getting all whishes) or a specific whish by id. DELETE and PUT should always have an id in the request.
Let’s make this changes in the Functions. Inside every function there is a function.json file, which defines all the input and output bindings. For doing the above changes, we will focus specifically on the HttpTrigger In binding. Two changes must be made, one is to change the method (the http verb) and the other is to add a “route” setting. So for example for GetWhishes, change the first binding to:
Now, run func start again in the terminal windows, and the Functions should now show the following:
The API is now much more RESTful, each method is focused on the resource whish, and using the correct http verbs for the operations.
The case of the Delete of Item in Cosmos DB
As mentioned earlier the CosmosOutput binding handles updates and creation of new items in the Cosmos DB, but not deleting. Barbara Forbes has a nice and more detailed walkthrough of how to use the Cosmos DB input and output bindings in this blog post, but for deletes I did it another way. Let’s look into that.
The code in run.ps1 for DeleteWhish function starts with the following, getting the input bindings and retrieving the whish by id from the CosmosInput:
using namespace System.Net

# Input bindings are passed in via param block.
param($Request, $TriggerMetadata, $CosmosInput)

# Write to the Azure Functions log stream.
Write-Host "PowerShell HTTP trigger function processed a request to delete a whish."

# Check id and get item to delete
If ($Request.Params.id) {
    $whish = $CosmosInput | Where-Object { $_.id -eq $Request.Params.id}
}
I now have the item I want to delete. Next I build the document URI for the item I want to delete using the Cosmos DB REST API:
# Build the Document Uri for Cosmos DB REST API
$cosmosConnection = $env:Festive_CosmosDB -replace ';',"`r`n" | ConvertFrom-StringData
$documentUri = $cosmosConnection.AccountEndpoint + "dbs/" + "festivetechcalendar" + "/colls/" + "whishes" + "/docs/" + $whish.id
Note that I have hardcoded my Database (festivetechcalendar) and container (whishes) above, you might want to change that in your environment if different. Next I check if the Azure Function is running in the Function App in Azure, or locally inside my VS Code. If running in the Function App I will use the Managed Identity to connect to the resource https://cosmos.azure.com and get an access token. If I run locally in VS Code I’ll just get an acces token using Get-AzAccessToken, providing that I have connected to my tenant and subscription earlier using Login-AzAccount.
NB! This operation requires RBAC Data Operations role assigment, more on that later!
# Check if running with MSI (in Azure) or Interactive User (local VS Code)
If ($env:MSI_SECRET) {

    # Get Managed Service Identity from Function App Environment Settings
    $msiEndpoint = $env:MSI_ENDPOINT
    $msiSecret = $env:MSI_SECRET

    # Specify URI and Token AuthN Request Parameters
    $apiVersion = "2017-09-01"
    $resourceUri = "https://cosmos.azure.com"
    $tokenAuthUri = $msiEndpoint + "?resource=$resourceUri&api-version=$apiVersion"

    # Authenticate with MSI and get Token
    $tokenResponse = Invoke-RestMethod -Method Get -Headers @{"Secret"="$msiSecret"} -Uri $tokenAuthUri
    $bearerToken = $tokenResponse.access_token
    Write-Host "Successfully retrieved Access Token Cosmos Document DB API using MSI."

} else {
    # Get Access Token for the interactively logged on user in local VS Code
    $accessToken = Get-AzAccessToken -TenantId elven.onmicrosoft.com -ResourceUrl "https://cosmos.azure.com"
    $bearerToken = $accessToken.Token
}
Then, when I got the Access Token for the Cosmos DB REST API, I can proceed to delete the document item. There are some special requirements for the headers to include the Authorization header, version and partition key as shown below. Then I can Invoke-RestMethod with Delete operation on the Document Uri and with the right Headers. Note also that PowerShell Core wasn’t to happy with this header format, so I had to use the SkipHeaderValidation:
# Prepare the API request to delete the document item
$partitionKey = $whish.id
$headers = @{
    'Authorization' = 'type=aad&ver=1.0&sig='+$bearerToken
    'x-ms-version' = '2018-12-31'
    'x-ms-documentdb-partitionkey' = '["'+$partitionKey+'"]'
}

Invoke-RestMethod -Method Delete -Uri $documentUri -Headers $headers -SkipHeaderValidation

$body = "Whish with Id " + $whish.id + " deleted successfully."

# Associate values to output bindings by calling 'Push-OutputBinding'.
Push-OutputBinding -Name Response -Value ([HttpResponseContext]@{
    StatusCode = [HttpStatusCode]::OK
    Body = $body
})
Now, for the user getting the access token, either interactively or the Managed Identity, you will need to assign roles for Data Operations. This is all documented here: https://docs.microsoft.com/en-us/azure/cosmos-db/how-to-setup-rbac, but the following commands should get you started:
In my commands from above I have assigned both my own user (running locally in VS Code) and the Managed Identity for the Function App to the Contributor Role.
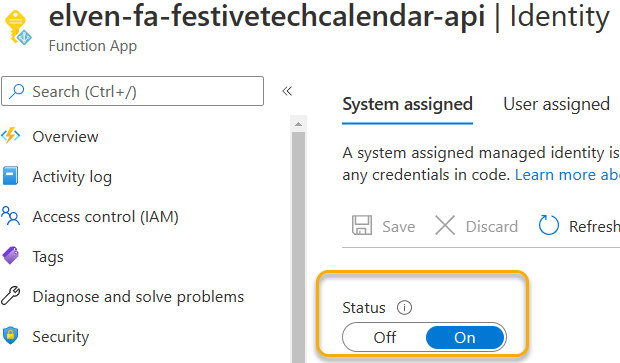
PS! Don’t forget to enable Managed Identity for the Function App:
That means that the API is now finished in this first phase, and we can deploy them to the Function App.
After you deploy the functions to the Function App, also make sure to update the app settings.
I won’t go into details for testing this now, I often use Postman for these testing scenarios, both locally and remotely to the Function App, but if you want to see this from a recording of my session at Festive Tech Calendar, you can find that here: https://www.youtube.com/watch?v=5zLbksF0Ejg.
The Web Frontend
A few words about the web frontend also, as I mentioned earlier this is built on Node.js as a Single Page Application (SPA). This means the entire application exists in the browser, there is no backend for the web. All the more reasons for separating the logic and security connections in the API.
The web frontend basically consists of an html page and a javascript file. The javascript file has some methods for using the api, as the screenshot below shows:
There is a API constant that points to the Azure Functions API urls that we saw when running func start. The getWhishes, updateWhish methods and so on use this API and the resource whish, together with the http verbs to send requests and receive responses from the API.
I’m not really a web developer myself, so I have depended on other Microsoft Identity samples and good help from collegueas and community, but I have been able to change the code such that the web frontend you downloaded from the repository earlier now should work with the API locally.
So while you still are running func start from before, open a new terminal window, choosing frontend as the folder, and run:
npm start
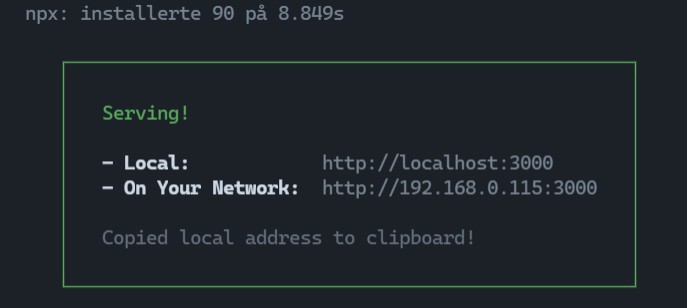
This will build and start the web frontend locally:
You can now go to your browser and use http://localhost:3000, which will show you the start page that will look something like this:
You can now Create a Whish, see existing as they are created, change or delete them, it should work provided you have followed the steps as layed out above.
With the API now working between the frontend and the backend Cosmos DB, we can proceed to secure the API!
Why secure the API?
The API is important to protect, as it contains connection strings in app settings and a managed idenity that can manipulate the Cosmos DB. While the default mode for functions require a knowledge of a function code query parameter, this will still be exposed in the web frontend code, any user can open this source code and get those URI’s and run them from other places.
Another reason is the increasing focus on security and zero trust, where every user and access should be verified and never trusted. For example, runnning requests from another unfamiliar location against the API, and as well the assume breach mindset should make sure that every connection is authenticated and audited.
Authentication is one thing, but also authorization is an important part of API protection. Take this simple, but relevant case of Christmas Whishes: Should really everyone be able to see both your own but also everybody elses whishes? Should you be able to write and delete other users whishes?
For this next scenario we will implement authentication and authorization for this Azure Functions API, using Azure AD and OAuth2.
How to use Azure AD to protect the API
Azure Active Directory can be the Identity Provider that can require and successfully authenticate users. Azure AD can also expose API scopes (delegated permissions) and roles (application permissions) as needed so that you can use OAuth2 for authorization decicions as well.
We can require authentication on the API, and provide a way for the frontend web to sign users in, consent to permissions that the scopes have defined, and securely call the API. In that way, there is no way an anonymous user can send requests to the API, they have to be authenticated.
We will use Azure AD App Registrations for setting this up. Let’s get started.
Create the API App Registration
We will first create a App Registration for defining the API. In the Azure AD Portal, select new App Registration, give it a name like FestiveTechCalendar API, and then select the multitenant setting of accounts in any organizational directory and personal Microsoft accounts, and the click create.
(NB! You can use single-tenant if you want to, then only users in your tenant will be able to authenticate to the API).
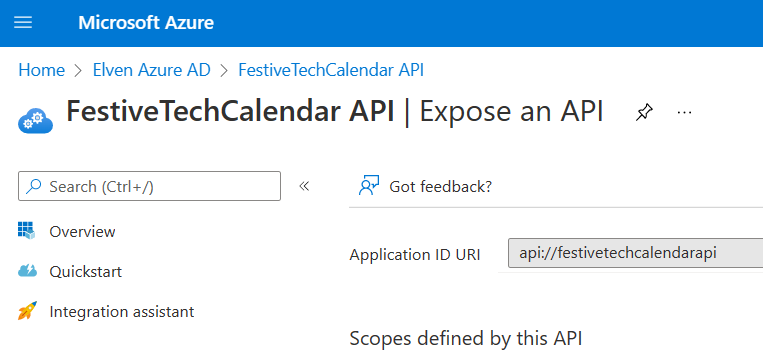
Next, go to Expose an API, and first set the Application ID URI to something like the following:
Then, we will add the following scopes to be defined by the API:
access_as_user, to let users sign in and access the api as themselves
Whish.ReadWrite, to let users be able to create, edit, delete or get their own whishes only.
Whish.ReadWrite.All, with admin consent only, to let privileged users be able to see all users’ whishes (for example Santa Claus should have this privilege 🎅🏻)
This should look something like this after:
This completes this App Registration for now. We will proceed by creating another App Registration, to be used from the clients.
Create the Frontend App Registration
Create a new App Registration, with the name for example FestiveTechCalendar Frontend, and with the same multitenant + Microsoft personal account setting as the API app. Click create.
Next, go to API permissions, and click Add a permission, from which you can select own APIs and find the FestiveTechCalendar API app and add our three custom scopes, as shown below:
PS! Do NOT click to grant admin consent for your organization: (I prefer that users consent themselves, providing that they are allowed to do so that is)
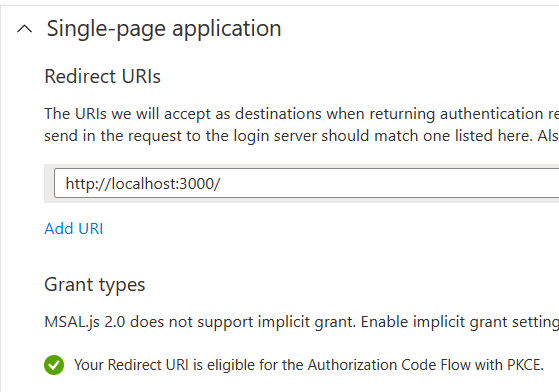
Next, under Authentication, click to Add a platform, select Single Page Application (SPA) and add http://localhost:3000 as redirect uri:
Adding localhost:3000 will make sure that when I run the web frontend locally, I can sign in from there.
Also, add the checkboxes for Access tokens and ID tokens, as we will need this in our scenario with the API:
Go back to Overview, and note/copy the Application (Client) ID, you will need that later.
Azure AD Authentication to the API with Postman
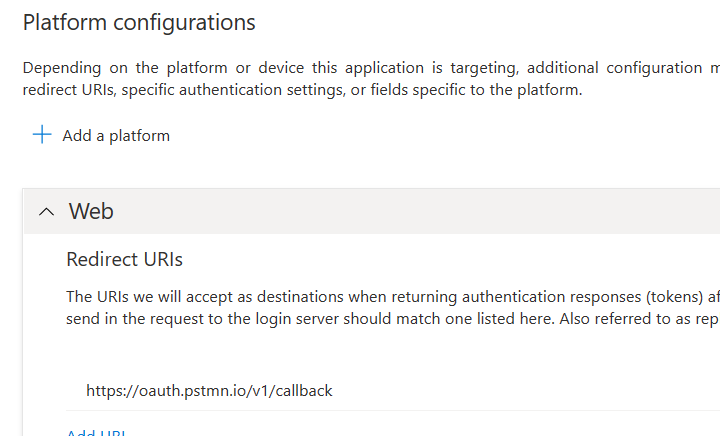
If you want to be able to test secured requests from Postman client, you can also add the following Web platform in addition to the Single Page Application platform:
For authenticating with Postman you also need to setup a Client Secret:
Take a note/copy of that Secret also, it will be needed for Postman testing later.
For now, this App Registration for the frontend client is finished.
Require Authentication on Azure Function App
Wiht Azure AD App Registrations set up, we can now proceed to the Function App and require Azure AD Authentication.
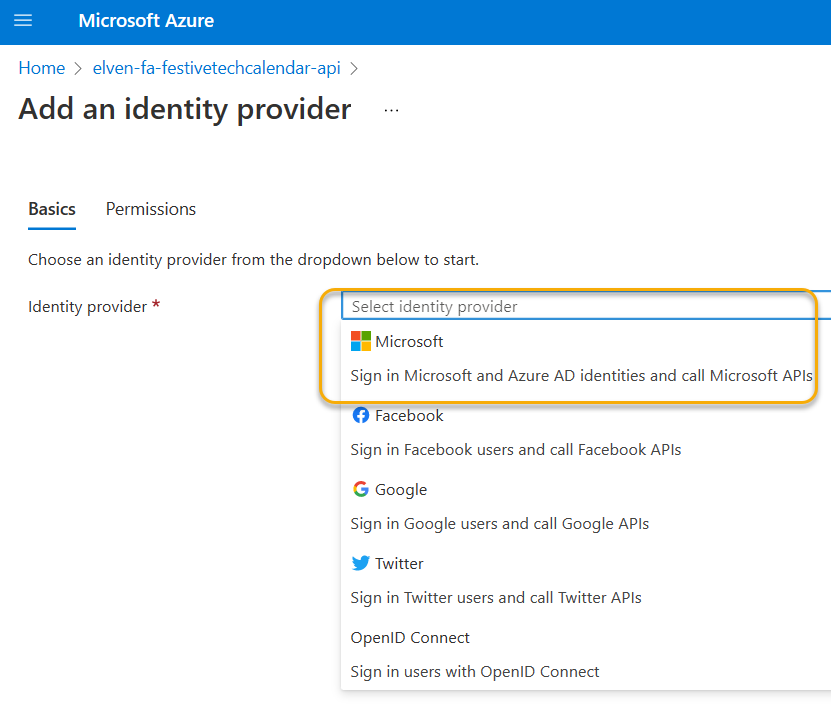
Under Authentication, click to Add an identity provider:
Select Microsoft, then pick and existing app registration and find the FestiveTechCalendar Fronted app. Change the Issuer URL to use the common endpoint, as we have configured this to support both multitenant and microsoft accounts:
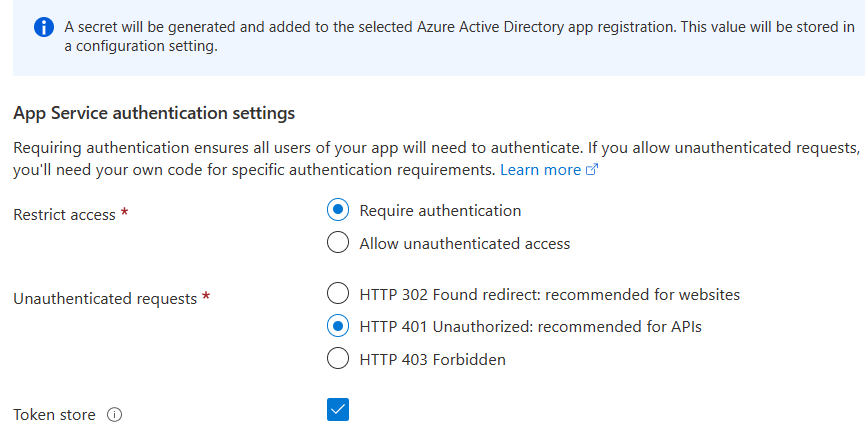
Set restric access to Require authentication, and for unauthenticated requests to the API to get a HTTP 401 Unauthorized:
Click Add to finish adding and configuring the Identity provider, the Function App and the Functions API are now protected!
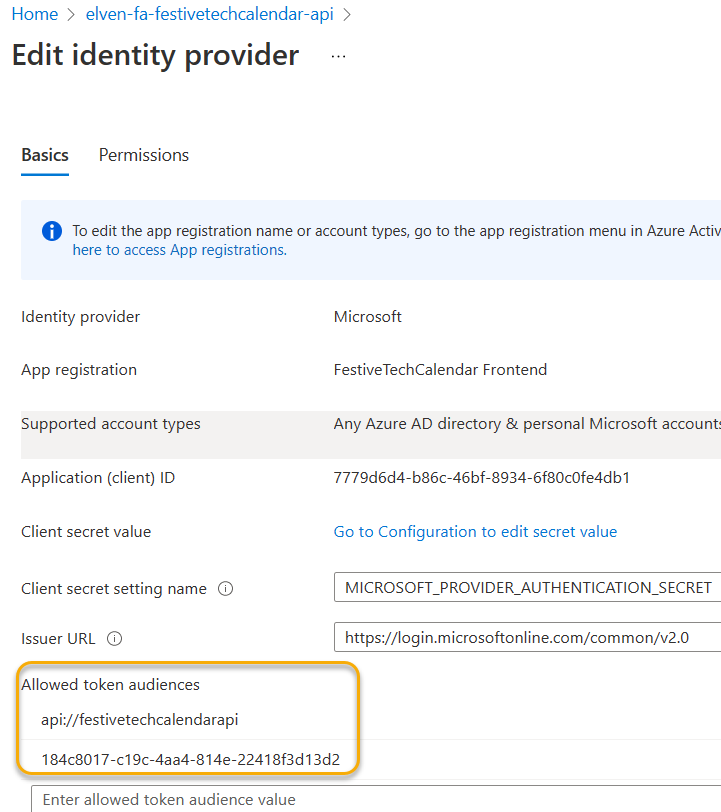
The last step we need to do, is to configure the allowed audiences for the function app authentication, we need to add the following two audiences, and this is for the API App Registration. For v1.0 token formats, use api://festivetechcalendarapi, for v2.0 token formats (which should be default today), use the App ID for the API App Registration:
Now that the Function App in itself is protected with Azure AD Authentication, we can remove the Function Key authentication. For each of the functions (GetWhishes, UpdateWhish, etc), go into the function.json file, and change the authLevel from function to anonymous, like below:
After the functions have been changed, deploy from VS Code to the Function App again.
Testing Authentication with Postman
We can now try to do some testing against the API from Postman. This isn’t something you have to do, but it’s nice to use for some evaluating and testing before we proceed to the web frontend.
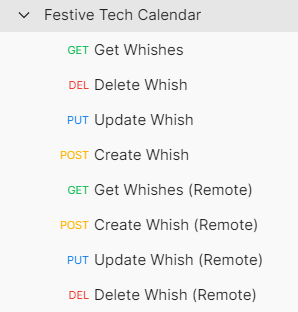
I have created myself a collection of requests for Festive Tech Calendar in Postman:
For example, if I try to Get Whishes Remote, without authentication, I will now recieve a 401 Unauthorized, and the message that I do not have permission:
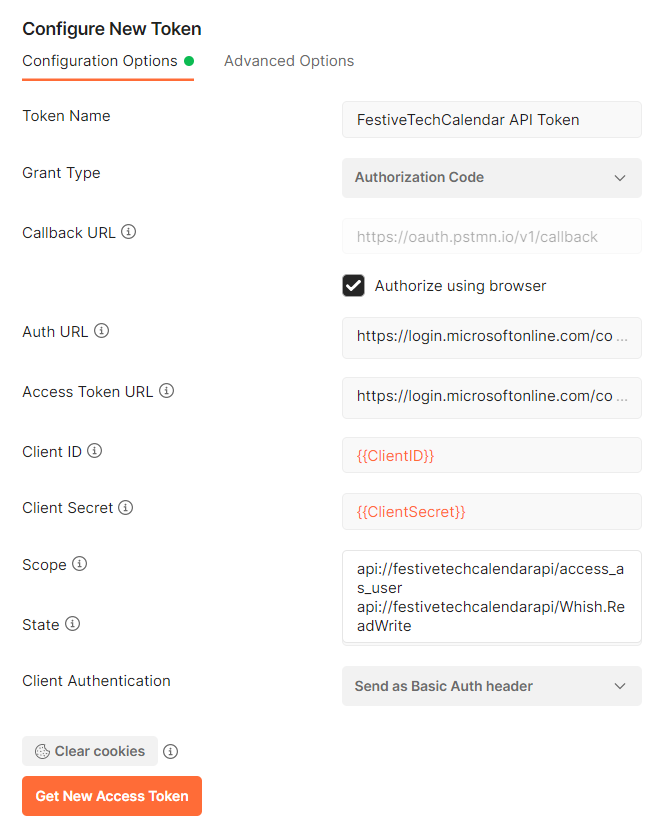
In Postman and on the Collection settings, you can add Authorization. Here I have added OAuth 2.0, and specified a Token Name and using Authorization Code grant flow. I will use the browser to authenticate, and note that the callback url should be the same as you added to the Frontend App registration earlier:
Important! You need to specify the scopes for which API you will get an access token for. In this case I use the api://festivetechcalendarapi/access_as_user and api://festivetechcalendarapi/Whish.ReadWrite:
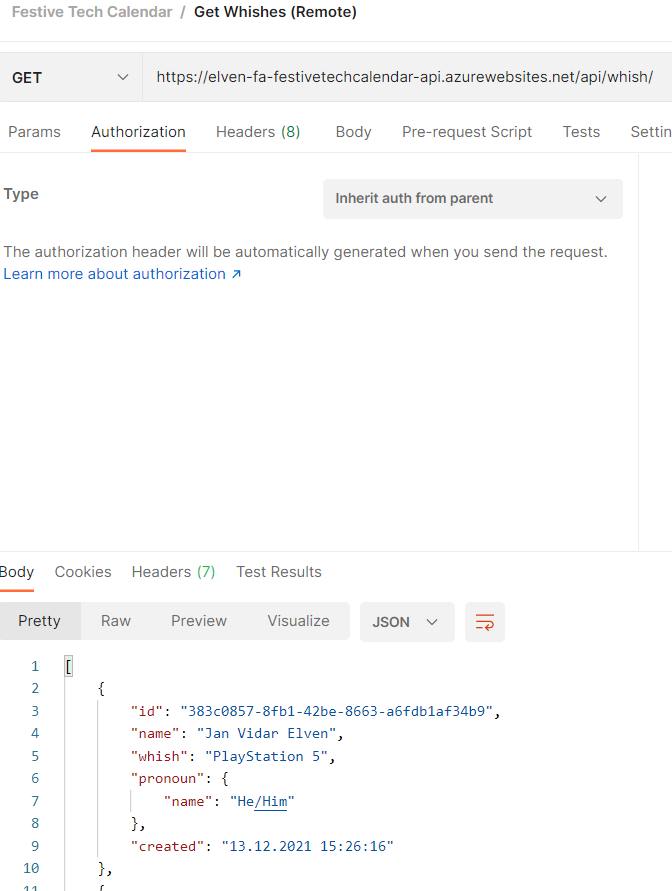
With all that set up, you can now click to Get New Access Token. It will launch a browser session (if you are running multiple profiles, make sure it opens in your correct one), and you can authenticate. Upon successful authentication, an access token will be returned to Postman and you can again test a remote request, which this time should be successful:
Adding Authorization Logic to Azure Functions
So now we know that the Function App and API is protected using Azure AD.
The next step would be to implement authorization logic inside the functions. This is when a request has been triggered with an Authorization Header, which contains the Access Token for the API, and where we can get the details from the token and make authorization logic based on that.
For this scenario I’m going to use a community PowerShell module called JWTdetails, made by Darren Robinson.
First add a dependency on that module in requirements.psd1 inside the api folder:
@{
    # For latest supported version, go to 'https://www.powershellgallery.com/packages/Az'.
    # To use the Az module in your function app, please uncomment the line below.
    'Az' = '7.*'
    'JWTDetails' = '1.*'
}
Then in run.ps1 for each of the functions (Create, Update, Get and Delete Whish) add the following in the beginning, just after param statement and write-host for “PowerShell HTTP trigger…”:
$AuthHeader = $Request.Headers.'Authorization'
If ($AuthHeader) {
    $AuthHeader
    $parts = $AuthHeader.Split(" ")
    $accessToken = $parts[1]
    $jwt = $accessToken | Get-JWTDetails

    Write-Host "This is an authorized request by $($jwt.name) [$($jwt.preferred_username)]"

    # Check Tenant Id to be another Azure AD Organization or Personal Microsoft
    If ($jwt.tid -eq "9188040d-6c67-4c5b-b112-36a304b66dad") {
        Write-Host "This is a Personal Microsoft Account"
    } else {
        Write-Host "This is a Work or School Account from Tenant ID : $($jwt.tid)"
    }
}
The code you see above, retrieves the Authorization Header if it is present, and then splits the access token from the string “BEARER <jwt token>”. That JWT token can then be checked for details by the Get-JWTDetails command. I’m retreiving a couple of claims to get the user name and the user principal name, and also checks which organization or personal (fixed tenant id for MS accounts) the user is coming from.
In addition, for the GetWhishes function, I also add the authorization logic that the functions checks the scopes, and if the user does not have Whish.ReadWrite.All, then the user should only be allowed to see own whishes at not everybody elses.
This code should be placed right after getting the Cosmos DB items in the run.ps1 for GetWhishes function:
If ($AuthHeader) {
    Write-Host "The Requesting User has the Scopes: $($jwt.scp)"
    # Check for Scopes and Authorize
    If ($jwt.scp -notcontains "Whish.ReadWrite.All") {
        Write-Host "User is only authorized to see own whishes!"
        # $Whishes = $Whishes | Where-Object {$_.uid -eq $jwt.oid}
        # $Whishes = $Whishes | Where-Object {$_.upn -eq $jwt.preferred_username }
        $Whishes = $Whishes | Where-Object {$_.name -eq $jwt.name}
    }
} else {
    Write-Host "No Auth, return nothing!"
    $Whishes = $Whishes | Where-Object {$_.id -eq $null}
}
You will see that I can select a few alternatives for filtering (I have commented out the ones not in use). I can use a soft filter based on name, or if I want to I can filter based on user/object id, or user principal name. The last two options require that I add a couple of lines to the CreateWhish function as well:
$whish = [PSCustomObject]@{
    id = $guid.Guid
    name = $Request.Body.name
    whish = $Request.Body.whish
    pronoun = [PSCustomObject]@{
        name = $Request.Body.pronoun.name
    }
    created = $datetime.ToString()
    uid = $jwt.oid
    upn = $jwt.preferred_username
}
As you see from the last two lines above, I have added that the creation of a new item is also stored with the object id and the upn of the user that has authenticated to the API (using the JWT token).
With these changes, you should once again Deploy the local Functions to the Function App.
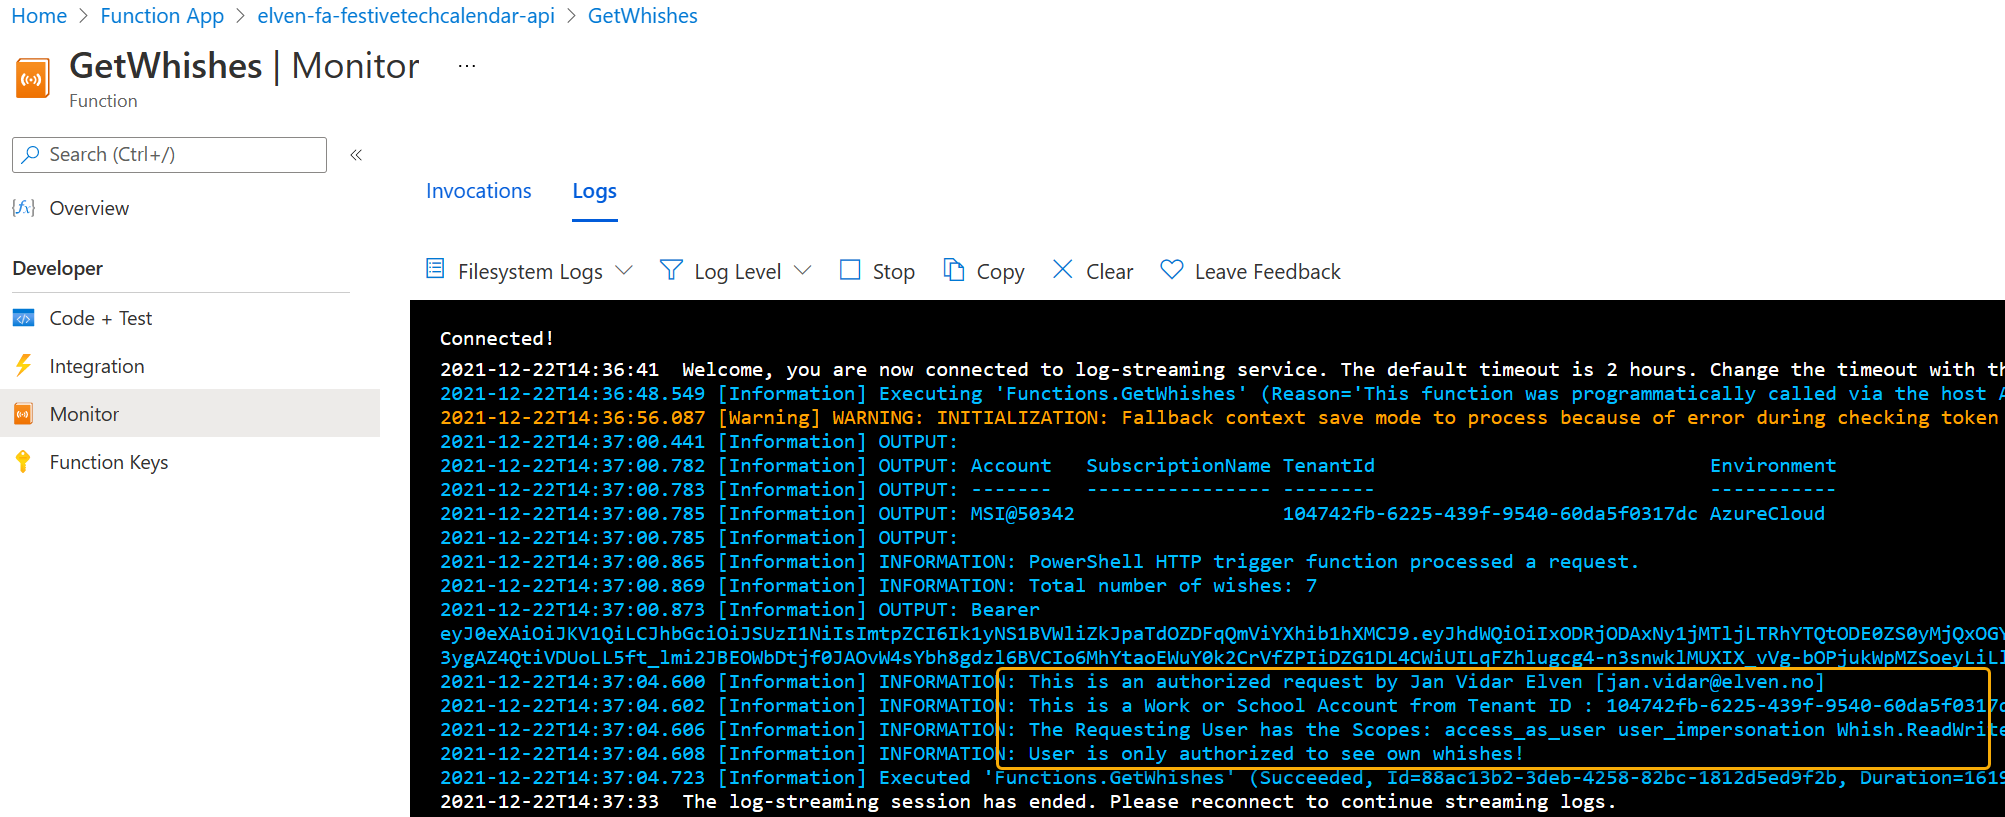
If I now do another remote test in Postman client, and follow the Azure Function App monitor in the Azure Portal, I can indeed see that my user has triggered the API securly, and is only authorized to see own whishes:
The last remaining step now is to change the web frontend to be able to use the API via Azure AD Authentication.
Authenticate to API from a Single Page Application (SPA)
We are now going to configure the web frontend application, which is based on JavaScript SPA, to be able to sign in and authorize, get ID and Access Token and send secured requests to our Christmas Whishes API, this will use the Oauth2 authorization code flow as shown below:
Configure Msal.js v2
We are going to use the Microsoft Authentication Library (MSAL) for Javascript, Msal.js v2, for the authentication and authorization flows in the web app.
First, in the frontend folder, create a file named authConfig.js, and add the following code:
const msalConfig = {
    auth: {
      clientId: "<your-app-id>",
      authority: "https://login.microsoftonline.com/common",
      redirectUri: "http://localhost:3000",
    },
    cache: {
      cacheLocation: "sessionStorage", // This configures where your cache will be stored
      storeAuthStateInCookie: false, // Set this to "true" if you are having issues on IE11 or Edge
    }
  };

  // Add here scopes for id token to be used at MS Identity Platform endpoints.
  const loginRequest = {
    scopes: ["openid", "profile"]
  };
Change the above code to your app id from the frontend app registration, and if you have other names for the api scopes change that as well for the tokenRequest constant.
Change the above endpoint to your function app name.
Next, create another file in the frontend folder named authUI.js, and add the following code:
// Select DOM elements to work with
const welcomeDiv = document.getElementById("welcomeMessage");
const signInButton = document.getElementById("signIn");

function showWelcomeMessage(account) {
  // Reconfiguring DOM elements
  welcomeDiv.innerHTML = `Welcome ${account.username}`;
  signInButton.setAttribute("onclick", "signOut();");
  signInButton.setAttribute('class', "btn btn-success")
  signInButton.innerHTML = "Sign Out";
}

function updateUI(data, endpoint) {
  console.log('Whishes API responded at: ' + new Date().toString());

}
The above code is used for hiding/showing document elements based on if the user is signed in or not.
Next, we need to have a script with functions that handles the sign-in and sign-out, and getting the access token for the API. Add a new file to the frontend folder called authPopup.js, and add the following script contents to that file:
// Create the main myMSALObj instance
// configuration parameters are located at authConfig.js
const myMSALObj = new msal.PublicClientApplication(msalConfig);

let username = "";

function loadPage() {
    /**
     * See here for more info on account retrieval:
     * https://github.com/AzureAD/microsoft-authentication-library-for-js/blob/dev/lib/msal-common/docs/Accounts.md
     */
    const currentAccounts = myMSALObj.getAllAccounts();
    if (currentAccounts === null) {
        return;
    } else if (currentAccounts.length > 1) {
        // Add choose account code here
        console.warn("Multiple accounts detected.");
    } else if (currentAccounts.length === 1) {
        username = currentAccounts[0].username;
        showWelcomeMessage(currentAccounts[0]);
    }
}

function handleResponse(resp) {
    if (resp !== null) {
        username = resp.account.username;
        console.log('id_token acquired at: ' + new Date().toString());
        showWelcomeMessage(resp.account);
    } else {
        loadPage();
    }
}

function signIn() {
    myMSALObj.loginPopup(loginRequest).then(handleResponse).catch(error => {
        console.error(error);
    });
}

function signOut() {
    const logoutRequest = {
        account: myMSALObj.getAccountByUsername(username)
    };

    myMSALObj.logout(logoutRequest);
}

loadPage();
We can now start to make some changes to the index.html file, so that it supports the Msal v2 library, shows a sign in button and a welcome message, and adds the app scripts from above.
First add the following html code to the HEAD section of the index.html file in frontend folder:
Then, back to the Visual Studio Code and Terminal Window, stop the node web application if it’s still running, and type the following command in the frontend folder:
npm install @azure/msal-browser
This will install and download the latest package references of Msal. After this has been run successfull you will see references updated in the package.json and package-lock.json files.
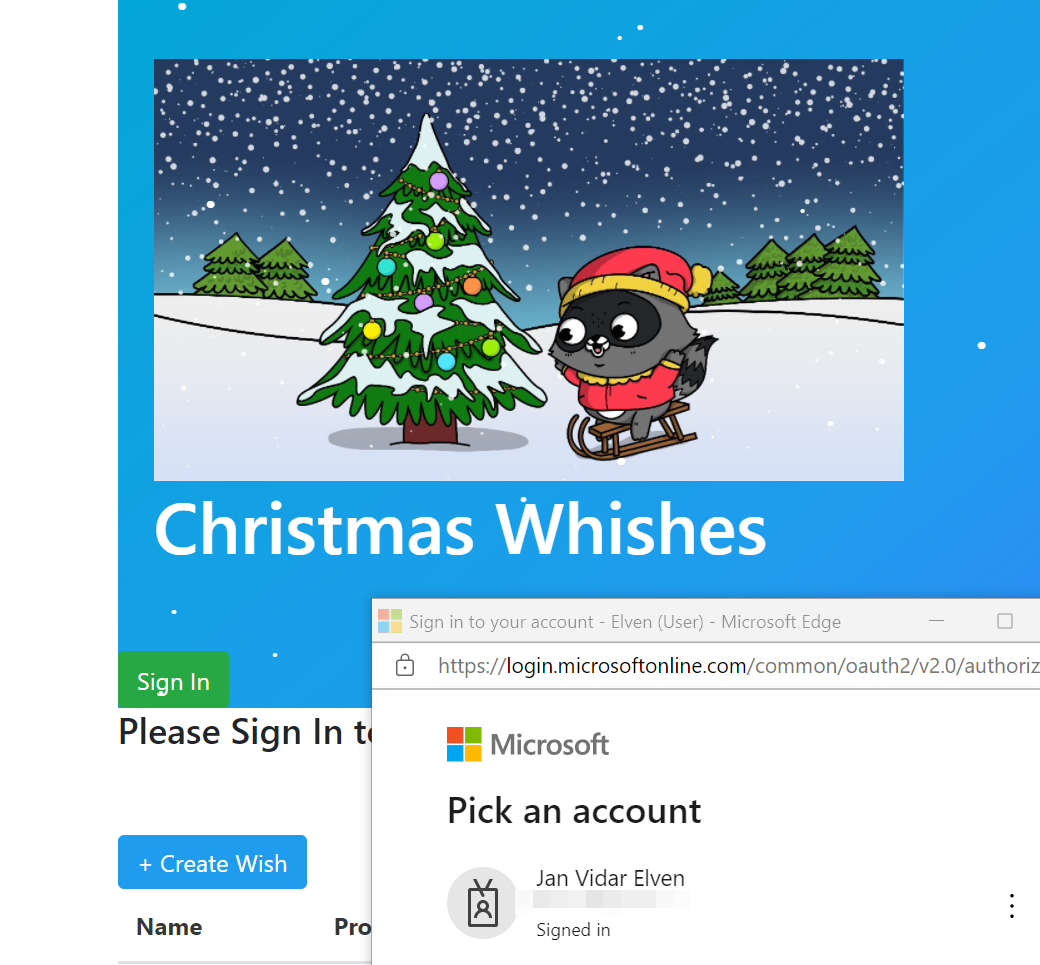
Save the index.html file with the above changes. We can now test the updated web page via http://localhost:3000. Type npm start in the terminal window to start the web application again. Now you can click the Sign in button, and you can sign in with your account:
PS! Note that the above application supports multi-tenant and personal microsoft accounts, so you can sign in with either.
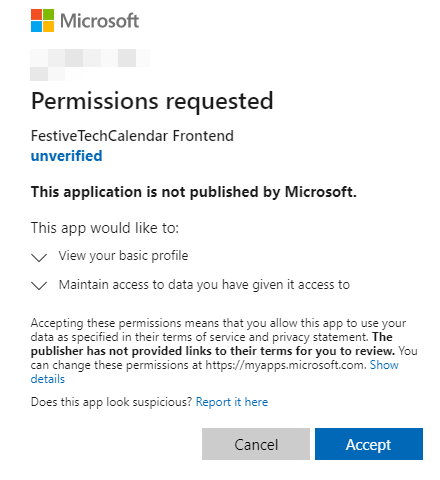
First time signing in you should get a consent prompt:
These are the permission scopes “openid” and “profile” defined in the login request above.
After signing in the welcome message should get updated accordingly:
We have now been able to sign in with the Identity Platform, and this will get an ID token for the signed in user. We are halfway there, because we will need an access token to be able to call the resource api.
Getting an Access Token for the API using Msal.js v2
I’m excited to announce that I will speak at the Second Edition of Nordic Virtual Summit, which will happen Online at 10th -11th November. Nordic Virtual Summit is a Microsoft IT Pro Community Event, organized by the people behind #SGUCSE #SCUGDK #SCUGFI #MMUGNO and #MSEndpointMgr communities!
24 sessions will be delivered by expert speakers including MVPs and Microsoft Program Managers over the 2 days, across two tracks: Microsoft 365 Endpoint Management and Microsoft 365 Security and Compliance.
My session will be about External Identities in Azure AD, and how you can go beyond the Invitation process, and look into how you can establish Self-Service Sign Up user flows, customized with API connectors, and use Approval management as a working example. We will also look into Azure AD Governance for Guest Users, so that you can control the lifecycle of External Identitites and Access as well. The session will be demo heavy and with expert level content.
I’m excited to announce that I will be speaking at the Cloud Lunch & Learn Marathon 2021, a Global and Online Community event that will run for 24 hours between May 13th and 14th, with Speakers and Community experts from all over the world.
Sessions will cover a range of Cloud topics, including AI, Cloud Native, Blockchain, IoT, Data & BigData, Security, DevOps, GitHub, Backend, Frontend, Power Platform and, more.
Many sessions will also be held in other languages than English, like Portuguese, Spanish, Hindi, Chinese and Arabic!
My session will be about Passwordless for Azure Services. It is well known that Passwordless for Microsoft Identities is now the thing to do to secure your end users, but what about Azure Services that need to authenticate to other resources and APIs? This is where Managed Identities is the way to go. In my session I will show the capabilities and usage scenarios for using Managed Identities to get rid of application credentials once and for all!
You can see all the sessions at the link below, where you also will find registration details.
My Session details:
Session Title: Passwordless Azure Authentication using Managed Identities
I’m very much looking forward to speaking this Saturday 27th of February at the Virtual Scottish Summit 2021! This amazing Community conference will host 365 (!) virtual sessions from experts all over the world, ranging from first-time speakers to experienced community leaders.
Sessions will be delivered in a range of tracks covering Microsoft technologies and community topics, something to choose from for everyone.
My session will be about why it so important to have Zero Trust Admins with least privilege access, and why you start using Azure AD PIM (Privileged Identity Management) today!
I learned about the stereotype of cheap Scots from reading about Scrooge McDuck, I’ve no idea if this is true or not, probably not ;), but the thing that is true is that you should be really cheap when handing out admin privileges.
Today Microsoft 365 Global Administrators or Azure Subscription Owners are the new Domain/Enterprise Admins, in many organizations too many users have these roles. In the session I will show how by implementing just-in-time and just-enough-access (JIT/JEA) policies, we can reduce vulnerability and attack surface, and the right tool for the job is using Azure AD Privileged Identity Management (PIM).
I have been using AAD PIM for years, and in this session I will share my best practices and how to implement and use the right way.
There is still time to register, but time and available tickets are running out fast. Go an register your free ticket for an awesome day of free community contents here:
I’m excited to announce that I’m speaking at the inaugural Nordic Virtual Summit 2021, from 10th to 11th February. Nordic Virtual Summit is a Microsoft IT Pro Community Event, organized by the people behind #SGUCSE #SCUGDK #SCUGFI #MMUGNO and #MSEndpointMgr communities!
Sessions will be delivered in 3 tracks:
Endpoint Management
Security & Compliance
Azure & Automation
Each day will start with a pre-conference talk, and then the sessions kick off each hour mark, 3 sessions before lunch and 3 after. There will be 15 minutes break and Q/A between sessions, so you can catch your breath, fill up your coffee or just wait in excitement for the next session 🙂
My session will be about while Azure Serverless Automation solutions like Azure Functions & Logic Apps can be great for your automation scenarios, how can you secure access to sending requests and protect your serverless automation using Azure AD authentication and authorization.
I’m happy to announce that I’m part of the amazing global initiative of automation bootcamps in starting from February 5th to 20th 2021!
Update: The Azure Automation track has now been pushed back one week from February 20th to February 27th.
I will speak about how Azure Serverless Automation solutions like Azure Functions, Logic Apps and more can be protected by Azure AD and how Power Platform can securely send requests to trigger your automation scenarios. Session details:
In this article I’m going to build on my previous blog posts in this series where I have written about how to add Azure AD OAuth authentication and authorization to your Logic Apps and expose them as an API. For reference the links to these blog post articles are here:
If you want to connect to API’s using Power Platform (Power Automate Flows, PowerApps etc.), you can do this in two different ways:
Using HTTP action and send requests that use Azure AD OAuth authentication. This will use the “Client Credentials” OAuth flow, and is suitable for calling the API using application permissions and roles.
Setting up a Custom Connector for the API, and using the HTTP logic app trigger as operation. This will use the “Authorization Code” OAuth flow, and is suitable for using delegated permissions and scopes for the logged on user via connections.
So it depends on how you want your Power Platform users to be able to send requests your Logic App API. Should they do this as themselves with their logged on user, or should they use an application identity? There are use cases for both, so I will show both in this article.
Connect to Logic App API using Custom Connector
Using Custom Connectors is a great way to use your own identity for sending requests to an API. This way you can also securely share Custom Connectors, and Flows/PowerApps, using them in your organization, without needing to share sensitive credentials like client id and client secrets.
If you want to create a Custom Connector in Power Platform that triggers an HTTP request to a Logic App, you can currently do this in one of the following ways:
Creating Custom Connector using Azure services and Logic App.
Exporting the Logic App to a Power Platform environment.
Creating the Custom Connector using an OpenAPI swagger definition file/url.
Creating the Custom Connector from blank.
Lets take a quick look at each of these, but first we need to take care of some permissions in Azure for creating the Custom Connector automatically.
Azure Permissions for Logic Apps and listing swagger
There are some minimum permissions your user needs to be able to create a Custom Connector automatically by browsing the Azure Service.
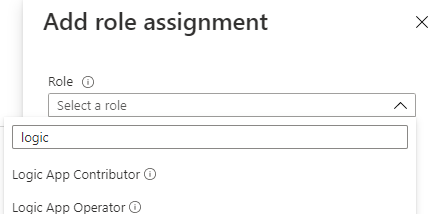
A good starting point is using one of the built in Azure roles for Logic Apps:
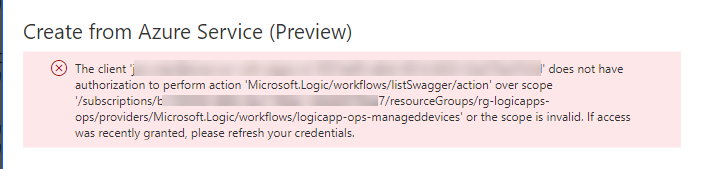
But even these do not have the permissions necessary, if you try you will get an error similar to the following:
After connecting to Azure using an Azure account that can create custom roles for the scope (Owner or User Access Administrator), start by exporting an existing role as a starting point:
# 1. Export a JSON template as a reference based on an exisiting role
Get-AzRoleDefinition -Name "Logic App Operator" | ConvertTo-Json | Out-File .\LogicAppAPIOperator.json
Then edit this JSON file, by removing the Id parameter, defining a Name, setting the IsCustom to true, and Description to something descriptive like below. I have also set my Azure subscription id under assignable scopes, and added the required ../listSwagger/action:
{
  "Name": "Logic App API Operator",
  "IsCustom": true,
  "Description": "Lets you read, enable and disable logic app, and list swagger actions for API.",
  "Actions": [
    "Microsoft.Authorization/*/read",
    "Microsoft.Insights/alertRules/*/read",
    "Microsoft.Insights/metricAlerts/*/read",
    "Microsoft.Insights/diagnosticSettings/*/read",
    "Microsoft.Insights/metricDefinitions/*/read",
    "Microsoft.Logic/*/read",
    "Microsoft.Logic/workflows/disable/action",
    "Microsoft.Logic/workflows/enable/action",
    "Microsoft.Logic/workflows/validate/action",
    "Microsoft.Resources/deployments/operations/read",
    "Microsoft.Resources/subscriptions/operationresults/read",
    "Microsoft.Resources/subscriptions/resourceGroups/read",
    "Microsoft.Support/*",
    "Microsoft.Web/connectionGateways/*/read",
    "Microsoft.Web/connections/*/read",
    "Microsoft.Web/customApis/*/read",
    "Microsoft.Web/serverFarms/read",
    "Microsoft.Logic/workflows/listSwagger/action"
  ],
  "NotActions": [],
  "DataActions": [],
  "NotDataActions": [],
  "AssignableScopes": [
    "/subscriptions/<my azure sub id>"
  ]
}
After that you can create the custom role:
# 3. Create the new custom role:
New-AzRoleDefinition -InputFile .\LogicAppAPIOperator.json
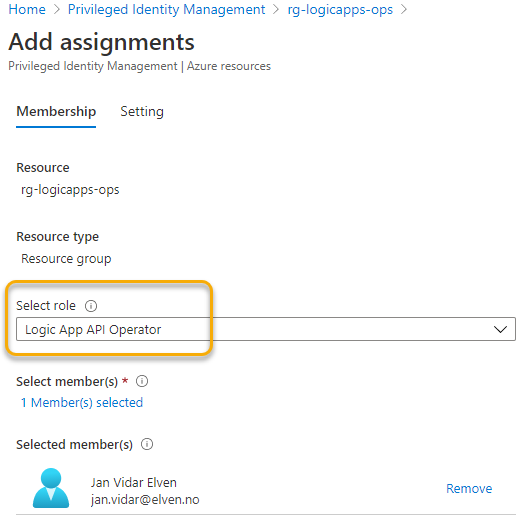
This role can now be assigned to the Power Platform user(s) that need it, using the scope of your Logic Apps, for example the Resource Group. You can either add the role assignment to the user directly, or preferrably using Azure PIM:
With the correct permissions now in place, you can proceed to the next step.
Creating Custom Connector using Azure services and Logic App
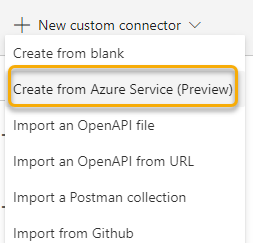
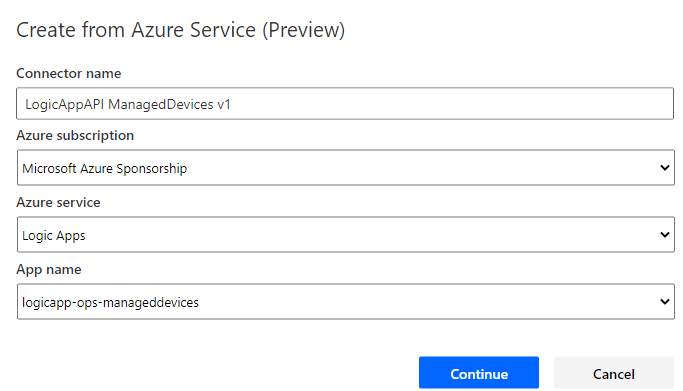
Log in to Power Apps or Power Automate using your Power Platform user. Under Data and Custom Connectors, select to create a New custom connector. From there select “Create from Azure Service” (Preview as per now):
Next, type name for your Custom Connector, select which Azure subscription, and from which Azure service which in this case is Logic Apps. Note that you can create from Azure Functions and Azure API Management as well. Then select the Logic App name from the list:
If you don’t see or get any errors here, verify your permissions.
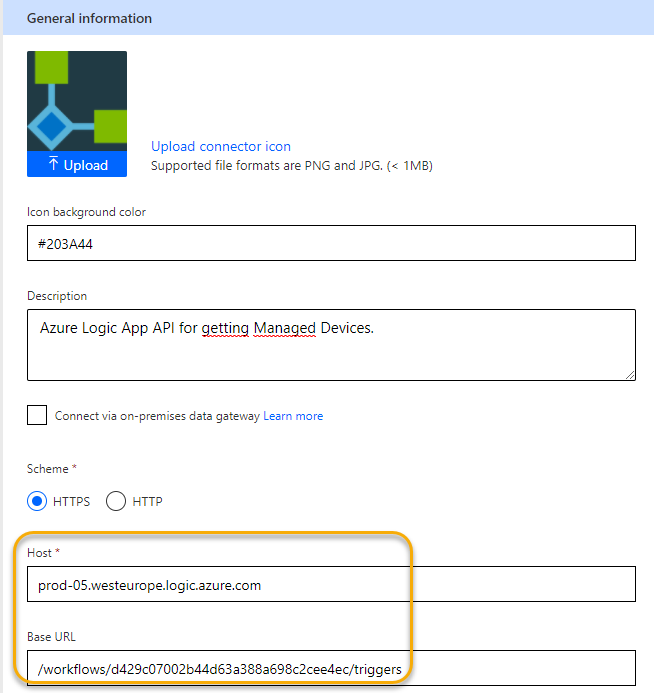
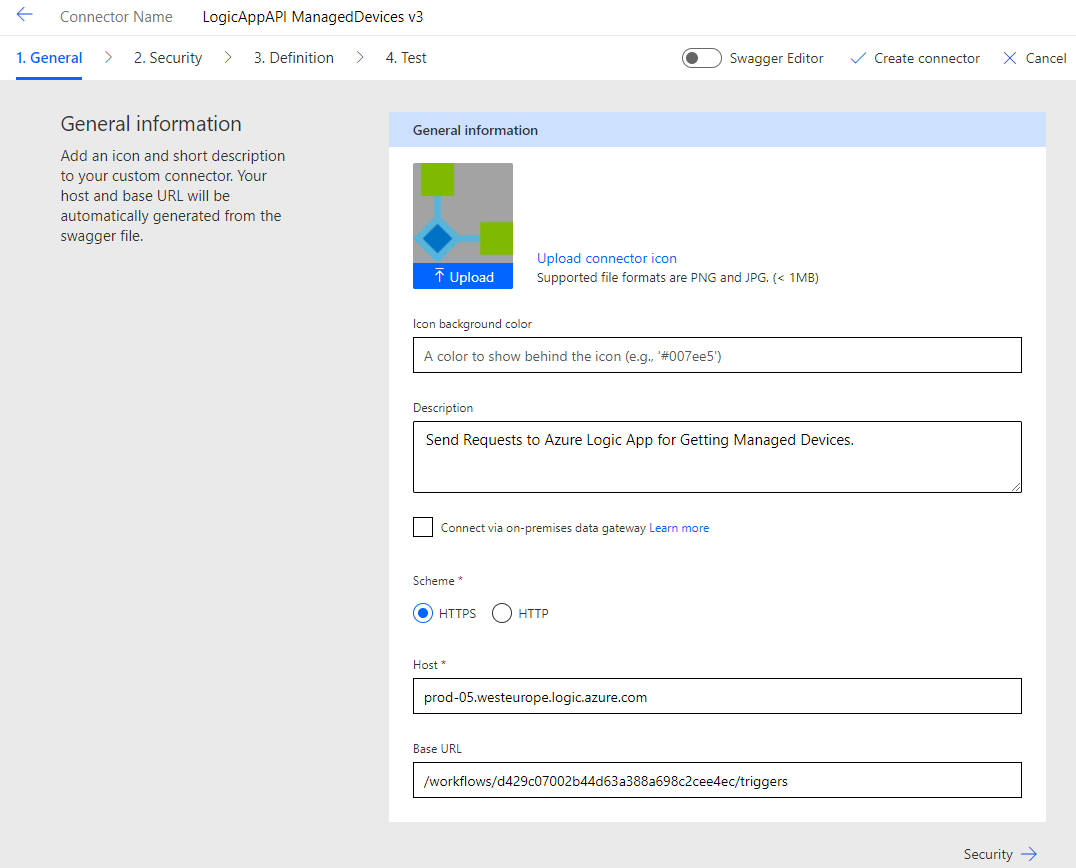
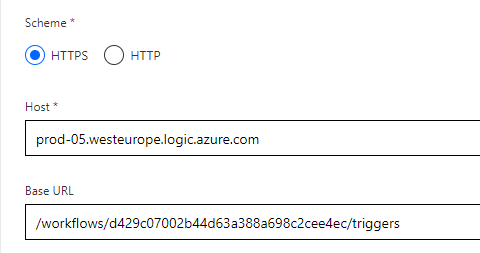
Click Continue, and you will see something like the following, where the Host and Base URL has automatically been set correctly for your Logic App HTTP trigger. If you want you can upload an icon, background color and desctription as well:
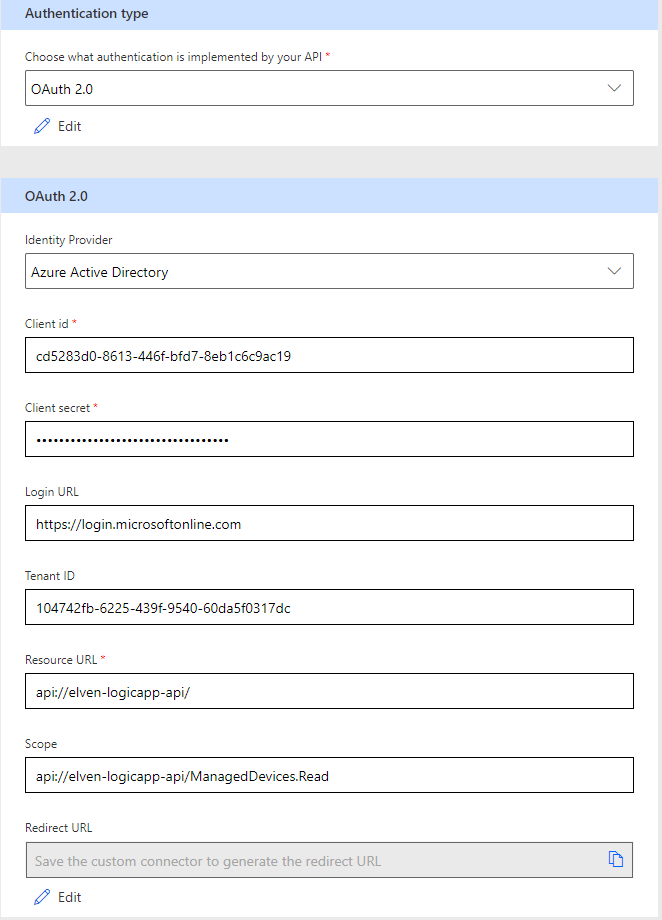
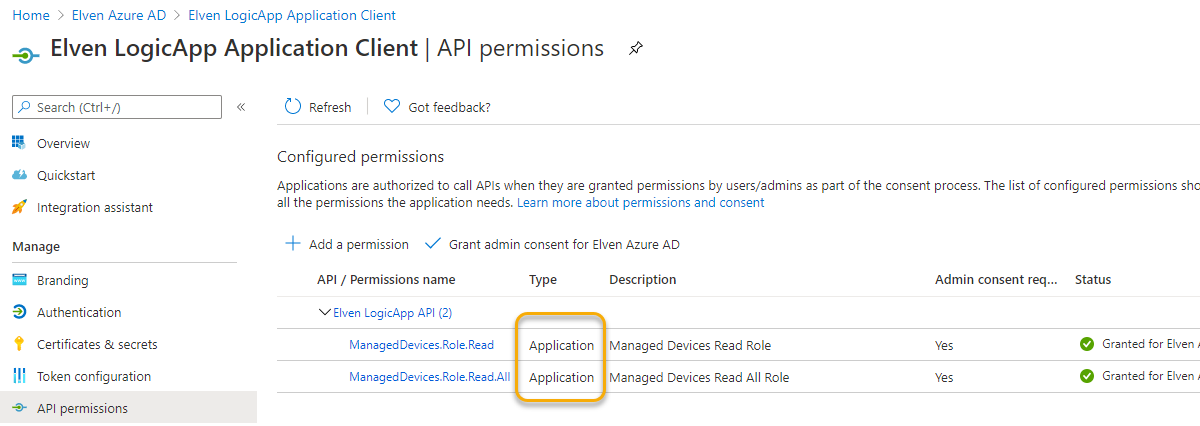
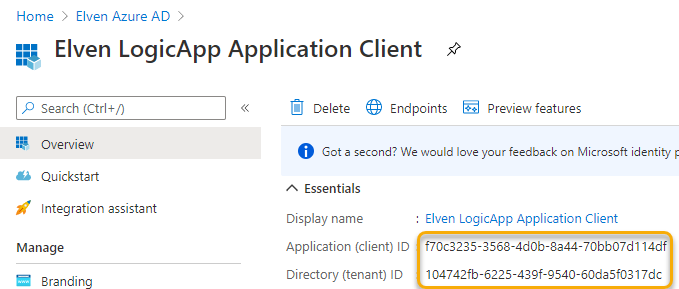
Click Next to go to Security. Here we need to change the Authentication to OAuth 2.0, as this is what we have implemented for authorizing requests to the Logic App. To authenticate and get the correct Access Token, we will reuse the LogicApp Client app registration that we created in the previous blog post. Copy the Application Client ID and Tenant ID:
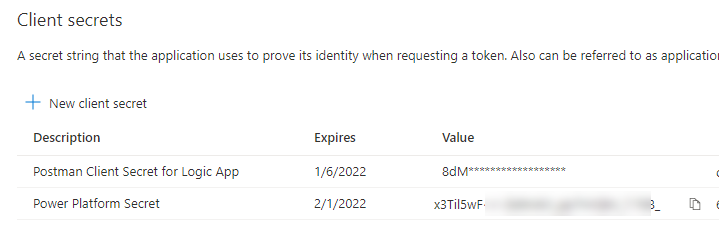
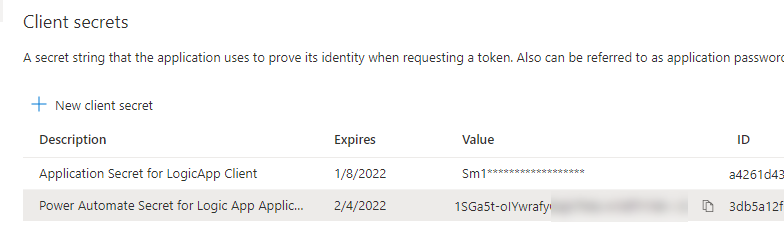
And then create and copy a new secret for using in the Power Platform Custom Connector:
Fill in the rest of the OAuth 2.0 details for your environment like below:
Note from above that we need to specify the correct resource (the backend API) and scope. This is all very vell described in the previous blog post.
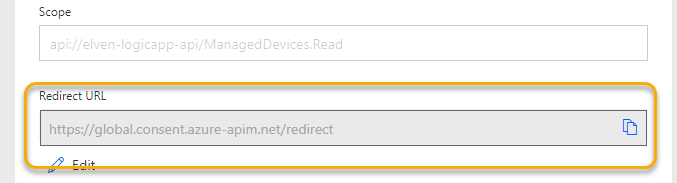
Click Create Connector to save the Connector details. Make sure that you copy the Redirect URL:
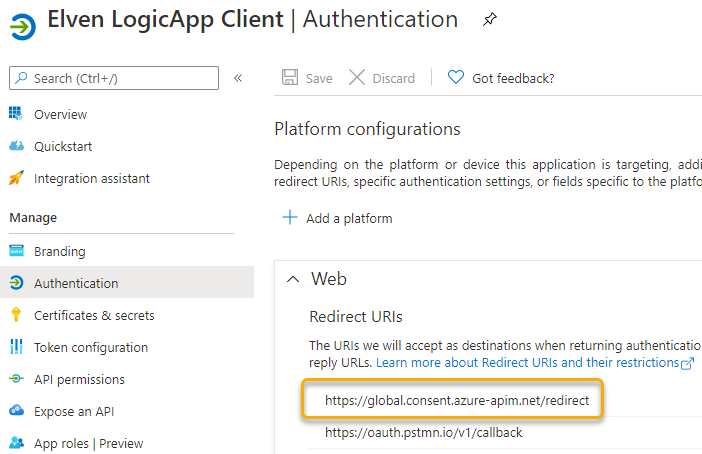
And add that to the App Registration redirect URLs:
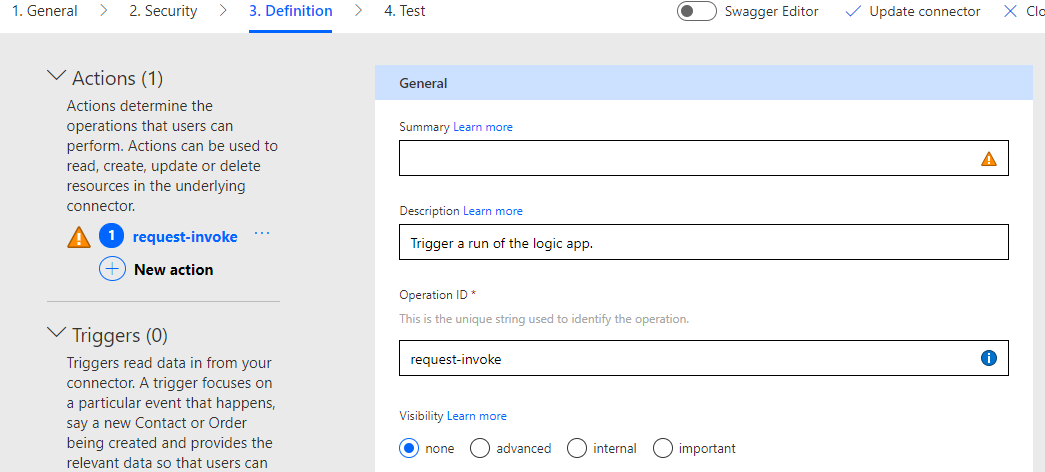
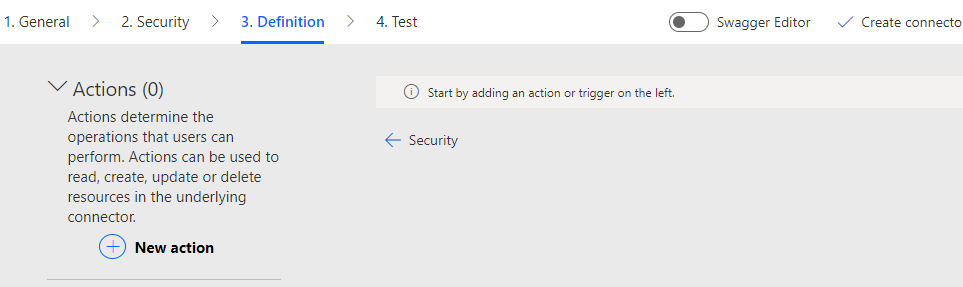
Next, under the Custom Connector proceed to step 3. Definition. This is where the POST request trigger will be, and it should already be populated with an action:
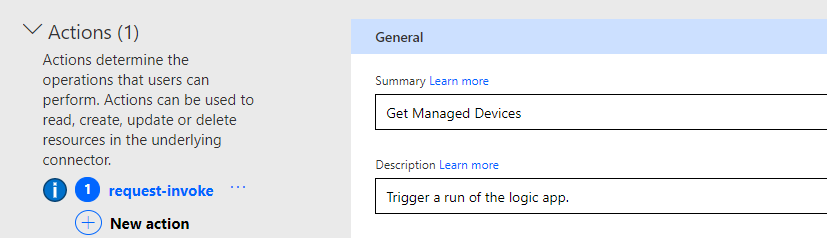
We need to specify a value for Summary, in my case I will type “Get Managed Devices”:
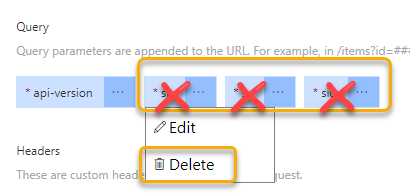
Next, under Request Query, remove the “sp”, “sv” and “sig” parameters, as these will not be needed as long as we are using OAuth2 authorization scheme:
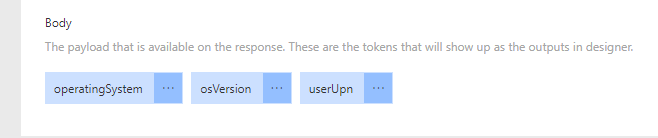
The Body parameter should be correctly specified, expecting an operatingSystem, osVersion and userUpn request body parameters:
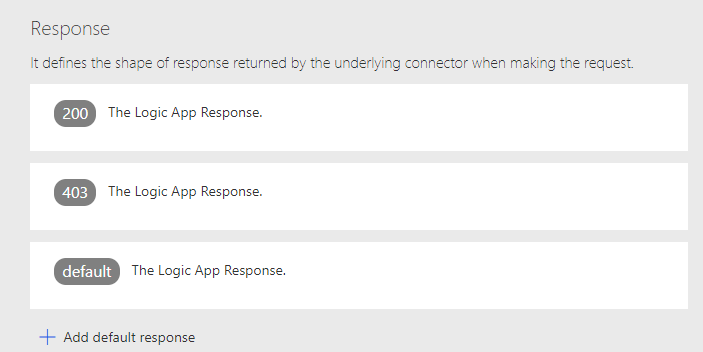
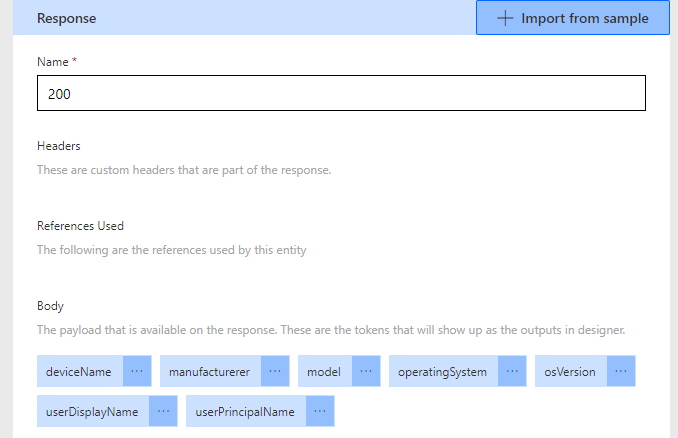
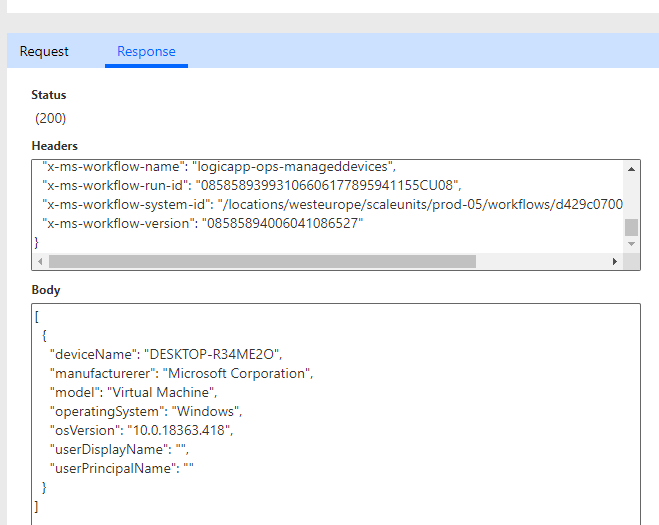
Last, lets check the Responses from the Logic App. They have been successfully configured with status 200 (OK) and 403 (Not Authorized), as these two responses were defined in the Logic App.
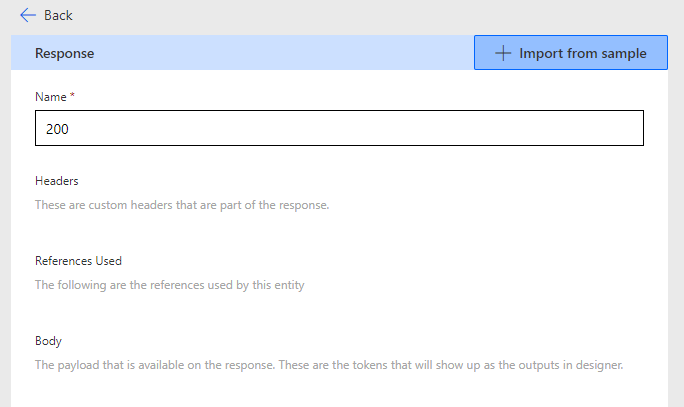
If the Response body is empty like below, we would need to import from sample output from the Logic App (response body should have automatically been configured if the response action in Logic App had a response schema defined):
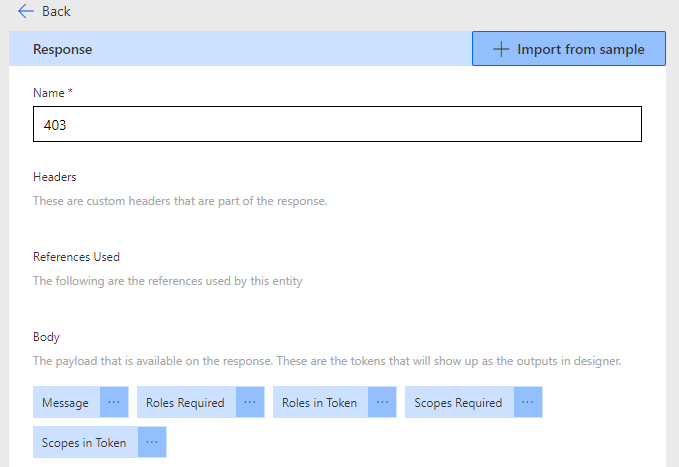
The sample response from the 403 not authorized should be:
{
  "Message": "",
  "Roles Required": "",
  "Roles in Token": "",
  "Scopes Required": "",
  "Scopes in Token": ""
}
Giving this response definition:
NB! It’s important to have correct responses defined like above, it will make it easier to consume those responses later in Power Automate Flows and Power Apps.
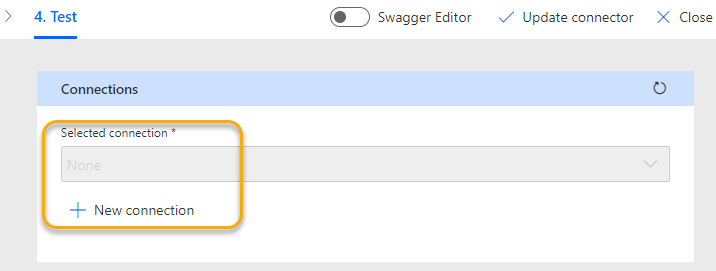
Click on Update Connector, and then go to next section 4. Test.
We can now test the Logic App trigger via the Custom Connector, first we need to create a new connection:
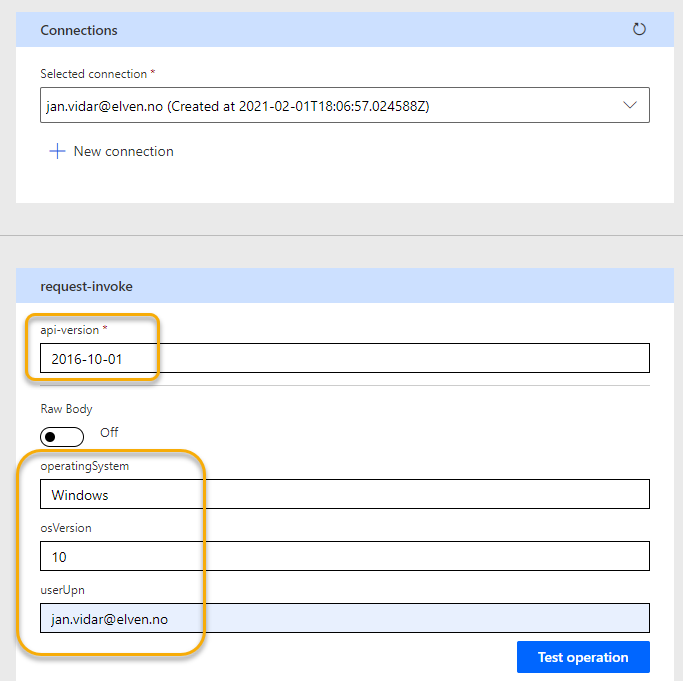
After logging in, and if needed consenting to the permissions scopes (se previous blog post for details), we should have a connection. We can now test the trigger by supplying the api-version (2016-10-01) and specify the operatingSystem, osVersion and userUpn parameters:
Click Test operation and verify a successful response like below:
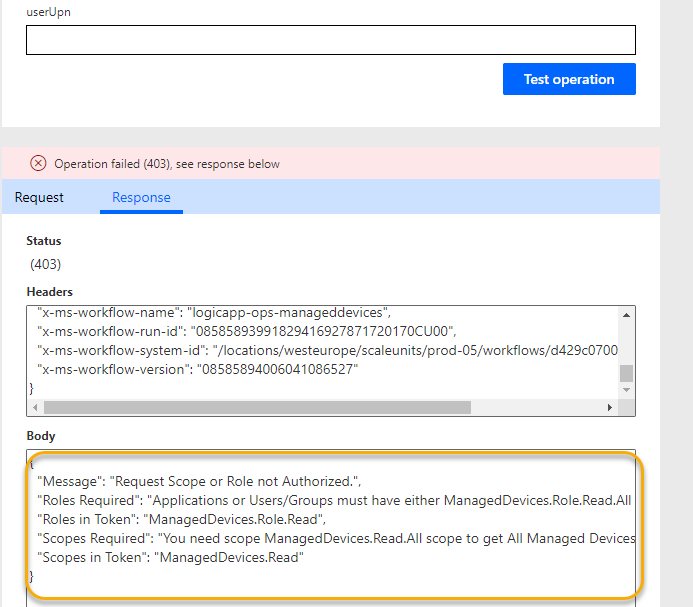
Let’s try another test, this time leaving the userUpn blank (from the previous blog post this means that the Logic App tries to return all managed devices, if the user has the correct scope and/or roles). This time I get a 403 not authorized, which is expected as I don’t have the correct scope/role:
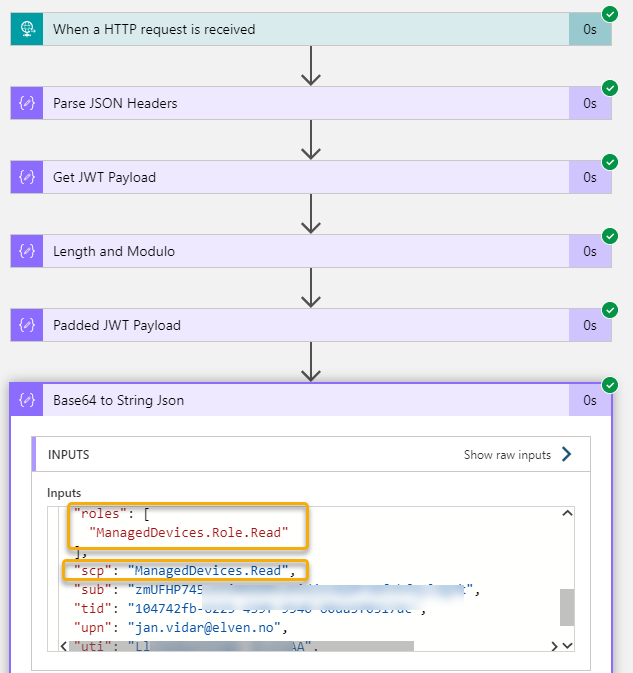
Checking the Logic App run history I can see that my Power Platform user triggered the Logic App and I can see the expected scp and roles claim:
Perfect so far! In the end of this blog post article I will show how we can get this response data to a Power App via a Flow and the Custom Connector, but first lets look into the other ways of creating a Custom Connector.
Exporting the Logic App to a Power Platform environment
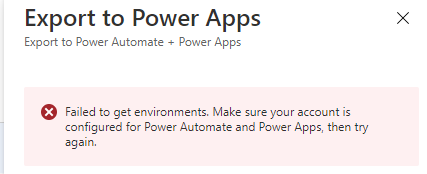
In the previous example, I created the Custom Connector from my Power Platform environment, in this example I will do an Export from the Logic App. The user I will do this with needs to be a Power Platform licensed user and have access to the environments, or else I will get this:
To Export, click this button:
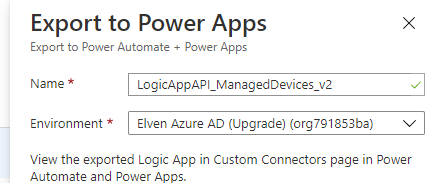
Then fill inn the name of the Custom Connector to create, I will call this ..v2, and select environment:
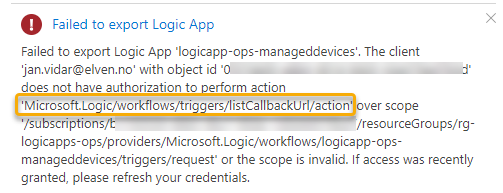
You might get another permission error:
If so, we need to update the Custom Role created earlier with this permission. Do the following:
# 3b. Update the custom role
$roleLogicAppAPIOperator = Get-AzRoleDefinition -Name "Logic App API Operator"
$roleLogicAppAPIOperator.Actions.Add("Microsoft.Logic/workflows/triggers/listCallbackUrl/action")
Set-AzRoleDefinition -Role $roleLogicAppAPIOperator
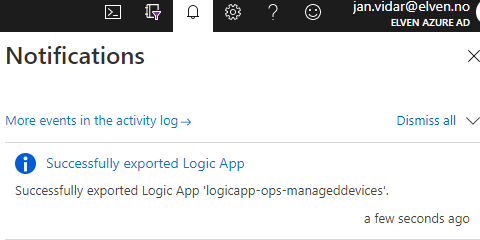
The role and the assignment should now be updated, so we can try again. You might need to refresh or log out and in again for the permission to be updated. After this the Export should be successful:
We can now find the Custom Connector right below the first we created:
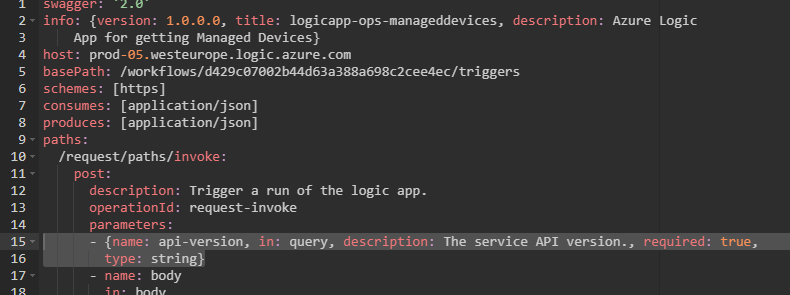
We still need to edit the Custom Connector with the authentication details, adding the app/client id, secret etc. The export has also left out all the query parameters (sv, sp, sig) but also the required api-version. This must be fixed, the easiest way is to switch to Swagger Editor, and add the line 15 and 16 as shown below:
After this you should be able to Update the Connector, and the Test, Create a Connection and verify successful results.
Creating the Custom Connector using an OpenAPI swagger definition file/url
Both examples above, either importing a Custom Connector from Azure Service, or exporting the Logic App to a Custom Connector in a Power Platform environment, require that the user doing this both has:
Azure RBAC role assignment and permissions as detailed above.
Access to Power Platform environment and licensed for using Power Platform.
What if you as Azure administrator don’t want your Power Platform users to have access to Azure, but you still want to help them with creating Custom Connectors that send requests to selected Logic App workflow APIs?
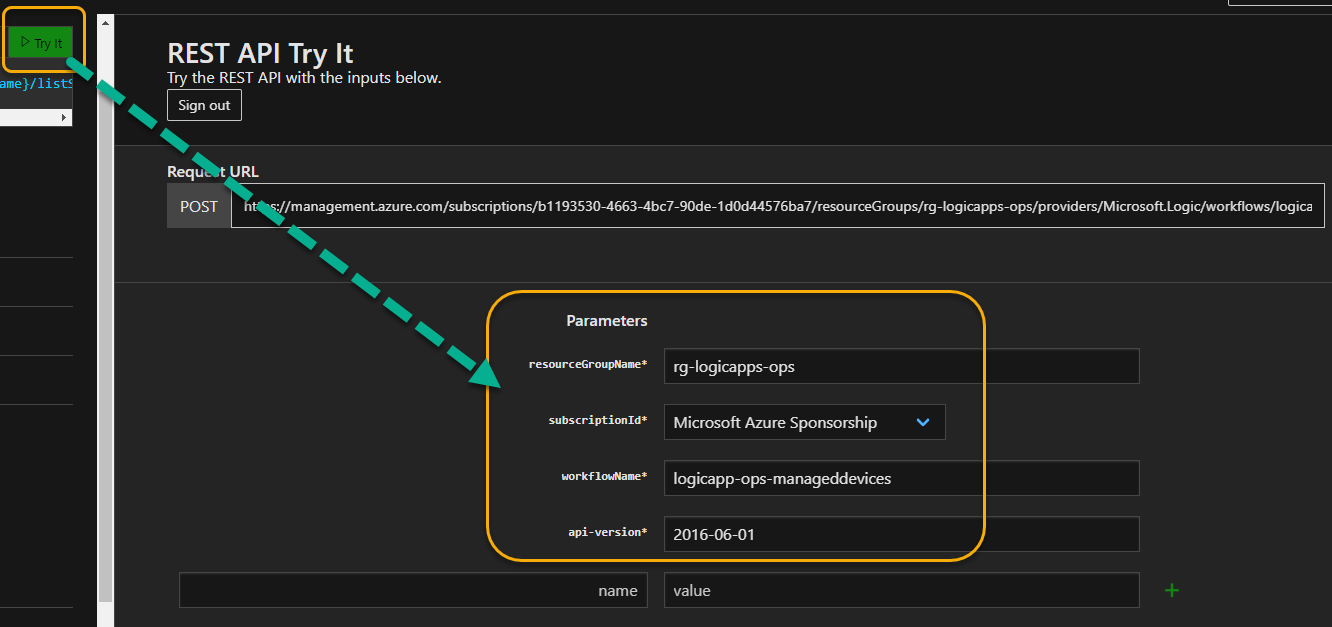
To get your swagger you can look at the first blog post in this series, where I showed how you could use Az PowerShell to get management access tokens using Get-AzAccessToken and running Invoke-RestMethod. In this example I’m just going to use the Try it button from the Docs link above, and then authenticate to my Azure subscription, and fill inn the required parameters:
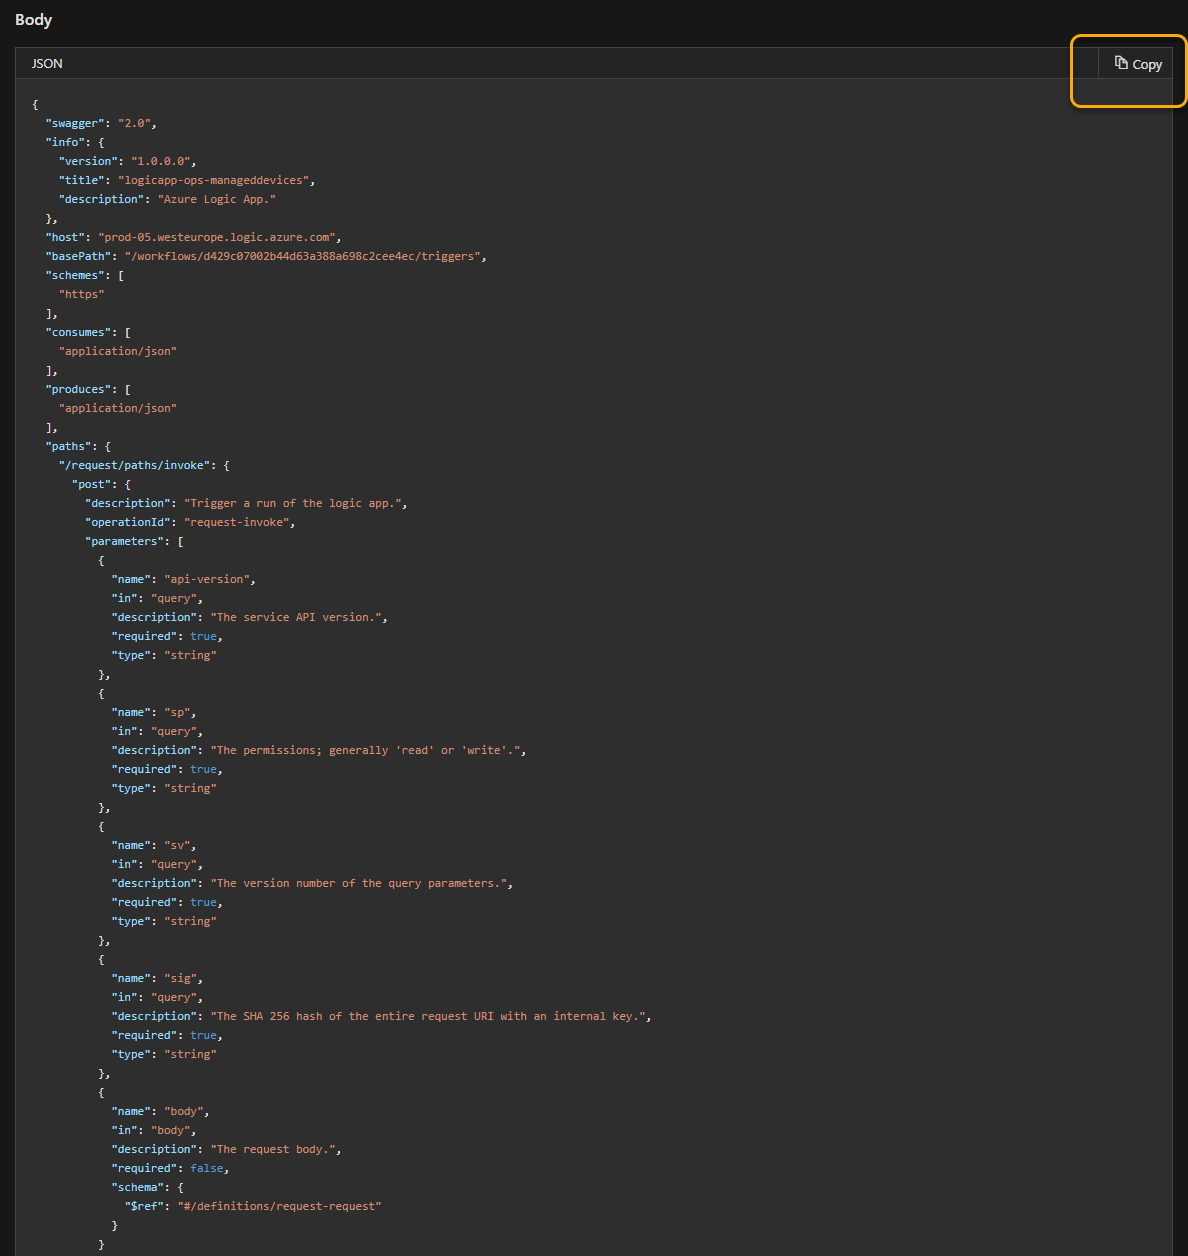
Running this request should produce your requested swagger OpenAPI definition. You can now copy this to a file:
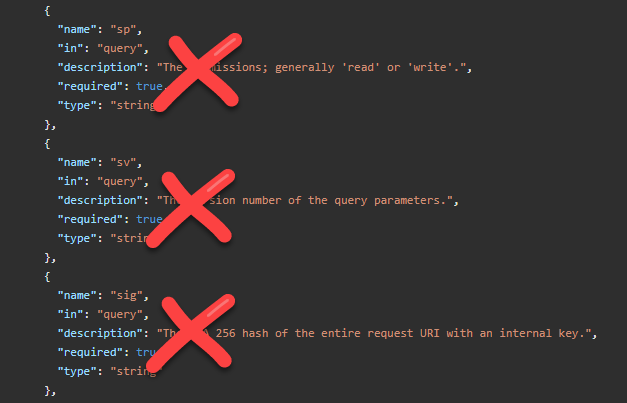
Before you share this OpenAPI file with your Power Platform developers, you should edit and remove the following request query parameters, as these are not needed when running the OAuth2 authorization scheme:
After this you can create a new Custom Connector, by specifying an OpenAPI file / url, depending on where you made the file available to your Power Platform Developers.
Browse to the filename and type a Connector name:
After this you will have the basis of the Connector defined, where you can customize general settings etc:
You will now need to add the authentication for Azure AD OAuth2 with client id, secret etc under Security, as well as creating the connector, and under test create a connection and test the operations. This is the same as I showed earlier, so I don’t need to show tthe details here.
Creating the Custom Connector from blank
You can of course create Power Platform Custom Connectors from blank as well, this should be easy enough based on the details I have provided above, but basically you will need to make sure to set the correct Host and Base URL path for your Logic App here:
After adding the authentication details for Azure AD OAuth2 (same as before), you will need to manually add actions, and providing a request from sample, as well as defining the default responses for 200 and 403 status, as shown in the earlier steps.
With the Custom Connector now in place for sending Requests to the Logic App using delegated authentication, we can now start using this Connector in our Flows/Power Apps.
Lets build a quick sample of that.
Creating a Power Automate Flow that will trigger Logic App API
I’ll just assume readers of this blog post knows a thing or two about Power Automate and Cloud Flows, so I’ll try to keep this high level.
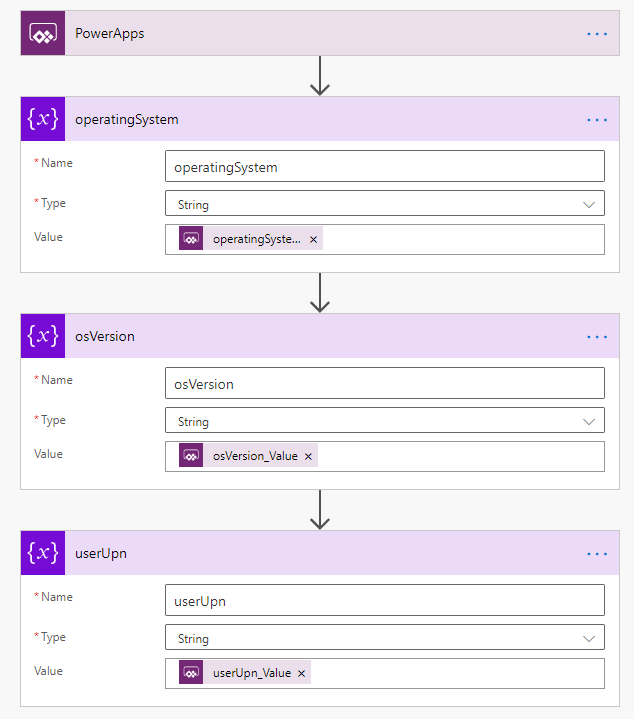
I’ve created a new instant Cloud Flow, using PowerApps as a trigger. Then I add three initialize variables actions, giving the variables and actions name like below, before I set “Ask in PowerApps” for values:
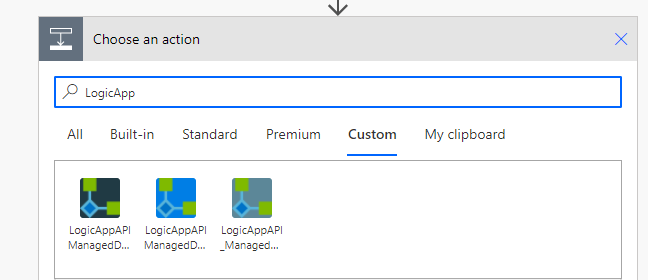
Next, add a Custom Connector action, selecting the Custom Connector we created earlier (I have 3 versions here, as I shown above with the alternative ways to set up a Custom Connector from Logic Apps:
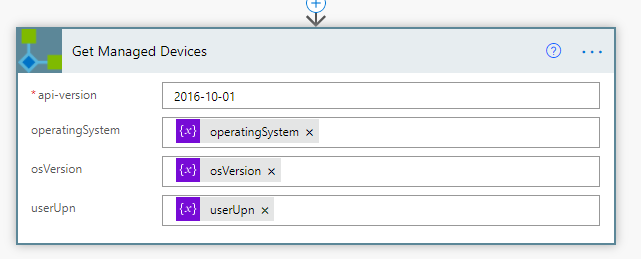
Next, select the action from the chosen Custom Connector, and fill in the parameters like below:
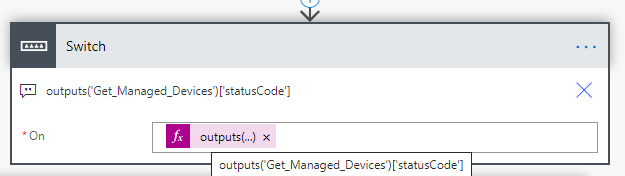
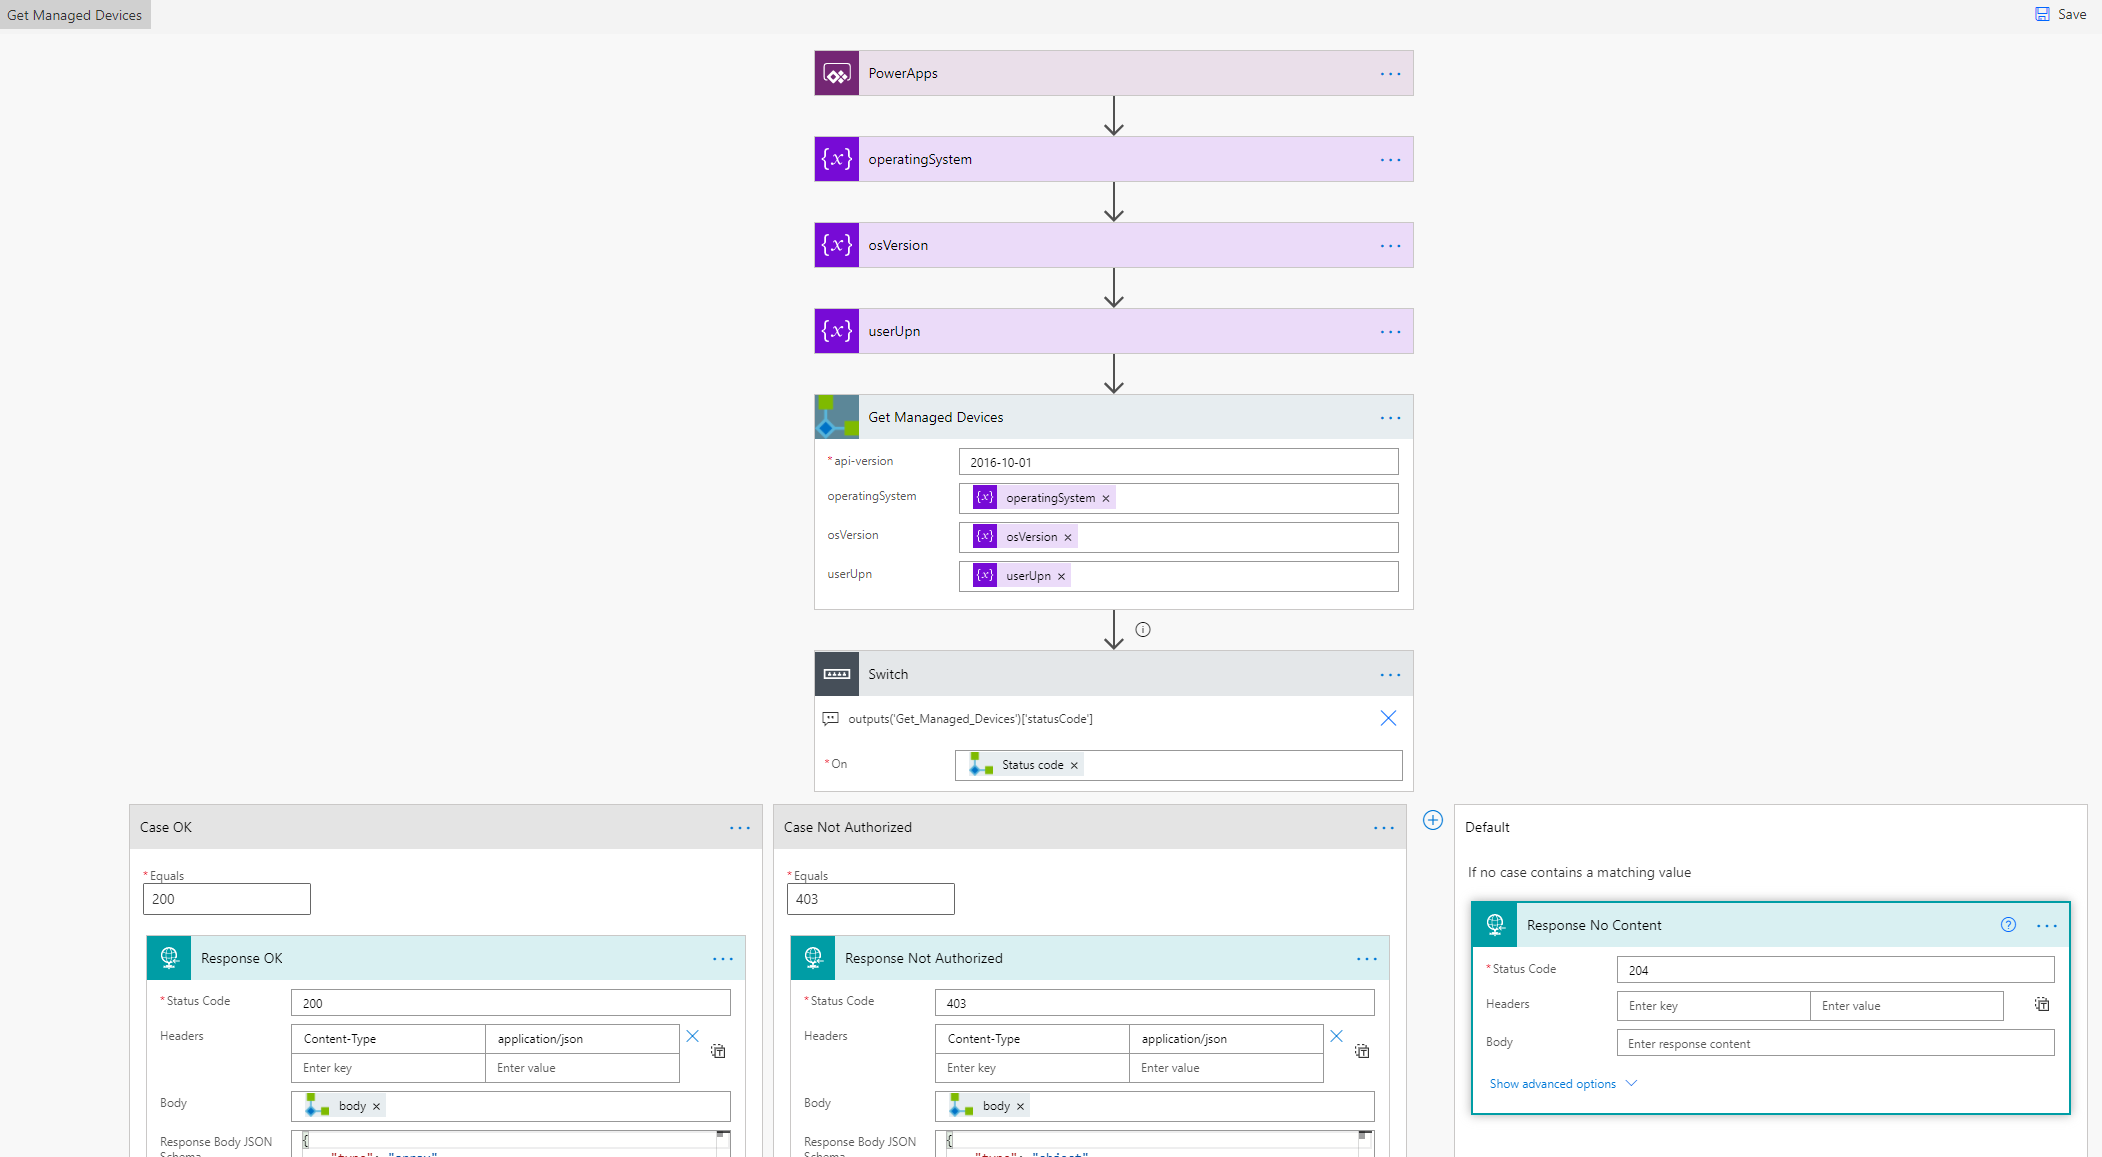
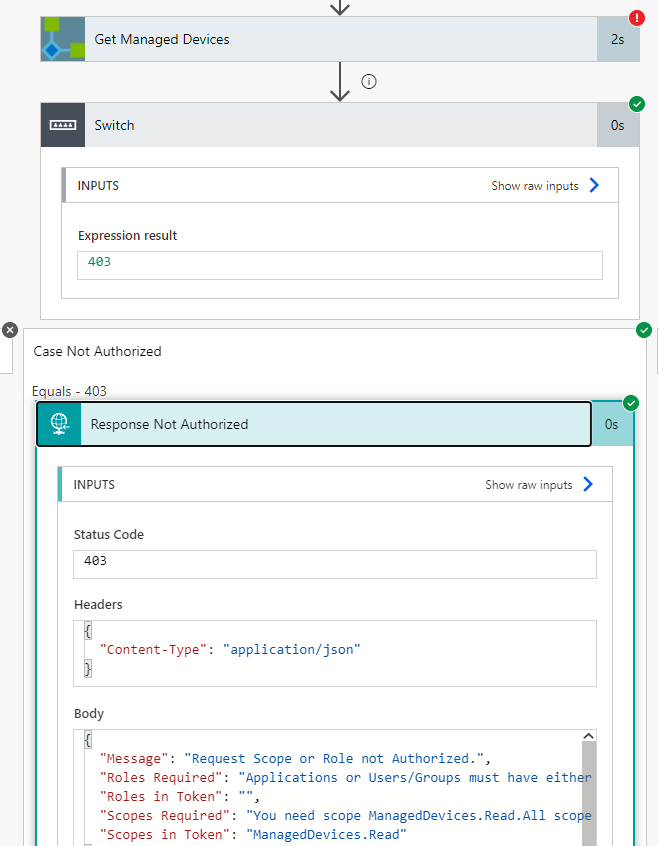
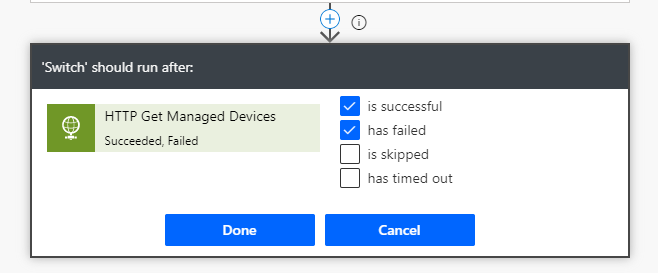
Next, we need to check the response status code we get back from the Custom Connector. Add a Switch control action, where we will check against the outputs from the Get Managed Devices and statusCode:
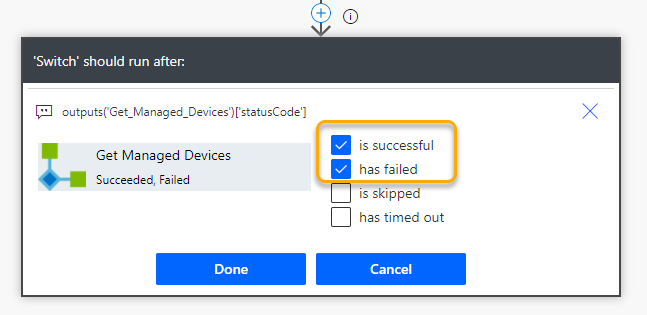
Make sure that the Switch action should run either if the Get Managed Devices is successful or failed:
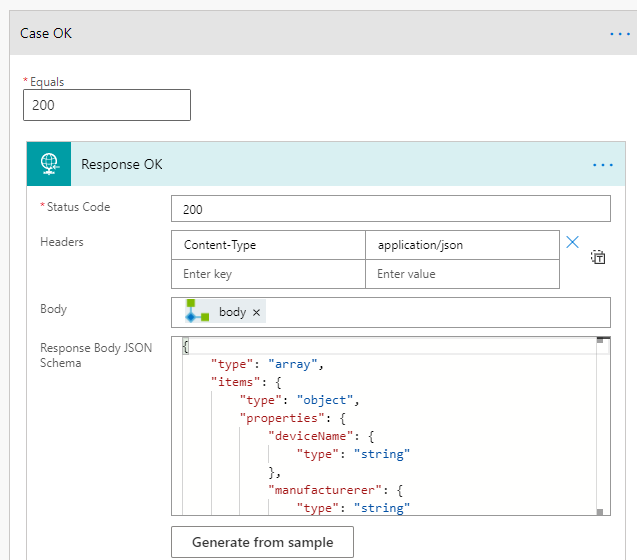
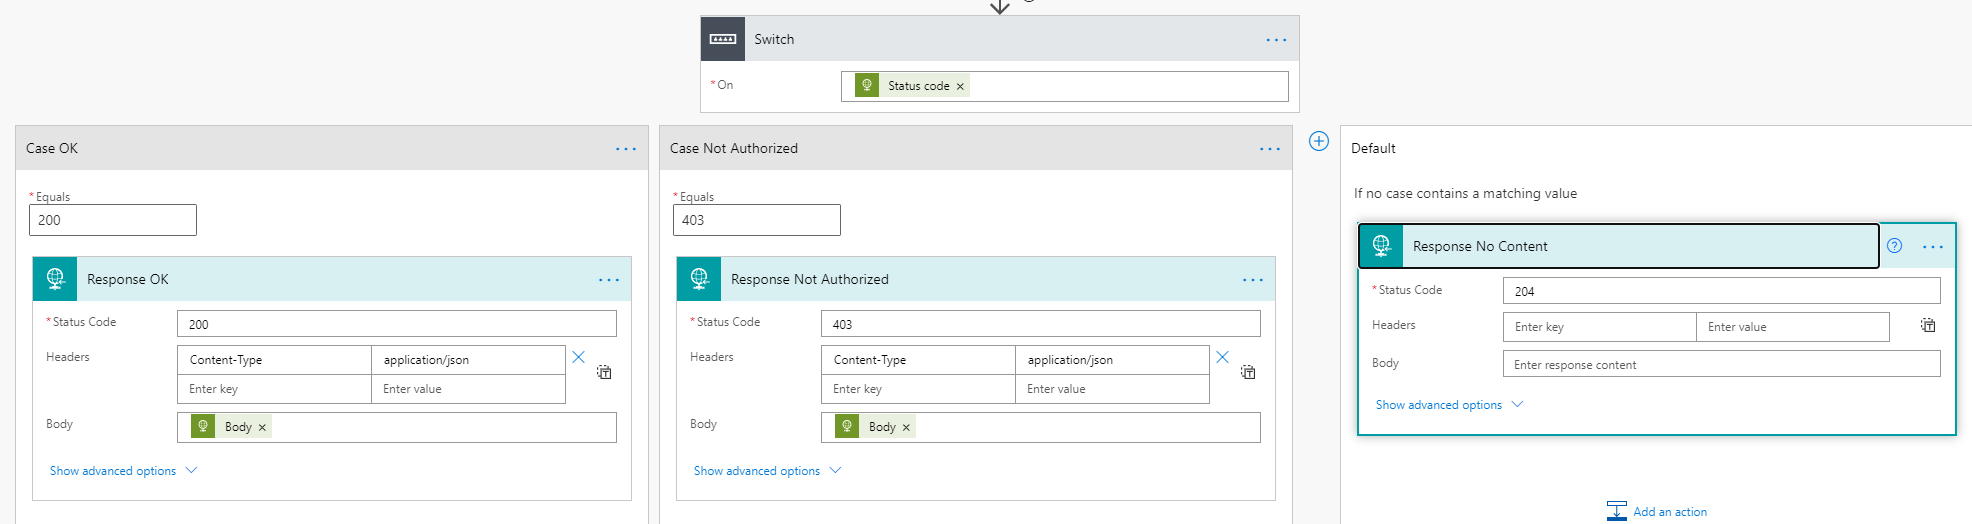
For each case of statusCode we will check against, we need a Response action to return data back to the PowerApp. For status code 200 OK, I’ll return the Status Code as shown below, adding Headers to be Content-Type application/json, and using the Body output from the Get Managed Devices custom connector action. The Response Body JSON schema is based on the sample output from the Logic App API.
PS! To get the Body output, you can use the following custom expression: outputs('Get_Managed_Devices')?['body']:
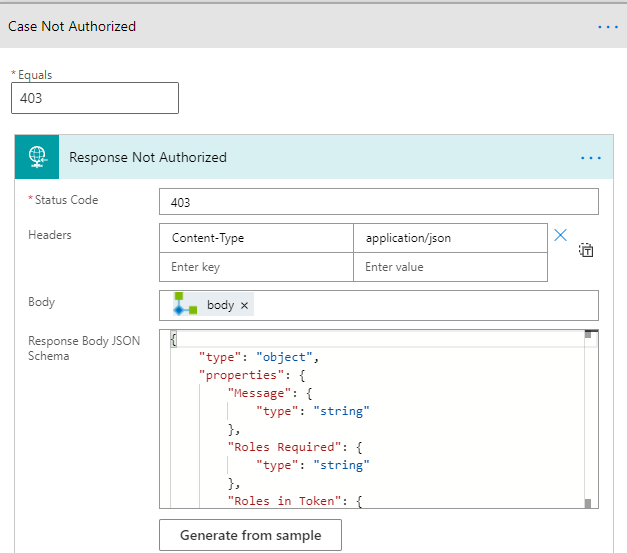
For status code 403 I have added the following Case and Response action, using the Body output again, but this time the schema is based on the 403 response from the Logic App API:
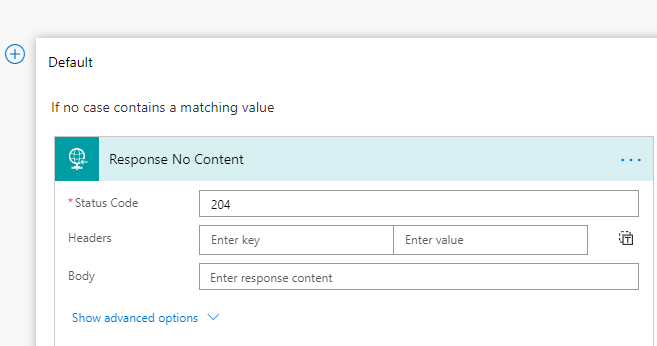
Last, as every case should have Response, I’ll add the following Default Case:
The whole Flow visualized:
PS! Instead of using the Response action, I could also have used the “Respond to PowerApps” action. However this action only let me return text strings, numbers, boolean etc, and I wanted to return native JSON response.
Make sure that you test and verify the Flow before you proceed.
Creating the Power App to connect to the Flow
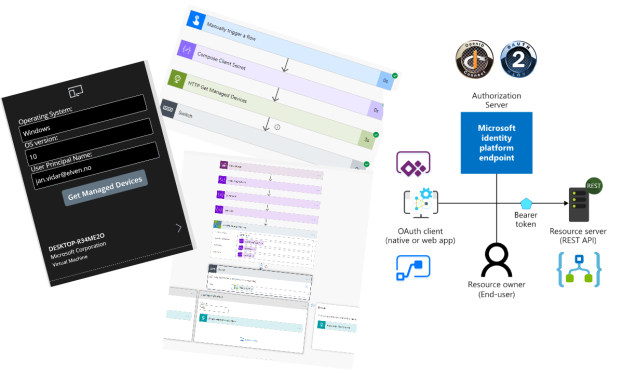
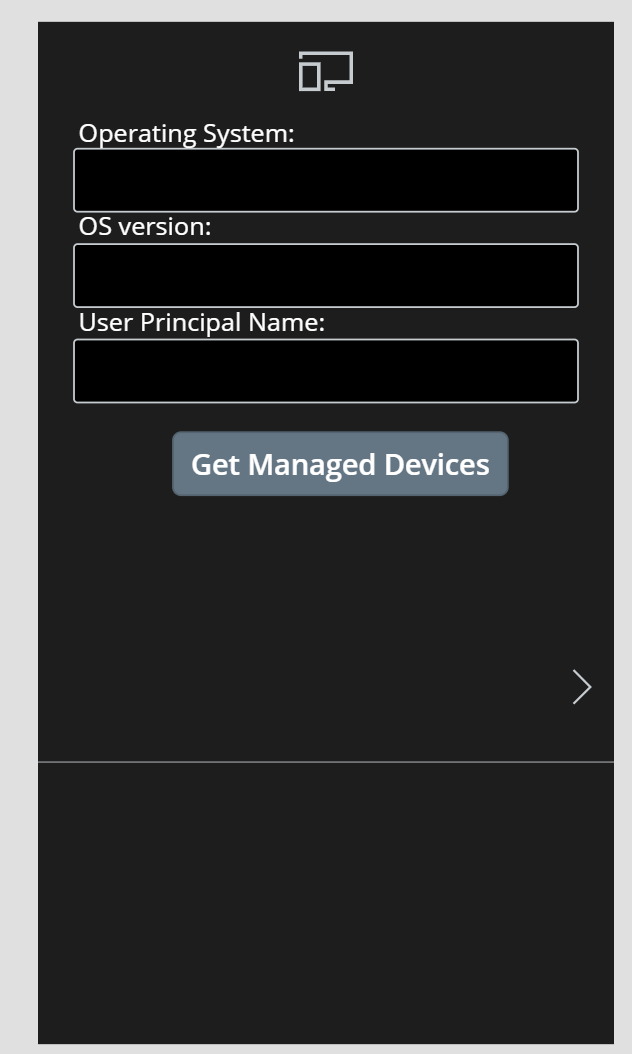
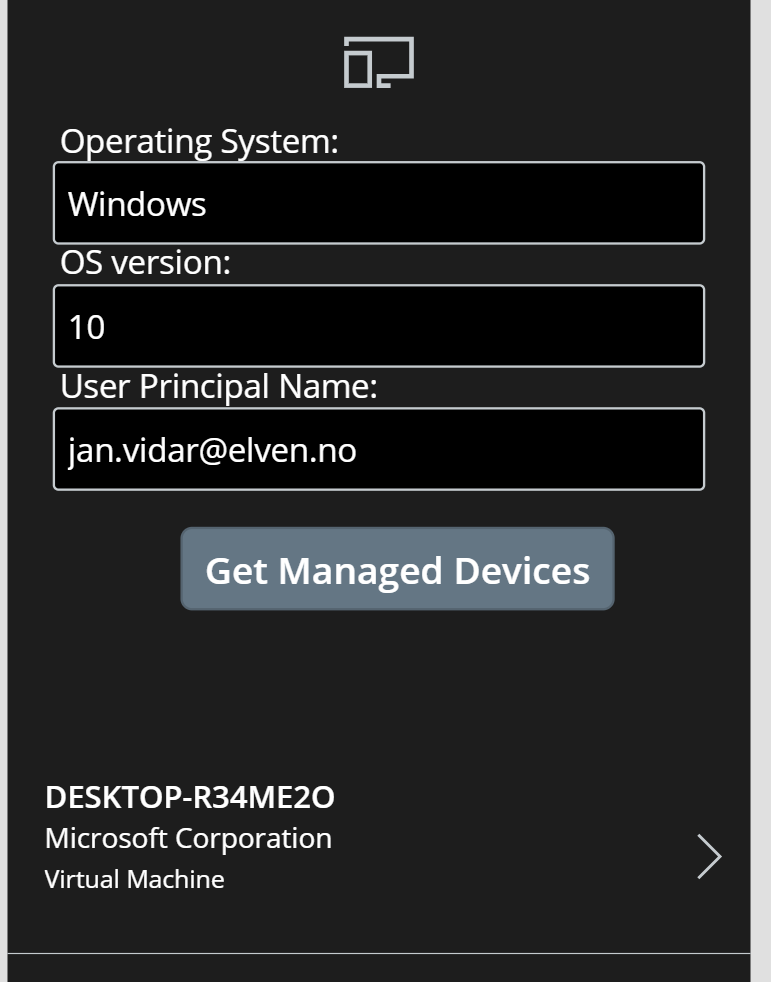
With the Flow ready, lets quickly build a PowerApp. My PowerApp is a Canvas App, and I have been using the Phone layout.
You can build this any way you want, but I used a dark theme, added an Icon at the top screen, and the 3 labels and text inputs for the parameters needed for the Flow. I then added a button for triggering the Flow, and under the button I have added a (hidden now) text label, for showing any error messages from the Flow. And I have added a Gallery control under there again for showing the resulting devices:
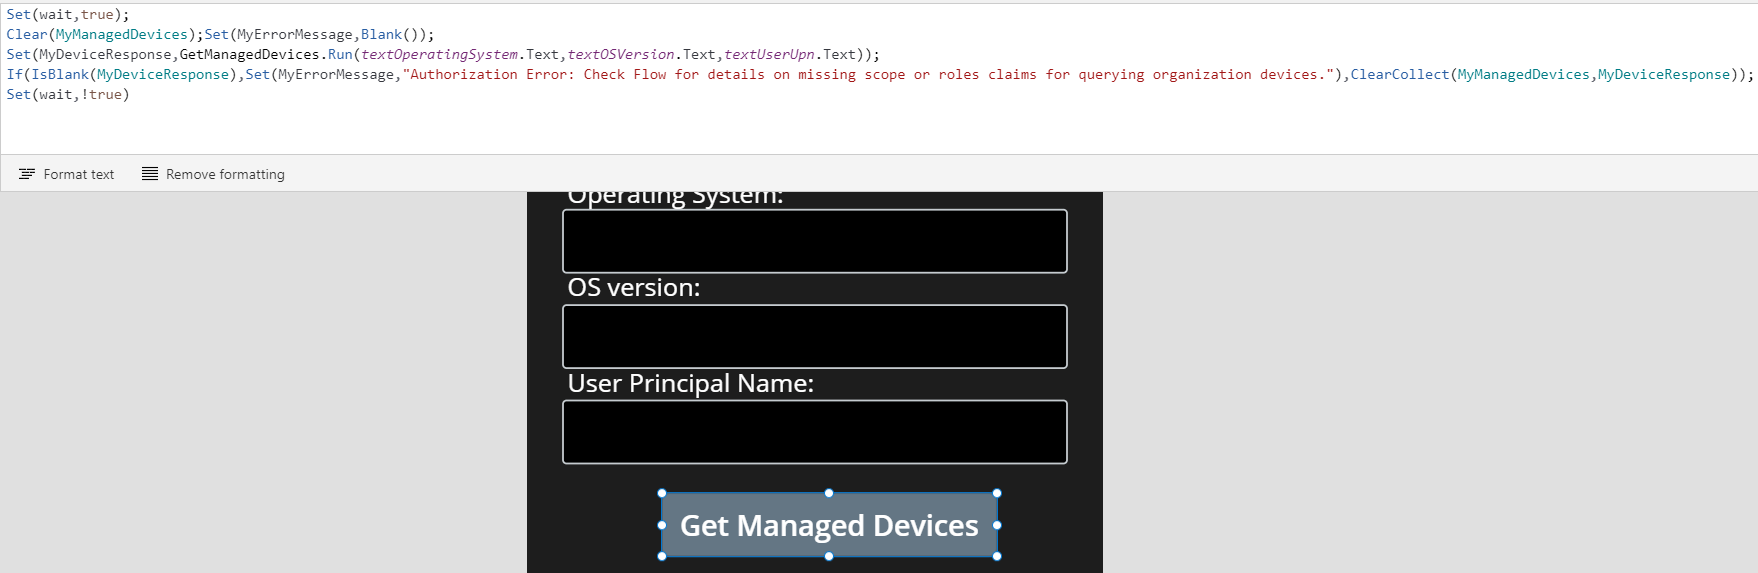
For the Button, select it and click on the Action menu and the Power Automate to connect your Flow. Next, change the “OnSelect” event for the Button to the following command:
Set(wait,true);
Clear(MyManagedDevices);Set(MyErrorMessage,Blank());
Set(MyDeviceResponse,GetManagedDevices.Run(textOperatingSystem.Text,textOSVersion.Text,textUserUpn.Text));
If(IsBlank(MyDeviceResponse),Set(MyErrorMessage,"Authorization Error: Check Flow for details on missing scope or roles claims for querying organization devices."),ClearCollect(MyManagedDevices,MyDeviceResponse));
Set(wait,!true)
A quick explanation of the commands above:
Set(wait,true) and Set(wait,!true) is to make the PowerApp “busy” when clicking.
I then Clear my Collection and Variable used.
I then use Set to get a “MyDeviceResponse”, this will return a collection of items (devices) returned via a JSON array from the Flow, or if I’m not authorized, it will return a failed response (based on the 403) and a blank MyDeviceResponse.
Next I do a If test, if the MyDeviceResponse i Blank, I’ll set the MyErrorMessage variable, if it’s not blank I will run a ClearCollect and fill the Collection with returned devices.
I fully appreciate that there might be other ways to do this fail checking and error handling, please let me know in the comments if you have other suggestions 🙂
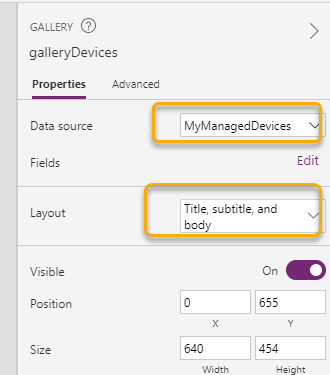
For the Gallery I set the Data source to MyManagedDevices collection, and I have selected to use the layout of “Title, subtitle, and body”. You can change the device data that get filled in for these items in the Galleri, for example Manufacturer, Version, Name etc.
And last I set the Text property of my error message label to the MyErrorMessage variable:
Let’s Save, Publish and test this PowerApp!
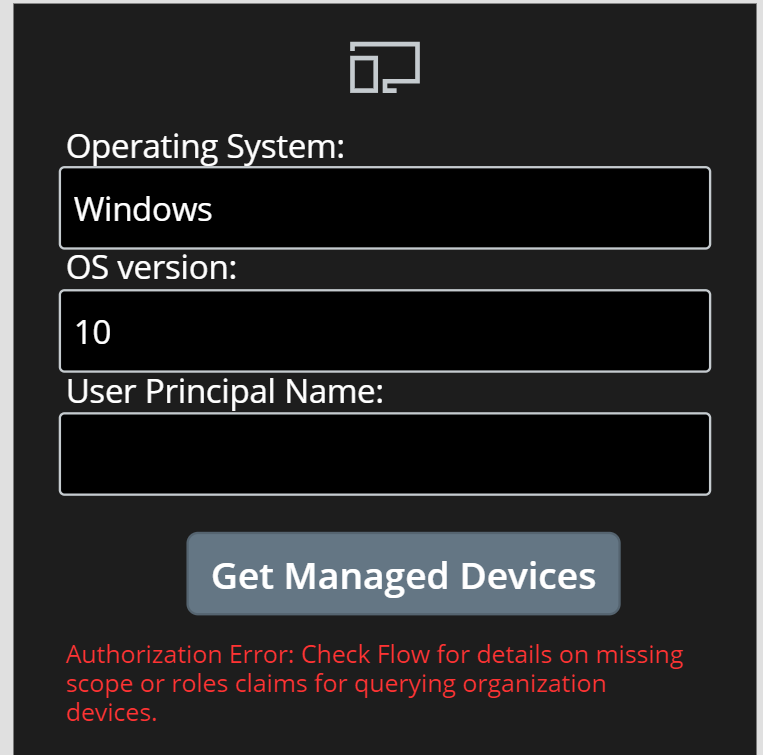
First, I’ll try to add parameters for getting all Windows 10 devices, leaving user principal name blank. This will via the Custom Connector send a request to the Logic App API to return all devices, and in this case I’m not authorized to do so, so I’ll get an authorization error:
This is something I can verify in the Flow run history also:
Next, I’ll try to return my test users devices only, and this is successful and will fill the gallery:
We now have a working Flow and PowerApp connected to the Logic App API using the signed in users delegated permissions. If I want I can now share the PowerApp and Flow including the Custom Connector with other users in my organization, and they can use their own user identity for connections to the Logic App API.
In the next part of this blog post I will show how you can access the Logic App API using HTTP action and application permissions.
Connect to Logic App API using HTTP action
Sometimes you will have scenarios where you want to use an application identity to call an API like the Logic App I have used in this blog post article series. This is especially useful if you want to run a Power Automate Flow without a logged in user’s permissions.
I the previous blog post part 2 for exposing Logic App as an API, I created this App Registration to represent the Application Client scenarios and Application permissions:
In that App Registration, create a new Client Secret for using in Power Automate, and copy this to your clipboard:
Make sure to copy the Application (Client) ID and Tenant ID also:
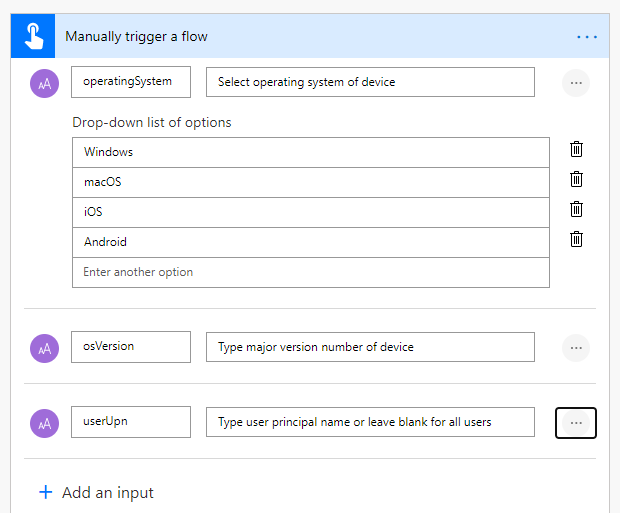
Now let’s create a new Power Automate Flow to test this scenario. This type of Flow could use a range of different triggers based on your needs, but I’ll just use a Instant Cloud Flow as trigger where I have configured the following inputs:
Note that I have configured userUpn as an optional input.
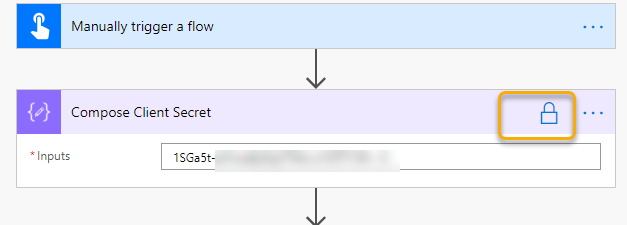
Next add a “Compose” action for the Client Secret, give the action a name and paste in the Client Secret you created earlier. Note the Lock symbol:
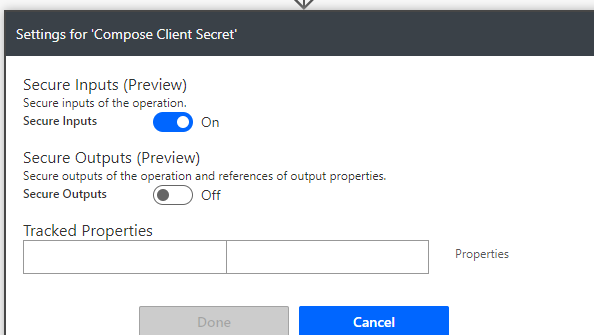
Click on settings and select to Secure Inputs:
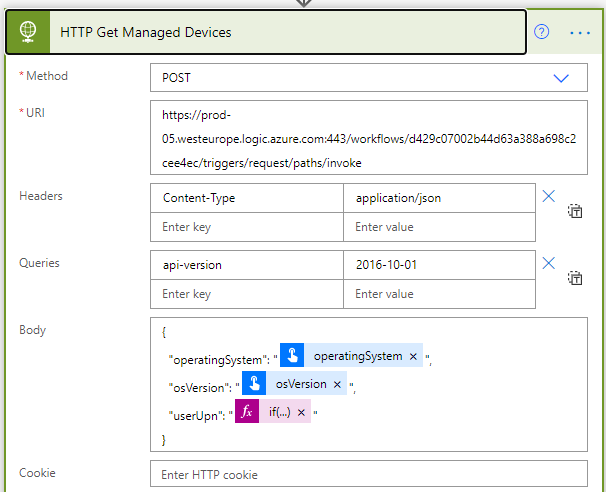
Next add a HTTP action, specifying the Method to POST and the URI to be the LogicApp API url, remember to not include the sv, sp and sig query parameters. Set Headers Content-Type to application/json, and under queries add the api-version. For body build the JSON request body using the inputs. We need to build a dynamic expression for userUpn, as this can be optional. I have used the following expression:
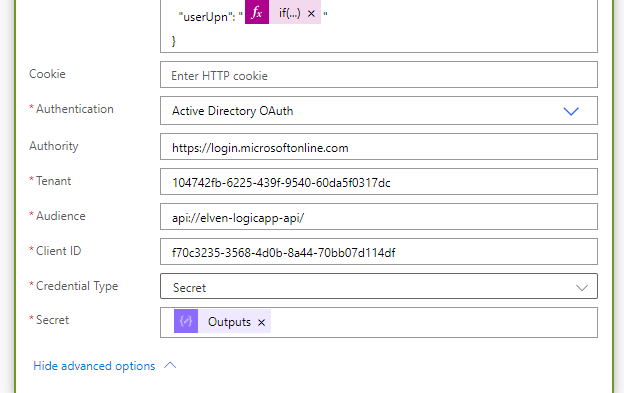
Click to show advanced settings, and choose Authentication to use Azure AD OAuth. Add the authority, tenant id and set audience to the custom Logic App API URI. Then paste in the Application (Client) Id, and use the Outputs from the Compose Client Secret action:
This authentication above will use the Client Credentials Flow to get an access token that will be accepted by the Logic App API.
The remaining parts of this Flow can be exactly the same as the previous Flow we built, a Switch control that continiues on success/failure of the HTTP action:
And then returning Response objects from the HTTP action body for each case:
When testing the Flow now, I can see that the client secret is hidden from all relevant actions:
Summary and Next Steps
We are at the end of another extensive blog post. The focus for this article has been to show how you can use Power Automate to connect to your custom API, that we built in the previous blog post for exposing the Logic App as an API.
The community are increasingly creating Power Platform custom connectors and http actions that sends requests to API’s to Microsoft Graph directly, and that is great but it might result in too extensive permissions given to users and application clients. My focus has been to show how you can control authentication and authorization using on-behalf-of flows hidden behind a Logic App API where users and clients are allowed to send requests based on allowed permission scopes and/or roles, using the powers of Azure Active Directory and OAuth2.
There will be a later blog post in this series also, where I look into how Azure API Management can be used in these scenarios as well.
In the meantime, thanks for reading, hope it has been helpful!
Recently I came across a personal scenario where I use Hugo and GitHub Pages as a team site for a Soccer team I’m coaching and wanted to automate some updates to the web site. I’ve written a blog post previously on how I organized trainings at home using Power Platform: How I as a Soccer Coach…. | GoToGuy Blog, and I am now using Github Pages and Hugo for publishing some statistics and more for that scenario.
In this blog post I will show how I:
Created an OAuth Application for Github API.
Created a Custom Connector in Power Platform for connections to that OAuth Application.
Created Operations for getting content, updating content and triggering workflows for Github Actions.
Connected to Github API using my Azure AD account and user impersonation.
Created a Power Automate Cloud Flow for using the Custom Connector and the defined operations.
Lets get started!
Create OAuth Application for Github API
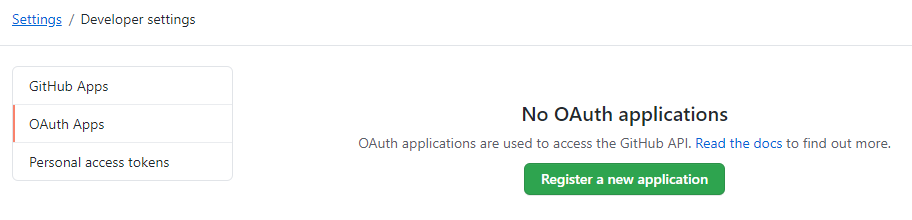
Start by logging in to your GitHub account and go to Settings. Under Settings you will find Developer Settings where you can access OAuth Apps. You can also go directly to the following URL https://github.com/settings/developers.
Click to Register a new application, and fill in something like the following:
As the above image shows, give the application a descriptive name for your scenario, you can type any homepage URL, this is not important in this scenario. The authorization callback URL is important though, as this will the callback to the Custom Connector we will create later. We can verify the URL later, but use https://global.consent.azure-apim.net/redirect.
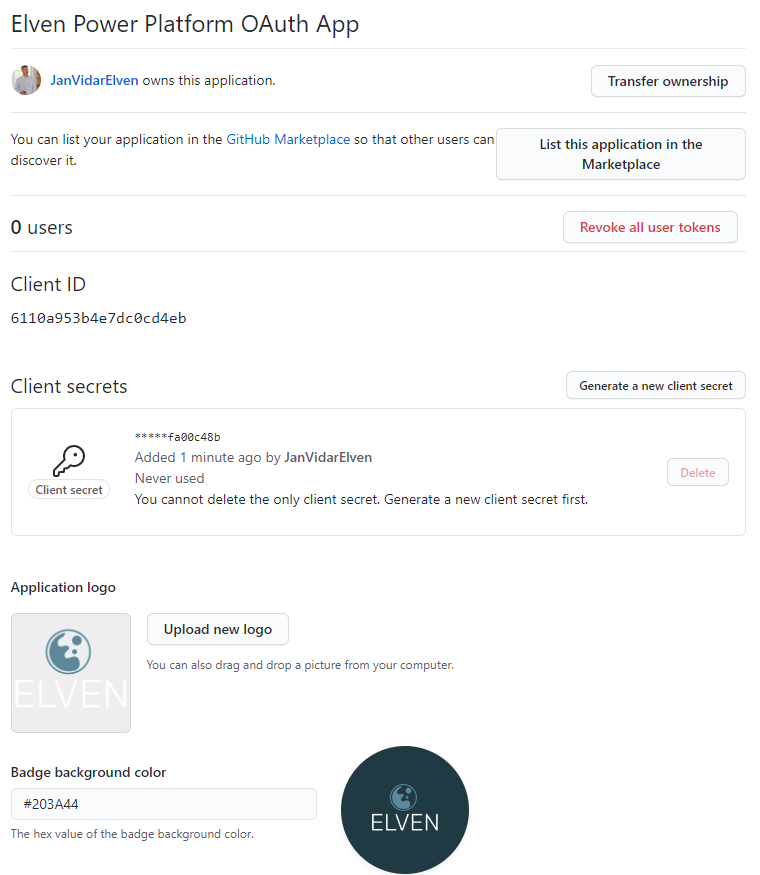
Register the application. Next you can change the settings for the registered app. You will have to copy the Client ID, we will need that later. You also need to create Client Secret, make sure to copy that as well, you will only be able to see this once. You can also change some settings like name, logo and branding if you like. This is how my Github App registration looks like now:
We can now proceed to Power Platform to create the Custom Connector.
Create Custom Connector to Github API in Power Platform
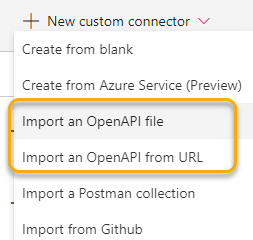
Log in to your Power Platform environment, and go to Custom Connectors under Data. Click to create a New custom connector. You can select to create from blank if you want to follow along the steps in my blog post here, or you can select to import an OpenAPI for URL, as I will provide the swagger file at the end of this blog post.
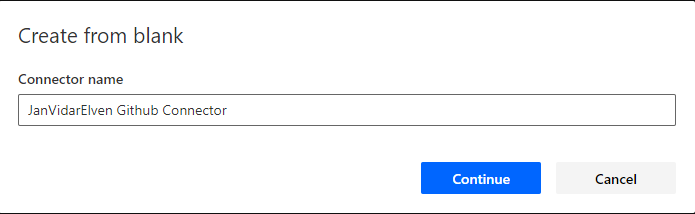
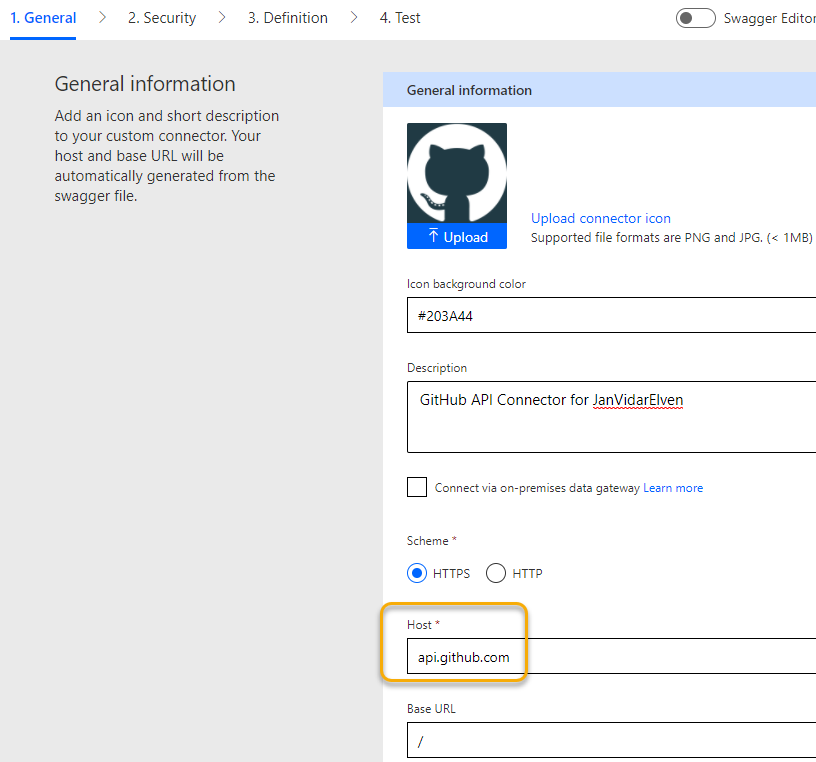
Give the connector a name of your choice and continue:
Next you need to specify “api.github.com” as host. You can also optionally upload a connector icon, as I have done here:
(You can grab the mark logo used above from here, GitHub Logos and Usage, note the usage requirements).
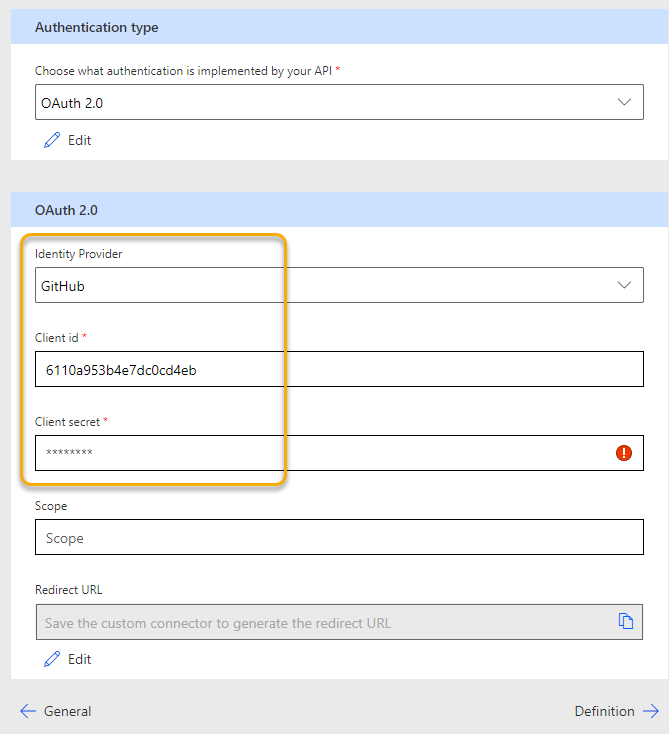
Next, go to Security. Select OAuth 2.0 as authentication type, and then selec GitHub as Identity Provider.
(PS! You can select Generic OAuth 2 also, but it will fall back to GitHub as Identity Provider eventually after all).
Add your Client ID and Secret from the Github OAuth application registration:
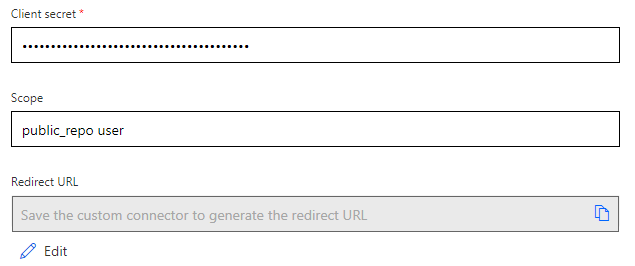
It is important to configure the correct scope (or scopes) as this will authorize the client for accessing the API. If you leave the scope blank, you will only get public read only access. You can read more on available scopes here: Scopes for OAuth Apps – GitHub Docs
In my case I want to have full read and write access to public repositories, as well as read write to user profile, so I set the scope to “public_repo user” (use space delimiter for multiple scopes):
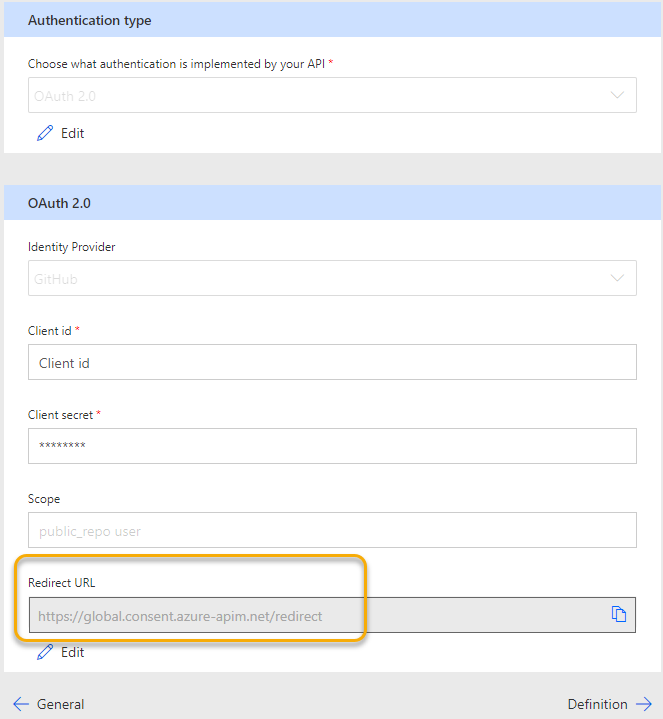
I can now click “Create connector”. After creating the security details are now hidden/disabled, and I can verify the Redirect URL to be the same as the Callback URL from the GitHub OAuth app registration:
We can now start defining the operations for the actions I want to do against the GitHub API.
Create Operations for sending requests to GitHub API
When querying and sending request to the GitHub API you need to know the API details and required parameters for what you want. The following link is for the official GitHub Rest API reference: Reference – GitHub Docs.
In my example I want to define the following 3 operations in my Custom Connector:
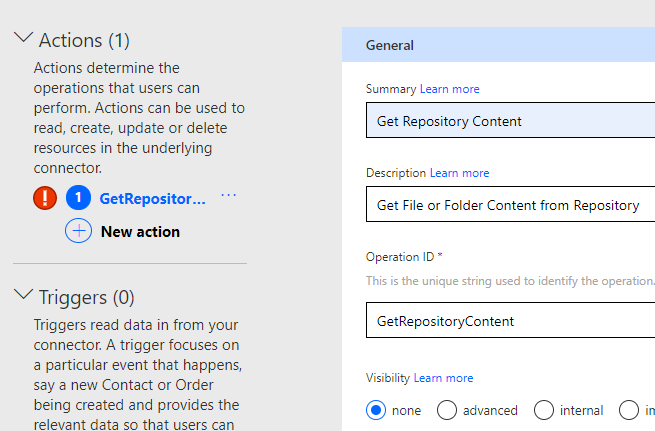
Under 3. Definition, select to create a New action, and call it something like “Get Repository Content” with the Operation ID set to “GetRepositoryContent”:
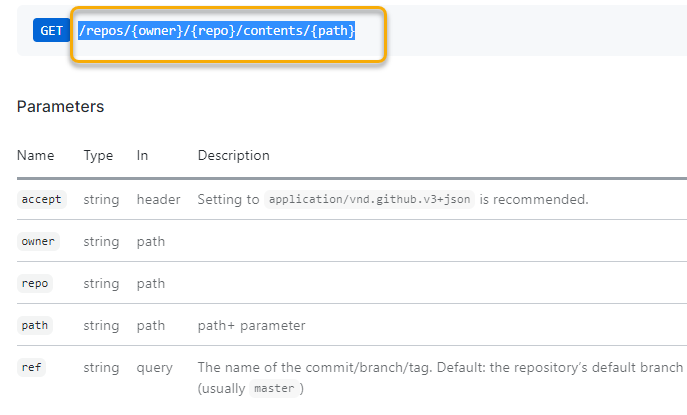
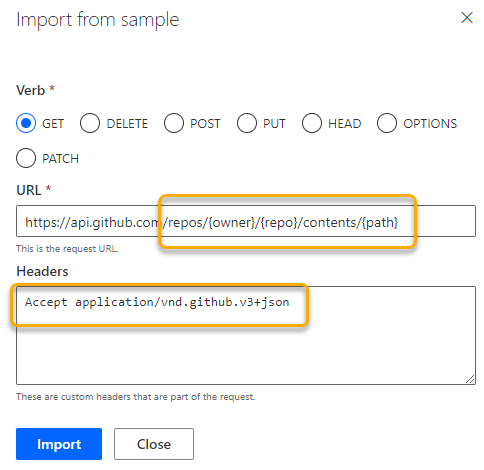
Then, under Request, click Import from sample. Select the Verb GET, and under URL type https://api.github.com. The rest of the query we will get from the GitHub API docs. Copy the following fra the REST API reference docs:
So that your sample request now looks like this, remember to add the recommended Accept header:
Click Import. The request will now ask for owner, repo and path as parameters:
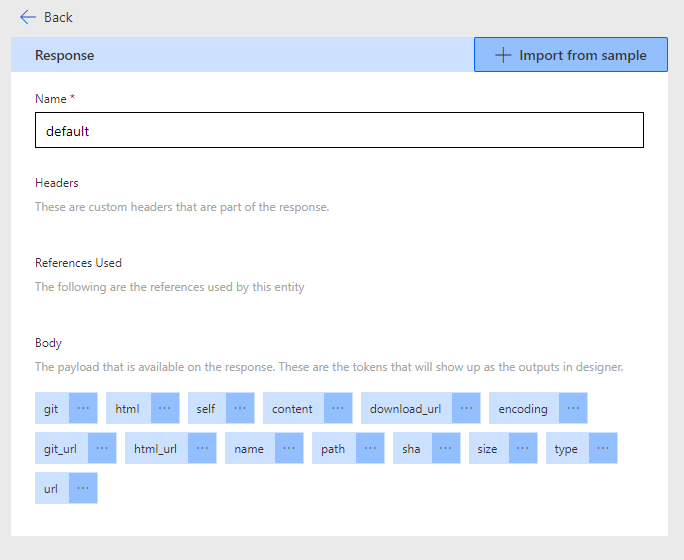
Next, click the default response. Here you can copy the sample response from the REST API docs, I’ve copied the sample response for getting file contents:
After that click “Update connector” and we have the first action operation defined.
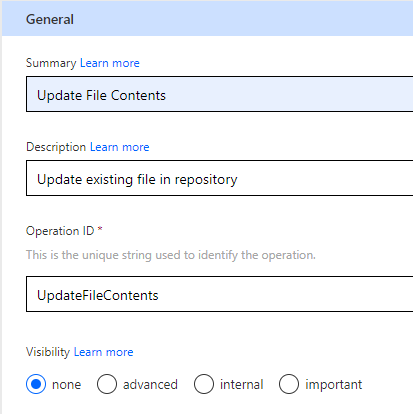
Click New action again, this time for updating file contents:
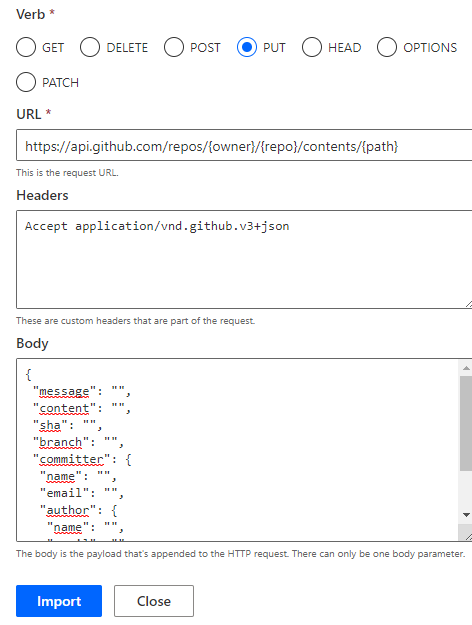
For the sample request the Verb is PUT, the URL is the same as when getting file content, but now we need to specify a request body as well:
I’ve created the sample request body based on the docs reference, with just empty placeholder values for the parameters needed. Some of these can be omitted, but message, contents, sha and branch is required for updating an existing file:
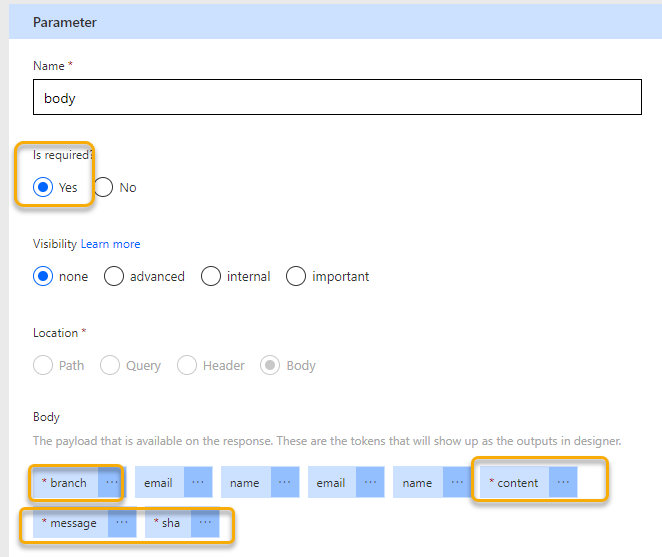
After importing the sample request, you can click into the body parameter and change to required for the body itself, as well as the payload parameters that you always want to include from below:
Add a sample default response as well, I’ve copied the example response for updating a file from the docs.
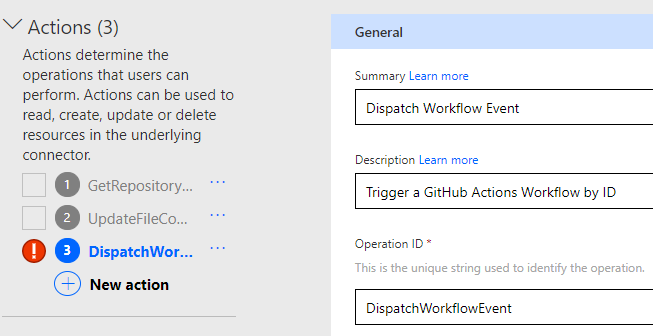
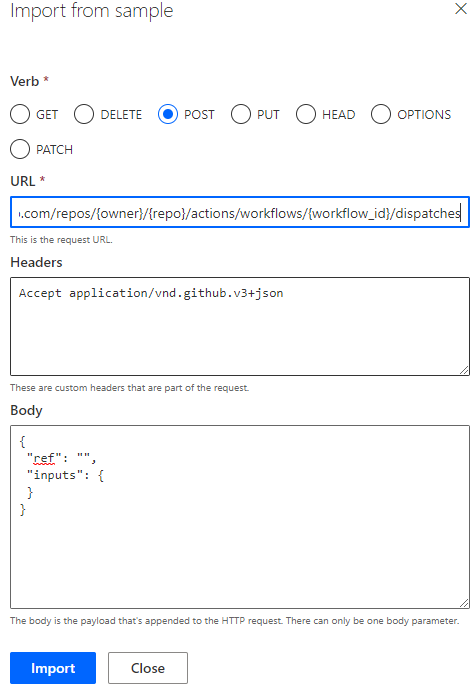
Click “Update connector” again and we are ready to add the third action:
This will be a POST request, with the following URL and request body:
Note from above that “ref” needs to be referencing a branch or tag name as is a required parameter. “Inputs” is an object, depending on your GitHub Actions workflow if incoming parameters is defned, so in many cases this can be empty.
You can leave the default response as it is, as API will return 204 No Content if request is successful.
Click on “Update connector” again, and you should now have 3 actions successfully configured.
We can now proceed to create a connection and authenticate to GitHub API using this custom connector.
Connect to Github API using my Azure AD account and user impersonation
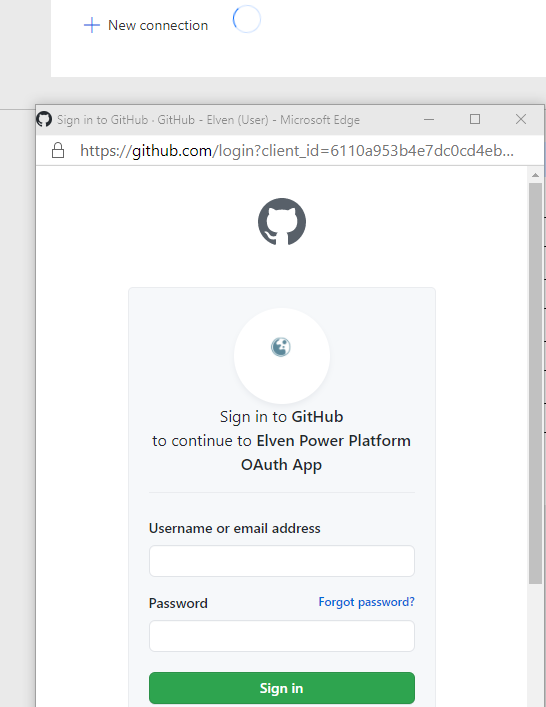
Go to “4. Test”, and click to create a “New connection”. This will create a new authentication popup, and if you’re not already logged in to GitHub you must log in first. Note the correct reference and branding to the “Elven Power Platform OAuth App”:
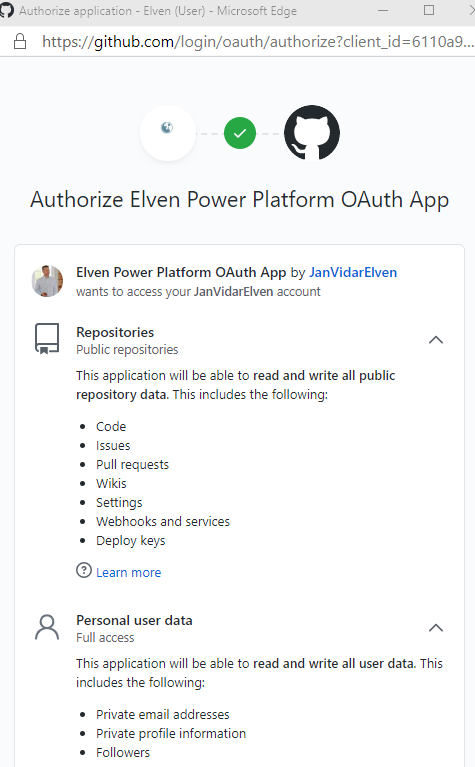
After logging in I’m prompted to authorize the OAuth app to access data in my account. Note that the scopes “public_repo” and “user” is shown in the authorization request:
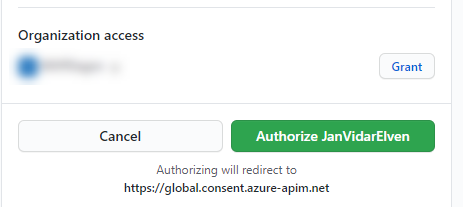
If you own other organizations you can grant access to that as well. Click Authorize “OwnerName”: as shown below:
After authorizing you will be redirected back to the Connections, and you should be able to successfully get a new connection object.
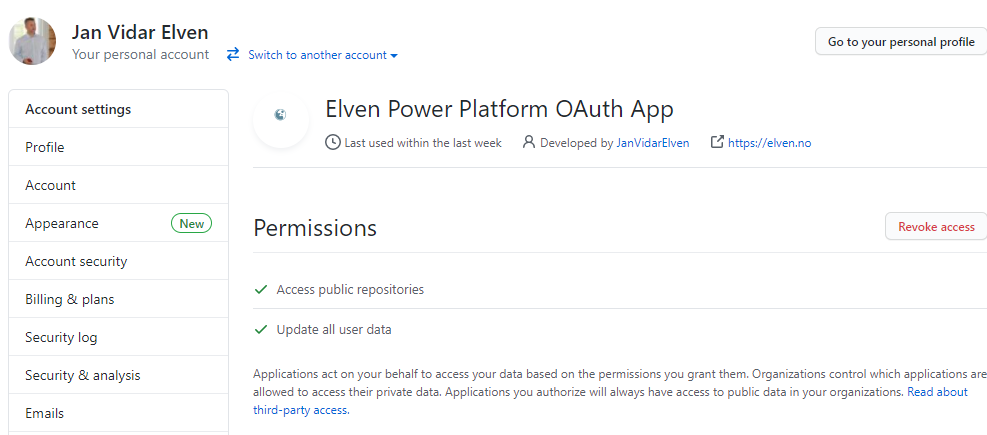
Let’s take a look at GitHub settings again, under https://github.com/settings/applications. You should see the OAuth App and the correct permissions configured if you click into details. You can also revoke the access if you need to remove it or reconfigure the scopes for example:
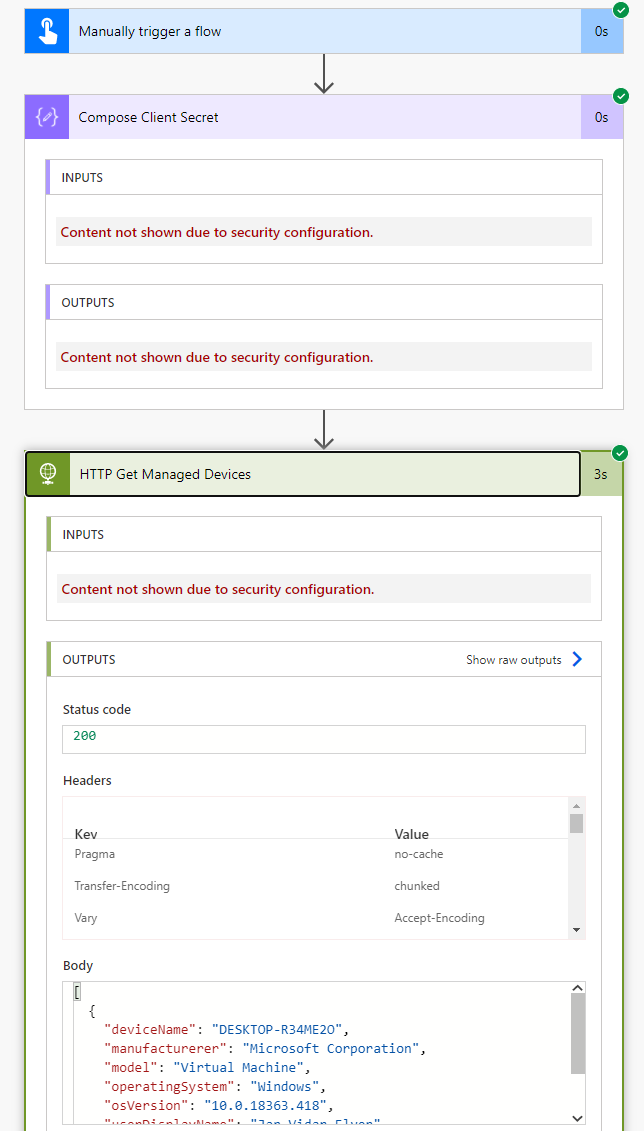
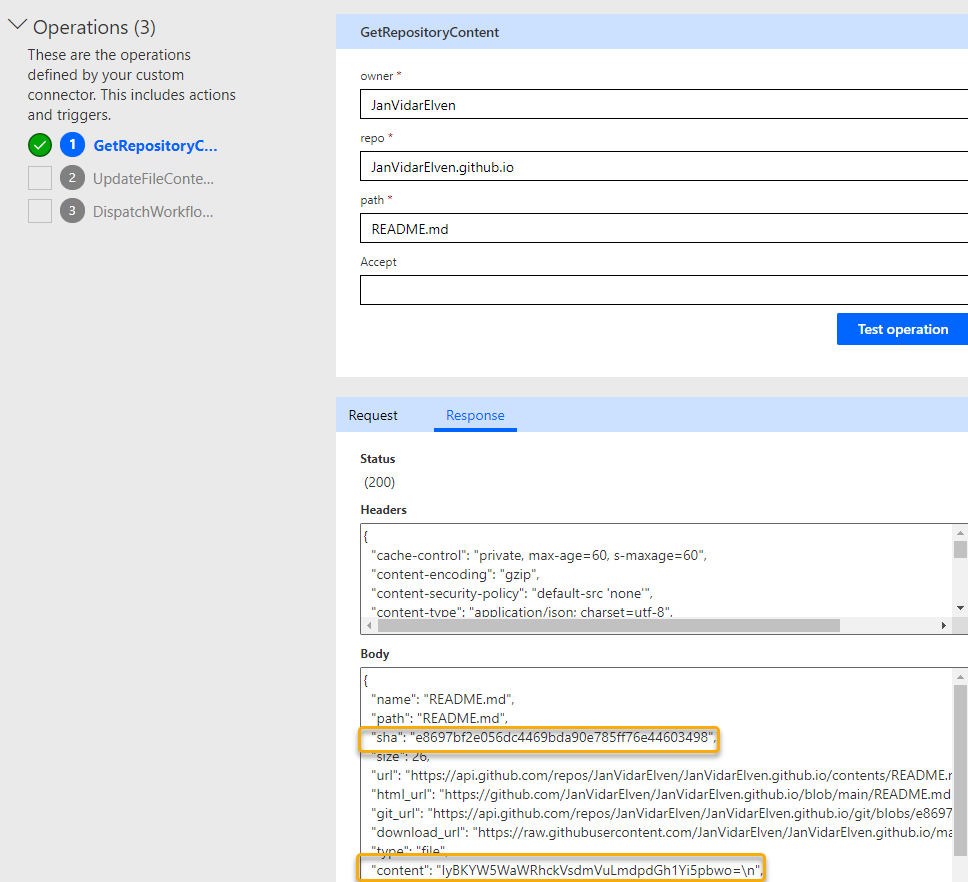
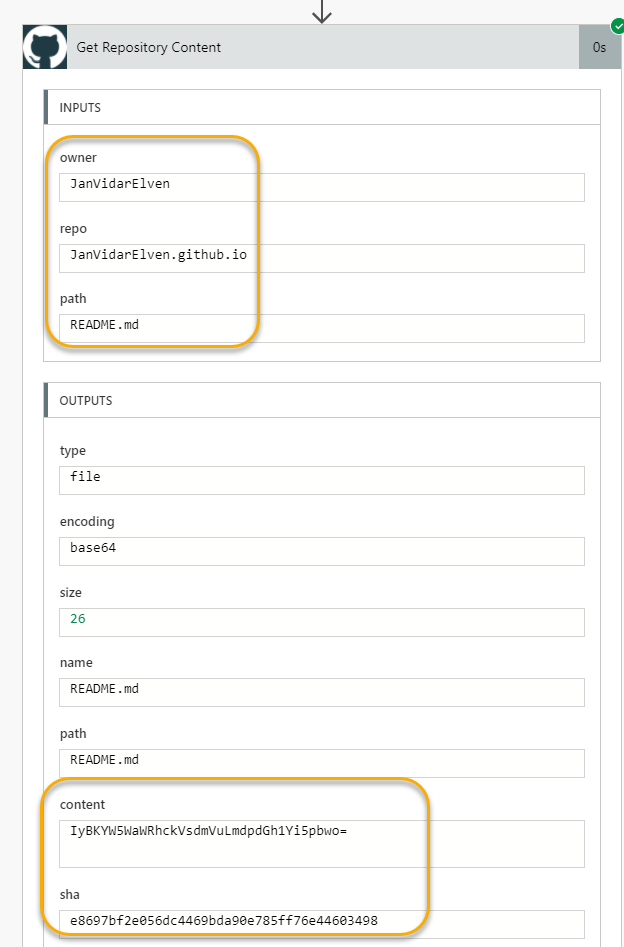
Let’s do a test from the Custom Connector and see what we get. Click on the GetRepositoryContent, and provide the paramaters for “owner” (your GitHub account name), “repo” (any repository, I’m using my GitHub Pages repo here), and a “path” to an existing file in that repo (I’m just testing against my README.md at root, but this can be any subfolder\file also). Click Test operation and see:
This should be successful, note that the response contains a couple of important values for later, the “sha” for the existing file, and the “content” which is a base64 representation of the current contents of the README.md file.
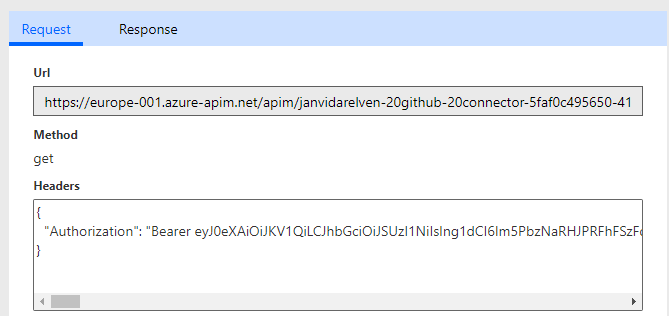
Click on the Request tab, and you will see a preview of how the request was constructed. You will also see the Authorization Header with the Bearer Token:
A couple of important things to note:
The request uses an API gateway in Azure APIM, not GitHub directly.
The Bearer Token in the Authorization Header is for the Azure API GW audience, so it cannot be used directly against GitHub API.
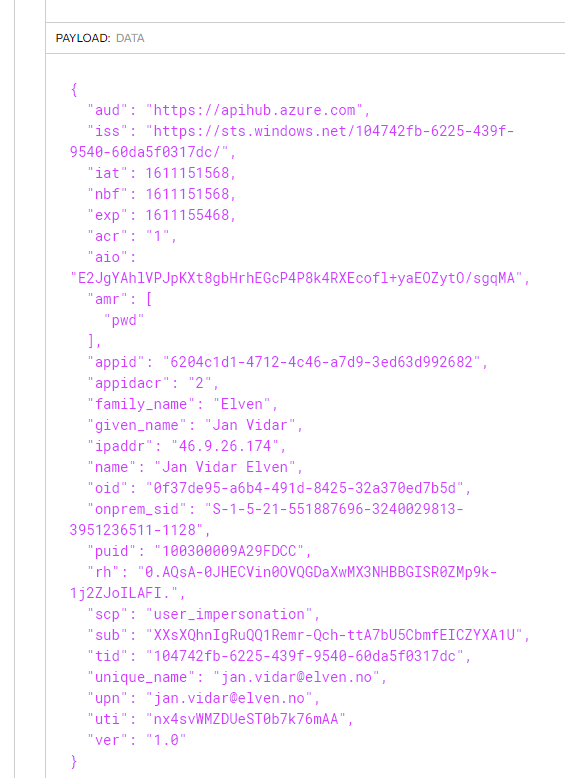
Copy the entire token value, from after “Bearer <token……>”, and paste it into a JWT debugger like jwt.io. From there we can look at the decoded payload:
From that payload it’s clear that the Token has been issued by my Azure AD tenant and for my logged on user in Power Platform. The scope is user_impersonation, so this will be used in a on-behalf-of flow scenario via the audience defined as apihub.azure.com, which in turn will request from GitHub API resources on my behalf via the APIM gateway used by Power Platform.
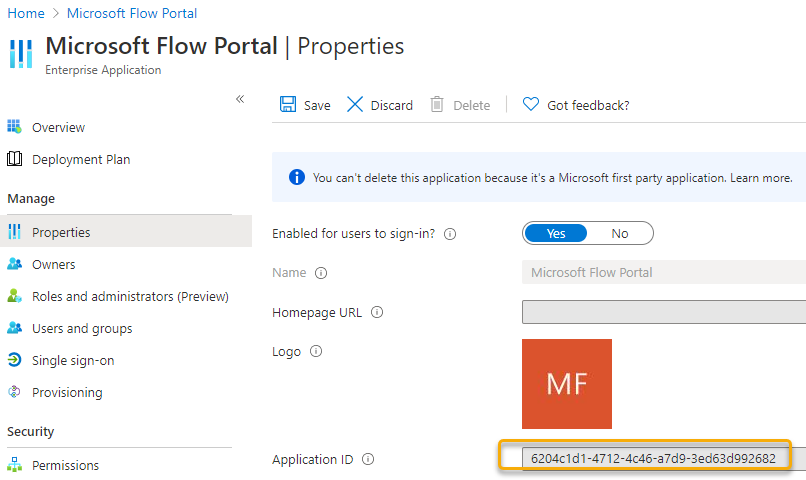
You can also lookup the appid from the Token in the Azure AD tenant, and you will find the following Enterprise Application, from where you can enable or disable it on an organization level, or you can examine the sign in logs:
We can test the other operations as well, but let’s create a Flow for that scenario.
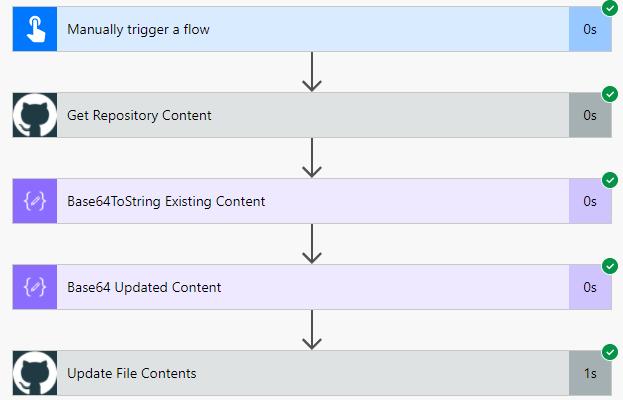
Create a Power Automate Cloud Flow for using the Custom Connector to Get and Update File Content
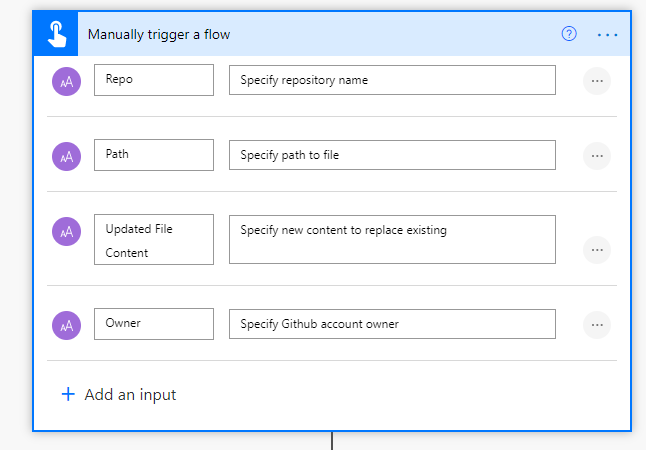
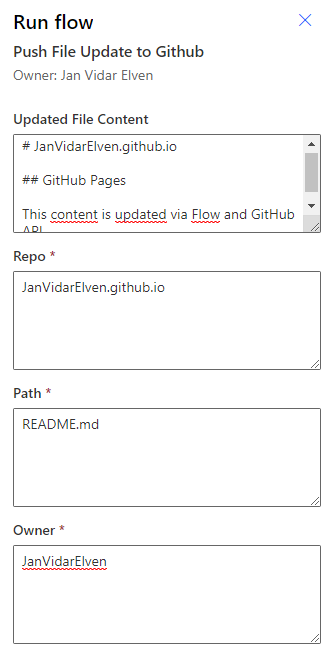
Create a new Cloud Flow, using an instant trigger for manually triggering a flow. Add some inputs like shown below:
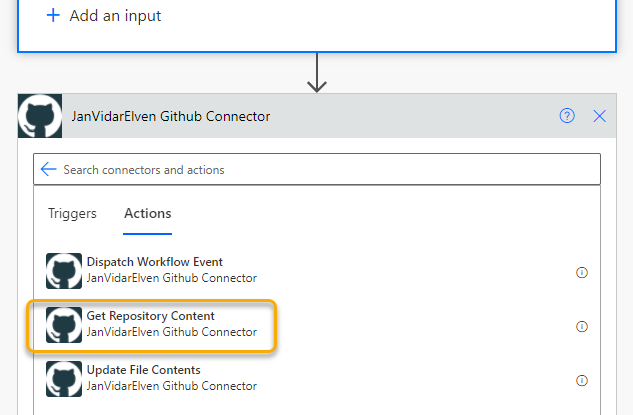
Next, add a new action and from under Custom find the GitHub Custom Connector:
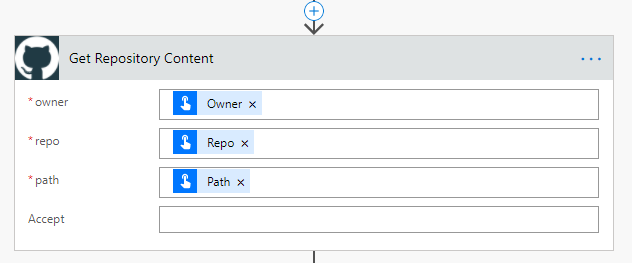
Add the “Get Repository Content” action and then fill in the inputs like below:
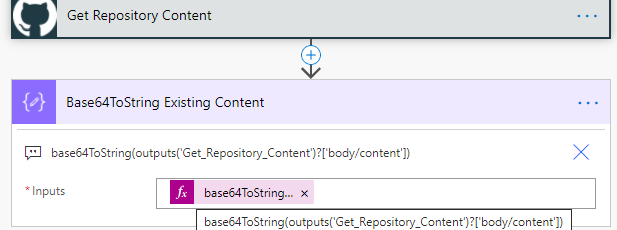
Next, add a Compose action, with the following dynamic expression:
This is just for checking what the existing file contents is:
We can do a quick Save and then Test Flow so far, from the Run history I should get the correct inputs, and when finding the existing file the outputs will include the sha value of the existing file, as well as the base64 encoded value of the content:
And when looking at the decoding of the content I can see that the readme.md file content is shown correctly:
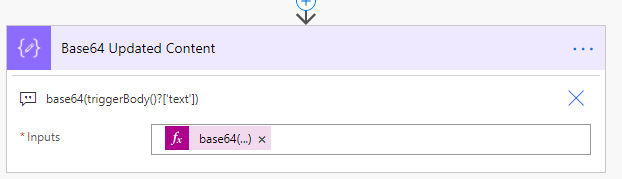
Go into Flow edit mode again, and add another Compose action, this time we need to base64 encode the new content I want to update the file with:
Note that the base64 function uses for parameter the input trigger of base64(triggerBody()?['text']), as this is the first text parameter of the trigger.
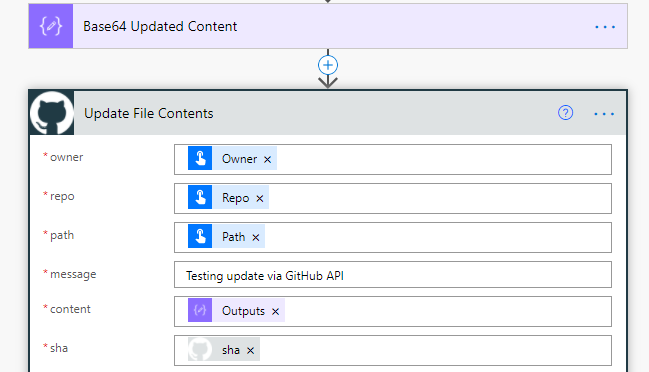
Add a new action, this time for the Custom Connector again, and the Update File Contents. Specify the owner, repo and path as previously input values, type a custom message for the message, and select the outputs from the “Base64 Updated Content” action, and use the sha value from the “Get Repository Content”. The rest of the values (committer, author objects) are optional:
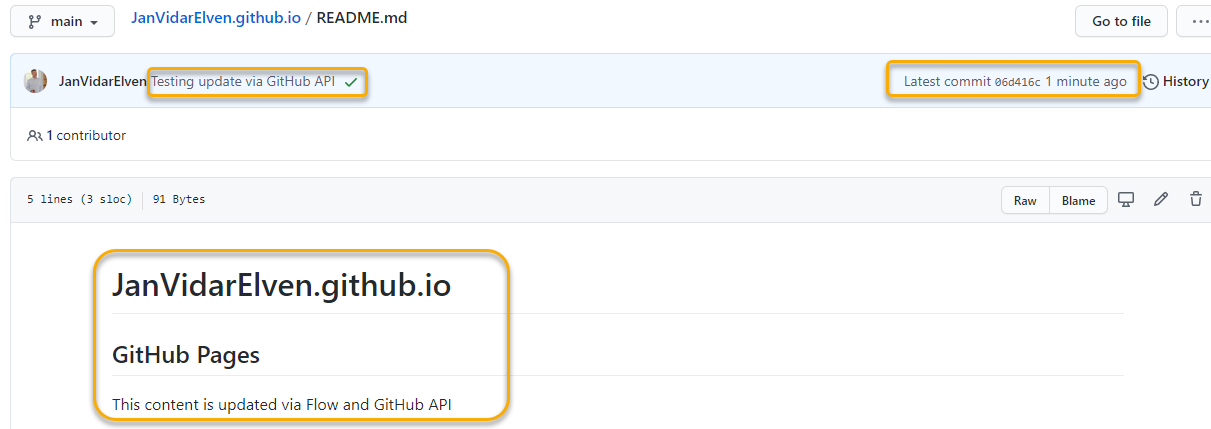
Save and then do another test, for example like the following to update the README.md file:
And the test should be successful:
I can also verify this at my repository and check the file has been updated. Note also the commit message:
Triggering a GitHub Actions Workflow
The last thing I wanted to go through in this blog post is using the Power Platform Custom Connector to trigger a GitHub Actions workflow. My use case for this is to start a Hugo build when I have dynamically updated files for my static website, but for now I will keep it simple.
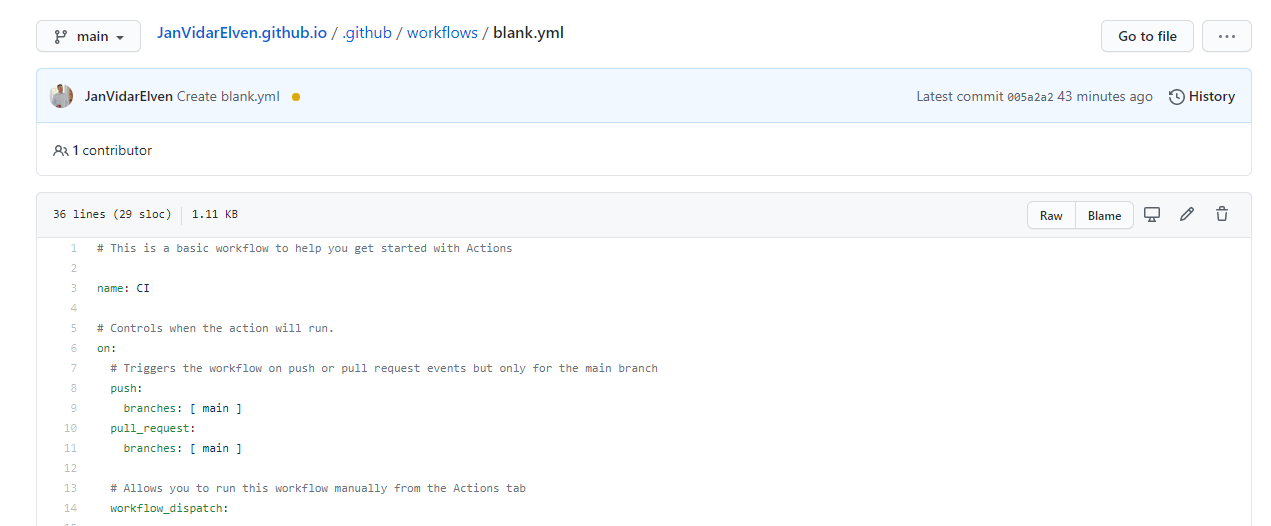
I have via a basic template created a simple workflow like this:
This workflow can also be triggered manually using workflow_dispatch, so let’s use that to verify that I can call it from Power Platform.
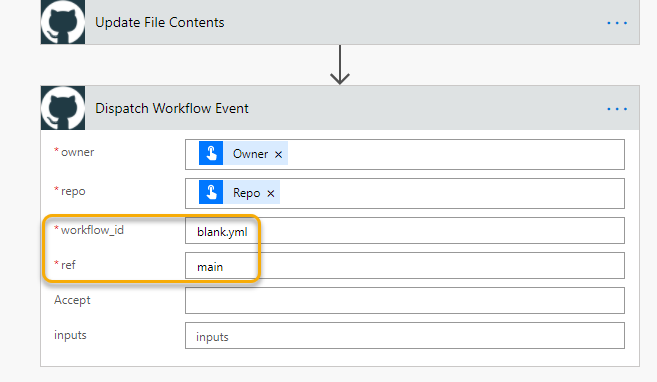
Add a new action at the end of the Flow, adding the Custom Connector action for Dispatching Workflow event:
Specify Owner and Repo from inputs, and for workflow id either specify ID or the name of the workflow file, in this case blank.yml. The ref parameter is either a branch or tag name, so in my case I use main branch. I leave the other parameters blank as I don’t have any inputs to supply, and use the default Accept header.
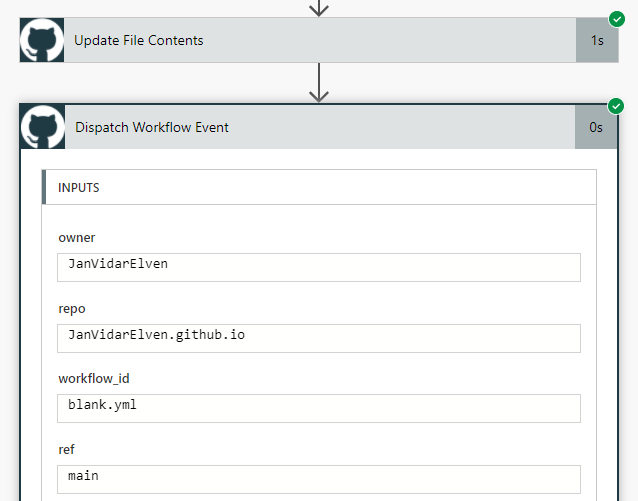
Save and Test the Flow again, supplying an updated file content, owner, repo and path similar to what we did previously. When the Flow runs it should complete successfully:
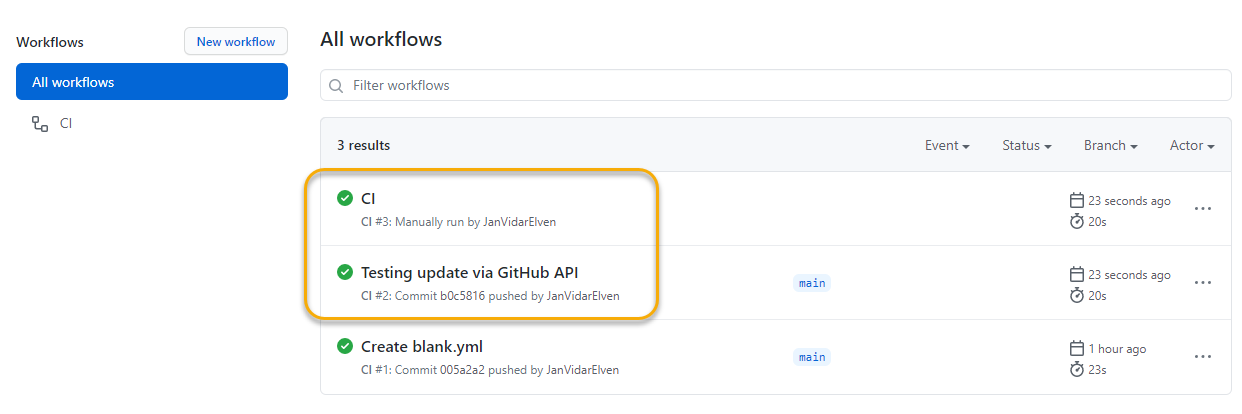
If I go to my GitHub repository, and under Actions, I can see that this workflow has been triggered:
Actually it has been triggered twice, as the first trigger is automatic for the push commit on the file update, and the other (named “CI” in results) is the actual workflow dispatch from the Flow.
Basically this means that I can select some different logic to when my workflows will trigger, either as a push or pull trigger, or as a trigger event based on my Flows. But of course I won’t normally run both triggers 😉
I now have what I need for working further with my personal Hugo and GitHub Pages project, my plan is to update data and assets files from my Power Platform environment, and then trigger a Hugo build for my website. I might blog more on that process later.
Summary and some last thoughts
In this blog post I wanted to show how you can work with the GitHub REST API via a Power Platform Custom Connector. This way you can basically achieve anything that the GitHub API has available, provided the correct scope/scopes has been authorized.
I do want to mention however that there is a GitHub Connector you can use directly in Power Automate, Logic Apps, or Power Apps also: GitHub – Connectors | Microsoft Docs, where you can create a direct connection to your GitHub account. You should take a look at that if that can server your needs.
In my case I needed the API to get or update file contents directly, as well as when using impersonation people in my organization can use their own Azure AD accounts if I share the Custom Connector with them, they don’t need their own GitHub accounts as long as the OAuth App has been authorized on my behalf.
If you want a quickstart on creating the Custom Connector your self, below is the Swagger definition. Thanks for reading, hope it has been useful!
This file contains hidden or bidirectional Unicode text that may be interpreted or compiled differently than what appears below. To review, open the file in an editor that reveals hidden Unicode characters.
Learn more about bidirectional Unicode characters