Category Archives: OAuth2

Protect Logic Apps with Azure AD OAuth – Part 1 Management Access

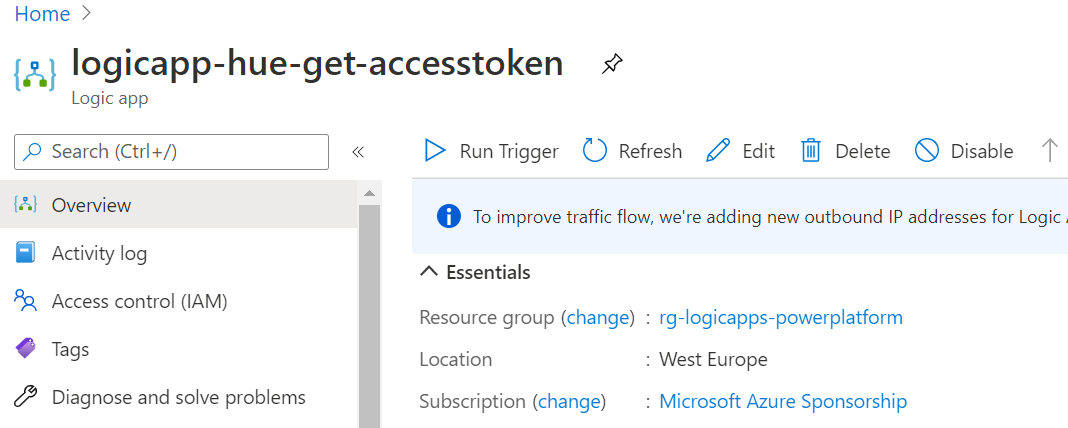
Azure Logic Apps are great for creating workflows for your IT automation scenarios. Logic App workflows can be triggered using a variety of sources and events, including schedules, but a popular trigger is using a HTTP trigger for starting the Logic App workflow interactively or on-demand from outside the Logic App.

To trigger a Logic App using a HTTP trigger, you need to know the endpoint URL, for example:

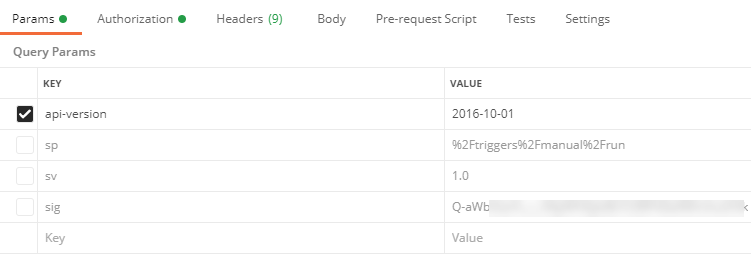
This URL consist of the endpoint address of the Logic App and workflow trigger, and with the following query parameters:

  • api-version
  • sp (specifies permissions for permitted HTTP methods to use)
  • sv (SAS version to use)
  • sig (shared access signature)

Anyone with access to this URL and query parameters kan trigger the Logic App, so it’s very important to protect it from unauthorized access and use.

In this multi part blog post series we will look into how Logic Apps can be protected by Azure AD.

Scenarios this multi-part blog post articles will cover:

  • Provide Management Access Tokens and Restrict Issuer and Audience via OAuth
  • Restrict External Guest User Access
  • Expose Logic App as API
  • Restrict permitted Enterprise Application Users and Groups and Conditional Access policies.
  • Scopes and Roles Authorization in Logic Apps.
  • Logic Apps and APIM (Azure API Management).

Lets first look at the other methods for protecting Logic Apps you should be aware of.

Protect Logic Apps Keys and URLs

Before we move on to protecting Logic Apps with Azure AD Open Authentication (OAuth), lets take a quick summary of other protections you should be aware of:

  • Regenerate access keys. If you have reason to think SAS keys are shared outside your control, you can regenerate and thus making previous SAS keys invalid.
  • Create expiring Callback URLs. If you need to share URLs with people outside your organization or team, you can limit exposure by creating a Callback URL that expire on a certain date and time.
  • Create Callback URL with primary or secondary key. You can select to create the Callback URL with the specified primary or secondary SAS key.

The above methods should be part of any governance and security strategy for protecting Logic Apps that perform privilieged actions or might return sensitive data.

Protect Logic Apps via restricting inbound IP address

Another way to protect Logic Apps is to restrict from where the Logic App can be triggered via inbound IP address restrictions.

This opens up scenarios where you can specify your datacenter IP ranges, or only let other Logic Apps outbound IP addresses call nested Logic Apps, or only allow Azure API management to call Logic App.

Protect Logic Apps with Azure AD OAuth

By creating an Authtorization Policy for your Logic App you can use a Authorization header with a Bearer Token and require that the token contains the specified issuer, audience or other claims. Showing how that works in detail, and usable scenarios will be the main focus for this blog post.

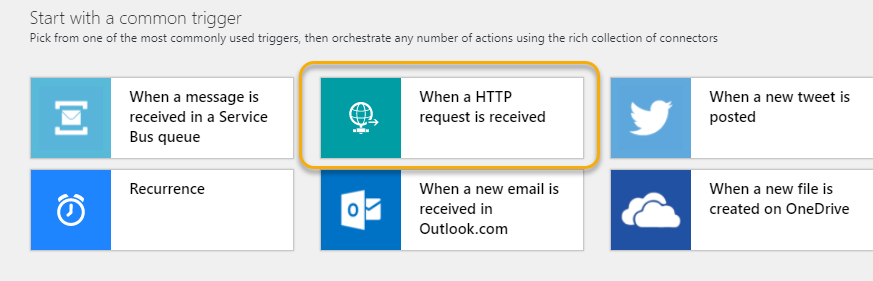
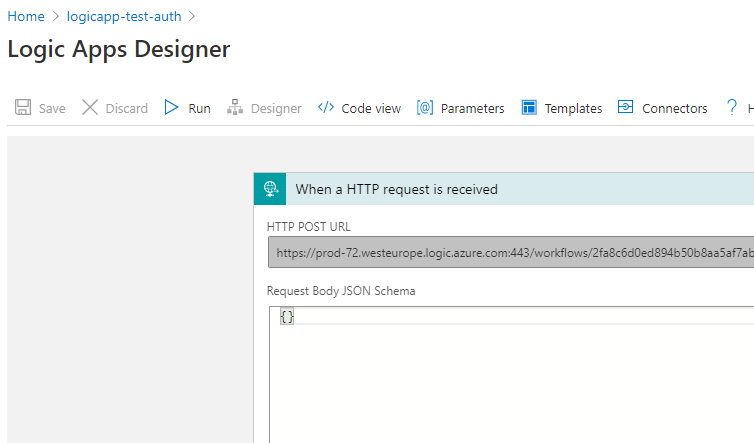
Let’s start by building a basic Logic App we can use for demo purpose.

Creating a basic Logic App with HTTP Trigger and Response

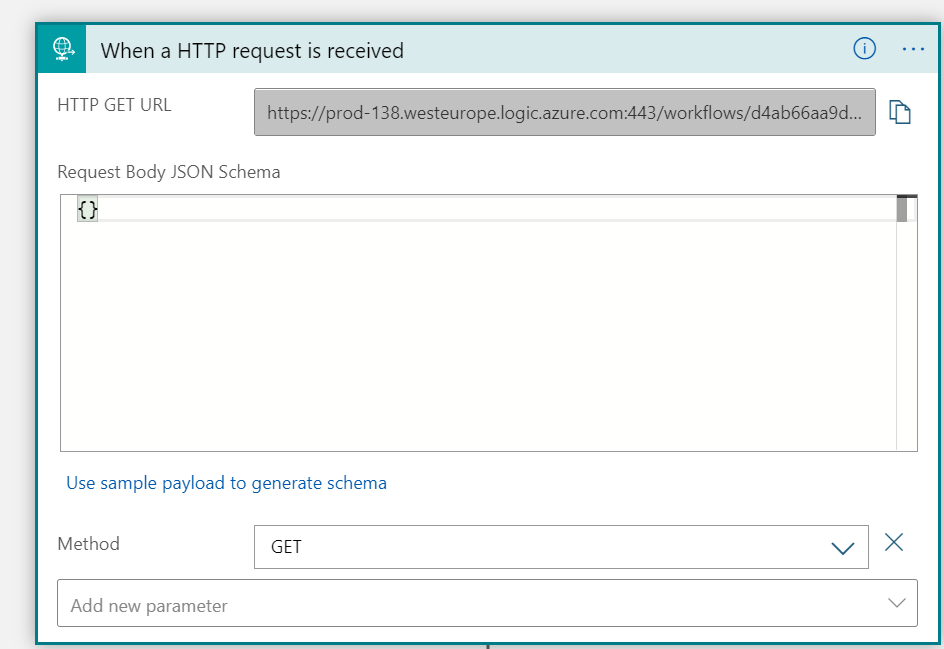
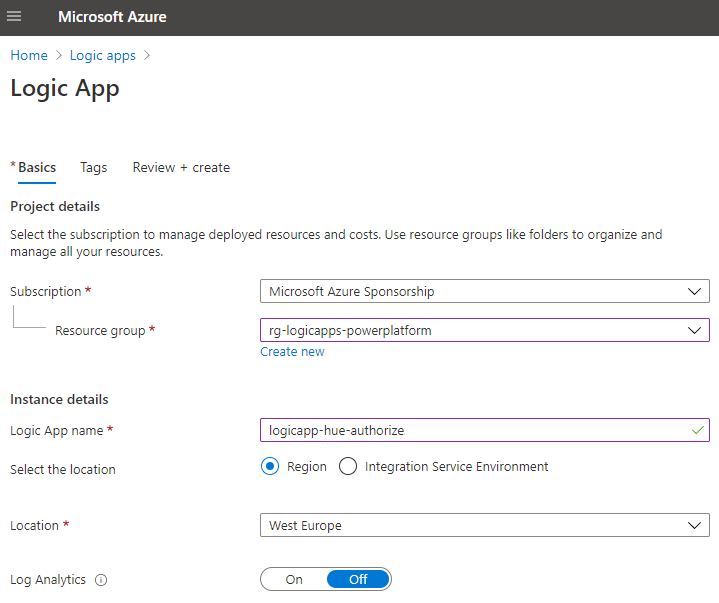
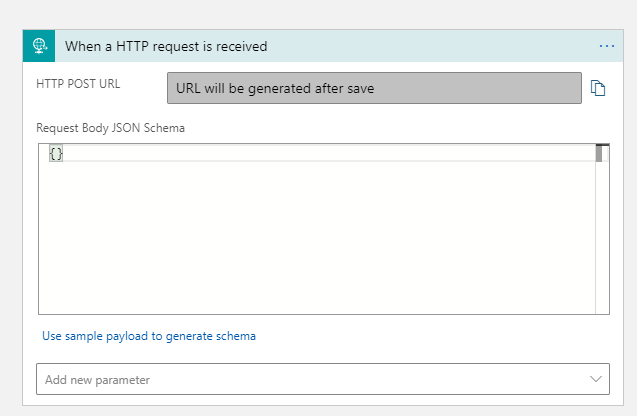
In you Azure Subcription, create a new Logic App, specifying to use a HTTP trigger. In my example below I have named my Logic App “logicapp-test-auth”:

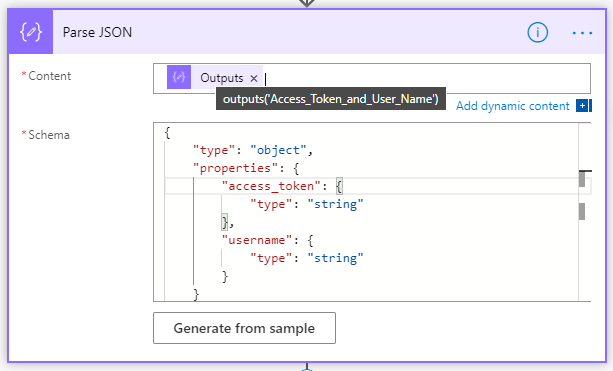
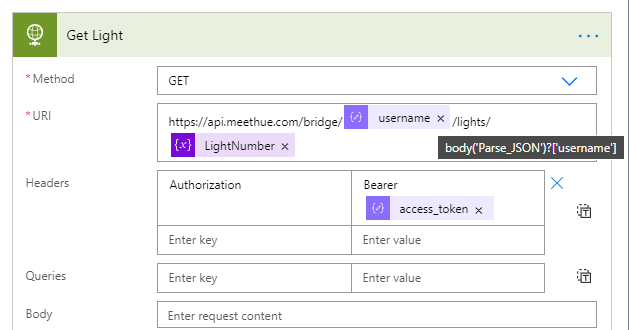
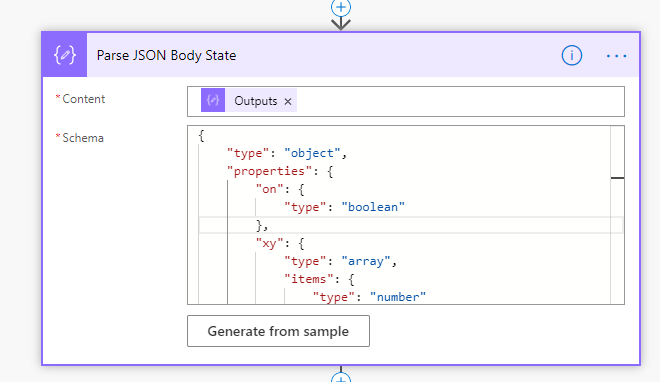
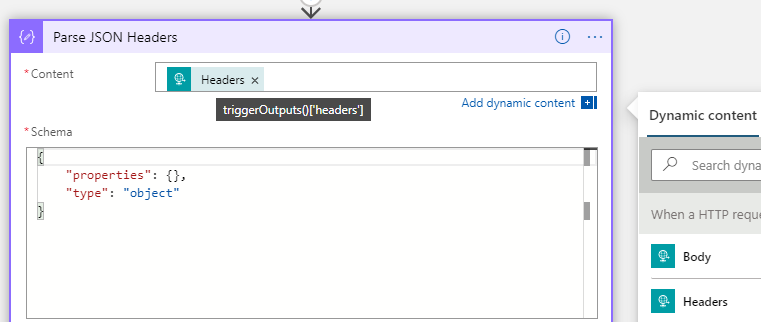
Next, add a Parse JSON action, where the Content is set to the trigger headers, as shown below. I’ve just specified a simple schema output, this can be customized later if needed:

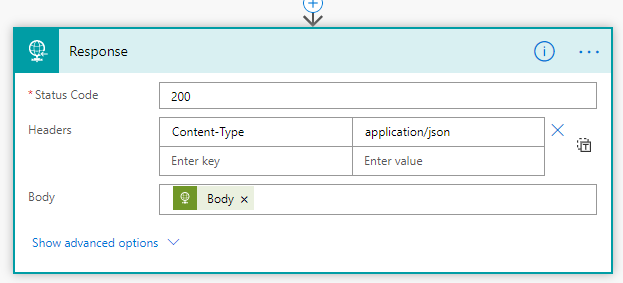
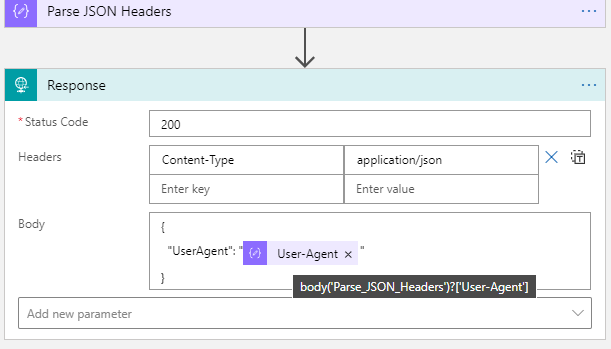
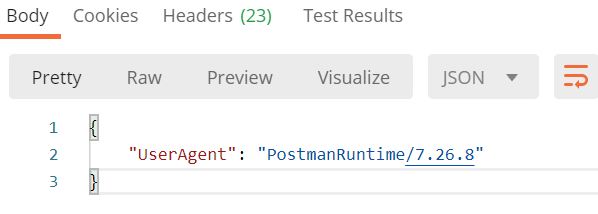
After that activity, add a Response action to return data to the caller. In my example below I return a Status Code of 200 (OK), and set the Content-Type to application/json, and return a simple JSON body of UserAgent where the value is set to the parsed header output from the trigger, using dynamic expression:
body('Parse_JSON_Headers')?['User-Agent']

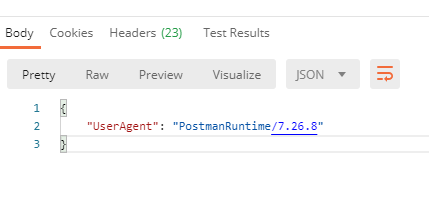
Testing Logic App with Postman

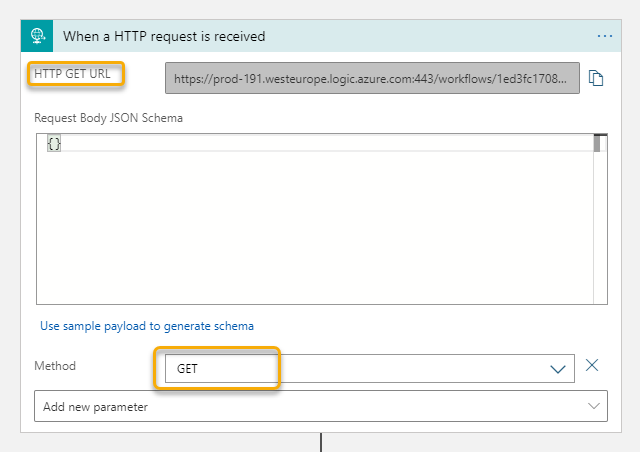
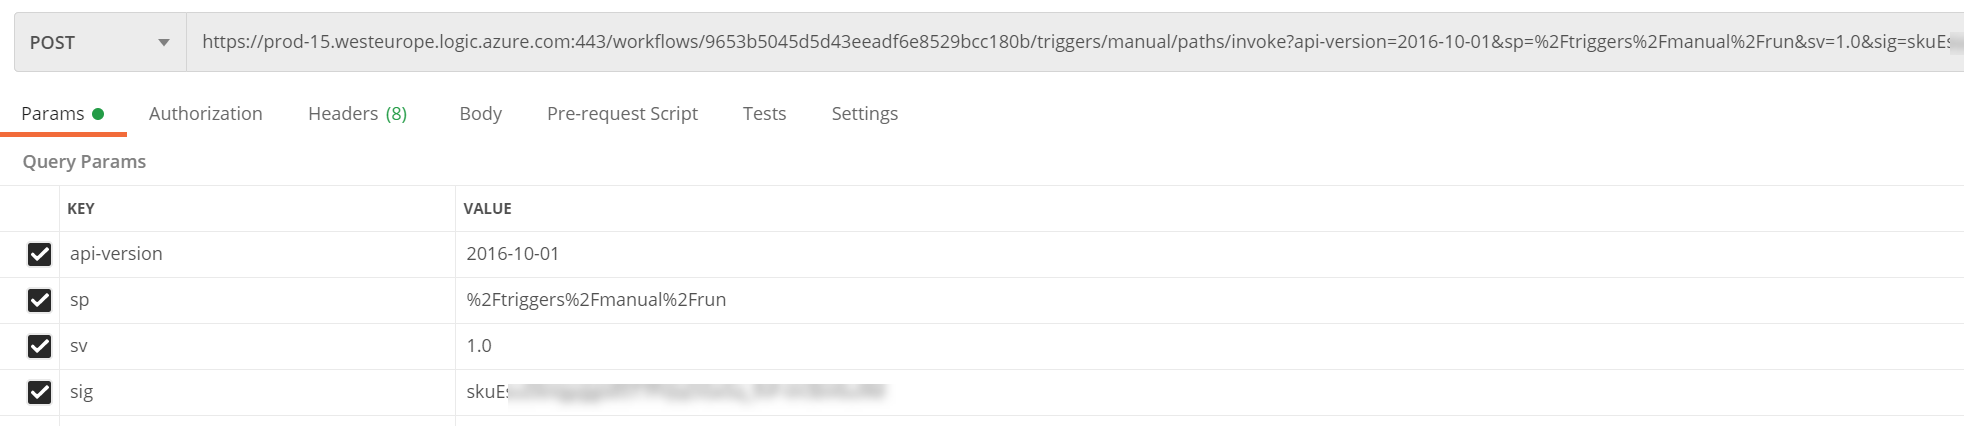
A great way to test and explore HTTP and REST API calls from your client is to use Postman (Download Postman | Try Postman for Free). When testing the above Logic App, paste in the HTTP POST URL for your trigger, and set the method to POST as shown below:

From the above image, you can see the URL, and also the query parameters listed (api-version, sp, sv, and sig, remember that these should be shared publicly).

When I send the request, it will trigger the Logic App, and should response back:

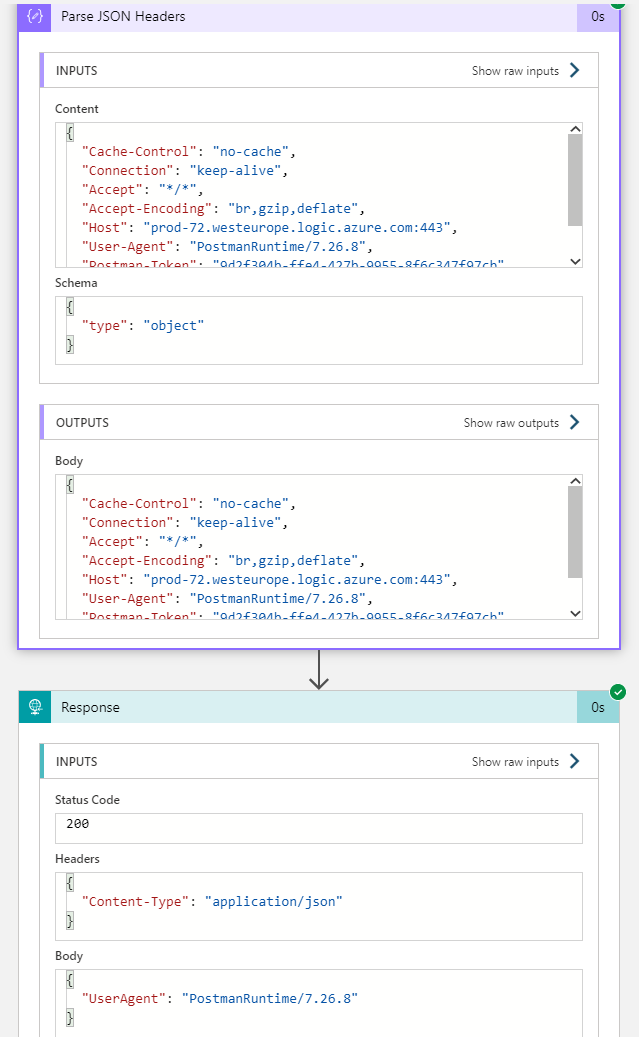
We can also verify the run history for the Logic App:

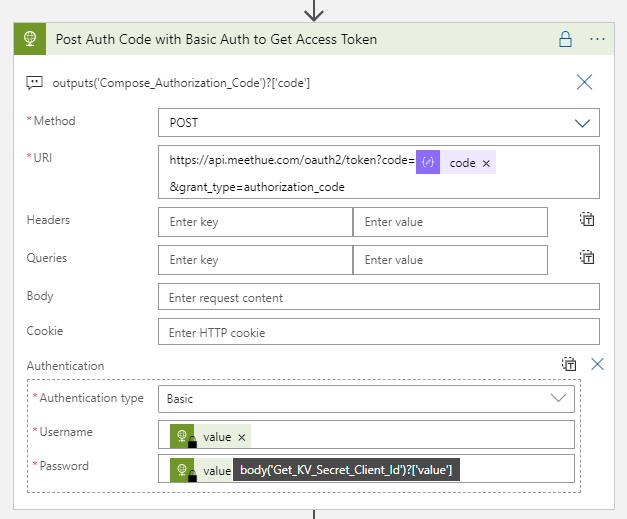
We have now successfully tested the Logic App using SAS authentication scheme, and can proceed to adding Azure AD OAuth. First we need to create an Authorization Policy.

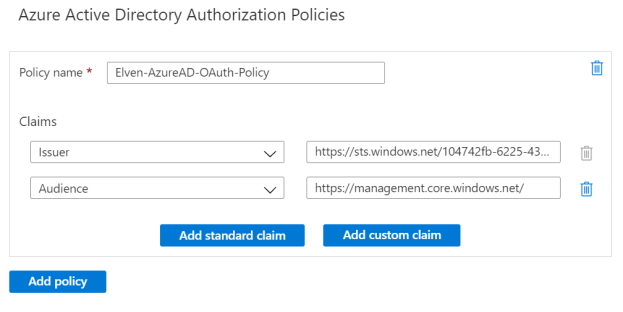
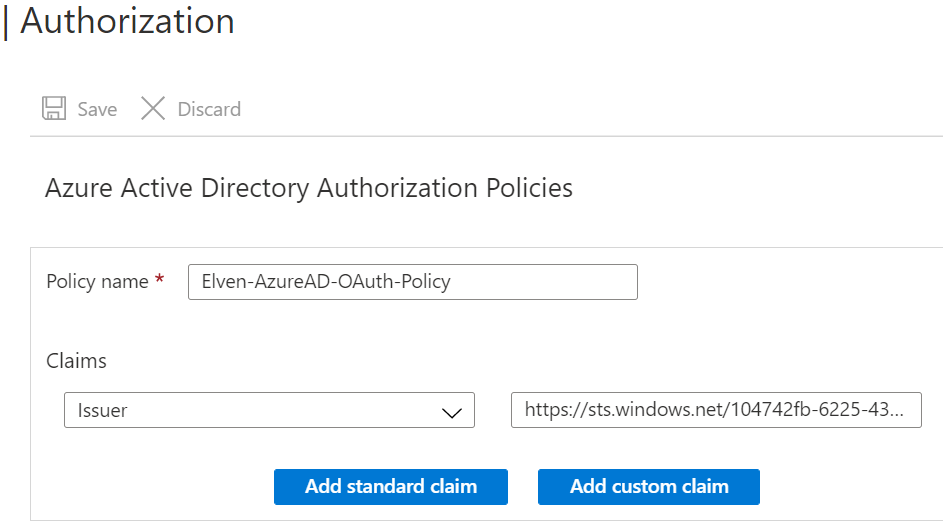
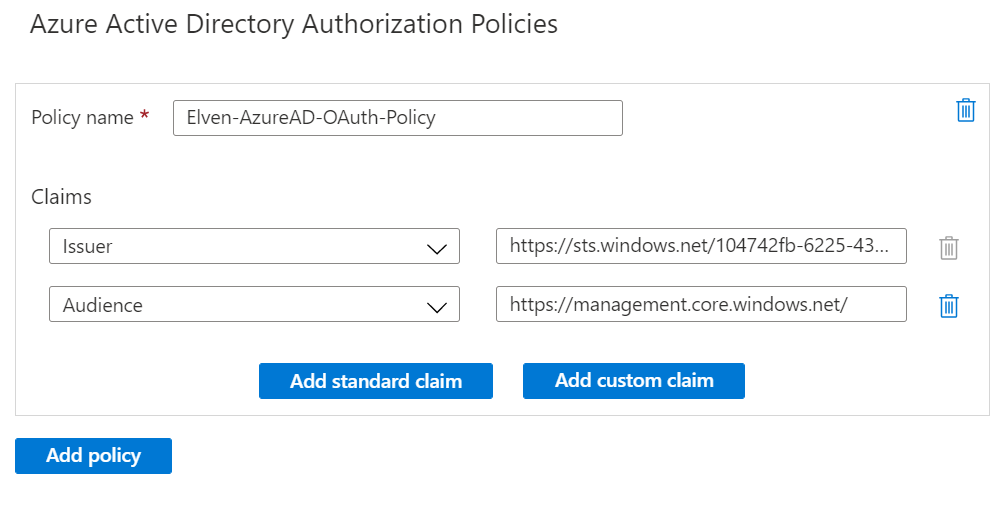
Creating an Azure AD Authorization Policy

Under Settings and Authorization for your Logic App, add a new Authorization Policy with your name, and add the Issuer claim for your tenant. Issuer will be either https://sts.windows.net/{your-tenant-id}/ or https://login.microsoftonline.com/{your-tenant-id}/ depending on the version of the Access Token:

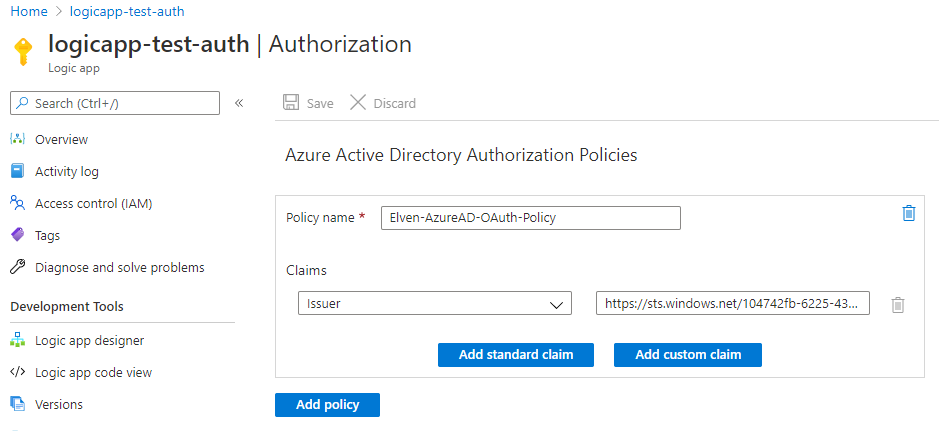
We will add more Claims later, but for now we will just test against the Issuer. Before we can test however, we need to get an Access Token. There are several ways to easily get an access token, basically we can consider one of the following two scenarios:

  1. Aquire an Access Token for well known Azure Management Resource Endpoints.
  2. Create an App Registration in Azure AD exposing an API.

We’ll cover App Registration and more advanced scenarios later, but for now we will get an Access Token using well known resource endpoints for Azure management.

PS! Just a quick note on Access Tokens aquired for Microsoft Graph resources: These cannot be used for Logic Apps Azure AD OAuth authorization policies, because Graph access tokens does not allow for signature validation.

Management Access Tokens

The following examples require that you either have installed Azure CLI (Install the Azure CLI | Microsoft Docs) or Az PowerShell (Install Azure PowerShell with PowerShellGet | Microsoft Docs).

Azure CLI

If you haven’t already, you will first need to login to Azure using az login. You can login interactively using default browser which supports modern authentication, including MFA, but if you are running multiple browsers and profiles it might be easier to use the device code flow:

az login --use-device-code

You will be prompted to open the microsoft.com/devicelogin page and enter the supplied device code, and after authentication with your Azure AD account, you will get a list of all subscriptions you have access to.

PS! If your account has access to subscriptions in multiple tenants, you can also specify which tenant to log into using:

az login --tenant elven.onmicrosoft.com --use-device-code

To get an Access Token you can just run az account get-access-token, like the following:

Let’s save that into a variable and get the token:

$accessToken = az account get-access-token | ConvertFrom-Json
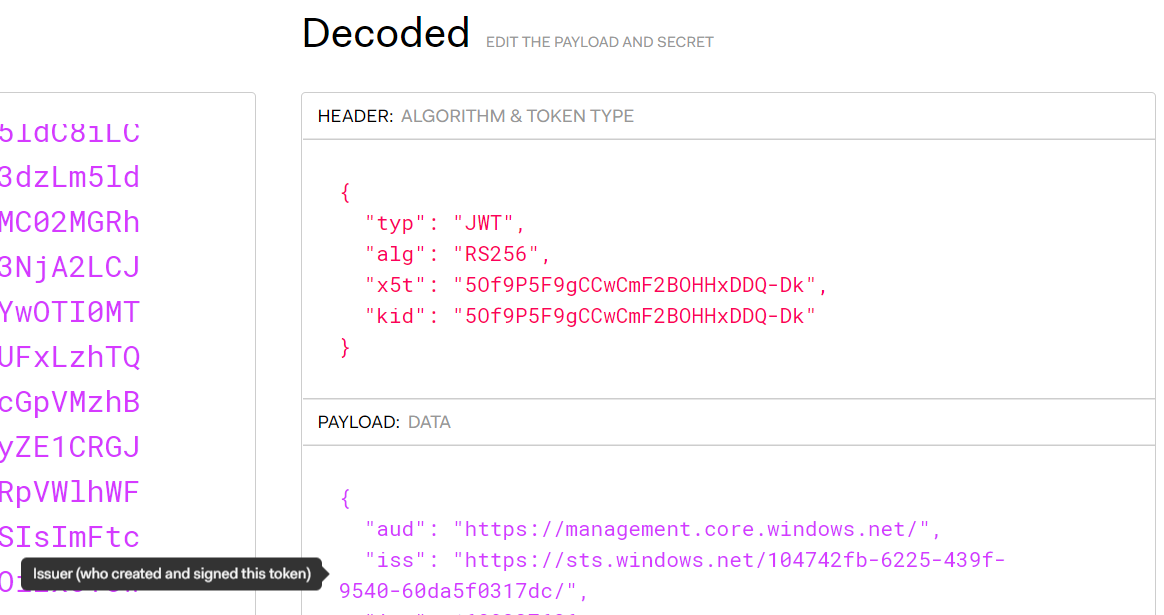
$accessToken.accessToken | Clip

The above command copies the Access Token to the Clipboard. Let’s take a look at the token. Open the website jwt.ms or jwt.io, and paste in the token. From the debugger you can look at the decoded token payload. The most interesting part for now is the issuer (iss) and audience (aud), which tells us where the token has been issued from, and to which audience:

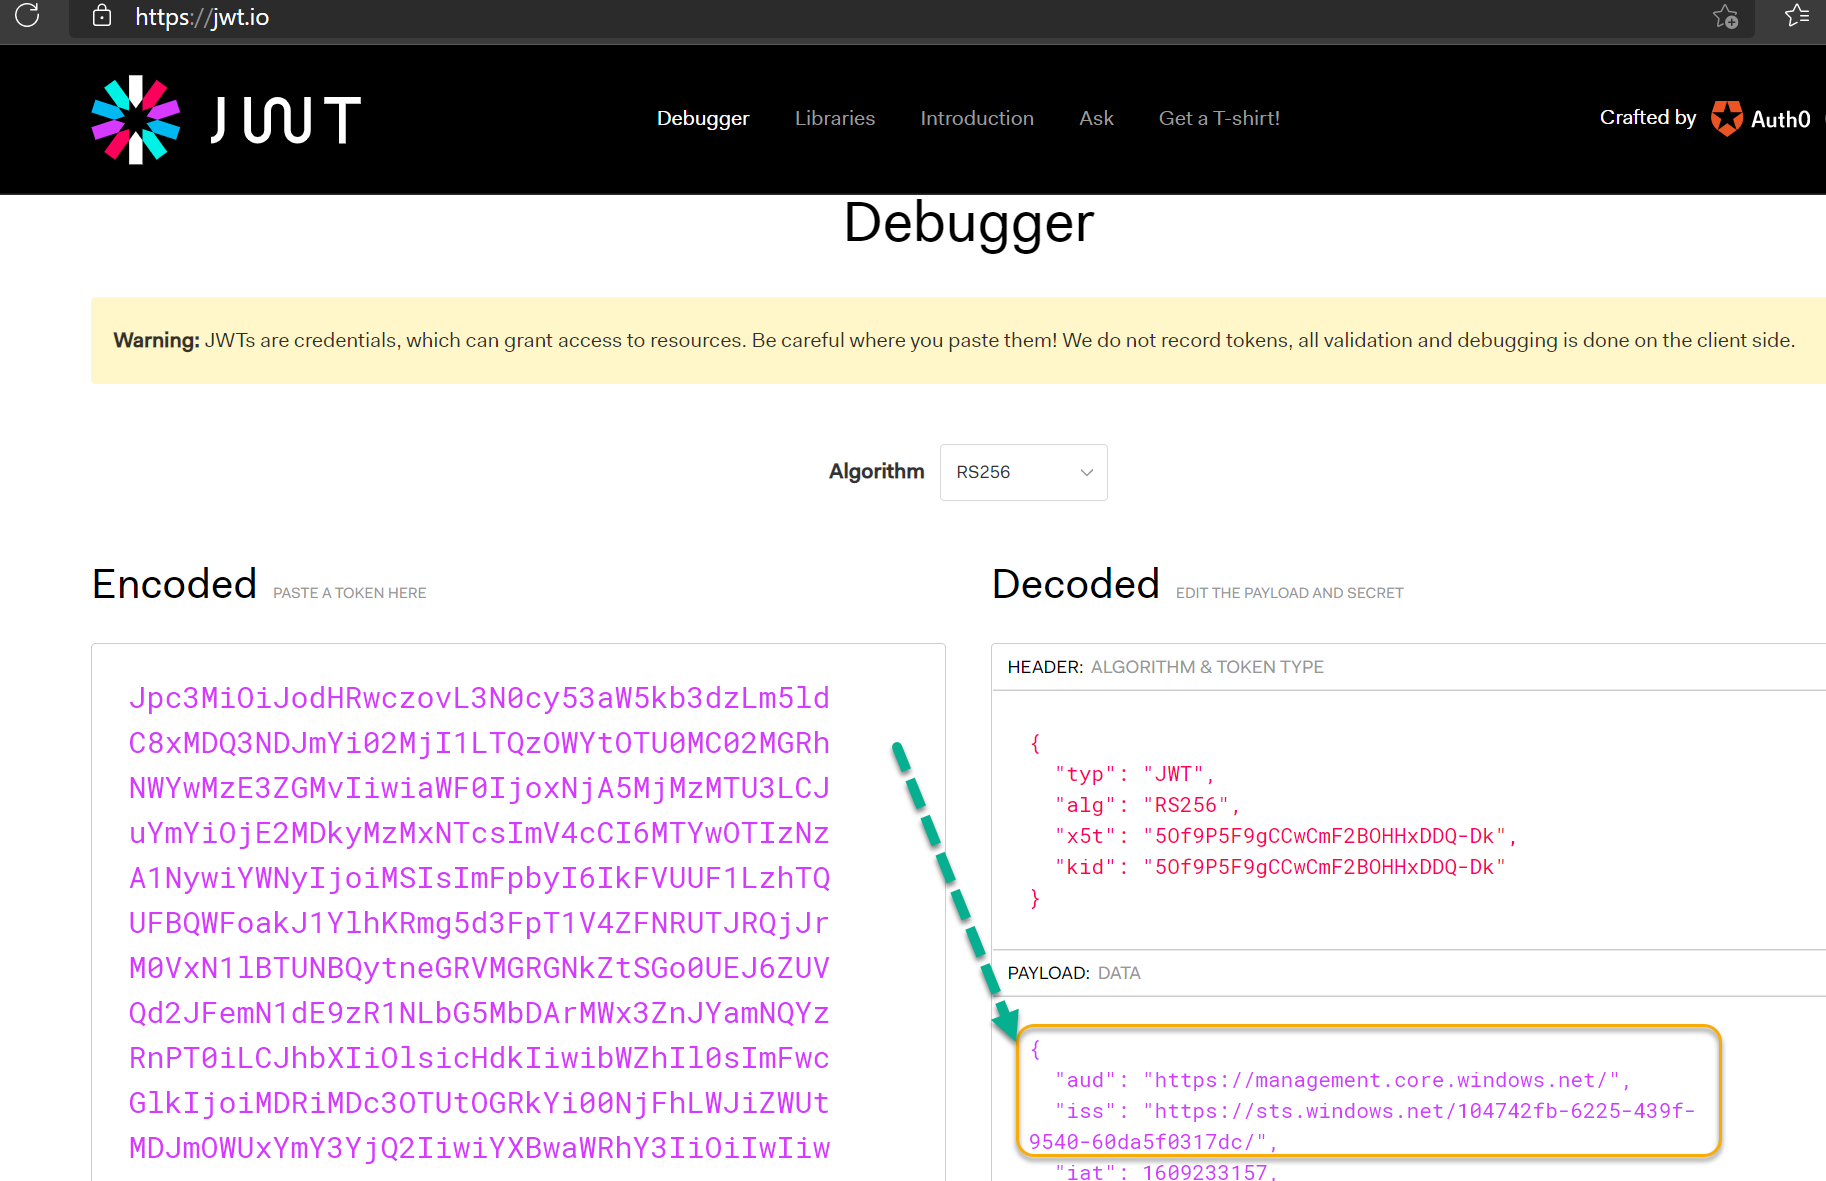
As we can see from above, the audience for the token is “management.core.windows.net”. You can also get an access token for a specific resource endpoint using:

$accessToken = az account get-access-token --resource-type arm | ConvertFrom-Json

To show all available resource endpoints use:

az cloud show --query endpoints

Now that we have the method to get the access token using Az Cli, lets take a look at Az PowerShell as well. For reference for az account command and parameters, see docs here: az account | Microsoft Docs

Azure PowerShell

First you need to login to your Azure Subscription by using:

Connect-AzAccount

If your account has access to multiple subscriptions in multiple tenant, you can use the following command to specify tenant:

Connect-AzAccount -Tenant elven.onmicrosoft.com

If there are multiple subscriptions, you might need to specify which subscription to access using Set-AzContext -Subscription <Subscription>. Tip, use Get-AzContext -ListAvailable for listing available subscriptions.

To get an access token using Az PowerShell, use the following command to save to variable and copy to clipboard:

$accessToken = Get-AzAccessToken
$accessToken.Token | Clip

We can once again look at the JWT debugger to verify the token:

As with Az CLI, you can also specify resource endpoint by using the following command in Az PowerShell specifying the resource Url:

$accessToken = Get-AzAccessToken -ResourceUrl 'https://management.core.windows.net'

Now that we have the Access Token for an Azure Management resource endpoint, let’s see how we can use that against the Logic App.

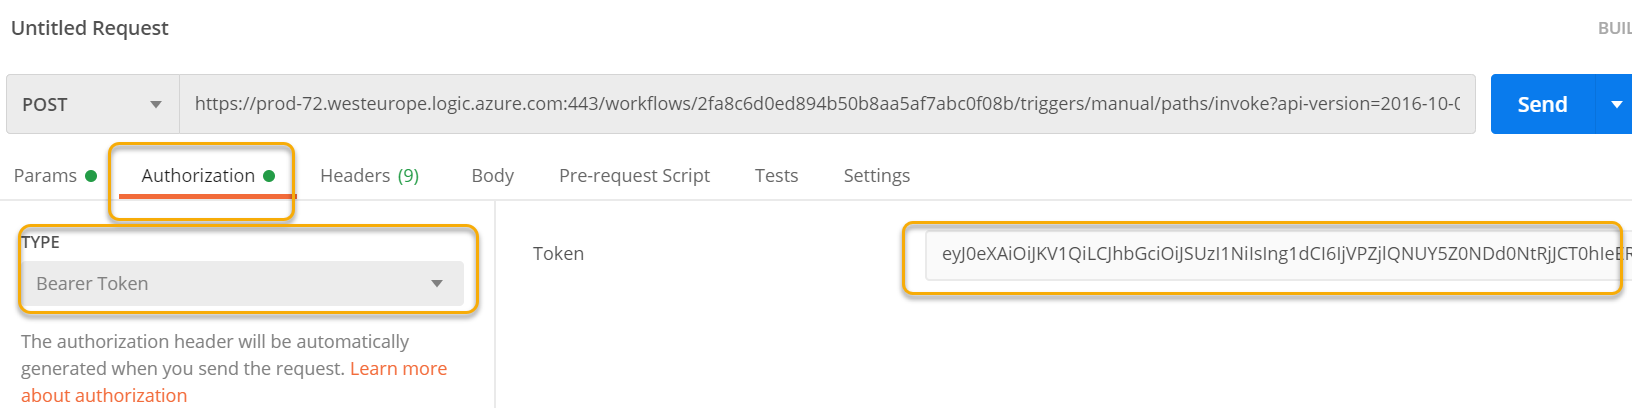
Use Bearer Token in Postman

From the previous test using Postman earlier in this article, go to the Authorization section, and specify Bearer Token, and then Paste the management access token you should still have in your clipboard like the following:

When clicking Send request, observe the following error:

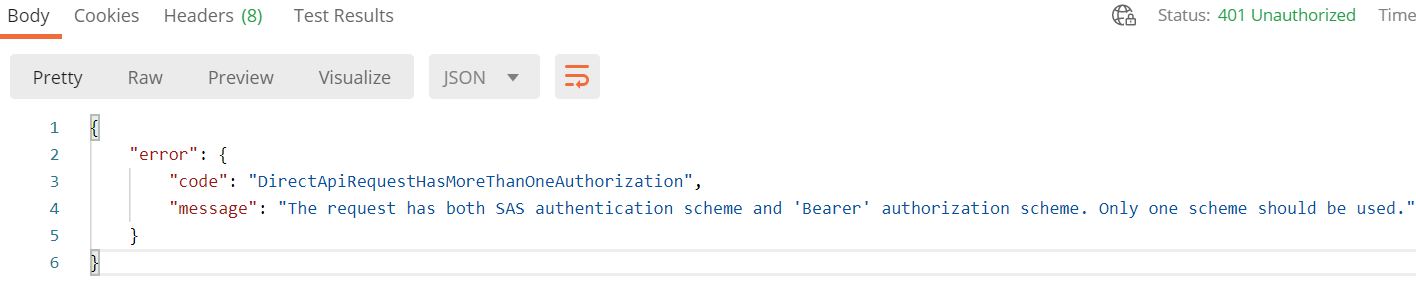
We cannot combine both SAS (Shared Access Signature) and Bearer Token, so we need to adjust the POST URL to the Logic Apps. In Postman, this can be easily done in Postman under Params. Deselect the sp, sv and sig query parameters like the following, which will remove these from the POST URL:

When you now click Send request, you should get a successful response again, provided that tha access token is valid:

Perfect! We have now authorized triggering the Logic App using Azure AD OAuth, based on the Authorization policy:

And the Access Token that match that Issuer:

I will now add the audience to the Authorization Policy as well, so that only Access Tokens for the management endpoint resource can be used:

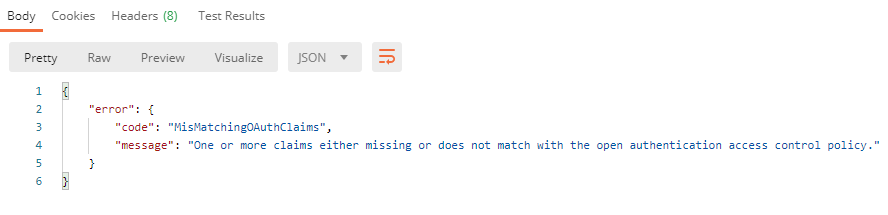
Any HTTP requests to the Logic App that has a Bearer Token that does not comply with the above Authorization Policy, will received this 403 – Forbidden error:

Test using Bearer Token in Azure CLI

You can trigger HTTP REST methods in Azure CLI using az rest --method .. --url ...

When using az rest an authorization header with bearer token will be automatically added, trying to use the url as resource endpoint (if url is one of the well known resource endpoints). As we will be triggering the Logic App endpoint as url, we need to specify the resource endpoint as well. In my example, I will run the following command for my Logic App:

az rest --method POST --resource 'https://management.core.windows.net/' --url 'https://prod-72.we
steurope.logic.azure.com:443/workflows/2fa8c6d0ed894b50b8aa5af7abc0f08b/triggers/manual/paths/invoke?api-
version=2016-10-01'

From above, I specify the resource endpoint of management.core.windows.net, from which the access token will be aquired for, and for url I specify my Logic App endpoint url, without the sp, sv and sig query parameters. This results in the following response:

So the Logic App triggered successfully, this time returning my console (Windows Terminal using Azure CLI).

Test using Bearer Token in Azure PowerShell

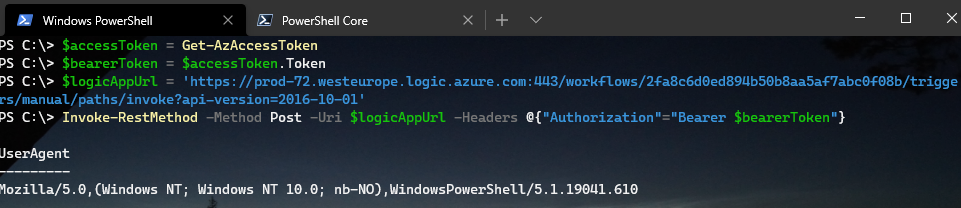
I will also show you how you can do a test using Az PowerShell. Make sure that you get an access token and saving the bearer token to a variable using this command first:

$accessToken = Get-AzAccessToken
$bearerToken = $accessToken.Token

I will also set the Logic App url to a variable for easier access:

$logicAppUrl = 'https://prod-72.westeurope.logic.azure.com:443/workflows/2fa8c6d0ed894b50b8aa5af7abc0f08b/triggers/manual/paths/invoke?api-version=2016-10-01'

There are 2 ways you can use Az PowerShell, either using Windows PowerShell or PowerShell Core.

For Windows PowerShell, use Invoke-RestMethod and add a Headers parameter specifying the Authorization header to use Bearer token:

Invoke-RestMethod -Method Post -Uri $logicAppUrl -Headers @{"Authorization"="Bearer $bearerToken"}

Running this should return this successfully, specifying my Windows PowerShell version (5.1) as User Agent:

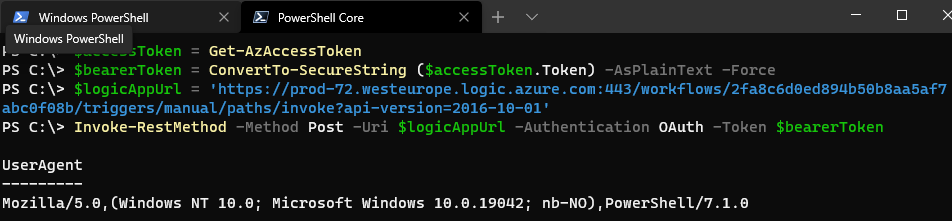
For PowerShell Core, Invoke-RestMethod has now support for using OAuth as authentication, but I first need to convert the Bearer Token to a Secure String:

$accessToken = Get-AzAccessToken
$bearerToken = ConvertTo-SecureString ($accessToken.Token) -AsPlainText -Force

Then I can call the Logic App url using:

Invoke-RestMethod -Method Post -Uri $logicAppUrl -Authentication OAuth -Token $bearerToken

This should successfully return the following response, this time the User Agent is my PowerShell Core version (7.1):

Summary so far of Management Access Tokens and Logic Apps

At this point we can summarize the following:

  1. You can trigger your Logic App either by using SAS URL or using Bearer Token in Authorization Header, but not both at the same time.
  2. You can add an Azure AD Authorization Policy to your Logic App that specifies the Issuer and Audience, so that calling clients only can use Bearer Tokens from the specified issuer (tenant id), and audience (resource endpoint).
  3. While you cannot disable use of SAS signatures altogether, you can keep them secret, and periodically rollover, and only share the Logic App url endpoint and trigger path with clients.
  4. This is especially great for automation scenarios where users can use CLI or Azure PowerShell and call your Logic Apps securely using OAuth and Access Tokens.

In the next part we will look more into how we can customize the Logic App to get the details of the Access Token so we can use that in the actions.

Include Authorization Header in Logic Apps

You can include the Authorization header from the OAuth access token in the Logic App. To do this, open the Logic App in code view, and add the operationOptions to IncludeAuthorizatioNHeadersInOutputs for the trigger like this:

        "triggers": {
            "manual": {
                "inputs": {
                    "schema": {}
                },
                "kind": "Http",
                "type": "Request",
                "operationOptions": "IncludeAuthorizationHeadersInOutputs"
            }
        }

For subsequent runs of the Logic App, we can now see that the Authorization Header has been included:

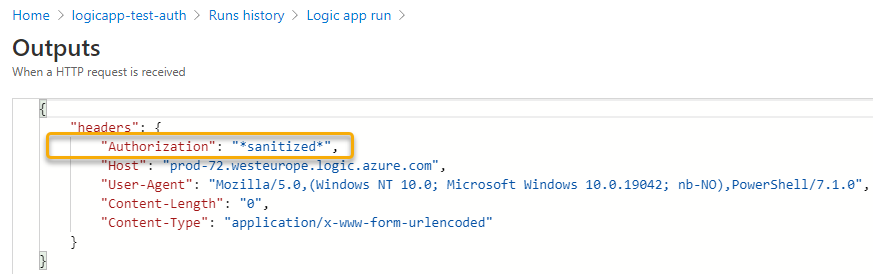
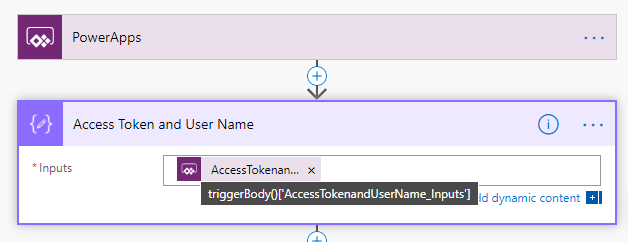
And if we parse the headers output, we can access the Bearer Token:

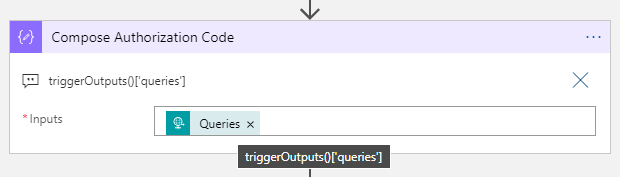
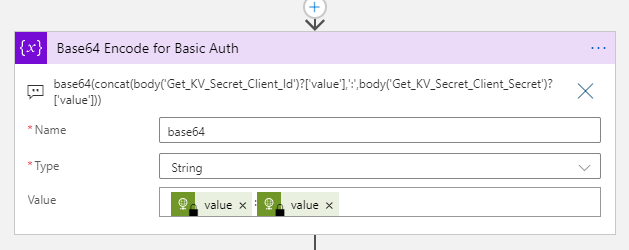
If we want to decode that Bearer token to get a look into the payload claims, we can achieve that with some custom expression magic. Add a Compose action to the Logic App and use the following custom expression:

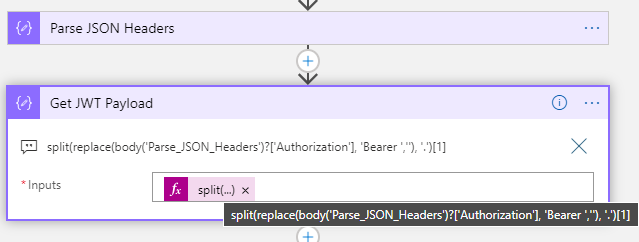
Let’s break it down:

  • The Replace function replaces the string ‘Bearer ‘ with blank (including the space after)
  • The Split function splits the token into the header, payload data, and signature parts of the JWT. We are interested in the payload, so refers to that with index [1]
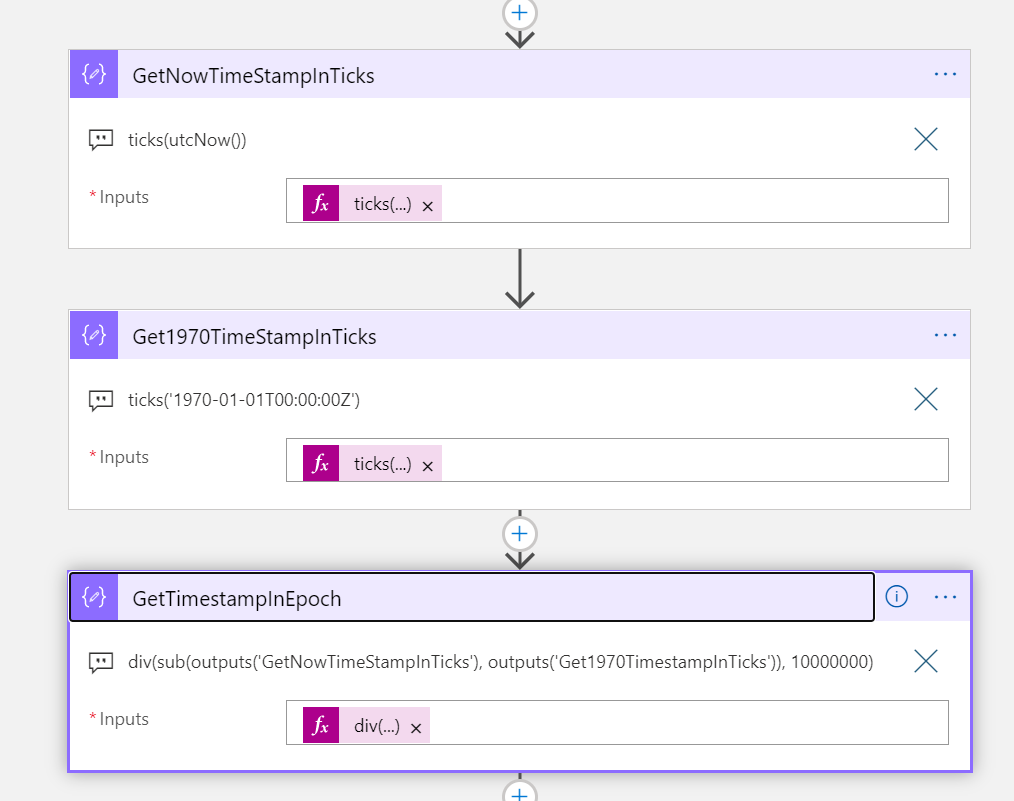
split(replace(body('Parse_JSON_Headers')?['Authorization'], 'Bearer ',''), '.')[1]

Now it becomes a little tricky. We will have to use the base64ToString function to get the payload into readable string, but if the length of the payload isn’t dividable by 4 we will get an error. Therefore we need to see if we need to add padding (=), as explained here: (Base64 – Wikipedia).

First I get the length of the payload data, and then use modulo function to see if there are any remaining data after dividing by 4:

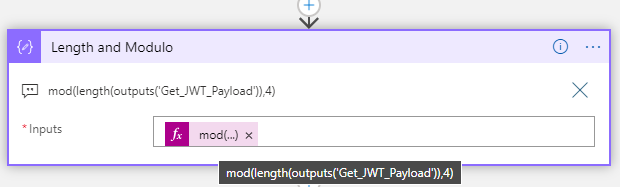
mod(length(outputs('Get_JWT_Payload')),4)

Then I can do a conditional logic, where I use concat to add padding (=) to make it dividable by 4:

if(equals(outputs('Length_and_Modulo'),1),concat(outputs('Get_JWT_Payload'),'==='),if(equals(outputs('Length_and_Modulo'),2),concat(outputs('Get_JWT_Payload'),'=='),if(equals(outputs('Length_and_Modulo'),3),concat(outputs('Get_JWT_Payload'),'='),outputs('Get_JWT_Payload'))))

After this I can use base64ToString to convert to a readable string object and format to JSON object:

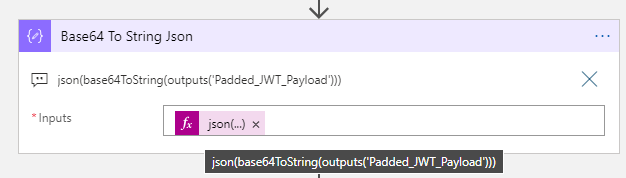
json(base64ToString(outputs('Padded_JWT_Payload')))

Now that we have access to the claims, we can later be able to do some authorization in the Logic Apps, for example based on roles or scopes, but we can also get some information on which user that has called the Logic App.

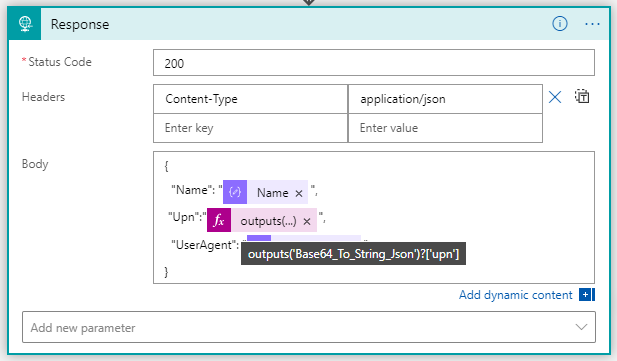
In the Response action, add the following to return the Name claim:

And if I test the Logic App http request again, I can see at it indeed returns my name based on the claims from the access token:

We now have a way to identify users or principals calling the Logic App. The Authorization Policy for the Logic App now permits users and principals from my own organization (based on the issuer claim) and as long as the audience is for management.core.windows.net. But what if I want external access as well? Let’s add to the authorization policies next.

Add OAuth Authorization Policy for Guests

A logic app can have several Azure AD Authorization Policies, so if I want to let external guest users to be allowed to trigger the logic app, I will need to create another authorization policy that allows that issuer:

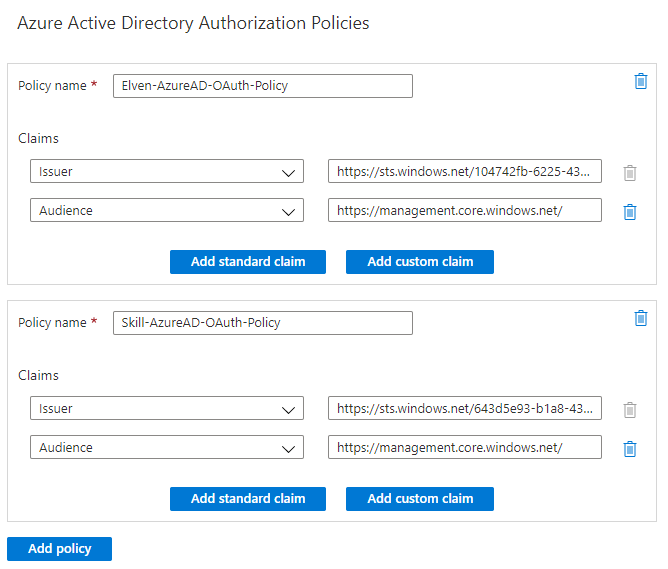
Lets also add the upn claim to the response, so it is easier to see which user from which tenant that triggered the Logic App:

When I now test with different users, internal to my tenant and external, I can see that it works and the response output is as expected:

Summary of Management Access Scenarios

The purpose of the above steps has been to provide a way for management scenarios, where users and principals can get an Access Token using one of the Azure Management well known endpoints, and provide that when calling the Logic App. The access token is validated using OAuth Authorization Policies, requiring specific issuer (tenant id) and audience (management endpoint). This way we can make sure that we don’t have to share the SAS details which lets users that have access to this URL call the Logic App without authentication.

In the next parts of this blog post articles, we will look into more advanced scenarios where we will expose the Logic App as an API and more.

Blog Series – Power’ing up your Home Office Lights: Part 8 – Using Power Automate Flows to Get and Set Lights State

This blog post is part of the Blog Series: Power’ing up your Home Office Lights with Power Platform. See introduction post for links to the other articles in the series:
https://gotoguy.blog/2020/12/02/blog-series—powering-up-your-home-office-lights-using-power-platform—introduction/

In Part 7 we built the main screen of the PowerApp, the topic for today is to build Flows and the PowerApp screen for controlling the Hue Lights:

If you want a quick summary of how this screen works, take a look at this video:

<YOUTUBE VIDEO PROCESSING, AVAILABLE SOON>

Building the Lights Control Screen

Start by adding another screen to the Hue PowerApp. If you have used a custom background color, logo and other graphical elements like I have you can do the same for this screen also. In addition to the label controls I’ve added for texts, I’ve added the following controls to my Hue PowerApp:

  • Small circle icons/shapes to reflect color states.
  • Toggle controls to set Light state On/Off and sync with Teams Presence On/Off.
  • Dropdown list for listing the Hue Lights.
  • Slider control for setting Brightness.
  • I’ve also added a Timer control and set it to not visible.

After adding and customizing the controls and named your controls after your chosen naming convention, your Hue PowerApp might look like the following:

Now we need to create a couple of Flows (as of today these are names Cloud Flows) for getting and setting Light State.

Creating Flow for Getting Lights and State

Create a new Instant Flow with PowerApps as Trigger. Name the Flow “Hue – Get Lights and State”. First add a Compose action, name the action “Access Token and User Name”, and select Ask in PowerApps under Dynamic Content:

Next, add a Parse JSON action below:

You can use the following schema:

{
    "type": "object",
    "properties": {
        "access_token": {
            "type": "string"
        },
        "username": {
            "type": "string"
        }
    }
}

We are now ready to query for the Lights for my Hue Remote API. But first it is helpful to understand a little about how the Hue Remote API returns lights. Earlier this year I published this blog post about exploring the Hue Remote API using Postman: Remote Authentication and Controlling Philips Hue API using Postman | GoToGuy Blog. For example when I query for all lights, https://api.meethue.com/bridge/{{username}}/lights/, I get a response similar to this:

The special thing to note here is that Hue returns every light as a named object identified by a light number. This is not an Array, so you cannot loop through that as you would expect. So I needed to think a little different in my solution.

I decided to create my own Array, and get the Lights one-by-one. For this I needed to start at light number “1”, and then do until some maximum value. I have currently 13 lights, so I created a variable for “13”. It makes it a little static, but at least it works with as little hassle as possible.

First add an Initialize variable action, of type Array and name arrayLights, and using the expression json('[]') as an empty json array as value:

Next, add two more Initialize variables actions, both of type Integer and named LightNumber with value 1, and NumberOfLights with value 13 (or whatever number of lights you have!).

Now, add a “Do until” action, setting LightNumber is greater than NumberOfLights as loop control:

Inside the Do until-loop, add a HTTP action, where we will run a GET query against the https://api.meethue.com/bridge/<whitelist identifer>/lights/<lightnumber>, using the access_token as a Bearer token in the Authorization Header:

This will return the first light state. Add a Append to array variable action, selecting the “arrayLights”, and adding the value like following:

This will add the Light number, the name of the Light source (body('Get_Light')?['name']) and if state on is true or false (body('Get_Light')?['state/on']).

Next action is to add an Increment variable action to increase the LightNumber by 1:

And last, outside the Do until, add a Response action so that we can return the data to the PowerApp. The important part here is to specify status code 200 and content-type application/json, and return the arrayLights variable as shown below:

Getting the Lights and State to the PowerApp

Now that we have to Flow for getting Lights and State, we can get that data into the PowerApp. Back in the PowerApp, select the Button control in the Main Screen with the name Control Lights. Click on the Action menu, and Power Automate to link the “Hue – Get Lights” and State Flow, and add the following lines to the OnSelect event:

Navigate(screenPresenceLights);
Set(wait,true);
ClearCollect(MyHueLights,'Hue-GetLightsandState'.Run(JSON(HueResponse)));
Set(wait,!true)

To explain, the Navigate(<screen>), is for changing to the other screen of course. I also use the Set(wait,true) and Set(wait,!true) on either side of the Flow run to make the PowerApp appear busy. And then, I save all the Lights and State back from the response from the Flow to a Collection, using ClearCollect and the Collection name “MyHueLights”. The Flow run expects that I supply the access_token and username, which I already has as a record variable in the shape of “HueResponse”. So, I’ll just add a JSON(..) function around that.

We can test. Hold down the “ALT” on your keyboard, and click on the “Control Lights” button. After this, go to the View menu and select Collections. You should see the “MyHueLights” collection, and a preview of the first 5 items:

Now we can get that data in to the PowerApp controls. Select the Drop Down list control, and set the Items property to “MyHueLights” and the Value to “Name”:

This should fill the Drop Down with Light names. Next, for the Drop Down list OnChange event, add the following:

Set(SelectedLight,(ddlMyLights.SelectedText));
Set(CheckStatus,false);
If(SelectedLight.State="True",Set(CheckStatus,true);Set(LightState,true),
Set(CheckStatus,true);Set(LightState,false)
)

So in the above expression for the OnChange event, I set a variable “SelectedLight” to the selected text from the Drop Down, and then I’m manipulating another variable with set “CheckStatus” and set “LightState”, depending on if the state on is true or false.

Proceeed to select the toggleLightState control, and set the Default property to the variable “LightState” and Reset property to “CheckStatus”:

We now have what we need for getting the Lights and State into the PowerApp. The next thing we need to build is to actually set Light states and colors back to the Hue Remote API.

Creating Flow for Setting Lights and State

Create a new Instant Flow with PowerApps as trigger, and name it “Hue – Set Light and State”. Start by adding the same two Compose actions as the “Hue – Get Light and State” Flow:

Next, add an Initialize variable action, with the name “Initialize LightNumber”, and select “Ask in PowerApps” under Dynamic content so that this input will be submitted from the PowerApp:

After that, add a Compose action. Name it “Body State”, and select “Ask in PowerApps” for input:

This input parameter is where we will supply the light state, colors etc.

Next add a Parse JSON action, using the outputs of the previous Body State input:

You can use the following schema:

{
    "type": "object",
    "properties": {
        "on": {
            "type": "boolean"
        },
        "xy": {
            "type": "array",
            "items": {
                "type": "number"
            }
        },
        "bri": {
            "type": "integer"
        }
    }
}

After this, add an HTTP action, using method PUT, and the address https://api.meethue.com/bridge/<whitelist identifier>/lights/<lightnumber>/state, and including the access_token as a Bearer token in the Authorization Header. For Body, construct the following JSON body:

And last, add a Response action to return status code and body to the PowerApp:

We now have a Flow in which we can call to set the light states in the PowerApp.

Control Light States from PowerApp

Lets start by turning selected Lights on and off. Select the Toggle control for Light State, and for the “OnCheck” event add the Power Automate Flow “Hue – Set Light and State” under the Action menu. For the OnCheck event add the following expression:

Set(MyLightState, "{'on':true }");
'Hue-SetLightandState'.Run(JSON(HueResponse), SelectedLight.LightNumber , MyLightState)

And for the UnCheck event:

Set(MyLightState, "{'on':false }");
'Hue-SetLightandState'.Run(JSON(HueResponse), SelectedLight.LightNumber , MyLightState)

So as you can see above, I’m using a variable named “MyLightState”, for dynamically storing the different light states I want to set and submit to the Flow. The ‘Hue-SetLightandState.Run’ takes three inputs in the form of access_token and username (via HueResponse variable), then selected LightNumber, and the MyLightState variable.

Next, lets go to the Slider control for setting Brightness. On the OnChange event, add the following expression:

Set(MyLightState, "{'bri': " & sliderBrightness.Value & " }");
'Hue-SetLightandState'.Run(JSON(HueResponse), SelectedLight.LightNumber , MyLightState)

Here I’m changing the state via the ‘bri’ value, and the sliderBrightness.Value. Btw, the Slider is set to minimum 2 and max 254, to support the values expected by the Hue API for ‘bri’.

And then finally we can set the color states for the three icons I have prepared. I have created pre-defined colors reflecting my presence status, green for available, red for busy and yellow for away.

For each of these, change the “OnSelect” event to the following:

Green (Available):

Set(MyLightState, "{'on':true, 'xy': [ 0.358189, 0.556853 ], 'bri':" & sliderBrightness.Value & " }");
 'Hue-SetLightandState'.Run(JSON(HueResponse), SelectedLight.LightNumber , MyLightState)

Red (Busy):

Set(MyLightState, "{'on':true, 'xy': [ 0.626564, 0.256591 ], 'bri':" & sliderBrightness.Value & " }");
 'Hue-SetLightandState'.Run(JSON(HueResponse), SelectedLight.LightNumber , MyLightState)

Yellow (Away):

Set(MyLightState, "{'on':true, 'xy': [ 0.517102, 0.474840 ], 'bri':" & sliderBrightness.Value & " }");
 'Hue-SetLightandState'.Run(JSON(HueResponse), SelectedLight.LightNumber , MyLightState)

A few words about the colors, this is something that could be a little difficult to get a grasp on. Hue has an explanation on the CIE color space and the “xy” resource here: Core Concepts – Philips Hue Developer Program (meethue.com).

You can also see some conversion functions here: Color Conversion Formulas RGB to XY and back – Philips Hue Developer Program (meethue.com)

Basically I’ve tested and learned. A good tip is to set the color you like using the official Hue Mobile App, and then read the state for the light.

Summary and Next Steps

The Hue PowerApp has now a working solution for getting Lights and State, as well as manually controlling colors, toggle on and off, and setting brightness.

In the next part of this blog post series, we will look into getting the presence status from Teams and show that in the Power App.

Thanks for reading!

Blog Series – Power’ing up your Home Office Lights: Part 7 – Building the PowerApp for Hue to Get Config and Link user

This blog post is part of the Blog Series: Power’ing up your Home Office Lights with Power Platform. See introduction post for links to the other articles in the series:
https://gotoguy.blog/2020/12/02/blog-series—powering-up-your-home-office-lights-using-power-platform—introduction/

With the Power Automate Flows we’ve built in the previous parts, we should now be able to get the Link and Whitelist the user and get the Hue Bridge Configuration details. It is time to build the main screen of the “Hue PowerApp”!

Here is a short video where I talk about the basics of the main screen of the PowerApp we are going to build:

Building the PowerApp and Main Screen

In my solution I wanted to build a canvas app with a phone layout, to be able to use it when on my mobile as well. Start by logging in to make.powerapps.com, and creating a new app from Blank, and either phone or tablet layout by your preference:

This next step is up to your preference and personal choice, but what I did was the following:

  • Added a custom background color from your palette (if you have a branding profile) or you could choose one of the built-in themes:
  • Add a Header logo
  • Add elements like frames and icons. I often use a Label control and set the border for it to create a frame like figure.
  • Add label controls for your text and placeholders for where you will update values later. Set font colors for labels and labels where you will have values.
  • Add some Images for where you want to add an action to the OnSelect event.
  • Add Button controls or Icons for navigating between screens.
  • Use a naming convenvtion for your controls.

In the end, adding and formatting all controls, and before I add any data to the PowerApp, my Hue PowerApp ends up like this:

I’ve uploaded Images for the Authorization and Linking, for your convenience I’ve attached those here:

After finishing the PowerApp main screen design, we can proceed to adding actions and getting data.

Connecting the PowerApp to Power Automate Flows

Start by selecting the Refresh Icon, on the Action menu, click the On Select button to change to the OnSelect event, and click the Power Automate button:

Under Data, select to associate the “Hue – Get Access Token and Config” Flow:

This will start populating the OnSelect event field, which you would edit so that you use the “Se”t function and save the response from calling the Flow in the variable HueResponse like this: Set(HueResponse,'Hue-GetAccessTokenandConfig'.Run())

Lets test this action. Before this I have removed my user from the Microsoft List “Elven Hue Users”, this list is empty now:

Hold down the “ALT” button on your keyboard, and click on the Refresh icon. The Flow will now run, you will see the small dots flying over the screen, but you won’t see any data yet. But you can check the contents of the “HueResponse” variable. Do this by going to the View menu, and click on the “Variables” button. From there you should see the HueResponse variable, it is of type “Record” and you can click on that Record icon:

You should now see something like the following values, if I hadn’t deleted the username from my List earlier I would see values for all these fields:

If I compare this with the response output from the Flow I triggered with the refresh icon above, I can see that the output really reflects the contents of the “HueResponse” variable:

Lets add these values to the labels I prepared in the PowerApp.

For the label containing the Hue name value, add the following to the Text property: If(HueResponse.access_token="","Hue not Connected!",If(HueResponse.username="","Connection to Hue OK, but User not linked!",HueResponse.name))

This should return something like this:

Proceed to add the following to the Text property for each of the remaining configuration value labels:

HueResponse.ipaddress
HueResponse.apiversion
HueResponse.internet
HueResponse.remoteaccess
HueResponse.devicetype

They won’t show any value in the PowerApp yet though. First we need to get the user registered at the Hue Remote API, which is the next step. Select the following image:

On the Action menu, for the OnSelect event, add the Power Automate Flow for Link and Whitelist User. Change the OnSelect event so that also this is using “Set” function and taking the response from the Flow to the same HueResponse variable, but you also need to supply an input to this flow. For this we will use the HueResponse.access_token, so your OnSelect event should look like this:

Set(HueResponse, 'Hue-LinkandWhitelistUser'.Run(HueResponse.access_token))

Lets test this button. Hold down “ALT” on your keyboard, and click on the image. The Flow should now run, register a user at Hue Remote API, create a new List item and return the configuration to the PowerApp:

Checking the HueResponse record variable now:

A couple of more things remain on the main screen. First, on the App’s OnStart event, add the same event as the refresh icon, this would get the config automatically at start:

Next, select this Image:

On the OnSelect event, add the following:

Launch("https://api.meethue.com/oauth2/auth?clientid=<your_client_id>&response_type=code&state=<youranystring>&appid=<your_app_id>&deviceid=<your_device_id>&devicename=<your device name>")

Replace the <your_…> values with the client id and app id from the Hue Remote API app registration, and your values for device id and name.

Clicking this image will now launch the Hue Developers portal, asking you to Grant permission to the App, and return to the Logic App that retrieves the Bearer Token and store that in the Key Vault as we have seen in previous parts of this blog series.

Summary and Next Steps

We’ve now built the foundation and first part of the PowerApp to retreive the configuration, create and link username, and if needed authorizing and getting a new Bearer Token via Hue Remote API if needed.

In the next part we will build the screen for getting lights and setting lights state and color.

Thanks for reading, see you in the next part!

Blog Series – Power’ing up your Home Office Lights: Part 6 – Using Power Automate Flow to Link Button and Whitelist user

This blog post is part of the Blog Series: Power’ing up your Home Office Lights with Power Platform. See introduction post for links to the other articles in the series:
https://gotoguy.blog/2020/12/02/blog-series—powering-up-your-home-office-lights-using-power-platform—introduction/

In the previous part 5 we created the first Power Automate Flow of the solution, for retreiving the Access Token and getting the configuration of the Hue Bridge via Remote API. To get all the configuration details of the Bridge, we were dependent on that the user had a Whitelist Identifier in the Microsoft List, and this is the Flow we will be working on in this blog post.

Lets do a quick video where I talk about this Flow and what it does:

Create the Flow for Linking and Whitelisting User

Create a new instant Flow, with PowerApps as Trigger. In my case I have named this Flow “Hue – Link and Whitelist User”.

As the first action in the Flow after the PowerApps trigger, add a Compose action:

Tips: Make sure that you set a name for the action, in my case I’ve named it “Access Token”, before you under Dynamic content selects “Ask in PowerApps”. This way the Input parameter will get a more descriptive name like “AccessToken_Inputs”, when we later call the Flow from the PowerApp.

Next, add two Initialize variable actions, called UserDisplayName and UserEmail and type String. For values use the following custom expressions (see comment for expression):

Next, add a Get Items action from SharePoint, and specify your Site and List. For Filter Query, add Title eq ‘<UserDisplayName variable>’:

Add a Condition action, where we will check if the Get Items returns an empty result to be false:

If false, meaning that the user already have a configuration in the List, under “If yes”, add a Get Item action. Specify the Site and List Name, and for Id add the following expression to return the first instance of results first(body('Check_if_User_Already_Linked')?['Value'])?['Id'] :

Next, add a HTTP action where we will query the Hue Remote API for the Bridge configuration details. Specify the URI to be https://api.meethue.com/bridge/<whitelist identifier>/config, and add an Authorization Header with Bearer <Token Outputs>:

This action should return all the details we want from the Hue Bridge, and we can add a Response action to return that back to the PowerApp:

In the other case, when a User Linked was not found in the SharePoint List, we need to add that user and get the Whitelist Identifier. Under “If no”, add a HTTP action. In this action we will “remotely” push the Hue Bridge button via a PUT method. This is basically the same procedure as when you add new lights or equipments, where you need to run and press the button down. But here we do it via the API like below:

PS! Note that above I’ve used “Raw” Authentication and for Value selected Bearer “AccessToken Outputs”. This is just another option to show, I could have have used an Authorization Header instead.

After the Link Button is enabled, we can add another HTTP action, this will register the username via a POST method and a request body containing the “devicetype” value. Device type is so that you can identify the registered usernames on your bridge:

After this action, add a Parse JSON action so that we can more easliy reuse the outputs from adding the username:

For Schema, select “Generate from sample”, and paste the sample output provided by the Hue API documentation here, https://developers.meethue.com/develop/hue-api/7-configuration-api/#create-user, under 7.1.5. Sample Response.

Next, add a “Create Item” action. Specify the Site and List Name, and add the following values for List columns:

Note that for Whitelist Identifier, use the expression body('Parse_JSON')?[0]?['success/username'], this is because the output from Hue API returns an array, so the [0] is to specify the first instance.

Now, using that newly created username, we can query for the Bridge config using the “Whitelist Identifier” from above:

And lastly, add a Response action that returns this back to the PowerApp:

Verify and Test the Flow

That should complete the Flow. We will link that into a PowerApp later, but if you want to you can test the Flow by performing the Trigger action yourself. Then you need to specify a valid Access Token, and the Flow should run successfully, creating a Linked User if you haven’t already:

If you check the List a new item should now represent your user:

Summary and Next Steps

We are now ready to start working on the PowerApp, linking the Flows we have created in this and the previous blog posts. That will come in the next part!

Thanks for reading so far 🙂

Blog Series – Power’ing up your Home Office Lights: Part 4 – Using Logic Apps to Get Access Token and Renew Access Token if needed

This blog post is part of the Blog Series: Power’ing up your Home Office Lights with Power Platform. See introduction post for links to the other articles in the series:
https://gotoguy.blog/2020/12/02/blog-series—powering-up-your-home-office-lights-using-power-platform—introduction/

After building the Logic App in part 3 that will authorize and get access token via Oauth2, we will now create another Logic App that will retrieve the Bearer Token from the Key Vault secret, and renew the Token using Refresh Token whenever it is expired.

Here is a short video where I walk through that Logic App scenario:

Create the Logic App and HTTP Trigger

The first thing you need to do, is to create a new Logic App in your Azure subscription. Select the Resource Group you have contributor access to, and give the Logic App a suitable name, as per your naming guidelines. This is the Logic App I created in my environment:

Add a HTTP request trigger for this Logic App as well:

In the Logic App Designer, make sure you hit Save on the Logic App before the next step. You will now be shown the URL, but first go down to the “Add new parameter” and select Method and GET for method. This way your Logic App will trigger on HTTP GET requests.

Adding Logic App Identity and Key Vault Access

As this Logic App also will request secrets from Key Vault, we will need to add a Managed Service Identity and add that to the Key Vault access policy.

Go to Identity settings, and set the System assigned Identity to On:

Next, go to your Key Vault and under Access policies, add the the newly created Logic App with the following Secret permissions (Get, Set, List):

Add Actions for Getting or Renewing Bearer Token

The actions in this Logic App will retrieve the Bearer Token from the Key Vault and return the Access Token as a Response. If Token is expired, it will be renewed using the Refresh token.

Start by adding a HTTP request, and get the Secret for the Bearer Token like the following:

Next, add a Compose action, getting the outputs from the Get KV Secret Bearer Token action. This secret was stored as a Json Object, but will be returned as a String, so I have used the following custom expression to convert to Json:

json(outputs('Get_KV_Secret_Bearer_Token')?['body/value'])

Next, add the following Compose actions for getting the timestamps in Ticks, and converting to Epoch. See the previous blog post for explanation of why this is necessary, but we need to do this to be able to calculate wether the secret is expired or not:

For your convenience, I’ve added the custom expressions as comments to the actions above, or you can copy it from below:

ticks(utcNow())

ticks('1970-01-01T00:00:00Z')

div(sub(outputs('GetNowTimeStampInTicks'), outputs('Get1970TimestampInTicks')), 10000000)

Next, add a Condition action. Here we will check if the expiry date time of the secret is greater than the current calculated timestamp in Epoch:

Use the following custom expression for getting the “exp” attribute from Key Vault Secret:

outputs('Get_KV_Secret_Bearer_Token')?['body/attributes/exp']

If the secret hasn’t expired, we will return the access token as a Response action as shown below. Note that I will only return the access_token, not the complete Bearer Token stored in the Key Vault secret, as this also contains the refresh_token. The reasoning behind this is that the calling clients (users from PowerApps/Automate) only need the access_token.

As you see from above, I’ve built a Json body and schema for the response, and the custom expression returing the value of access_token is outputs('Compose_Bearer_Token')?['access_token'].

On the False side of the Condition, meaning that the Secret is expired, we will have the logic that renews the Bearer Token. First add two HTTP actions, for getting the Client Id and Client Secret from Key Vault:

Next, add another HTTP action, using Method POST we will send a request to the oauth2/refresh endpoint at Hue Remote API:

The refresh_token need to be sent in a Request Body, using the expression: outputs('Compose_Bearer_Token')?['refresh_token']

Remember to set Content-Type: application/x-www-form-urlencoded. And Authentication Type should be set to Basic, using the retrieved Client Id and Secret from Key Vault as username and password.

Refreshing the Token correctly will return a new Bearer Token. We now need to get and convert the time stamps to Epoch integer, to calulate when the Access Token expires. This is the same process as we used in the Logic App “logicapp-hue-authorize” in part 3 of this blog series. Add 3 new Compose actions like below:

For your convenience, here are the custom expressions used for the above actions:

addSeconds(utcNow(), int(body('Post_Refresh_Code_with_Basic_Auth_to_Update_Access_Token')?['access_token_expires_in']))

ticks(outputs('AccessToken_Expires_Utc'))

div(sub(outputs('GetTimestampInTicks'), outputs('Get1970TimestampInTicks')), 10000000)

Next step is to update the Bearer Token Secret in Key Vault with the new Token we received now and the new expiry date. Add a HTTP action like below:

We can now return the access_token using the HTTP action like below:

The last action we need to add is a default response if any accest_token could not be returned. This is important as we are going to call this Logic App using Power Automate Flows, and we need to have a response for any scenario. Add this after the condition action like below:

For the Null Response action, change the Configure run after setting like the following:

That should be it. Remember to secure outputs for any actions that return credential information:

Verify Logic App

We can now test the Logic App. You can use Postman, Invoke-RestMethod in PowerShell, or just run in the Browser your Logic App Http Trigger Url:

This should return your Access Token:

Looking at the Run History for the Logic App, we should see a sucessful run:

Summary and Next Steps

That should conclude this blog post. In this post, and the previous, we have built the logic behind authorizing and getting the Bearer Token for Philips Hue Remote API, as well as providing and refresh the Token when needed.

In the next part we are going to start building the solution in Power Automate. Thanks for reading, see you in the next part!

Blog Series – Power’ing up your Home Office Lights: Part 3 – Using Logic Apps to Authorize and Get Access Token using Oauth and Hue Remote API

This blog post is part of the Blog Series: Power’ing up your Home Office Lights with Power Platform. See introduction post for links to the other articles in the series:
https://gotoguy.blog/2020/12/02/blog-series—powering-up-your-home-office-lights-using-power-platform—introduction/

Now that we have registered the application for Hue Remote API, and stored the client Id and Secret in Azure Key Vault, we can start build the Logic App that will authorize and get access token via Oauth2.

Here is a short video where I introduce the concept:

Create the Logic App and HTTP Trigger

The first thing you need to do, is to create a new Logic App in your Azure subscription. Select the Resource Group you have contributor access to, and give the Logic App a suitable name, as per your naming guidelines:

Next, select HTTP request to be the trigger for the Logic App:

After that you will see the following in the Logic App designer:

Make sure you hit Save on the Logic App before the next step. You will now be shown the URL, but first go down to the “Add new parameter” and select Method and GET for method. This way your Logic App will trigger on HTTP GET requests, which is required for the Authorization Code flow with Hue:

Now copy this URL, and make sure that no one but you can access this URL, as this is a SAS (Shared Access Signature) URL that anyone in the world can send requests to if they know the URL. Save the Logic App.

Go back to your App Registration in the Hue Developers Portal, and change your temporary http://localhost/logicapp Callback URL to your Logic App URL:

This means that from now on, the Logic App will handle the authorization code for the Hue App. But first we will need to let the Logic App access the Key Vault.

Adding Logic App Identity and Key Vault Access

For the Logic App, under Settings and Identity, set system assigned managed identity to On:

After this setting is saved, you can later see the status and the object id of the service principal.

Next, under your Key Vault, click on Access Policies and Add Access Policy, from there selec the Get, Set and List Secret Management operations, and for principal search for and add the Logic App. This should look like this after adding:

With permissions in place, we are now ready to add actions to the Logic App.

Add Actions for getting Access Token

The first ting we need to do is to get the authorization code after the Hue App registration redirects back to the callback URL. This is returned as a querystring appended to the URL. Add a “Compose” action and use the following expression for getting the request queries:

(I’ve added the custom expression to comments for better visibility).

Then we need to get the Client Id and Secret from the Kay Vault. Add a HTTP action next, where we will use the Azure Rest API for getting the secret, and authenticate with the Managed Service Identity:

The URI above points to my Azure Key Vault URI, and the specified secret. The documentation for getting secrets can be seen here: Get Secret – Get Secret (Azure Key Vault) | Microsoft Docs.

The same applies to getting the Client Secret, add another HTTP action:

The get an access token from Hue Remote API we must either use Basic Authentication or Digest Authentication. Since I’m running this as a Logic App in a controlled environment and trusting the SSL encryption I will use Basic Authentication. In addition, I will secure the outputs from getting Client Id and Secret from Key Vault, so that other users cannot see those values from the run history:

This setting has been enabled for both the actions getting KV Secret Client Id and Client Secret:

For obtaining an Access Token with Basic Authentication the following header is required: Authorization: Basic <base64(clientid:clientsecret)>

This means that we need to base64 encode the clientid + “:” + clientsecret. This can be done using this lengthy expression, here in a “initialize variable” action:

This above action is just for reference though, as the HTTP action supports base64 encoding out of the box. So when posting to the token endpoint, the best way is to use the following:

(PS! Another way to do Basic Authentication in a HTTP action would be to add the Authorization header manually in the Action above with: “Basic <your calculated base64>” as value, and leaving the Authentication type to None.)

From the above settings, in the URI add the authorization code we got from the request queries earlier, using the expression:

outputs('Compose_Authorization_Code')?['code']

When selecting Authentication type to Basic, the username (client id) and password (secret) will automatically be base64 encoded. The values for username and password are the valies from the Get KV Secret Client actions earlier, in the following format:

body('Get_KV_Secret_Client_Id')?['value']

And this action will return the Bearer Token from Hue Remote API if everything is correctly inputted.

I also make sure that the output of this action is secured from viewing:

With the Bearer Token now retrieved, the next actions is to calculate the expiry time and write the Token back to the Key Vault secret.

Add Actions for getting expiry time and write Token to Key Vault

The Bearer Token returned by Hue Remote API will be in the format of the following masked response:

The _expires_in values are in seconds, so that means that the Access Token is valid for 7 days, and the Refresh Token about 112 days. It would then make sense to only refresh the token when needed.

Lets start by calculating when the access_token expires, with the following expression in a Compose action:

addSeconds(utcNow(), int(body('Post_Auth_Code_with_Basic_Auth_to_Get_Access_Token')?['access_token_expires_in']))

The above expression takes the current time and add the number of seconds for when the access token expires.

This will return a new datetime 7 days ahead. This value will be used to set the expiry time on the Key Vault secret for Bearer Token. By setting an expiry time I can later calculate if I need to refresh the Access Token or not.

But it’s not that easy.. The calculated time above will need to be converted to Epoch (32-bit “Unix”) integer format to be able to set the Key Vault secret “exp” attribute. This isn’t so clear when seeing the API docs, Set Secret – Set Secret (Azure Key Vault) | Microsoft Docs, so took me a little trial and error. And I found great help in this blog article: https://devkimchi.com/2018/11/04/converting-tick-or-epoch-to-timestamp-in-logic-app/.

Based on this I need to convert the timestamp to Ticks (64-bit). Ticks is a built in function in Logic Apps, but to be able to convert to Epoch I will need to calculate the difference in ticks between when the Access Token expire, and the first value of Epoch which is 1970-01-01T00:00:00Z. This is well explained in the above reference blog, but here are my resulting actions.

After calculating the Access Token expiry, I add a compose action which converts this to Ticks:

Using the following expression: ticks(outputs('AccessToken_Expires_Utc'))

Then I need to find the 1970-01-01T00:00:00Z value in Ticks:

Using this expression: ticks('1970-01-01T00:00:00Z')

Then we can convert this to Epoch by subtracting the two Ticks values calculated above, and divide by 1 million:

This is the expression used above: div(sub(outputs('GetTimestampInTicks'), outputs('Get1970TimestampInTicks')), 10000000)

We now have the correct format for the “exp” attribute to update the Key Vault secret. Add a new HTTP action and configure like below:

Remember to secure the Output for this action also:

Finally we can finish this Logic App by adding a Response action and do a quick test to verify that everything works as expected.

Adding Response action and verify Logic App

Add a Response action with status code 200 and a body like below:

Tips: It can be difficult to troubleshoot the Logic App when securing outputs, so you might hold back in that when testing. It will show your secrets in the run history though, so it might be best to do this in a test enviroment depending on your needs.

Now we can test. Construct the URL for authorizing the App again, like we did in Part 1:

https://api.meethue.com/oauth2/auth?clientid=&response_type=code&state=elvenanystring&appid=elven_demo_hue_app&deviceid=elven_demo&devicename=Elven Demo

Paste it in the Browser, and after granting access to the App in Hue Developer portal:

You should be redirected to the Logic App:

.. and with a respons success!

Looking at the Run history, we can verify the steps were successful:

You can also look into the inputs and outputs of the actions, except the actions where we secured the output:

We can also verify that the Key Vault secret storing the Bearer Token has been updated and have an Expiration Date one week forward:

Summary and next steps

That concludes this blog post. Thanks for reading this far, in the next part we will build the Logic App that will respond back the Access Token and renew using Refresh Token if needed.