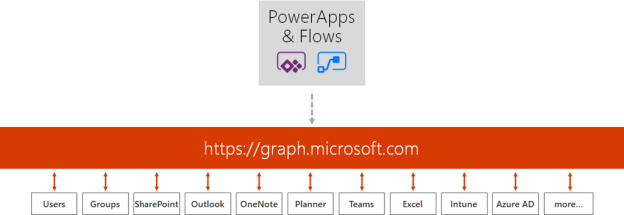
Microsoft PowerApps and Flows are great and simple to get started and use solutions for creating Apps and for how to “Code with No Code”. And the Microsoft Graph API is a great source of information for your Organizational data, including Users, Devices, Apps and Data. The Microsoft Graph has one common endpoint for which you can access and use all the information you want.
The purpose of this blog post is to show how to set up the requirements for accessing Microsoft Graph from PowerApps and Microsoft Flow.

I will show how you create an App Registration in your Azure AD tenant with the required settings and permissions for Microsoft Graph, and how you set up a custom connector in PowerApps and how to connect to that using PowerApps and Flows. We will create a simple App and see how you can share that App in your Organization. Let’s get started!
App Registration
If you want to access the Microsoft Graph you will need an App Registration, for which you can authenticate against the Graph API. There are two options available, depending on whether you want to authenticate only with Azure AD Work or School accounts, or if you also want to authenticate with Microsoft Accounts. The first option is to use the Azure AD portal (https://aad.portal.azure.com), the second option is to use the Application Registration Portal (https://apps.dev.microsoft.com). I will use the Azure AD Portal.
First, login as a Global Administrator to your Azure AD Portal, or have your IT admin perform the following steps for you. Under Azure Active Directory, create a new App Registration:

Provide a name like below, select Web app / API type, and then type any URL you want. It doesn’t have to be an accessible URL, as long as it is a valid format:

After the App Registration is created, you can open it and note the application id, which we will require later:

Next, under Settings, click Required Permissions. Here we will add the permissions we need for accessing the Microsoft Graph.

Click Add and then select Microsoft Graph from the list over available APIs:

Next, you will need to specify the permissions this App will have to access the Microsoft Graph. Note that there are two types of permissions:
- Application Permissions. These permissions are for Apps that run without a user logged in, like a service or deamon.
- Delegated Permissions. These permissions are for running apps in the context of the logged on user. The users effective permission will be a least privilege of these permissions you give the App, and the users actual permission in your organization.

In my scenario with using PowerApps and Flows, I will only use Delegated Permissions. Lets start with the most basic permission, and add that to the Microsoft Graph API:

Note that there is a column for Require Admin which either contains a Yes or No. If you select a permission that require Admin grant, the Global Administrator must click on the Grant Permissions. In our example now I don’t have to do this, but remember that any time you update the permissions for your app registration that require Admin, you must click on this Grant Permissions button.

Next, under Settings for the App Registration, go to Keys. We will now create a secret key to be used together with the application id when authenticating. Type in a description and select a period of expiry, and then click save. Your key will be displayed only once, so make sure you copy it and note it down for later use:

We are now ready to head over to PowerApps and create our Custom Connector that will use this App Registration.
Create a Custom Connector in PowerApps
Go to https://web.powerapps.com and log on as your normal user account, you don’t have to be an admin to do this.
Under Custom connectors, select Create Custom Connector, specify a name and continue:

On the General page, type a description and optionally change the icon or background color:

Under scheme select HTTPS, and under host, specify graph.microsoft.com. The base URL is “/”.

Click Continue. Under Security select OAuth 2.0 as authentication type, and then for Identity Provider select Azure Active Directory. For Client id, copy the Application id from the Application Registration we did in the previous section in the Azure AD portal:

Scroll down and for Client secret, paste in the secret key you generated from the app registration. Let login URL and tenant ID be as suggested and the type https://graph.microsoft.com as Resource URL:

Scroll further down. Scope is optional, and take a note of that Redirect URL will be generated after we save the connector.

Click continue to the Definition section. We will get back to this later, so for now just click Create connector:

The custom connector will be created, and we can go back and get the redirect URL:

Now you need to get back to the application registration in Azure AD and add that Redirect URL to the list of Reply URLs like this:

Save that and we are ready for the next step. To summarize, we have now created an App Registration in Azure AD with these 4 steps, as well as prepared a Custom Connector i PowerApps.

Now we need to prepare some queries we are going to run in Microsoft Graph.
Prepare queries in Graph Explorer
When working with Microsoft Graph, Graph Explorer is your best friend and resource. You can access the Graph Explorer via the https://graph.microsoft.com website, or even with this simple url:
At the Graph Explorer page you can run from a great collection of samples, and you can either run with a sample account, or log in using your own Work/School or Microsoft account.

I will log in as my normal user, and if this is the first time you log in to Graph Explorer you are prompted to consent to permissions needed by the Graph Explorer. From the picture below I have just Run Query for getting my profile:

With Microsoft Graph, you can also select just the attributes you want to see, so if I run the following query: https://graph.microsoft.com/v1.0/me/?$select=displayName,givenName,surname,userPrincipalName,aboutMe
I will get this response for my user:

From the response I see that my “aboutMe” attribute is empty. Let’s try to put a value into that. This is where the Microsoft Graph documentation is useful. If I look at the API reference for update user, https://developer.microsoft.com/en-us/graph/docs/api-reference/v1.0/api/user_update, I see that I will have to use a PATCH method and specify a Request Body which contains the attributes and values I want to update. So for example I will specify my request like this, and then Run Query:

I see that the status is success with a status code of 204, and if I check my profile again with the GET query from earlier, I will se that the aboutMe value now has been set: (It’s true by the way, I love working with Microsoft Graph!)

Now that we have seen how we can run queries for reading and writing to Microsoft Graph, lets try to implement that in a PowerApp, but first we need to create some Operations for our Custom Connector.
Create Custom Connector Operations
Back in PowerApps and under Custom connectors, I select edit for my connector:

I then go to Definition, and since there are no Actions created previously, I will add that now by clicking New Action. This will present me with the following form. I will specify a name, description and an operation id:

Scroll down to Request, this is where we will provide the details for our query. The best way to do this is to select to Import from sample. I specify the Method to be GET, and then the query like this, which is the same query I ran in the Graph Explorer earlier:

I don’t need to specify any Header or Body for this query, so I just press Import. Now my action looks like this:

Scroll down to the Response section, and then click on the default response. Click on Import from sample, and this time you paste in the response body from the previous Graph Explorer query:

This response will help the custom connector operation so that we can get the right output values mapped in our PowerApp later. Select Import.
The response now looks like this:

We can also validate that the response looks ok:

Click on Update connector to save this operation.
Next I want to create another action for updating the aboutMe attribute in my profile. I’ll create a new Action:

Under Request I will select Import from sample again, this time specifying PATCH as operation verb, the request URL is https://graph.microsoft.com/v1.0/me, and also add the Headers and Body as shown below. These samples are exactly the same as what I tested in Graph Explorer:

As this operation does not return a specific response object, I will let the default response be as it is, and will save my settings by Updating the connector.
Testing the custom connector
In my custom connector I can now move to the Test section:

The first thing I need to do is to create a New connection:

By logging in with my user I will be presented to consent to the permissions of the App, these are the delegated permissions we configured when registering the App in Azure AD (the reason for the double consent is that in addition to the Microsoft Graph delegated permission, there was also an Active Directory Graph permission for sign in and read profile) :

After creating the connection, go back to the custom connector and to the test section again. This time we have a valid connection to choose, and can test the action we want. I will test the GetMyProfile action first:

By using the $select parameter I can specify any attribute I want to get, and when clicking Test operation I get a successful response like this:

Now, let’s test the second action:

I specify the Content-Type to be application/json, and then an updated value for the aboutMe in the profile, and then Test operation:

The response is also successful.
Now that the operations are tested and verified, we know that the Custom connector can successfully access the Microsoft Graph, and we are finally ready for creating a PowerApp and testing it all out!
Set up the PowerApp and use the Connector
I will create a PowerApp that will get my profile details, and also be able to update the about me attribute. I will not get into great detail on the general instructions to set up the PowerApp, but the high level steps are:
- Create a new PowerApp using the blank template and phone layout
- Add some custom colors and an image (optional)
- Add some labels and text boxes for getting some chosen profile attributes
- One of the text boxes is for the “about me” value
- Create a couple of buttons for getting profile data and to update the “about me” value
So after playing around a little bit I have this PowerApp ready:

So lets bring some action into the PowerApp. First, go to the View menu, and then Data Sources. From the list of data sources you should be able to see a connection with your username and the PowerApps Microsoft Graph connector (as I am using PowerApps for other data sources as well, I have a few more):

After I add the connection I now have a data source for this Connector:

Now I can refer to this data source in my PowerApp, for example in my buttons. I will for the first button add an action for getting my profile data, and for the second button add an action for writing back to “about me” in my profile.
For reading data from my profile, I will add the following action to the OnSelect event:

First a little explanation of this action:
- UpdateContext is a function that would hold data into a variable i specify.
- Calling the PowerAppsMicrosoftGraph.GetMyProfile operation would return a response I want to save to that variable.
- Using arguments for $select I can specify which attributes I want to return as a response.
- So by using UpdateContext and specifying that I save the response back to the MyProfile variable I can use that variable in other controls.
The complete operation is: UpdateContext({MyProfile: PowerAppsMicrosoftGraph.GetMyProfile({‘$select’:”DisplayName,givenName,surname,aboutMe”})})
Then for each textbox control I can get the value from the MyProfile variable, like this:

And l would do the same for the other text boxes, using MyProfile.givenName, MyProfile.surname and MyProfile.aboutMe.
Next, for updating the attribute “about me”, I will add the following action to the OnSelect event:

In this case I call the PowerAppsMicrosoftGraph.UpdateAboutMeProfile operation, specifying the arguments for content-type and using the text specified in the txtAboutMe.Text property:
PowerAppsMicrosoftGraph.UpdateAbouteMeProfile({‘Content-Type’:”application/json”,aboutMe:txtAboutMe.Text})
Now you can Save, give the PowerApp a Name and a chosen Icon, and then Publish the PowerApp. You are now ready to run the PowerApp!
Running the PowerApp
The PowerApp can be started in different ways, via the mobile app, desktop app or via the https://web.powerapps.com website. When I run this PowerApp I see this after starting up:

When I click Read Profile, it will call the Custom connector and get my profile information from Microsoft Graph:

Lets update some text in the About me textbox:

And then click on the butting Update About me, this will run the PATCH query against Microsoft Graph and update the “about me” attribute.
PS! The operation will run successfully, but it will return the following error when the custom connector to Graph API does not return a response object:
![]()
This is a flaw in PowerApps using Custom API connector, as it expext a JSON response object, but some operations against API’s are designed to return a 204 No Content response. We will fix that later by using a Flow.
To verify my profile has been updated, I can check in Dvelve and the about me section:

At this point we have seen that we can access the Microsoft Graph using a Custom connector from a PowerApp. There are a couple of more scenarios I will show before I wrap up this blog post, using Flows and Sharing the PowerApp with other users in my organization.
Using Microsoft Flow
Using Microsoft Flow with your PowerApps will make it possible to add workflows with actions and condtions to your apps. When creating a custom connector like we did to Microsoft Graph earlier, the same connector is available for your Flows.
I will go to the Flows section and create a new Flow. The first step for getting input from PowerApps is already there, so add a new step and select Action. From there you can search a lot of actions available, and you will find our PowerApps Microsoft Graph connector as well, with it’s 2 defined operations. Select the Update About Me Profile:

Next, the operation require 2 inputs, the first one I specify “application/json” which Microsoft Graph expects, and for the next aboutMe input, I select “Ask in PowerApps”:

This will create an input I later can use from PowerApps. This is all I need to do now, but I could have added more actions for example for sending an e-mail after updating the profile etc.
Now I specify a Flow name and Create or Update the Flow:

Back in my PowerApp, select the Update About me button, and then in the Action menu, select Flows:

Then find the Flow I created and add that:

You will see that the Run action for the Flow will prompt me for the Input I created with the “Ask in PowerApps” when I edited the Flow. This is where I would supply the the content from the txtAboutMe.Text control:

The OnSelect action for this button now looks like this, which will run the Flow:

Let’s Save and Publish the PowerApp again, and then launch it. First i Read the profile, and then I update some text in the About me:

When running Update About me now, the action successfully completes, with no error warning, and if I go to the Flow I can see the run history shows that it successfully completed. In the details I see that the Flow has triggered with the input I specified in the PowerApp:

Note that the Flow handles 204 No Content well, so now we have solved our problem in the PowerApps from earlier 🙂
Using a Flow will not only handle some types of inputs and outputs better for custom connectors than directly from PowerApps, but also make it possible to create more logic to your apps using workflows with actions, conditions and a lot of other data sources.
Sharing the PowerApp with other users
In the last part of this blog post I will show how you can share the PowerApp with other users. When you create a PowerApp it is only you that can access it:

Sharing an app that uses a custom connector, like we use for the Microsoft Graph, it will be automatically shared, but users must create their own connections to it.
And when sharing an app that includes a Flow, users who run the app will be prompted to confirm or update any connections on which the flow relies. In addition, only the person who created the flow can customize its parameters.
You can share the PowerApp to specific individuals, to groups or to the whole organization.

When sharing to the organization the users can find the PowerApp in the Dynamics 365 app store, under in-house apps:

Now, let’s test with another user, in this case I have a test user called [email protected]. When he launches the PowerApp for the first time he will need to create a connection to the custom connector:

After signing in he would need to consent to the App permissions:

And after consenting click to Allow:

Now he can use the PowerApp, and when clicking Read Profile his details are filled in as expected. This is a test user I have based on the Seinfeild Show, so I will add to the “About me” with some text:

When I click Update About me, this users profile is updated. My test user does not have access to see the details of the Flow, but back with my original user that owns the Flow I can see that it indeed ran with the input from this user:

Summary
In this blog post we have seen how we can access the Microsoft Graph via a Custom connector in PowerApps and Flows. The sample shown in this post is simple with working with the profile of the logged on user, but with the power of the Microsoft Graph this opens up a lot of possibilities!
In later blog posts I will show some more exciting scenarios for using the Microsoft Graph, and I will link back to this blog post as a reference for how to get it all set up!
Thanks for reading, let me know in the omments if you have any questions or maybe some ideas for usage scenarios!

The Images not loading?
Images in the blog post you mean? Yes, they should be visible, just verified.
Pingback: Create your own Azure AD PIM App with PowerApps and Flow using Microsoft Graph | GoToGuy Blog
Pingback: Exporting and Importing PowerApps and Flows Package that use a Custom Connector | GoToGuy Blog
Great post. I worked through the example without any problems.
Thanks for your feedback and sharing, glad it was useful!
Great article indeed.
Excellent! Thank you!
how can I add this to the connector https://graph.microsoft.com/beta/users?$filter=mail eq ’[email protected]’. So I can get this data in powerapps
Hi, you would add a new GET operation using that query and filter criteria. I have another more detailed blog post, https://gotoguy.blog/2018/09/15/create-your-own-azure-ad-pim-app-with-powerapps-and-flow-using-microsoft-graph/, where I also show how to use filter criteria.
do we need powerapps plan 2 to use the custom connector?
From October 1st 2019 P1 and P2 transition to the new PowerApps / Power Automate per user / per app plans. Going forward these plans include rights to custom connectors. There are more specifics for transitioning here in this FAQ: https://docs.microsoft.com/en-us/power-platform/admin/powerapps-flow-licensing-faq
Do we need a PowerApps plan 2 to create a custom connector?