Tag Archives: Service Manager

Service Manager Self Service Portal – Password Reset with Azure AD Premium

One challenge with using a Self Service Portal for Service Manager is that the user must have a valid Active Directory user name and password to be able to log on to the Self Service portal. So what do you do if have forgotten your password or the password has expired?

Previously in Service Manager, we have addressed this by having another user request a password reset on your behalf, that user being either a Service Desk analysts or a Super User allowed to create that password reset request.

The optimal solution would be to enable the user to reset their own password. This blog article will show how you can use Azure AD Premium to accomplish just that!

Some requirements

First of all, this solution will have some requirements:

  • You must have Azure AD with Directory Integration enabled for your on-premises Active Directory
  • You must have configured password write-back to on-premises Active Directory

  • You must configure a user password reset policy in Azure AD, and users must at least have one authentication method defined:
  • You must have either configured federated (SSO with ADFS) users or users with password synchronization in the directory integration set up
  • Each user, and any administrator setting this up, needs to have an Azure AD Premium license. Azure AD Premium is either licensed directly or part of the Enterprise Mobility Suite (EMS)

Some recommendations

In addition to the requirements above, I have some recommendations as well:

How this works

With all these requirements in place, this is how it works when a user tries to access the Self Service Portal and wants to reset the password.

In my environment, I am using the Self Service Portal from Cireson, but this should work for the built-in Service Manager Portal as well.

  1. First, I go to my application URL, https://selfservice.skill.no. Since I have published this with Azure AD App Proxy, I must sign in with my hybrid Azure AD identity. I am presented with my customized Azure AD sign in page:
  2. Since I have forgotten my password or maybe my password has expired, I select the link for “Can’t access your account” under the Sign in button. This will bring me to the reset password page where I can specify my user identity and write the captcha code:
  3. Next I select one of my defined authentication methods, in this example I will receive a text message to my mobile phone:
  4. I receive the SMS verification code and type it in:
  5. Next after successfully verifying my SMS code, I can specify my new password:
  6. And my password has been reset:
  7. Since my user are a federated user I will now be redirected back to the ADFS on-premises and my customized sign-in page there:

  8. After logging in, I’m redirected directly to the published Self Service Portal:

Conclusion

By using the powers of Azure AD Premium and directory integration with my local Active Directory, I can as an end-user reset my passwords, and directly access my published Self Service Portal for Service Manager in this case.

PS! For those that are not in Azure AD yet, Cireson will soon deliver their own password reset solution in the Identity Management Stream. I’ll come back to that later.

Customize Service Manager Business Services CI for Relationship with Cireson Asset Management Organizations

I had a request where the question was if it was possible to customize the Business Services Configuration Items in Service Manager, so that it could reference Organizations defined in Asset Management CMDB. In this case, the Asset Management solution in Service Manager was based on Cireson Asset Management, but the following solution could easily be applied for other Asset Management solutions as well.

If you look at the built-in Configuration Items and Business Services in Service Manager, you will see that there already is a field for “Owned By Organization”. This built-in field however is based on a simple string value:

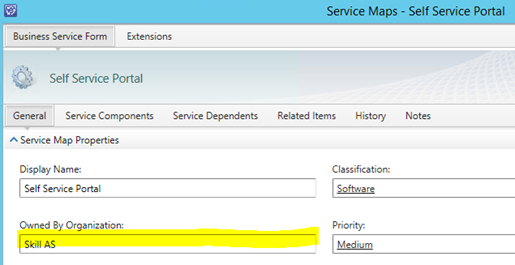
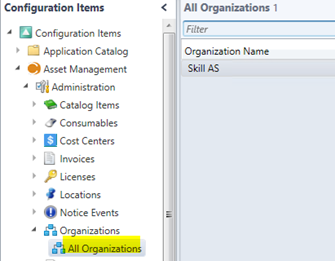
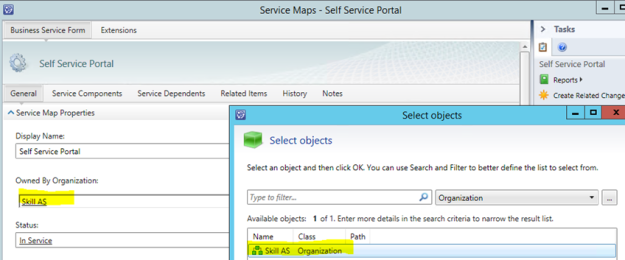
The question was to replace this field with a single instance picker, which would reference the Organizations defined in Cireson Asset Management:

The solution

The solution consists of several parts, which I will explain in this blog post:

  • A sealed Management Pack which consists of the required class extension for referencing Cireson Asset Management.
  • An unsealed Management Pack for Type Projection and Form Customization, so that the Business Service Form can show the single instance picker for the custom relationship.

Optionally, you could create a custom form in Visual Studio instead, but then you would have to create all the other fields for Business Service as well.

The first part, “extending” the Service class

So first, I would have to create a new Management Pack for the class extension. To do this I use the Service Manager Authoring Tool, and create a new blank Management Pack xml file.

I want to extend the Business Service class, and after examining Service Manager and classes, I found these relationships between the relevant classes for my scenario:

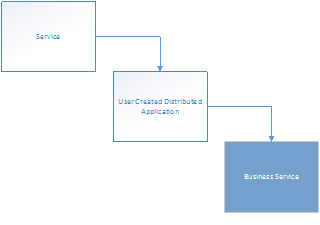
The “Service” and “User Created Distributed Application” classes are abstract classes. These classes cannot contain instances, and acts as base classes for inherited classes. Therefore, normally this means that the class I would want to extend is the “Business Service” class.

But! There is a caveat here. There are two types of Services in the Service Manager CMDB: Those that you manually create and those you would synchronize from Operations Manager as Distributed Applications. If I were to extend the Business Service class this would only be available for my manually created Business Services, and besides that I will have a problem with the default view and default form in Service Manager Console as it targets the Service class. Trust me, I have been there 😉

This challenge is well described in Oskar Landman’s blog post: http://www.authoringfriday.com/2013/04/27/scsmscom-business-service-extension/.

So I decided to base my solution on the workarounds described in that article, with a little tweaks and customizations.

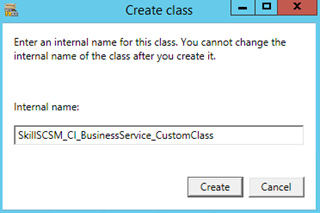
Using Service Manager Authoring Tool I create a new Configuration Item Class and name it with an appropriate internal name.

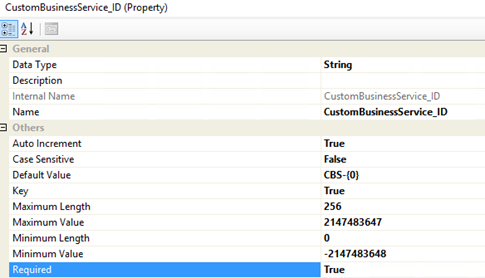
I delete the default ID Property_4, ignore the warnings, and create my own ID property with auto increment, default value and key configured as:

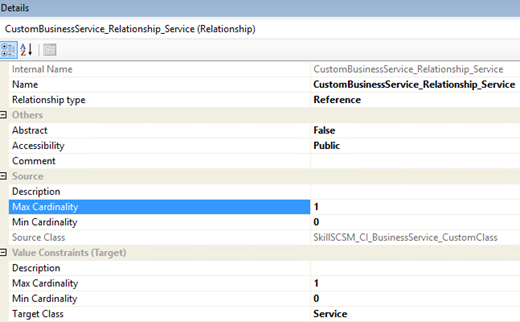
I then create a relationship choosing the target to the Service class, and specifying source max cardinality to 1:

Next, to prepare for creating the relationship to the Cireson Asset Management, I find and import the sealed CiresonAssetManagement.mp file to the Authoring Tool. This file can be downloaded with the AssetManagement.zip from Cireson and can be located in the Authoring folder in the zip file.

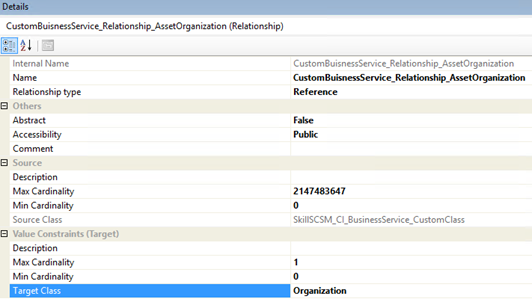
From my custom class for Business Service, I then click on the Create Relationship button and give it an internal ID and name. I then choose Target Class and browse to the Cireson Asset Management Pack and selecting Organization:

I save my Management Pack file and then choose to close the Solution in Service Manager Authoring Tool. I will now edit and clean up the XML file manually, which I always find is good practice.

Tip: When I save XML MP files in Service Manager Authoring Tool, and later open the files in Notepad I always get the word wrapping all messed up. I usually open the file in XML Notepad 2007 (yes, I know, but it works;), save it, and then I can open it in Notepad again. Then the XML file is formatted nicely and line by line. You can also work with the xml file in Notepad++.

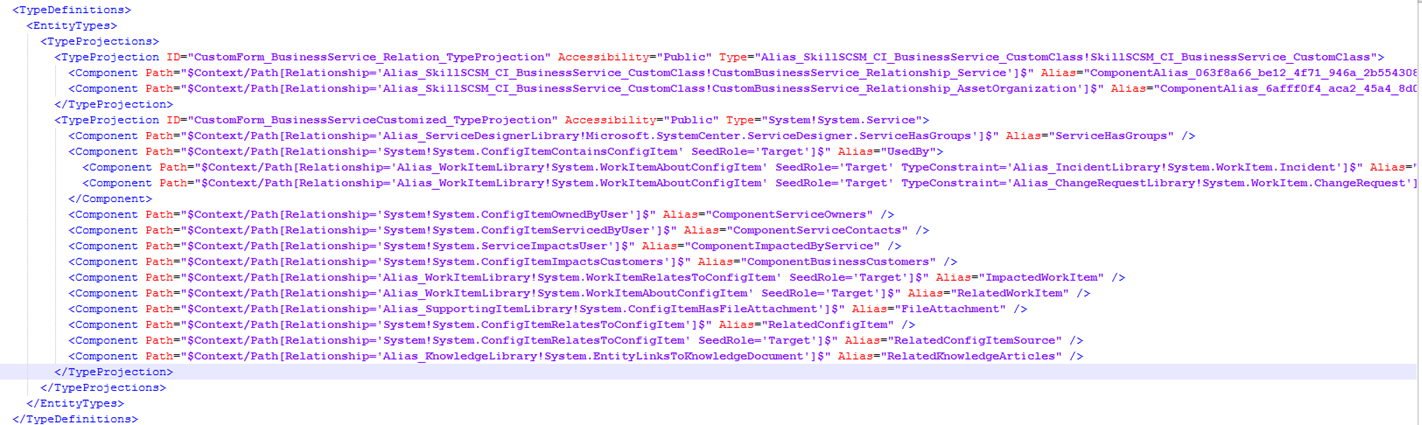
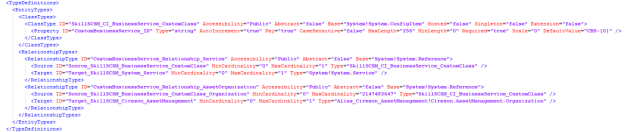
So if you have been following me until now, you might have a MP XML with Type Definitions that looks like this (don’t mind the my custom names for aliases, you might have Guids there instead):

My custom class for extending Service are now finished, I just need to seal the XML file to a MP file. In Service Manager Authoring Tool I open the xml file again, and then sealing it. I have already prepared a Strong Name Key file (.snk) to use when sealing my custom Management Packs.

That concludes the first part, and I can now import this sealed MP to Service Manager. In the next part I need to work on the forms and type projections.

Second part, type projection and form customization

At this point, I have a working relationship between the custom class for Business Service and the Service class and Organizations in Cireson Asset Management. It is just that I do not have any forms or views to see or edit them! Therefore, this second part will focus on creating the required type projections and form customizations so that I can see and edit those relationships.

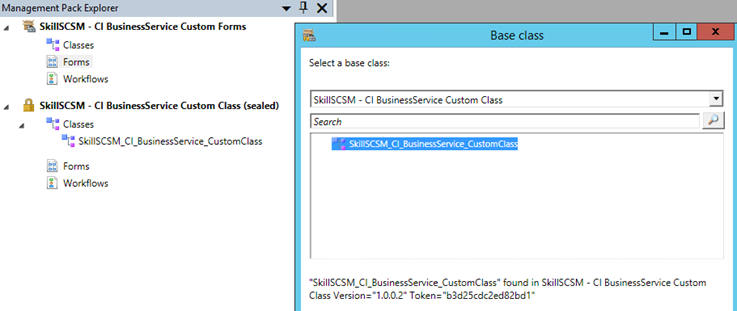
In Service Manager Authoring Tool, I close any open solutions, and then open the sealed MP from part one. I also create a new blank Management Pack XML to contain my form customizations.

Create a blank form for the custom class

I then create a new Form, specifying the Business Service Custom Class as my Base class:

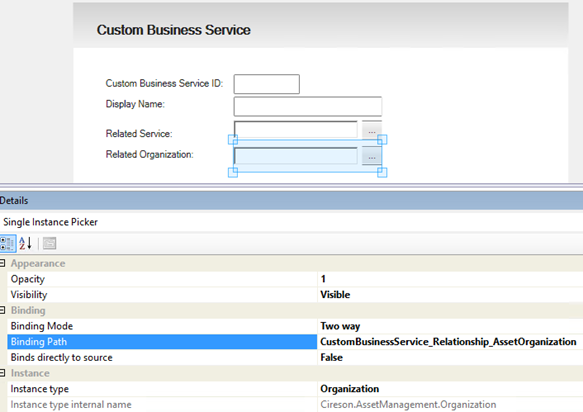
I then create a simple form. I create labels and textboxes for my custom ID and Display Name, and single instance picker for the related Service and Organization. For each of these I change the binding path, for example:


I now have a custom form that I can use for creating new instances of the custom class of Business Services, but need to customize the default main form for Service to be able work with my custom relationship there.

Customizing Service main form and type projections

From the Form Browser I find the ServiceMainForm, and click to View it. When right clicking this form I select to Customize it. I’m prompted to choose my unsealed XML Management Pack file and the form will open as customizable.

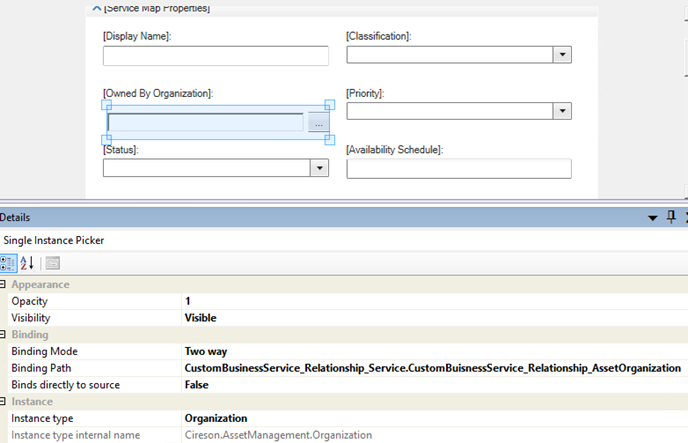
I can now easily see the text box for Owned By Organization. I select it and from Properties I set the Visibility to Hidden. (I could have deleted it but prefer to have the text box in the Management Pack if I should want it back).

From the Form Customization Toolbox, drag the Single Instance Picker over the place where the Owned By Organization textbox was. Do not change any bindings yet. This should now look something like this:

At this point, I have to step out of the Service Manager Authoring Tool, and do some XML editing. I save and close the unsealed Management Pack in the Management Pack Explorer, and open the XML file in my text editor.

After renaming some aliases and ID’s to be more readable, I can look over my existing Type Projections. I have two Type Projections, the first one for the blank form I created, and the second one for the customized default Service form:

Further down in the XML file I can see the two Forms, targeting each of the above Type Projections (I have collapsed the Customization part to make it more readable):

I now need to add to the Type Projection for the customized Service Form, so that the relationship that I created earlier can be used. This is done by adding the following two components, specifying SeedRole=’Target’ for the relationship for the custom Service class and inside that a component for the Asset Organization relationship:

I can now save and open this XML file again in Service Manager Authoring Tool, and go to the single instance picker I added for the customized Service Form earlier and change the Binding and Instance type. I set the Instance type to Organization from Cireson Asset Management, and the Binding Path manually to “CustomBusinessService_Relationship_Service.CustomBusinessService_Relationship_AssetOrganization”. This has to be entered manually and cannot be browsed, and the binding path will traverse the two relationships specified in the added component paths from above.

I have now completed the form customizations and type projections, and can import this Management Pack to Service Manager. I do not have to seal it, as it refers to the other Management Pack for the custom class that was sealed.

As a last step, I need to create a view for the custom Service class.

Creating a view for the custom Service class

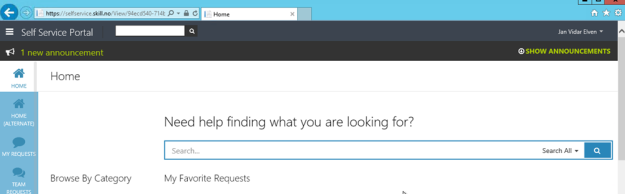
In Service Manager Console I can now create a view under Configuration Items targeting the Custom Service Class. This will let me create instances of the custom class for Business Services and relate them to the Business Services I have either created manually or synchronized from Operations Manager.

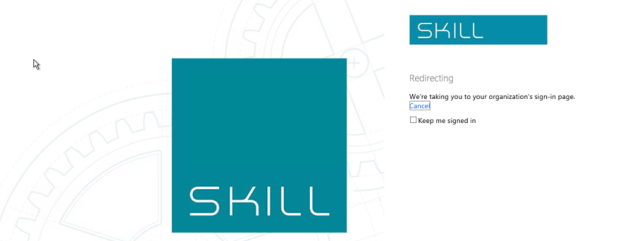
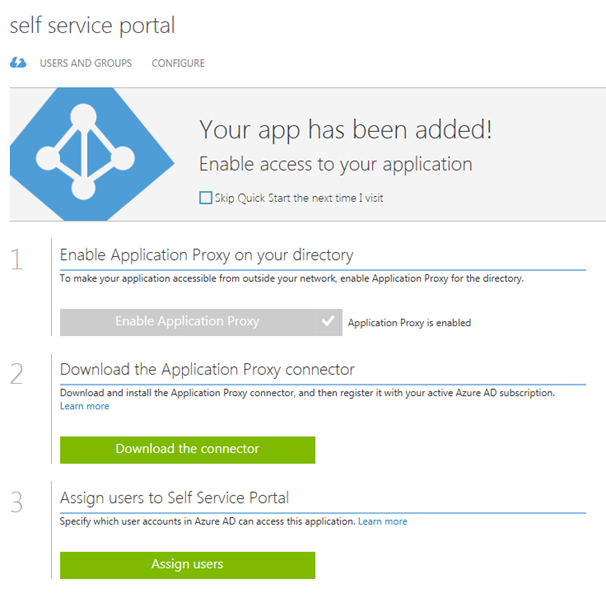
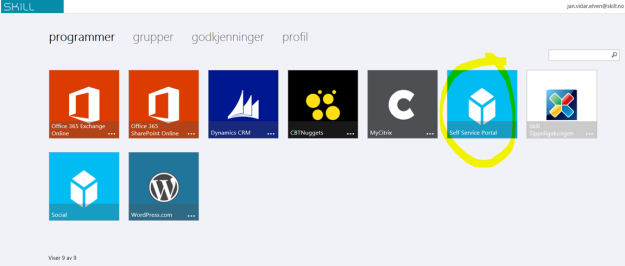
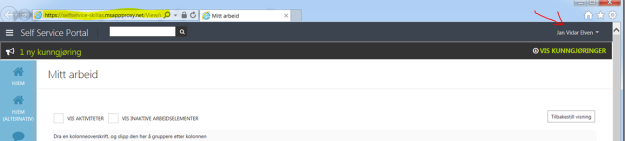
In this example I have a Business Service for Self Service Portal, and create a relationship to it:

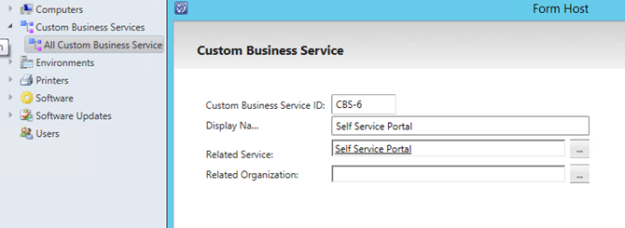
I can now open the Business Service form, and use the instance picker for selection the Organizations I have added to the Asset Management:

That concludes this blog post, hope it has been helpful!

Publish the Cireson Self Service Portal with Azure AD Application Proxy

The Scenario

Update: This blog post is the first part in a series. See:
Part 2 – Using a Custom Domain Name for an Application Published with with Azure AD Application Proxy

I have been looking at different usable scenarios for publishing internal sites via the Azure AD Application Proxy, and decided to have a go at publishing the Cireson Self Service Portal. This will give me some interesting possibilities for pre-authentication and controlling user access.

I have been considering two scenarios for publishing the Self Service Portal:

  1. Publish without pre-authentication (pass through). This scenario is best used when the Self Service Portal is running Forms Authentication, so that the user can choose which identity they want to log in with.
  2. Publish with pre-authentication. This scenario will used Azure AD authentication, and is best used when the Self Service Portal is running Windows Authentication so that we can have single sign-on with the Azure AD identity.

It is the second scenario with pre-authentication I will configure here.

I went through these steps:

Configure Windows Authentication for Cireson Self Service Portal

The Cireson Self Service Portal installs per default with Forms Based Authentication. I need to configure Windows Integrated Authentication for the portal, and this is well documented in the Knowledge Article Cireson customers and partners can access at https://support.cireson.com/KnowledgeBase/View/45. From my environment, I can summarize the following configuration settings:

  • The Self Service Portal (v3.6 with hotfix) are running on the same server as the Service Manager Management Server (recommended and officially supported by Cireson)
  • The Portal/Management Server is configured with Kerberos Delegation in Active Directory with “Trust this computer for delegation to any service (Kerberos only)”
  • The Service Manager Service Account is configured with Service Principal Names (SPN) with:
    • SETSPN –s MSOMSDKSVC/NameOfYourServerHere SCSMServiceAccountHere
    • SETSPN –s MSOMSDKSVC/FQDNOfYourServerHere SCSMServiceAccountHere
  • Service Manager Service Account is added to the IIS_IUSRS local group on the Portal Server
  • The Cireson Portal Web Site are configured with Windows Authentication (Kernel Mode Authentication Enabled, Extended Protection to Off). For Providers Negotiate are listed on top.

It is a good idea at this point to verify that Windows Integrated Authentication is working correctly by browsing internally to http://portalservername. Your current logged on user (if permissions are correct) should be logged in automatically.

Create the Application in Azure AD

In this next step, I will create the Proxy Application in Azure AD where the Self Service Portal will be published. To be able to create Proxy Applications I will need to have either an Enterprise Mobility Suite license plan, or Azure AD Premium license plan. From the Azure Management Portal and Active Directory, under Applications, I add a new Application and select to “Publish an application that will be accessible from outside your network”:

I will then give a name for my application, specify the internal URL and pre-authentication method. I name my application “Self Service Portal”, use “http://portalserverfqdn” as internal URL and choose Azure Active Directory as Pre-Authentication method.

After the Proxy Application is added, there are some additional configurations to be done. If I have not already, Application Proxy for the directory have to be enabled. I have created other Proxy Applications before this, so I have already done that.

I also need to download the Application Proxy connector, install and register this on a Server that is member of my own Active Directory. The Server that I choose can be either on an On-Premise network, or in an Azure Network. As long as the Server running the Proxy connector can reach the internal URL, I can choose which Server that best fits my needs.

Since I choose to use pre-authentication, I can also assign individual users or groups to the Application. This enables me to control which users who will see the application under their My Apps and who will be able access the application’s external URL directly.

I now need to make additional configurations to the application, and go to the Configure menu. From here I can configure the name, external URL, pre-authentication method and internal URL, if I need to change something.

What I need to configure here is to use Internal Authentication Method to “Windows Integrated Authentication”. I also need to configure the Service Principal Name (SPN). Here I specify HTTP/portalserverfqdn, in my example this is HTTP/az-scsm-ms01.skill.local.

From the bottom part of the configuration settings I can configure Acces Rules, which at this time is in Preview. This is cool, because I can for example require for this Application that users will be required to use multi-factor authentication. I have not enabled that here though.

After I have configured this, I am finished at this step, and now need to configure some more settings in my local Active Directory.

Configure Kerberos Constrained Delegation for the Proxy Connector Server

I now need to configure so that the Server running the Proxy Connector can impersonate users pre-authenticating with Azure AD and use Windows Integrated Authentication to the Self Service Portal Server.

I find the Computer Account in Active Directory for the Connector Server, and on the Delegation tab click on “Trust this computer for delegation to specified services only”, and to “Use any authentication protocol”. Then I add the computer name for the portal server and specify the http service as shown below:

This was the last step in my configuration, and I am almost ready to test.

If you, like me, have an environment consisting on both On-Premise and Azure Servers in a Hybrid Datacenter, please allow room for AD replication of these SPN’s and more.

Testing the published application!

Now I am ready to test the published proxy application.

Remember from earlier that I have assigned the application either to a group of all or some users or directly to some pilot users for example.

I will now log on with my Azure AD user (which of course is synchronized from local Active Directory), and I will use the URL https://myapps.microsoft.com.

After logging on, I can see the applications I have access to. Some of these are SaaS applications I have configured, some are applications we have developed ourselves, and I can see the published Self Service Portal:

(Don’t mind the Norwegian captions and texts, you get the idea;)

I then click on the Self Service Portal, and can confirm that I am able to access the Self Service Portal. See the special proxy URL and that indeed I’m logged in with my Active Directory user with SSO.

Another cool thing is that I can use the App menu in Office 365 and add the Self Service Portal to the App chooser for easy access:

I can now also access the Self Service Application from the “My Apps” App on my Mobile Devices.

Keep your Cireson Self Service Portal Website Ready and Alive

Cireson have done a great job optimizing the performance of the Self Service Portal for Service Manager.

Since the Self Service Portal is running on a web site in IIS, some additional configurations can help you keeping the portal site ready and alive.

From my experience working with the Self Service Portal, some operations can take a while to respond if you have not been active for a while. This is especially true when using the portal in a pilot or test environment where traffic is more intermittent.

Two settings I recommend to configure are the Idle Time-out and Application Pool Recycling settings.

Idle Time-out

The Idle Time-out will cause the application pool in IIS to terminate when there is no traffic. The default setting is 20 minutes, and after that the first user to access the web site, will have to wait while the app pool creates a new w3wp.exe worker process, waiting for creating the app pool, loading the ASP.NET or another framework, and then load the web application.

You find the Idle Time-out in Internet Information Services Manager, under Application Pools. Right-click the CiresonPortal application pool and select Advanced Settings. There you will find the default value of 20 minutes:

I recommend changing it to zero, which means it will never time out:

Following this setting, you should also configure the automatic recycling of the pool next.

Application Pool Recycling

It is a good idea to recycle the application pool regularly. You find the Recycling settings by right clicking the Application Pool and choosing Recycling:

The default setting is to recycle the application pool every 1740 minutes, which is 29 hours. The reason for why exactly 29 hours is that it is the first prime number after 24, explained here http://weblogs.asp.net/owscott/why-is-the-iis-default-app-pool-recycle-set-to-1740-minutes.

For the CiresonPortal pool, I recommend setting a specific time that suits you, for example every morning, which I have done here:

PS! Installing Cireson Portal Updates

Please remember that every time you use the setup program to update the Cireson Self-Service Portal installation, you will have to re-configure the Idle Time-out and Recycling settings.

Creating a Console Task for Cireson’s Remote Manage App in Service Manager

Cireson recently released a Remote Manage App for Configuration Manager, read more about it here: http://cireson.com/blog/remote-manage-app/. The App is even free, so go get your download.

As I am working a lot on Service Manager and customizations, I thought it would be useful to create a console task in Service Manager Console for this Remote Manage App. I have previously been using a similar task for the built in Remote Control functionality in Configuration Manager.

The first thing I verified was that the Remote Manage App from Cireson supports launching from command line and with parameters. How to do that is described in the above link where you would specify the command like this:

Installpath\ConfigMgrClientTools.exe client
smsprovider

Actually, it is easy to create your own task in the Library section of the Service Manager Console and use the built in Wizard, but I will show the whole process from creating the XML Management Pack and the required contents in it to get the task up and running. This will also let me specify an Image for the task, which I cannot do if I use the wizard in the Console.

I will even leave the complete Management Pack for you to download and just import in your own environment. After all, Christmas is coming up!

Requirements

There are some requirements for this to work:

  1. You have to have the Remote Manage App installed on the same computer you are using Service Manager Console.
  2. You will need permissions to connect to the Configuration Manager site as well as administrative permissions to the clients you will Remote Manage.

Management Pack

The content of my Management Pack is shown below, and I will comment on each section. At first, I have the Manifest with the Identity, Version and Name of the Management Pack, and the required references with aliases. These references will be used later in the MP.

<ManagementPack ContentReadable=true SchemaVersion=2.0 OriginalSchemaVersion=1.1xmlns:xsd=http://www.w3.org/2001/XMLSchema xmlns:xsl=http://www.w3.org/1999/XSL/Transform>
<Manifest>
<Identity>
<ID>SkillSCSM.RemoteManageApp.ConsoleTask</ID>
<Version>1.0.0.0</Version>
</Identity>
<Name>SkillSCSM Remote Manage App Console Task</Name>
<References>
<Reference Alias=EnterpriseManagement>
<ID>Microsoft.EnterpriseManagement.ServiceManager.UI.Console</ID>
<Version>7.5.3079.236</Version>
<PublicKeyToken>31bf3856ad364e35</PublicKeyToken>
</Reference>
<Reference Alias=CustomMicrosoft_Windows_Library>
<ID>Microsoft.Windows.Library</ID>
<Version>7.5.8501.0</Version>
<PublicKeyToken>31bf3856ad364e35</PublicKeyToken>
</Reference>
<Reference Alias=ConfigurationManagement>
<ID>ServiceManager.ConfigurationManagement.Library</ID>
<Version>7.5.3079.0</Version>
<PublicKeyToken>31bf3856ad364e35</PublicKeyToken>
</Reference>
</References>
</Manifest>

The next section is the Categories. The first Category ID is for the MP itself. After that, I can have Categories where I can control where the Task will be shown. I have commented them out here, but two Categories are shown for how to Hide the Task either from the Console Tasks section, or from the Form Tasks section. Leaving it like shown under here will show the task in both the Console and Form tasks.

<Categories>
<Category ID=Category.SkillSCSM.RemoteManageApp.ConsoleTask Value=EnterpriseManagement!Microsoft.EnterpriseManagement.ServiceManager.ManagementPack>
<ManagementPackName>SkillSCSM.RemoteManageApp.ConsoleTask</ManagementPackName>
<ManagementPackVersion>1.0.0.0</ManagementPackVersion>
</Category>
<!–<Category ID=”Category.SkillSCSM.Hide.RemoteManageApp.FromConsole” Target=”RemoteManageAppTask” Value=”Console!Microsoft.EnterpriseManagement.ServiceManager.UI.Console.DonotShowConsoleTask” />–>
<!–<Category ID=”Category.SkillSCSM.Hide.RemoteManageApp.FromForms” Target=”RemoteManageAppTask” Value=”Console!Microsoft.EnterpriseManagement.ServiceManager.UI.Console.DonotShowFormTask” />–>
</Categories>

Following that is the Presentation section. This is where I define the actual Task and its Target. As you can see, I have targeted it to Windows Computers, meaning that the task will show up everywhere I select a Windows Computer either in a View or open the Windows Computer Form. I am running the task as a Command Line Task, and the Parameters are specified as arguments.

Important! Here you must verify that the Application Path is the same as where you would be running it.

The last argument is constructed of the variable where I choose to use the Netbios Computer Name as client name. Here you can if you like to replace that with the DNS FQDN or IP address or whatever fits your need. The second part of the argument is to specify your SMS Provider Host, make sure you fill inn your own Servername there.

At the end of the Presentation section, I have included an Image Reference to the task, with an Image ID. This ID is later specified in the Resources section.

<Presentation>
<ConsoleTasks>
<ConsoleTask ID=RemoteManageAppTask Accessibility=Public Enabled=true
Target=CustomMicrosoft_Windows_Library!Microsoft.Windows.Computer RequireOutput=false>
<Assembly>EnterpriseManagement!SdkDataAccessAssembly</Assembly>
<Handler>Microsoft.EnterpriseManagement.UI.SdkDataAccess.CommandLineHandler</Handler>
<Parameters>
<Argument Name=LoggingEnabled>False</Argument>
<Argument Name=Application>C:\Program Files (x86)\Cireson\Remote Manage app\ConfigMgrClientTools.exe</Argument>
<Argument Name=WorkingDirectory>%windir%\system32</Argument>
<Argument Name=“”>$Context/Property[Type=’CustomMicrosoft_Windows_Library!Microsoft.Windows.Computer’]/NetbiosComputerName$ YOURSMSPROVIDERHOST</Argument>
</Parameters>
</ConsoleTask>
</ConsoleTasks>
<ImageReferences>
<ImageReference ElementID=RemoteManageAppTask ImageID=ImageRemoteManageApp />
</ImageReferences>
</Presentation>

Following this we have the Language Packs section, where the string values for the different translations are available. Feel free to add your own language packs and strings here.

<LanguagePacks>
<LanguagePack ID=ENU IsDefault=true>
<DisplayStrings>
<DisplayString ElementID=SkillSCSM.RemoteManageApp.ConsoleTask>
<Name>SkillSCSM Remote Manage App Console Task</Name>
<Description>Management Pack for Remote Manage App Console Task</Description>
</DisplayString>
<DisplayString ElementID=RemoteManageAppTask>
<Name>Remote Manage Computer</Name>
</DisplayString>
</DisplayStrings>
</LanguagePack>
</LanguagePacks>

And at last in the Management Pack, we have the Resources section where I specify the Image ID and the FileName. I have included a small 24×24 PNG file, which are similar to the icon Cireson use for Remote Manage App.

<Resources>
<Image ID=ImageRemoteManageApp FileName=ConsoleTaskRemoteManageApp24x24.png
Accessibility=Public HasNullStream=false Comment=Remote Manage App Image />
</Resources>
</ManagementPack>

Importing the Management Pack

With the Management Pack now ready, the next step is to import it to Service Manager. There is one important thing though, since I chose to add an Image for my task, I will need to create a Management Pack Bundle file (.mpb) before I can import it. This can easily be done with some Service Manager PowerShell. These are the CmdLets I have been using:PowerGUI Script Editor


# Import Module for Service Manager PowerShell CmdLets
$SMDIR    = (Get-ItemProperty 'hklm:/software/microsoft/System Center/2010/Service Manager/Setup').InstallDirectory
Set-Location -Path $SMDIR
If (!(Get-Module –Name "System.Center.Service.Manager")) { Import-Module ".\Powershell\System.Center.Service.Manager.psd1" }

# Change to Directory for MP files
$MPDIR = "C:\_Source\ServiceMgrAuthoring"
Set-Location -Path $MPDIR

# Set variables for MPB, MP og Resource files
$mpbPath = "SkillSCSM.RemoteManageApp.ConsoleTask.mpb"
$mp1 = "SkillSCSM.RemoteManageApp.ConsoleTask.xml"
$r1 = "ConsoleTaskRemoteManageApp24x24.png"

# Opprette MP Bundle
New-SCSMManagementPackBundle -Name $mpbPath -ManagementPack $mp1 -Resource $r1 -Force

After the Management Pack Bundle has been created, import it to Service Manager under the Administration Pane and Management Packs Node.

Using the Remote Manage Console Task

Now that I have the Console Task imported to Service Manager, I can lookup any Windows Computer I would want to Remote Manage. For example by going to Configuration Items Pane, and choosing the View for All Windows Computers. When I select a Computer Name I can see my Remote Manage Computer Task in my right Console Task window.

When clicking on the Task, the Remote Manage App is launched and are immediately starting to connect the selected Computer (if it has permission and FW permits that is):

Similarly, if I am working with an Incident Work Item, and have added this users Computer as related CI, I can also open the Computer Form and launch the Task from there.

Downloading the solution

As promised I have made this solution freely downloadable, please click the link below to start downloading a Zip file consisting of:

  • SkillSCSM.RemoteManageApp.ConsoleTask.xml
  • ConsoleTaskRemoteManageApp24x24.png
  • CreateRemoteManageAppConsoleTaskMpbBundle.ps1

Download the Zip file from here: http://1drv.ms/1BIxW5G

Good luck and Happy Christmas!

Cireson Portal and SQL AlwaysOn Availability Databases

I have for a while been working on my System Center Service Manager environment to run on Azure Virtual Machines, and to increase availability for this environment I have created a SQL Server AlwaysOn Cluster also in Azure. While my environment is mostly for demo and development, and availability is not that critical, I find it important to look into high availability scenarios for knowledge and guidance for our customers.

There are some great tutorials and support on how to create SQL Server AlwaysOn in Azure, and how Service Manager supports AlwaysOn in these links:

I have also placed my Cireson Portal server on an Azure Virtual Machine, configured to use the Service Manager environment above.

The SQL Server AlwaysOn cluster use an Availability Listener, which until recently had to use a Public IP endpoint for the Cloud Service. Therefore, my Availability Listener is using a custom endpoint port, which I have set to 51433 but could be anything you want. Since this is a Public IP address, it is also important to set ACLs on that endpoint. Some weeks ago, there was finally support for running AlwaysOn listener on Internal Load Balancer, http://azure.microsoft.com/blog/2014/10/01/sql-server-alwayson-and-ilb/, so I will change my configuration to that next.

Now for Cireson Portal v1 and v2, where the connection string had to be configured manually in the .config files, it was quite straightforward to configure the SQL Server connections. In v2 Cireson also introduced the HTML KB and ServiceManagement database, which also required a connection. To get this to work I configured the following files:

  • In the Web.Config file at C:\Inetpub\CiresonPortal, specify database connection string with Server=ListenerName,Port:<connectionStrings>
    <add name=”ManagementServer” connectionString=”az-scsm-ms01″ />
    <add name=”ServiceManagementDatabase” connectionString=”Server= AZ-SCSQLListen,51433;Database=ServiceManagement;Trusted_Connection=True;” />
    </connectionStrings>
  • In the Cireson.CacheBuilder.WindowsService.exe.Config file at C:\Inetpub\CiresonPortal\CacheBuilder\WindowsService, and Cireson.CacheBuilder.Service.exe.Config file at C:\Inetpub\CiresonPortal\CacheBuilder\ConsoleApplication, specify the database connection strings to both ServiceManager database and ServiceManagement database with Server=ListenerName,Port:<connectionStrings>
    <add name=”ServiceManagementDatabase” connectionString=”Server=AZ-SCSQLListen,51433;Database=ServiceManagement;Trusted_Connection=True;” />
    <add name=”ServiceManagerDatabase” connectionString=”Server=AZ-SCSQLListen,51433;Database=ServiceManager;Trusted_Connection=True;” />
    <add name=”ManagementServer” connectionString=”az-scsm-ms01″ />
    </connectionStrings>

In Cireson Portal v1 and v2, this worked perfectly. I was able to use both ServiceManager database, and the new ServiceManagement database via the AlwaysOn Availability Listener.

Now, for Cireson Portal v3 and the Release Candidate I have been testing, there is a new Setup program. This setup program does not recognize using Availability Listener name and custom SQL Server port, as shown below:

The same warning message applied to the Cache Builder settings of the Setup program.

Now, I have two choices:

  1. Go ahead and use the listener, port configuration and finish the setup.
  2. Or just specify the name of the primary SQL Server, and later reconfigure the same Config files that I did in the previous version.

For the first alternative, at the end of running Setup, I got this error message:

The setup log gave the same information, and when looking into the Web.Config file at C:\Inetpub\CiresonPortal the availability listener and port was configured in the server setting. The same applied to the Console and Windows Service cache builder config files, which in v3 are located in the folder C:\inetpub\CiresonPortal\bin.

So I tried the second alternative, just use the name of the primary SQL Server node, and finish Setup that way. This time I get a little further, but get an ALTER DATABSE error from Setup:

Looking at the log for details, I see the reason for the failure:

10/26/2014 7:53:57 PM Attempting to create ServiceManagement Database

10/26/2014 7:53:57 PM Failed to create management database ServiceManagement on az-scsql01 : The operation cannot be performed on database “ServiceManagement” because it is involved in a database mirroring session or an availability group. Some operations are not allowed on a database that is participating in a database mirroring session or in an availability group.

ALTER DATABASE statement failed.

So, in other words, to successfully complete Setup I would need to temporary remove the ServiceManagement database from the Availability Group, so that only the primary SQL Server node has the database.

When I did that, everything went as planned and the Setup completed without any errors!

I now wanted to see how I could after Setup still configure the Cireson Portal v3 to use the Availability Group and Listener for ServiceManagement database. So I did the following:

  1. Added the ServiceManagement database back to the Availability Group
  2. Configured the Web.Config file to use <availability listener name>,<port> for Server connection for ServiceManagement database.
  3. Configured the Cireson.CacheBuilder.WindowsService.exe.Config and Cireson.CacheBuilder.Service.exe.Config files in C:\inetpub\CiresonPortal\bin, with the same <availability listener name>,<port> for Server connection for ServiceManagement database.

This worked fine, and when accessing the Cireson Portal I was able to log in and use HTML KB and more.

But, after a while, I suspected a problem with the cache builder, which in v3 use the ServiceManagement database. And when running the Console application for Cache Builder I see the following error:

From the CacheBuilder.log file at C:\Inetpub\CiresonPortal\bin\logs folder I see several of these errors:
ERROR [MAIN] 26 Oct 2014 20:12:00,068: Error executing delegate: System.Data.SqlClient.SqlException (0x80131904): The operation cannot be performed on database “ServiceManagement” because it is involved in a database mirroring session or an availability group. Some operations are not allowed on a database that is participating in a database mirroring session or in an availability group.
ALTER DATABASE statement failed.
at System.Data.SqlClient.SqlConnection.OnError(SqlException exception, Boolean breakConnection, Action`1 wrapCloseInAction)
at System.Data.SqlClient.SqlInternalConnection.OnError(SqlException exception, Boolean breakConnection, Action`1 wrapCloseInAction)
at System.Data.SqlClient.TdsParser.ThrowExceptionAndWarning(TdsParserStateObject stateObj, Boolean callerHasConnectionLock, Boolean asyncClose)
at System.Data.SqlClient.TdsParser.TryRun(RunBehavior runBehavior, SqlCommand cmdHandler, SqlDataReader dataStream, BulkCopySimpleResultSet bulkCopyHandler, TdsParserStateObject stateObj, Boolean& dataReady)
at System.Data.SqlClient.SqlCommand.FinishExecuteReader(SqlDataReader ds, RunBehavior runBehavior, String resetOptionsString)
at System.Data.SqlClient.SqlCommand.RunExecuteReaderTds(CommandBehavior cmdBehavior, RunBehavior runBehavior, Boolean returnStream, Boolean async, Int32 timeout, Task& task, Boolean asyncWrite, SqlDataReader ds)
at System.Data.SqlClient.SqlCommand.RunExecuteReader(CommandBehavior cmdBehavior, RunBehavior runBehavior, Boolean returnStream, String method, TaskCompletionSource`1 completion, Int32 timeout, Task& task, Boolean asyncWrite)
at System.Data.SqlClient.SqlCommand.InternalExecuteNonQuery(TaskCompletionSource`1 completion, String methodName, Boolean sendToPipe, Int32 timeout, Boolean asyncWrite)
at System.Data.SqlClient.SqlCommand.ExecuteNonQuery()
at Cireson.ServiceManager.DAL.Database.SwitchToBulkLoggedRecoveryMode(ISqlConnectionWrapper connection)
at Cireson.ServiceManager.DAL.Database.<>c__DisplayClass7`1.b__6(ISqlConnectionWrapper connection)
at Cireson.ServiceManager.DAL.Database.OpenConnection(Action`1 action, String context)
ClientConnectionId:9004c2b3-2cc2-4d04-8748-106e431b7cab
ERROR [MAIN] 26 Oct 2014 20:12:00,068: SqlBulkCopy caused an exception.
ERROR [MAIN] 26 Oct 2014 20:12:00,068: Native Error : The operation cannot be performed on database “ServiceManagement” because it is involved in a database mirroring session or an availability group. Some operations are not allowed on a database that is participating in a database mirroring session or in an availability group.
ERROR [MAIN] 26 Oct 2014 20:12:00,068: Native Error : ALTER DATABASE statement failed.
INFO [MAIN] 26 Oct 2014 20:12:00,068: Added 0 work items.

So, a quick recap:

So far on testing the Cireson Portal v3 with SQL AlwaysOn availability databases I have discovered:

  • The new Setup program cannot use availability listener and custom SQL Server port. Setup finishes but any DAC packages and changes to the ServiceManagement database are not deployed.
  • The Setup program cannot deploy ServiceManagement database if the database is in an Availability Group even if I only specify the primary SQL Server node directly.
  • After Setup I can change the Config files to use AlwaysOn availability group, but Cache Builder fails if the ServiceManagement database is in an Availability Group.
  • Cireson Portal v3 can successfully connect to and use the ServiceManager database in an Availability Group.

These experiences are submitted to Cireson as bug/feature requests, so I will update this post if changes are made to any of this.


Data Warehouse Jobs fails when upgrading Service Manager 2012 from SP1 to R2

I recently performed upgrades of a Service Manager 2012 SP1 environment at a customer and our own environment, from SP1 to Service Manager 2012 R2.

While following the pre-upgrade and upgrade steps as specified in http://technet.microsoft.com/en-us/library/dn520902.aspx, including disabling the Data Warehouse Jobs, both upgrades were successful but when enabling the Data Warehouse Jobs some of the jobs and job modules started failing.

The jobs that was failing in both environment were:

  • Transform.Common
  • Load.Common
  • Load.OMDWDataMart
  • Load.CMDWDataMart

Upon examine the jobs more closely I found that not all job modules failed, only a subset of the job modules. For example:

At the Data Warehouse server I would find a lot of these events in the Operations Manager log:

Error Event ID 33502, Source Data Warehouse:

ETL Module Execution failed:

ETL process type: Load

Batch ID: 136704

Module name: LoadCMDWDataMartPowerActivityDayFact

Message: UNION ALL view ‘CMDWDataMart.dbo.PowerActivityDayFactvw’ is not updatable because a primary key was not found on table ‘[CMDWDataMart].[dbo].[PowerActivityDayFact_2013_Jun]’.

..and..

Warning Event ID 33503, Source Data Warehouse:

An error countered while attempting to execute ETL Module:

ETL process type: Load

Batch ID: 136704

Module name: LoadCMDWDataMartPowerActivityDayFact

Message: UNION ALL view ‘CMDWDataMart.dbo.PowerActivityDayFactvw’ is not updatable because a primary key was not found on table ‘[CMDWDataMart].[dbo].[PowerActivityDayFact_2013_Jun]’.

Each of the the transform and load jobs would generate these error messages.

I started examining the Data Warehouse SQL Databases, and found that the error messages was correct, the primary key constraint really was missing on the table that the error message referred to.

So what to do?

Well, luckily I know my way around SQL Server and T-SQL commands. I found that not all Fact tables were missing the primary key (PK). For example, the primary key constraint was missing from dbo.PowerActivityDayFact_2013_Jun, but it was in place for dbo.PowerActivityDayFact_2013_Jul (and the other months for the fact).

So all I needed to do was to script the PK for the correct table, and update the table name and PK name and run the T-SQL command to create the missing primary key.

A little more information step-by-step:

  1. First of all, I disabled all the Data Warehouse Jobs.
  2. After that I began with resuming the Transform.Common job.
  3. I examined the event log and found the tables that were missing the primary key.
  4. I scripted the primary key for the table where it was present, changed the table name and PK name, and run the script on the database to create it on the table where it was missing. The database for the tables updated via the Transform.Common job is DWRepository.
  5. In my environment there were only two tables that was missing primary key in the DWRepository table.
  6. I ran the Transform.Common job again, this time successfully.

I repeated this process for each of the other jobs. These jobs also used different databases, and had different numbers of tables where the primary key was missing:

  1. Load.Common
    1. Database DWDataMart, 59 tables with primary key missing (puh!)
  2. Load.OMDWDataMart
    1. Database OMDWDataMart, 7 tables with primary key missing
  3. Load.CMDWDataMart
    1. Database CMDWDataMart, 9 tables with primary key missing

So it took a while to read through the event logs and find all the tables, but in the end every job was able to run successfully and I could enable the job schedules again.

How to script the primary key and create the missing on the table?

I recommend that you really know your way around SQL Server to do these things, and most importantly: Do a full backup of the affected databases first!

This is the process I used to script and create primary keys, each step repeated for each table:

  1. For example dbo.EntityManagedTypeFact_2013_Jun was missing the primary key, but it was present on the next month; dbo.EntityManagedTypeFact_2013_Jul.
  2. In SQL Management Studio, expand the database and the table in question. Expand Keys and right click. Select Script Key as, CREATE To and New Query Editor Window:
  3. The script would then be shown as:
  4. Since the primary key was missing on the ..Fact_2013_Jun, I updated the script so that Jun replaced Jul (marked yellow above).
  5. And then I executed the script to create the missing primary key.

What about the other environment?

I found that basically the same tables which missed the primary key in the first environment, also missed the primary key in the second environment.

The only difference was that in the first environment, it was always “Jun” tables that were missing the PK. And in the second environment it was “Jan” (and a few “Feb”), but exactly the same tables in the same databases! In fact, I collected all script commands in one main script for each database from the first environment, and after a quick find and replace of month I was able to run the exact same script in the second environment.

One other thing I noted was that also these fact table months was the oldest ones in the database (Jun or Jan/Feb) respectively.

Why does this happen?

I don’t know really. I would like to think I followed the upgrade steps methodically. I will at a later time upgrade other enviroments from SP1 to R2, and will update this blog if I learn more.

The strange thing is I have experienced something similar to this at another time when upgrading another environment (not these) from 2012 RTM to SP1. But that time the problem was that the MP sync job failed because of already existing primary keys. The solution at that time was to DELETE primary keys, which then would be recreated automatically with the MP sync job.

Hope this can be helpful for others, please comment or get in touch if you have any questions.