A while back I bought my first starter kit of Philips Hue lights and bridge, and since then I’ve bought several more bulbs, lamps, lights strips and more. One of the things I quickly got interested in was how to use the very well developed Hue API (https://developers.meethue.com/develop/hue-api/). You need to register and login with a Hue Developer Account, which is free, to be able to explore the API documentation, and for following the steps I describe in this blog post.
If you want to have a very quick look at the Hue API, you can start with this link which does not require a Hue Developer Account: https://developers.meethue.com/develop/get-started-2/. If you are familiar with Postman for exploring API’s, which may have brought you to this blog post to begin with, you should read on as I will describe and share some of the work I have been doing.
When I started exploring the API, I did what most people do: I searched online for tips and how-to’s. I found the following useful Postman Collection on GitHub: https://github.com/moldedbits/philips-hue-postman. So I downloaded that collection, and after configuring my Postman environment with the IP address to the bridge, and pushed the linked button to create a username, all described above on the get started link, I was good to go!
However, this let’s me explore the API only locally, requiring me to run the commands from a local device. This is where I should let you know my real reasons for wanting to use the Hue API, as I work with Microsoft and Cloud solutions daily. I wanted to look into scenarios where I can manipulate my Hue Lights dependent on events from the Microsoft Platform. It could be updating the lights to reflect my presence in Teams, it could be blinking the lights if some alerts happened, and so on. I want to be able to use Azure Functions, Power Platform, PowerShell etc. for controlling my Hue API.
To be able to do that, I need to be able to run Hue API commands remotely, and luckily the Hue API support that as well: https://developers.meethue.com/develop/hue-api/remote-api-quick-start-guide/.
Before I go into the details of this blog post on how I set up remote authentication and control of my Hue API using Postman, I first wanted to share a proof and sneak peak of a coming blog post that I have succeeded in what I’ve wanted, I can now authenticate and control my lights using for example Power Platform:
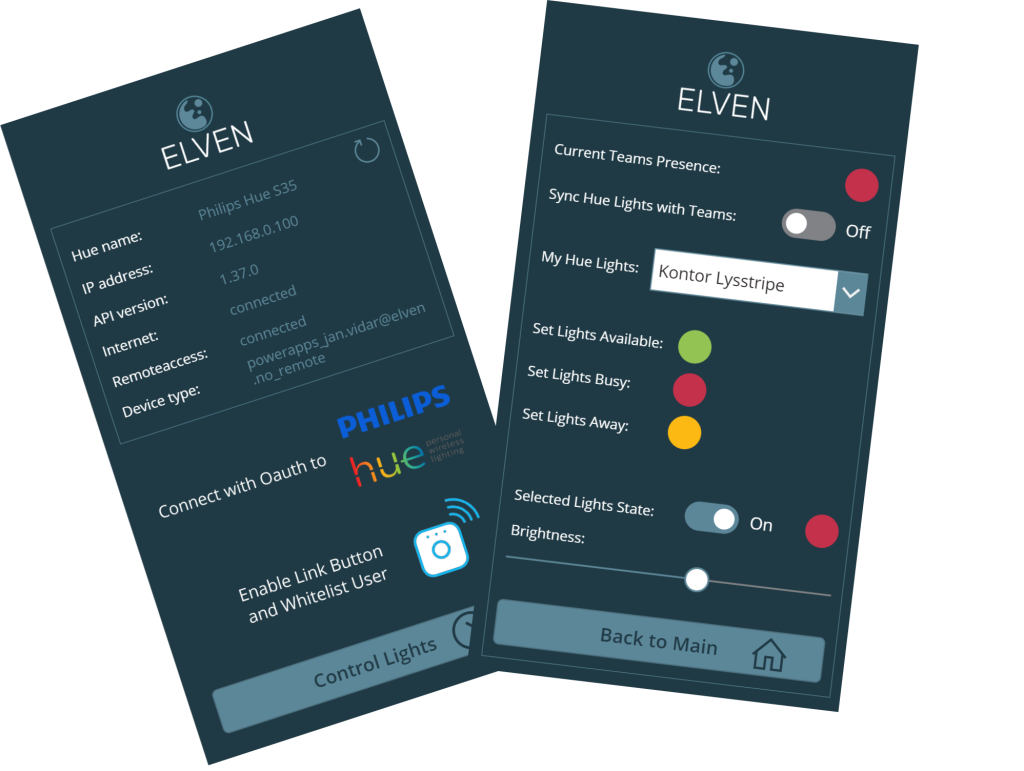
It was really the foundation of what I learned using Postman to do Remote Authentication to Hue API that made me able to create the solution above, so lets get into the details.
Create a New Remote Hue API app
The first thing you need to do after you have create a Hue Developer account, is to create a new Remote Hue API app here: https://developers.meethue.com/my-apps/.
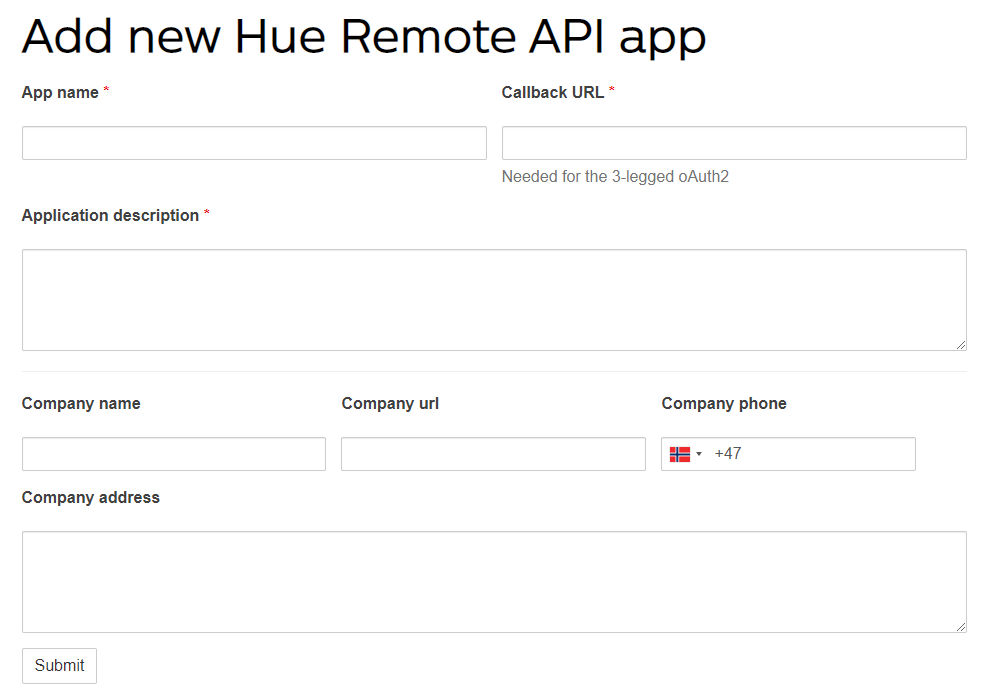
You need to specify the following required fields:
- App name: A display name for your remote app
- Callback URL: This is needed for the Oauth2 consent and returning an authorization code. Specify https://app.getpostman.com/oauth2/callback here.
- Application description: A short description for your remote app.
- Optionally you can specify contact details.
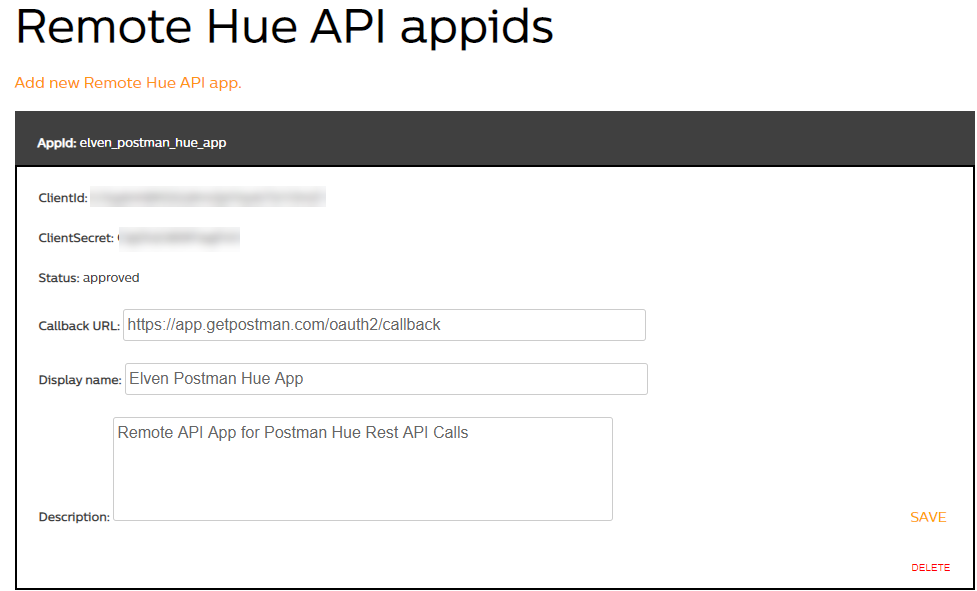
After submitting your new app is ready, and also an AppId, ClientId and ClientSecret will be provided, for example:
You are now ready to start setting up your Postman client. If you don’t have Postman installed you can get it at https://www.postman.com/downloads/.
Create Postman Environment and Collection
In the Postman client I have saved all my variables and requests against the Hue API in an environment and collection. At the end of this blog post, I will share with you the link to a GitHub repository where you download these samples for you to start with yourself.
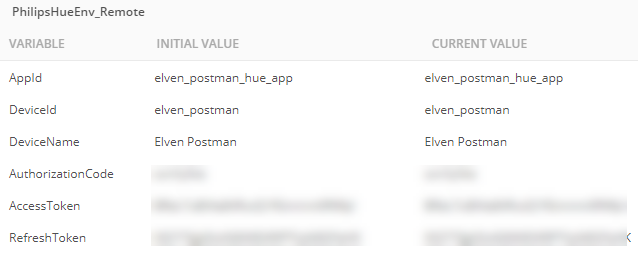
As I will be using several variables with my Postman queries against the Hue API, I’ve created an environment like the following:
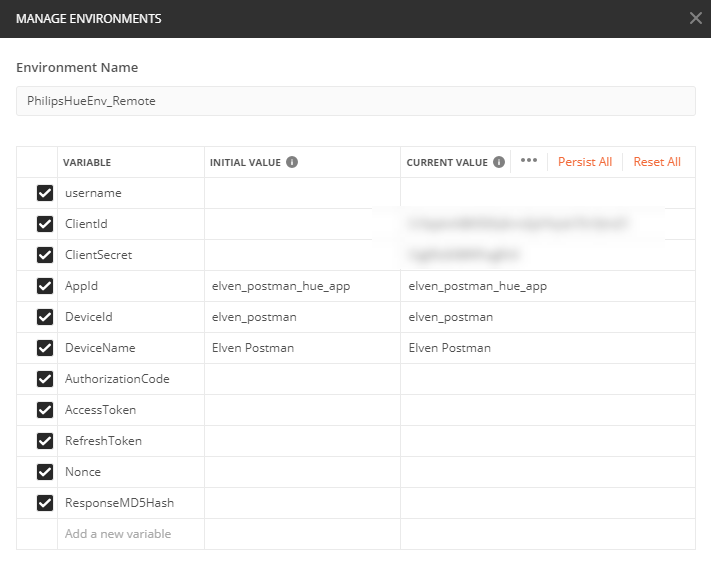
Most of these variables are empty to begin with, but you can start by filling out:
- ClientId: From the app registration at your Hue Developer Account.
- ClientSecret: From the app registration.
- AppId: From the app registration.
- DeviceId: This is the id of the client you will be running queries from. It could be anything like the name of the computer, or the environment you are running from. I just chose my surname and postman.
- DeviceName: Anything Display Name for the device you run the queries from.
The rest of the variables will be empty for now, but they will be calculated and updated based on responses later.
Also, since collections and variables can be synced and shared with other users or devices, I keep the sensitive variables like client id and secret only in current value column.
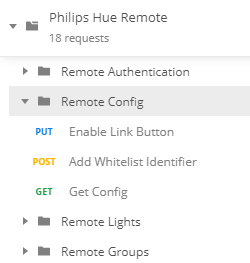
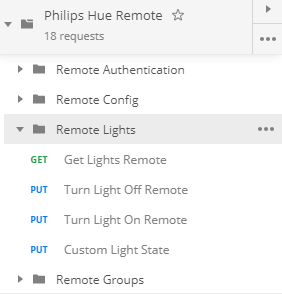
After creating my environment, I’ve created a collection with folders for my requests, for example like the following:
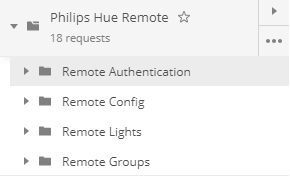
We can now proceed to start with Remote Authentication to Hue API.
Remote Authentication to Hue API
Hue Remote API use Oauth2 authorization code flow to get an access token that has to be included in the HTTP Authorization Header for every request to the API. We will use the app registration we did earlier to authenticate with the developer account and grant application access, and with the resulting authorization code we can request the access token to be used in the requests.
The documentation for Remote API is here: https://developers.meethue.com/develop/hue-api/remote-authentication/, and I will walk through the following requests in my Postman Collection:
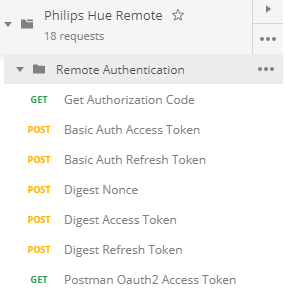
Get Authorization Code
To get an Authorization code you need to construct an Url like the following:
You can use Postman to construct the Url like the following, but you cannot really run the query from here as the Postman browser does not support the response:
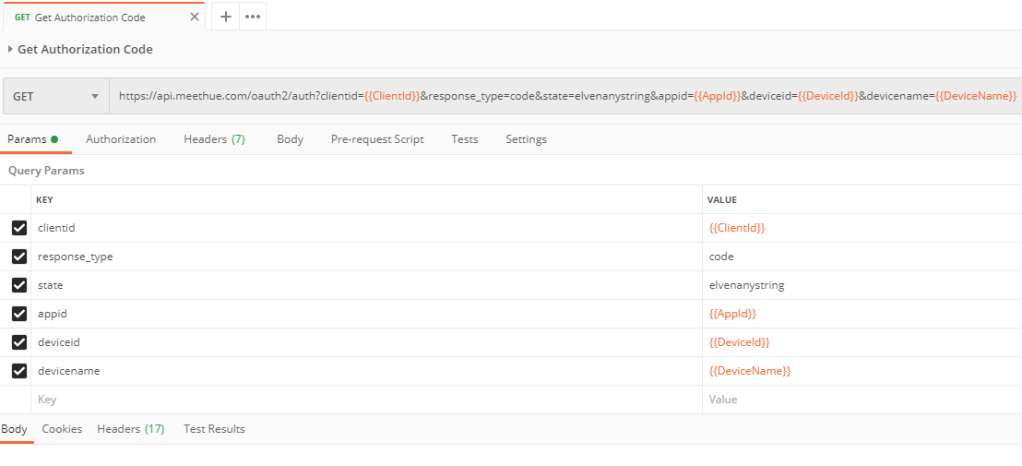
You can use the code view on the right to get a preview of the request, and the copy it from there and paste it to your browser:

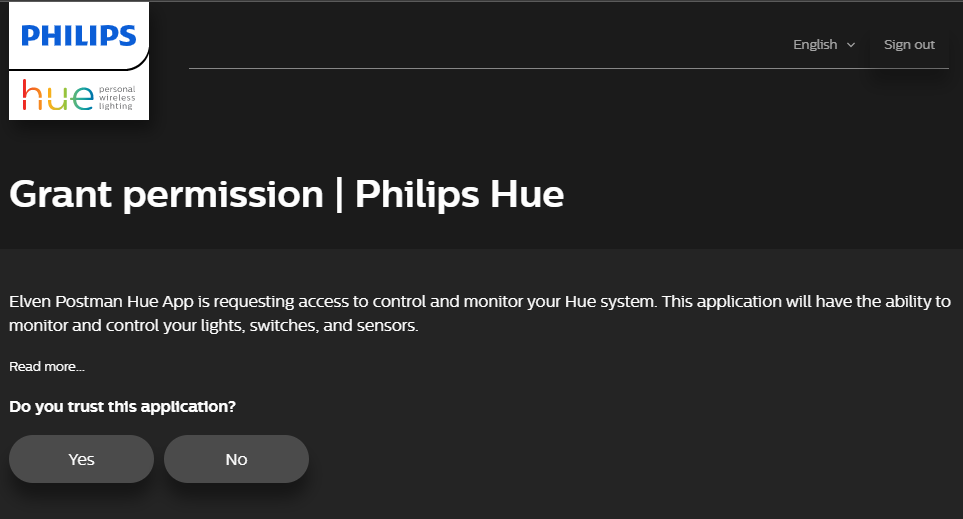
When you execute the authorization code url in your browser, you will be asked to log in with your Hue Developer account, if you aren’t already, and then you need to grant permission to your app registration:
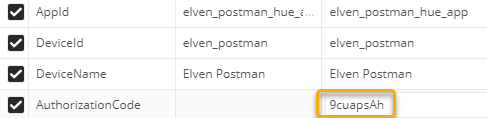
After successfully granting permission, you will be redirected to the Callback Url you specified earlier, and from there you can get the authorization code:

Copy that code and paste it in the environment variable for AuthorizationCode as shown below:
Now that we have the Authorization Code, we can proceed requesting the Access Token. There are two methods for getting an access token:
- Basic Authentication, which sends your client id and secret as base64 encoded strings in the authorization header.
- Digest Authentication, which use a more secure challenge-response handshake that handle the credentials more securely.
See documentation for more details on whether to use basic or digest. I will show both in the following.
Get Access Token with Basic Authentication
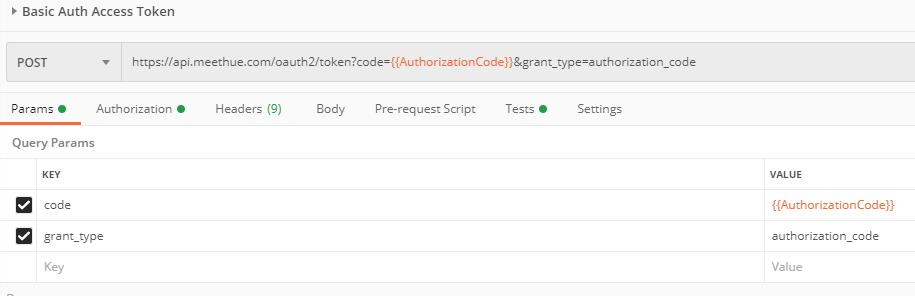
To get an access token with basic authentication, create a POST request to the token endpoint, specifying the following query parameters:
- code=authorization code you received in the previous step, using the environment variable
- grant_type=authorization_code
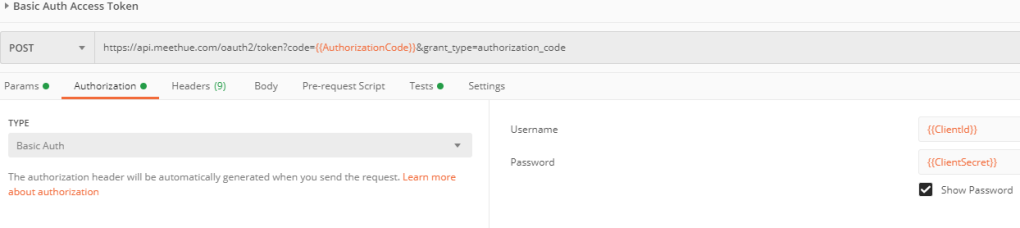
In addition to that you need to set the Authorization Header to type Basic Authm and specify the ClientId and ClientSecret as shown below:
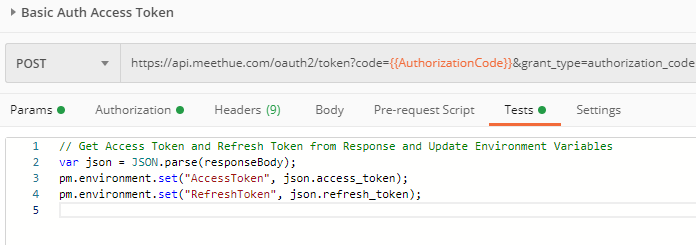
Postman has this great feature called tests that you can use to run javascript commands before (pre-request) or after queries. You can use this to save response details and update your environment variables. In my example I’m saving the response which would include the access and refresh tokens, and update my environment variables with that:
If I now run this request (and you haven’t waited to long to the authorization code to expire), you should get a successful response:
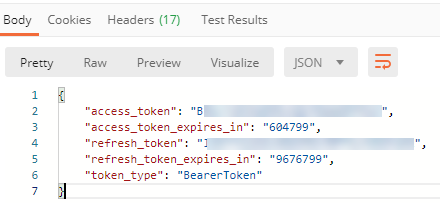
These tokens expire after the specified amount in seconds. For the Access Token this is 168 hours = 7 days. The Refresh Token expire after 112 days.
This means that after 7 days, you will need to use the refresh token to get a new access token. And when you do that, you will get a new access token valid for 7 more days, and a new refresh token again valid for another 112 days. This means in theory that as long as you refresh the access token regularly, this can last “forever” for your client.
You can also verify that the environment variables for access token and refresh token has been updated based on my javascript from above:
Refresh Token with Basic Authentication
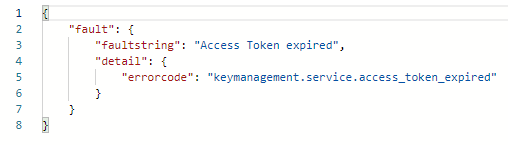
If your access token has expired, you will get a response like the following:
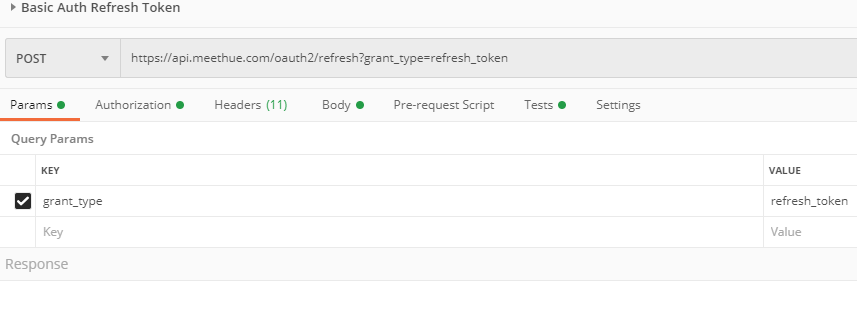
To refresh the access token, you need to use the oauth2/refresh endpoint and with the query parameter grant_type?refresh_token:
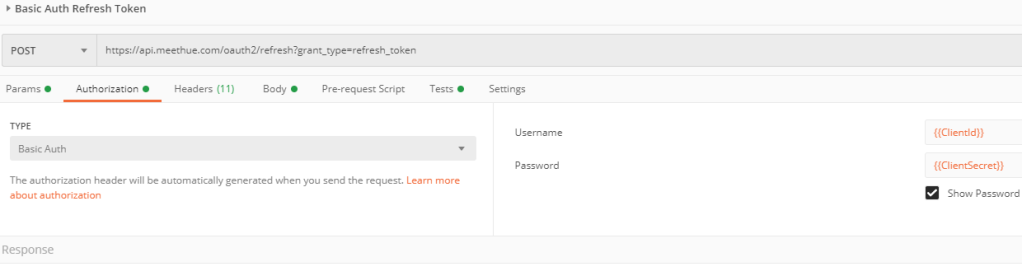
The same as getting access token with basic authentication, also when refreshing you need to specify the authorization header to use basic auth, and with client id and secret as username and password:
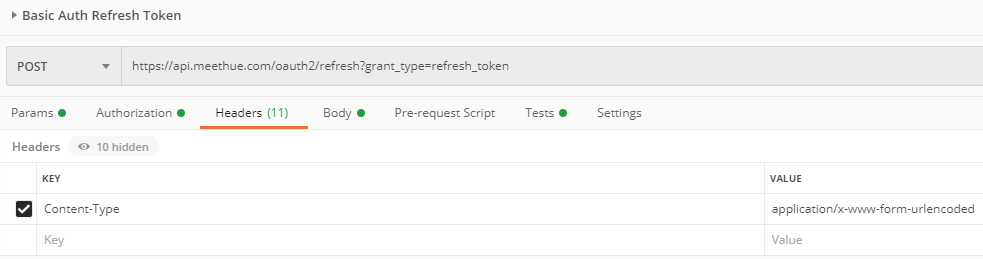
In Headers, specify that the Content-Type is application/x-www-form-urlencoded:
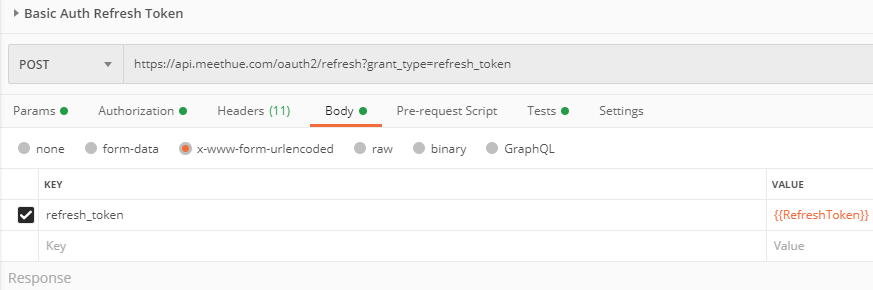
And in the Body of the request, specify the environment variable for refresh token as form parameter like this:
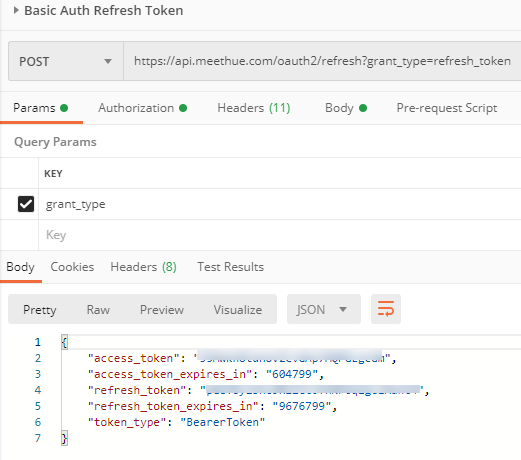
Under Tests I have the same javascript as shown earlier, which lets me save the refreshed access token and refresh token to my environment again. When I run the request to refresh the access token, I should get a successful response like the following:
Now that I have an access token and refresh token, I’m all set for doing the necessary remote config for getting a username to use in the requests, but first I will show how to do Digest Authentication. If you want you can skip right to the Remote Configure Link Button and Create User section below.
Get Access Token with Digest Authentication
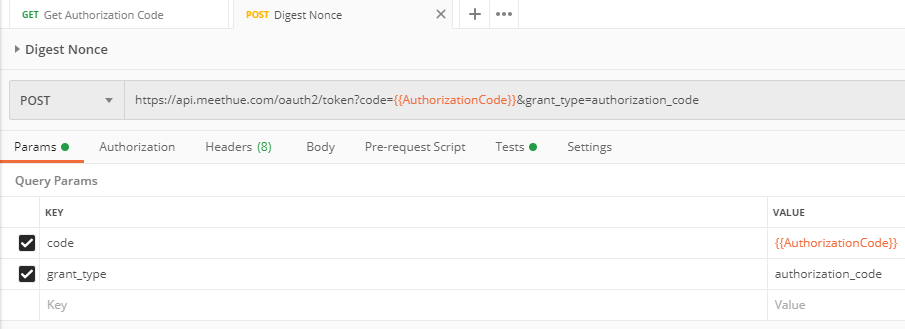
When you want to get an access token using Digest Authentication, you will need to start over again with getting an authorization code as described earlier. After that I will just request an access token with a POST request to the oauth2/token endpoint with the query parameters of code=authorization code & grant_type=authorization_code. This is basically the same request as I used with basic authentication, but with one important difference: I will not specify the Authorization Header to be basic auth.
When I run this request without a authorization header, I will get a 401 unauthorized response like the following. In the response Header and the WWW-Authenticate key I will get the first part of the challenge-response needed for Digest Authentication, the value called Nonce:

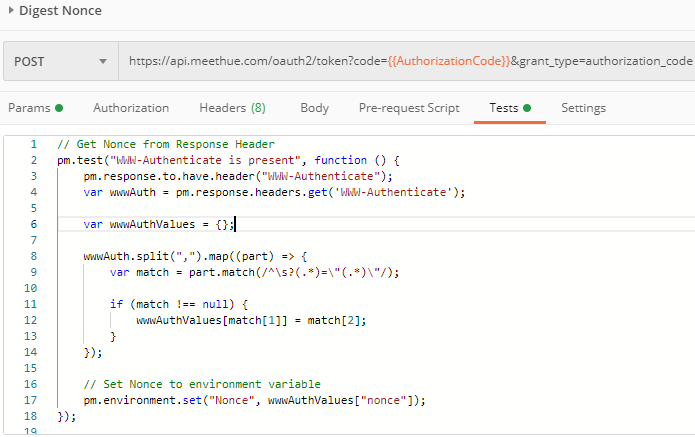
As with previous requests, I run a javascript test that extracts the response, in this case it is a little more complicated as i need to examine the response header and split so that I can get the Nonce value. This is so saved to the Nonce environment variable like this:
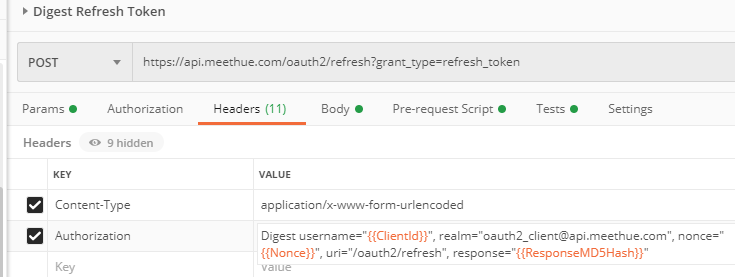
Now that I have the Nonce I can proceed requesting an access token with Digest Authentication. This time I go to the request Headers and add an Authorization Header with a value as shown below:
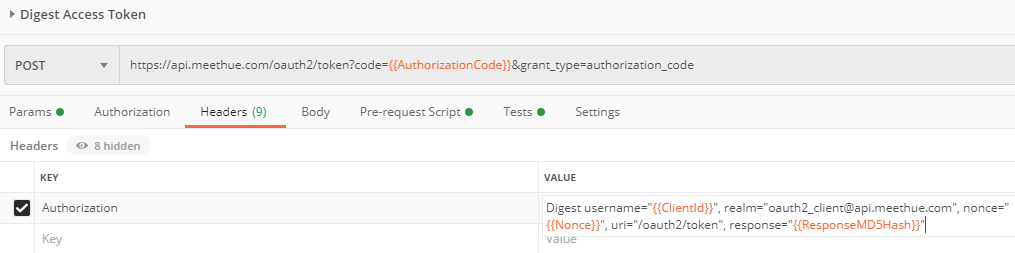
This requires a little more explanation. The Authorization header consist of the following:
Digest username=”{{ClientId}}”, realm=”[email protected]”, nonce=”{{Nonce}}”, uri=”/oauth2/token”, response=”{{ResponseMD5Hash}}”
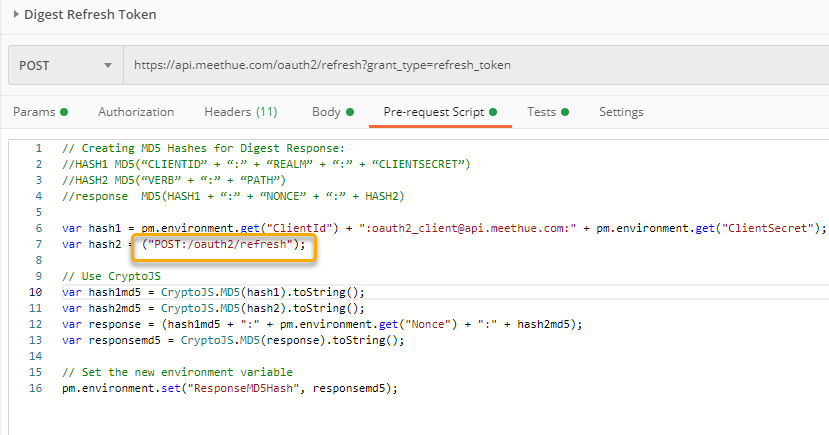
, where Nonce is the value I retrieved from the WWW-Authenticate response header in the first request, and the response is a calculated MD5 Hash as explained in the documentation linked earlier from Hue Remote API. But how did I get this value calculated? This time around I’m using a pre-request script to calculate that, based on the formula from the documentation (marked in green comment below):
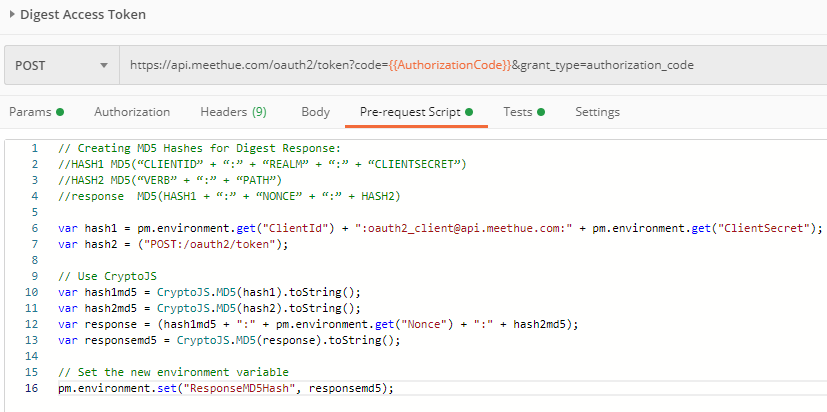
So this little pre-request script calculates and sets the ResponseMD5Hash environment variable, so that I have that available when constructing the Authorization Header for Digest authentication.
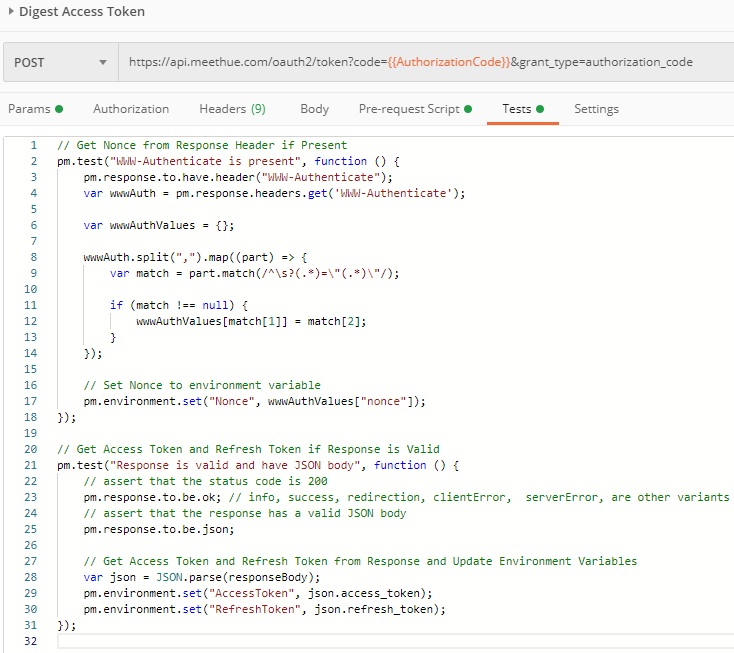
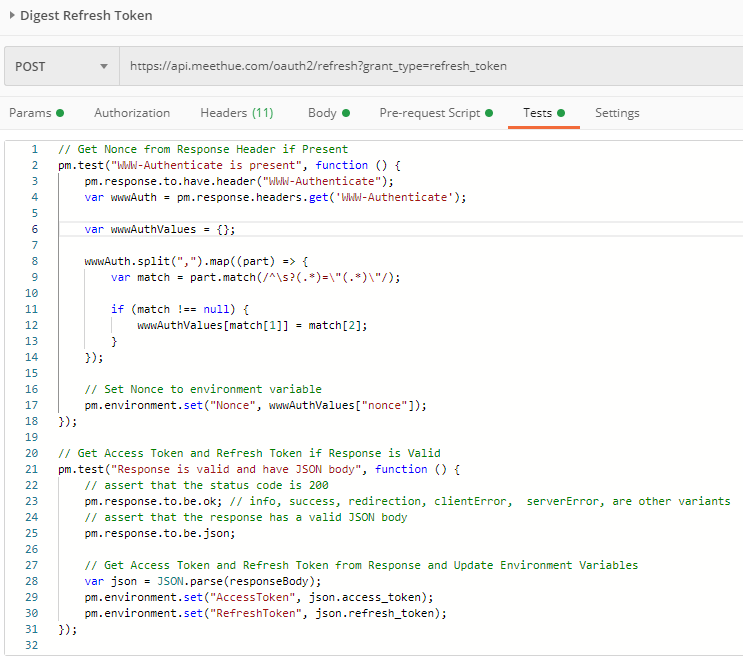
Before I proceed with requesting an access token using Digest Authentication, I need to put together a Test script that do 2 tests:
- Check if there is a WWW-Authenticate response header, and if so save the Nonce to environment variable.
- Check if there is a successful json response and if so save the access and refresh tokens to environment variables.
My script now looks like this:
This means that I will need to run the request twice in succession, the first time I will get a 401 Unauthorized response, in which I will get the Nonce:

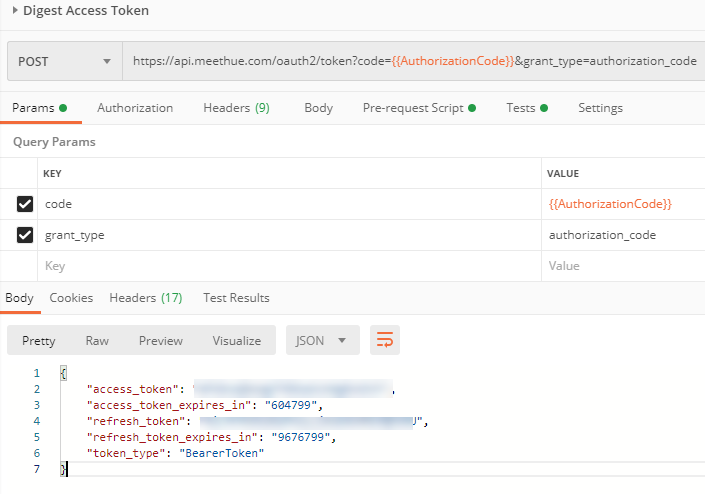
The second time I will get the 200 OK and a JSON response:

I now have an access token using Digest Authentication:
Refresh Token with Digest Authentication
When the Access Token expire, I will need to use the Refresh Token to get a new Access Token with Digest Authentication. Refreshing using Digest is based on the same challenge-response flow as getting the access token.
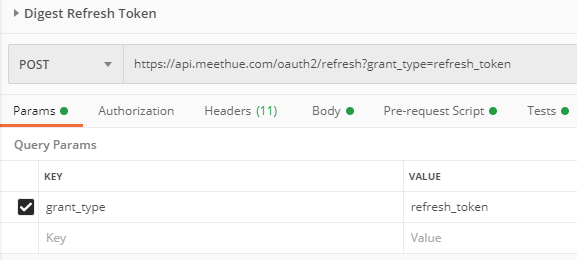
First I need to construct a POST request to the oauth2/refresh endpoint like below:
Then I have to add to the Header Content-Type: application/x-www-form-urlencoded, and the Authorization using Digest like shown below:
This Digest Authorization Header is the same as with requesting the access token, with one important difference, uri is “/oauth2/refresh“.
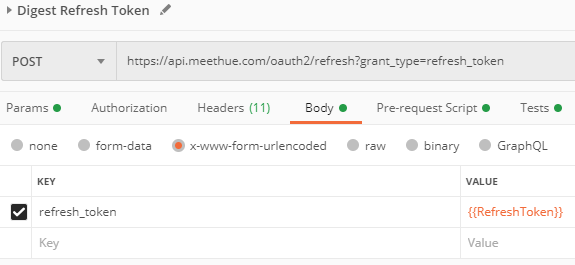
Next, in the Body I need to specify the refresh token:
In the Pre-request Script, make sure to use “/oauth2/refresh” when calculating the md5 hash:
And the Tests scripts are the same as with getting an access token:
Remember that refreshing the access token using Digest will follow the same pattern as getting the access token, you will need to run the refresh request twice in succession for getting a 401 Unauthorized and then 200 OK like shown above.
Get Access Token with Postman Oauth2 Authorization
With the collection of requests shown above, you should now be able to use the access token and refresh when needed for as long time as you need to. Before I proceed to configuration and accessing my lights, I will add one more method of getting access token with Postman: Using the built-in Oauth2 Authorization method.
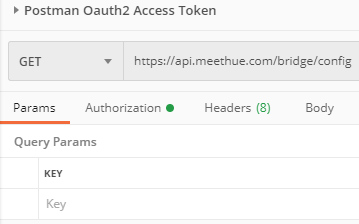
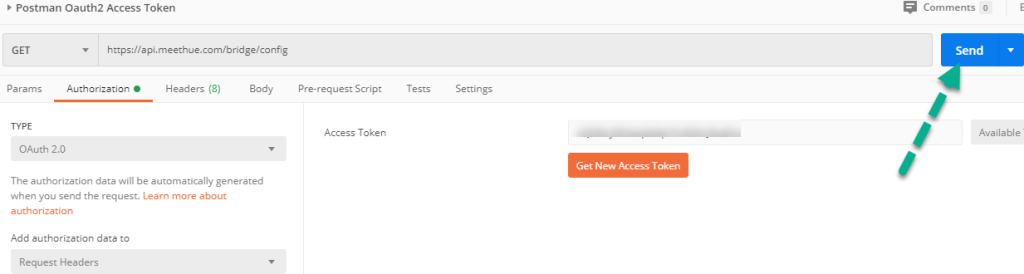
Lets start by creating the following GET request, this is just a simple request to get configuration from my HUE bridge:
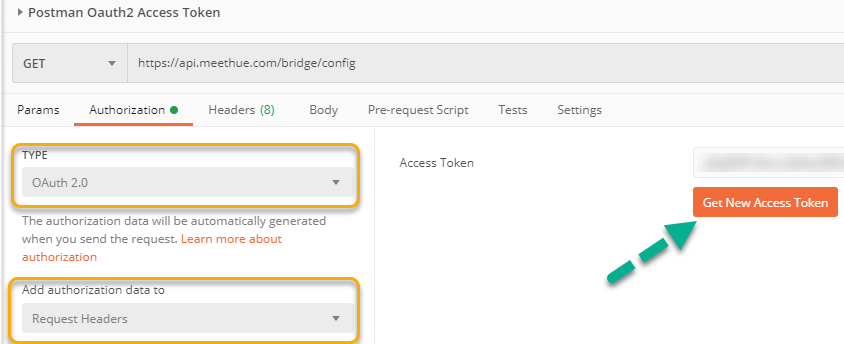
Next, go to Authorization, select Oauth 2.0 and add Authorization data to Request Headers as shown below. Then click on the Get New Access Token button:
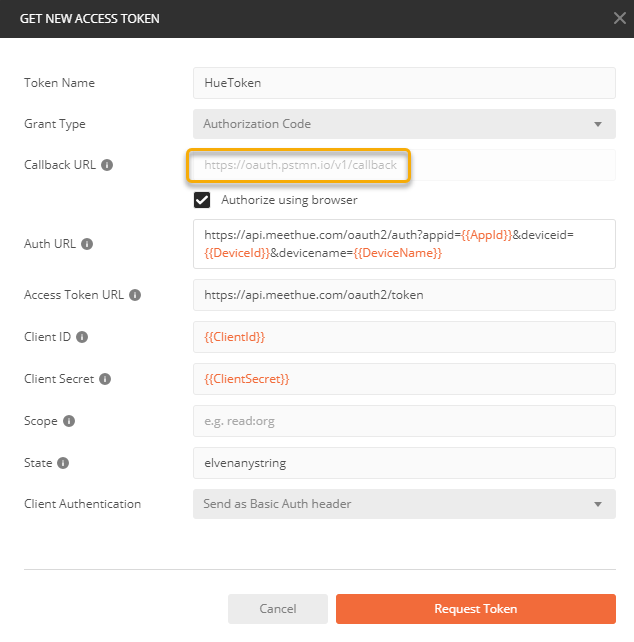
In the following dialog, give a name for your Token, and make sure that grant type is Authorization Code. Select Authorize using browser, and note the Callback URL. You need to copy this URL. Construct an Auth URL using your environment variables like I have shown below, the Access Token URL, specify ClientId and ClientSecret variables, type any string for state, and make sure that Client Authentication is Basic Auth header:
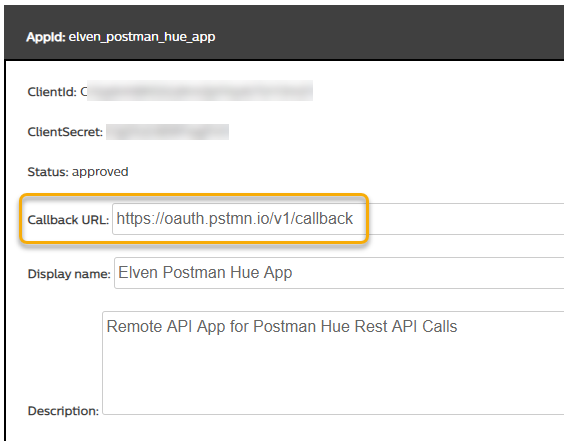
Now, before you click on Request Token, you need to go back to your Hue Developer Account and change the Callback URL to the one above:
When you have done that, you can click on Request Token, which will launch you default browser:
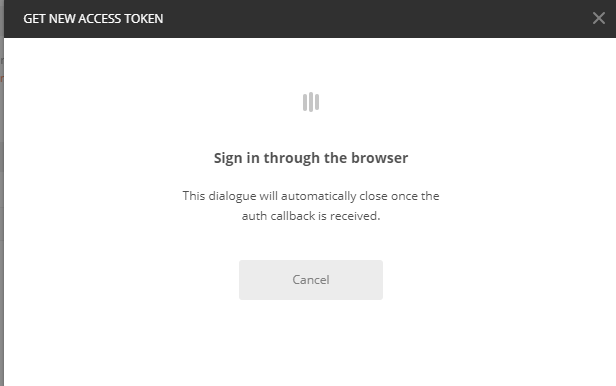
You need to be logged in with your Hue Developer account and grant permission:

After that you will get the following message when redirected:
You might have some issues with pop up blocker or redirects:

If everything works as expected, your Postman client will receive the callback and complete then authentication:
And you should receive your Access Token:
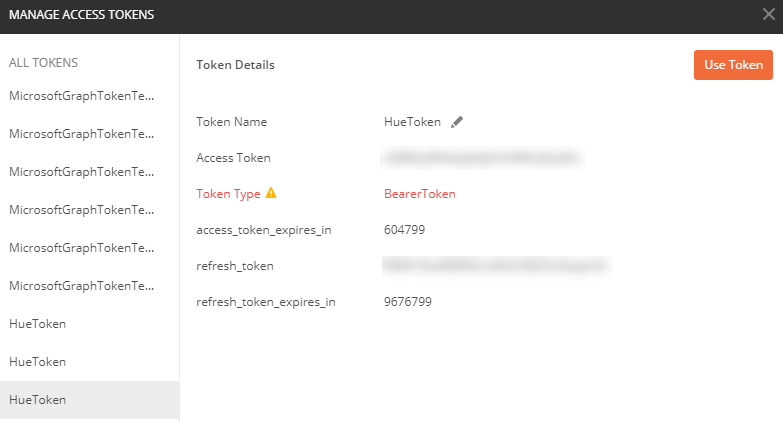
Note the little warning about partially support:
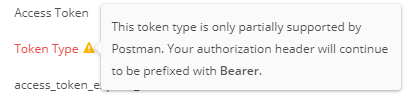
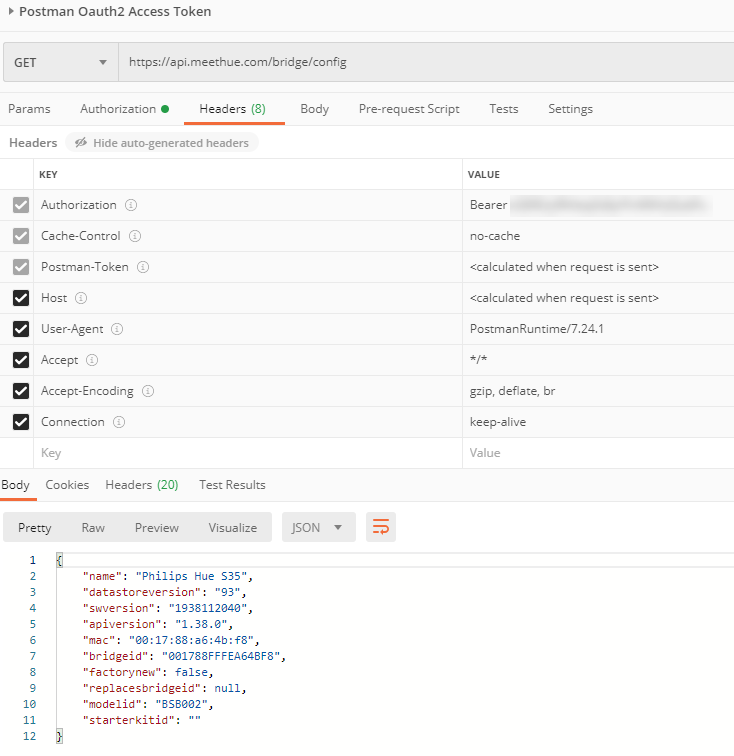
Click the Use Token button, which should fill in the Access Token field. Now click Send on the request:
This should now response with some config details of your Hue Bridge, like the name and versions. If you go to Headers and show the hidden Headers you will see that Authorization Header has been set with Bearer and your Access Token.
So going forward, and for the rest of this blog post, you now have two options for using Access Token:
- Use the Access Token from environment variables that I have shown how you can retrieve with Basic or Digest Authentication, and Refresh when needed.
- Use the Oauth2 Authorization for every request (or set it on the parent level of your collection of requests). When the Access Token expire, it won’t refresh automatically, so you need to Request a new one.
Remote Configure Link Button and Create User
Now for the next part we will have to remote configure the link button, so that the bridge will accept creating a new user for us to be able to control the lights.
Enable Link Button
Users of Hue will remember that you from time to time that you need to push the link button on your bridge when adding new users. With Remote API we can do this without having to run around the house 😉
Create a PUT request like the following. On Headers specify Authorization and value to be Bearer {{AccessToken}}, which will get your environment variable from the previously retrieved access token. PS! For all the following requests: Always include this Authorization: Bearer {{AccessToken}} header!
Specify Content-Type: application/json:
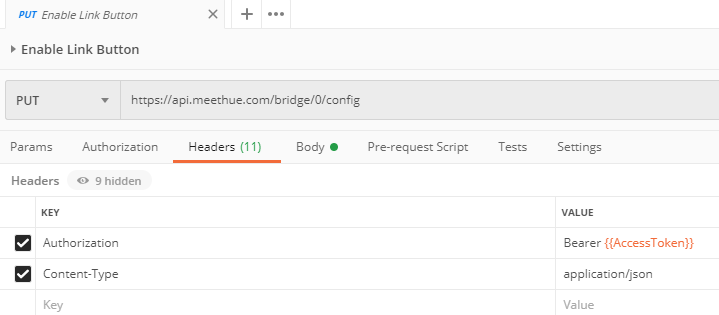
Next, set the Body to {“linkbutton”: true}:

And then Send the Request, you should get a success response like below:
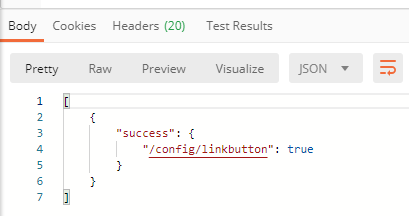
You now have 30 seconds to add your user..
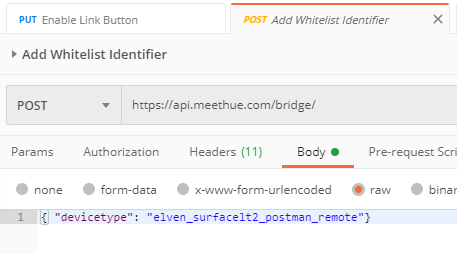
Add Whitelist Identifier
Next, create a POST request to the Bridge endpoint that specify devicetype in the Body, like shown below, where devicetype is a named description of your client and app, for example:
Run the request, but if 30 seconds have passed, you will get this response:
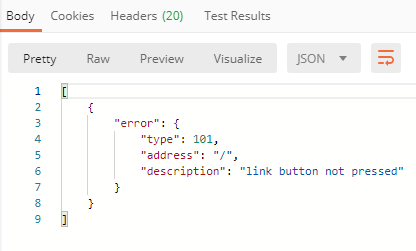
In that case, just run the PUT request again to enable the link button, and try again. When successful you should get a response like the following:
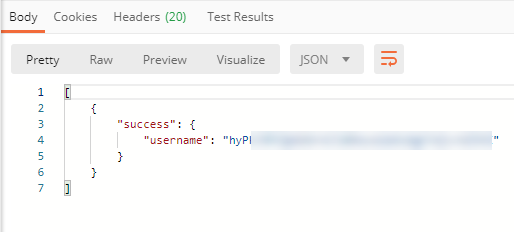
This username have to be included in every Hue Remote API request later, so make sure to save it in your environment variables:

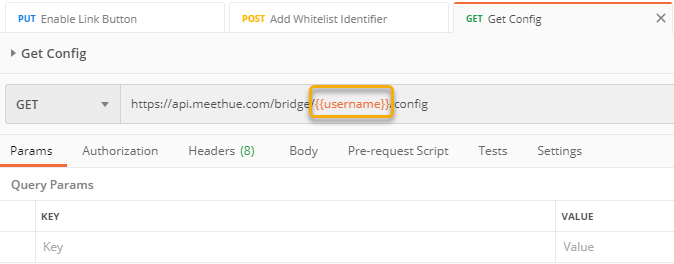
Get All Configuration
Your starting point now for all requests are https://api.meethue.com/bridge/{{username}}/ (and remember to include the Authorization: Bearer {{AccessToken}} header always).
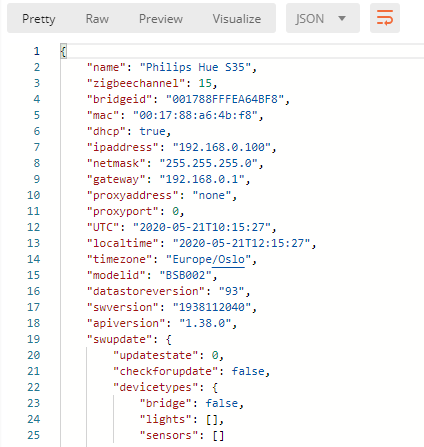
If I want to list all configuration, I can run this GET request:
Which will provide me with all the configuration details of my Bridge:
We are now ready to start controlling the Lights and more!
Control Lights Remotely
If will now show you some sample requests for controlling lights via Hue Remote API:
List All Lights
If I want to list all my lights, I can just run a GET request: https://api.meethue.com/bridge/{{username}}/lights/:
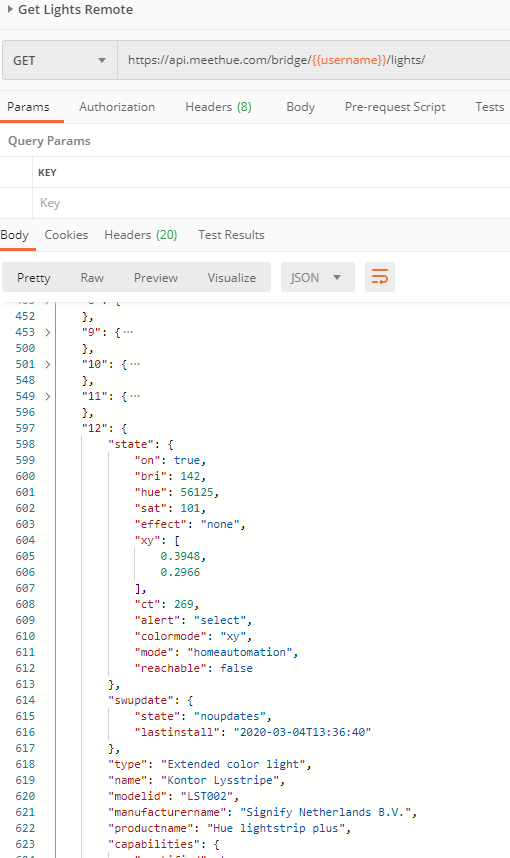
The response will show all lights, numbered from 1 to count of lights connected to your bridge. I’ve collapsed some details in the response above, but you can see from my light number 12 that the state is “on”, you can see the brightness, color and more.
PS! Every light is a new typed object, and not an array, which I find a bit unfortunate, so you need to be aware of that if you want to loop through your lights for example.
If you want to get a specific light, just add the light number at the end of the GET request URI, like this: https://api.meethue.com/bridge/{{username}}/lights/12
Turn a Light On/Off
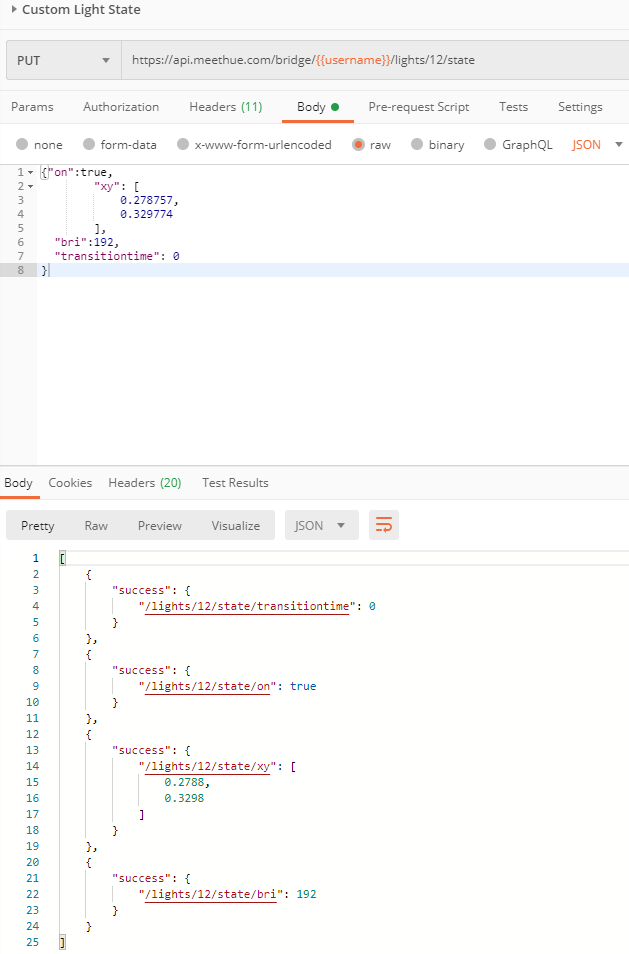
You can control the state of a specific light by doing a PUT request to your specified light number, for example light number 12: https://api.meethue.com/bridge/{{username}}/lights/12/state
You need a Request Body that tells what the light state should be. For example to turn the light off, just include a body with {“on”:false}, the response will confirm success (and you should be able to visually confirm as well ;):

Likewise, to turn on again:

Controlling Light State and Colors
Now you can really start playing with your lights with custom states, you can change brightness, go from cold white to warm white, or maybe set a color scene for the millions of colors available if your light supports color. More info can be found here:
https://developers.meethue.com/develop/get-started-2/core-concepts/#controlling-light
Light color are primarly controlled by the CIE color space, where you specify an array of two values between 0 and 1 expressed as x and y.

Here is an example where I both control brightness (1-254) and a custom color:
Now, you can just experiment and learn for yourself. A good tip is to use your Hue App on your mobile phone to set the color you like, and then use GET to get the light state color settings.
Summary and Github Repo
I hope you have learnt a lot about Hue Remote API when reading this, I certainly learnt a lot exploring and documenting this via Postman. This understanding has provided me with the knowledge and tools to look into automation and integration scenarios with the Microsoft solutions I use daily in my job. I’ve already been doing this with PowerShell, Azure Functions, Logic Apps and Power Automate to name a few. There is a blog post coming soon on Power Platform and how I did that to control my lights based on Teams Presence and more.
So whether you are a developer that loves to write code, or maybe you are more into the low-code, no-code solutions, I hope this has been helpful.
I promised I will share my Postman Collection and Requests for Hue Remote API, so here it is: https://github.com/JanVidarElven/HueRemoteAPI-Postman-Collections
Knock your self (or your lights) out, and please feel free to comment or contribute 🙂

This is amazing! Thank you so much, I saved hours of testing and digging in the documentation because of you 🙂 Thanks again!
Thank you for putting in the effort in writing this in detail.
Pingback: Blog Series – Power’ing up your Home Office Lights: Part 1 – Get to know your Hue Remote API and prepare for building your solution | GoToGuy Blog
Pingback: Blog Series – Power’ing up your Home Office Lights: Part 8 – Using Power Automate Flows to Get and Set Lights State | GoToGuy Blog
Unfortunately, the remote app (app.getpostman.com) is not working
Hi. Postman has made some changes on their end since this blog post was published. See https://learning.postman.com/docs/sending-requests/authorization/#requesting-an-oauth-20-token for more details. See also later in my blog post on how to use browser for OAuth2 where the callback URL will need to be https://oauth.pstmn.io/v1/callback.
Est-il possible de piloter plusieurs ponts Hue avec le même compte Api Remote ?
No. As far as I know Philips Hue only allows one Bridge per Developer Account.
Super nice and interesting guide, this is really useful for a guide I’m writing to change your Philips Hue light color from within a CI/CD pipeline.
Pingback: Hue-valojen energiankulutuksen seuranta Power Platformilla – Timo Pertilä
Loved reading this thaank you
Update! When making the POST request to add the whitelist identifier, the URL is no longer https://api.meethue.com/bridge/, it is now https://api.meethue.com/route/api.
Make a POST request to that endpoint while including the `Authorization: Bearer {{accessToken}}` and `Content-Type: application/json` headers in your request and you should be good. You do still need to make sure you recently made the previous PUT request to the “configure link button” request as mentioned.
Hi, thanks for bringing this to my attention, I will update my blog post later when I have time to verify my setup.