The Scenario
Update: This blog post is the first part in a series. See:
Part 2 – Using a Custom Domain Name for an Application Published with with Azure AD Application Proxy
I have been looking at different usable scenarios for publishing internal sites via the Azure AD Application Proxy, and decided to have a go at publishing the Cireson Self Service Portal. This will give me some interesting possibilities for pre-authentication and controlling user access.
I have been considering two scenarios for publishing the Self Service Portal:
- Publish without pre-authentication (pass through). This scenario is best used when the Self Service Portal is running Forms Authentication, so that the user can choose which identity they want to log in with.
- Publish with pre-authentication. This scenario will used Azure AD authentication, and is best used when the Self Service Portal is running Windows Authentication so that we can have single sign-on with the Azure AD identity.
It is the second scenario with pre-authentication I will configure here.
I went through these steps:
Configure Windows Authentication for Cireson Self Service Portal
The Cireson Self Service Portal installs per default with Forms Based Authentication. I need to configure Windows Integrated Authentication for the portal, and this is well documented in the Knowledge Article Cireson customers and partners can access at https://support.cireson.com/KnowledgeBase/View/45. From my environment, I can summarize the following configuration settings:
- The Self Service Portal (v3.6 with hotfix) are running on the same server as the Service Manager Management Server (recommended and officially supported by Cireson)
- The Portal/Management Server is configured with Kerberos Delegation in Active Directory with “Trust this computer for delegation to any service (Kerberos only)”
-
The Service Manager Service Account is configured with Service Principal Names (SPN) with:
- SETSPN –s MSOMSDKSVC/NameOfYourServerHere SCSMServiceAccountHere
- SETSPN –s MSOMSDKSVC/FQDNOfYourServerHere SCSMServiceAccountHere
- Service Manager Service Account is added to the IIS_IUSRS local group on the Portal Server
- The Cireson Portal Web Site are configured with Windows Authentication (Kernel Mode Authentication Enabled, Extended Protection to Off). For Providers Negotiate are listed on top.
It is a good idea at this point to verify that Windows Integrated Authentication is working correctly by browsing internally to http://portalservername. Your current logged on user (if permissions are correct) should be logged in automatically.
Create the Application in Azure AD
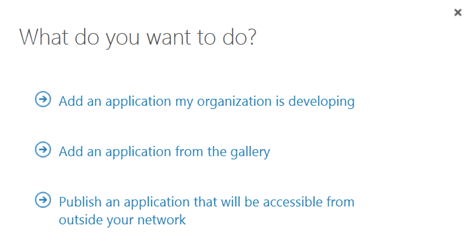
In this next step, I will create the Proxy Application in Azure AD where the Self Service Portal will be published. To be able to create Proxy Applications I will need to have either an Enterprise Mobility Suite license plan, or Azure AD Premium license plan. From the Azure Management Portal and Active Directory, under Applications, I add a new Application and select to “Publish an application that will be accessible from outside your network”:
I will then give a name for my application, specify the internal URL and pre-authentication method. I name my application “Self Service Portal”, use “http://portalserverfqdn” as internal URL and choose Azure Active Directory as Pre-Authentication method.
After the Proxy Application is added, there are some additional configurations to be done. If I have not already, Application Proxy for the directory have to be enabled. I have created other Proxy Applications before this, so I have already done that.
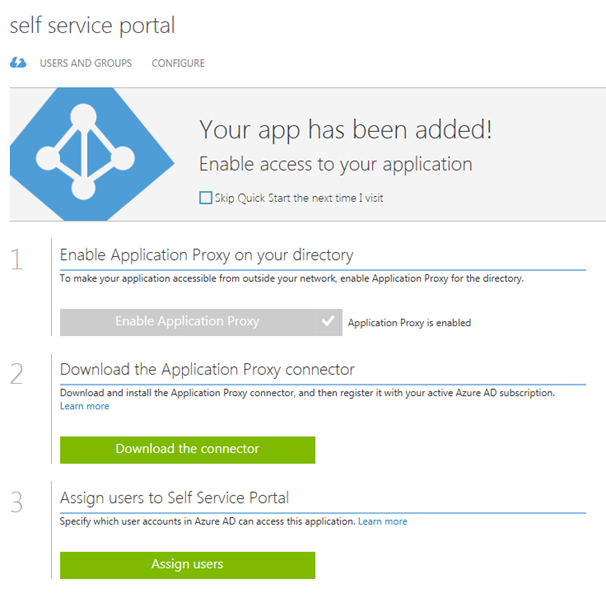
I also need to download the Application Proxy connector, install and register this on a Server that is member of my own Active Directory. The Server that I choose can be either on an On-Premise network, or in an Azure Network. As long as the Server running the Proxy connector can reach the internal URL, I can choose which Server that best fits my needs.
Since I choose to use pre-authentication, I can also assign individual users or groups to the Application. This enables me to control which users who will see the application under their My Apps and who will be able access the application’s external URL directly.
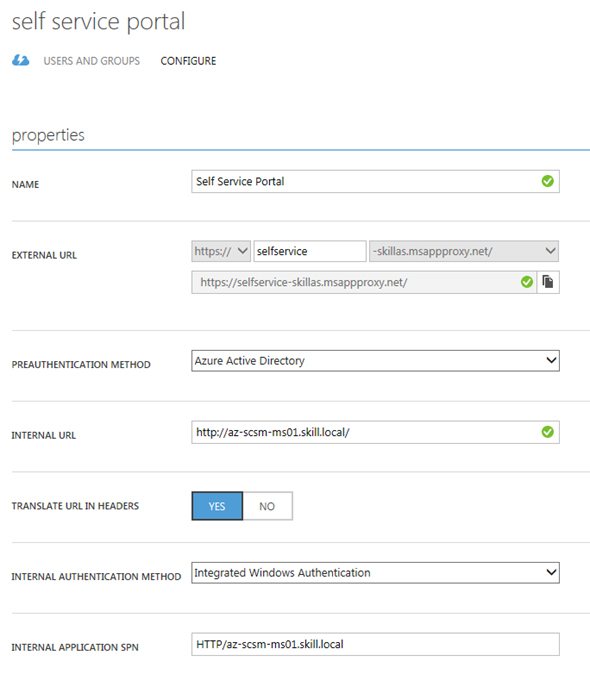
I now need to make additional configurations to the application, and go to the Configure menu. From here I can configure the name, external URL, pre-authentication method and internal URL, if I need to change something.
What I need to configure here is to use Internal Authentication Method to “Windows Integrated Authentication”. I also need to configure the Service Principal Name (SPN). Here I specify HTTP/portalserverfqdn, in my example this is HTTP/az-scsm-ms01.skill.local.
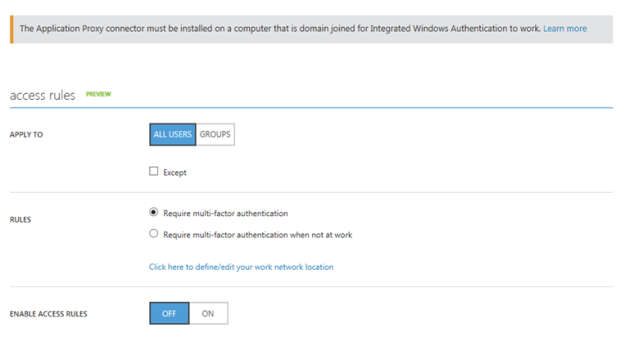
From the bottom part of the configuration settings I can configure Acces Rules, which at this time is in Preview. This is cool, because I can for example require for this Application that users will be required to use multi-factor authentication. I have not enabled that here though.
After I have configured this, I am finished at this step, and now need to configure some more settings in my local Active Directory.
Configure Kerberos Constrained Delegation for the Proxy Connector Server
I now need to configure so that the Server running the Proxy Connector can impersonate users pre-authenticating with Azure AD and use Windows Integrated Authentication to the Self Service Portal Server.
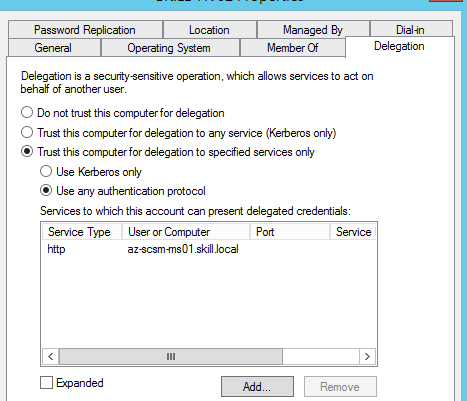
I find the Computer Account in Active Directory for the Connector Server, and on the Delegation tab click on “Trust this computer for delegation to specified services only”, and to “Use any authentication protocol”. Then I add the computer name for the portal server and specify the http service as shown below:
This was the last step in my configuration, and I am almost ready to test.
If you, like me, have an environment consisting on both On-Premise and Azure Servers in a Hybrid Datacenter, please allow room for AD replication of these SPN’s and more.
Testing the published application!
Now I am ready to test the published proxy application.
Remember from earlier that I have assigned the application either to a group of all or some users or directly to some pilot users for example.
I will now log on with my Azure AD user (which of course is synchronized from local Active Directory), and I will use the URL https://myapps.microsoft.com.
After logging on, I can see the applications I have access to. Some of these are SaaS applications I have configured, some are applications we have developed ourselves, and I can see the published Self Service Portal:
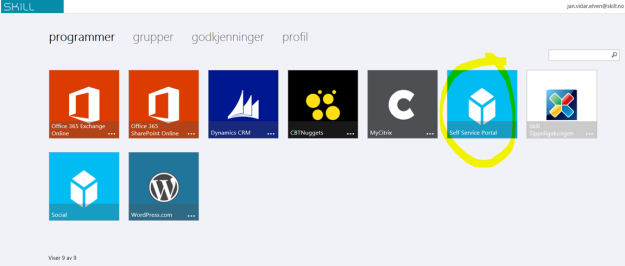
(Don’t mind the Norwegian captions and texts, you get the idea;)
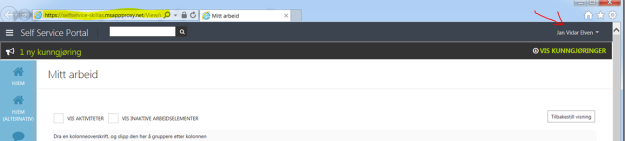
I then click on the Self Service Portal, and can confirm that I am able to access the Self Service Portal. See the special proxy URL and that indeed I’m logged in with my Active Directory user with SSO.
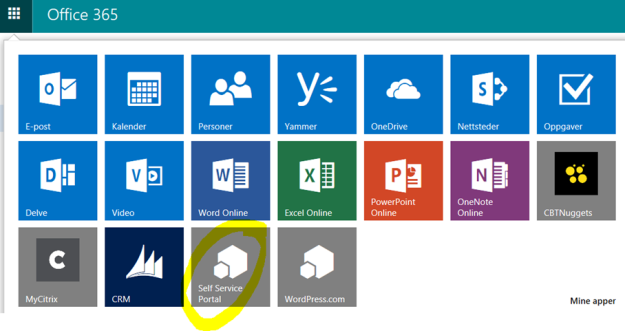
Another cool thing is that I can use the App menu in Office 365 and add the Self Service Portal to the App chooser for easy access:
I can now also access the Self Service Application from the “My Apps” App on my Mobile Devices.

Pingback: Azure AD Application Proxy related blog posts - Application Proxy Blog - Site Home - TechNet Blogs
Reblogged this on Våre ansatte blogger om nyheter og løsninger and commented:
I Azure AD kan man publisere interne web sites med Azure AD Application Proxy. Det som er spennende med App Proxy i Azure AD er at man kan pre-autentisere brukere, før man får tilgang til den interne web siten. Denne blogg artikkelen viser hvordan man kan publisere Cireson Self Service Portalen for Service Manager via Azure AD App Proxy.
Pingback: Using a Custom Domain Name for an Application Published with with Azure AD Application Proxy | SystemCenterPoint
Pingback: Service Manager Self Service Portal – Password Reset with Azure AD Premium | SystemCenterPoint
Pingback: Publish the Service Manager Self Service Portal with Azure AD Application Proxy | SystemCenterPoint
Pingback: Session Recap – Nordic Infrastructure Conference (NIC) 2016 – Publishing Azure AD Applications | SystemCenterPoint