A Blog about Enterprise Mobility + Security, Azure AD, Datacenter Management, Service Delivery, Automation, Monitoring, Cloud OS, Azure and anything worthwhile sharing with the Cloud and Datacenter community.
The above blog post is currently the only “graphical” or UI based way that you can assign those permissions today, most people use Microsoft Graph SDK PowerShell for this. On the other hand, many also rely on Infrastructure as Code to deploy Azure resources, for example by using Bicep, and while Bicep can provision Managed Identities and Role Assignments to Azure resources, you cannot assign application role permissions to Microsoft Graph without using another more “imperative” method.
While there a a limit set of scenarios where we can use Bicep for Graph at this time, mostly focusing on applications, service principals and groups, there is also support for managing scopes and role permissions via oauth2PermissionGrants and appRoleAssignedTo. And this caught my attention, as this was exactly the way I approached this via my blog post on how to add Graph application permissions using Graph Explorer.
Lets say that you have a Bicep deployment consisting of a Resource Group, User Assigned Managed Identity, and maybe a Function App or a Logic App or something similar that is assigned the managed identity, and you need to assign Graph application role permissions to that service principal. That can all be done now in Bicep, let me show you how!
Walkthrough
The complete bicep code is available at my GitHub and the following repository:
Then you can start building your bicep declarations. In my example I will start simple by using an existing Resource Group and User Assigned Managed Identity, and deploy at Subscription scope:
targetScope = 'subscription'

// Main Parameters for Existing Resources
param resourceGroupName string = 'rg-<your-resource-group>'
param managedIdentityName string = 'mi-<your-managed-identity>'

// Get existing Azure resources for Resource Group and Managed Identity
resource rg 'Microsoft.Resources/resourceGroups@2024-03-01' existing = {
  name: resourceGroupName
}
resource userManagedIdentity 'Microsoft.ManagedIdentity/userAssignedIdentities@2023-01-31' existing = {
  name: managedIdentityName
  scope: resourceGroup(rg.name)
}
Next I need to initalize the use of the MicrosoftGraph provider in the main.bicep file:
// Initialize the Graph provider
provider microsoftGraph
I can now use the Bicep Graph and get the existing Service Principal for the Managed Identity:
// Get the Principal Id of the Managed Identity resource
resource miSpn 'Microsoft.Graph/[email protected]' existing = {
  appId: userManagedIdentity.properties.clientId
  // Tip! If using a System Assigned managed identity, you can refer to the resource symbolic name
  // directly and use <resourcesymbolicname>.identity.principalId for appId
}
I also need to get the existing Service Principal for Microsoft Graph, using the well know Graph appId:
// Get the Resource Id of the Graph resource in the tenant
resource graphSpn 'Microsoft.Graph/[email protected]' existing = {
  appId: '00000003-0000-0000-c000-000000000000'
}
All that remains now then is to create an array of all the application roles I want to assign, and loop through to assign each of the role permissions:
// Define the App Roles to assign to the Managed Identity
param appRoles array = [
  'User.Read.All'
  'Device.Read.All'
]

// Looping through the App Roles and assigning them to the Managed Identity
resource assignAppRole 'Microsoft.Graph/[email protected]' = [for appRole in appRoles: {
  appRoleId: (filter(graphSpn.appRoles, role => role.value == appRole)[0]).id
  principalId: miSpn.id
  resourceId: graphSpn.id
}]
Basically I’m using the same logic here as my above mentioned blog post on using Graph Explorer, but in this case I’m able to use Bicep all the way.
Deploy
Now all that remains is to deploy:
az deployment sub create --location NorwayEast --name "bicep-graph-demo" --template-file .\main.bicep
Summary
This simple scenario shows how we now can use Bicep also for managing application role permissions together with Azure ressources that has assigned managed identities, and you no longer need to do this separately if you are using IaC. Note that the user running the deployment need permission to assign role permissions, see the documentation for details on that.
At time of writing this blog post, it’s only the first week after Microsoft Copilot for Security went GA April 1st, and already the #Security #Community are creating scripts, automations and tools for provisioning or deprovisioning Secure Capacity Units (SCU) that are required for running Copilot for Security in your environment.
A potential cost of 4$ per hour per SCU can amount to $2920 per month if you count 730 hours standard per month, so the motivation is clear, to save cost and use the service only when you need to.
I took inspiration from https://thoor.tech/Copilot-for-Security-deploy-and-destroy/, and decided to create my own solution based on Bicep, Deployment Stacks, and Azure DevOps Pipelines to automate creating a SCU on weekday mornings, and destroy again on the afternoon.
Disclaimer: This is a concept for saving cost in my own sponsored development and demo subscription, and the effects of removing and recreating Secure Compute Units in a Production environment must be carefully evaluated.
Update for Zero SCU & Overage Units – November 2025
My Gist code for below has now been updated for usage of Overage Units (ref. https://learn.microsoft.com/en-us/copilot/security/manage-usage#update-the-provisioned-and-overage-security-compute-units-scus), meaning that it is now possible to provision a SCU with 0 units, and for example 2 overage units. This is not supported in the Azure Portal as per now (it requires at least 1 SCU), but is allowed either in the Security Copilot standalone portal, or as in this case via Bicep deployments. This opens up the scenario of not using consistent SCU’s for 4$ per hour without usage, but to pay instead 6$ per hour for use of any overage units. I found this to be useful for using Agents in Entra that are scheduled to run every 24 hours.
Bicep and Deployment Stacks
I wanted to use Bicep and often when I deploy Bicep I use a main.bicep file that deploys at subscription level, that also creates resource group(s) as well as contained resources which I place in modules.
I decided to use Deployment Stacks because I wanted to do a declarative approach, not only to do the actual deploy of the Secure Compute Unit, but also remove the resource from the resource group when the resource became unmanaged.
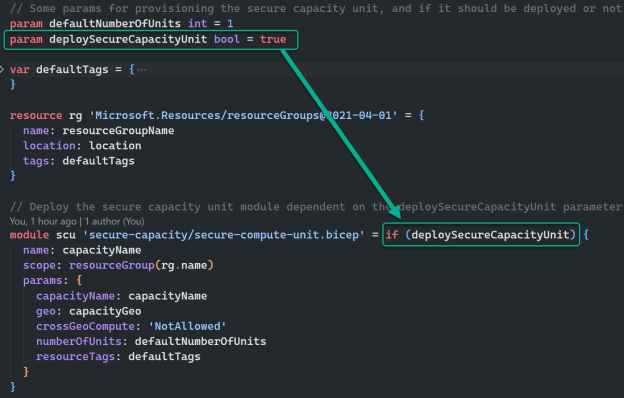
I think the code referenced at the end of this blog post is mostly self-explaining, but I will highlight a couple of elements. The first is using conditional deployment of the module in Bicep like this:
From the image above I can control whether the module will be managed in the deployment or not when I deploy the Bicep.
When running Bicep and using Deployment Stacks, you can control what happens to resources that are ‘unmanaged’. This is how I run the deployment if I want to NOT deploy the Secure Compute Unit for Copilot for Security Capacity, basically controlling CREATE operation with setting the parameter to true, and DELETE operation with setting the parameter to false:
az stack sub create --location WestEurope --name "stack-scu-elven-we" --template-file .\main.bicep --parameters deploySecureCapacityUnit=false --deny-settings-mode none --action-on-unmanage deleteResources
The magic parameter here is the –action-on-unmanage, which I set to deleteResources, which will delete all resources that falls out of bicep template (either by condition or removing resource from file). You can also do a detachResources, which will keep the resources, and you can specify deleteAll which will also remove the Resource Group (which I do not want in my scenario).
PS! Note that I run an az stack sub create, which lets me run a bicep deployment that creates resource groups as needed (yes, I could be a bit colored by my much longer Terraform experience where I also create resource groups).
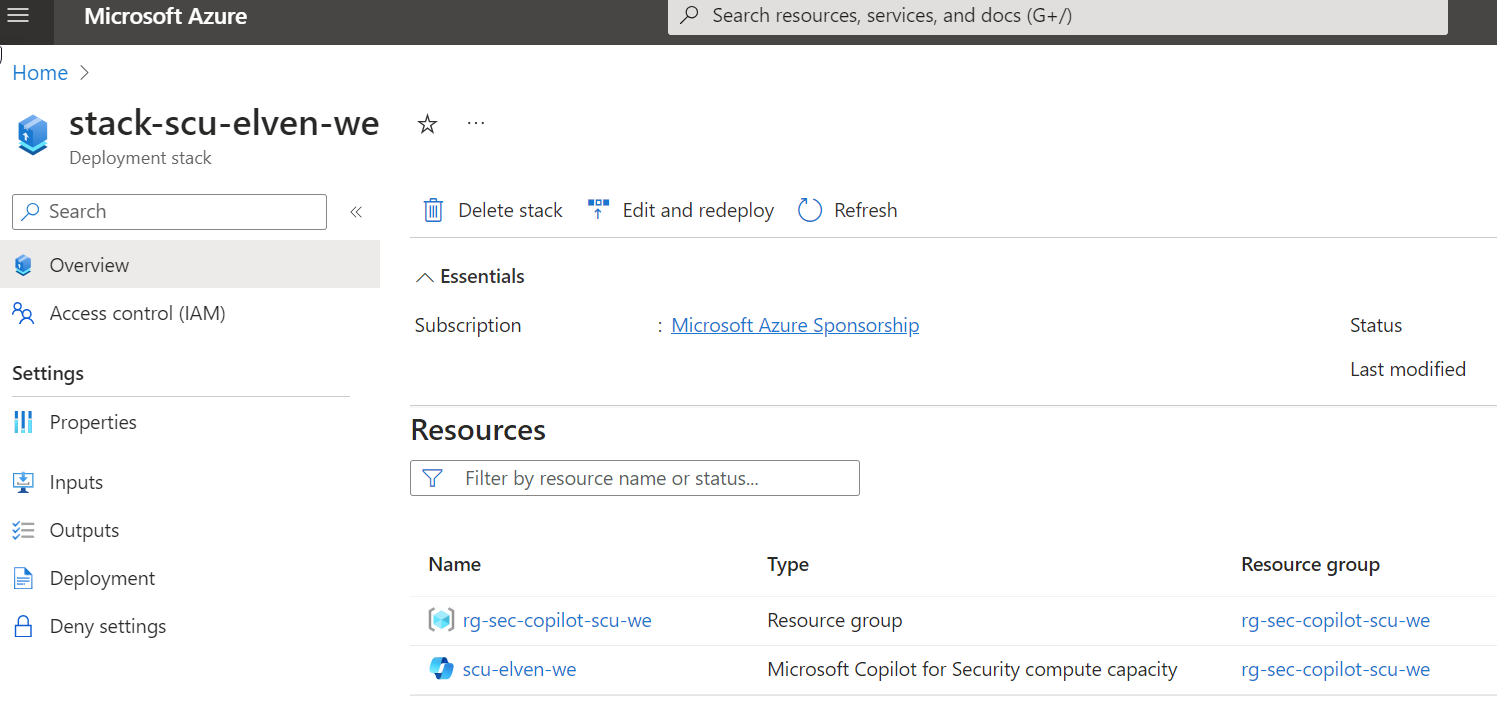
In the Azure Portal, when I run a deploy that creates a SCU, it will look like this in the Deployment Stack:
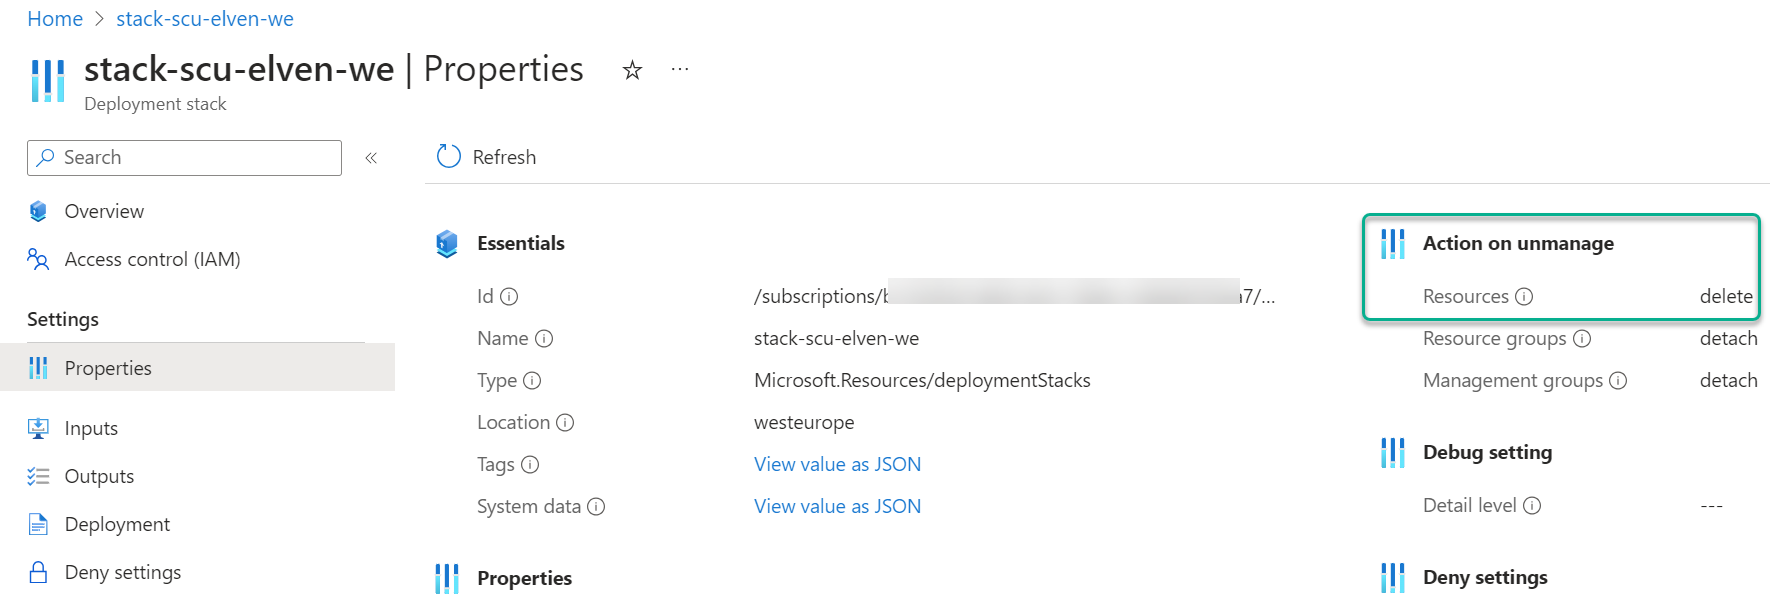
Note the action on unmanage:
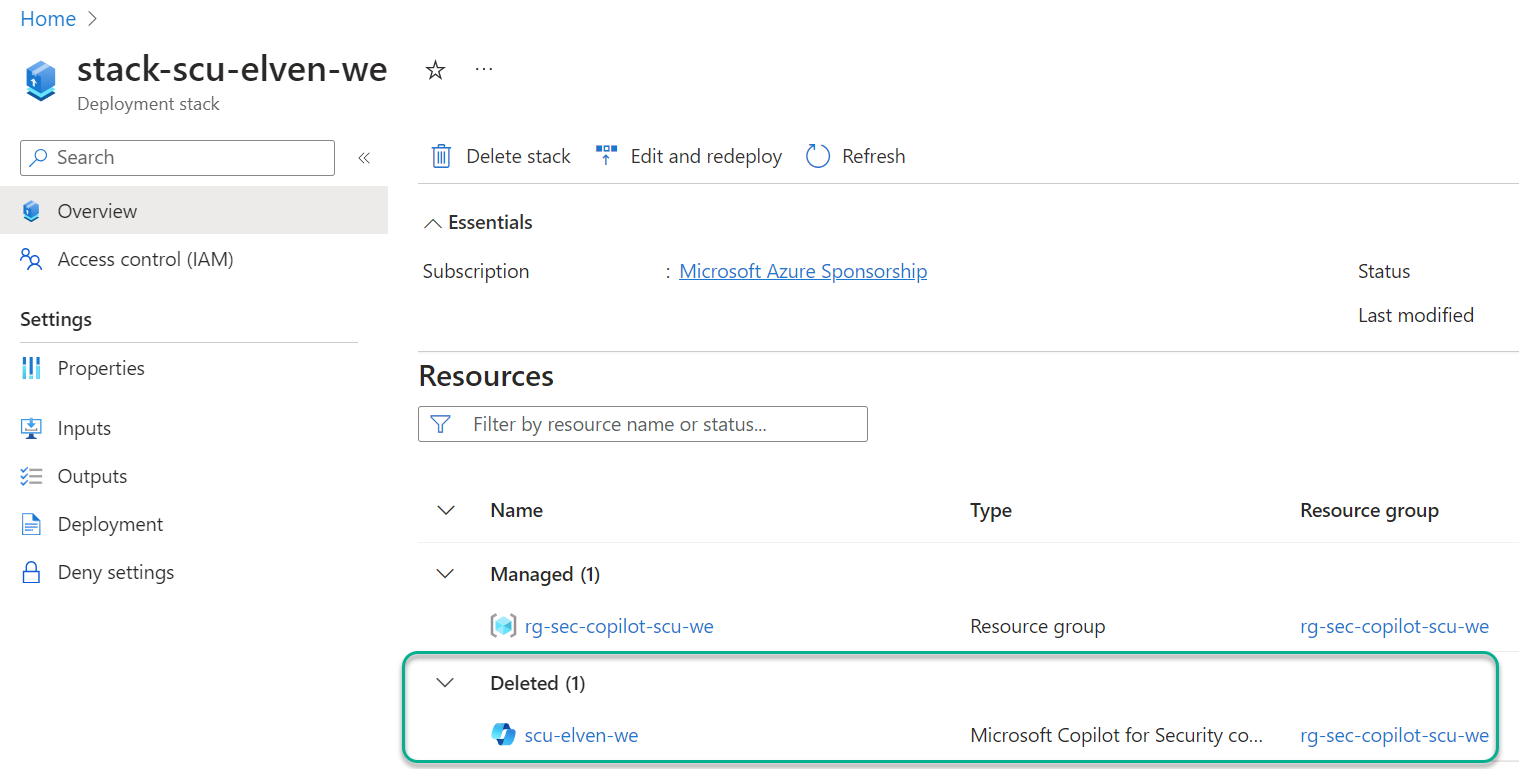
And when I set the parameter to false, to delete the SCU, the result is this:
Azure DevOps Pipelines
With the Bicep deployment using Az CLI verified succesfully, it should be straight forward to create Pipelines for deploying and destroying. The full YAML files are reference below, and should be easy to understand. The main components and requirements are:
Using a CRON expression and not a trigger for just scheduling when to run the pipeline. Note the use of always: true for the schedule, because I want the schedule to run in any case even if the files in the repo have not changed.
Remember you need to set up a Service Connection (Workload Identity Federation highly recommended), with approriate permissions to create resources in your reference Azure subscription.
If you look closer, you can see that the 2 pipelines, one for deploy and one for destroy, are almost exactly the same, with the exception of default value of either false or true for deploySecureCapacityUnit, and of course the morning and afternoon schedules are different.
FEATURE WHISH: I would have thought that I could use multiple schedules in the same YAML pipeline, and specifying different default value for the deploySecureCapacityUnit parameter based on schedule. Then I would be able to have just the one pipeline instead of two..
I’ll leave you to the rest, see reference to files I have published as Gists on my GitHub account https://github.com/janvidarelven.
Gist Reference
Complete Gist is linked below and is public, and feel free to Clone, Fork, Pull if you want to contribute, etc.
Gist consists of 4 files:
main.bicep – Parameters, variables, resource group and a module for Secure Compute Unit
secure-compute-unit.bicep – Module definition for deploying a Secure Compute Unit for Copilot for Security
deploy-security-copilot.yml – Pipeline with schedule for deploying Bicep from above files using Deployment Stack, creating a Secure Compute Unit.
destroy-security-copilot.yml – Pipeline with schedule for deploying Bicep from above files using Deployment Stack, deleting the Secure Compute Unit.
This file contains hidden or bidirectional Unicode text that may be interpreted or compiled differently than what appears below. To review, open the file in an editor that reveals hidden Unicode characters.
Learn more about bidirectional Unicode characters
This file contains hidden or bidirectional Unicode text that may be interpreted or compiled differently than what appears below. To review, open the file in an editor that reveals hidden Unicode characters.
Learn more about bidirectional Unicode characters
This file contains hidden or bidirectional Unicode text that may be interpreted or compiled differently than what appears below. To review, open the file in an editor that reveals hidden Unicode characters.
Learn more about bidirectional Unicode characters
This file contains hidden or bidirectional Unicode text that may be interpreted or compiled differently than what appears below. To review, open the file in an editor that reveals hidden Unicode characters.
Learn more about bidirectional Unicode characters