Category Archives: Enterprise Mobility Suite

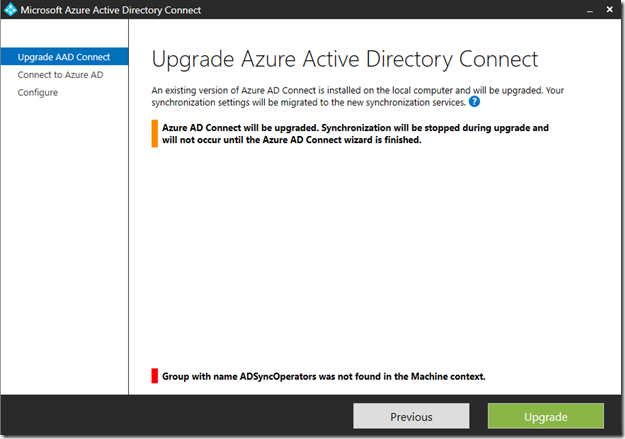
Missing groups prevents upgrade of Azure AD Connect

This is just a short blog article on a problem I experienced when upgrading Azure AD Connect from a previous version. This was a small environment where the Azure AD Connect server was running on the Domain Controller.

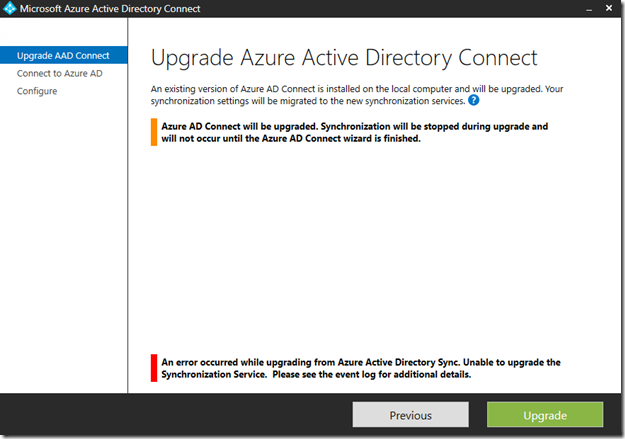
When starting the upgrade process I noticed that a message was displayed that a “Group with name ADSyncAdmins was not found in the Machine context”. When I clicked to Upgrade anyway, an error message was displayed that it was “Unable to upgrade the Synchronization Service”:

image

Looking into the event log, I found this error:

Product: Microsoft Azure AD Connect synchronization services — Error 25037.The groups entered do not all exist or cannot be found. Verify that each group name is correct, and then try again.

image

Since this was a Domain Controller, and there is no Local Users and Groups, I created the ADSyncAdmins group in Active Directory, as a Domain Local Security group. Trying the upgrade again, I got a new group that was missing:

image

So I ended up creating these 4 groups that was missing:

  • ADSyncAdmins
  • ADSyncBrowse
  • ADSyncOperators
  • ADSyncPasswordSet

After that I was able to successfully finish the upgrade of Azure AD Connect.

Awarded MVP Enterprise Mobility! Introducing myself to the community.

On Friday April 1th I got one of the best e-mails in my professional IT career so far, Awarded MVP for Enterprise Mobility for 2016!

image

This is my first MVP Award, and I’m incredibly proud and honored to be part of such as amazing community and network of professionals.

I thought this was a good opportunity to introduce myself to the community, so in this blog post I will write a little more about myself and what I do.

Some personal info

I’m from Norway, a town called Sarpsborg some 100 kilometers south of Oslo. I work as a Architect for Cloud and Datacenter solutions at Skill AS, a Microsoft Partner with offices in both Oslo and Sarpsborg. My company has received numerous partner prizes and finalist awards over the last years, embracing the Cloud and Microsoft especially.

I’m born in 1971, at an age where I’m old enough to know how and when to use my experience when I need to, and young enough to eagerly learn new stuff and use technology to solve challenges and use solutions creatively. When I’m not working I spend time with my family, I’m married and have two boys at the age of 10 and 12. Its all about football (soccer) in the spare time, and at least 3 of us are huge Arsenal fans. You can guess who 😉 We also spend a lot of time in our cabin in the mountains, where we ski (cross country) a lot. This is where we recharge our batteries, a very needed window of family quality time in a mostly hectic work and activity filled weeks.

Work and career

I’ve been in the IT industry for over 20 years now. When I started I did IT support on IBM OS/2 machines, my first internet e-mail experience was using 3270 terminals and if I remember correctly something called Office Vision. I wrote documents using Lotus Ami Pro, Later I achieved my first Microsoft MCP certifications on Windows 95 and Word 6.0. From there on it has been mainly Microsoft products and solutions for me!

A large part of my first career I spent at a private educational institution, and was an instructor for Microsoft Official Curriculum courses. I kept my Microsoft Certified Trainer certification from 1997-2012. I have spent thousands of hours teaching students and business IT pros on MCSE certifications for NT 4.0, Windows 2000, 2003 and beyond. For a few years I was even a Citrix Certified Instructor. While working as an instructor I started to get more in to consulting as well, working at customer sites and presenting company seminars.

I remember that I could hold the BackOffice 4.5 CD folder in my hand, and say that I had knowledge of all Microsoft management, productivity and server solutions! Try to say that today 😉 The first “System Center” product I worked on was SMS 2.0, later I started working with Microsoft Operation Manager (MOM) from 2000 and up, I have been working with e-mail and productivity from Microsoft Mail via Exchange 5.0 to todays Exchange Online and Office 365, identity solutions from “User Manager of Domains” to Azure Active Directory. It has really been a great journey, but nothing compares to how rapid Microsoft and Cloud solutions evolve these days,

After leaving the educational institution, I worked for a few years as a consultant and freelance training, before I worked some years at an Application Service Provider. I was working with the Datacenter and Infrastructure, moving into virtualization slowly by using Virtual Server 2005! Exchange 2007 was my first meeting with PowerShell, love at first sight, and offered Hosted Exchange as a Service. If only we had something called Office 365 and Azure Stack etc.. 😉

In 2010 and till today I have been with my current employer, Skill. In these years I have been working more and more with Azure, Office 365, Enterprise Mobility Suite and System Center, while at the same time been working closely with Microsoft, being a P-TSP for Cloud OS and Datacenter management.

Community

Over the last years I have been more and more engaged in the community of IT-professionals, visiting conferences, using social media, blogging and networking with other MVP’s and other community influencers. I have also been a speaker at local events and at conferences like Experts Live, Nordic Infrastructure Conference and will also be speaker at this years System Center Universe in Berlin, August.

It is with huge pride my contributions has led me to receiving the MVP award, and I can only look forward to contributing more in the years to come. While Enterprise Mobility and especially Azure AD is an area I focus greatly on, I will also continue to contribute in areas related to Azure, Cloud and Datacenter Management (CDM) with OMS, Service Manager, Operations Manager and more as these are solutions I work a lot with in my daily work as well. I will especially look for contributions where EMS, CDM and Azure can work together and play to each others strengths 🙂

Thanks for reading, looking forward to engage with you all. In addition to this blog, you can follow me at social media using:

Twitter: @skillriver

LinkedIn: linkedin.com/in/jvelven

Session Recap – Nordic Infrastructure Conference (NIC) 2016 – Publishing Azure AD Applications

This week I had the pleasure of not only revisiting Nordic Infrastructure Conference (www.nicconf.com), but also presenting a session myself: Deep Dive – Publishing Applications with Azure AD. My session was about how you with Azure AD can publish applications from a SaaS Gallery, your organization’s own applications, or internal applications that will be accessible outside with Azure AD Application Proxy.

This was the 5th anniversary of NIC, held in Oslo, Norway and the venue of Oslo Spektrum. NIC has been established as a premium event for IT-professionals, attracting internationally renowned speakers and MVPs, SMEs and Partners.

In this blog post I will do a recap of my session, for both attendees that was there and others that couldn’t be. I will also expand on some of the things we went through in the session as there were some limits to the time we could use on several demos.
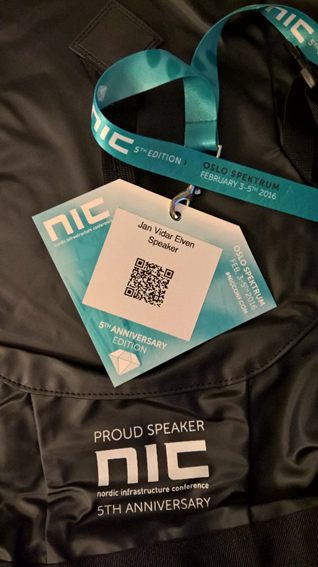
Proud Speaker

The presentation and session recording will later be available at the www.nicconf.com webpage. At the end of this blog post, there is also a link to where you can download the presentation and other code samples and files that where used in the session.

Session Menu

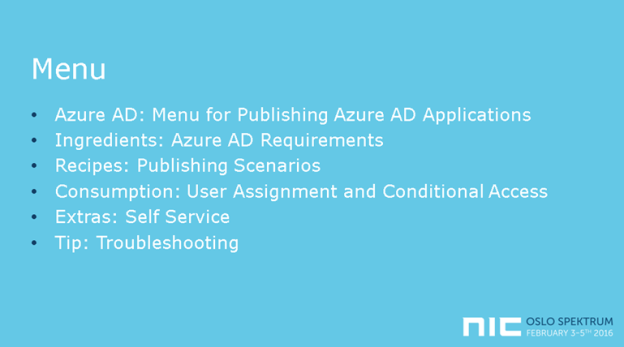
The theme for the presentation was to present a menu for publishing Azure AD Applications with Azure AD. The menu would consist of required ingredients, recipes for publishing scenarios, consumption of the published applications from the users’ perspective, and some extras and tip for self-servicing and troubleshooting.
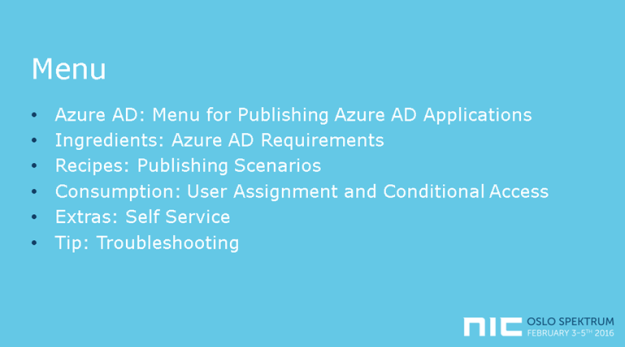
I started with pointing to the key features of Azure AD as an Identity and Access Management Solution, for both Cloud and On-Premise Solutions, an enabler for true Enterprise Mobility and Business Everywhere, with one common, hybrid identity. There are some important Business Value for Organizations such as controlling access to applications, single sign-on, conditional access, hybrid identity and self-servicing.

Ingredients

It is no surprise that you need Azure AD as a key ingredient 😉 But what edition of Azure AD should you use? Free, Basic or Premium? In the session I covered the most important differences relevant for Publishing Applications, where you would need at least Basic to be able to publish internal applications with Azure AD App Proxy, and Premium Edition if you want to cover all the self-servicing scenarios and advanced reporting. For all details, refer to https://azure.microsoft.com/en-us/documentation/articles/active-directory-editions/.

In addition to the application you want to publish, you will need an Azure AD identity, either a cloud based identity or a hybrid identity synchronized with Azure AD Connect.

In the first demo of the session we looked into configuring and verifying that your Azure AD tenant is ready for publishing applications.

Recipes

The publishing scenarios we looked at in the session was from the following menu of three alternatives in Azure AD:
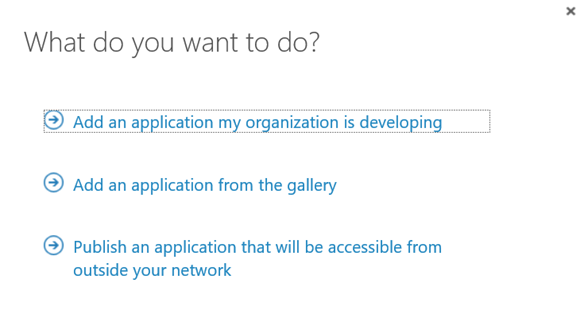
Add an application from the gallery

The first publishing scenario we looked at in the session was publishing applications from the SaaS gallery of applications. The gallery contains over 2500 different SaaS applications, many offering both true Single Sign-On (SSO) with Azure AD and provisioning/de-provisioning of users and groups. Other applications provide password-based same sign-on.
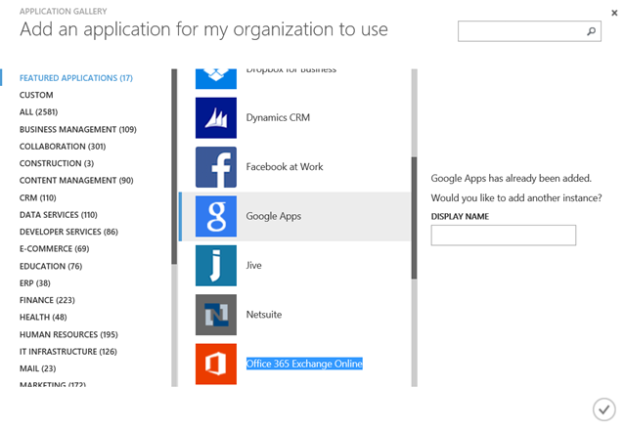
The demos in the session used two different SaaS apps as example; Twitter and Google Apps.

Twitter is a good example of a SaaS application using password same sign on.
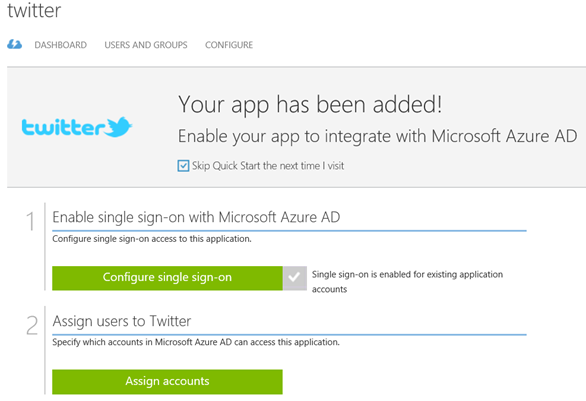
When configuring single sign-on for Twitter, we don’t have the option of using Azure AD Single Sign-On. Some applications can maybe support one of the federation protocols implemented in a local ADFS or a third-party provider, but that is dependent on the application. So for Twitter we will typically use Password Single Sign-On.
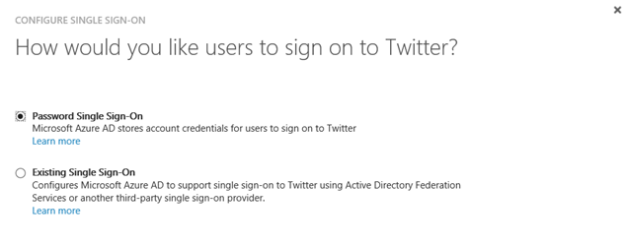
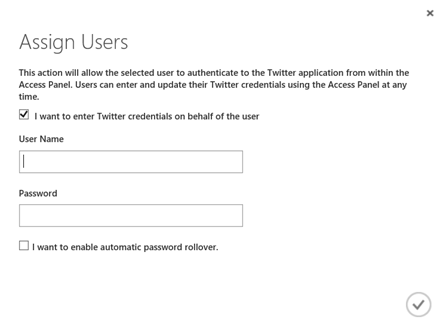
After configuring Password Single Sign-On, the next step is to assign account to the application. When assigning accounts, you can select that the users enter passwords themselves in the Access Panel. Or you can enter the credentials on behalf of the user.

This opens up a very interesting scenario: Consider you have a company based social media account on Twitter, Facebook, Instagram or other. All the users in the marketing department should have access to that/those application/applications, so you start handing out the username and password to the shared account. This is a risk, as users can lose the password and it can get on wrong hands, or maybe previous employees that are no longer in the company still have the username and password to the application.

With Azure AD, by entering the Twitter credentials on behalf of the user, they are never given the logon details directly. And when they leave the organization after removing the user from Azure AD, they will no longer have access. You can even apply conditional access policies for the application.
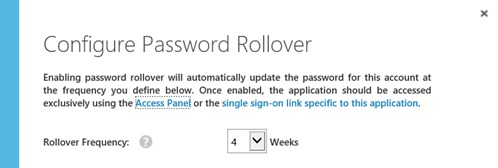
You can even configure automatic password rollover to update the password at a defined frequency:
The other part of the demo focused on Google Apps. I had an existing subscription for Google Apps, which I configured to use Azure AD Single Sign-On and account provisioning for.
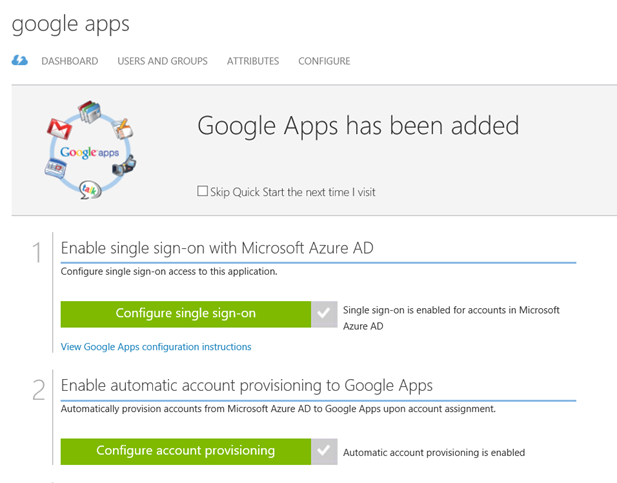
There is a complete tutorial for configuring SSO and provisioning for Google Apps at https://azure.microsoft.com/en-us/documentation/articles/active-directory-saas-google-apps-tutorial/.

In the demo I created a test user named [email protected], and assigned that user to the Google Apps application.

I showed that the user didn’t exist in the Google Apps user directory for my organization, and after a while (new user accounts are provisioned ca every 10 minutes), the user appeared in the Google Apps directory via Azure AD.
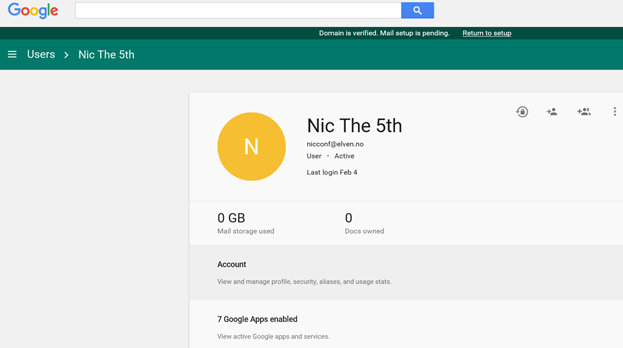
The new user can now use Azure AD SSO when logging into Google:
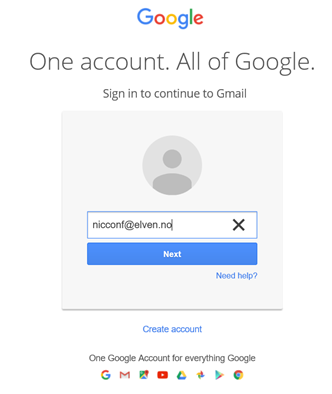
I’m redirected to my Azure AD tenant for signin in:

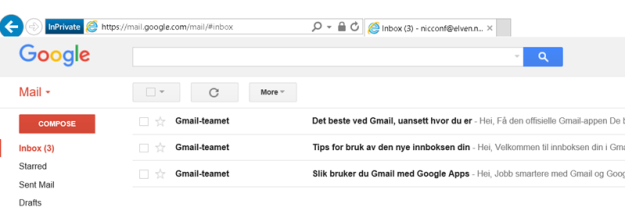
And then the user is logged in to Google:
Add an application my organization is developing

The next part of the publishing scenarios was adding applications that my organization is developing. Most times these applications will be Web Applications or Web API, but it’s possible to publish native client applications also.
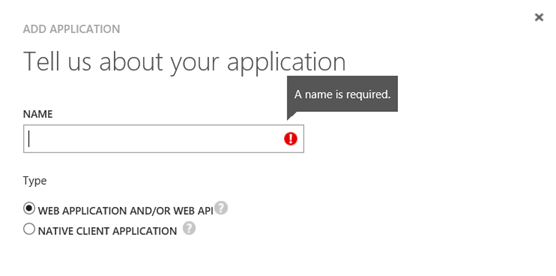
When creating a web application you give it a name, and a sign-on url and unique app id uri:
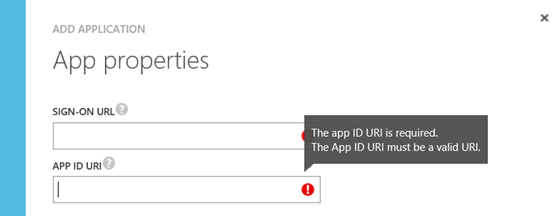
Keep in mind that creating a web application here only does the publishing part of it, you still would need to create the actual application somewhere, for example as an App Service in an Azure Subcstiption.

You can have the web applications do their own authentication, for example integrating with on-premise Active Directory Federation Services, or you can have the application use Azure Active Directory as SSO provider.

In the session demo we looked at how we could quickly create a Web Application, integrate it with Azure AD for authentication and publish it. These are the main steps:

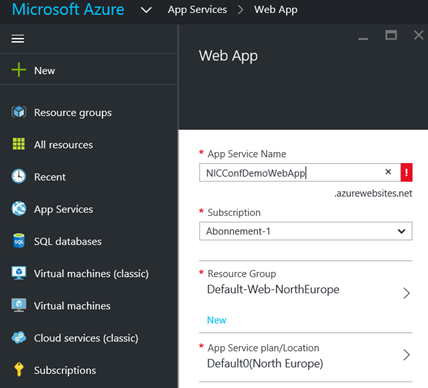
  1. Create a new Web App in you Azure Subscription. In the new Azure Portal for your subscription, under App Services create a new Web App. The Service Name must be unique, and you select either an existing resource group or create a new, and specify an App Service plan.
  2. After the Web App is created, open the application properties and under Settings find Features and Authentication / Authorization:
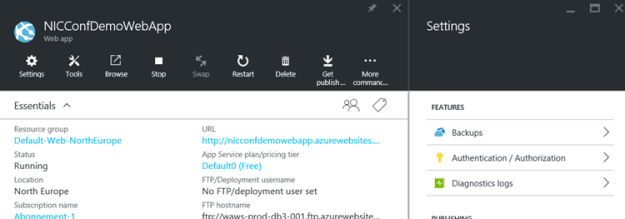
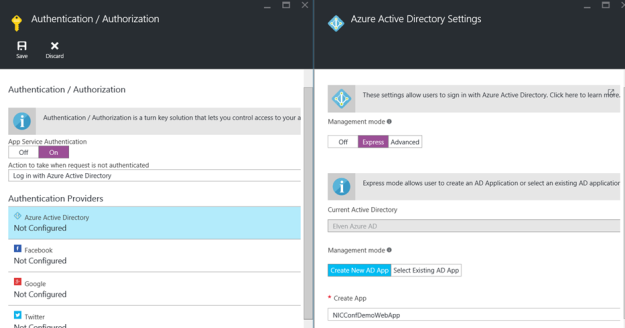
  3. Enable App Service Authentication and log in action. Enable Azure Active Directory as authentication provider and configure Express settings. PS! Here we can create and publish a new AD App (or select an existing one) also. We created a new one for our demo:
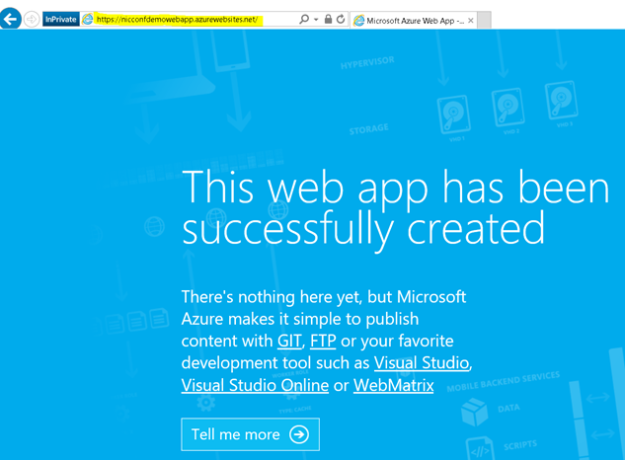
  4. Remember to save the Web App and the first part of the demo is done. A this point you can go to http://nicconfdemowebapp.azurewebsites.net, and be prompted to sign in with a Azure AD account from the directory the application was configured for. There is no content in the application, and every user in the Azure AD directory can access the application as long as they authenticate:
  5. The next part of this demo was to change some configuration settings for the published web application which is now published to Azure AD:
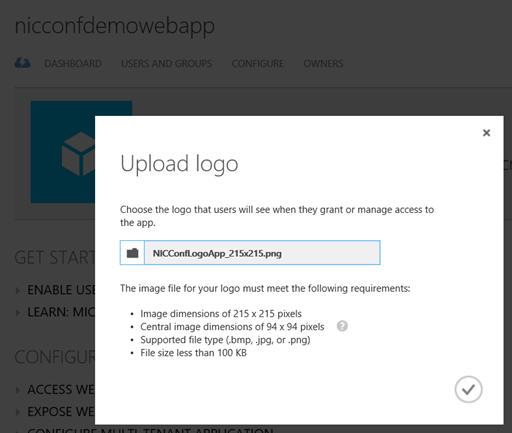
  6. I want to upload a custom logo, and configure the application so that only assigned users/groups can access it. First upload a logo:
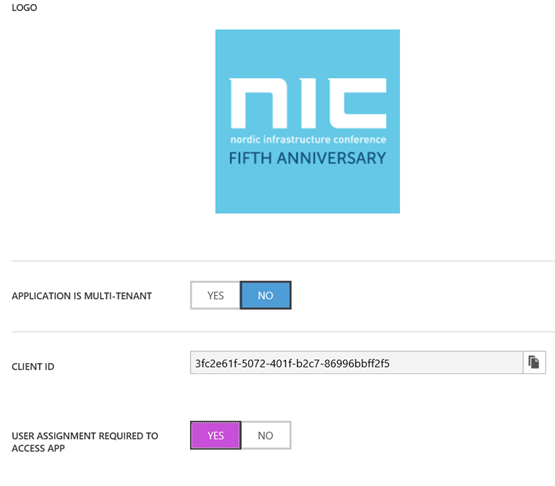
  7. Then at the Configure page, I select that user assignment is required to access the App:
  8. Then after saving, I go to the Users and Groups page, and select to assign the users I want:
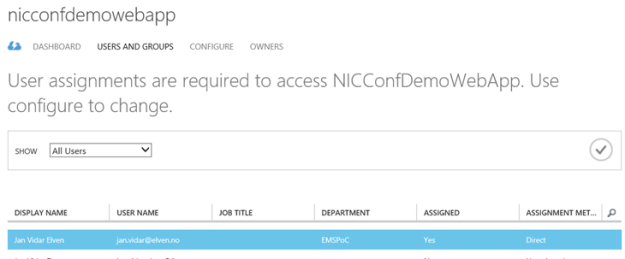
    If you assign individual users the assignment method will be Direct, if you assign Groups the members will assigned by inheritance.

  9. Now, if I start a new session to the Web App and log in with a user that has not been assigned, I will get this message:
  10. The final steps of this demo showed how you can create some content in that Web App via Visual Studio. There are several development tools you can use, I have been using Visual Studio 2015, and you can download a Community Edition that is free if you don’t have a license. In my example I created a VB.NET Web App Project, and by using a Publish Profile file and some custom code I was able to show the logged in users claim properties.You can even create App Services directly from Visual Studio, and create and publish Azure AD Web Apps from there. But if you download this file from the Web App:


    And import it to the Visual Studio project, you can publish your changes directly.

  11. This is the result for the demo web application, the code is included at the end of this blog post:
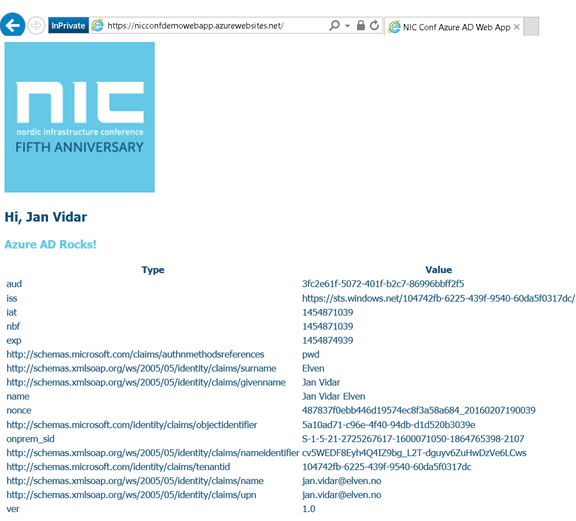
Publish an application that will be accessible from outside your network

The third scenario for publishing applications with Azure AD is the applications you want to be available from outside your network. These applications are internal web applications like SharePoint, Exchange Outlook Web Access or other internal web sites, you can even publish Remote Desktops and Network Device Enrollment Services (NDES) with Azure AD Application Proxy.

Azure AD App Proxy uses Connector Servers and Connector Groups inside the on premise infrastructure that must be able to connect to the internal URLs. These Connector Servers also can perform Kerberos Constrained Delegation for Windows Authentication, so that you can use Azure AD Single Sign-On to those internal applications.

A sample diagram showing the communication flow is shown below:

In the demo we looked at how you could install and configure a Connector installation, and organize Connector Servers in Groups for the applications to use. Here are some of the steps required:

  1. First the setting for enabling Application Proxy Services for the Azure AD Directory must be enabled, and Connectors downloaded for installation.
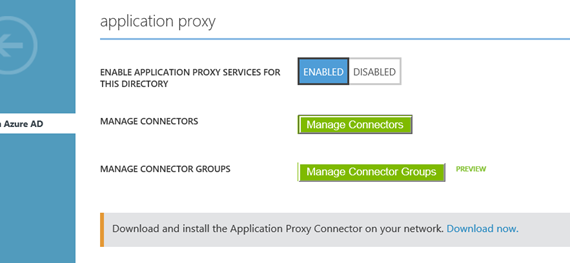
  2. You create and manage connector groups:
  3. And organize the installed connectors in those groups:
  4. When these requirements are in place you can start publishing your internal web applications.

For each internal published web application, you can configure authentication method, custom domain names, conditional access and self-servicing options. For details on how to do these different configurations, see previous blog posts I have published on this subject:

Consumption, Self Service and Troubleshooting

The last part of the session focused on the user experience for accessing the different published Azure AD applications.

User can access Azure AD published applications via:

  • Access Panel, https://myapps.microsoft.com
  • My Apps (iOS, Google Play)
  • App Launcher in Office 365
  • Managed Browser App with My Apps
  • Directly to URL

The Access Panel is a web-based portal that allows an end user with an organizational account in Azure AD to view and launch applications to which they have been assigned access. The Edge browser in Windows 10 is not fully supported yet, so you need to use either Internet Explorer, Chrome or Firefox for all supported scenarios. In addition, an Access Panel Extension needs to be installed for accessing Password SSO Applications.

The Access Panel is also where users can view account details, change or reset password, edit multi-factor authentication settings and preferences, and if you are using Azure AD Premium self-manage Groups.

The Access Panel via Internet Explorer:
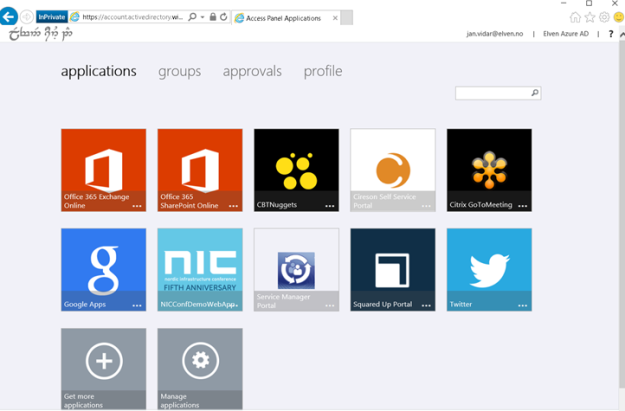
The Access Panel via My Apps and Managed Browser Apps:
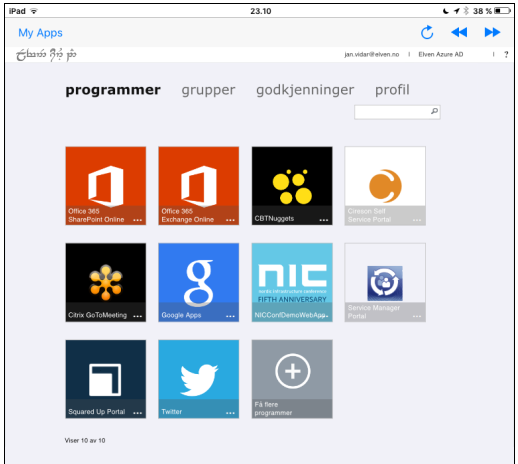
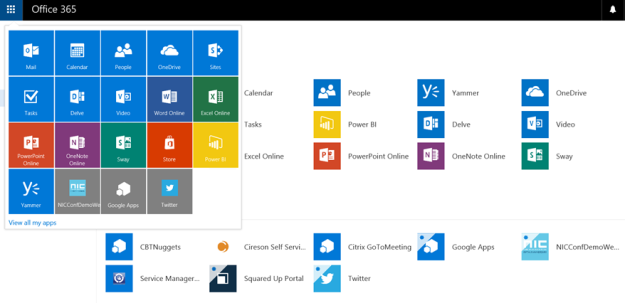
If the user is licensed for Office 365, the published applications are available via the App Launcher and URL https://portal.office.com/myapps:
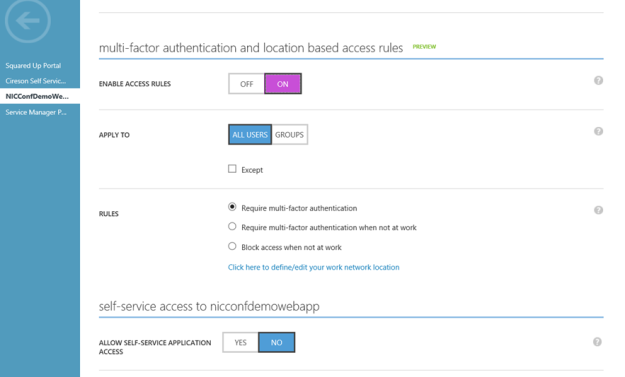
Conditional Access, which is an Azure AD Premium licensed feature, can be configured for each published Azure AD Application. These settings consist of enabling Access Rules for All Users or selected Groups, and optionally with exceptions to those users/groups. The access rules settings are requiring multi-factor authentication, require MFA when not at work, or block access when not at work. For the location based rules to work there must be configured IP addresses/subnets for the company’s known IP address ranges.
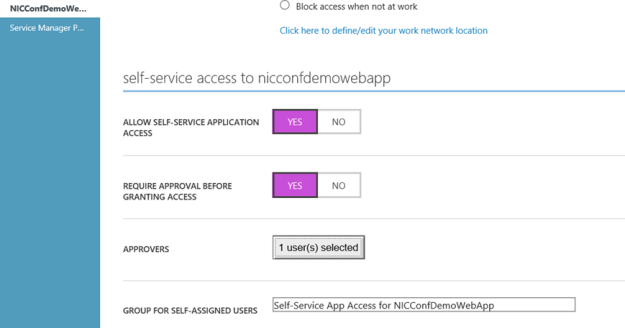
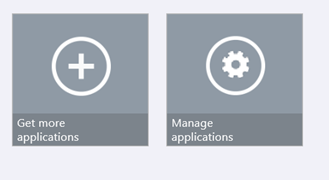
Instead of Assigning Users and Groups you could also let users manage self-service access to the published applications. When configured a group will be automatically created that application, and optionally you could configure 1 or more Approvers:
The end user will access this self-servicing via the Access Panel:
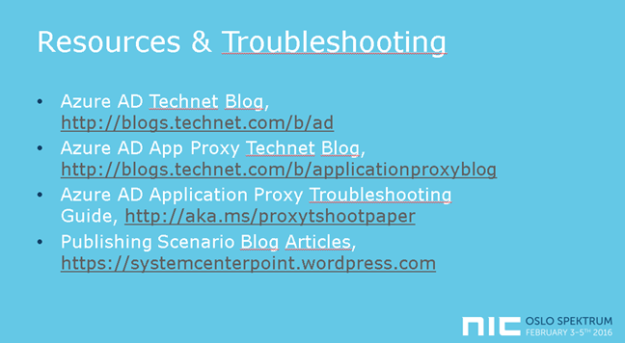
The session was wrapped up with some links to troubleshooting and more resources:
Presentation and files downloads

The presentation and files used in the demos can be downloaded from this link: http://1drv.ms/1Q429rh

Thank you for attending my session and/or reading this recap!
How to enable Conditional Access for Azure RemoteApp Programs

Last week I published a blog article on how to publish the System Center Service Manager and Operations Manager Consoles as Azure RemoteApp Programs. (See https://systemcenterpoint.wordpress.com/2016/02/02/publish-operations-and-service-manager-consoles-as-azure-remoteapp-programs/)

One great feature if you are using Azure AD Premium is that you can enable Conditional Access for your Azure RemoteApp Programs. Conditional Access will enable your organization to require Multi-Factor Authentication or required that the programs only can be accessed when at work. In this blog post I will show how this can be configured.

Requirements for Conditional Access for Azure RemoteApp Programs

The following requirements must be met to enable Conditional Access for Azure RemoteApp Programs:

  • Conditional Access are an Azure AD Premium feature, so your organization must be licensed for that
  • You must have created at least one Azure RemoteApp Collection
  • At least one user/group must be assigned to a Program in the Azure RemoteApp Collection

If all these requirements are met, you will see this “Microsoft Azure RemoteApp” Application in your Azure AD:

Configuring Conditional Access for Microsoft Azure RemoteApp

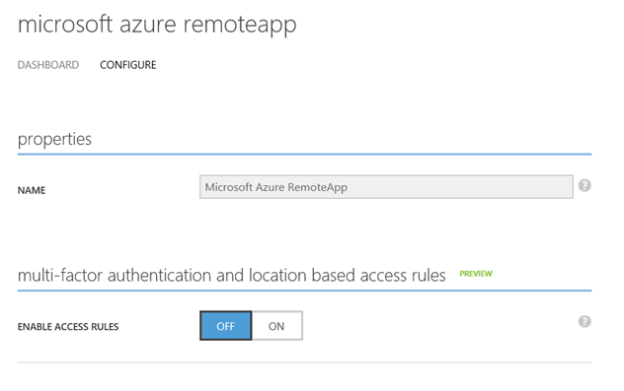
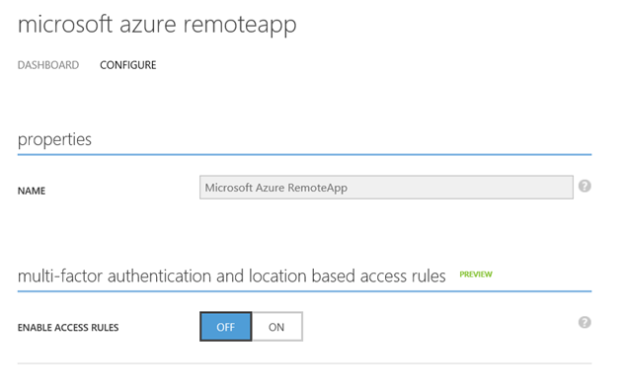
Select the Microsoft Azure RemoteApp Application and go to the Configure tab:

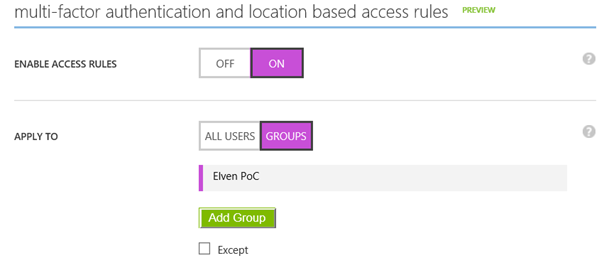
When enabling Access Rules, you can select to enable it for All Users, or for selected Groups. Both options can have exceptions for groups that you don’t want to have Access Rules:

For the Rules you have 3 options for Conditional Access:

You can require Multi-Factor Authentication for the groups/users you selected above, every time they launch a RemoteApp Program Session. I

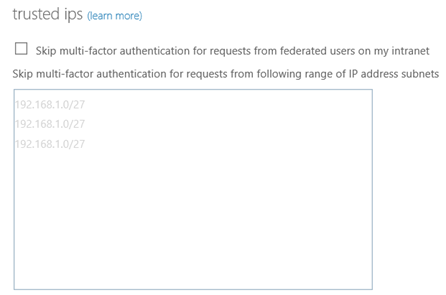
Another scenario, if you define your work network locations, you can require MFA when not at work, or block the application completely.

To configure trusted IPs, click on the link to get to the MFA Service Settings:

User Experience for Azure RemoteApp Conditional Access

So, how does this look for the user when accessing Azure RemoteApp Programs?

Require Multi-Factor Authentication

I launch my selected Azure RemoteApp Client, and clicking on a RemoteApp Program:

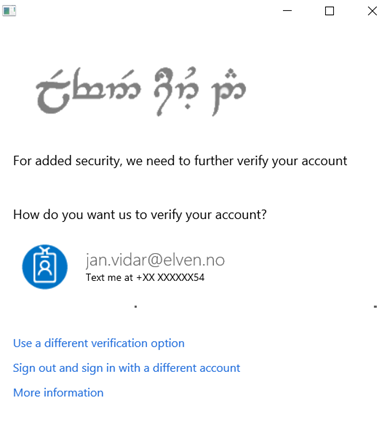
When launching the program, I’m prompted for MFA as expected:

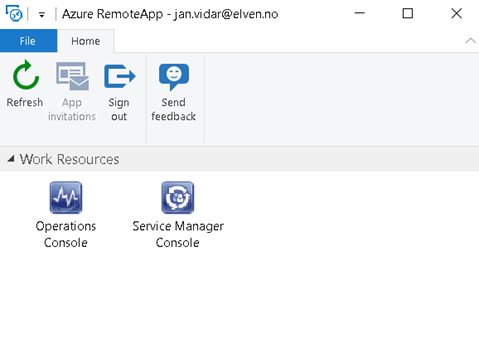
If I sign in with the Azure RemoteApp HTML5 Preview client, https://www.remoteapp.windowsazure.com/web, the Multi-Factor Authentication will be performed before you see your Work Resources.

Block access when not at work

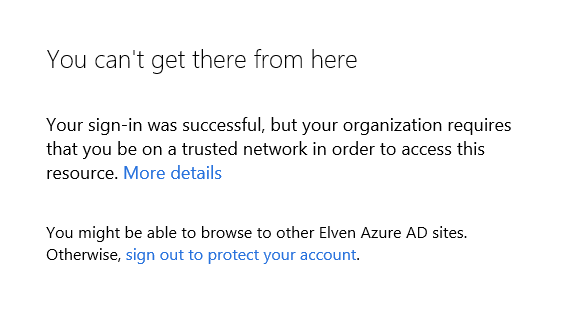
If I selected the Access Rule for Blocking Access when not at work, I will get this message if I’m not on a trusted network:

Conclusion

Meeting the requirements, we can verify that Conditional Access can be enabled for selected groups of users, and it will apply to all the Azure RemoteApp Programs you have published. Note that you cannot enable this specifically for selected Azure RemoteApp Programs, it will be for all the RemoteApp Programs or none.

Publish Operations and Service Manager Consoles as Azure RemoteApp Programs

This blog post will show how you can publish System Center 2012 R2 Management Consoles like the Operations Console and Service Console as Azure Remote Apps.

I already have an environment in Azure that runs Service Manager and Operations Manager 2012 R2. Now I want remote clients and platforms to be able to run these consoles as remote apps.

When planning, I decided to use a Hybrid Collection, and the overall steps was (as documented in https://azure.microsoft.com/en-us/documentation/articles/remoteapp-create-hybrid-deployment/):

  1. Decide what image to use for your collection. You can create a custom image or use one of the Microsoft images included with your subscription.
  2. Set up your virtual network.
  3. Create a collection.
  4. Join your collection to your local domain.
  5. Add a template image to your collection.
  6. Configure directory synchronization. Azure RemoteApp requires that you integrate with Azure Active Directory by either 1) configuring Azure Active Directory Sync with the Password Sync option, or 2) configuring Azure Active Directory Sync without the Password Sync option but using a domain that is federated to AD FS. Check out the configuration info for Active Directory with RemoteApp.
  7. Publish RemoteApp apps.
  8. Configure user access.

Azure Remote App can only be configured in the classic Azure Management Portal (manage.windowsazure.com), it’s on the roadmap for support in the new portal.azure.com and with Azure Resource Manager.

Step 1 – Create Custom Image for Installing Service Manager and Operations Consoles

There are several options available for creating a custom image. As my System Center environment already was set up in Azure, it made sense to create and use an image on an Azure VM, https://azure.microsoft.com/en-us/documentation/articles/remoteapp-image-on-azurevm/.

Create Azure VM for Image

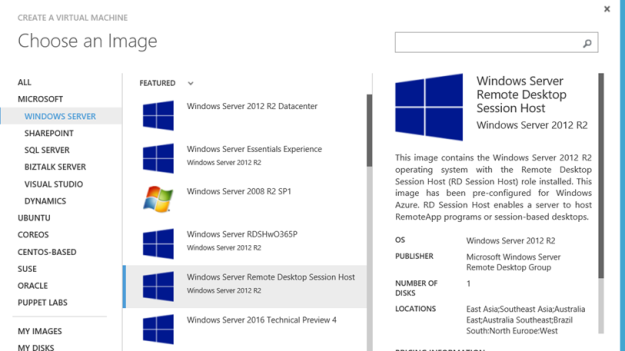
First I created a VM based on template for Remote Desktop Session Host:

The VM template must be configured to run on a VNet that can contact the Domain Controller for the Domain that the System Center Servers are joined to.

After the VM was provisioned, I joined it to my AD Domain and rebooted.

After that I was ready to install and configure the Service Manager and Operations Consoles with all requirements on the image. I also added the most recent Update Rollups for System Center 2012 R2 Consoles (that already are updated on the System Center Servers of course).

A this point I tested the Service Manager and Operations Consoles, and was successful in connecting the Management Servers.

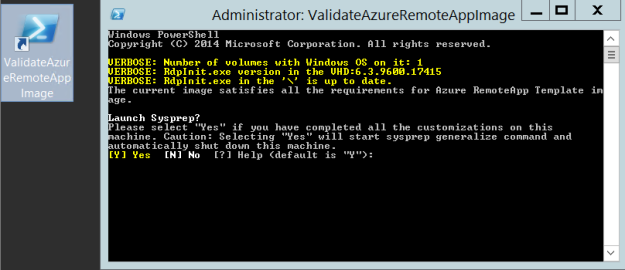
Finally, the Azure VM needed to be Sysprepped. The desktop contains a validation script, it will validate the image for Azure RemoteApp requirements, and ask to launch Sysprep:

Then:

After running Sysprep the VM shuts down and we are ready for capturing the virtual machine.

Capture the virtual machine

To capture the image follow the instructions as specified here https://azure.microsoft.com/en-us/documentation/articles/virtual-machines-capture-image-windows-server/.

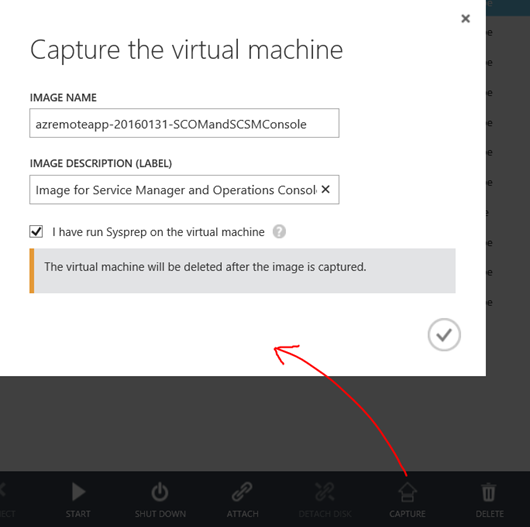
I give the virtual machine an image name and description, and confirm that I have run Sysprep. Note that the VM will be deleted after the image is captured:

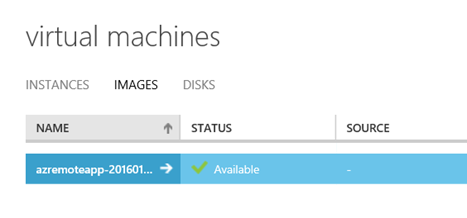
When finished, the captured image is deleted from the virtual machines instances, and available under images:

At this point I have a ready image to use. I can create new VM’s based on this image if I want, or I can use it as a RemoteApp image, which I will return to later. Now I’m ready for the next step.

Step 2 – Set up virtual network

Most will already have this in place if you have an existing Azure Subscription with Azure VMs. The requirement is that the Azure RemoteApp collection and image must be able to connect to the existing infrastructure. In this scenario where I want to use Service Manager and Operations Manager Consoles as Azure RemoteApp, I would need to be able to reach the Management Servers. Basically there are 3 scenarios:

  1. The Management Servers and the RemoteApp programs are on the same Azure Virtual Network.
  2. The Management Servers are on on-premise infrastructure, and the Virtual Network must be configured with a VPN to the on-premise infrastructure.
  3. The Management Servers are on another Virtual Network, and these two Virtual Networks must be connected to each other via Azure Site-to-Site VPN.
    1. A variant on the third scenario, where the Management Servers are created in a Resouce Group in ARM (Azure Resource Manager).

And of course, my scenario was the last one, as I have created my System Center 2012 R2 environment in a Resource Group using Azure Resource Manager J.

Since I cannot configure and deploy Azure RemoteApp in ARM, I needed to create a Site-to-Site VPN between my Azure Service Management environment (ASM) and ARM environment.

There are some good guidance on how to do that in this article: https://azure.microsoft.com/en-us/documentation/articles/virtual-networks-arm-asm-s2s/.

Since I already had VNets and VM’s in place I had to tweak a little in the guide, but I was able to make it work successfully. I will not get into details on that here, as I will focus on Azure RemoteApp, but that might be stuff for another blog post later :).

PS! Make sure that the Virtual Network has at least one DNS server to provide name resolution!
Step 3 – Create a collection

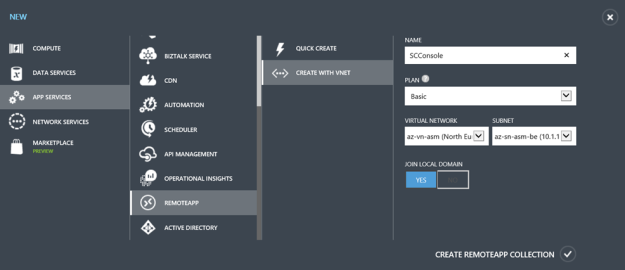
At this stage I was ready to create a RemoteApp Collection. I have signed up for a trial as notified in the image below, and selected to create a RemoteApp Collection with a Basic Plan. I specified my Virtual Network and Subnet that has connection to the ARM environment, and select to Join Local Domain.

After creating the RemoteApp Collection, I get a status of Input Required:

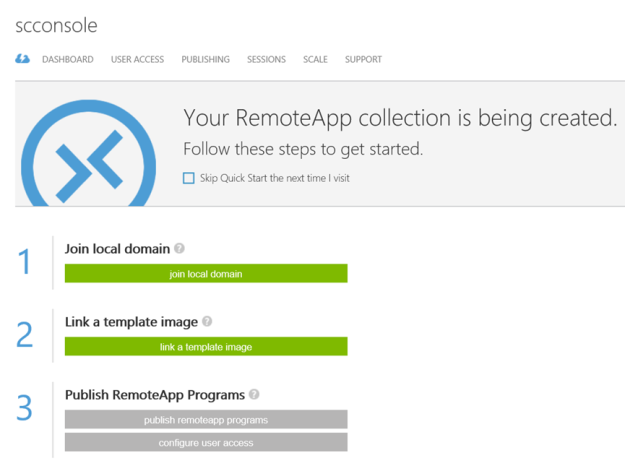
At the Quick Start menu, the steps to follow are highlighted:

Step 4 – Join collection to local domain

The next step is to join the local domain.

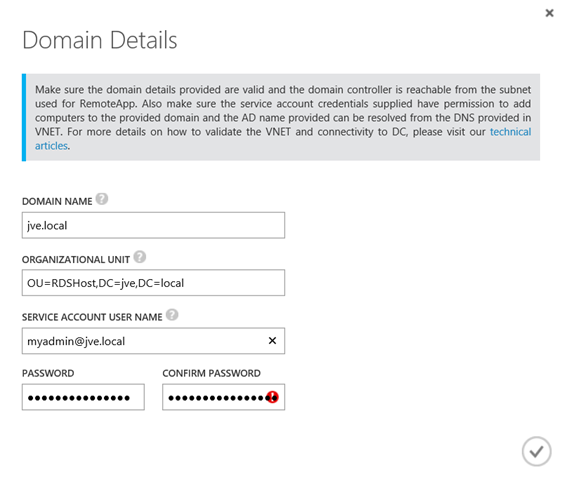
I specify my Active Directory Domain information, optionally specifying a OU for the RDS hosts that will provide the service. I also need a service account that has permissions to add computers to the domain.

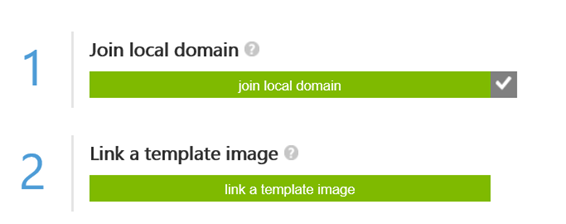
After successfully joining the domain, the first step is acknowledged and I’m ready for the next step:

Step 5 – Add template image to collection

I now need to add the previously created Azure VM image I captured to the RemoteApp Collection.

Import the image into the Azure RemoteApp image library

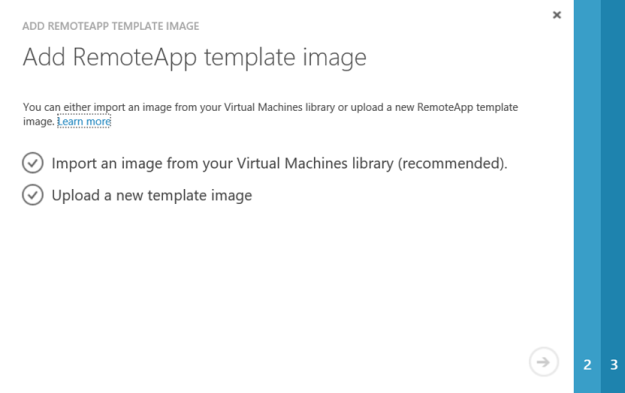
First I add the image to the RemoteApp library:

I select to import from the Virtual Machines library:

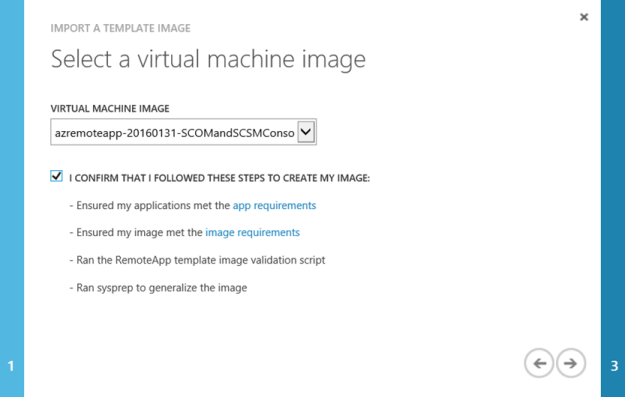
Find my image:

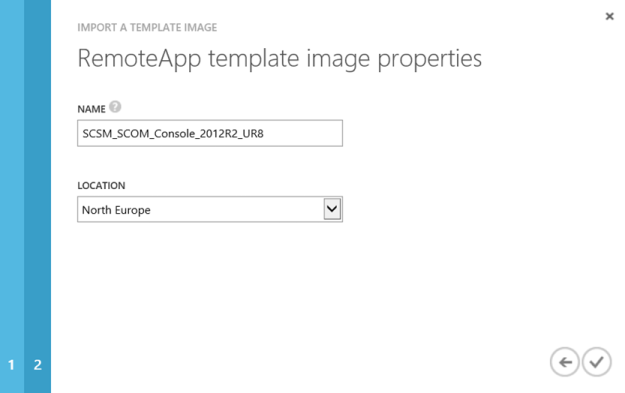
Give it a name for the RemoteApp template and specify a location consistent with my Azure infrastructure:

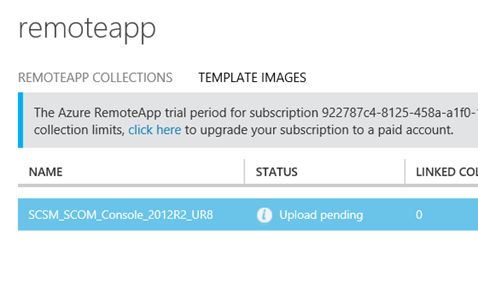
After that the Upload Pending status will be there for a while, about 15-20 minutes in my case:

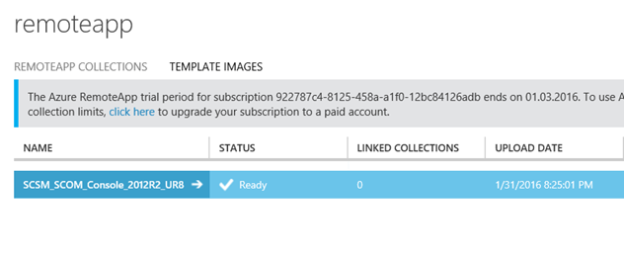
And then the RemoteApp image is ready:

Link collection to existing template image

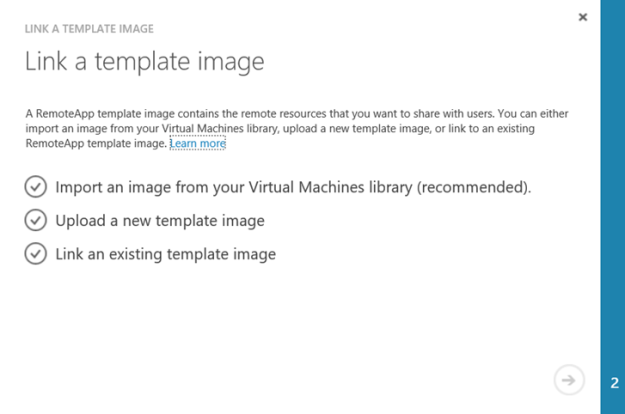
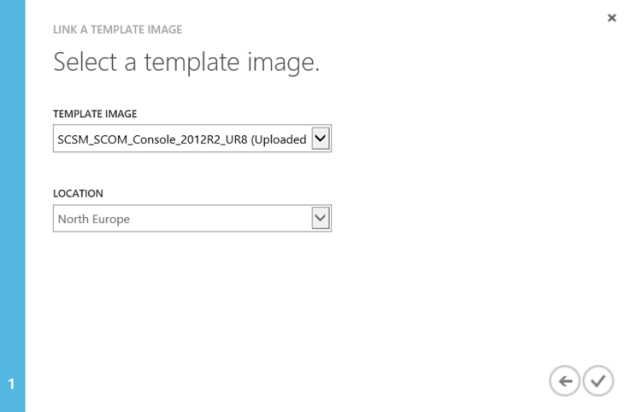
Now I can link the uploaded image to the collection:

Selecting my image template:

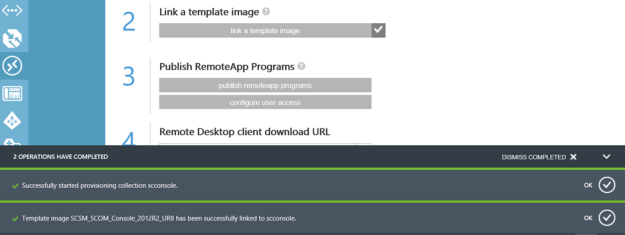
And after that provisioning of the collection with the image starts. This will take a while longer:

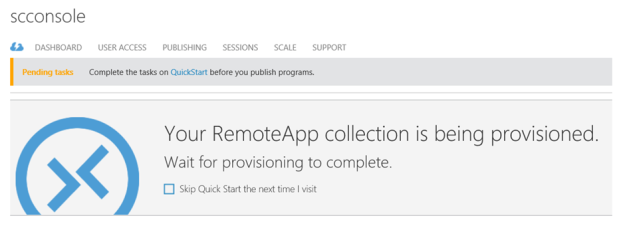
While its being provisioned, I can see that the status is pending, and that the operation can take up to 1 hour:

Provisioning status:

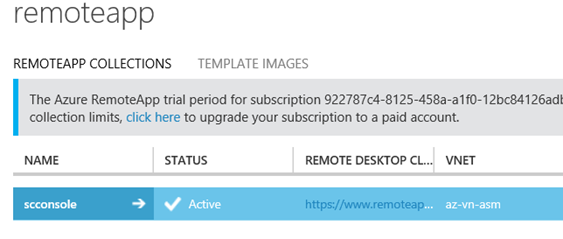
Finally, after provisioning:

Then we are ready for the last final steps before we can start testing!

Step 6 – Configure directory synchronization

Azure RemoteApp requires that you integrate with Azure Active Directory by either 1) configuring Azure Active Directory Sync with the Password Sync option, or 2) configuring Azure Active Directory Sync without the Password Sync option but using a domain that is federated to AD FS.

This is already in place in this environment, so the users I want to configure access for are already in Azure AD.

Step 7 – Publish RemoteApp apps

I can now publish the Remote App Programs from the provisioned image:

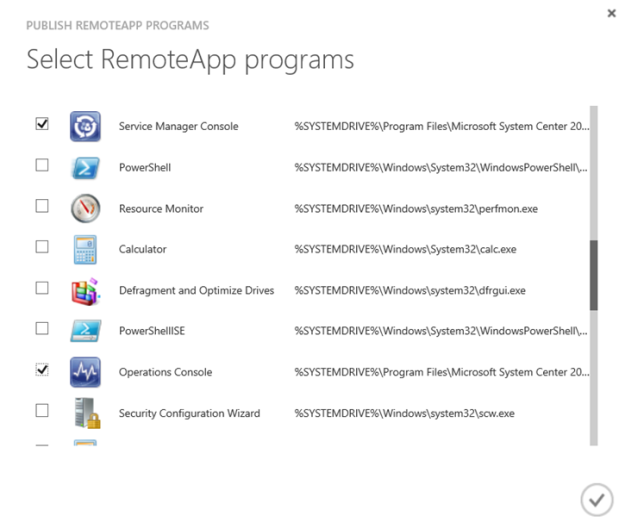
I select the Service Manager Console and Operations Console:

Verify that the RemoteApp programs are published:

Step 8 – Configure user access

Next I need to configure the users that should have access to the RemoteApp Programs:

After that I’m ready for testing!

Testing the RemoteApp Programs

Now I can test the RemoteApp Programs.

HTML5 Remote App Web

First I test with the new HTML5 Remote App Web Client, this is now in Public Preview, and available at the following URL: https://www.remoteapp.windowsazure.com/web.

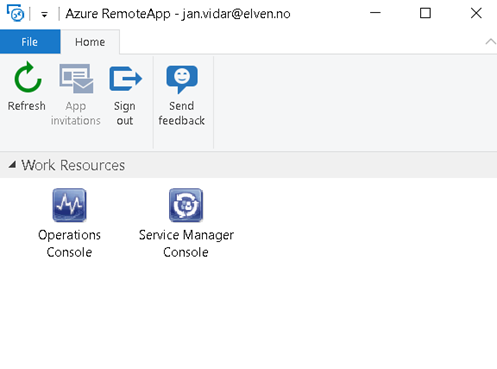
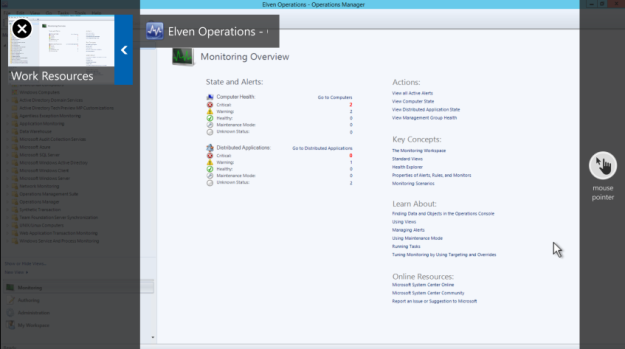
When logging in I’m presented with the following Work Resources:

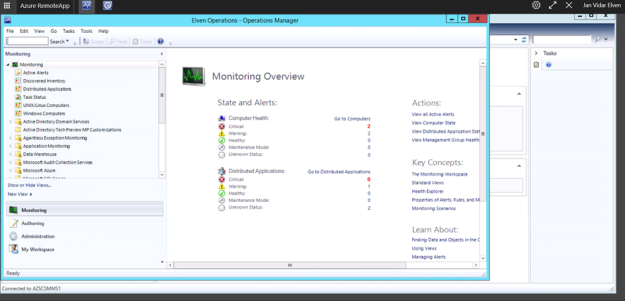
I can successfully launch the Service Manager and Operations Consoles. I can also easily switch between them in the top menu bar:

Azure Remote App Desktop App

Next I test with the downloadable Azure RemoteApp Desktop Application. After signing in I can see my work resources and launch them:

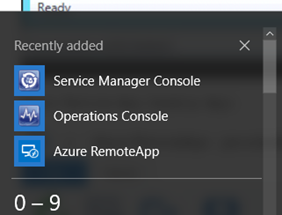
The Azure RemoteApp client also seamlessly integrate the RemoteApp Programs at the Start and All Apps Menu in Windows 10:

Windows 10 Mobile Remote Desktop App

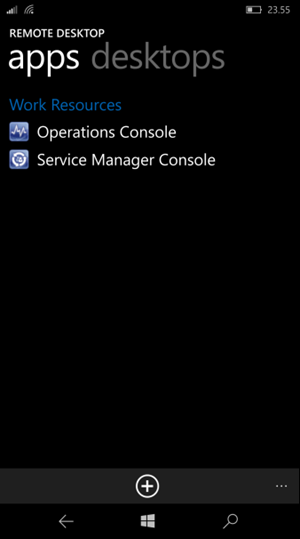
There are Remote Desktop Apps for all mobile platforms (Windows Mobile, iPhone, iOS, Android). Here I have tested the Windows 10 Mobile App:

And I can launch the RemoteApp Program on my phone:

Windows 10 Continuum Support

There is a new Remote Desktop Preview App out for Windows 10 Mobile that support Continuum, but this Preview App does not currently support Azure RemoteApp. That will come later down the line though, and when that comes I will update this blog post or create a related post with my experiences on that!

Conclusion

This was quite fun to work with, and the whole process with the 8 steps above worked like a charm. The most challenging thing was to create the Site-to-Site VPN between my ASM and ARM environment in fact. Outside that I never had any errors or problems.

I’m eagerly awaiting Azure RemoteApp support for Azure Resource Manager though!

Publish Operations Management Suite Portal with Azure AD

To be able to access the Operations Management Suite Portal for your OMS workspace, you will need to have an account with either administrator or user access to the workspace.

This could be a Microsoft Account, or if you have added an Azure Active Directory Organization to your OMS workspace, you can add Azure users or groups to your workspace.

add organization

When users from your Azure AD has been granted either administrator or user access to the OMS workspace, you can notify them that they can log on to the portal.

But, where should they go to log in? The simplest way could be to tell them to go to http://www.microsoft.com/oms, and hit the Sign In link at the top. After signing in they will be instructed to choose the OMS workspace and then be directed to the OMS portal.

Another method is to tell them the workspace url for the portal directly. This would be something like: https://<workspaceid>.portal.mms.microsoft.com/#Workspace/overview/index

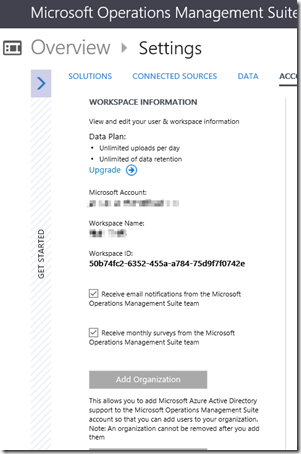
You will find the Workspace ID under Settings, and sometimes you can also use the Workspace Name in the above URL as well.

image

So you can communicate to users in your organization one of the methods above on how to access the portal. Chances are that most users will forget this info after a short while. They will either search after your e-mail, or ask you again at some time.

In this blog post I will show how you can publish the Operations Management Suite Portal as an Azure AD Application, utilizing Single Sign-On, so that users can access it easily with My Apps or the App Launcher in Office 365!

Step 1 – Add Organizational User or Group Accounts to OMS Workspace

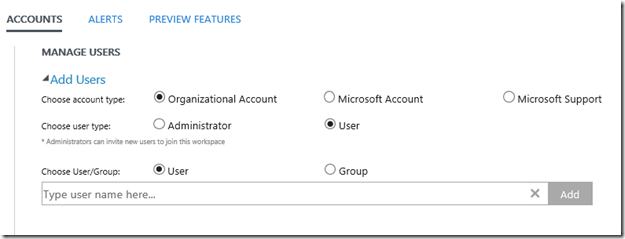
First you will need to add the Azure AD User or Group Account to your OMS Workspace. Select account type Organizational Account, and if they should be users or administrators. In the Choose User/Group type in and search for the users or groups you want to add:

image

Step 2 – Creating the Azure AD Application

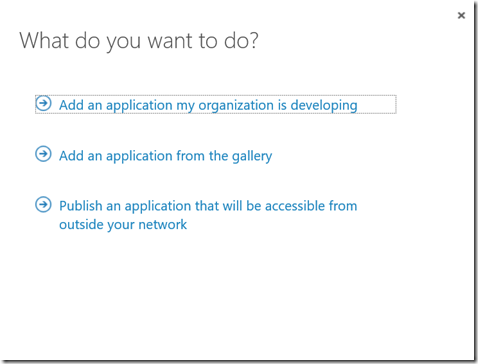
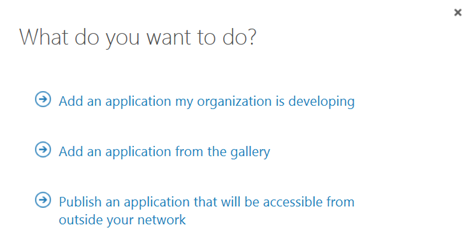
Next, log on as an Azure AD Global Administrator to the classic Azure management portal (manage.windowsazure.com). Under Active Directory, select your Azure AD, and then select Applications. Select Add to start adding a new Application. Select to Add an application my organization is developing:

image

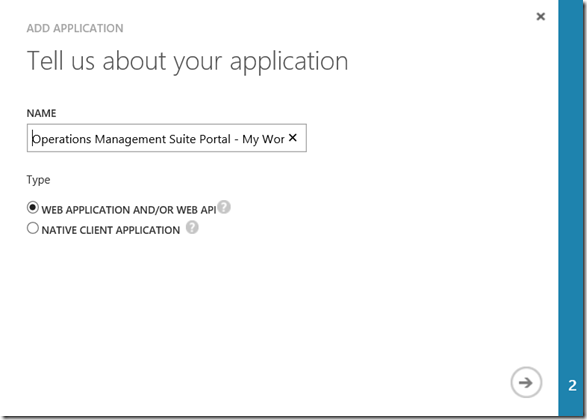
Next, specify a name for the application, and type of web application:

image

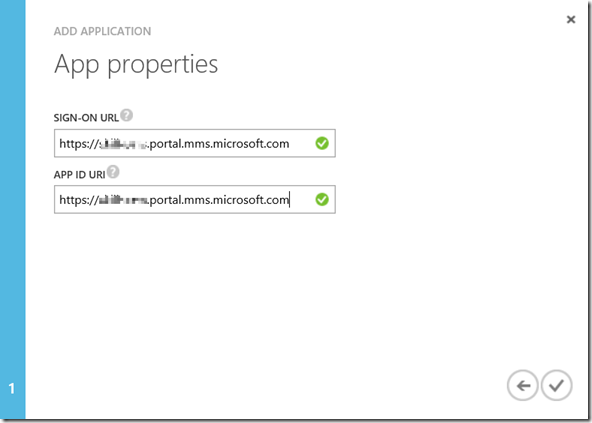
Specify URL for SIGN-ON and APP ID UR. This will be the OMS Portal url. using either workspace name or ID which you have discovered before:

image

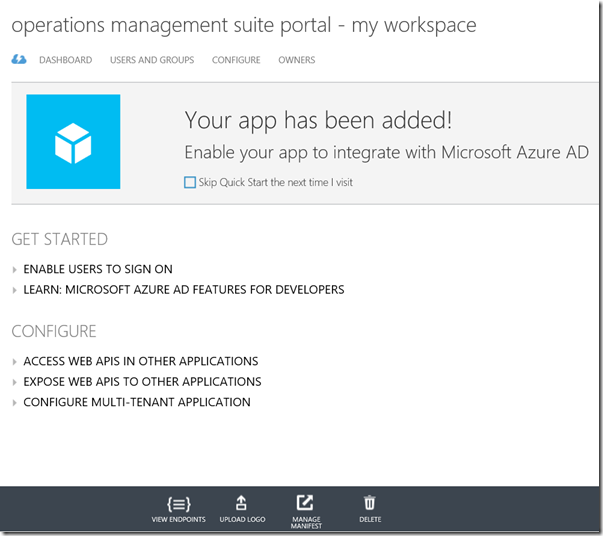
Finishing that and the Application has been added to Azure AD:

image

Step 3 – Adding Users and Groups to the Application

Next I need to add which Users or Groups that will see the published application. At the Users and Groups page for my application, I’m notified that user assignment are not currently required to access Operations Management Suite Portal. That is correct, because users can access the portal directly if they know the URL or sign in at the Microsoft OMS site.

Adding Users or Groups here will enable the application to be visible for the users at the My Apps / App Launcher:

image

I search for and select to Assign the Groups (or Users) I want to have the application visible for.

Step 4 – Logo and optional configuration

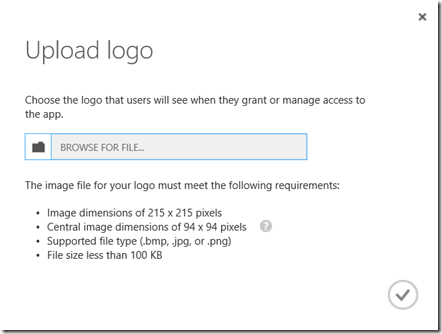
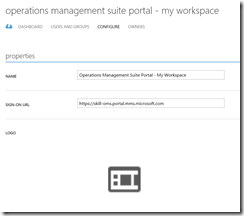
After adding users, the application is ready to test, but first I would want to add my own logo.

image

In this example I’m using a transparent png image with dimensions 215×215, and a central image dimension of 94×94.

image

image

At the Configure page, other settings can be set such as requiring user assignment, access rules with Multi-Factor Authentication and Self-Service access for users that has not been specifically assigned access.

I this scenario I only wanted to get the application published to users, so I will not configure any more settings. We are ready to test.

Part 5 – User Access to the Published Application

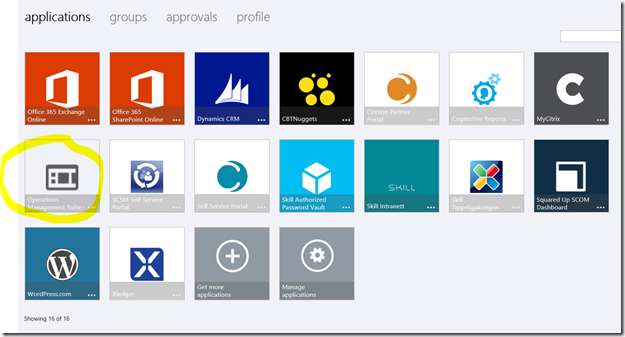
Users can now access My Apps at https://myapps.microsoft.com. When logging in with the Azure AD User a list of published applications will be visible, and I can see the OMS Portal Application:

image

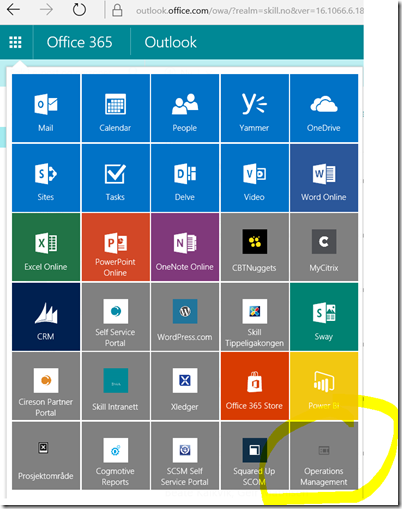
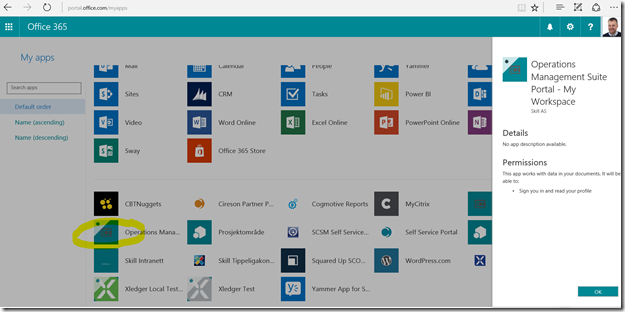
And, logged in to Office 365, I can select the App Launcher and show all my apps at https://portal.office.com/myapps.

image

I can pin the application to the App Launcher if I want for quicker access.

image

So to conclude this blog post, users now have a quickly accessible shortcut to the Operations Management Suite Portal using single sign-on with Azure AD.

Speaking at NIC 2016 #NICConf

I’m very excited to have a session at Nordic Infrastructure Conference, 5th anniversary edition, in Oslo February 4.-5. 2016. In exactly one month from today (with a pre-conference day starting at Feb 3rd) NIC kicks off the fifth version of this premium event for IT professionals!

Aiming for up to 1400 participants, the sessions will be presented in 7 tracks:


For a list of current published sessions, see this link: http://www.nicconf.com/sessions

My session will be a deep dive on publishing applications with Azure AD, http://www.nicconf.com/deep-dive–publishing-applications-with-azure-ad.

The session will cover Azure AD Single Sign-On and Password Single Sign-On, integrating Azure AD SSO with your internally developed applications, and publishing applications with Azure AD App Proxy that either use pre-authentication or pass through. The session will cover how to assign users, configure access control with MFA per-application, use self-servicing and how users can access these applications on different platforms and through which portals.

The session will honor the NIC original concept: Less slides, more demos!

I’m very much looking forward to next month, and hope to see you there!

Read more about NIC here: http://www.nicconf.com.

Publish the Squared Up SCOM Web Dashboard with Azure AD Application Proxy

The Scenario

Squared Up is a Web based Dashboard solution for SCOM environments, and since its built on HTML5 it works on any device or browser as long as you can connect to the Web Server the solution is installed on.

This should be another good scenario for using the Azure AD Application Proxy, as the Squared Up Web Site needs to be installed either on the SCOM Management Server or on a Server that can connect to the Management Server internally.

In this blog article I will describe how to publish the new Squared Up Web Site. This will give me some interesting possibilities for either pass-through or pre-authentication and controlling user access.

There are two authentication scenarios for publishing the Squared Up Web Site with Azure AD App Proxy:

  1. Publish without pre-authentication (pass through). This scenario is best used when Squared Up is running Forms Authentication, so that the user can choose which identity they want to log in with. Forms Authentication is also default mode for Squared Up installations.
  2. Publish with pre-authentication. This scenario will use Azure AD authentication, and is best used when Squared Up Web Site is running Windows Authentication so that we can have single sign-on with the Azure AD identity.

I will go through both authentication scenarios here.

I went through these steps:

Create the Application in Azure AD

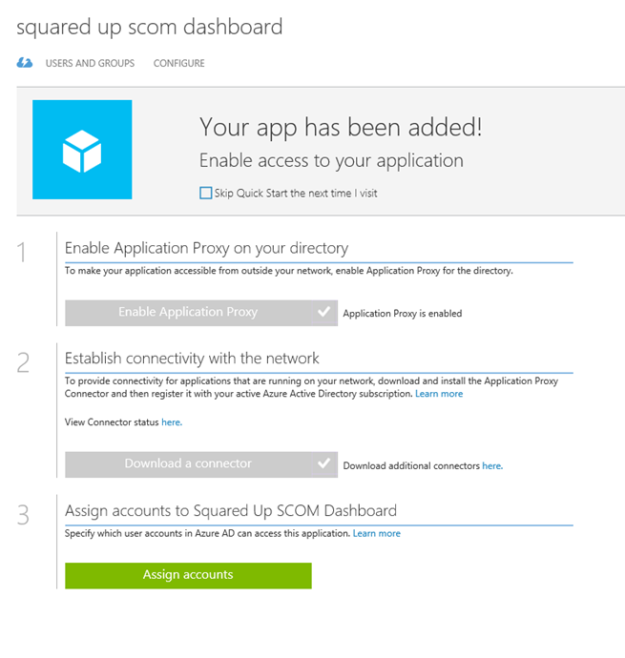
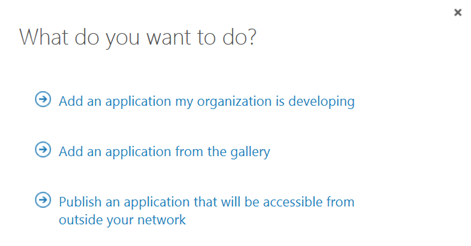
In this next step, I will create the Proxy Application in Azure AD where the Self Service Portal will be published. To be able to create Proxy Applications I will need to have either an Enterprise Mobility Suite license plan, or Azure AD Basic/Premium license plan. From the Azure Management Portal and Active Directory, under Applications, I add a new Application and select to “Publish an application that will be accessible from outside your network”:

I will then give a name for my application, specify the internal URL and pre-authentication method. I name my application “Squared Up SCOM Dashboard”, use http://scomdashboardserver/SquaredUp/ as internal URL and choose Passthrough as Pre-Authentication method.

After the Proxy Application is added, there are some additional configurations to be done. If I have not already, Application Proxy for the directory have to be enabled. I have created other Proxy Applications before this, so I have already done that.

I also need to download the Application Proxy connector, install and register this on a Server that is member of my own Active Directory. The Server that I choose can be either on an On-Premise network, or in an Azure Network. As long as the Server running the Proxy connector can reach the internal URL, I can choose which Server that best fits my needs.

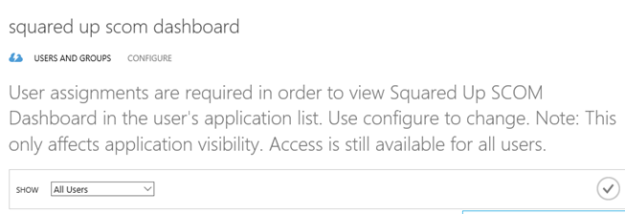
When choosing passthrough as authentication method, all users can directly access the Forms Based logon page as long as they know the external URL. Assigning accounts, either users or groups, will only decide which users that will see the application in the Access Panel or My Apps.

I now need to make additional configurations to the application, and go to the Configure menu. From here I can configure the name, external URL, pre-authentication method and internal URL, if I need to change something.

I choose to change the External URL so that I use my custom domain, and note the warning about creating a CNAME record in external DNS. After that I hit Save so that I can configure the Certificate.

Since I have already uploaded a certificate (see previous blog post https://systemcenterpoint.wordpress.com/2015/06/10/using-a-custom-domain-name-for-an-application-published-with-with-azure-ad-application-proxy/), I can just verify that it is correct.

When using passthrough I don’t need to configure any internal authentication method.

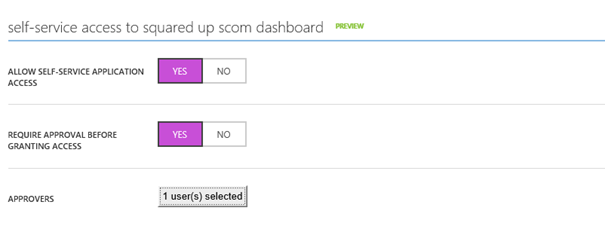
Another feature that is in Preview, is to allow Self-Service Access to the published application. I have configured this here, so that users can request access to the application from the Access Panel (https://myapps.microsoft.com).

After I have configured this and uploaded a logo, I am finished at this step, and can test the application using passthrough.

Testing the application using passthrough

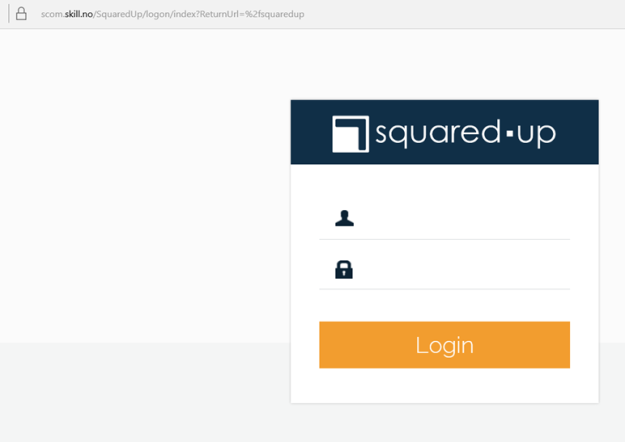
When using Passthrough I can go directly to the external URL, which in my case is https://scom.skill.no/squaredup. And as expected, I can reach the internal Forms Based login page:

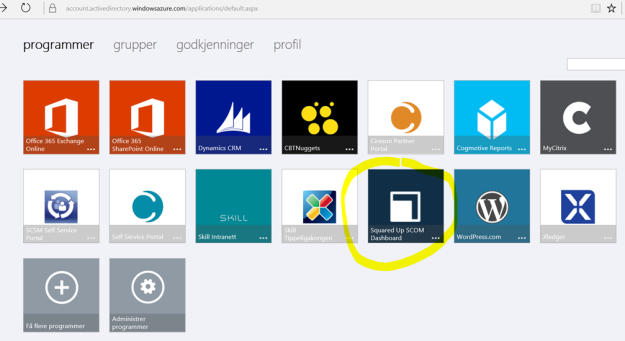
For the users and groups I have assigned access to, they will also see the Squared Up application in the Access Panel or in My Apps, this application is linked to the external URL:

Now I’m ready to do the next step which is change Pre-Authentication and use Azure AD Authentication and Single Sign-On.

Change Application to use Azure AD Authentication as Pre-Authentication

First I will reconfigure the Azure AD App Proxy Application, by changing the Preauthentication method to Azure Active Directory.

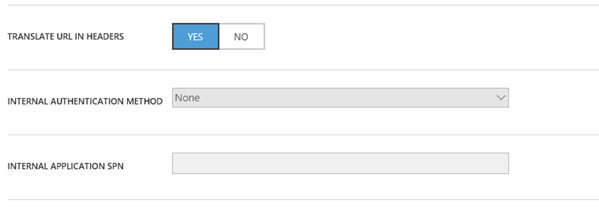
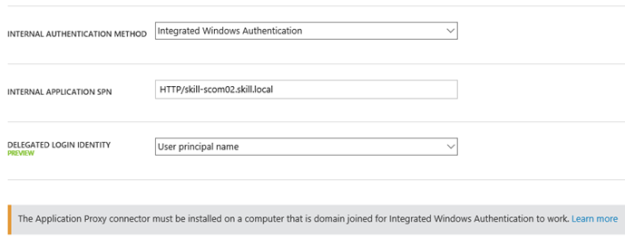
Next I need to configure to use Internal Authentication Method “Windows Integrated Authentication”. I also need to configure the Service Principal Name (SPN). Here I specify HTTP/scomdashboardserverfqdn, in my example this is HTTP/skill-scom02.skill.local.

PS! A new preview feature is available, to choose which login identity to delegate. I will continue using the default value of User principal name.

Since I now will use pre-authentication, it will be important to remember to assign individual users or groups to the Application. This enables me to control which users who will see the application under their My Apps and who will be able access the application’s external URL directly.

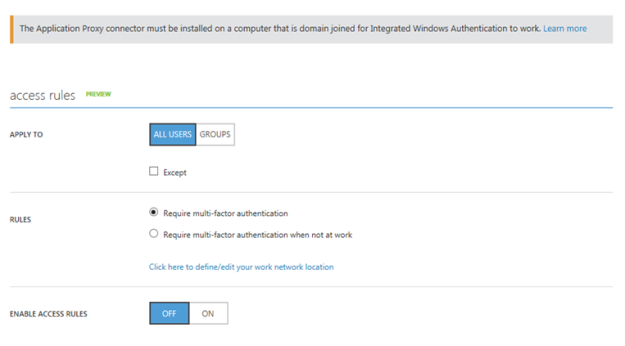
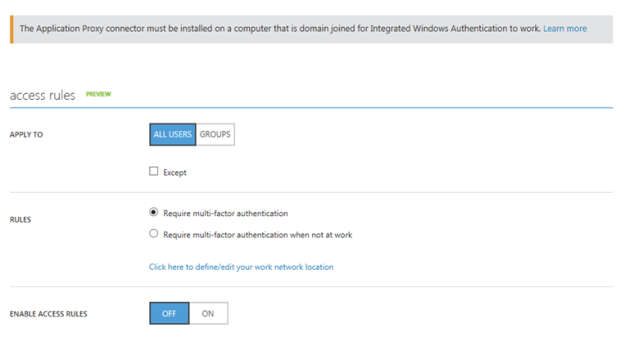
From the bottom part of the configuration settings I can configure Access Rules, which at this time is in Preview. This is cool, because I can for example require for this Application that users will be required to use multi-factor authentication. I have not enabled that here though.

After I’m finished reconfiguring the Azure AD App Proxy Application, I can save and continue with the other requirements.

Enable Windows Authentication for Squared Up

The Squared Up Web site supports Windows Authentication, the instructions for configuring that is described here: http://support.squaredup.com/support/solutions/articles/4136-enable-integrated-windows-authentication-single-sign-on-.

Follow that article and you should be ready for the next step.

It is a good idea at this point to verify that Windows Integrated Authentication is working correctly by browsing internally to http://scomdashboardserver/SquaredUp. Your current logged on user (if permissions are correct) should be logged in automatically.

Configure Kerberos Constrained Delegation for the Proxy Connector Server

I now need to configure so that the Server running the Proxy Connector can impersonate users pre-authenticating with Azure AD and use Windows Integrated Authentication to the Squared Up Server.

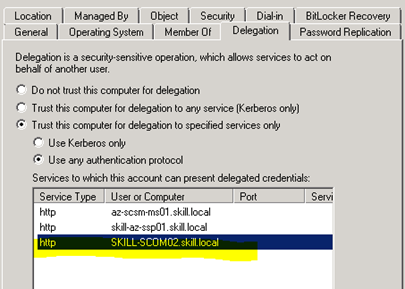
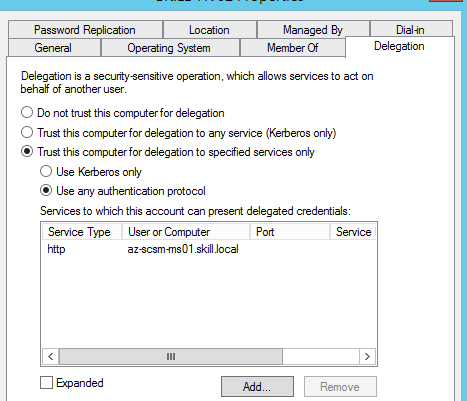
I find the Computer Account in Active Directory for the Connector Server, and on the Delegation tab click on “Trust this computer for delegation to specified services only”, and to “Use any authentication protocol”. Then I add the computer name for the web server that Squared Up is installed on and specify the http service as shown below (I already have an existing delegation set up):

This was the last step in my configuration, and I am almost ready to test.

If you, like me, have an environment consisting on both On-Premise and Azure Servers in a Hybrid Datacenter, please allow room for AD replication of these SPN’s and more.

Testing the published application with Azure AD Authentication!

Now I am ready to test the published proxy application with Azure AD Authentication.

When I go to my external URL https://scom.skill.no/squaredup, Azure AD will check if I already has an authenticated session, or else I will presented with the logon page for Azure AD (in Norwegian but you get the picture ;):

Remember from earlier that I have assigned the application either to a group of all or some users or directly to some pilot users for example.

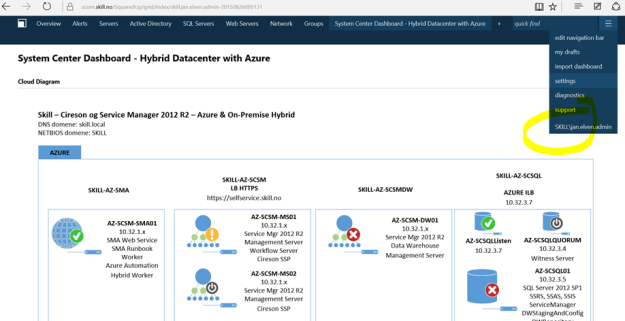
If I log in with an assigned user, I will be directly logged in to the Squared Up Dashboard:

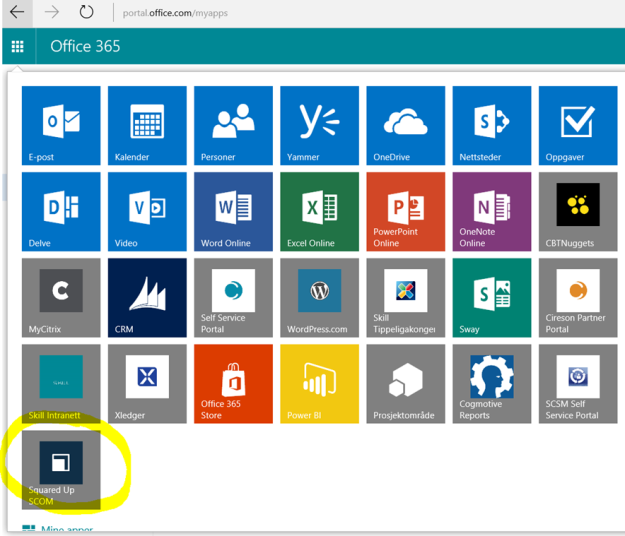
In addition to access the application via the Access Panel (https://myapps.microsoft.com), I can use the App Launcher menu in Office 365 and add the Squared Up Dashboard to the App chooser for easy access:

I can also access the Squared Up Application from the “My Apps” App on my Mobile Devices.

So to conclude, Squared Up is another great solution for publishing with Azure AD Application Proxy !

Publish the Service Manager Self Service Portal with Azure AD Application Proxy

The Scenario

Updated blog post: 10th November 2015. With todays release of Update Rollup 8 for Service Manager 2012 R2 (https://www.microsoft.com/en-us/download/details.aspx?id=49556) and the new HTML5 based Self Service Portal, I have made some changes to this blog post where the scenario is updated. Please read on for how to publish this portal externally via Azure AD App Proxy:

Recently in a SCSM LyncUp call news came of a coming Self Service Portal that the Service Manager Team are working on. This portal will no longer have a requirement for SharePoint and Silverlight, and will be built on HTML5. Stefan Johner has a good write-up on the features here: http://jhnr.ch/2015/08/22/service-manager-lync-up-summary-august-2015-new-portal-sneak-preview/.

For a while ago I had a blog article on how to publish the Cireson Self Service Portal via the Azure AD Application Proxy (https://systemcenterpoint.wordpress.com/2015/03/26/publish-the-cireson-self-service-portal-with-azure-ad-application-proxy/), and in this blog article I will describe how to publish the new SCSM Self Service Portal. This will give me some interesting possibilities for pre-authentication and controlling user access.

There are two authentication scenarios for publishing this Self Service Portal with Azure AD App Proxy:

  1. Publish without pre-authentication (pass through). This scenario is best used when the Self Service Portal is running Forms Authentication, so that the user can choose which identity they want to log in with. As the new SCSM Self Service Portal doesn’t support Forms Authentication, this is not really an option here.
  2. Publish with pre-authentication. This scenario will use Azure AD authentication, and is best used when the Self Service Portal is running Windows Authentication so that we can have single sign-on with the Azure AD identity.

It is the second scenario with pre-authentication I will configure here.

I went through these steps:

Verify Windows Authentication for Service Manager Self Service Portal

The Service Manager Self Service Portal installs per default with Windows Integrated Authentication. From my environment, I can verify the following configuration settings:

  • Windows Authentication is enabled for the Web Site Application
  • On Advanced settings for the Web Site Application, Kernel Mode Authentication Enabled and Extended Protection to Off. For Providers Negotiate are listed on top.

It is a good idea at this point to verify that Windows Integrated Authentication is working correctly by browsing internally to http[s]://scsmportalservername:[port]/selfserviceportal. Your current logged on user (if permissions are correct) should be logged in automatically.

Create the Application in Azure AD

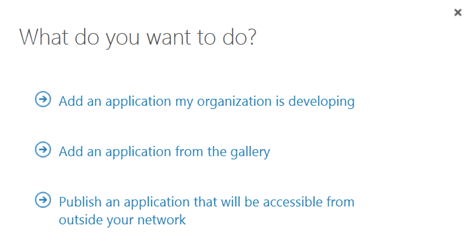
In this next step, I will create the Proxy Application in Azure AD where the Self Service Portal will be published. To be able to create Proxy Applications I will need to have either an Enterprise Mobility Suite license plan, or Azure AD Basic/Premium license plan. From the Azure Management Portal and Active Directory, under Applications, I add a new Application and select to “Publish an application that will be accessible from outside your network”:

I will then give a name for my application, specify the internal URL and pre-authentication method. I name my application “SCSM Self Service Portal”, use “http://portalserverfqdn:%5Bport%5D&#8221; as internal URL and choose Azure Active Directory as Pre-Authentication method.

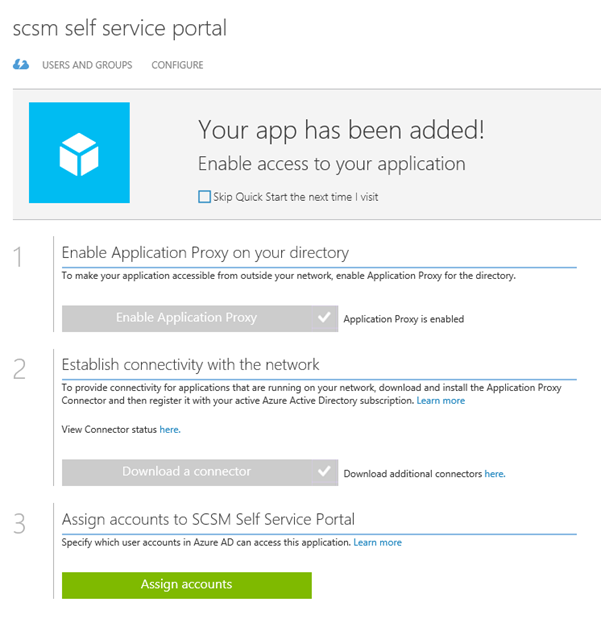
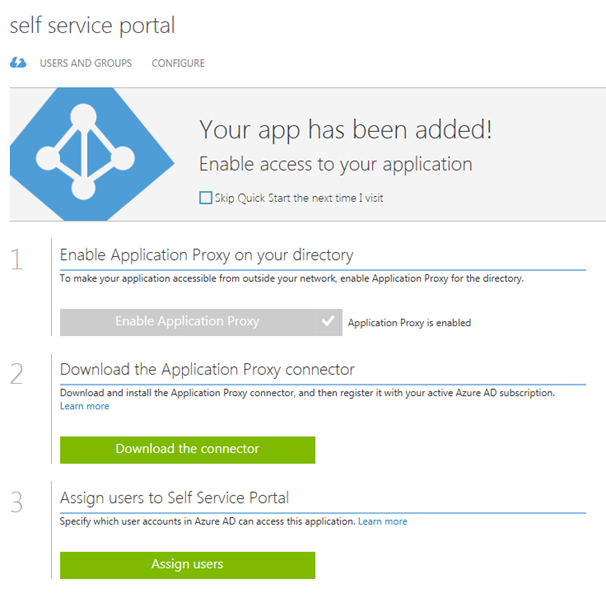
After the Proxy Application is added, there are some additional configurations to be done. If I have not already, Application Proxy for the directory have to be enabled. I have created other Proxy Applications before this, so I have already done that.

I also need to download the Application Proxy connector, install and register this on a Server that is member of my own Active Directory. The Server that I choose can be either on an On-Premise network, or in an Azure Network. As long as the Server running the Proxy connector can reach the internal URL, I can choose which Server that best fits my needs.

Update: Regarding AADP Connector, you can now greate connector groups and configure the application to use the group of connector(s) you choose:

AADPConnectorGroup

Since I choose to use pre-authentication, I can also assign individual users or groups to the Application. This enables me to control which users who will see the application under their My Apps and who will be able access the application’s external URL directly.

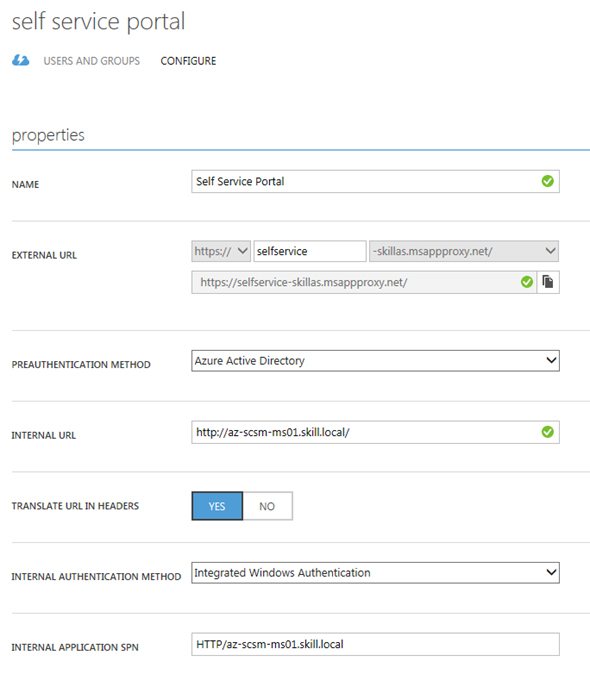
I now need to make additional configurations to the application, and go to the Configure menu. From here I can configure the name, external URL, pre-authentication method and internal URL, if I need to change something.

I choose to change the External URL so that I use my custom domain, and note the warning about creating a CNAME record in external DNS. After that I hit Save so that I can configure the Certificate.

AADPCustomDomain

Since I have already uploaded a certificate (see previous blog post https://systemcenterpoint.wordpress.com/2015/06/10/using-a-custom-domain-name-for-an-application-published-with-with-azure-ad-application-proxy/), I can just verify that it is correct.

AADPCert

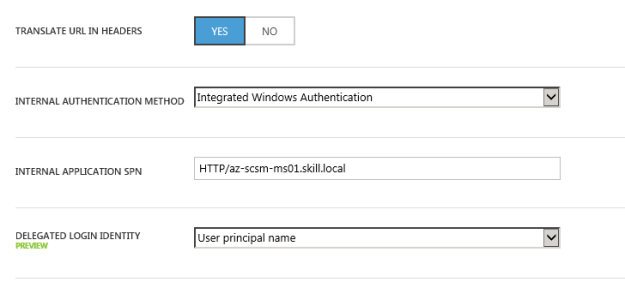
Next I need to configure to use Internal Authentication Method “Windows Integrated Authentication”. I also need to configure the Service Principal Name (SPN). Here I specify HTTP/portalserverfqdn, in my example this is HTTP/az-scsm-ms01.skill.local.

Update: You can now choose which Identity to delegate, in this case UPN is fine.

AADPIntegratedWinAuth

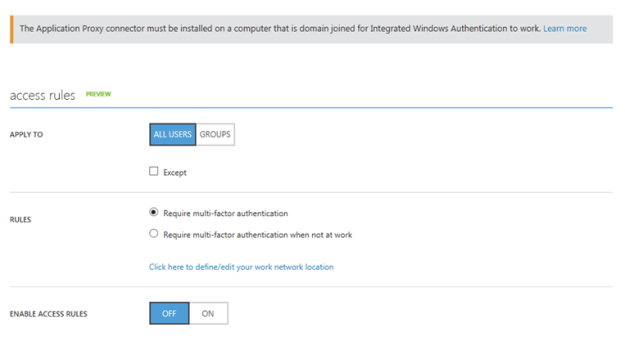
From the bottom part of the configuration settings I can configure Acces Rules, which at this time is in Preview. This is cool, because I can for example require for this Application that users will be required to use multi-factor authentication. I have not enabled that here though.

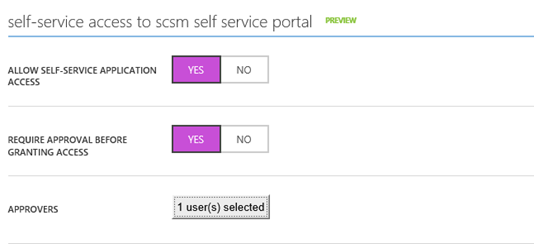
Another feature that is in Preview, is to allow Self-Service Access to the published application. I have configured this here, so that users can request access to the application from the Access Panel (https://myapps.microsoft.com).

After I have configured this and uploaded a logo, I am finished at this step, and now need to configure some more settings in my local Active Directory.

Configure Kerberos Constrained Delegation for the Proxy Connector Server

I now need to configure so that the Server running the Proxy Connector can impersonate users pre-authenticating with Azure AD and use Windows Integrated Authentication to the Self Service Portal Server.

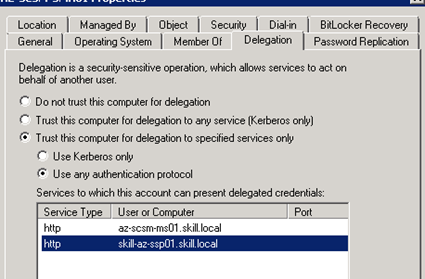
I find the Computer Account in Active Directory for the Connector Server, and on the Delegation tab click on “Trust this computer for delegation to specified services only”, and to “Use any authentication protocol”. Then I add the computer name for the portal server and specify the http service as shown below (I already have an existing delegation set up):

This was the last step in my configuration, and I am almost ready to test.

If you, like me, have an environment consisting on both On-Premise and Azure Servers in a Hybrid Datacenter, please allow room for AD replication of these SPN’s and more.

Testing the published application!

Now I am ready to test the published proxy application.

Remember from earlier that I have assigned the application either to a group of all or some users or directly to some pilot users for example.

I will now log on with my Azure AD user (which of course is synchronized from local Active Directory), and I will use the URL https://myapps.microsoft.com.

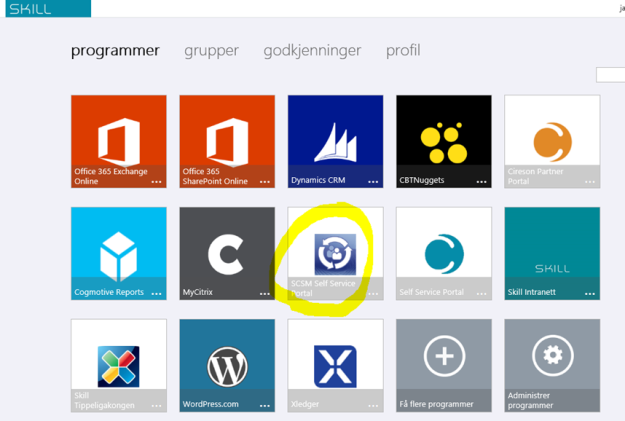
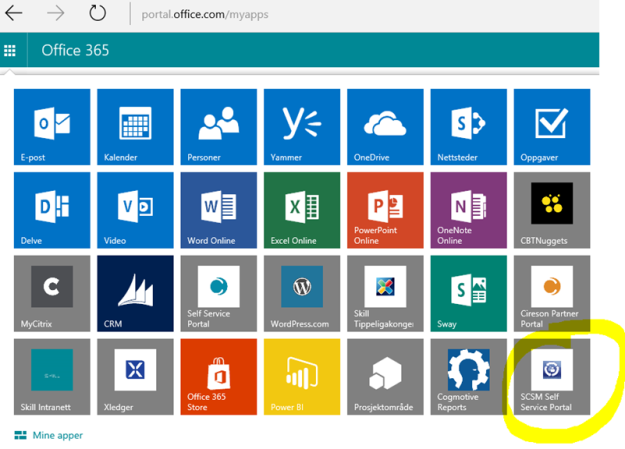
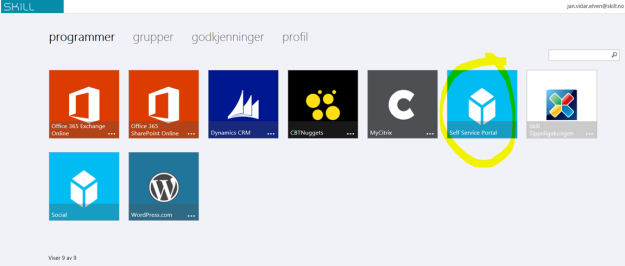
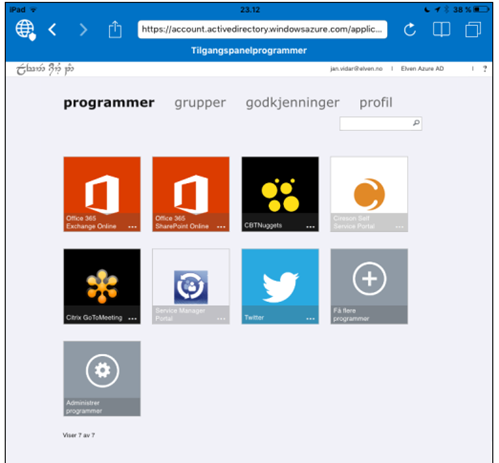
After logging on, I can see the applications I have access to. Some of these are SaaS applications I have configured, some are applications we have developed ourselves, and I can see the published Self Service Portal:

(Don’t mind the Norwegian captions and texts, you get the idea;)

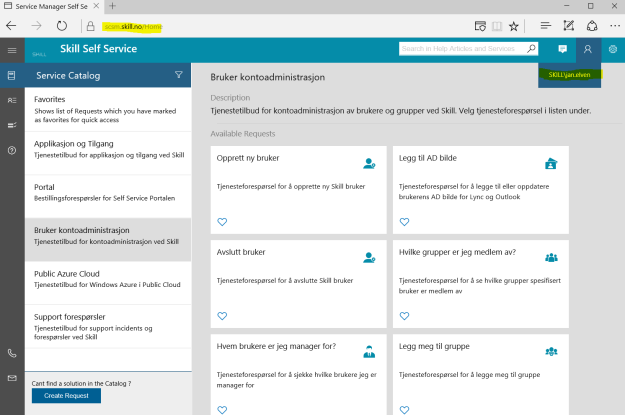
I then click on the SCSM Self Service Portal, and can confirm that I am able to access the Self Service Portal. See the external URL I specified and that indeed I’m logged in with my Active Directory user with SSO.

AADPSCSMPortal

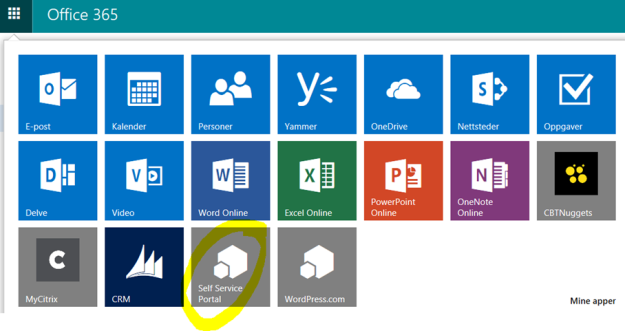
Another cool thing is that I can use the App menu in Office 365 and add the Self Service Portal to the App chooser for easy access:

I can now also access the Self Service Application from the “My Apps” App on my Mobile Devices.

Publish the Cireson Self Service Portal with Azure AD Application Proxy

The Scenario

Update: This blog post is the first part in a series. See:
Part 2 – Using a Custom Domain Name for an Application Published with with Azure AD Application Proxy

I have been looking at different usable scenarios for publishing internal sites via the Azure AD Application Proxy, and decided to have a go at publishing the Cireson Self Service Portal. This will give me some interesting possibilities for pre-authentication and controlling user access.

I have been considering two scenarios for publishing the Self Service Portal:

  1. Publish without pre-authentication (pass through). This scenario is best used when the Self Service Portal is running Forms Authentication, so that the user can choose which identity they want to log in with.
  2. Publish with pre-authentication. This scenario will used Azure AD authentication, and is best used when the Self Service Portal is running Windows Authentication so that we can have single sign-on with the Azure AD identity.

It is the second scenario with pre-authentication I will configure here.

I went through these steps:

Configure Windows Authentication for Cireson Self Service Portal

The Cireson Self Service Portal installs per default with Forms Based Authentication. I need to configure Windows Integrated Authentication for the portal, and this is well documented in the Knowledge Article Cireson customers and partners can access at https://support.cireson.com/KnowledgeBase/View/45. From my environment, I can summarize the following configuration settings:

  • The Self Service Portal (v3.6 with hotfix) are running on the same server as the Service Manager Management Server (recommended and officially supported by Cireson)
  • The Portal/Management Server is configured with Kerberos Delegation in Active Directory with “Trust this computer for delegation to any service (Kerberos only)”
  • The Service Manager Service Account is configured with Service Principal Names (SPN) with:
    • SETSPN –s MSOMSDKSVC/NameOfYourServerHere SCSMServiceAccountHere
    • SETSPN –s MSOMSDKSVC/FQDNOfYourServerHere SCSMServiceAccountHere
  • Service Manager Service Account is added to the IIS_IUSRS local group on the Portal Server
  • The Cireson Portal Web Site are configured with Windows Authentication (Kernel Mode Authentication Enabled, Extended Protection to Off). For Providers Negotiate are listed on top.

It is a good idea at this point to verify that Windows Integrated Authentication is working correctly by browsing internally to http://portalservername. Your current logged on user (if permissions are correct) should be logged in automatically.

Create the Application in Azure AD

In this next step, I will create the Proxy Application in Azure AD where the Self Service Portal will be published. To be able to create Proxy Applications I will need to have either an Enterprise Mobility Suite license plan, or Azure AD Premium license plan. From the Azure Management Portal and Active Directory, under Applications, I add a new Application and select to “Publish an application that will be accessible from outside your network”:

I will then give a name for my application, specify the internal URL and pre-authentication method. I name my application “Self Service Portal”, use “http://portalserverfqdn&#8221; as internal URL and choose Azure Active Directory as Pre-Authentication method.

After the Proxy Application is added, there are some additional configurations to be done. If I have not already, Application Proxy for the directory have to be enabled. I have created other Proxy Applications before this, so I have already done that.

I also need to download the Application Proxy connector, install and register this on a Server that is member of my own Active Directory. The Server that I choose can be either on an On-Premise network, or in an Azure Network. As long as the Server running the Proxy connector can reach the internal URL, I can choose which Server that best fits my needs.

Since I choose to use pre-authentication, I can also assign individual users or groups to the Application. This enables me to control which users who will see the application under their My Apps and who will be able access the application’s external URL directly.

I now need to make additional configurations to the application, and go to the Configure menu. From here I can configure the name, external URL, pre-authentication method and internal URL, if I need to change something.

What I need to configure here is to use Internal Authentication Method to “Windows Integrated Authentication”. I also need to configure the Service Principal Name (SPN). Here I specify HTTP/portalserverfqdn, in my example this is HTTP/az-scsm-ms01.skill.local.

From the bottom part of the configuration settings I can configure Acces Rules, which at this time is in Preview. This is cool, because I can for example require for this Application that users will be required to use multi-factor authentication. I have not enabled that here though.

After I have configured this, I am finished at this step, and now need to configure some more settings in my local Active Directory.

Configure Kerberos Constrained Delegation for the Proxy Connector Server

I now need to configure so that the Server running the Proxy Connector can impersonate users pre-authenticating with Azure AD and use Windows Integrated Authentication to the Self Service Portal Server.

I find the Computer Account in Active Directory for the Connector Server, and on the Delegation tab click on “Trust this computer for delegation to specified services only”, and to “Use any authentication protocol”. Then I add the computer name for the portal server and specify the http service as shown below:

This was the last step in my configuration, and I am almost ready to test.

If you, like me, have an environment consisting on both On-Premise and Azure Servers in a Hybrid Datacenter, please allow room for AD replication of these SPN’s and more.

Testing the published application!

Now I am ready to test the published proxy application.

Remember from earlier that I have assigned the application either to a group of all or some users or directly to some pilot users for example.

I will now log on with my Azure AD user (which of course is synchronized from local Active Directory), and I will use the URL https://myapps.microsoft.com.

After logging on, I can see the applications I have access to. Some of these are SaaS applications I have configured, some are applications we have developed ourselves, and I can see the published Self Service Portal:

(Don’t mind the Norwegian captions and texts, you get the idea;)

I then click on the Self Service Portal, and can confirm that I am able to access the Self Service Portal. See the special proxy URL and that indeed I’m logged in with my Active Directory user with SSO.

Another cool thing is that I can use the App menu in Office 365 and add the Self Service Portal to the App chooser for easy access:

I can now also access the Self Service Application from the “My Apps” App on my Mobile Devices.