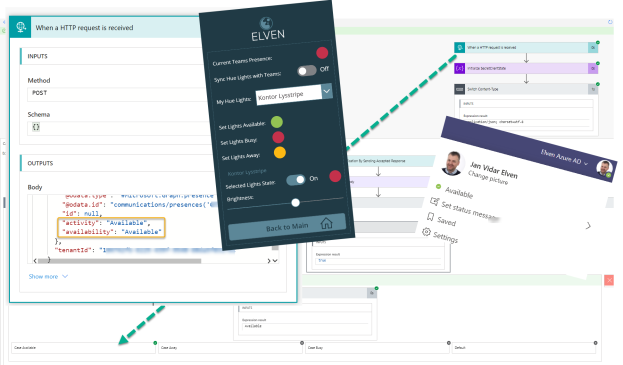
Since the support for getting Teams Presence via Microsoft Graph API came into public preview earlier this year, https://docs.microsoft.com/en-us/graph/api/presence-get?view=graph-rest-beta&tabs=http, many where seeing interesting scenarios for automating Microsoft 365 using this presence status. In fact many, myself included, created different solutions for setting light bulbs etc to reflect the Teams presence. If busy, then red lights, if available green lights, and so on. I have this setup myself using Philips Hue lights, and have created a PowerApp using Flows to control my lights:

There has been one problem though, getting Teams Presence has only been possible by continuously querying the API to check if the status has changed. This can be scheduled of course, but running this every minute or so seems like an excessive way to achieve the goal: being able to see if the Teams Presence has changed!
Until just a few days ago that is, where I noticed that Teams Presence now is in Preview for subscribing to change notifications in Microsoft Graph: https://docs.microsoft.com/en-us/graph/webhooks#supported-resources
In this blog post I wlll show how to create a subscription for change notifications for Teams Presence for a specified user, and the requirements for doing this. And I will use Power Platform and Power Automate Flows to achieve this.
Let’s start with the Requirements..
First of all, to be able to set up a change notification for a resource, you need the same API permission as the resource require itself, for Teams Presence this is one of the following:
- Presence.Read, for being able to read your own users presence status.
- Presence.Read.All, for being able to read all users in your organization’s presence status.
Currently in the Beta endpoint, getting presence is only supported for Delegated permissions using work account, so you will have to to this with a logged in user.
The other important requirement is that you need a webhook uri for where the change notification can send a POST request for the resource that has been changed. This webhook uri can be on your preferred platform, many are using Azure Functions for this, but it can also be a third party platform. I will do it using Power Automate, another alternative could be using Azure Logic Apps also.
This webhook uri need to be able to:
- Process the initial creation of the change notification subscription. Microsoft Graph expects a text response with a validation token for it to be successful.
- Process every change to the resource that you subscribe to, in this example a Teams Users Presence Status.
We will get into the details on this, but for now, we will start explore using Graph Explorer.
Explore Presence and Subscriptions with Graph Explorer
Go to the Microsoft Graph Docs site and find Graph Explorer there, or just go to https://aka.ms/ge, and log in with your work account.
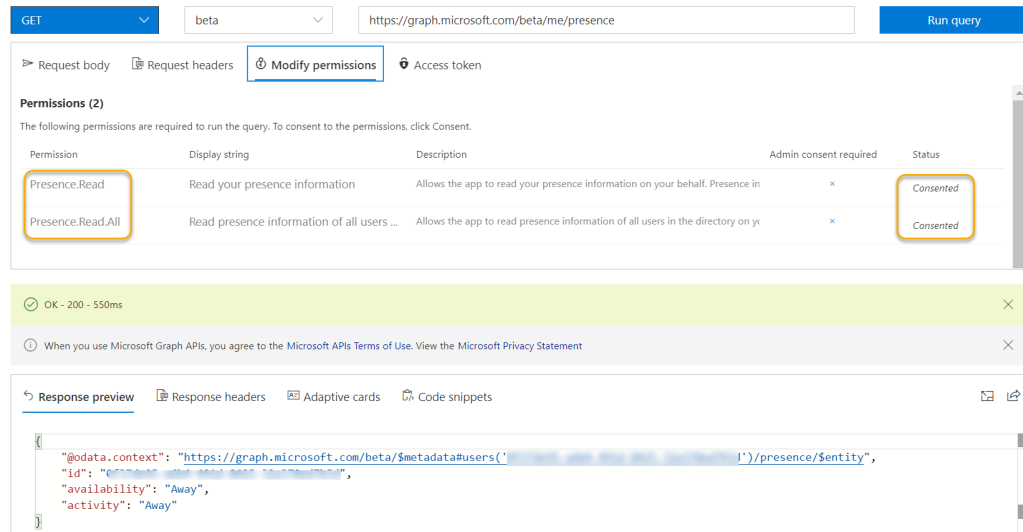
Type the following GET query: https://graph.microsoft.com/beta/me/presence
You need to be a Teams user to run this, but if permissions are consented, you should be able to see your own presence status like my example below. If you are getting a permission error, make sure that one of the permissions for Presence.Read or Presence.Read.All er consented. This can already been done by your administrator, if not you need to consent to them yourself.
Great, let’s check another users’ presence status. PS! The permissions don’t require admin consent, and using delegated permissions every user can check other users presence status, but you need Presence.Read.All to do that.
You need the other users id property, so you can check that first using for example <a href=”https://graph.microsoft.com/v1.0/users/https://graph.microsoft.com/v1.0/users/<someotherusersUpn>/?$select=id.
And then query for the other user’s presence: <a href=”https://graph.microsoft.com/beta/users/https://graph.microsoft.com/beta/users/<userid>/presence
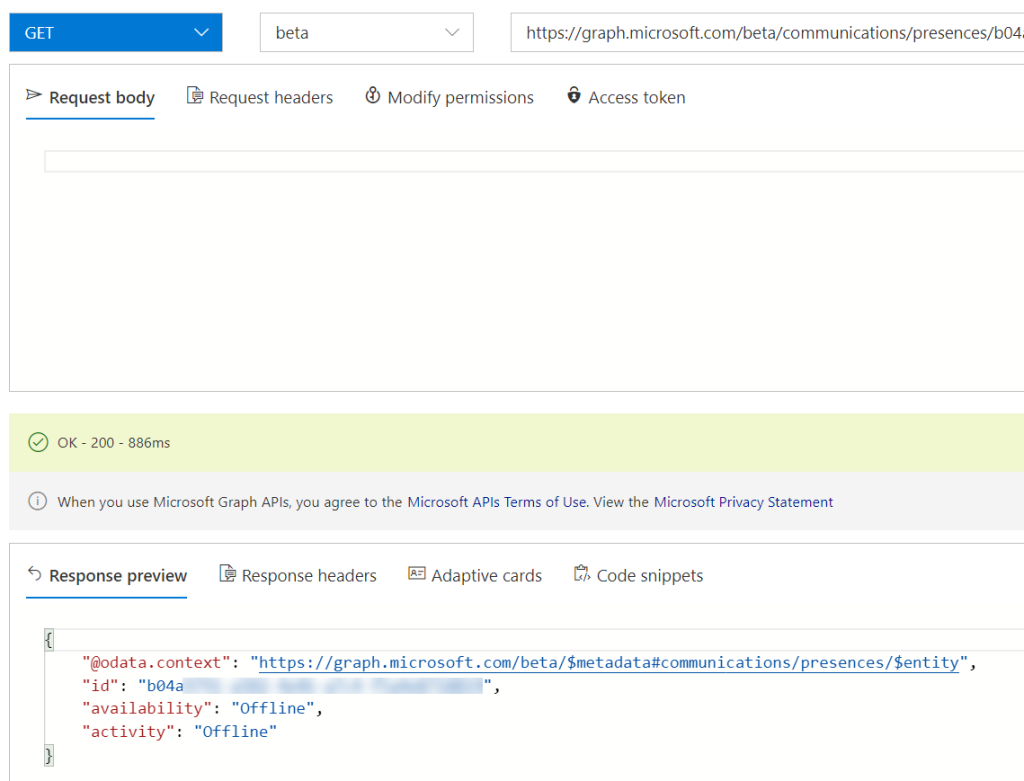
Another way to query for your or other users presences, that are more aligned to the change notifications is using the /beta/communications/presences endpoint: <a href=”https://graph.microsoft.com/beta/communications/presences/https://graph.microsoft.com/beta/communications/presences/<userid>:
If you can run all these queries successfully, then you are ready to proceed to change notifications subscriptions.
You can check if you have any active subscriptions for change notifications using a GET query to: https://graph.microsoft.com/v1.0/subscriptions or https://graph.microsoft.com/beta/subscriptions, depending on if you are working with preview resources. If you have no active subscriptions this should return a successful but empty response like below:

The next part would be to create a subscription for change notifications for presence, but first we need to prepare the Flow for receiving the webhook uri.
Create a Power Automate Flow for Change Notification Webhook
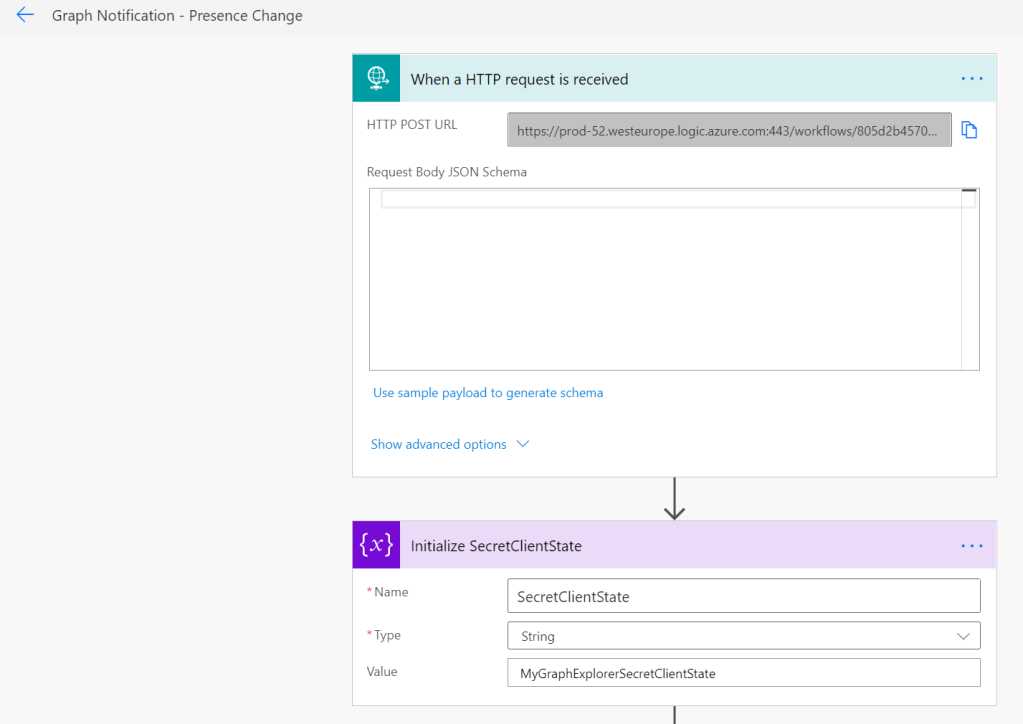
Log in with your work account to flow.microsoft.com, and create a new flow of type automated and blank, skip the first part of using pre-selected triggers. Search for the Request type trigger that is called “When a HTTP request is received”:
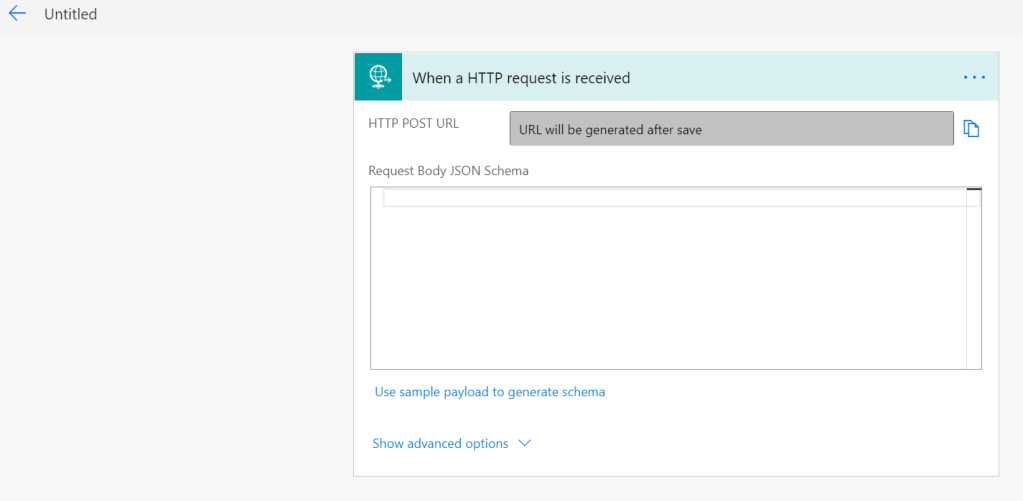
Next add a Initialize Variable action for setting the ClientState which we will use later for the creating the subscription. Set the variable to anything you want, give a name to the Flow and then save. When saved the HTTP POST URL will show the value you later will use as the webhook uri for the change notifications:
The next part is the most important one, and that require a little knowledge of the creation process for change notifications subscriptions. This is documented here https://docs.microsoft.com/en-us/graph/webhooks#managing-subscriptions, but the high level steps are:
- When the Subscription is created, a POST request is sent with Content-Type text/plain and a query parameter that contains a validationToken. Microsoft Graph expects a 200 OK response and a text/plain body that contains the validationToken to be able to successfully create the subscription.
- Immediately after creation, and for every change notification, a POST request is sent with Content-Type application/json. Microsoft Graph expects a 202 Accepted response to this, if not it will continuously try to send the same change notification. You should also check the ClientState for verification, and of course include your own business logic for what to do in the Flow for when changes occur.
So your Flow needs to address these requirements, and there can be different ways to achieve this, but this is how I did it in my setup:
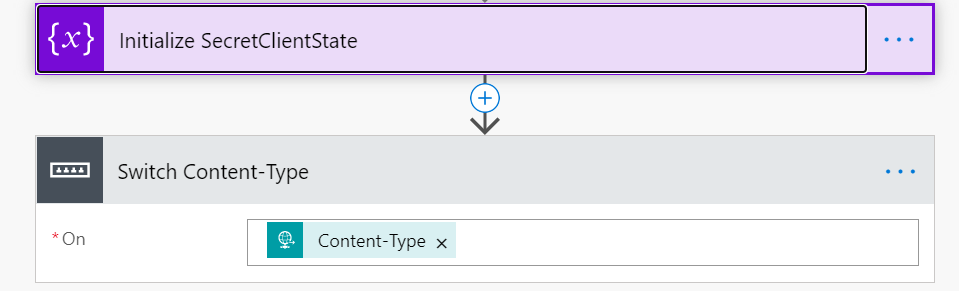
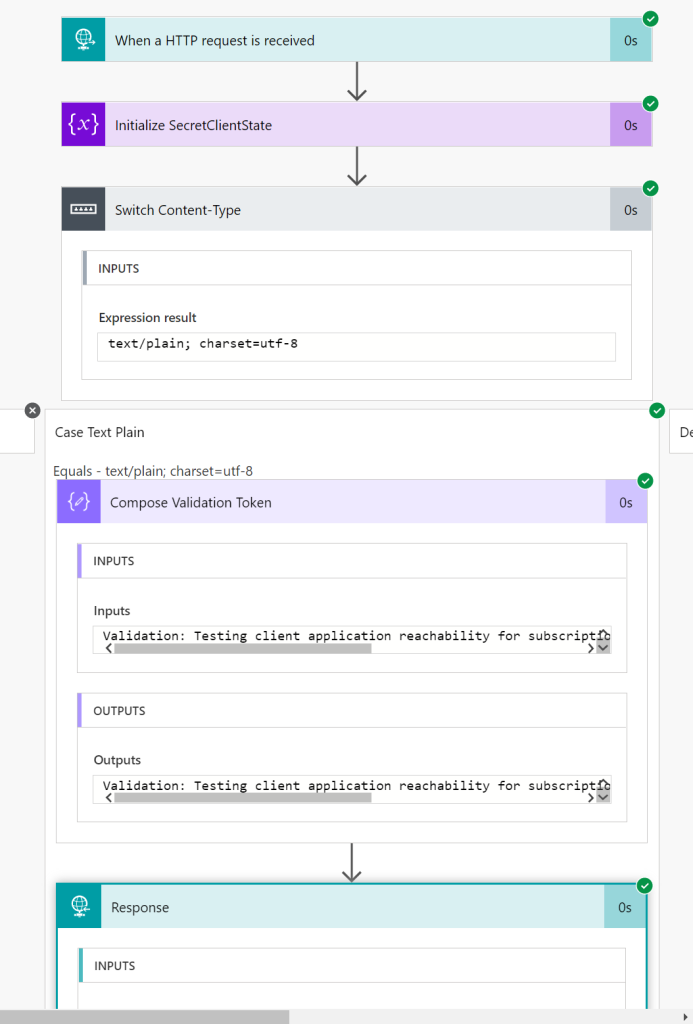
After the initialize variable, I created a Switch control action, using Content-Type from the HTTP Request trigger. In this way I can separate the logic in my flow for the initial creation and validation, and for the updates.
Validating the Subscription
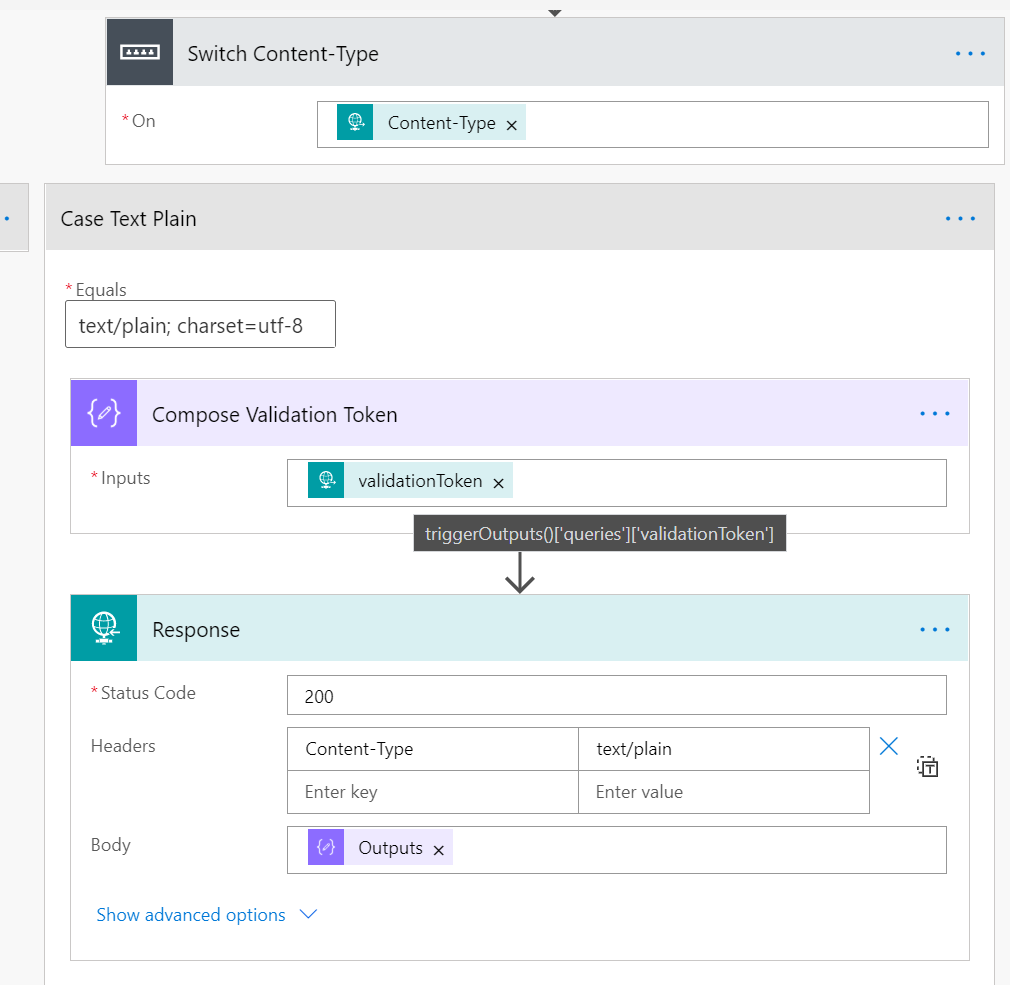
If the Content-Type is text/plain; charset=utf-8, I will try to get the validation token sent by Microsoft Graph, and create a response that returns status 200 OK and the validation token back in a text/plain body.
I used the Compose data operation, and a custom expression that retrieves the validationToken from the query parameters. The expression I use is: @triggerOutputs()[‘queries’][‘validationToken’].
The Request Response action returns a status code of 200, set the Content-Type to text/plain and for Body select the Output from the Compose Validation Token.
The above steps should be sufficient for creating the subscription, it is recommended to validate the ClientState also, in my case I have done that in the next step.
Processing and Responding to Change Notifications
The change notifications will come as Content-Type “application/json; charset=utf-8”, so I add a case for that under my Switch. Microsoft Graph expects a 202 Accepted Response, it is recommended to respond this early in your flow, so that any later actions or your own business logic generates errors that prevents this response.
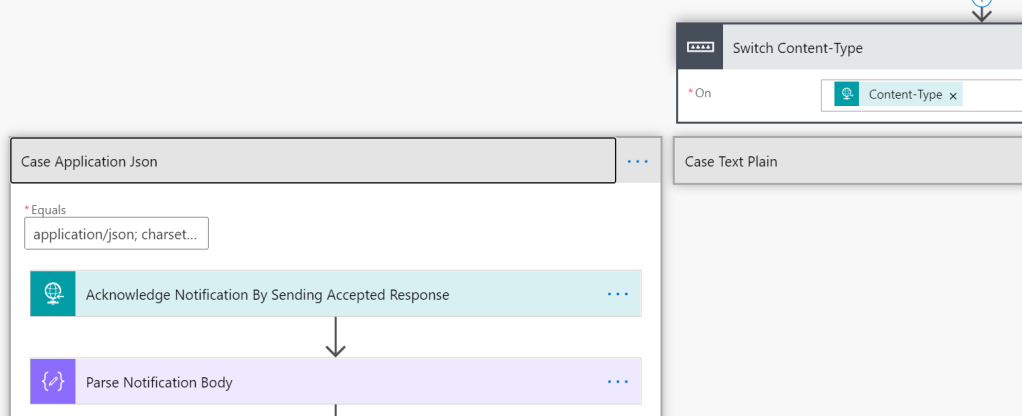
In the Response action I just return 202 Accepted. I have then added a Parse Json action to make it easier to reference the values later in the flow:
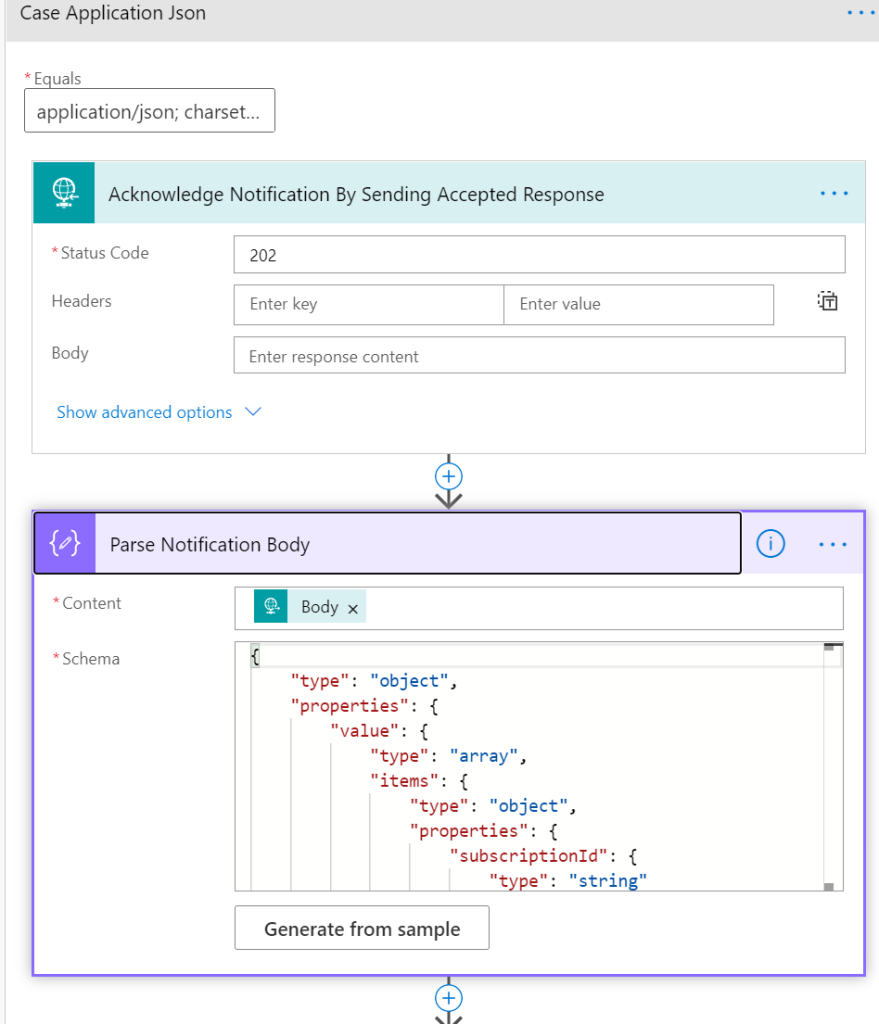
You can generate the schema from an existing sample, from the Microsoft Graph docs, referred above, or you can just use the following sample from me here:
{ “value”: [
{ “subscriptionId”: “<subscriptionid>”,
“clientState”: “MyGraphExplorerSecretClientState”,
“changeType”: “updated”,
“resource”: “communications/presences(‘<userid>’)”,
“subscriptionExpirationDateTime”: “2020-07-11T20:04:40.9743268+00:00”,
“resourceData”: {
“@odata.type”: “#Microsoft.Graph.presence”,
“@odata.id”: “communications/presences(‘<userid>’)”,
“id”: null,
“activity”: “Away”,
“availability”: “Away” },
“tenantId”: “<tenantid>” }
]}
Now I can begin my business logic. As the value from the notification body is of type array, an Apply to each block will be needed, it will be automatically added if you select any of the attributes in the resulting actions. I will first verify that the clientState is matching the variable i defined in the beginning of the flow. This is a safestep that only the Graph subscription I created can call this Flow.
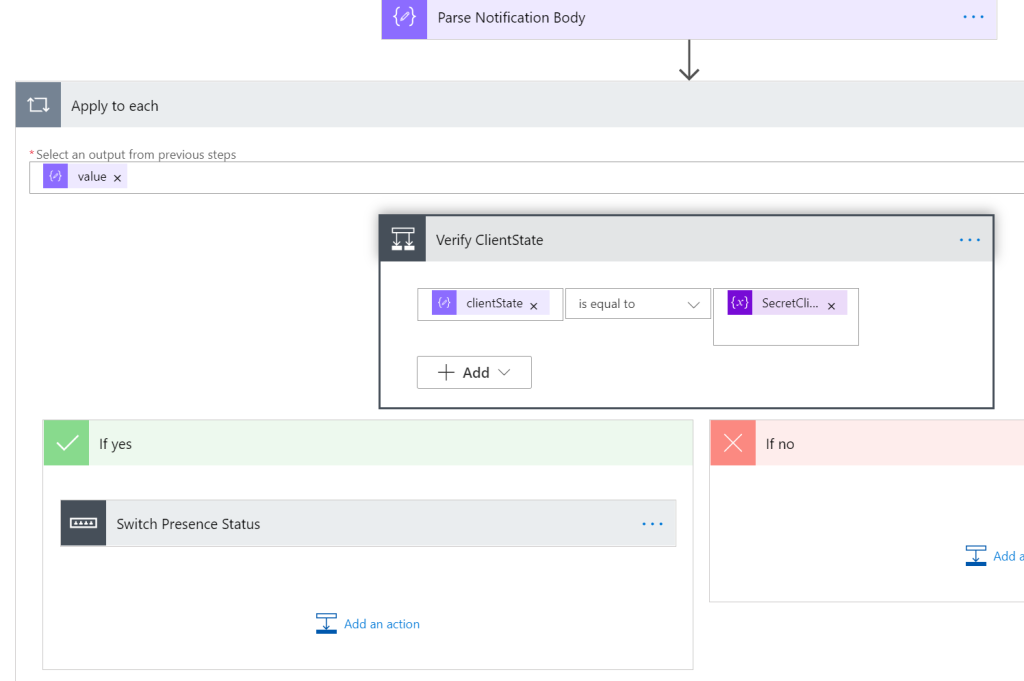
In the next part I have added a new Switch control, where I retrieve the presence status that have changed.
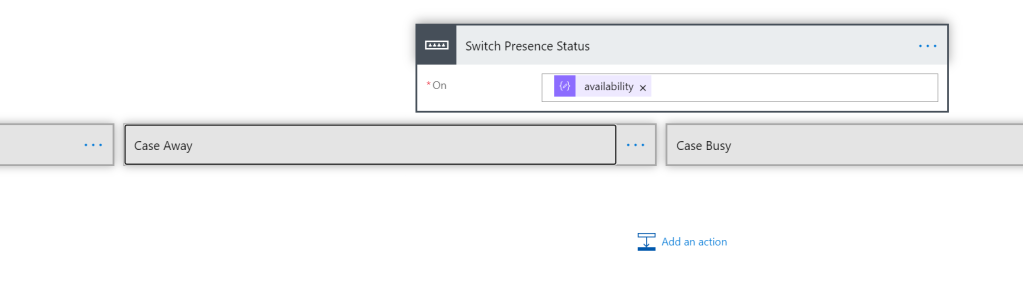
And this is where you add your own business logic, so I will stop here. In my own example (see PowerApp for Hue Lights above) I will control my lights based on presence updates, but this is a theme for a upcoming blog post.
With the Flow ready, we can now create the Subscription.
Creating Microsoft Graph Change Notification for Teams Presence
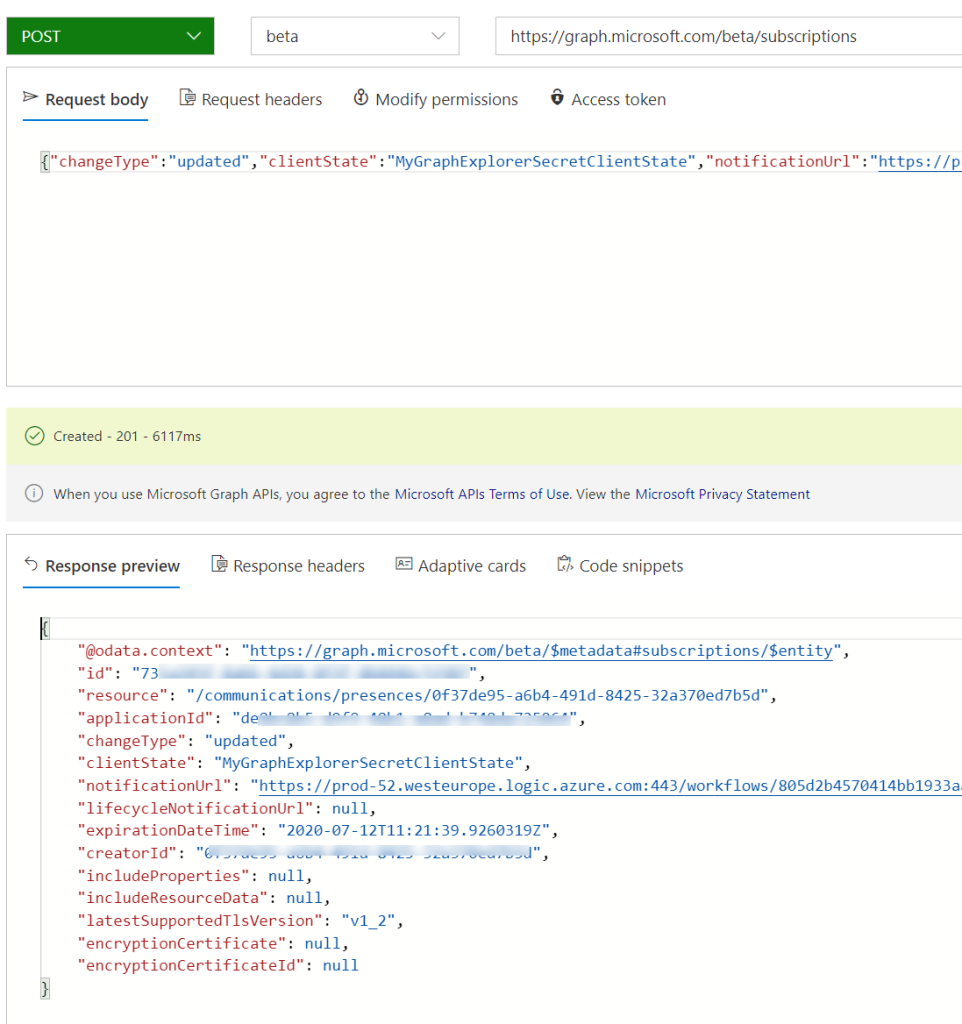
I will now create the Subscription in Graph Explorer, using a POST request to https://graph.microsoft.com/beta/subscriptions. In this POST request you will need a request body that contains the following:
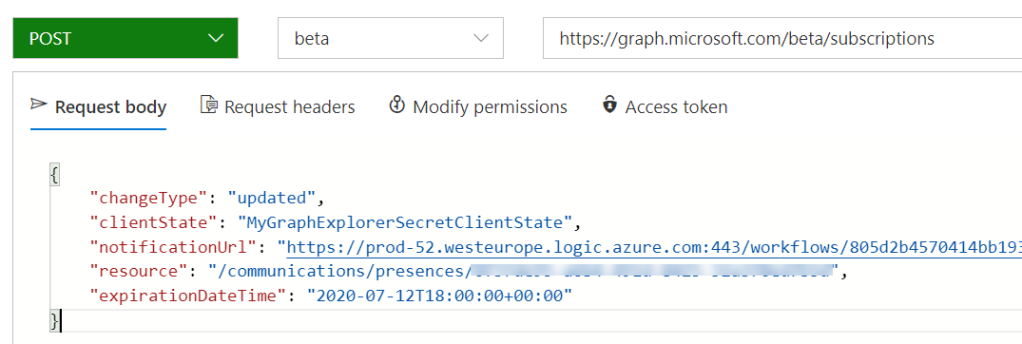
Here is a quick explanation of the above values:
- changeType: can be “updated”, “created”, “deleted”. Only “updated” is relevant for presence changes.
- clientState: For verification in the webhook that the call is coming from the expected source, consider this a sensitive value.
- notificationUrl: This is the webhook uri, and for my Flow this will be HTTP POST URL shown earlier.
- resource: This is the user I want to get presence updates from. Note that you can get multiple user presences also using /communications/presences?$filter=id in ({id},{id}…) (https://docs.microsoft.com/en-us/graph/api/resources/webhooks?view=graph-rest-beta)
- expirationDateTime: Every subscription only lasts for a specific time depending on resource type. The subscription needs to be renewed before expiry. For Teams Presence subscriptions only last one hour, same as chatMessage. See details for different types of resources: https://docs.microsoft.com/en-us/graph/api/resources/subscription?view=graph-rest-beta#properties. If you select an expiry time that is larger than supported, it will reset to one hour max.
Let’s run this query to create the subscription, if everything works, I will now get a 201 response that the subscription is created. Note the expiration time that is one hour from now:
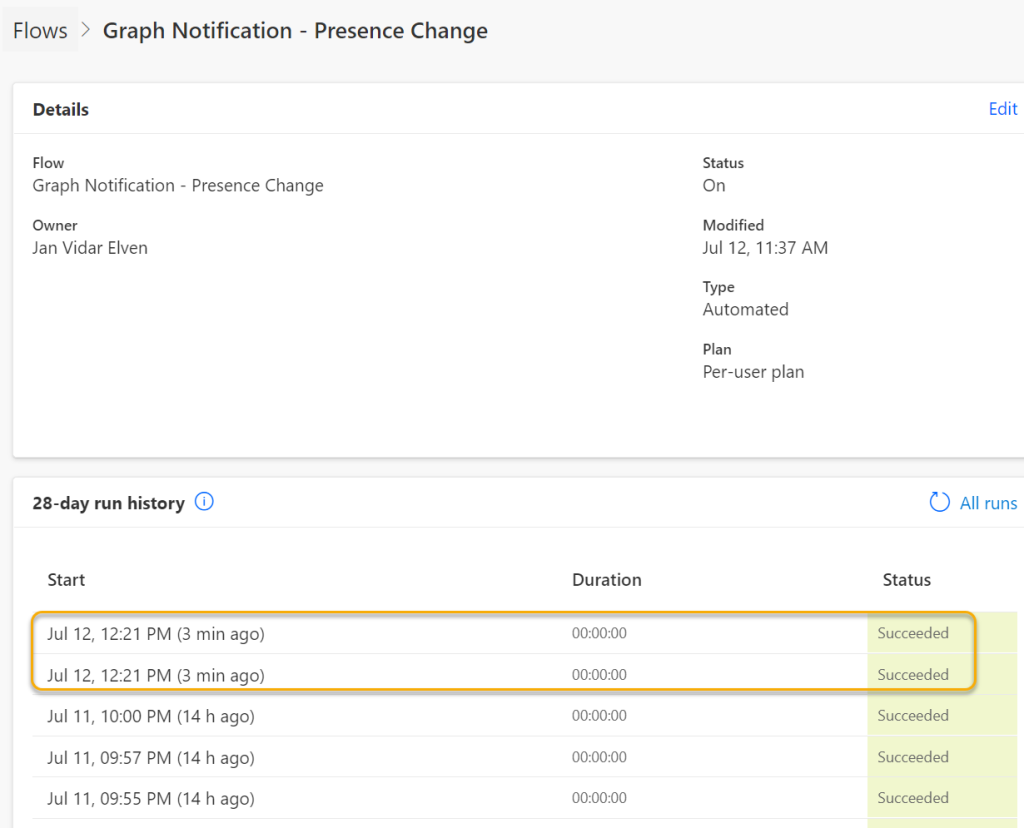
This wouldn’t work if my Flow had failed, so let’s look into the run history on that. I see that I have 2 recent successful runs:
Let’s look into the first one. I see that the request is coming in as a text/plain with a validationToken, which I then return to Microsoft Graph:
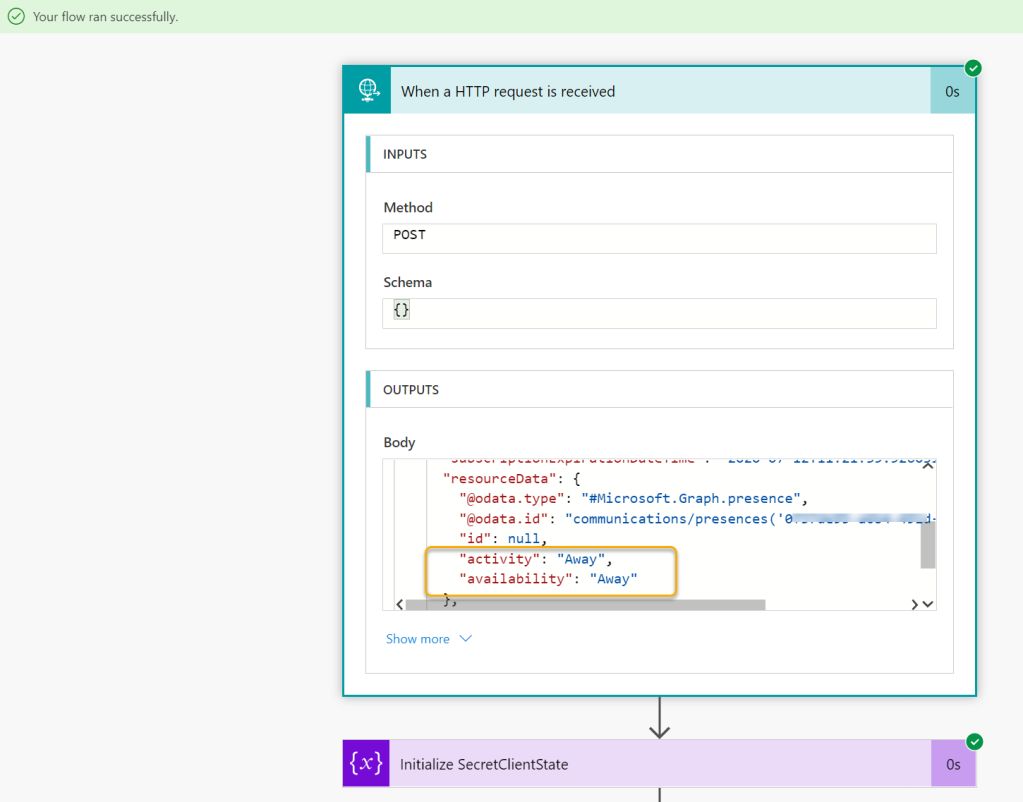
Let’s look into the second run. This returns the first presence update, I can see that the user is “away”:
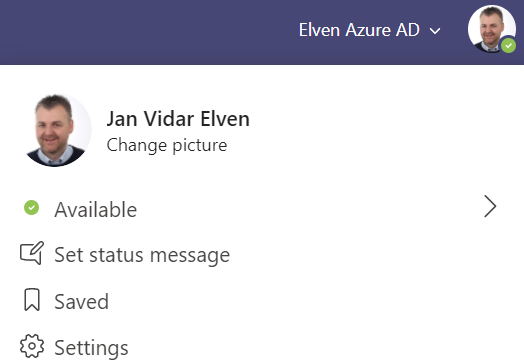
Now, let’s test this. With my user I go to Teams client, it should automatically change my presence from away to available or busy depending on my calendar, or I can set the status manually myself:
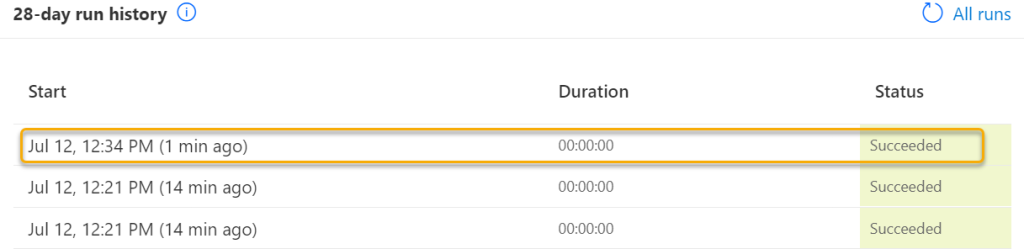
Checking the Flow runs again, I can indeed see that the Flow has been triggered via the Change Notification:
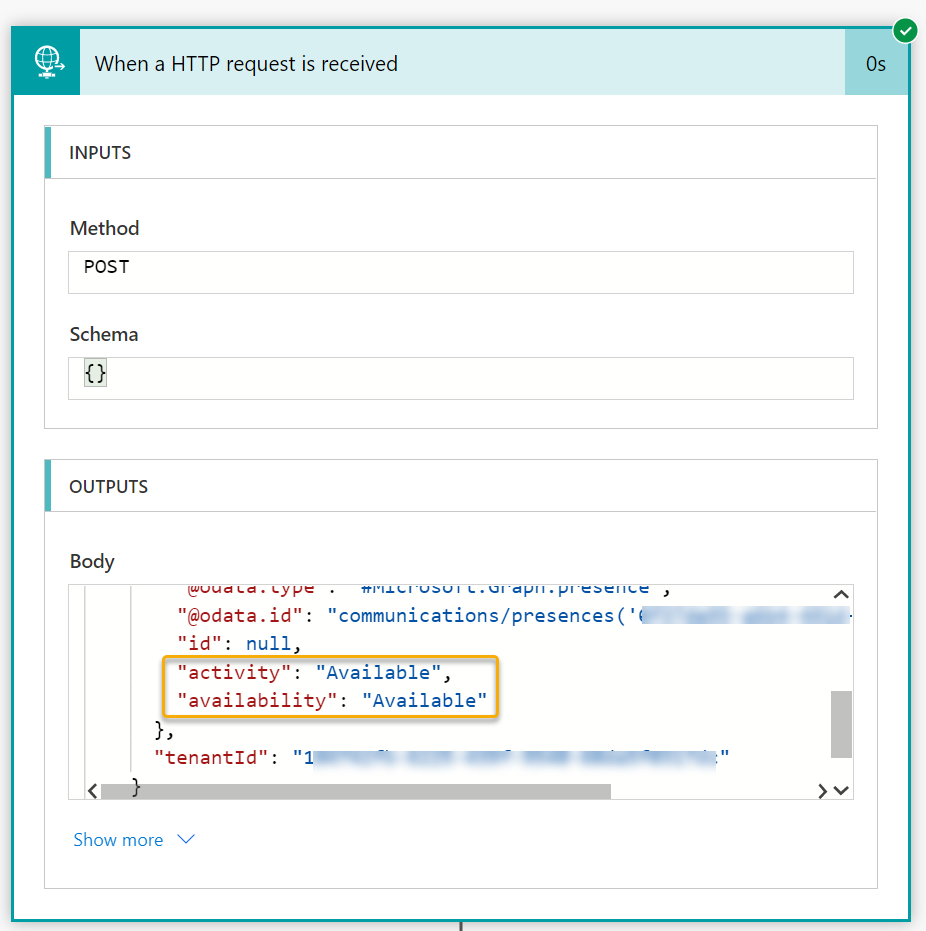
If I look into the details, the status update is Available:
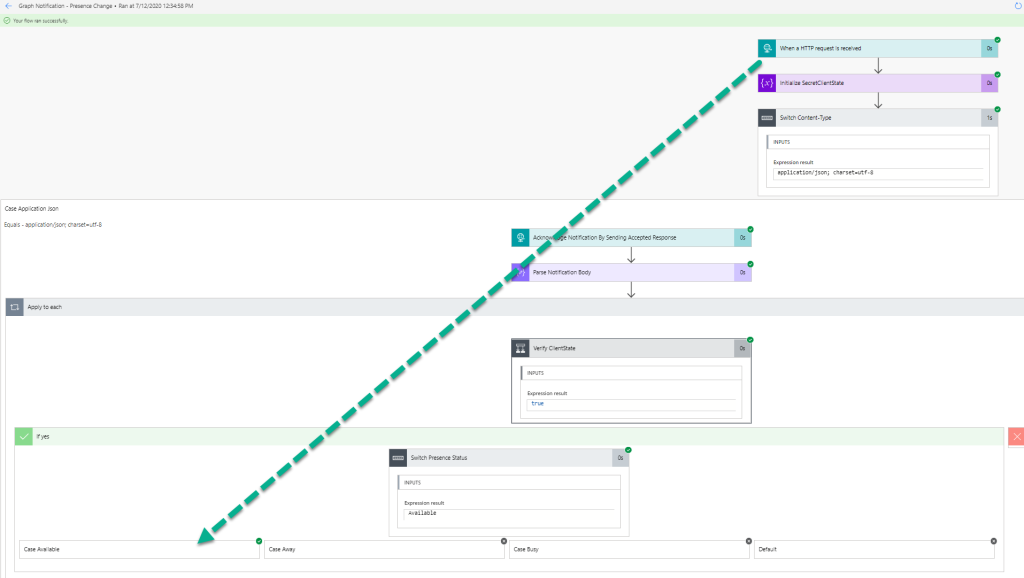
If I bring up the Flow in a bigger picture I can indeed see that my logic ends up where the switch case checks for available status:
My Flow will now be triggered for every change as long as the subscription don’t expire.
Summary
In this blog post I have shown how you can create a Microsoft Graph Subscription for Change Notifications to selected users Teams Presence, using Power Automate to validate subscriptions and process the changes.
There are more work to do, as I need some logic for renewing and managing my subscriptions. But that will be the topic for the next blog post coming soon!
Thanks for reading, hope it has been useful 🙂

Thanks! This is very useful! Good starting point for digging into subscriptions.
However, I cannot select the content-type from the HTTP request. Any idea how I can solve that?
Thanks. As you pointed out there was a typo in my post that said text/plan.. updated now.
Here’s the JSON format for the HTTP request:
{
“type”: “object”,
“properties”: {
“Connection”: {
“type”: “string”
},
“Host”: {
“type”: “string”
},
“Content-Length”: {
“type”: “string”
},
“Content-Type”: {
“type”: “string”
}
}
}
Actually, ignore my last post.
For the content type add an expression with the following:
triggerOutputs()[‘headers’][‘Content-Type’]
Pingback: Blog Series – Power’ing up your Home Office Lights: Part 9 – Using Microsoft Graph to get Teams Presence and show state in PowerApp. | GoToGuy Blog
Pingback: Managing Microsoft Graph Change Notifications Subscriptions with Power Platform | GoToGuy Blog
Unfortunately the following in your post isn’t quite correct ” If you are getting a permission error, make sure that one of the permissions for Presence.Read or Presence.Read.All er consented. This can already been done by your administrator, if not you need to consent to them yourself.”
It seems organisations can turn off the ability for users to self-consent to any new permissions, so in my case I get an a’Approval Required’ prompt which goes to a tenant admin. Getting someone to actually aprove it in large organisations with this set up is near impossible.
Yes, by default users can consent to permissions for data they own and that don’t require admin consents, but this can be completely locked down by organizations as per: https://docs.microsoft.com/en-us/azure/active-directory/manage-apps/configure-user-consent?tabs=azure-portal.
Have you tried only to use Presence.Read?
Thanks for this, it’s a great guide!
Did you ever figure out a way to automatically renew the subscription?
Pingback: Two-way sync of bookings between Dynamics 365 and Outlook, Part I – Change Notifications
Pingback: Two-way sync of bookings between Dynamics 365 and Outlook, Part III – Sync from Outlook to D365 - Dynamics 365 Field Service Community
Pingback: Two-way sync of bookings between Dynamics 365 and Outlook, Part III – Sync from Outlook to D365
Pingback: Building a MS Teams Status Cube with the Graph API Presence Subscriptions – Coder's Jungle