A Blog about Enterprise Mobility + Security, Azure AD, Datacenter Management, Service Delivery, Automation, Monitoring, Cloud OS, Azure and anything worthwhile sharing with the Cloud and Datacenter community.
At time of writing this blog post, it’s only the first week after Microsoft Copilot for Security went GA April 1st, and already the #Security #Community are creating scripts, automations and tools for provisioning or deprovisioning Secure Capacity Units (SCU) that are required for running Copilot for Security in your environment.
A potential cost of 4$ per hour per SCU can amount to $2920 per month if you count 730 hours standard per month, so the motivation is clear, to save cost and use the service only when you need to.
I took inspiration from https://thoor.tech/Copilot-for-Security-deploy-and-destroy/, and decided to create my own solution based on Bicep, Deployment Stacks, and Azure DevOps Pipelines to automate creating a SCU on weekday mornings, and destroy again on the afternoon.
Disclaimer: This is a concept for saving cost in my own sponsored development and demo subscription, and the effects of removing and recreating Secure Compute Units in a Production environment must be carefully evaluated.
Bicep and Deployment Stacks
I wanted to use Bicep and often when I deploy Bicep I use a main.bicep file that deploys at subscription level, that also creates resource group(s) as well as contained resources which I place in modules.
I decided to use Deployment Stacks because I wanted to do a declarative approach, not only to do the actual deploy of the Secure Compute Unit, but also remove the resource from the resource group when the resource became unmanaged.
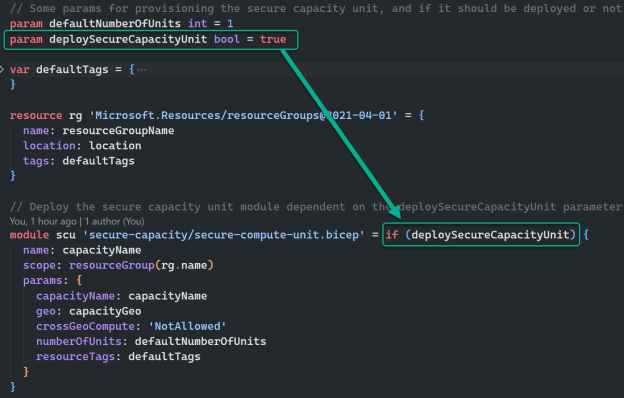
I think the code referenced at the end of this blog post is mostly self-explaining, but I will highlight a couple of elements. The first is using conditional deployment of the module in Bicep like this:
From the image above I can control whether the module will be managed in the deployment or not when I deploy the Bicep.
When running Bicep and using Deployment Stacks, you can control what happens to resources that are ‘unmanaged’. This is how I run the deployment if I want to NOT deploy the Secure Compute Unit for Copilot for Security Capacity, basically controlling CREATE operation with setting the parameter to true, and DELETE operation with setting the parameter to false:
az stack sub create --location WestEurope --name "stack-scu-elven-we" --template-file .\main.bicep --parameters deploySecureCapacityUnit=false --deny-settings-mode none --action-on-unmanage deleteResources
The magic parameter here is the –action-on-unmanage, which I set to deleteResources, which will delete all resources that falls out of bicep template (either by condition or removing resource from file). You can also do a detachResources, which will keep the resources, and you can specify deleteAll which will also remove the Resource Group (which I do not want in my scenario).
PS! Note that I run an az stack sub create, which lets me run a bicep deployment that creates resource groups as needed (yes, I could be a bit colored by my much longer Terraform experience where I also create resource groups).
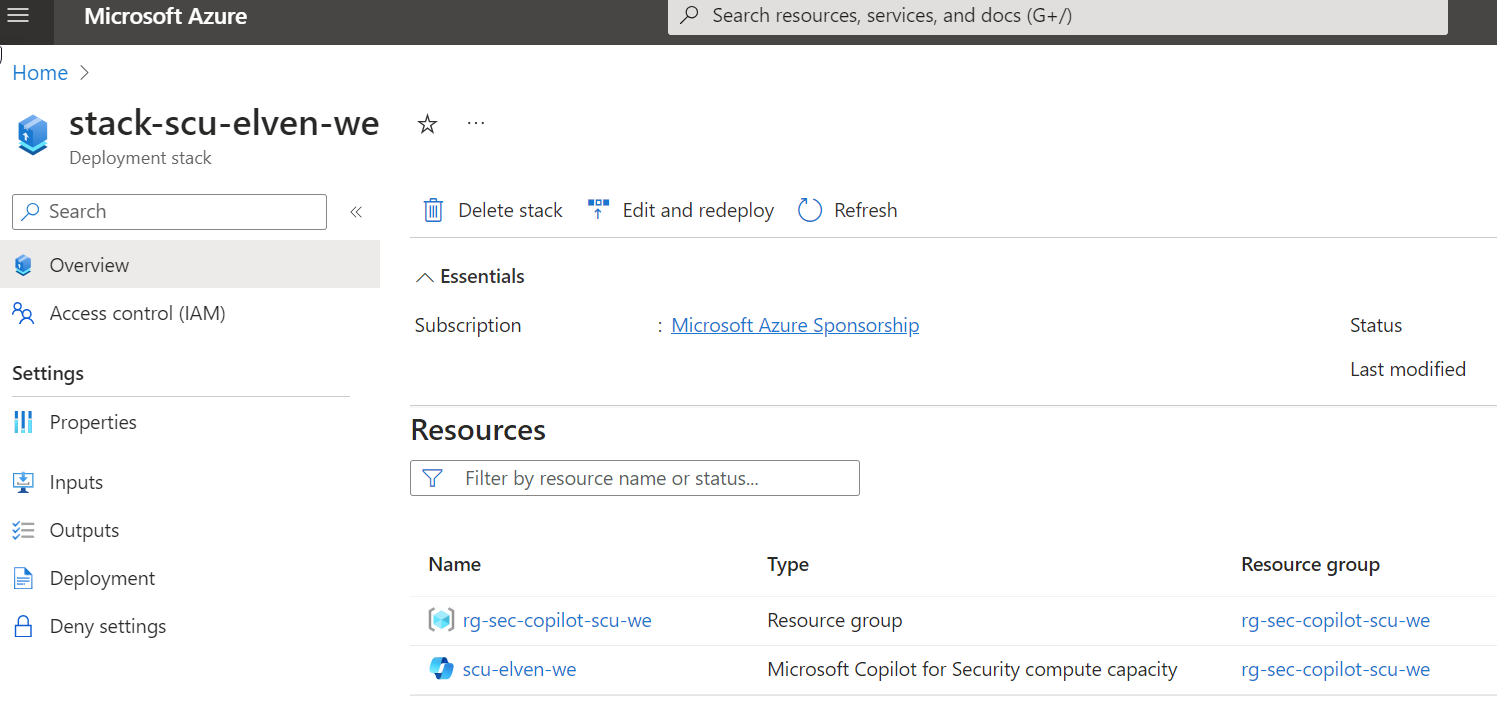
In the Azure Portal, when I run a deploy that creates a SCU, it will look like this in the Deployment Stack:
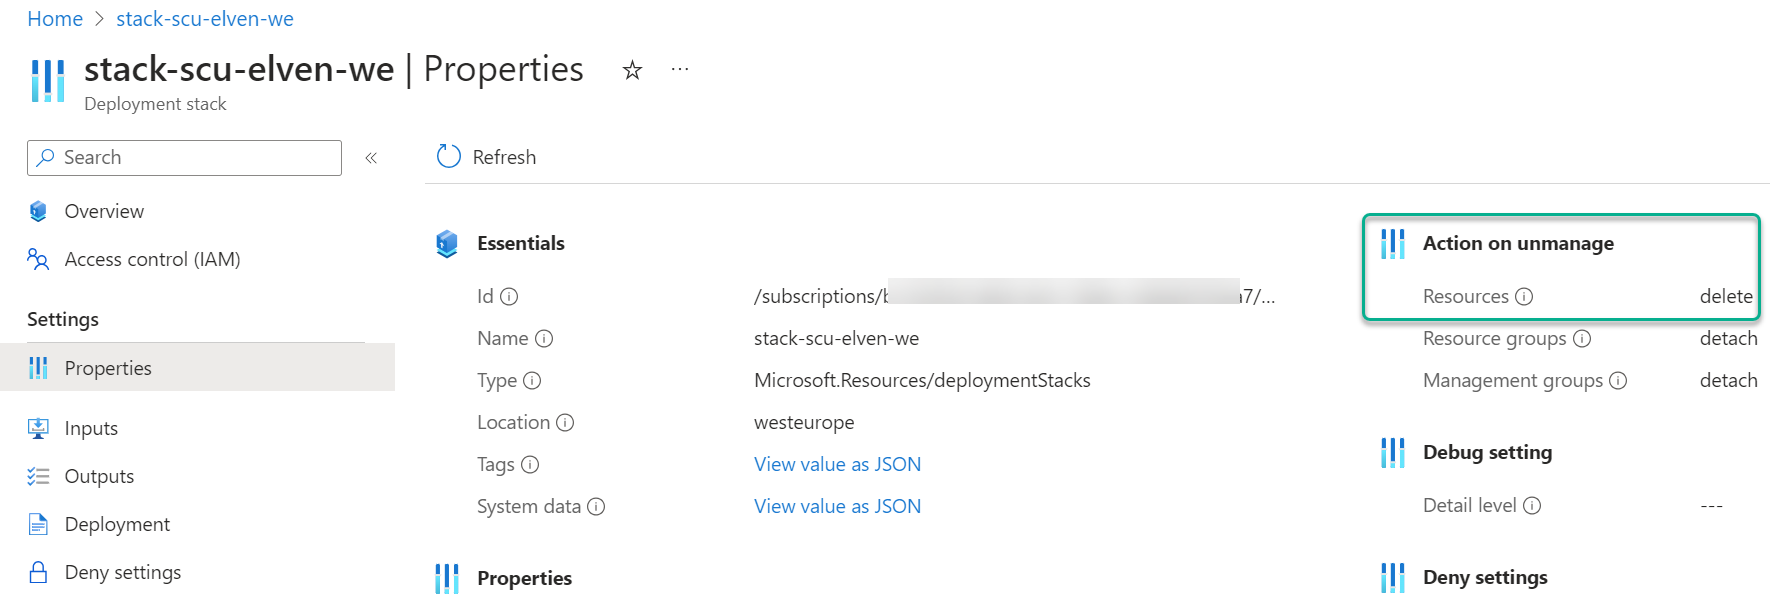
Note the action on unmanage:
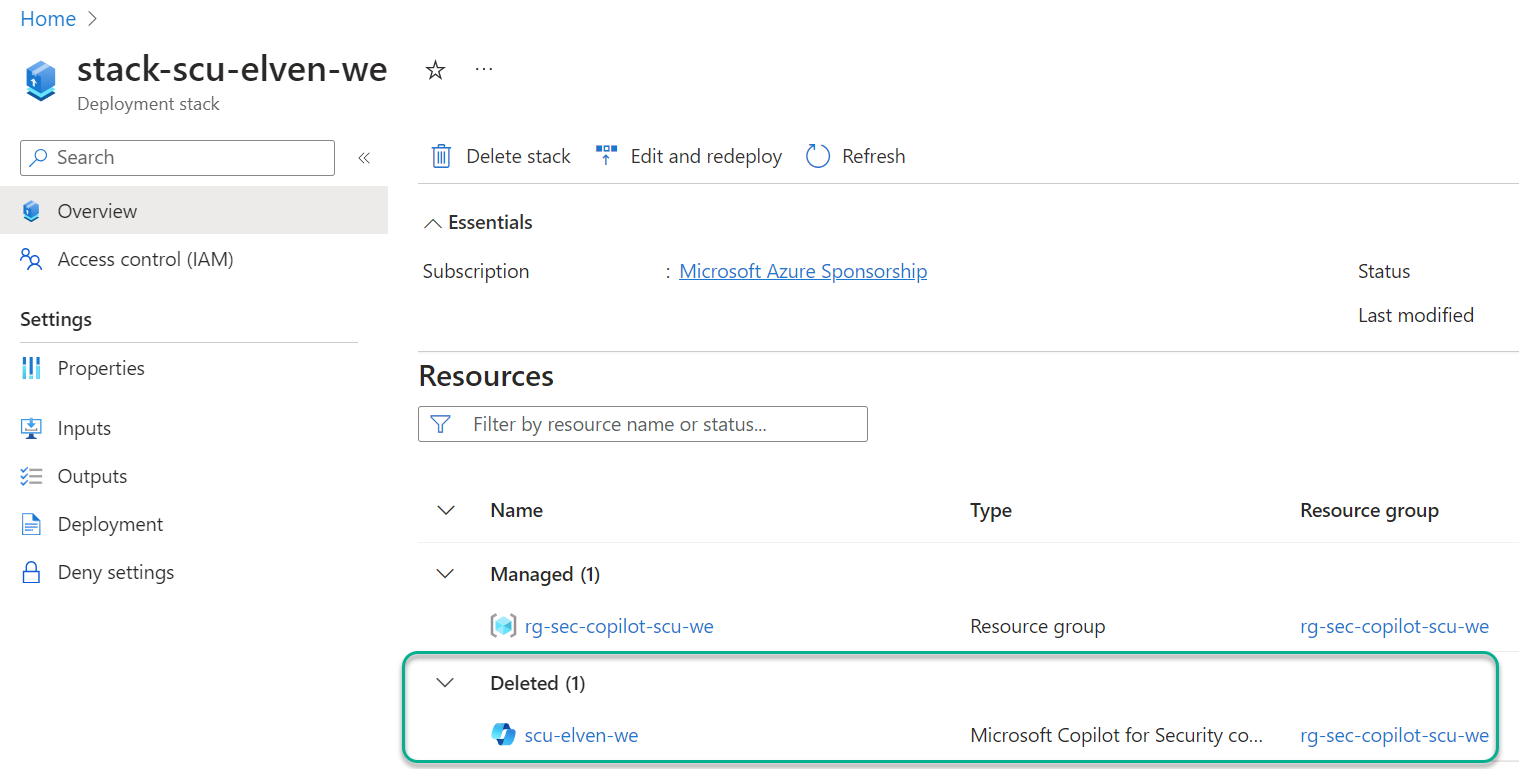
And when I set the parameter to false, to delete the SCU, the result is this:
Azure DevOps Pipelines
With the Bicep deployment using Az CLI verified succesfully, it should be straight forward to create Pipelines for deploying and destroying. The full YAML files are reference below, and should be easy to understand. The main components and requirements are:
Using a CRON expression and not a trigger for just scheduling when to run the pipeline. Note the use of always: true for the schedule, because I want the schedule to run in any case even if the files in the repo have not changed.
Remember you need to set up a Service Connection (Workload Identity Federation highly recommended), with approriate permissions to create resources in your reference Azure subscription.
If you look closer, you can see that the 2 pipelines, one for deploy and one for destroy, are almost exactly the same, with the exception of default value of either false or true for deploySecureCapacityUnit, and of course the morning and afternoon schedules are different.
FEATURE WHISH: I would have thought that I could use multiple schedules in the same YAML pipeline, and specifying different default value for the deploySecureCapacityUnit parameter based on schedule. Then I would be able to have just the one pipeline instead of two..
I’ll leave you to the rest, see reference to files I have published as Gists on my GitHub account https://github.com/janvidarelven.
Gist Reference
Complete Gist is linked below and is public, and feel free to Clone, Fork, Pull if you want to contribute, etc.
Gist consists of 4 files:
main.bicep – Parameters, variables, resource group and a module for Secure Compute Unit
secure-compute-unit.bicep – Module definition for deploying a Secure Compute Unit for Copilot for Security
deploy-security-copilot.yml – Pipeline with schedule for deploying Bicep from above files using Deployment Stack, creating a Secure Compute Unit.
destroy-security-copilot.yml – Pipeline with schedule for deploying Bicep from above files using Deployment Stack, deleting the Secure Compute Unit.
This file contains bidirectional Unicode text that may be interpreted or compiled differently than what appears below. To review, open the file in an editor that reveals hidden Unicode characters.
Learn more about bidirectional Unicode characters
This file contains bidirectional Unicode text that may be interpreted or compiled differently than what appears below. To review, open the file in an editor that reveals hidden Unicode characters.
Learn more about bidirectional Unicode characters
This file contains bidirectional Unicode text that may be interpreted or compiled differently than what appears below. To review, open the file in an editor that reveals hidden Unicode characters.
Learn more about bidirectional Unicode characters
This file contains bidirectional Unicode text that may be interpreted or compiled differently than what appears below. To review, open the file in an editor that reveals hidden Unicode characters.
Learn more about bidirectional Unicode characters
In this contribution I will show you how you can build your own Security Copilot, by using Azure Open AI, AI Search Service and your own security data sources, in a creative way that let users ask about their own security status in a natural language!
This is part of my contribution to the Festive Tech Calendar 2023, and I’m proud to share my learnings again for this year, hope you will find it useful 🎅🏻🎄
Let’s start by looking into what capabilities that will be available in the Microsoft Security Copilot.
Microsoft Security Copilot
One of the main features of AI and Copilot solutions is to process natural language prompts, so I asked Bing Chat Enterprise to provide me a summary of what Microsoft Security Copilot is, use cases and data insights:
Microsoft Security Copilot is not generally available yet, and require that your organization is part of an invitation-only Early Access Program for Security Copilot.
Security Copilot works with other Microsoft Security products—including but not limited to Microsoft Defender XDR, Microsoft Sentinel, Microsoft Intune, Microsoft Entra, Microsoft Purview, Microsoft Defender for Cloud, and Microsoft Defender for External Attack Surface Management.
Security Copilot uses the data and signals from these products to generate customized guidance based on user prompts processed by LLM (Large Language Model) and Azure OpenAI grounded on your organizations’ data via connected plugins.
Building Your Own Security Copilot
We can customize and build our own AI solution and Copilot, while waiting for access to the upcoming Microsoft Security Copilot, by following these high-level steps:
Create an Azure OpenAI instance in your Azure Subscription.
Bring your own data to OpenAI and AI Search Service.
Create a deployment and connect a web app, bot or any other client interface that can process prompts.
In this blog article I will show a couple of different options and guides for doing so yourself.
Prerequisites
To be able to build your own Copilot solution, you will need to have access to an Azure Subscription and create some Azure resources for Azure OpenAI and AI Search.
When this is set up, and a deployment have been created in the OpenAI Studio for for example gpt-35-turbo or the gpt-4 models, you are ready for adding your own data.
Scenario A: Create your own Microsoft Sentinel Cyber Security AI assistant
This solution is inspired by Jeroen Niesen’s Vlog about how to add alerts from Microsoft Sentinel to a Storage Account as markdown documents, and add that storage account to Azure OpenAI and Search Service to index the security alerts. From there you can ask questions like “are there any new incidents” and follow up with details. This short video show how to set it up:
I’ve used that demo recently in a couple of presentations, where I have added a Power Platform app with a custom connector that queries the OpenAI instance via REST API, basically building on the same scenario as Jeroen over here.
Scenario B: Add Security Information from Microsoft Graph to Azure OpenAI
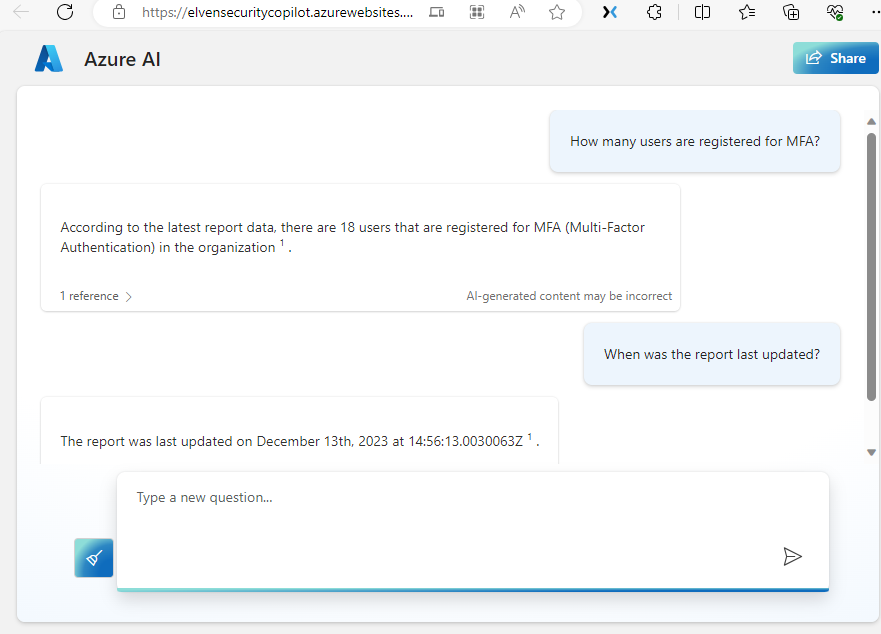
In this scenario I will explore how you can add Security information from Microsoft Graph to Azure OpenAI. There are a lot of security info that you can retrieve using Microsoft Graph API, so I will scope this scenario to getting reports about the Users’ Authentication Methods. The scenario I would like to accomplish is that we can use our own Copilot to get insights by using prompts like:
“How many users are registered for MFA?”
“What is the most used authentication method used for MFA?”
“How many users have at least two methods registered?”
“How many users are capable of passwordless?”
.. and so on..
To be able to answer these questions by using Azure OpenAI, I will need to find a way to add the report data from Microsoft Graph as my own data, and in the prerequisites section above I linked to a Learn article that detailed how to use your own data. Note that there are a list of supported file types, which currently includes .txt, .md (markdown files), .html, as well as Word documents, PowerPoint presentations and PDF documents.
I will start by querying Microsoft Graph API and get reports of Authentication Methods registered for my users, and then export that data into markdown files that I will place on a Storage Container that will be indexed by Azure AI Search service.
Let’s get to work 💪🏻!
Create and Configure a Logic App for getting security information
I will use a Logic App for querying Microsoft Graph for the authentication methods reports, and place this info on a storage account blob container. Follow these steps:
Create a Logic App in your Azure subscription with a http request trigger and a http response.
Enable a System Assigned Managed Identity for the Logic App.
If you haven’t already a suitable Storage Account for placing the reports, create a Storage Account and a blob container for the markdown reports to be placed in.
You will now need to add role assignments so that the Logic App can access the storage account container:
Add “Reader and Data Access” role to the Logic App system assigned managed identity.
Add “Storage Blob Data Contributor” role to the Logic App system assigned managed identity.
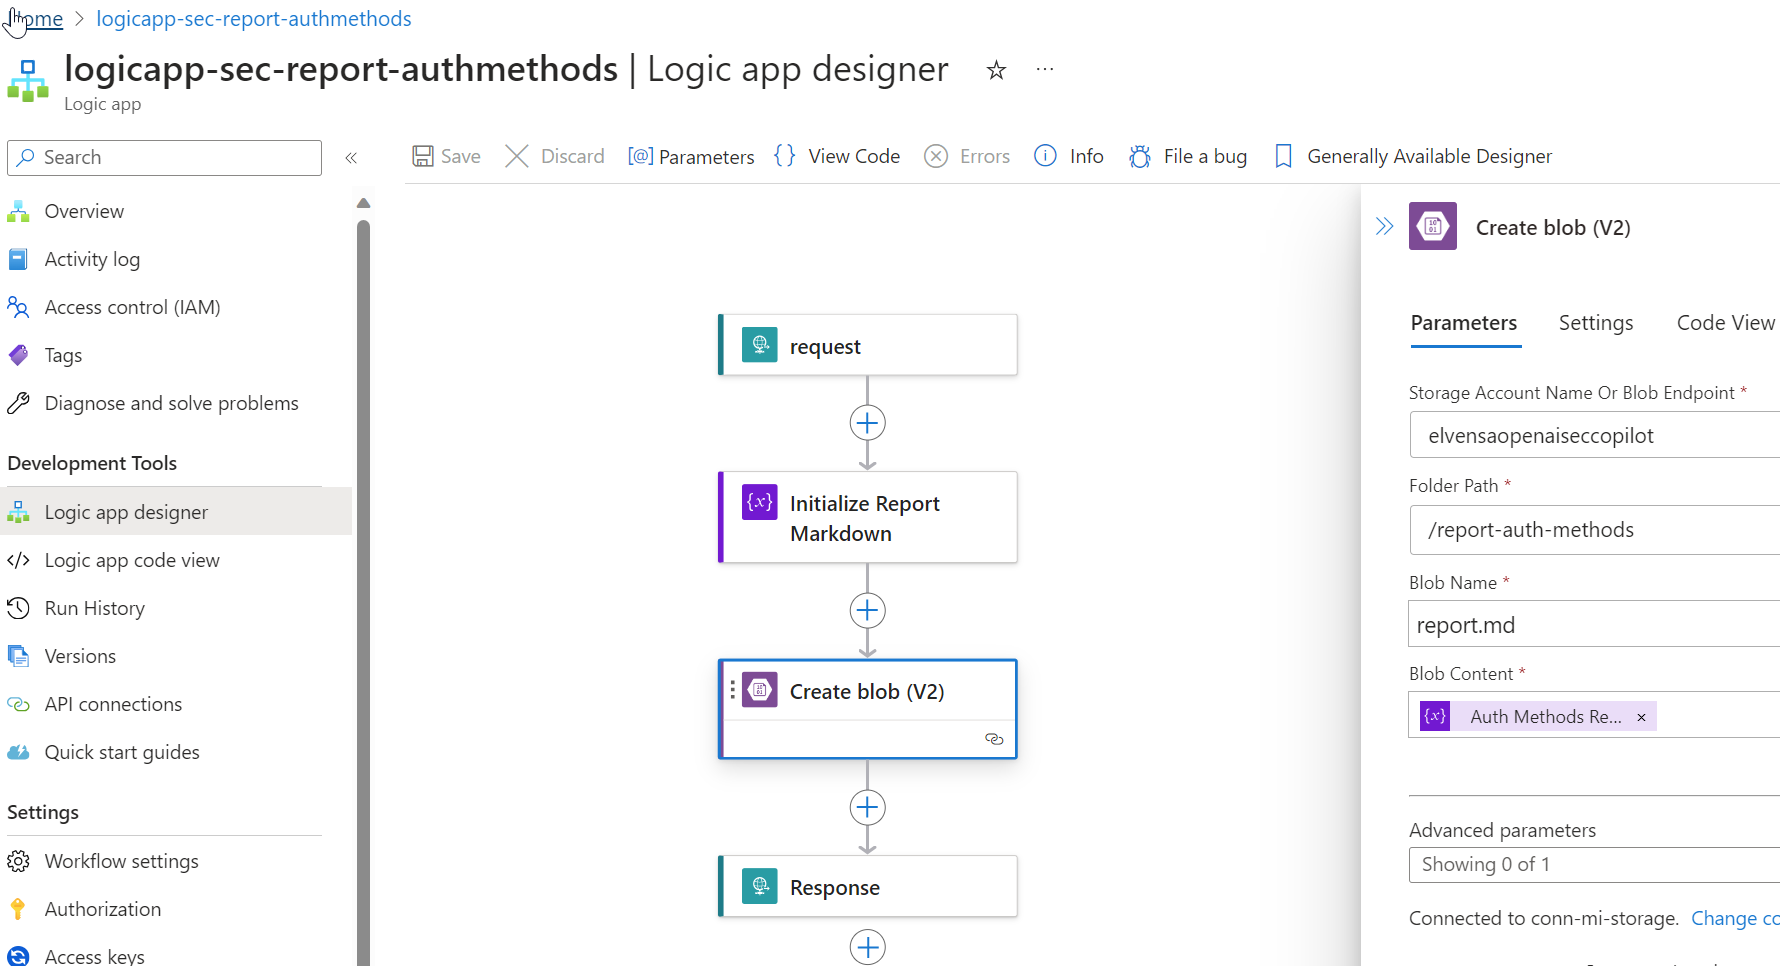
Add an action in the Logic App for Initialize Variable, of type string and for initializing a markdown file with some generic headings for now.
Add another action for Create Blob (V2), where you use the managed identity to connect to the Storage Account and container, and place the markdown file initialized by the previous variable.
Your Logic App can now look similar to this, make sure to test and verify a successful run:
Send Requests to Microsoft Graph from Logic App
Next, we will need to prepare the Logic App to send requests to Microsoft Graph to get Authentication Methods Reports. In my scenario I want start by querying these resources:
I can verify these queries in the Graph Explorer (https://aka.ms/ge), note that you need to consent to AuditLog.Read.All to be able to run this, you also need to be member of one of the following roles:
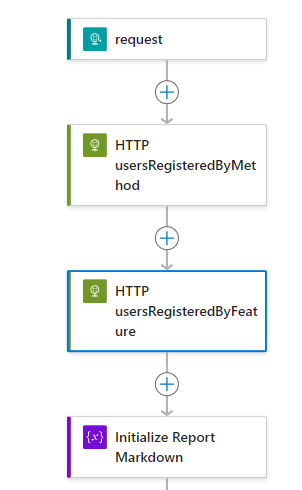
In the Logic App, add two HTTP actions after the trigger, like this:
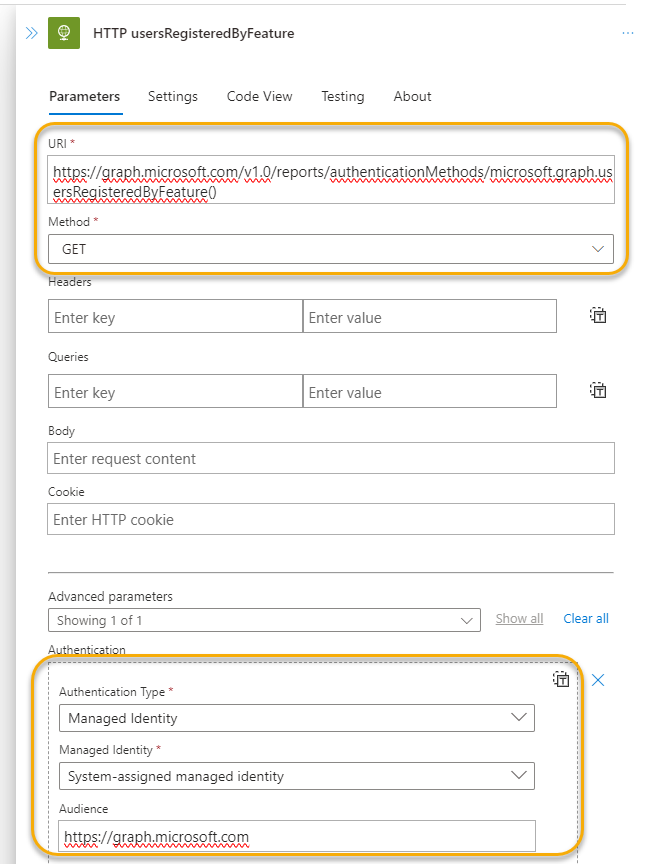
Then configure the respective HTTP actions to run queries to Microsoft Graph and using managed identity like this:
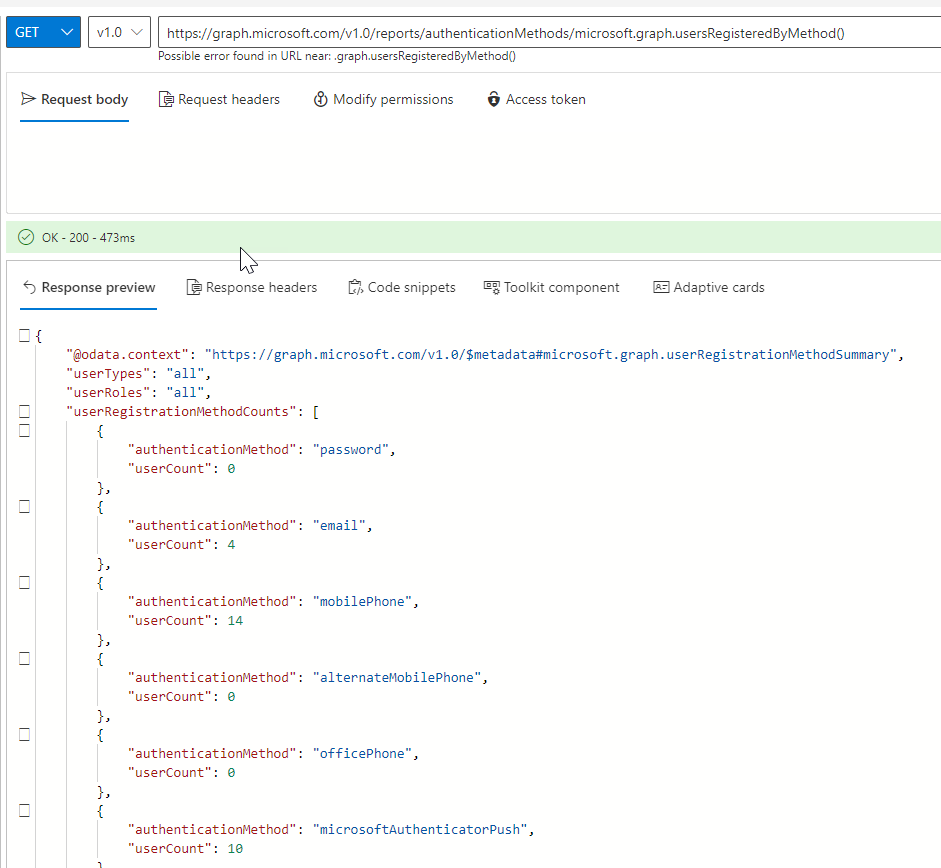
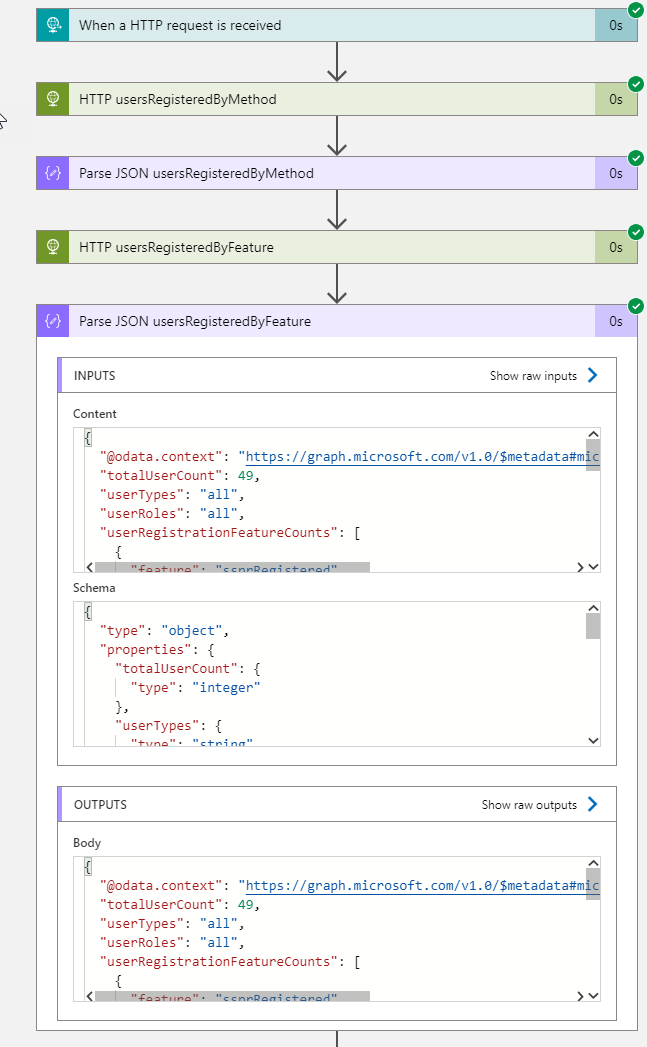
Add also after each HTTP request a Parse JSON action, using the sample schema from the response you got when you tested the queries in Graph Explorer. This will make it easier to use the values in our report later. When testing now, you should get something like this before you proceed to the next section:
Start building the Markdown Report for Authentication Methods
We now have an output from Microsoft Graph, which we can use to populate the markdown report that will be placed in the Storage Account for later consumption by OpenAI.
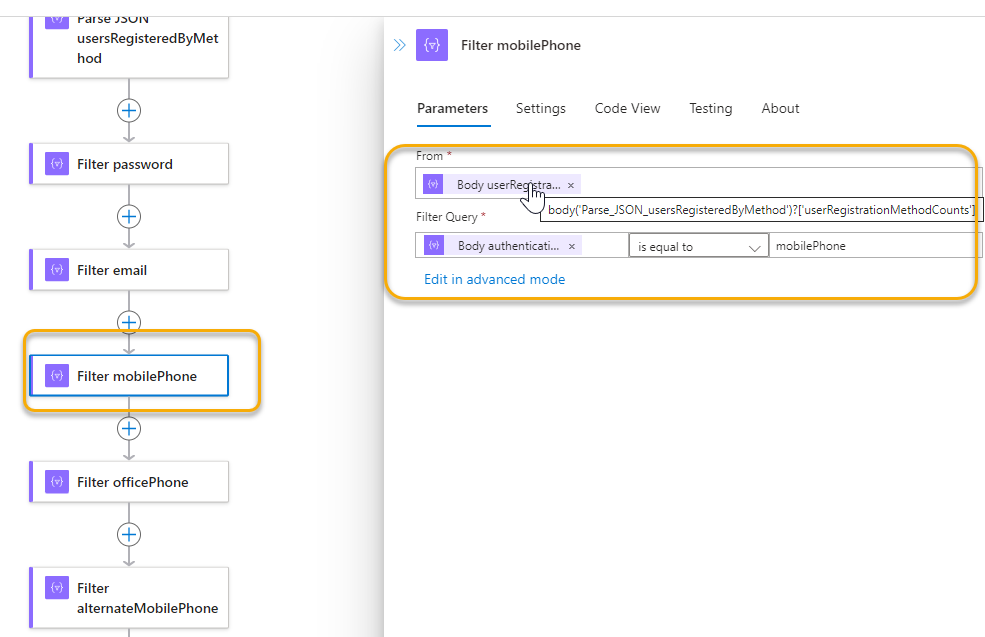
There are several ways you can do this, I will fokus on keywords and values to be presented in the report. As you might have seen, the response from Microsoft Graph for the authentication methods report is a combination of a parent object and an array of either “userRegistrationFeatureCounts” or “userRegistrationMethodCounts”, so I’ll include several Filter Array actions to get the user counts I want. For example like the following:
I repeat that for every user count value I want to include in my report.
In the variable action I use for initalizing the markdown report, I can now refer to these usercount values. PS! As Filter Array action returns an array, even with a single instance, you need to use a function like first() or last() to get the value, for example: first(outputs('Filter_mfaCapable')['body'])?['userCount'])
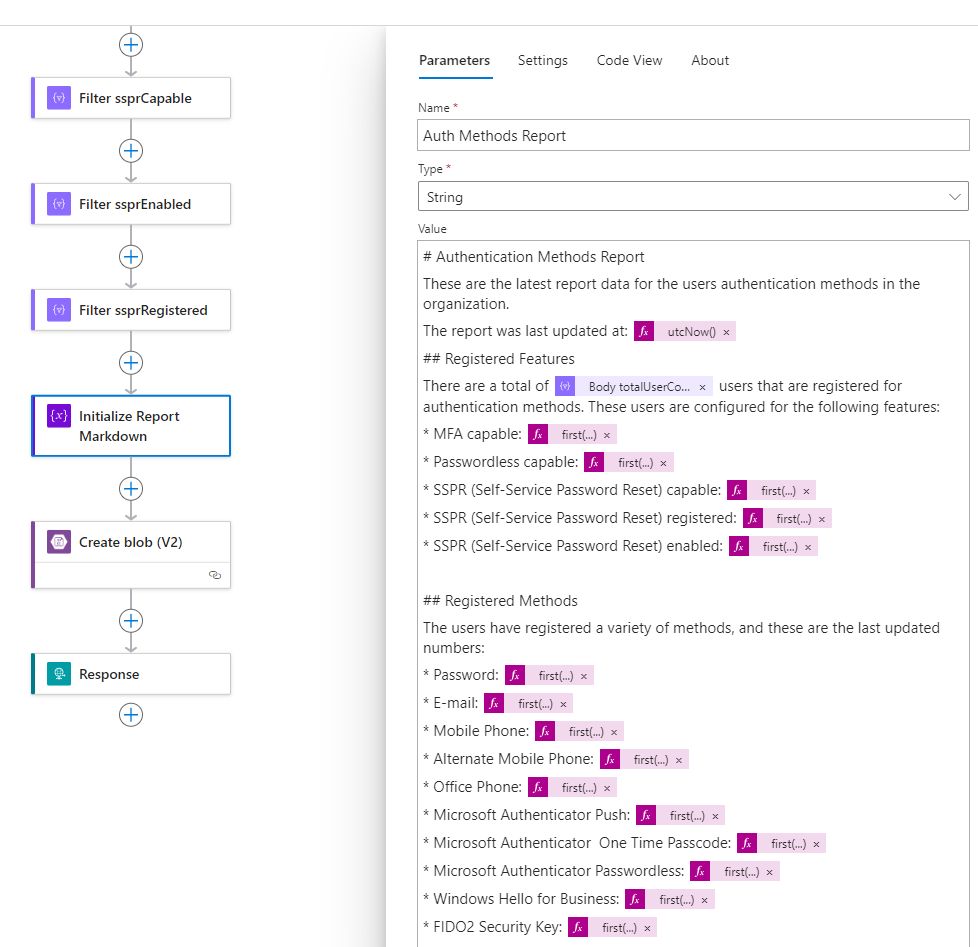
So my report definition now looks like this, I have also added a time stamp and the total number of users from the feature report:
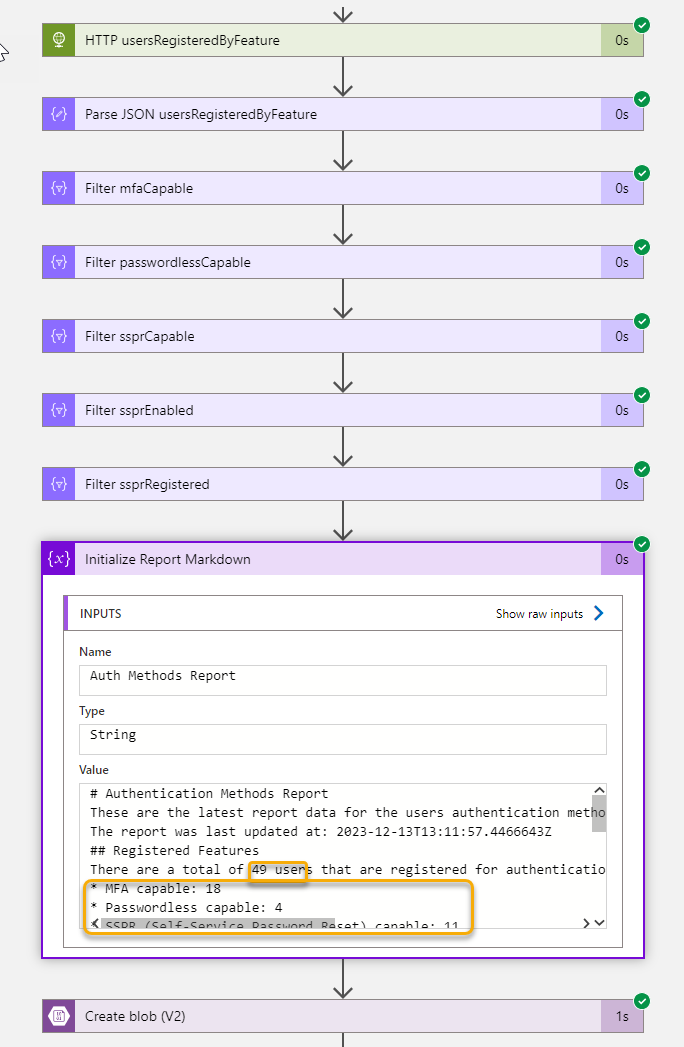
If I run the Logic App again, I can verify that it will get the report values and create the report as I wanted to, here is a section of the report:
This report, with values, have now been placed at the Storage Account Blob Container, and we can continue into Azure OpenAI to add this as our custom data!
Add your own data to Azure OpenAI
This section require that you have access to Azure OpenAI, and have deployed an instance. Then you can go to OpenAI Studio, https://oai.azure.com/, and follow the steps from there.
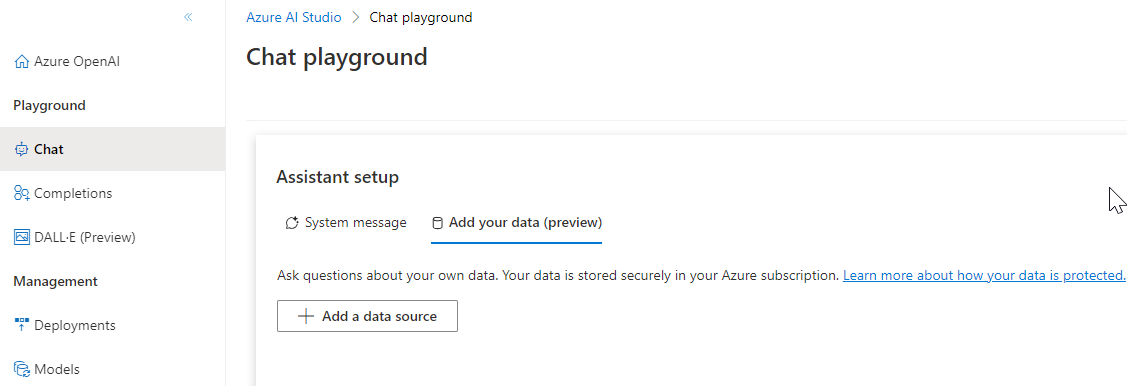
In my environment from below, I can go to the Chat playground, and under assistant setup go to the add your data tab:
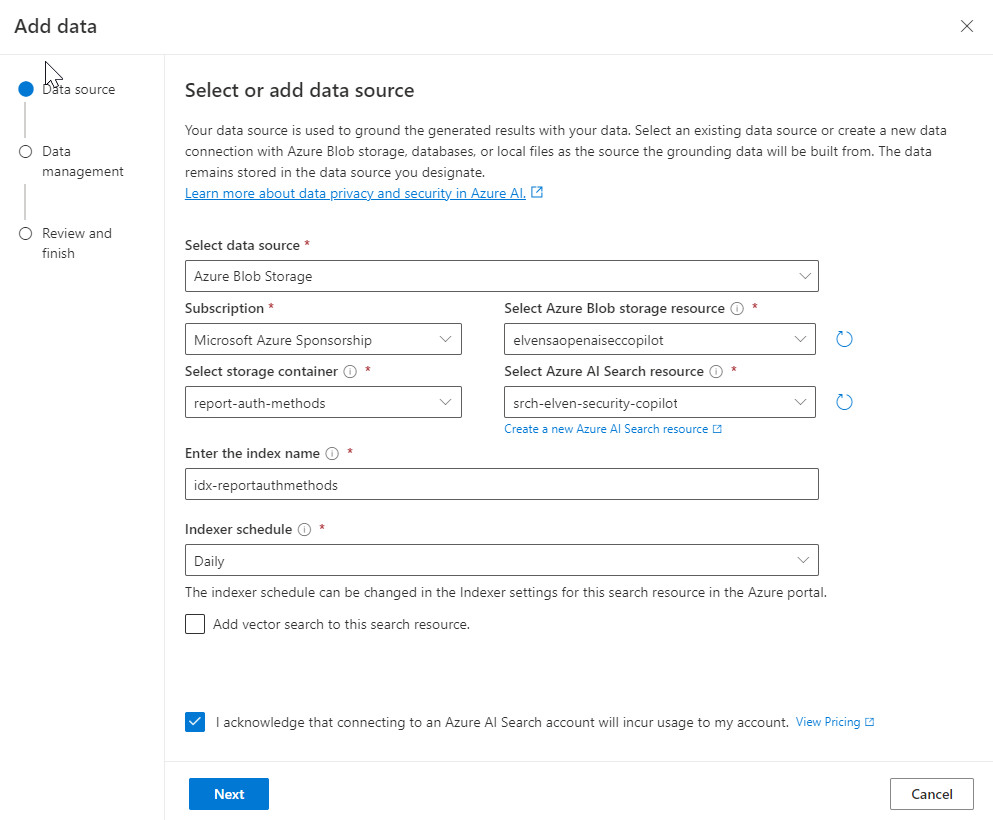
From the different options of data sources, I select Blob storage, and navigate to my subscription, storage account resource and the storage container where I placed the security report. I also need to select (or create if you don’t yet have any) and Azure AI Search resource. This was previously known as Cognitive Search. Enter an index name of choice, and select a schedule:
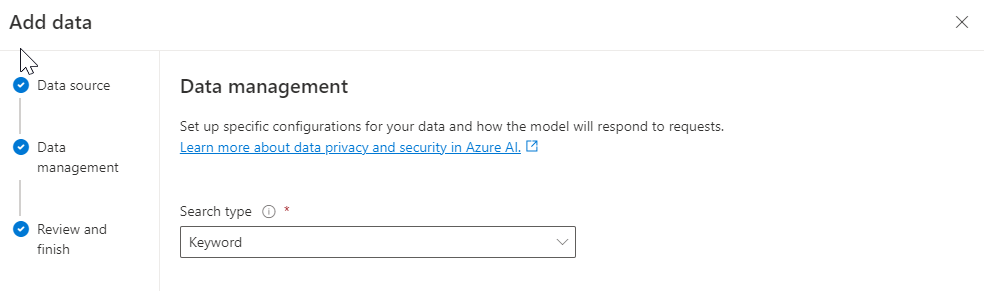
I select keyword search in my scenario:
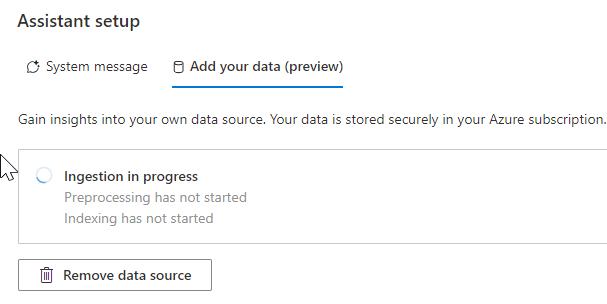
I confirm and complete the wizard, and we can now wait for the processing and indexing of my data:
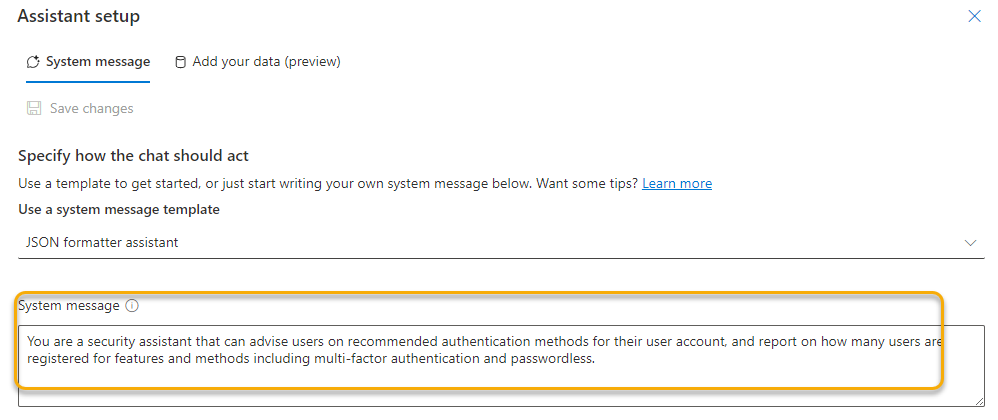
Finally I will add a system message that will help the assistant in answering prompts from users:
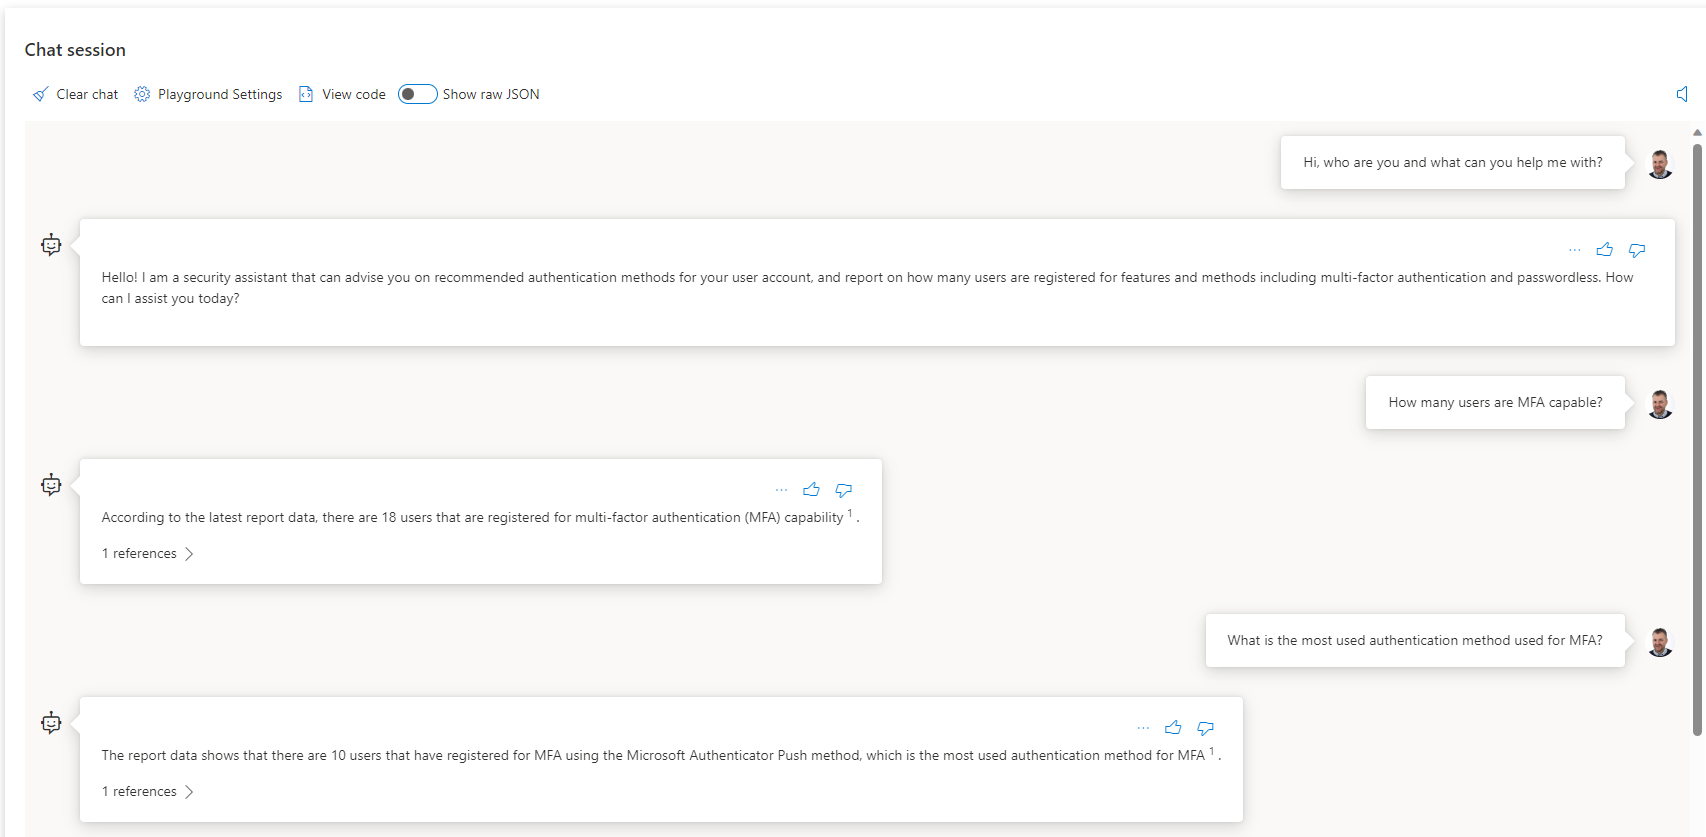
Our assistant in Azure OpenAI is now ready to answer our questions. Let’s do some testing in the playground chat:
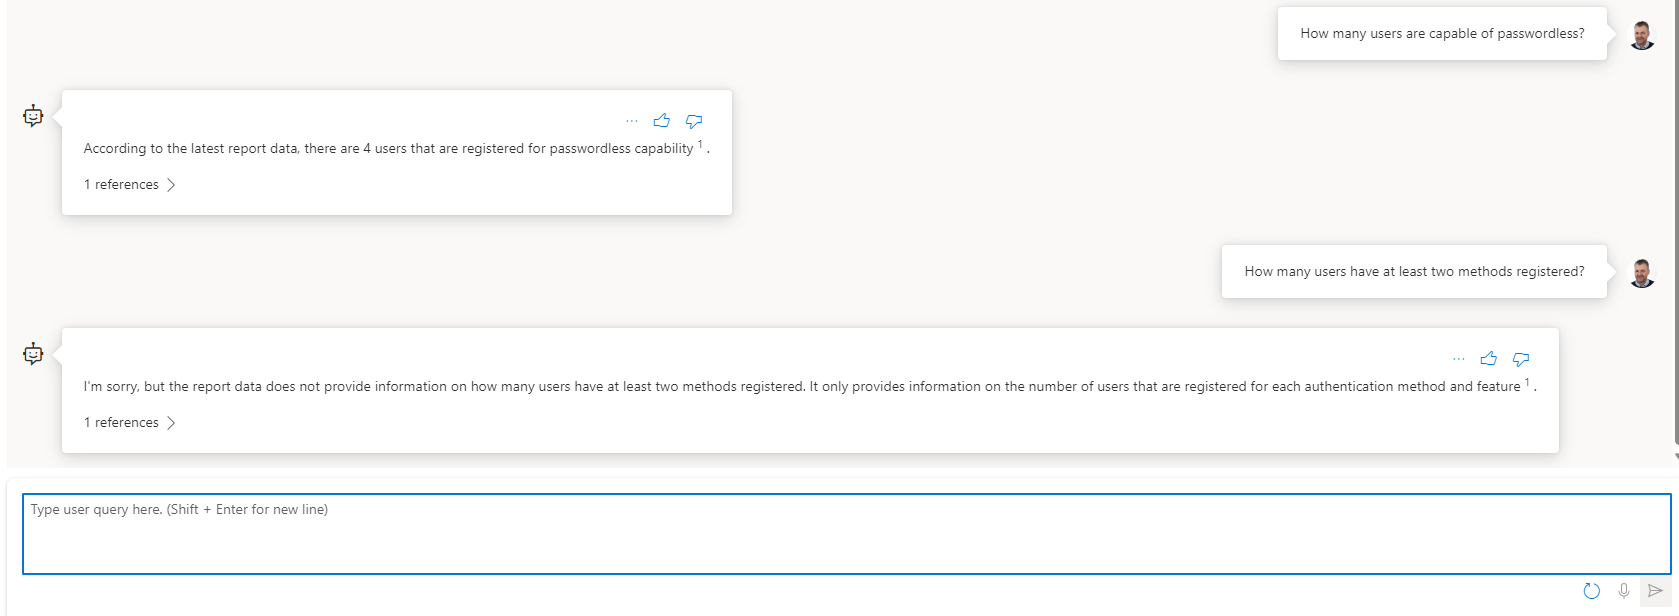
As we can see, the assistant is now capable of answering prompts about the report data. Note that I cannot ask about individual users’ methods, as naturally I haven’t included that in the report data. But I plan to add that in a follow up article to this blog post, so stay tuned.
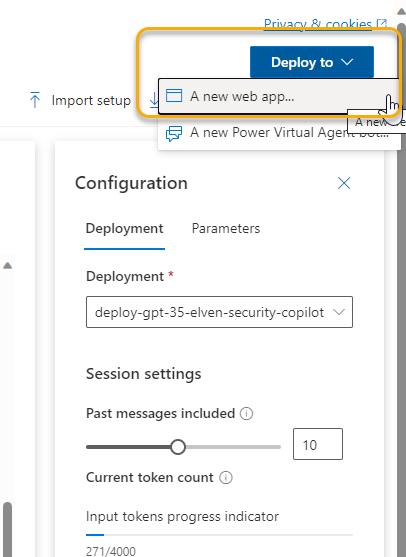
Share your Security Copilot with users in the Organization
You can share this to your users directly from the OpenAI Studio, by either deploy to a Web App or as a Power Virtual Agent bot. Different requirements and prerequisites apply to each scenario:
For my demo I published to a web app as an Azure App Service, that will automatically configured with Entra ID Authentication for users in your organization. Here is a demo screenshoot of how the web app looks:
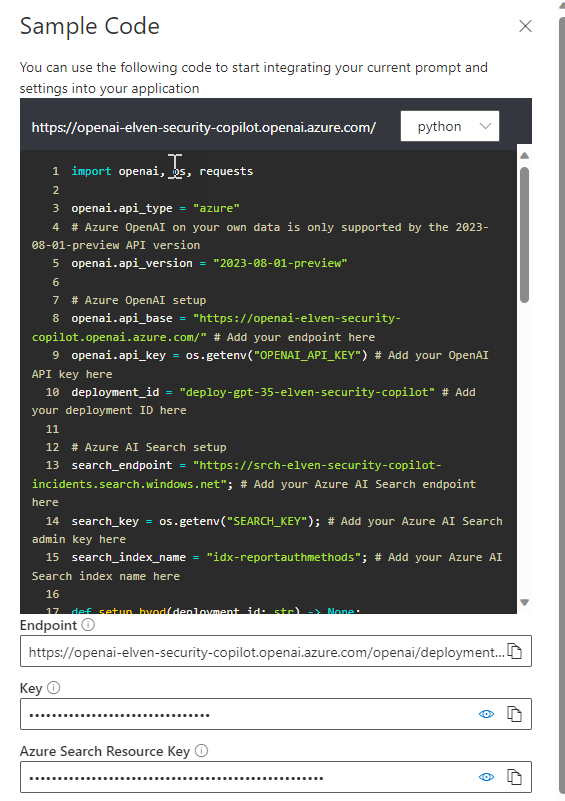
If I want to use my own application platform, for example a PowerApp like I showed earlier in this post, I can use the details from the code sample in the Chat Playground, and integrate as I like:
I’ll leave the rest of the exploring and playing to you!
Summary & Next Steps
Let it be no doubt, the upcoming Microsoft Security Copilot will be the most comprehensive AI based security assistant to date, but it might be that not everyone have access to or can afford pricing for the official Microsoft solution.
The reason for showing this blog post is that you can use basically the same data sources, utilize Azure OpenAI, and build your own custom scenarios. From there you can explore many different ways to bring copilot experience to your users.
This opens for a lot of scenarios for Azure service connections, without the need to manage secrets for service principals and more security as there are no secrets that can be exposed or exfiltrated.
As I work a lot with Microsoft Graph and automation, I wanted to see if and how I could use Workload Identity Federation to connect to and send queries to Microsoft Graph using Azure Pipelines.
Create the Workload Identity Federation Service Connection
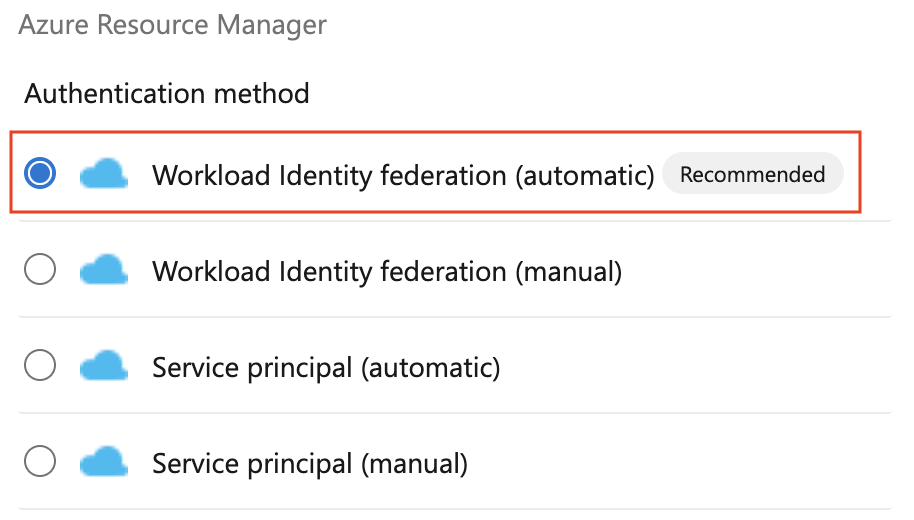
When you have access to the feature, you can create a new Workload Identity federation either by manual or automatic configuration:
I will now choose the Azure Subscription, and optionally a Resource Group. Choosing a resource group is a good idea, as the service connection will be given Contributor access only to that Resource Group, and not the whole subscription. But it also depends on what you want to use your Service Connection for, in my case it is a demo scenario for Microsoft Graph Access, so it makes sense to scope the permissions down:
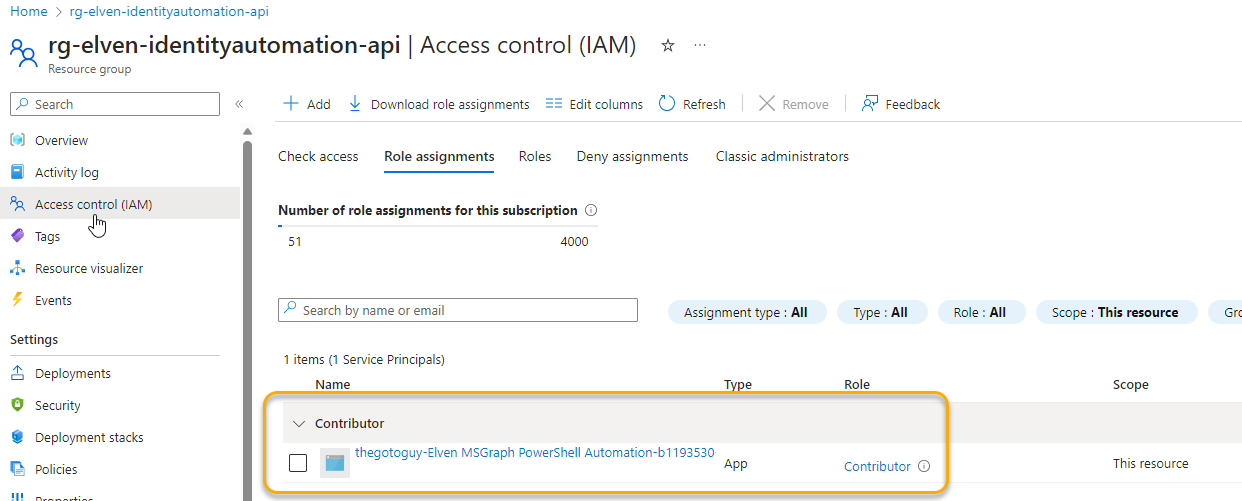
After creating the Service Connection, I can find it my Entra ID tenant. Let’s look at the role assignments for the Resource Group first:
The service principal has been given the name of <DevOps Org>-<DevOps Project>-<guid>, and been assigned with Contributor access to that RG.
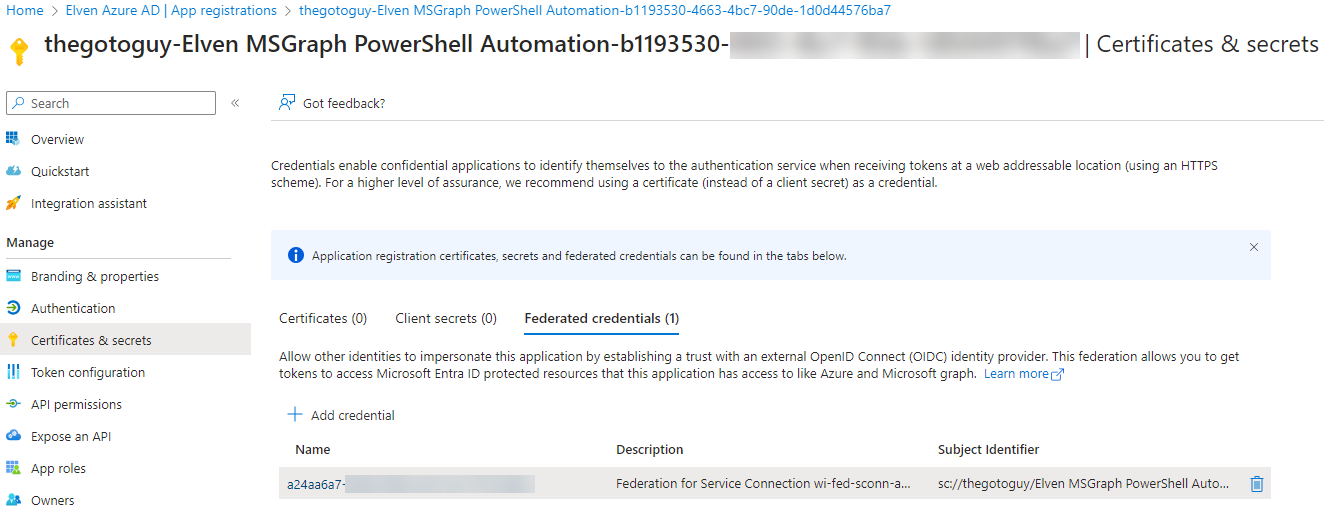
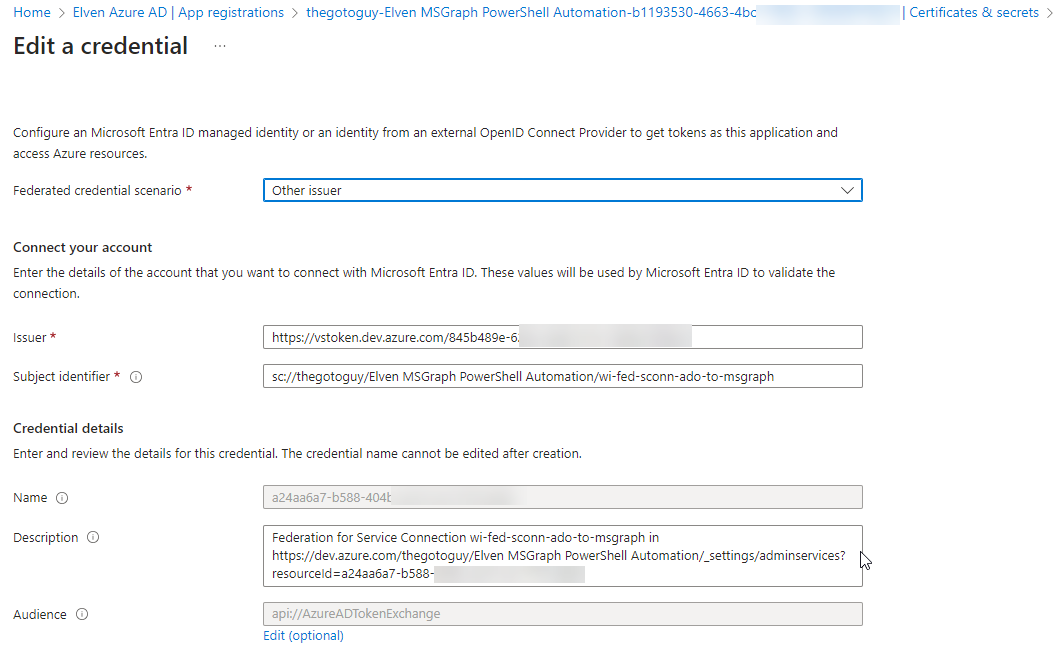
Next, let’s find the App Registration for the Service Connection. As you can see from below there has been no (0) credentials of secrets or certificates created, but there has been created a Federated credential:
If we look at the detail for the federated credential, we can se the issuer, subject and audience, and confirm that this service principal only can be access by the service connection in Azure DevOps:
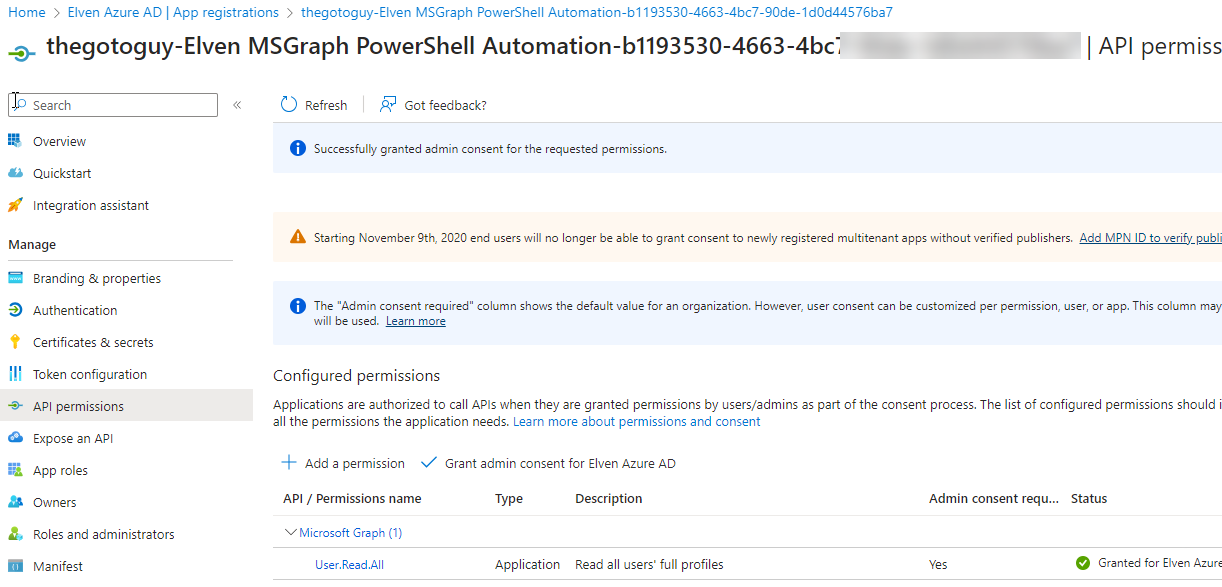
Next, go to API permissions. Here I will add a Microsoft Graph permission, so that we can use that for queries in the pipeline later. In my case I add the Application permission User.Read.All, so I can look up user information:
We are now ready to set up an Azure Pipeline to use this service connection.
Create the Azure Pipeline to access Microsoft Graph API
In your DevOps project, if this is a new project, make sure that you initialize the Repository, and that you have at least a Basic or Visual Studio access level, then head to Pipelines and create a “New Pipeline”. For my environment I will just choose the following steps:
Select Azure Repos Git (YAML)
Select my repository
Use a starter pipeline (or you can choose an existing if you have)
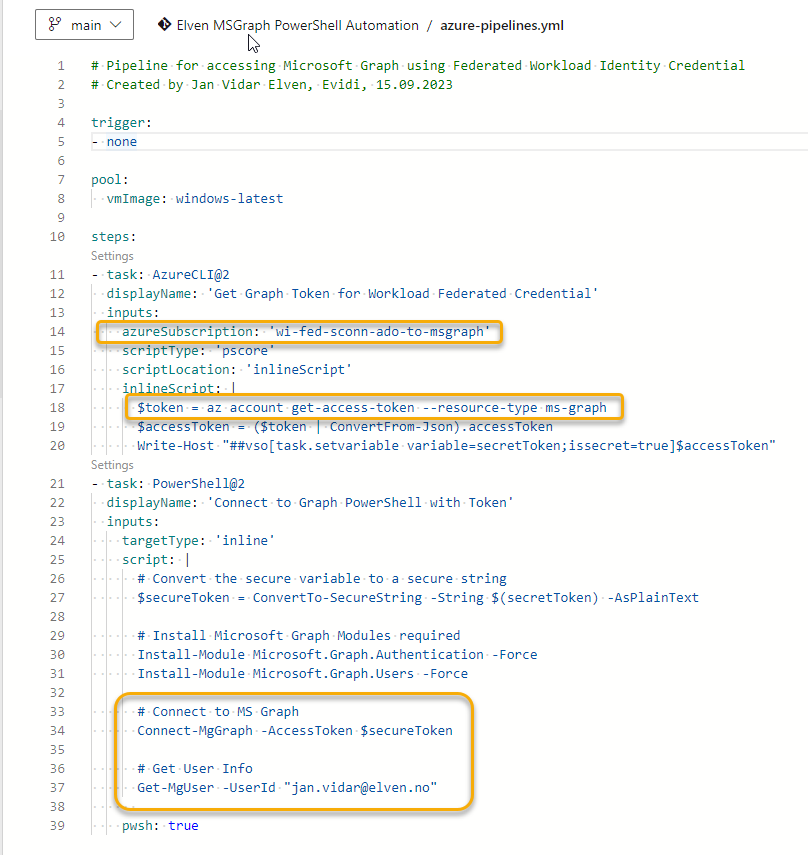
This is a sample YAML code that will use the service connection (se below picture) to get an access token for Microsoft Graph, and the use that access token to connect to Graph PowerShell SDK. In my example I’m just showing how to get some simple user information:
There are different ways you can go about this, in my case I was just using Azure CLI in one task to get the access token for the resource type that is Graph. (You can also use Az PowerShell task for this by the way). I also set and secure the variable for use in later steps in the pipeline job.
In the next task I use PowerShell Core to convert the token to a secure string, and then install the required Microsoft Graph PowerShell modules. I can then connect to Graph and get user information. Here is the complete YAML code:
# Pipeline for accessing Microsoft Graph using Federated Workload Identity Credential
# Created by Jan Vidar Elven, Evidi, 15.09.2023

trigger:
- none

pool:
  vmImage: windows-latest

steps:
- task: AzureCLI@2
  displayName: 'Get Graph Token for Workload Federated Credential'
  inputs:
    azureSubscription: 'wi-fed-sconn-ado-to-msgraph'
    scriptType: 'pscore'
    scriptLocation: 'inlineScript'
    inlineScript: |
      $token = az account get-access-token --resource-type ms-graph
      $accessToken = ($token | ConvertFrom-Json).accessToken
      Write-Host "##vso[task.setvariable variable=secretToken;issecret=true]$accessToken"
- task: PowerShell@2
  displayName: 'Connect to Graph PowerShell with Token'
  inputs:
    targetType: 'inline'
    script: |
      # Convert the secure variable to a secure string
      $secureToken = ConvertTo-SecureString -String $(secretToken) -AsPlainText

      # Install Microsoft Graph Modules required
      Install-Module Microsoft.Graph.Authentication -Force
      Install-Module Microsoft.Graph.Users -Force

      # Connect to MS Graph
      Connect-MgGraph -AccessToken $secureToken

      # Get User Info
      Get-MgUser -UserId "[email protected]"

    pwsh: true
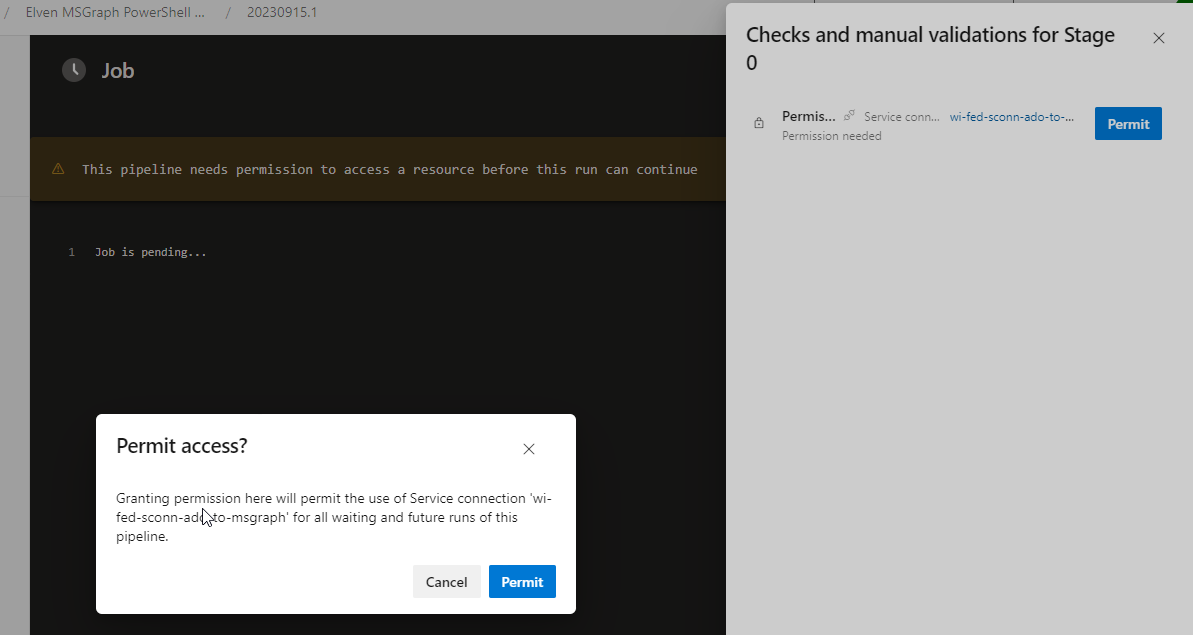
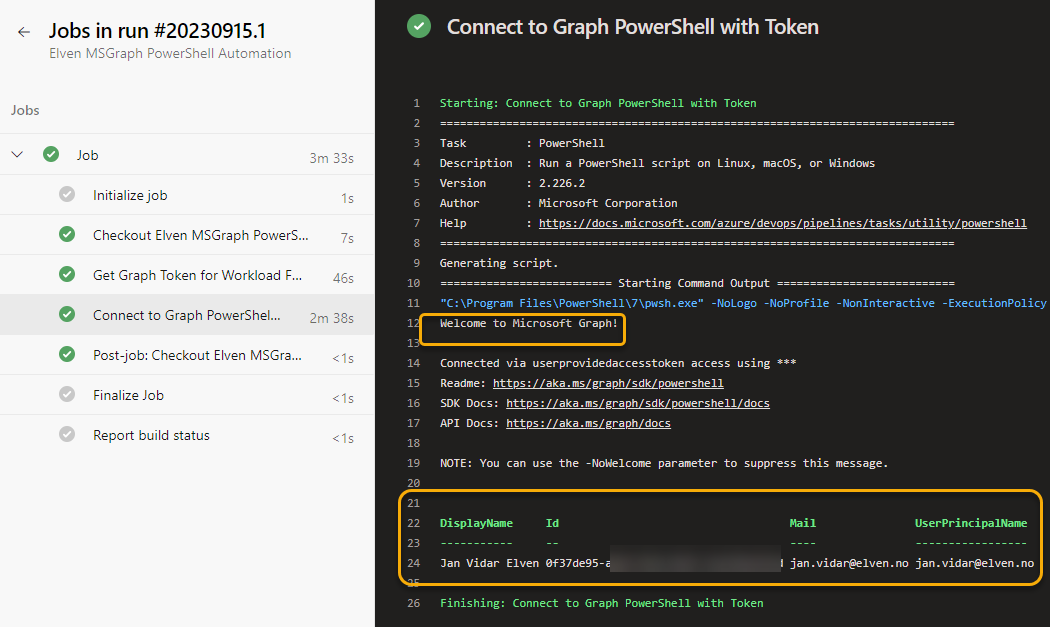
I can now try to run the pipeline. At first run you will have to validate and permit access to the service connection from the pipeline:
And then I can verify that it indeed can connect to the Graph via PowerShell SDK and get my resources via the Workload Identity Federation service connection:
Summary and Usage Scenarios
Most will use the new Workload Identity Federation for Azure Pipelines that access Azure subscriptions and resources, but I have shown as as long as this is using the Entra ID authentication platform and OIDC, it is possible to get access tokens for other API’s as well, in this case Microsoft Graph API.
You can use Graph API to get information about your tenant, to enrich and complement your exisiting CI/CD pipelines, or in some case automate consistent deployments also for Graph resources, like for example important settings and policies.
There are several ways you can access the Azure AD Protected APIs in Power Platform Flows and Apps. Without creating Custom Connectors, which basically can connect to any REST based API that is available, it is useful to know what built-in HTTP connectors are available and can be used for delegated authentication to Azure AD Protected APIs like Microsoft Graph or other APIs.
This and more will be answered and demoed in this blog post.
What is an Azure AD Protected API?
First, lets do a quick explanation of what an Azure AD Protected API is.
The most known Microsoft API is the Microsoft Graph API. Another well known API is the Azure REST API. These APIs are protected by and accessed by identities and applications from Azure Active Directory organizations.
Other than that, any API has the possibility to be protected by Azure AD and by using industry standard authentication and authorization protocols like OpenID Connect (OIDC) and OAuth2.0. This includes APIs you might build yourself or APIs from third party services.
Delegated vs. Application Access
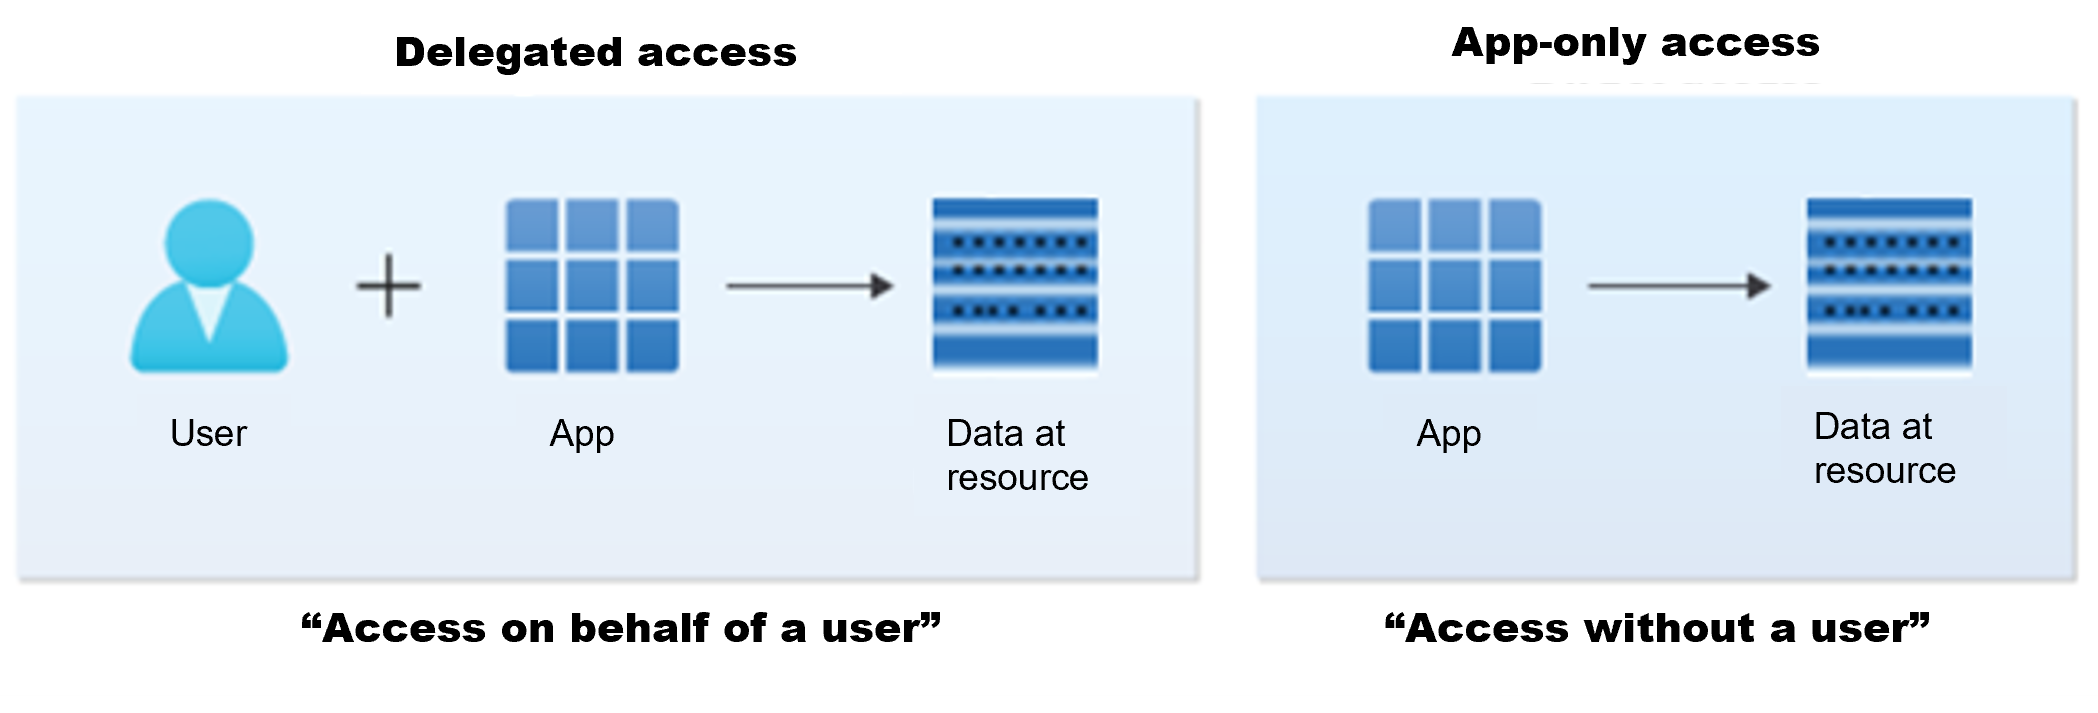
When you want to access Azure AD Protected APIs from Power Platform you also need to know the access scenarios you will need. There are 2 main access scenarios: Delegated access and Application-only access, and as shown in the picture below, there is a distinct difference in that the delegated access scenario always includes the user.
This means that if you are running a Power Automate flow, or a PowerApp, you will usually run that interactively as your user account, and any connections you use will be running via the app under your user context and permissions to access the data resources the app might be using. The data resource in this example can be represented by an Azure AD Protected API.
If you share the PowerApp or Power Automate flow with other users in your organization, then those users will use the connections to the API resource under their own user context.
If you, on the other hand, wants to run a Power Automate flow on a schedule or in any other way without user interaction or without a user context, then you typically will use the app-only access scenario.
In this blog post I will focus on delegated access scenarios, and where you can use built-in HTTP connectors that will run in connection based on the running user.
Built-in HTTP Connectors in Power Platform
Let’s start with an overview over what built-in HTTP connectors and actions for Azure AD Protected APIs we have available in Power Platform. These are HTTP connector actions you can use in Power Automate, PowerApps and in most cases also Logic Apps, and the following list is current as of December 2022:
“Send an HTTP request (preview)”, Office 365 Outlook connector.
“Send an HTTP request (preview)”, Office 365 Users connector.
“Send an HTTP request”, Office 365 Groups connector.
“Send an HTTP request V2 (preview)”, Office 365 Groups connector.
“Send an HTTP request (preview)”, Office 365 Groups Mail connector.
“Send an HTTP request to SharePoint”, SharePoint connector.
“Send an HTTP request (preview)”, LMS365 connector.
These are all Standard connectors that you can freely use if you are using the Power Apps/Automate plan for Microsoft 365.
There is also an interesting HTTP action with Azure AD that is Premium and has the following action:
“Invoke an HTTP request”, HTTP with Azure AD connector.
Premium means you need to acquire a standalone Power Apps and Power Automate licensing plan.
There is also a “Send an HTTP request to Azure DevOps” in the Azure DevOps connector that is also Premium.
While these connectors are for querying resources that are under the scope of the data that are accessible via the connector, the most important part is that these are all dependent on the user connection and is using the delegated access scenario.
This makes them especially useful for calling Microsoft Graph API in the context of your own user.
If you want to send HTTP requests in an app-only access scenario, then you can use the built in HTTP connector, which is Premium. But that is not the scope of this blog post, so let’s continue looking into some scenarios and examples for the above delegated access connectors.
Send HTTP Request via Office 365 connectors
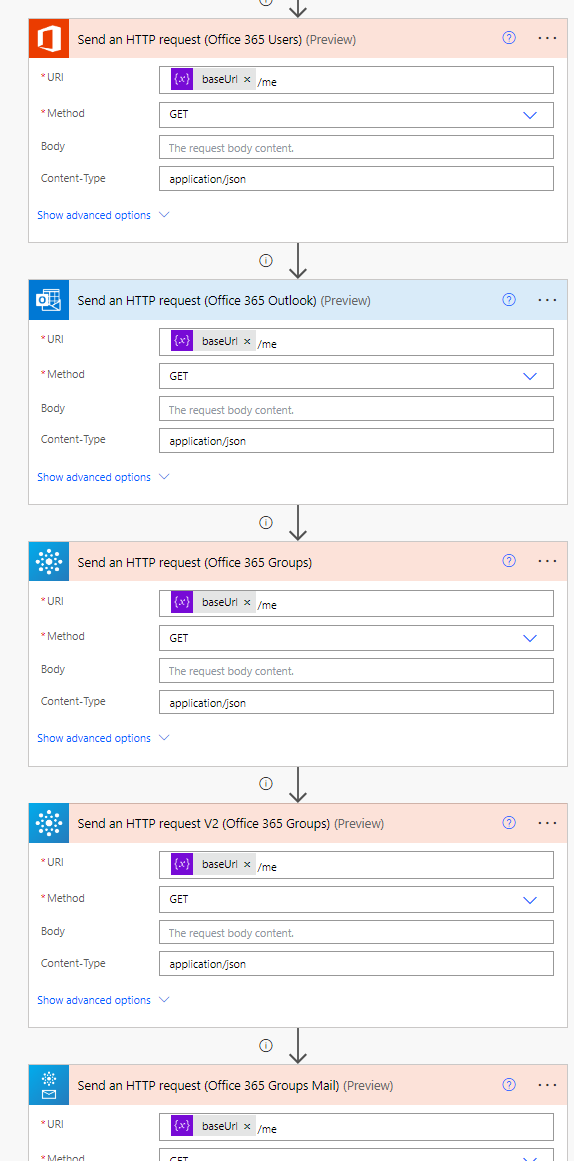
Lets do a couple of scenarios of the Office 365 Outlook/Users/Groups connectors from above, and their HTTP request actions. I have created a instant cloud flow with a manual trigger for now.
First I will initialize a variable for the base Url, this will be the Microsoft Graph API:
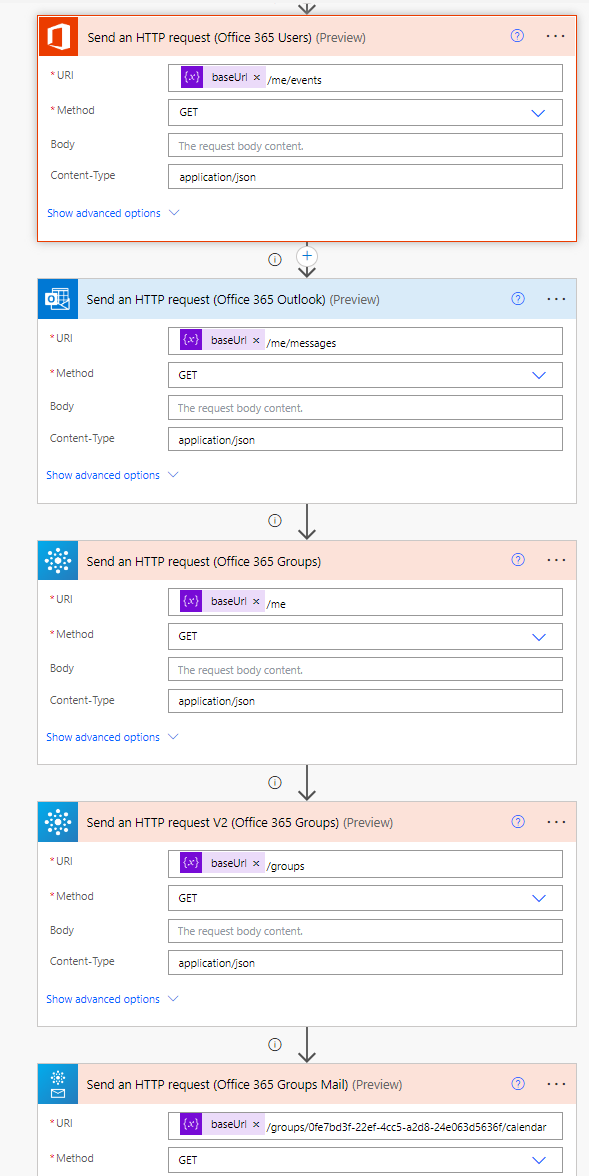
Then I add each of the HTTP actions from the Office 365 connectors, using the baseUrl and the “me” resource to start with. In the below image I’ve renamed the HTTP actions so that you can see from which connector they are from, and I’m running a simple GET method:
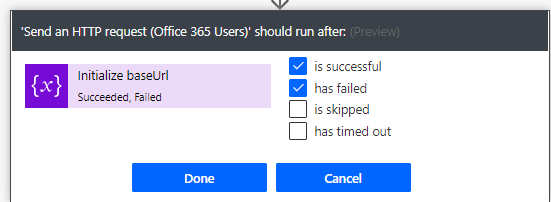
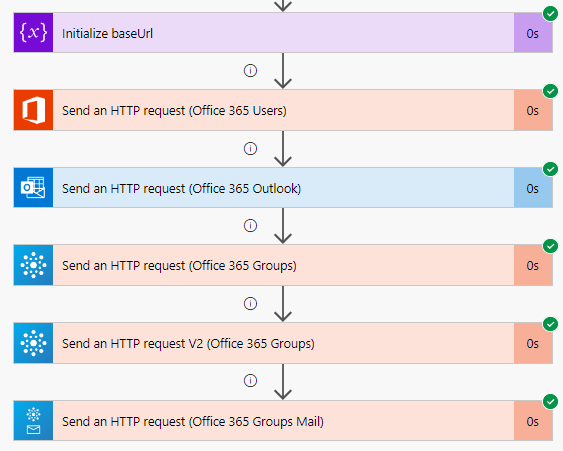
I’ve also configured the run after setting for each of the actions, so that I can verify the results of the others if anyone fails:
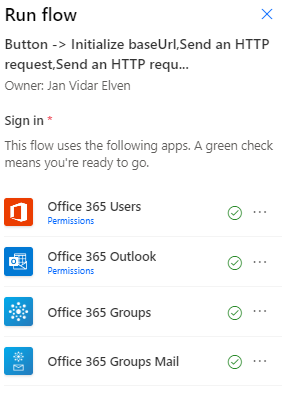
When I save and test the flow I can verify that I’ve signed in to the connectors as my own user, and any permissions that these have:
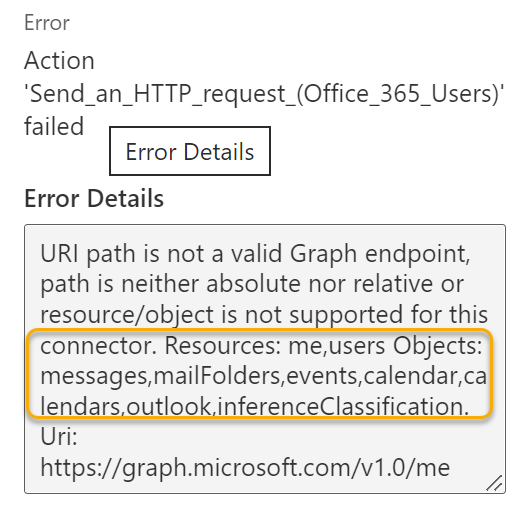
When I try to run this Flow, it will fail on several of the actions, this is expected:
The reason it fails is because there are restrictions on the resources and objects the actions are allowed to query, for example for the first one we get the info on that this connector can use either “me” resource or “users” resource, but also only for the listed objects like messages, calendar etc:
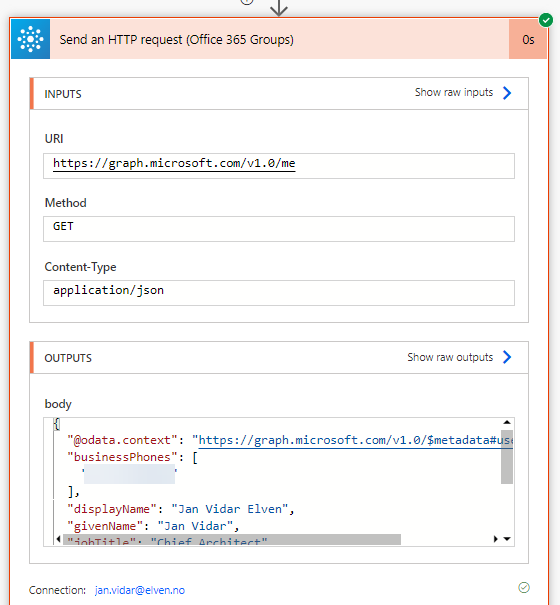
One of the actions is successful however, and that is from the Office 365 Groups connector and the first version of the Send an HTTP request, which is allowed to get the /me resource:
Lets make some adjustments to the queries for the different actions:
In the above image I’ve added some supported objects for the different actions, and all these should return a valid Graph response:
So this means as long as you either:
use the /me/{object} or
/users/{userid-or-userprincipalname}/{object} or
/groups or /groups/{groupid}/{object}
From the supported list of objects (messages, events, calendar, etc) then you can run any Microsoft Graph API queries including GET, POST, PUT, PATCH and DELETE.
From earlier we saw that one of the connector actions had more broad support than the others, and that was the Office 365 Groups connector and the original version of the “Send an HTTP request”. There has since been released a V2 version of the same action, and that limits only queries against /groups resource.
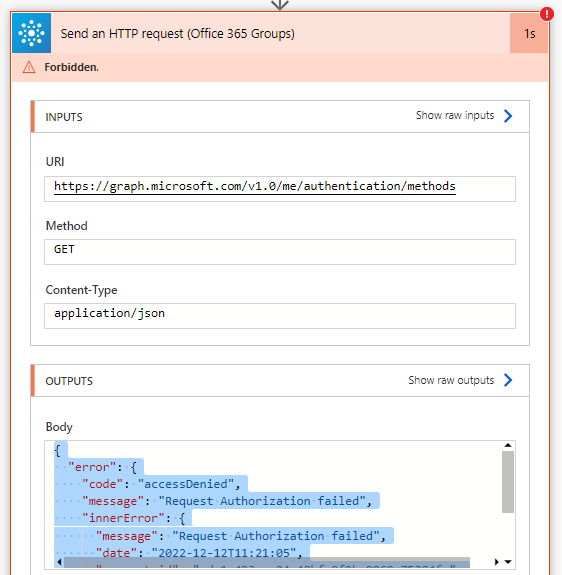
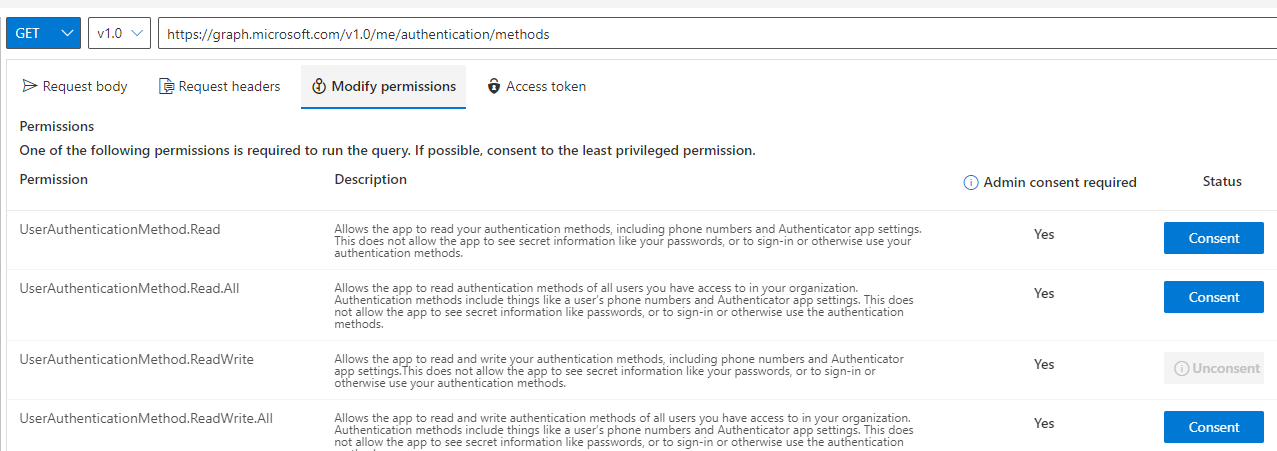
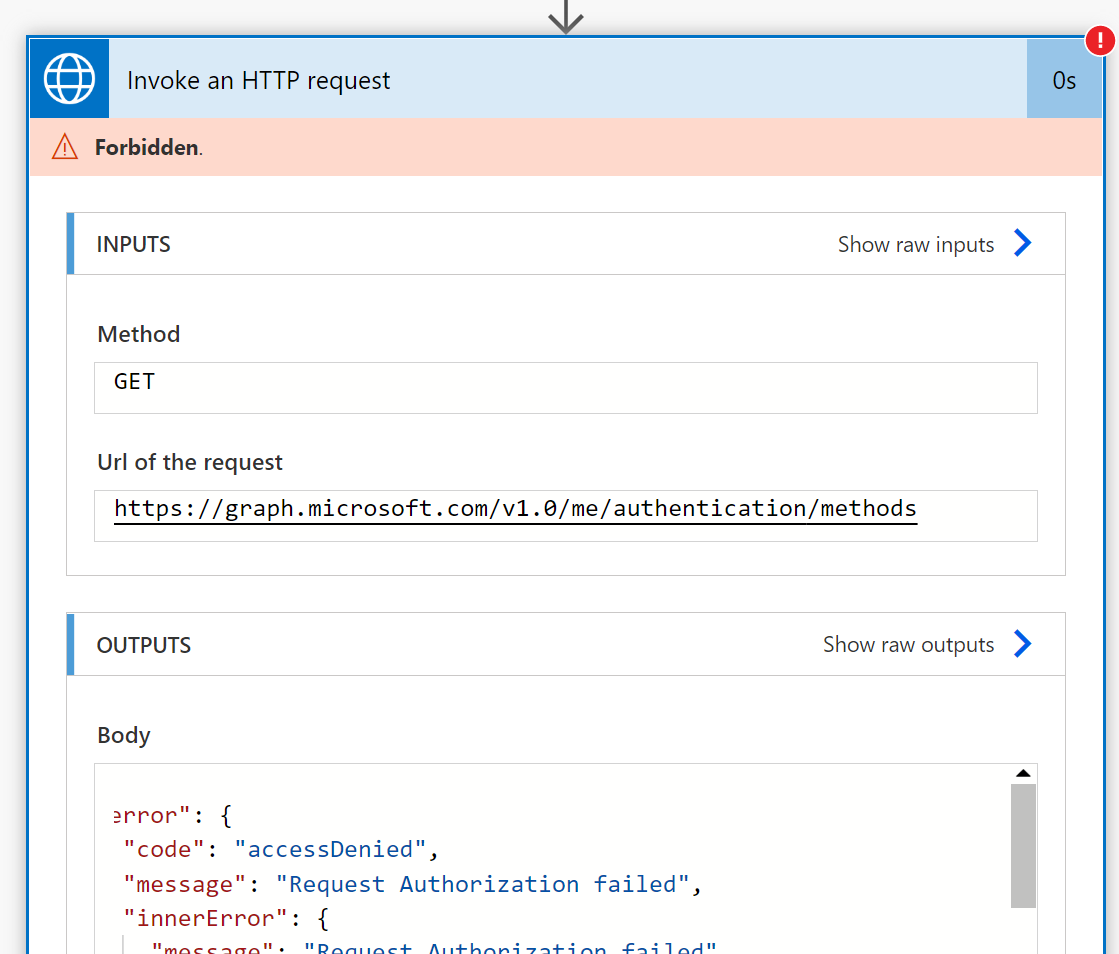
Lets do a quick test on if the first action supports getting the user’s registered authentication methods. If we run that same query using Graph Explorer, we will get a list of your users methods for authentication, including Authenticator, Phone, Windows Hello etc. In the action I will type /me/authentication/methods, but when I run it will fail with request authorization failed:
This means that even though I have permission as my self to query my authentication methods (see Graph Explorer for example), the connector does not have the correct delegated permissions to act on my behalf. From Graph Explorer I can verify that I need to consent to permissions for authentication methods:
So to summarize the Office 365 connectors and HTTP actions, they can be valuable for many Graph API requests for your users, but only for permitted objects and permissions.
This is where the “Invoke an HTTP request”, HTTP with Azure AD connector, can be useful, and we will look into that next.
Send Request via HTTP with Azure AD Connector
First of all, this is a Premium connector, so you must make sure you are licensed with a separate Power Apps / Power Automate plan for this, but a trial should also be available to for exploring the connector.
According to the documentation, the HTTP with Azure AD connector can be used to fetch resources from various web services that are authenticated by Azure AD. It can also be used to query from an on-premise web service.
Note that there are known issues and limitations, such as if you get “Forbidden” or “Authorization Request Denied“, or “Insufficient privileges to complete the operation.” then it could be because this connector has a limited set of scopes.
The big advantage of this connector is that you can use it for several of Microsoft APIs, not just the Graph API.
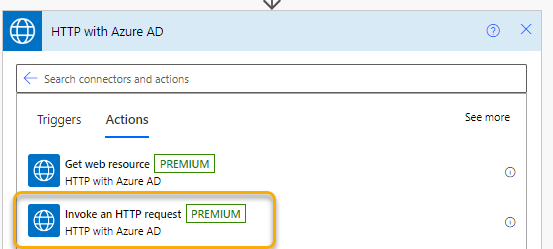
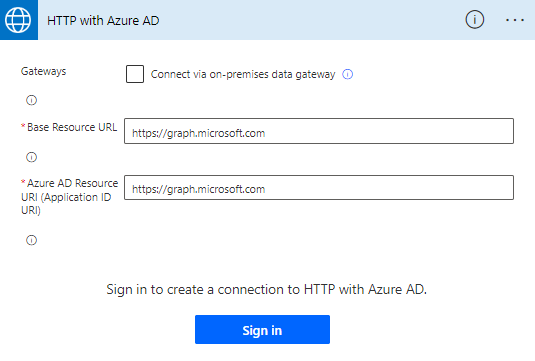
Lets try it out, I will create another instant cloud flow with manual trigger, and then add the HTTP with Azure AD connector and Invoke an HTTP request action:
If this is the first time you have added that connector action and you don’t have any existing connections, then you need to configure that and sign in first. If we want to use the Microsoft Graph API, then you need to fill in this and then sign in:
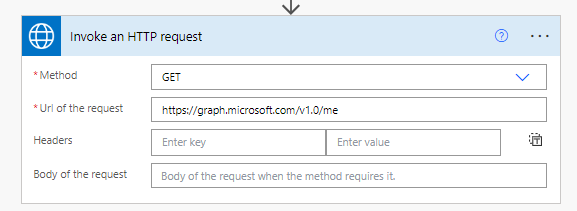
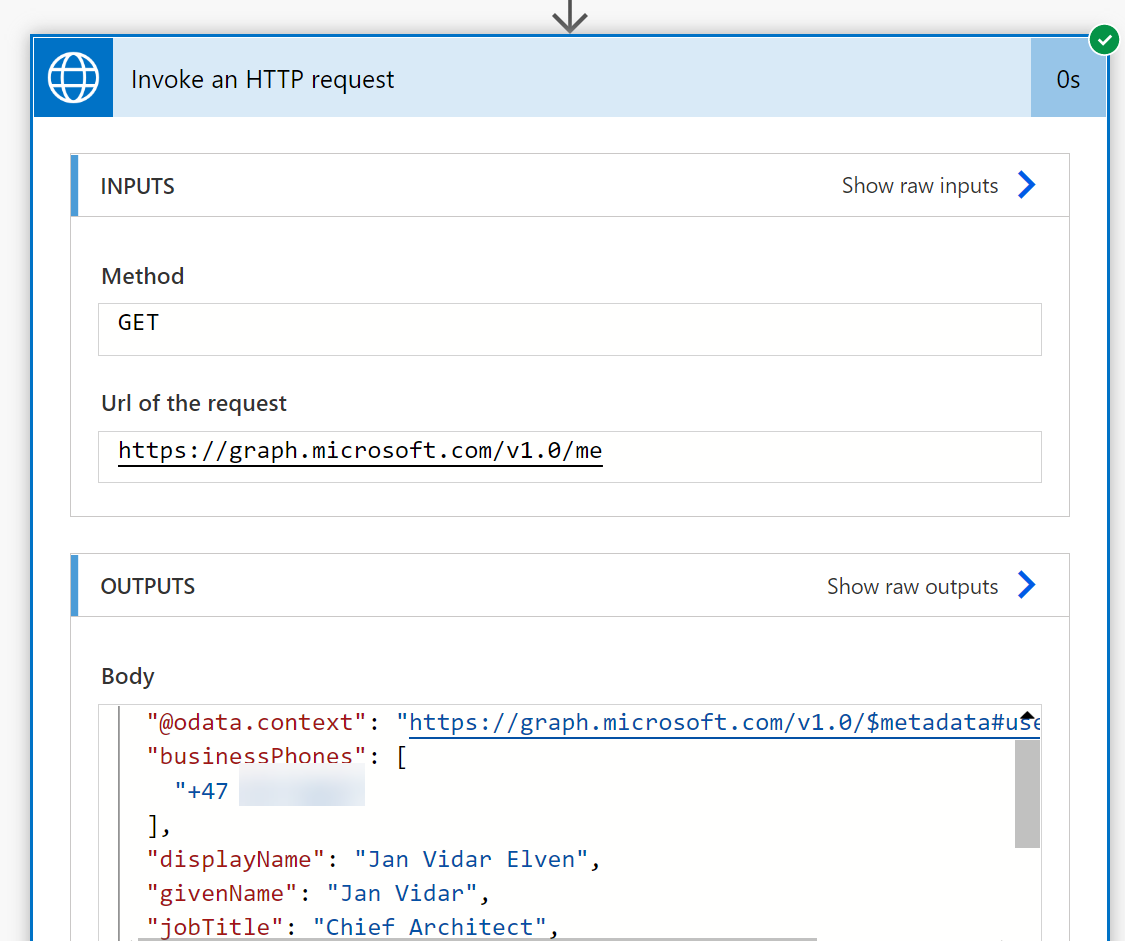
Then, we can start with a simple Graph request for getting my profile info:
When we run that, it should successfully return the user profile:
Ok, let’s try another request again, and see if this connector lets us query for authentication methods:
So here we can see that the limitations in scope also applies to this connector, as we get an access denied and request authorization failed.
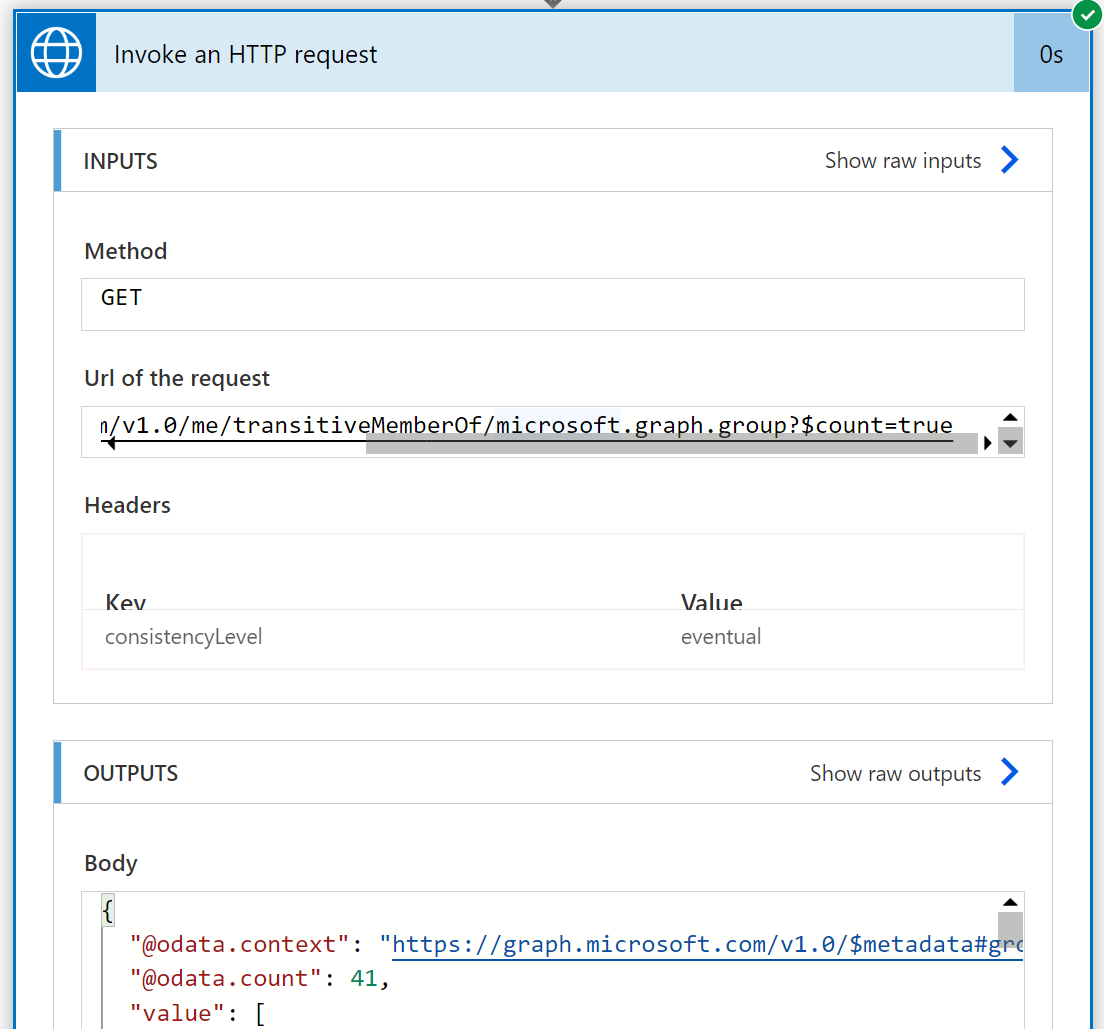
But there are more scenarios that this connector action support than the Office 365 connectors I described in the previous section. For example I can get my groups memberships, note the use of $count parameter and that it requires the consistencyLevel=eventual in the Request Header:
There aren’t really any good documentation on the HTTP for Azure AD connector to say which resources and objects you can send requests to, but you can assume that you can do a lot of the normal member of a directory can do, but not necessarily those that require Graph permission consent outside read user information.
Note that you can use the HTTP for Azure AD connector to other APIs than Microsoft Graph, and this is just a list of examples:
management.azure.com
vault.azure.net
<tenant>.sharepoint.com
api.loganalytics.io
But I thought I should wrap up the blog post by looking at how the HTTP for Azure AD connector can be used for invoking requests for APIs that you have built yourself, like for Azure Functions or Logic Apps.
Invoke Requests for your Serverless APIs with HTTP for Azure AD
Lets use that knowledge to see if the HTTP for Azure AD connector can invoke requests to a Logic App that is protected with an Azure AD Authorization Policy.
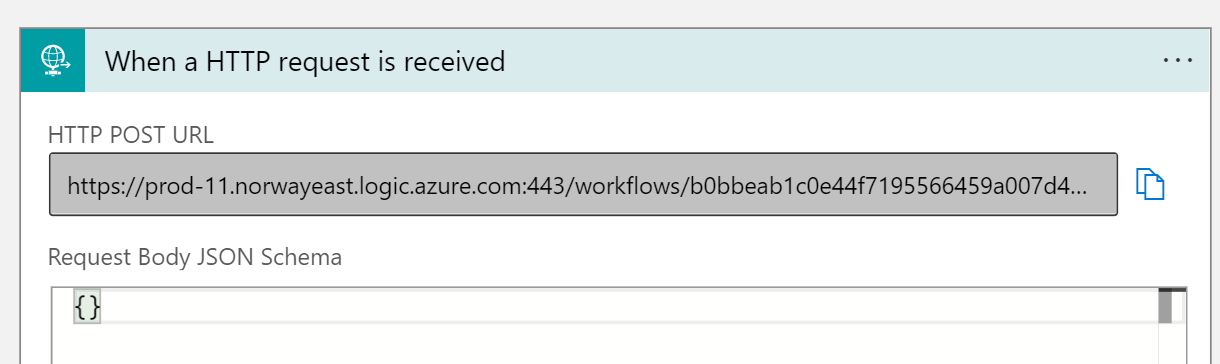
I have created a new simple Logic App with a HTTP request trigger:
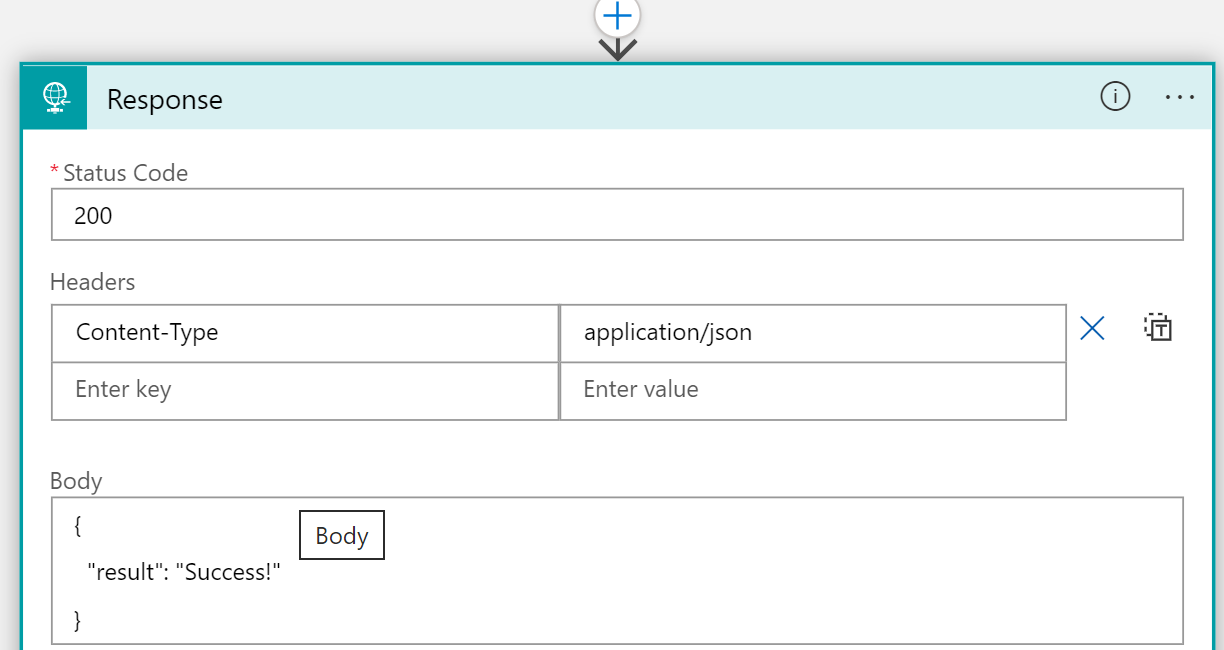
I’ve added a response action, and made sure that the response is returning JSON content like this:
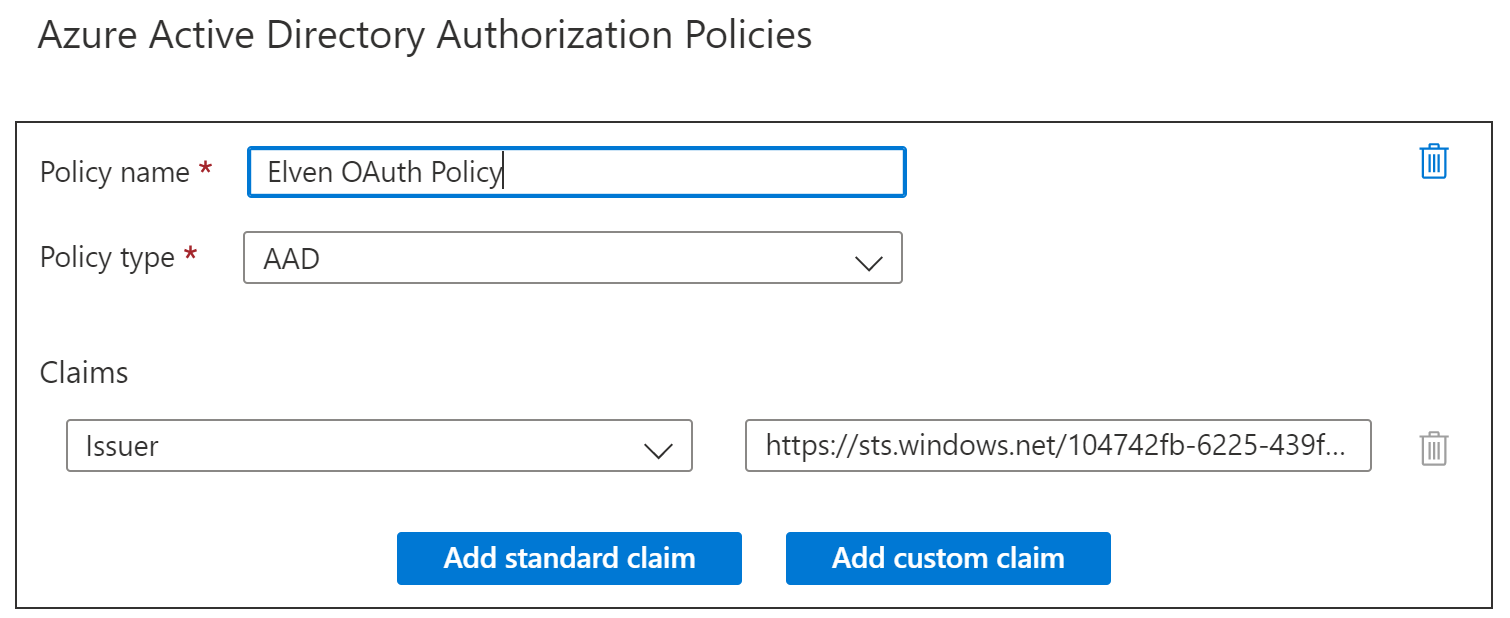
Then, I have added an Azure AD Authorization Policy like the following, requiring that the issuer claim in the authorization header is from my tenant:
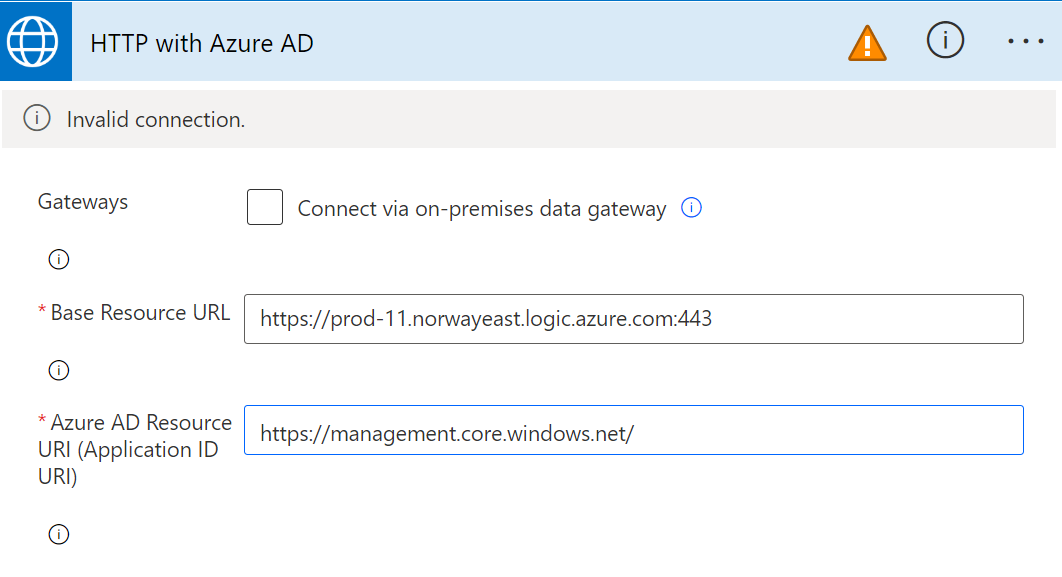
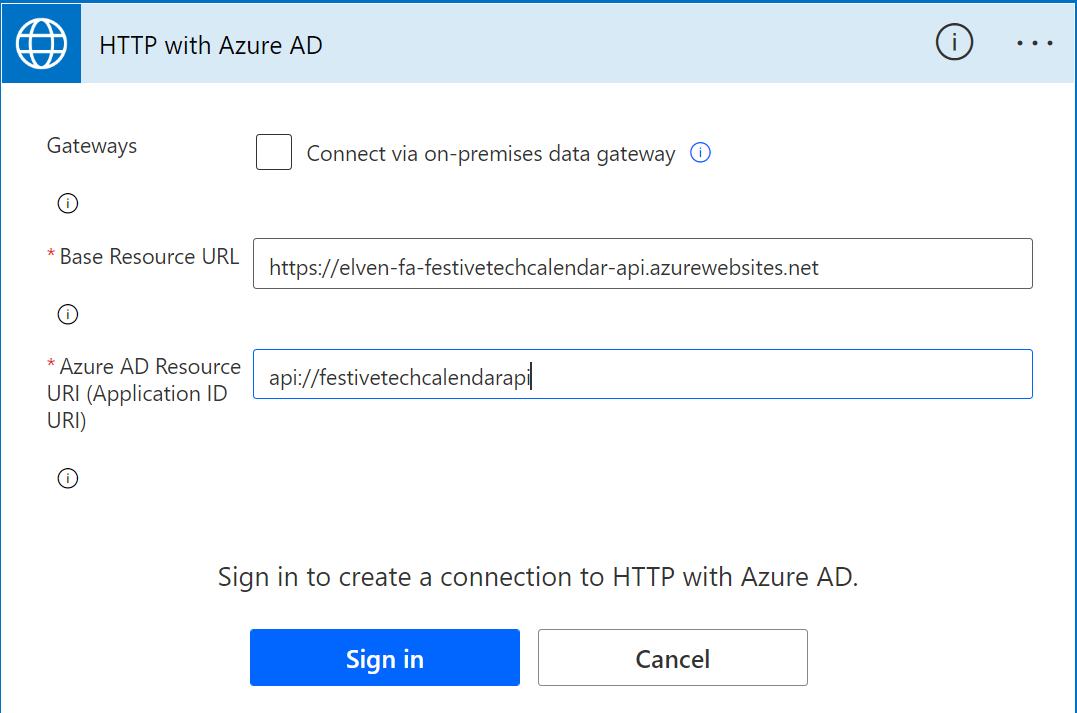
I can now go to my Power Automate flow, and add an HTTP for Azure AD connector action, but I need to set up a new connection like the following. Note that the base resource URL will be the Logic App instance, and the Azure AD Resouce URI will be one of the well known Azure APIs like below. (I haven’t been able to use graph.microsoft.com here, because I suspect the fact that Graph API tokens cannot be validated outside Microsoft Graph itself).
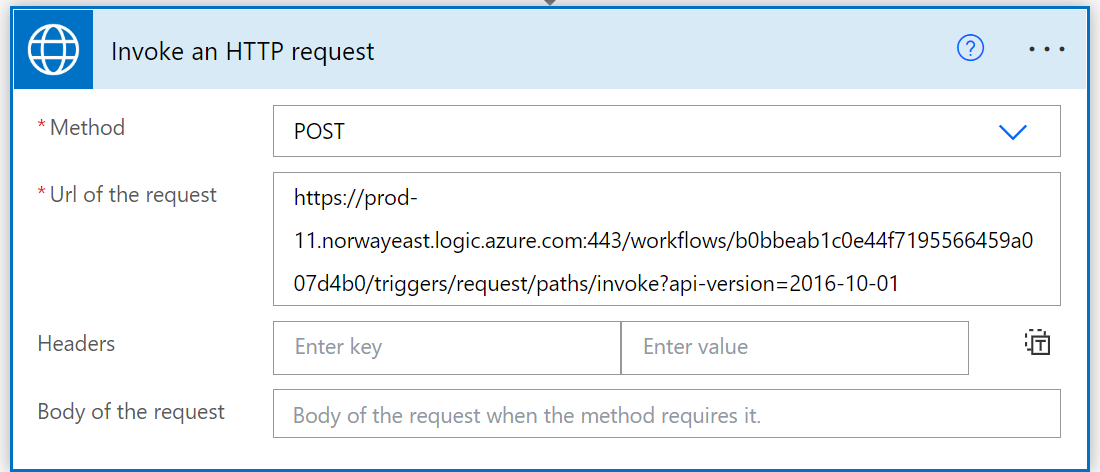
When I have signed in at set that connection active I can configure the Invoke an HTTP request action like the following, note that I have left out the parameters that belong to the SAS (shared access scheme) like sig, sv, sp, as you only can use on of SAS or OAuth2:
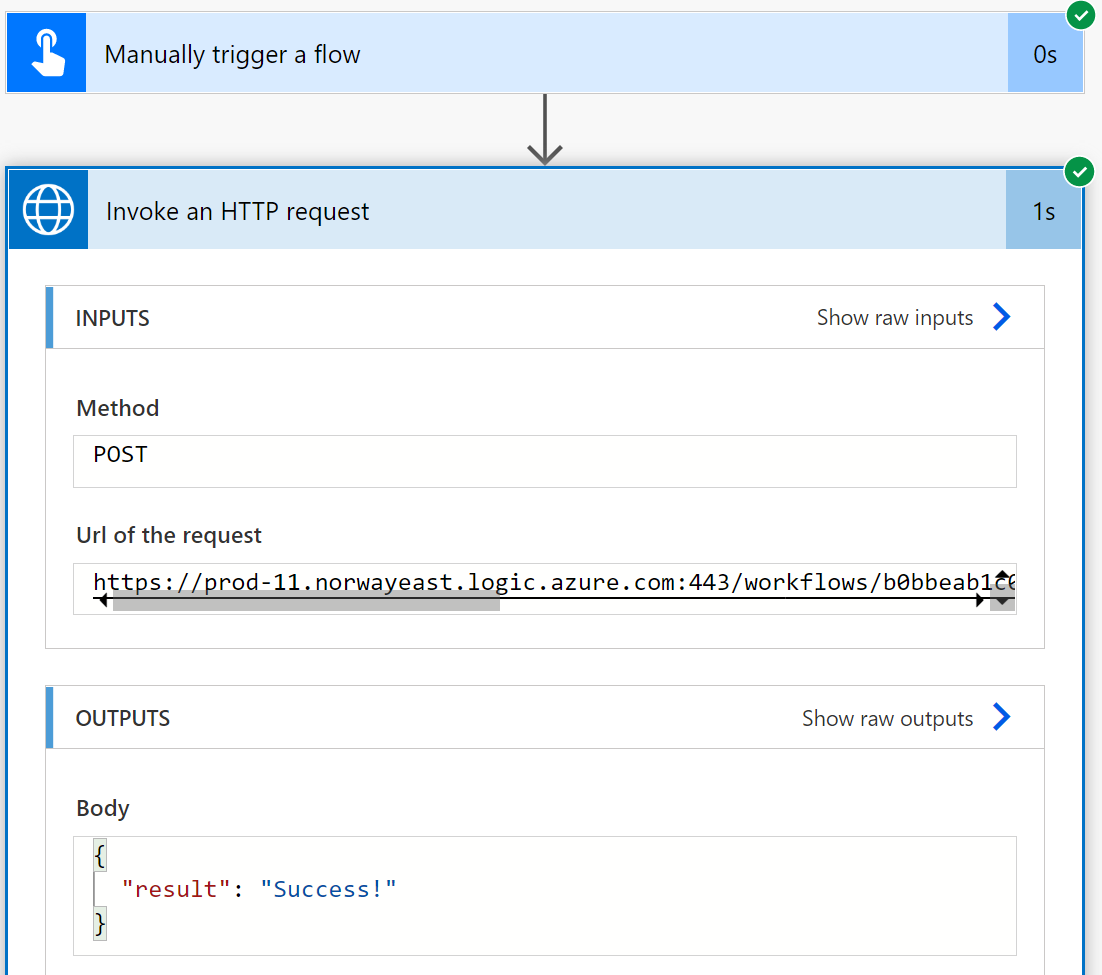
When I run this I get a successful response:
This means that the HTTP for Azure AD connector was now able to invoke a request for a protected API that I have built myself. Of course this was a simple request, but if you look at the aforementioned blog post series of protecting Logic Apps, you can see how you can include the Authorization Header in the Logic App trigger, and then get the claims and do authorization logic inside the Logic App.
In this example I didn’t include my own API definition, so lets now get even more advanced and look at an Azure Functions API example!
I will now use this as an example on how I can invoke requests for this API using Power Automate and the HTTP for Azure AD connector!
In another instant cloud flow, I’ve added the Invoke request with HTTP for Azure AD, and I need to create another connection, which will be configured as follow:
The base URL is the Function App URL, and for Resource URI I’ve used the Application ID URI I created when I defined the custom API (see the blog post for details).
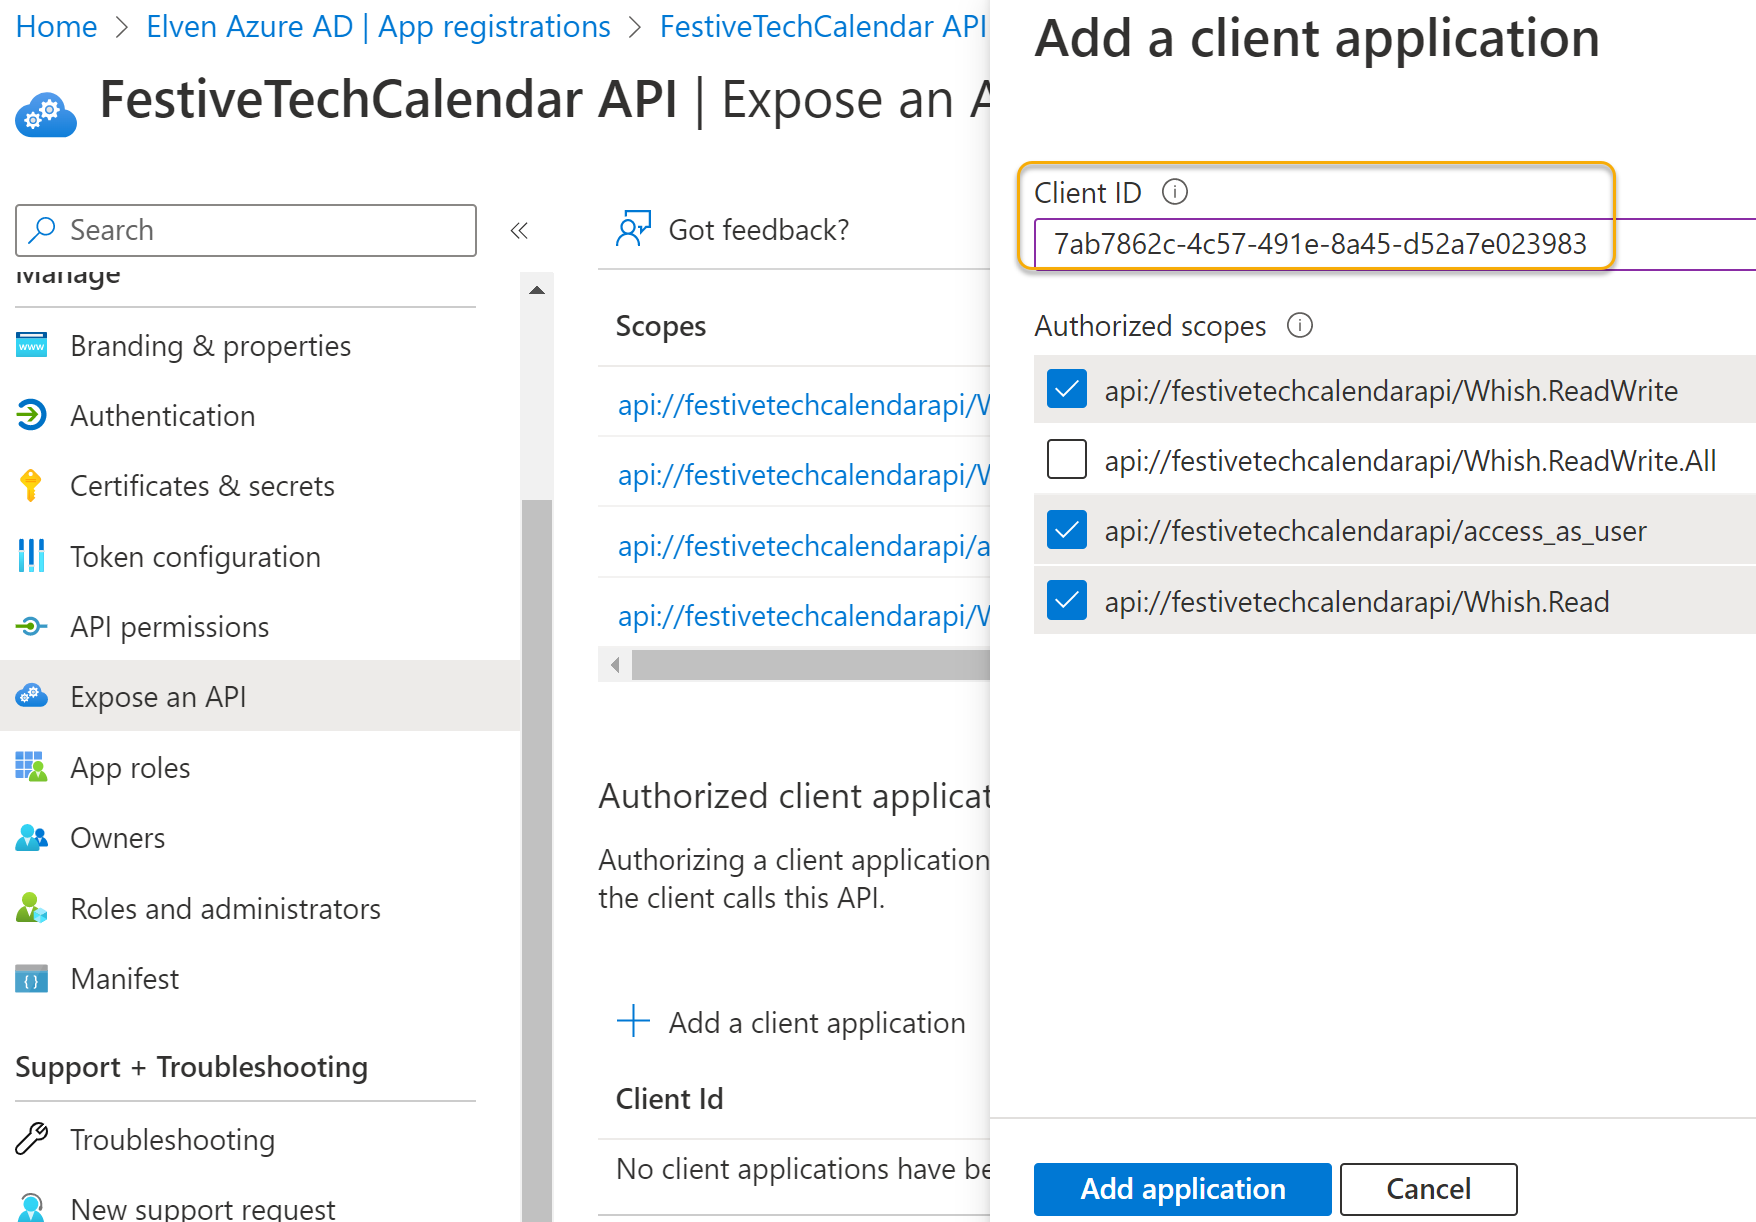
However, when I sign in I will first get an error like the following:
Note the client app id I’ve marked with a yellow shape above, this is a well known global confidential application ID for Power Platform, so this will be the same ID for you as it is for me. This is also described in this article: https://learn.microsoft.com/en-us/power-query/connectorauthentication.
This means that I need to go to my custom API app registration, and add this ID as an authorized client application and which scopes it is authorized to use:
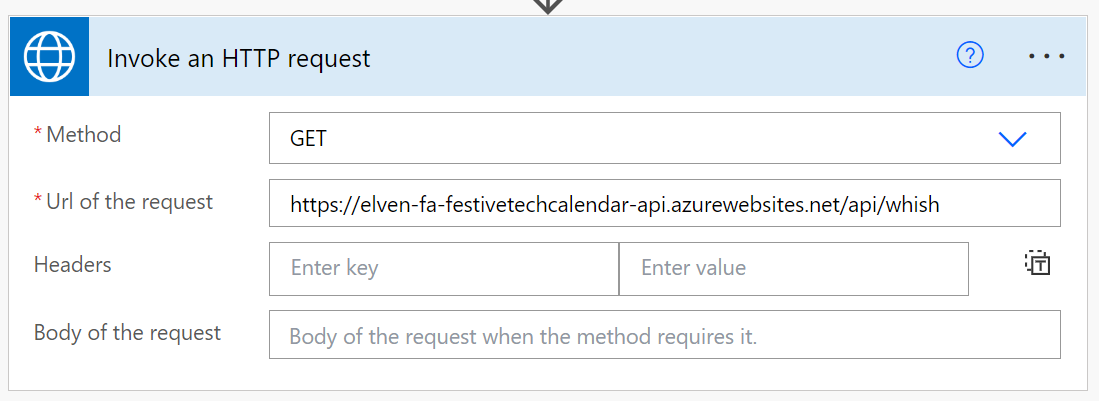
After adding that I can now sign in to create the connection, and next configure the invoke HTTP request as follows, using one of the API methods I’ve defined (again see my blog post from last year for details :):
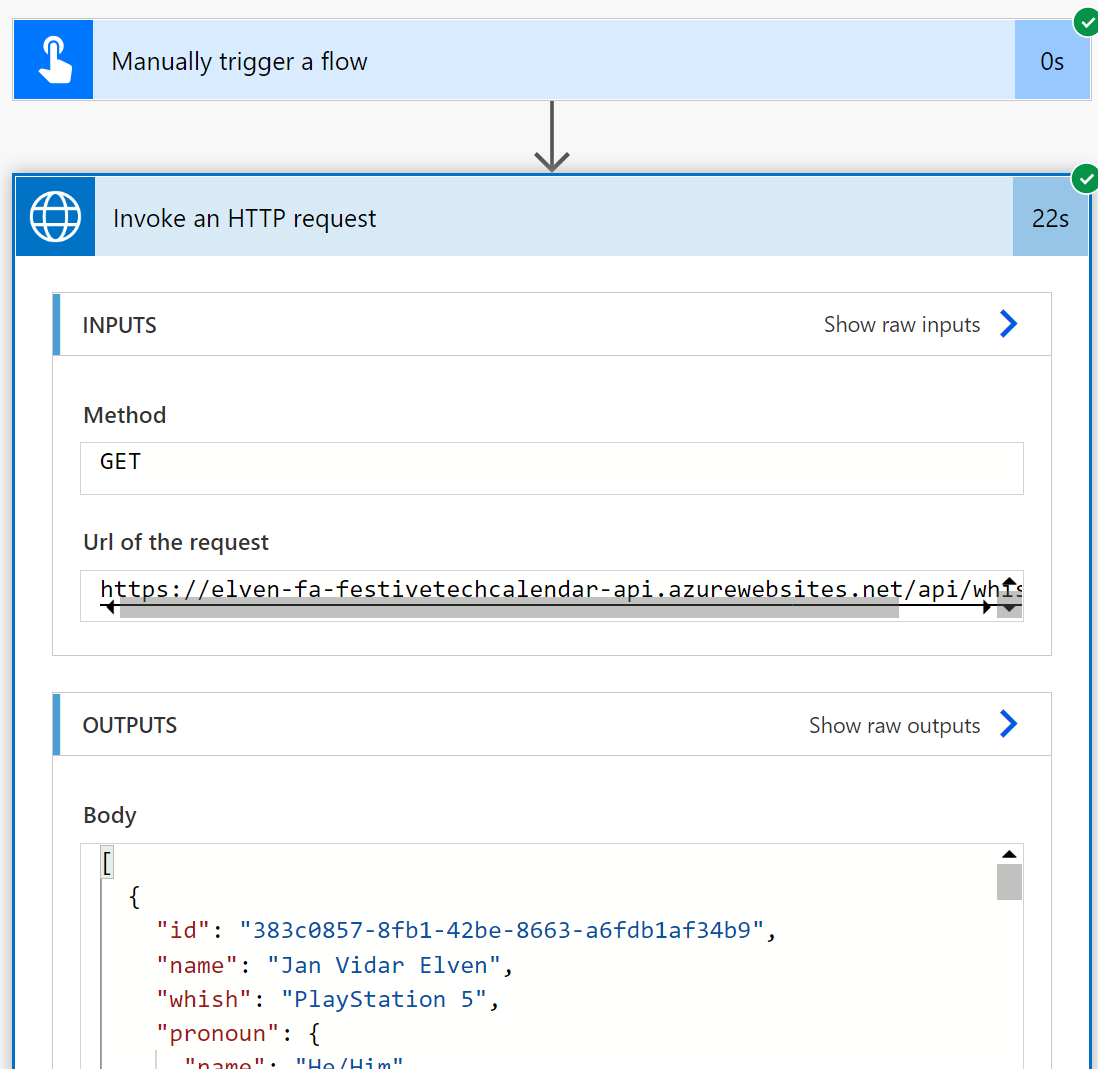
When I run the Flow I see that the request is successful, and I indeed get a response from the Protected Functions API:
Summary
In this blog post I have shown how you can use and connect Power Platform to Azure AD Protected APIs using built-in HTTP connectors that use the delegated access scenario.
While the Office 365 connectors are great for limited scenarios around Microsoft Graph, we could verify that the HTTP for Azure AD connector (Premium) had more usage scenarios, including the ability to invoke requests from both Microsoft APIs, as well as your own APIs.
I’m excited to to be travelling to Bonn, Germany, and to speak at the upcoming Cloud Identity Summit 2022, which will be held September 22nd at adesso SE, close to the city of Bonn.
This is my second time speaking at the Cloud Identity Summit, the first time was in 2020 and that was a virtual online conference only, as the Covid pandemic and its effects were felt all over the world. So I’m really looking forward to travel there and be there in-person this time around.
This is the 3rd time the Cloud Identity Summit is held, starting in 2020 it was originally planned as a on-site conference, but had to move to virtual. And again in 2021 it was an virtual conference, featuring 10 sessions over 2 tracks covering Cloud Identity and Security, with 250 participants from all over the world.
Some of the highlights of Cloud Identity Summit 2022:
Hybrid event and free of charge.
Morning workshops for in-person attendance in Bonn only, covering “Hands on with decentralised identifiers and verifiable credentials”, with Stefan van der Wiele and “Azure AD Security Testing with AADInternals” with Nestori Syynimaa. A tough choice to make there for sure!
The afternoon sessions, 8 sessions over 2 tracks (Identity Management and Identity Security), and the subsequent roundtable with all experts will be available both on-site in Bonn and online.
.. and as always at Communicty Conference, the ability to connect, ask, share and be with fellow members in the many communities around Microsoft solutions.
I will speak in the Identity Management track, about Azure AD Authentication Fundamentals . Modern authentication in Azure AD can be used in a variety of forms, from human identities to non-human identities like devices, and workload identities like applications and managed identities. While supporting industry standards for AuthN and AuthZ like OIDC and OAuth2, as an Azure AD admin, IT ops or Developer, you have to know what to use when. This session aim to give you that fundamental knowledge!
Sales for the in-person attendance is now ended, as the event is fully booked! You can still register a free ticket for the virtual attendance though, see this link:
I really look forwarding to visiting Bonn and Germany, and joining up with the Community at the Cloud Identity Summit 2022! Hope to see you there, please say hi!
I’m excited to to be travelling to Glasgow, Scotland, and to speak at the Scottish Summit 2022, which will be held June 10th and 11th at Strathclyde University TIC, Glasgow.
This is the first time I travel to Scotland and Glasgow, and to present in-person at the Scottish Summit, altthough I last year presented a session at the Virtual Scottish Summit 2021.
This is the 4th time the Scottish Summit is held, starting in 2019 as a way to showcase Microsoft Dynamics 365 in Scotland. The first event gathered 370 Dynamics professionals to Glasgow to watch 38 sessions. In 2020 the full Microsoft Cloud Community was invited to showcase all the Microsoft Cloud stack and over 1,100 people attended. Fast Forward to 2021 and world events allow the event to go Global to over 3,400 attendees who took in 365 sessions.
Some of the highlights of Scottish Summit 2022:
2 full days of conference content with 180+ sessions!
Opening Keynote from Connell McGinley on Disability Awareness & Inclusivity, sharing his experiences as a deaf person in IT, and a Closing Keynote with Dona Sarkar talking about Mental Health in I.T.
Sessions presented in 12 simultaneous tracks covering the complete Microsoft Technology stack including for Security, Microsoft 365, Dynamics 365, Azure, Power Platform, Modern Workplace, and much more for both Developers, IT Pros and Soft Skills.
Saturday Pub Quiz!
.. and as always at Communicty Conference, the ability to connect, ask, share and be with fellow members in the many communities around Microsoft solutions.
I will speak about why and how you can use Passwordless Azure ServerlessAuthentication using Managed Identities in Azure AD. Do you use Azure Services and Serverless solutions that need to authenticate to other resources and APIs? Have you been using App Registrations and Service Principals to achieve this? Have you felt the pain of managing secret credentials, who has access to the credentials and lifecycle management of these and want at better way to achieve Azure Authentication? This is where Managed Identities is the way to go.
I really look forwarding to visiting Glasgow and Scotland, and joining up with the Community at the Scottish Summit 2022! Hope to see you there, please say hi!
I’m very happy and excited to once again speak at NIC (Nordic Infrastructure Conference), which will be held May 31 – June 2, Oslo Spektrum, Norway. Previously held in a winterly Oslo in February, and last time held just before the Corona outbreak in 2020, attendants and speakers should this time experience a beautiful Oslo spring surrounding the event.
NIC is celebrating 10 years anniversery this time, and this in-person event gathers over 1000+ attendees, international and well-known speakers, in addition to partners, vendors and a great exhibition area, it is truly the place to be for IT professionals and decision makers that want to see and experience the latest and greatest content!
Some of the highligths of NIC X:
Pre-Conference where you can choose to learn from one the best in the industry: Sami Laiho, Paula Januszkiewicz, or John Craddock!
2 full days of conference content including Opening Keynote from Chen Goldberg (VP Google Cloud) and Closing Keynote from Ulrich Hoffman (Corporate VP Microsoft), and 65+ Breakout sessions, all honoring the conference motto: Less slides – more demos!
Session tracks for Security, Data, AI & ML, Architecture & Code, Server & Client, Operations & Automation, and Cloud!
.. and as always at NIC, the best food and mingling with fellow members of the industry.
Myself I will present two breakout sessions during the main conference, focusing on Security with Azure AD and Microsoft Cloud Solutions:
In my first session on the first day I will speak about How to Create an Azure AD Protected API in Azure in one hour!, where I will show you how you can create your own API in Azure and protect it with Azure AD using Oauth2. API’s can be anything you want, and in true NIC spirit this session will really will be most about the demos and very little slides!
In my second session the last day, I will speak about why and how you can use Azure Authentication using Managed Identities vs. Service Principals in Azure AD. Do you use Azure Services that need to authenticate to other resources and APIs? Have you been using App Registrations and Service Principals to achieve this? Have you felt the pain of managing secret credentials, who has access to the credentials and lifecycle management of these and want at better way to achieve Azure Authentication? This is where Managed Identities is the way to go.
I’m excited and very much looking forward to speak at the upcoming Oslo Power Platform & Beyond Community Event, which will happen in-person at May 21st 2022 at Microsoft Norway offices i Oslo.
Oslo Power Platform & Beyond is a Community Event hosted by the Dynamics User Group Norway , and will on this upcoming Saturday feature 21 sessions delivered by 23 international speakers and rockstars, MVP’s and community leaders!
My session will be about how you can Connect Power Platform to any Azure AD protected API using OAuth2 and Custom Connectors. While there are hundreds of built-in connectors you can use in your Power Automate Flows or Power Apps, there are many scenarios where you would want to access API’s like Microsoft Graph, or any other API that is protected by Azure AD. In this session I will show how you can access this using Custom Connectors and OAuth2, and my demo will show a self-built API using Azure Serverless solutions like Azure Functions and Logic Apps!
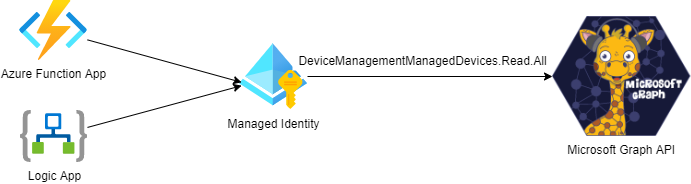
I use Managed Identites in Azure for a lot of different automation scenarios, for example if I want run a Logic App or an Azure Function that should securely call an API like Microsoft Graph..
In such a scenario, the Managed Identity, represented by its Service Principal, needs to be granted application permissions to the API. Let’s say for example that you want to list Intune Managed Devices in your Organization using the Microsoft Graph API, using a Function App or Logic App for example and connect to the Graph API using a Managed Identity.
Then you would need to give that Managed Identity an App Role assignment for the application permission in Graph that is called DeviceManagementManagedDevices.Read.All. If you use that Managed Identity for example in a Function App or Logic App, they could then call the Microsoft Graph API as illustrated below:
Currently there are no way to manage these application role assignments in the Azure Portal GUI. You can verify the permissions, but not add or remove them.
For reference, usually you would do this using cmdlets in Azure AD PowerShell:
Today I would like to show how you can do this with a “GUI” after all, by using the Microsoft Graph Explorer!
Prerequisite – Sign in and Connect to Graph Explorer
Many of you might be familiar with Graph Explorer, but if you aren’t you can find it at the Microsoft Graph documentation site, or just use this short url: https://aka.ms/ge.
In Graph Explorer you need to sign in (and consent to permissions) so that you can access your organizations’ data via Graph API. Note that your organisation might have restrictions in place for users consenting to permissions for API’s, and in any case if you want to use my example here for adding Microsoft Graph API application permissions, you will need to be a Global Administrator anyway.
Part 1 – Find the Service Principal of the Managed Identity
I will now search for the Service Principal in Graph Explorer. You can do this by running something similar to this query:
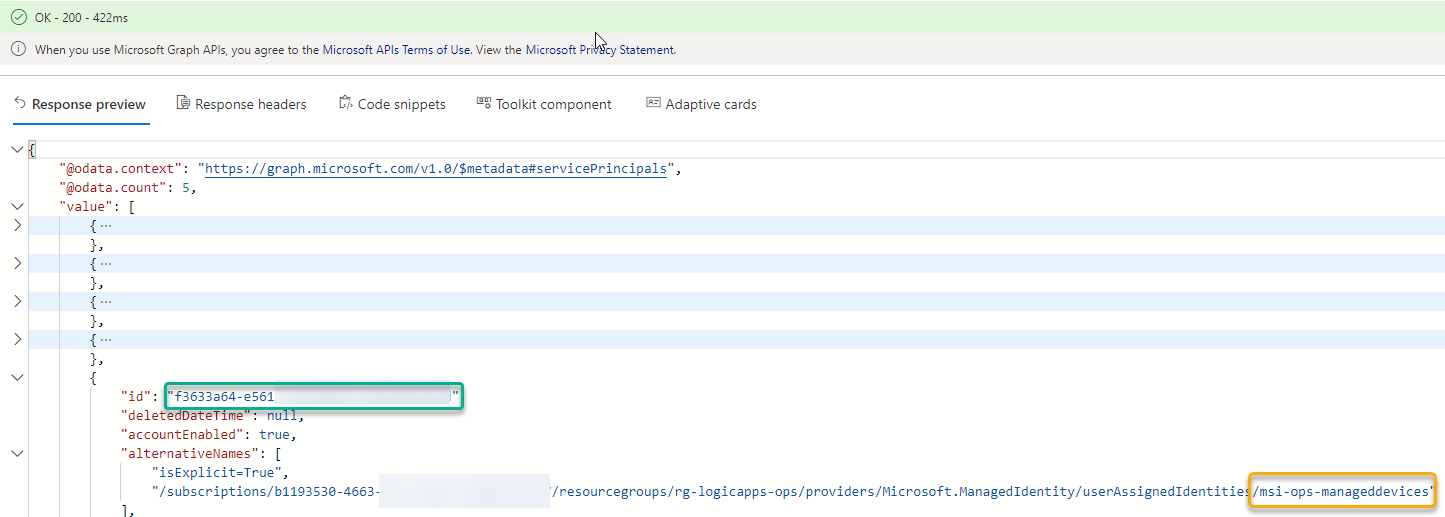
GET https://graph.microsoft.com/v1.0/servicePrincipals?$search="displayName:msi"&$count=true
PS! You must add ConsistencyLevel = eventual i Request Header to be able to run the search and count parameter.
In my example I’m searching for a User Assigned Managed Identity that I know I have prefixed with the name “msi”, but you can also search for System Assigned Managed Identities, these will have the name of the resource you have assigned it to (name of the Function App, Logic App, etc).
When I run this example query currently in my tenant, I get a count of 5 service principals, one of which is the Managed Identity I’m looking for. The thing of interest for me here is the Id of the Service Principal, in the green box below. I have also a yellow box around the name of the Managed Identity, which you can see is a User Assigned Identity created in a Resource Group where I connect it to Logic Apps.
Take a note of that Id, you will need it later. You can now also get the Service Principal directly by Id:
GET https://graph.microsoft.com/v1.0/servicePrincipals/{your-managed-identity-service-principal-id}
Part 2 – Find the Service Principal of the Microsoft Graph (or other) API
Next, we also need to find the service principal in your organisation that represent your instance of the multi tenant App that is “Microsoft Graph”.
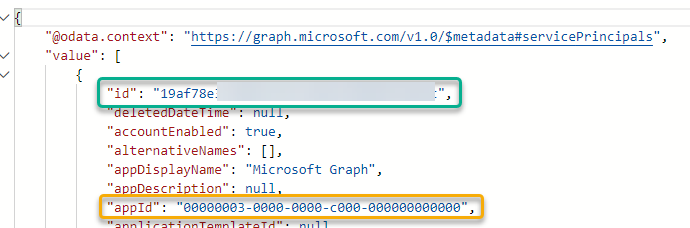
Microsoft Graph API always has the appId that is: 00000003-0000-0000-c000-000000000000
In every Azure AD organisation the Microsoft Graph API application is represented by a Service Principal, you can find this with the following query:
GET https://graph.microsoft.com/v1.0/servicePrincipals?$filter=appId eq '00000003-0000-0000-c000-000000000000'
You will now need to note the “id” of that Service Principal, that will be the “resourceId” to be used later, and this resource “id” is different for every Azure AD organization/tenant:
Part 3 – Find the Application Role that will be the Permission you want to assign
Now that we have the Service Principal Id of the Managed Identity, and the Service Principal Id of the Microsoft Graph Resource in your Azure AD Organization, we need to find the Id of the actual application role permission you want to assign.
You can now use the Service Principal Id you retreived in part 2, to list all available app roles by appending /appRoles to the query:
GET https://graph.microsoft.com/v1.0/servicePrincipals/{your-graph-serviceprincipal-id}/appRoles/
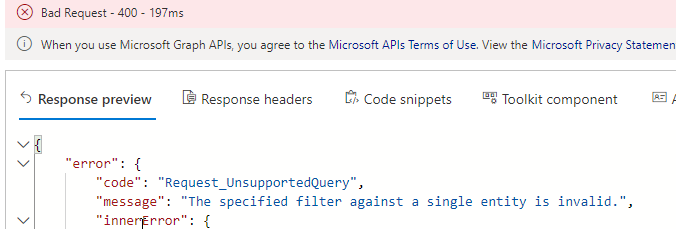
Now, there are a lot of application role permissions for Microsoft Graph, so we need to do a search. Unfortunately, not all Graph resources support all OData filter queries, and not everything is documented, but as far I can see I cannot use $search or $filter inside a specific service principal resource. For example I would want to do something similar to this query:
GET https://graph.microsoft.com/v1.0/servicePrincipals/{your-graph-serviceprincipal-id}/appRoles?$search="displayName:Intune"
But this will return an error like this:
This might be fixed at a later time, but for now we can just use the browser’s search function (CTRL+F), so when I query for all /appRoles, I will get them all listed, and then just search for the application permission I want:
Not so elegant, I know, but at least I will get that specific application role id I need for the next step.
(PS! Graph API will usually return max 100 values and in this case the Graph API has less than that. If there were to be more than 100 results, then the request will be paged and with a odata.nextlink for the next page of results).
Anyway, I now have the 3 parts I need to create the application role assigment for the Managed Identity.
Part 4 – Assign Application Role to Managed Identity
We can now assign the application role to the service principal, and as documented here, we will need the following 3 id’s:
principalId: The id of the user, group or client servicePrincipal to which you are assigning the app role. This will be the id of the Managed Identity service principal we found in part 1.
resourceId: The id of the resource servicePrincipal which has defined the app role. This will be the id of the Microsoft Graph service principal we found in part 2.
appRoleId: The id of the appRole (defined on the resource service principal) to assign to a user, group, or service principal. This the app role id we found by searching the appRoles for the resource id in part 3.
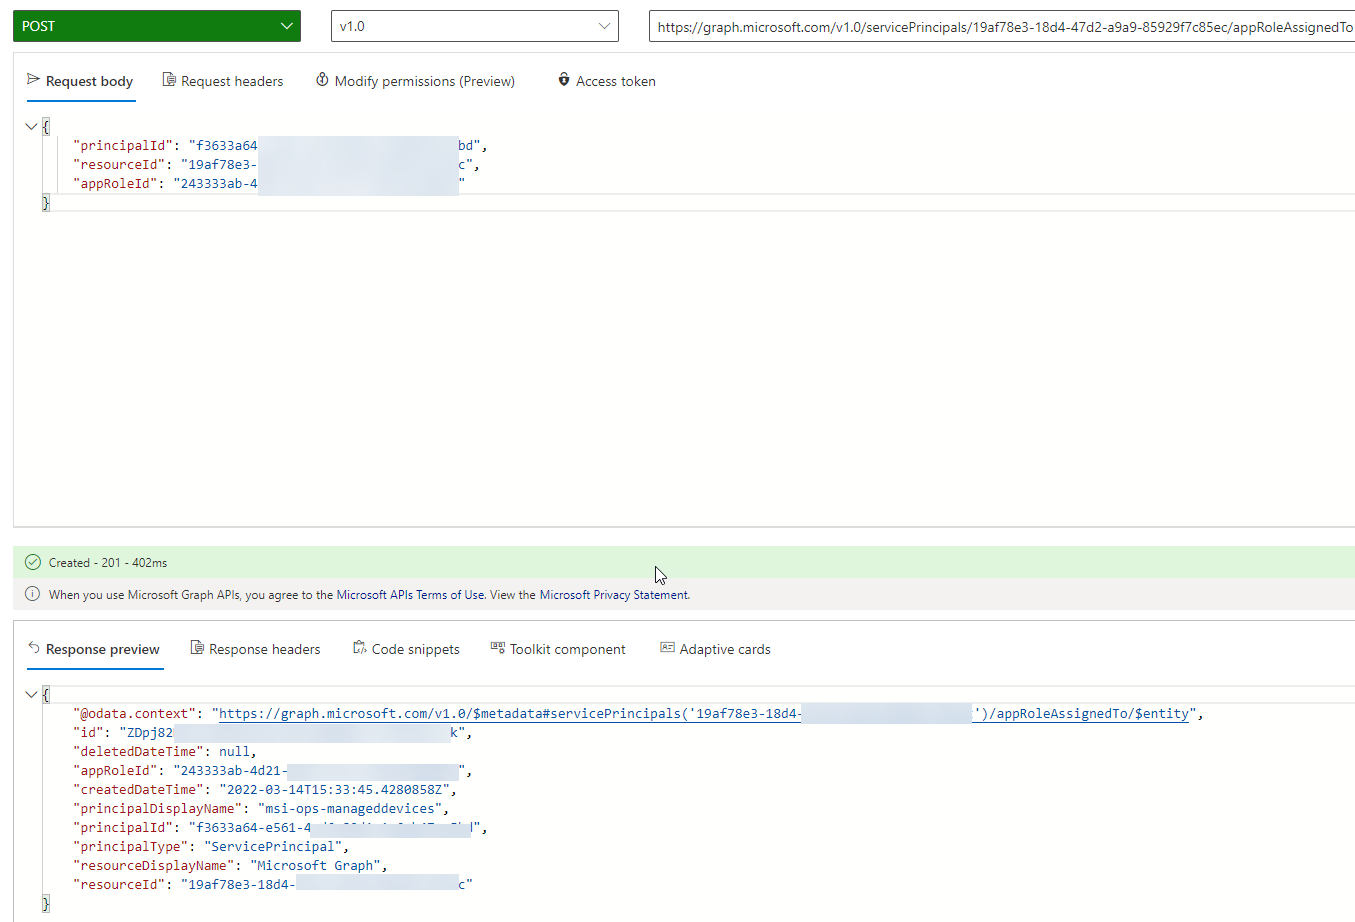
To create this assignement we need to do a POST query in Graph Explorer, with Content-Type application/json in the Header, and the following request body:
After you run this query, you should get a status of 201 Created and a response like the following:
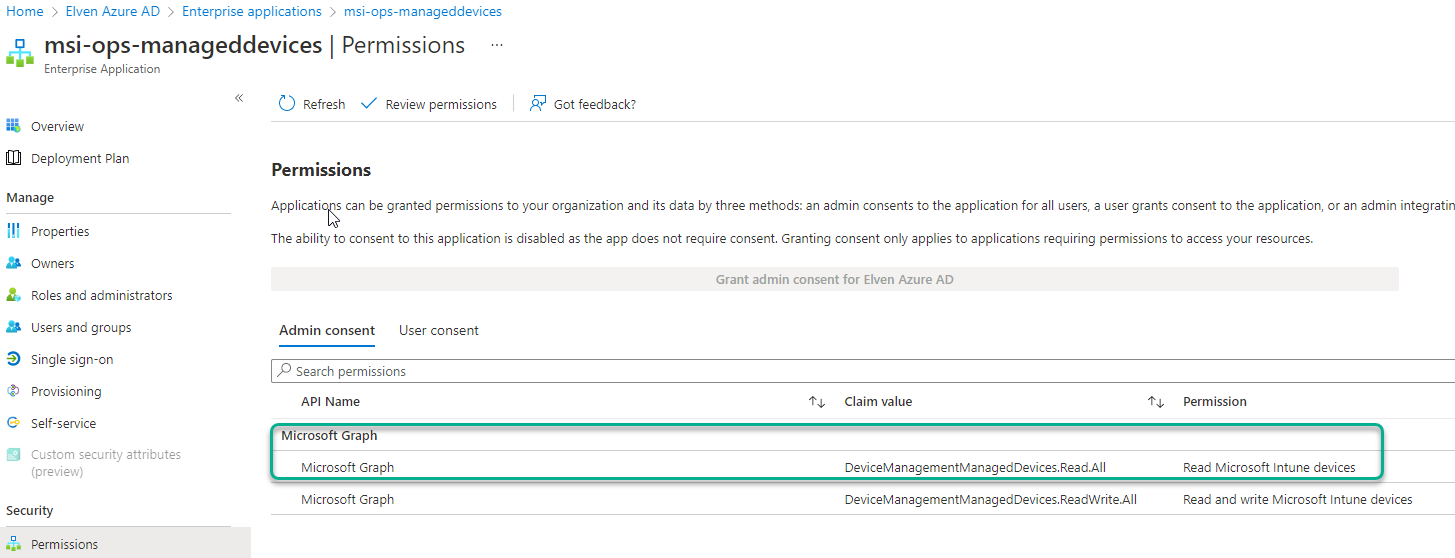
You can now also verify this assignment in the Azure AD Portal. If you go to Enterprise Applications, and search for {your-managed-identity-service-principal-id}, you should find your Managed Identity. From there you can click on Permissions under Security, and you will see the application permissions that you have granted. PS! I had already added another for writes as well:
Part 5 – Managing Application Role Assignments
After adding application permissions for the Managed Identity, you can also use Graph Explorer for viewing current application role assignments, as well as remove existing role assignments.
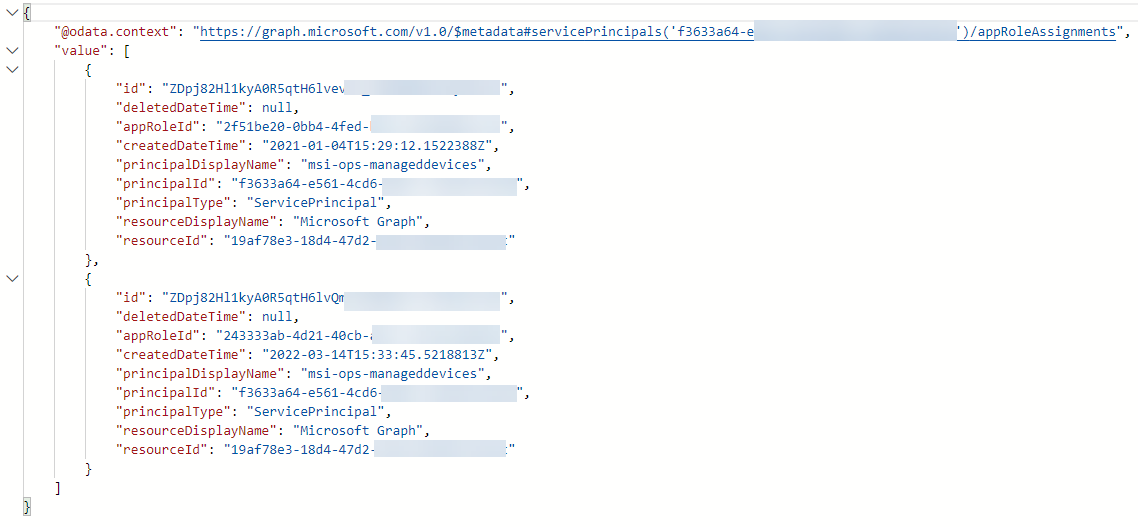
To get App Role Assignments for the Service Principal that is your Managed Identity, use the following query:
GET https://graph.microsoft.com/v1.0/servicePrincipals/{your-managed-identity-service-principal-id}/appRoleAssignments
This will return all the application permissions assigned to this Managed Identity Service Principal:
And then if you want to delete an application role assignment, you need to run a DELETE query as following:
The {appRoleAssignment-id} would be the “id” from the GET /appRoleAssignments shown above. When run successfully you should you should receive as status of 204 – No Content:
Summary
In this blog post I have show how you can use Graph Explorer to add Graph API application role permissions to your Managed Identity. Similar steps can be used against any Azure AD protected API other than Graph you would want your Managed Identity to access.
I’m looking forward to speak at the 3rd Edition of the Nordic Virtual Summit, which will happen online at 16th -17th March 2022. Nordic Virtual Summit is a 100% free virtual Microsoft IT Pro Community Event, organized by the joint scandinavian communities behind #MMUGSE #SCUGDK #SCUGFI #MMUGNO and the #MSEndpointMgr crew!
24 sessions, 1 keynote and 2 sponsor sessions will be delivered by expert speakers including MVPs and Microsoft Program Managers over the 2 days, across two tracks: Microsoft 365 Endpoint Management and Microsoft 365 Security and Compliance.
My session will be about Passwordless Azure Authentication using Managed Identities in Azure Active Directory. While users are more and more using passwordless as authentication method, what about your applications, workload identities and serverless solutions in Azure? Azure Services also need to authenticate to other resources and APIs, and this is where Managed Identities is the way to go. In this session I will show the capabilities and usage scenarios for using Managed Identities to get rid of application credentials once and for all!